

kees de mol
-
Posts
796 -
Joined
-
Last visited
Reputation Activity
-

 kees de mol reacted to guraus in HMS Victory main mast section by guraus - 1:48
Thank you all for the comments and likes.
Here is a small update.
Alexandru
-
kees de mol reacted to NenadM in Cutty Sark by NenadM
Thank you Igor and Denis ... here is Serbia, where you can not find such a things, particular 2,5 mm letters, particular in white. This is why I drew them
Cosmetic works continued
color mess on white panel
Before
And after
Tool - allmighty toothpick with "softened" top
BTW - on those photos is shown the closest shade and look of color I get
-
 kees de mol got a reaction from Leo-zd in Lady Nelson by Leo-zd - 1:119 - SMALL
Those canons really look realistic. I can not imagine how small they are.
-
kees de mol reacted to tadheus in La Salamandre by tadheus - 1:24
Continuation
The beginning of the relationship is available at this address:
http://5500.forumact...ndre-1-24#66516
Regards, Paul
-
kees de mol reacted to torpedochief in USS Barbel (SS-580) by torpedochief - FINISHED
First of all I want to thank you all for the kind words. I do love all ships, however I spent from my late teens to my 40s riding submarines. So bear with me. Still have many projects going. Scratch Building the LEE, upgrading a little Academy Whale Ship. Oh yeah and a 1/700 EDMUND FITZGERALD.
Lets Rig for Dive and get this little puppy to bed!
Well I poured the mold by using the syringe method to ensure the pour hole did not become clogged and result with a missing mid ship.
SUBMARINE FACT TIME!!!
On a US 688 Class Fast Attack there are only two water tight doors. One is at Frame 57 and separates operations from engineering. We have another name for forward people and after people. We are Coners (We work in the cone.) and Nukes. The other water tight door is the washing machine in the laundry space.
I did not attach any control surface to the master prior to pouring. Thin areas of a pour take forever to cure out as they can not generate heat that well. Also unless you can spin cast or have a pressure pot there is always the chance a bubble will somehow get trapped and really complicate your day.
After 30 minutes I de-molded the hull, and re-drilled the mounting holes.
The mold for the control surfaces was heated to 150 F in the oven. Your mold might sweat some so be sure you wipe it clean and give it a bit of mold conditioner. With the mold heated I mixed and poured the control surfaces.
The surfaces were allowed to cure for an hour then removed from the mold and the little bit of flash trimmed away.
The surfaces were attached to the hull at locations indicated by the plan using CA. A fillet was made where the vertical stabilizers meet the hull just forward of the Stern Planes using Green Filler Putty, and sanded smooth.
Three light coats of auto primer were applied. After each the hull was given a light going over with 0000 steel wool.
With the primer coats dried I next airbrushed Flat Black Acryl over the entire hull. As with the Primer this was steel wooled between coats.
While these dried I used GIMP 2.0 to design the screw and decals for the model. The decals were printed and sealed and the screw was photo-etched.
With my water line marker I retraced the previous marks and taped the hull at the line. The lower hull was air brushed with a mixture of 80% Red 10% dark Blue and 10% Black.
With the paint cured I gave the little monster a few coats of clear coat. Then the dry transfer hull numbers went on the sail. Along with the BARBEL'S BATTLE E Award. We love getting those! Means we are best of the best. Of course!
I then applied the draft marks and locked then down with Micro sol decal solution. Black ink was used to highlight the hatches and Bronze was used to paint the capstan.
I made the base from Walnut and added the ships patch and a set of Dolphins. After a coat or so of clear, the ole girl was moored on her base.
Well that is that friends. BARBEL was the test bed for many of the systems modern subs use. It was found that bow mounted torpedo tubes can really interfere with passive sonar as it is also bow mounted. Starting with PERMIT 594 Class SSNs the tubes were located on the sides of the ship. These are at and angle of 8.5 degrees off centerline. S.I.N.S was tested on BARBEL Ships Inertial Navigation System. This system was in use until late 637 and all 688 Class Attack boats.
Hope you enjoyed the build and a little sub history.
All clear on the broadcast. All messages aboard. Lower all masts and antennas. Going Deep!!
Chief
-
kees de mol reacted to Mfelinger in Pasara by Mfelinger - FINISHED - 1:30 - Traditional boat of the Croatian Adriatic
Thank you Kees, I think I put everything according to the draft.
Here are more photos of today's work:
Regards, Matija.
-
kees de mol reacted to Mfelinger in Pasara by Mfelinger - FINISHED - 1:30 - Traditional boat of the Croatian Adriatic
Here are a few more photos:
Regards, Matija.
-
kees de mol reacted to Mfelinger in Pen Duick 1898 by Mfelinger - 1:20
Here I tested the protection of the deck.
I am satisfied, so I applied it to the deck.
Regards
Matija
-
kees de mol reacted to SuperSylvester in Dutch Two-decker by SuperSylvester - 1/50 scale - from plans of Heinrich Winter's Hohenzollern model
Thanks mates.
Tjerk has discovered the internetshopping, the fool is decorating his room
View from the back window
View from the 'zij-galerij'
The chest will have steel bands, they will be delivered later, as Tjerk said
Jack
-
kees de mol reacted to SuperSylvester in Dutch Two-decker by SuperSylvester - 1/50 scale - from plans of Heinrich Winter's Hohenzollern model
The last details for the Captains Cabin.
On the pics I see that there is still some work to do.
Jack
-
kees de mol reacted to SuperSylvester in Dutch Two-decker by SuperSylvester - 1/50 scale - from plans of Heinrich Winter's Hohenzollern model
Hmm, last updated in october 2013? oops!
Here we go, lots of pics with few words. I propably forgot this topic...
Some small parts
Deckbeams
Continued....
-
kees de mol reacted to Gregor in La Mutine and La Topaze by Gregor – 1:64 scale - French Schooners - La Jacinthe Type
It was in summer 2014 when I had the idea to build the French light Schooner “La Jacinthe” after the plans of Jean Boudriot. Together with five sisters she was launched in 1823, and in the following year five more ships were built, among them “La Mutine” (“The Rebel”).
As my cutter HMC Sherbourne she should be in 1:64 scale, so I scanned the plans and traced bulkheads and false keel in a way so I could build everything with plywood of 3mm. For that I used Adobe Illustrator, so I could laser cut the pieces in the FabLab of the local technical university.
“Printed out” in late summer, you can see here the bulkheads, false keel and deck, a few small parts and a piece for a jig that will help me to build a cutter. When I wanted to start building, alas, I saw that the false keel was totally warped. So I had to go to the university again, and cut everything again, but this time in MDF. And while I was at it, I did everything twice.
Just for testing purpose I cut keel, stem etc., I will user these parts as templates when working with pear wood. In the upper left corner you can see a jig that will act as a bulkhead former.
But why do everything twice?
I simply couldn’t decide: build the “Jacinthe” or the “Mutine”? The latter is shown in Boudriot’s book, after a refit in 1835. The main differences are closed and elevated bulkheads, new deck layout, iron pumps and anchor chains, a steering wheel, new chains and a new bowsprit, set in a different angle – in general, the “Mutine” appears much more seaworthy than the very lightly built “Jacinthe”.
So the plan is to build both: a fully rigged “Jacinthe” in natural pear wood, and a hull model of a black-painted, coppered “Mutine”. The twin build should not be boring or repetitive. Well, have to build two identical hulls, but all the other details mentioned promise to be sufficiently different from each other to make this a very interesting project.
Here a look of the two schooners, “La Jacinthe” (1823) ans “La Mutine” (1835):
The foundation is already laid: the two sisters can hardly be told apart yet.
This will be a slow build, and quite an adventure; my only experience in building wooden models is the Sherbourne kit, which I modified to my liking and where I learned the pleasure of working from scratch.
And as I have to do the heavy sanding outside, progress is dependent of the weather (yes, the with stuff is snow, for those having the privilege of living in a moderate climate).
Cheers,
Gregor
-
kees de mol reacted to NenadM in Cutty Sark by NenadM
First attempt with idea to paint numbers
Grrrr ... my thinest brush seems like gigant broom when I put it close ... each number is over 2mm high ... and I just WANT this numbers
Must discover some hot water
Must discover
-
kees de mol reacted to NenadM in Cutty Sark by NenadM
Numbers on bow ...
They follow different line before fire and after
Look at this pictures:
What will be ?
On a "hmmm" road again ...
-
kees de mol reacted to NenadM in Cutty Sark by NenadM
Final look and color of left hull rails
Nice and precise straight lines, clean and straight edges of color surfaced
Happy to the sky I succeded this. Hours and hours of exercises paid off
-
kees de mol reacted to captainbob in Friendship Sloop by captainbob - FINISHED - 1:48
Moving right along, the benches are mounted. I used .010” card stock to space the.030” bench slats. (.5” space between 1.5” slats) I also carved and put in place the tiller. Now with just a little more work at the companion way I’ll be ready for the deck. The way I normally build I would have the deck on already and would be trying to put in the details through small openings. I like this method for the ability to do more with the interior details, on the other hand it feels like it’s slower because the deck is not on yet.
Bob
-
kees de mol reacted to Chuck in HM Cutter Cheerful 1806 by Chuck - FINISHED - 1:48 scale - kit prototype
I have been working on both models and wanted to show the finished square tuck and Cheerful. I am just about done with the planking but will be doing a tech session next Tuesday night at my club meeting. So until then I wont be getting more done. I may however move ahead and start treenailing. I have only five strakes left as you can see and its killing me that I cant just finish it up. But a week will go by really quick.
Chuck
-
kees de mol reacted to AntiSpiral in La Belle Poule 1765 by AntiSpiral - 1/48 - An Adventure in POB
hate to keep the log quiet so here's a small update, slow builder so i've only built 7 frames or 28 each since the last update.. only 24 (6) more to go.......
in the centre the parts for holding the small nuts in place look flimsy and weak but will later be reinforced with some infill.
The stern is probably as detailed as the frame will ever get. Cant say the build so far is perfect but im happy with the results, from previous builds cant believe im actually going to say - looking forward to planking - im sure i'll regret those words!
Progress so far!
Looking for some tips and ideas, glueing on these paper plans to the wood may later cause some trouble for other parts of the ship, does anyone have any ideas whats the best way to transfer the plans to the wood? i've seen it done but no idea how unless its the same as they do with tattoos?
-
kees de mol reacted to AntiSpiral in La Belle Poule 1765 by AntiSpiral - 1/48 - An Adventure in POB
Well weeks have gone past since my last update and nothing since for a good reason.. Many problems were found when i noticed the frames weren't align which would obviously cause many problems, i expected little inconsistencies when builing my first scratch but nothing as bad as that, so ofcourse i've had to start again which isn't as bad a problem as i thought.
Tempted to restart the whole post but i think i'll just add these few pictures and next time post a big update.
Starting again was the best idea because now the ship is more accurate and reliable for future building, simple changes have helped me ensure its correct this time and i've had loads of spare timber left over to make the parts so far, as i had only got as far as making 5 frames.
The progress so far:
Im very slow at this and am still waiting for stock of lime so im taking my time as to save money aswell.
-
kees de mol reacted to kruginmi in HMS Druid by kruginmi - 1:48 - cross-section - Hahn
Another update in the evolution of the Druid-X, this time focusing on the garboard and limber strakes.
For the limber strakes I am still using the thickstuff stock (1/8"). These require a slot to allow the limber boards to fit in between this and the keelson. Using the Byrnes saw I quickly had my raw stock.
Using a spacer piece of wood to insure consistent separation from the keelson I glued in both limber strakes.
Everything ended up looking fit and proper. A good result.
As a companion it was time to put on the first regular planks on the hull (1/16"). The natural choice was the garboard strake - and in fact I did one better, the garboard strake plus one each side. These were again cut rectangular with no specific shaping. The rest of the planking will be custom fit and cut.
The ends of the planks aren't perfectly flush with the aft and fore frames. I am resisting the urge to sand them into all the outside and inside planks are attached to avoid screwing up the face of the frames - as much.
Next up is the middle stuff (my term - hah hah). Some 3/32" stuff that abuts a lot of the thickstuff prior to the regular planking. I also want to get the berth deck clamp in. It wont be too long before the lower hold is sealed in.
Mark
-
kees de mol reacted to kruginmi in HMS Druid by kruginmi - 1:48 - cross-section - Hahn
Thanks for all the likes and looks.
While the wind howls outside and the temp reads below zero I set my sights on getting the middle stuff (my term) set in the lower hold. This is 3/32" basswood strips primarily on either side of the thickstuff (1/8" basswood). Finally I can call it good.
Next up is the regular planking (1/16" basswood). It shouldn't take too long.
When I started this process of the internal planking I thought the big question was going to be whether to plank up from the keelson or down from the berth deck clamp. The reality was a bunch of jumping around to set the thickstuff and now I am left with the filler. A lot more respect for trying to accurately plank the internal hull of a complete hull, regardless of scale!
Mark
-
kees de mol reacted to Leo-zd in Lady Nelson by Leo-zd - 1:119 - SMALL
Here we are
The guns are done (except the rigging, and that will be fun)
the coloring may be looks aproximativ and less precise but in the great part it's invisible at normal looking, without magnifier.
-
kees de mol reacted to Rao A.L.G. in Longboat by Rao A.L.G. - FINISHED
Hi,
The model is complete.
Thanks, Michael, Matija, Nils, Mark, Omega and Mike for dropping in and offering comments and advice. Surely, all your encouragement would help me in future.
I only follow all your builds and observe - truly, this has helped me a lot.
The final pics are attached :
The lantern is placed...
Anchor and gun ..
The gun swivels around ...
bucket...
with the supplies, oars, etc.
another view..
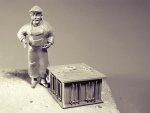
A small box. I enjoyed doing it. The latch and hinges were of second thought.
Another trial .. a compass.. not to the mark.
all supplies placed...
top view.
Last pic of the boat.
Let me thank you all for your comments.
Regards,
Rao
-
kees de mol reacted to IgorSky in ATLANTIC by IgorSky - FINISHED - 1/600 Scale - BOTTLE - three-masted schooner
Railings...
I tried two options, possible for me, - from a thin wire and with application of photoetched details for models in scale 1:700. I think that on the model I will use the second option. But I think to add to photoetched details of the racks from a wire.
-
kees de mol reacted to Dan Vadas in HMS Vulture 1776 by Dan Vadas - FINISHED - 1:48 scale - 16-gun Swan-class sloop from TFFM plans
Thank you again John, Nenad, George, Druxey and Eamonn.
Eamonn, I hope you're kidding .
Jibboom Horses
The jibboom horses are the equivalent to the Footropes on the other yards. They are knotted every 2 scale feet, which takes a bit of careful doing to get them spaced evenly. There is a small eye in the forward end which loops back on itself and then around the forward end of the boom :
The aft ends are passed around the boom aft of the cap and have two seizings to fix them :
To get the horses to hang naturally I dampened them and attached a couple of clamps about 1/3 of the way in from each end until they dried:
Danny