


Bob Blarney
-
Posts
467 -
Joined
-
Last visited
Reputation Activity
-

 Bob Blarney got a reaction from mtaylor in Hold Down Jigs
Hello, there are some very nice fixtures and jigs shown here. But is a metal base essential to your need? The base could be made from MDF with an overlay of cement backerboard for kitchen or bath tiles. It would also have a perimeter of aluminum t-track for anchoring hold-downs or thirdhands.
I could also imagine a second jig for assembling delicate things. Instead of the cement board, it would have a thick cork or wood tile overlay to hold pins or screws for hold-downs anywhere on the board (with a sheet of wax paper or baking parchement paper laid down to prevend glue adhesion.)
-
 Bob Blarney got a reaction from thibaultron in My handy Lie-Nielsen Violin Maker's Block Plane
L-N also made the 102 in ductile iron - just a functional at 3/4 the cost of bronze. Maybe you could ask about that. Also, keep your eye out at flea markets & yardsales (or Ebay) for a Stanley 60-1/2 low-angle block plane, or one of its analogues from Millers Falls or Sargent. It might be a better choice for your arsenal since you already have the Violin Plane.
One more thing - an occasional swipe or two (not a coating) with a block of canning wax with make that plane glide, and won't make problems with finishing - try it on scrap - you'll like it.
-
 Bob Blarney got a reaction from cristikc in My handy Lie-Nielsen Violin Maker's Block Plane
Maybe you might be interested in seeing this pic. Here I'm planing down a ~9" x 24" piece of bandsawn East Indian rosewood from about 4 or 5mm to about 2.5 mm for a guitar back. Note that the rosewood was bordered with 7/64" model aircraft plywood. The plywood controlled the depth of cut of the planes' strokes.
Most of the excess rosewood thickness was hogged off in diagonal strokes with the No.4 bench plane. When it got down to about 3mm, then the No.6 foreplane was used. It rested on the 7/64 plywood - on the sides or bridging the rosewood, and it shaved off the rosewood a little at a time. Final cleanup was done with a No. 80 scraper and a L-N 112 scraper plane. Note the can of Johnson paste wax that was used to lubricate the soles of the planes - I want my energy to go into planing wood, not lost as heat generated by friction.
It's quite possible to do this on a smaller scale with smaller planes. Remember to put a small radius on the corners of the plane blade so as not to carve grooves. Generally, a heavier and longer plane will produce more uniform and smoother thickness, but a sharp blade is most important of all. In the long run, you'll find that it's much quicker to plane to thickness than to sand, and the surface feels wonderful. Actually, sometimes you might need to sand a planed piece to achieve a good adherence of glue.
>As always - practice on scrap to prevent savaging a beautiful bit of wood<
-
Bob Blarney got a reaction from thibaultron in My handy Lie-Nielsen Violin Maker's Block Plane
Maybe you might be interested in seeing this pic. Here I'm planing down a ~9" x 24" piece of bandsawn East Indian rosewood from about 4 or 5mm to about 2.5 mm for a guitar back. Note that the rosewood was bordered with 7/64" model aircraft plywood. The plywood controlled the depth of cut of the planes' strokes.
Most of the excess rosewood thickness was hogged off in diagonal strokes with the No.4 bench plane. When it got down to about 3mm, then the No.6 foreplane was used. It rested on the 7/64 plywood - on the sides or bridging the rosewood, and it shaved off the rosewood a little at a time. Final cleanup was done with a No. 80 scraper and a L-N 112 scraper plane. Note the can of Johnson paste wax that was used to lubricate the soles of the planes - I want my energy to go into planing wood, not lost as heat generated by friction.
It's quite possible to do this on a smaller scale with smaller planes. Remember to put a small radius on the corners of the plane blade so as not to carve grooves. Generally, a heavier and longer plane will produce more uniform and smoother thickness, but a sharp blade is most important of all. In the long run, you'll find that it's much quicker to plane to thickness than to sand, and the surface feels wonderful. Actually, sometimes you might need to sand a planed piece to achieve a good adherence of glue.
>As always - practice on scrap to prevent savaging a beautiful bit of wood<
-
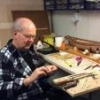
.thumb.jpg.a354db03134920ba16c2c840f8430fbb.jpg) Bob Blarney got a reaction from Mike Shea in My handy Lie-Nielsen Violin Maker's Block Plane
Bob Blarney got a reaction from Mike Shea in My handy Lie-Nielsen Violin Maker's Block Plane
Maybe you might be interested in seeing this pic. Here I'm planing down a ~9" x 24" piece of bandsawn East Indian rosewood from about 4 or 5mm to about 2.5 mm for a guitar back. Note that the rosewood was bordered with 7/64" model aircraft plywood. The plywood controlled the depth of cut of the planes' strokes.
Most of the excess rosewood thickness was hogged off in diagonal strokes with the No.4 bench plane. When it got down to about 3mm, then the No.6 foreplane was used. It rested on the 7/64 plywood - on the sides or bridging the rosewood, and it shaved off the rosewood a little at a time. Final cleanup was done with a No. 80 scraper and a L-N 112 scraper plane. Note the can of Johnson paste wax that was used to lubricate the soles of the planes - I want my energy to go into planing wood, not lost as heat generated by friction.
It's quite possible to do this on a smaller scale with smaller planes. Remember to put a small radius on the corners of the plane blade so as not to carve grooves. Generally, a heavier and longer plane will produce more uniform and smoother thickness, but a sharp blade is most important of all. In the long run, you'll find that it's much quicker to plane to thickness than to sand, and the surface feels wonderful. Actually, sometimes you might need to sand a planed piece to achieve a good adherence of glue.
>As always - practice on scrap to prevent savaging a beautiful bit of wood<
-
 Bob Blarney got a reaction from Jack12477 in My handy Lie-Nielsen Violin Maker's Block Plane
Maybe you might be interested in seeing this pic. Here I'm planing down a ~9" x 24" piece of bandsawn East Indian rosewood from about 4 or 5mm to about 2.5 mm for a guitar back. Note that the rosewood was bordered with 7/64" model aircraft plywood. The plywood controlled the depth of cut of the planes' strokes.
Most of the excess rosewood thickness was hogged off in diagonal strokes with the No.4 bench plane. When it got down to about 3mm, then the No.6 foreplane was used. It rested on the 7/64 plywood - on the sides or bridging the rosewood, and it shaved off the rosewood a little at a time. Final cleanup was done with a No. 80 scraper and a L-N 112 scraper plane. Note the can of Johnson paste wax that was used to lubricate the soles of the planes - I want my energy to go into planing wood, not lost as heat generated by friction.
It's quite possible to do this on a smaller scale with smaller planes. Remember to put a small radius on the corners of the plane blade so as not to carve grooves. Generally, a heavier and longer plane will produce more uniform and smoother thickness, but a sharp blade is most important of all. In the long run, you'll find that it's much quicker to plane to thickness than to sand, and the surface feels wonderful. Actually, sometimes you might need to sand a planed piece to achieve a good adherence of glue.
>As always - practice on scrap to prevent savaging a beautiful bit of wood<
-
Bob Blarney got a reaction from Mike Shea in My handy Lie-Nielsen Violin Maker's Block Plane
L-N also made the 102 in ductile iron - just a functional at 3/4 the cost of bronze. Maybe you could ask about that. Also, keep your eye out at flea markets & yardsales (or Ebay) for a Stanley 60-1/2 low-angle block plane, or one of its analogues from Millers Falls or Sargent. It might be a better choice for your arsenal since you already have the Violin Plane.
One more thing - an occasional swipe or two (not a coating) with a block of canning wax with make that plane glide, and won't make problems with finishing - try it on scrap - you'll like it.
-
 Bob Blarney got a reaction from Canute in My handy Lie-Nielsen Violin Maker's Block Plane
The 'big brother' 102 is handy too, and bedded at 12d. The Model Maker's Block Plane looks interesting too.
-
Bob Blarney got a reaction from Mike Shea in My handy Lie-Nielsen Violin Maker's Block Plane
The 'big brother' 102 is handy too, and bedded at 12d. The Model Maker's Block Plane looks interesting too.
-
Bob Blarney got a reaction from mtaylor in My handy Lie-Nielsen Violin Maker's Block Plane
The 'big brother' 102 is handy too, and bedded at 12d. The Model Maker's Block Plane looks interesting too.
-
Bob Blarney got a reaction from thibaultron in My handy Lie-Nielsen Violin Maker's Block Plane
The 'big brother' 102 is handy too, and bedded at 12d. The Model Maker's Block Plane looks interesting too.
-
Bob Blarney got a reaction from Canute in Sherline has chucks on sale for 20% off in Jan
Hmm, a four-jaw independent chuck is something that is very useful.
-
Bob Blarney got a reaction from mtaylor in Sherline has chucks on sale for 20% off in Jan
Hmm, a four-jaw independent chuck is something that is very useful.
-
Bob Blarney got a reaction from Canute in detail knives at a very reasonable price: linoleum block cutters
Hello, while rummaging through a drawer, I found a long-lost tool set -- a linoleum cutter and interchangeable blades for incising lino blocks for contact printing. The price is right at less than $10US, the blade steel is acceptable and they can be re-sharpened , the handle holds the blades securely, and there are a variety of blade shapes available. It works for me.
https://www.artistsupplysource.com/product/804451/inovart-lino-cutter/
-
 Bob Blarney got a reaction from Moxis in detail knives at a very reasonable price: linoleum block cutters
Hello, while rummaging through a drawer, I found a long-lost tool set -- a linoleum cutter and interchangeable blades for incising lino blocks for contact printing. The price is right at less than $10US, the blade steel is acceptable and they can be re-sharpened , the handle holds the blades securely, and there are a variety of blade shapes available. It works for me.
https://www.artistsupplysource.com/product/804451/inovart-lino-cutter/
-
Bob Blarney got a reaction from mtaylor in detail knives at a very reasonable price: linoleum block cutters
Hello, while rummaging through a drawer, I found a long-lost tool set -- a linoleum cutter and interchangeable blades for incising lino blocks for contact printing. The price is right at less than $10US, the blade steel is acceptable and they can be re-sharpened , the handle holds the blades securely, and there are a variety of blade shapes available. It works for me.
https://www.artistsupplysource.com/product/804451/inovart-lino-cutter/
-
Bob Blarney reacted to noel_colledge in Tools for Masts and Spars
If you are looking at hand tools
I would recommend looking at the veritas range of miniature tools. They are good quality tools, not cheap versions of their bigger cousins, hold a good edge and very useful.
I would suggest the block plane and spoke shave to start. Many places sell them including Axminsters, or RDG Tools,
You can use the bigger ones but I feel these work better on the smaller scales.
-
Bob Blarney got a reaction from Canute in Sharpening with MK !! Narrow Blade Honing Guide
A typical factory bevel for chisels is 25 degrees (not percent), but considering that pear wood is fairly hard, I would be inclined to go with a steeper angle. This is easily accomplished by creating a secondary bevel to 27-30 degrees. But between you, me, and the mainmast, I would worry about a degree here and there.
As for sharpening rigs, there is no shame in using a fixture to hold the angle (I do). For a long time, I used a 12x12 polished granite floor tile, with strips of good quality (3M or Norton) silicon carbide wet/dry autobody papers that were fixed to granite with sprayed on contact adhesive (spirits of naptha will dissolve it), with grits from 400 to 2000. I lubricated with Windex window cleaner. Now I use DMT diamond stones, but I think Trend diamond stones would be a better choice. (I prefer to use diamond stones over natural stones because they never need flattening, although they will need occasional scrubbing to remove minute metal bits.) For final honing, I use a leather strop with a polishing compound. If you don't have a leather strop, try a piece of MDF with compound.
If an edge is severely damaged, I grind it on a white aluminum oxide wheel or a 1x30 silicon carbide belt (Klinspor). You can occasionally dip the chisel in water to keep it cool. You can also shove it through a piece of potato and then grind - the potato will absorb the heat, but don't cook it (or eat it).
-
Bob Blarney got a reaction from mtaylor in Heat sealing iron question
Perhaps you might consider a hair straightener iron. I modified one for the purpose of removing acoustic guitar bridges. It would heat wood from both sides, and many if not most straighteners have at least a rudimentary heat control on them, or you could use an ordinary incandescent lamp dimmer.
-
Bob Blarney got a reaction from mtaylor in Bill Pentz - a comprehensive source for dust collection information and system design
I had assumed that others were aware of Mr. Pentz' site, but perhaps that was a dubious assumption. On this site you will probably find more than you wish to know about the subject, including wood toxicities and design tools if you wish to design and build your own system. This site provided me with ideas for my wall-mounted separator with the bucket-head vac.
http://billpentz.com/woodworking/cyclone/index.cfm#index.cfm
-
Bob Blarney got a reaction from Canute in Bill Pentz - a comprehensive source for dust collection information and system design
I had assumed that others were aware of Mr. Pentz' site, but perhaps that was a dubious assumption. On this site you will probably find more than you wish to know about the subject, including wood toxicities and design tools if you wish to design and build your own system. This site provided me with ideas for my wall-mounted separator with the bucket-head vac.
http://billpentz.com/woodworking/cyclone/index.cfm#index.cfm
-
 Bob Blarney got a reaction from Ben752 in How serious do you get about dust protection
Power tools produce the greatest and finest airborne dust, and I've started to avoid their use whenever possible. For dimensioning larger boards into smaller stock for model building, hand sawing and hand planing are efficient enough once the techniques are learned, and actually can be quite enjoyable. There's some physical exercise, and it's possible to listen to music or radio discussions, and work at any hour of the day or night. Hand tools do not blow dust everywhere, are less expensive to buy, do not need many replaceable parts and maintenance, and do not occupy a large amount of bench and floor space. Also, hand planing produces a better surface than sanding as well. What's not to like?
-
Bob Blarney got a reaction from Canute in How serious do you get about dust protection
If you've got the jingles, this may be the system for you.
http://www.bridgecitytools.com/default/tools/what-s-new/gyro-air.html
-
 Bob Blarney got a reaction from PeteB in How serious do you get about dust protection
Power tools produce the greatest and finest airborne dust, and I've started to avoid their use whenever possible. For dimensioning larger boards into smaller stock for model building, hand sawing and hand planing are efficient enough once the techniques are learned, and actually can be quite enjoyable. There's some physical exercise, and it's possible to listen to music or radio discussions, and work at any hour of the day or night. Hand tools do not blow dust everywhere, are less expensive to buy, do not need many replaceable parts and maintenance, and do not occupy a large amount of bench and floor space. Also, hand planing produces a better surface than sanding as well. What's not to like?
-
Bob Blarney got a reaction from mtaylor in How serious do you get about dust protection
If you've got the jingles, this may be the system for you.
http://www.bridgecitytools.com/default/tools/what-s-new/gyro-air.html