PMG
-
Posts
199 -
Joined
-
Last visited
Content Type
Profiles
Forums
Gallery
Events
Everything posted by PMG
-

HMS AGAMEMNON by PMG - Caldercraft
PMG replied to PMG's topic in - Kit build logs for subjects built from 1751 - 1800
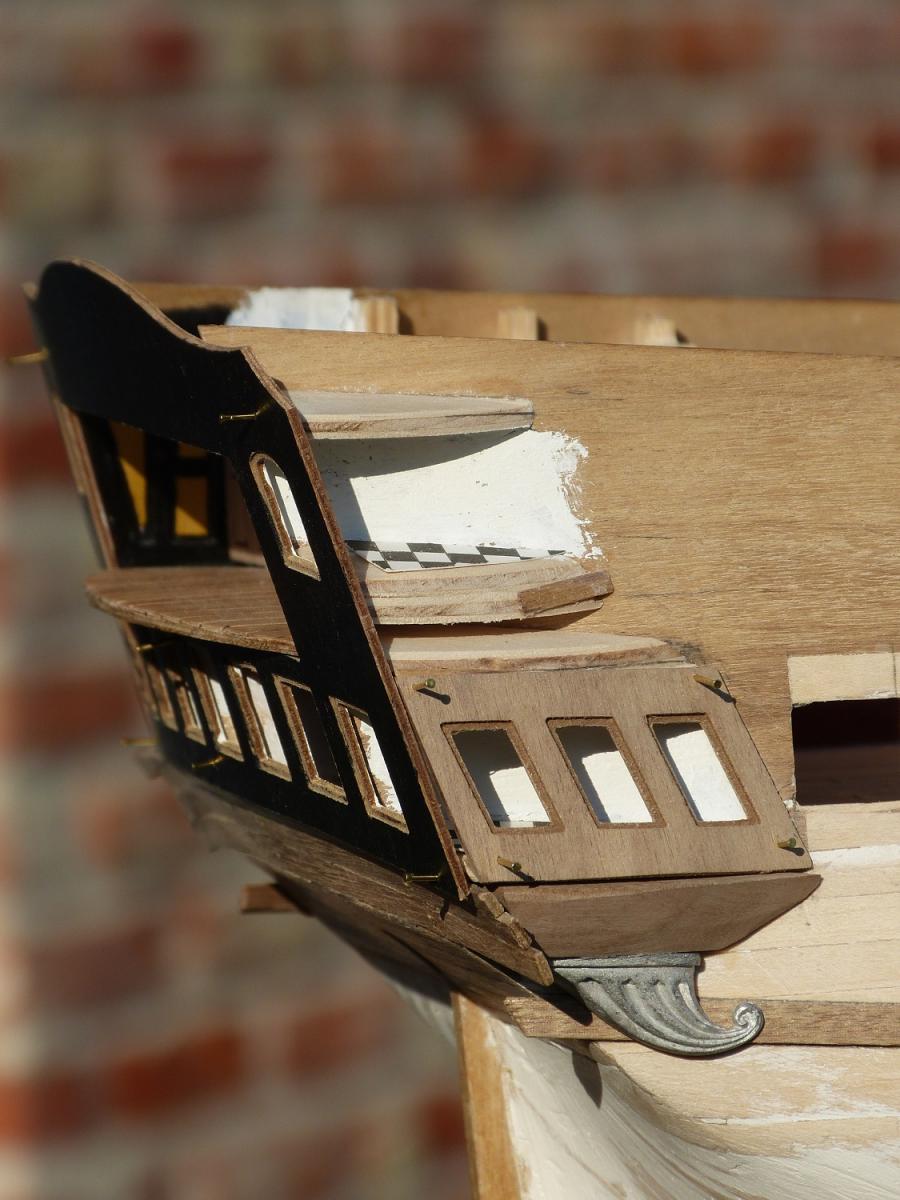
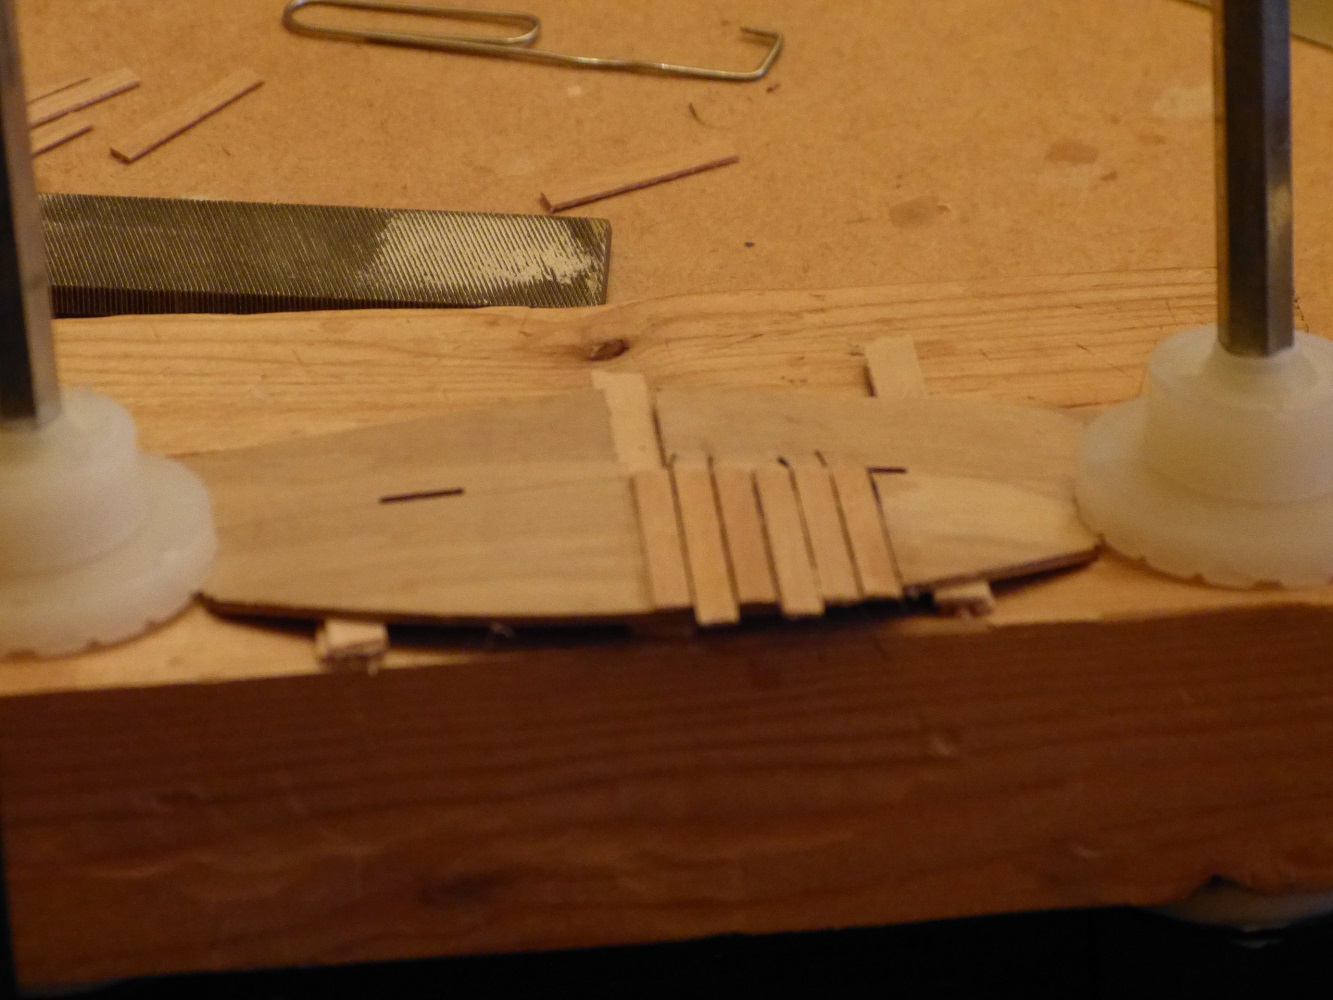
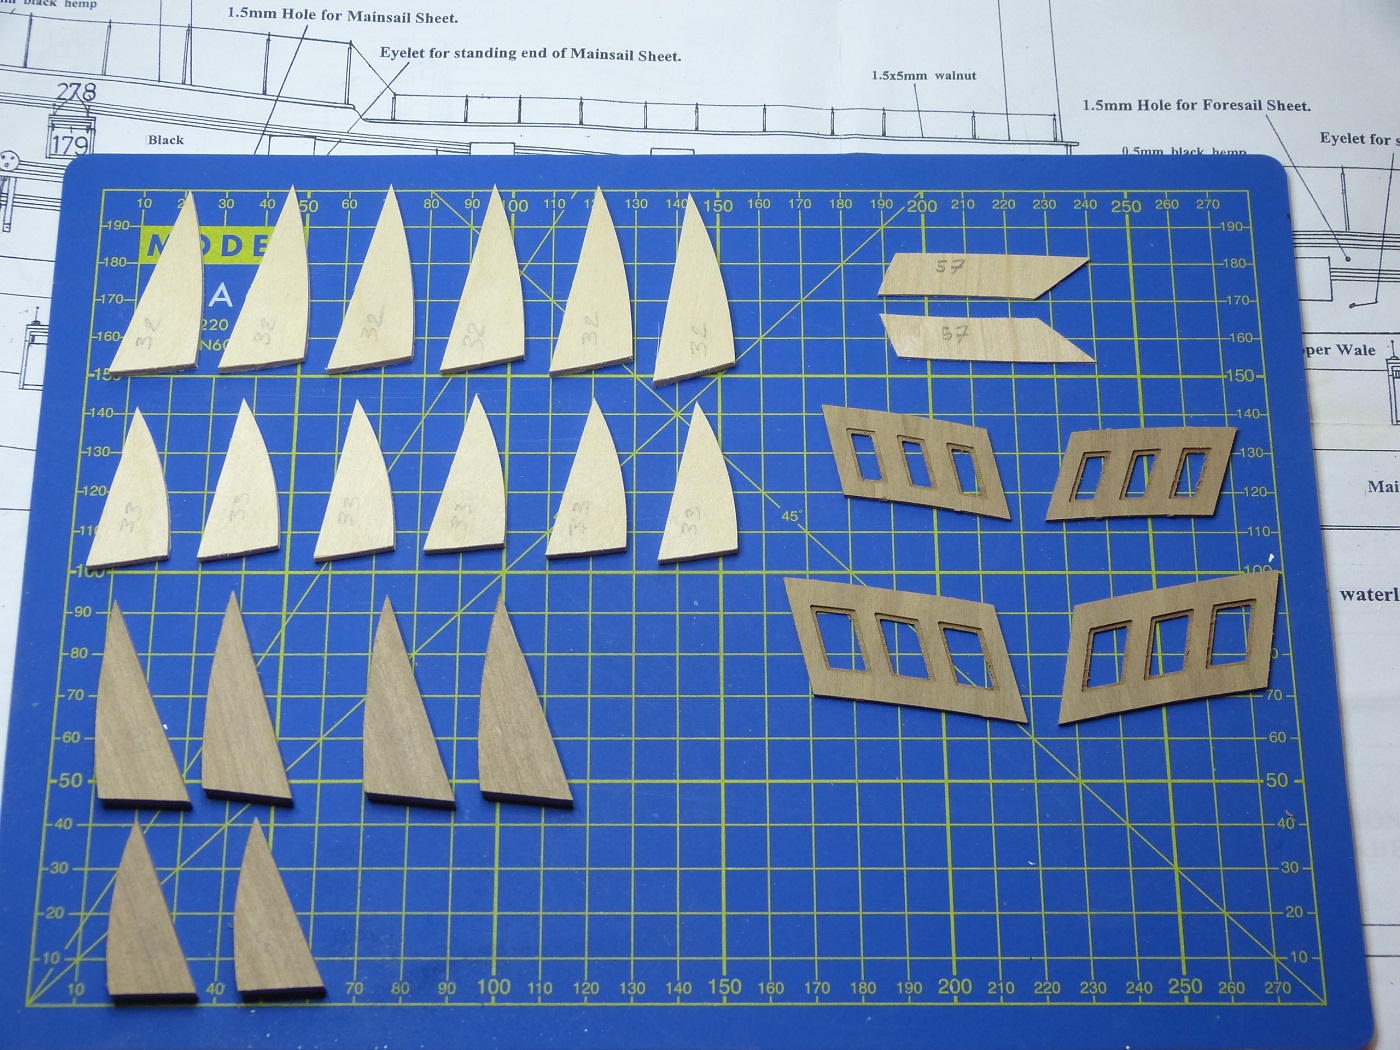
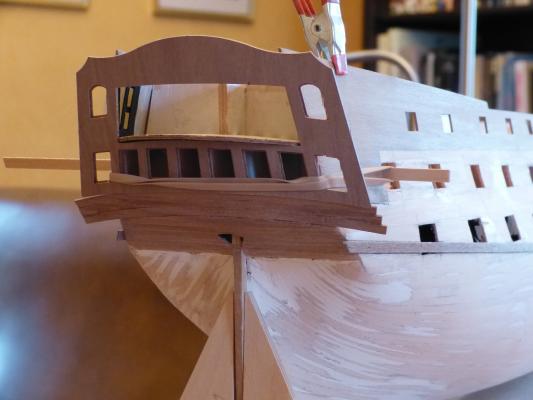
Finally back after a long absence. The quarter galleries appeared to be more complicated than expected. An extreme accuracy is absolutely necessary if you want to avoid an extensive use of filler. That's my case. After a first attempt I decided to remove all parts and to restart completely. Angles and parallelism are extremely important and a mistake ca definitively spoil your model. I finally discovered that pinning was much more efficient for the temporary fixing than rubber bands. Here is the present status of my quarter galleries. And now a view of my Aggie as she is today. You will notice that I temporarly fixed the lower pattern (34) and the finishing casting. These parts will be removed before starting the second planking. They are just there to see how it looks, and they still need some further adjustment. But forming the patterns necessitated the use of my Dremel machine, it means a lot of dust, and I was obliged (by the Admiral, of course) to wait for better weather to do it outside.. Best greetings to all of you, Pierre.

-
I am glad to see you feel better. I wondered about your long absence. Hopefully it's over. Very nice your rigging! Pierre
- 1,279 replies
-
- 1
-

-
- agamemnon
- caldercraft
- (and 1 more)
-
Very nice, Sjors! I just planked a few square centimeters of the lower gundeck, where I supposed it could be seen through the ladders, but... Yours is very impressive... Pierre
- 1,616 replies
-
- 1
-
-
- caldercraft
- agamemnon
- (and 1 more)
-
HMS AGAMEMNON by PMG - Caldercraft
PMG replied to PMG's topic in - Kit build logs for subjects built from 1751 - 1800
Thank you, Mike. Pierre -
HMS AGAMEMNON by PMG - Caldercraft
PMG replied to PMG's topic in - Kit build logs for subjects built from 1751 - 1800
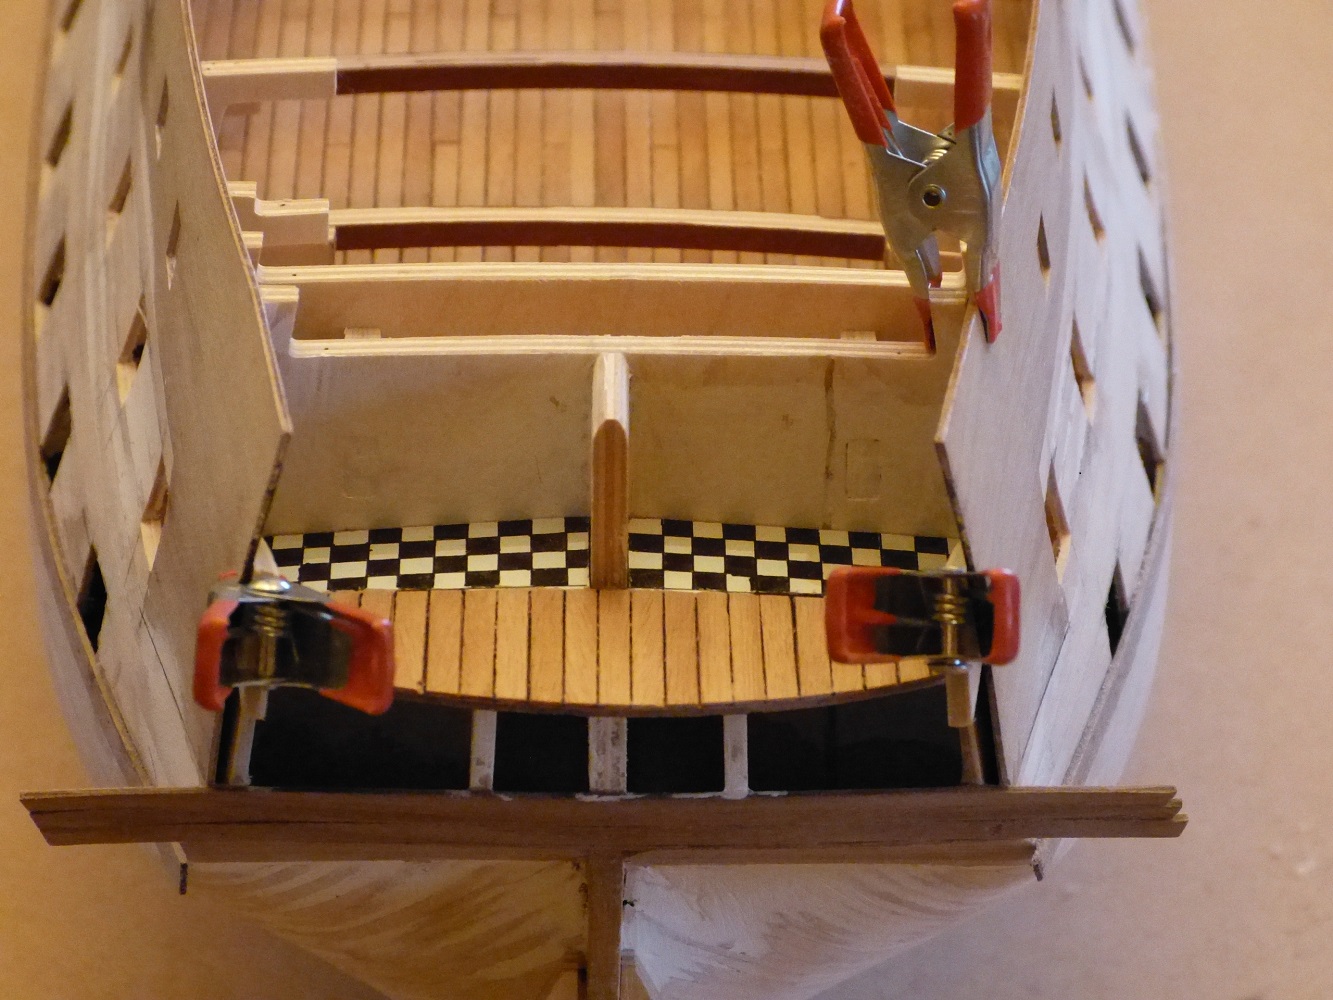
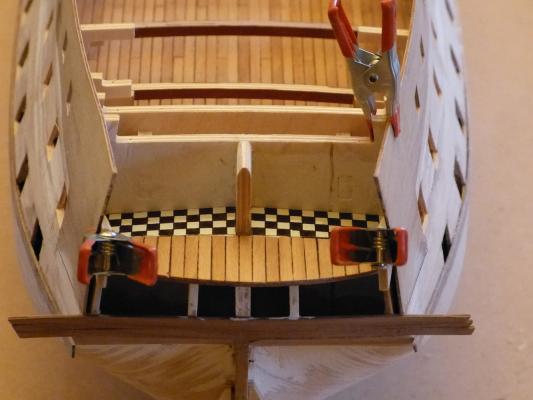
I finally came back a little bit earlier than foreseen (aniway, the weather in the South of France was not so nice...) and that's a good news for my Aggie. I first planked the stern gallery deck. And that's not such an obvious job. As the deck is curved, I decided to plank it curved too to avoid distortion of the planking once in place. And then, I glued it very carefully in position. You will notice that (inspird by Mobbsie) I made a little checker after the wall. I don't know if it is useful or not. I think that it will be completely invisible from outside... Once completely dried, I made a first attempt to temporarily fix the stern fascia. Here, a lot of chamfering is required to have it right in place. It's very important but it works well. Now serious things can begin, such as fixing the edges. Pictures will come later. Pierre
-
Mobbsie, fantastic, as usual... What's your program in May? I suppose your Aggie is completed in April. Pierre
- 1,279 replies
-
- 1
-
-
- agamemnon
- caldercraft
- (and 1 more)
-
Nice start, Sjors! Go ahead! Pierre
-
Hello Sjors, I feel a great log is beginning today! Greetings, Pierre
-
HMS AGAMEMNON by PMG - Caldercraft
PMG replied to PMG's topic in - Kit build logs for subjects built from 1751 - 1800
I am now in the South of France for some weeks (looking for a better weather??) and so, there is no more progress on my Aggie. I wish to all friends a very happy (shipbuilding, as Christian said) New Year! Best regards Pierre (coming back soon) -
HMS AGAMEMNON by PMG - Caldercraft
PMG replied to PMG's topic in - Kit build logs for subjects built from 1751 - 1800
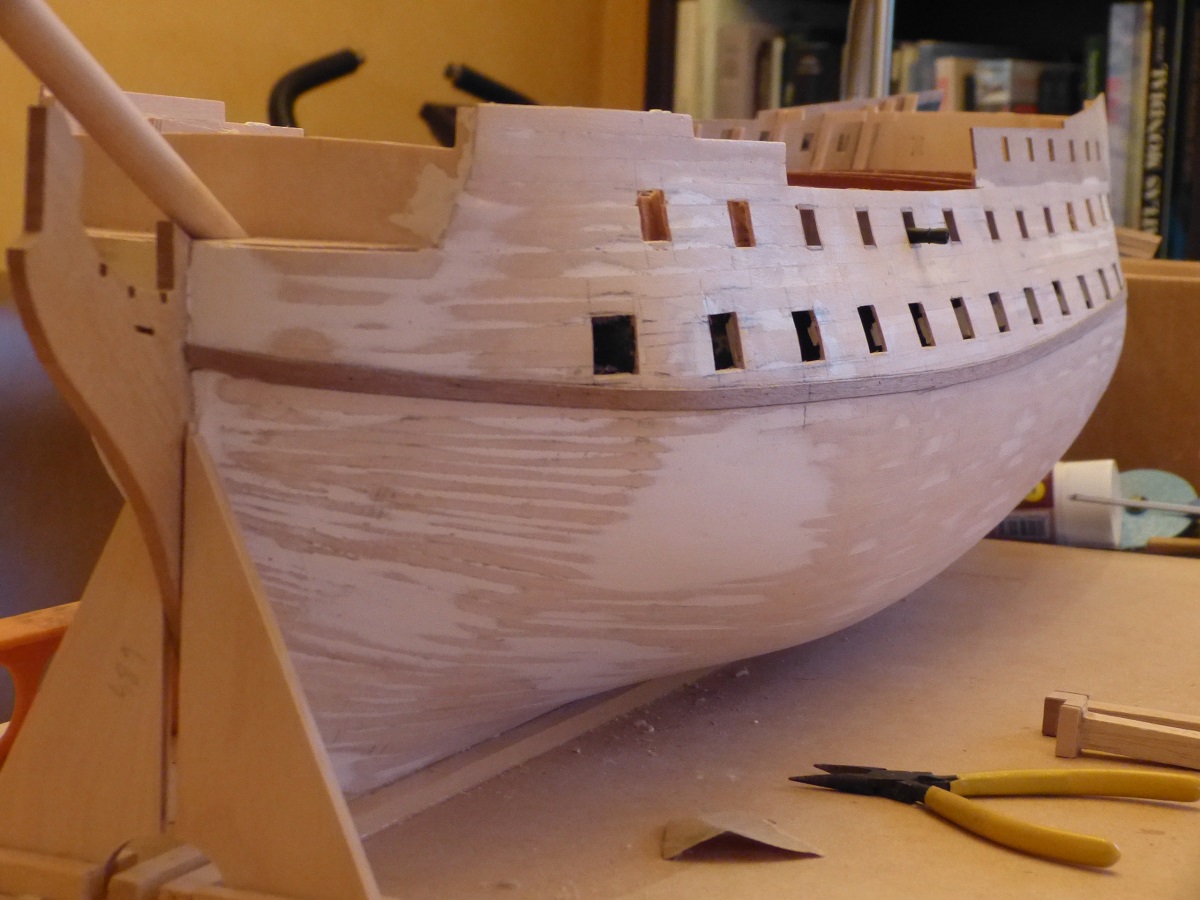
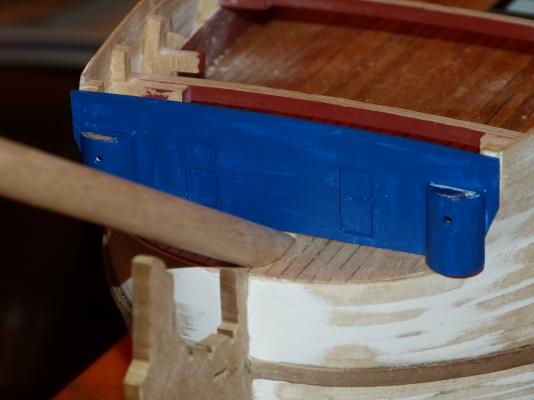
Here is a picture of the front fascia finally painted and fixed. I diluted the Caldercraft french blue with a little bit of white and I used the brush and not the aerograph. I take the opportunity to wish a merry Christmas to all the friends reading this post! Pierre
-
Thank you, Mobbsie, for the nice pictures and the clear explanations. I shall surely use them in the (far) future. Very nice job! Pierre
- 1,279 replies
-
- 1
-
-
- agamemnon
- caldercraft
- (and 1 more)
-
Very nice work. Congratulations, George! Please, give some details the way you will fix the channels. Pierre
- 83 replies
-
- 1
-
-
- agamemnon
- caldercraft
- (and 1 more)
-
HMS AGAMEMNON by PMG - Caldercraft
PMG replied to PMG's topic in - Kit build logs for subjects built from 1751 - 1800
Hi Christian, I finally putted a second layer (with the brush) and I mixed the paint with 2 drops of white. After a good mixing, you don't have very much time because it dries very quickly. But now, I am happy with the result. I send a photography when it is completely dry. Pierre -
HMS AGAMEMNON by PMG - Caldercraft
PMG replied to PMG's topic in - Kit build logs for subjects built from 1751 - 1800
Hi Christian, I am coming back on the aerograph and send hereafter a picture of mine. I made a new tentative of painting the front fascia not too dark. This time I used the brush and I diluted the Jotika french blue with a couple of drops of water. The resut, again, was not good for my point of view. I realised that the problem comes from the dilution. The instructions of thr aerograph tell you have to dilute your paint, what I did. Apparently, the jotika admiralty paint don't like water dilution at all. Next step, without dilution, but, may be a little bit too dark... Pierre
-
HMS AGAMEMNON by PMG - Caldercraft
PMG replied to PMG's topic in - Kit build logs for subjects built from 1751 - 1800
Hello Christian, Thank you for your kind comments. About the aerograph, I acquired mine by the way from Lidl. It was not expensive at all. The compressorand all other pieces are looking fine. It's ,of course, to be used with water paint. It sprays very well, and I obtained not too bad results on a test plank. But, again, the result on the front fascia is horrible. May be that the bottom was too glad, because painted in white? May be was my painting too diluted? But it's already less diluted thad in the instructions. Any way, several layers are necessary, but that's not a problem and even better. Be careful if you paint on plastic. Obviously if you are using water soluble paint. I think, I will go back to the brush... Pierre -
HMS AGAMEMNON by PMG - Caldercraft
PMG replied to PMG's topic in - Kit build logs for subjects built from 1751 - 1800
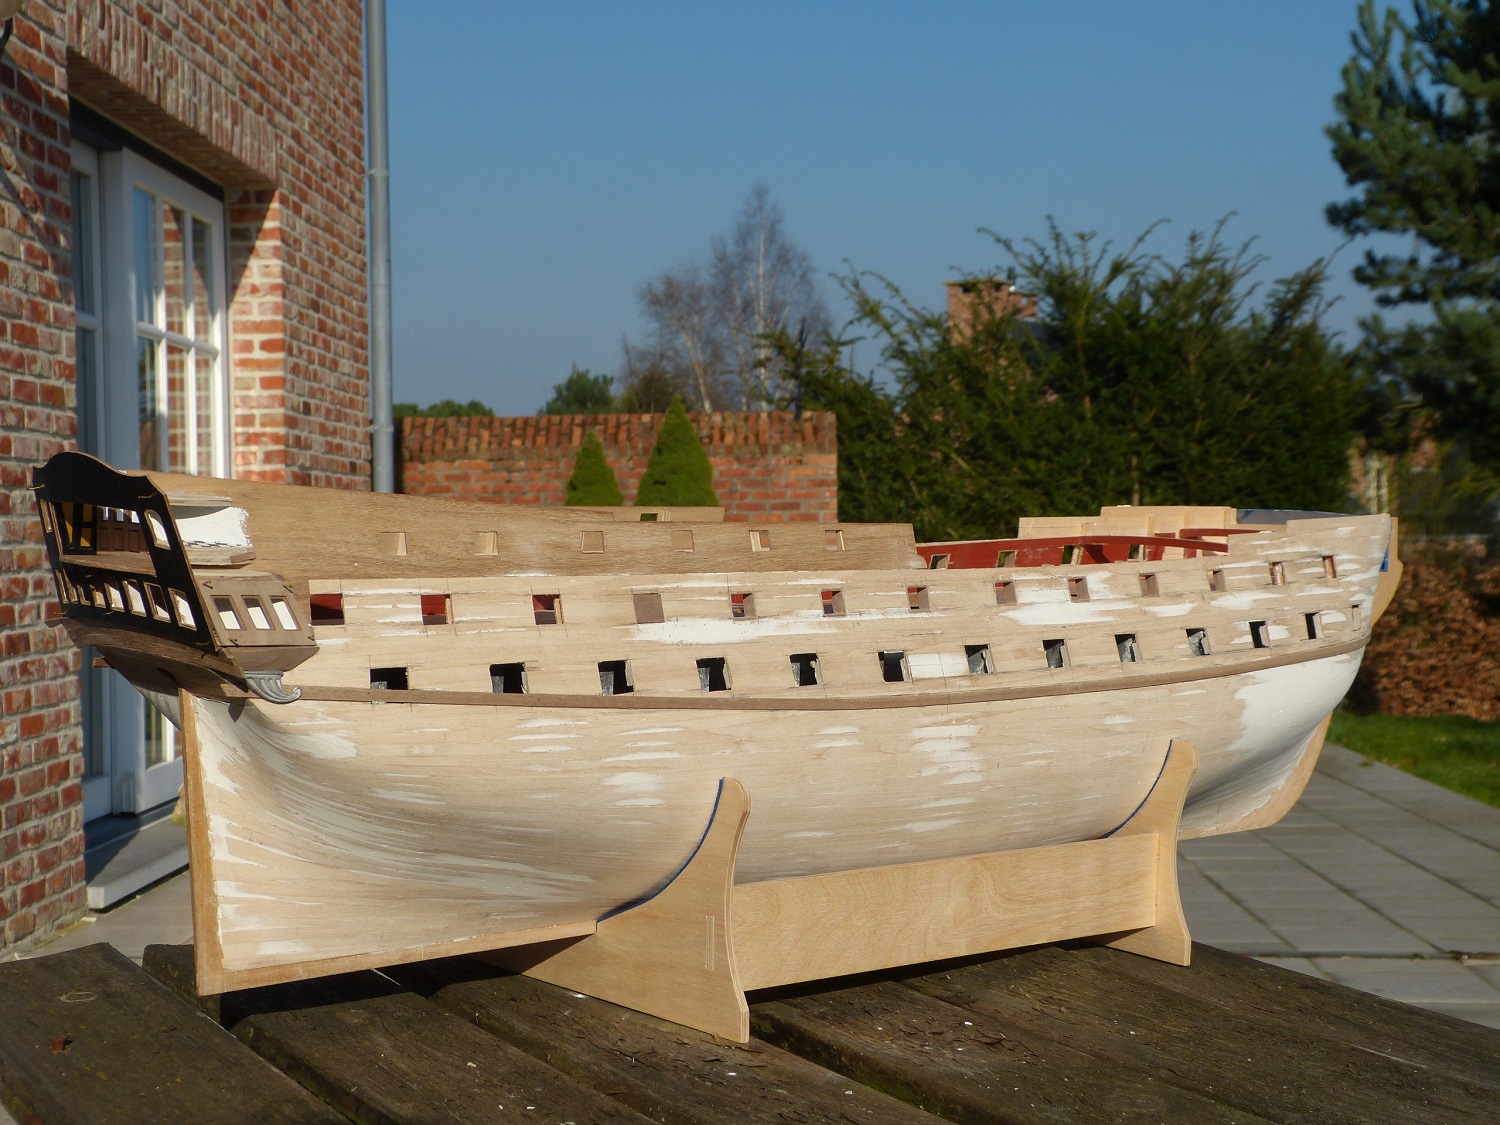
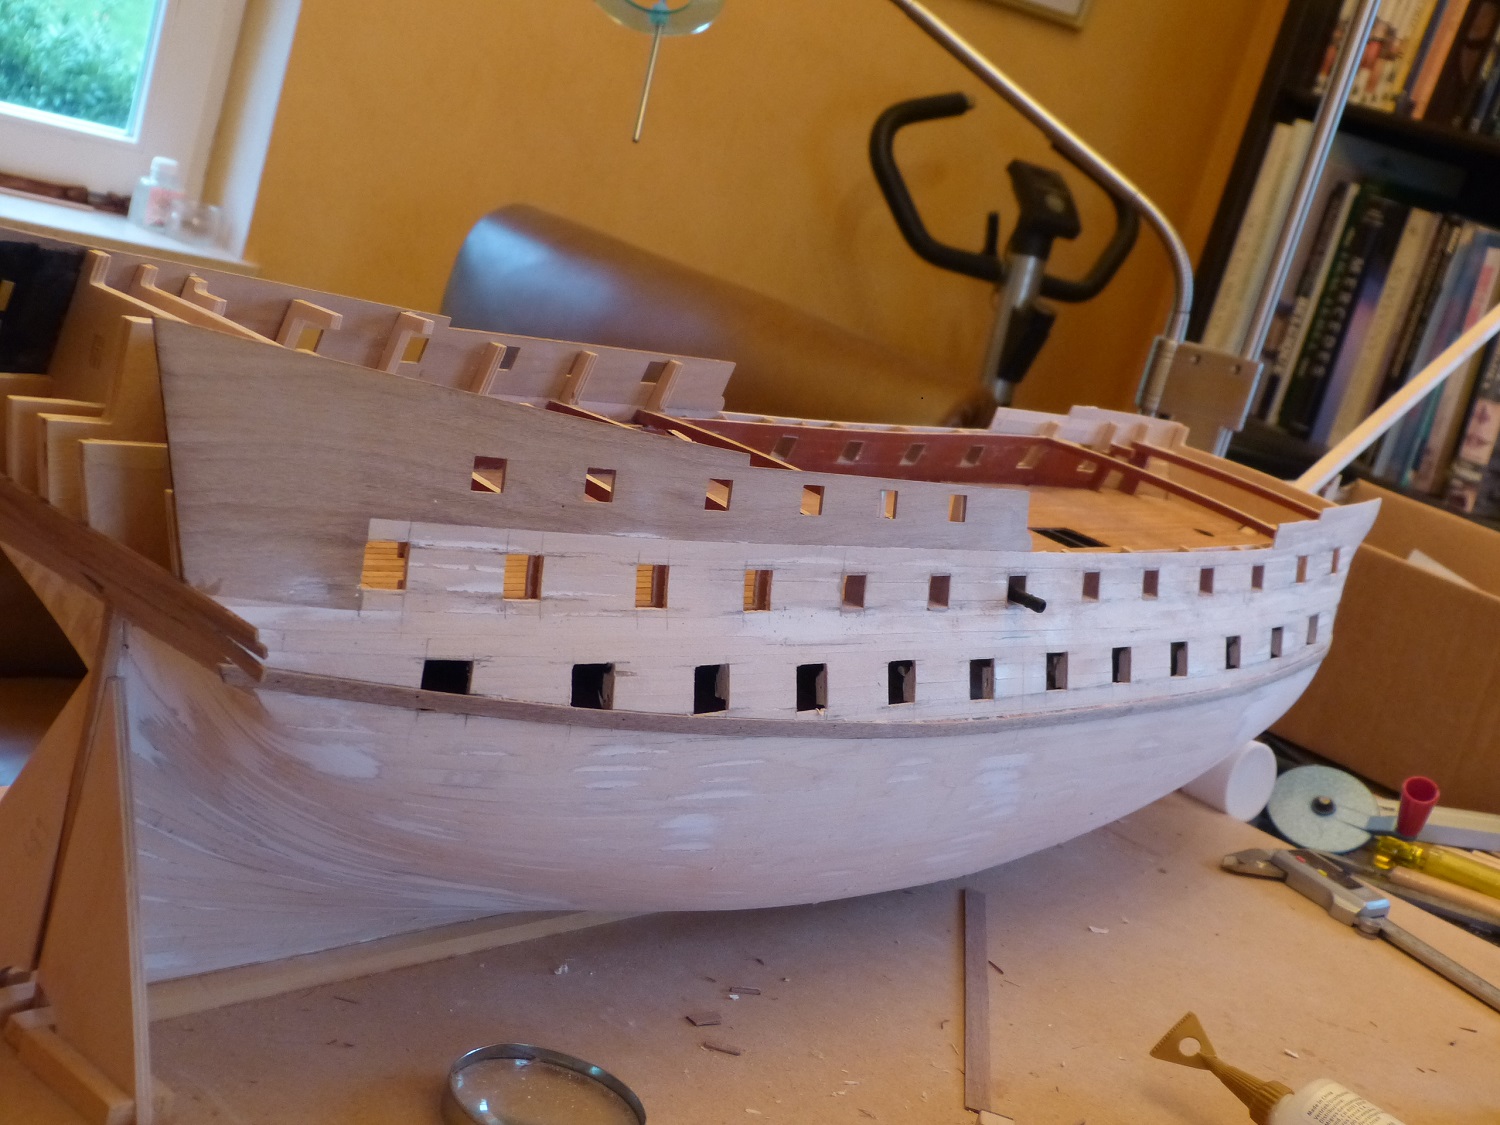
Finally, some progress. I finished the lining of the gunports without lids of the starboard side. I am now ready to start a new phase in the construction of my Aggie. Fist picture: the finished side. Second picture: pieces are ready to start with the quarter galleries. About the front fascia, I completely sanded it again and painted white. My first attempt is for today. But, it's the first time in my live that I am using an aerograph and I am a little bit anxious about the result... Pierre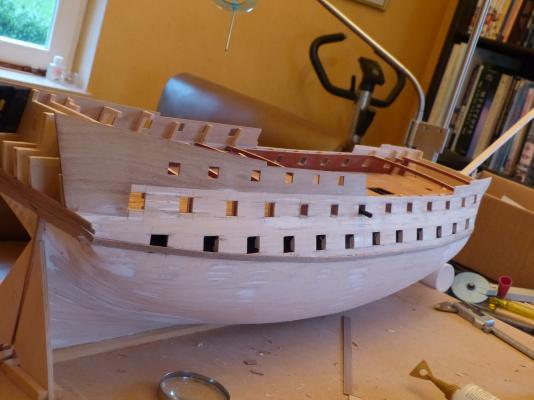

-
Mobbsie, great and tremendous progress as usual.... If you continue like that your Aggie will be sailing for March! Some pictures (and plans?) of your serving machine should be very useful for a lot of friends! (and probably for me too, but in a couple of years). Pierre
- 1,279 replies
-
- 3
-
-
- agamemnon
- caldercraft
- (and 1 more)
-
HMS AGAMEMNON by PMG - Caldercraft
PMG replied to PMG's topic in - Kit build logs for subjects built from 1751 - 1800
Hi George, Thanks for the comment. I sanded the front fascia and I shall do a new attempt using an aerograph. The Caldercraft french blue will so be a little bit diluted and, may be, not so dark. Presently, I am finishing the lining of the gunports of the starboard siide. I hope it will be done for the end of this week. Pierre -
Hi Mobbsie, I am really glad to see that you stay here with your friends and the Aggie community. Your progress is, once again, tremendous. Did you varnish or paint the masts? Thanks. Pierre
- 1,279 replies
-
- 1
-
-
- agamemnon
- caldercraft
- (and 1 more)
-
HMS AGAMEMNON by PMG - Caldercraft
PMG replied to PMG's topic in - Kit build logs for subjects built from 1751 - 1800
Thank you ,Christian, for your appreciation. Coming from you it's highly appreciated. In fact, I took a very very long time to cut and adjust the gunports. I constantly worked with a calliper square and special callipers I made. I assume that finally the size (and also the position) of my gunports are right with a precision of 0,1 or 0,2mm (it means around 1 cm on the actual ship). I am now working on the starboard and hope to have it done ... for Christmas. You are right about the last events, but the loss of one of our friends is always ...a loss. Pierre -
HMS AGAMEMNON by PMG - Caldercraft
PMG replied to PMG's topic in - Kit build logs for subjects built from 1751 - 1800
Finally back after a long absence. I could continue the piercing of the inner wall and also lined the gunports (without sills). The port side is now completely finished and ready for receiving the second planking. I also added to all the other ports a liile piece of balsa that can be used as support of the lining in the future. I also made a new attempt in painting the front fascia. I mixed a little bit of white to the Caldercraft french blue. The final colour seems to me better (however the photography with flash doesn't give the right colour. It's actually much darker), but the result is horrible because the paint doesn't mix easily (they dry too quickly). I have to redo it and I think I shall go back to the Caldercraft (dark) french blue. I don't know what is exactly happening, but I feel that today is a sad day (for all Aggie builders and for MSW) as I noticed that Mobbsie closed his log. Pierre
-
Very very nice your boats! Congratulations, Mobbsie, Pierre
- 1,279 replies
-
- 1
-
-
- agamemnon
- caldercraft
- (and 1 more)
-
HMS AGAMEMNON by PMG - Caldercraft
PMG replied to PMG's topic in - Kit build logs for subjects built from 1751 - 1800
Thank you George, Effectivelly the front fascia appears darker than on the picture. On another side, yours seems to me a little bit too clear. But, if you look to the Anatomy of the ship Bellona, it's not dark at all...and yours looks right. I am now for a few weeks in the South, and there is no question to work on my Aggie. I have a little bit time to think about. I applied already the second layer and there is no change in the effect. I am now thinking to a third layer diluted with a bit of white. Pierre -
HMS AGAMEMNON by PMG - Caldercraft
PMG replied to PMG's topic in - Kit build logs for subjects built from 1751 - 1800
Thank you Christian and Mobbsie for your kind words and your good advises. I sanded lightly the piece and applied a second layer. It gave me already a better impression. May be that the first layer appeared darker because the walnut bottom is dark. By daylight it appears darker than on the photography (but it was not daylight, but artificial light...) Some yellow lines will come and change the severe aspect. I think that I shallcontinue so with the colours supplied by Caldercraft. After all, I assume they (generally) know what they do. Thanks anyway for the discussion. Pierre