HOLIDAY DONATION DRIVE - SUPPORT MSW - DO YOUR PART TO KEEP THIS GREAT FORUM GOING! (Only 68 donations so far out of 49,000 members - Can we at least get 100? C'mon guys!)
×


fletch944t
-
Posts
143 -
Joined
-
Last visited
Content Type
Profiles
Forums
Gallery
Events
Everything posted by fletch944t
-
Blackjack. I promise you won't regret building the Revell model. I built that model back in the late 90's and it is a very nice model. The ONLY reason that I don't still have it is that it got destroyed during a move (to the point that it wasn't repairable).
-
BTW GLakie, I go by either Clark or Fletch. Although most of my son's friends refer to me as Fletch's Dad.
-
Thanks Bill. I do have the Navy general plans. In fact, I was studying them last night checking out the gun deck hatch locations in relation to the spar deck hatches. Having those plans makes it much easier. Honestly, I don't see how you could attempt to this without them. When I started thinking about the long guns, I realized that even if MS considered the possibility that someone would model the gun deck (I doubt they did), I'm sure they used the height of the carriages in the MS long gun kit. Since I'm using Chuck Passaro's gun kits, it would only be a lucky coincidence if they were the same height. GLakie, the extent to which I'll expose the gun deck will be limited to open hatches here and there on the spar deck, open gun ports, and open doors from the Captain's Quarters to the forward areas of the gun deck. In doing so, I hope to limit the extent of gun deck modeling. I plan to model all of the major components but, leave out some of the very small details. I won't know for sure until I can tell exactly what's visible from outside.
-
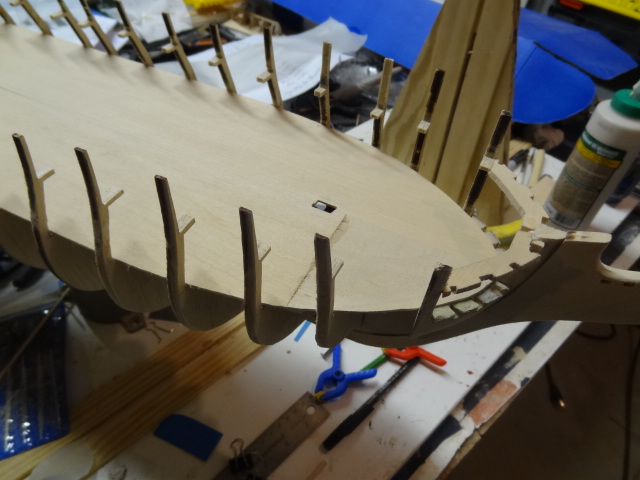
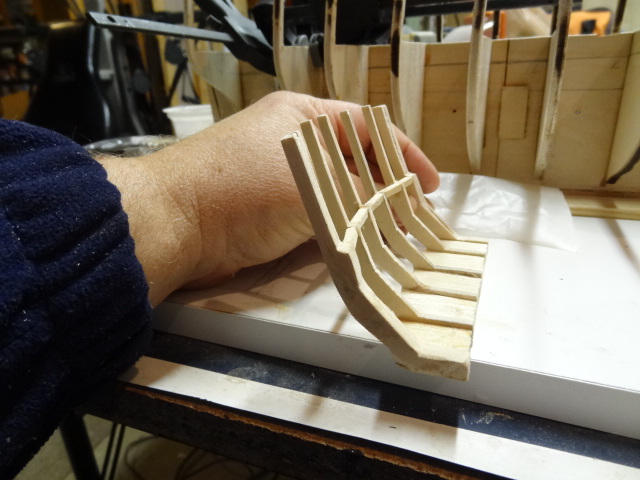
Work on the model has been sporadic over the last week. Things have been hectic since going back to work after the holidays. But, I was able to accomplish a great deal on the model during that time so, it was worth it. So, since I last posted, I went ahead and attached the stern filler blocks. I still have some shaping to do there but, I wanted to work on something a little different. I cut and shaped the bow filler blocks and attached them. I also cut the stem framing and have it ready to attach. I realized before cutting them that because the bow filler blocks are 1/8" shorter than what the plans call for (gun deck planking), the stem framing would have to be 1/8" longer. I also realized that the locations shown on the plans for the gun deck dummy ports may or may not work for fully modeling the gun deck. So, I'm going to have to develop the gun deck planking and finish at least one of the 24 lb. long guns to determine the exact height of the gun deck ports. That being said, I went ahead and developed a pattern (more or less) for the two halves of the gun deck subflooring. I had to piece together some 1/16" thick pieces of basswood sheet to get a piece long enough for the gun deck (26-3/4"). I then drew the pattern onto one of the pieces and cut it using the band saw. However, when I fit the first piece, I immediately realized that my measurement of the width at the "A" frame must have been off. So, I cut a new piece of the appropriate shape, cut the front of the original piece off and attached the new front piece. I then used this finished piece as a pattern for the other half of the subfloor. The following pictures show the subflooring lying on the gun deck bulkhead supports with the cutouts for the masts. They actually look much better when you press the down flat against the bulkheads. The next task will be to determine the locations of the cutouts for the gun deck hatches.

-
Thanks Russ. That's precisely what I'm worried about - not taking off near enough material. I know it'll be much easier to take the material off now with the blocks off the boat than it will be once they're installed. As I've shaped the blocks I've tried to visualize the hull planking flowing over the last bulkhead, on to the filler block, and aft to the stern. Just doing that has caused me to remove more material than I would have otherwise. But, I still question whether I've taken off enough. I've been going back through build logs but, once the blocks are actually on the boat, it's difficult to discern the size and shape of the blocks. Fletch
-
Well. Some of it immediately makes sense. I'm going to have to absorb the rest and think about it a bit for it to make complete sense to me. Fletch
-
I probably have a little more work to do on the stern filler blocks but, there pretty close here.
-
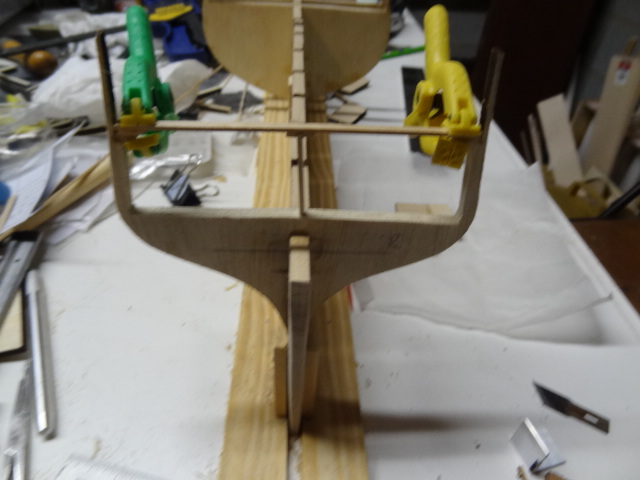
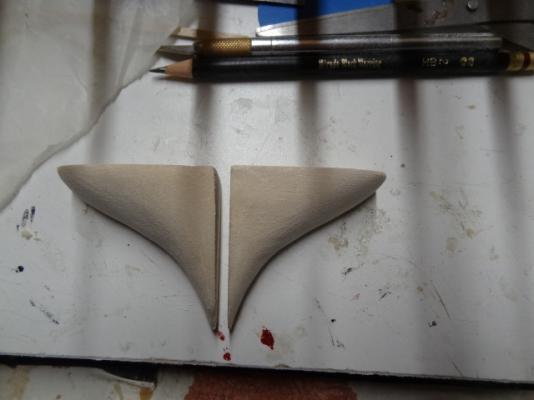
Picture of the newly completed six window stern frame assembly and the assembly in position on the stern.
-
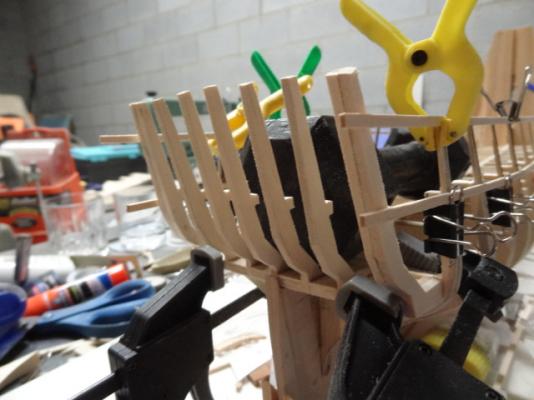
As I mentioned previously, I attached some temporary battens to the bulkheads to ensure I got the orientation of the stern framing correct. Here's a picture of that in case anyone's interested.
-
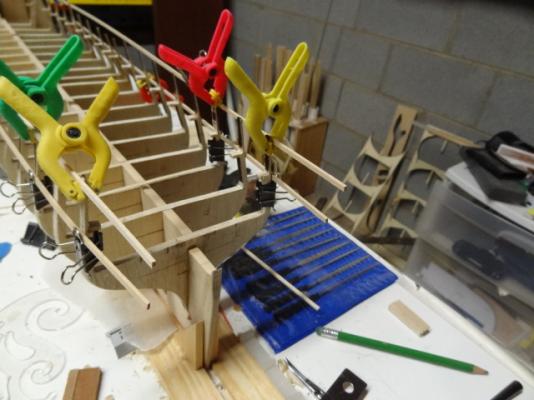
No problem Captain Steve. What really bothered me the most from the very beginning is that the Isaac Hull model clearly shows a six window stern configuration. Regardless of how every one else has modeled it or painted it over the years, for major configuration items of that era, I still think the Hull model is probably the most reliable. Even if I had stuck with the five window configuration, I was probably going to redo the stern framing anyway. Reconstructing the assembly with an additional frame would have been simple enough. However, being the extremely self-critical type, I knew I could fabricate frames that were much more precise than the ones I had come up with for the five window configuration. That being said, I left the five window stern assembly as is and cut all new frames for the six window frame assembly. And, I must admit I'm much happier with the new frames. I've also attached temporary battens to the aft-most bulkheads that extend beyond where the stern will end. Hopefully, this will allow me to get the alignment of the outer frames port and starboard such that the hull will follow a nice smooth line all the way to the stern.
-
Yes Patrick. I've already started working on the stern filler blocks. However, I'm now seriously considering going back and redoing the stern framing for a six window configuration. Fletch
-
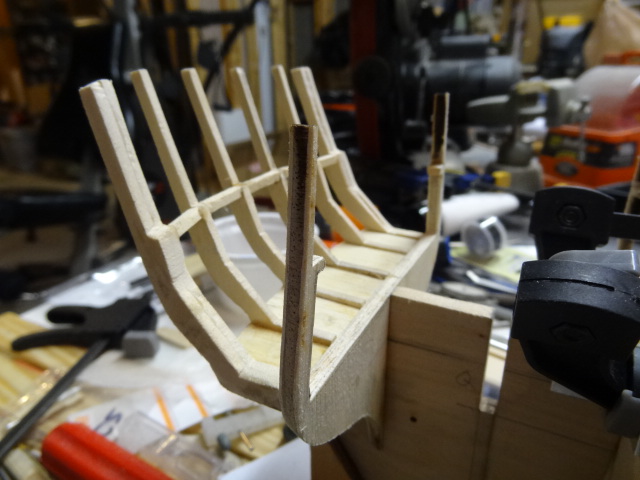
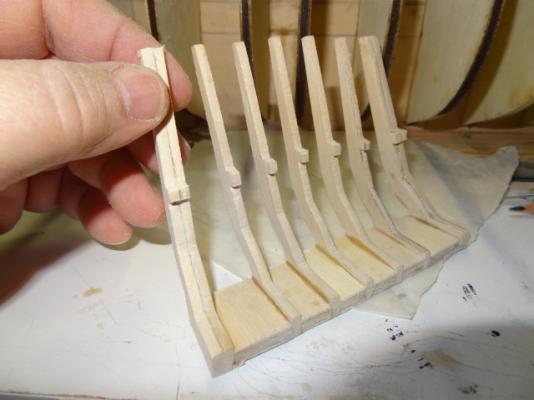
Today I finished construction of the stern frame assembly. It won't win any beauty contests but, I figure it's all going to be covered by planking anyway. Here's a picture of the assembly after completion (still have some cleanup to do) and a couple of the frame assembly temporarily installed.


-
Good point Bill. When I told Henry I was planning on using it to construct the keel, he suggested the frame timber as opposed to the spar material. Fletch
-
Bill (robnbill) suggested I contact popeye2sea (Henry) here on MSW. Henry is a member of the 1812 Marines who dress in period uniforms and conduct tours on the Constitution. They are a private organization and one of the things the do is recover wood from restorations of the Constitution. The wood currently available through the museum is spar material. while it's a good souvenir, it's not suitable for modeling anything. I contacted Henry (a very nice guy btw), told him what I was going to use the wood for, and he cut me some pieces from some frame timbers they had recovered. Plus, being a huge fan of the Constitution, I made a nice donation to the 1812 Marines via PayPal through their website (www.1812marines.org). Fletch
-
Very nice work Patrick. I kind of wish I had doubled up on the interior frames like you did. However, I only doubled up on the outer-most frames. We'll see how well it holds up. If it doesn't hold up I may end up having to go back and double up on the interior frames as well. One thing for sure, I don't think you have to worry about your Captain's Quarters holding up to some abuse. Fletch
-
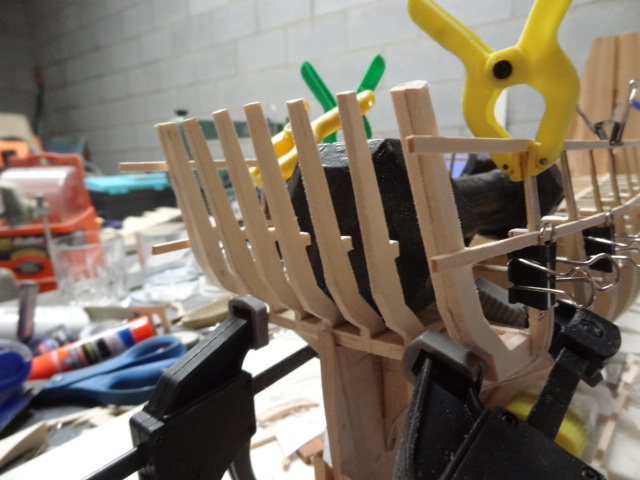
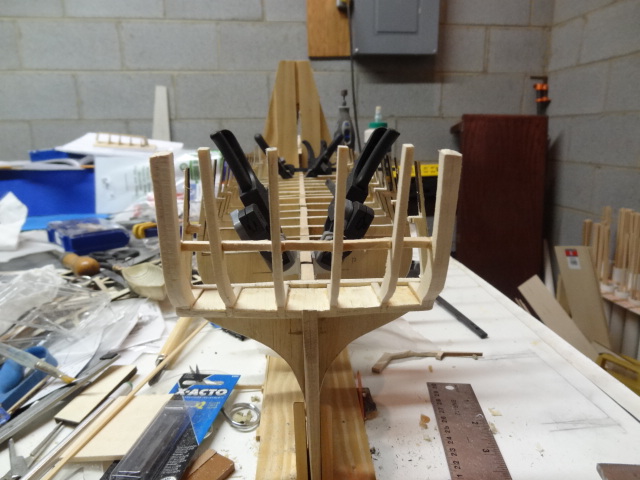
Today, after finishing fabrication of all of the stern frames, I was pondering how to best attach them to "R" bulkhead and keep everything aligned correctly in the process. I also wanted to make sure that the stern framing was very solid. So, I've decided to take a bit of a different approach to attaching the framing. One of the things that both Patrick and I came to understand when we started working on the stern framing is that the bottom of the frames more or less form what would have been the counter. As a matter of fact, when I cut my frames, I shaped the bottom of the frames to approximate the shape of the counter. So, what I've decided to do is to cut individual counters to go between each stern frame. I'll construct the stern framing as a complete assembly off the boat. Once the stern frame assembly is constructed, I'll glue it to the "R" bulkhead, drill holes through the bulkhead, and secured the assembly to the bulkhead with brass rods. I've already started work on the stern frame assembly and it's going well so far. I should have pictures of the completed assembly to post sometime tomorrow. Fletch
-
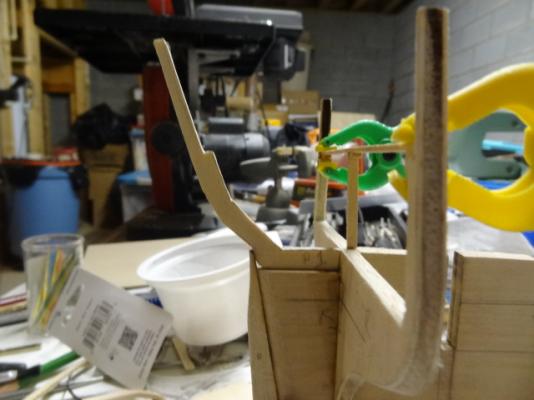
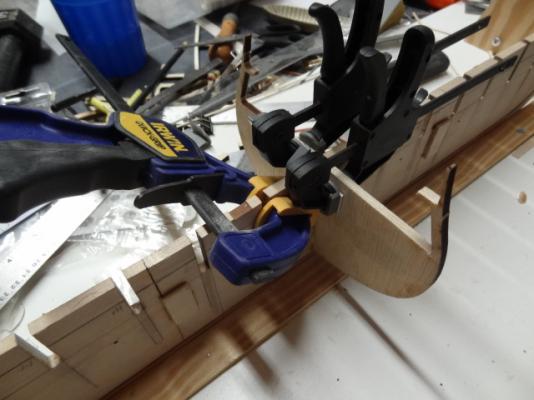
In retrospect, when developing the templates for the stern framing, it would have made it much easier had I left the "R" bulkhead uncut until after I had drawn up the stern framing diagrams. Uncut, the "R" bulkhead would have given me a point of reference for the level of the spar deck and I would then be able to use the stern frames provided in the kit to develop the new frames. With the "R" bulkhead cut down to the gun deck level (minus planking thickness), I still needed a spar deck reference point to get the shape and height of the stern framing correct. So, I constructed temporary spar deck framing on the "R" bulkhead to use as a reference point (first picture below). Then I started developing the stern frames using a combination of the stern frame pieces provided in the kit with pieces of wood glued to the bottom and then shaped to get the correct configuration. I then used this as a template (second picture below) for cutting the needed frames. In light of my recent epiphany, I'm now inclined to model a five window stern as opposed to the six or eight window stern. That being said, the frame show in the second picture wouldn't be centered on the false keel as it is in the picture.
-
Well Patrick. It's funny you should ask about stern window configuration because I had a bit of an epiphany today (not five minutes ago) related to this. From the outset, I was convinced that I would use at least a six window configuration (possibly the 8 window configuration you're considering). Most likely though, I would lean toward the six window considering that is how the Hull model appears. So, as I was working on development of the stern framing today, a light went on. Most likely the number and placement of the stern windows would have been dictated by the stern framing (i.e. windows between each of the stern frames). That being said, any even numbered window pattern would require a stern frame dead center on the stern. Since this would interfere with both the rudder head and the tiller (rudder head extends up into the Captain's quarters), from a strictly engineering standpoint, it would be impossible to have a stern frame dead center. The only way around this would have been to put stern frames on either side of dead center and those two frames would have cross-framing to support the center two windows. Consequently, and again from a strictly engineering standpoint, a five window pattern makes the most sense. So, to answer your question, I have no idea what I'm going to do - yet. Fletch
-
Captain Steve. Have not gotten to the point of deciding how I'm going to handle the work on the stem yet. I've really been too engrossed in figuring out how I'm going to make the stern framing work out. And yes, I do plan to use internal lighting on the gun deck. I starting looking at options for that several weeks ago. However, I think I'm going to have to order several different sizes of LED bulbs and install them temporarily on the gun deck to determine the actual type, number, and placement I need. Fletch
-
Pretty phenomenal Bill. Congratulations on a wonderful build. The only decision left is what your next build is going to be. Fletch
- 335 replies
-
- 2
-

-
- Constitution
- Mamoli
- (and 3 more)
-
Thanks Patrick. My next step will be to begin work on the stern framing similar to what you've done. I'll need to get that in place before I can work on the base for planking the gun deck. Off all the things necessary to model the gun deck, to me getting the stern framing correct is going to be the most daunting. I suspect that mine will look very similar to what you've done. Fletch
-
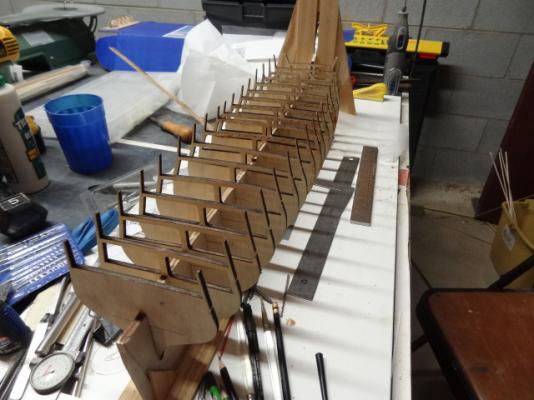
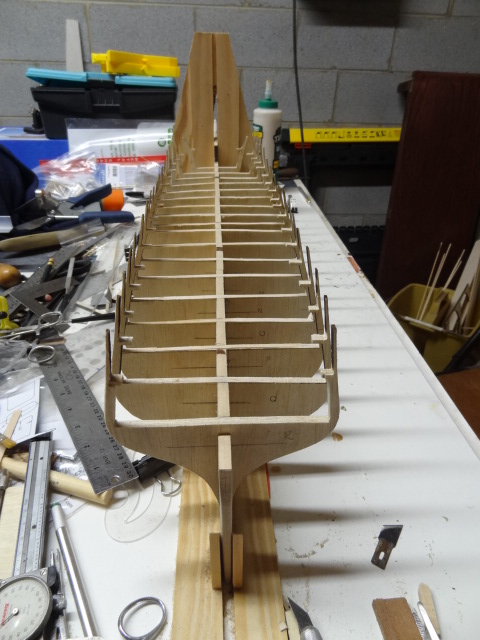
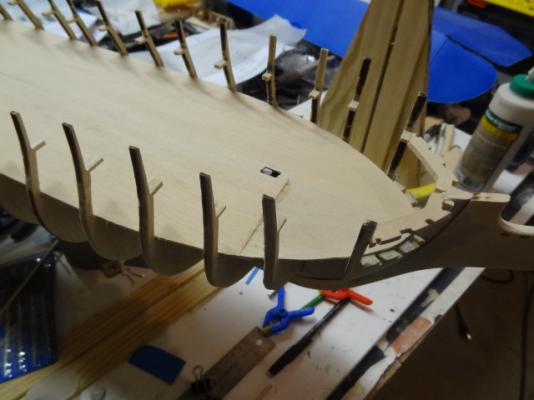
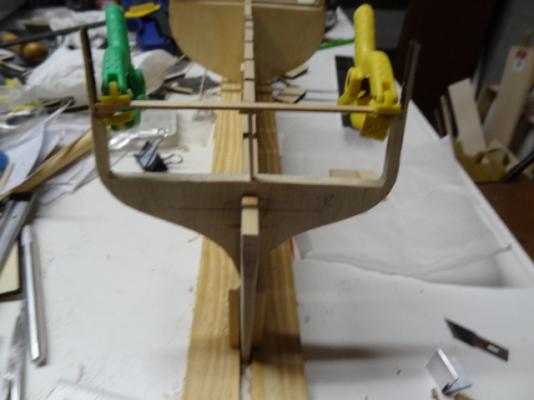
Yesterday and today I worked on the first steps toward modeling the gun deck. I cut the spar deck framing away from the bulkheads, faired the bulkheads, and test fit them. As previously discussed, this required lowering the height of the false keel and the bottom of the gun deck opening in bulkheads to account for the thickness of the gun deck planking. Since I plan to put down a 1/16" sheet of basswood and then 1/16" planking, this required lowering everything by 1/8" total. So, I marked a line 1/8" down from the top of the false keel along its entire length and then cut it. I first removed the spar deck framing from the bulkheads. So, the next step was to lower the bottom of the gun deck cutout in the bulkheads by 1/8". If the opening in the bulkheads consistent from port to starboard, you could simply mark a line 1/8" down from the bottom of the opening for your cut. However, this is NOT the case. You have to determine the cuts in the bulkhead measuring out from the centerline of the bulkhead to get the correct shape. I won't go into a drawn out discussion of that here. I can provide it to anyone who needs it. Here are some pictures of the final bulkheads temporarily installed and the first bulkhead in its final position (fingers crossed and knocking on wood).


-
Thanks for all of the info on the ship's stove guys. It'll really shorten the fabrication time since I won't have all the time invested in researching dimensions. I started laying out fairing lines on the bulkheads today. Hopefully by the end of the day tomorrow, I'll have all of the bulkheads marked, faired, the spar deck framing removed, and the bulkheads and false keel cut down to accept gun deck planking. We'll see how it goes. Fletch
-
Thanks Bill, One of things I've been scratching my head over is what I was going to do about the stove. That will really help to move things along. Fletch
-
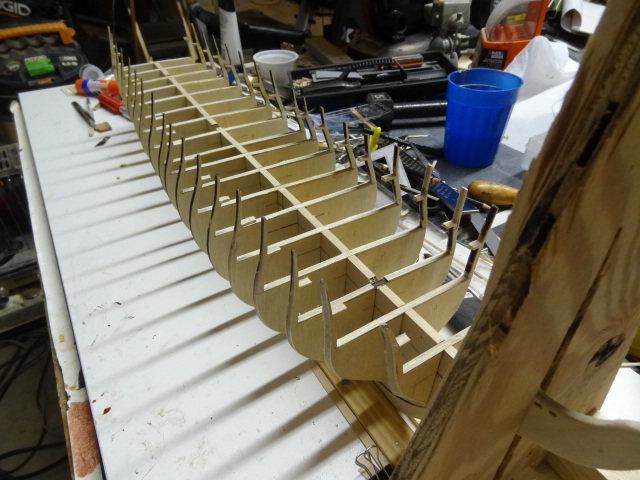
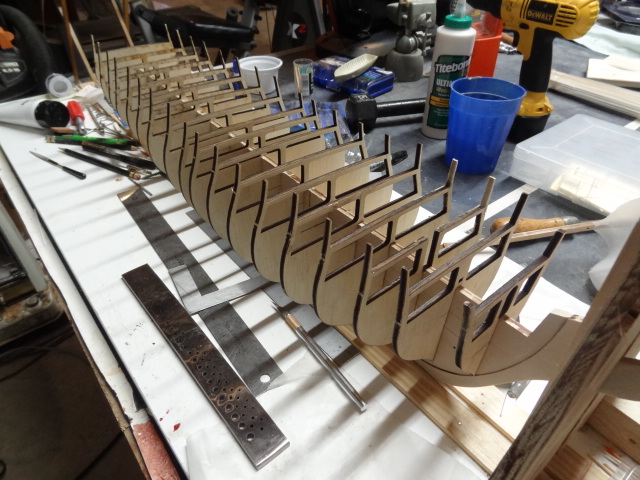
Fitted up all of the bulkheads. Several of the slots on the false keel required a lot of work to get the bulkheads to slide in. I actually broke the framing for the spar deck at the top of bulkhead "E" trying to get it to slide in. I glued it back in place before proceeding just so I could make sure everything lined up okay. The lesson I learned here is that if you encounter an appreciable amount of resistance, stop and sand/file the bulkhead slot a little more. The good news is that, for me, I'm going to cut the spar deck framing off anyway since I'm going to model the gun deck. Normally, in addition to cutting away the spar deck framing you'd cut down the bulkheads and false keel by 1/16" to account for the thickness of the gun deck planking. However, I plan to put down two sections of 1/16" sheet prior to planking the gun deck. So, I'll be cutting the bulkheads and false keel down 1/8". Also, I may attempt to use the fairing lines from the plans to get the fairing on the bulkheads close (even though I already know the shape of the bulkheads on the plans is inaccurate). Then once I get the bulkheads back on the false keel, I'll adjust the fairing as necessary.