fletch944t
-
Posts
143 -
Joined
-
Last visited
Content Type
Profiles
Forums
Gallery
Events
Everything posted by fletch944t
-
Thanks Mark. Very interesting. Didn't consider using something so thin. Fletch
-
I did a search though the forums and didn't find any builds in progress where someone had attempted this. So, here's the question. Has anyone double planked the hull on a Model Shipways Constitution build? I ask because I'd like to attempt it (for several reasons I won't bore you with) and I thought I'd need to reduce the size of the bulkheads by 1/16" to account for the extra layer of planking. However the tops of the bulkheads are already so thin, I don't know if this is possible. So, if you've done this, how did you handle this? Or if you know someone who has can you point me in their direction? Thanks, Fletch
-
I know what you mean Mundie. Just getting back into wooden ship modeling, I'm finding that, for me, there are a number of skills that are not yet back up to par or some that I simply never possessed to begin with. For me, soldering brass is a prime example. However, I'm also finding that with a little patience and practice (sometimes a lot of practice) the skills will come. Unfortunately, sometimes it means we must waste a lot of time and resources to re-do stuff. For me, it has meant re-doing more stuff than I care to because "good" simply isn't good enough (I'm on my second attempt at doing the frames in a small boat). Just be patient, the skills will come. Fletch
-
Mundie. Take a look at pages 14-16 of Cookster's build log. Personally, I really like the way he constructed the hatch coamings. I plan to emulate what he did. Fletch
-
USS Constitution 1812 Era Topics - Small Boats
fletch944t replied to fletch944t's topic in Nautical/Naval History
Yes Force9. That and the fact that the types of boats carried by Constitution changed frequently (probably every time she changed Captains). -
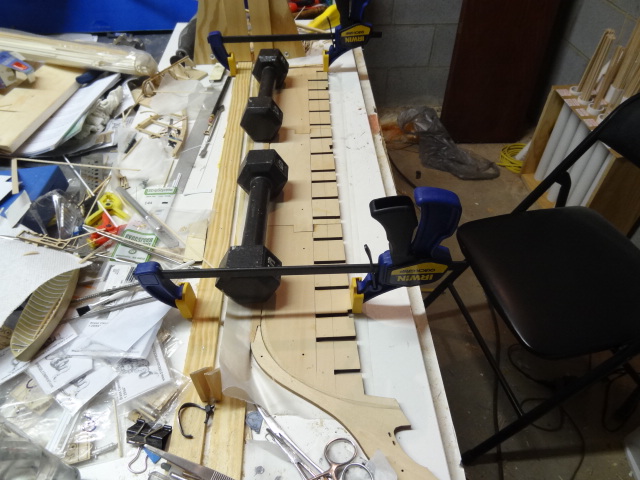
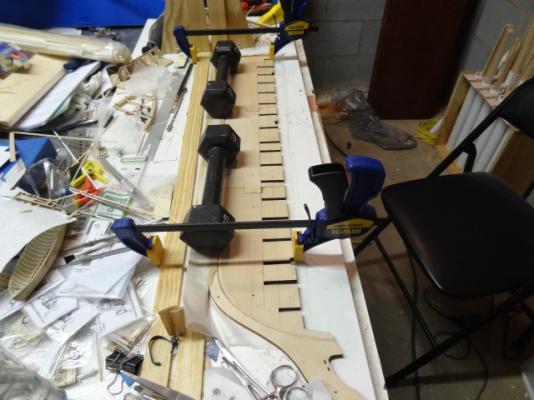
In the first picture the new keel is on top an the keel built from the kit is on bottom. In the second picture, I've glued the new keel in place and have the entire assembly clamped to my build jig.
-
Can i live without a BYRNES TABLE SAW
fletch944t replied to shihawk's topic in Modeling tools and Workshop Equipment
Thanks for that Bob. This thread really has peaked my interest in the Japanese saws. It would appear that for quality saws you're looking at the $75-125 range (depending on the type of saw). Is that correct? Or am I looking in the wrong places? When I was in the local hardware store the other day, I noticed that Irwin is marketing a Ryoba and Dozuki saw that are inexpensive (relatively speaking). I'm wondering if they're worth spending the money on just to give them a try. However, Irwin doesn't call them by their actual name. In fact, they don't even refer to them as Asian or Japanese saws. From a lot of the comments I'm seeing on MSW, it would appear that there are more than a few luthiers who are also ship models. I find that very interesting although I'm not really surprised. Seems like a natural progression. Fletch -
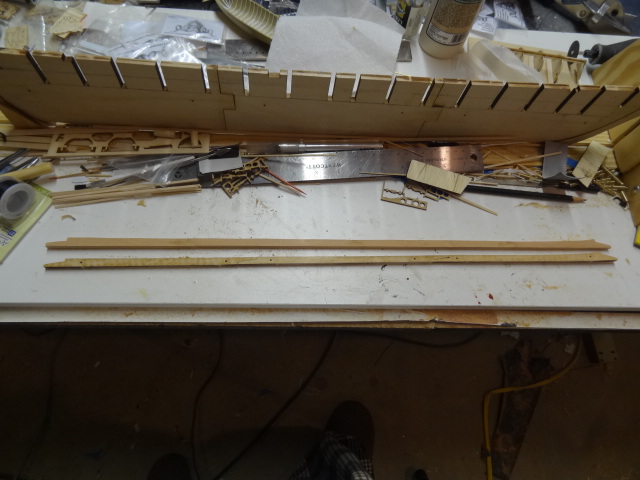
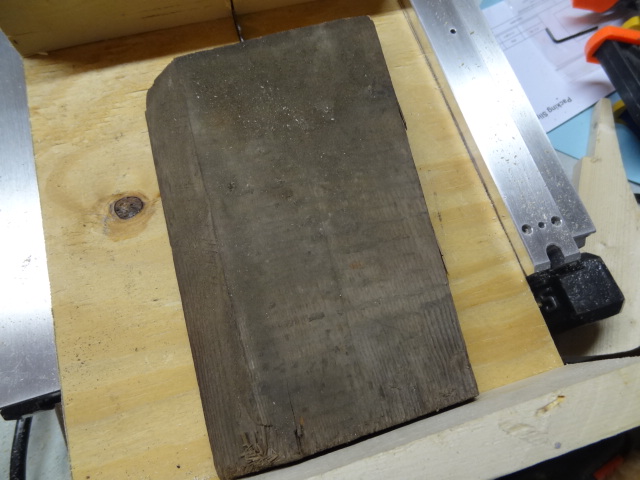
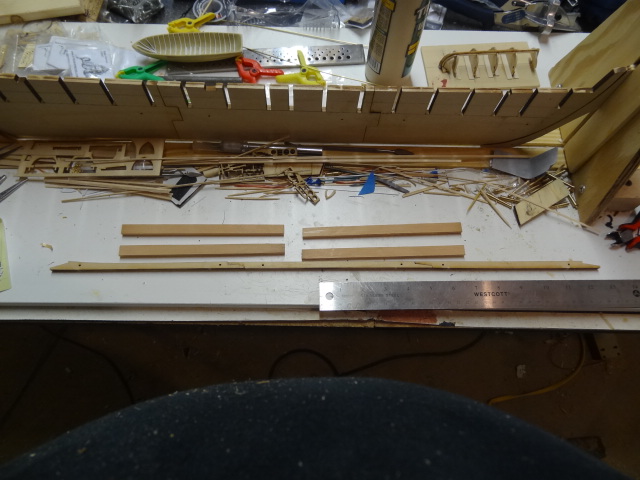
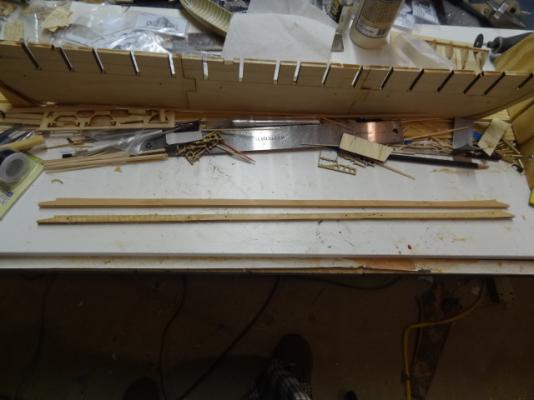
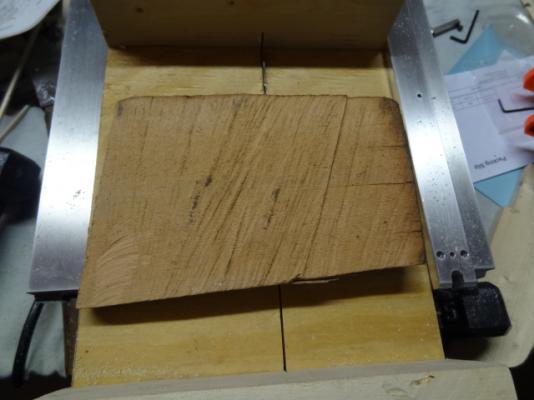
Over the last couple of weeks, I've been working mostly on small boats and cannons. I'll be posting more on those later. After receiving some wood from the Constitution (thanks Henry), I started cutting and dimensioning pieces to construct a keel for my build. The wood from the Constitution was cut from frame timbers and oddly shaped so, it required a lot of work to get to the correct dimensions. Also, due to the length of the wood, it will require doing it in four pieces instead of three (as with the kit). But, instead of sandwiching 1/8" piece together to come up with the 1/4" thick keel, I was able to make each of the pieces 1/4" thick. I went ahead and put together the keel pieces provided in the kit and will use them as a pattern for final sizing of the new keel. In the pictures below you'll see a couple of pictures of the piece of wood I started with and the four pieces I've put together for the new keel along with the keel provided in the kit. My next post will be of the completed keel. Fletch


-
Can i live without a BYRNES TABLE SAW
fletch944t replied to shihawk's topic in Modeling tools and Workshop Equipment
Well. Christmas arrived early. My Byrnes table saw was delivered yesterday evening. However, did not get to unbox and set it up till late this afternoon. I must admit that I was a little apprehensive about spending $500+ on a small table saw. Especially, when I can get a good 10" table saw for slightly more (and eventually will). However, after using the Byrnes saw for the very first time, I'm a believer. I used it to start cutting parts for a table saw cutting sled and it is nothing short of fantastic. I now find myself thinking back over all the projects I've done over the years that I wish I'd had the Byrnes saw (projects before I got back into ship modeling). Also, my wood from the Constitution arrived yesterday. So, after the sled is completed, the next project the Byrnes saw will see is cutting and dimensioning wood from the Constitution to construct the keel for my build. I'm actually going to need the sled to dimension the wood from the Constitution. Otherwise, I'd already be working on the keel. Fletch- 367 replies
-
- 12
-

-
Yeah, you're definitely going to need to go with a system supplied by a transformer. In retrospect, you may want to stick with lights just around the top of the frame shining down on the ship. If you run them up the sides of the frames as well, they might be shining in peoples eyes when they're trying to look at the model. I know what you mean about light color. One of the things I've noticed is that white LED lights seem to be harder to find than colored lights. And, I couldn't agree more about the "color" of the white lights. Typically, the ones I've found come in "bright white" and "warm white". The bright white are the ones that have the bluish tint to them and I don't think would be appropriate for case lighting or lighting within the ship. The warm white has more of a yellowish or golden tint to them. Personally, the warm white is probably what I'll use for the case and for illuminating the gun deck. I'll definitely be interested to see how other with more experience respond to what they've used and what works best. Fletch
- 335 replies
-
- 1
-
-
- Constitution
- Mamoli
- (and 3 more)
-
Hey Bill. Things are progressing nicely. Not surprised that your starting to consider cases. I'm a long way away from that point but, I have started looking at LED lighting simply because I'm going to model as much of the gun deck as possible and I'm thinking about lighting the gun deck. Anyway, I'm not sure how often you intend to use the lighting on the case but, that may determine what type of lighting you choose. Some systems supply the lighting via a transformer other are simply supplied by a battery. If you're going to use the lights a lot, I would look at a transformer supplied system. Otherwise, consider one supplied by a battery. Some LED lights will allow you to supply up to 50 LEDs with a 9V battery. It would be a lot of work but, if you would somehow make a hidden channel up the entire length of the frame of the case, you could put lights up the length of each of the corner frames to illuminate the ship from all angles. Just my two cents. Fletch
- 335 replies
-
- 1
-
-
- Constitution
- Mamoli
- (and 3 more)
-
Can i live without a BYRNES TABLE SAW
fletch944t replied to shihawk's topic in Modeling tools and Workshop Equipment
DocBlake, what was the turn around time on your order? I ordered a table saw from Jim a couple of weeks ago and I'm hoping it arrives before Christmas. My wife and I don't normally give each other Christmas presents. We normally take a trip immediately after Christmas and shop for each other during the trip. That way we're ensured of getting exactly what we want. The other day my wife became upset when she found out I had bought her something to go under the tree this year. She scolded me and said she didn't have anything for me for Christmas. I told her "Yes you do. You just haven't seen it yet." Fletch -
Can i live without a BYRNES TABLE SAW
fletch944t replied to shihawk's topic in Modeling tools and Workshop Equipment
I can't help but wonder if Byrnes has other machines in the works.... -
Can i live without a BYRNES TABLE SAW
fletch944t replied to shihawk's topic in Modeling tools and Workshop Equipment
As far as I'm concerned, no need to apologize Marc. I have only been a member of MSW for a very short period of time. But, I've learned as much or more from this thread as I have from any thread since I've been a member. The great thing is, a lot of it will enhance my woodworking skills outside of ship modeling. Ironically, one of the reasons it has been so informative is the fact that it has NOT stuck strictly to the original topic. I can't speak for the OP but, as long as I'm learning something new, it doesn't bother me to stray from the topic. -
It's true that you learn something new every day. I never knew that there was a correct way for the Union Jack to be displayed. And, quite honestly, if John hadn't posted the pictures side-by-side, I don't know that I would have ever been able to see it. Thanks for that John. Fletch
- 900 replies
-
- 1
-
-
- victory
- caldercraft
- (and 1 more)
-
Can i live without a BYRNES TABLE SAW
fletch944t replied to shihawk's topic in Modeling tools and Workshop Equipment
To answer your question Richard, the planer is more for dimensioning wood. The thickness sander is more for finishing. They can, as you stated, perform similar functions (to a point). For example, you would typically use a planer to square up a piece of wood and you needed to remove a lot of material to do so. And, by a lot I mean more than 1-2 mm. You could perform the same function with a thickness sander but, you'd have to make a lot of passes and potentially waste a perfectly good piece of sandpaper. As I mentioned the thickness sander is primarily used for finishing to get a smooth consistent finish across the entire surface of the wood. Where you would want to use the thickness sander for dimensioning wood is if you're milling your own wood strips for a model and you're trying to square up extremely thin pieces of wood (where you don't want to remove a lot of wood). Hope this helps. -
Can i live without a BYRNES TABLE SAW
fletch944t replied to shihawk's topic in Modeling tools and Workshop Equipment
Thanks for the post Roman. Very interesting reading. I'm going to give that a try. Fletch -
Well, I've gone back and started installing the styrene frame members using gel CA instead of the regular thin CA glue. To this point it is working infinitely better. The small boat on which I am working is approximately 5-3/16" long. One of the other problems I was having was consistently getting the distance between the frame right. I was originally using a short piece of 3/16" wide wood placed in the bottom of the boat as a spacer while installing the next frame. However, with the thin CA, I frequently ended up with the spacer glued to the bottom of the boat. I stumbled across a solution (at least for me) while going though my parts bins on another project the other day. I happened across some lead tape strips which I think came with a ceiling fan for balancing the blades. I cut one of the lead tape strips to 3/16" wide, left the backing material on and use it as a spacer for installing the frames. Because it conforms to the shape of the inside of the boat, it can be used to space the frame along the entire inside of the hull. Also, can be used to easily used as a measuring device to determine the length of the styrene strip you need. Since the inside of my boat is going to be painted and not natural finished, I simply conform the tape to the inside of the hull, trace a line on the inside of the hull to mark where the next frame will go, remove the tape and use it to determine the cut length of the styrene, and install the styrene on the marked line. With the gel CA, I use a small piece of scrap wood or a toothpick to put three spots of glue along the mark line - one at each gunwale and one in the bottom of the boat at the centerline. When I install the strip, I make sure it's on the mark line at centerline and then use a small clamp on each side near the bottom of the boat to ensure that the strip is touching the entire inside of the hull and is aligned to the mark line. I then use a triangular tipped carving tool to remove any excess CA before it dries. I'll post some pictures of the progress as it moves further along. However, I must say at this point that I'm warming up to breadboard construction for small boats, Fletch
-
Can i live without a BYRNES TABLE SAW
fletch944t replied to shihawk's topic in Modeling tools and Workshop Equipment
Richard. Personally, I don't think the Byrnes saw is really up to the task of ripping 2" wood, especially if it's extremely hard wood. You might make it work but, I don't think I'd risk damaging a really expensive tool by using it for a purpose that it wasn't really intended. I have a similar problem with space. Have you considered a portable 10" table saw with a rolling stand? They don't take a lot of room to store inside. And, they can be moved outside and set up quickly with minimal effort. That's actually the route I'm considering. Also, don't rule out a circular saw for ripping thicker wood. Since I don't have a full size table saw (yet), I have for many years used a circular saw for all my ripping. In fact, many years ago, I made a very nice solid mahogany bookcase for my dad as a Christmas present and ripped all of the wood for that using only my circular saw. Most folks poo-poo the idea of ripping thicker woods with a circular saw. However, in my experience, most folks won't invest in a variety of blades appropriate for the cutting job or won't take the time to change out to the correct blade. If you already have a circular saw, I recommend investing in a high quality ripping blade and give that a try before you run out and invest in a larger table saw. Bottom line is, if you think you going to be ripping 2" wood on a regular basis, consider a portable table saw with a rolling stand. If you think you're only going to be ripping 2" wood on an infrequent basis, use a circular saw. Fletch -
Thanks guys. I'll give those a try. Bear, I've never seen CA accelerator. Where would I look for that?
-
I wasn't really sure where to ask this question because there doesn't seem to be forum for asking questions regarding general modeling techniques. But, I figured this was probably the most appropriate place to ask this question. As the topic title implies, I'm currently working on modeling the small boats for my build. I'm experimenting with several different types of small boat construction, including POF and breadboard. Anyway, I built a small boat using the breadboard construction technique (which I've come to like a lot better now that I've actually tried it). I decided to use styrene strips to add the frame members to the boat (since it's going to be painted anyway). I started gluing the strips in using CA glue. When I was almost finished gluing all the strips, I hated the way it was looking. There were places where I had obviously gotten a little to much glue on the strips. Consequently, it just didn't look real. And, I didn't think that paint would cover up my errors. So, I've started over. I've removed all of the strips, redid the interior of the boat, and I'm ready to start adding the strips again. So, my question is this - is there a better way to do this? Should I be using something other than CA glue? Would it be easier to control the amount of glue using a gel CA glue? Is there a trick to getting the styrene strips installed in the boat? Or is it simply that I need more practice doing this? Thanks, Fletch
-
I tried sharpening some hobby knife blades using a stone provided in the hobby knife kit. I was NOT happy with the results. Turns out, I had purchased a Work Sharp sharpening tool based on a recommendation from someone who had done product testing on it. Thus far, I've only sharpened kitchen knifes, pocket knives, and scissors and have been very happy with the results. I thought the old lady was going to kill me when I started pulling butter knives out of the drawer (just kidding). Anyway, if you run a pocket knife through the 220 grit belt 3-4 times and then through the 6000 grit belt 3-4 times, you can shave with it. Next, I'll be trying the Work Sharp out on my hobby knives and will report the results. BTW, they have two versions of the Work Sharp. One is about $70, the other is about $130. Don't waste your money on the $130 model. BTW, order bunches of extra belts off eBay if you buy one. Fletch
-
If your kit says that it's an option, then I guess it is. With POB kits that isn't always the case. However, if you were double-planking the hull, scale length planks is always an option regardless of the type of build. And, even with POB kits where the bulkheads are appropriately spaced, double-planking the hull makes scale length planking easier.
-
Let's talk 3D printers.
fletch944t replied to Keith_W's topic in Modeling tools and Workshop Equipment
Hi Pat. I wasn't sure if you had possibly farmed everything out when you first got started and might now be doing your own stuff. Thanks for clearing that up. Based on what you've had them do, I have no doubt that anything I would send their way would be a piece of cake for them. How much re-work have you had them do because something didn't turn out as planned? Fletch -
Let's talk 3D printers.
fletch944t replied to Keith_W's topic in Modeling tools and Workshop Equipment
Pat, just out of curiosity, what 3D printer do you use? Or do you farm everything out to Shapeways? And, by the way, that is a truly amazing model. Beautiful work. Fletch