HOLIDAY DONATION DRIVE - SUPPORT MSW - DO YOUR PART TO KEEP THIS GREAT FORUM GOING! (Only 13 donations so far - C'mon guys!)
×


mattsayers148
-
Posts
685 -
Joined
-
Last visited
Content Type
Profiles
Forums
Gallery
Events
Everything posted by mattsayers148
-
 Awesome pics Cathead! Looks like you had a great trip in some really beautiful places. I seem to remember some farmers who had found another boat in a similar situation, a shifted river covered by sediment. Do you know how many ships/boats they've unearthed in the U.S.? On one of my trips on a steamboat up the Columbia River, it was very obvious how people have gone to great lengths to "tame" rivers. The Columbia used to boast white water up and down which made it quite a challenge for riverboats to navigate. Now, after the many dams were built, it's quite a calm River, until it collides with the Pacific and makes it an extremely dangerous crossing. Looking forward to seeing your engine construction.
 -
Thank you George, Bob, CaptainSteve, Robb and everyone for the encouragement and likes. I'm kind of hooked on the PML Robb. I use the Dremel flex shaft in one hand and a file in the other. I have a lamp/magnifying glass combo that I position half way to my work and spin away as I sit there relaxing.☺️
-
Exciting times Robb! I've been getting a little practice with rigging my cannons, but my day will come. I'll be glued to your build, cheering you on. Looks like your off to a great start and looking great!
- 389 replies
-
- 2
-

-
- scottish maid
- artesania latina
- (and 1 more)
-
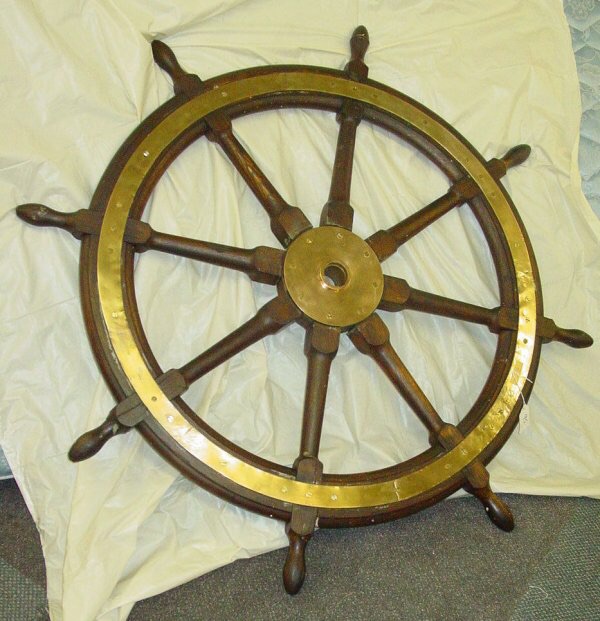
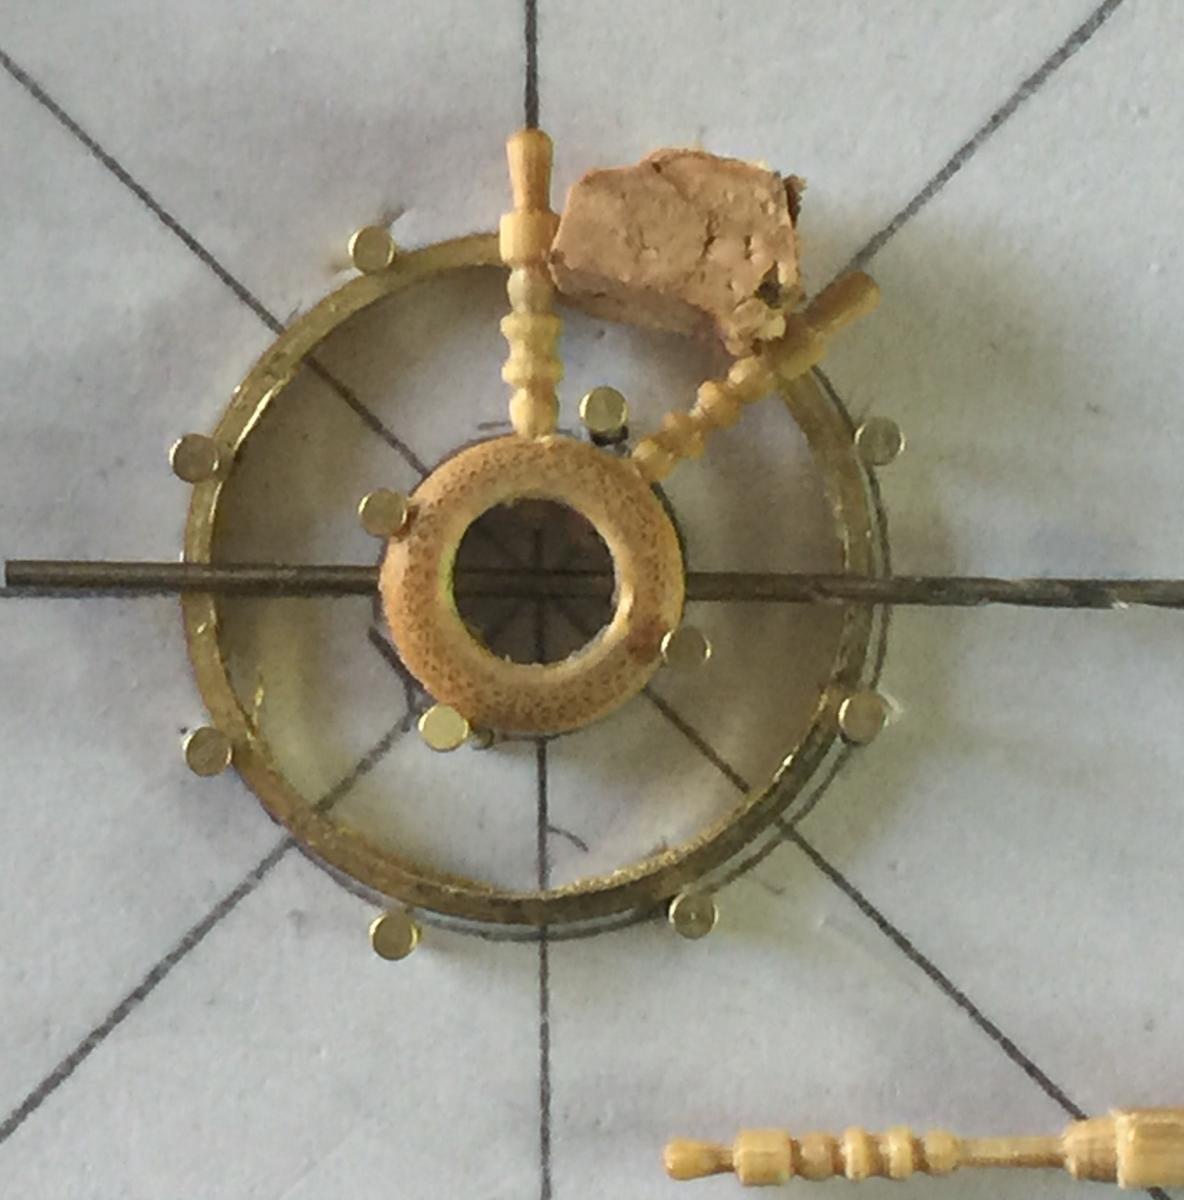
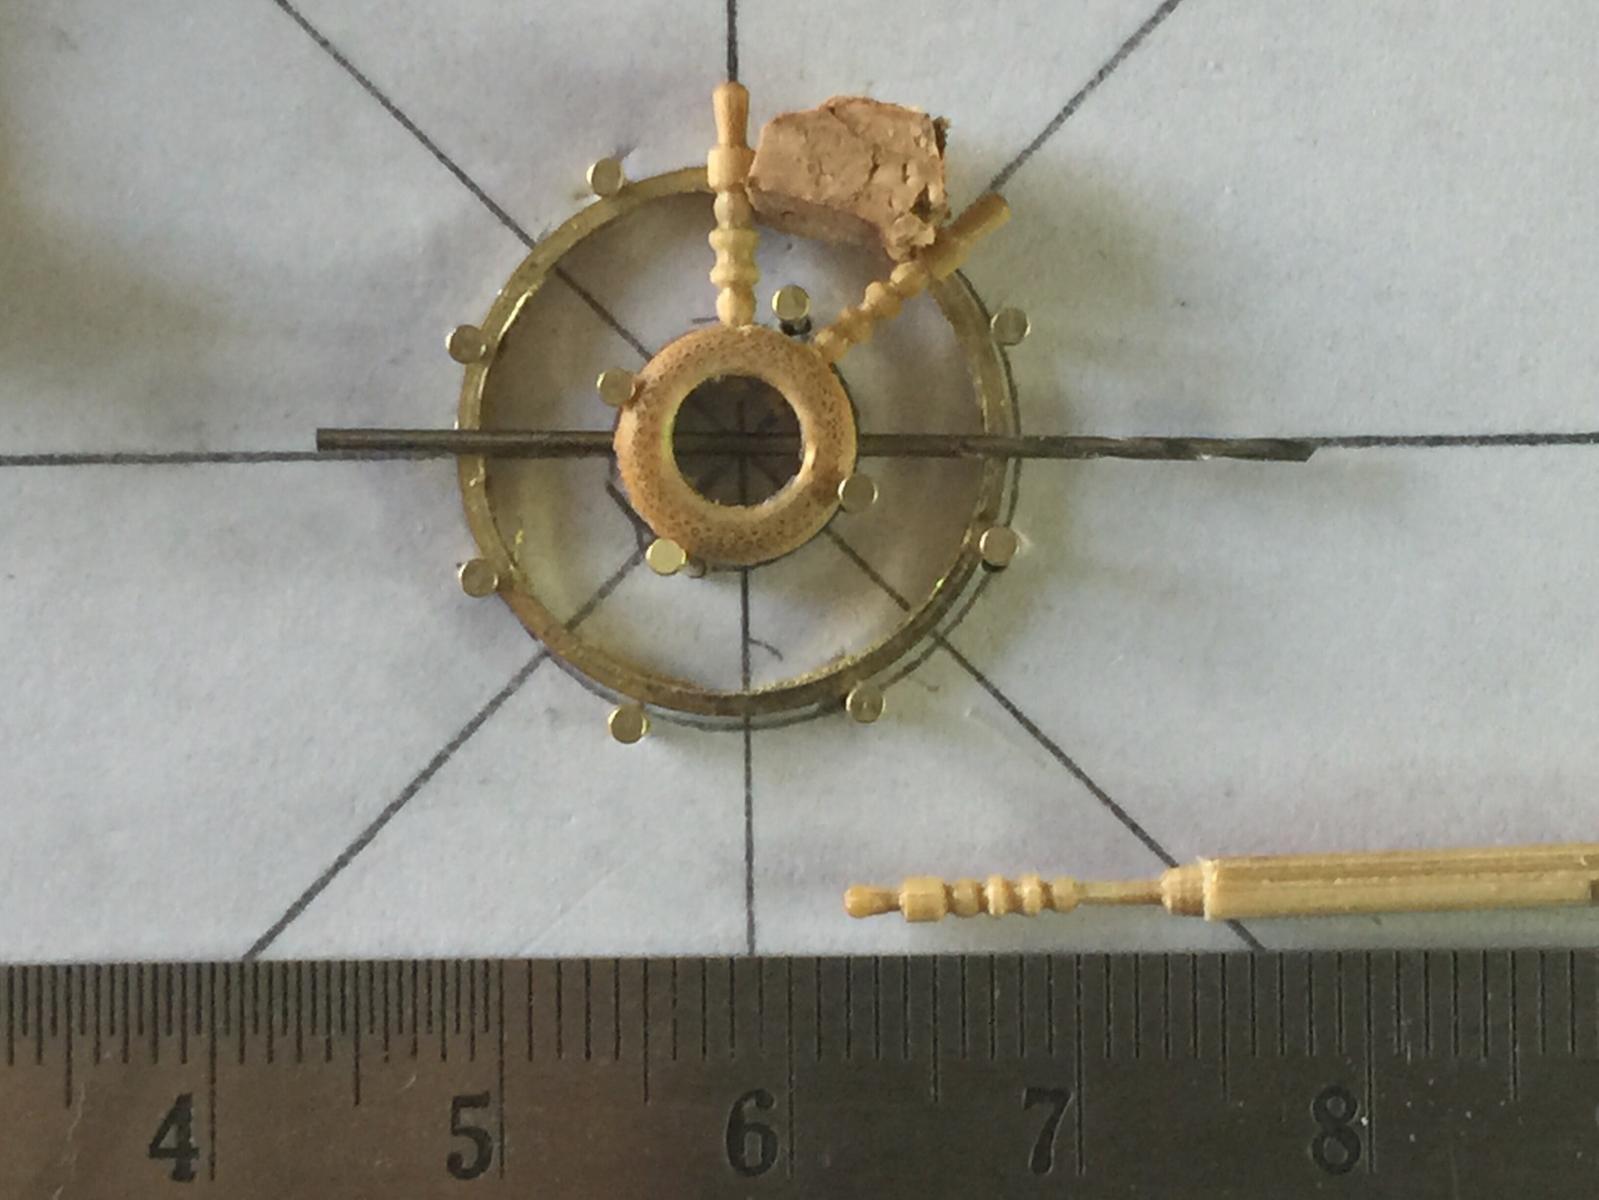
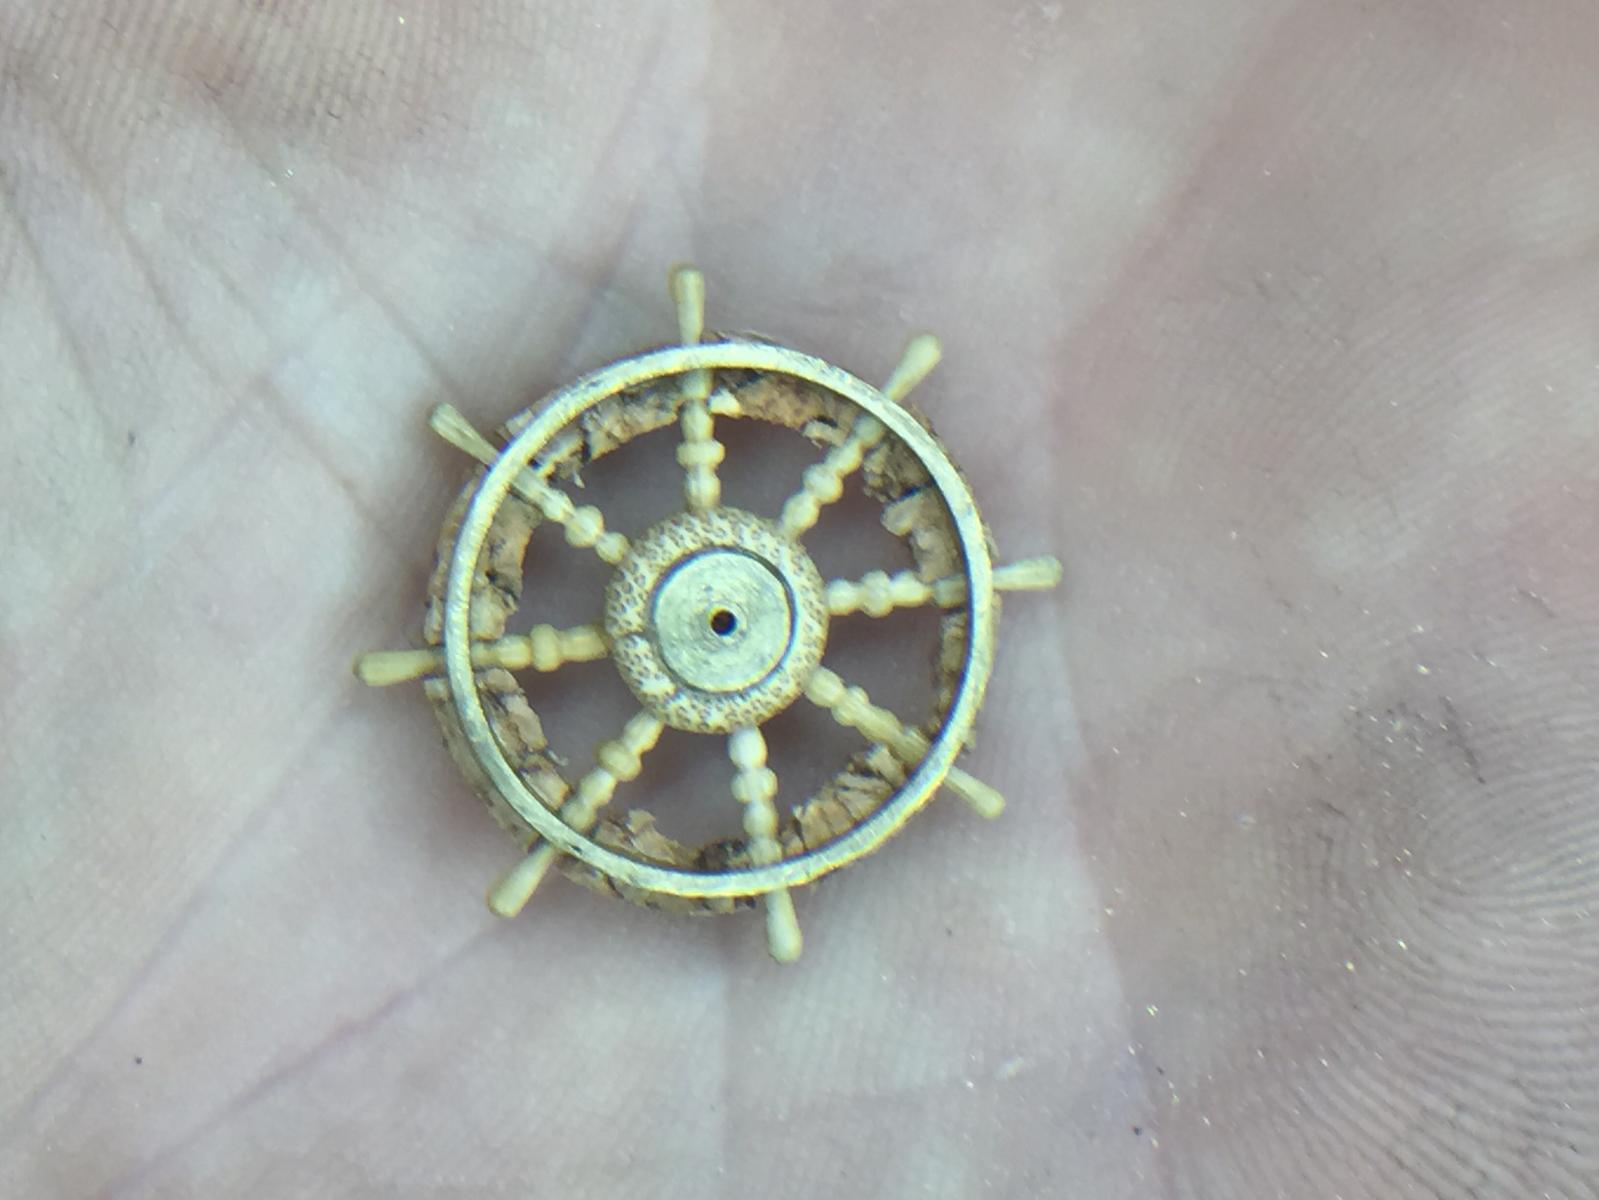
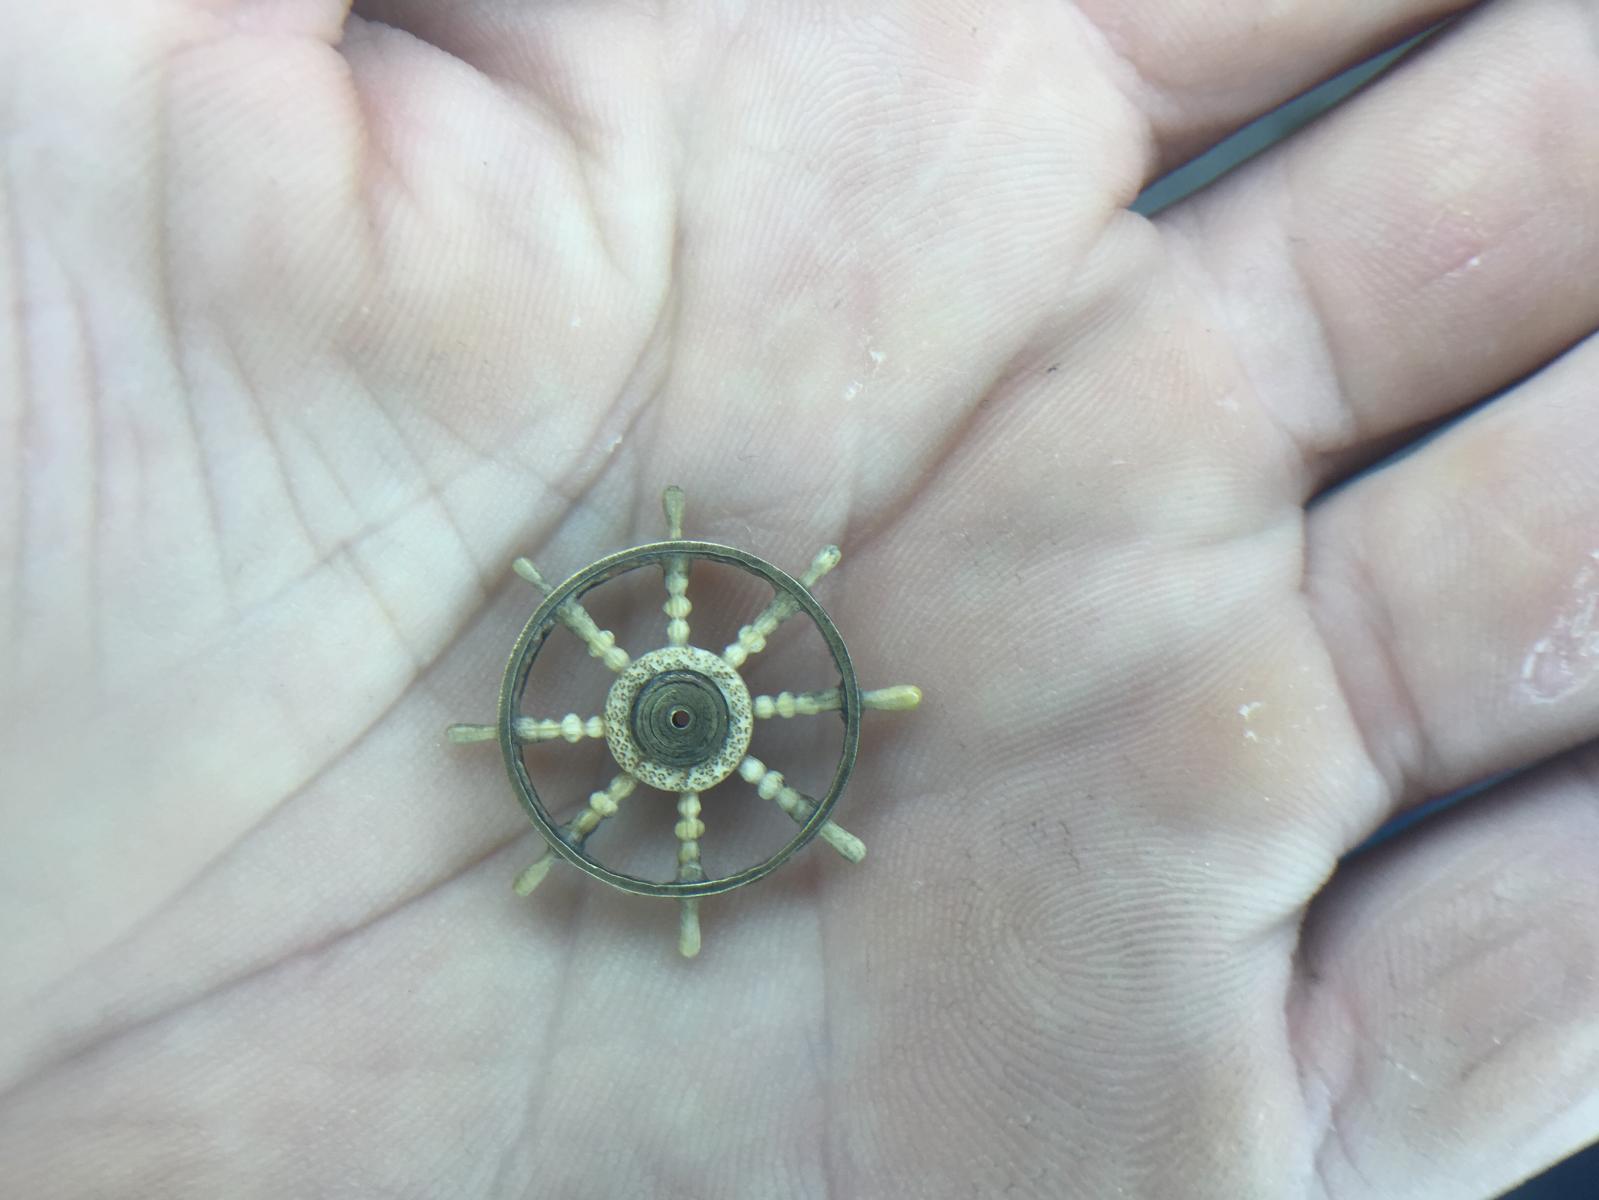
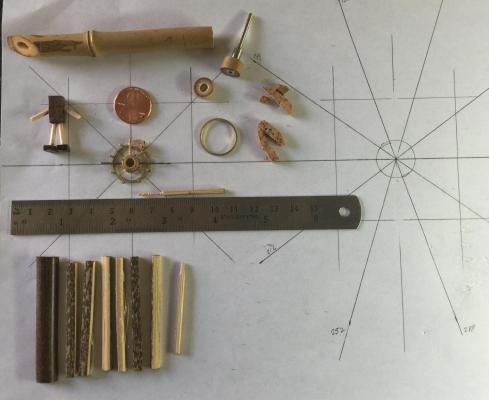
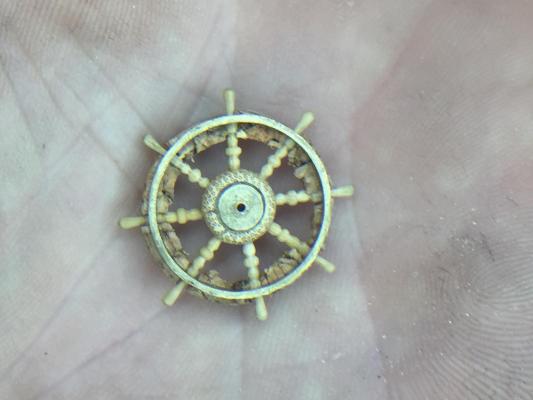
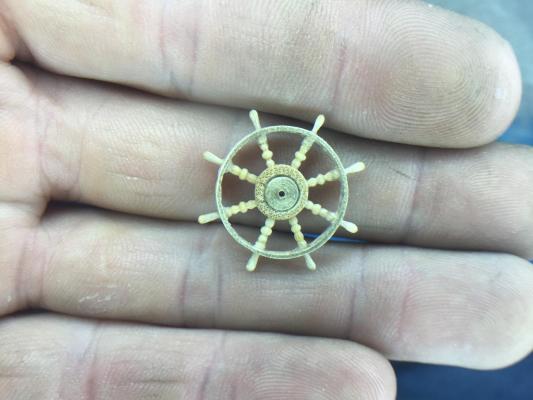
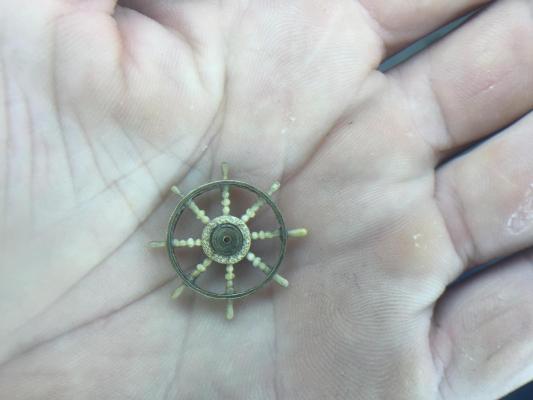
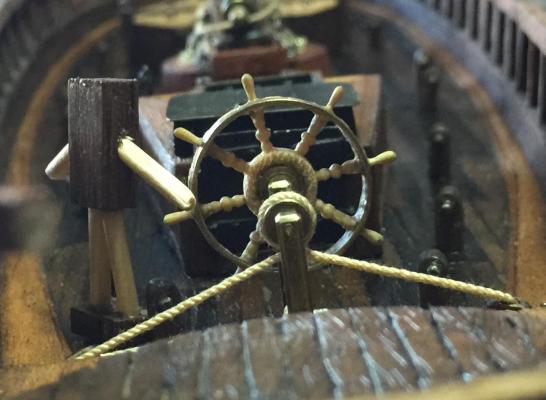
I want to thank everyone for all the likes and kind words of encouragement. I owe my gratitude to everyone here for the daily inspirational threads. This is the jest of the wheel making process. Reinventing the wheel. It began with picking a design I liked and then deciding how big to make it. I found this photo on Google images and liked the design. Then I put my 6ft tall stick-man on deck to determine the size. Four feet seemed a good size for a pirate cutter, scaled to 1:64 made it about 19mm. So began the layout. All adhesives are up to the makers choice. I chose CA exclusively for this item. I chose to use bamboo since it's very easy to turn and strong for such tiny little pieces. I drew up the size I wanted and the amount of spokes there would be. Two thin rings were cut off brass stock that would lend strength and aesthetics to the wheel. Next was to cut a slice of small diameter bamboo for the center piece. The bamboo slice was then turned to thin it to the desired thickness and placed into the center of the brass ring for alignment. After both rings were lined up, they were pinned into place. A measurement was taken for the distance between the two rings. In this case it was 6mm. Then the turning began. I took a small length of bamboo and split it into pieces that were slightly larger than my target diameter of 1,3mm. The design of the spokes were completely random and took shape as I began turning the piece. The spokes were constantly checked against the circles making sure the 2mm handles were past the brass ring, that the piece that lined up with the brass was the thickness of the brass(1mm), that the distance of 6mm were maintained and the stem stayed at least 3mm long to fit into the center wheel. Eight holes at 0,8mm were then drilled into the center bamboo ring. After the spokes were shaped, the 3mm length of stem was then turned down to 0,8mm to fit into the drilled holes. The spoke was then cut off the stock and fit into place to determine if I liked it or not. Afterward, the fun of duplication began seven more times. Once all eight spokes were finished, they were fit into the pre-drilled holes, making sure that the 1mm section below the handle was even with the brass ring. Now the spokes were glued into the bamboo center and to the brass ring. Cork was used between the handles on the brass for its flexibility. Oversized pieces were glued into place and trimed flush to all the spokes, followed by glueing the second brass ring on top, centered on the lower brass ring. The center of the inner bamboo ring was then cleaned up and fit with brass stock that was drilled out to fit the piano wire axis. The cork was then carefully soaked with CA to harden it, and once dry trimed flush to both sides of the brass. Everything was then cleaned up and fine tuned before the brass was blackened with Casey's Brass Black. I used the same method of antiquing that I use on the cannons and other brass fittings. The process was fairly time consuming and far to long to describe in every detail. If there's anything to question, feel free to ask.


- 443 replies
-
- 18
-
-
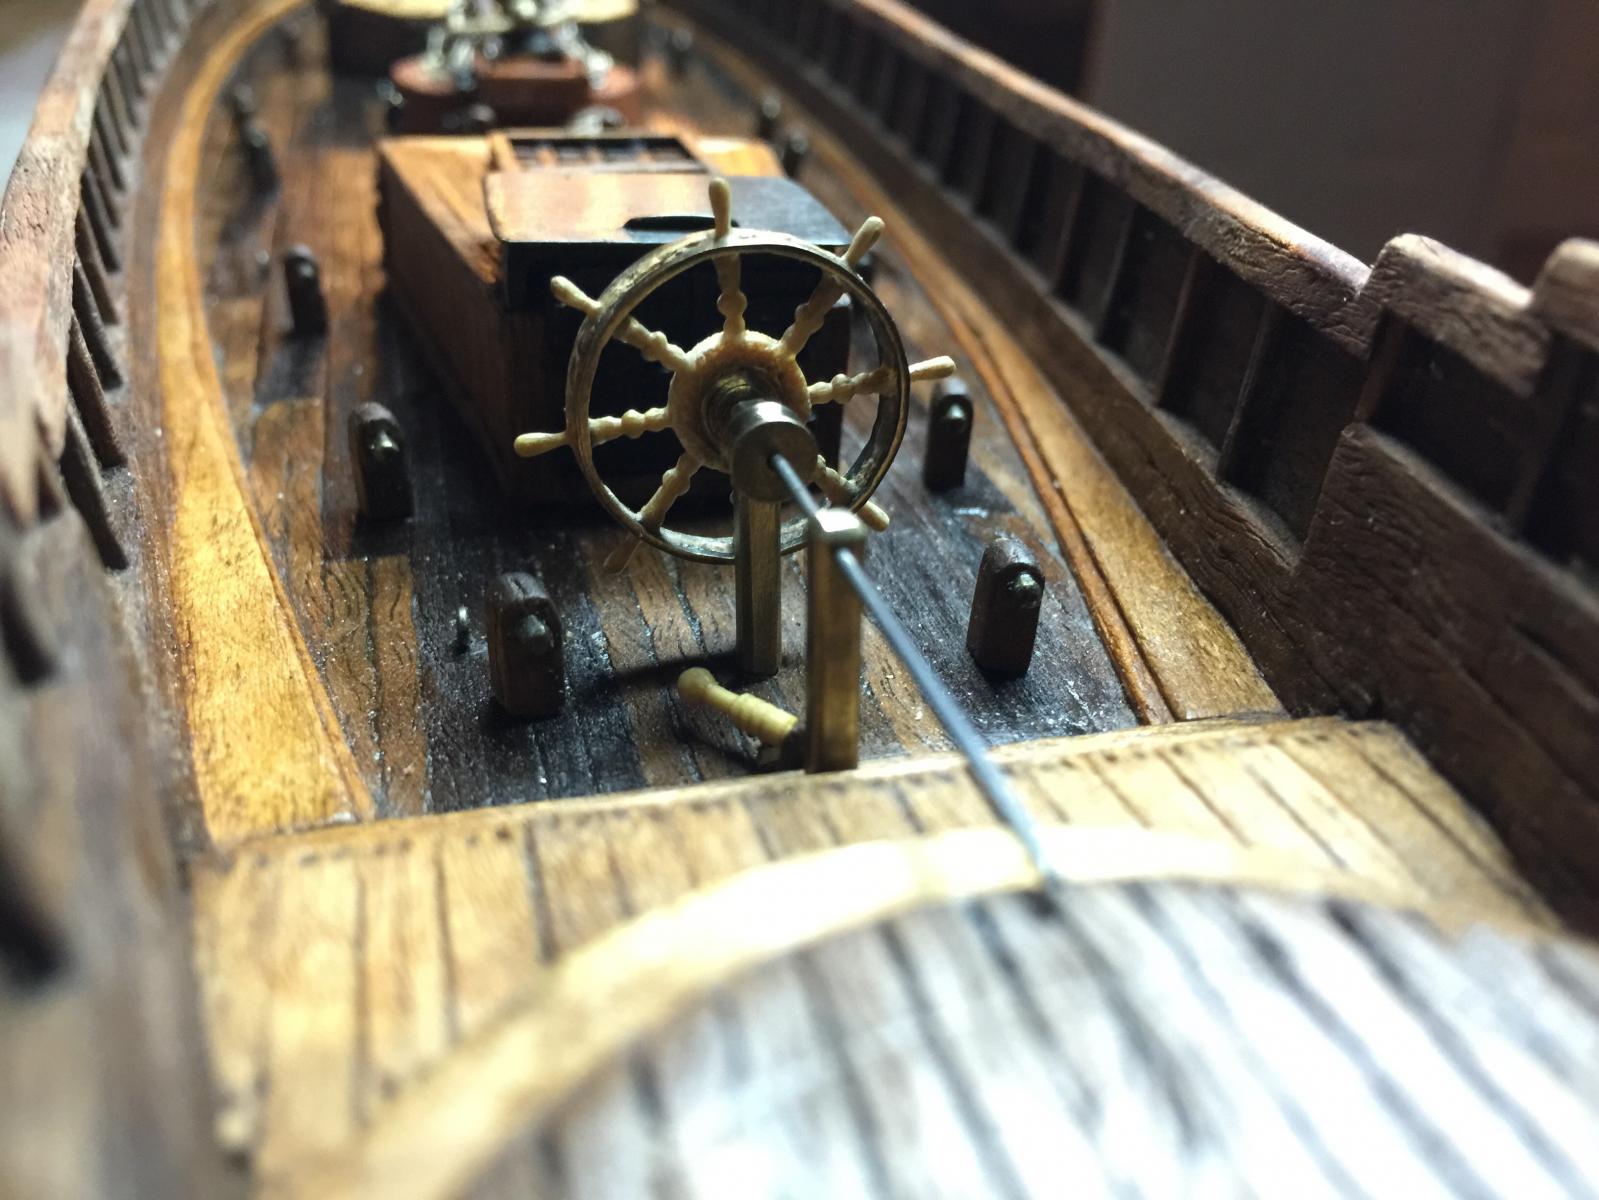
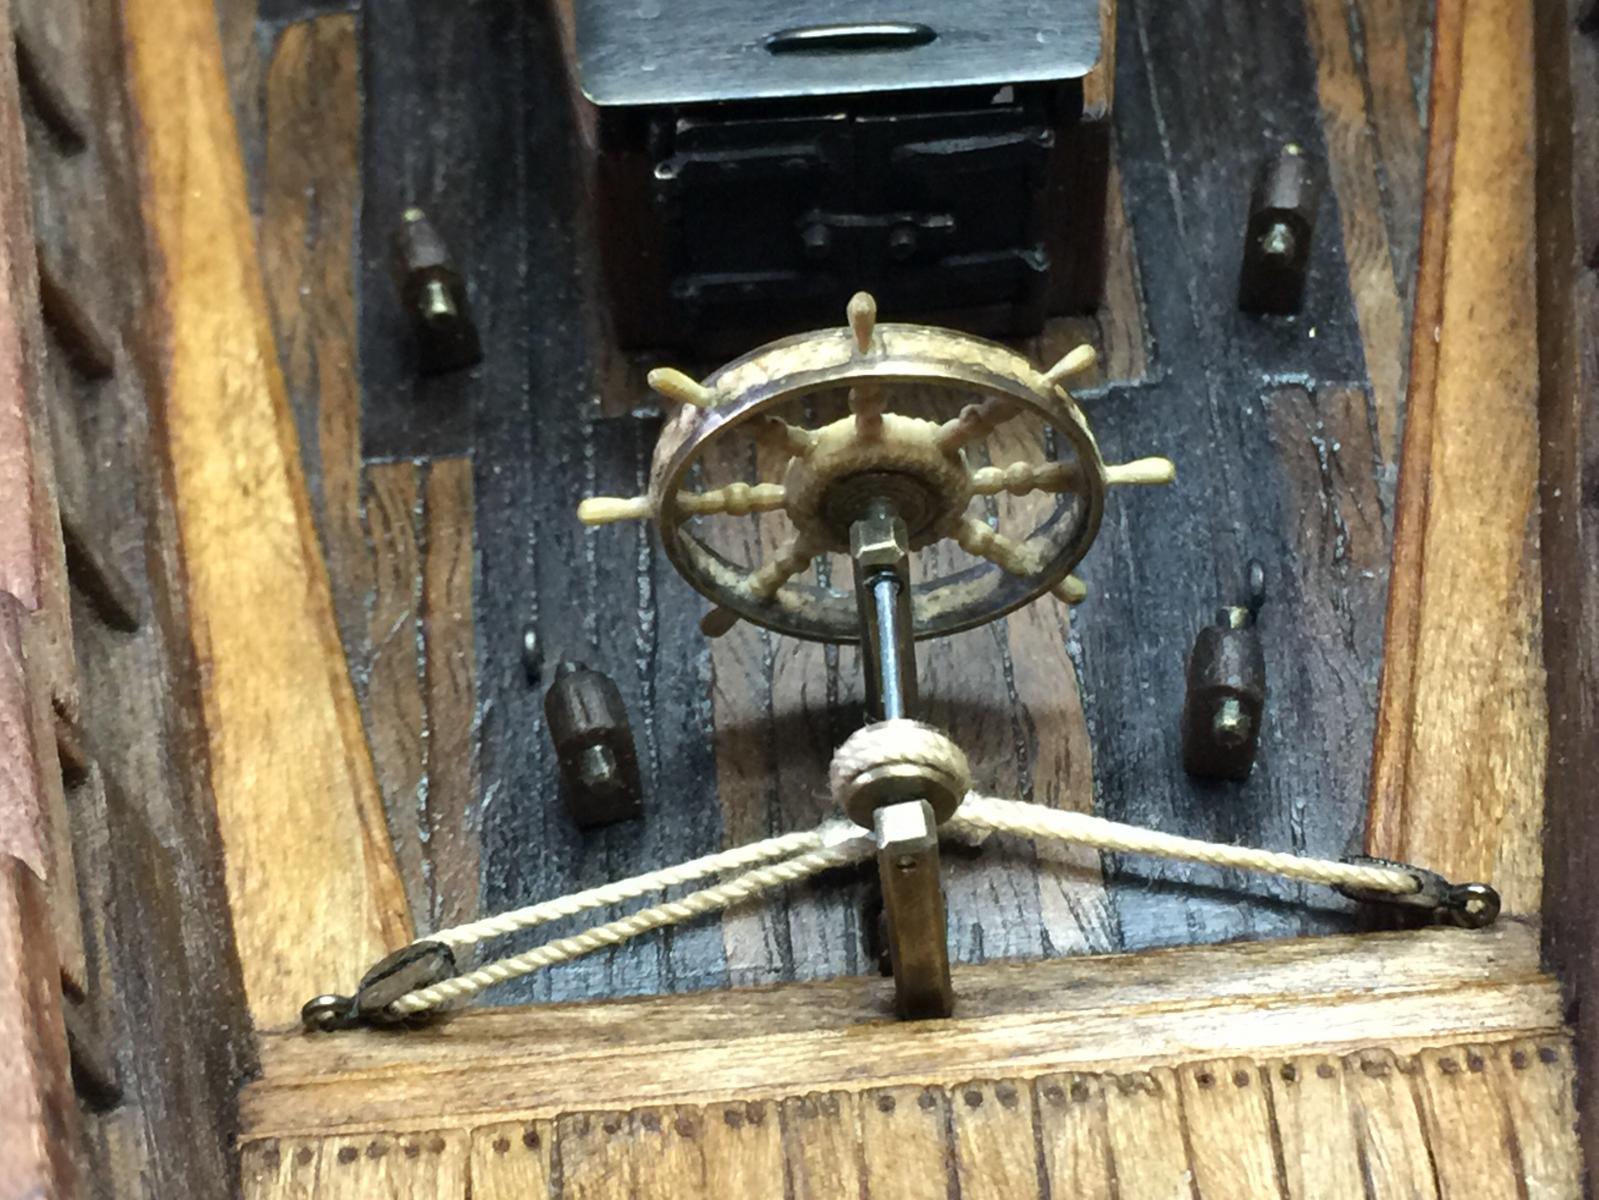
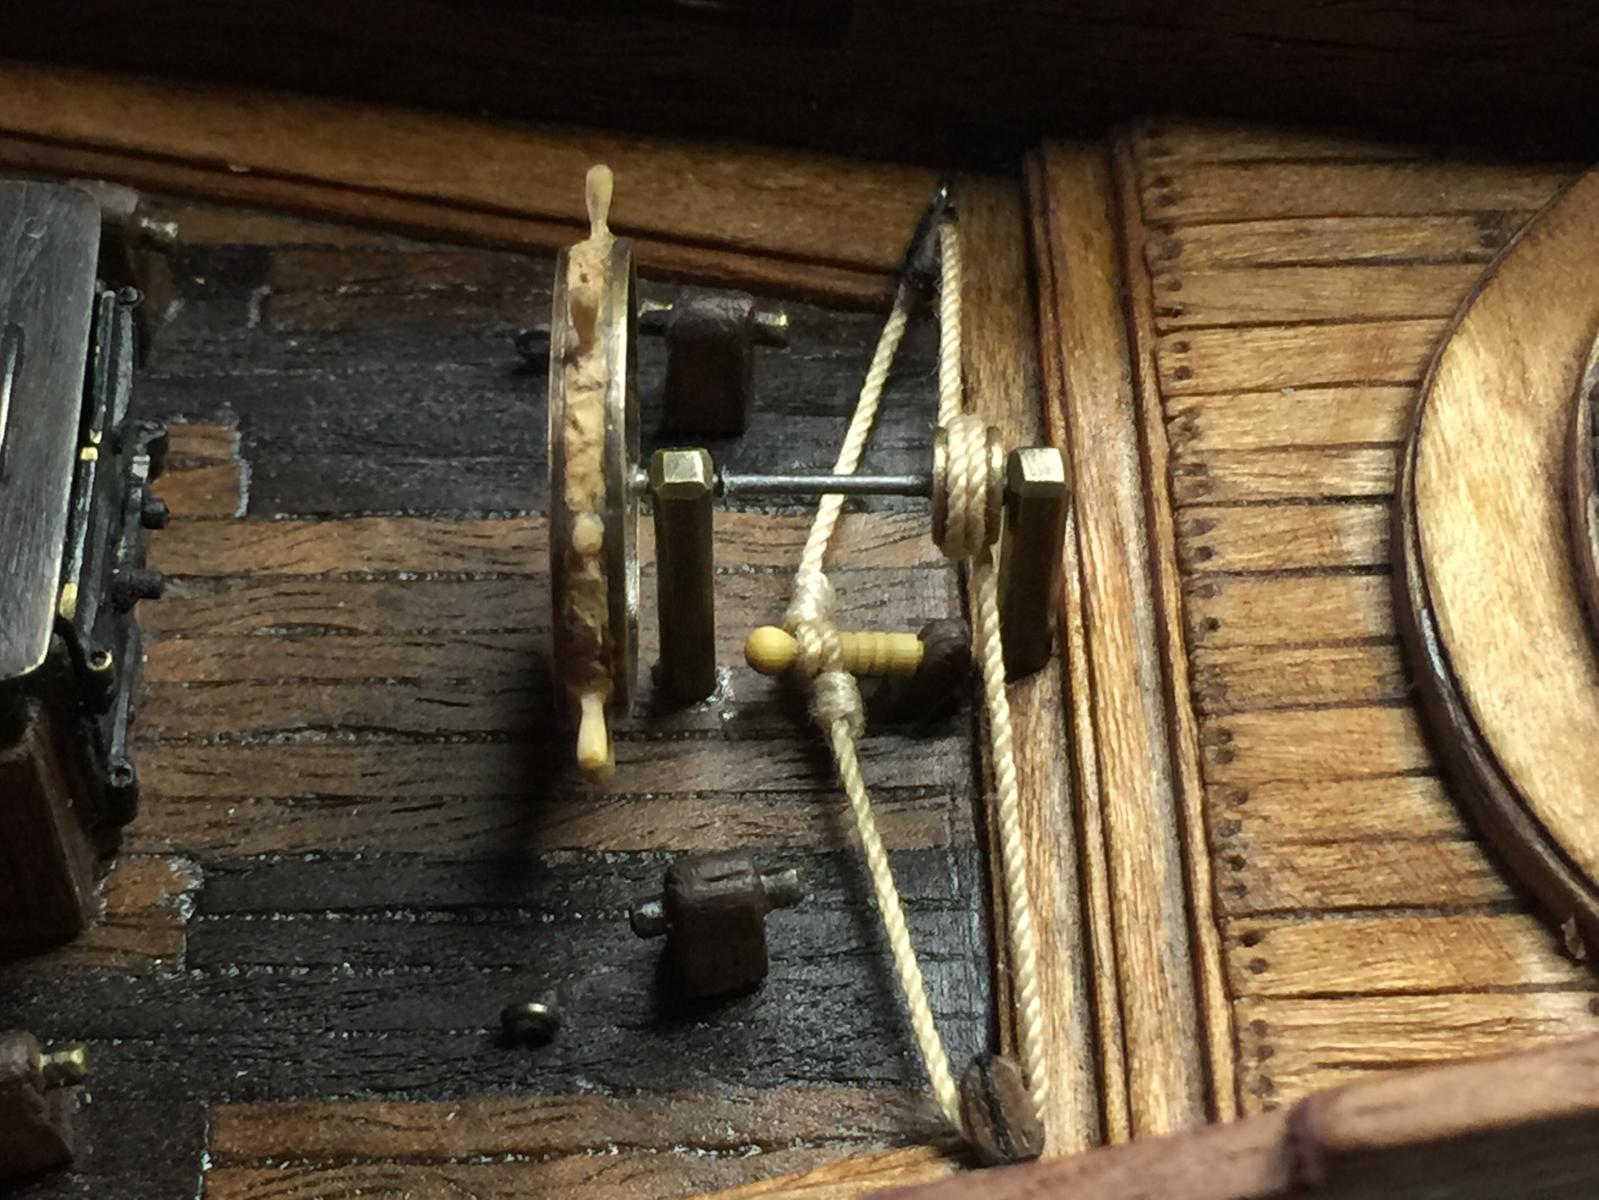
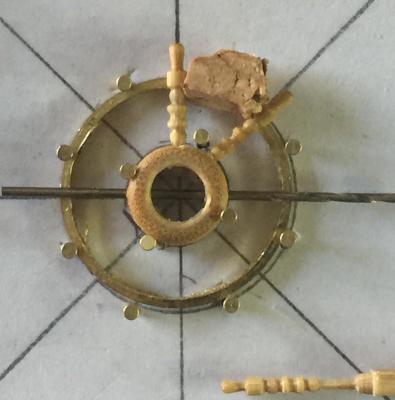
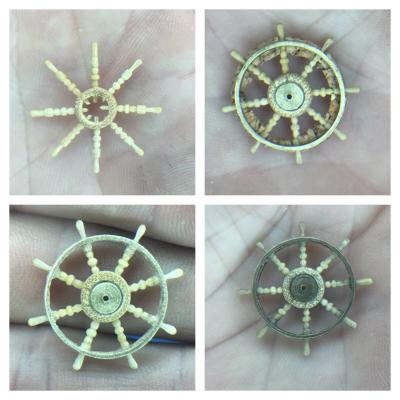
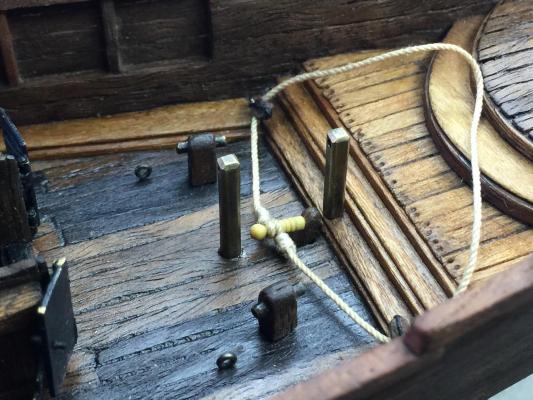
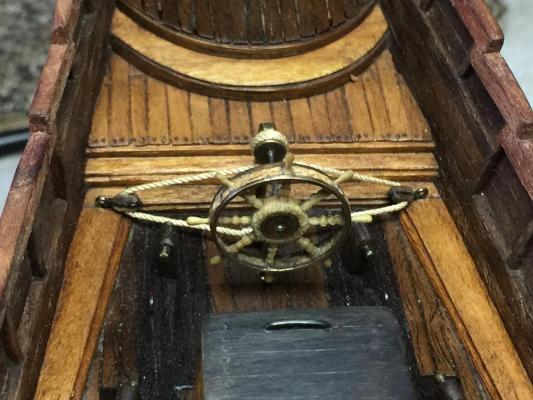
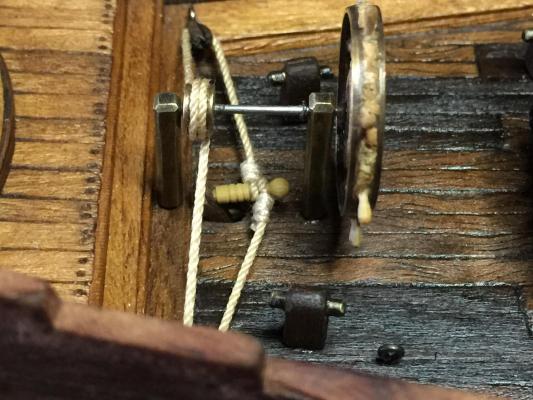
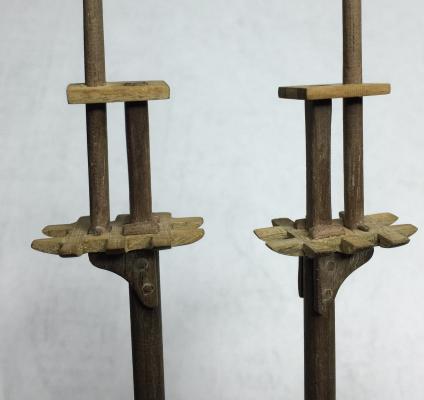
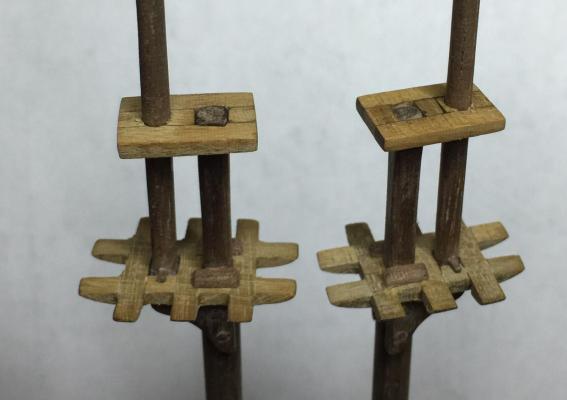
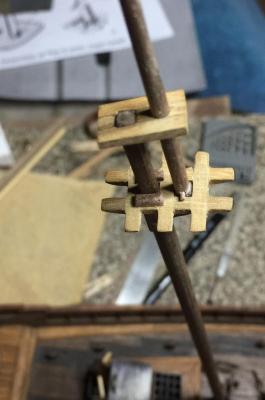
Thank you George, Boyd, CaptainSteve and everyone for the likes and kind words. First off was the making of the wheel. I'm going to make an additional post on how I made the wheel, so for now here's a view of some of the stages. I want to thank Robb and his Scottish Maid for the inspiration of the steering system. I decided 4ft was a good size for the wheel so I made it first and built the assembly to fit it. The posts were made from 3mm x 3mm brass stock and the axis point is piano wire. The spokes and tiller were made from bamboo. Bamboo is very strong and easy to work with as well as the light color and grain are a nice contrast. The wheel that holds the rope was turned from brass stock. The blocks were made from walnut. I began with dry fitting everything. The tiller handle was removed and one end of the rope was seized to the handle. With the tiller put back into place, the rope was fed through the first block, wrapped around the small brass wheel twice and then fed through the second block. Everything was pulled snug, the rope wrapped around the tiller and marked where the second seizing will be. Then everything was disassembled and the rope was seized to the tiller handle. Next, everything was reassembled and checked thoroughly so that I was satisfied with the results. Everything was glued into place leaving the wheel to be able to freely turn. All the clamps holding the rudder straight were removed so that it coul freely move as well. The final step was placing my 6ft tall stick man next to the wheel to give a perspective of the size of the wheel.


- 443 replies
-
- 15
-
-
Your gallery looks amazing! And no, you're not nutz for multitasking. Keep breeding the squirrels, their little hand work wonder.
-
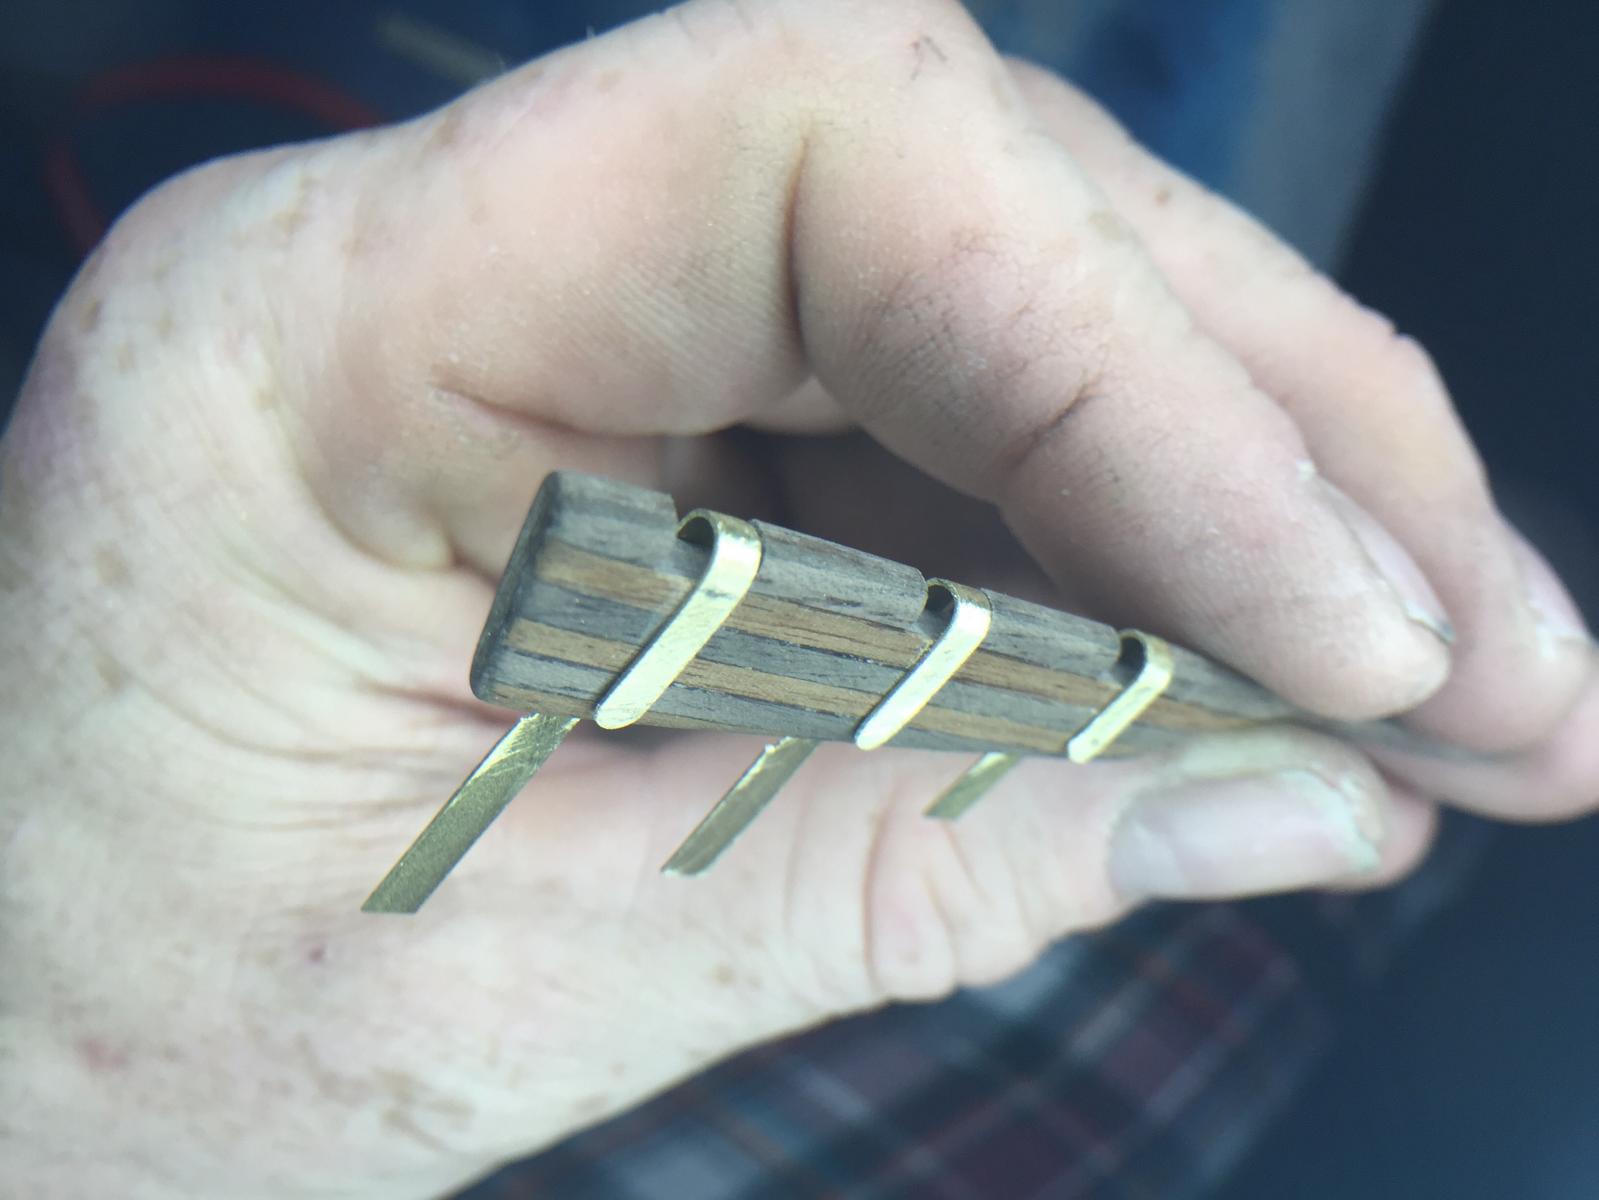
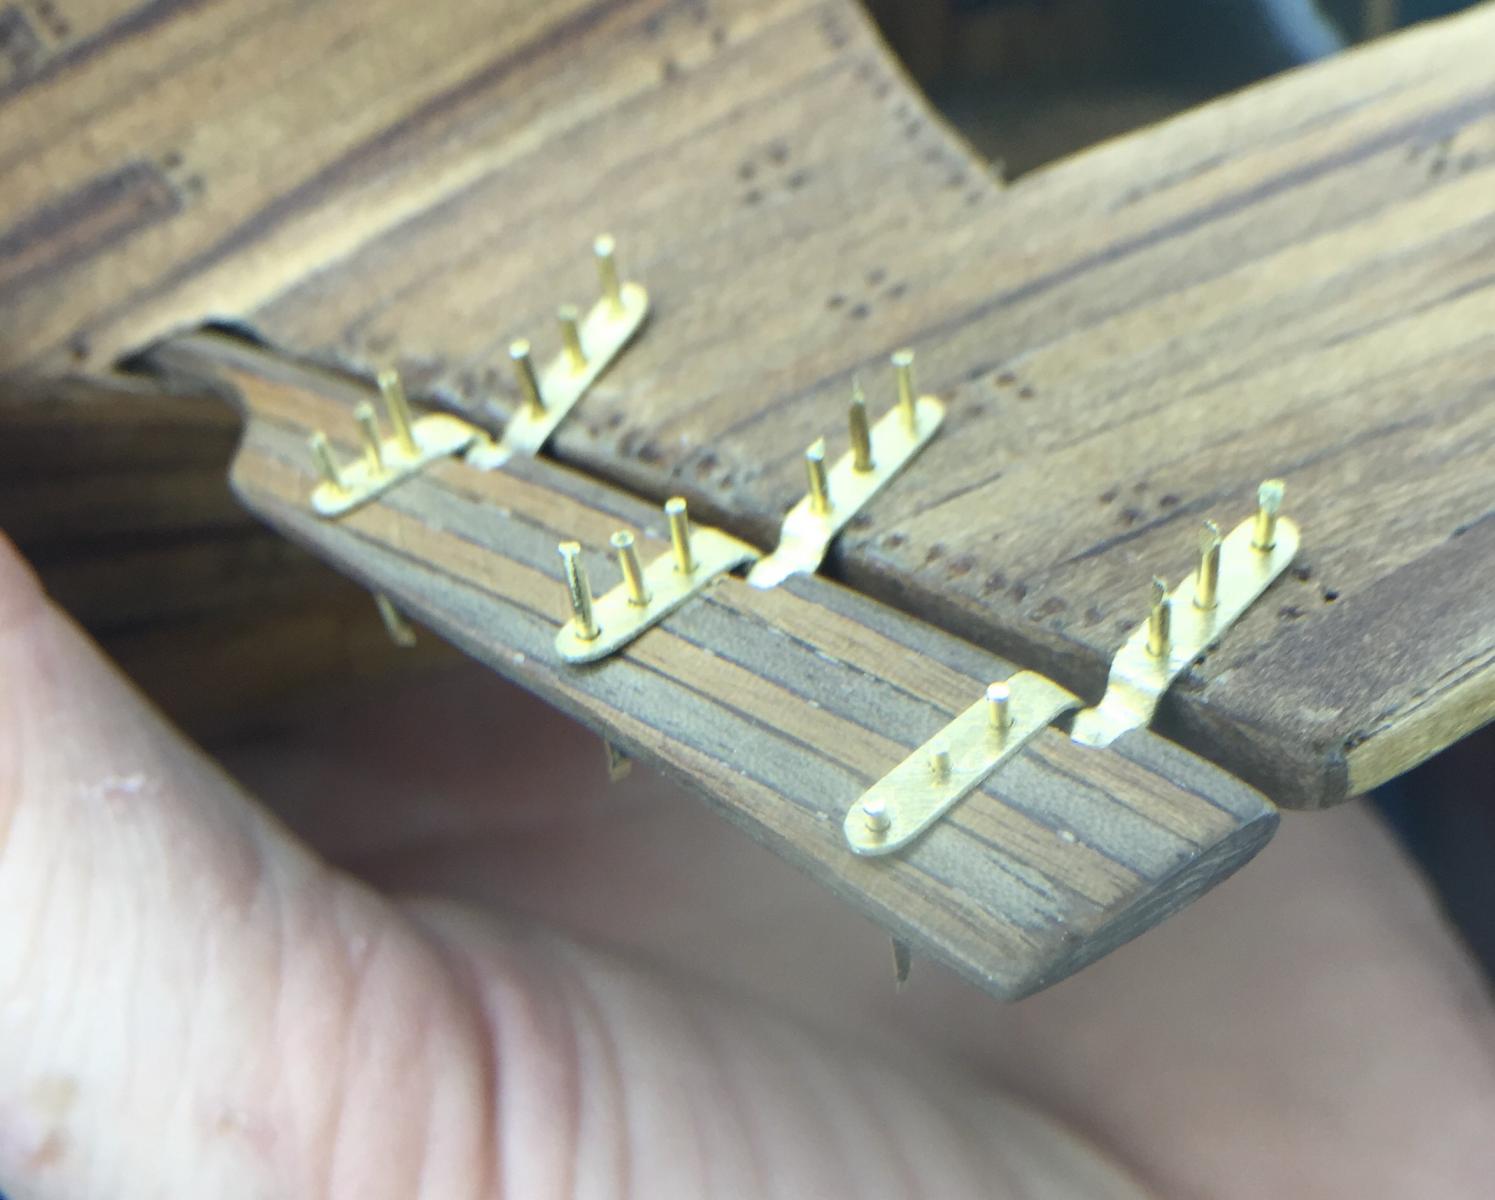
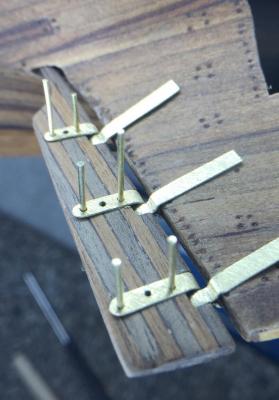
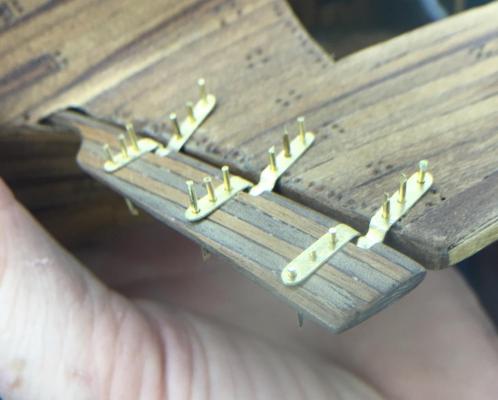
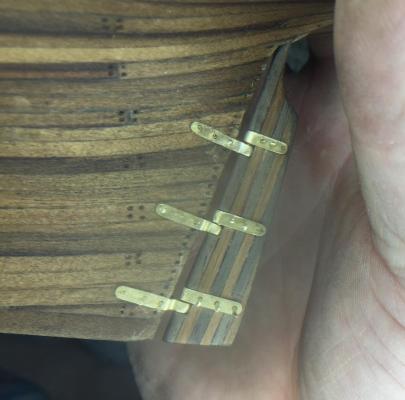
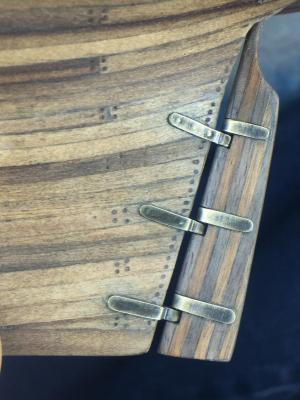
It been a few weeks since my last post, with the move and all. The rudder assembly is complete, the steering mechanism will follow shortly(pre-thanks to Robb). I used light and dark walnut together to give it some contrast. The pintles and gudgeons were formed in the usual way with bent brass strips and brass tubing all soldered together. I had mounted everything as removable until I got the steering mechanism lined up satisfactory. Once aligned, the pins were affixed and ground down. Once things were secured and cleaned up a bit, I gave it the double blackening that gives it the antique look. Then it was wire wheeled to achieve the final look. The topside steering assembly should be coming shortly...

- 443 replies
-
- 12
-
-
Hey Robb. One method I use a lot is laminating. If you start out as you did with the mast rings, only to mast diameter, just don't stop. Wrap it around as many times as you need, plus a bit more, then use your choice of glue. To keep them flat you can drill a hole in a piece of scrap and put a short piece of mast material. You can use wax paper or just wax everything before glueing. In a case this small, I would use CA because it will harden the material preventing it from breaking too easily. Strength will also come from the grain being circular and having dissimilar fracture points(like plywood). The CA also lets you to be able to work the piece within minutes, whereas wood glue will have to dry. I can attest that this works well since I use 0,5mm sheets to make just about anything. Look close at my masts, they are laminated. It also is great to use on anything with a radius since you're bending very thin pieces. So there's my two cents for the day, hope this is helpful.
- 389 replies
-
- 3
-
-
- scottish maid
- artesania latina
- (and 1 more)
-
The anticipation! Your mast rings look really awesome! Those vid links for seizing blocks also have links for making furled sails. The show you a simple way to furl with just a partial sail. I think in here some guy's have done this as well. Good luck.
- 389 replies
-
- 1
-
-
- scottish maid
- artesania latina
- (and 1 more)
-
Hey Cathead, didn't you say you cut all the timber for your barn? A little finesse with a fruit tree might be all you need to make a second hull. It could be the stuck inside crapulous weather need a break from writing minds well sip on a nice glass of Yukon Jack split some limbs and let em dry above the fire kinda day.
-
Excellent build Cathead. I finally got caught up on your log and it's very impressive! My experience with steamboats has been riding on them with my grandma years back. There's nothing like riding one up the Columbia River, which is home to many prehistoric looking sturgeons. So my input will be little beyond the admiration of a beautiful boat and a cheering squad on the side lines. One thought I had, budget and time permitting, is to make a second, framed only. Now that you've mastered that part, it could be displayed to give viewers a completely unrestricted look at the impressive internal structure(time and budget permitting). I spent my two cents so I'll sit back, shut up and admire your progress.
-
Looks great Robb, and very inventive! I would suggest to add your hoop process in CaptainSteve's Kit Bashers Guide. I've worked with bamboo quite a bit, so I'm going to attempt making my rings using black bamboo.
- 389 replies
-
- 3
-
-
- scottish maid
- artesania latina
- (and 1 more)
-
Thanks Ken, Robb, Boyd, George, Mark and to everyone for the likes and words of encouragement, they are great encouragement to me. I pulled off from the carronade setup to let some ideas bounce around in my head. I took a saw to the rail in front of the carronade because it would get blown away the first time it's fired. So Harry is off to see about a nice solution while Tiny and I are working on the masts, bowsprit and such, hoping to see the ship start to take form. Oh Corel, why the vague instructions? So I've taken the liberty of changing some things in the attempt to acquire better info from other builds. So if you happen to see something from your build showing up on my build, please be flattered, not annoyed, at my plagiarism. I, along with the Nutz and Bawlz Clans, welcome any and all thoughts that could be changed or added to. Pics with descriptions are the best, as the rabble I'm working with are fairly illiterate. (I'm not poking at the squirrels, last thing I need is a mutiny or a cutlass in the back!)
-
Nice job on the hammocks Boyd! I see your bash fever is flaring up again, and it shows in your creativity. Well done sir, well done!
-
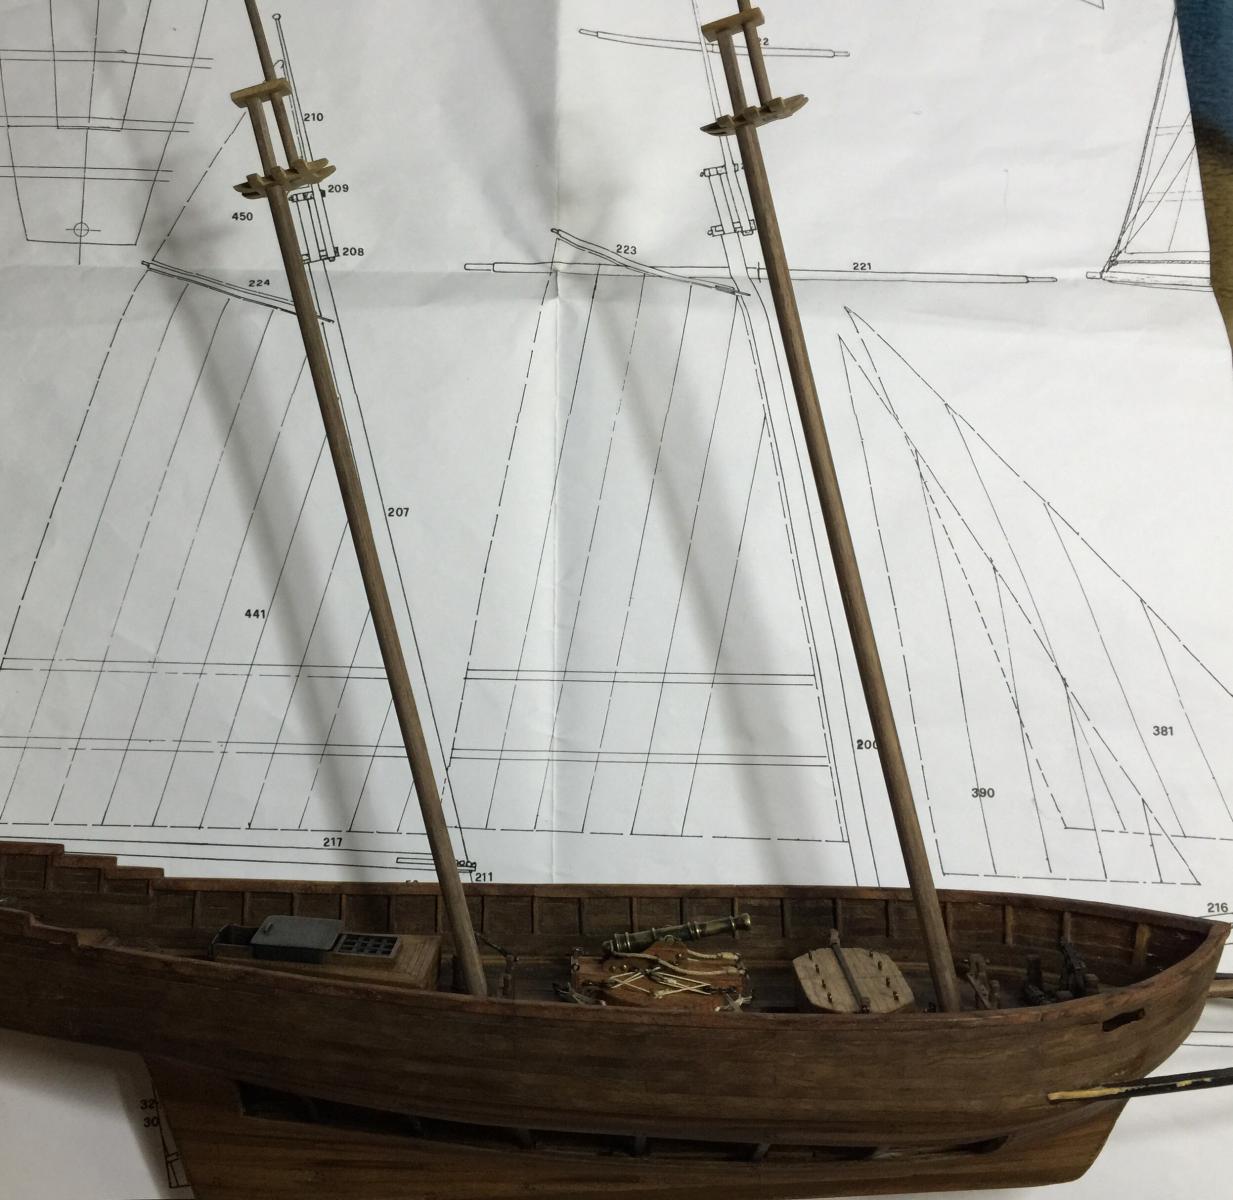
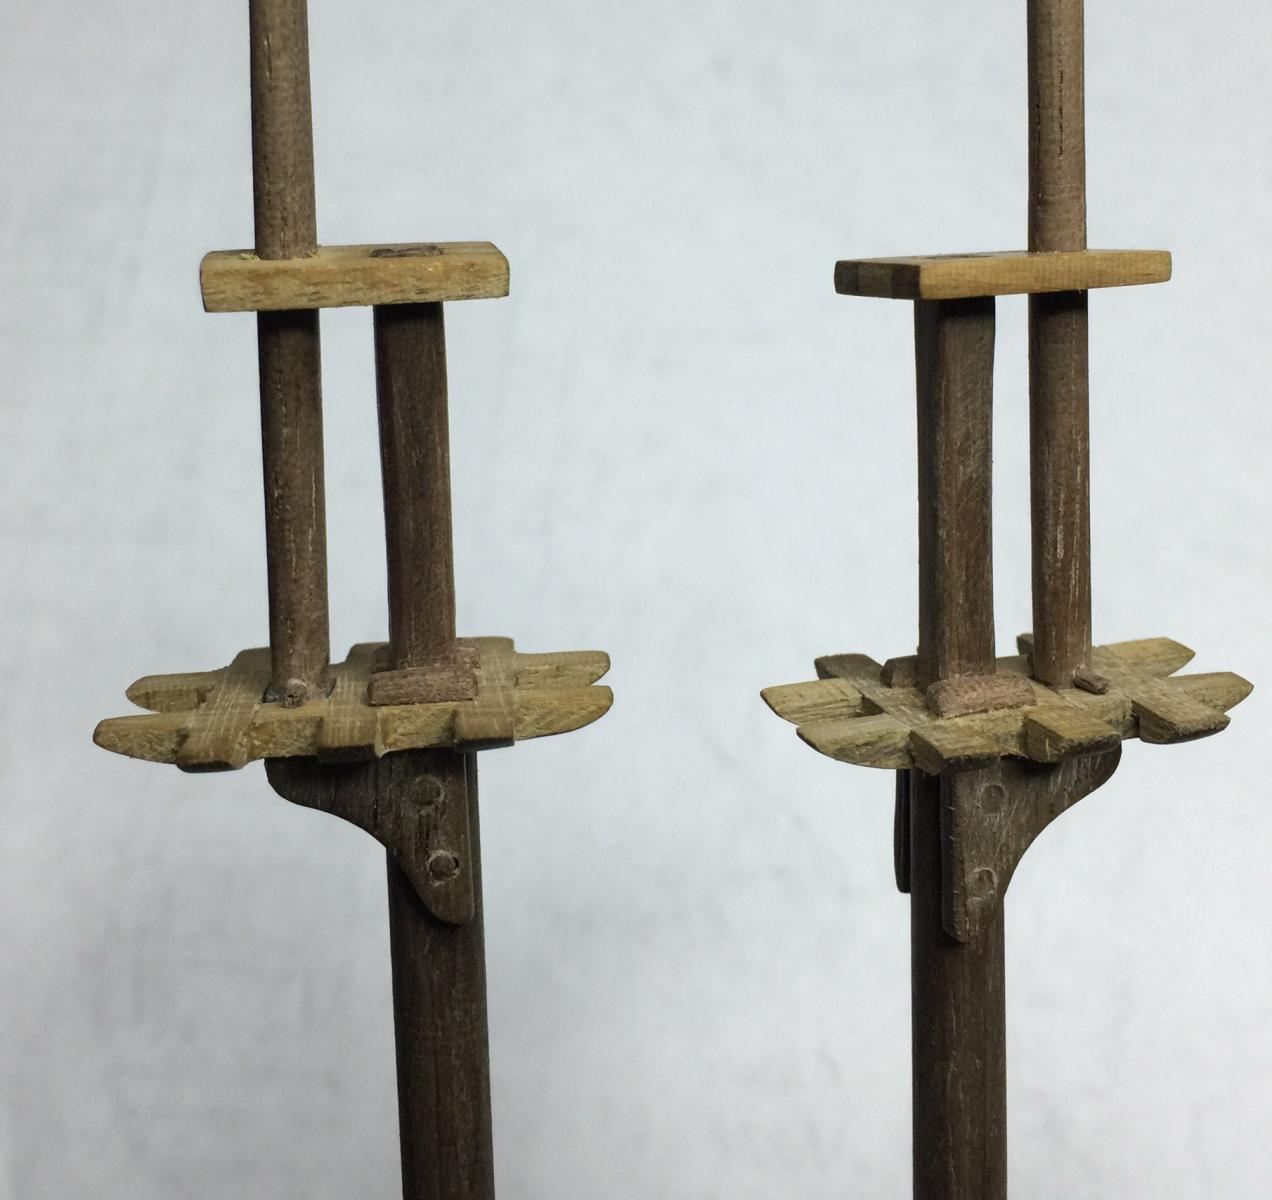
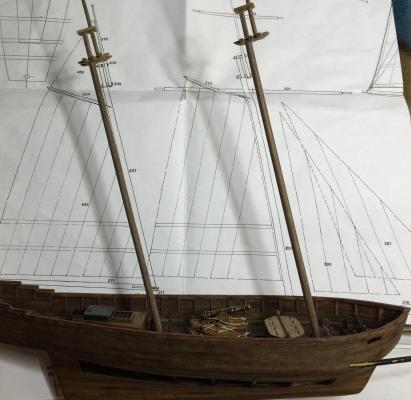
I switched gears a bit this week and worked on the masts. I used the laminate method again to make the masts, glueing 0,5mm thin strip together until the desired diameter was attained. Turning the mast was quite interesting since they were over 12inches long, the top masts were quick and easy though. I tossed the metal cross tree assembly and used light walnut stock instead. Cross halving joints were notched to join the trestle trees to the cross trees. After that the cheeks, the caps and the bolsters were fitted and glued in place. The top masts and caps were not glued yet so they can be removed for rigging.
- 443 replies
-
- 14
-
-
Looking great Robb. I'm also in the process of mast making, woohoo! I have absolutely no idea how to rig a ship and my Italian plans are of scattered help, so I have some studying to do.
- 389 replies
-
- 2
-
-
- scottish maid
- artesania latina
- (and 1 more)
-
Hey Robb, here's a way to go easy on the CA. I take an empty prescription bottle, flip it over and put a few drops of CA into the indentation. Next can be done many ways, I use a sewing needle and dip the eye in the CA. Experiment with different size needles as the CA fills the eye. Then quickly dab the spot you want. The eye plugs up after awhile but you can just scrape it off. Hope that helps.
- 389 replies
-
- 3
-
-
- scottish maid
- artesania latina
- (and 1 more)
-
On my build the O with the slash refers to diameter. So my guess would be that it's a 1mm hole. I may be wrong so don't drill a hole till you get another opinion.
- 389 replies
-
- 2
-
-
- scottish maid
- artesania latina
- (and 1 more)
-
Oh, I know what you mean. Not sure if the formula changed but I remember the horrible foam. The kind I use says 'no foam'. I like the tight bond for larger items or when I'm installing wood floors. Great hold but it seems to take a while to dry. When I'm laminating pieces for various ship items I glue and clamp, and can usually remove the clamps and work the piece within minutes(5 or so). Since clean up is water, I really try to minimize water as much as possible. So if I pay close attention to how it's drying, I can use the tip of my blade to carefully lift excess off. I think you can get a little bottle and try it out, just make sure it says no foam. It also dries really clear, not milky or yellow. Yeah the foaming kind I don't think would work well when planking. Hope that makes sense.
-
Hey Danny, I'll take a seat on the side line if that's ok. I think that's a noble project you've taken on there. I'm sure the family will be happy beyond words. I agree with George's comment, it's definitely not a lost cause. Can't wait to see the progression as I've not seen a restoration before. I hope to learn much from this.
- 59 replies
-
- 4
-
-
- norske lowe
- billing boats
- (and 1 more)
-
Thanks George, Ian B, Bob, Mark and those who pound that like button. Mark, I was thinking the same. While I'm milling away at my 3mm blocks, I'll pass it off to Harry and see what happens. By now the Nutz and Bawlz Clans are getting fidgety. They make be looking for something to destroy, so I need to channel that rage into something productive!
-
This particular video may not be what helps, but this guy has many videos on different ways to rig. If you watch this video it should link you up with the rest of his videos. I know for me, seeing someone is the easiest way to learn. I would imagine that somewhere on YouTube you'll find what you need. If I find something else I'll post it for you. What I did, which may not be accurate at all, is to first thread the eyebolt like a needle and tie one knot with the eyelet in the middle. Then seize the block as you do, just keep the eyelet centered on the opposite end. Glue like GuntherMT said. I believe the YouTube guy does like GuntherMT said, but he was attaching to the mast which could be modified to the eyelet instead. Hope that helps. This one may help also, just make the hook an eyelet...
- 389 replies
-
- 2
-
-
- scottish maid
- artesania latina
- (and 1 more)