
MORE HANDBOOKS ARE ON THEIR WAY! We will let you know when they get here.
×


KeithAug
-
Posts
3,867 -
Joined
-
Last visited
Reputation Activity
-

 KeithAug reacted to Mirabell61 in SS Kaiser Wilhelm der Grosse 1897 by Mirabell61 - FINISHED - scale 1:144 - POF - first German four stacker of the Norddeutscher Lloyd line
Denis,
trust now all vents in raw, basic shape are done. There are so many, that I had to make a plan, which and how many go where...... For the length adjustments there is a bit surplus tube on every vent. The pics show the variety of sizes, tube / bowl diameters and raw lengths. The plan though is not in scale ( only to give an overview)
Some of the tubes go through the boats deck and remain visible looking on the promenade deck, some tubes will be blended behind vertical claddings on the promenade deck
Nils
-
 KeithAug got a reaction from mtaylor in Furniture for a cabin
Exceptional work Toly. I am very impressed.
-
 KeithAug got a reaction from WackoWolf in Furniture for a cabin
Exceptional work Toly. I am very impressed.
-
 KeithAug got a reaction from Eddie in Endeavour 1934 by Julie Mo - Amati - Scale 1:35 - America's Cup UK J-Class Challenger
Julie
I found the rudder profile didn't blend very smoothly with the hull and keel which to me looked wrong. I adjusted the shape slightly as per photos.
-
 KeithAug got a reaction from KORTES in Altair 1931 by KeithAug - FINISHED - Scale 1:32 - schooner
Julie - you might want to see the rest before stealing anything!
So here is how it developed.
I started to sand the rudder down to its final form but part way through the process I started to feel the larger pieces of mahogany were looking a bit monolithic and hence out of scale. I did like the pin stripes and I think I will bank this for a future date.
So decided to use what I had as the core of the rudder and clad it as I had done with Endeavour.
I started by laying two strips either side of the leading edge. I seemed to have created some sort of bug!!!!!!!
I then laid more strips across the rudder, parallel to the waterline. Another weird creature was born!!!!!!!
27 pieces per side = 54. Plus the 17 core parts = 71 parts in total.
After a lot of sanding..........
The next step is to make and attach the 2 strengthening plates - one either side of the rudder and then buff the rudder with fine sandpaper before painting with poly.
-
KeithAug got a reaction from KORTES in Altair 1931 by KeithAug - FINISHED - Scale 1:32 - schooner
The rudder............
Sometimes I have to question my sanity. I managed to make the rudder (excluding the strengthening plates) from 71 separate pieces. Excessive by any stretch of the imagination! This did include a bit of experimentation but that only added a few bits to the total.
I started with a card template made to the profile on the plans.This was positioned on the hull and adjusted to fit. I also made a template of the rear of the keel (immediately in front of the rudder) so that I could get the varying thicknesses correct.
My starting point was to find a brass tube from which to make the pivot. Around the tube I constructed a beam which would ultimately form the front edge of the rudder - thus far 5 parts.
I attached the template to the beam and shaped it to the profile of the keel.
It always looks better to me to have the grain on the rudder running in the same direction as the hull planks. Also I like including a bit of detail (interest) into the rudder. I thought I'd have a go at some pin stripes.
I started to question my approach at this point - thus far 17 parts.
More to follow.....
-
KeithAug got a reaction from KORTES in Altair 1931 by KeithAug - FINISHED - Scale 1:32 - schooner
And finally the capping rail is complete and ready for final sanding.
I put the outer edge of the rail in as a series of short lengths - approx 30cm long - 3 per side. This felt easier to manage than glueing and clamping the whole thing in one go.
I finished with a very slight dip where the stern rail joined the side rail. I tried to ignore it but failed. I then tried to fill the indent by overlaying it with infill planks and then sanding back. I still wasn't happy - so eventually I cut it out.
And replaced it.........
I then tried to ignore that it didn't match the other side. I failed so had to replace the good side as well.
Eventually all was done.
I think next I'll have a go at the rudder.
-
 KeithAug got a reaction from Nirvana in Altair 1931 by KeithAug - FINISHED - Scale 1:32 - schooner
Thank you Nils - not quite on the scale of your Kaiser but quite satisfying never the less. Loved your screws - which prompted me to have a go on Altair.
I made a little more progress on the capping rail along the length of the hull. At about .300 inch wide the rail was much too stiff to bend to follow the curvature of the deck edge. I was pretty certain I would be able to bend a rail of half the thickness and so decided to make the width from two planks. I had the option of trying to lay up the rail on top of the plan but decided to form the rail by mounting it directly on the bulwark.
Having cut mahogany strip (.080 x .300 inch) I needed to round the edges. I was considering making a scraper in the form of a "U" and using this on the plank edge to generate the half round...............however i hit upon a simpler solution....................the back of the knife blade.
Mounting the half rail on top of the ribs necessitated drilling and pining the rail to secure it in place while the PVA dried.
I did have slip and a break which required repair.
So far so good!
-
KeithAug got a reaction from Eddie in Endeavour 1934 by Julie Mo - Amati - Scale 1:35 - America's Cup UK J-Class Challenger
P.S.
Julie looking at the back of your keel it looks quite consistent in thickness. Mine had a waist - see photo.
-
KeithAug got a reaction from Eddie in Endeavour 1934 by Julie Mo - Amati - Scale 1:35 - America's Cup UK J-Class Challenger
Hi Julie
I had a go at steaming and bending the .010 inch mahogany planks. It sort of worked but I don't think I'd use this method. I think David B's post is the way to go.
-
KeithAug got a reaction from mtaylor in Endeavour 1934 by Julie Mo - Amati - Scale 1:35 - America's Cup UK J-Class Challenger
Hi Julie
I had a go at steaming and bending the .010 inch mahogany planks. It sort of worked but I don't think I'd use this method. I think David B's post is the way to go.
-
KeithAug got a reaction from Eddie in Endeavour 1934 by Julie Mo - Amati - Scale 1:35 - America's Cup UK J-Class Challenger
Hi Julie. I agree it is a dinghy / tender and not a lifeboat.
I have scrapped more than a few attempts in the past, learning what works is part of the fun. How thin did you make the planks. I was cutting some mahogany planks recently and mistakenly made a plank .010 inch thick. It behaved more like paper than wood. I'm away at the moment but I'll have a go at bending it when I get home and let you know the result.
-
KeithAug reacted to Mirabell61 in SS Kaiser Wilhelm der Grosse 1897 by Mirabell61 - FINISHED - scale 1:144 - POF - first German four stacker of the Norddeutscher Lloyd line
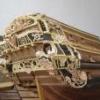
Build log part 40
(update, making the vents)
starting with the various number of bowl vents to begin with.....
Here bowels for the 3 smallest sizes with holes in them to solder the appropriate vent-tubes in. The bowls are made from steel sheet bag-feet buttons, after removing the bag- fastening clip devices....
Nils
-
KeithAug got a reaction from Nirvana in Altair 1931 by KeithAug - FINISHED - Scale 1:32 - schooner
Julie
Most of the rudders on sailing ships were built solid from very heavy timbers - and even then they failed.
Cutty Sark is a good example:-
Cutty Sark lost her rudder in heavy seas in the Indian Ocean when racing Thermopylae with a cargo of China tea. The accident meant Thermopylae beat her back to London by 7 days.
Endeavour being of metal construction probably did have a fabricated rudder.
-
 KeithAug got a reaction from cabrapente in Altair 1931 by KeithAug - FINISHED - Scale 1:32 - schooner
Julie - you might want to see the rest before stealing anything!
So here is how it developed.
I started to sand the rudder down to its final form but part way through the process I started to feel the larger pieces of mahogany were looking a bit monolithic and hence out of scale. I did like the pin stripes and I think I will bank this for a future date.
So decided to use what I had as the core of the rudder and clad it as I had done with Endeavour.
I started by laying two strips either side of the leading edge. I seemed to have created some sort of bug!!!!!!!
I then laid more strips across the rudder, parallel to the waterline. Another weird creature was born!!!!!!!
27 pieces per side = 54. Plus the 17 core parts = 71 parts in total.
After a lot of sanding..........
The next step is to make and attach the 2 strengthening plates - one either side of the rudder and then buff the rudder with fine sandpaper before painting with poly.
-
KeithAug got a reaction from Nirvana in Altair 1931 by KeithAug - FINISHED - Scale 1:32 - schooner
The rudder............
Sometimes I have to question my sanity. I managed to make the rudder (excluding the strengthening plates) from 71 separate pieces. Excessive by any stretch of the imagination! This did include a bit of experimentation but that only added a few bits to the total.
I started with a card template made to the profile on the plans.This was positioned on the hull and adjusted to fit. I also made a template of the rear of the keel (immediately in front of the rudder) so that I could get the varying thicknesses correct.
My starting point was to find a brass tube from which to make the pivot. Around the tube I constructed a beam which would ultimately form the front edge of the rudder - thus far 5 parts.
I attached the template to the beam and shaped it to the profile of the keel.
It always looks better to me to have the grain on the rudder running in the same direction as the hull planks. Also I like including a bit of detail (interest) into the rudder. I thought I'd have a go at some pin stripes.
I started to question my approach at this point - thus far 17 parts.
More to follow.....
-
KeithAug reacted to Julie Mo in Endeavour 1934 by Julie Mo - Amati - Scale 1:35 - America's Cup UK J-Class Challenger
It was, Keith, until I learned the "massage" trick on the tightest bend. When I was bending the others, I would push the steamed wood down firmly against the form. I just kept going from one side to the other. And fibers would break. I didn't see it until I pulled my hand away.
When I got to the last frame, there was no way that method would work. So I put the steamed piece in between my fingers and squeezed tightly. Then I gradually began to bend it. When I felt resistance, I could feel that's where the fibers were about to break. So I put it back in the cup of hot water and let it soak some more.
What I found was even though I had boiled the wood and let it soak to the point that the wood sunk to the bottom of the glass, it still wasn't wet through the center. By bending it a bit, I think I exposed the dry wood. In the end, that last piece gave me less resistance than the previous pieces, even though the bend was much sharper.
This morning I removed the top half of the forms.
I was pleasantly surprised to find the sharpest bend turned out the best. I guess wood likes a good massage.
I also made a 6th section of the form so I could add another frame.
I didn't notice the little nib that needs to be removed until I saw this picture.
Now I need to get out the water glass and zap another piece in the micro.
-
 KeithAug got a reaction from Julie Mo in Altair 1931 by KeithAug - FINISHED - Scale 1:32 - schooner
Julie
Most of the rudders on sailing ships were built solid from very heavy timbers - and even then they failed.
Cutty Sark is a good example:-
Cutty Sark lost her rudder in heavy seas in the Indian Ocean when racing Thermopylae with a cargo of China tea. The accident meant Thermopylae beat her back to London by 7 days.
Endeavour being of metal construction probably did have a fabricated rudder.
-
 KeithAug got a reaction from Tecko in Altair 1931 by KeithAug - FINISHED - Scale 1:32 - schooner
Julie - you might want to see the rest before stealing anything!
So here is how it developed.
I started to sand the rudder down to its final form but part way through the process I started to feel the larger pieces of mahogany were looking a bit monolithic and hence out of scale. I did like the pin stripes and I think I will bank this for a future date.
So decided to use what I had as the core of the rudder and clad it as I had done with Endeavour.
I started by laying two strips either side of the leading edge. I seemed to have created some sort of bug!!!!!!!
I then laid more strips across the rudder, parallel to the waterline. Another weird creature was born!!!!!!!
27 pieces per side = 54. Plus the 17 core parts = 71 parts in total.
After a lot of sanding..........
The next step is to make and attach the 2 strengthening plates - one either side of the rudder and then buff the rudder with fine sandpaper before painting with poly.
-
KeithAug reacted to Julie Mo in Endeavour 1934 by Julie Mo - Amati - Scale 1:35 - America's Cup UK J-Class Challenger
Thanks, Bob. I really am enjoying this experimental phase. I've always been an experimenter and when things go right, you get a real sense of pride.
I didn't have a chance to work on the lifeboat until late but I at least wanted to get those other two frames bent. I went back to the boil the planks in a glass of water and zap in the microwave method. 3 minutes was enough to make the lesser bend and, coupled with a press form, it made the bend pretty easily.
For the final frame I tried using the same technique but the plank snapped. I cut another and zapped it in the microwave for 3 minutes and let it sit in the hot water another 5 minutes. When I took it out, I pinched the center and began to massage it into a bend. As soon as it felt stiff, I threw it back in the hot water. I did this several times and each time it became more pliable. When it came time to make the form, it complied more easily than any of the others.
I will let them sit overnight and hopefully when I remove the forms I will have a smile on my face.
-
KeithAug got a reaction from Nirvana in Altair 1931 by KeithAug - FINISHED - Scale 1:32 - schooner
Julie - you might want to see the rest before stealing anything!
So here is how it developed.
I started to sand the rudder down to its final form but part way through the process I started to feel the larger pieces of mahogany were looking a bit monolithic and hence out of scale. I did like the pin stripes and I think I will bank this for a future date.
So decided to use what I had as the core of the rudder and clad it as I had done with Endeavour.
I started by laying two strips either side of the leading edge. I seemed to have created some sort of bug!!!!!!!
I then laid more strips across the rudder, parallel to the waterline. Another weird creature was born!!!!!!!
27 pieces per side = 54. Plus the 17 core parts = 71 parts in total.
After a lot of sanding..........
The next step is to make and attach the 2 strengthening plates - one either side of the rudder and then buff the rudder with fine sandpaper before painting with poly.
-
 KeithAug got a reaction from GuntherMT in Altair 1931 by KeithAug - FINISHED - Scale 1:32 - schooner
The rudder............
Sometimes I have to question my sanity. I managed to make the rudder (excluding the strengthening plates) from 71 separate pieces. Excessive by any stretch of the imagination! This did include a bit of experimentation but that only added a few bits to the total.
I started with a card template made to the profile on the plans.This was positioned on the hull and adjusted to fit. I also made a template of the rear of the keel (immediately in front of the rudder) so that I could get the varying thicknesses correct.
My starting point was to find a brass tube from which to make the pivot. Around the tube I constructed a beam which would ultimately form the front edge of the rudder - thus far 5 parts.
I attached the template to the beam and shaped it to the profile of the keel.
It always looks better to me to have the grain on the rudder running in the same direction as the hull planks. Also I like including a bit of detail (interest) into the rudder. I thought I'd have a go at some pin stripes.
I started to question my approach at this point - thus far 17 parts.
More to follow.....
-
KeithAug got a reaction from Nirvana in Altair 1931 by KeithAug - FINISHED - Scale 1:32 - schooner
And finally the capping rail is complete and ready for final sanding.
I put the outer edge of the rail in as a series of short lengths - approx 30cm long - 3 per side. This felt easier to manage than glueing and clamping the whole thing in one go.
I finished with a very slight dip where the stern rail joined the side rail. I tried to ignore it but failed. I then tried to fill the indent by overlaying it with infill planks and then sanding back. I still wasn't happy - so eventually I cut it out.
And replaced it.........
I then tried to ignore that it didn't match the other side. I failed so had to replace the good side as well.
Eventually all was done.
I think next I'll have a go at the rudder.
-
 KeithAug got a reaction from hexnut in Altair 1931 by KeithAug - FINISHED - Scale 1:32 - schooner
The rudder............
Sometimes I have to question my sanity. I managed to make the rudder (excluding the strengthening plates) from 71 separate pieces. Excessive by any stretch of the imagination! This did include a bit of experimentation but that only added a few bits to the total.
I started with a card template made to the profile on the plans.This was positioned on the hull and adjusted to fit. I also made a template of the rear of the keel (immediately in front of the rudder) so that I could get the varying thicknesses correct.
My starting point was to find a brass tube from which to make the pivot. Around the tube I constructed a beam which would ultimately form the front edge of the rudder - thus far 5 parts.
I attached the template to the beam and shaped it to the profile of the keel.
It always looks better to me to have the grain on the rudder running in the same direction as the hull planks. Also I like including a bit of detail (interest) into the rudder. I thought I'd have a go at some pin stripes.
I started to question my approach at this point - thus far 17 parts.
More to follow.....
-
 KeithAug got a reaction from tadheus in Altair 1931 by KeithAug - FINISHED - Scale 1:32 - schooner
The rudder............
Sometimes I have to question my sanity. I managed to make the rudder (excluding the strengthening plates) from 71 separate pieces. Excessive by any stretch of the imagination! This did include a bit of experimentation but that only added a few bits to the total.
I started with a card template made to the profile on the plans.This was positioned on the hull and adjusted to fit. I also made a template of the rear of the keel (immediately in front of the rudder) so that I could get the varying thicknesses correct.
My starting point was to find a brass tube from which to make the pivot. Around the tube I constructed a beam which would ultimately form the front edge of the rudder - thus far 5 parts.
I attached the template to the beam and shaped it to the profile of the keel.
It always looks better to me to have the grain on the rudder running in the same direction as the hull planks. Also I like including a bit of detail (interest) into the rudder. I thought I'd have a go at some pin stripes.
I started to question my approach at this point - thus far 17 parts.
More to follow.....