


bryanc
-
Posts
218 -
Joined
-
Last visited
Content Type
Profiles
Forums
Gallery
Events
Everything posted by bryanc
-
 Thanks for the input guys. Obviously I must be on my toes even more than I anticipated! Don't hesitate to throw more suggestions at me as I go along.
- 52 replies
-
- 4
-

-
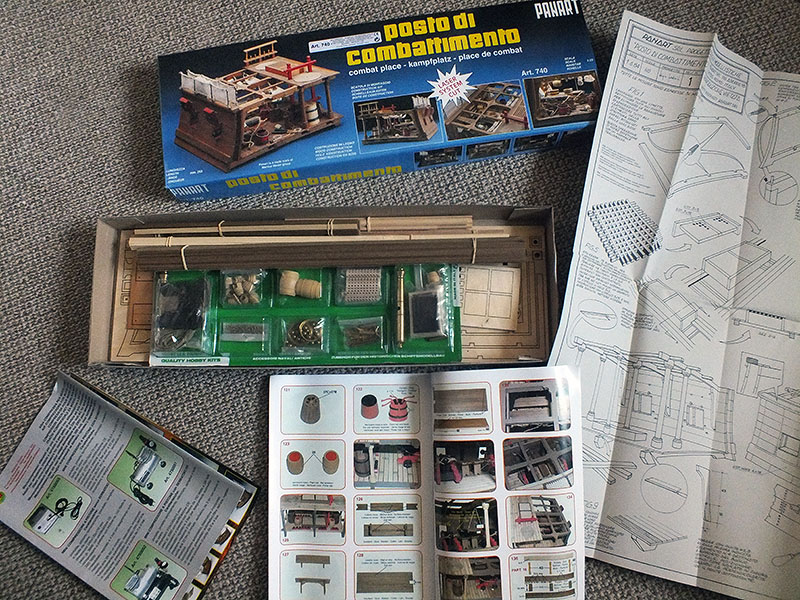
- panart
- posto di combattimento
- (and 1 more)
-
Moving on… The kit itself is quite impressive, not the least because of the scale; none of the photos in this build log will ever properly show just how “big” this thing is. The cannon clearly shown in the first pic for instance, is over 10cms long. After my last thwarted build I am going to be very careful about waxing too lyrical about components, however the quality of this kit seems very good overall, the wood is certainly sound and of good quality, the components (which appear to be all present and correct) also seem well manufactured, even down to eyelets, which are not the usual off the shelf things, but seem to have been procured especially. As ever there is a lot of brass stuff that will have to be blackened, even the cannonballs, but at least they are superbly made, and upon close inspection, have a small hole presumably for easy placement (the manual reveals nothing to suggest otherwise). Talking of which, the manual doesn’t overburden itself with text. There are no explanations, descriptions or even instructions short of the curt “glue here” type (in six languages). It is very well illustrated however and the photos do appear pertinent and well labelled where appropriate. I can see the lack of explanation is going to trip me up sooner or later, but thankfully there are, as I’ve said, at least two other good build logs on here for me to get second opinions from. There is also the vast plan/drawing, a full A1 sheet of it, printed both sides. It contains very detailed drawings of the various stages of the build. There is considerable written detail, albeit in Italian. And so to the build.
- 52 replies
-
- 5
-
-
- panart
- posto di combattimento
- (and 1 more)
-
Thanks for that Bob, and yes it's a great shame. I don't want to completely abandon it just yet, which is why its on the windowsill and not in the bin. We'll have to see. I just needed to get back into things, and it was holding me back. Thanks for the good wishes re. the new build, and best wishes with your Endeavour. Cheers.
-
Posto di Combattimanto Which Google translates as "instead of fighting", which I don't think is Panart's intention. A more correct (direct Italian) translation is simply "battle station" which is a lot more appropriate. As far as I can ascertain this isn't based on any real ship, but is a figment of the designers imagination. It is, hopefully an historically accurate depiction of a cross section of a gun-deck based one deck down midships somewhere. During this build I will be constantly referring to the brilliant build of this kit by Cobr@ here on NRG. I make no apologies for this, I only hope my build is half as good. Onward... Bryan
- 52 replies
-
- 5
-
-
- panart
- posto di combattimento
- (and 1 more)
-
Hi guys, Well I'm back after a long absence with the sad news that I've shelved my current build the Navio Rayo - Puesto de Combate, at least for now. As I've said many times the kits concept is wonderful, and it was a fun build, to a point, but there comes the time when the never ending tearing it apart to rebuild after discovering design errors or scale imperfections or lack of materials just wears you down. I became very disenchanted with it, and there was a very real danger of it putting me off model ship building altogether (which in effect it did, for nearly a month). I don't want that so its sat in a windowsill for the time being, and all the bits are back in its box and stowed away. I'm about to start work on the Panart Posto di Combattimanto, another cross section, but one with a brilliant build log on here already (nod to Bob), so I know that serious issues with this build will be down to me. See you there...
-
Well I do sympathise Bob, god knows, but given you are forewarned to a point, and can learn from my (forced) mistakes, you will I'm sure do an infinitely superior job, but more to the point, will enjoy it (in that masochistic way of wooden kit builders) ;-) In fact, if I were awash with money (which I'm definitely not!), I would genuinely be tempted to buy another and redo it - I so like the concept. Incidentally, the supplier did mention Disarmodel have four new kits ready for release (he inferred nautical ones)! Can't deny I'm curious!! Thanks, Bryan
-
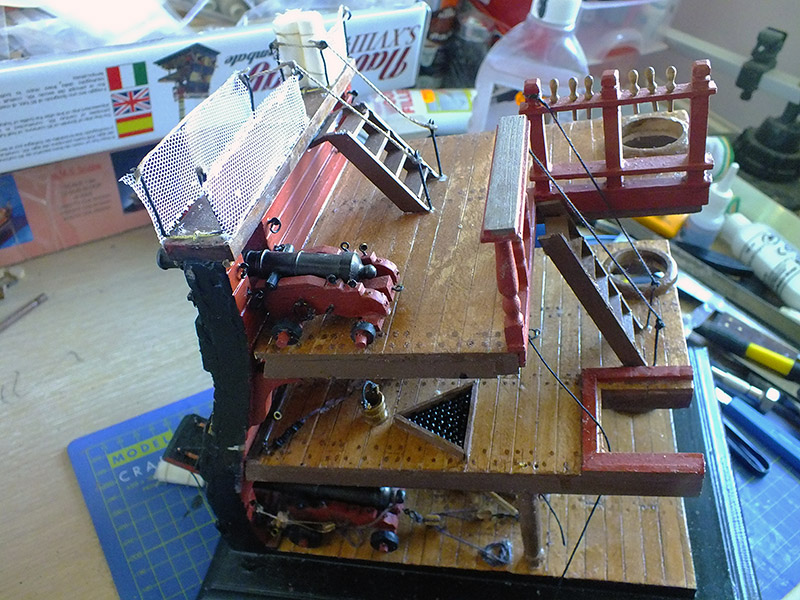
Bit of a late update Whoops, various things have kept me from the build; a few nice summer days for instance, but also awaiting parts for the build and so on. Because of the various problems I've had with the kit; poor instructions and lack of, or poor, parts, I wrote to the suppliers. Given that the lack of parts, and poor instructions, are actually nothing to do with him as such, he responded very positively. He has been in touch on my behalf with the kit manufacturers, and has been able to confirm that the poor manual will be revised and items like the cast iron stanchions etc will be replaced with more sensible items in further editions of the kit - not much use to me of course, but the supplier did send me various items to replace or add to the broken or missing things; more cannonballs(!), more eyelets, brass wire of various dimensions and other stuff, including replacements for the cast iron items. Although he replaced those items, he did suggest I actually fashion replacements from the brass wire, which I had actually already started doing, having found in addition to the cast iron items that arrived broken, one only had to begin to work with them and they snapped - really really useless and not fit for purpose. But the build has (limped) forward as you see. I do dislike inaccuracy, and I maintain the upper deck "furniture"; the stanchions etc, are scaled far too big. Given the handrails are presumably at waist height or above, the men manning the upper deck guns would have to be on their hands and knees to do so! It just doesn't sit comfortably with me. The cannon itself (one of the two just dry fitted for now) do seem too small, and the over-small wheels make the thing look like a toy. I may yet put more substantial wheels on them. Again it just drives home what a well imagined and brilliantly design concept this is, but so badly let down by poor implementation and, well, that manual! But I'll persevere because despite everything, I do like the kit... Bryan
-
Yes Bob, a really good kit, wholly spoilt by a poor manual - and lack of parts. No ladder sides, not one of the two sets are present, and this time they are not intended to be built, they are clearly marked as "pref"! I've started making the small one myself (top RH corner of the cutting mat), but the big one will be more demanding. Anyway, the middle deck is now removed (did anyone hear the heart rending crack?!). It came away intact apart from the supports (again!). You can see one replacement about to be shaped on the cutting mat. I've tried a refit "by hand" lower down, and thankfully I can go low enough to make it look all the more respectable. I can't deny I'm a bit worried about the mast alignment, the mast "hole" is bound to move back a fraction, just how much of a fraction!?
-
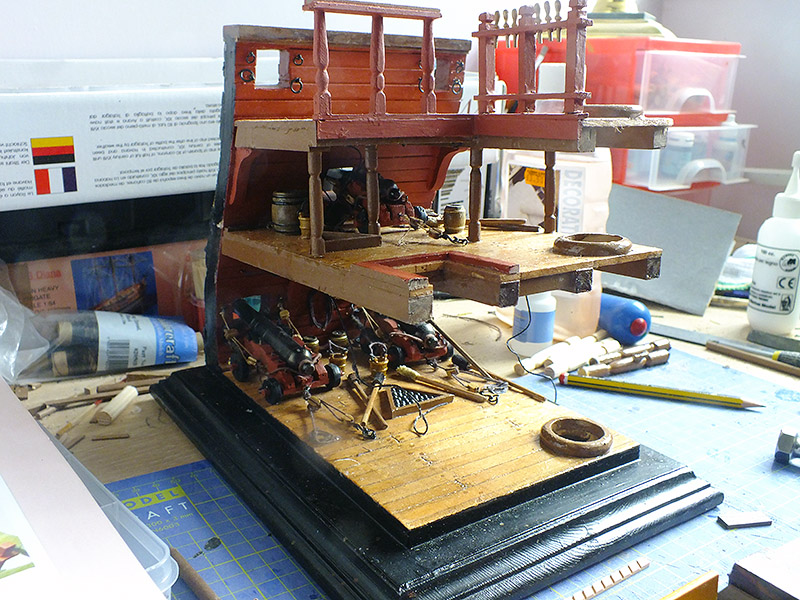
Top Deck Fitted and ...oh dear! I hand built the handrails and stanchions including the ones I thought had been omitted (yes you were right Bob, oh that manual) and fitted them in place before fitting the deck. All went well and was quiet pleased, they look quite good - until I stood back. The said handrails and stanchions were built by the book, but look oversized. But then I realised it wasn't them that were too big, but the middle deck that had been fitted too high :-( As fitted the sailors who manned that deck would have to be about 4ft high (proportionally). (You can imagine the nautical terms that were uttered!). I've no choice, I'll have to remove and refit the middle deck otherwise it would haunt me forever. I notice the cannon barrel is riding higher than it should (not surprisingly), so I've about 8mm to play with. Not a great deal, but as in effect it will mean both the lower deck will be 8mm less high and the middle deck 8mm lower, it will help appearances. I've already removed the middle deck support pillars from the lower deck. You'll probably hear the sickening crack as the middle deck is separated from the hull! A lot to do though, all deck support pillars will have to be remade. The cannon should survive, as it's pinned to the deck. It will alter the alignment of the mast to, but hopefully not too much. Oh well...
-
Yes Bob I tend to think you're right, I absolutely sure they could shut under their own weight. There would have to be some system to keep them securely up and open when necessary, but all that rigging does seem over the top. Try though I did I could find absolutely no reference to "port lid rigging" in my Internet searches. By the way, looking now at the top deck I find all four of the "precut" cast hand rail stanchions have been neatly snapped in half. It looks for all the world as if some disgruntled packer has just snapped all four. I really can't imagine how all four could just break like that in transit. Mind you they are ugly things and aren't even used in the manual photos, so I'll be making them out of wood anyway. But out of curiosity have a look in your box when you have a moment. Also no "pre-cut" hand rails as it claims in the manual (I think). They won't be easy to replicate with those holes in. Have you got those? Cheers.
-
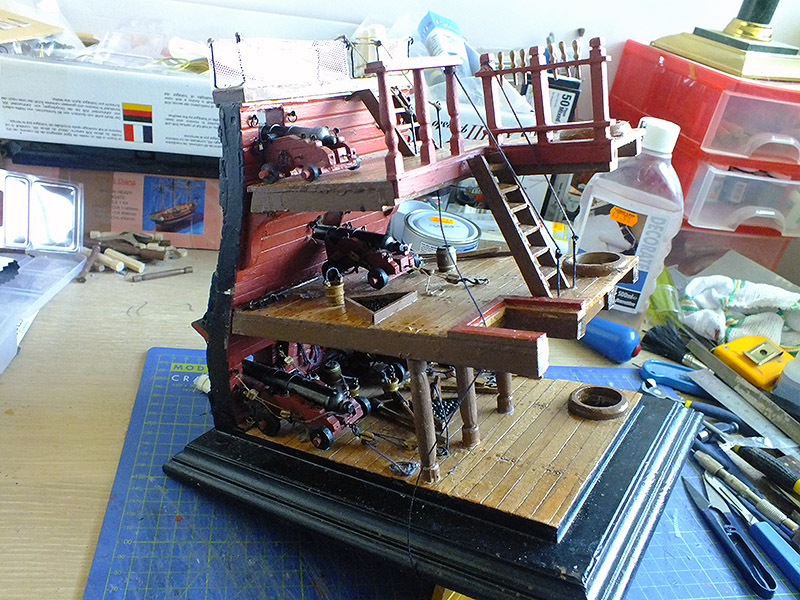
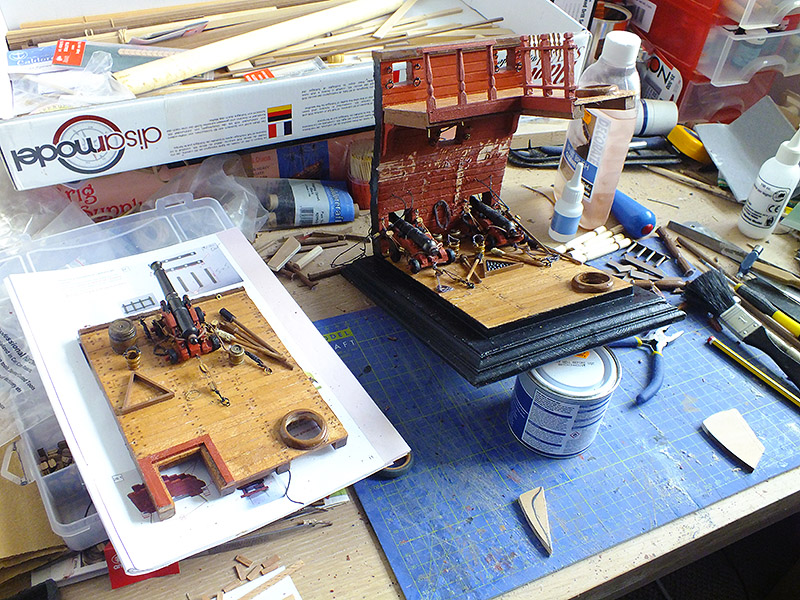
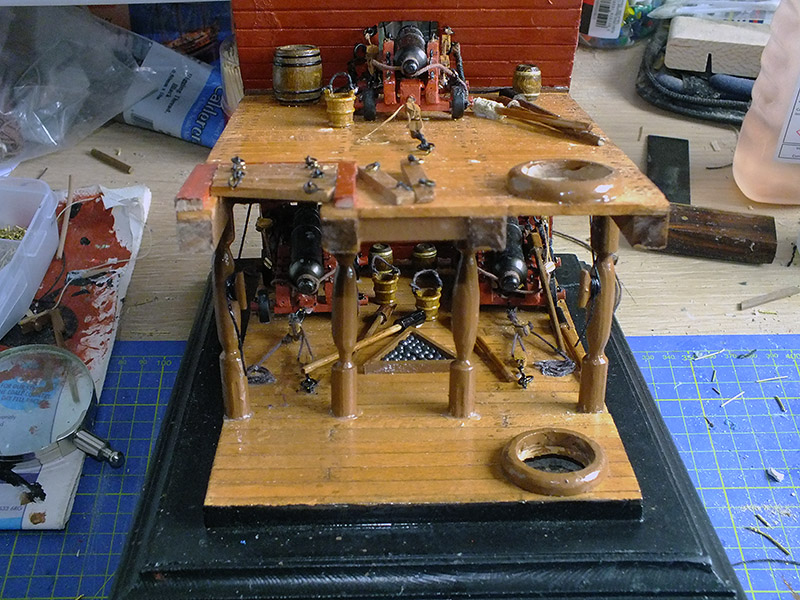
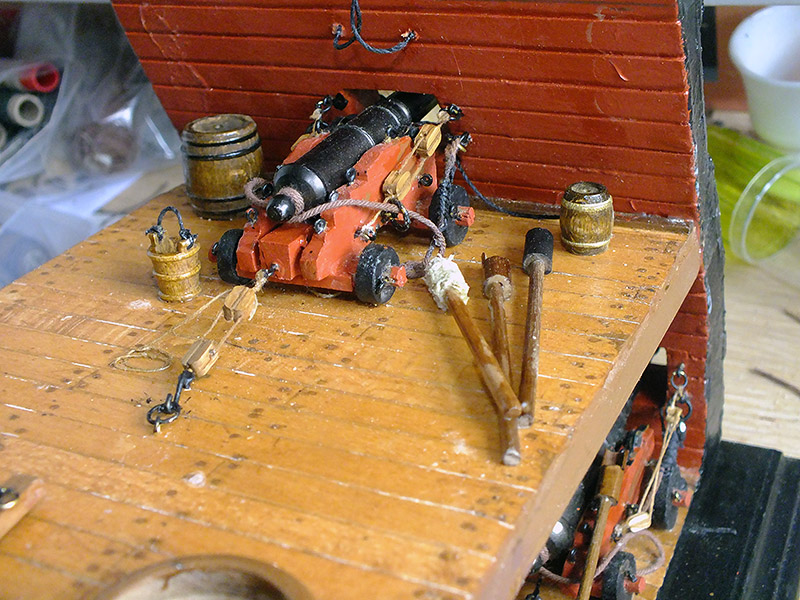
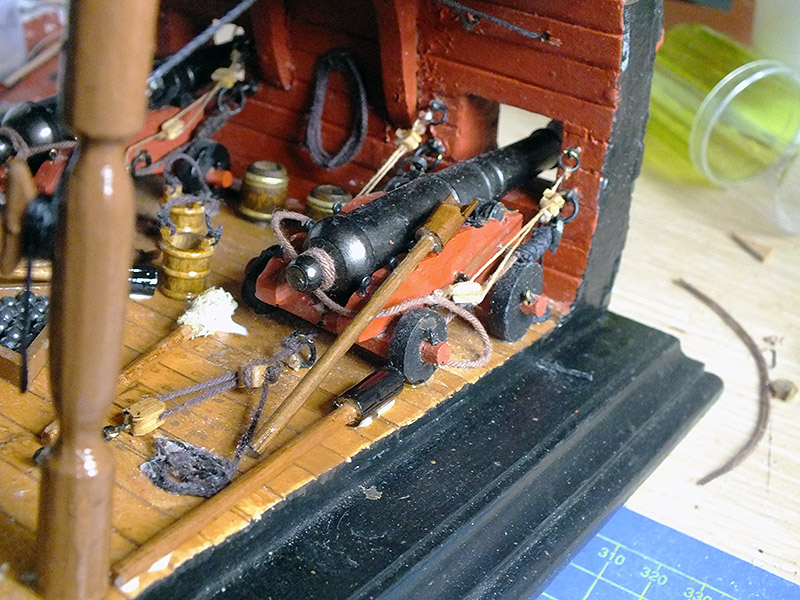
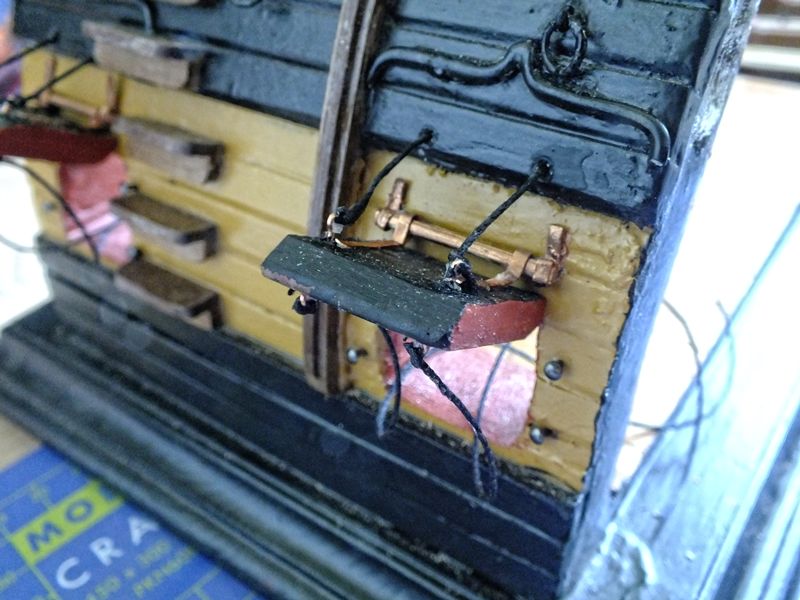
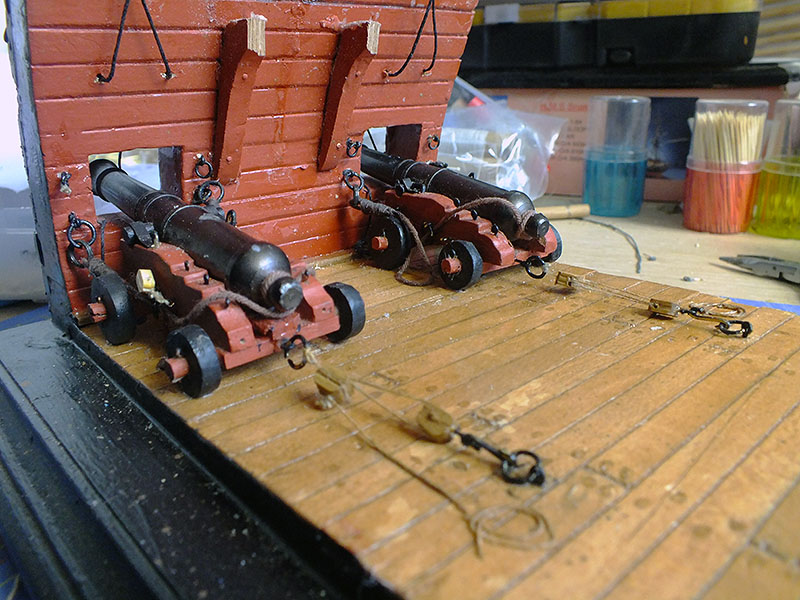
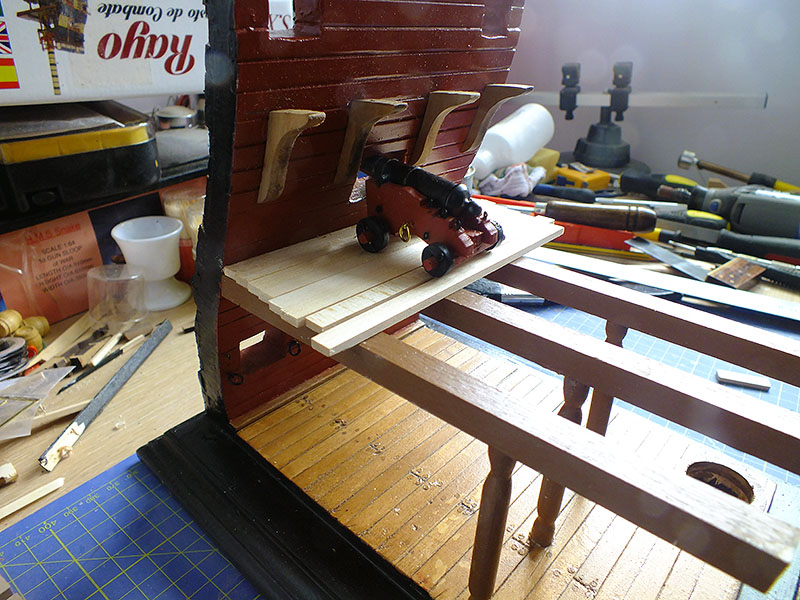
Working up to the Top Deck There's been quite a lot of additions, so I thought I'd do an update because the top deck will be going on shortly, and quite a lot of the work, while still visible, won't be so easy to photograph. Having said that I think I'm going to do a lot of the top deck furniture and fittings; balustrades and the like, before I fit the deck. The work done recently includes completion of the gun rigging, and the mass of paraphernalia that litters the two decks, and litters is really the word in this case. A great jumble of stuff laying about, but I love it, it makes it all the more interesting even if no self respecting captain would ever allow a deck to be so messy! The gun cleaners and ramrods were interesting to make, I approached it with some trepidation, but ultimately found them fun to do, so much so that in addition to the "ladles" and ramrods, I also made a sponger which isn't catered for in the kit, and I may yet try and do a "wormer/scraper", although that might be gilding the lily a little, as there isn't a great deal of room left, and the infamous fuse buckets have yet to go on each deck (still awaiting a post with whatever delights Guinea Models might send). Needless to say I had run out of material to make the handles long before I even got to the extra ones. (Which accounts for the vaguely different handle colours of the latter ones). I had to sand down a bit of spare doweling I had "in stock". One item of note which as much as anything illustrates what a rubbish manual the kit has is the port lid rigging. Absolutely no reference is made to it in the instructions, nor is there a photo specifically showing it, although it can vaguely be seen in a couple. Its actually quite complicated, and were it not for it being an integral part of Cobr@s "Section Deck Between Gun Bays", and Cobr@ thoroughly photographing it, I would have been totally clueless as to how it was rigged. (Must remember to blacken the brass fittings!). The end is still a good way off, but is in sight, and I can honestly say for all its faults I am enjoying this build more than any I've previously attempted.

-
Thanks Bob, I did wonder about the hinges, but thought I'd thoroughly checked re. the big barrels. But as you say, with a manual like that! Makes you wonder what on earth Guinea Hobbies are going to send me!
-
Let me add my congratulations Bob, superb work and a masterclass in model-making without a doubt. It really is exquisite work and take it from one who tries so hard to emulate you - but is so far behind. Thanks for sharing it with us Bryan PS I'm strongly considering this for my next work, I've researched it enough to know its not difficult to get hold of, but who do you recommend - msg me if you like.
- 206 replies
-
- 4
-
-
- battle station
- panart
- (and 1 more)
-
Middle gun-deck about to be (re)fitted! The cannon rigging and most of the lower deck paraphernalia has now been completed. I say "most" because several items were missing or incomplete as regards the kit contents. The large fuse barrels just weren't in the kit, and the number of cannon balls (of both sizes) was grossly inadequate, as were the rings already mentioned. (More about my efforts to get them replaced later). As there wasn't even room to place the two cannonball stands as the manual shows I have made do with just the one. It looks OK, whereas two of the same size (as specified in the manual) would have looked ridiculous - and I didn't have enough cannonballs to fill two stands anyway! Also not yet added are the cannon ramrods, cleaners etc., which can be added at anytime, and I'll almost certainly construct and position them all at the same time. Larger barrels and maybe other odds and sods I'll position when the middle deck (and its supports) are positioned. The cannon by the way were fitted a la Cobr@, with pins through the wheel base into the deck (thanks Bob!). They at least won't be going anywhere. No room unfortunately for the bashed table and benches, although I will give some thought to other deck items which may have been present in the real thing when I can see how much room I have to play with - it seems there will be quite a lot. Just some scratched paintwork on the lower inner hull to touch up, then the middle deck goes up! You can imagine my dismay to discover no large fuse barrels present, and given the general lack of other items I "penned" a terse email to the kit suppliers Guinea Hobbies in Spain. Given the problems I had with them originally I wasn't too confident I'd even got a response, but perhaps because of my threat to get the "credit card people" on the case (always a good weapon), I was delighted to receive an email almost by return promising they had got onto the manufacturers and would be replacing the missing items within 7 days. We'll see! Bryan
-
Yes well that would make sense Bob as I've discovered. However, as you now know, one of the things the manual does emphatically say is do the decks first! But we've said all there is to say about the manual! Glad you like it, I'm very pleased. There are faults of course, but overall its looking OK. Bryan
-
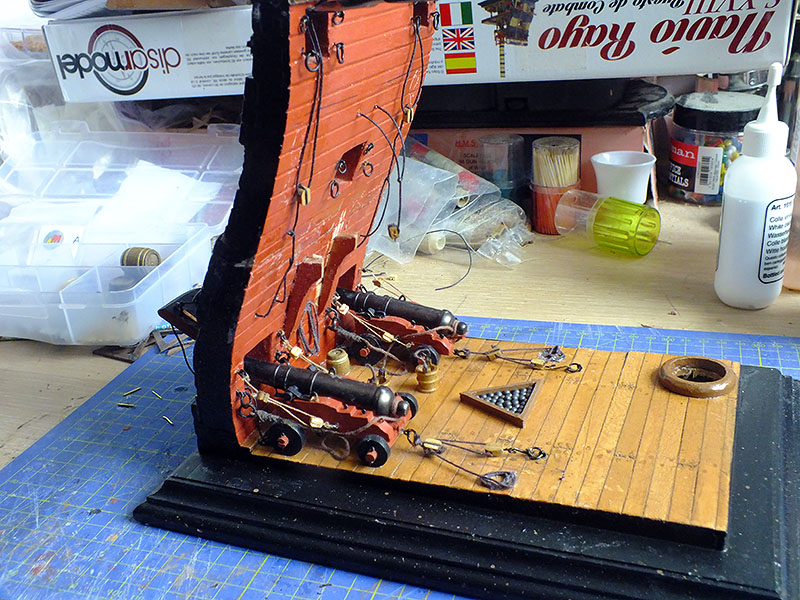
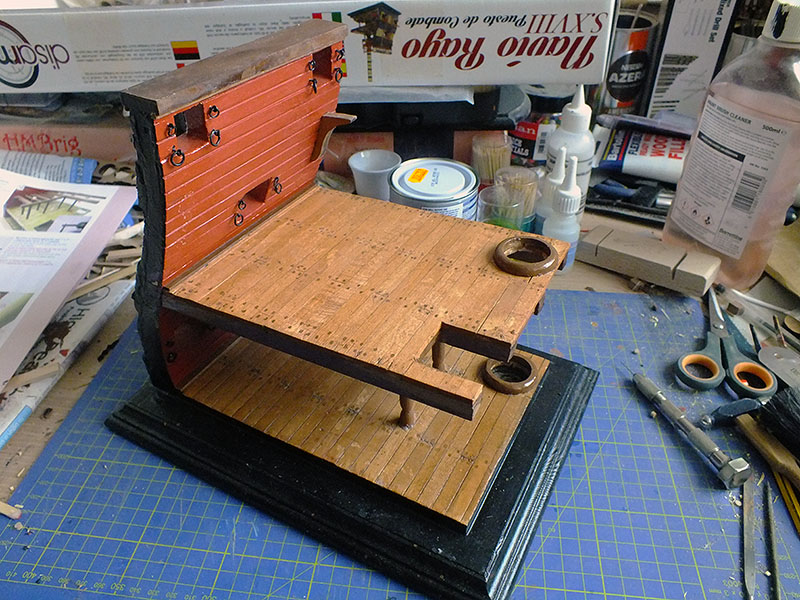
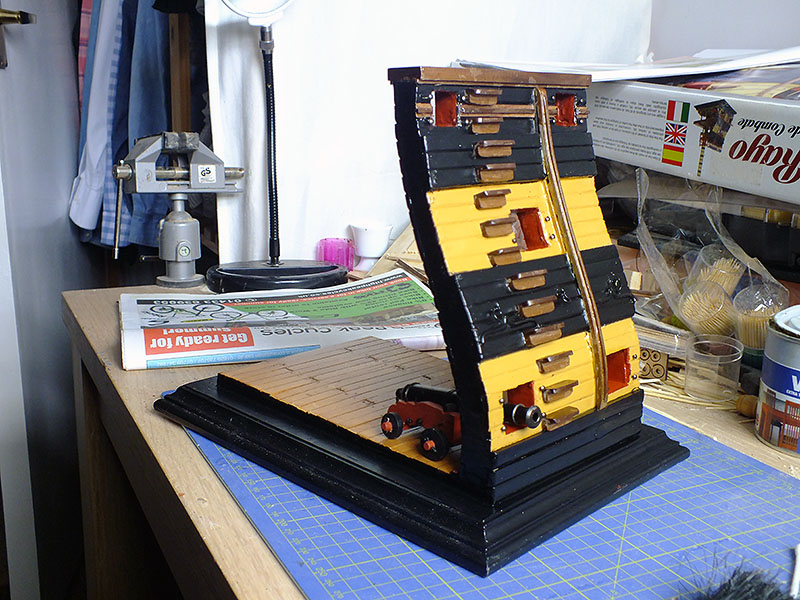
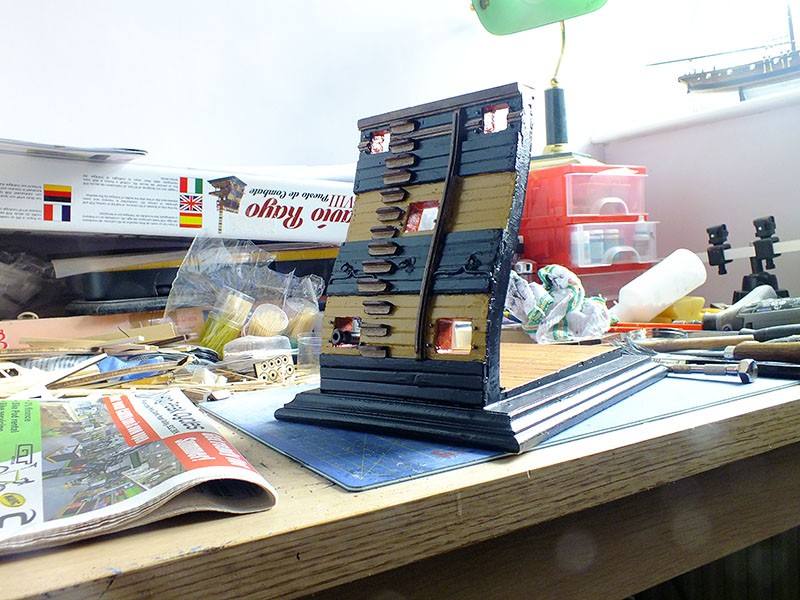
We can rebuild... I thought an update was overdue, because many changes have occurred which needed logging, if only for my own benefit! The three gun port covers were assembled and positioned, but not without difficulty. By now I'm used to having inadequate instructions, but not having pieces of the kit missing! There were no cover brackets, nor hinge mechanisms (assuming there were meant to be, that manual...!), so I had to create and assemble my own. I'm not at all displeased with them, and decided to leave them "brass" rather than black. They add a great deal to the outer hull of course. As I was pondering earlier; I decided to build the upper deck completely "off piste", and in fact it's still "off piste" for the moment. It was infinitely easier to build in this way, but lining it up with the rest of the build was tricky obviously, as was getting the mast "hole" in the right place. I'm confident it is now, after a lot of work, as good as if it was built onto the existing kit. Another benefit was of course having lots more room to play with below, and it occurred to me that positioning the guns, and all the deck paraphernalia on the bottom deck would be so much easier if the middle deck wasn't there! Nothing ventured ... I removed it! Not without casualty I must admit; the photos reveal the upper deck supports didn't take kindly to being uprooted, and both were severed in half! Not for the first time I underestimated the power of the humble carpenters wood glue! However the sheared off "stumps" actually act very well as "registers", enabling the deck to be exactly positioned as it was before, by keying them together. And of course it did make adding the guns, their rigging etc sooooo much easier. The photos show the (biggest) guns positioned in all their brooding glory. Not all the rigging has yet been attached. I did also construct a table and benches (bashed, as no provision was made for them in the kit). Alas as the guns took their positions it became obvious the table made things far too cramped. I have since made it more narrow, and will include it later if it seems appropriate. The middle deck will shortly be (re)fixed in position and I have already "turned" four pillars which are an improvement on the last ones (my local builders merchants did have some (9mm) dowel I'm relieved to say. Sadly they didn't have any 6mm rings and smaller eyelets (well, it was unlikely) , so I've had to order and await these before I could continue. Sadly another criticism of this kit; lack of parts! My enjoyment of this build however remains undiminished, we'll say nothing of the instructions. Bryan


-
Good idea Bob, as already discussed, the instructions are dire, but the photos at least a little helpful. Obviously I'll watch how you go about things. Thanks Wacko it is looking good isn't it? As I've said its a thoughtful design and well implemented, its quite nudged me towards section and "diorama" kits, but there's few about. Bryan
-
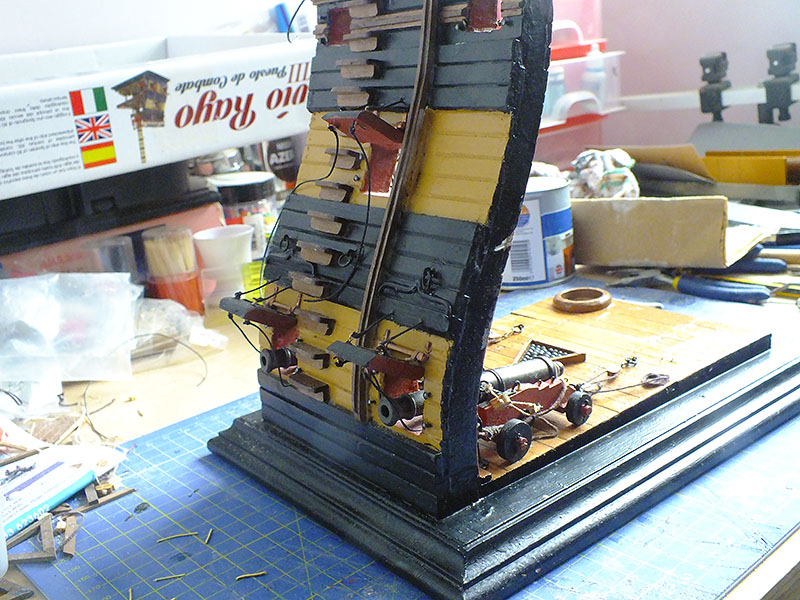
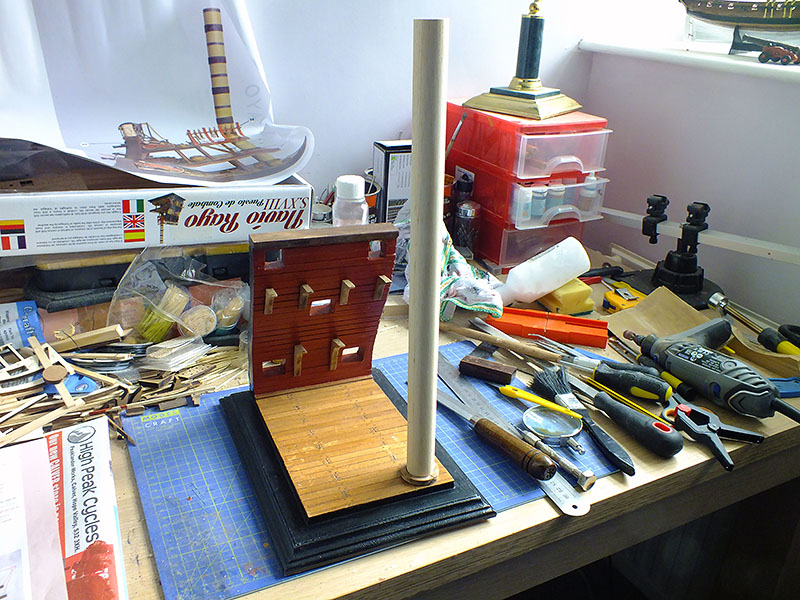
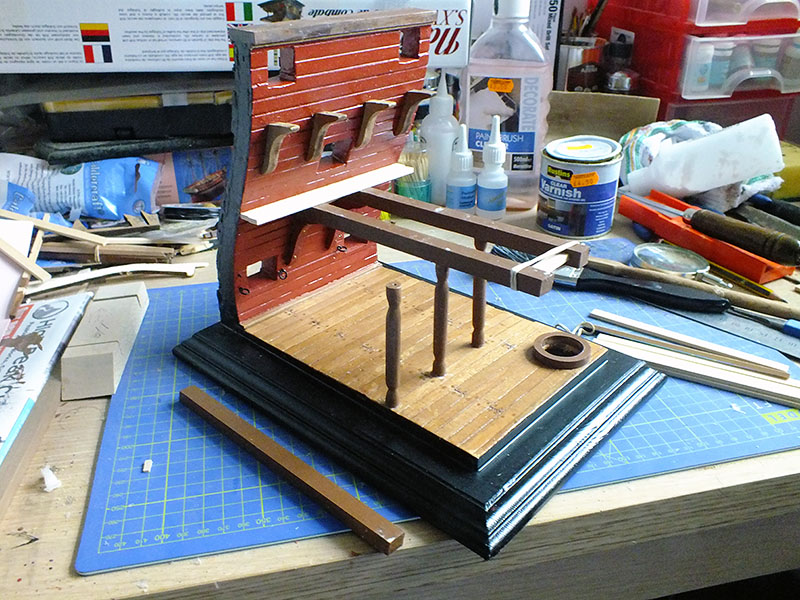
Middle Deck fitted Just a quickie as the next logical step has been completed. The middle gun deck is now fitted and finished. I'm quite pleased, although it took some work to get there. Its looking good and solid if nothing else, and my previous comments about the deck pillars taking the weight is rubbish, completely removed the deck would remain just as solid. The odd doughnut shaped things are the mast supports/decoration of course. I have dry fitted the mast several times, its a tight fit, but fine. I do hope the "doughnuts" look a little less odd when the mast is in situ! A couple of things to note; you may note I'm down to two deck support pillars (one of the intended three ended up too short!), but shorty I'll be down to none! I'm unhappy with them, surely I can do better, so am going to replace them all. I'm desperately hoping my local DIY shop sells 8mm doweling and am heading up there shortly, that supplied by the kit long since used up. (I know I can readily get some online Bob, but the 8mm is all I need and bearing in mind the hefty postage, if the local shop can supply it, then its obviously the better choice initially). I've also veered away from the plan somewhat. I have fitted an extra deck beam. The one furthest away as the photo shows, is not on the plan. So I've fitted one. I feel justified in doing so partly because I moved the existing ones closer together than planned (not entirely intentionally!), and partly because it just didn't look right, the cross beams ending in the middle of nowhere on the right hand side. No doubt I'll pay the price when I run out of beam material on the top deck. That is a point actually; quality stuff though it is, there's certainly not an overabundance of material supplied. Eyelets are another example, I ran out ages ago, and still need many more. Luckily anyone who has done a couple of builds previously has spare eyelets. So the upper deck beckons. I'm going to sit and have a good think about it though, I had such problems fitting the middle deck, I'm half tempted to build the deck completely "off ship", to fit it as one complete piece after. Its getting the dimensions right that's going to be problematic doing it that way. Onward and upward... Bryan
-
Thanks Cristi, interesting you have completed the Santisima Trinidad Cross Section, because I now have that waiting. Am about to study your build log ;-) Bryan
- 77 replies
-
- 4
-
-
- cross-section
- hms victory
- (and 2 more)
-
Just a very brief update as things, predictably, are getting really "interesting". I'm currently building the middle deck support structure, and its proving very difficult. Needless to say the instructions are next to useless, with no direction as to methology, and only lateral measurements to help. There is no mention of heights whatsoever. You'd think an indication of how tall the beam support pillars are intended to be might be of use! But no, you're very much on your own. In the end I just winged it; I laid one of the decking planks at a suitable position and angle on the hull and used that as my anchor point, and in fact building everything upside down - planks, beams, hull supports, and lastly the beam supports went on in that order. Then the model was righted and a heavy weight on the beams at the deck centre end to ensure they adhered to the planking at the other by pure counter balance! I don't know if that makes any sense, but it works! Even then I'm afraid the mid deck cannon rides too high in the gun-port, but that can be remedied to an extent by making the barrel sit lower in the carriage. Turning wood is not my strong suit, and the beam supports (pillars) are best just glanced at, but in this model they are functional, actually carrying the weight of the deck! Critical though I know I sound, I am thoroughly enjoying myself! Bryan BTW Wacko; I have received my birthday present and alas its not the Victory Cross-section, but the Santisima Trinidad cross-section, a very different (and small scale) kit, which may end up being shelved for a little while, as I'm loving building on a bigger scale so much. Sorry.
-
That's inspired Bob, thank you very much. A good example of a skilled modeller thinking on his feet - and sharing his wisdom. I think I'll probably do both. If you look at the RH bottom port you may just notice its about 1mm lower than the left, and the cannon looks that bit better when there, so a subtle combination of both ideas should crack it! Re the mast deck hole, I think I'll do the usual; small holes around the inner perimeter, then finish off with a file. There's a good 10mm underneath and including the deck itself to support the mast anyway. But thanks for the dowel link, its an incredibly useful one and is now in my "favourites" ;-) Wacko - I'll certainly do a build log when I start the new cross section and will be bashing where possible and practical. That's why I love the Victory so much, more so than any other ship of the time we know almost down the the last treenail how she looks and was built and designed - she still exists after all and is so well documented. Thanks guys, Bryan
-
Thanks guys, and Bob its 22cms to where it is now, plinth included, but it will rise another 30mm or so when the other stuff goes on top of the balustrade. That broom handle of a mast obviously will take it to nearly as much again! BTW the manual, typically, says to drill the 25mm hole for the mast in the decks. Yea right, like I'm going to take an inch drill to my kit! I'll take to heart what you said about the low port and give it some thought, a mm or so won't be that much of a pain to shave off, and it might make it more respectable ;-) The deck of course is cambered down from the middle of the deck to the scuppers, maybe I lost that mm by not putting much of a slope to it, that said though in one of the pics you can see the slope is quite dramatic, too much, not too little I would have thought. But hey, nothing there that isn't recoverable. Thanks again.
-
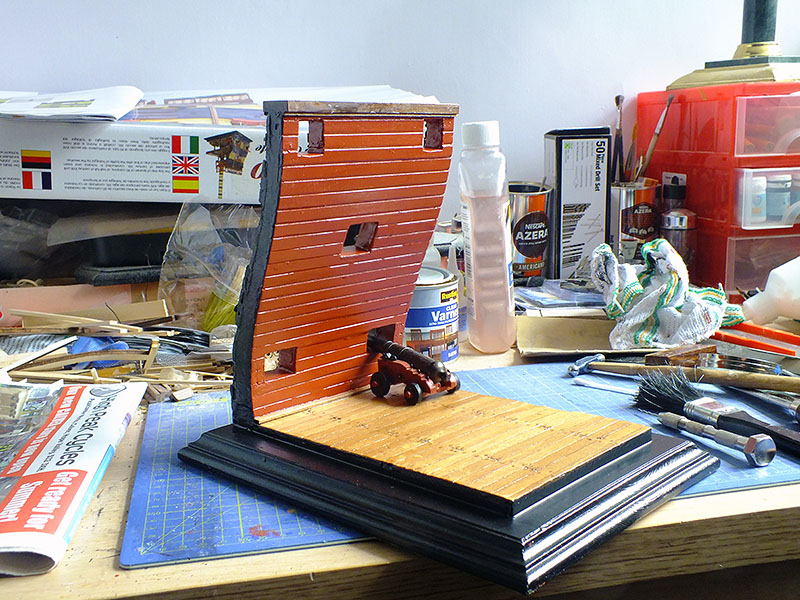
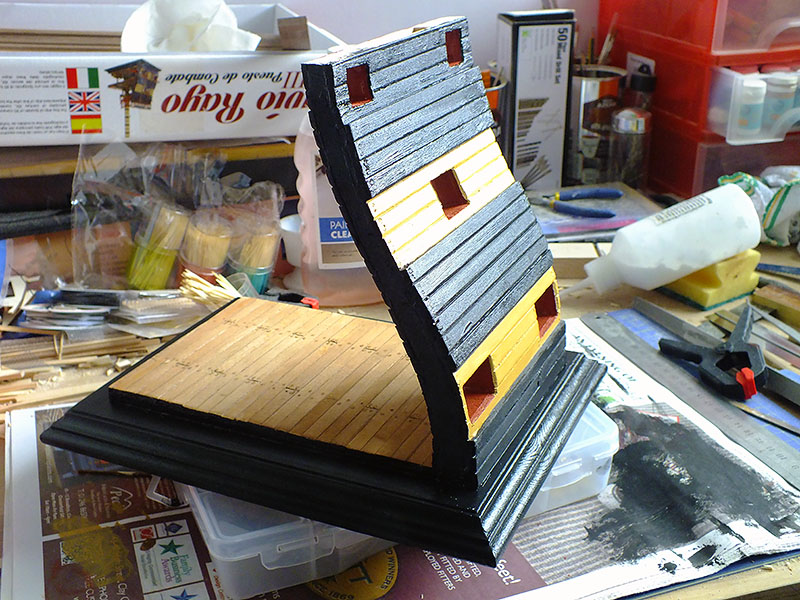
Outside done, now to the inside... A lot of work has been done, some obvious, some less so. The less immediately obvious includes the removal of the extra strakes! I did so probably within the hour I had just posted that I'd put them on! I just wasn't happy, and I'm glad I went for it, it now looks more "proper" somehow and certainly more like the excellent photos Bob pointed out. Thankfully the surplus strakes came off easier than I anticipated and it was relatively easy to make good after I had removed them. The "yellow" ones incidentally Bob are painted standard yellow ochre, I think the photos perhaps makes them appear richer in colour than they actually are - plus its had a coat of (clear satin) varnish now which hasn't really dried yet so is more shiny than it will be when its dulled and weathered a little. I also took the decision to make the bottom gun ports a little more narrow, so the extreme outsides have a little more "meat" for the eyelets etc. That was awkward to do, but thankfully it worked. As you see I also built one of the larger cannon (what a job!). In situ it looks fine, but I am wondering if to just take a little more off the bottom of the port, so the barrel has more clearance. Not sure. I'm quite happy it having far more space above the barrel, the cannon recoil goes upwards as well as backwards after all! And in reality there was definitely far more air above than below the barrel. The "ladder" steps were awkward to line up, and the manual no help at all. Again the high res photos on the poster that came with the kit (and Bobs pdf) proved of far more assistance. I did think the steps look(ed) a little bit over-big and "woody", and that's one reason for the varnish, its "dumbed" the unpainted wood down a little. But now I'm both excited and apprehensive about started on the decks etc. The instructions seem to be less than helpful as usual, but we'll see. I notice all of the deck supports that fasten to the hull are the first things to go on, so I should get an immediate rough idea of whether my gun-ports are correctly placed quite soon! I can't see they are going to be hopelessly out, and there is a little bit of room for maneuver anyway. The kit continues to both frustrate (mainly because of the manual) and give me genuine pleasure to build - its after all very well designed and planned, and the materials are generally good and in some cases excellent. Its good fun to build, and wouldn't be as much so if it wasn't a little challenging! Incidentally its my birthday next week, and I think I'm about to receive another kit as a present; I've a feeling its another cross-section, the Victory again, this time a mid ship section, perhaps the Corel one. But I'm not meant to know of course! Bryan

-
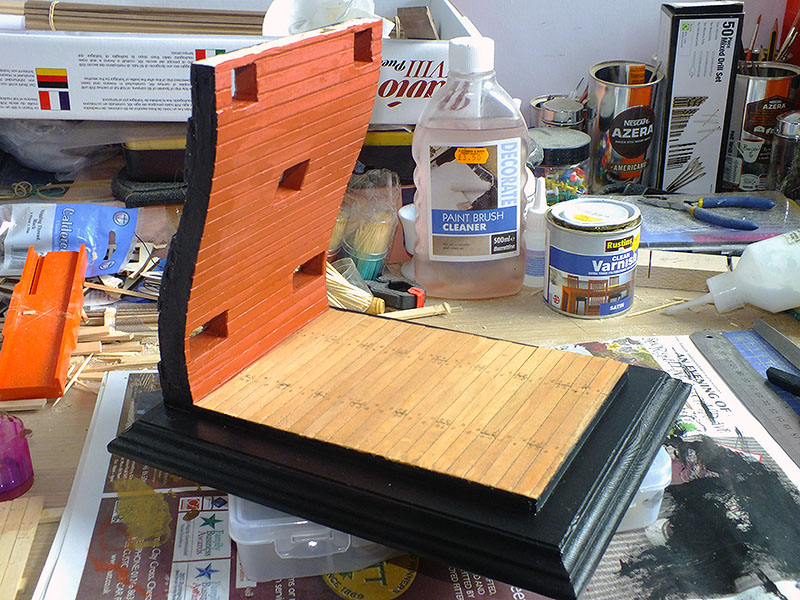
Hmmm... Well here she is nicely painted, and on one hand I'm pleased and impressed (love the way the deck merges into the plinth), on the other hand the gun port size and positioning is still bothering me. Or is it the fact I put an extra strake under each set (done to try and match up the photo) but now I feel I may have overdone things. (They are going to be buggers to remove again)! At least the deck looks reasonable, but oh how I wish I had created the "plank ends" with a simple bash with a chisel and not scored them, but there's no undoing that! I was already thinking about building the cannon for lining up purposes Bob, and now you've confirmed it. Trouble is I'll have to do them all really as there are three very different sizes, the biggest being real beasts! Maybe one of each for now. Right, I'll get onto that now, but may varnish the whole lot while I can relatively easily... decisions decisions... Bryan
-
Thanks as ever guys, your comments are much appreciated. Yes Bob, the hull planks have all been chamfered on the lower edge - that's what I meant by recessed. It really adds to it doesn't it? The manual also says to draw a pencil line under each one, but I really don't see the point in that and will wait until its fully painted before committing myself to that. As you correctly point out the plank count on my model is the same as in that picture, and, as far as I can ascertain, the same as in the manual, so maybe I'm worrying unnecessarily. One thing which is definitely contributing to the situation is that I've established all three (layers of) gun ports are a few millimeters short of the total height they should be. (No surprise there then). The trouble is I can't work out whether its the top or bottom that need some work. I'll re-investigate, but at least its doable. You're right Paul, this particular kit needs reams of interpretation, but it seems to be a universal thing. It makes you wonder how some first timers ever get beyond their first ventures! Welcome Zoltan, that Santa Maria looks a good challenge! Assuming I get a couple of hours work in today, I expect the planking to be complete, and even fully painted by the end of the day, then it gets interesting! Bryan