HOLIDAY DONATION DRIVE - SUPPORT MSW - DO YOUR PART TO KEEP THIS GREAT FORUM GOING! (Only 20 donations so far - C'mon guys!)
×


bryanc
-
Posts
218 -
Joined
-
Last visited
Content Type
Profiles
Forums
Gallery
Events
Everything posted by bryanc
-
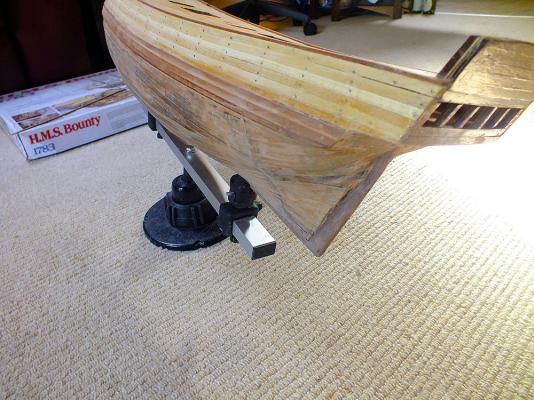
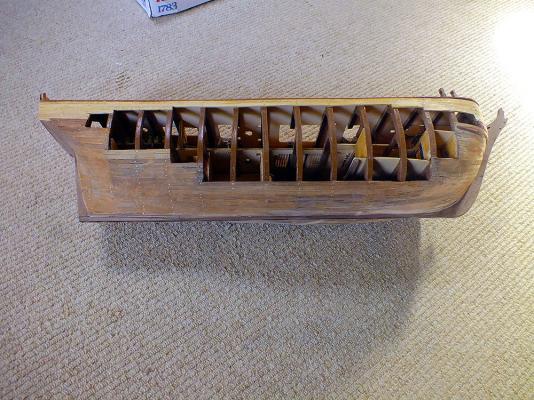
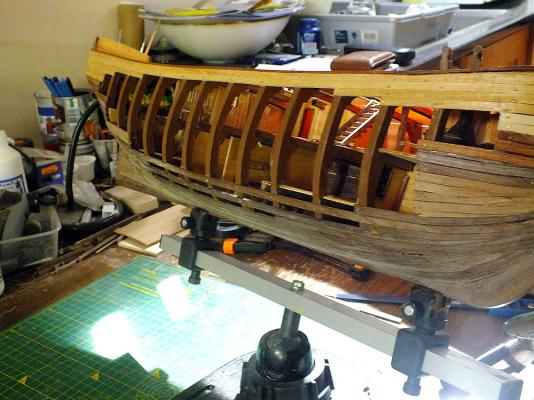
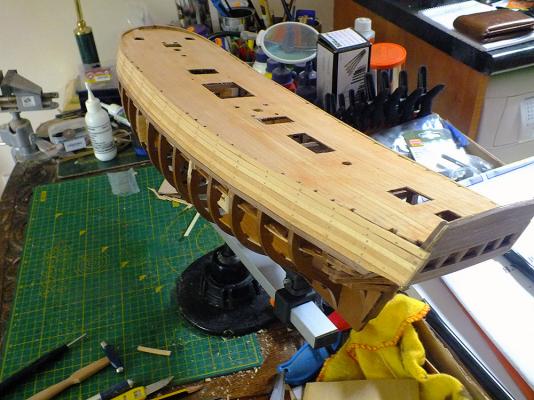
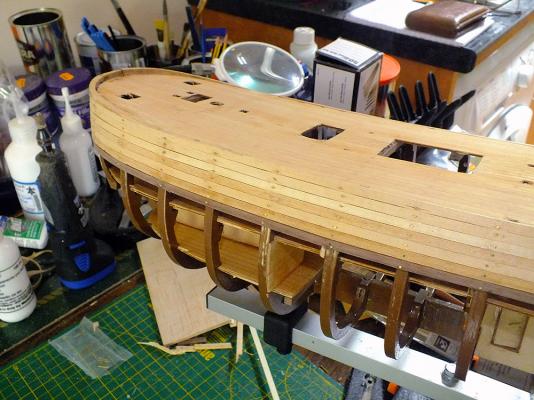
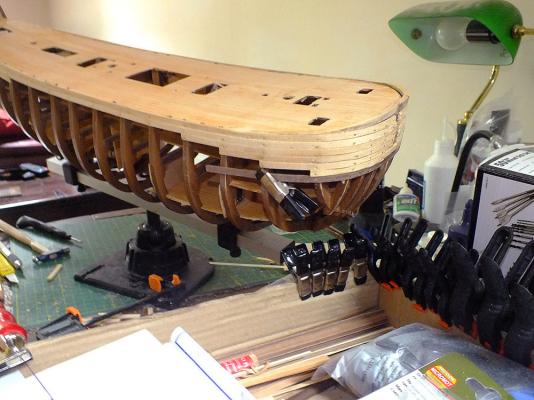
 Build underway Hi, you may well have followed the link from my temporarily suspended build http://modelshipworld.com/index.php/topic/11039-hms-bounty-by-bryanc-artesania-latina-scale-148/ and you'll see the Bounty languishing in the background in the photos below. That build will continue shortly, and probably during breaks form this new build of the HMS Victory Bow Cross Section.
- 77 replies
-
- 1
-

-
- cross-section
- hms victory
- (and 2 more)
-
Hi, apologies for the age its taken to reply, you'll see the reason why below. I use normal PVA almost exclusively. I had a bad experience "overdosing" on "superglue", and now use it very sparingly and only when I have to. Good luck with the build, she's a lovely model but oh those instructions, or lack of them...
-
Excellent stuff:-) As one who is just a step behind you I'm finding the latest photos and details helpful and so instructive. Thanks, Bryan
-
Thanks Nils, yes it's a voyage of discovery in so many ways ;-)
-
Thanks so much guys! Between you both you have cleared that one up, and I'm grateful. However parts 275 simply no longer exist in my box. Strangely every other part on that sheet do (many of which of course are now assembled in position), but the sheet itself has long since disintegrated and those two parts with it I assume. I do patiently number each part in pencil (where possible), and keep them safe, but those have gone to that great lost part heaven! I to keep the more useful pieces of scrap, which come in very handy! I have already designed and constructed (but not yet finished off) my custom knighthead assembly, and its based on the "open ended" "The Anatomy of..." original rather than the AL (almost fully) enclosed version. I think it being so enclosed may cause real problems when it comes to finally fitting the bowsprit, whereas mine simply "rests" on the assembly and as such is much more adaptable! Photo below, but I think the assembly will actually be put further into the woodwork, nearer the prow, and I estimate it will give about 3 to 4mm clearance of the figurehead which seems about right. Al, I do take your point re. permanently fixing the bowsprit at this stage, so I will take your advice and not fix it in position just yet, but go back to the masts. I have precious little space to work, and may well have real problems turning the thing, so will take your advice and put the bowsprit safely away until a more appropriate fitting time! Thanks again guys! Bryan
-
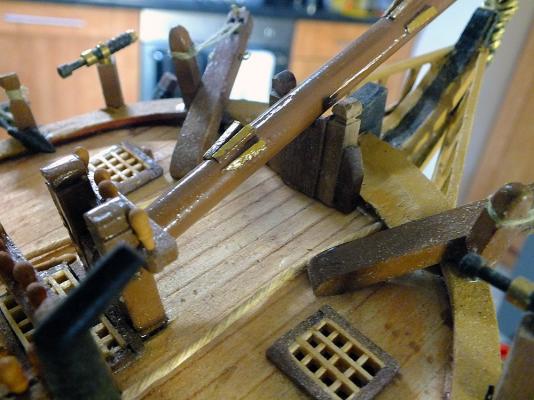
Knightheads!? Yes Al, the parts list rescued me on this occasion, confirmed by your photos. I've also now got the chocks in place (which I probably wouldn't even have noticed but for our exchange). I haven't however continued and got the cheeks positioned, because I thought I'd get the bowsprit finished and in position before continuing with the masts. As I was dry fitting it immediately before gluing it in place, I realised it would foul the figurehead, not having quite enough height to clear it. A quick glance at all the other users photos I've downloaded as building aids shows no one else has included anything in that position. I then researched in "The Anatomy of..." and a knighthead assembly is clearly shown several times. There's no mention of it in the instructions (what a surprise) and the knighthead uprights appear in the parts list but I can't find them, but I suddenly noticed they are featured in the background in one of the photos! But there's only one tiny reference to an upright on one of the plans, and nothing anywhere else! Not very helpful! It’s all very odd, but I'm going to go ahead and bash it, I haven't got any choice really, but I'd be interested in others opinions / comments. Bryan
-
Thanks Al, thats all very much appreciated. Yes I do love employing the odd creative addition or amendment, as you say, thats where the fun lies. And yes, whereas I left the cannon basic brass because it looks so good (if not historically accurate!), I did touch up the 1/2 pounders with black paint, just to add a bit of interest. The pump handles to. The holes in the channels for the deadeye handles are in fact off centre with an outside bias, but then again, not done too well, so your tip re. filing the odd askew holes with toothpick and redoing them may well prove useful. The groove filing will also. The whole deadeye fitting usually taxes me a little! Mast construction; yes I will refer back to you if I may, as the AL plans, while good are sometimes a bit over my head. Funnily enough, I've spent several hours of headscratching today. As I said I appreciated very much LA Dons photographs and I was talking about crosstrees etc as much as anything. Of course I didn't realise he was being "creative" with his, and what I assumed was kit supplied, he'd obviously created. I couldn't understand why I couldn't find a centre crosstree for each of the three lower assemblies, I couldn't have lost all three surely? Of course I hadn't, they were never supplied, and the intention is to use a 7mm long "spreader" made from 3 x 3. I (eventually) worked this out from the plans and parts list, and later confirmed it from your photos (which I should have looked at in the first place)! Obviously it makes tying all the shrouds infinitely easier. So, I've no doubt I will be getting back to you, and probably quite soon! Thanks again.
-
Boats fitted As you can see I managed to get both the ships' launch and "jolly boat" fitted, and am pleased I did. Mind you the launch was virtually sculptured from filler! They have still got to be rigged completely, but at least are there. Now onto the masts (and bowsprite); I must here pay thanks to others build log contributers; as builders of this kit will be aware, the instuctions here are non existant, and while the (actual size) plans are good, they are not easy to follow. However the contributions by other users are, not for the first time, helping me out enormously. Thanks to you all - especially in this case - LA Don, for those photos which explain so much. Bryan

-
Hi Rick, yes it did include the gunwhales. The depth of those is about 12mm complete. Good luck with the build, I'll watch with interest should you post it. Bryan
- 57 replies
-
- 1
-
-
- Lady Nelson
- Victory Models
- (and 2 more)
-
Hi Rick, I don't know how easy it will be to "bash" the standard kit as you intend. Its relatively small after all. But, (very) rough dimensions (literally just taken with a tape measure); overall length 50cms, hull length 30cms, beam 10cms, overall height 50cms and depth 8cms. She was my first "proper" complete build, and is a lovely little ship. Cheers, Bryan
- 57 replies
-
- 1
-
-
- Lady Nelson
- Victory Models
- (and 2 more)
-
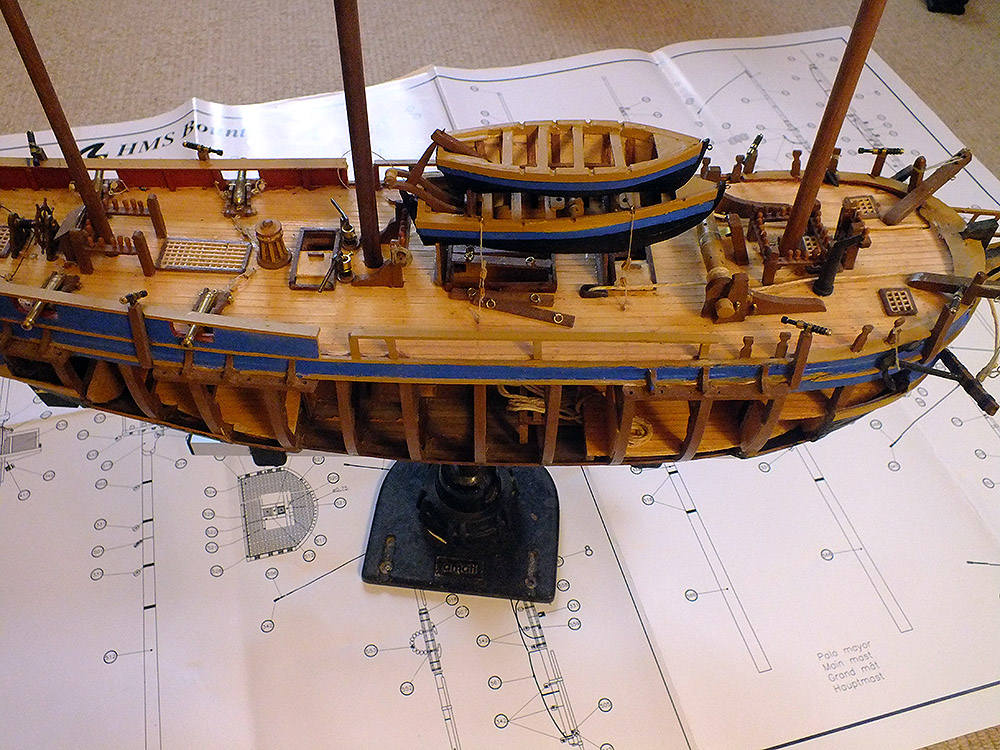
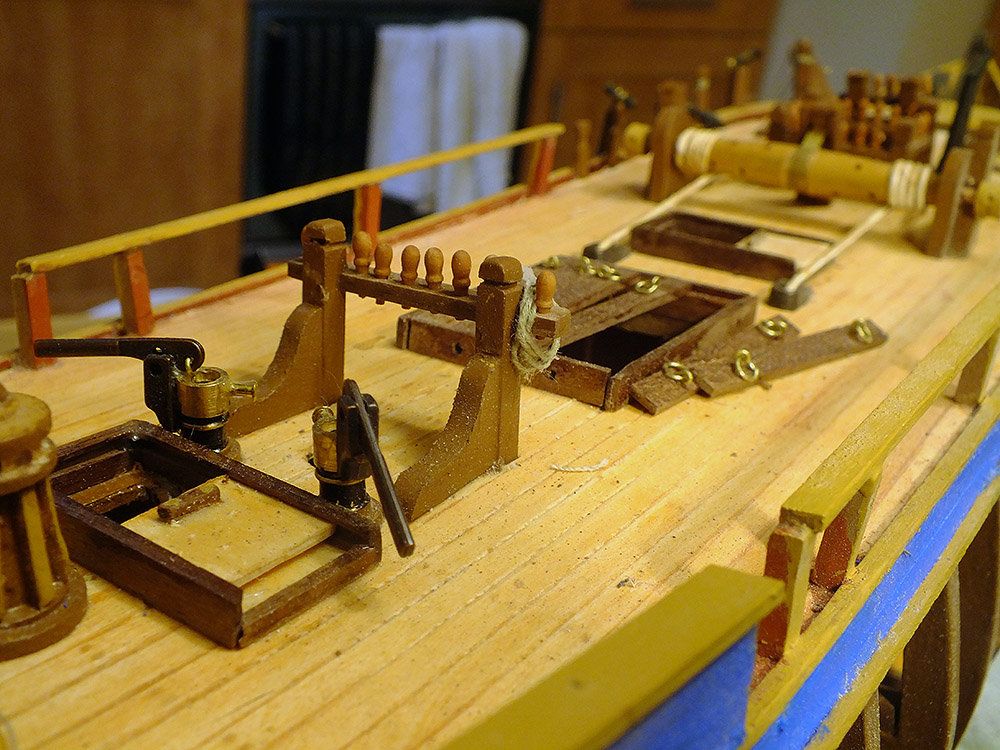
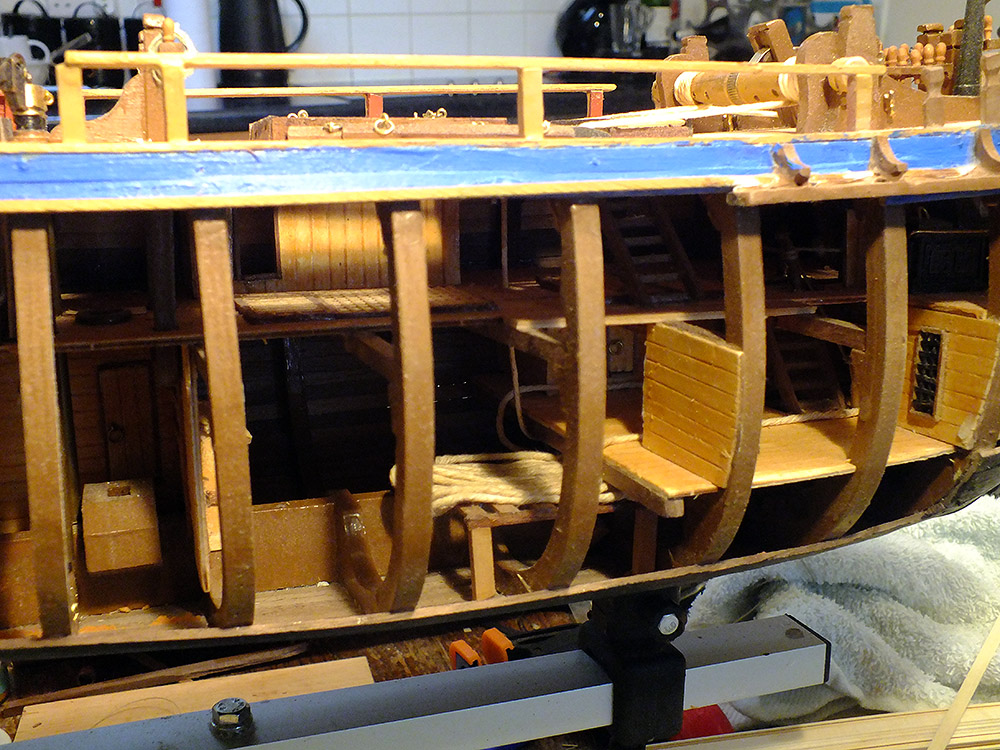
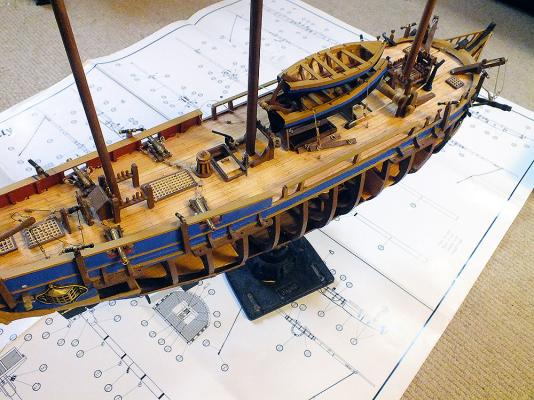
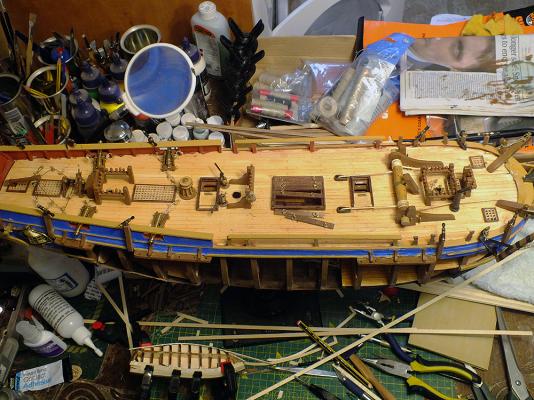
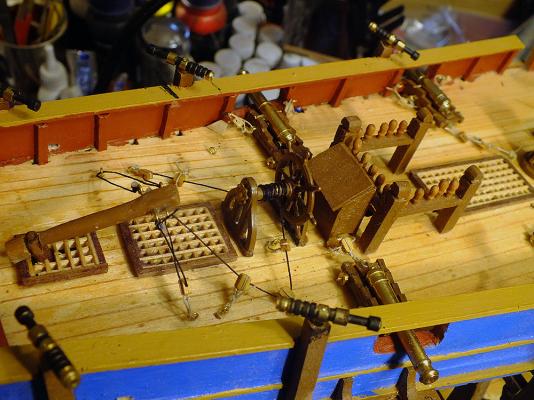
Deck detail almost complete Most of the "official" deck furniture and fittings are now in place, although as ever, there's lots of tidying up and touching up to be done. Several items were more difficult than anticipated, but to balance things, the items I thought would be difficult, weren't! The wheel assembly for instance was really tricky to build, or at least to hold steady while it was glued. In contrast I was surprised how easily I managed the complicated looking steering rope assembly (which was originally very much tighter than it now is, I suppose there is some stretching takes place post assembly). The cannon were also surprisingly tricky, and the rope tackle thereof always is! After much heart searching and head scratching I've left the cannon in their original turned brass state. I'm the first to say they should be gunmetal black, but that brass finish is just too good looking! The sliding hatch "manhole" covers were easier than anticipated, as were the main hatch "slats", considering there isn't a word of instruction (in common with almost everything on the deck). With the anchor winch I cheated a little; I didn't file and sand the round sides into flats. I know I would have been unable to resist using the Dremel to help, and that would undoubtedly have overdone things. The anchors themselves lack the instructed "brass" metalwork. I struggle with that a little, and have simply resorted to the black cartridge paper trick, which I've always thought looks really effective anyway. I've been quite creative with the anchor ropes (in more ways than one), but if it looks good, it must be good! Another little bit of creativity was used below decks; in reality the anchor ropes were stored below decks either on racks or carefully hung. This was to ensure they dried properly and thus discourage rot. I elected to build racks for the ropes to be spread on. Note the two ropes both disappear into the darkness forward. In reality they were secured to the mast more often than not. Mine won't be (far too much work for something that won't even be seen. I anticipate enough problems getting the foremast to fit, much less tie things to it). There's a bit of a story regarding the rope; I elected to use ordinary household string. (The kit provided one is, I believe, much too thick, and there's not enough of it). So I carefully soaked the string in sections, in an eggcup, with a stain and water mix. When dry I was pleased to note the "string" really did look like seasoned rope. Feeling really smug I began to fit it. It was only then I realised the string had swollen and was twice its original thickness and far too thick to be of use. In the end I used the original string and dabbed it with the stain once it was in place! Note the door to the brig at the far right ;-) I am currently struggling (and I mean struggling) with the launch which sits in the middle of the deck. It really is tricky. There is a temptation (which I may yet be unable to resist) to leave it out completely, but I do think it will add a great deal. I've elected to make it complete rather than be exposed on one side like the ship itself (as per the instructions). I believe that is unnecessary and one step too far. Assuming I am successful, and both launch and ships jolly boat do end up residing on the deck, then it's the masts! Yet another challenge! Bryan


-
Hi Don, Thanks, and yes the "gold" painting is very effective and I've actually used in small doses elsewhere where brass was required. I don't know how easily you'd get hold of it, but its one of the Admiralty Paints range; AP9125W Gold / Brass. I got it from here
-
Thanks Thomas, and yes the chair is a Herman Miller, the Aeron I believe; a wonderful piece of engineering. Given to me by my son when he moved to live in Bangkok!
-
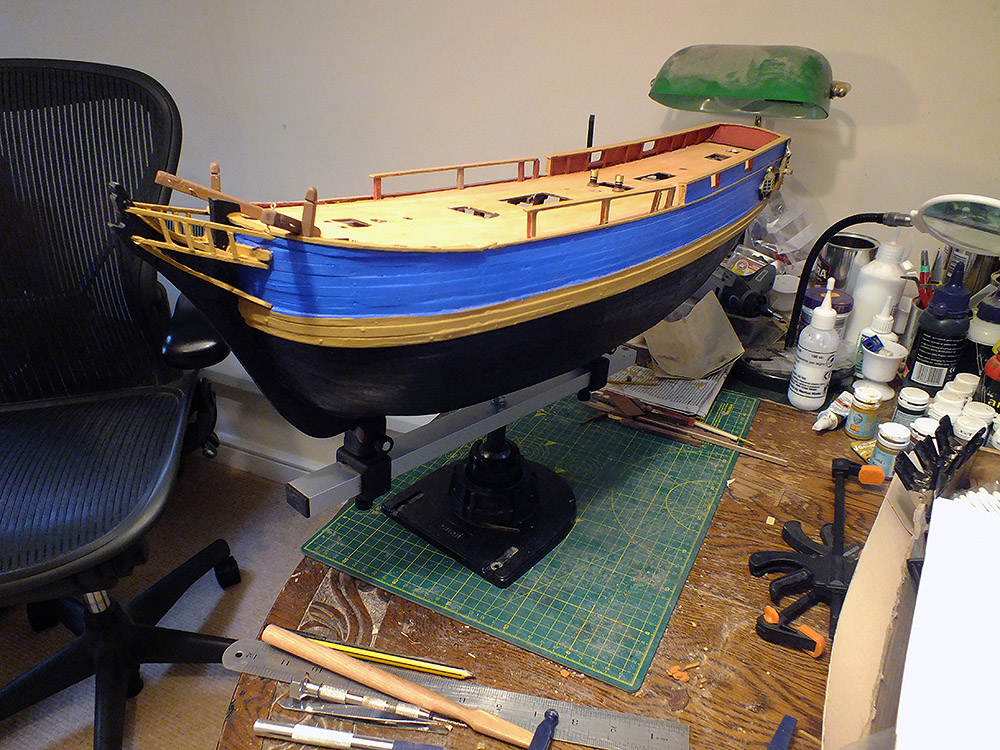
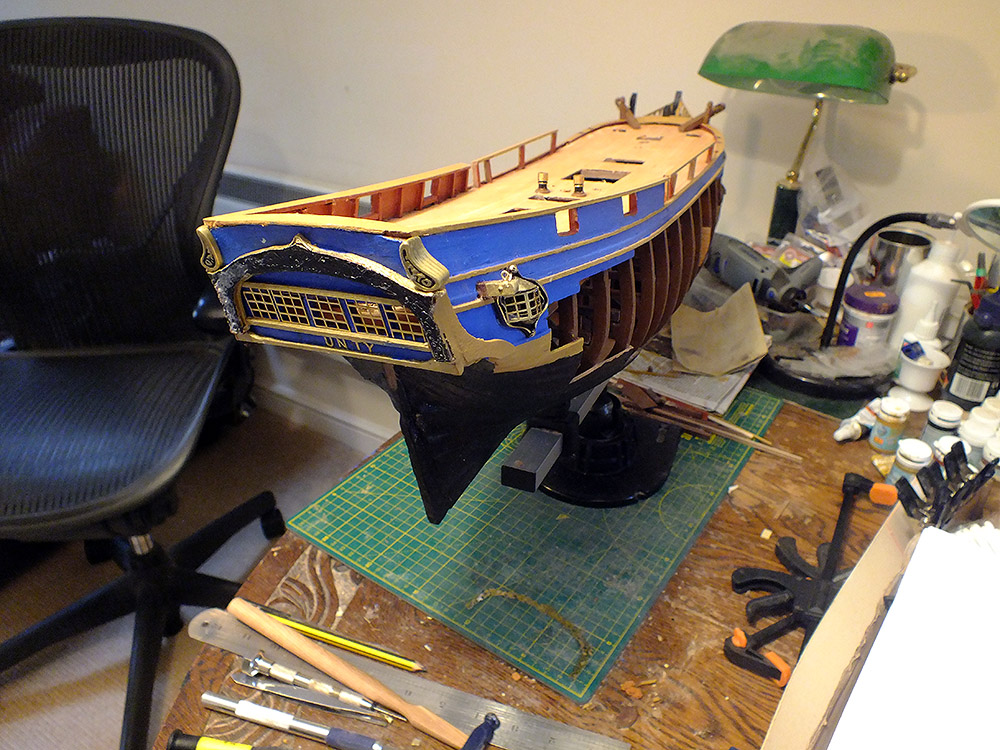
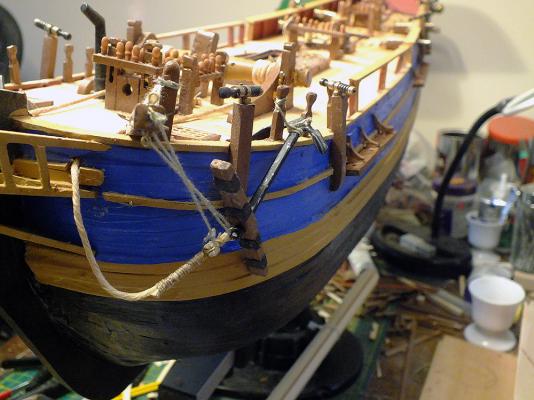
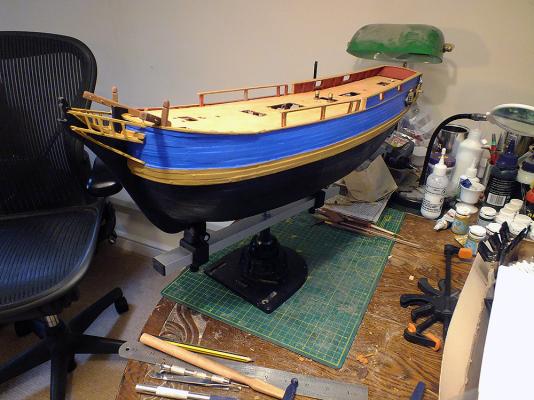
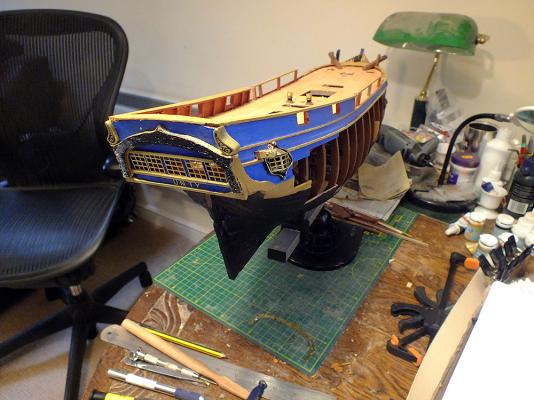
Blue! Well it was the blue after all. On reflection an all-black Bounty would have been just too unrealistic (although I have got a photo of a black Bounty)! I'm quite pleased with the decision overall. As you can see there has been considerable other work done as well, although the guidance for it was taken from other forum users build logs, and not the instructions, which have reached the point where the manual editor gave up, and could no longer be bothered, in fact, even stating; "...the more laborious and delicate work has now been done, after photo 48 (out of 112!) it is a case of fashioning and fitting the parts into place... using photos, parts list and plans...". There is less than a page worth of instructions left, whilst there have been nearly 4 up to this point! Yet there is all the deck detail, not to mention masts and rigging - and sails (!) still ahead! A case in point is the head rails, where no guidance was offered, and I think I needed it as my efforts leaves a lot to be desired. Overall however I'm not too displeased with the work thus far, a few mistakes obviously; the gun ports are far too big, I can fashion them a little smaller, but I'll wait until the cannon themselves are complete, and make my decision when I see them in situ. The brass ornamental piece on the stern facia fell off! Well, I actually pulled it off, it had become a little detached at one end, and trying to fix it revealed none of it was too secure. I don't like the idea, but I think it may have to be pinned as well as glued. The observant will notice the brass letters "B" and the "O" of "Bounty" are missing. I still have the "B", but the "O" is somewhere on the beige carpet beneath my work table! I have searched, and recovered lots of brass pins, and the like, but sadly no "O"! Hopefully it will turn up before the next hoovering takes place! One of my criticisms of the kit has been the somewhat economic supply of materials in the kit. This is illustrated by the lack of the second, lower "rubbing lander" on the port side. I simply haven't got enough of the 2 x 2 sapelia wood left. Hopefully I'll be able to scrape something together from other bits! Now onto another challenge; the rudder assembly, something else I've always found challenging. I've already successfully drilled the hole to accommodate the tiller shaft; hopefully the rest of the rudder will be as accommodating! Then I can get on with the more enjoyable deck furniture! Bryan
-
Quandry! Just a quickie, because I'm in a quandry. I painted the lower hull black, which is fine - or will be with a second coat and some varnish. Then I did the "rubbing strakes" above yellow ochre for the nice contrast with the black, but... against the basswood planking above them they are dull and lifeless so a paint rethink is required. Will it be more black with further yellow ochre trim, which I have seen somewhere (the John Player Special F1 racing car!?), or will it be the Bounty replica blue after all Don?! Bryan

-
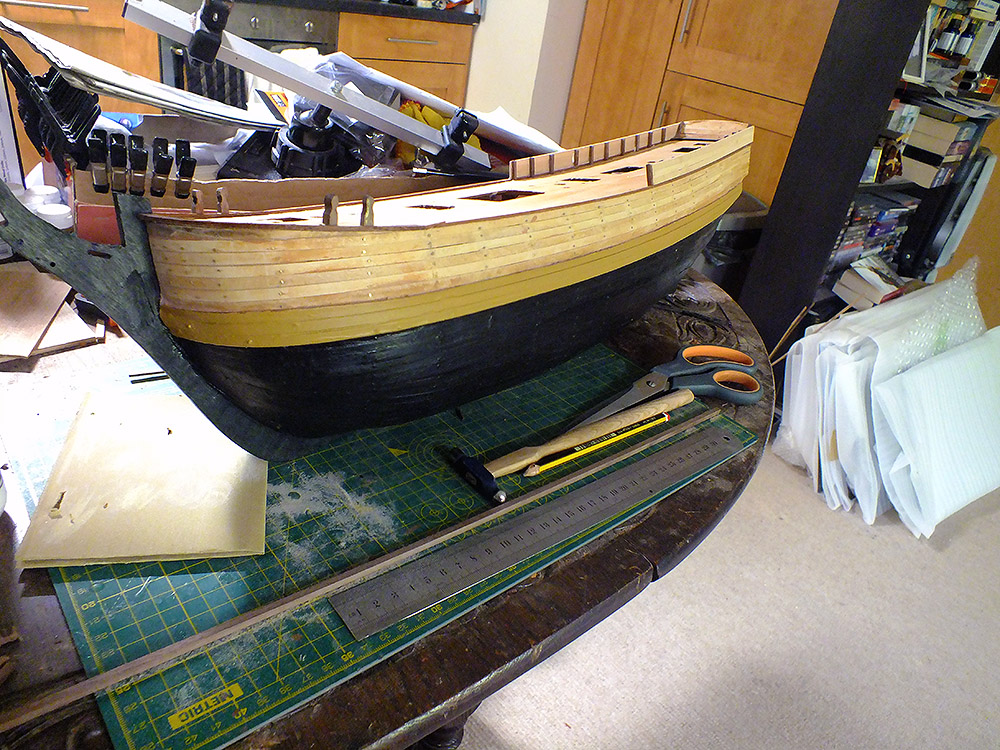
Redeemed... ..to a degree! Well I think I've redeemed myself a little. After a lot of filling and sanding and sanding and filling she looks a little more seaworthy. Far from perfect obviously and too stained and "worked" to make do with a simple varnish, so it's a paint job. I've decided to go the whole hog and paint the hull black, which will then be varnished; inspired by LADon's wonderful work - and the ill-fated Bounty replica. (It won't be blue as well though Don!). Right, a little more fine sanding then I reach for the paintbrush! Bryan
-
Hi Gentlegiant, I'm glad and honoured (and surprised) you find my build log interesting enough to follow. Thank you. I would just caution you though, I am far from the most adept model builder currently working on this ship, and suggest you do look at the others also. But regarding your question, single or double planking; I to was very surprised when I learnt the kit was only single planked, and I thought long and hard about this myself before deciding to stick with the plan. This was partly because of my relative inexperience, and anyway the supplied 2mm walnut is sound and strong enough in itself. If you do elect to go the single planking route be very frugal in your use, there's not an overabundance of it, and it is tough to work (I found soaking it for a few hours before use was enough though). While on the subject the 2mm basswood needs similarly careful working, as its all too happy to snap when bent around too tight a curve. Thanks and good luck with the build. Bryan
-
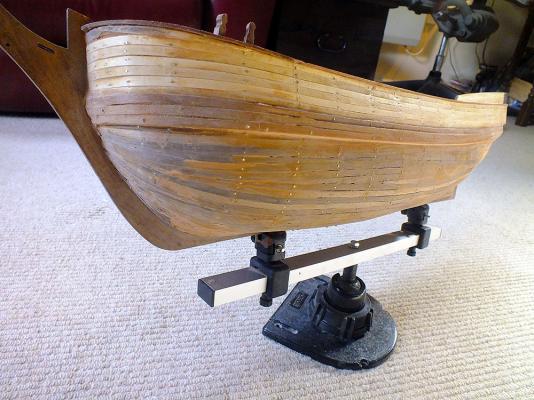
Hi again Al, Thanks for the observations. It’s reassuring to know you to have suffered the same trials and tribulations, as you are another I look to for inspiration, and yes, it’s taken some time and some drastic action to pull through; I daren't show photos of the stern section until I've fettled it considerably. From about frame 3 or 4 sternwards all the planking was cut and removed and only replaced after considerable grinding and sanding of far too prominent ribs and frames - I suspect it’s that heavy work the finished off my original Dremel! And again you’re correct of course, I left it far too long before I started tapering the planks, and paid the price. In all honesty I was trying to follow the natural "lie" of the wood as I positioned planks, but I guess one has to help nature along a little! But now, yes. The new Dremel has a baptism of fire and a lot of work to do! Thanks, Bryan
-
Hi and thanks, you have been on my "Content I follow" list for some time, and are one of my "role modellers" to coin a phrase. You are certainly ahead of me, and in more ways than one. I've just saved quite a few of your photos of deck detail and "furniture", for inspiration, as I am nearly at that stage as you know. In doing so I came across photos of your version of the stern section planking, which I cannot even get my head around! You have gone about it in a different way surely? But effective, very effective. Yes I do intend a paint job, but for now intend keeping to the "natural" wood look, although that as everything, is subject to change! Thanks.
-
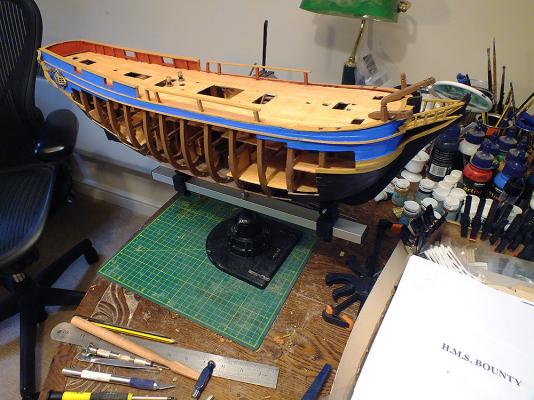
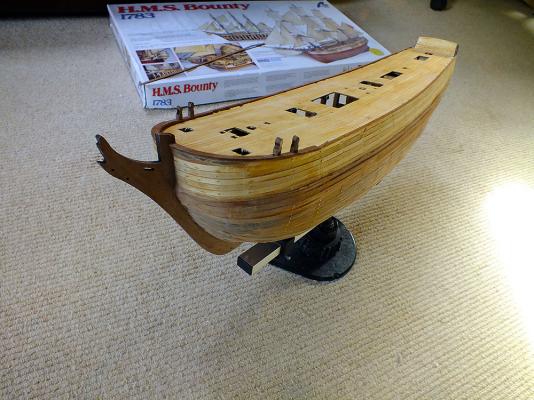
Hull planking finished, but... The keel is now fully planked - apart from (a lot of) filling, sanding and painting (yes I've elected to paint it after all, little choice as there are many "ills" to try and cover or at least camouflage. Nothing heavy or garish though, I’ll keep to more simple “wood” colours). I have always found planking the keel very taxing, and although I am improving, it’s not at the rate I’d like! I got off to a good enough start, but began to struggle when the going got more tough. It’s a long sad story, but you may notice not two types of wood (the top rubbing strakes – the "orangey" ones - are of a much lighter material and will be painted much lighter), but three types. I had to do extensive removal and replacement, as I went along, and ran out of the supplied (walnut) wood, so ordered more, but it turned out to be a lighter walnut! The lower hull planking is the original supplied walnut, the lighter planking immediately above, the replacement. Be warned there is not a vast amount of the original supplied. This is one reason why I’ve elected to paint the hull; the difference in woods would be too obvious if I just left it clear varnished. The observant may also notice my Dremel 7700 Cordless has been replaced by the infinitely more beefy Dremel 3000 Corded (sat in the plastic tray to the upper left). Oh how I wish I’d spent that little extra in the first place. The 7700 failed! Right on to the filling and sanding! Bryan

-
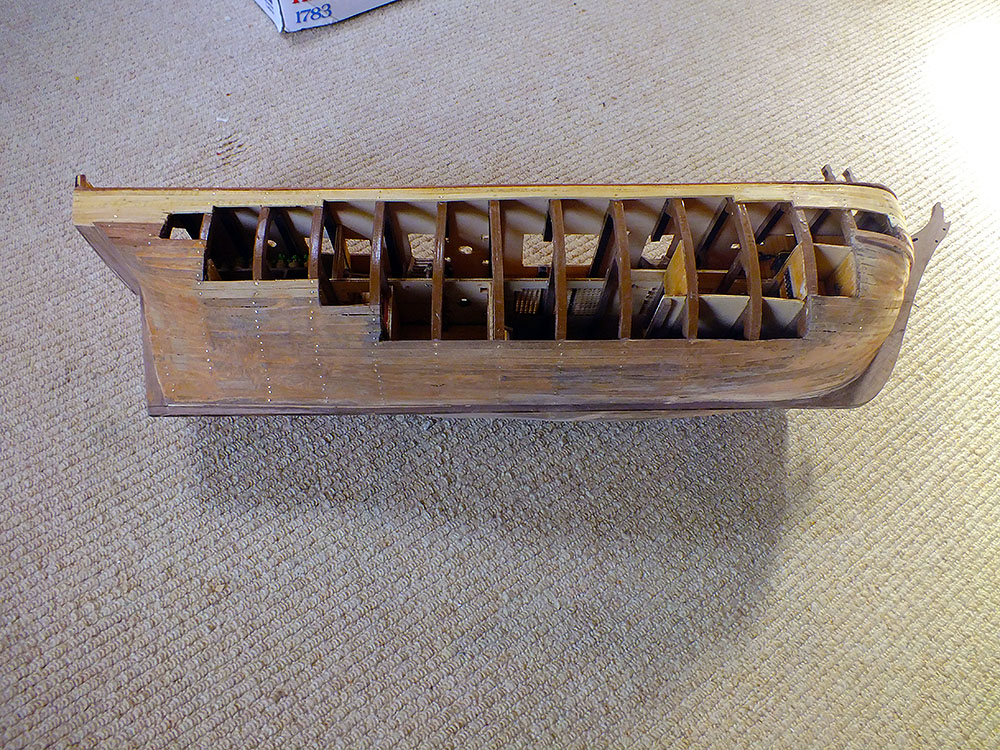
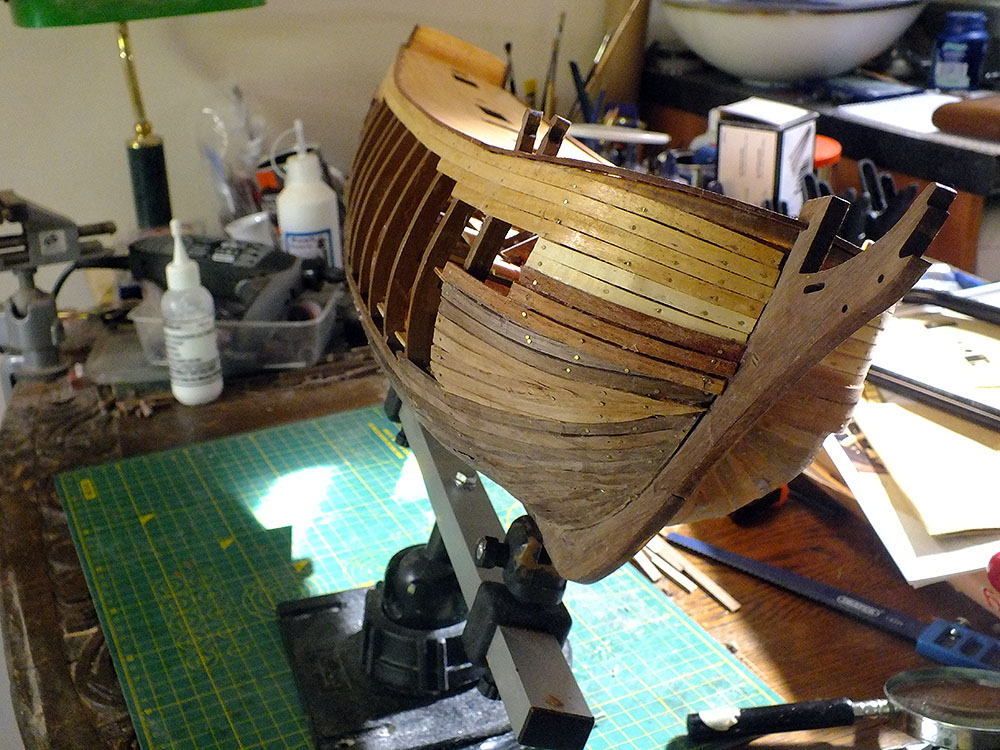
Onwards… Moving on apace, at a speed which could be deemed worrying, but I’m not rushing, I’m taking my time and being careful (mostly!). The whole project has just grabbed me at the moment, the build is going well and everything is coming together very pleasingly; hence the rapid progress. It won’t last! Not that there haven’t been problems, but mostly of my own making. The AL instructions are really petering out after such a good start, and I’m tending to look at other users work and photos on the forum as much as the instructions, and that how you miss things! For instance I assumed the upper hull planking came together at the bow, with port and starboard planking coming together. Not so, a gap has to be left to accommodate the keel stem. Oh well, a bit of whittling with the scalpel sorted it. I was also a little too keen with the fretsaw as I elected to shape the bow boards with that rather than patiently sand them down as might be considered more correct. They are covered by the gunwale before long though, and I hope my over-enthusiasm will also be covered up. And plenty more problems to come given how hard the 2 x 5 walnut planking is; this is the majority of the hull planking material of course. I’ve just moved from the basswood upper hull planking to this lower hull planking. Walnut? More like teak! Given it has to be curved quite radically in places, and I elected to use pins rather than glue alone, it’s really proving hard work. I would have preferred not to use the pins, but the build dictated it really. While inserting the pins, one has to pray the pin pusher will drive the pins right home, so you are not obliged to hammer them in, because they invariably make that horrible twang - and bend. So the planking is well and truly soaked before use, and does become a lot more malleable, but saturated of course! But now the planking gets more involved and the whole procedure a little more taxing as the tapering and the stealers come into use. I’ve elected to keep to the plan and use just single planking. At this moment in time I’ve decided not to paint the hull, but use varnish only. But this is subject to change, as filler and paint can cover up a multitude of sins! Bryan
-
Hi Mike, Thanks for the interest, I've just looked and you have indeed started your log, made me quite wistful looking back to that stage, but its actually not that long ago! I like your "King" to, and how appropriate given where you live (what an evocative sounding place; St Charles, Missouri. More romantic sounding than than Buxton, Derbyshire anyway!). Yes, after starting off so well the AL instructions have gone downhill fast. But the standard of the kit is still good - mostly! Right, going to update my log now. Bryan
-
Thanks Nigel, Glad you like my build, and while I'm not up to the same standard as others working on the same kit, I'm thoroughly enjoying myself and learning a lot :-) And yes, I love adding the detail (much more to come of course), so much so I've already decided my next build will be a cross section kit - lots more scope for adding detail and bashing additional bits:-) (An edit is inserted here!). I just belatedly looked at your current builds, and was delighted to see your HMS Triton cross section! I've never come across this before, and assume its a scratch build? In that case infinite scope for bashing! Needless to say I'll be watching keenly, and only hope one day I'll feel confident enough to tackle such a build. Thanks again, Bryan
-
Hi Al, Thanks and yes, I think I've unintentionally come to the same conclusion; I'll work on the foot of each mast to ensure it fits into the applicable well, and while doing so can hopefully make the mizzen mast fit without too much heartache! I was unaware the mizzen in reality has a slight rake to it (I assume to the stern) and this is likely what will happen to mine - equally accidentally, as any work I do will be to the stern side of the mast, and in so doing is likely to encourage the "rake"! Regarding the bilge pump tubes, no, they are not glued in yet, I was assuming they would have to be fitted into the bilge pump(s), (not that I've even looked at the pumps yet), and that simple act of gluing will dictate where the bottom of the tubes sit. When dry fitted the tubes actually rest on the rib that is immediately to the rear of the main mast step, with only a tiny amount clear of the deck (which will be even less when its planked). I imagine when they are glued to the actual pumps, they will be lifted that important few inches (or equivalent thereof) and will have enough clearance to adequately "suck up" the water and associated gunk from the bilges! Bryan
-
Hi Thomas, Thanks again. It did occur to me to notch the bottom of the mizzen mast to help it fit, but as Captain Al says, the bottom of the masts have to be notched to fit into the mast step anyway, so I'll hold off. In fact I may do the notching on the masts quite soon anyway, then I'll be in a better position to see if the mizzen mast needs additional notching up one side, although I'm still hoping "a little persuasion" is all that is required. I can well imagine you're not ready to glue the main deck down just yet. If I could "bash" as creatively as you, I'd still be working on the interior ;-) Bryan