bryanc
-
Posts
218 -
Joined
-
Last visited
Content Type
Profiles
Forums
Gallery
Events
Everything posted by bryanc
-
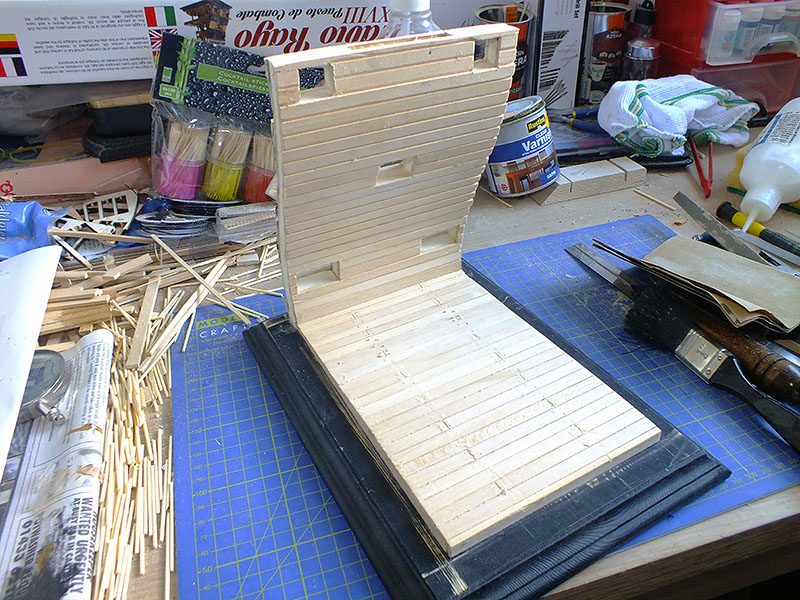
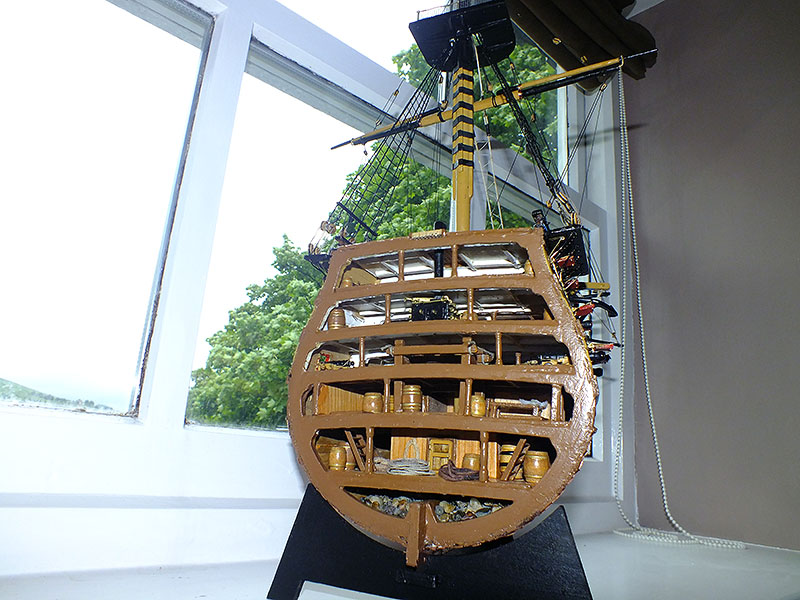
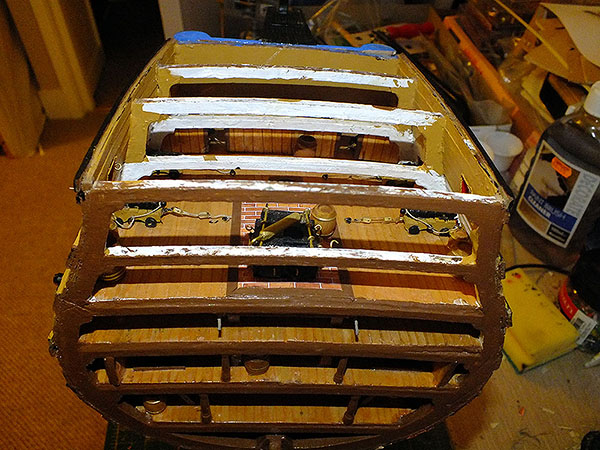
 Onward I thought I’d better do an update as things are moving on surprisingly rapidly (partly because the weather has been appalling and I’ve been indoors more than usual). Once the initial inaccuracies reported earlier were (sort of) resolved, the next stage, the planking of both the hull (inside and out) and the lower deck was carried out. The deck was no problem at all, and I’m pleased with it. Given the much larger scale of this kit as opposed to earlier work I’ve done, this time I elected to use “proper” treenails on the deck. It’s been very much experimental, as I’ve never done it before, but apart from some awkwardness at the start it’s gone OK, and I’m fairly pleased. The stain I use on the deck will make or break it of course, and I’m still unsure what exactly to use. I also elected to tree nail the front of the hull, I'm being a bit of a masochist, but it will add to the realism, hopefully. The planking up both inside and outside of the hull continued apace, and it was very enjoyable and satisfying (the supplied wood is very good). Ordinary carpenter’s wood glue was used exclusively throughout, with every batch of two or three planks being clamped while they set, whilst I busied myself with treenails. Each plank needed to have a recess along the edge, which I must confess I used my Dremel to provide (why I haven’t got recessed fingers as well I’ll never know)! The gun ports were tricky as one might expect, especially the top two which were redone several times. One thing about working at this scale is that it’s got to look right, and that takes work, and more creativity than I am used to! The rubbing strakes went on last and here again the manual was at odds with the actual kit. The strakes sit at 8mm above and below the middle gun port openings, the planking is 8mm wide, so it’s not rocket science to work out where they sit. The manual photograph however shows them much closer to the ports in both cases, so much so that the model I am constructing has one full planks’ worth of space more than the manual allows for and shows. I pray this extra height isn’t going to reflect badly when the fittings are presented to the inside later. Similarly no mention is made in the manual of the lowermost strakes, which is probably why I missed them, and they don’t appear in my photographs. They are on now, but again fall one planks worth short of the lower gun ports. I think for appearances’ sake I think I’m going to add an additional strake to all three of the groups of rubbing strakes, so they match up with each other and the lower set of the uppermost strakes (I hope that makes some sense). This all makes me wonder if the overall height in the kit is as much as the three planks worth more than in the manual. The photographs are beginning to suggest this :-( This all sounds like I’m having a miserable time, but I’m thoroughly enjoying this kit. Manual apart it’s well-designed, very good quality, enjoyable to build and is already looking good. Bryan
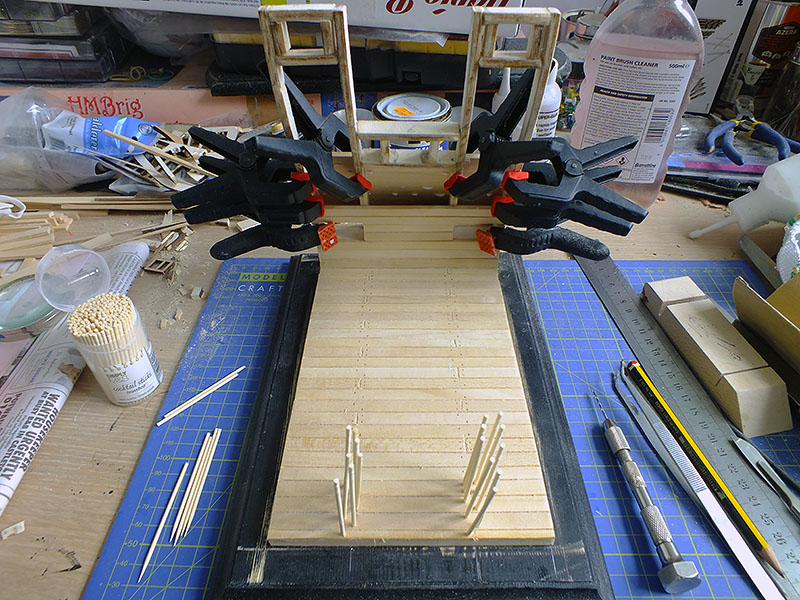

-
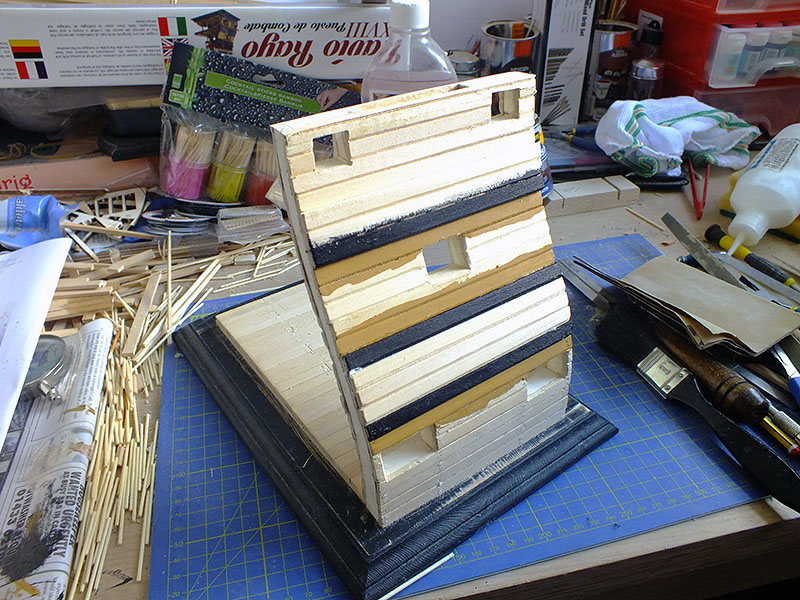
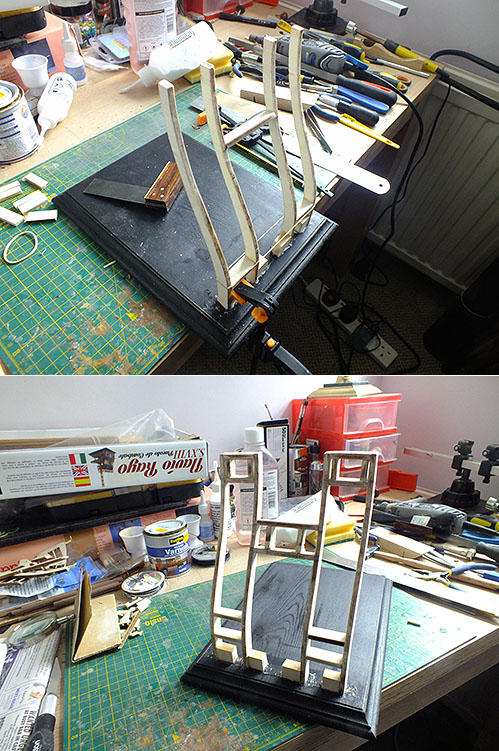
Thanks Bob, yes the mid gun-port section is intended to be higher than centre, I just hope the dimensions given on the photo are correct, there's no way of knowing for sure until that mid deck goes in, as there are no pre-cut parts to help confirm things. That mid section has now been cut out and replaced not once but twice! BTW you did previously mention using the gun-port lids to gauge the opening sides; alas there are no supplied gun-port lids, you have to make your own (from planking as far as I can ascertain) and quote "take the existing gap into account when doing so". Similarly Paul mentioned using 1:1 plans to assist - there are no 1:1 plans unfortunately! The whole thing does look a bit Heath-Robinson and precarious at this stage, but is actually remarkably solid, and thanks to some overnight twisting is also laterally blob on! (Lines up perfectly from the side view)!! Well you can't say its not challenging.
-
Thanks Paul and Bob, you're quite correct both of you, its somewhat creative labeling to say the least. The two top ports are a case in point as you say; the distance between the outer edge and the right hand side of 4a as shown would be about 15mm, not the 5mm it maintains. I've got that far now, and have made my 4a closer to the edge, and that '5mm' is still a good 10mm! Just posted the photo above and looking at it anew, the middle port seems to be located too high. I've just measured it against the photo dimensions and its the thickness of the cross member (part 7) too high, dammit! I'll gingerly slice it out as a whole section (hopefully) and re-position it. I hope the photo is correct in its dimensions in that regard (it says its 63mm from the extreme top to the top of part 7), the positioning of that port is important of course. This is proving challenging!
-
Thanks Jeff, praise indeed from such an excellent modeller as yourself. She was an 'interesting' build, and looks really well now complete, I'm sure yours looks even more so!
- 77 replies
-
- 3
-

-
- cross-section
- hms victory
- (and 2 more)
-
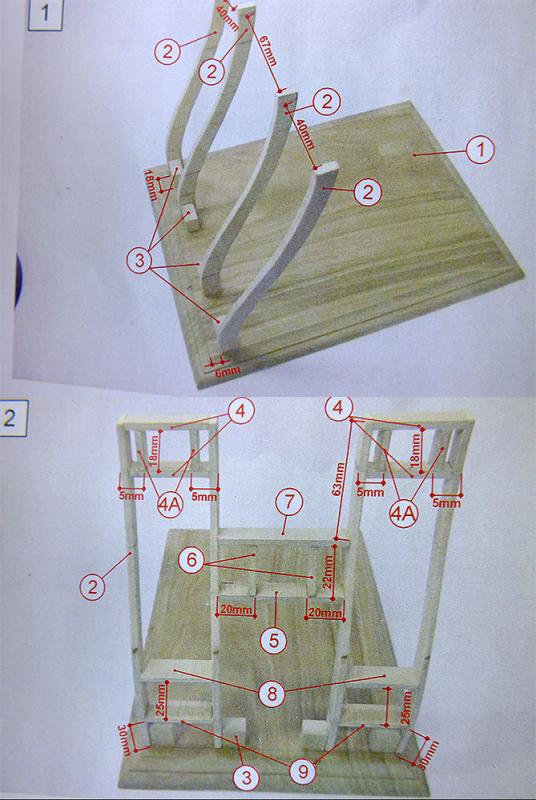
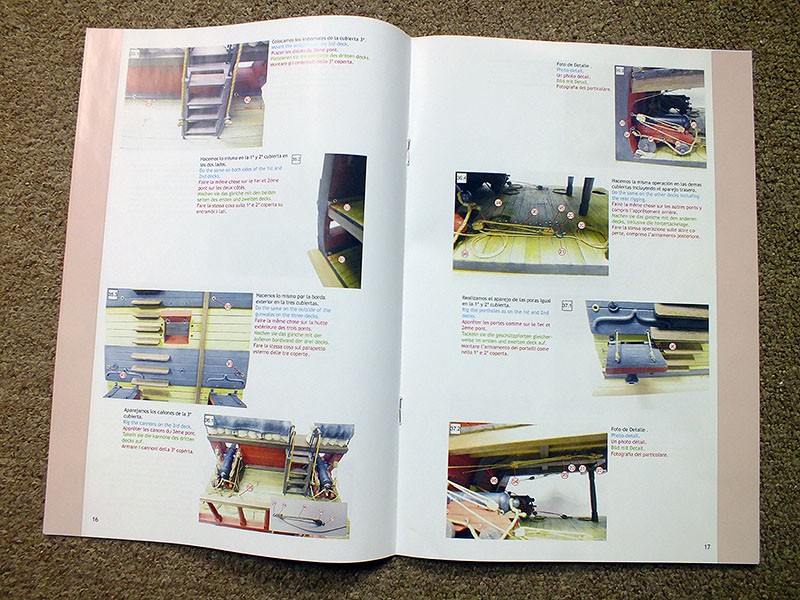
Thanks guys and especially you Bob, the pictures afforded by the .pdf are truly wonderful, and make me salivate to get going! Not a great deal of opportunity afforded for bashing, but such a "diorama" doesn't really need it. However the manual v materials are not going to help. I've already fallen at the first. Forgive me for labouring a point, but its going to be a struggle if you have to constantly make a choice between materials provided and the manual. Below is a photo of the first instruction from the manual. Clearly the gap between the two outer ribs is intended to be 40mm, and the middle gap is 67mm. Unequivocal really. Then how does one then rationalise the fact that the parts (pre-cut mind) which fit directly between the ribs (4, 8 and 9 for the outer and 5 and 7 for the inner) are 30mm and 55mm long respectively)?! Am I missing something, or being stupid? There is little choice but to go with the parts provided, but will this mean other inaccuracies later? Suggestions welcome! Bryan
-
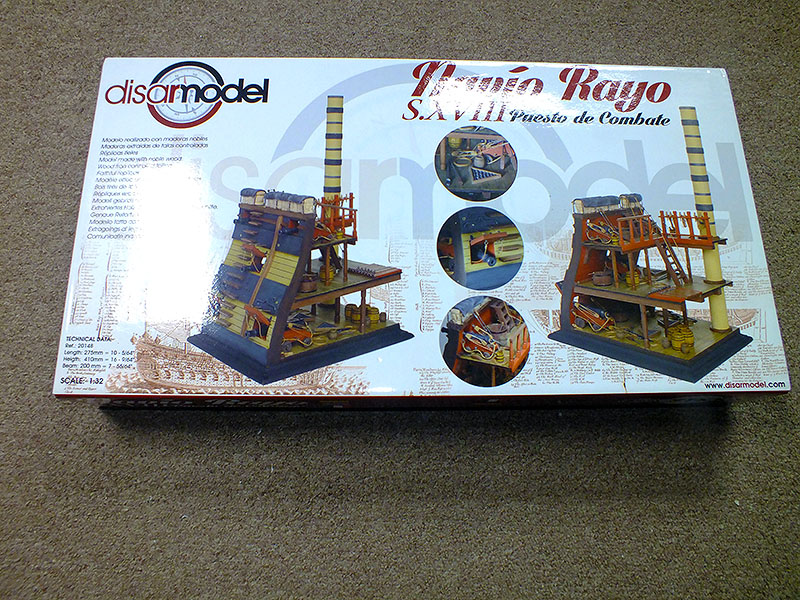
Yes it turned up Bob, a couple of days after the estimate, but safe and sound nevertheless. It is a nice looking kit, and does look to be of good quality, but oh the manual; the English instructions are the ones in blue in the above photograph; hardly going into detail! From my brief look it is obvious you're very much on your own, and I can't find any other build logs anywhere to help (gulp!). However I should think that once you've got the basic shell up, it shouldn't be too difficult, nor take that long - relatively speaking ;-)
-
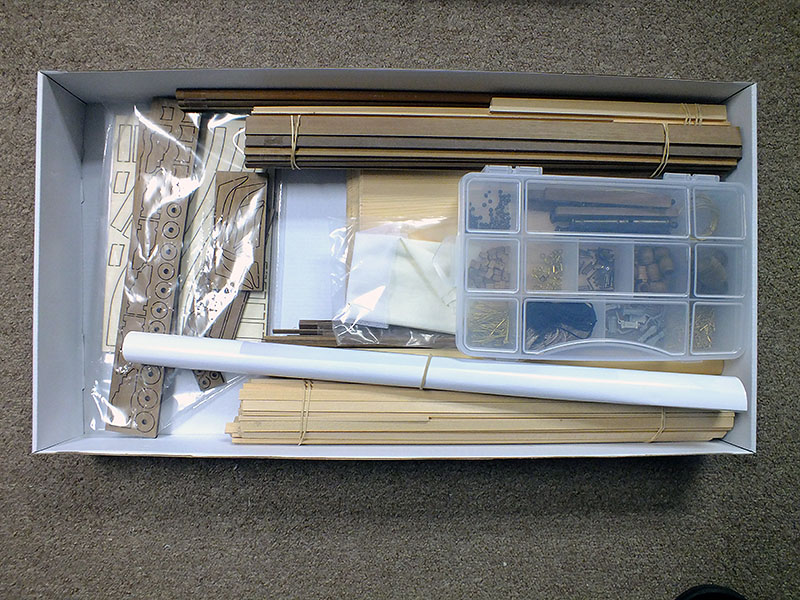
Open the box! The box; 58 x 30 x 6.5cm is not overbig, but a hefty 2kg according to the dispatch note, and it alarmed me enormously when I first took possession of it. It rattled as if every component within was loose and this worried me considerably. When opened it wasn’t as bad as it sounded. All the pieces were sound and tied together, the majority of the rattling must have come from the plastic box of preformed components which were well and truly mixed together! Having travelled 1,110 miles this isn’t surprising! The box contained said stout plastic box compartmentalised to hold the separate preformed components, an A4 manual c/w full colour photographs, a huge “poster” depicting 3 views of the finished build with limited nomenclature, two big bundles of firmly bound lengths of wood and four more smaller ones including what appears to be a short length of broom handle! This I assume is destined to be the mast, and by its huge diameter gives an idea of the big scale of the kit. Lastly the plinth on which the whole kit sits, and which indeed is an integral part of it. This is solid and quite well cut. Several laser cut sheets of various thicknesses were held together in a plastic bag. First impressions were good. The quality of the wood appears very high, as does the quality of the preformed components. The laser cut sheets do worry me a tad, as the laser cuts do leave wide gaps of un-burnt wood, and on thicker pieces this can lead to problems extricating the pieces intact, as I know to my cost. The manual however made me groan. The photos are fairly good, and plenty of them, each with individual items numbered. These numbers correspond to the parts list in the rear of the manual, where are also to be found the diagrams of each of the six laser cut sheets. What did make me groan though were the build instructions themselves. I think the word is minimal! Thankfully this shouldn’t be too complicated a build, but just as well if I had to rely on the instructions themselves. However I’ll persevere, the first job to paint the plinth black… Bryan
-
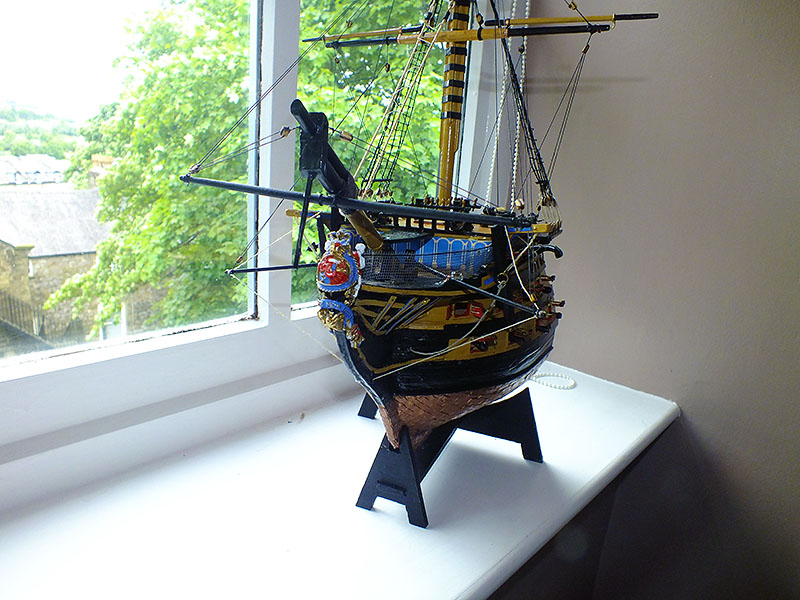
Finished! Well she’s finished. Odds and sods to tidy up, a bit of rigging I removed to fit the figurehead and forgot to replace I must put back, but she’s essentially complete. She was as trying at the end as she has been throughout; the figurehead proved as awkward as almost anything has been to get correctly in place. As it is the lower section is a tad too low, but… But I’ve benefited from it; I’ve grown as a modeller actually enjoying many aspects of it. I thoroughly enjoyed doing the rigging, which is a complete reversal for me. And I think it shows, my standard of building is improving. Obviously there is a long way to go, but I’m improving, and I’m enjoying it, and you can’t really ask for more. Final evaluation of the kit; as a finished model she is really something. The photos don’t do it justice, and in the hands of a real master modeller, the results would be something special. The quality of components was generally good, sometimes excellent. The manual; yes well you can’t have everything. Suffice to say this kit is not for the novice, and the more experienced should go warily. My latest next kit arrived 24 hours before I finished the Victory, and its already beckoning! Time to move on. Bryan
- 77 replies
-
- 7
-
-
- cross-section
- hms victory
- (and 2 more)
-
They certainly have my email Bob, because yes, it is part of the registration process. On balance it sounds like they are legit enough, just not very efficient! We'll know for sure in a few days. Thanks for the easy counter site link, I've bookmarked it, that may prove very useful. Cheers, Bryan
- 77 replies
-
- 4
-
-
- cross-section
- hms victory
- (and 2 more)
-
But back to the Victory Cross-Section... Just the rigging and shrouds to complete, but no deadeye stops provided in the kit despite the manual saying (and a diagram indicating) that there are! I'll get on to the manufacturers or distributors once I've established who they are (the kit was a present). In the meantime has anyone any suggestions how to get round it?
- 77 replies
-
- 4
-
-
- cross-section
- hms victory
- (and 2 more)
-
An update regarding Guinea Hobbies; one of the reasons I was so worried was the fact the website messaging didn't work, and apart from a Spanish telephone number there was no other communication detail present, or didn't appear to be. There is nothing on the Contact Page, where you would expect something, apart from the contact web-form which doesn't work. However I went through every page on the site and eventually found an email address on an "About Us" page which wasn't listed in the menu. I emailed them in somewhat terse terms. Within an hour I received not one but four replies, two in Spanish and two in English (sort of). Basically the order was seen, but was treated as "anonymous" as there was no personal details!? Even if that is the case, it still sounds fishy, by definition my name forms part of the Credit Card details, and I'm a registered member of the site, c/w my address, so they didn't look into it very hard, and debited the credit card immediately anyway! They assure me the package has now been sent and should arrive tomorrow (Friday) or Monday coming. Obviously I'll let you know if and when.
- 77 replies
-
- 4
-
-
- cross-section
- hms victory
- (and 2 more)
-
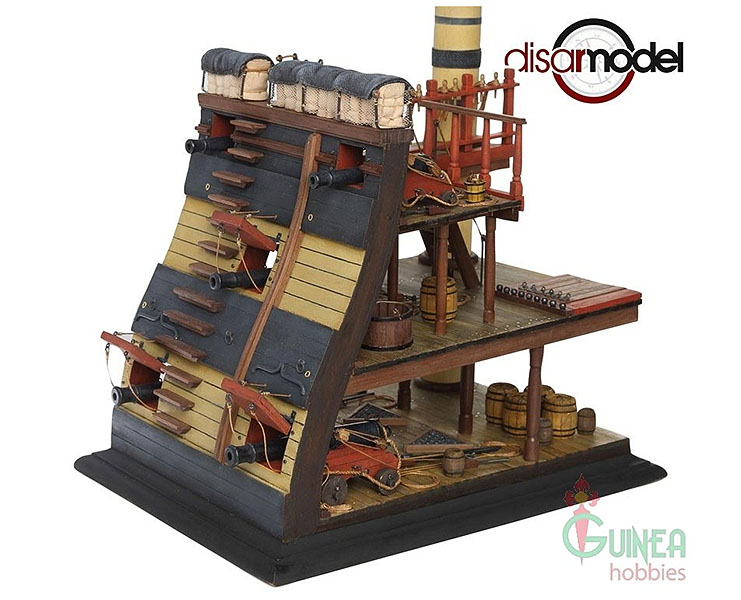
A Cautionary Tale Just a bit of an aside really, but I’ve made decisions regarding what kit(s!) come next. My birthday is getting close, so at my suggestion (!) my children are getting me the Ocre - Section de Sanctissime Trinidad, another cross section – and of an interesting ship with an interesting history; I was trying to keep the Victory connection, and the “Trinidad” actually fought at Trafalgar, and was captured by the British but sank during the storms that followed the battle. Anyway (get to the point Bryan!), for myself as it were, I’m getting another kit, this time it is still the Victory, but yet another cross-section, just a small section at a much higher scale i.e. the one mentioned previously, the Disarmodel Rayo Ship of the Line 1751 - Battle Station Cross section (1:32) (photo below). It looks very intriguing I'm sure you'll agree, and I shall be most interested to have a play, however (the point at last!) there is something of a snag, and I may have to flag an official warning and blacklist the suppliers, because I ordered it on their website, paid by Credit Card, but received no acknowledgement or communication whatsoever. Then I noticed they had taken the money! It’s approaching a week now, still no communication and certainly no kit. There’s time yet I suppose, but it’s worrying. I’ll keep you informed, but Guinea Hobbies of Spain may turn out to be a company to avoid.
- 77 replies
-
- 5
-
-
- cross-section
- hms victory
- (and 2 more)
-
Thanks Paul, but you should know; we're hiding from the wet here to ;-)
- 77 replies
-
- 4
-
-
- cross-section
- hms victory
- (and 2 more)
-
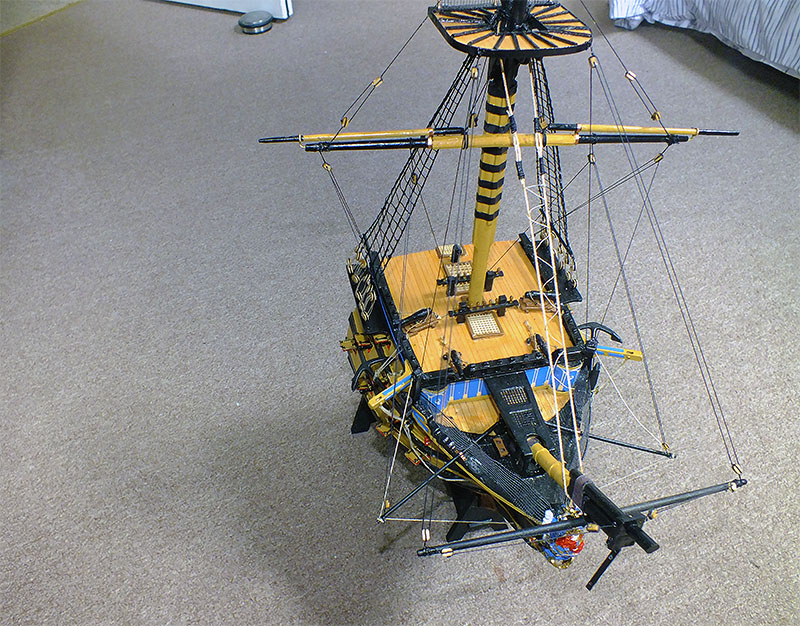
The end is in sight! I just thought another quick update might be appropriate as things are moving along and the end is now actually on the horizon. Basically just the foremast tweaking, the yards and then the rigging and we’re done (he says optimistically). Additions since last time are significant but perhaps not all obvious. The gun port covers took the longest; not too troublesome in themselves, but time consuming. They do make quite a difference to the model though. Originally the ropes holding the port covers open were in situ, but they looked most unreal. They were in fact thread stiffened with superglue, but they looked tatty, so despite the age they took to put in place they had to go. Instead I’m now thinking in terms of precut and identical lengths of painted wire might look better. We’ll see. The ballast was perhaps the quickest job, but again it adds quite a lot of interest. I simply coated the hull of the hold inside with glue then poured in the ballast (real stone created for model railways). I stiffened it further afterwards with liberal drops of superglue. It looks good. The “hold” itself is far too small to add further barrels which would have otherwise sat there. The two anchors were also added (the “real” Victory actually having four!), and the catheads now coming into use supporting them. The channels for the shrouds were also fitted. They do seem way too wide to me, but no doubt it will make fitting the shrouds all the easier (not one of my favourite jobs!). Now onto to shaping and fitting the one set of yards (the foreyard) and then all that lovely rigging! Oh, and of course the figurehead!! As is not unusual at this stage I’m already casting about for the next creation. I know I’ve still got the poor old Bounty sat unfinished, but as I’ve really “enjoyed” doing this cross section, I’m keen to do another (I just love the “bashing opportunities, and the greater detail afforded). The Panart “Section Deck Between Gun Bays” which Cobr@ is making such a wonderful job of, is a strong contender as is the Corel mid-section Victory one, but I wish it was a little wider. Surfing the ‘net I have come across another kit I’m very interested in; like Cobr@s it’s more of a diorama than an actual model, and is the Disarmodel – Rayo Ship of the Line 1751 - Battle Station Cross section at a mouth-watering 1:32 scale (oh the detail that can be added). The Spanish company will actually ship to the UK, but at a premium. Does anyone know of a British distributor? Here is a link to the actual kit; http://www.hobbiesguinea.es/en/disarmodel/12007-disarmodel-20148-rayo-ship-of-the-line-1751-battle-station-cross-section-1-32.html (Sorry its such a mouthful). Thanks, Bryan
- 77 replies
-
- 7
-
-
- cross-section
- hms victory
- (and 2 more)
-
I really like that deck planking; understated but all the better and more pleasing for it. Nice work! Such a good build.
- 206 replies
-
- 6
-
-
- battle station
- panart
- (and 1 more)
-
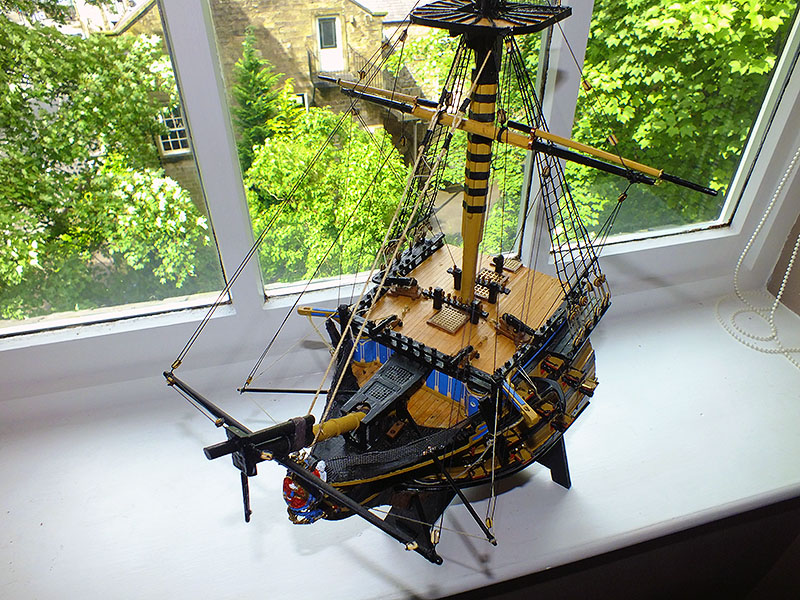
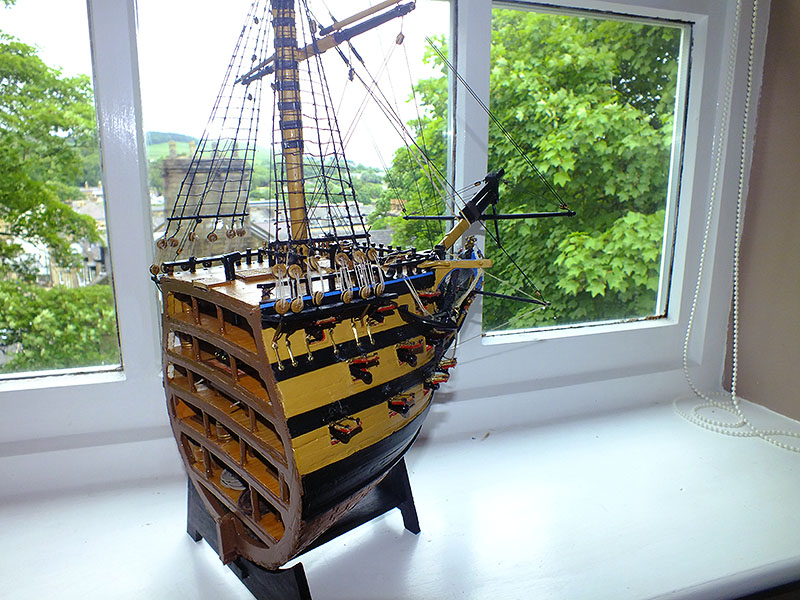
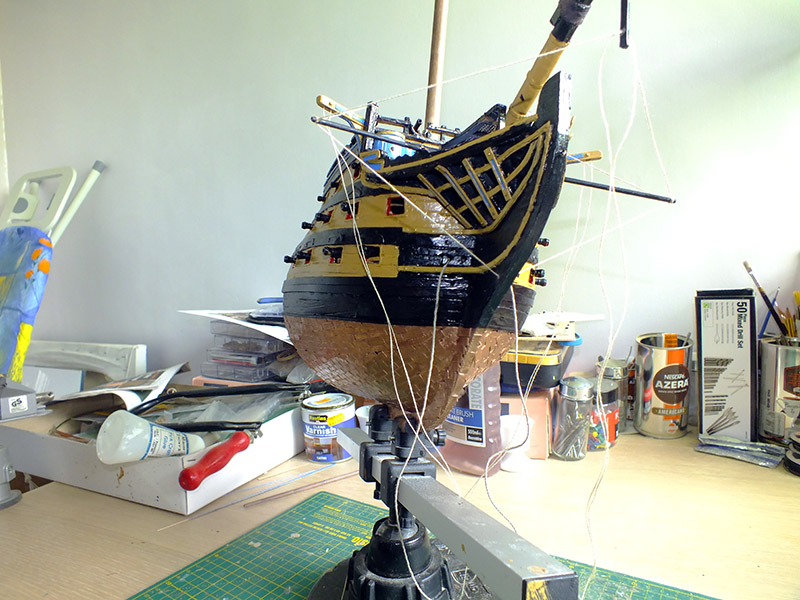
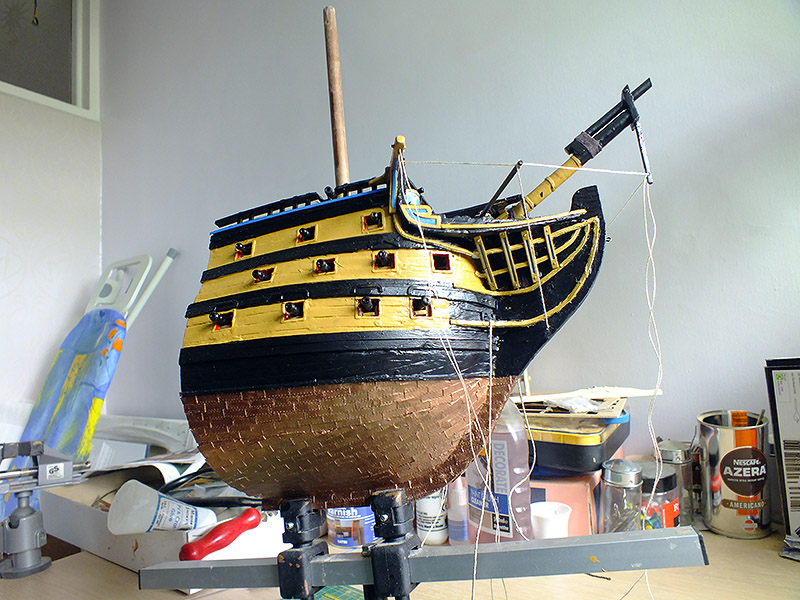
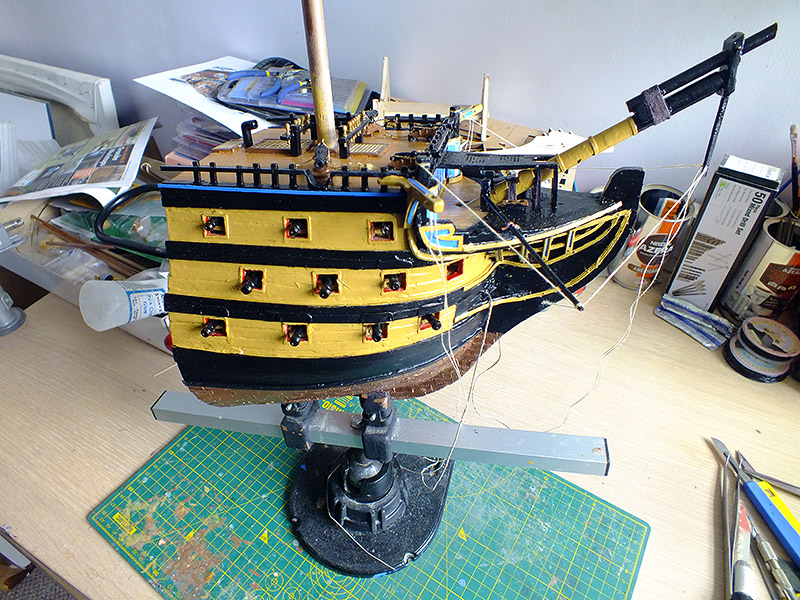
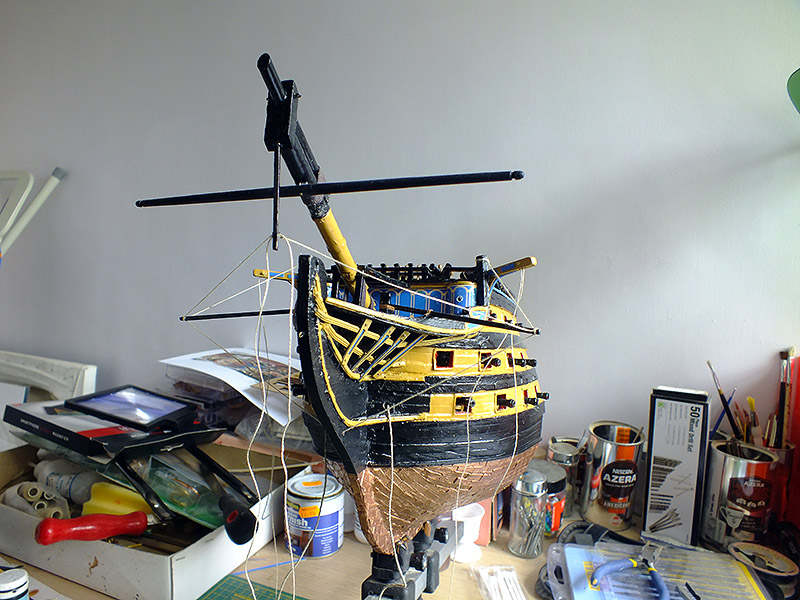
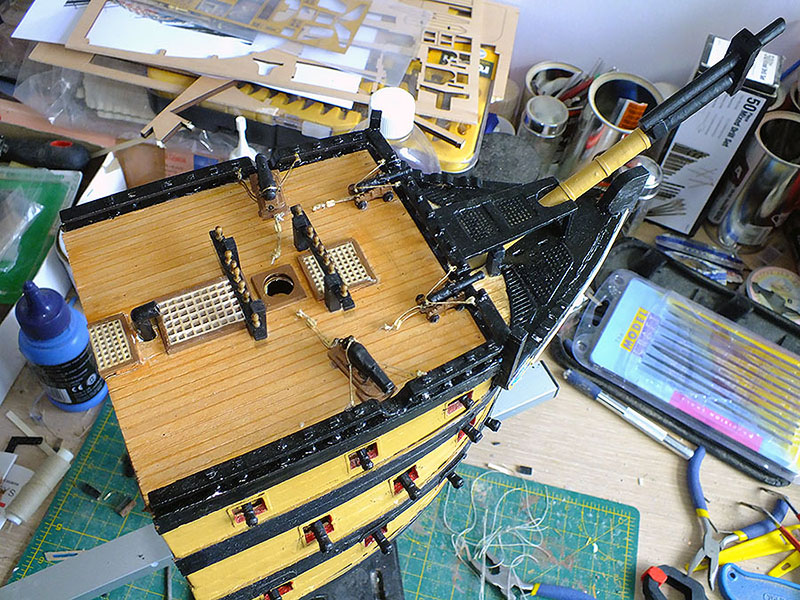
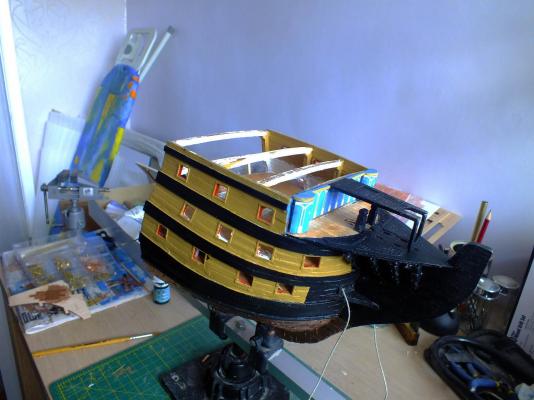
Things moving fast I thought I'd better do another build update as things are moving ahead remarkably quickly and I'll shortly begin work on the main mast - foremast actually, but as its the only one in this particular model... She's looking OK, and I'm fairly pleased. Not that she's remotely perfect by any means, and the photographs tend to emphasise the defects as photographs do, but I'm far from unhappy with the build thus far. The manual leaves so much to be desired and its really telling. For instance there's discrepancies between what the manual suggests and the box cover illustration. One suggests the bowsprit forestay (the only one as far as the kits concerned) is situated below the bowsprit cap while the box photo clearly shows it well forward of it. I've gone with the latter as it allows easier fitting of rigging etc on the lower part of the bowsprit. A (belated) look into my McKay shows this was in fact the case. My McKay also confirms the presence of a dolphin striker (love that quaint if cruel expression) on the underside of the cap and a flagpole on top of it which the kit ignores completely. I have included the former, and will include the latter. (Note the bowsprit forestay is present only in the last photograph). I managed to construct and fit the catheads - and their supports - adequately, and even managed the decoration and the holes for the anchor ropes, so the catheads will be functional and not just ornamental. Some of the blue decoration is yet to be added. Speaking of 'ornamentals', the so distinctive sweeping herpes decorations had to be constructed from 1mm brass strip and it was incredibly difficult to work and get those wonderful sweeping curves - and to bend it significantly in places. the brass had to be painted the familiar yellow ochre, which it didn't take kindly to! I managed it all after a fashion and it looks OK with a passing glance! Note the rather rough ends of the brass decorations will be covered by the figurehead (and that will be fiddly painting detail)! Now for the construction that mast (temporarily fitted in the photos), and I have a feeling that to is going to be challenging! Bryan
- 77 replies
-
- 4
-
-
- cross-section
- hms victory
- (and 2 more)
-
Thanks Bob, praise indeed from a such admired modeller! I hope you're enjoying your "double build"!
- 77 replies
-
- 3
-
-
- cross-section
- hms victory
- (and 2 more)
-
Thanks Dave, good of you to comment. I'm really "enjoying" this build, though as ever I'm working too fast!
- 77 replies
-
- 2
-
-
- cross-section
- hms victory
- (and 2 more)
-
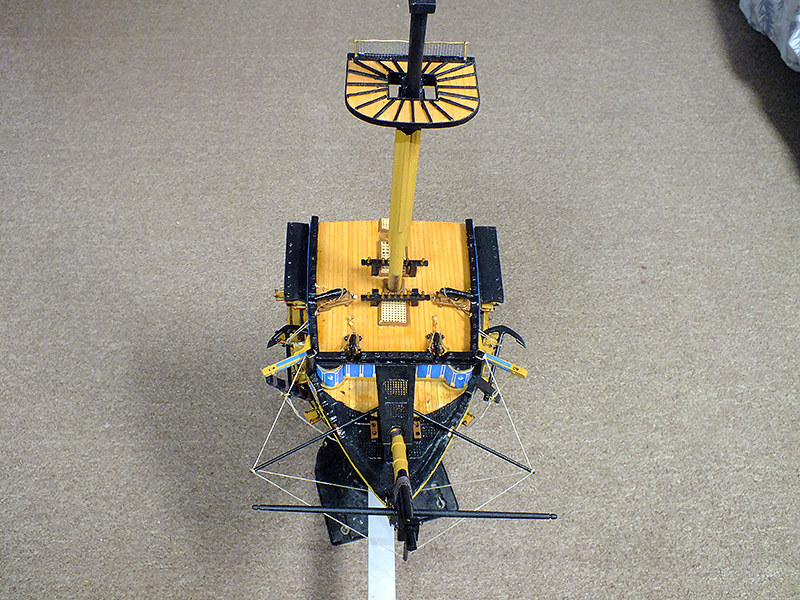
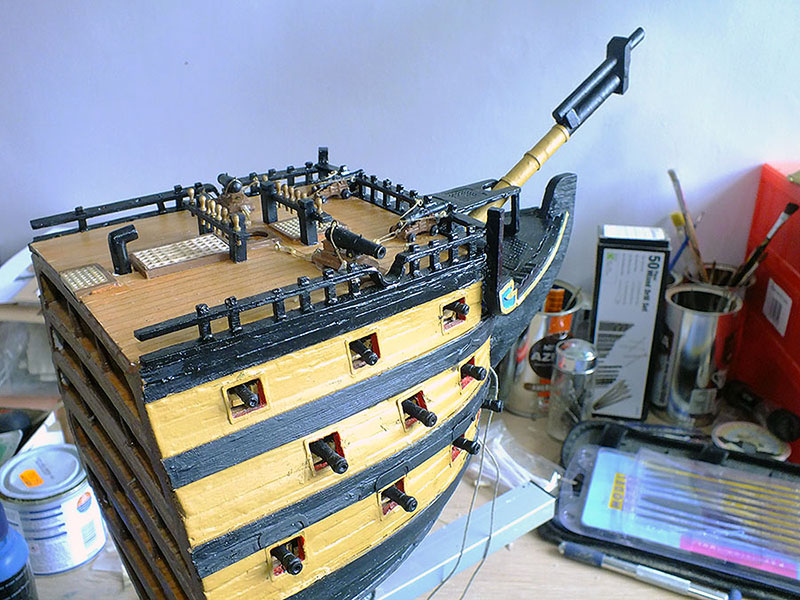
Problems…problems… The build moves on apace, and generally I’m pleased with how she’s looking. The near completion of the quarter deck itself (or forecastle to be specific I suppose), and the addition of the bowsprit, really makes it look like a ship – or part of one! Of course there was bashing! I was surprised and disappointed there were no bow chasers catered for, so while I left the enormous 68 pounder cannonades where the kit intended them, I added two 12 pounder carriage guns facing forward ready to tear down sails and rigging of any ship the Victory may be chasing. In reality these certainly existed, but were set further back, just beyond the stove chimney. But that wouldn’t have looked so threateningly businesslike! However there are annoying problems and issues as one might expect. The handrail on the port side is a mess; half the supports fell apart whilst being extricated from the laser cut sheets. However these can be easily replaced. The observant will also notice something not quite right with the middle of the three hatch covers; I ran out of parts, so had to use left over ones, which were one size too big! I don't like it, but couldn't just leave it open to the elements. Of far more concern are the cat heads (not yet shown). In the proposed build they don’t actually do anything, they just sit there! I intend to make them functional, with ropes running from them supporting the anchor – they were actually responsible for raising and lowering the anchors after all. Easier said than done though, as they are rather small to go drilling holes in. Hmmm… And then there are the “engraved sheets”. They are proving a nightmare. I had issues with the ones that were intended for the beakhead and believe it or not, rather than paint them, the intention is to stick similar ones on all the sides of two cat heads, not to mention all over the prow! You then presumably paint them yellow ochre and blue. Or just the blue bits. Or something. Predictably there’s not much guidance! I’ll probably mostly paint them anyway and forget the stick-on engravings, but again, they are very small and my painting prowess leaves a lot to be desired! Problems…problems… Bryan

- 77 replies
-
- 6
-
-
- cross-section
- hms victory
- (and 2 more)
-
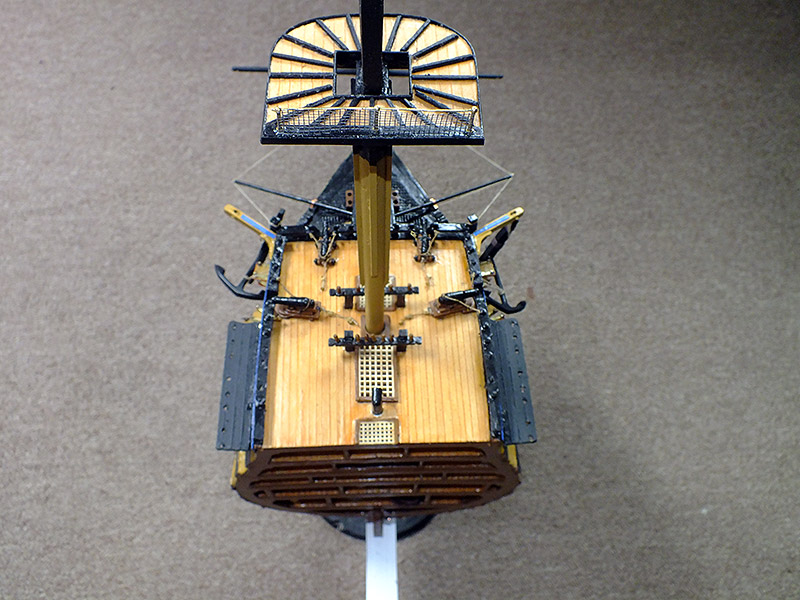
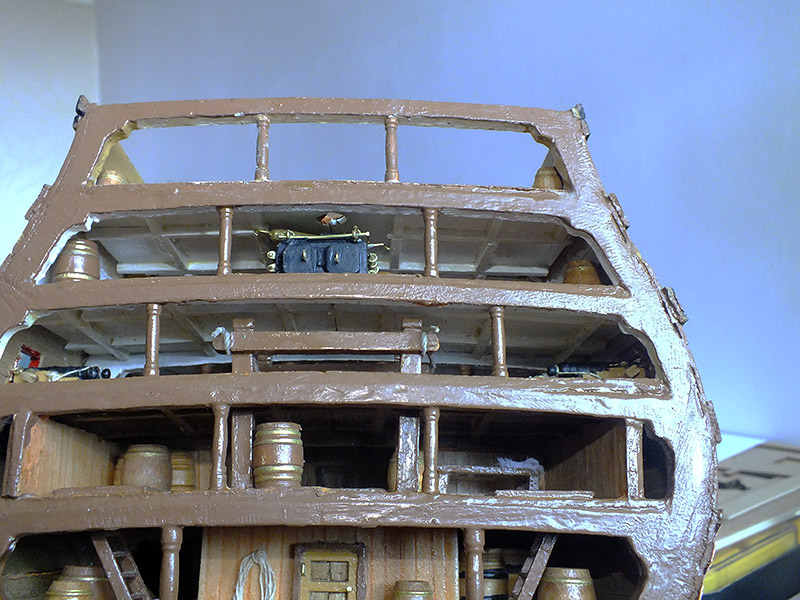
Upper Gun-deck Completed A relatively speedy update this time, but I thought it necessary to “celebrate” it as the next part of the build will be so significant and different; completing the quarterdeck. The upper gun-deck build passed uneventfully, as it primarily consisted of positioning the six cannon and rigging them. The placing of the stanchions (which I acknowledge I have still to touch up with paint) really completed the deck build. For those who may have had concerns over the stove and its condenser being ill used by the bashed beams on the underside of the upper gun-deck, you can be assured through careful placement of the beams, they suffered no damage! It really does look like it needs further detail, some sort of embellishment, but even the real thing only has a few buckets and gun tools in addition to the cannon, and of course a liberal sprinkling of the ubiquitous barrels. Of course there is also the small “rooms” to the rear of the roundhouses, but thanks to the faulty gun port template, and the necessity to move the gun ports forward by quite a way, I haven’t got room for them. I was going to place two smaller cannon pointing from gun ports in the actual beakhead, but the positioning of the most forward two cannon again means no room. It did also occur to me to bash the actual (temporary) tables to swing between the guns, as exist in reality, but as these are fastened to the underside of the quarterdeck, which isn’t there yet(!) and would also need tiny benches to suit, both of which would stretch my model making skills rather too much. Now to build and fit the quarterdeck! Bryan
- 77 replies
-
- 5
-
-
- cross-section
- hms victory
- (and 2 more)
-
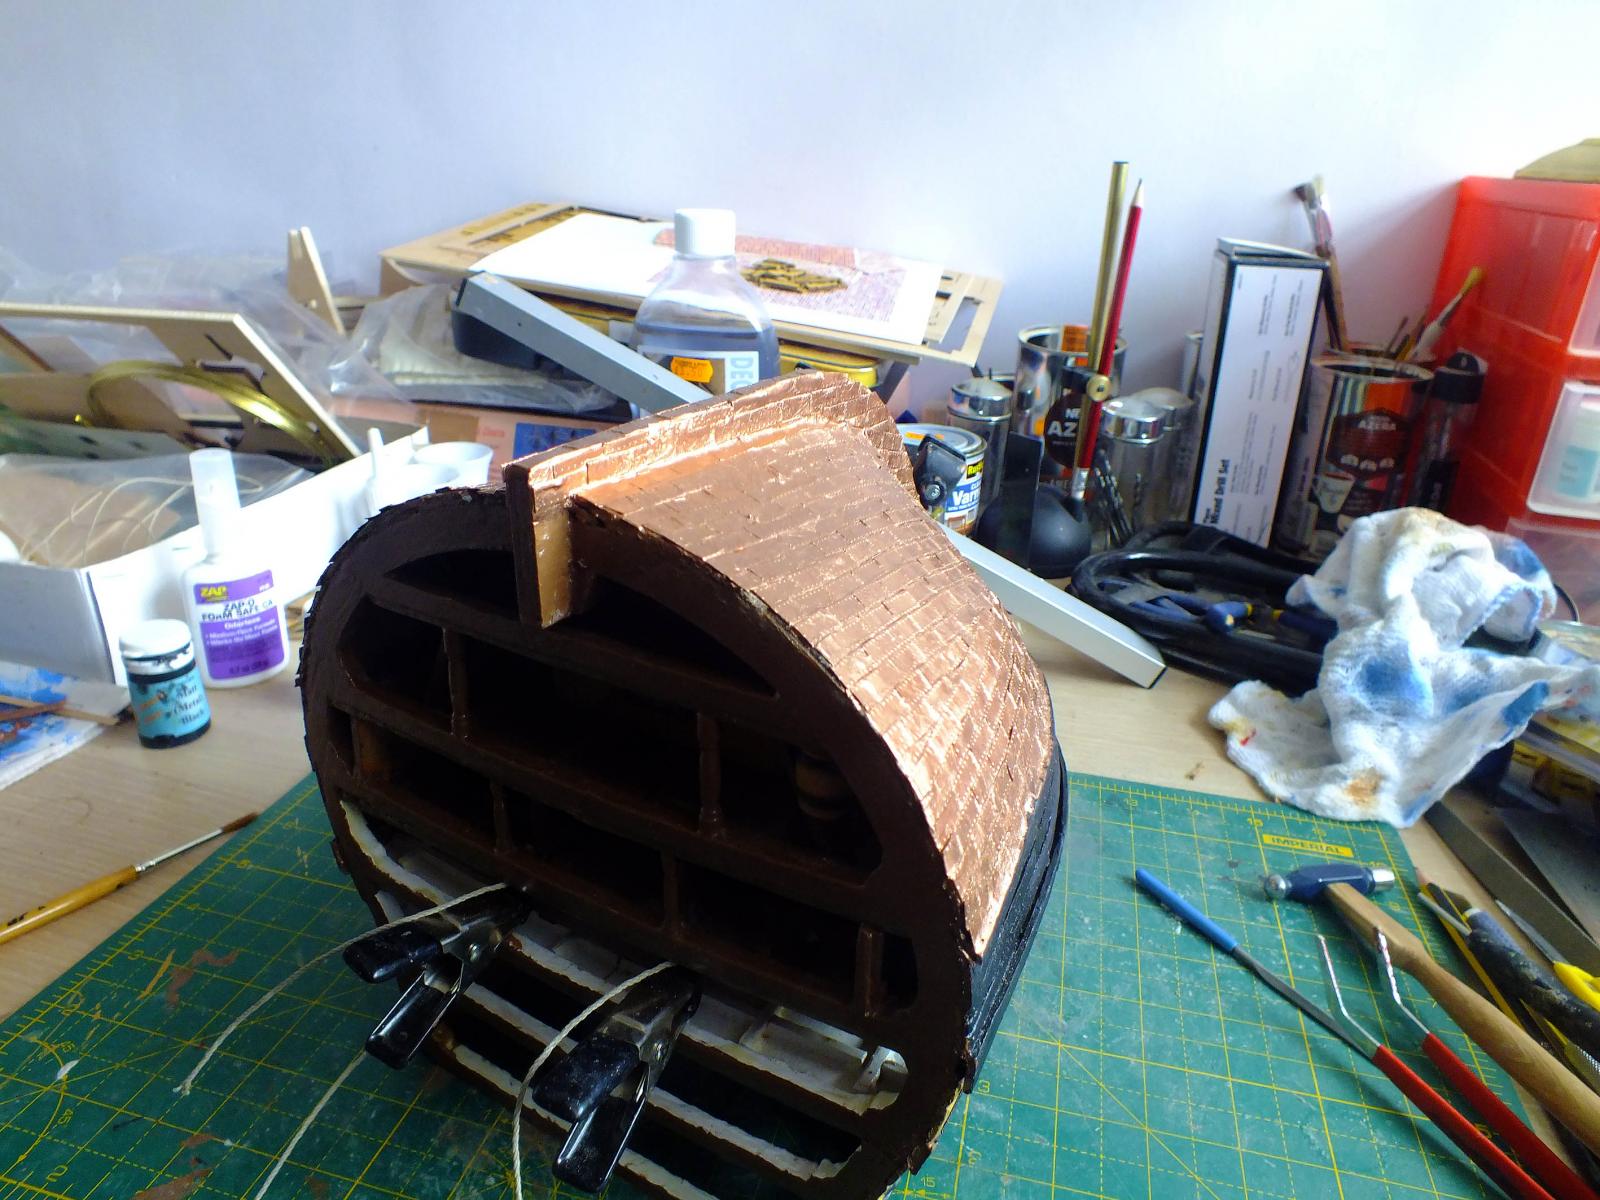
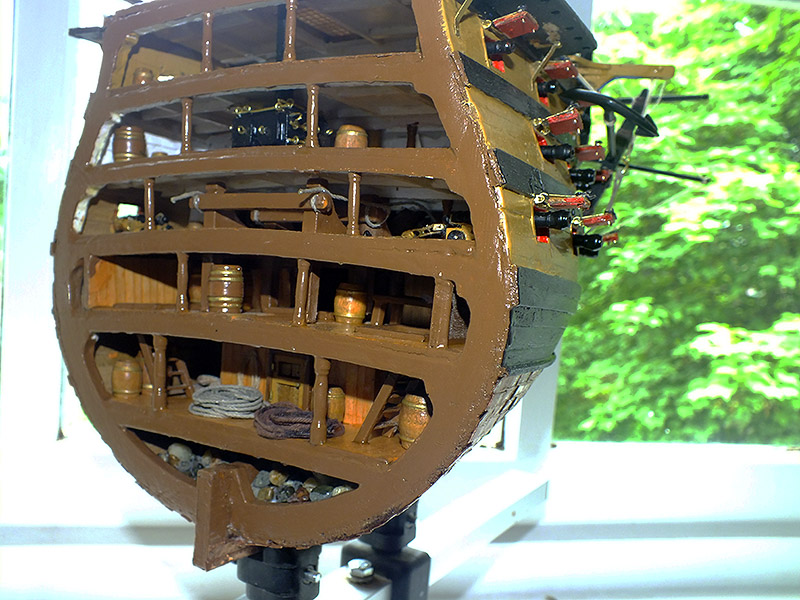
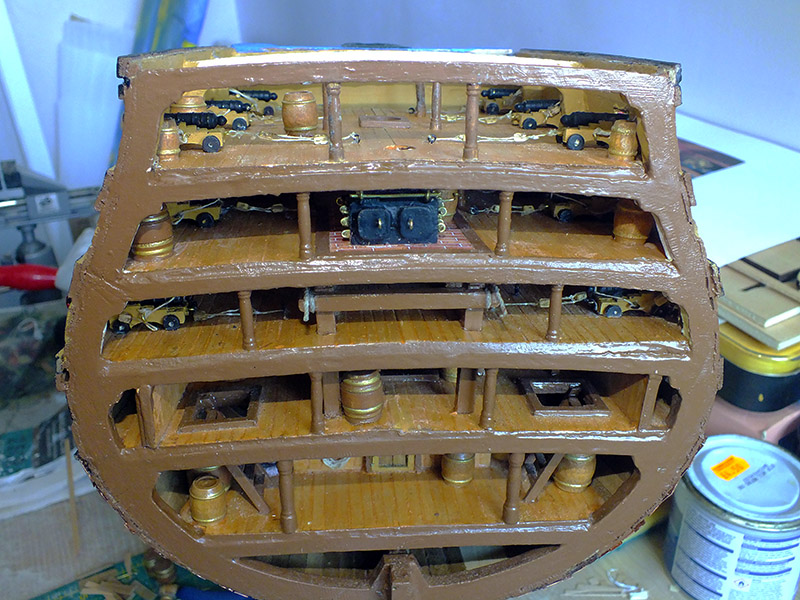
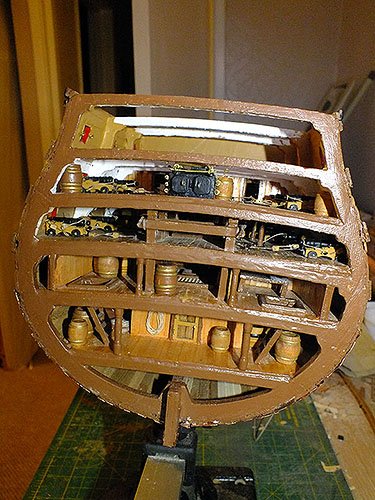
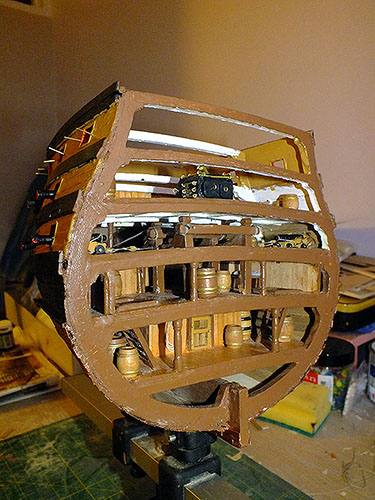
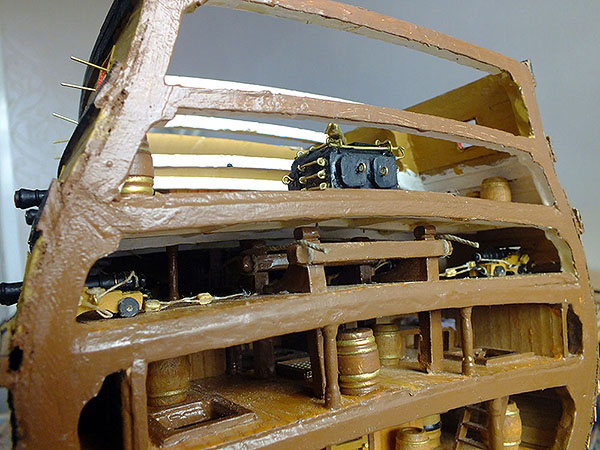
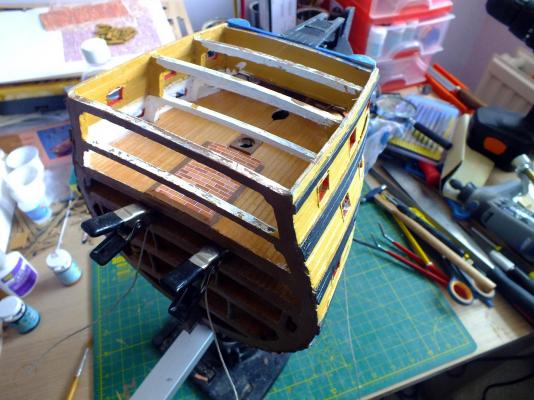
Complete up to the Middle Gun-Deck Well my great plans to continue to add to the top deck detail were neatly thwarted! I just couldn't continue without permanently fitting the top deck itself (not just temporarily as I intended). To do this I needed to complete all the other, lower gun decks, and to do this I have to fit all the guns. Which is what I'm continuing to do. She's now complete up to the middle gun deck, and the upper gun-deck deck itself is about to be fitted, so a first - and last - lingering look at middle gun-deck before its obscured forever! The work went reasonably well, its far from perfect, but looking "interesting", and I do like the bits of detail now present. Like for instance the anchor ropes wrapped correctly around the riding bitts (see I did need to fit the anchor ropes sooner rather than later), the cannon appearing to be fully rigged (although in reality only the "front" two on each deck are remotely fully rigged), the "brickwork" of the stove floor and the deck wall of the sick bay in position towards the prow end of the middle gun-deck. Note to self: I must remember to fit (and in a couple of cases "refit") the between deck stanchions! The main problems I had were really unavoidable; positioning the cannon on the lower gun-deck (which was already "decked-in") was very tricky, and rigging all but the front two guns impossible. Positioning the most obscured ones was eventually achieved by tying string loosely around the business end of the barrel, threading the other end of it through the required port, liberally applying adhesive to the "flattened" wheels and pulling the gun assembly, upside down, into position with the tip awkwardly poking through the gun-ports, where the gun carriage was "righted" with my fingers, and the string removed! Almost a magic trick! Now to assemble and fit the upper gun-deck. I must take care the "beams" I will create to go under the deck do not interfere with the stove and especially its wonderful "condenser" which I fear is very much at risk!
- 77 replies
-
- 8
-
-
- cross-section
- hms victory
- (and 2 more)
-
You can also find the image linked on the page I mentioned and also here; images Its the game developers page and also has links to two other stunning 3D renderings.
- 77 replies
-
- 3
-
-
- cross-section
- hms victory
- (and 2 more)
-
Computer "wallpaper" I just thought I might mention the wonderful new "wallpaper" I use on my PC monitor (I'm not at all sure that sentence is either grammatically or technically correct!). It is a 3D rendering I "acquired" from a website which chats about what looks to be a very interesting and certainly graphically brilliant nautical game; Navel Action. It can be found here; http://www.navalaction.com/#ageofsail (This isn't an ad., I have no connection whatsoever with the game, I just thought I'd better credit it)! Here's that image; Its actually a remarkably accurate image in its detail, and helped me with a point or two, for instance cannon protruding from a port in the beakhead, which the laser engraving has, but the manual doesn't explain. It also shows the secondary anchor which the kit doesn't provide! Bryan

- 77 replies
-
- 4
-
-
- cross-section
- hms victory
- (and 2 more)
-
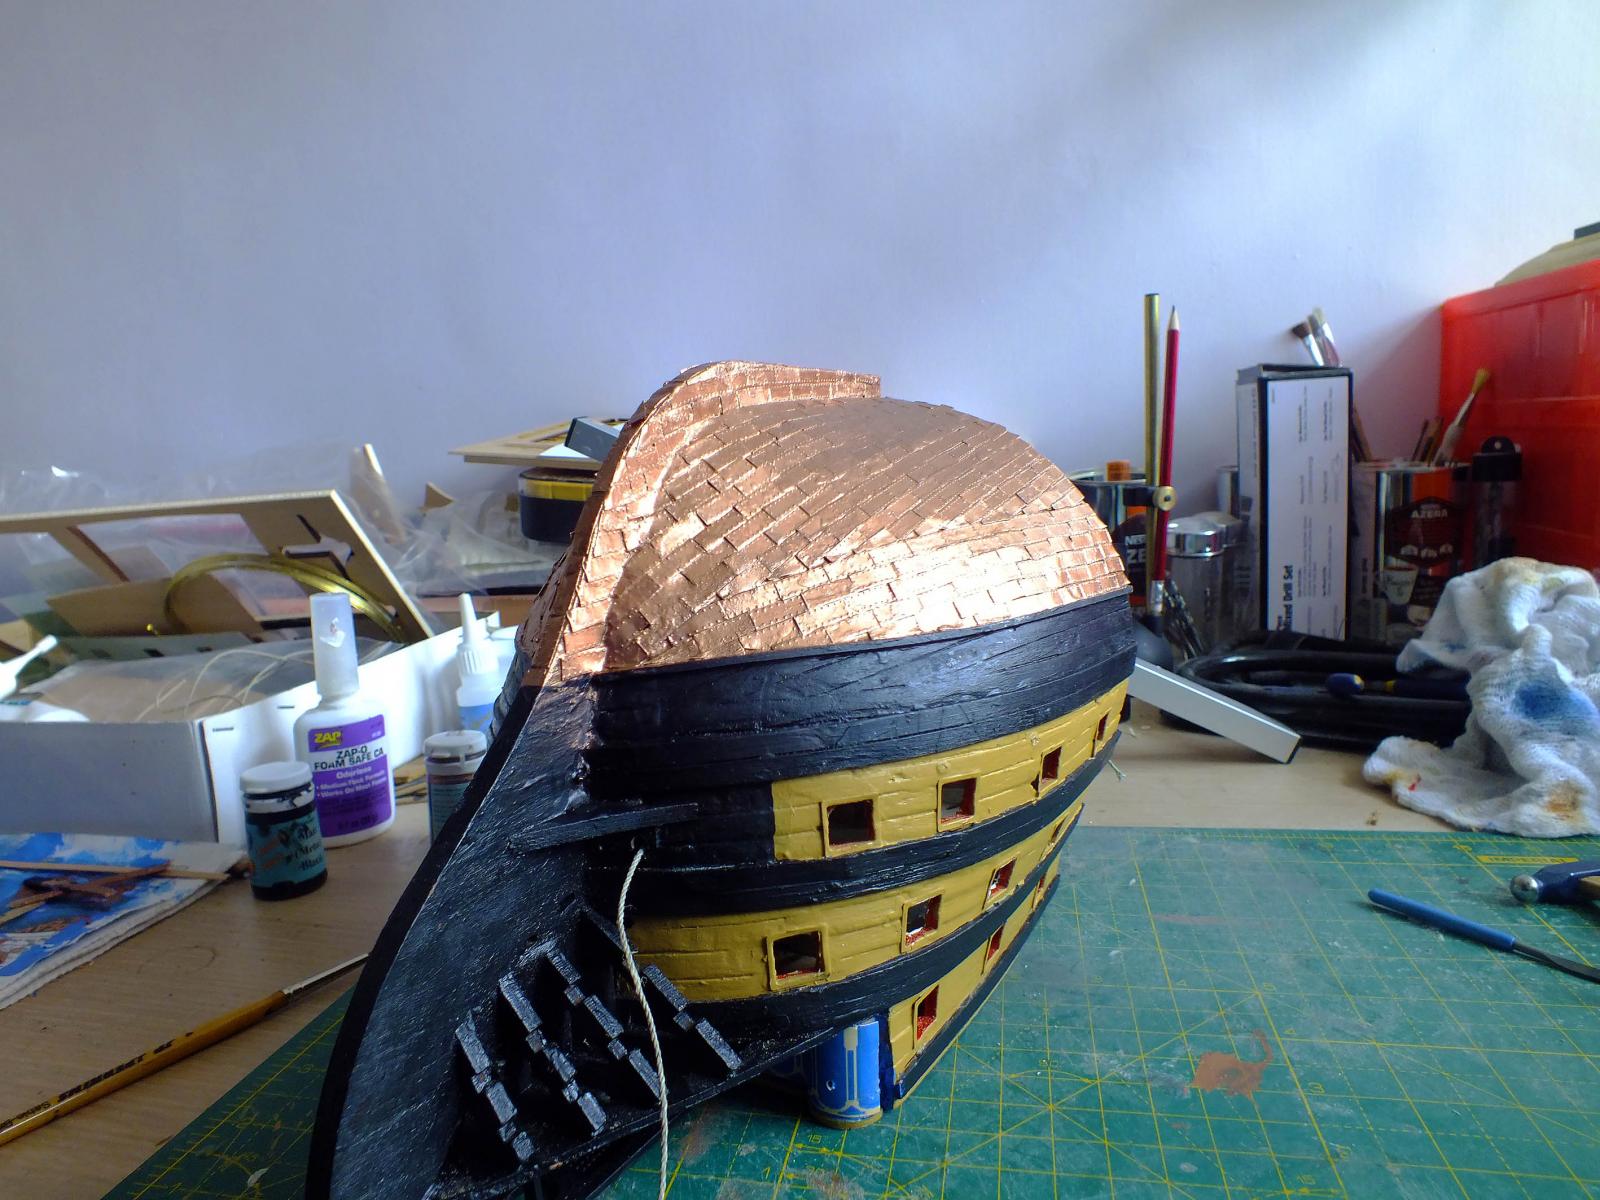
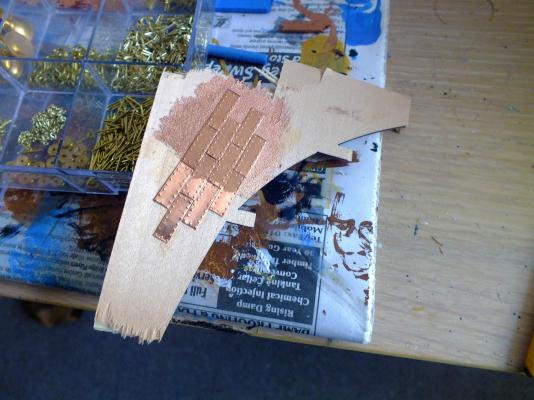
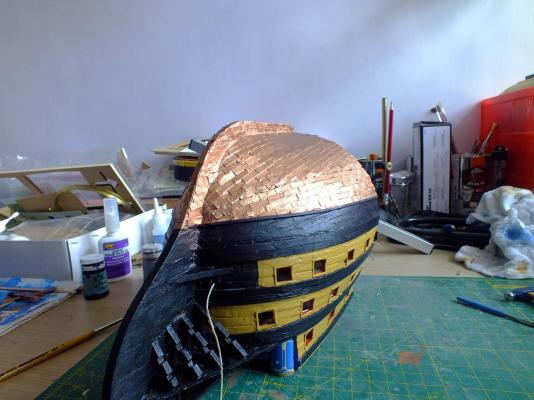
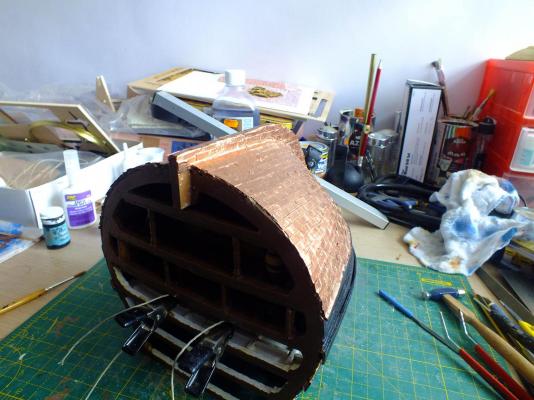
Oh that copper plating... Well the hull is now completely copper plated. I wish I could say I enjoyed doing it, but I found it very taxing. Its not unlike planking the hull, and can be equally as frustrating, made worse by the minute size of the "plates". The completed job far from perfect, but I had one inspired idea; I was in the process of ordering more paints when I noticed the supplier had actual "copper" paint (Admiralty AP9126W Copper). It occurred to me it might well be useful for touching up the bad joints etc. I purchased some and in fact I ended up painting the entire plated hull with it! This served two purposes; it took the very unrealistic copper "shine" off the plates, and indeed did disguise a host of plating imperfections, especially at the joints of the keel, which now look almost good, but elsewhere to. It definitely helps my plating look a whole lot more presentable. The "copper" still needs considerably more "weathering", something I shall have to look into - not that I intend using my own urine to tarnish the plating as someone on here has suggested! A lot of other work has also being completed, in all cases before I undertook the plating. This work is confined to detail below upper deck level as the kit has to be positioned upside down to plate the hull, and sits neatly on the top deck to do so. The work includes a lot of detail on that forward deck area as well as the brick "hearth" for the stove. The latter was in fact produced by editing and printing onto card a screen-grab of some brickwork. I used a similar method (arguably not as successfully) to produce the round-house(s) and beakhead fascia as I was having horrendous problems trying to paint the supplied laser engraved sheets, completely spoiling them and certainly not being able to afford to replace them. (Have you seen just how much these things cost?!!!). Incidentally my research also revealed just what the roundhouses actually are, I'd often wondered at their function, but they are in fact officers toilets! The quaintly named "marines walk" was also added, though I doubt the marines ever ventured there during rough weather! The observant will also notice the anchor ropes dangling from the ports. It was definitely foolish to do this at this stage, but I was concerned to get the ropes wrapped correctly around the riding bitts inside on the lower gun-deck, which I'd convinced myself needed doing before I advanced much further. I was quite concerned the supplied 1.25mm "rope" is much too thin considering the "real" anchor ropes were 47cms (19 inches) in circumference. However scaled up they are not far off. The observant will also notice the ropes protrude from the wrong holes (the outer rather than the inner hawse holes). This is quite simply because the inner holes are completely blocked inside by the woodwork of the keel assembly - and in one case by a snapped off round needle file I was using to try and widen the hole! I was wondering why there are in fact two hawse holes on each side, but assume the outer one was either a spare for use in emergencies when the primary anchor rope was damaged, or for the use of the secondary "messenger"(?) anchor rope. It may also be worth belatedly mentioning that, contrary to what I had previously decided, I did use the supplied brass gun port "edging" because they do "finish" the ports nicely. I have however painted them over to make them less obvious, and from the looks of the photographs will have to repaint them and in some cases the red of the interior sides. Right, now to fit the herpes(!?) and start the top deck detail.
- 77 replies
-
- 4
-
-
- cross-section
- hms victory
- (and 2 more)
-
Paul and Bob, thanks for that info re. the Section Deck between Gun Bays (what a mouthful!). All taken to heart for when I make the purchase (or cajole one of my kids to!). I follow both your builds with much interest. Bryan
- 77 replies
-
- 3
-
-
- cross-section
- hms victory
- (and 2 more)