DONATION DRIVE - SUPPORT MSW - DO YOUR PART TO KEEP THIS GREAT FORUM GOING!
×


andy
-
Posts
96 -
Joined
-
Last visited
Content Type
Profiles
Forums
Gallery
Events
Everything posted by andy
-
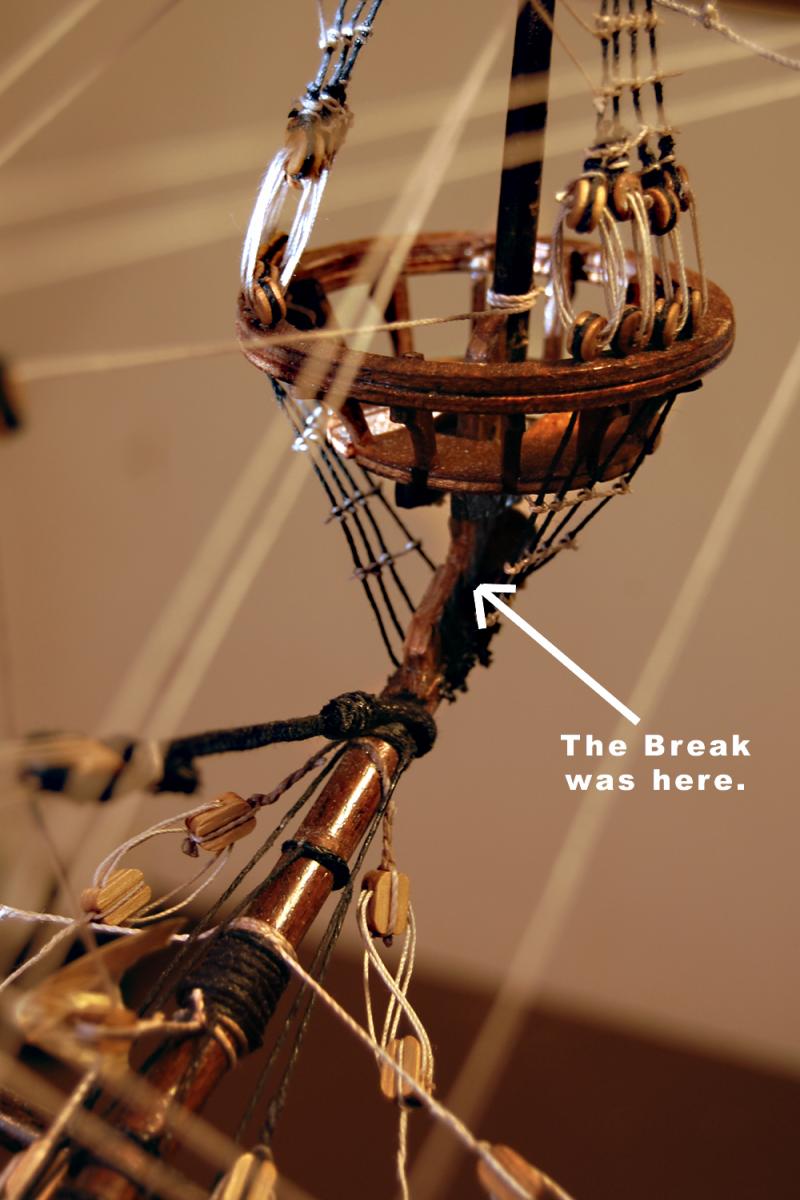
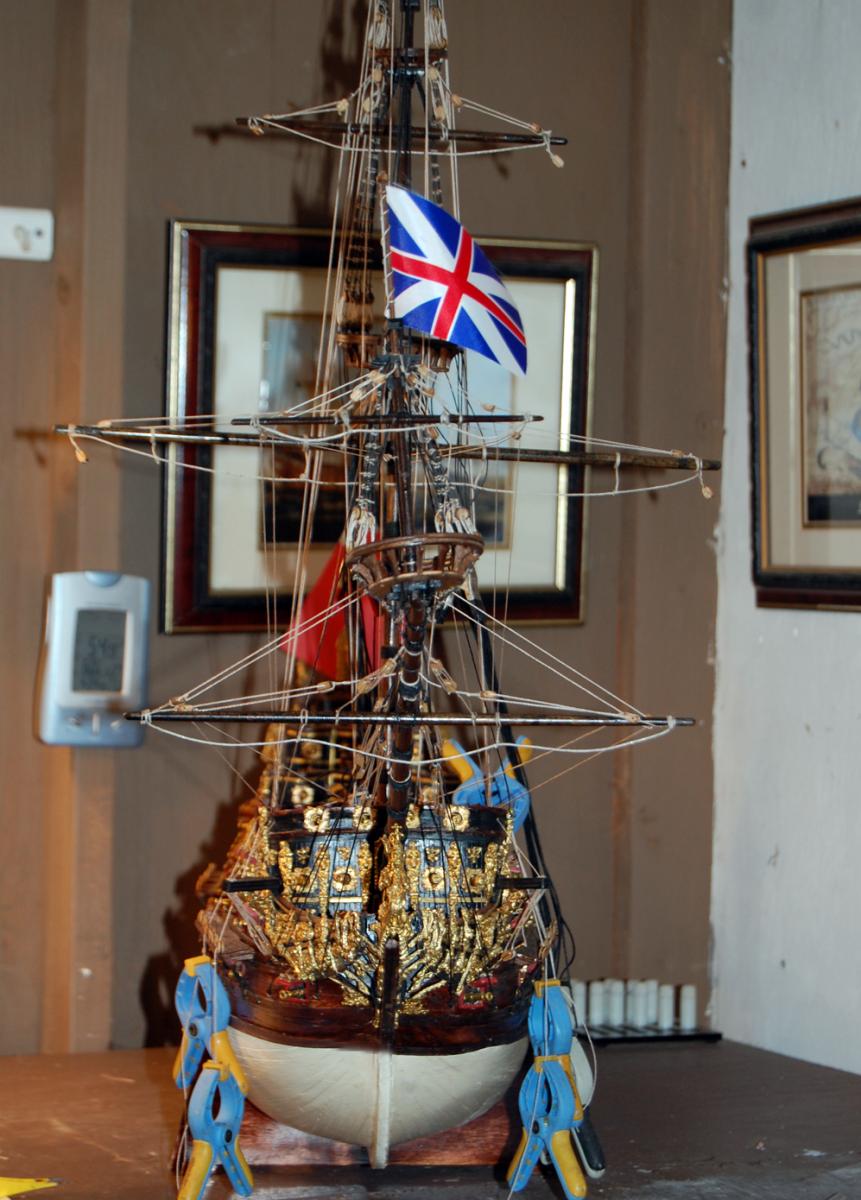
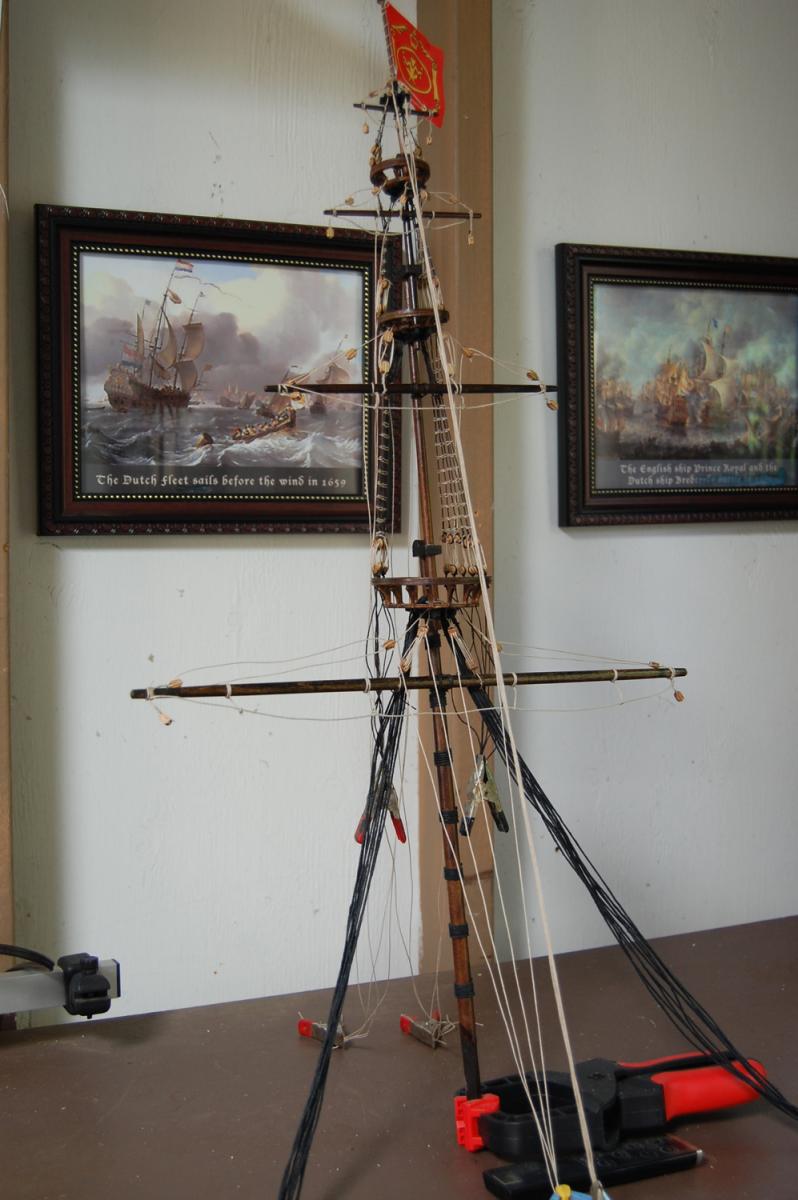
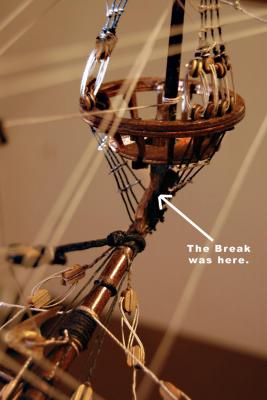
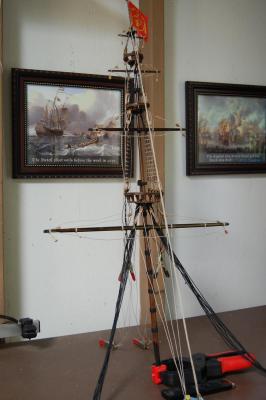
 Hi Everyone, Since my last post, I have narrowly escaped a ship-building disaster. The picture of my work shed on the first page of this build log shows 2 black lamps hanging over my work area. Here in Northern California at this time of year we can have wide swings from the nighttime to the daytime temperatures. My assumption is that this caused something to break, and one of the lamps came crashing down on the ship. Although fully rigged the entire bowsprit snapped off as it emerges from the hull and the spritsail topmast also broke off. When I went out to the shed the morning after it happened I think I must have felt like the Captain of the sinking Vasa. After a couple of hours of despair though, I decided I would try to repair the damage or rebuild everything from scratch. As it turned out repair was possible. I carefully drilled some holes into both sides of the broken bowsprit and inserted a metal dowel made from a nail. I was able to get it back together without disturbing too much of the rigging. Repairing the spritsail topmast was more difficult. I had a hard time figuring out how to clamp everything so that it would be upright and all the rigging would remain taut while the glue dried. In the end it all worked out, and unless you knew about the problem, you would never know it happened. I was too upset to take pictures during the midst of the problem but I am including two post repair pictures below. Meanwhile, I am making forward progress and have almost completed the main mast.
-
Hi Nils, I have been away for a couple of days hence the delay in responding, but thanks so much for the encouraging words. Andy
-
Hi everyone, Where else can you have a learned discussion on foot ropes in 1640? Isn't MSW great. It is very early in the morning here on the Pacific Coast, and I am about to take a weekend trip to Yosemite. While contemplating the wonderful scenery, I am going to think about the fate of foot ropes on my SOS model. Although I think Gary is correct, I also think Vince has made a strong case. It could go either way!
-
Hi Gary, Mantua's drawings and pictures of the ship show foot ropes and I never thought to question their presence. After reading you comment, though, I started looking at other models and paintings, and you are correct. I can remove them easily and it will, indeed, save a lot of work. Thanks for the info. I hope you can make it to the meeting in June. I look forward to seeing you there. Andy
-
Mounted the foremast to the hull and started some of the rigging between the bowsprit and the foremast. Having some trouble keeping everything taut.

-
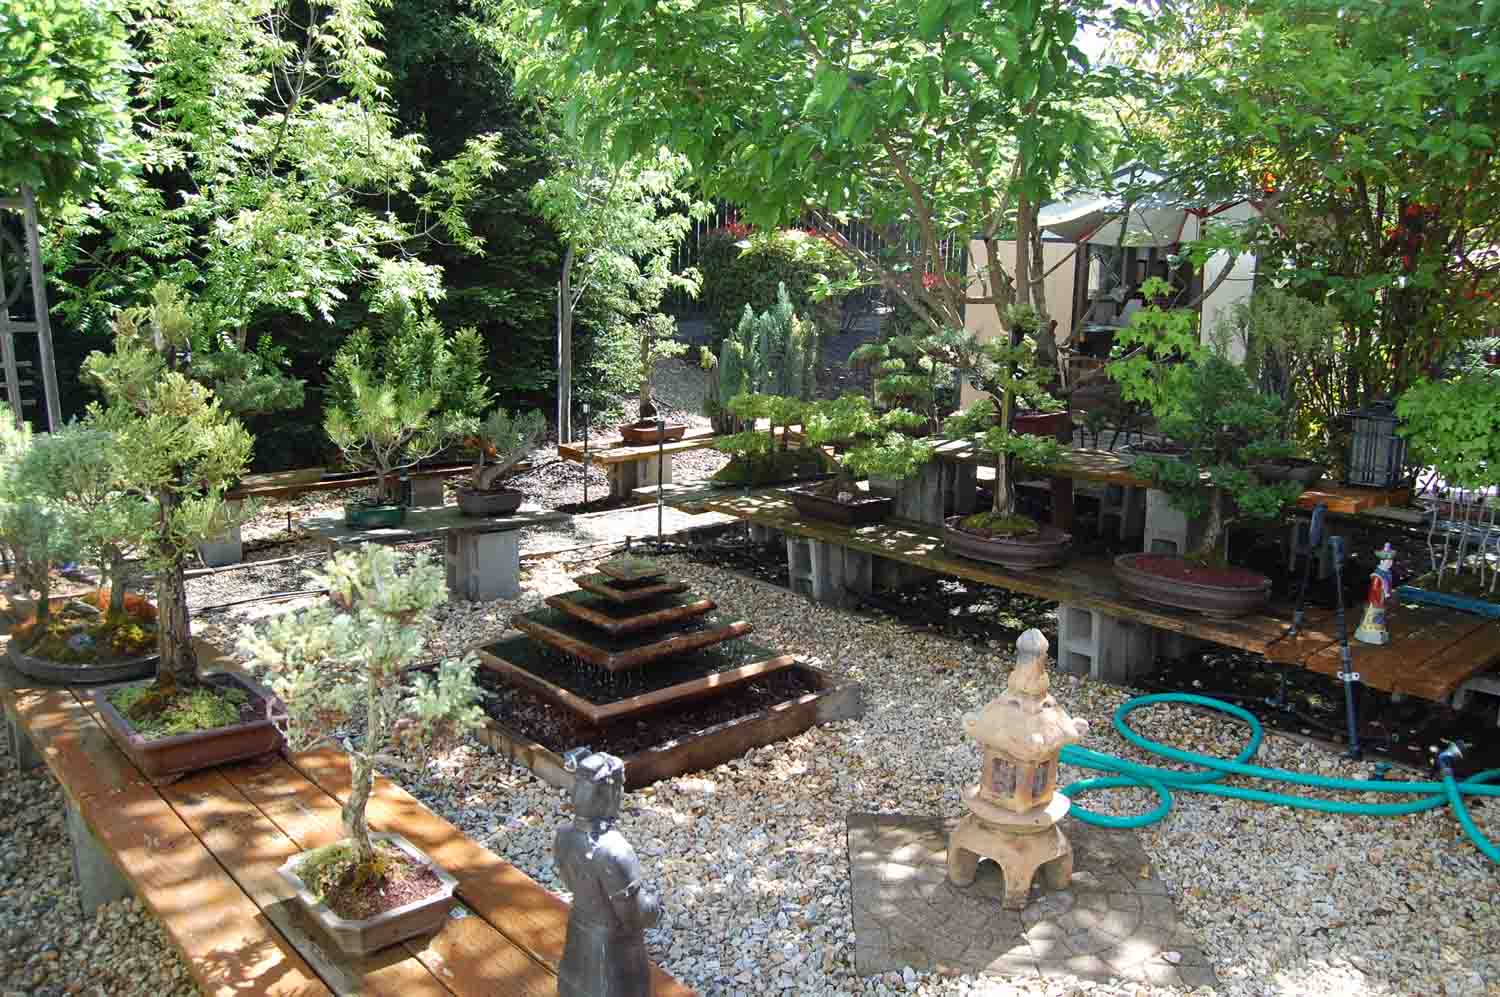
Hi Everyone, It has been awhile since my last posting. In the Spring one of my other hobbies, the care and growing of bonsai trees, takes up a lot of my time and I haven't been spending as many hours on the SOS as normal. I have over forty bonsai trees, and they all require attention this time of year. The picture below shows some of my trees with the Boatyard, aka: The Shed, in the background. In spite of the diversion, I have completed and attached the bowsprit and am almost done with the foremast. I have tried to do as much work as possible off the ship so there are many loose lines in the picture of the foremast. These will all look better when tension is applied. I haven't encountered any real problems other than some of this work is tedious in the extreme.


-
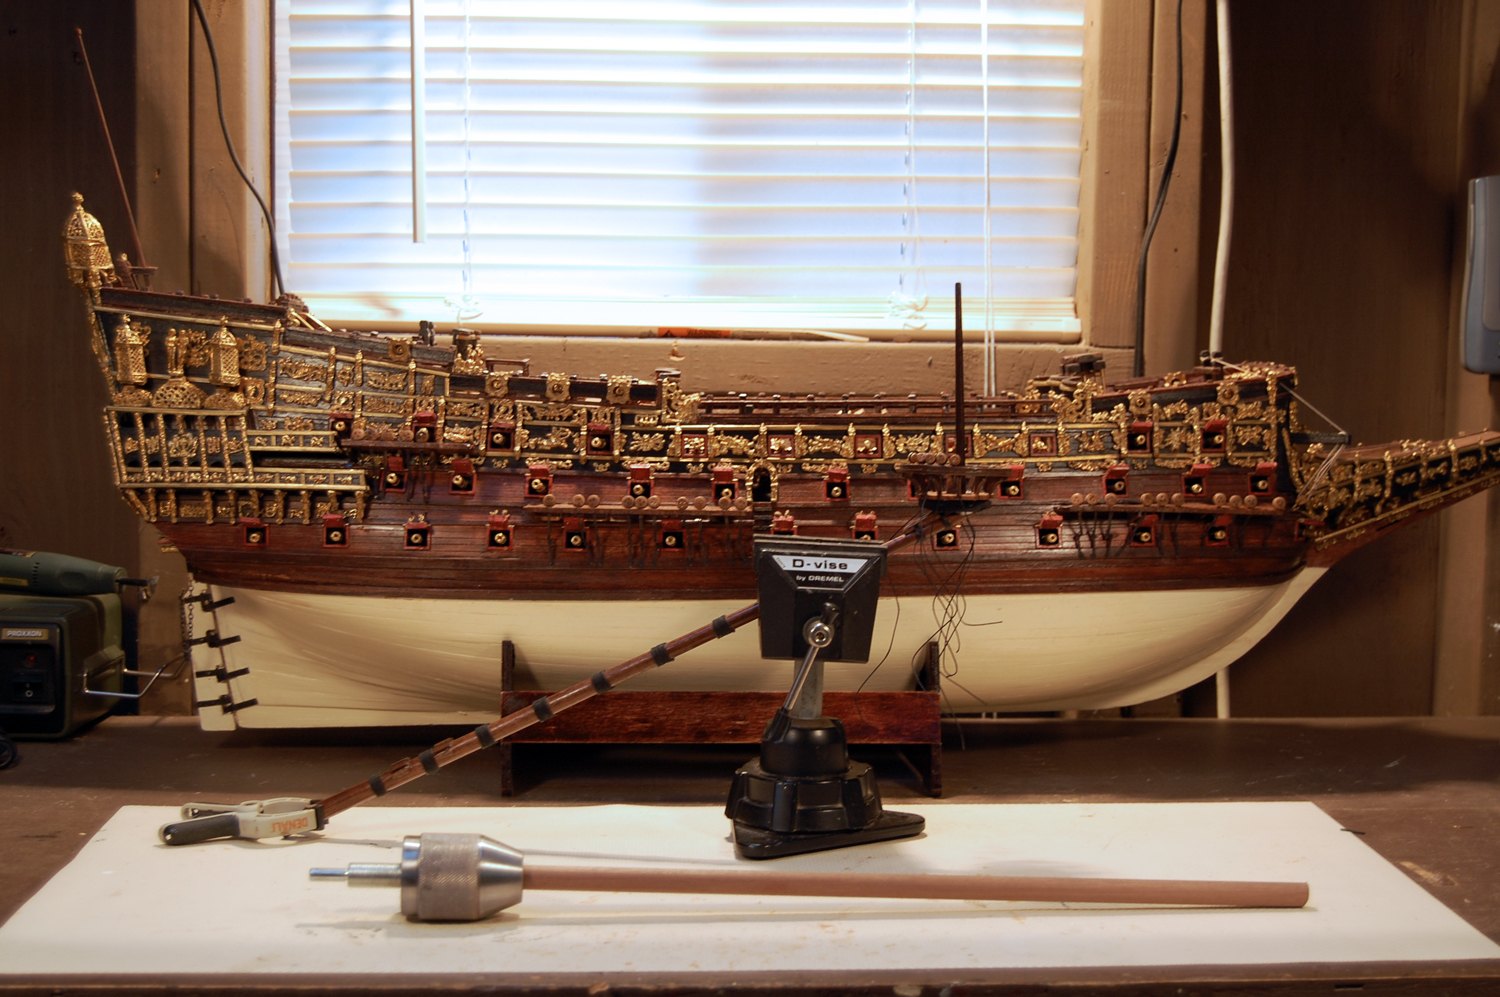
The hull is completed, and I have begun working on the masts and spars. I have been concerned about this because of the dowel sizes required for the masts - up to 12 mm. The diameters are too big to fit in my 3/8" drill chuck, and I wondered how I was going to taper them. The problem was solved when I came across a 3/8" to 1/2" conversion chuck on the internet for a very reasonable price. (For those of you not in the U.S., my original drill chuck will handle about 8mm.) The picture below shows the chuck holding the dowel for the foremast, with the semi-completed bowsprit in the background.

-
Hi Vince, OK, now I see my problem. You're using diamonds. I'm sure it has nothing to do with skill level and patience. Thanks for the response, and I'll be following your Royal William log with interest. Andy
-
Hi Vince, I am curious about what tool or tools you used to make such clean and square cut gunports. Mine never turn out so perfectly. My problem could be lack of patience and not choice of tools. I use a Dremel small grinding bit to make most of the hole and then try to square things up with a sharp knife. As always, I admire your workmanship. Mine turn out OK, but never like yours.
-
Hi Vince and Denis, I'm relieved to know that my two ship building mentors have also had problems with the chain plates for SOS. It's nice to know that I am not the only one who thinks they are junk. Vince, I just visited your Royal William web site. It's looking terrific. I also came across your letter to M. E. I have had the same experience, but 2 months ago I got an email from them, and they had kits on sale at extreme discounts. One of the ships on my 17th century build list is the Wappen Von Hamburg. It is usually the most expensive kit available, but they had it for sale at over a 60% discount. Needless to say, I scooped it up, and it will be my next build. Happy ship building to both of you and thanks for the comments. Andy
-
The bell is in the tower. The oars are in the lifeboat, and the rudder will not fall off. All is well in the world! Except for the soldering. I started assembling and soldering the chain plate pieces. If I soldered small, neat joints when I attached the chain plate to the hull and put a small amount of stress on it to make it taut, the joints gave out. If I soldered larger, blobby joints, they held but looked awful. I finally gave up in frustration. I had a number of chain plate parts which did not require soldering from a prior 17th century build. I decided to order more and save my sanity. Anyone have any soldering advice for the future?

-
Hi Gary, I heard at the last Vallejo get together that you had just received your SOS kit. I missed seeing you, but look forward to hearing your experiences next time. I agree with you about the quality of some of the castings, but I went ahead and used what was given. If you think that is bad, read the above to see about the pitfalls of following the kit's instructions.
-
Vince P. was kind enough to privately send me the message below so I wouldn't be embarrassed by my somewhat stupid mistake: Hi Andy, I have looked at your latest pictures. Coming along nicely. One thing I have noticed and that is the reason for sending you a private message. You fell into the same trap as me when mounting the rudder. It is mounted on the hinges upside down. The rudder hinges should be on top and the hull hinges on the bottom, else the rudder would have just fallen off. The instructions show it upside down! I caught it just as I was placing the rudder and had to redo all of the hinge positions and mount it correctly. Vince P. I have decided to include it here as a warning to anyone else who will be building this kit. Vince, I don't know what I was thinking. I have owned several full size sailboats with removable rudders and know full well that the the hinges should have been reversed. I also know not to take any part of the instructions at face value. My brain must have been on vacation that day. Fortunately, I did not glue the hinges on. I just used the nails. I will be able to disassemble the rudder and do it correctly this time. Thanks for your sharp eye.
-
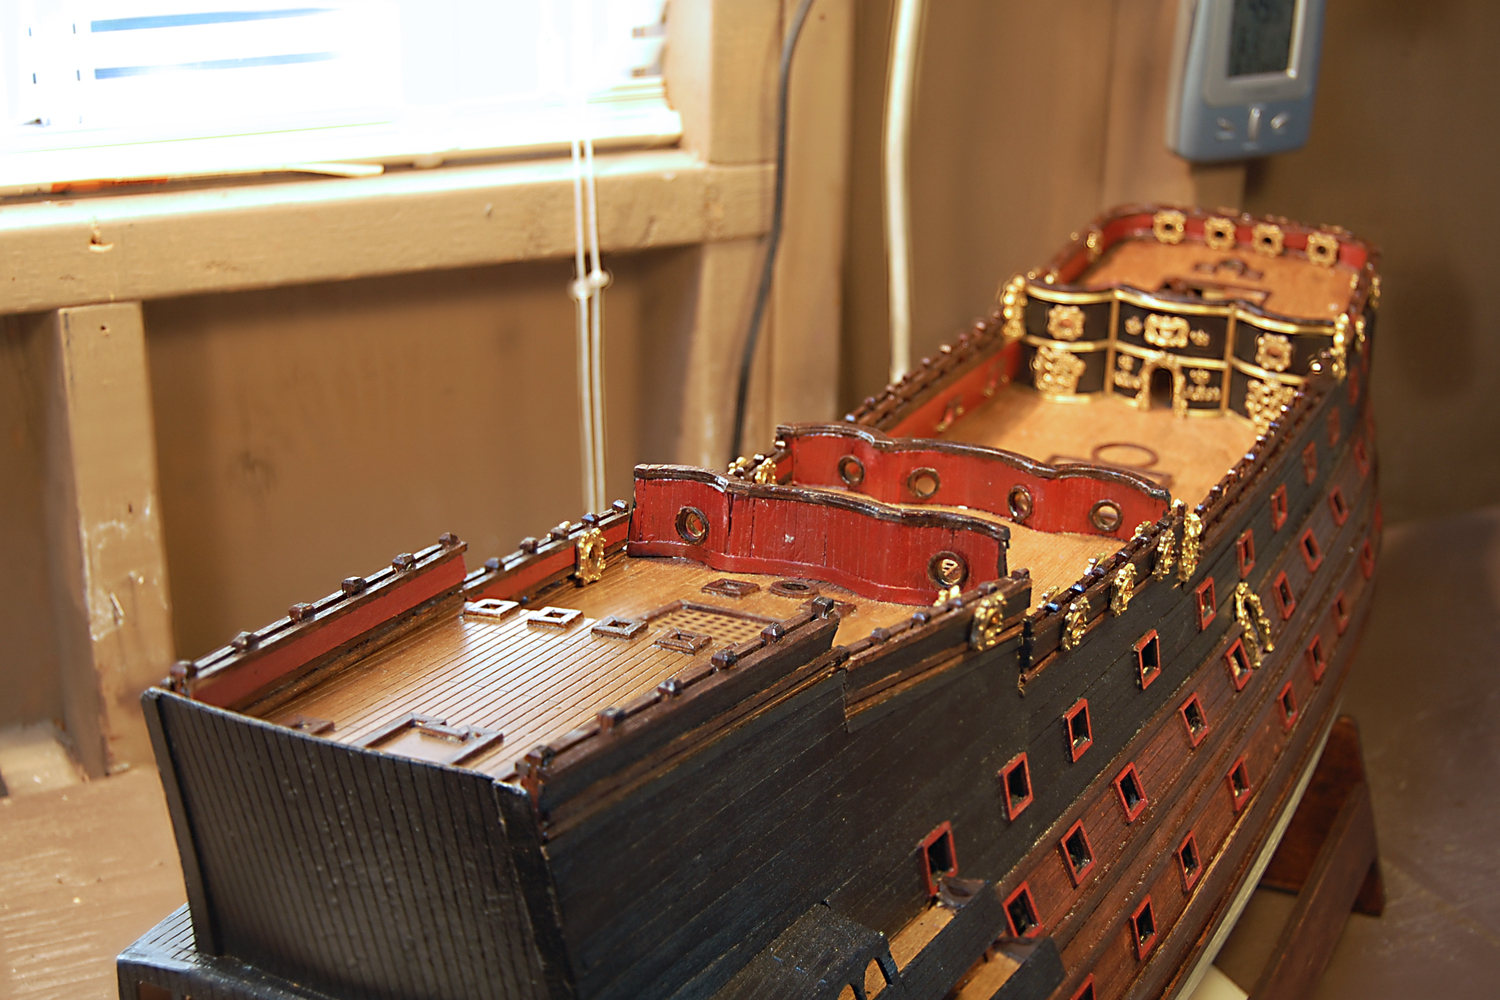
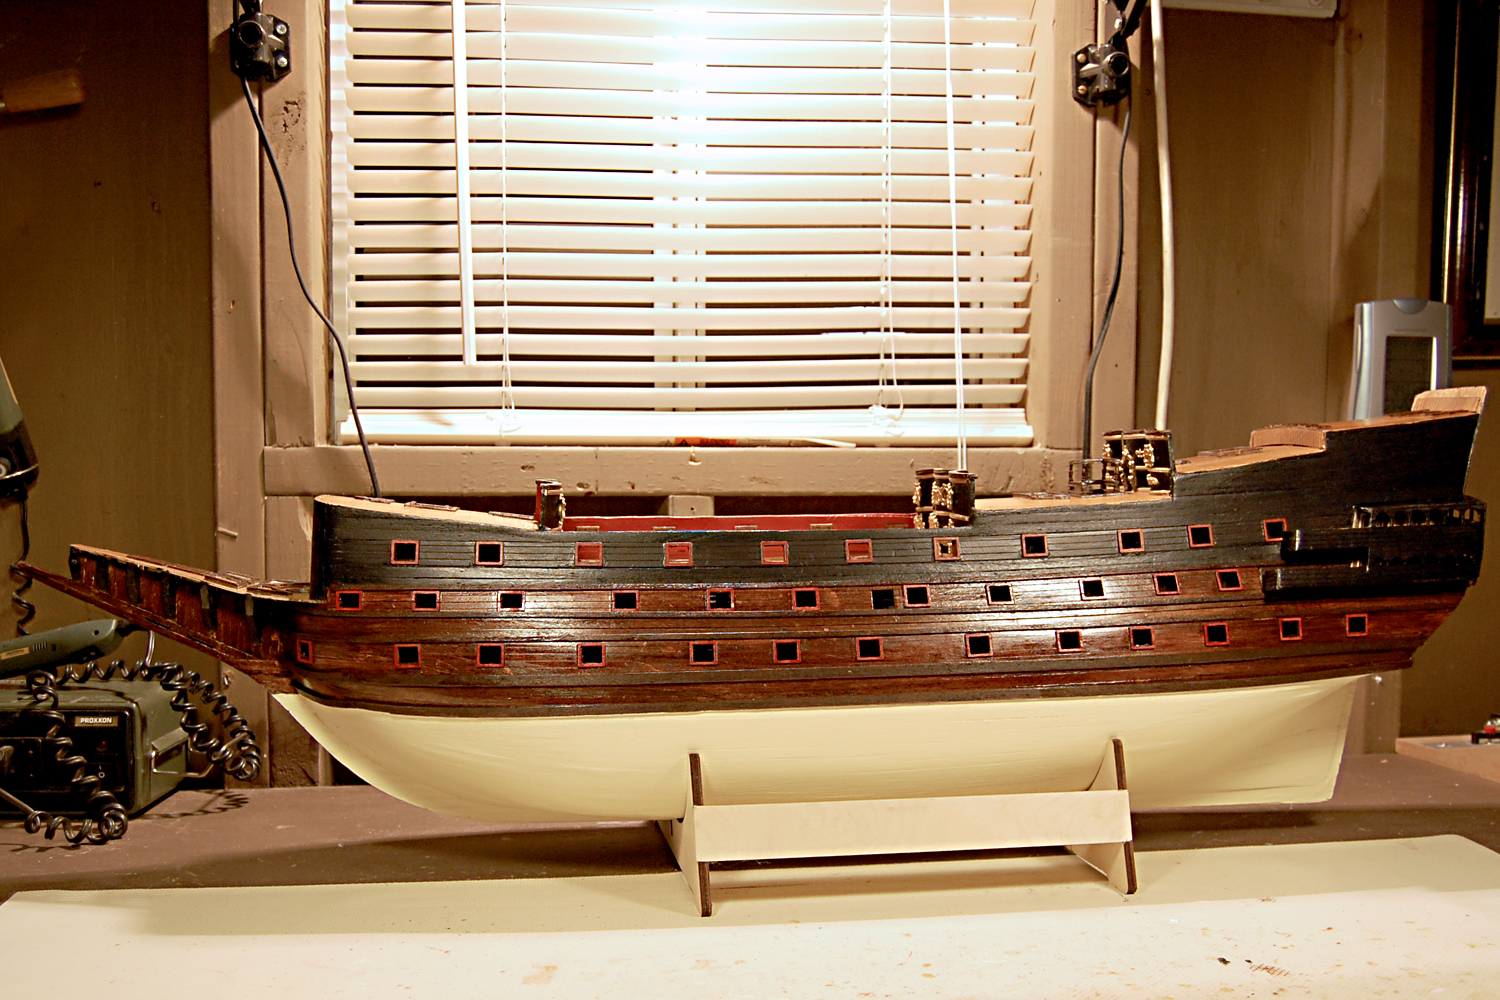
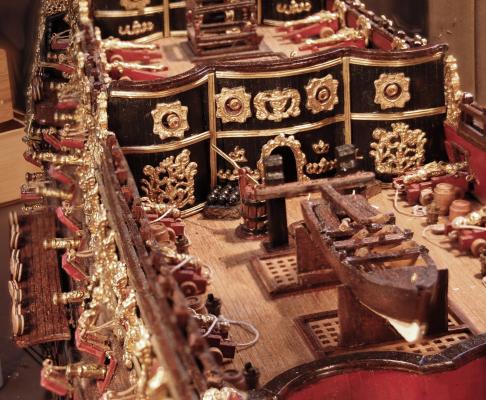
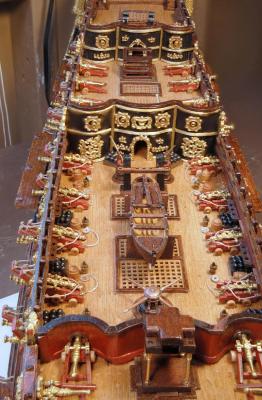
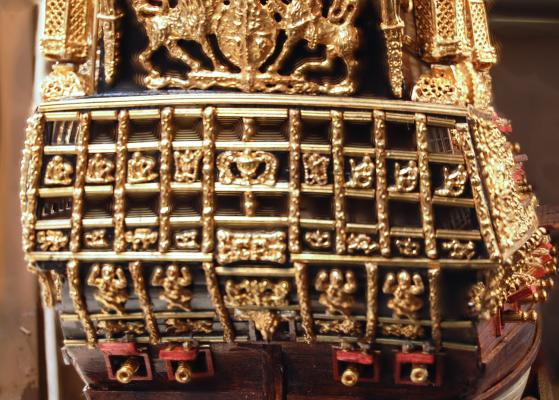
I have been busy for the last several weeks primarily assembling and installing most of the deck fittings. I ran into a problem with the bell tower. I had the wood components but I could not locate the brass columns and the bell. I have tried to be very careful with all of the kit components, but although I searched diligently, I could not find them. I had 4 surplus brass columns from a previous build, and although not exactly the same I used them and they worked pretty well. I have ordered a bell from Cornwall Model Boats, and will install it as soon as it arrives. While searching for the bell tower parts I came across a carved lifeboat hull that also came from a previous build, and since it seemed to be about the right size, I decided to use it. I made the rest of the parts from scratch but couldn't make oars that looked right. Along with the bell, I ordered some from Cornwall. I also installed the rudder with a lot less problem than I thought I would have. The ship is so heavy now that I finally put it permanently in its cradle. The kit's cradle is somewhat ugly, but I dressed it up with a brass nameplate holder I had. I used Photoshop to create an appropriate label and glued it on. Next, it is on to assembling and installing the 50 chain plates required. Assembling the components requires soldering, and soldering is not my strong point. Not only is there soldering, but itsy-bitsy somewhat neat joints are required. I have gathered solder, flux and a decent soldering iron and will give it a try tomorrow. On the theory that a picture is worth a 1000 words, here are four:

- 100 replies
-
- 10
-

-
Hi Denis, I have trial fitted the catheads and they seem OK. The photo is foreshortening the actual room. Andy
-
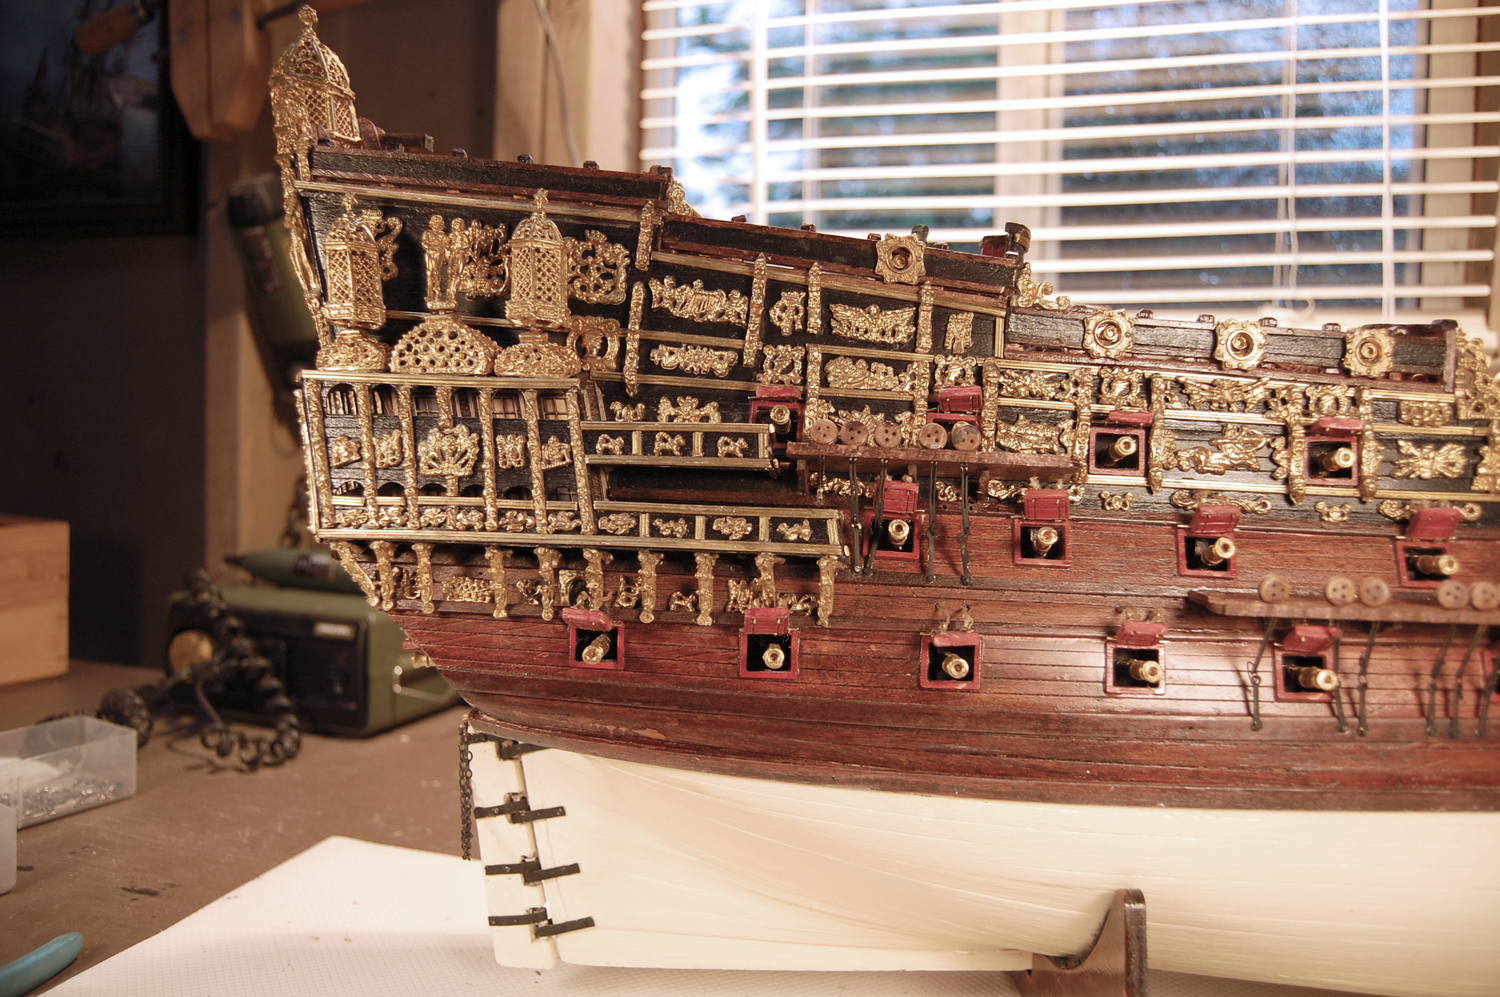
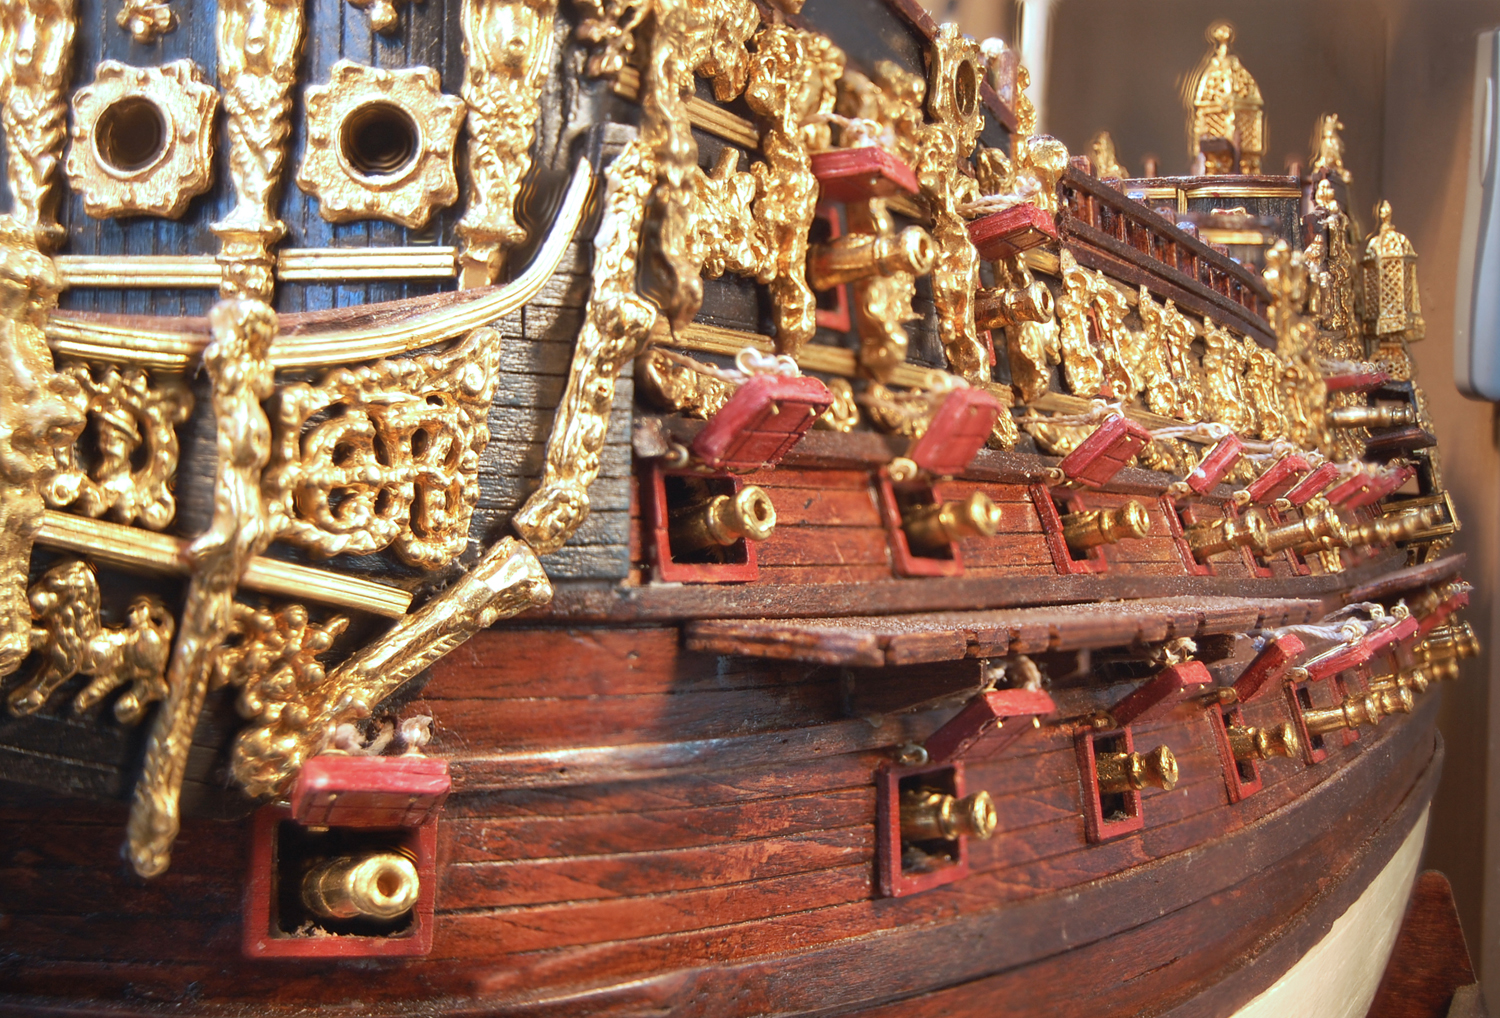
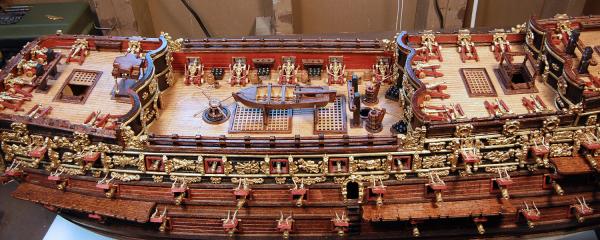
Hi everyone, I have been working for the last couple of weeks on completing the gun port covers, attaching them to the hull, and inserting the cannons into the previously installed support blocks. Very tedious, but I finally have finished. It all went pretty well, but I wish I had used slightly smaller line for the ropes used to raise the covers. When I started it looked right, but I couldn't get the line to look taut, as it should with the weight of the cover pulling against it. Oh well! Hopefully there is so much bling on the ship that no one will notice except in really close-up pictures. Also, I really should have dusted before taking the pictures.

- 100 replies
-
- 10
-
-
Between the Holidays and a lingering cold a couple of weeks went by without any ship building work. I think things are now finally back to normal. I have been working on completing the brass decorations for the bow and the 64 gun port covers for the hull. The directions, as shown in the photo below, call for 3 layers of wood to be glued together to make each cover. I built one as directed and decided it looked unnaturally thick. I checked with the other Sovereign build logs, and as near as I could tell, they were built as directed. I still couldn't get over the thickness, so I went with 2 layers. As i examined the pictures of the gun port covers on the other build logs I noticed they had used black rope for the lines used to hoist the gun port covers up and down. I wondered if this is correct since this rope would have been used frequently while sailing and would have been more like running rigging than standing rigging. Anybody have any thoughts?


-
Hi Denis and Vince, Thanks to both of you for sharing your expertise through your build-logs and personal advice. Each of you have saved me from making errors, and I really appreciate it. Your Sovereigns are both beautiful, and I only hope that I can come somewhat close to the skills and knowledge that you each have shown. Over the coming months, and perhaps even years, I will continue to visit your build-logs for direction and inspiration. Andy
- 264 replies
-
- 1
-
-
- sovereign of the seas
- mantua
- (and 1 more)
-
Hi Denis and Vince, Thanks to both of you for sharing your expertise through your build-logs and personal advice. Each of you have saved me from making errors, and I really appreciate it. Your Sovereigns are both beautiful, and I only hope that I can come somewhat close to the skills and knowledge that you each have shown. Over the coming months, and perhaps even years, I will continue to visit your build-logs for direction and inspiration. Andy
-
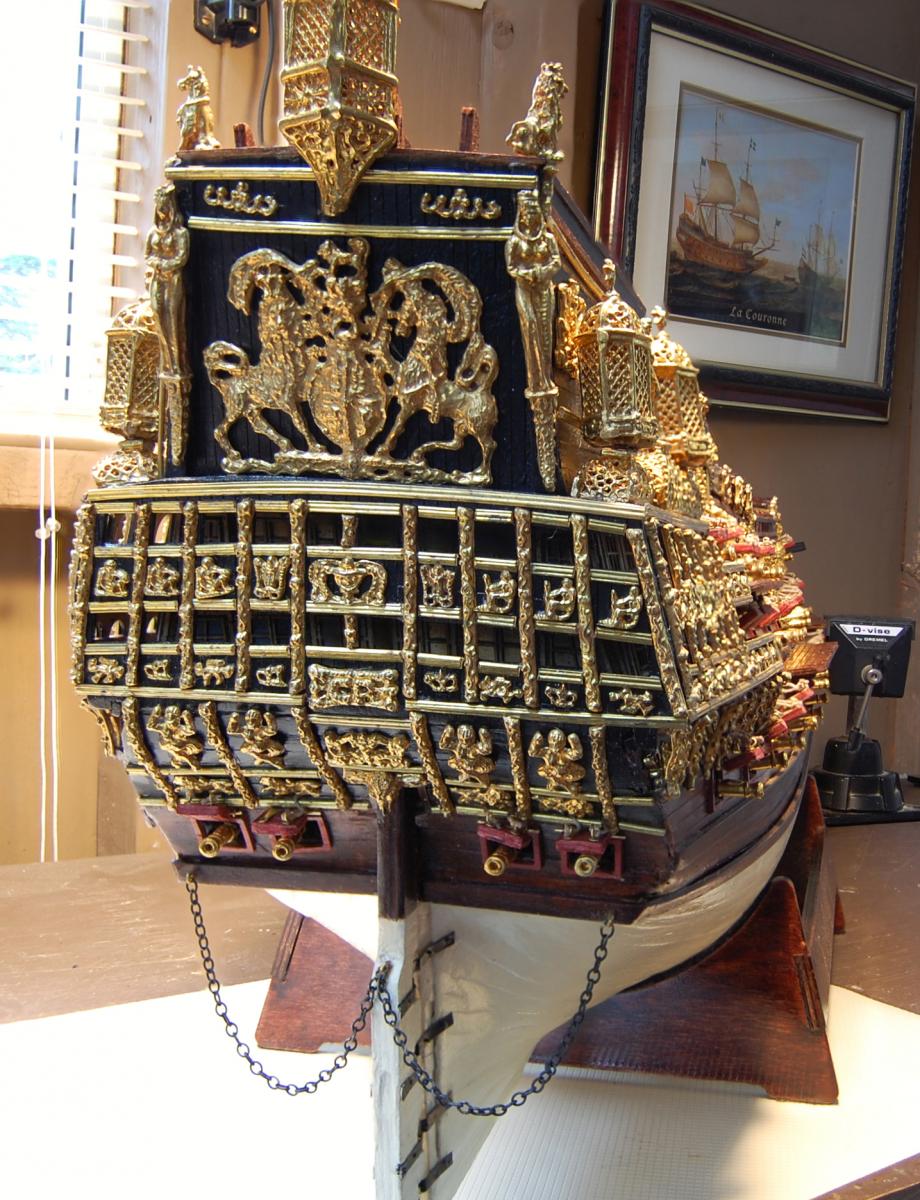
Hi Vince, Thanks for the advice. I will keep it in mind as I attack the stern. I was so far off that I actually left one piece out. It was a wooden fitting that went just in front of the galleries, and I had no idea what it was. I studied the pictures of your build and saw that you had bent the metal stripping up so it would fit. Although not historically accurate, I decided I liked the curvature of the metal strip better without the piece. I am afraid I am not as precise as you and Denis when it comes to historical accuracy. For me, just getting the model together is challenge enough.
-
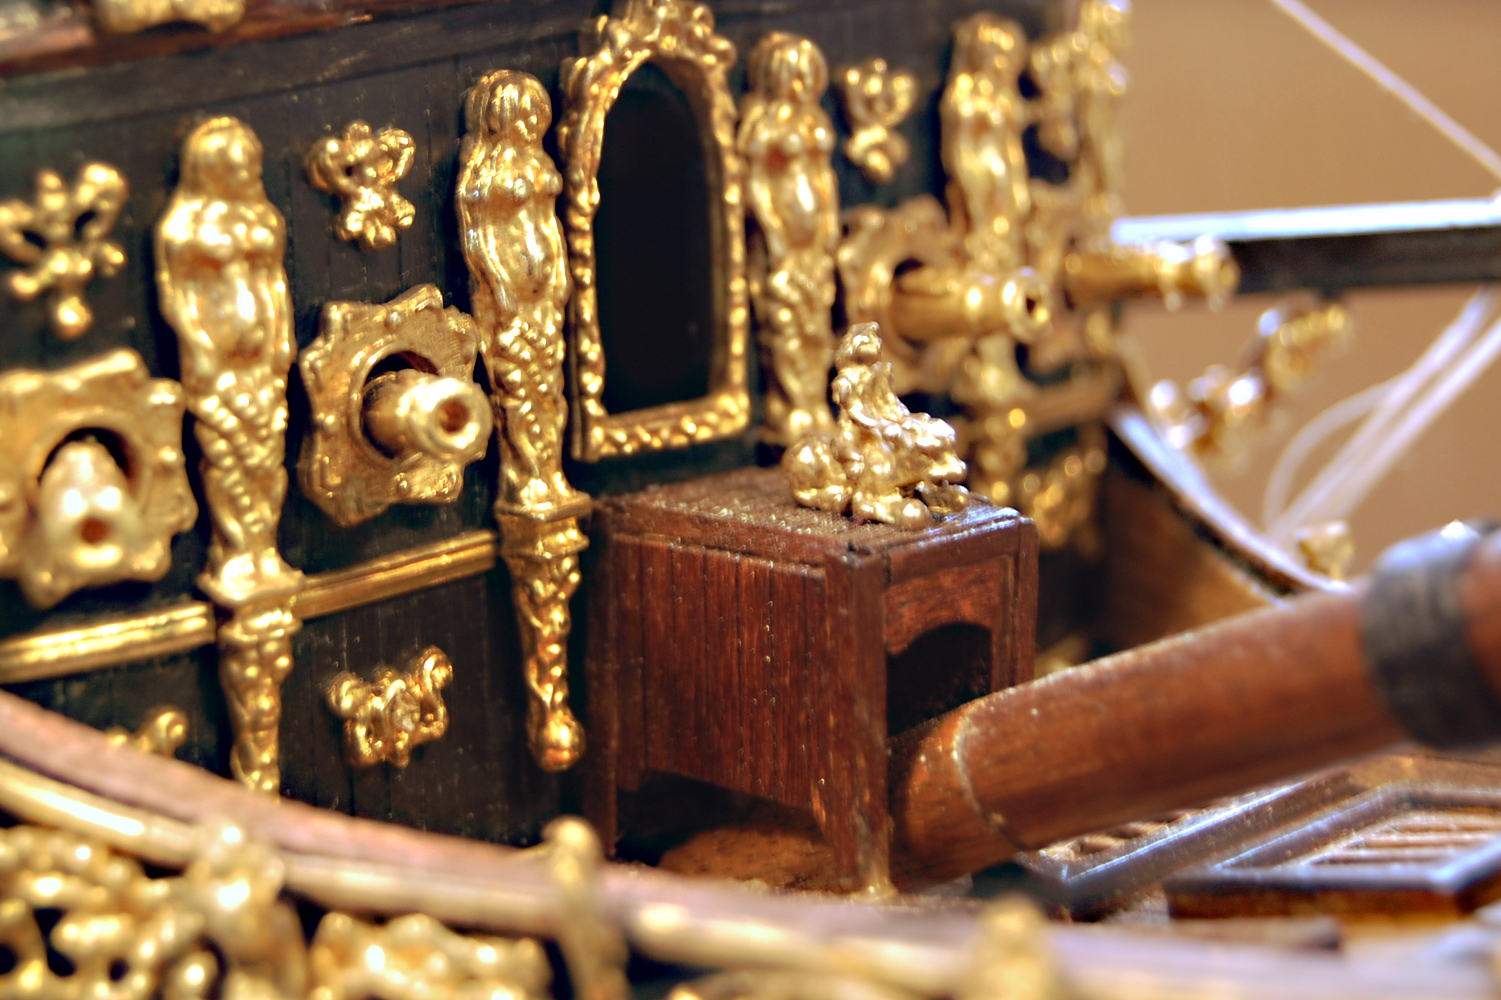
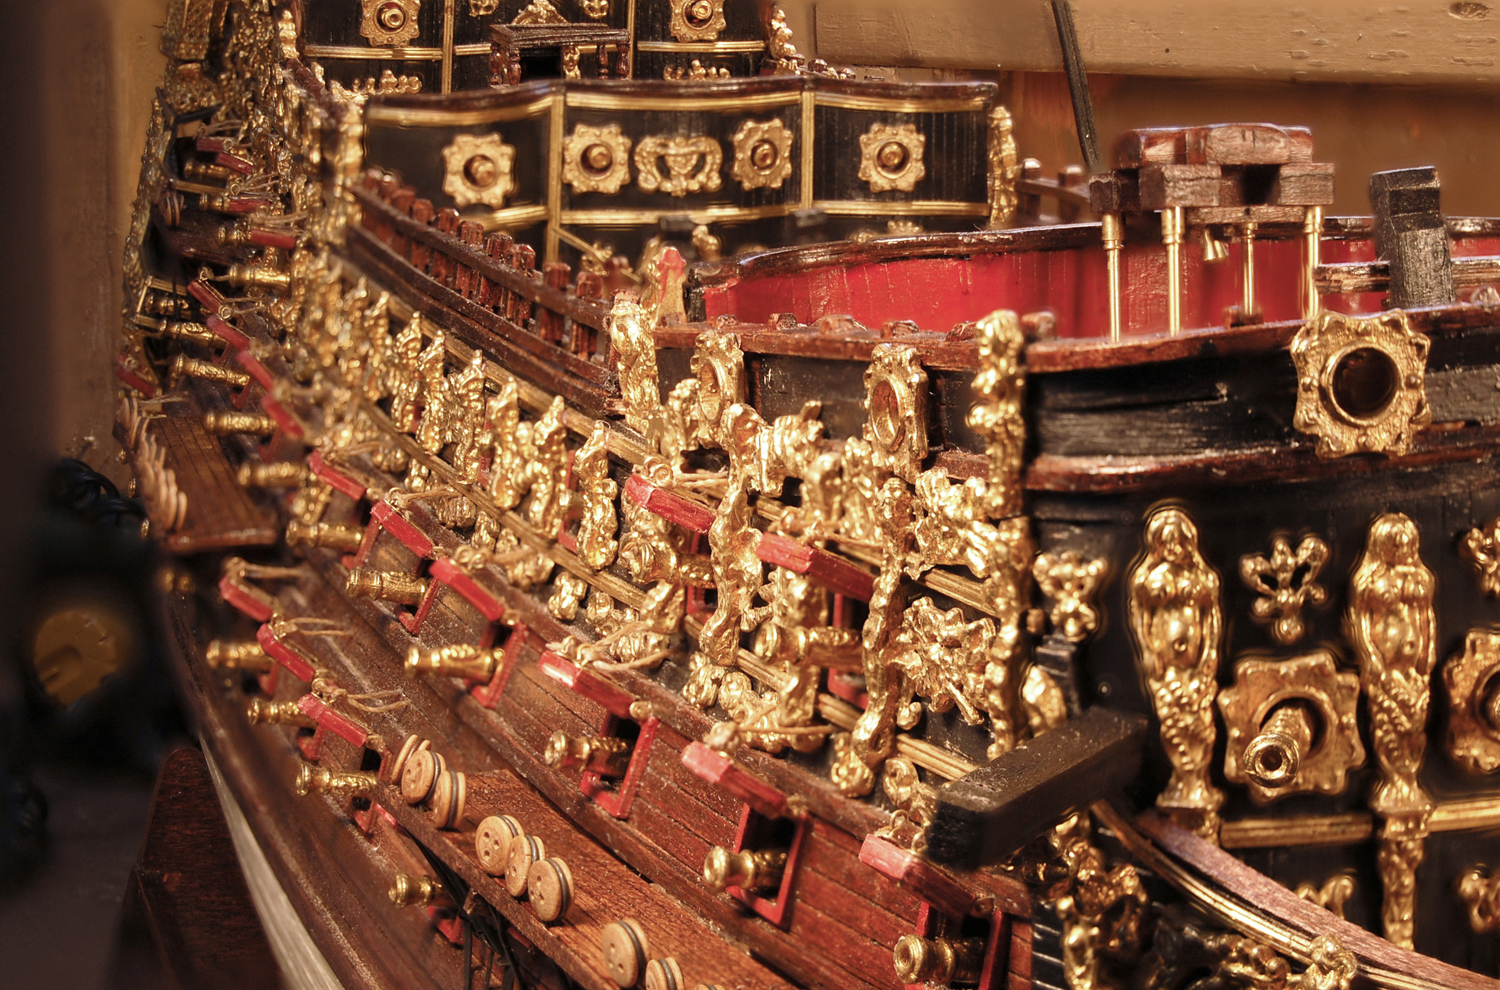
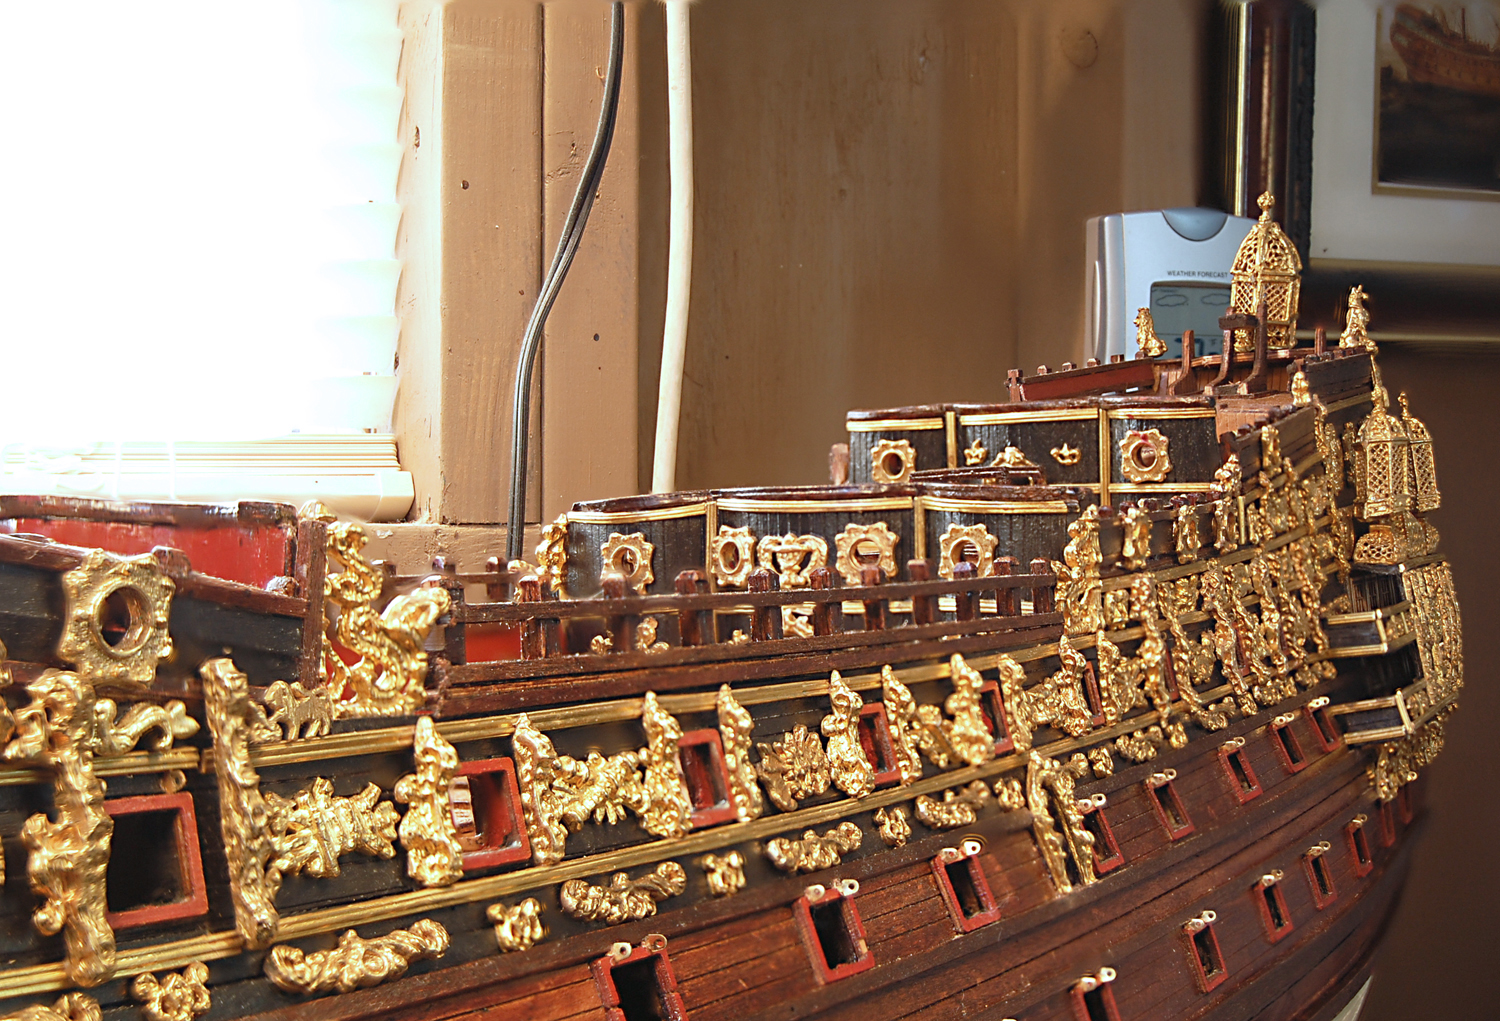
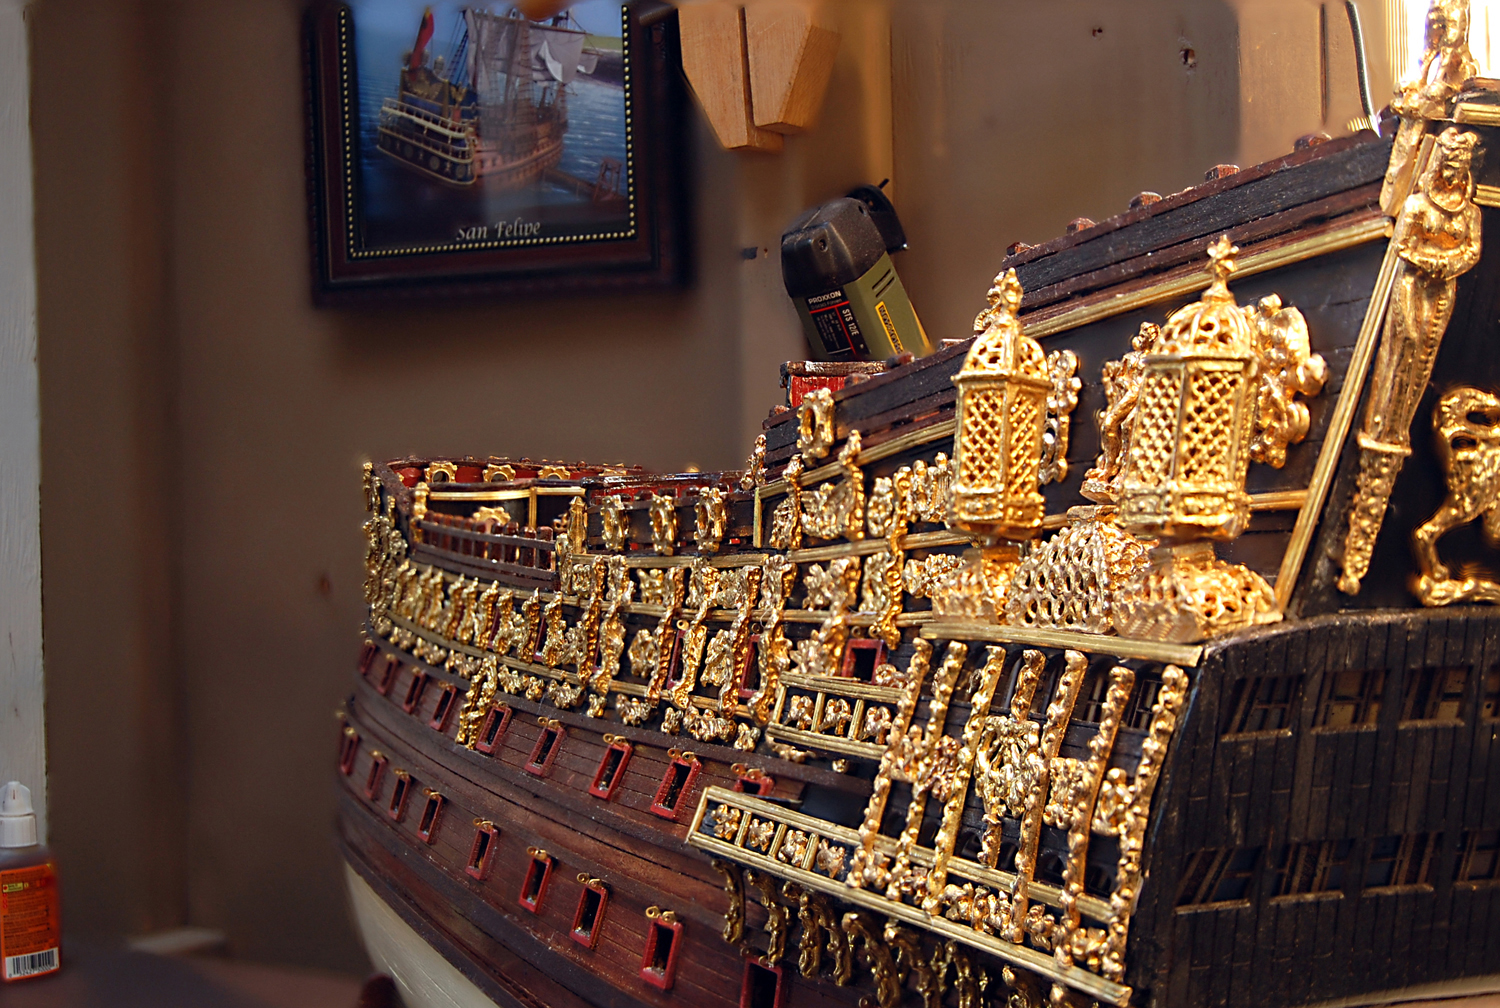
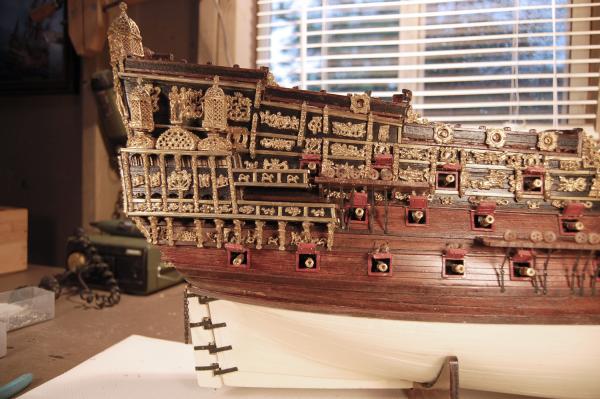
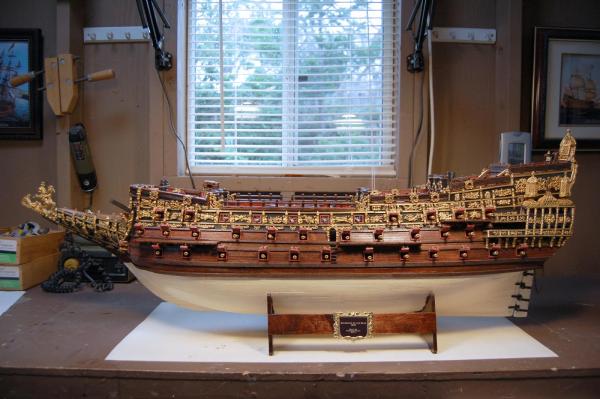
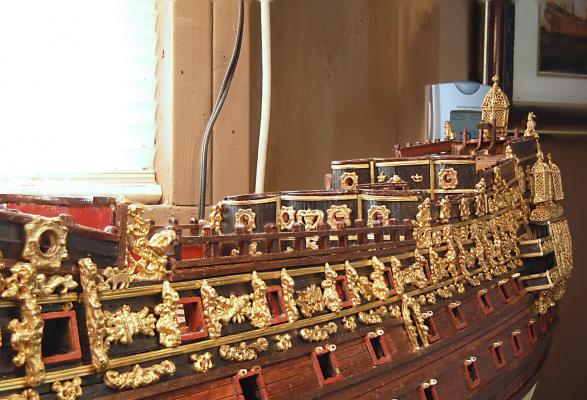
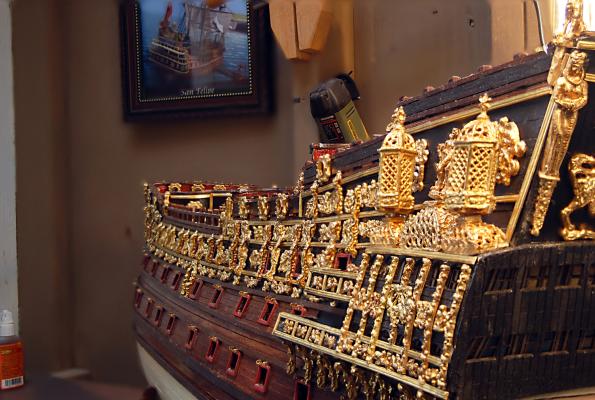
It seems like I have been grinding away at brass fittings forever, but it really has only been a couple of weeks. Although beautifully done, many of the castings simply don't fit in the space provided. I would ordinarily think I had made a mistake, but many of the problems are in areas where the base parts were laser cut by the manufacturer. Nevertheless, the ship ends up being beautiful, and it is hard to believe it was built as a war machine. I have completed the port side and am about half done on the starboard side. Then its on to the the bow and stern. The ship has become heavy and difficult to move. As you can see from the pictures below, I have placed it on a turntable that I use to work on my bonsai plants. Now I can simply spin it around.

-
Thanks everyone for the advice. I have started on the brass fittings and so far things are going quite well. As usual, the directions provided by the instruction manual are not correct, and many of the fittings do not fit in the space provided, but a little grinding takes care of that problem. I came across a portion of an article in Ships in Scale Magazine written by William Mowll that so precisely echoes my thoughts about model ship building that I thought I would share it here: "To my mind, models are like three dimensional pictures, and all artists strive above all else, to make their pictures or portraits tell a single story. There has to be a binding factor if the all important message of the picture is not to be lost in a confusion of detail. We have all seen models which have often been professionally made and are more or less perfect in their presentation, but have no soul or bite to them. So what is it that gives a model that precious gem-like quality which manages somehow to take one's breath away? I think it has to do with unity; The scene which the model creates must, in spite of all its detail, send a single clear message to the viewer. This means finding a medium which will encompass all the single parts which go to make up the whole model. If there is a detail which stands out from all the others - however beautiful or however long it took you to make - don't allow it to confuse the over arching message."
-
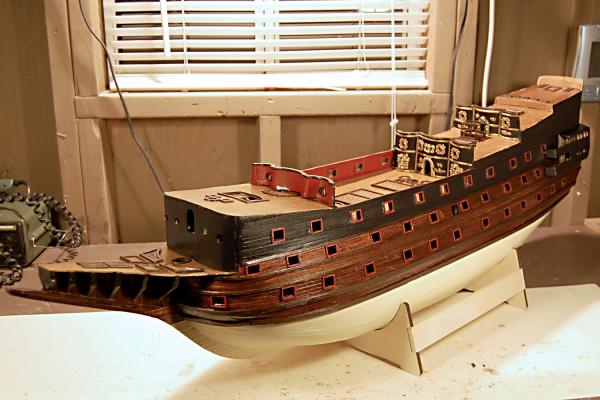
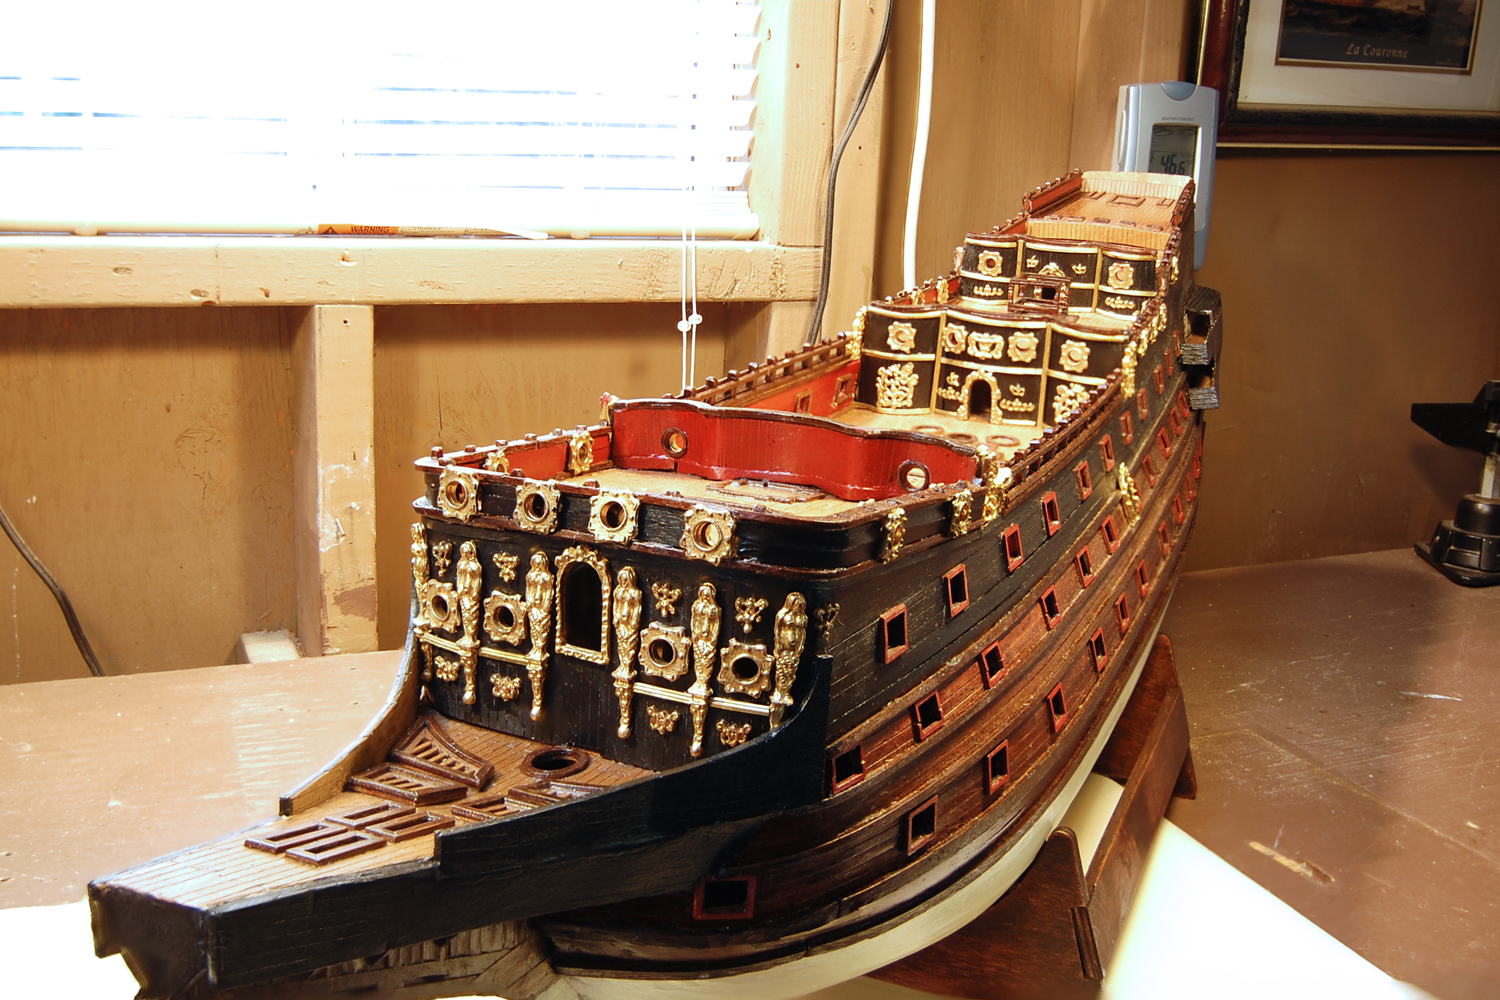
I have been working on the ship's railings and have started adding a small number of the brass fittings. I have decided to paint all of the inner railings red and have painted the outer railings a combination of wood stain and black. Because of the paint job the ship looks quite a bit different than other builds, but I think it stays within the realm of historical possibility. The instruction manual says to continue adding brass fittings to the hull but I'm not sure that is the way to proceed. I'm thinking it might be better to add the gun port covers and channels to the hull before adding more brass. Any advice?


-
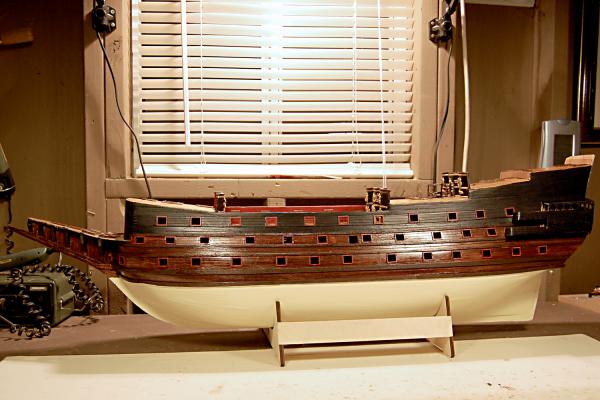
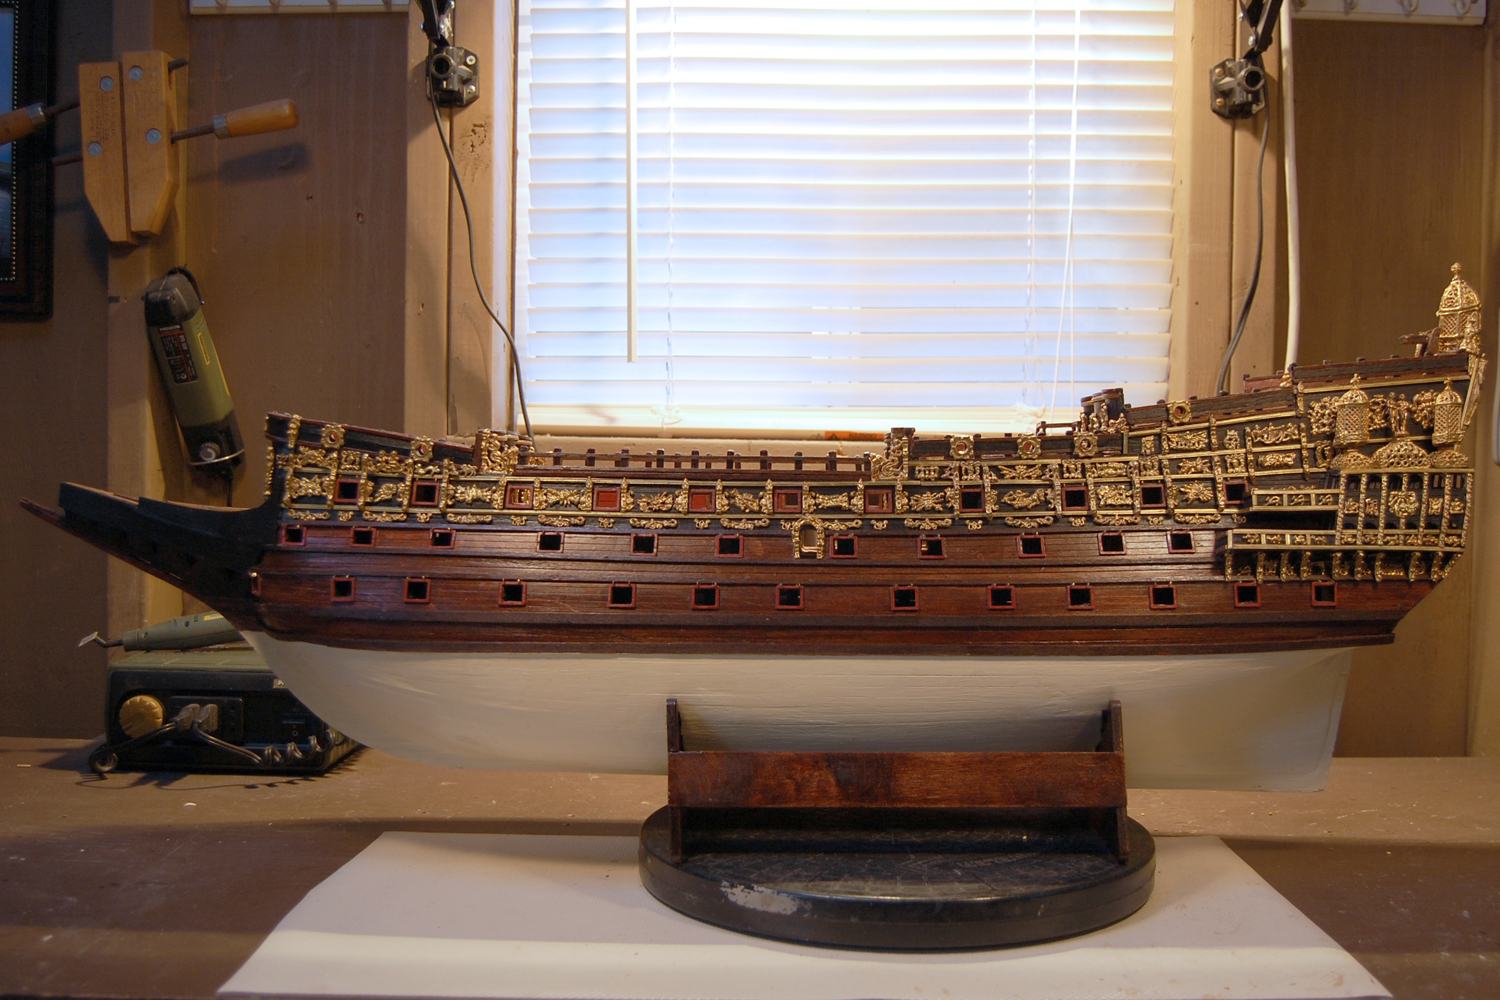
After a lot of sanding and 2 coats of Minwax wood conditioner, I was finally ready to apply paint and varnish. I used water based flat black and antique white for the top and bottom of the hull, respectively. I used a solvent based Minwax stain called Red Oak in the middle. I gave everything 3 coats and then applied 1 coat of varnish, water based for the paint and solvent based for the stain. I only applied one coat of varnish because there inevitably will be touch-ups required, and when all is done I will varnish again. I am pleased with the darker stain, and think it will really look good when all the bling is applied.