

ioannis
-
Posts
67 -
Joined
-
Last visited
Reputation Activity
-

 ioannis reacted to Omega1234 in Paragon by Mahuna - FINISHED - a modified Mayflower
Hi Frank
Paragon's looking brilliant, which leads me to wonder how you may intend to display her? For instance, will you draw the link from your ship to the book that inspired the model? Maybe a passage or two from the book perhaps, which gives meaning to the ship?
Just curious.
Cheers
Patrick
-
ioannis reacted to Mahuna in Paragon by Mahuna - FINISHED - a modified Mayflower
Paragon – a Modified Mayflower
Part 18 – Standing Rigging
Sorry for the delay since the last post – I’ve been dealing with some health issues. Hopefully we’ll get them cleared up soon. I had mostly finished the standing rigging and had started on the ratlines when I needed to put things aside. I’ll try to catch up here, but then it will be a while longer before I have any more progress to report.
I decided to pre-rig as much as possible off the ship. It sounded like a good idea, since it would make it easier to bring line to the small blocks and other fixtures. Unfortunately when I started the standing rigging most of the pre-rigging was in the way so I removed it. You may see some lines on the ship in some photos, and then maybe will notice that they disappeared – that’s the reason why.
Some of the pre-rigging made sense, so it was used. This mainly consisted of the rigging for holding the yards in place on the masts. If I had waited until after the standing rigging and ratlines were in place I’m sure it would have been much more difficult.
Rigging started with the installation of the gammoning on the bowsprit. When I built the beakhead I had made a couple of small gratings for the area of the gammoning, and made them removable to give me more room to install the gammoning – they certainly helped.
I pinned all of the yards to the masts, and installed the slings that were used for raising and lowering the yards. The slings for the mizzen yard and for the main course were brought to the related knightheads, since I thought this would be much more difficult once the standing rigging was in place. The following photo shows all of the slings in place.
Parrels are part of the rigging on the main course and fore course, and also on the mizzen. They all serve to hold the yards in place. I started by milling castello to 1/32” strips and gluing them together using Ambroid glue. Once the glue was set I filed the middle area down, leaving the ends the size that the parrells would be. Then I used a small triangular file to make a cut in the middle of each parrell.
Then, using a small parallel barrette file (and my favorite jig for fiing) I rounded over each wing of each parrell.
Then I used a razor saw to cut halfway through between the parrell and the middle of the stock. This would make it easier to separate each parrell when ready to do so.
Last task was drilling the holes for the lines through the parrells.
Then a bath of acetone was used to separate the individual pieces
When these dried I separated off the individual parrells at the cut I had already made. I used some 11/0 beads to make the parrells.
I thought the parrells turned out pretty well.
I needed some splices for the stays, so I made them by making the end of the line unravel then used some white glue to glue those frayed lines to the body of the line.
I also need to make a mouse on each stay. I did this by wrapping some fine thread around the stay, using white glue liberally applied to keep the line in place. At this scale I didn’t think I needed to go through the effort to make a mouse the more traditional way.
I decided to use ‘zip seizings’ on all of the lines that I could – in my opinion this is a much easier way to do seizings, and at this scale it looks better than anything I could do using a more conventional approach. (I learned this approach through Wooden Ship Modeling for Dummies by the late Hubert Secard).
The following photo shows the tube created for seizings, along with a couple of seizings already cut from it.
All of the standing rigging has been completed, and the following photos show the progression to the current state of the rigging. There are a few lines I will need to re-rig, but overall I’m pretty happy with it. The only rigging I have done prior to this is for the pilot ship Phantom, which is a much simpler rig.
100d
When I get through the current issues I'll be tying ratlines, so I don't think I'll have any updates for a while yet. In the meantime, thanks to everyone who has been looking in.
-
ioannis reacted to Mahuna in Paragon by Mahuna - FINISHED - a modified Mayflower
Paragon – a Modified Mayflower
Part 17 – Making Model Rope
I use DMC Cordonnet cotton crochet thread for rope making. It comes in several standard sizes, from 100 (smallest) to 20 (largest), and is very consistent in quality and color (I buy ecru-colored thread). It’s 100% cotton, which is my preference.
The following photo shows some spools of the Cordonnet, along with some rope samples I’ve made with it.
The thread itself has a very nice right-hand lay, so it can be used right off the spool if the size is right.
I use the Prozak 3 vertical ropewalk from Domanoff Workshop.
http://shipworkshop.com/products/tools/prosak-30
Using the Prozak, I made sample rope from all of the Cordonnet sizes, both 3 and 4 strand, and measured the diameter of the resultant rope (including single-strand right off the spool). I put together a reference sheet of all of the sizes.
Rigging Line Sizes.pdf
I’ve tried different methods for measuring model rope (and threads).
First I used a traditional measuring stick, where you mark off a 1 inch gap, wrap the rope around the gap counting the turns, then divide the number of turns into an inch to get the size. This is fairly accurate, but the result will vary based on how tight or loose the windings are around the stick.
I’ve also tried a digital caliper, but I find that no matter how gently I use it the rope gets compressed and the results will vary.
I finally came up with the method I like best: I mount a digital micrometer in a vise, set an approximate sized opening, and slide the rope along the top of the measuring rod. By adjusting the opening until the rope can be moved through it with slight friction, we have the correct rope size. I find I can be pretty consistent in measuring to the nearest .001 inch (one thousandth).
Initially I used India ink for coloring the rope, but I found that it made the rope fairly stiff and unnatural feeling. After reading how N. Roger Cole colors his rope using RIT fabric dye I started using that method.
The standing rigging is a deep warm black (lots of brown undertones in it). The running rigging is a nice hemp color. The formulas I use are the same as Roger uses, with some minor modifications. The PDF shown above has the formula for each of the colors.
First I boil sufficient water for the mixture. I put some in the first container, and add a wetting agent to the water. A measured amount of the hot water goes into the container for dying, and I add the appropriate amount of the various colors. I’ve found that as soon as the dye mixture starts to cool down the color will loose intensity, so if I’m dying a lot of rope I’ll mix a new batch when the mixture is only slightly warm.
I use a product named Liquitex Flow-Aid as my wetting agent. You could also use Photo-Flo or any other wetting agent. In a pinch a few drops of liquid dish detergent would also work.
The line to be dyed goes in the wetting agent for about 5 minutes, then is transferred to the dye solution for the specified length of time (7 minutes). When the time is completed the line gets hung for drying.
The hangers I use are from a wooden rack for holding spools of thread, a reject from my wife’s sewing room. Each wooden arm has 10 dowels for the thread spools, and the whole contraption had 8 rows. I took it apart into the individual rows. When I get into ‘production’ mode, I have rope hanging all over. The lengths I make on the ropewalk are a little over 6 ft long, so these are hung vertically.
For rope right off the spool, I generally use about 16 ft lengths, and hang these across the room.
After the rope has dried overnight, it needs to be heat-set and waxed. Heat-setting will help the rope to remain color-fast. I don’t think this is so important in model rope, but since my wife told me I should do it I take the time to do so (one of my mottos is “a happy wife is a happy life”). I heat-set by running the rope over the hot housing of a small incandescent lamp that clips to the edge of my bench. I’ll generally make about 4 slow passes with the rope.
When heat-setting is completed I normally hang the rope overnight again. I’ll skip this hanging if I’m in a hurry for a size.
After heat-setting the rope, the next step is waxing the rope. I’ve tried beeswax but was never happy with the process. I’ve started to use Conservator’s Wax and I’m really pleased with it. I dip my index finger in the wax (it’s very soft and translucent) and rub the finger and my thumb together to spread out the wax, then run the rope through my coated fingers while rubbing the rope back and forth (a little of this wax goes a long way). I’ll do this 3 or 4 times, then I’ll run the newly waxed rope over the lamp I used for heat-setting, agin making 3 or 4 passes with the rope.
The line is hung overnight again, and is then ready for use.
-
ioannis reacted to Mirabell61 in HMS Vulture 1776 by Dan Vadas - FINISHED - 1:48 scale - 16-gun Swan-class sloop from TFFM plans
Congratulations Danny,
your "HMS Vulture" is an awsome Milestone Setting build in the modeling comunity.
It was such a delight to watch this "Swan Class" ship grow to it`s full blossom as it is presented today....
Very,very well done, and many thanks for sharing all your experiences, your thoughts and your so skilled handcraft work
Nils
-
ioannis reacted to NenadM in HMS Vulture 1776 by Dan Vadas - FINISHED - 1:48 scale - 16-gun Swan-class sloop from TFFM plans
:im Not Worthy: :im Not Worthy: :im Not Worthy: :im Not Worthy: :im Not Worthy: :im Not Worthy: :im Not Worthy: :im Not Worthy: :im Not Worthy:
-
ioannis reacted to Dan Vadas in HMS Vulture 1776 by Dan Vadas - FINISHED - 1:48 scale - 16-gun Swan-class sloop from TFFM plans
Cheers Greg . My next Build will be in my Signature.
Here's the Celebration Pic :
Danny
-
ioannis reacted to mtaylor in Licorne 1755 by mtaylor - 3/16" scale - French Frigate - from Hahn plans - Version 2.0 - TERMINATED
A side update... I'm doing the drawings for the ship's boats and I'll be putting one together while waiting for glue to dry on the main hull. So as not to "interrupt the flow of things", I'll either make them a separate log like Danny did for his, or just hold off until the planking is done. Here's a bit of where I am on these.
The longboat drawings are done but still need some tweaking. Seems that I didn't always account for kerf which I finally managed to get down to 0.015" (0.381mm). And man, these things are tiny. Might just be the end of me....
Here's two pics of the parts being cut, which is something I couldn't do on a scrollsaw to save my soul. I tried and failed several times.
And here's the resulting parts.... the keel is 5" or 125mm long. The keel and assorted structural members are 1/16" (1.5mm) thick cherry. The frames (which look like bulkheads are 1/32" (0.79mm)) cherry and the other parts (knees, seats, thwarts on the upper left and upper right) are 1/32" from scrap holly but I'll have to redo them in boxwood as soon I as get some milled down. I'm planning on using Chuck's method but gluing the bulkheads upside down into a basswood jig for handling and planking.
There (hopefully) will be two more boats. A barge and cutter and all will be nested into the longboat.
-
ioannis reacted to mtaylor in Licorne 1755 by mtaylor - 3/16" scale - French Frigate - from Hahn plans - Version 2.0 - TERMINATED
Thanks for the "likes" and comments.
Druxey.. I'll try.
Dan... thanks for explaining the anchor stowage planking. You beat me to it.
Hi John,
I have the pictures from Boudroit's History of the French Frigate 1650-1850 As built, she had wales similar to the English but her decorations including quarter galleries were typical for the period. See pictures.
After a rebuild/Great Repair or whatever the French called it, she resembles the Belle Poule and it also appears the L'Hermoine is similar (same period) in galleries, planking but Licorne, has the full Arms of France for the stern decoration due to not having the chase ports on the quarterdeck level. The wales were converted to as shown and also as you explain. It's been a bit confusing at times especially since Hahn thought it was Le Venus that should be used. Le Venus was an 18-pdr of a later period and design.
One big surprise was they went from 5 stern windows (4 real and 1 deadlight) to 7 windows (4 real and 3 deadlights). Also, the original design had lids on the ports. After the rebuild.. no lids.
One thing I did discover from Boudroit's works is that the 8-pdr and 12-pdr frigates were very similar and the biggest difference as far as visual is that on a 8-pdr, the quarter deck stops on the aft side of the main mast. On the 12-pdr, the quarterdeck continues to the fore side of the mainmast.
The more I get into this build, the wilder some things seem to get.
Edit.. accidentally hit "post" while writing this.
-
ioannis reacted to mtaylor in Licorne 1755 by mtaylor - 3/16" scale - French Frigate - from Hahn plans - Version 2.0 - TERMINATED
Still hammering away... Thanks for the likes and comments.
Here's the latest pics. Starboard side wide wale planking is complete. Needs final sanding and bit more caulking ( ) of some planks that I didn't quite get fitted right. Relatively minor fix, in my opinion. the splotchiness is from wiping it down with water to raise the grain for the final sanding. An interesting effect is that not all Swiss Pear is the same color.. some is darker than the others. Interesting.
Next comes the narrow planks. per measurements, I need 28 strakes. Seven strakes at the stern to the deadwood so I need to take those into account as they are 9" planks on the counter to the deadwood. After that, they can be wider as they run to the garboard. The bow will need serious tapering and I'm starting to mark everything out.
Any tips, oops, or advice appreciated.
-
 ioannis got a reaction from IgorSky in Symphony by Omega1234 - FINISHED - 1/200 scale - 112' Ketch
microbuilder >just was wondering what else are we going to see
-
 ioannis got a reaction from Omega1234 in Symphony by Omega1234 - FINISHED - 1/200 scale - 112' Ketch
microbuilder >just was wondering what else are we going to see
-
 ioannis got a reaction from mtaylor in Symphony by Omega1234 - FINISHED - 1/200 scale - 112' Ketch
microbuilder >just was wondering what else are we going to see
-
ioannis reacted to Mahuna in Symphony by Omega1234 - FINISHED - 1/200 scale - 112' Ketch
Hi Patrick
The whole boat is awesome. I can't believe you've reached this point in only a few months - it seems like I've been on Paragon forever.
-
ioannis reacted to Maury S in Cutter Cheerful 1806 by Maury S - 1:48 - POB
The transition at the stern went well. It took a very tiny wedge as a filler on both sides, and once sanded it will look great. I got another strake in at the bottom. Six more to go.
Maury
-
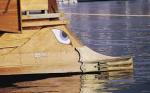
ioannis got a reaction from IgorSky in Cutter Abythistos by ioannis - FINISHED - Scale 1:48 - RADIO
working hard the last days, mostly thinking how would i connect this ?? how shall i do with the gear. ??...searched arround the forum from similar constuctions i got some ideas and answers.
well i helped by George and even my wife,so i saved time running to next levels
D7 Start placing electric equipment ,connections and steering
Orange arrows>Sponge type rubber self glue in all around under deck line. will make the void space water tight
Black arrow>a small motor 6 v mounted on the white gear which gives a funny noise while rolling.
the white gear is connected with a shaft
Green arrow>>double arm steering bracket connect via tens ropes with the circular top of servo
Yellow arrow>> servo top head
Blue arrow>>a stainless steel dowel cross vertically the bracket connecting the rudder
Red arrow>>nut grommet with ball bearing and O-ring
Orange arrow
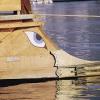
REMOVABLE DECK
I made the aft part of deck[2/3 of the total deck length] removable so I can watch servos rudder and motor
Yellow lines shows the part of deck that can easily be placed or remove
4 red arrows shown you the point where 4 screw 6 mm push through the deck and place nuts on end of the screws
[4 nuts –bolt are correspondingly placed vertically on top of 4 beams under the deck]
Tighten the screws but not too tight ,the rubber which is glued under deck seal firmly the deck roof
D8 picture above show
Removable deck capsized,
black color self glue sponge rubber
Deck details and decoration
i have not
place a high priority on the accurate reproduction
I need time for smallest details
A miniature cannon added - sorry no records to show you how its been made before ships construction-
As I have seen from historical pictures looks like a
French 18 pounder gun 1740 to 1830.
Picture showing changes I made
Yellow arrow- hatch cover cut is larger than original top can be removed so I can insert and connect battery and receiver
Time is out . work now
comments are free
-
ioannis reacted to cog in LENA by IgorSky - FINISHED - scale 1/290 - BOTTLE - steam schooner
Marvelous work ... again ... (see you still use that hughe match stick ;-) and those giant's fingers) Ashtonishing scale work ...
-
 ioannis got a reaction from Chrome in LENA by IgorSky - FINISHED - scale 1/290 - BOTTLE - steam schooner
Another microbuilder here.
Welldone igor.
-
ioannis got a reaction from mtaylor in Greek Bireme by bensid54 - FINISHED - RADIO
You may find some interest in the photos>
-
ioannis got a reaction from mtaylor in Greek Bireme by bensid54 - FINISHED - RADIO
Ben >About the donkey..is a....
Greek proverbs meaning a man who has great patience to manage what he wants
Your patent is great and helps people who suffer.
Im sure you will find a way with moving oars .
The one who tries and insists with the patience always succeed>>>another pvb
-
ioannis got a reaction from mtaylor in LENA by IgorSky - FINISHED - scale 1/290 - BOTTLE - steam schooner
Another microbuilder here.
Welldone igor.
-
ioannis reacted to Bedford in Runabout by Bedford - RADIO - Mahogany and Walnut
I don't know so much about talent, a bit of education and a lot of perseverance and patience are more what gets that finish. I am still not entirely happy with it though and I think I need a dust free room to do final coats because I always end up with small fine hair like dust in the finish but I will find somewhere suitable to do a final coat soon or maybe just use 1200 grit wet&dry to get rid of the dust.
Steve
-
ioannis reacted to IgorSky in LENA by IgorSky - FINISHED - scale 1/290 - BOTTLE - steam schooner
Ευχαριστώ ioannis! ))
-
 ioannis got a reaction from Mirabell61 in LENA by IgorSky - FINISHED - scale 1/290 - BOTTLE - steam schooner
Another microbuilder here.
Welldone igor.
-
ioannis reacted to IgorSky in LENA by IgorSky - FINISHED - scale 1/290 - BOTTLE - steam schooner
The next step - making the steering wheel
-
ioannis reacted to IgorSky in LENA by IgorSky - FINISHED - scale 1/290 - BOTTLE - steam schooner
The next stage - the making of steam windlass