HOLIDAY DONATION DRIVE - SUPPORT MSW - DO YOUR PART TO KEEP THIS GREAT FORUM GOING! (Only 13 donations so far - C'mon guys!)
×

Gbmodeler
-
Posts
465 -
Joined
-
Last visited
Content Type
Profiles
Forums
Gallery
Events
Everything posted by Gbmodeler
-
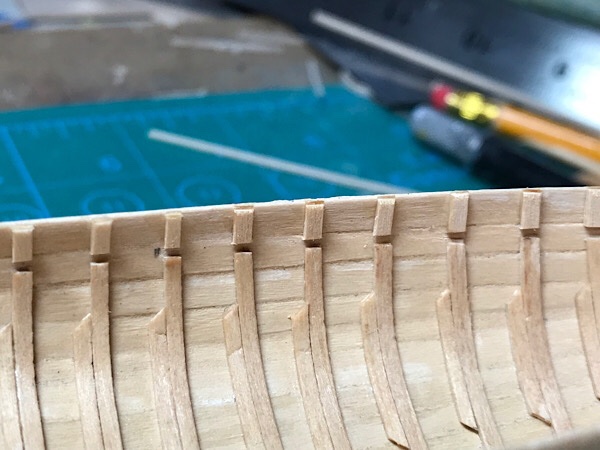
 I am beveling the lower edge of each upper plank to near zero for about 5 or 6 plank widths. It seems easier to do it that way (modeling-wise) as the plank is fitted and applied.
 -
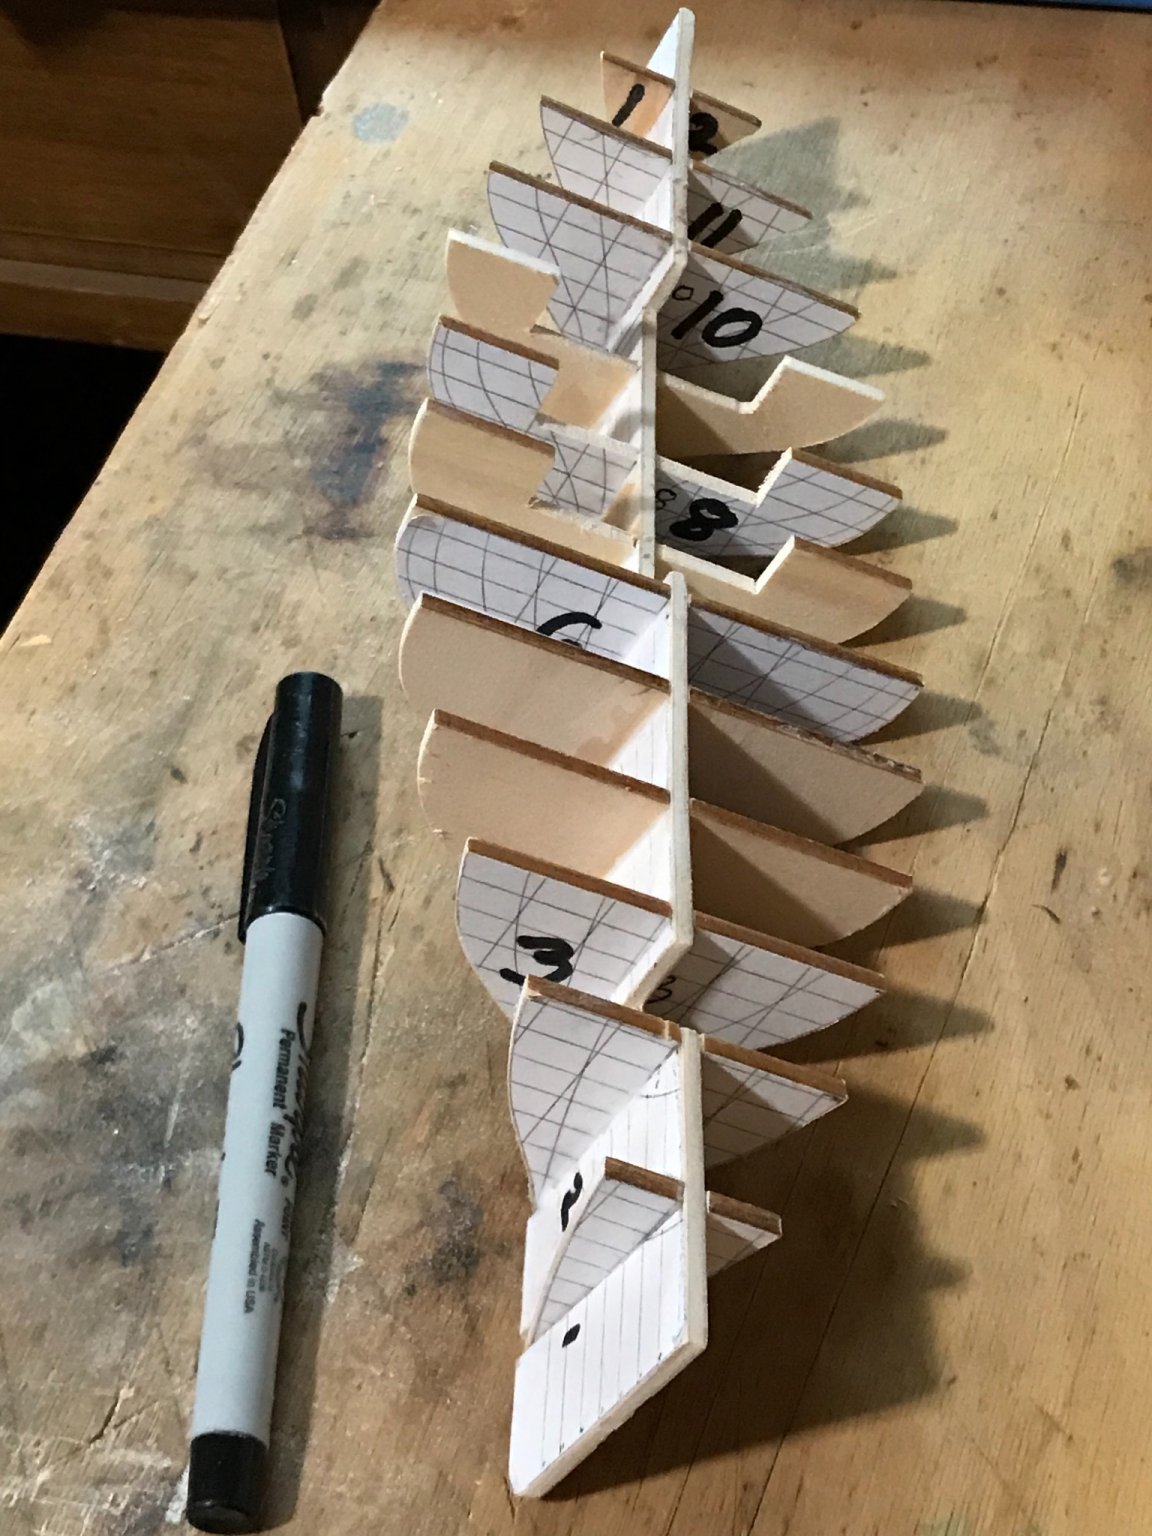
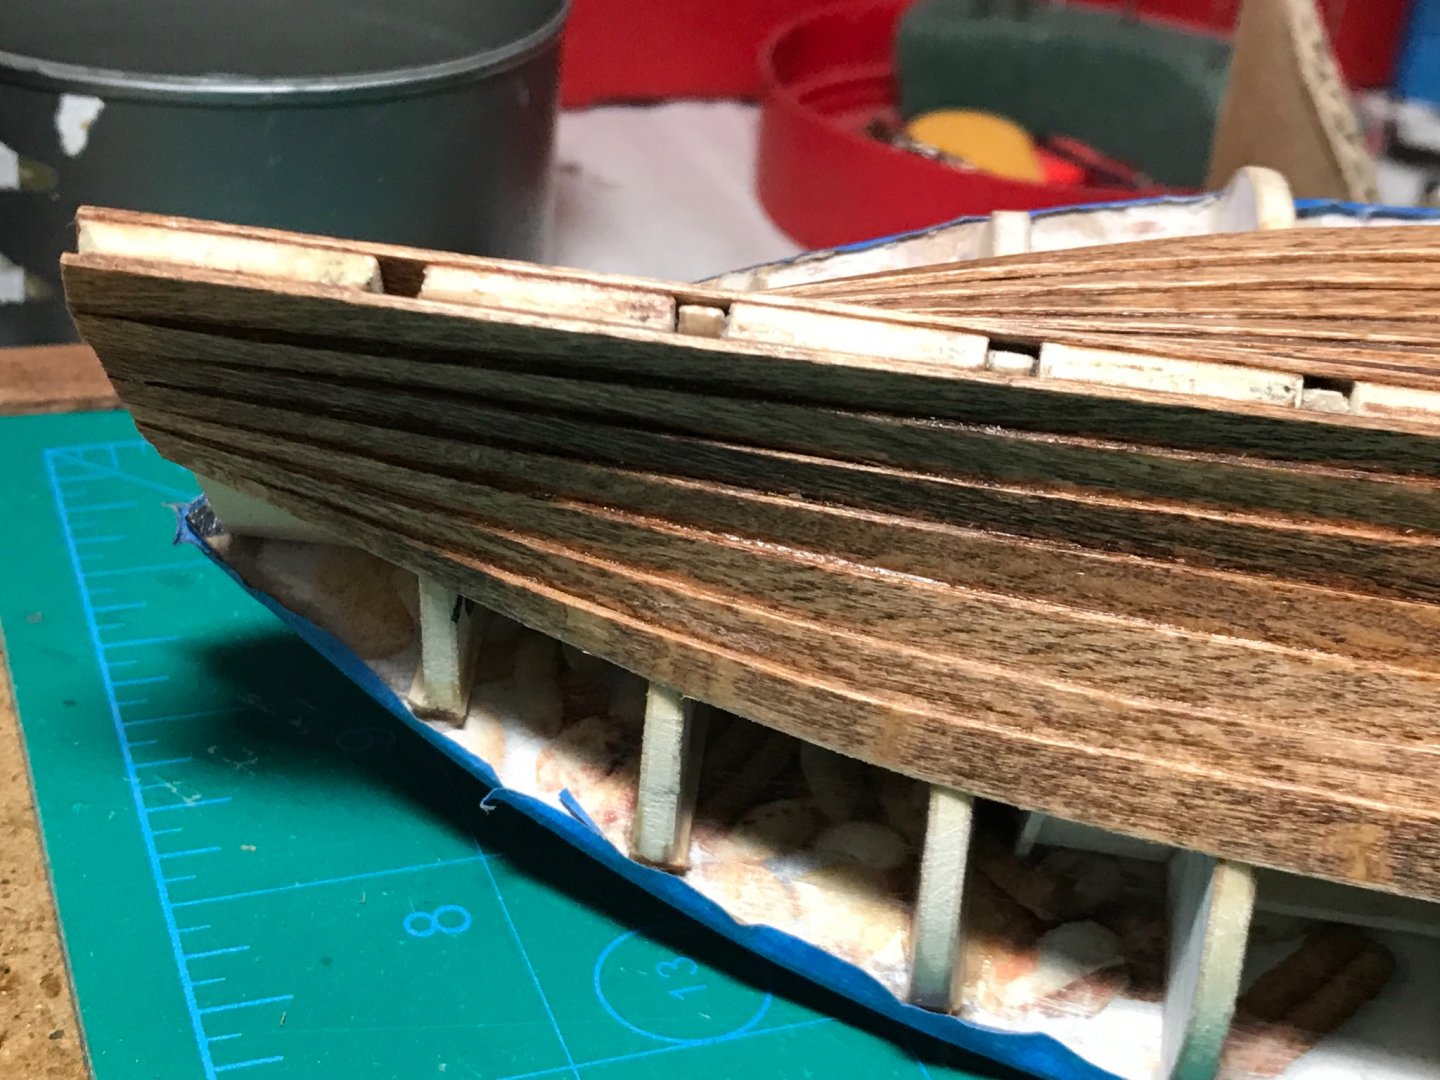
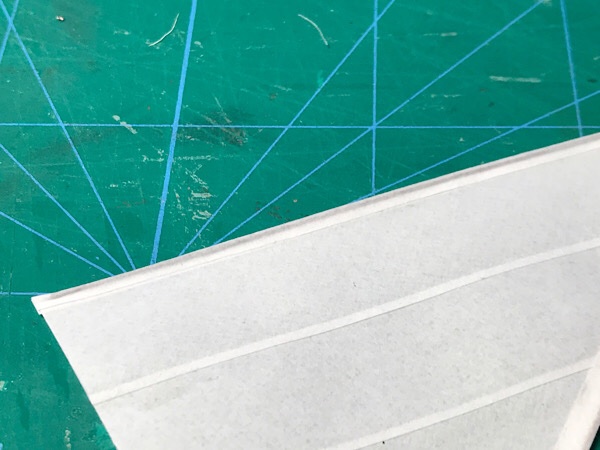
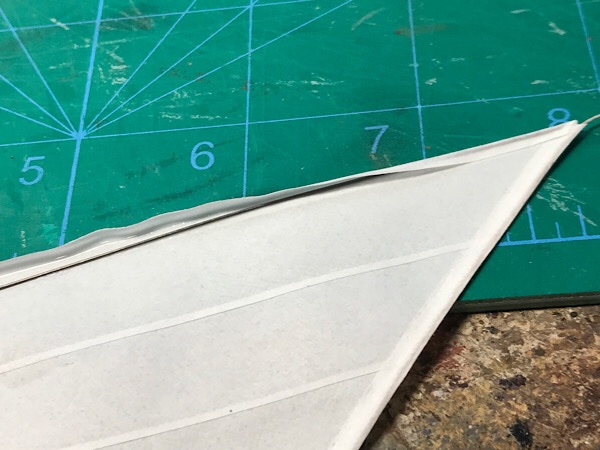
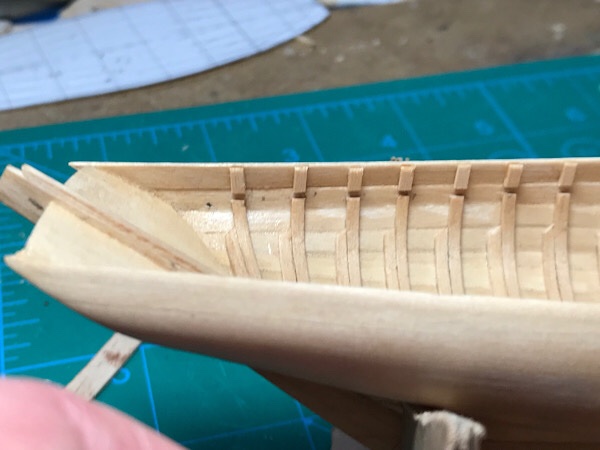
I decided to try my hand at "clinker" (lapstrake) planking, since most of the historical photos of smaller (and older) fifies have that feature. I have never attempted clinker planking before, but it seems easier than carvel planking, so far. Also, the planks are being stained, rather that painted, for a more natural wood appearance. Again, the wood is basswood cut from 1/32" sheet. I find planking a slow process, but if it works well, it is very rewarding. The hardest part of clinker planking is getting the ends near the stem and stern posts to transition from clinker to edge-matched carvel-like planking as the planks fit into the rabbet. Fortunate for me, there is no real rabbet, as I will install the keel, stem post, and stern post after planking😬.
- 86 replies
-
- 10
-

-
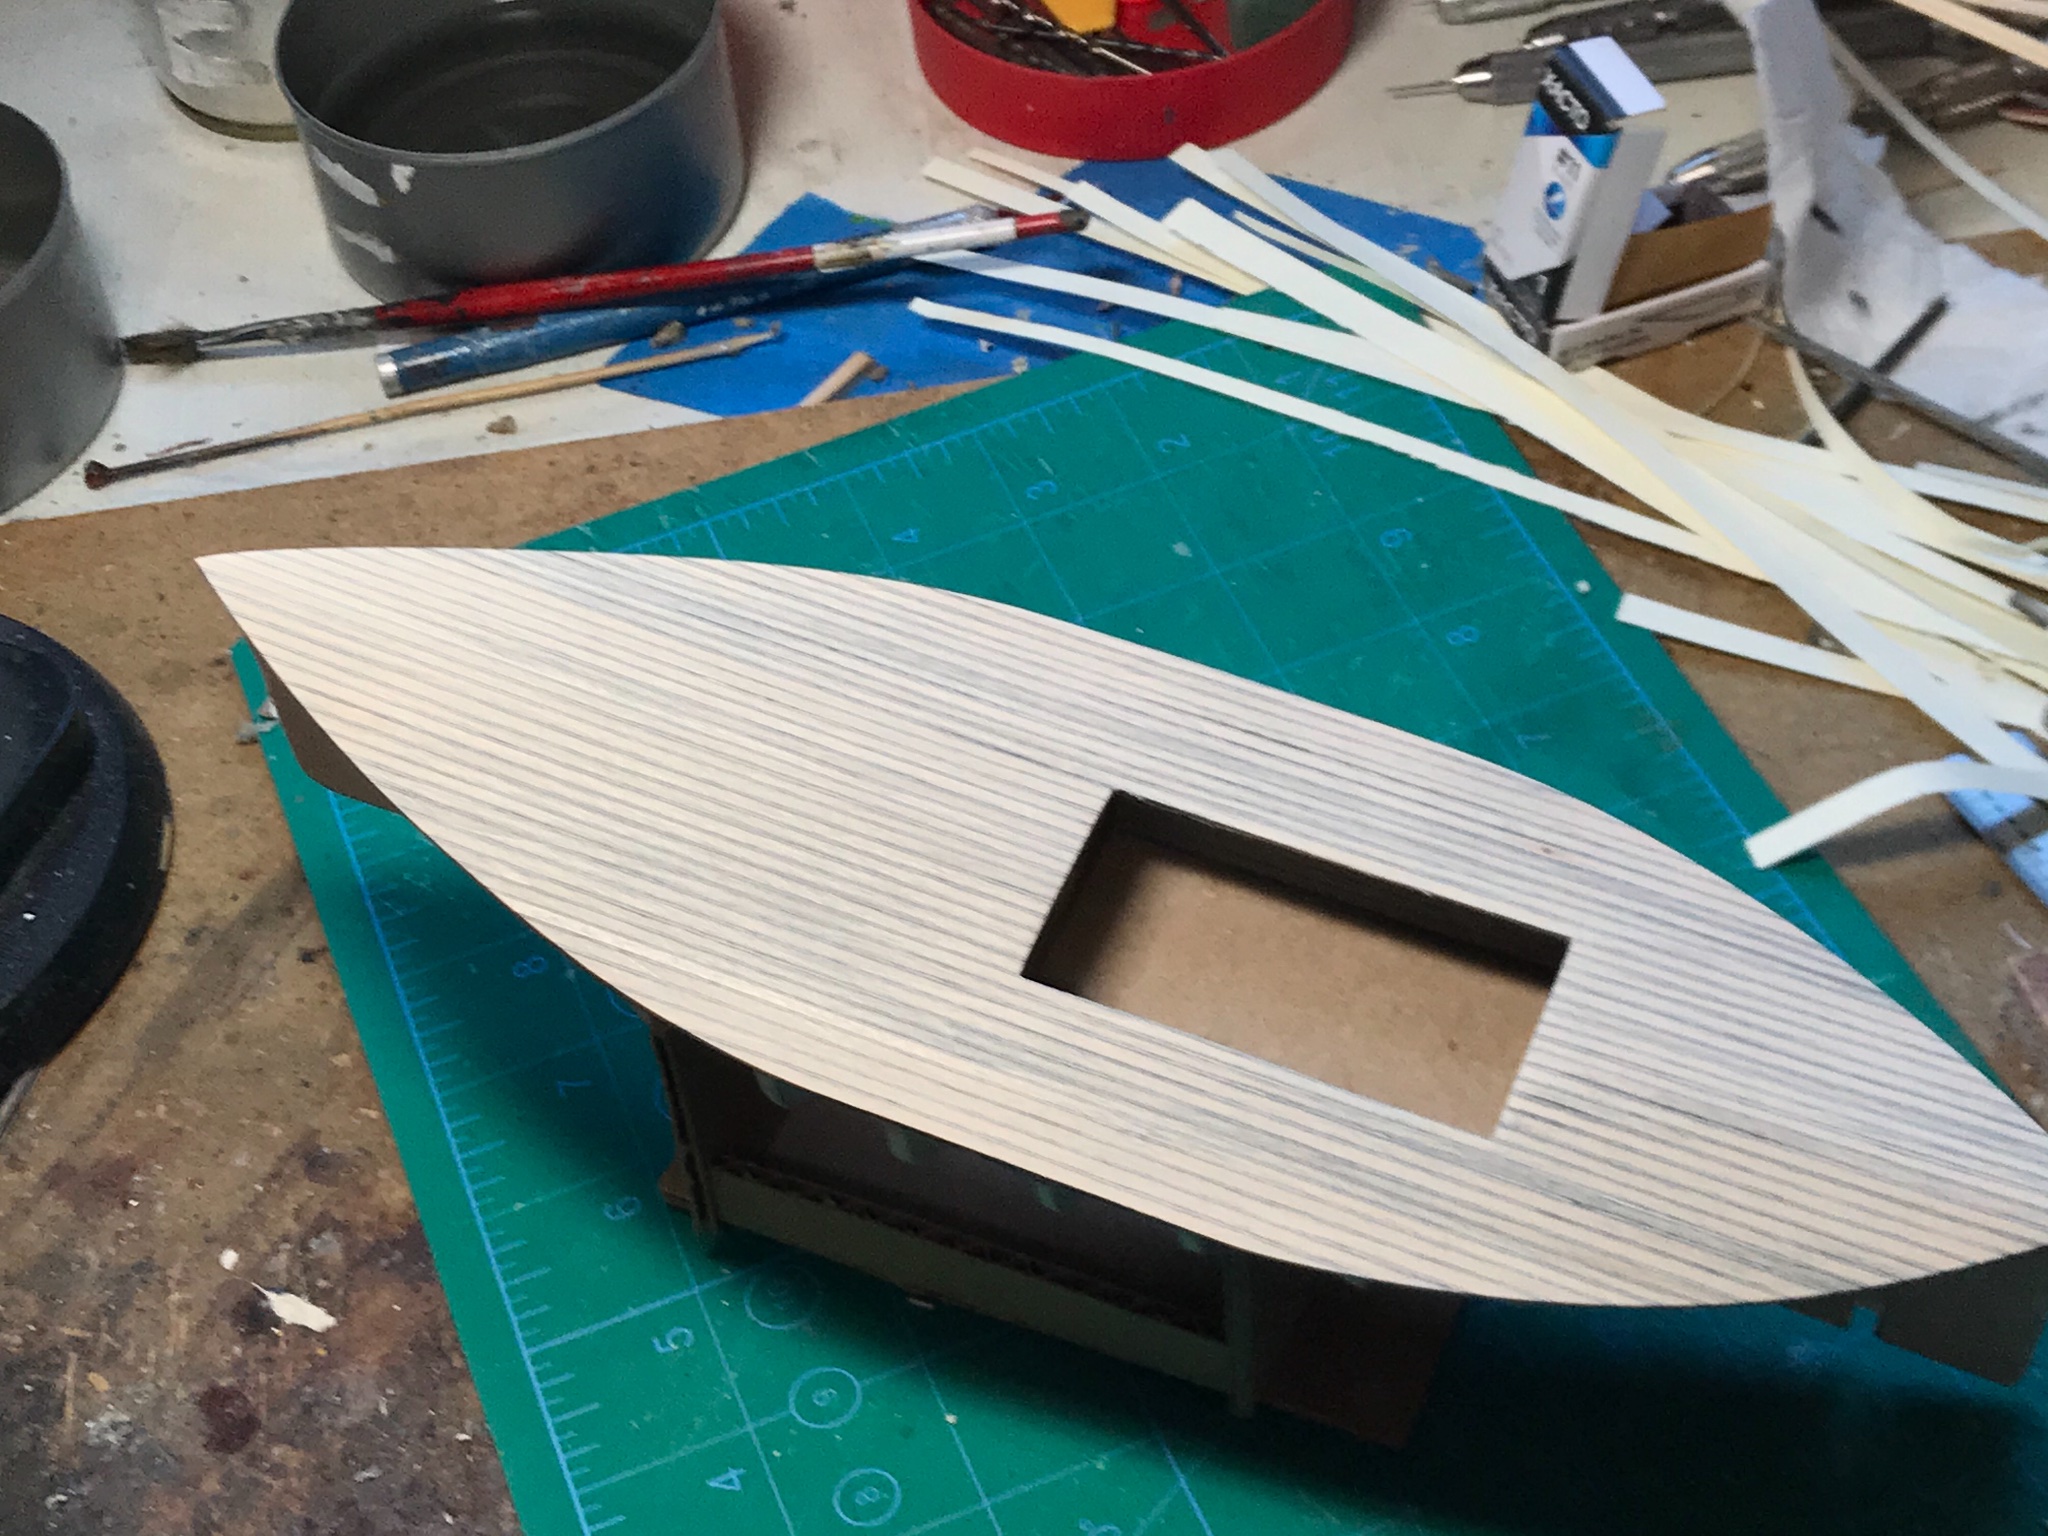
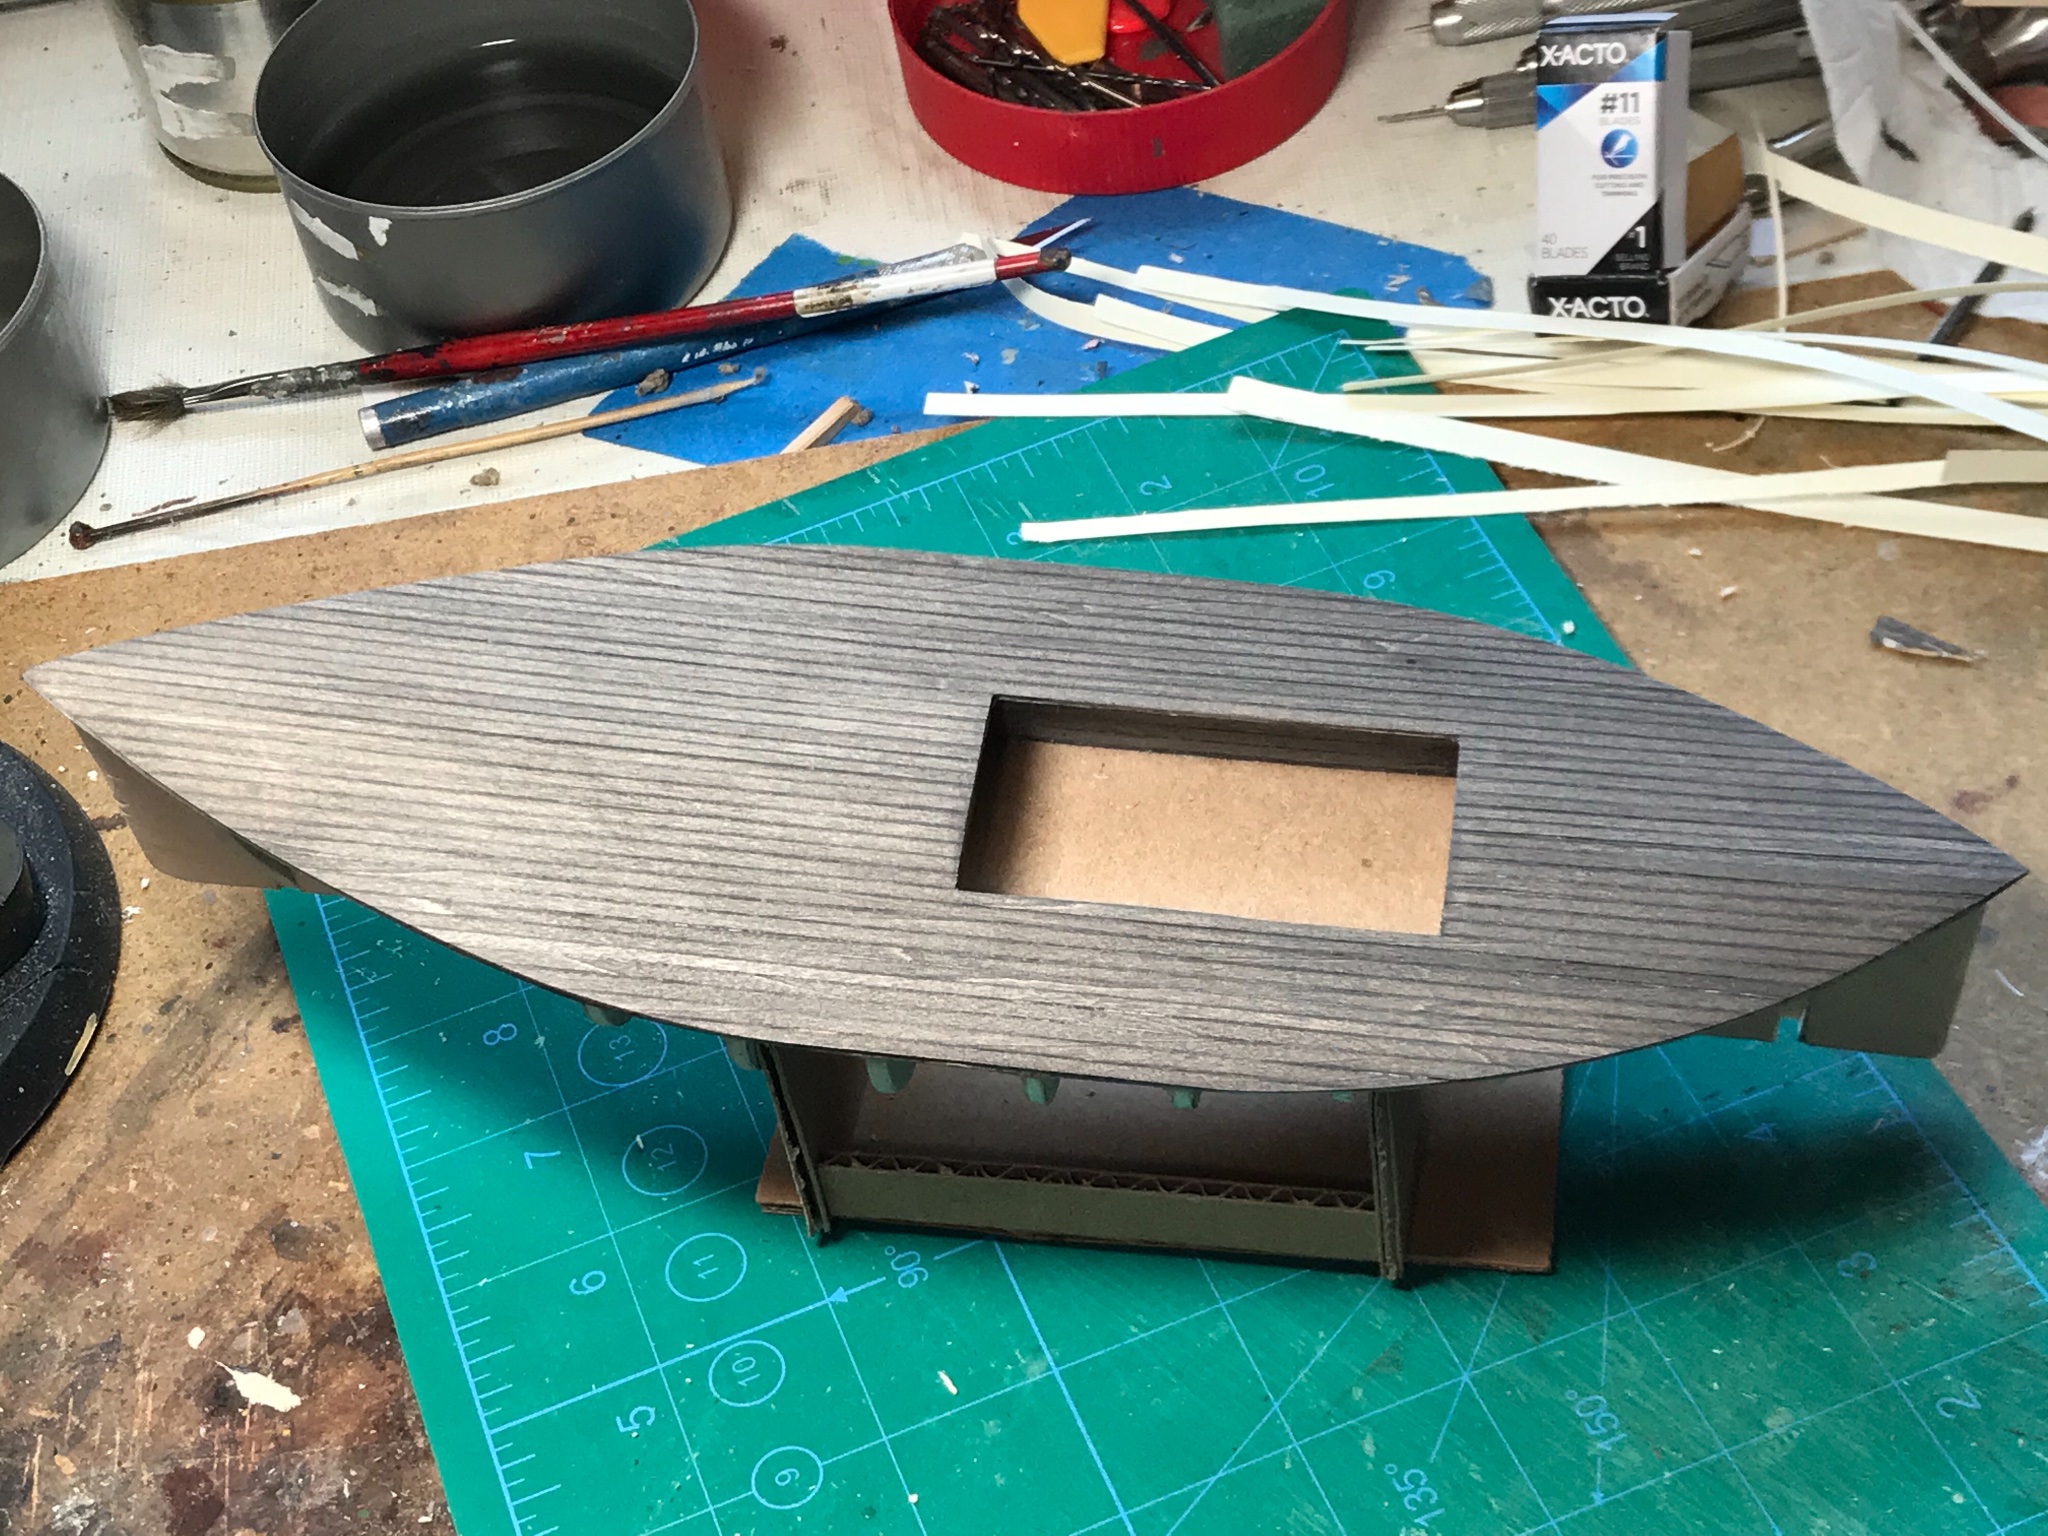
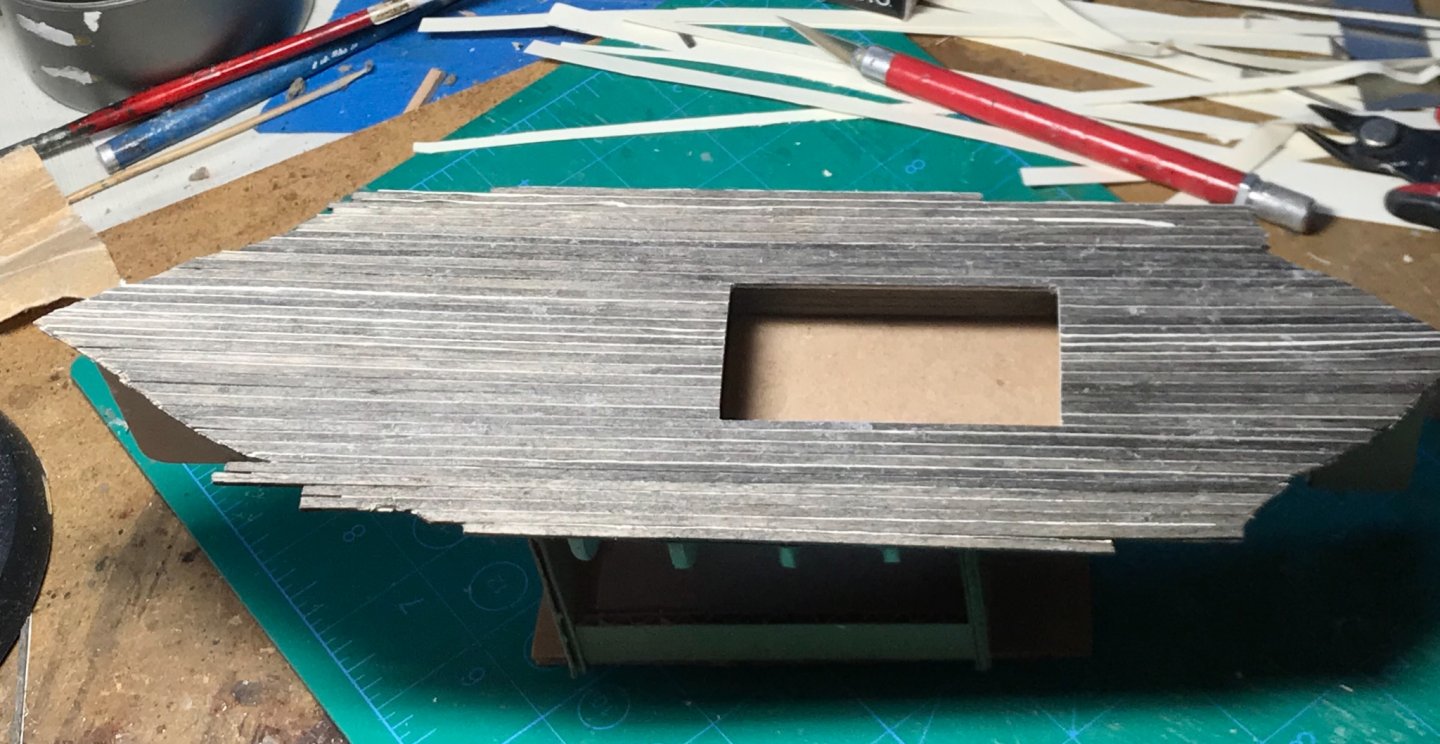
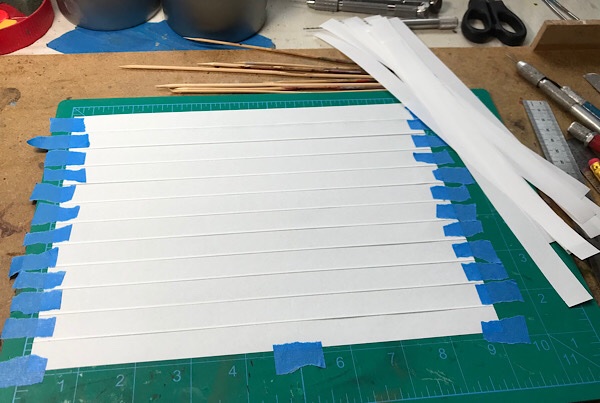
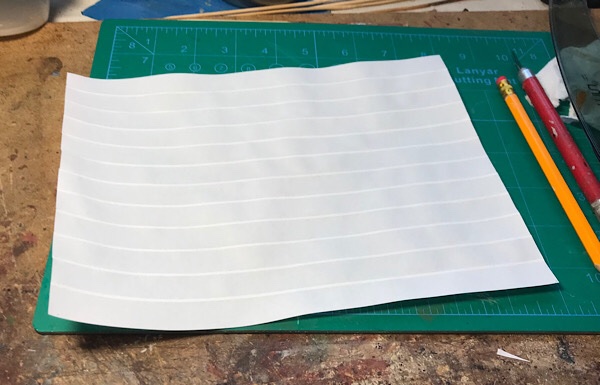
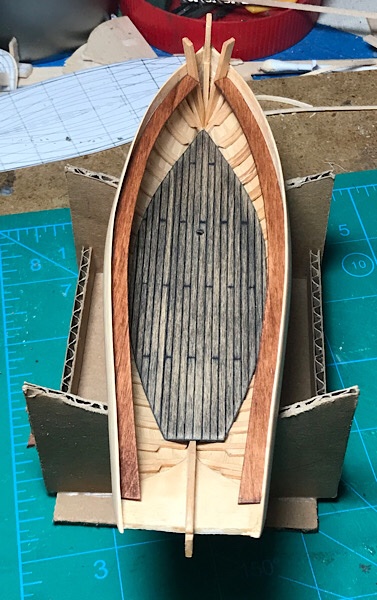
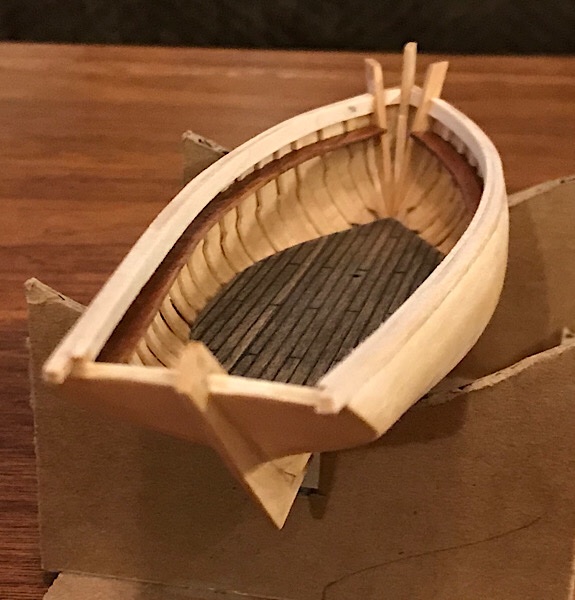
Deck planks were made from 1/16" basswood sheet cut into 3mm wide strips. The strips were lightly sanded and then stained with a mixture of India ink, isotropic alcohol, and water. The stain goes on dark but dries to a "weathered wood" appearance. The more you dilute the stain with water and alcohol the lighter the color, of course. Trial and error finds the right mix you prefer. The strips were then glued with white PA glue to some off-white cotton "business" paper. I have also used black construction-paper in the past, but wanted to try something different, and a little thinner, this time. The planks were cut off the paper and installed over the false deck, starting from the middle and working out toward the sides. The deck planks were stained prior to installing because the gluing process (with PA white glue) is very messy (at least the way I do it). Even though I plan to sand and re-stain the deck, any residual glue would block the second application of stain and give an uneven finish... After sanding and shaping. You can see almost all the original stain has been sanded off... The re-stained deck. Now on to planking the hull!


- 86 replies
-
- 12
-
-
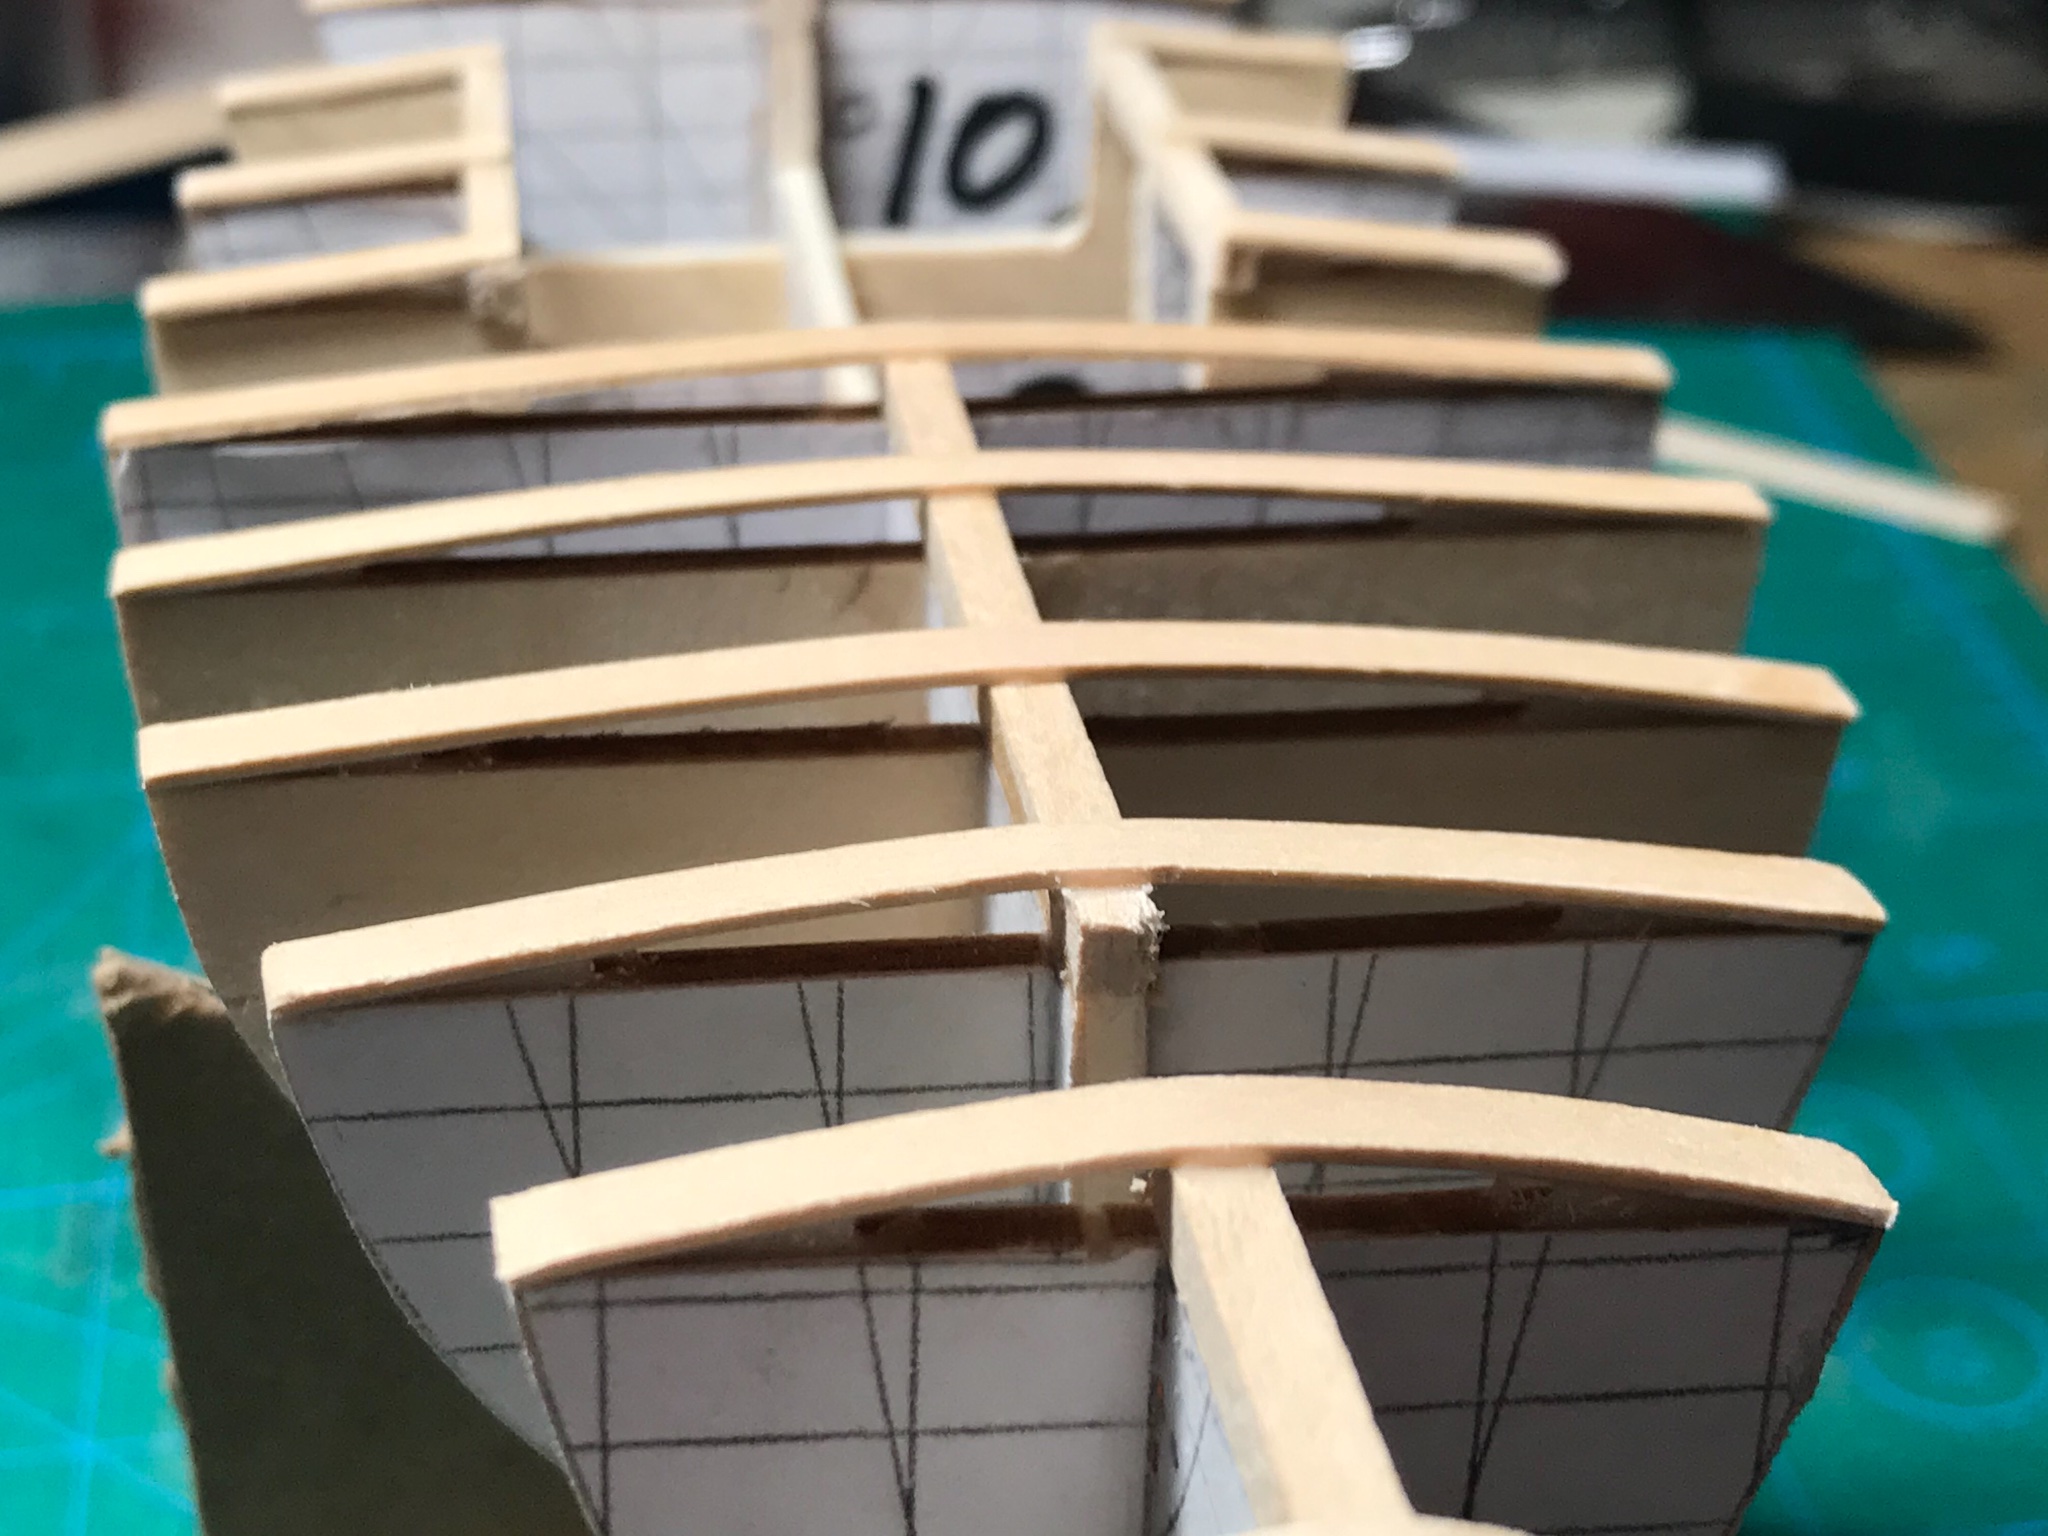
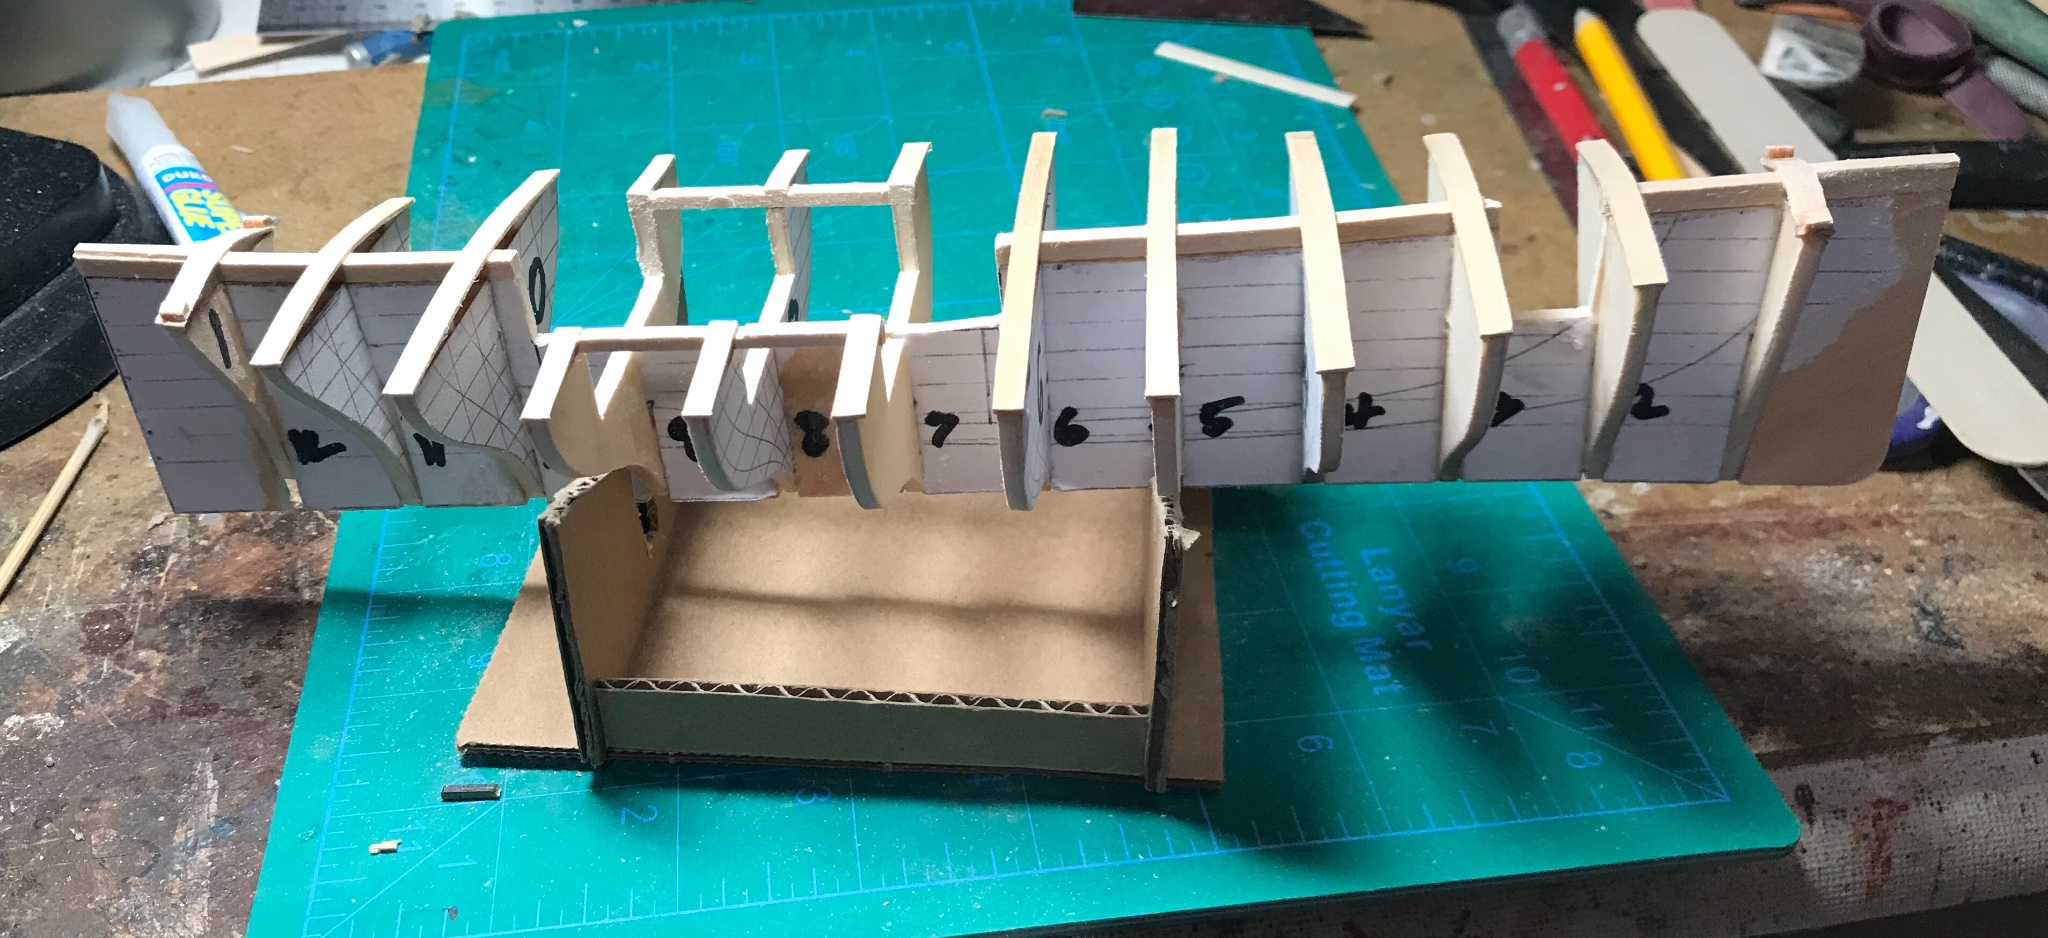
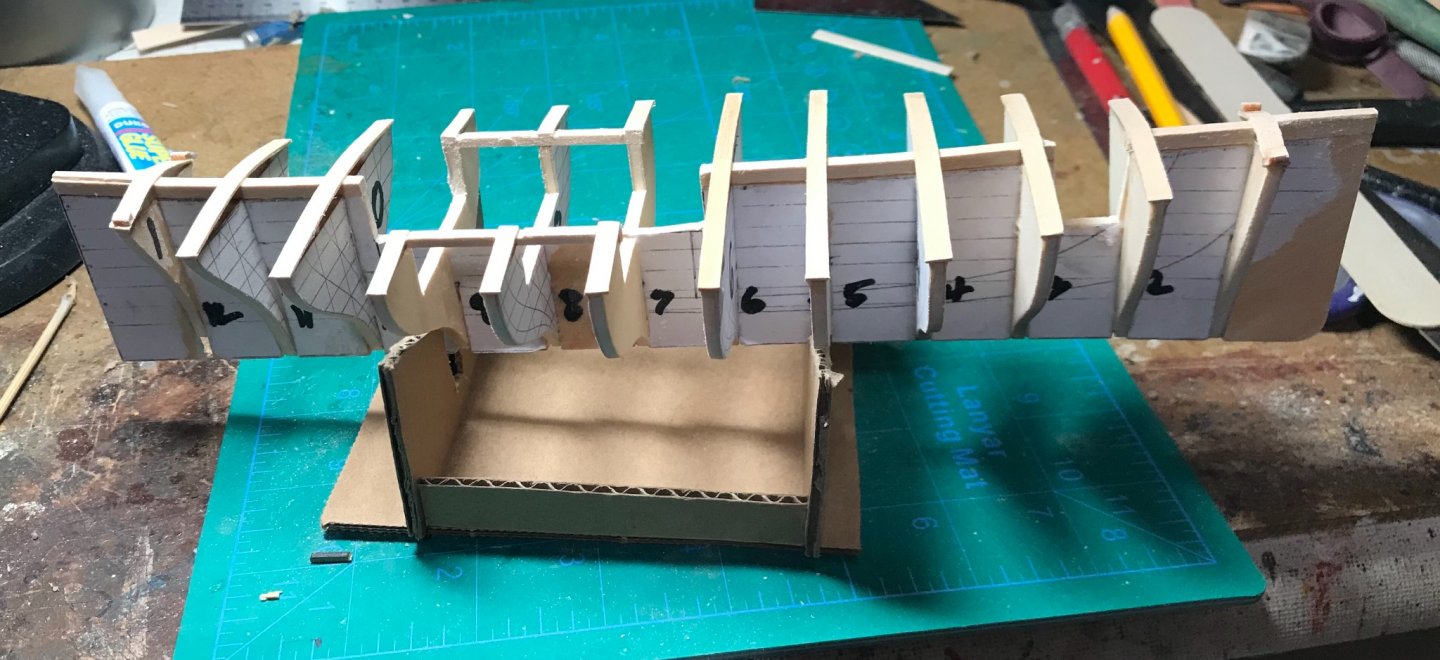
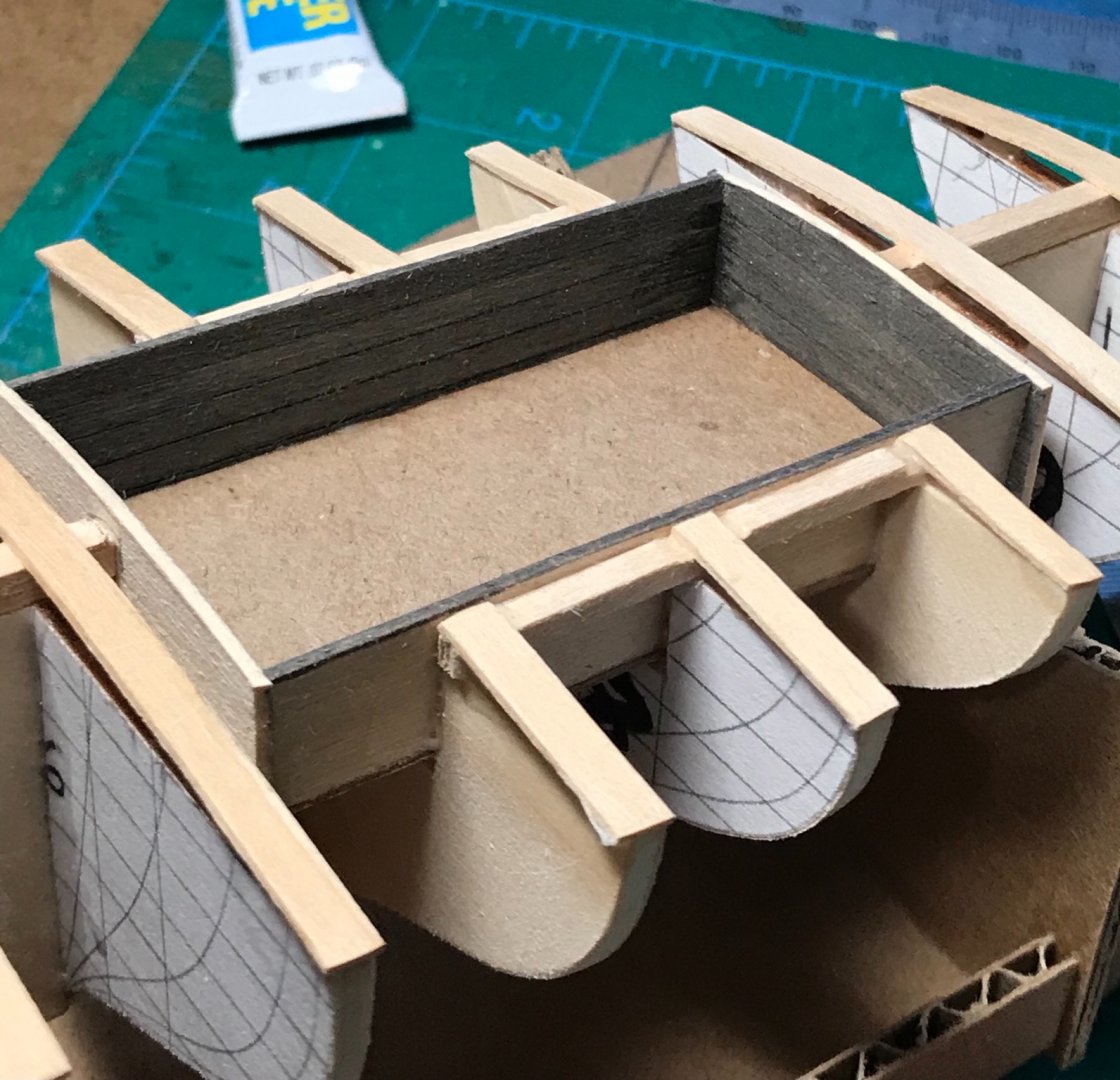
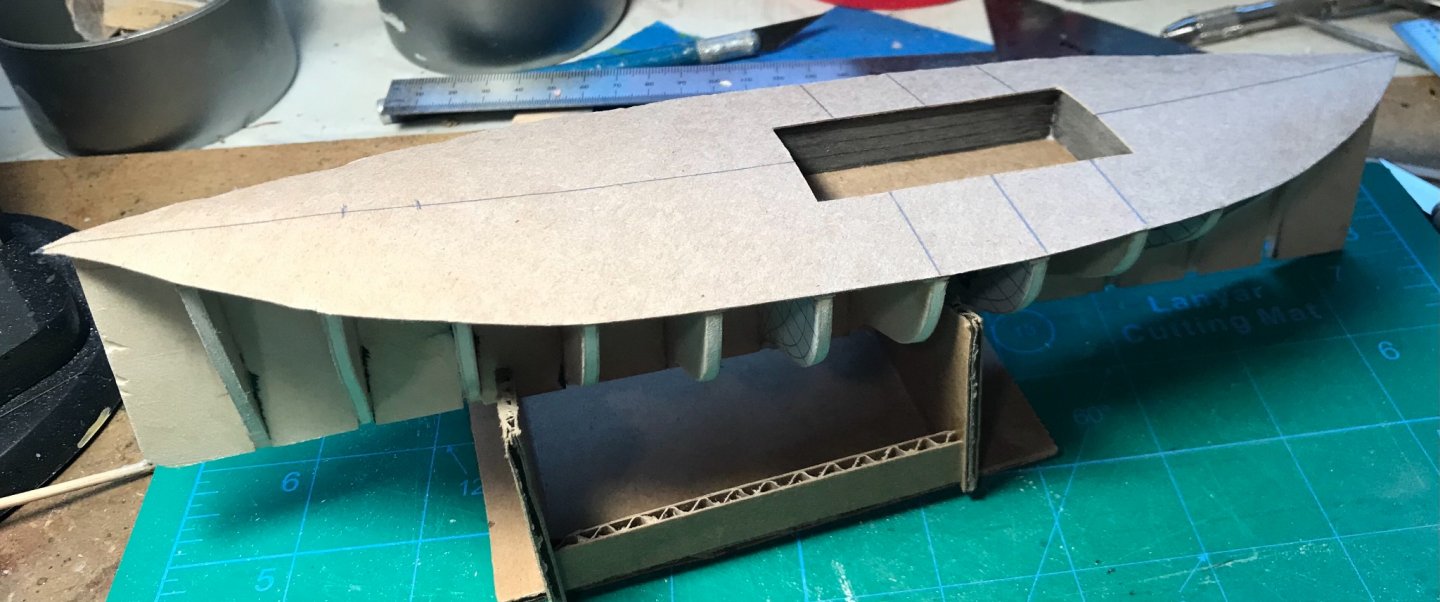
More building-up the frame today. I added curved strips to the tops of the bulkheads to create camber for the deck. Also installed walls for the hold and a foundation for the decking (i.e. a false deck). The false deck is cardboard made from a repurposed cereal box.😬

-
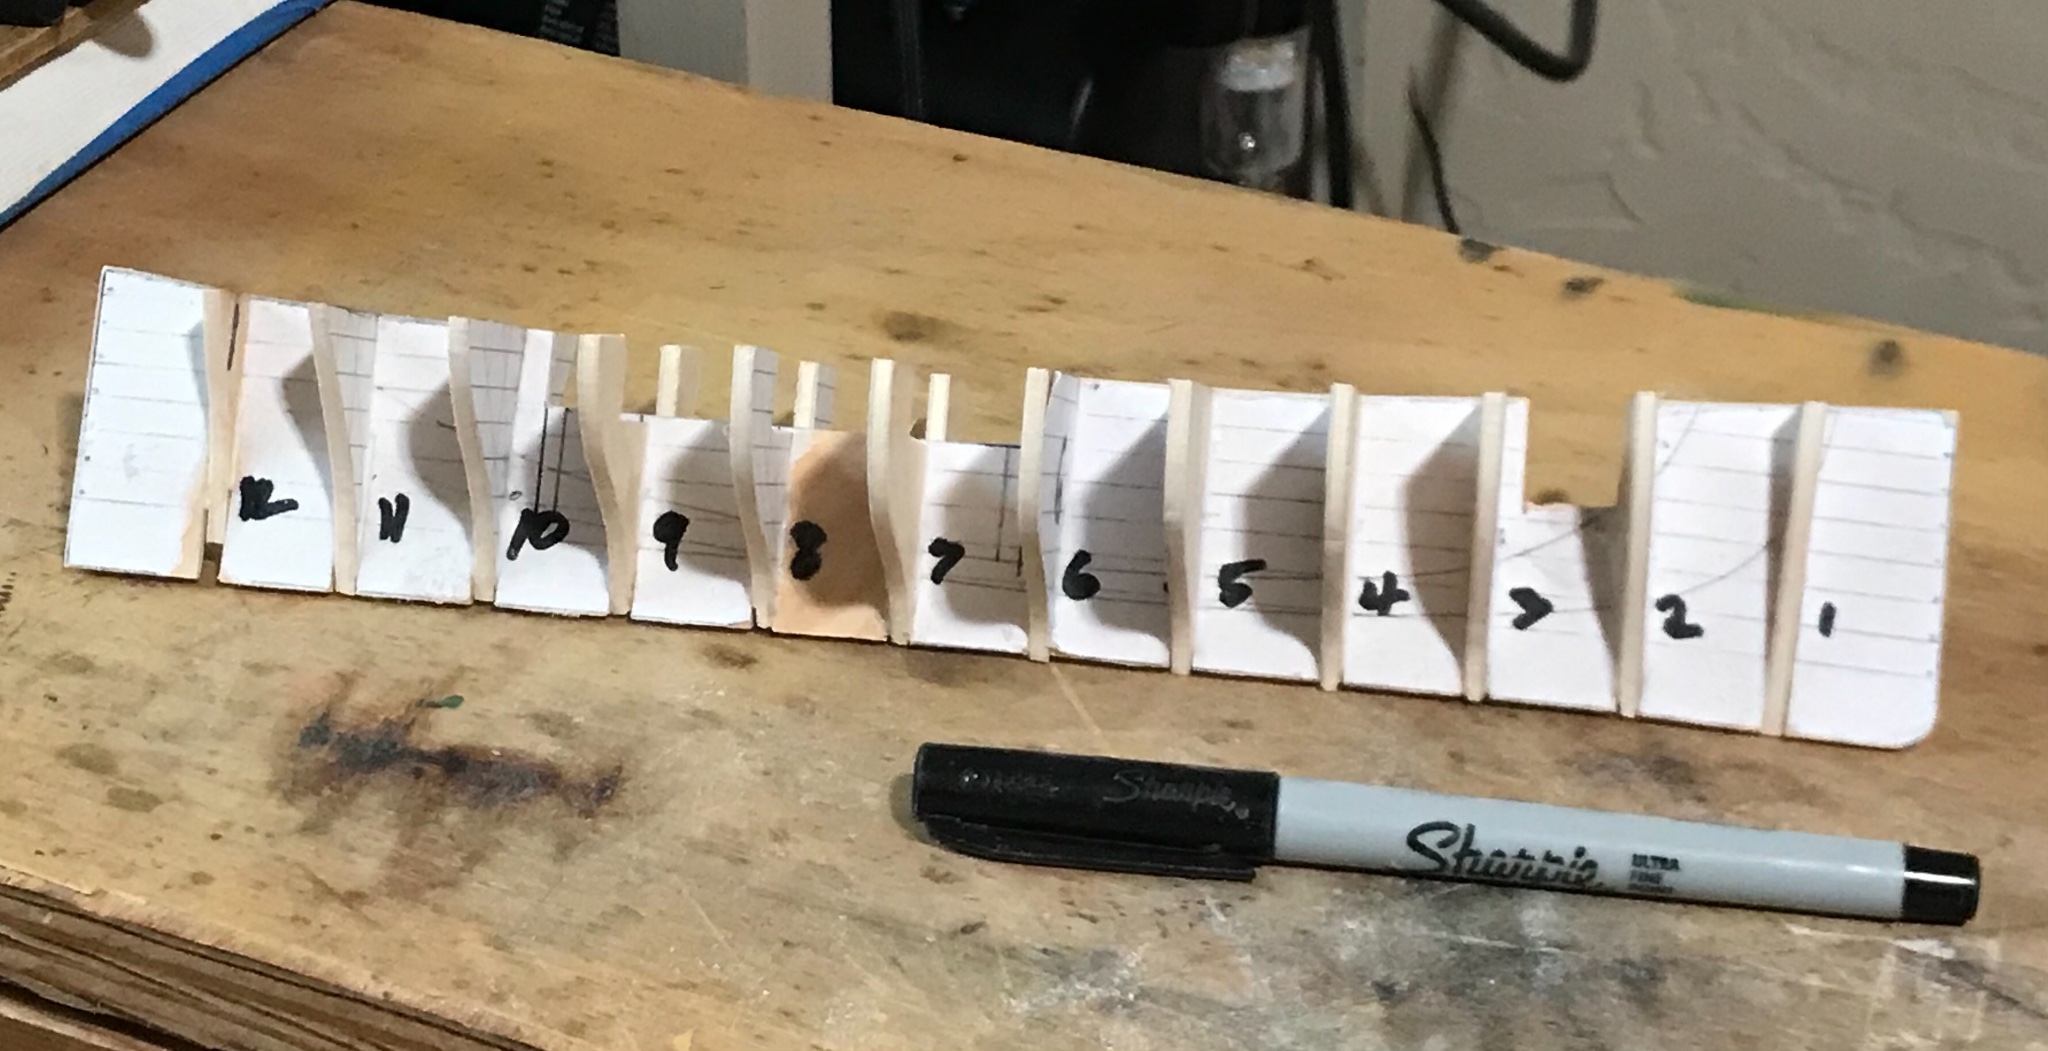
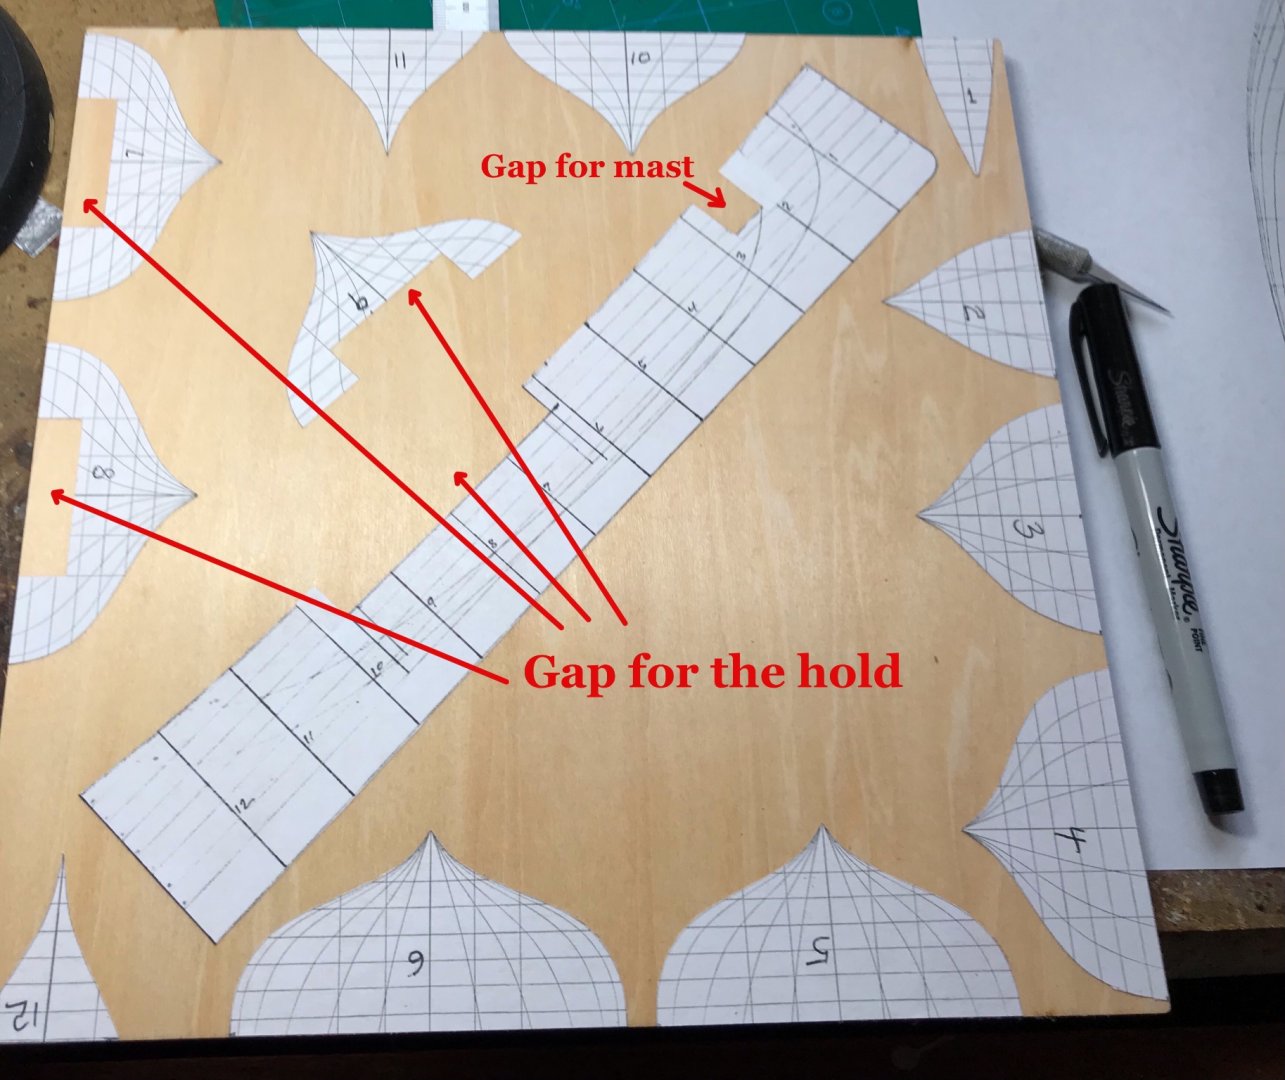
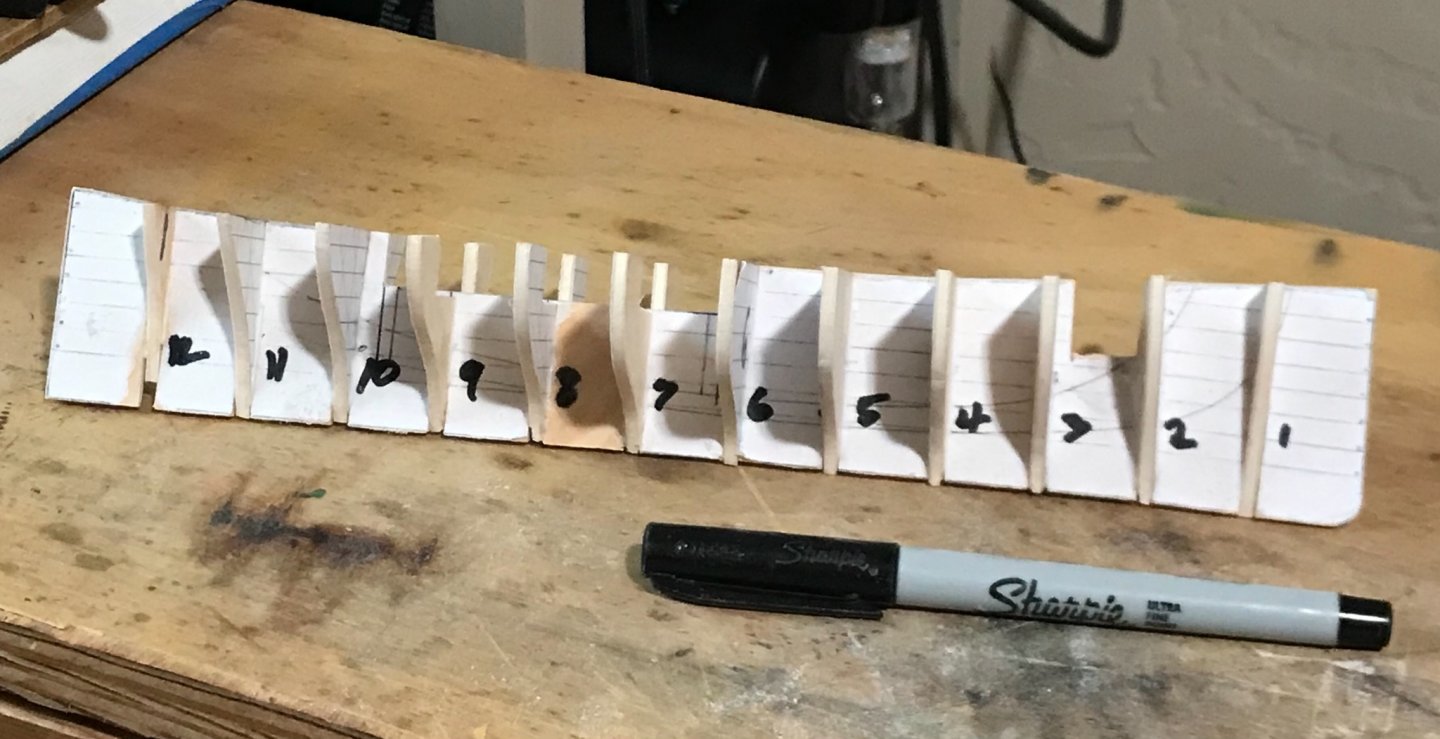
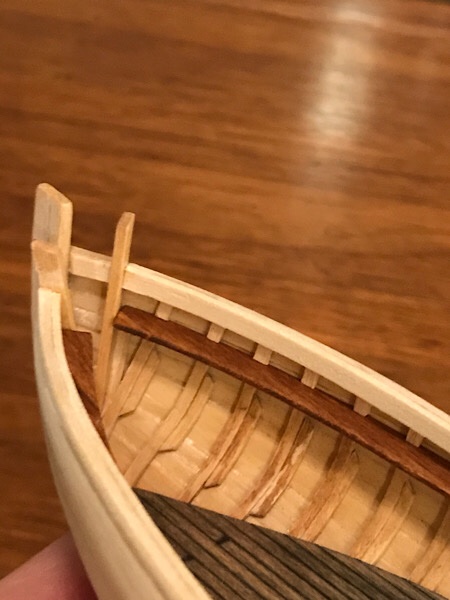
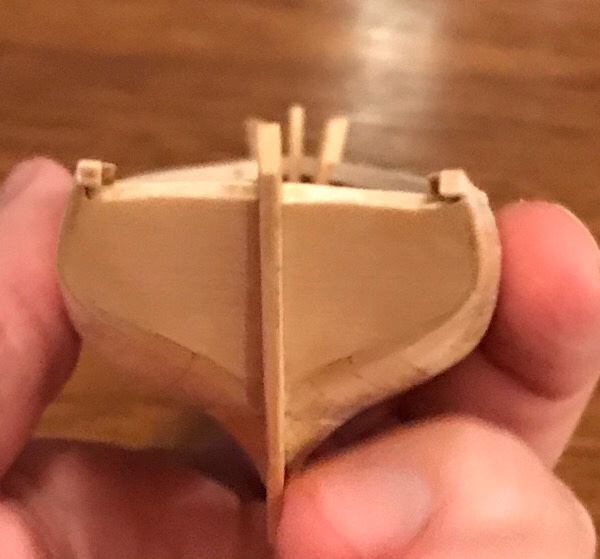
Making progress by cutting out and assembling the false keel and bulkheads... Paper templates glued to 3/32" basswood plywood. A "gap" in the false keel and some bulkheads will become the main hold. Another gap will accommodate the fore (main) mast. All the parts were cut out with a table scroll saw...

-
Cutting out templates for the bulkheads. These will be glued with rubber cement to basswood plywood and cut our out using a power scroll saw...
-
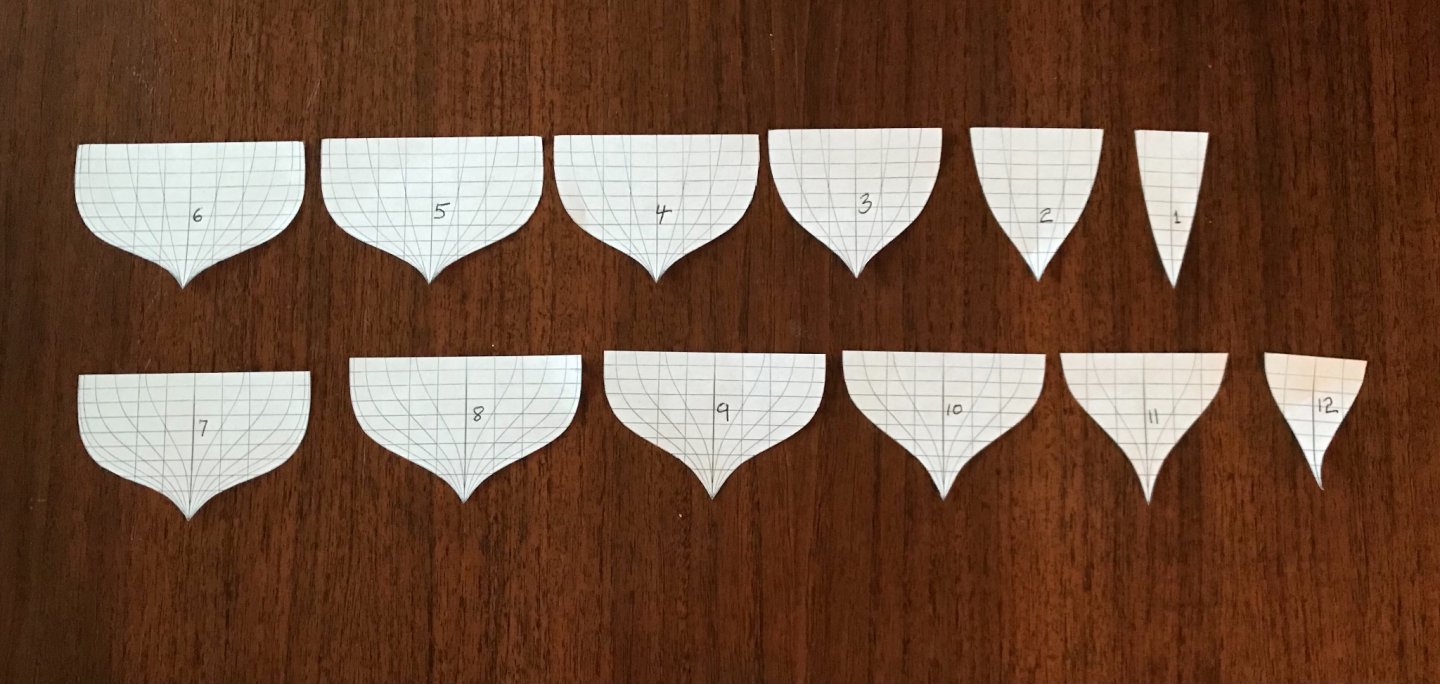
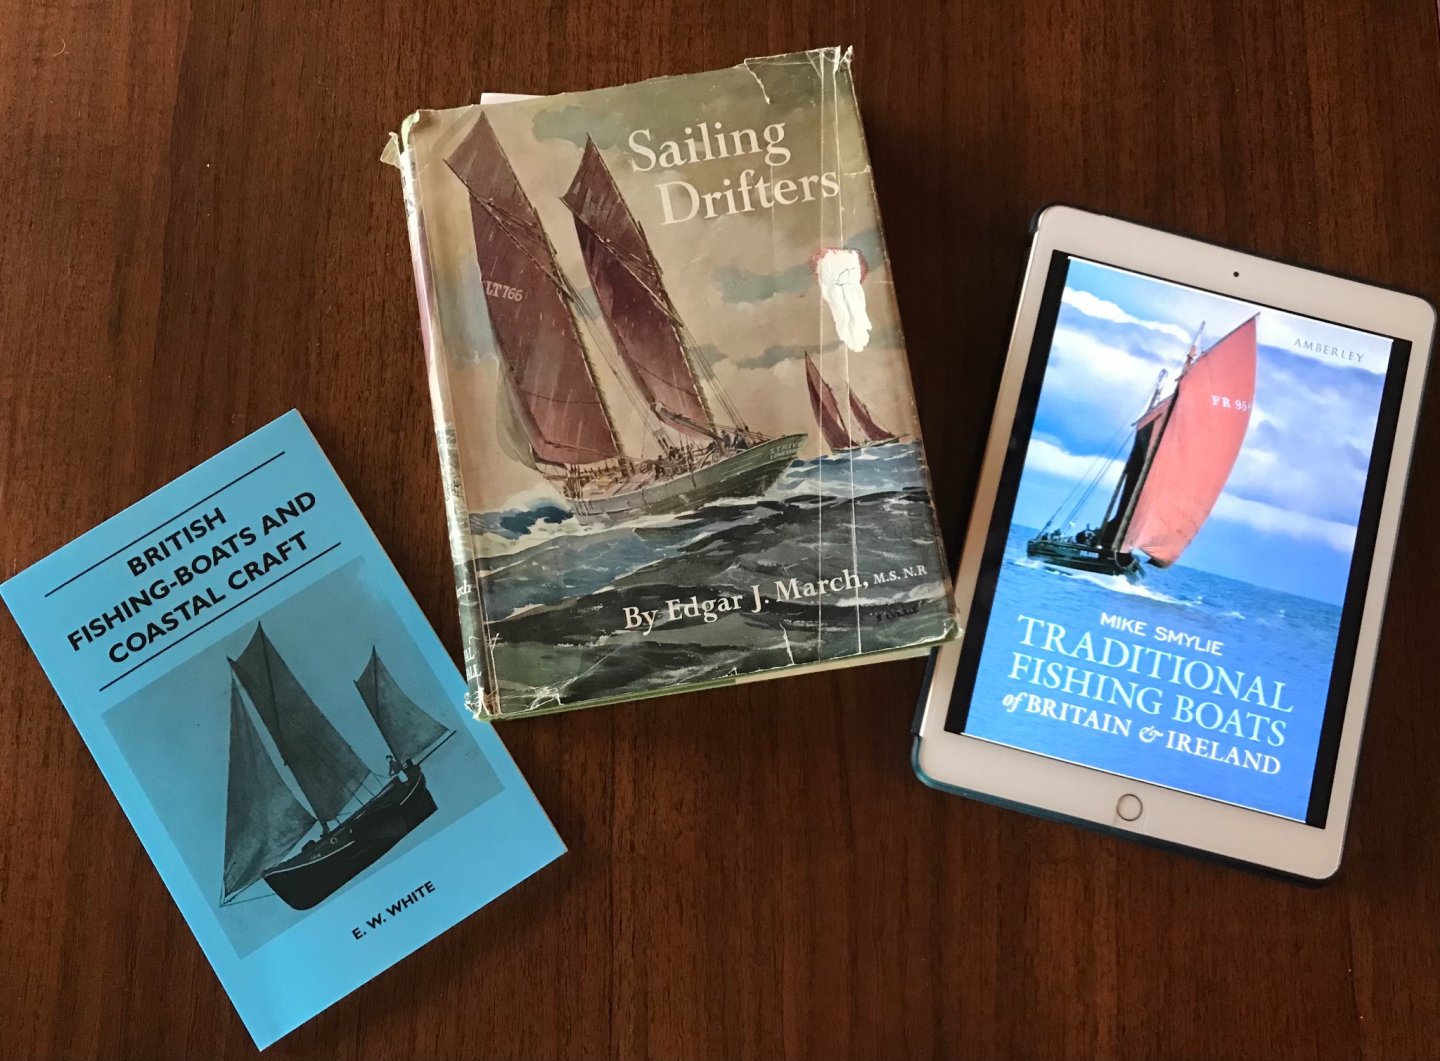
I have been researching the famous Scottish Fifies, and am inspired to try building a model of a small to medium sized boat of 42-feet (12.8 meters). Detailed information about these boats is hard to find. Evidently, the real boats were mostly built by sight, without the help of plans or half-hull models, so there is not a lot of documentation to discover. Most of the sources I did find focus on the large Fifies (60 to 80 feet loa) of the early 1900s. However, from various historical photographs and writings, I am under the impression that smaller boats were more common-place during the late 1800s. In addition, there are very few surviving Fifies left in the world today. One smaller boat, the "Isabella Fortuna," survives as a Scottish National Historic Ship. She was built in 1890 and is 43 feet loa. By using written descriptions, historical photographs, and the plans of larger boats, I have developed my own paper line-plans of what I think would be a typical boat in existence, circa 1870 - 1880. Here are some of my sources:
- 86 replies
-
- 10
-
-
I've been wanting to do a Scottish Fifie for a long time...🤔
- 69 replies
-
- 3
-
-
- Galway hooker
- fishing
- (and 2 more)
-
Fini! I'll post more photos in the completed project gallery😃

- 69 replies
-
- 18
-
-
- Galway hooker
- fishing
- (and 2 more)
-
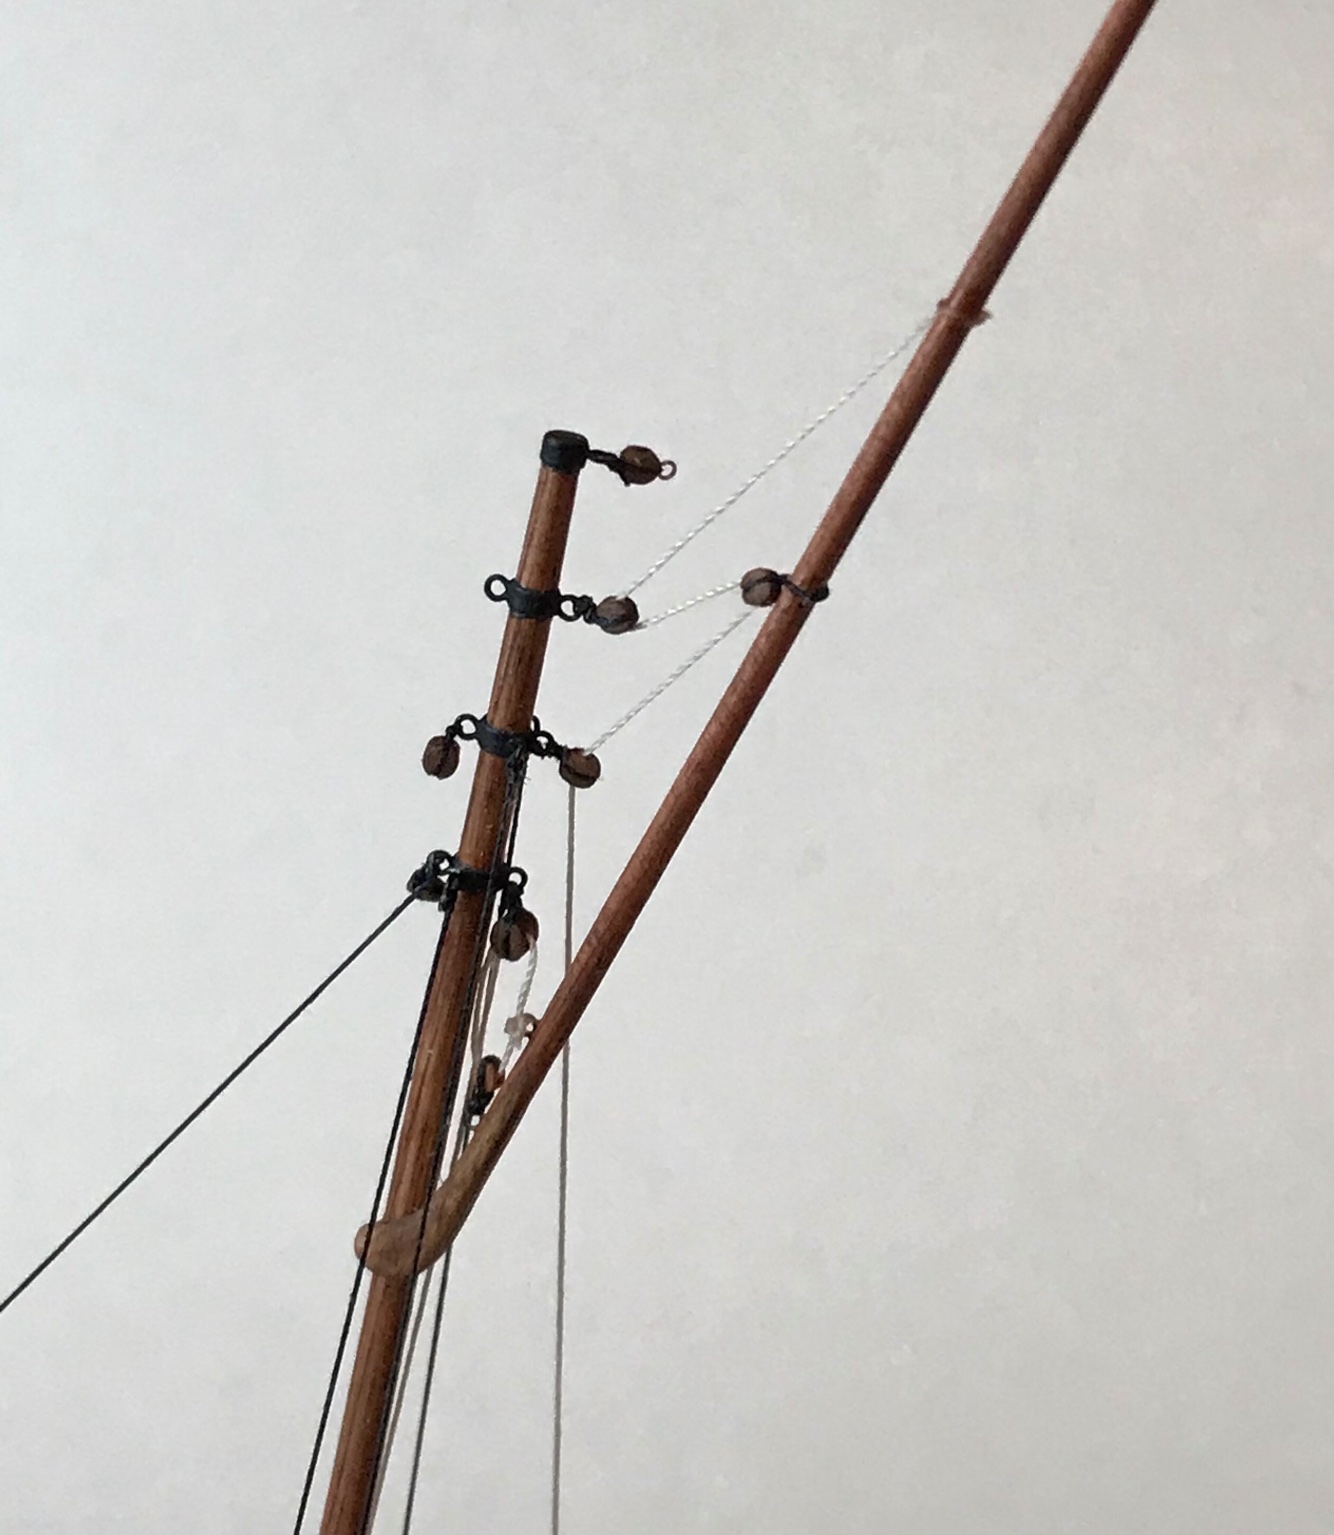
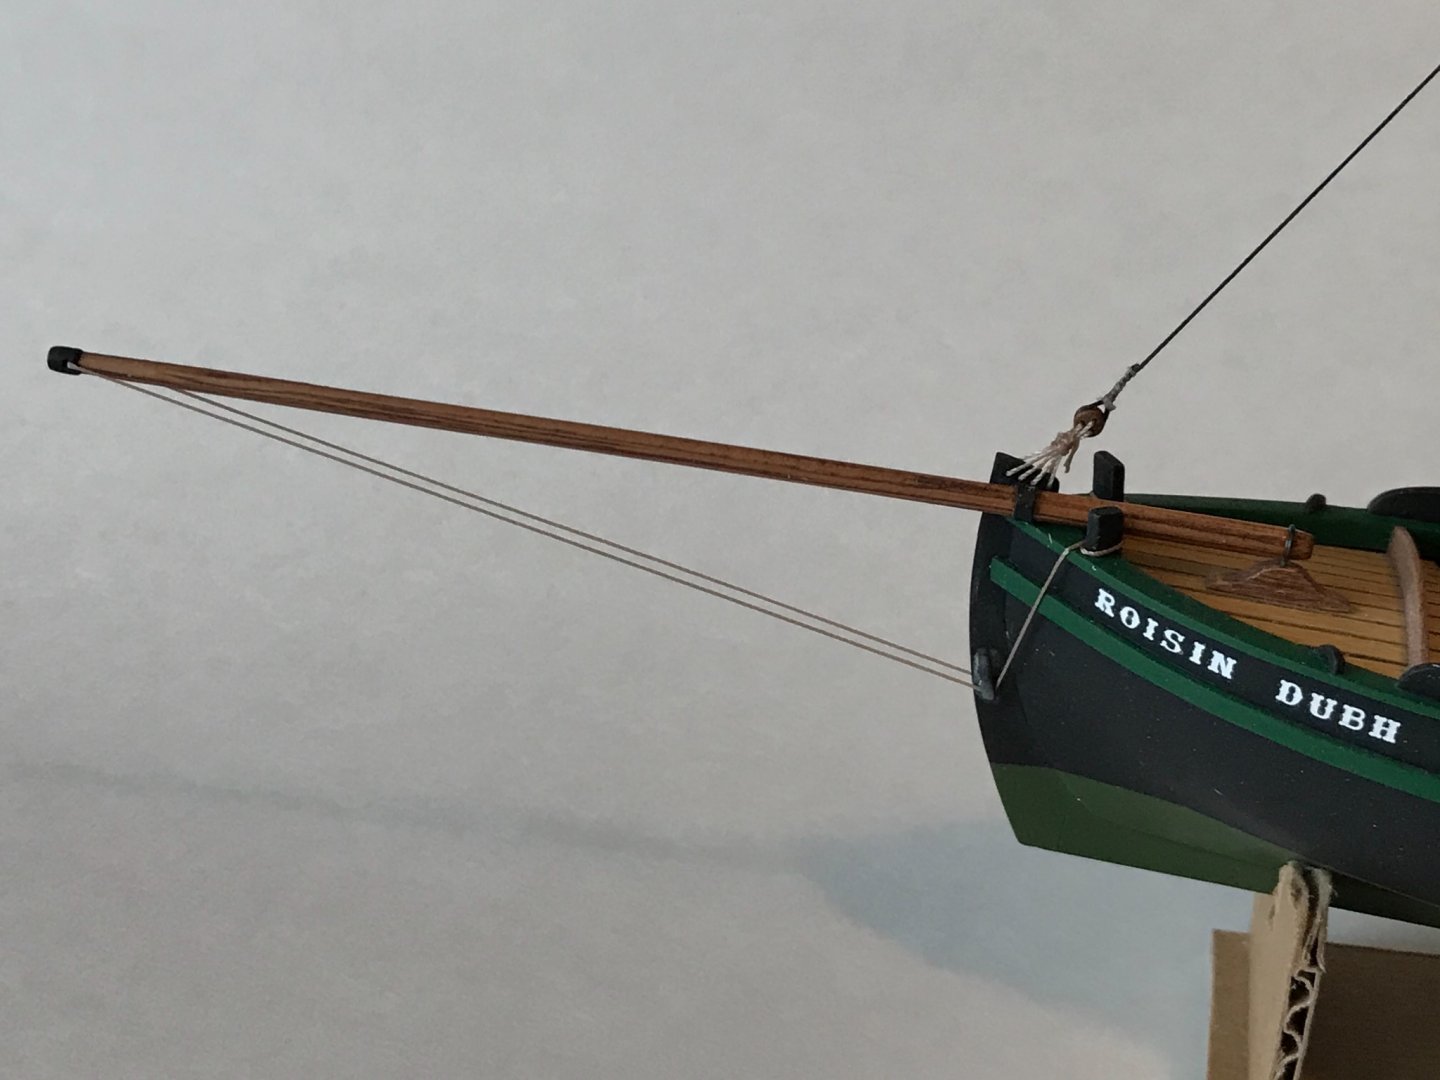
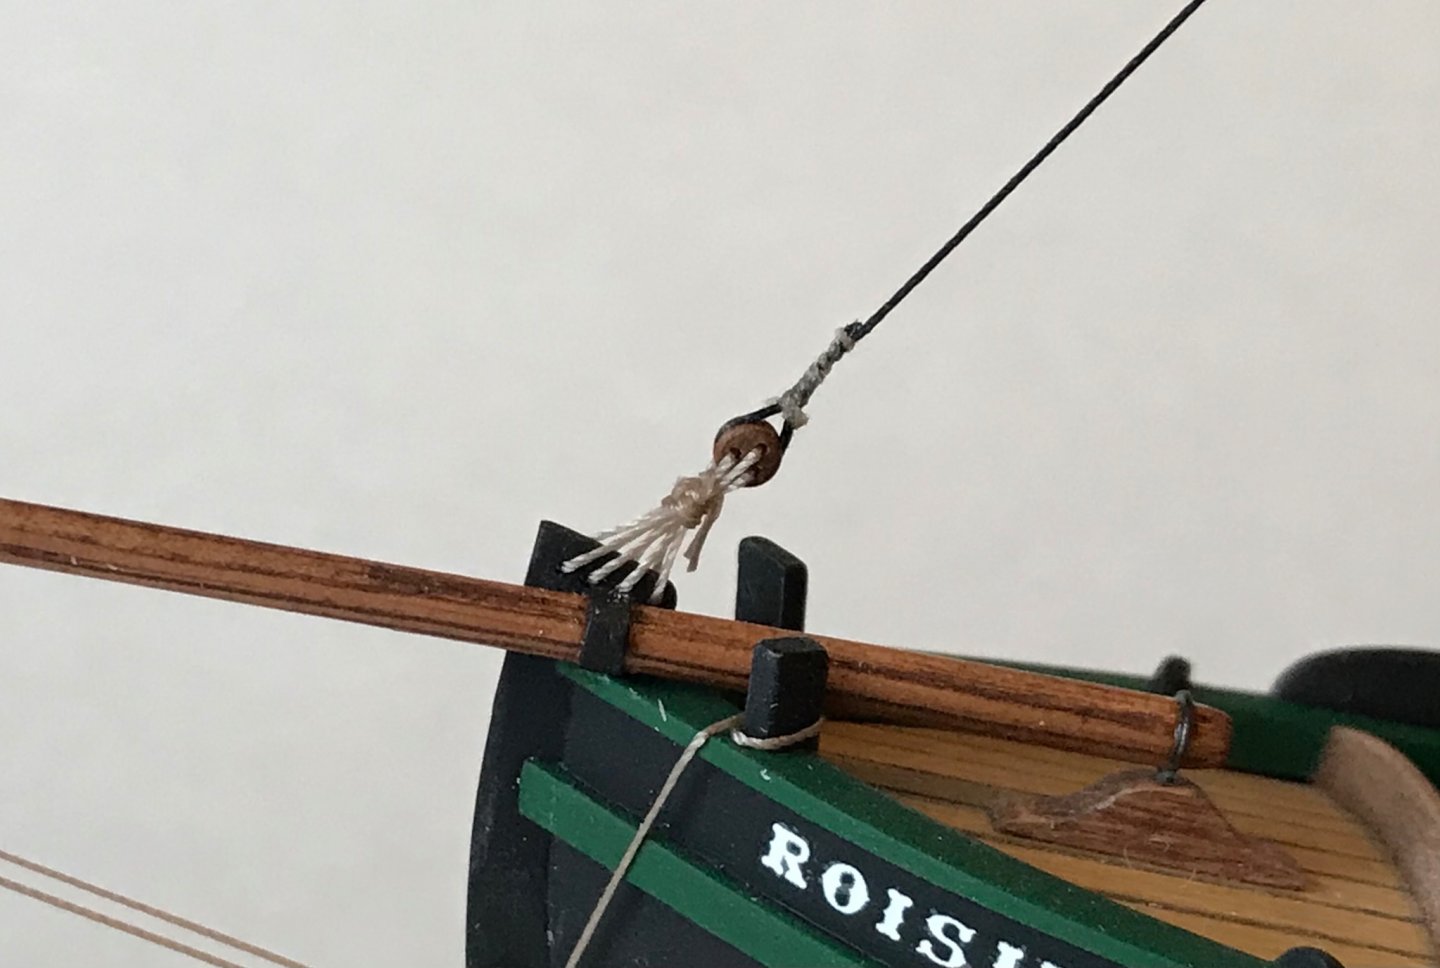
I plan to present the model in a "heeled over" position, as if driven by the wind. Only one mounting point will be used, but that point will be a heavy-gauge piece of steel piano wire (about 1.5mm diameter). The wire passes through the keel and extends up through the center of the mast, for about an inch. The exposed end, shown here, will go into a pedestal attached to the base, which is a plaque...
- 69 replies
-
- 5
-
-
- Galway hooker
- fishing
- (and 2 more)
-
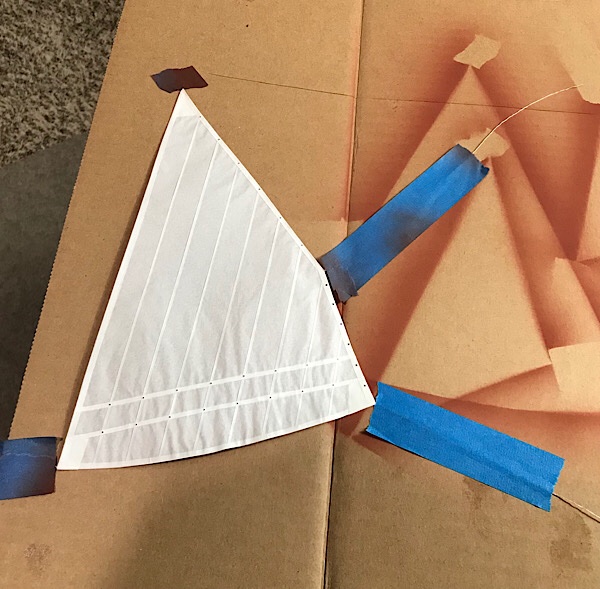
The paint did not appear to have any affect on the paper, probably because it was applied with an airbrush. The white glue, diluted with water had some affect. Even so, I thought the texture of the sails looked too flat and paper-like. Therefore, prior to painting, I "forced" some puckering texture by placing the sails between two sheets of paper towels and ironing them with a steam iron for clothes.
- 69 replies
-
- 3
-
-
- Galway hooker
- fishing
- (and 2 more)
-
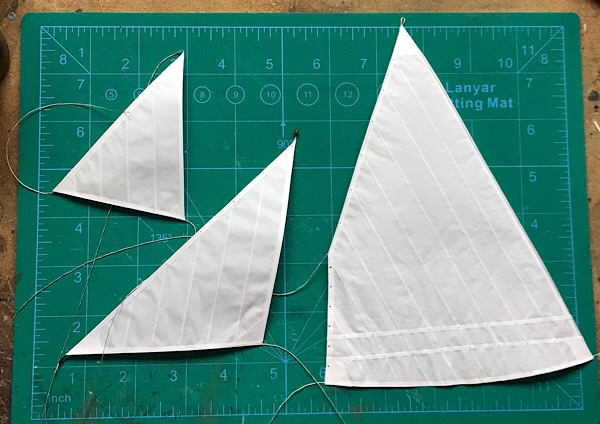
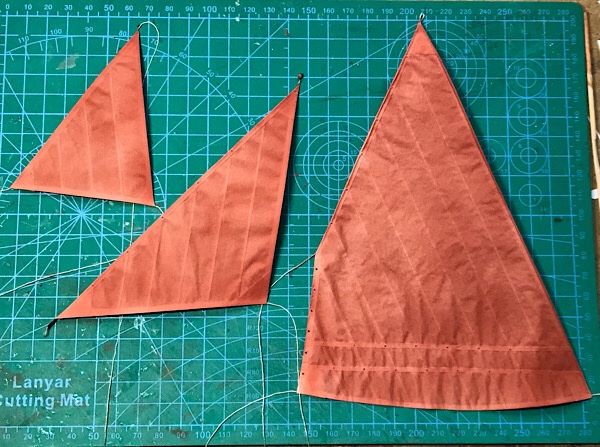
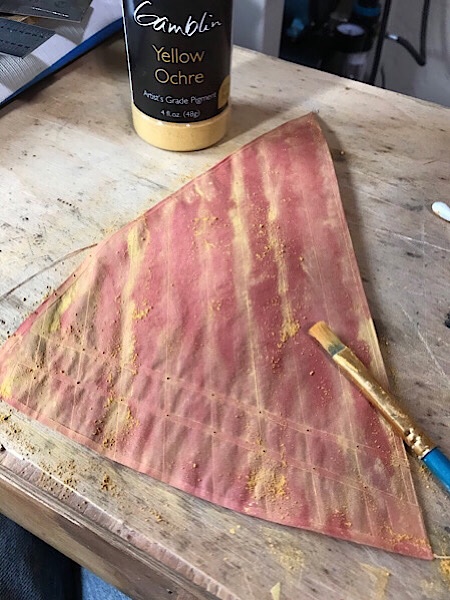
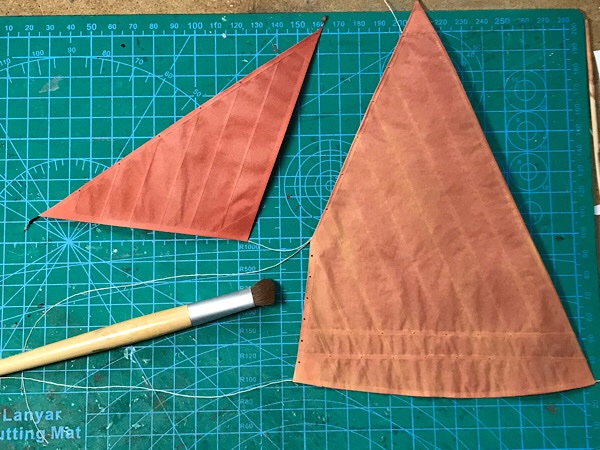
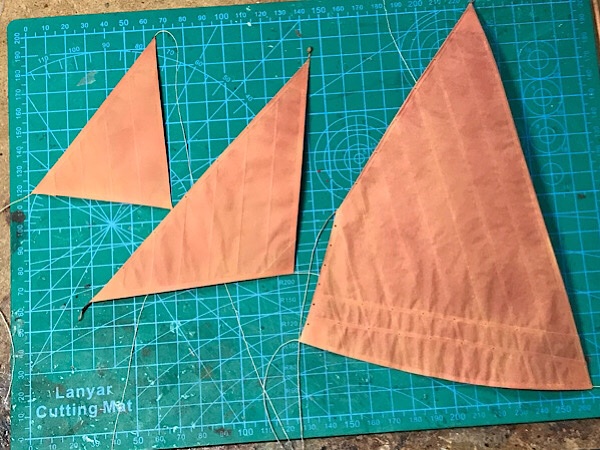
Working on the sails: I started building the sails by cutting 15mm wide strips from graphic marker paper. The strips were taped down with a 1.5mm overlap to simulate seams. That way I could make sure all the overlaps looked fairly even and uniform before gluing. Diluted white glue was painted along the seams with a small brush. Slop-over glue was dabbed (not rubbed) with cotton swabs. Rubbing can damage the wet paper and ruin the surface. The result is a sheet of "sail-cloth." I used regular paper to make sail templates, using trial and error to make sure the templates fit the masts. Once satisfied, I cut out the same shape from the sail-cloth I made previously Next, wire and/or thread was put along the edges under trim. Wire was used only on the sail edges I plan to "bend" in the wind. Thread was for rigging later. Sail construction finished, now on to painting... Wanting to simulate the colored sails of yesteryear, I painted the paper with an airbrush using mixed Tamiya acrylic paints... The rigging lines and pulleys were masked with tape, which also held the sail in place when the air hit it. The painted sails.... Next I applied yellow ochre powdered paint pigment to "fade" the sails and bring out the highlights. The pigment was applied with a brush along seam lines, then rubbed in with a makeup brush. You have to be careful not to accidentally bend or crimp the paper while rubbing. That will leave a crease you can never get out! Un-pigmented sail (left), and pigmented sail (right). Finished sails....

- 69 replies
-
- 13
-
-

-
- Galway hooker
- fishing
- (and 2 more)
-
Construction slowed during the holidays, but some progress was made on the masts, spars, and some of the rigging. Sails are next!


- 69 replies
-
- 14
-
-
- Galway hooker
- fishing
- (and 2 more)
-
Thanks for the info, Bob Cleek! I don't think shortening the tiller will be a problem, and had not considered it fouling with the rigging, but can see where that might be a problem... I did see a couple of photos of smaller boats with eyebolts on the stempost, but most photos show the drilled holes you related. I think I can make the change, and plan to examine it closer. It looks like a good (and fun) challenge in this scale!
- 69 replies
-
- 2
-
-
- Galway hooker
- fishing
- (and 2 more)
-
Thanks! I worked that up to hold the model while building, and to hold it while I located the waterline with a pencil taped to a wood block. Poor man's stand😎
- 69 replies
-
- 2
-
-
- Galway hooker
- fishing
- (and 2 more)
-
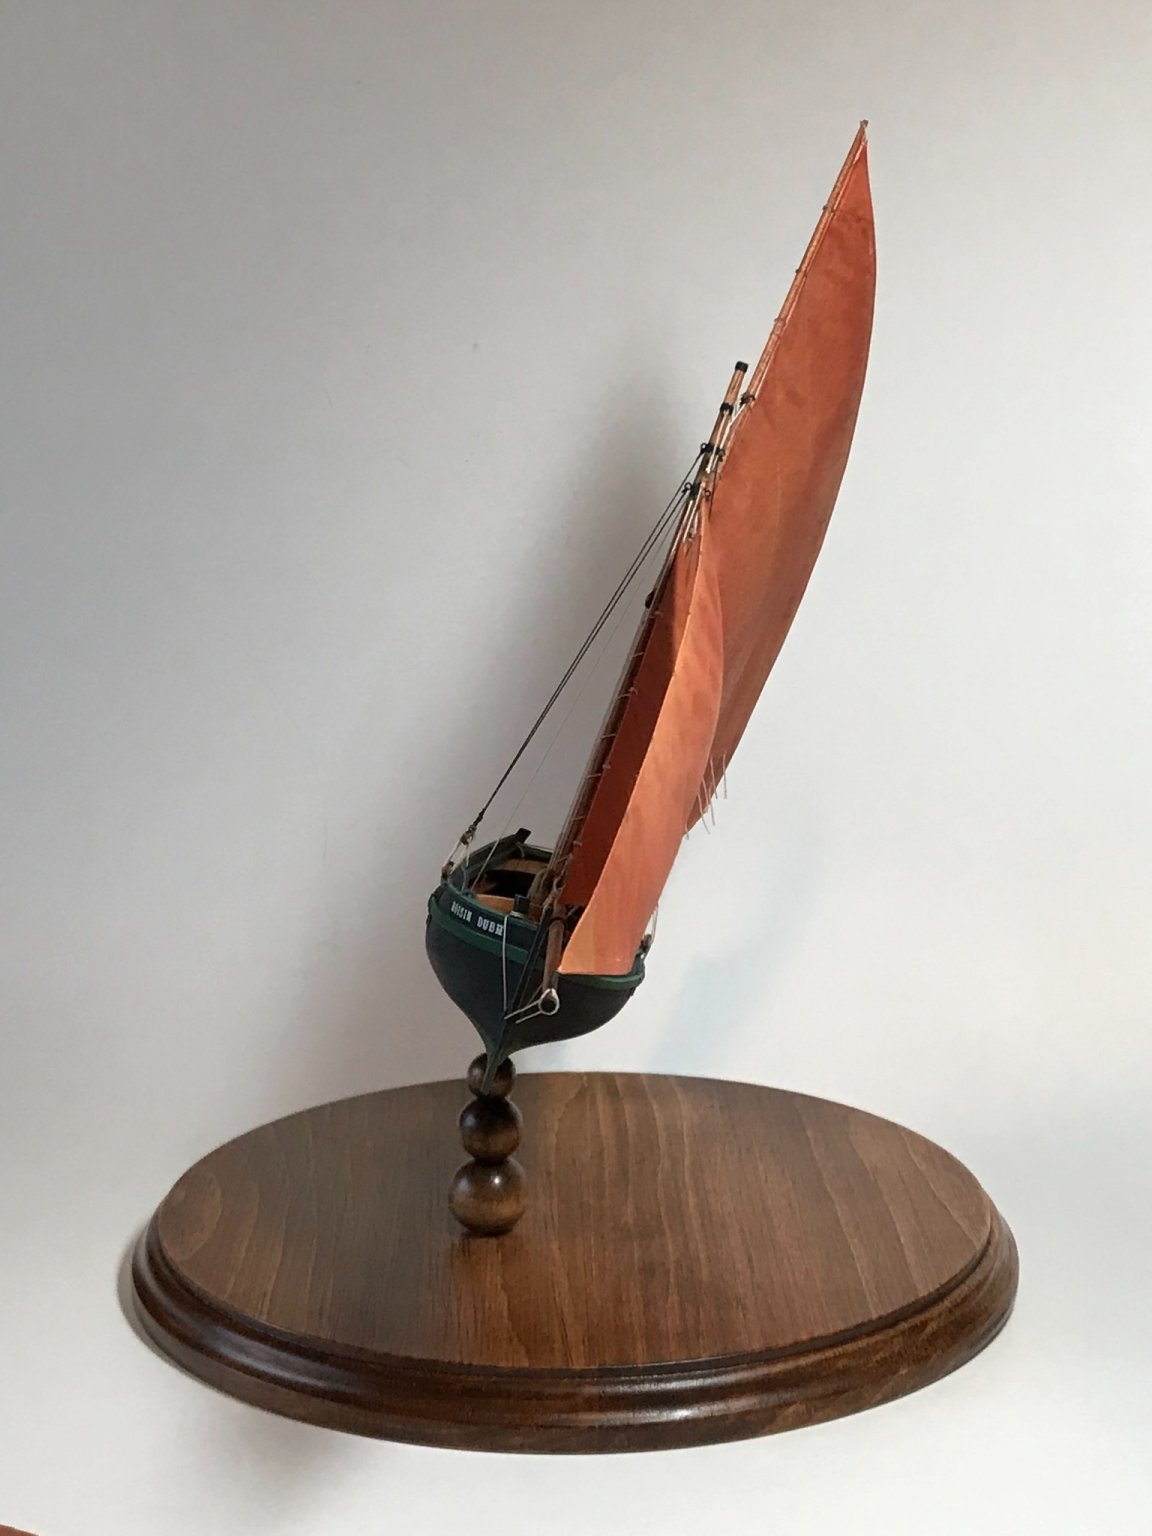
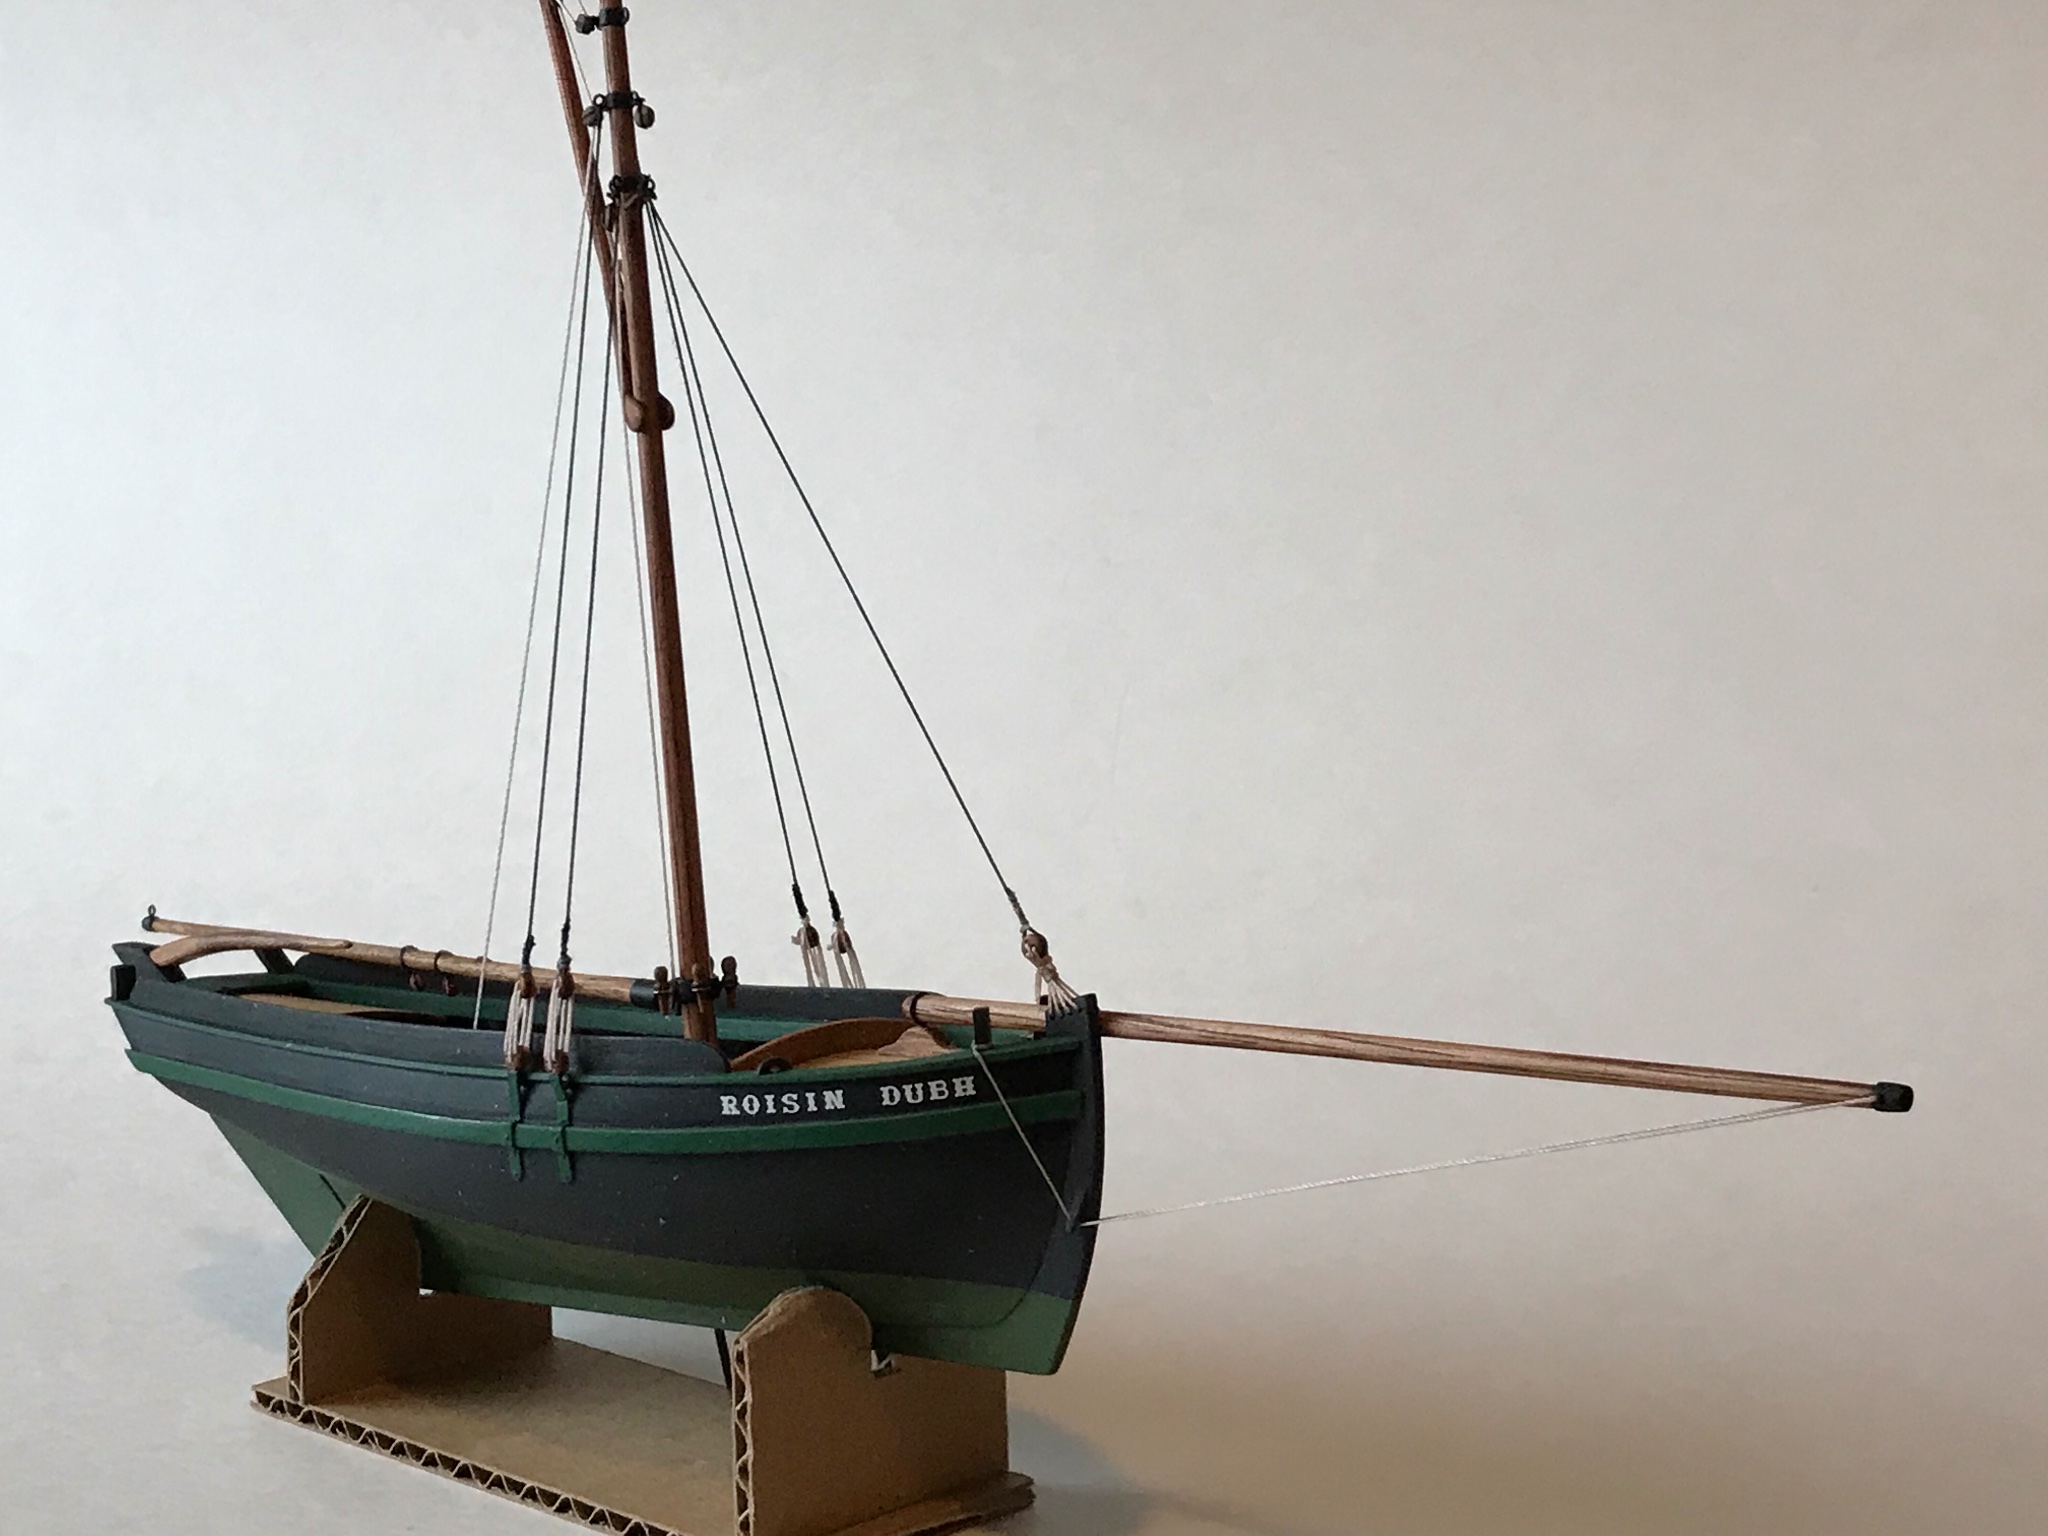
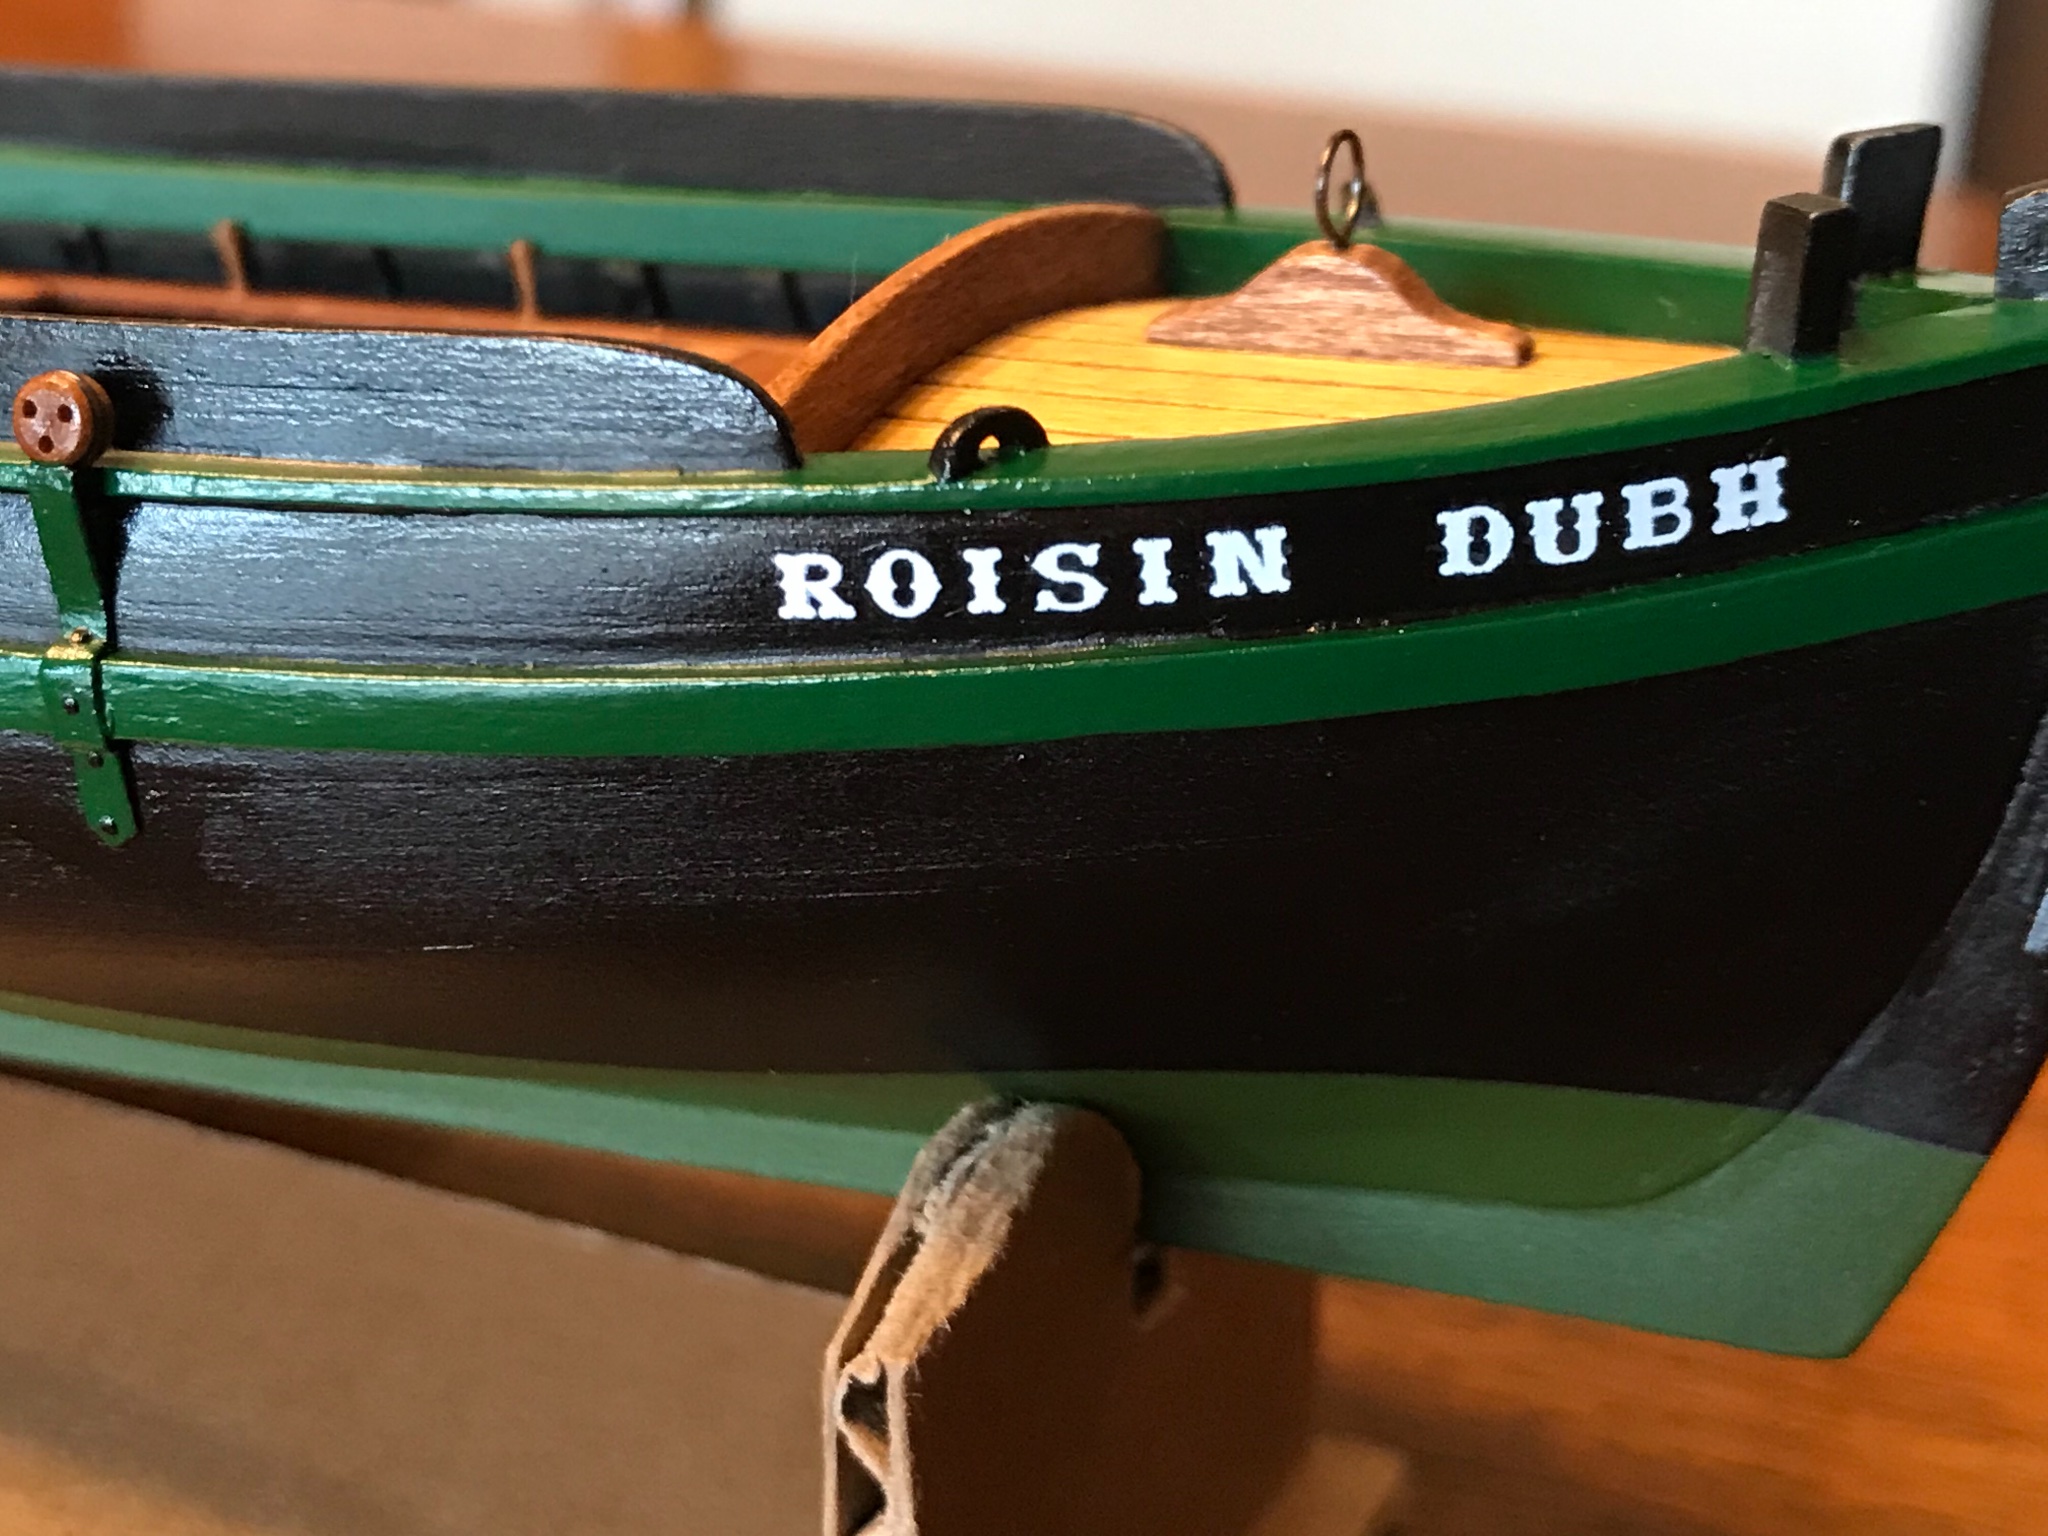
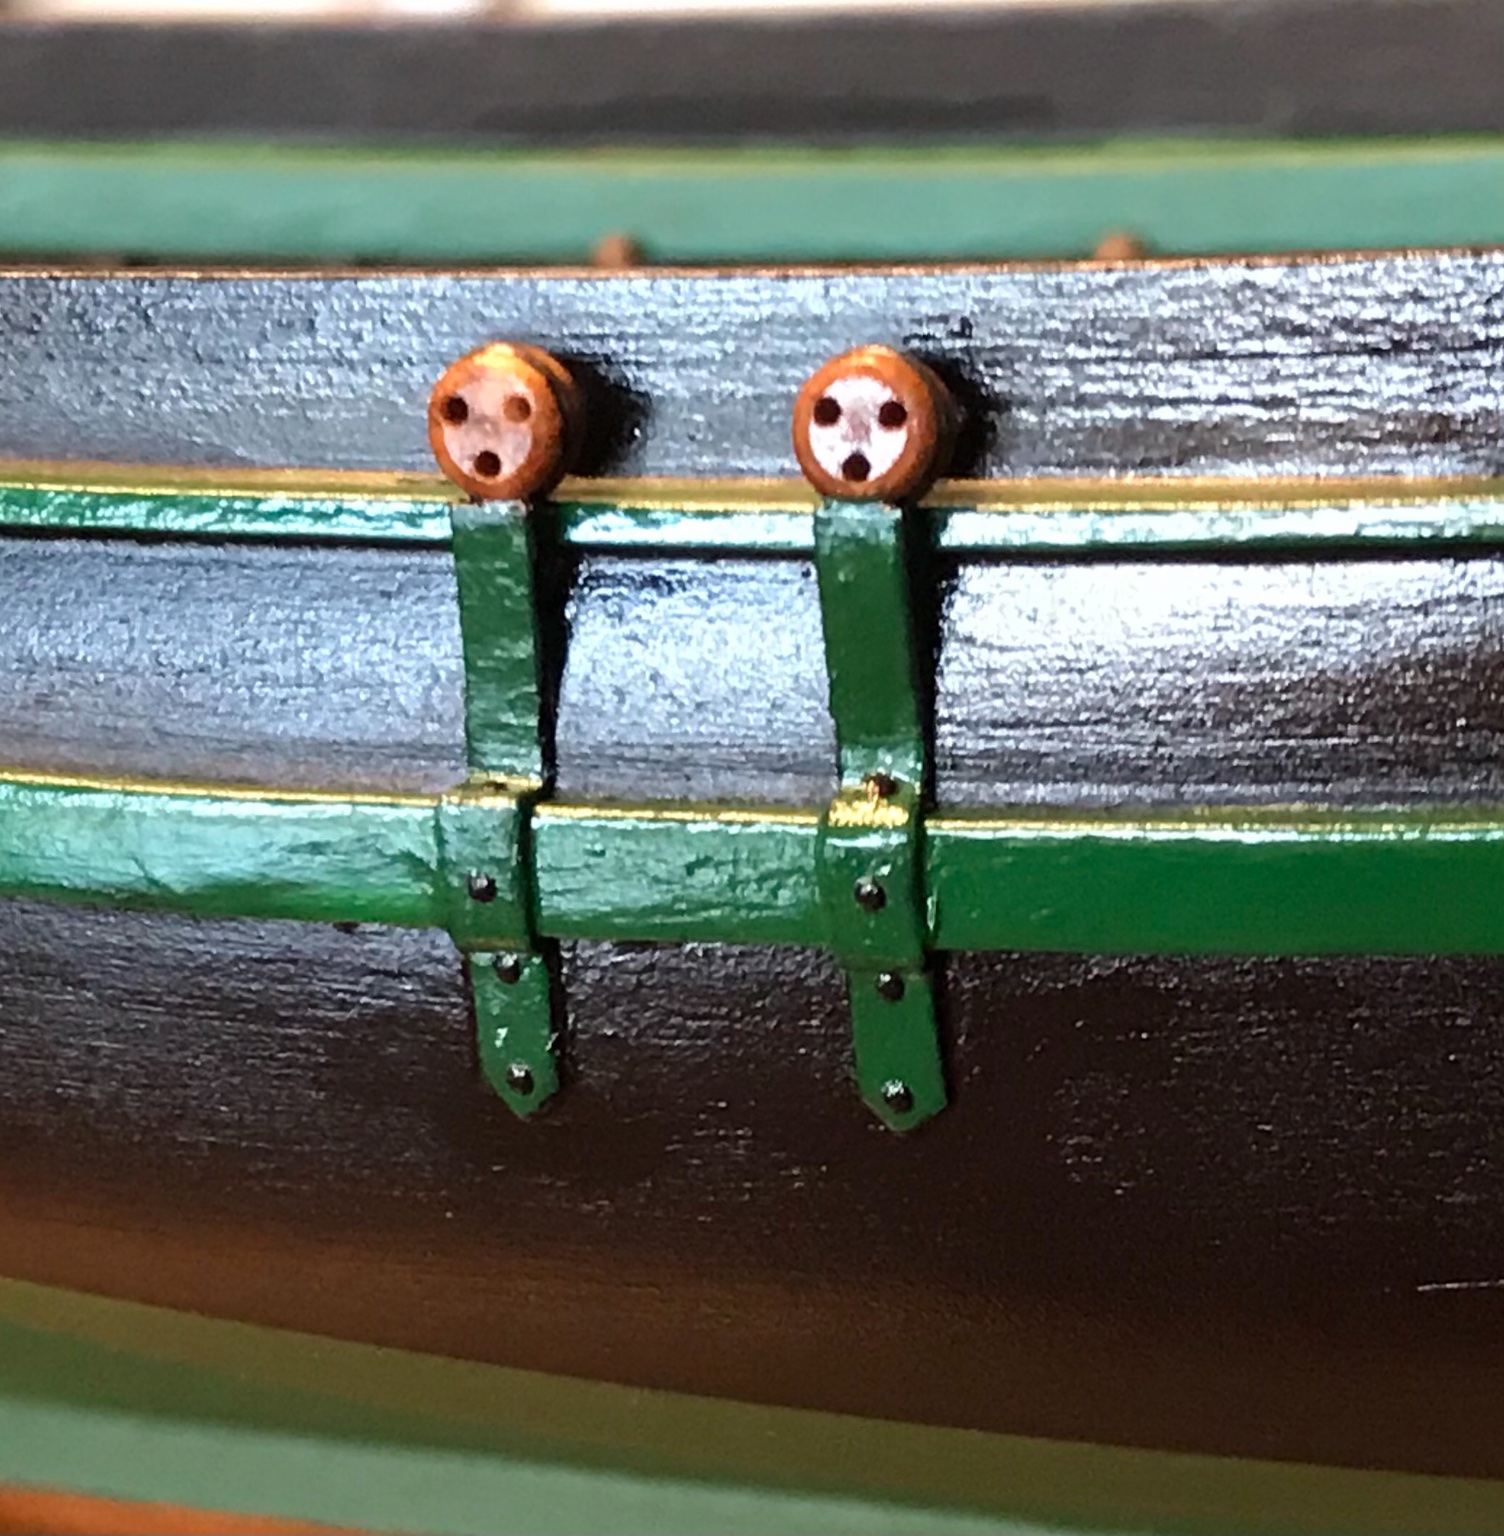
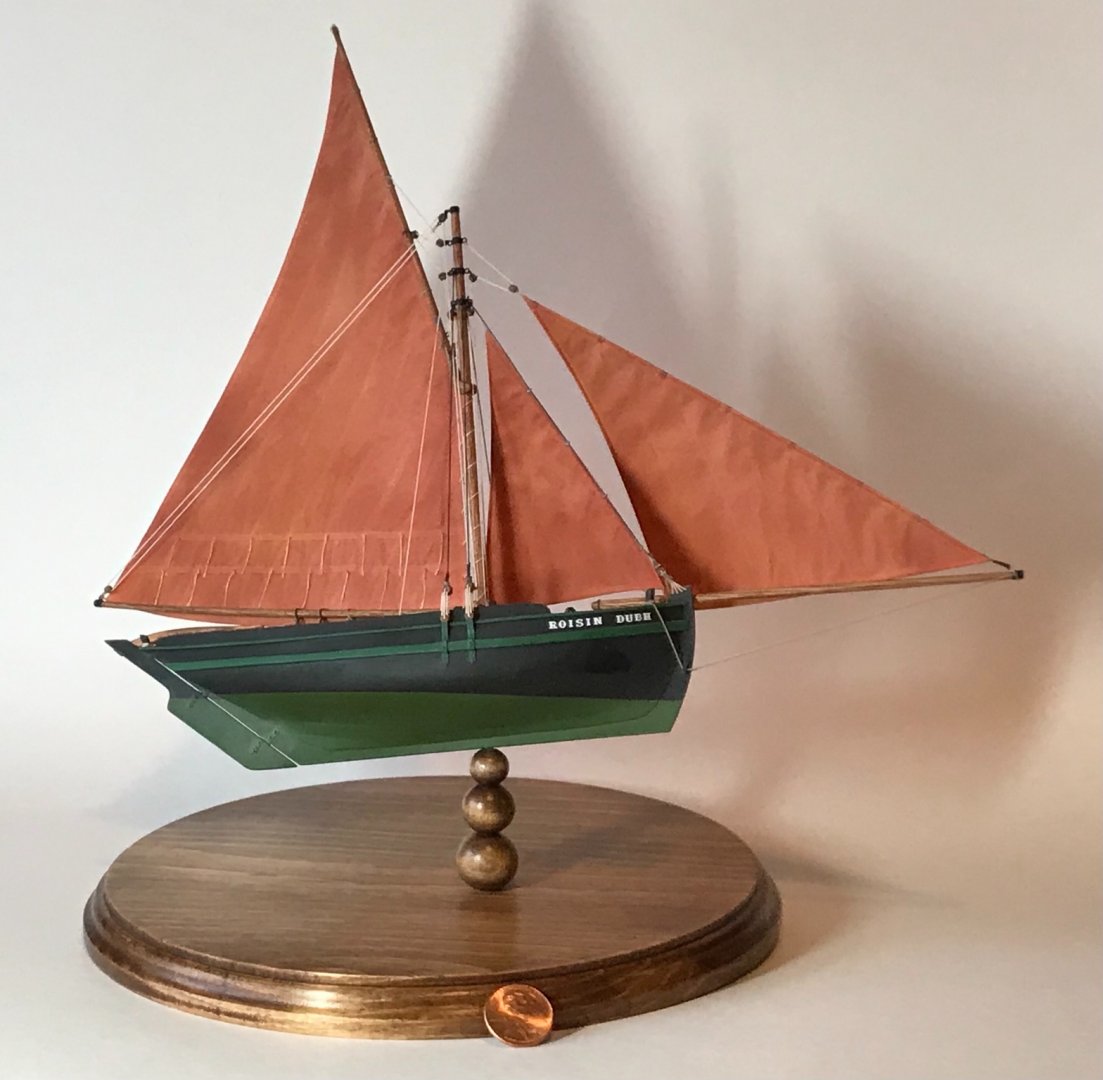
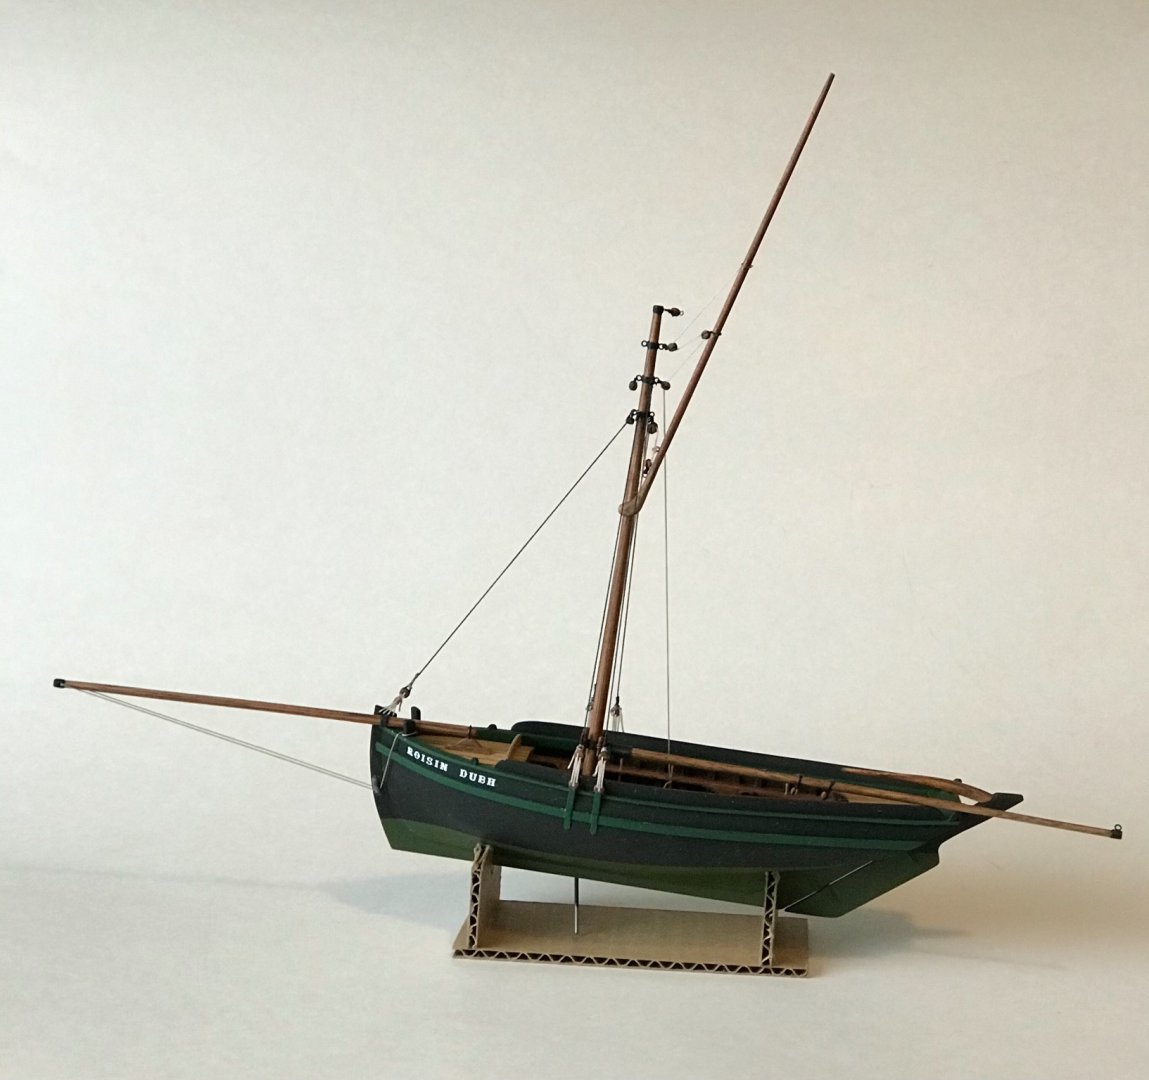
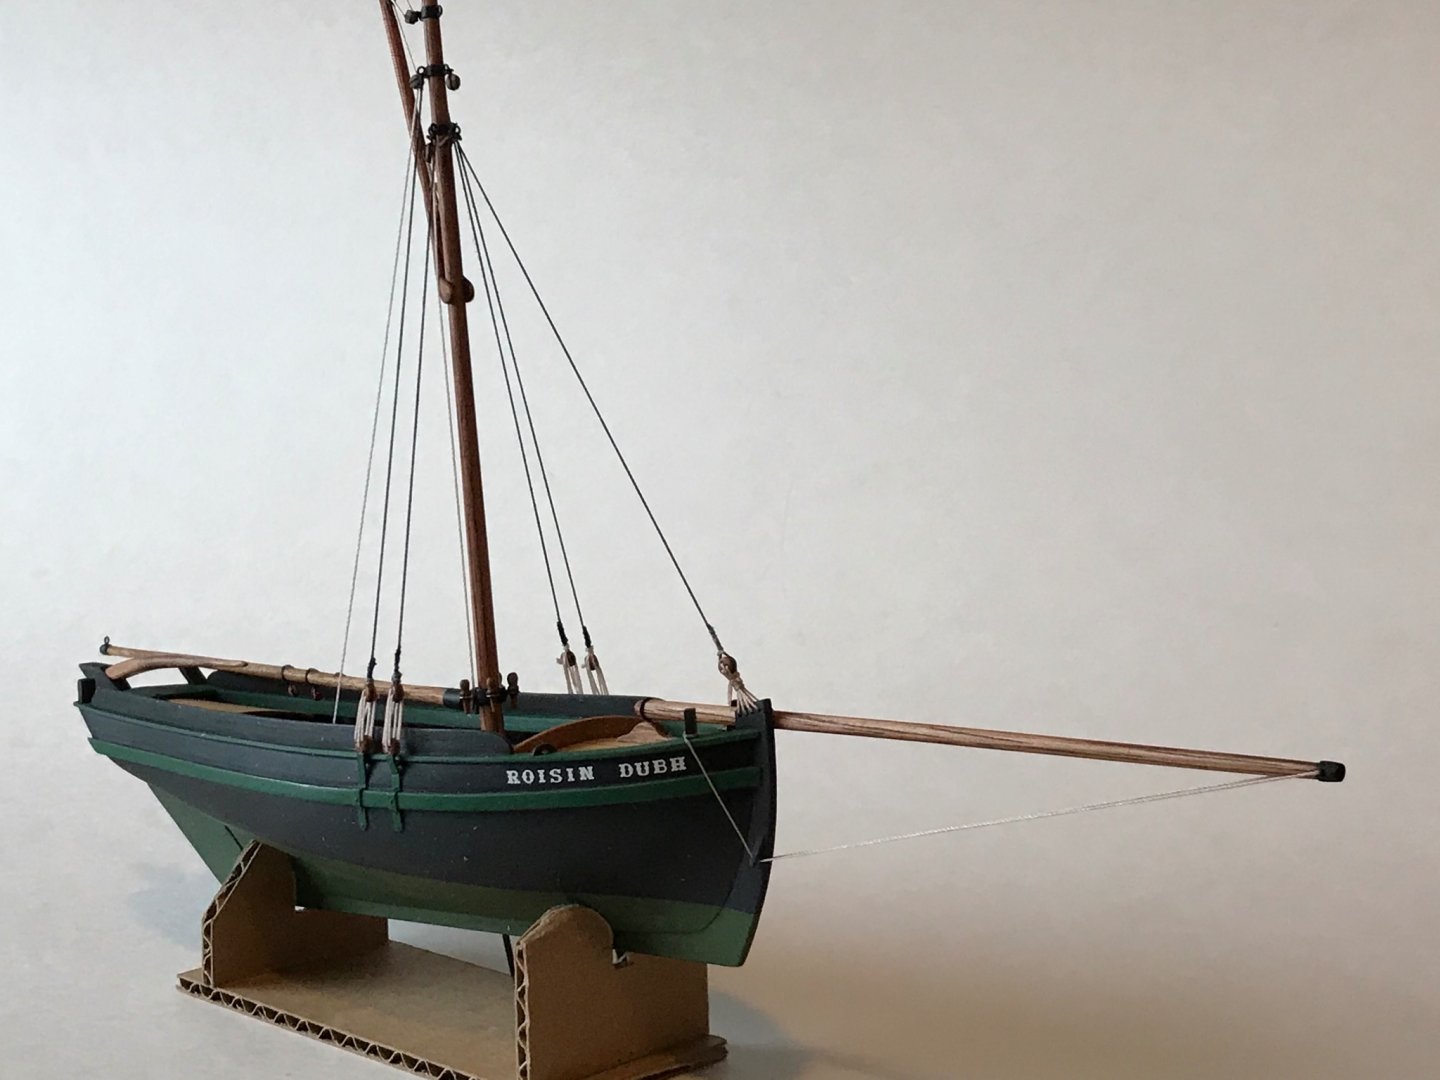
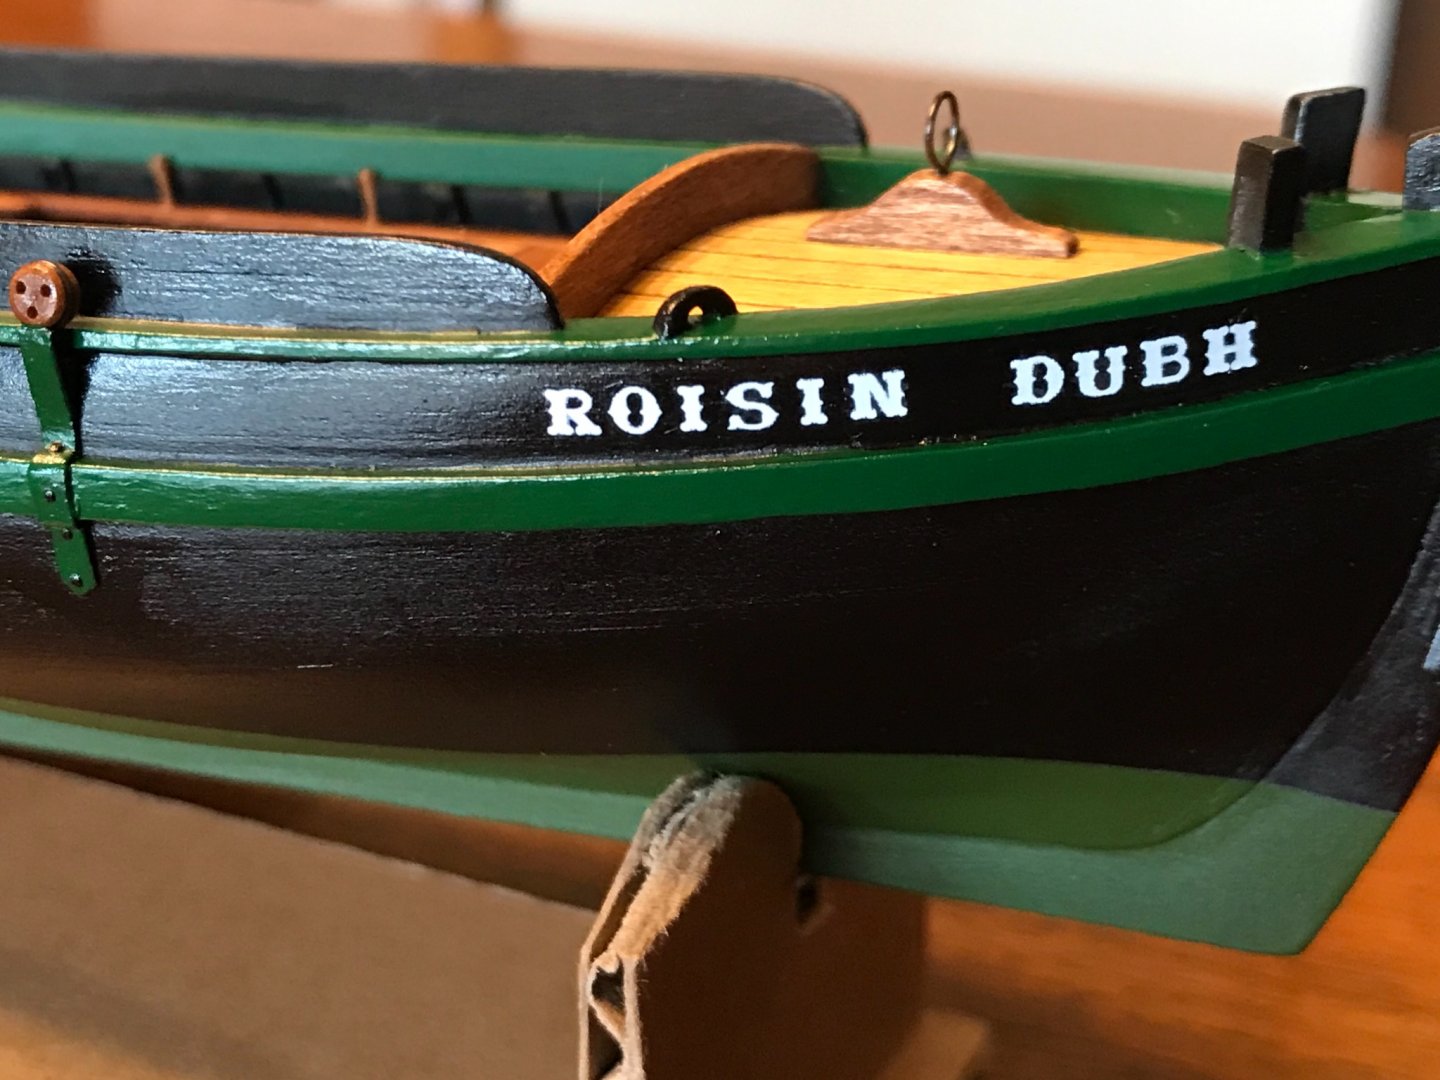
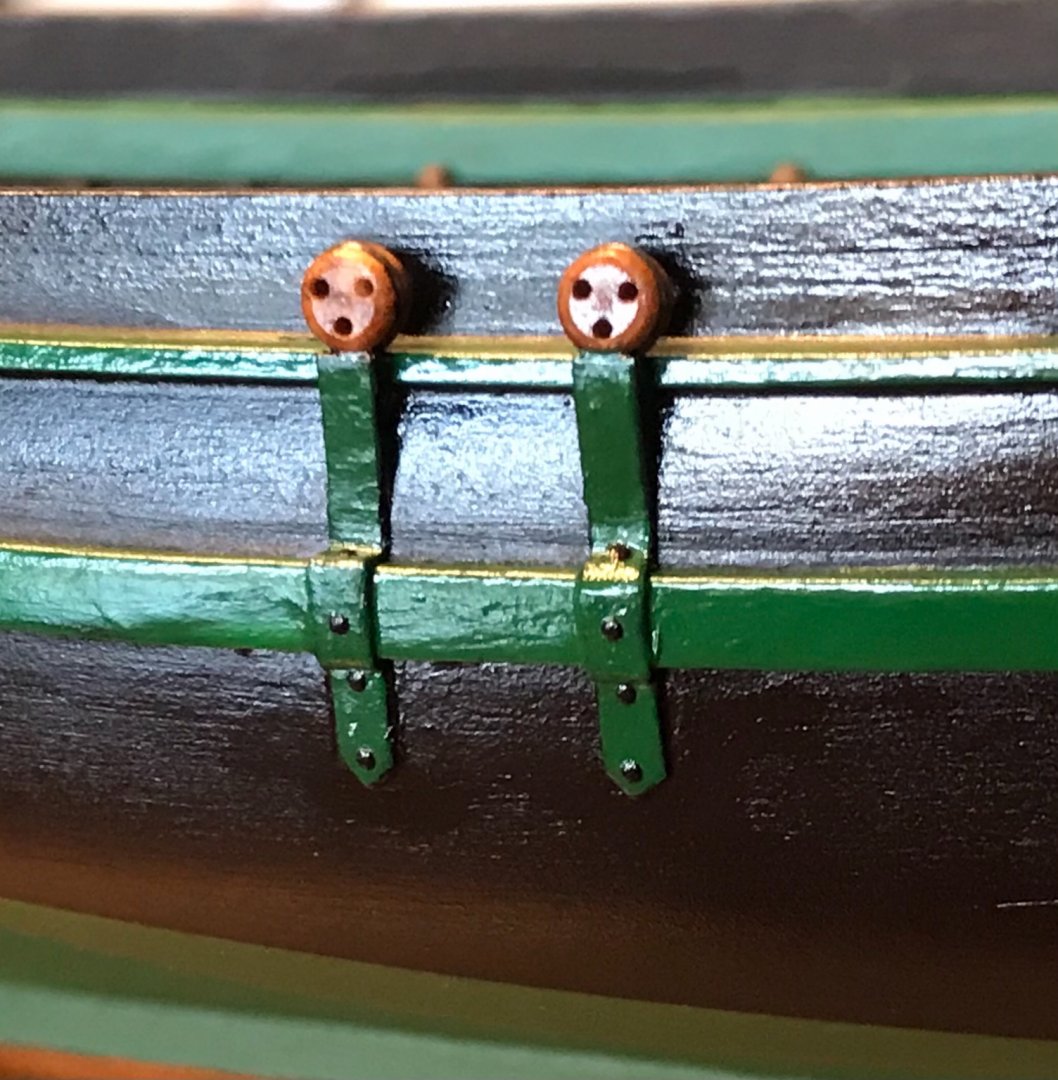
Thanks for the comments everyone! Lots of good discussion and information provided, too. Can't ask for more than that! Today was decal day. Decided to name the boat "Roisin Dubh (pronounced "Ro-sheen Dove"). It means "black rose" and was the title of an Irish political song from the 16th century, according to Wikipedia. After spraying a gloss coat all over the boat (in part to protect the paint but mostly to prepare the surface for decals), I used individual-letter decals from "Microscale." These letters are made for model railroads, and the font is called "Ornate." The gloss coat was "Pledge Acrylic Floor Wax" sprayed on with an airbrush and allowed to dry overnight. You will also notice the rivets on the chainplates. This is also a decal product for modelers from "Archer Fine Transfers" (http://www.archertransfers.com). They are little drops of resin on clear decal sheet. Three dimensional decals! They can be cut out in strips and applied quickly, or you can muddle along with individual rivets. I used the strip method. Usually, I apply them before painting, but these are not yet painted. I'll do that after they set, really well.
- 69 replies
-
- 8
-
-
- Galway hooker
- fishing
- (and 2 more)
-
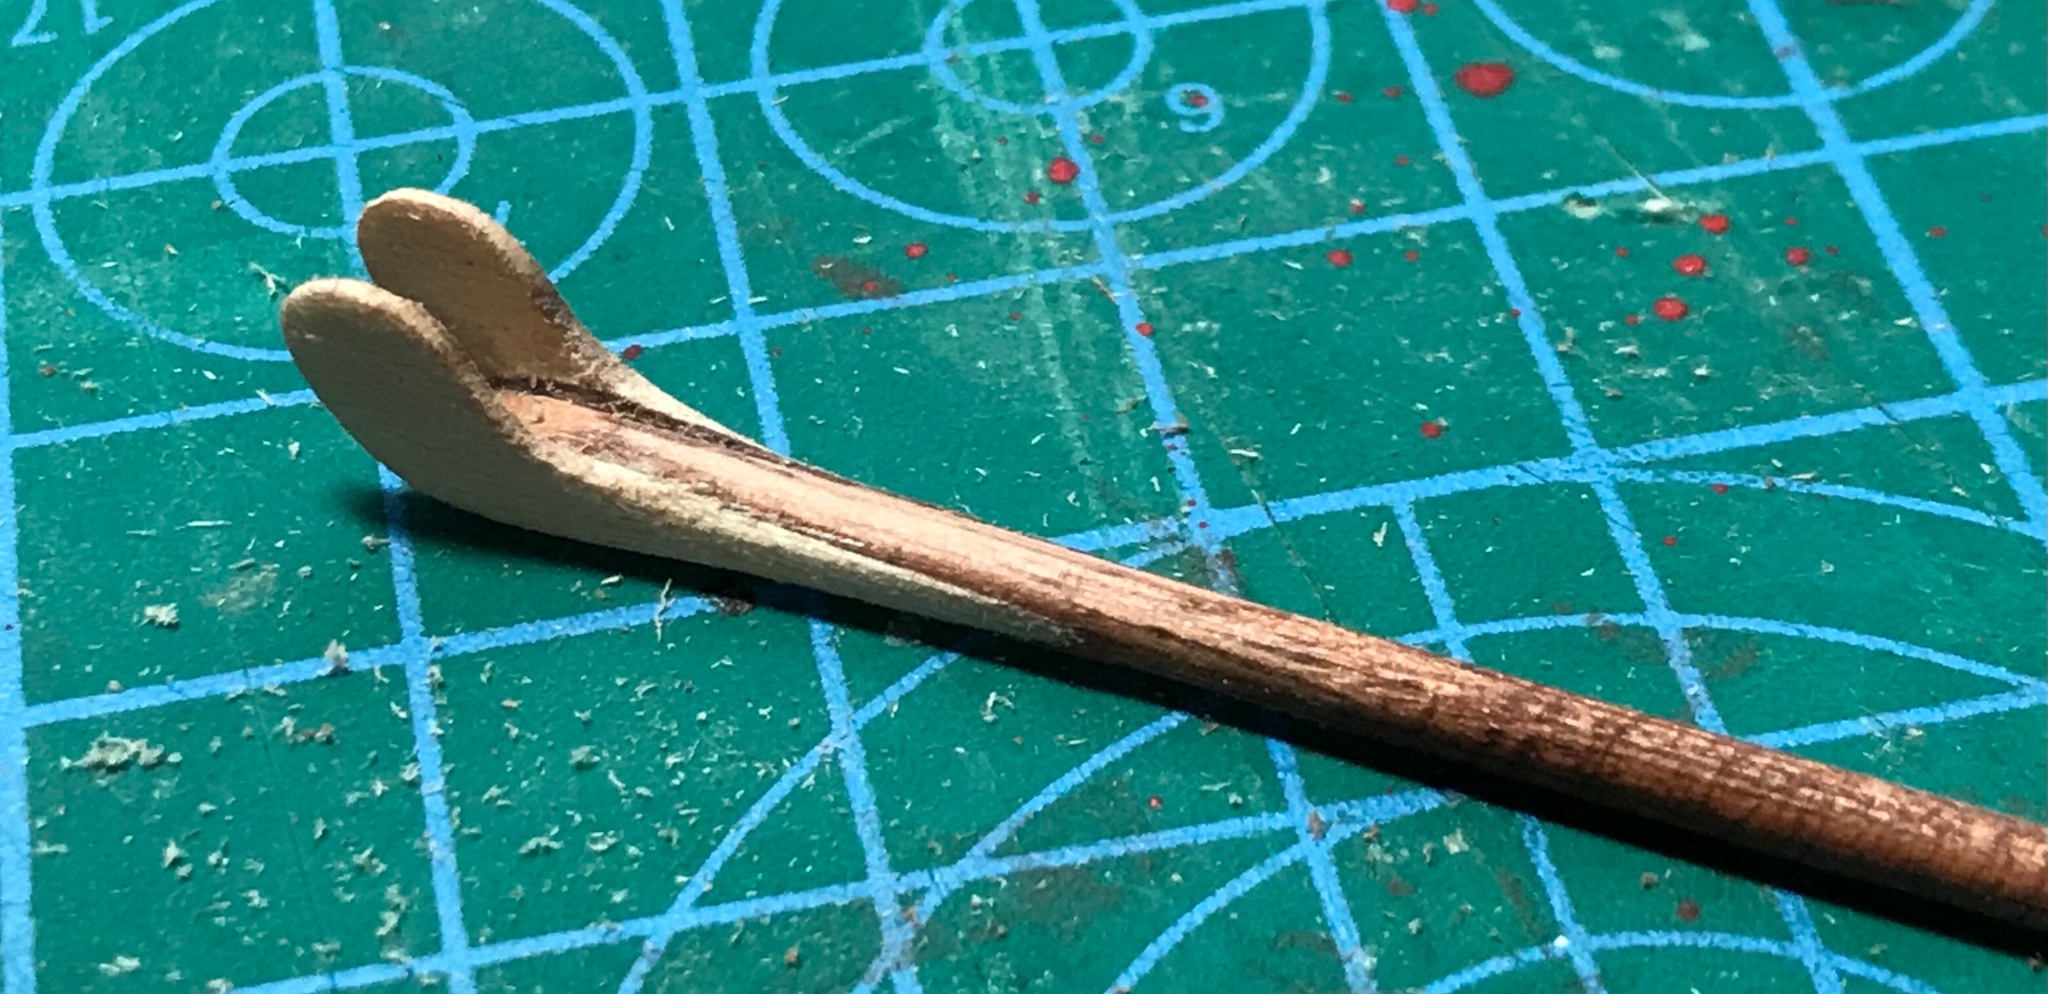
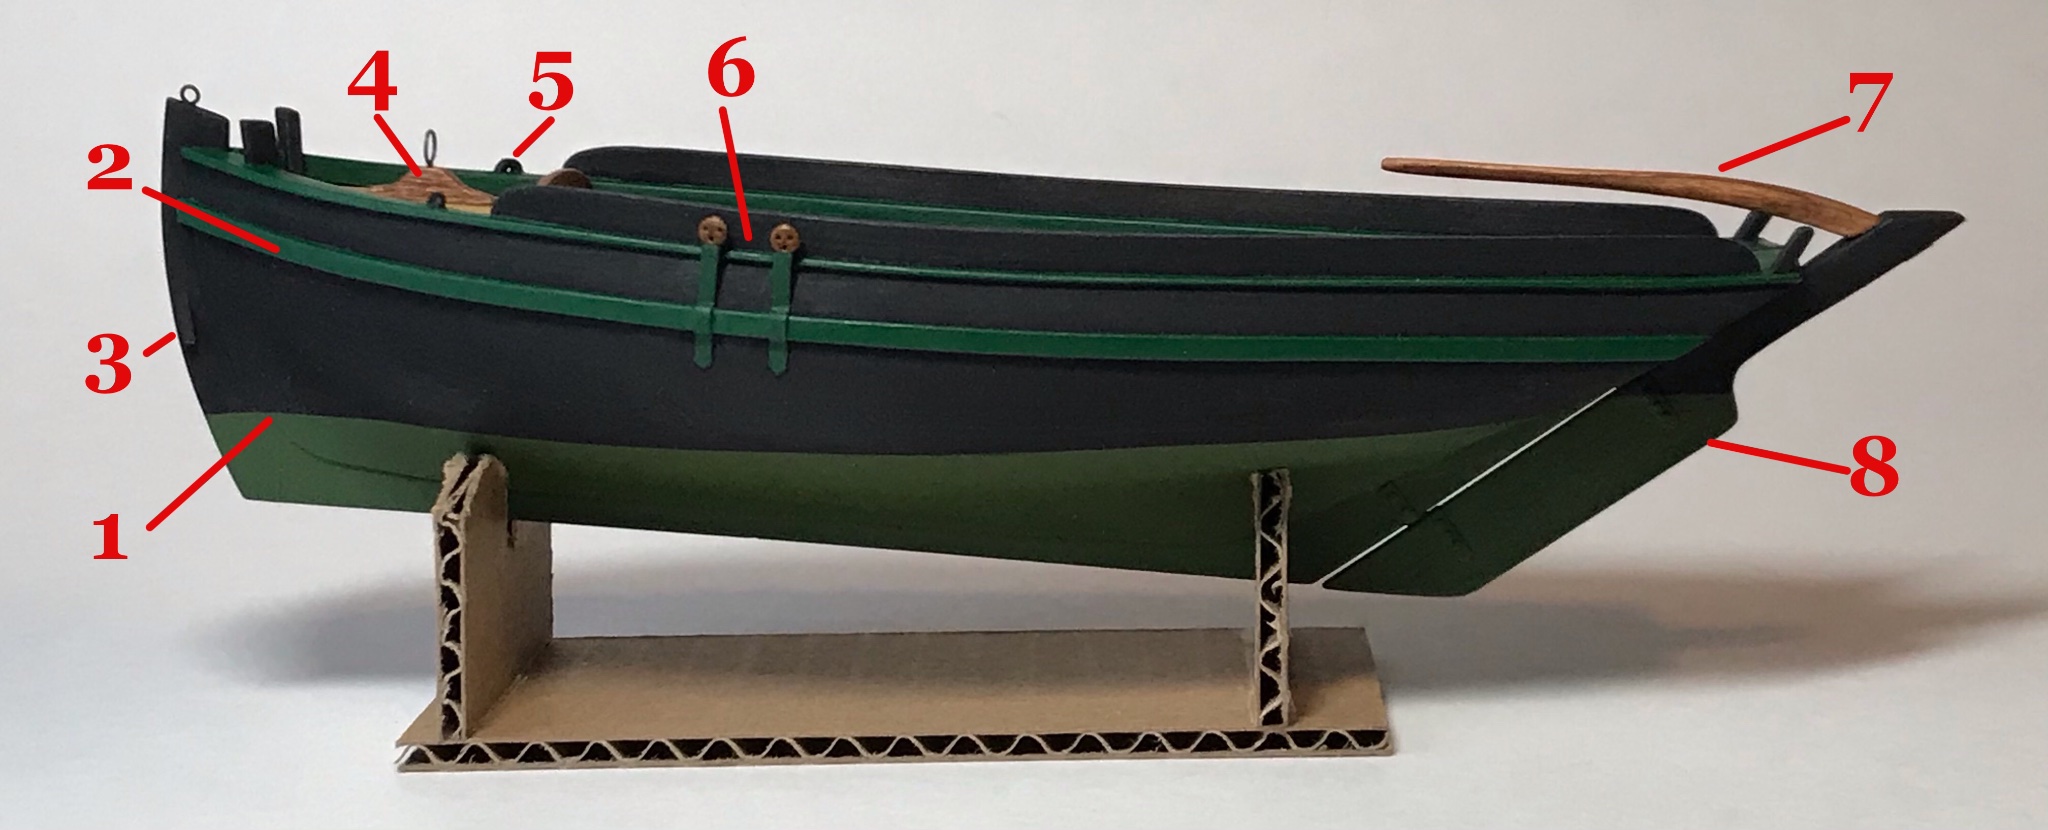
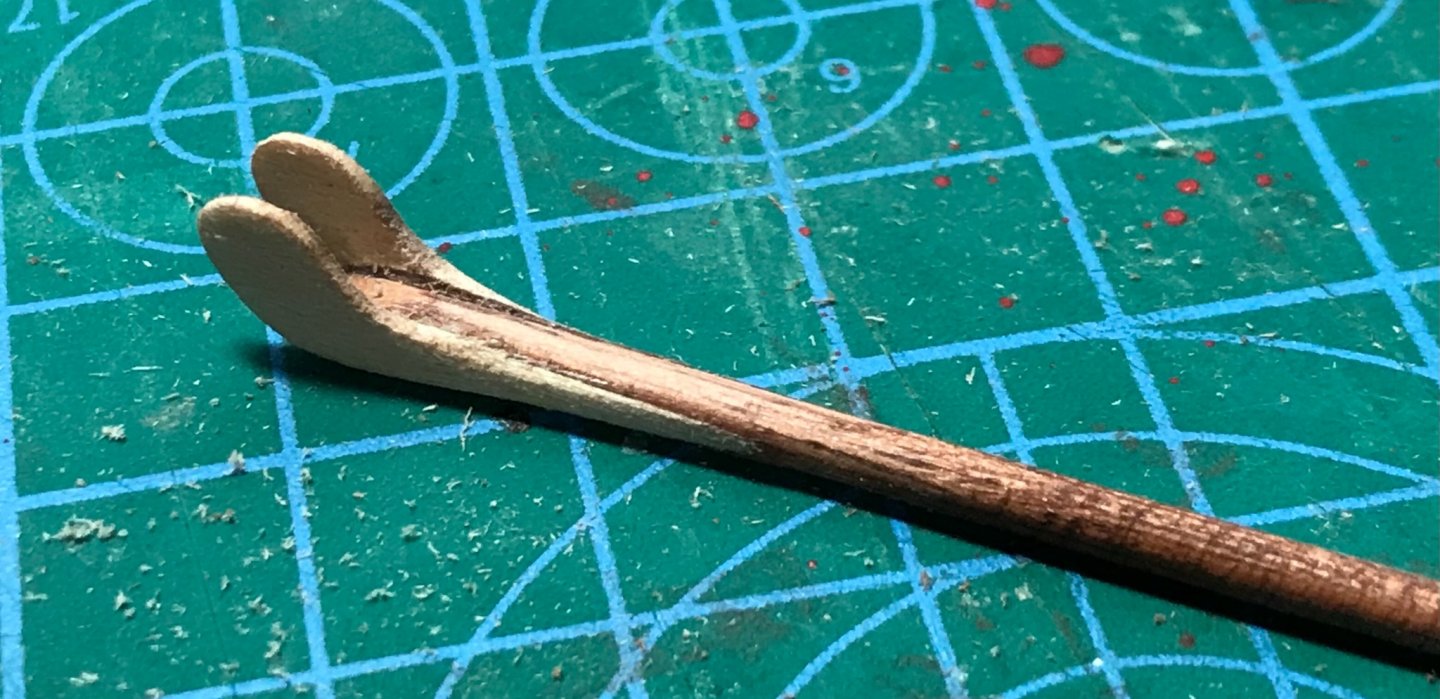
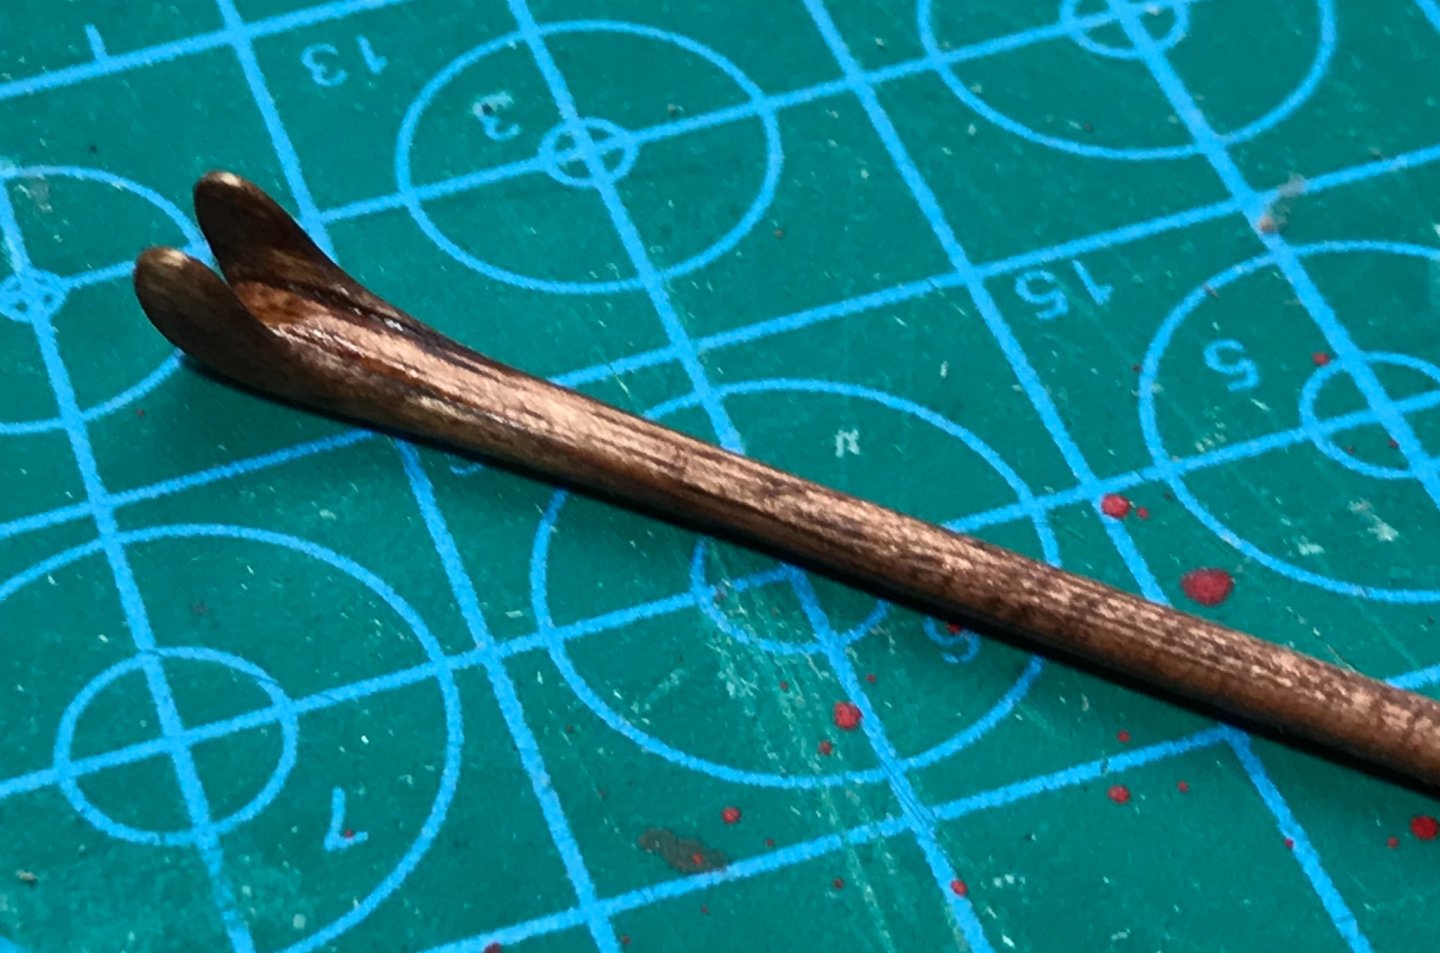
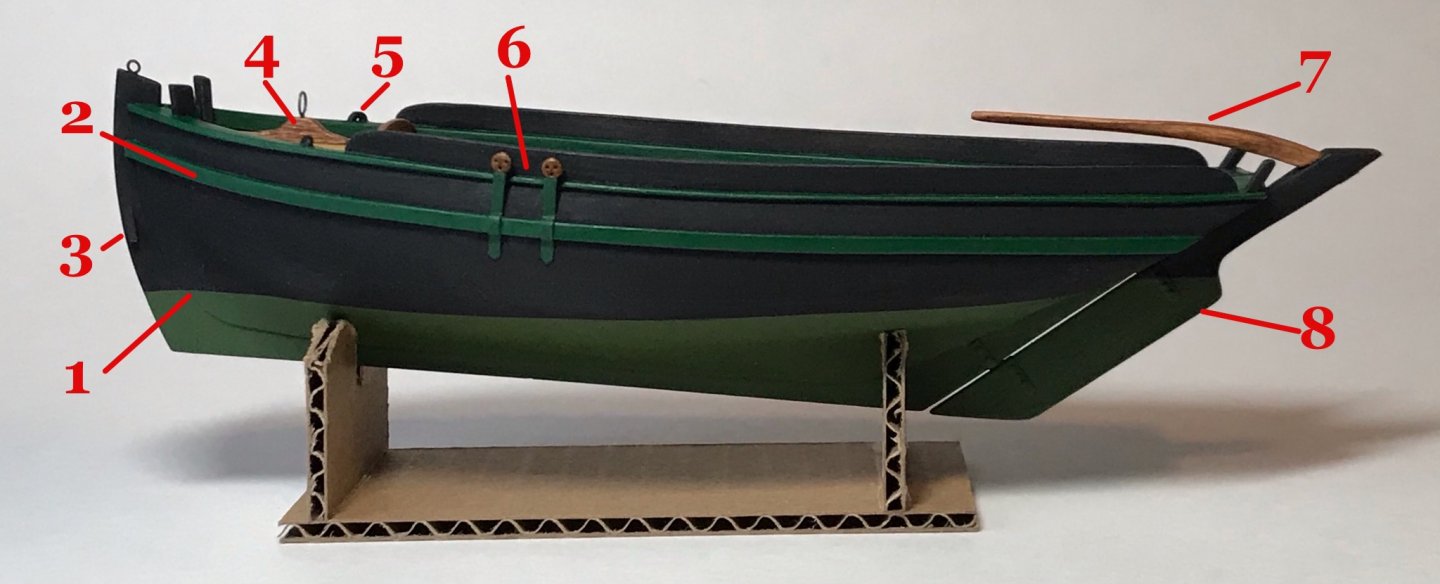
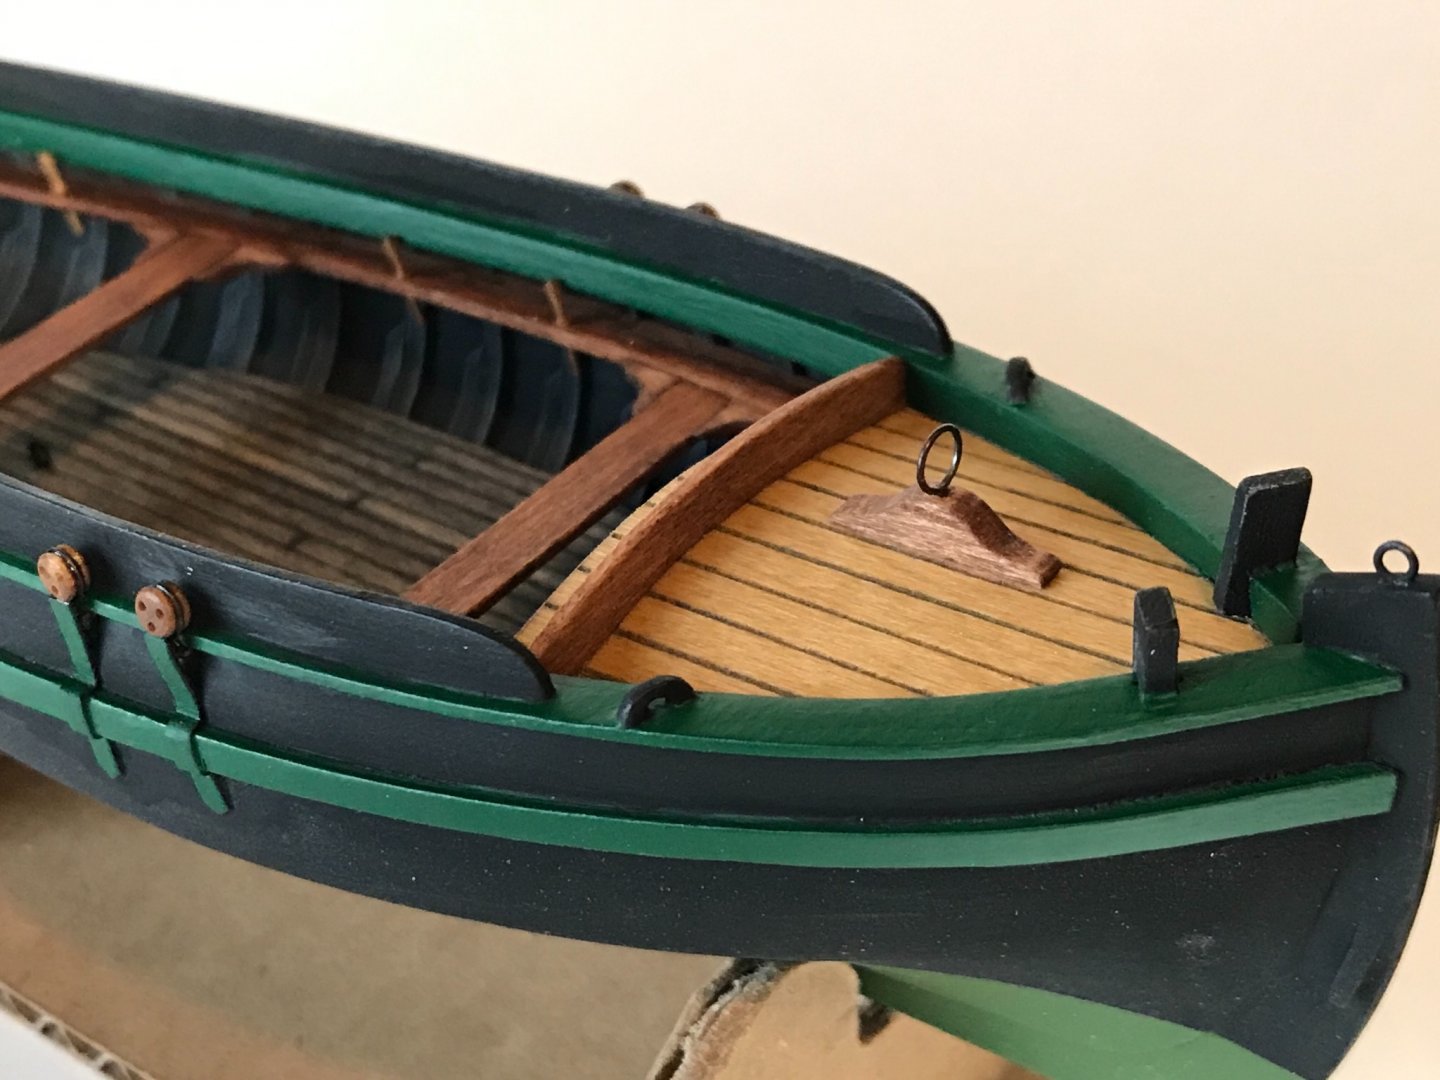
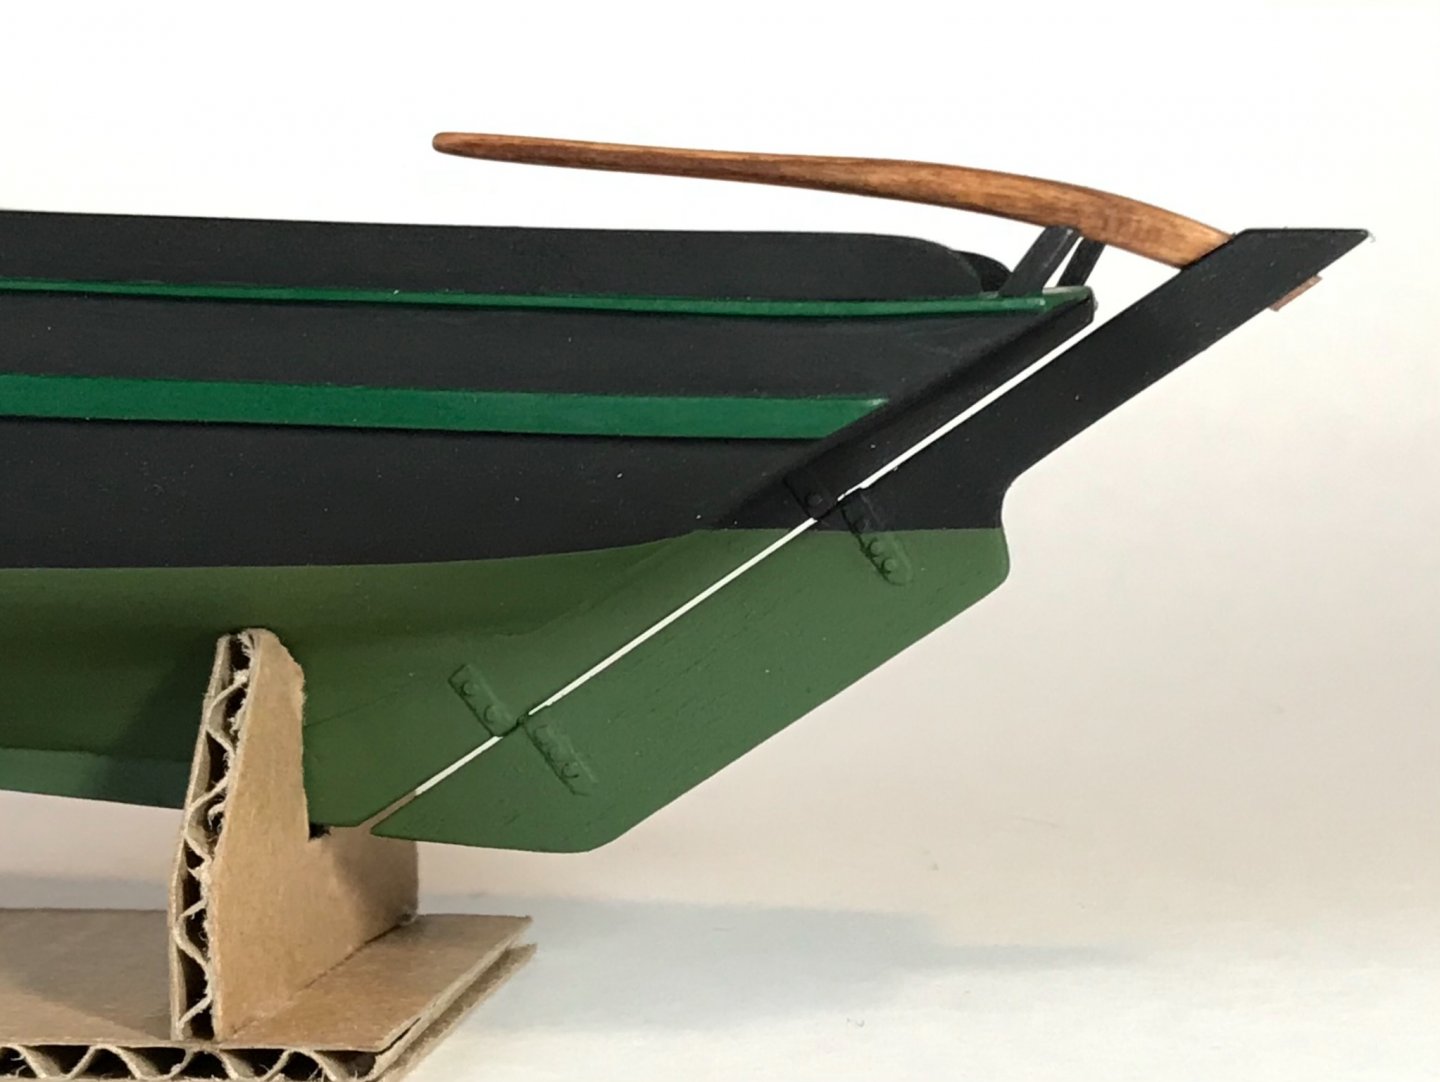
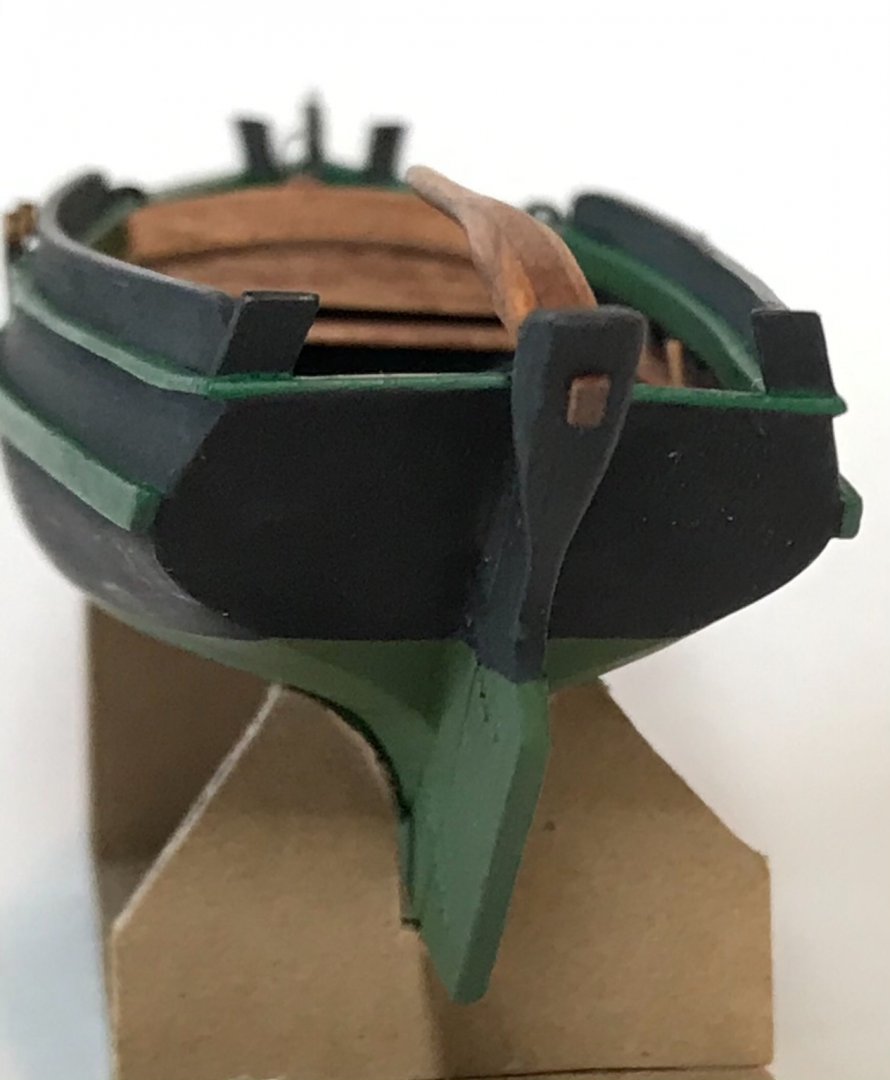
Been busy adding lots of details and painting.... Here's a description of the work done, as identified on the photo: 1. Determined the water line and painted a drab green below it. 2. Painted the trim an emerald green. (It is an Irish boat!) 3. Installed guides for bowsprit rigging (as seen on these boats). Made from basswood. 4. Carved and installed a tabernacle (is that what you call it?) for the bowsprit. 5. Added rigging/rope guides. These are half circle loops made from wood, kind of like a cleat. (Don' t know if they have an official name.) Photos show them used to guide the rope from the foot of the foresail, which is then tied-off somewhere else. 6. Deadeyes (walnut product) and chainplates (card stock) added. 7. Tiller arm (basswood strips: bent, layered, and carved). 8. Rudder fashioned from basswood sheet with construction paper hinges and copper wire rivets. The rudder is attached to the hull with thin piano wire "posts" drilled into both the rudder and the sternpost at the hinge points. No, the rudder does not turn...it's fixed.
- 69 replies
-
- 17
-
-
- Galway hooker
- fishing
- (and 2 more)
-
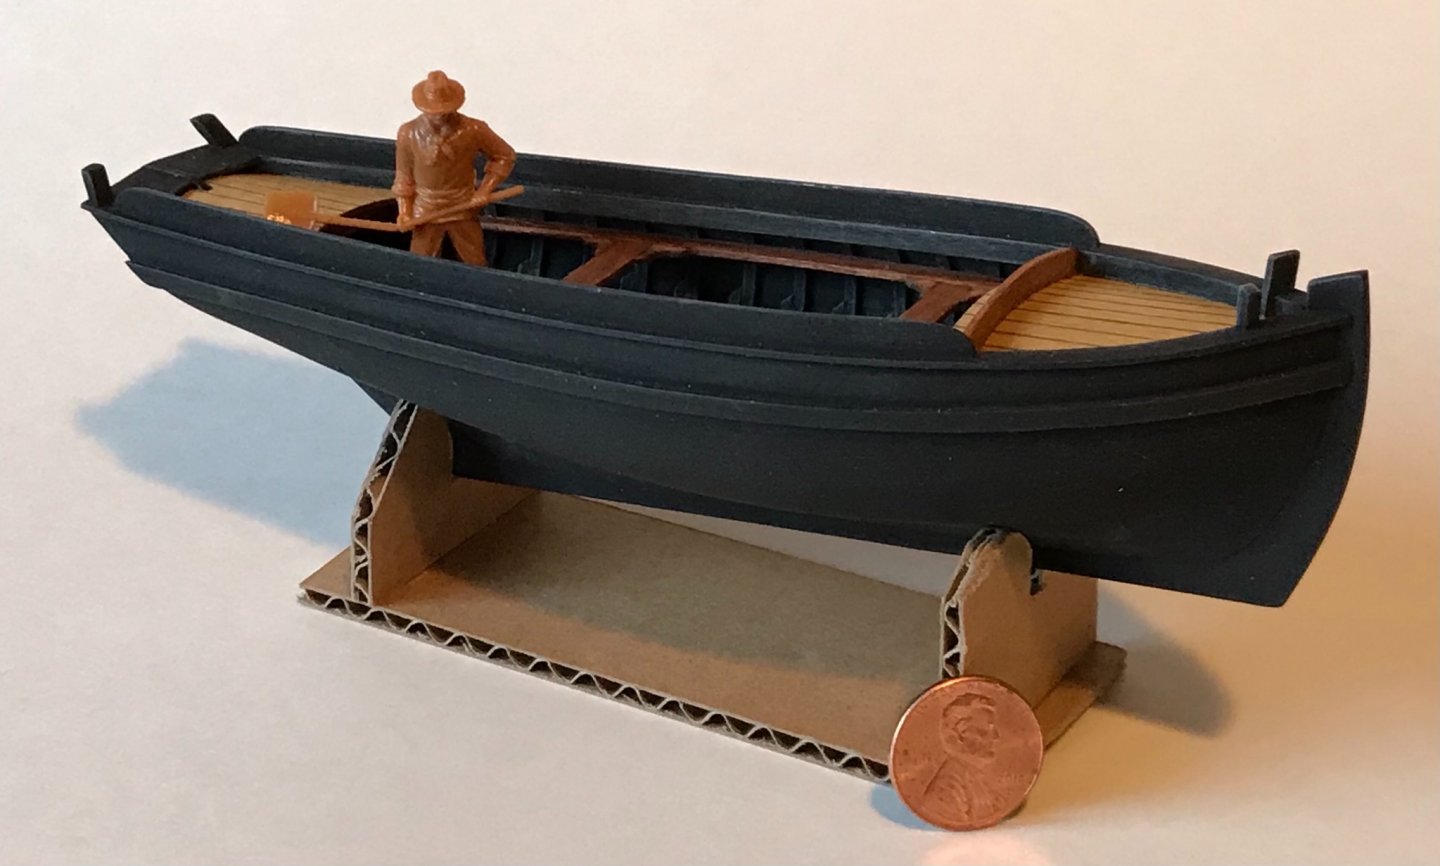
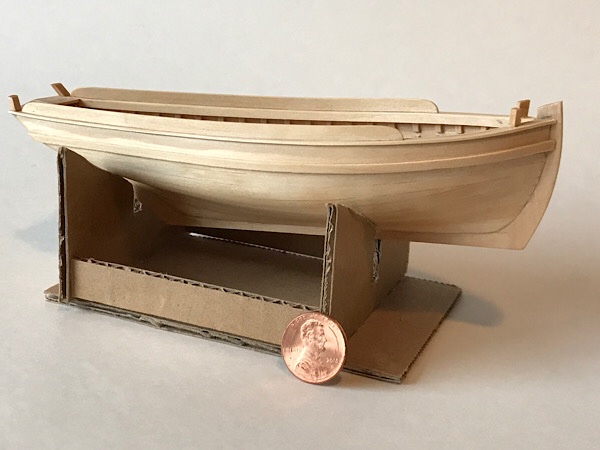
Not much change from yesterday, except the decks are now permanently attached and a splashboard was added at the focsle. A 1/48 scale miner is checking out the progress so far. His presence gives some idea of the size of these boats in real life...
- 69 replies
-
- 9
-
-
- Galway hooker
- fishing
- (and 2 more)
-
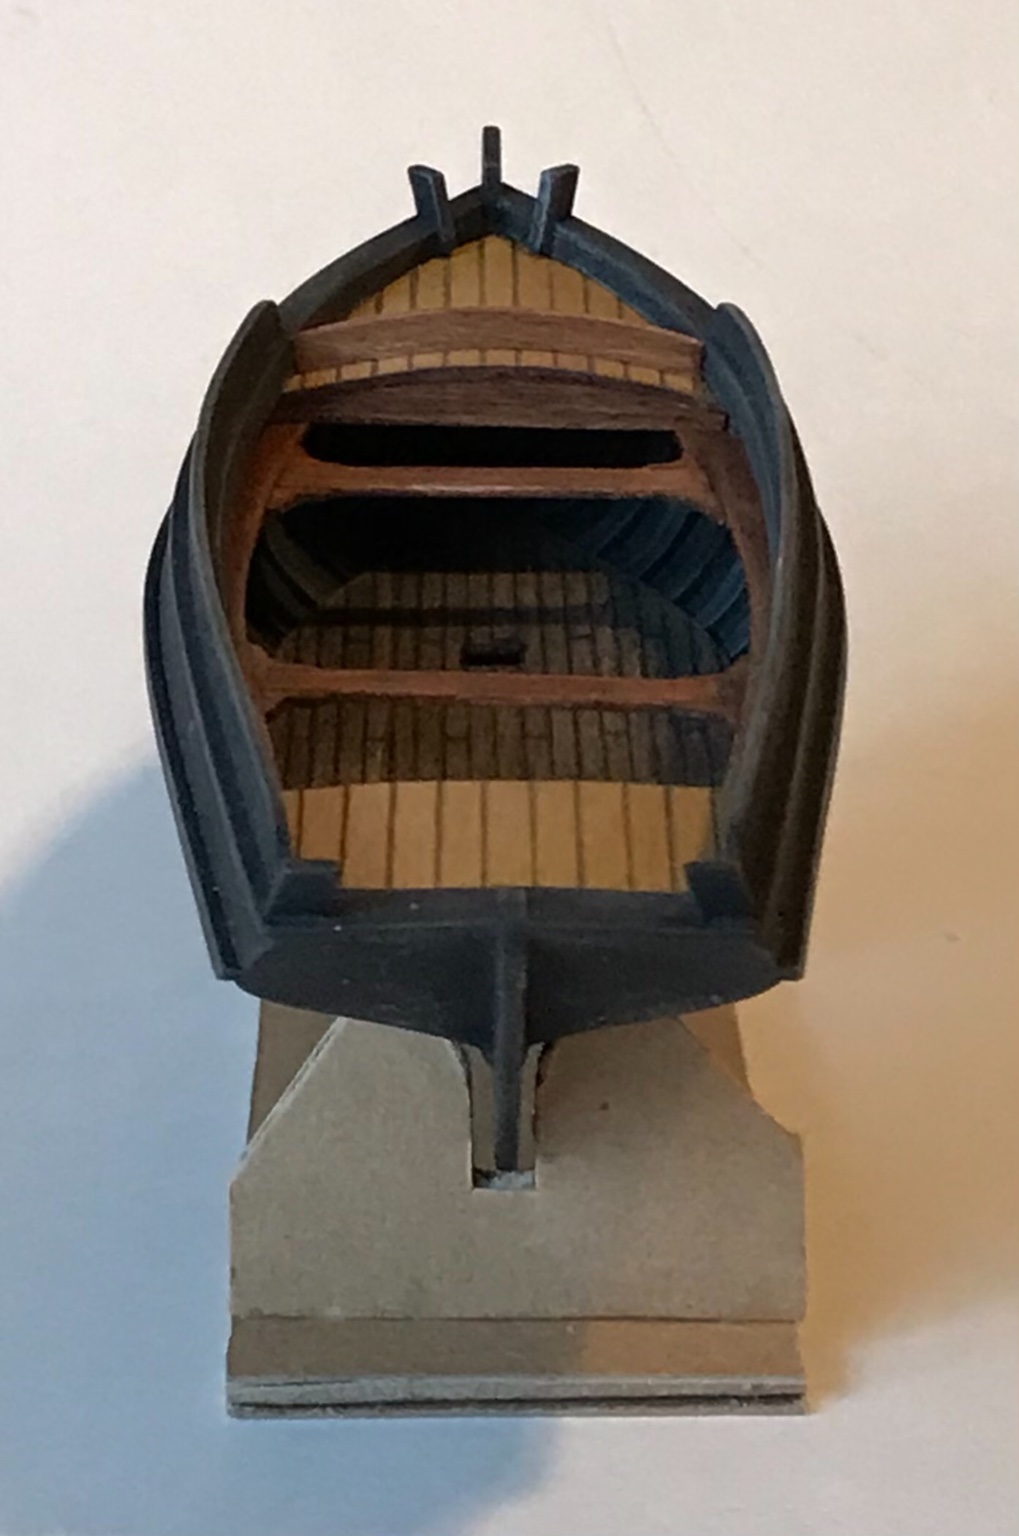
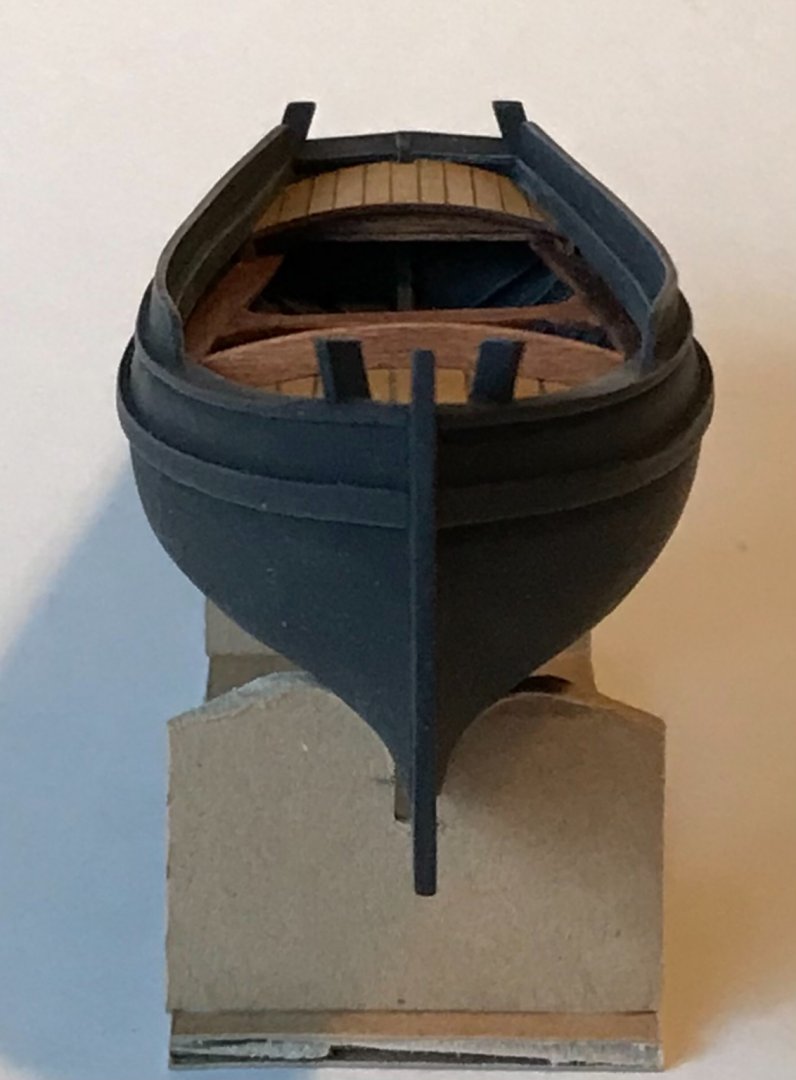
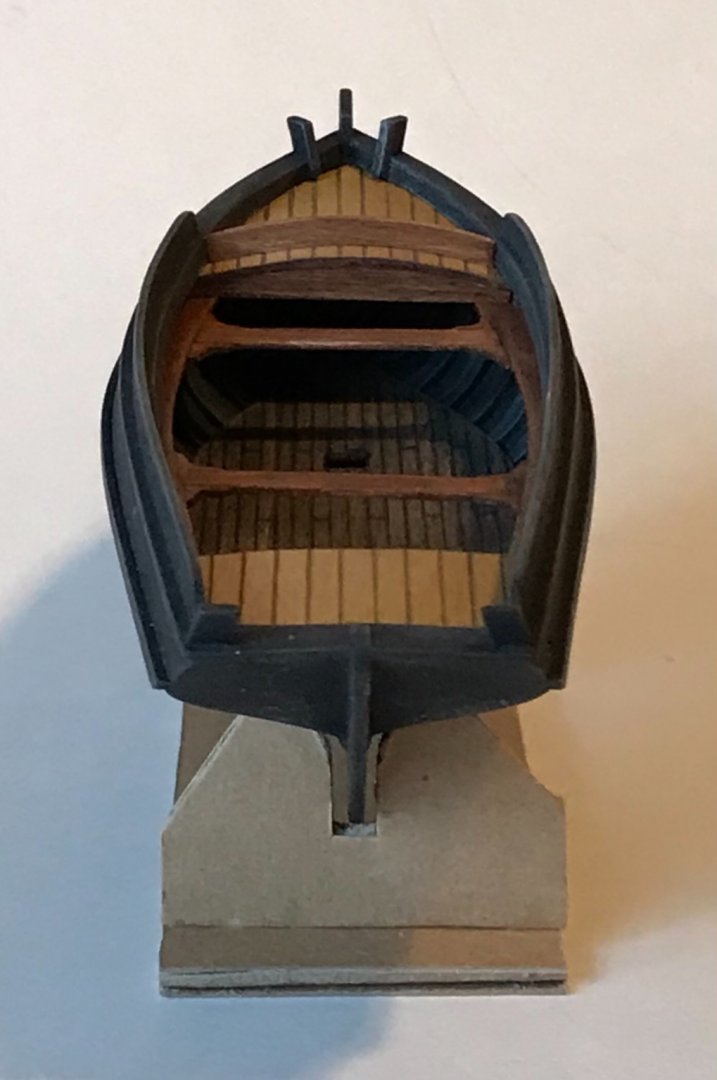
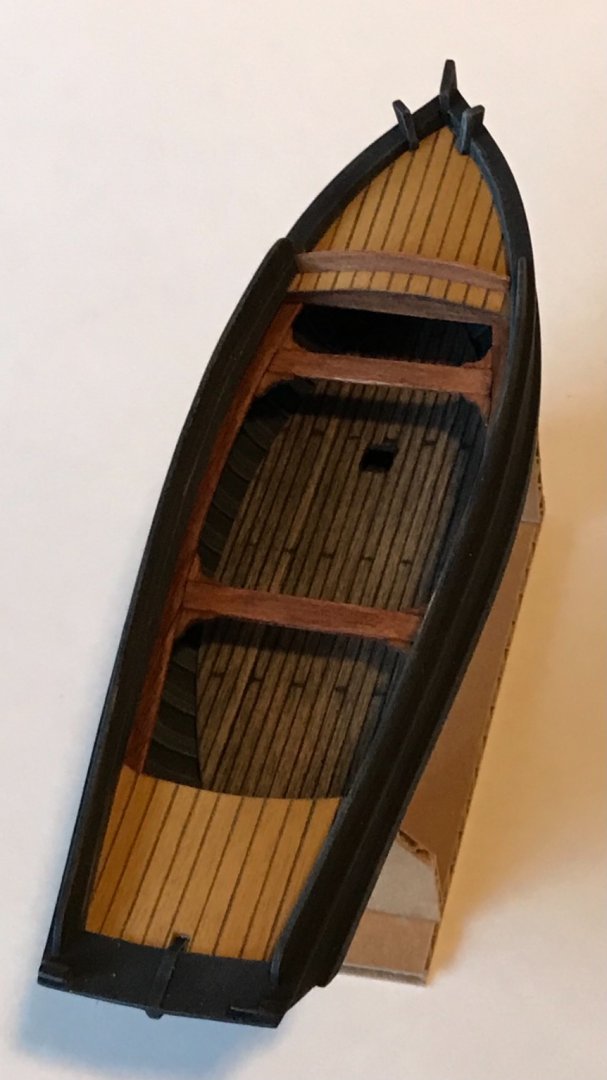
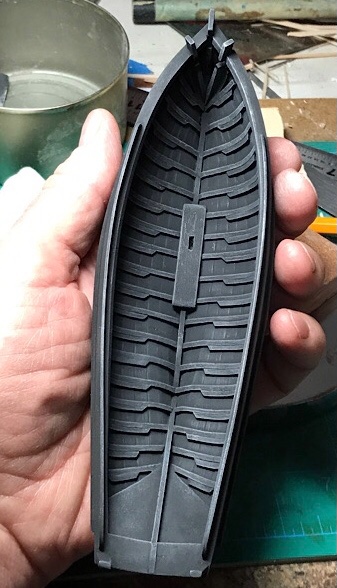
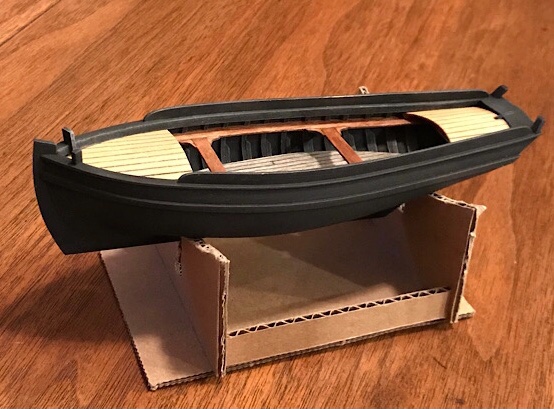
So yesterday, the hull was painted flat black with Testors' enamel paint via airbrush. Then, the interior received a light "dry-brushing" to accent the highlights. I had previously built the floor and shelves that run along the interior bulwarks. Today, both were installed. The cross "seats" were built in after the side shelves were set. Now, I'm designing the short decks... Since this model is not based on an actual boat, but is meant to be representative of the type, I have a lot of leeway in choosing specific details - like deck furniture, winches, cabin style, etc. I enjoy studying lots of photos of real boats/ships and then incorporate features I like in my construction. So, I just "build up" the model as I go. In this case, the fore and aft short decks are being tested for fit, and are not yet attached. They were made of 1/32" basswood sheet, scribed, and stained. The scribed plank lines were "filled" with a ultra fine point Sharpie marker. I need a main cross-beam at the end of the fore deck, but like where this is going so far. Stay tuned...


- 69 replies
-
- 11
-
-
- Galway hooker
- fishing
- (and 2 more)
-
Finished up the taffrail, main wales, trim, gunwale and sideboards. Should be ready to start painting!
- 69 replies
-
- 12
-
-
- Galway hooker
- fishing
- (and 2 more)
-
Over the last two days, I was able to complete the upper part of the frames, construct the "shelves," prepare the floor, and start working on the bulwark rails. The shelves and floor were fashioned from 1/32" basswood sheet. The shelves are colored with chestnut wood stain, while the floor is scribed to look like planks, and stained with a mixture of India ink, isopropyl alcohol, and water. I do not know if there is a name for what I call the "shelves." It appears that all classes of Galway Hookers have them, and they are connected with cross pieces (I have yet to build the cross pieces). The final structure appears to serve as bracing and/or seats - almost like the framework for decking. The railing done so far is a 1/16" basswood strip set interior and above the planking and the tops of the frames. A 3mm wide strip of 1/32" basswood sheet was attached interior to that 1/16" strip, covering the tops of the frames a little bit. I still have to fashion the outer (exterior) trim to the rail. The shelf and floor pieces are not glued in yet. Once the railing is done, I plan on painting the whole hull black before installing the floor and finishing the shelf and other interior features. I read somewhere, that the hulls of these boats were heavily tarred, hence the typical black color, inside and out...


- 69 replies
-
- 13
-
-
- Galway hooker
- fishing
- (and 2 more)
-
Great info Bob Cleek! Kind of mind boggling. My course is pretty much set for this "build." With all the new data, I hope others can research the building of a fabulous model!
- 69 replies
-
- 1
-
-
- Galway hooker
- fishing
- (and 2 more)
-
Thanks for all the information Bob Cleek. You certainly have a depth of knowledge on these boats! I must confess, the process of removing the bulkheads was learned from fellow member Javier Baron. He does beautiful and amazing work in much smaller scales! The youtube videos you shared are great! I have been studying still photos of boats, and trying to copy (generally) what I see. There appears to be a wide variety (probably due to the different classes and ages of boats). I'm trying to focus on historic photos from the internet, but those pictures are scant for close-up detail, so I examine all eras. These videos really help!
- 69 replies
-
- 1
-
-
- Galway hooker
- fishing
- (and 2 more)