CDW
-
Posts
7,730 -
Joined
-
Last visited
Content Type
Profiles
Forums
Gallery
Events
Everything posted by CDW
-

Shelby 427 S/C Cobra by CDW - FINISHED - Fujimi - 1:24 Scale
CDW replied to CDW's topic in Non-ship/categorised builds

- 67 replies
-
- 15
-

-

-
Shelby 427 S/C Cobra by CDW - FINISHED - Fujimi - 1:24 Scale
CDW replied to CDW's topic in Non-ship/categorised builds
My advantage is a dedicated spray booth in a separate building outside. I agree, without the appropriate gear, leave it alone. I bought this quart size can and a pint of hardener over a year ago and it’s still fine. Paid somewhere around $65 for it. Have used it a number of times on various projects. Custom Creations Creative brand. PS: I see now where my source is selling a 5 liter can with a half-size of hardener for $100, so my memory of $65 for my liter (I said quart earlier) size was probably more like $45 instead of $65, but whatever. You get ripped off when you buy things like this in tiny, small, "hobby sized" bottles. Another thing....keep your hardener far away from the base and use every precaution not to introduce and hardener whatsoever to your can of base. It's so easy to accidentally contaminate the entire batch and if you do, it will harden it in nothing flat. -
Shelby 427 S/C Cobra by CDW - FINISHED - Fujimi - 1:24 Scale
CDW replied to CDW's topic in Non-ship/categorised builds
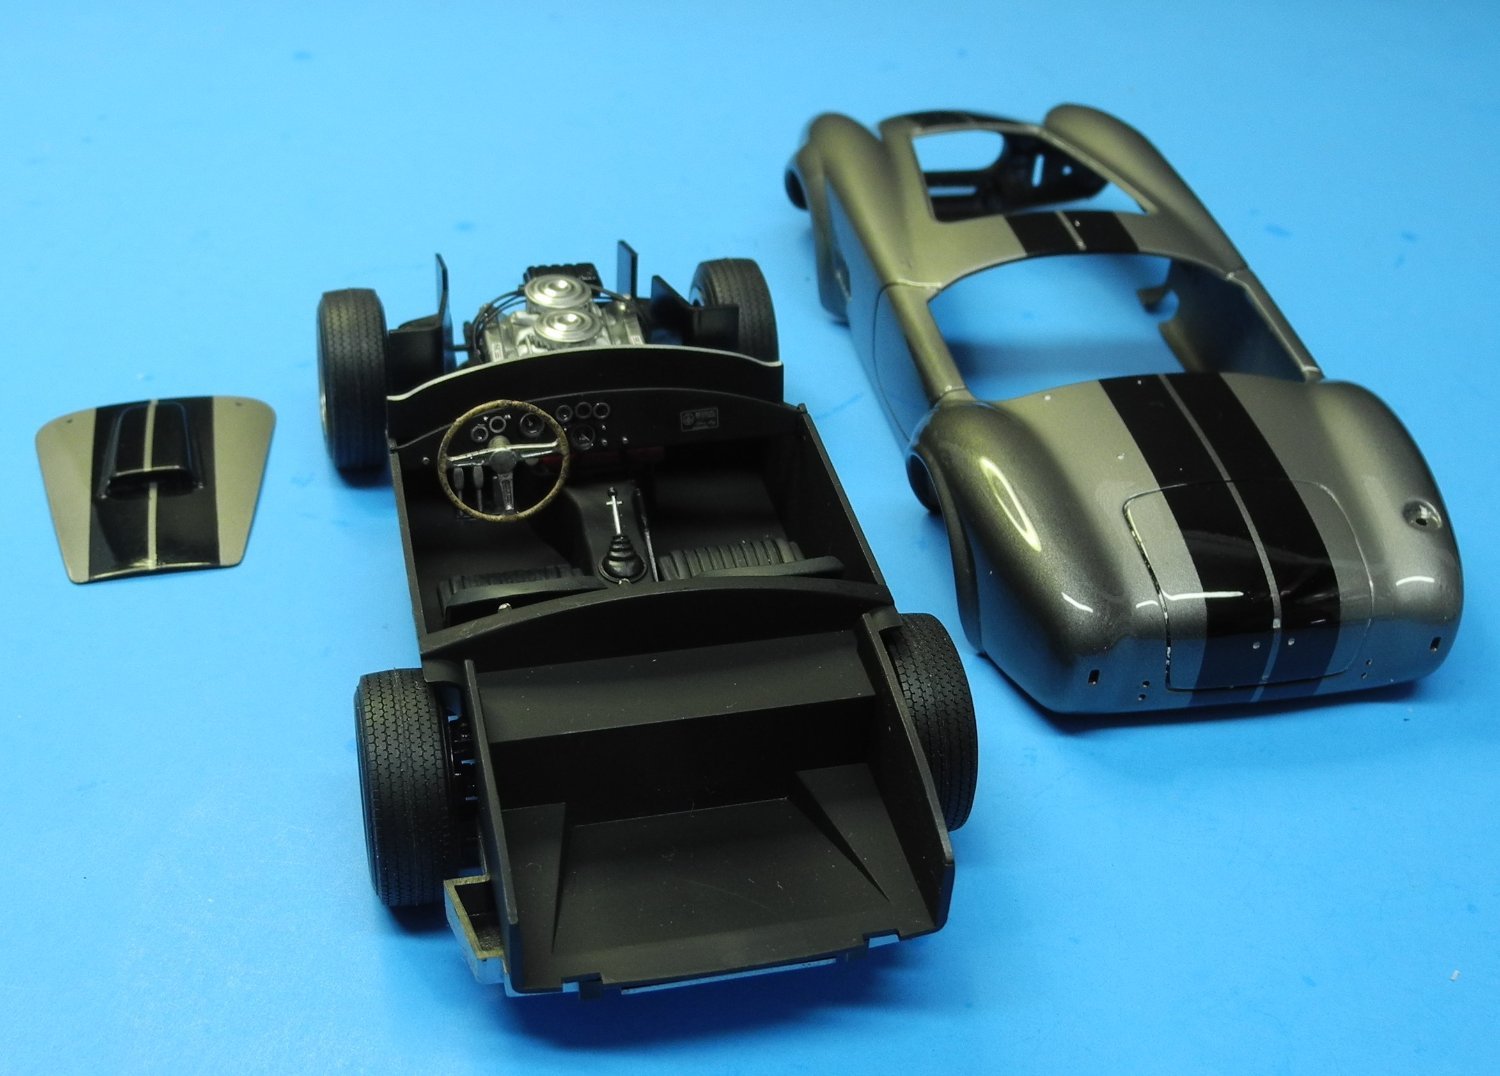
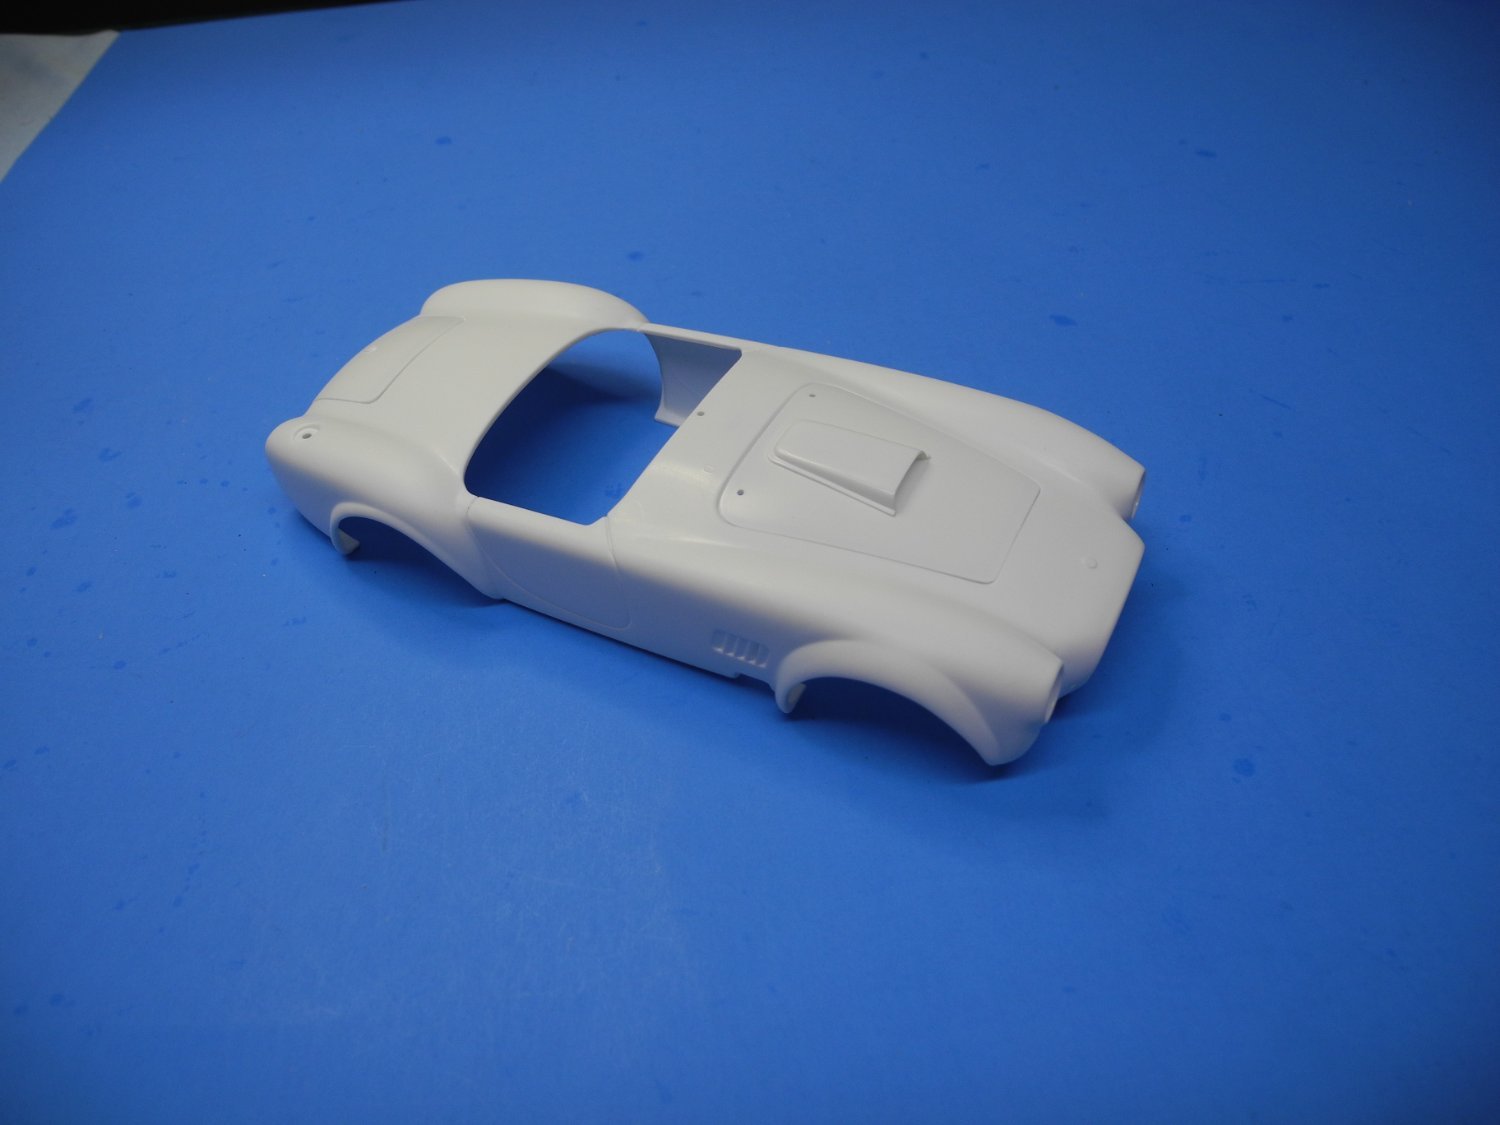
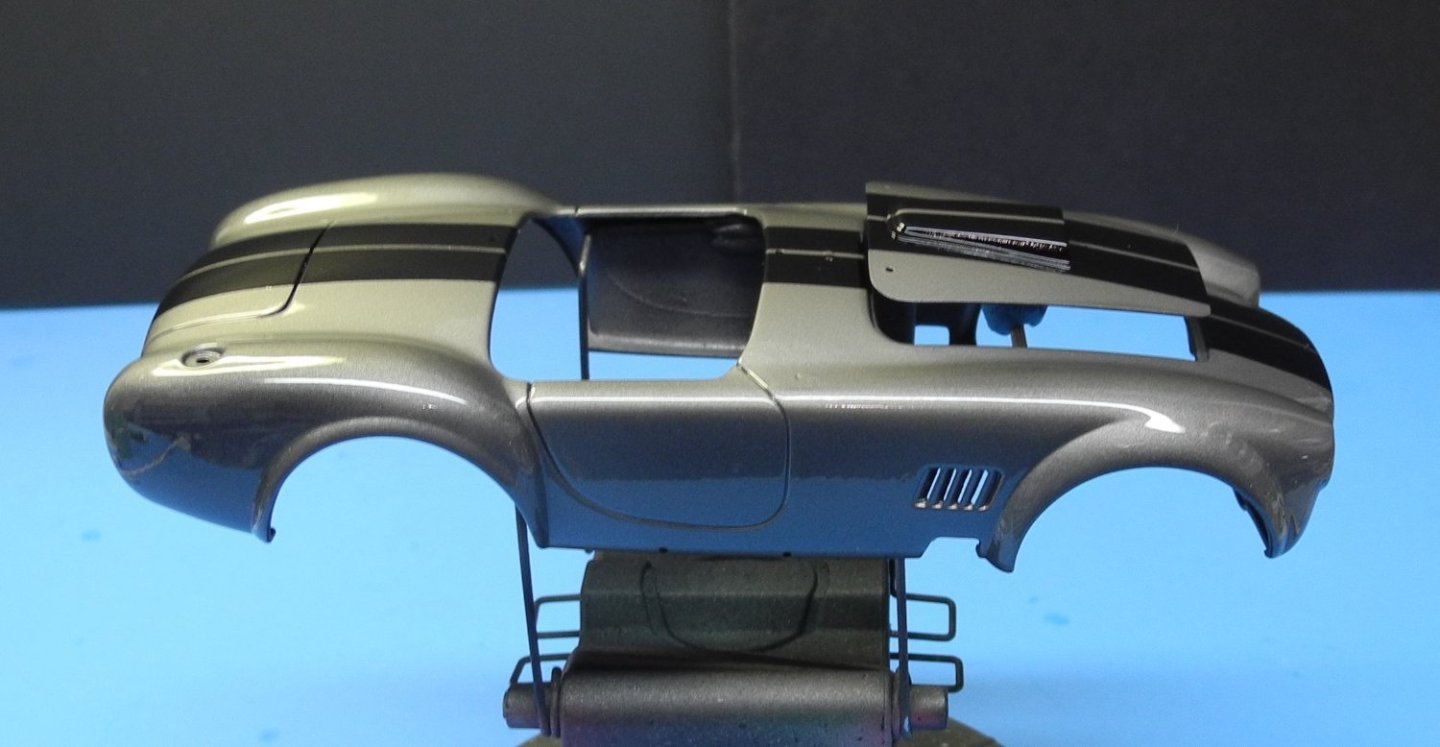
For the dashboard, I drilled out the molded, raised detail gauges, used the kit gauge decals on a backing sheet made of thin styrene which was then glued to the backside of the dashboard (to show the gauges through the holes). Next used some generic photo etch rings that fit the holes. everything else in the interior is box stock.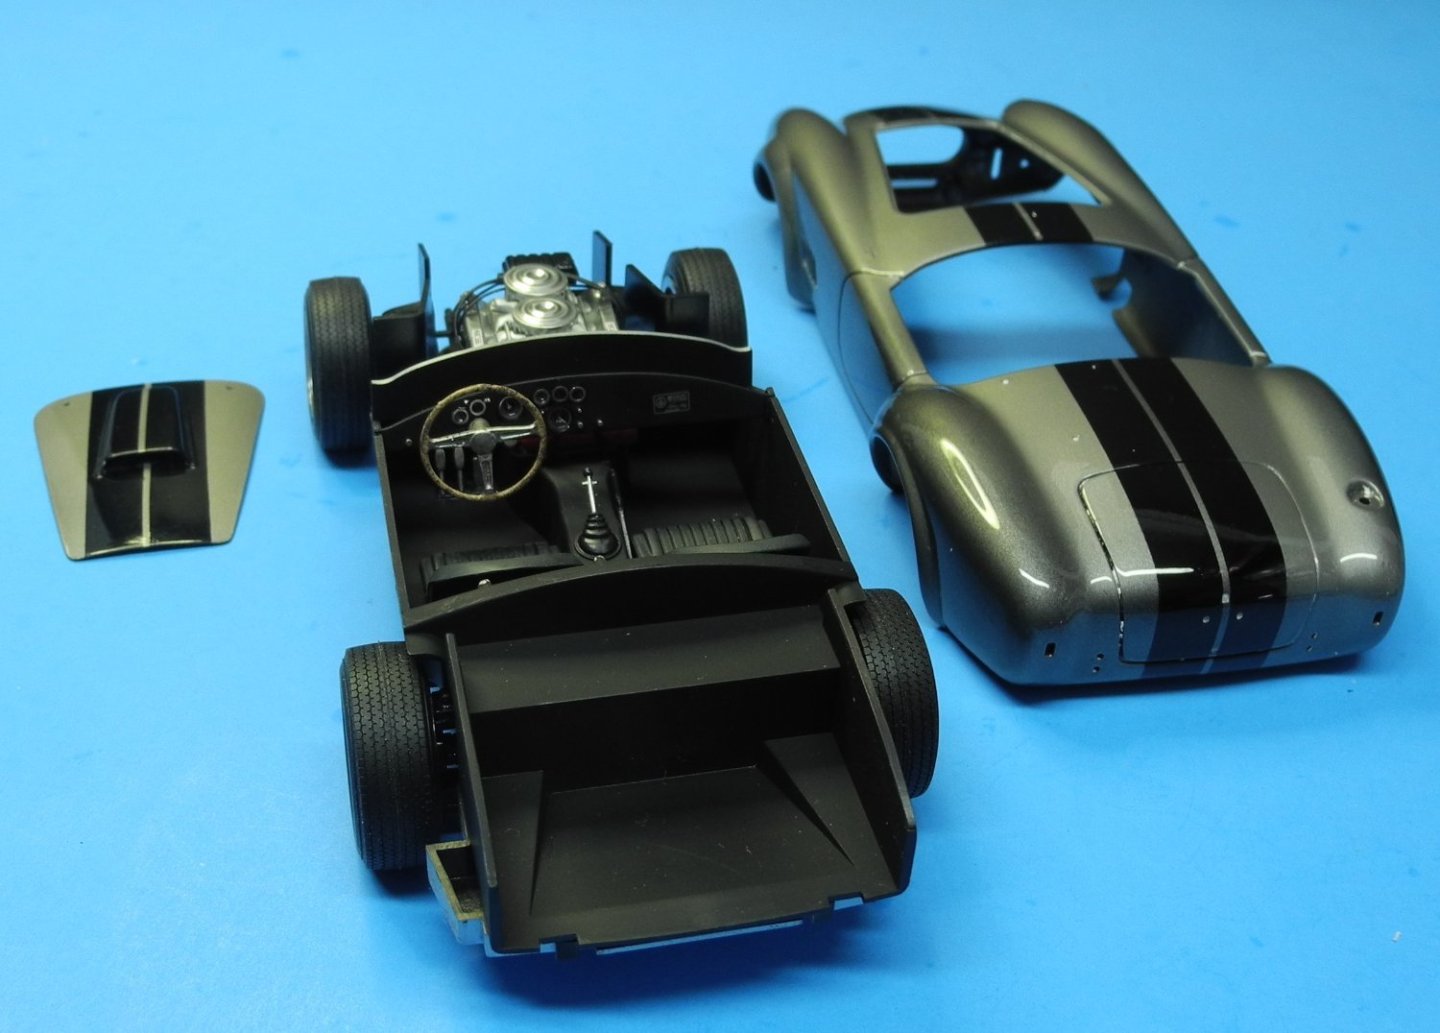
- 67 replies
-
- 10
-
-
Shelby 427 S/C Cobra by CDW - FINISHED - Fujimi - 1:24 Scale
CDW replied to CDW's topic in Non-ship/categorised builds

-
Shelby 427 S/C Cobra by CDW - FINISHED - Fujimi - 1:24 Scale
CDW replied to CDW's topic in Non-ship/categorised builds
A dry-fit. Finished the suspension, lowered it a bit by cutting and repositioning this and that. Out of the box, the model would sit a little higher than you see it here, by 1mm all around.

- 67 replies
-
- 13
-
-
-
Shelby 427 S/C Cobra by CDW - FINISHED - Fujimi - 1:24 Scale
CDW replied to CDW's topic in Non-ship/categorised builds
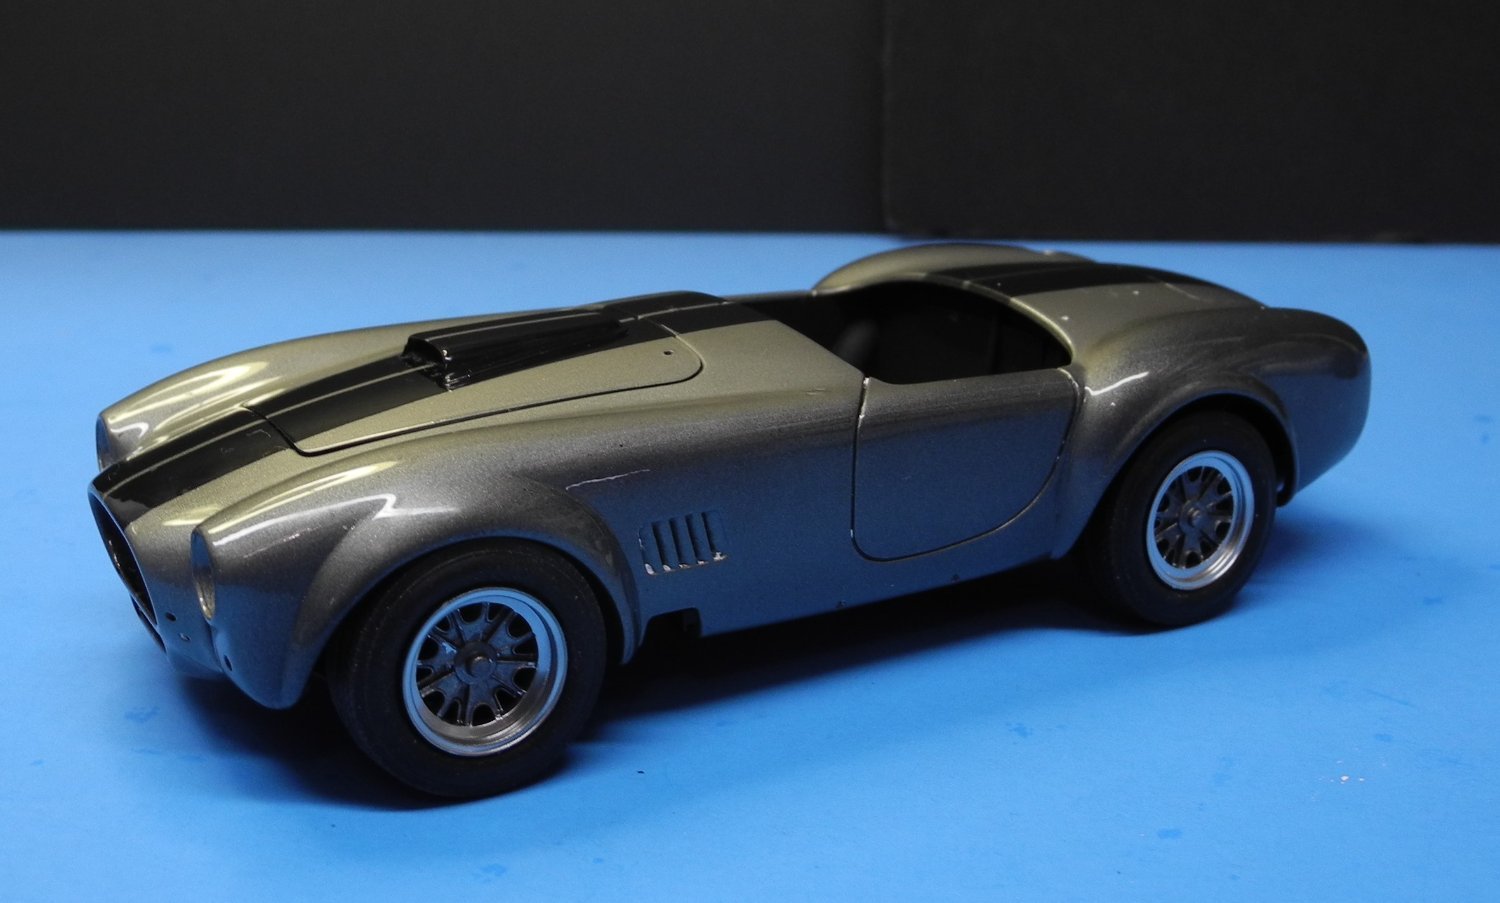
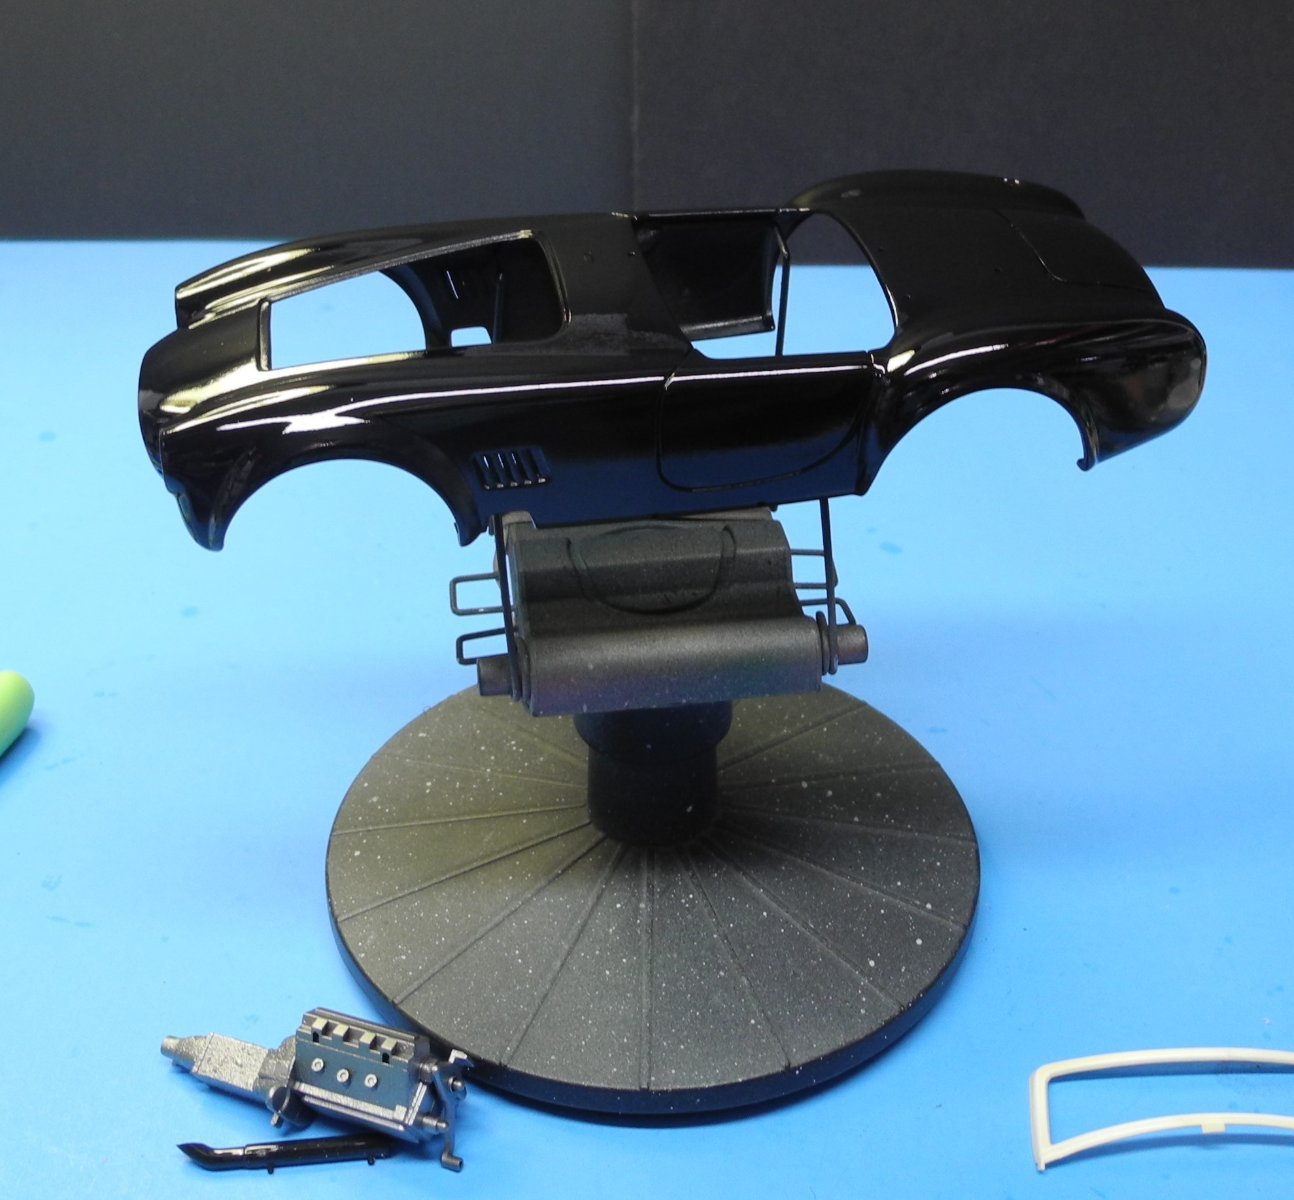
It’s next to impossible to avoid all specks of dust or even a grain of dirt in a clear coat. So this is pretty much standard procedure to fix it. One must be very careful not to burn through the clear coat or else another clear coat will be needed. -
Shelby 427 S/C Cobra by CDW - FINISHED - Fujimi - 1:24 Scale
CDW replied to CDW's topic in Non-ship/categorised builds
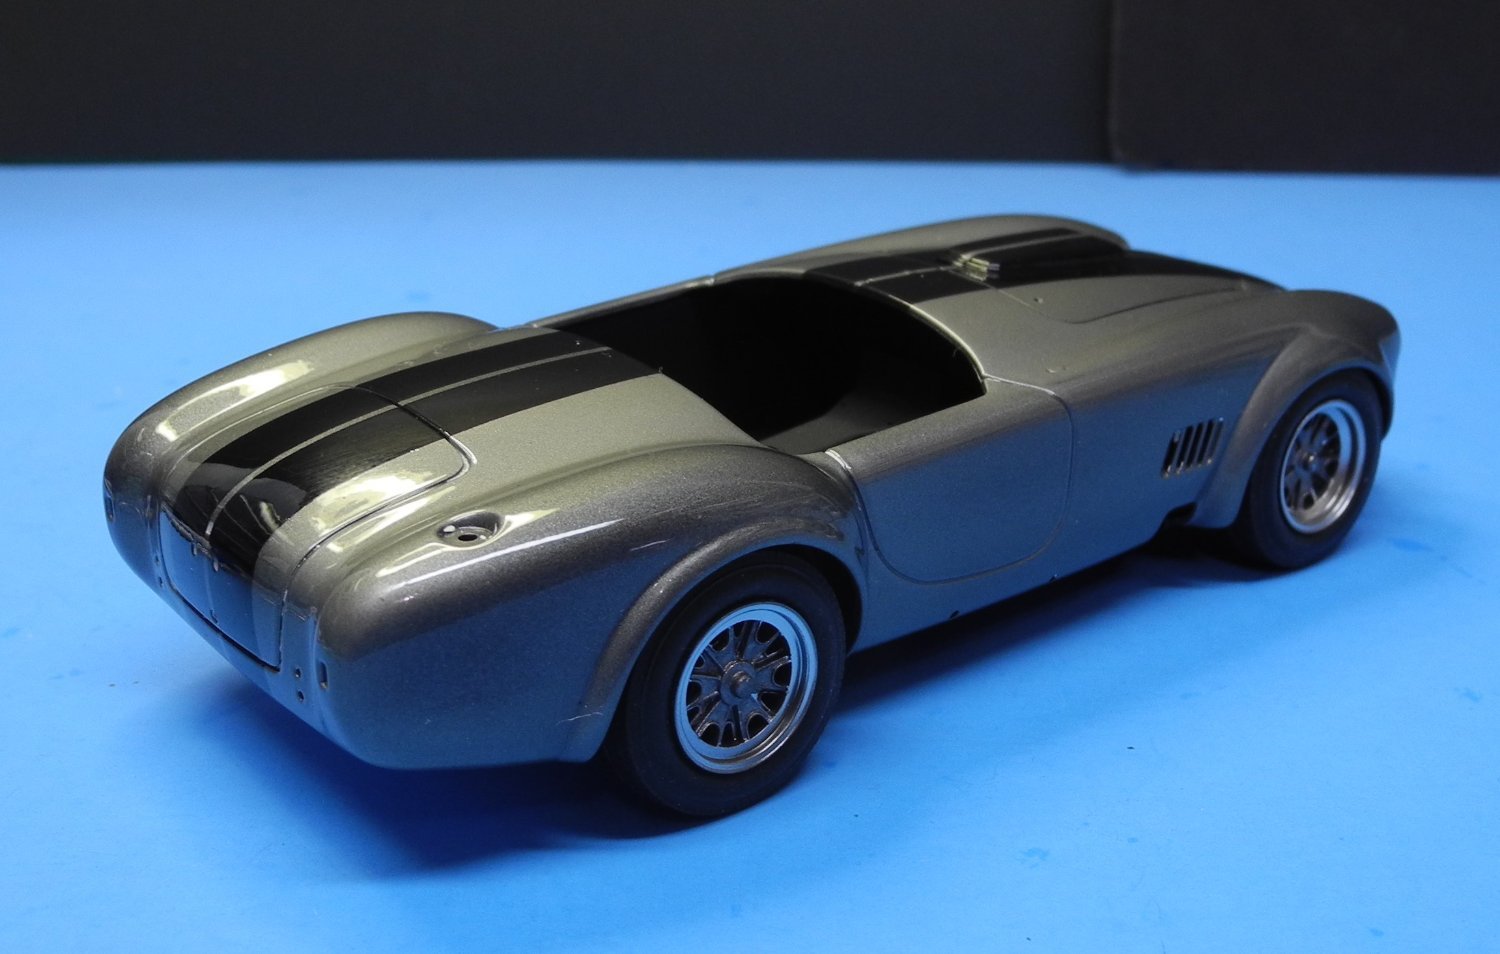
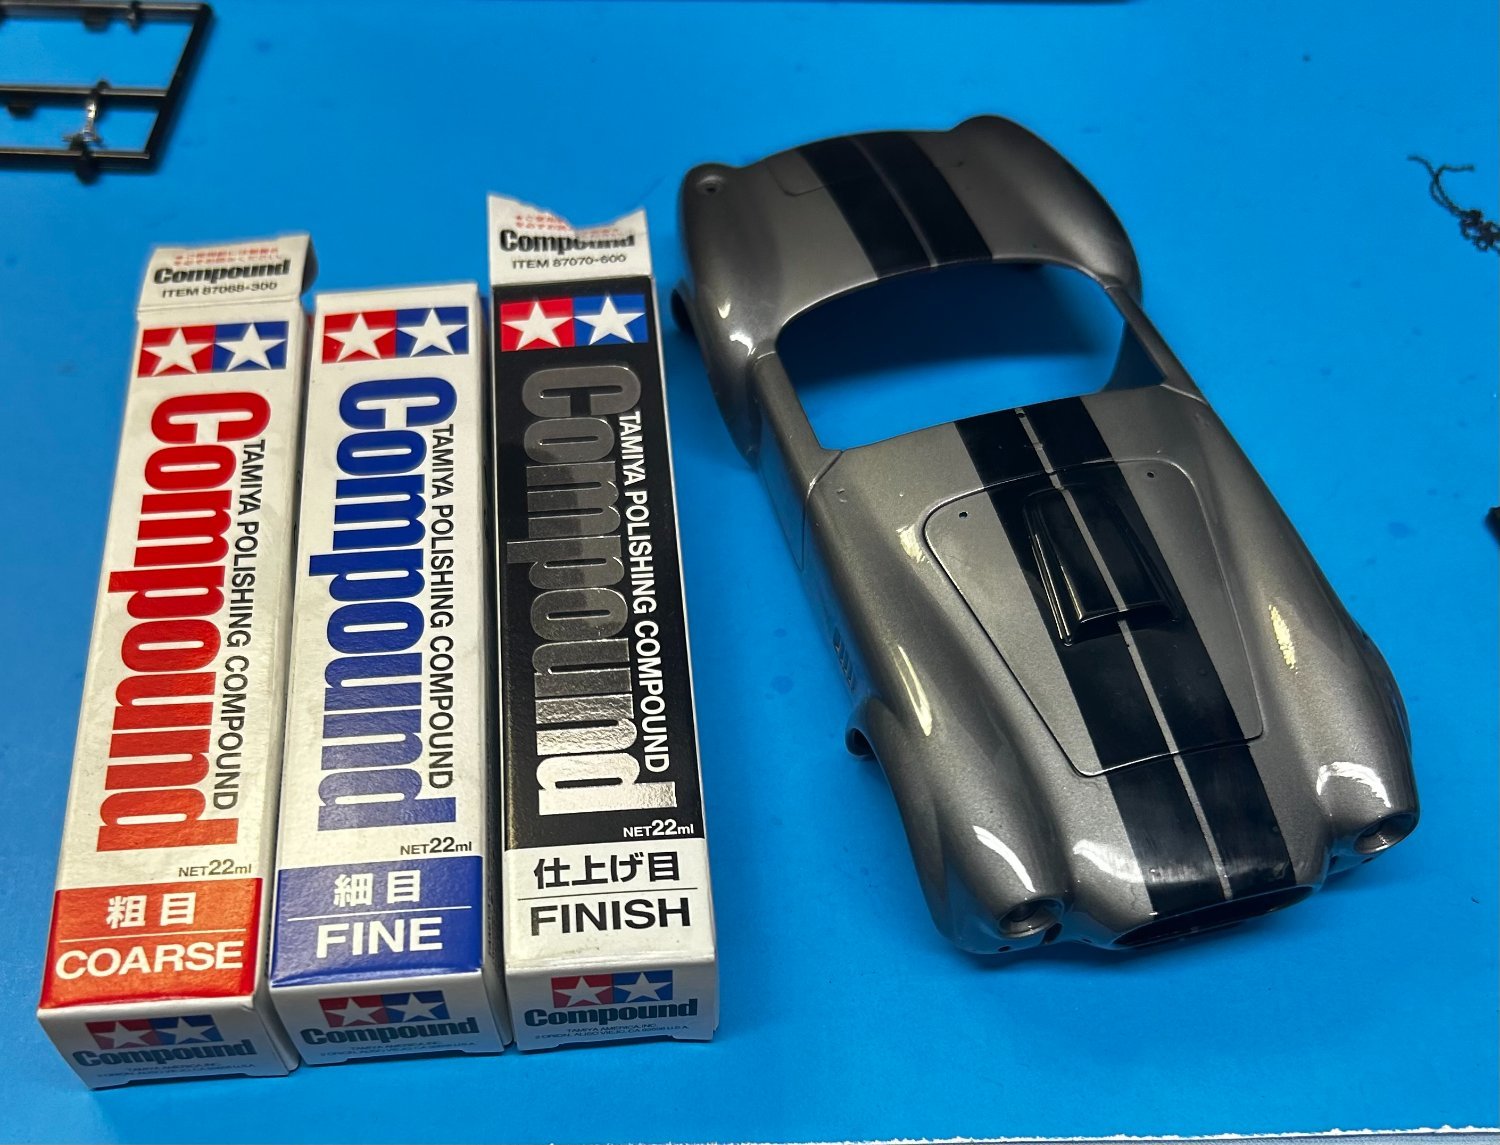
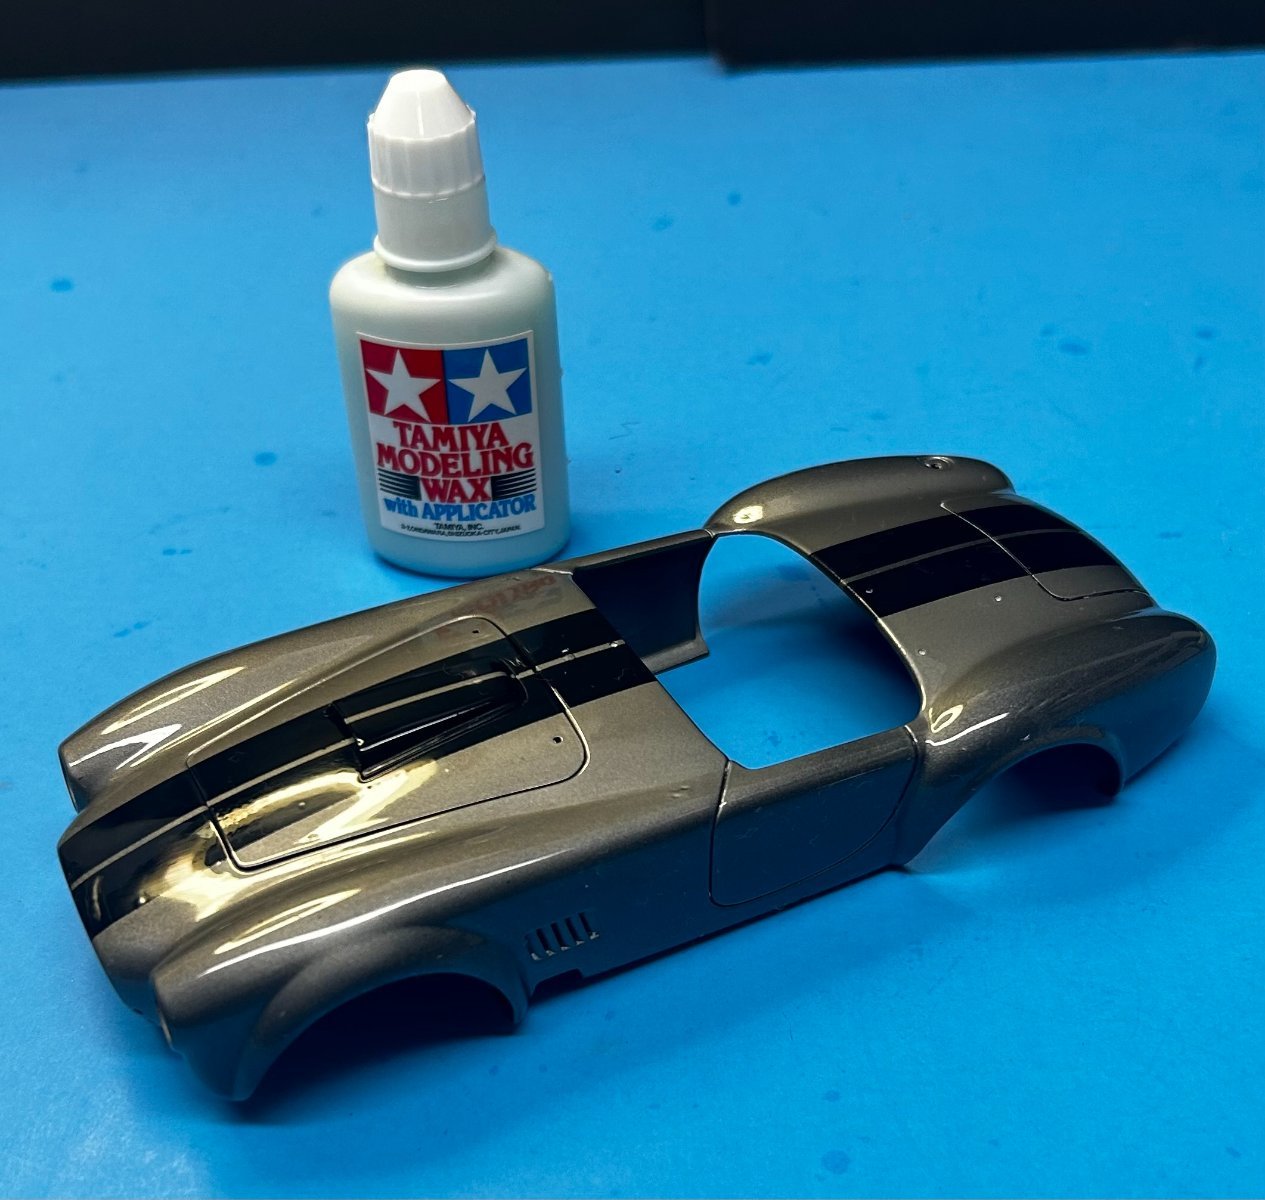
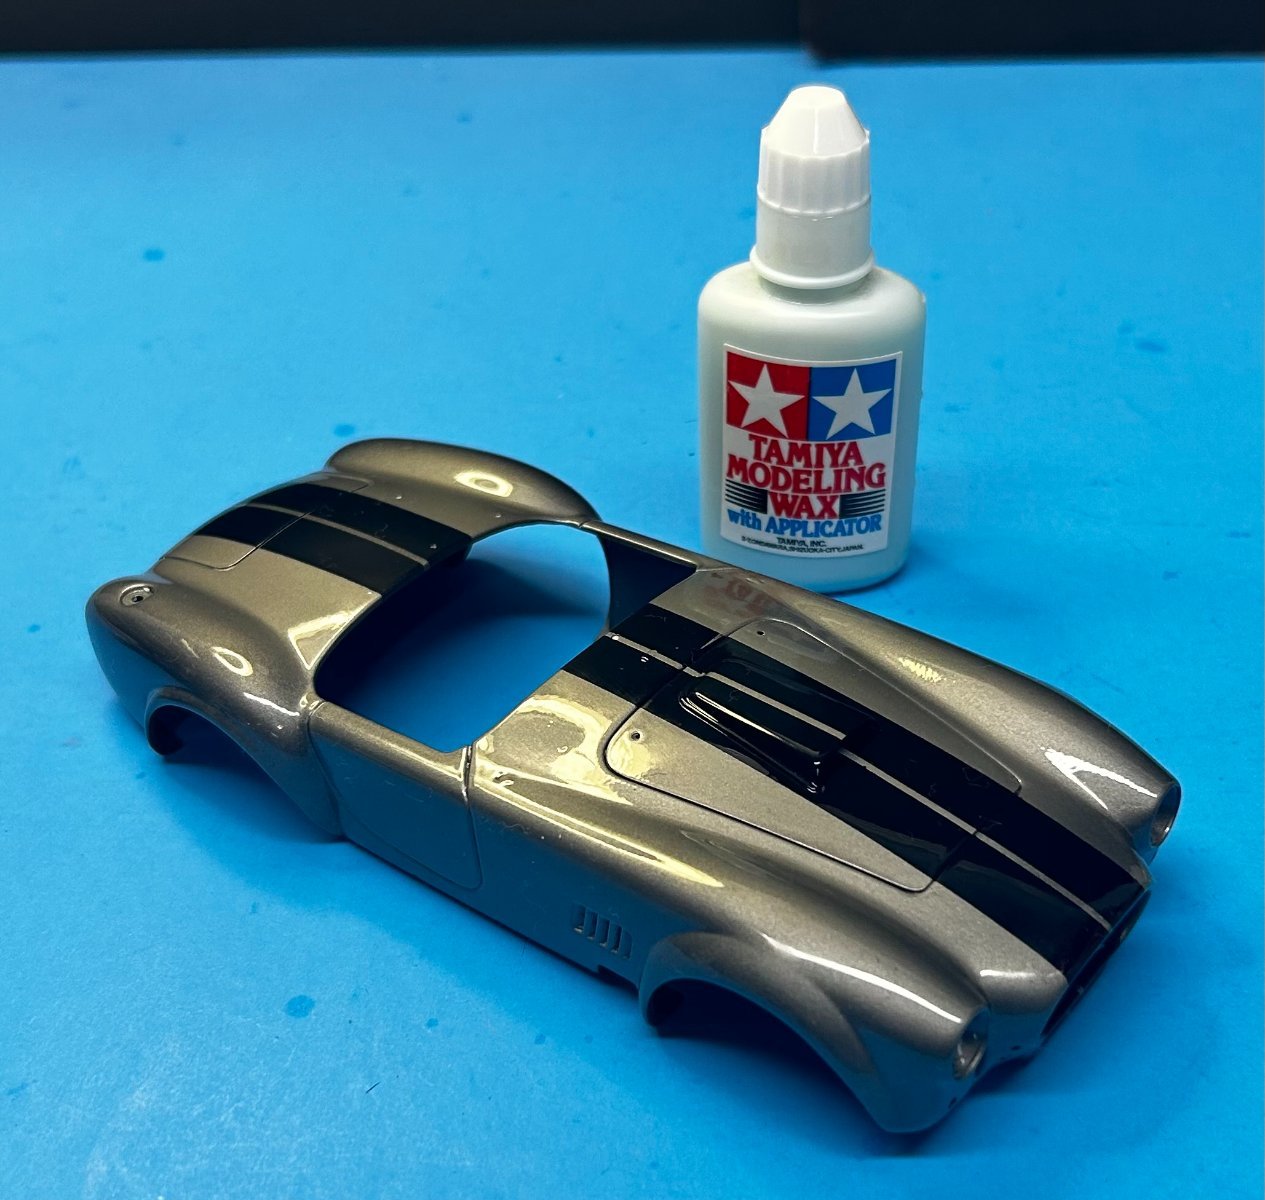
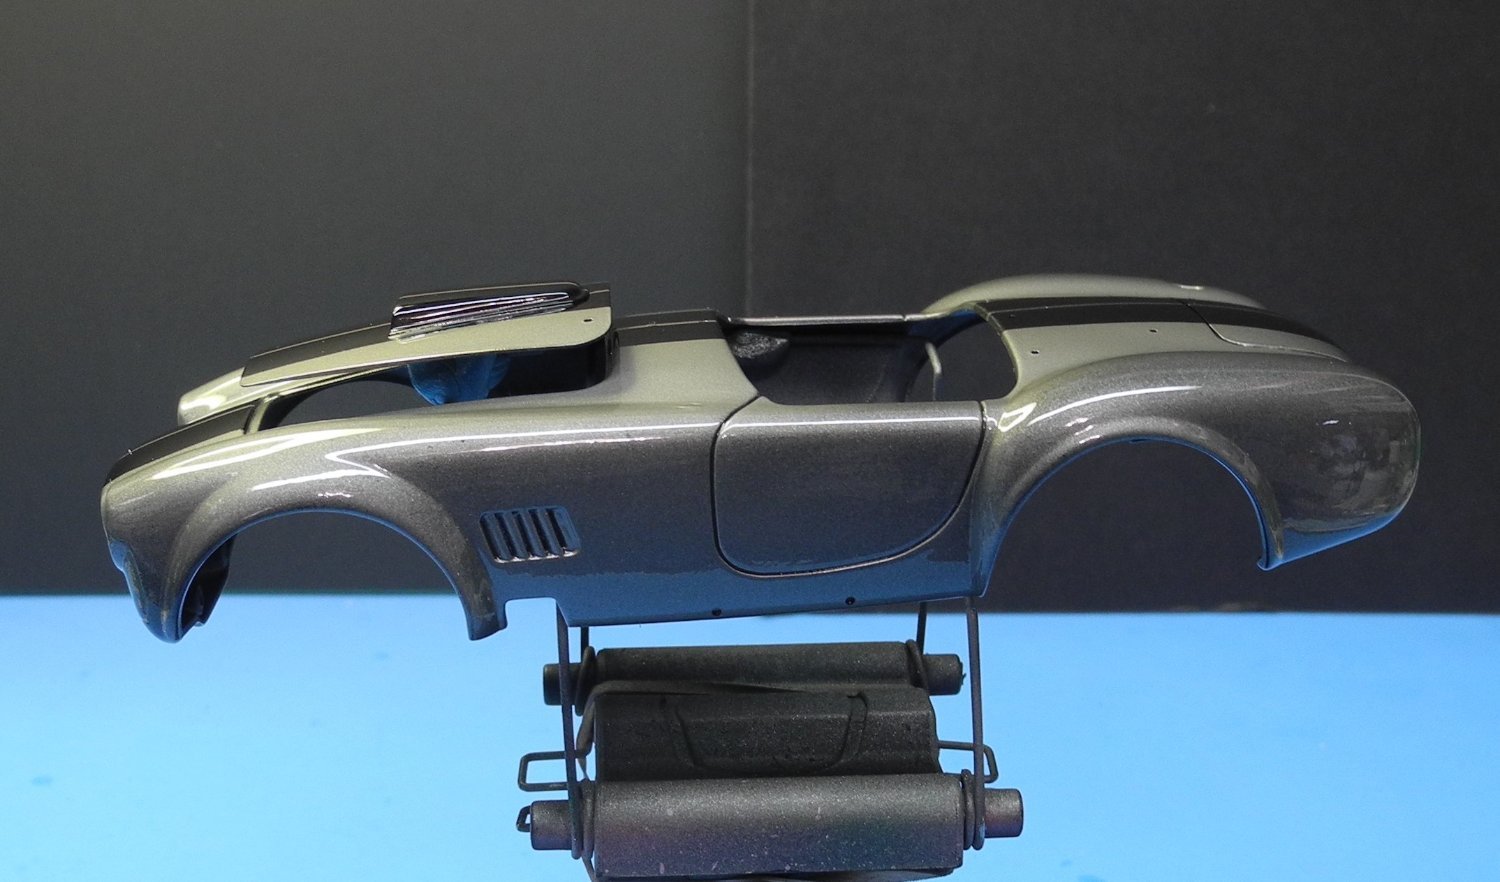
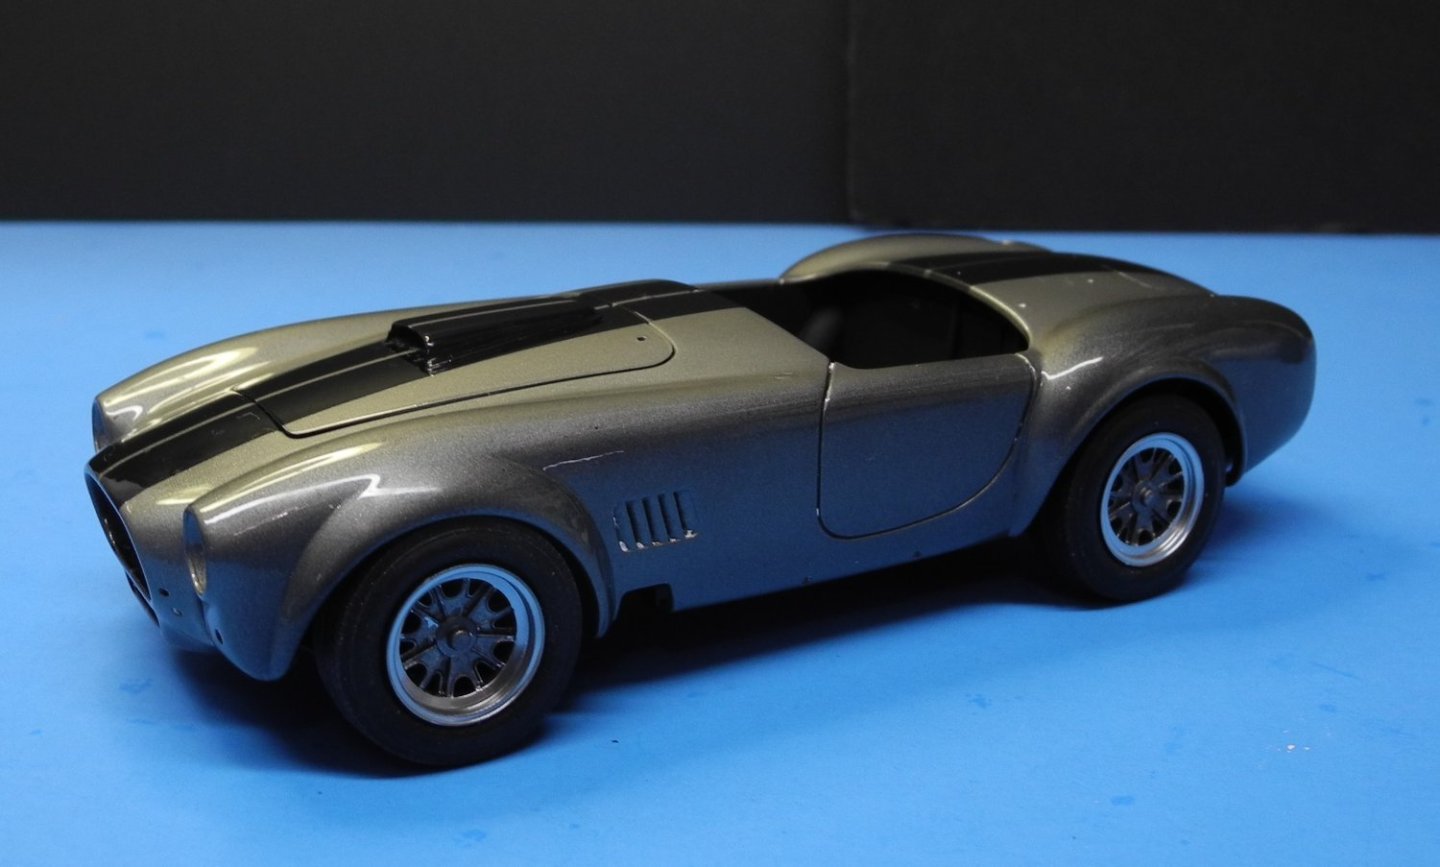
There were some specks of dust embedded in my clear coat, so I wanted to wet sand them out. After allowing the clear coat to cure 72hrs+, used a 3000 grit sanding/polishing sponge to lightly give it a go. Next, used three grades of Tamiya polishing compound in successive sessions. Last, used Tamiya wax to finish it out.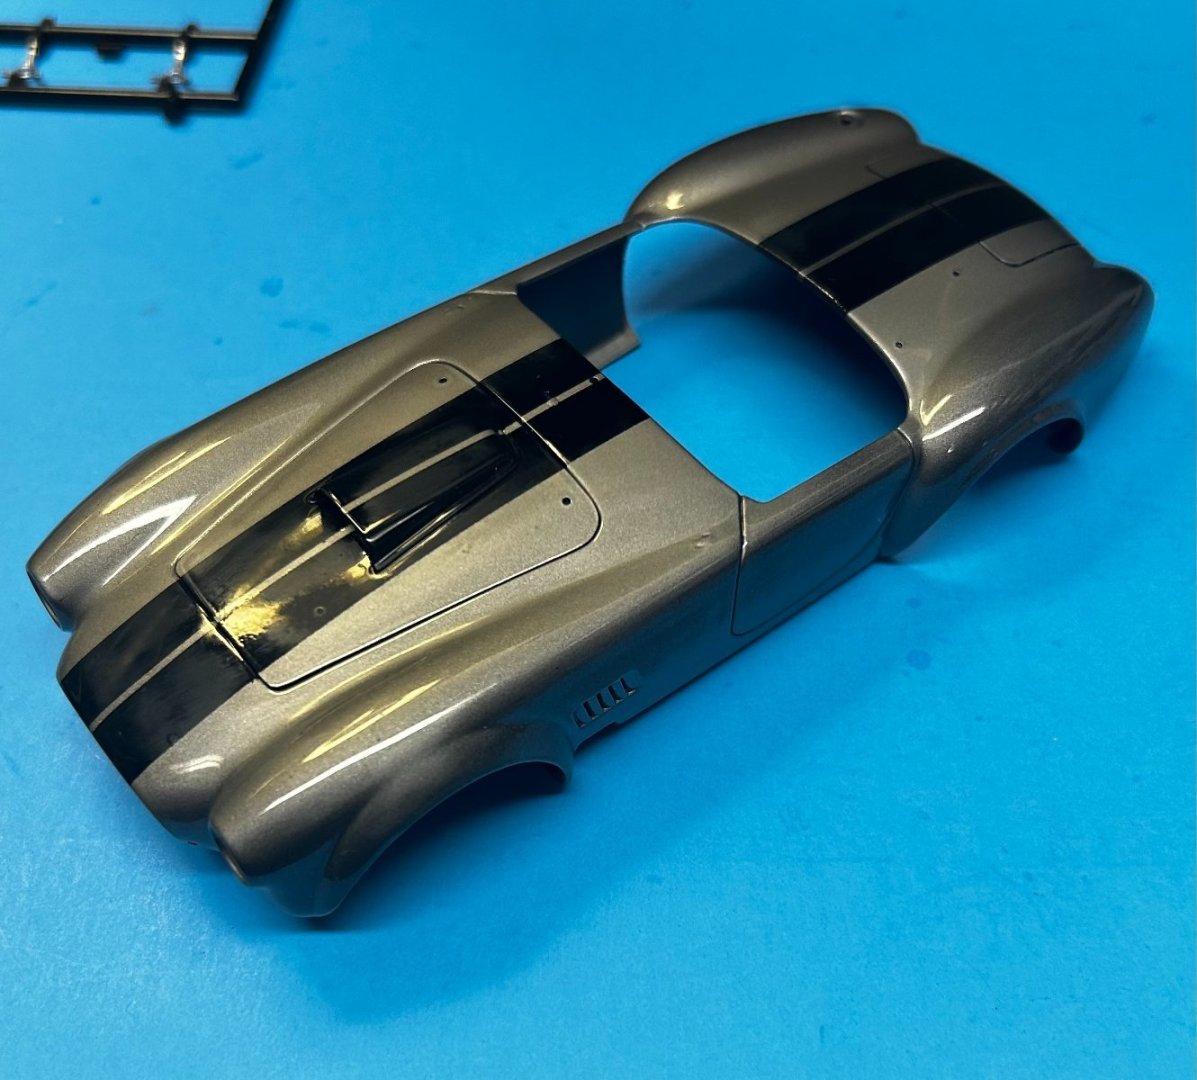


- 67 replies
-
- 11
-
-
-
Shelby 427 S/C Cobra by CDW - FINISHED - Fujimi - 1:24 Scale
CDW replied to CDW's topic in Non-ship/categorised builds
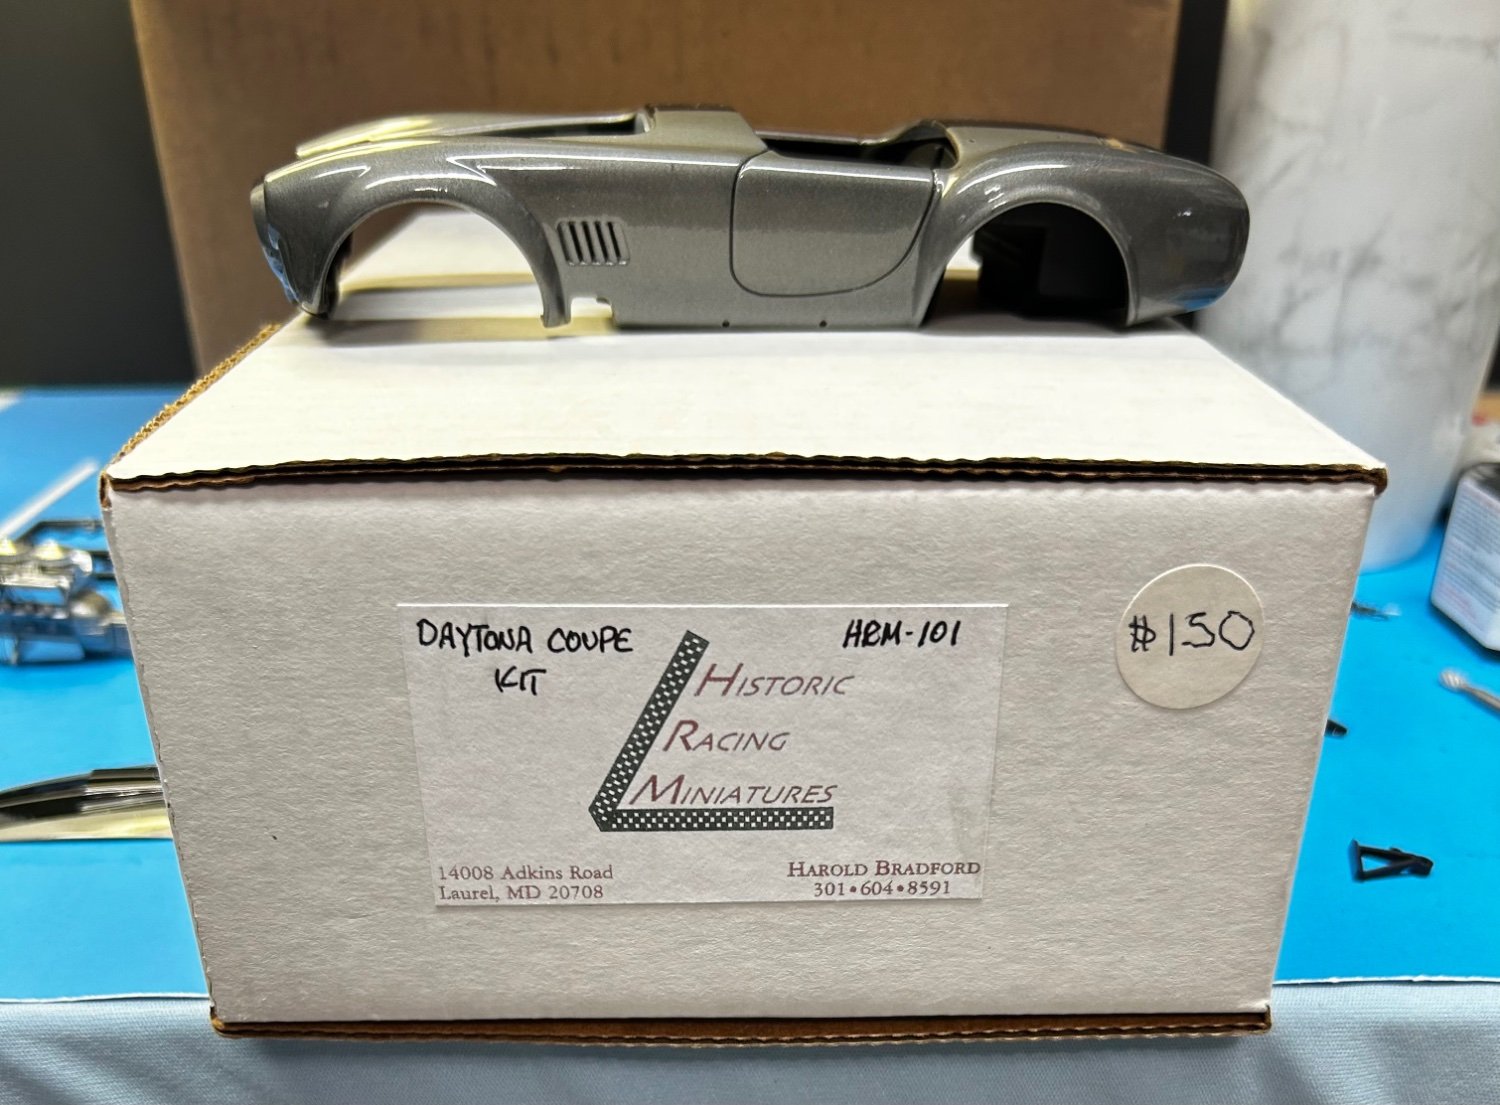
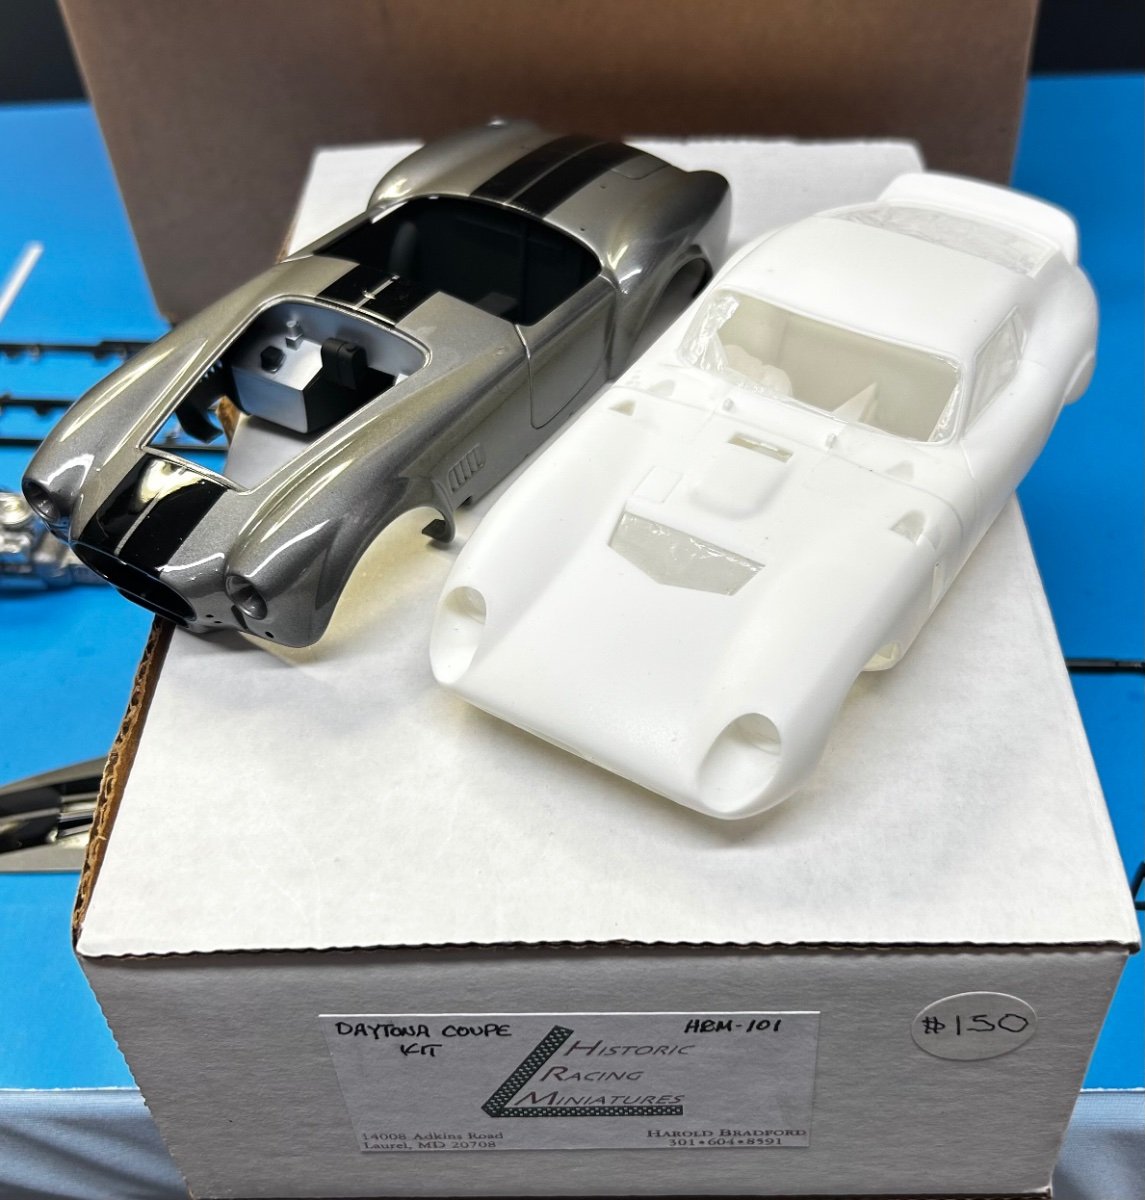
Once this project is completed, sometime in the near future, will build this 1965 world champion Cobra Daytona Coupe. A limited run, fully detailed resin/multi-media kit.

- 67 replies
-
- 11
-
-
Shelby 427 S/C Cobra by CDW - FINISHED - Fujimi - 1:24 Scale
CDW replied to CDW's topic in Non-ship/categorised builds
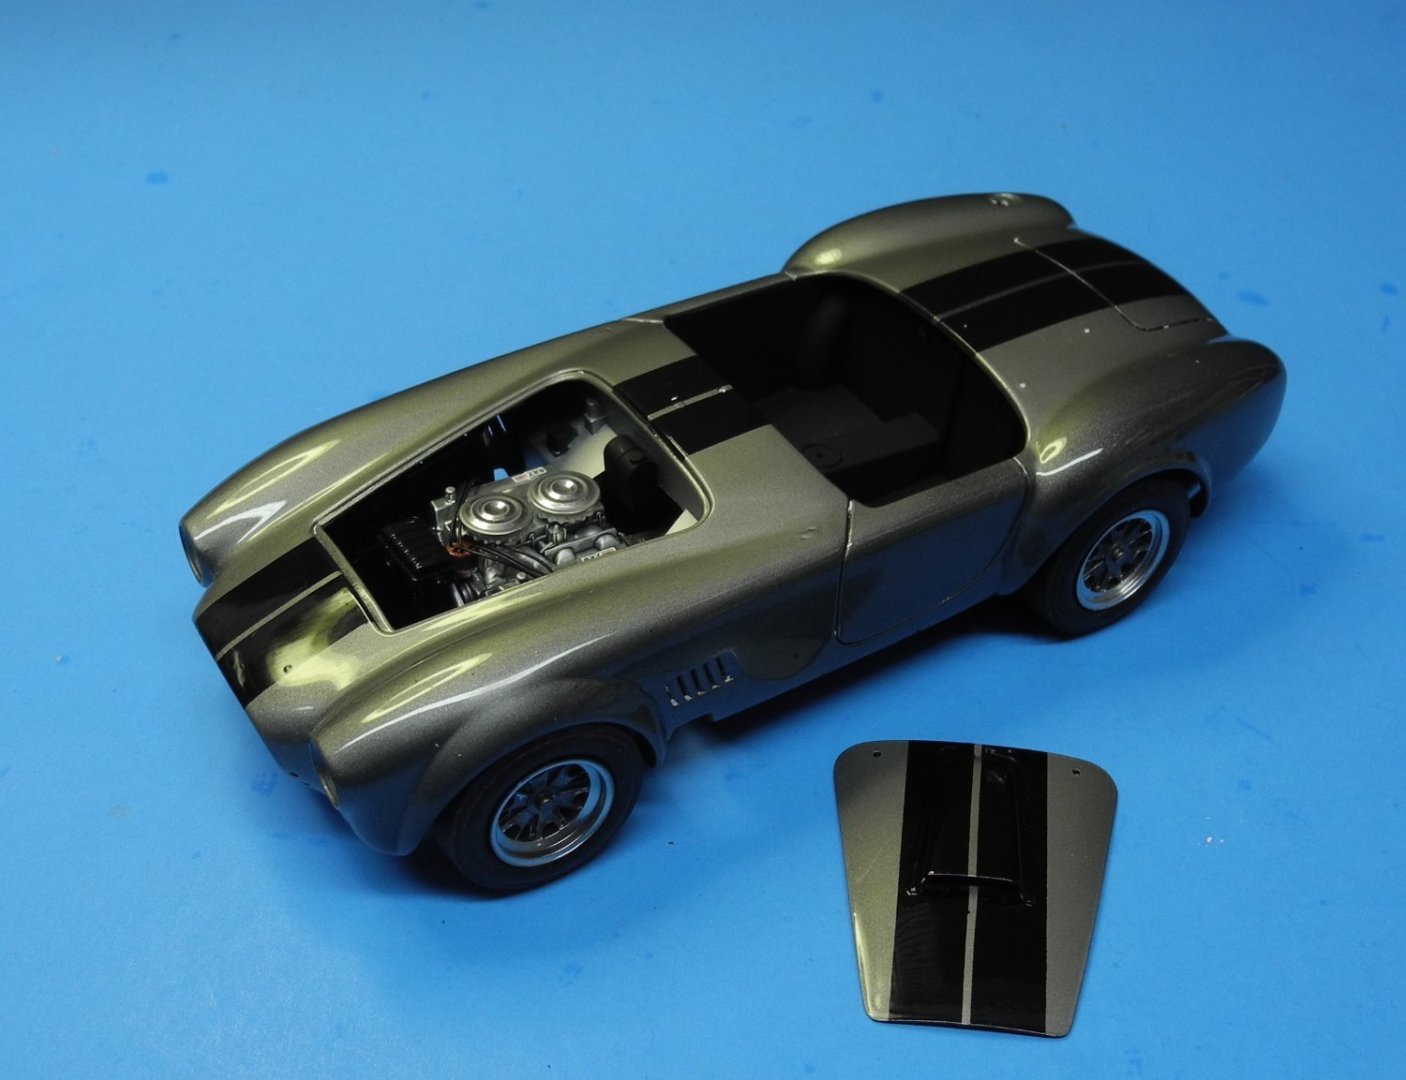
Don’t want to spend a huge amount of time on the engine. Along with the wired distributor will add some hose clamps where appropriate. Once the engine compartment gets built out, I think it will be okay.
- 67 replies
-
- 16
-
-
Shelby 427 S/C Cobra by CDW - FINISHED - Fujimi - 1:24 Scale
CDW replied to CDW's topic in Non-ship/categorised builds
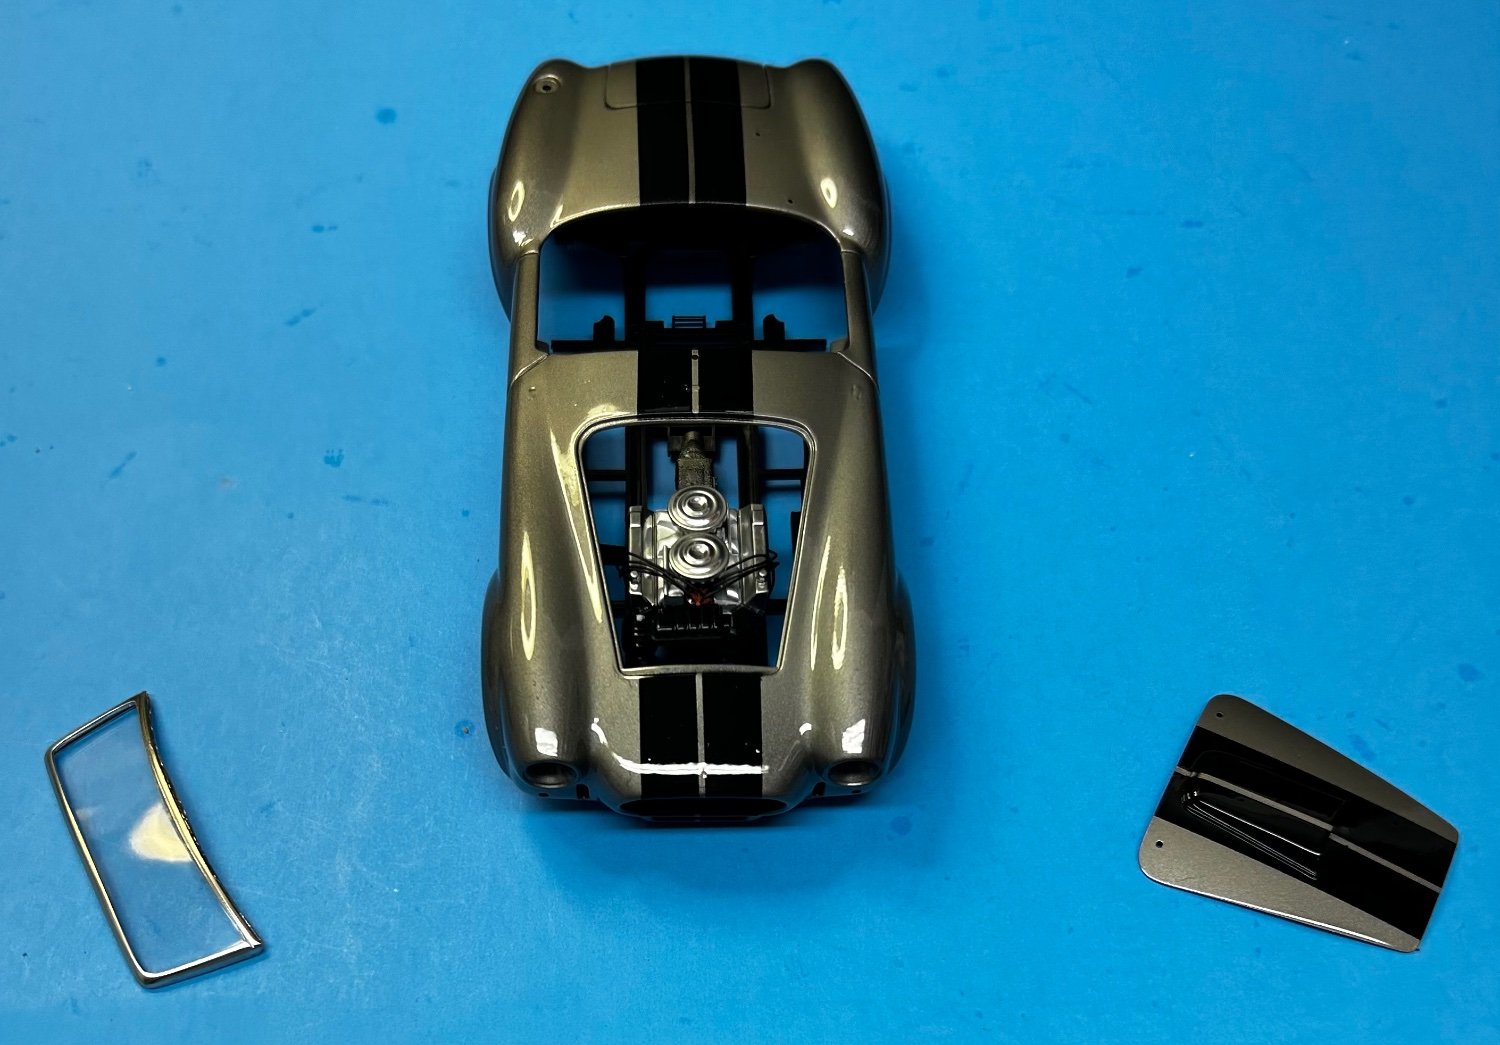
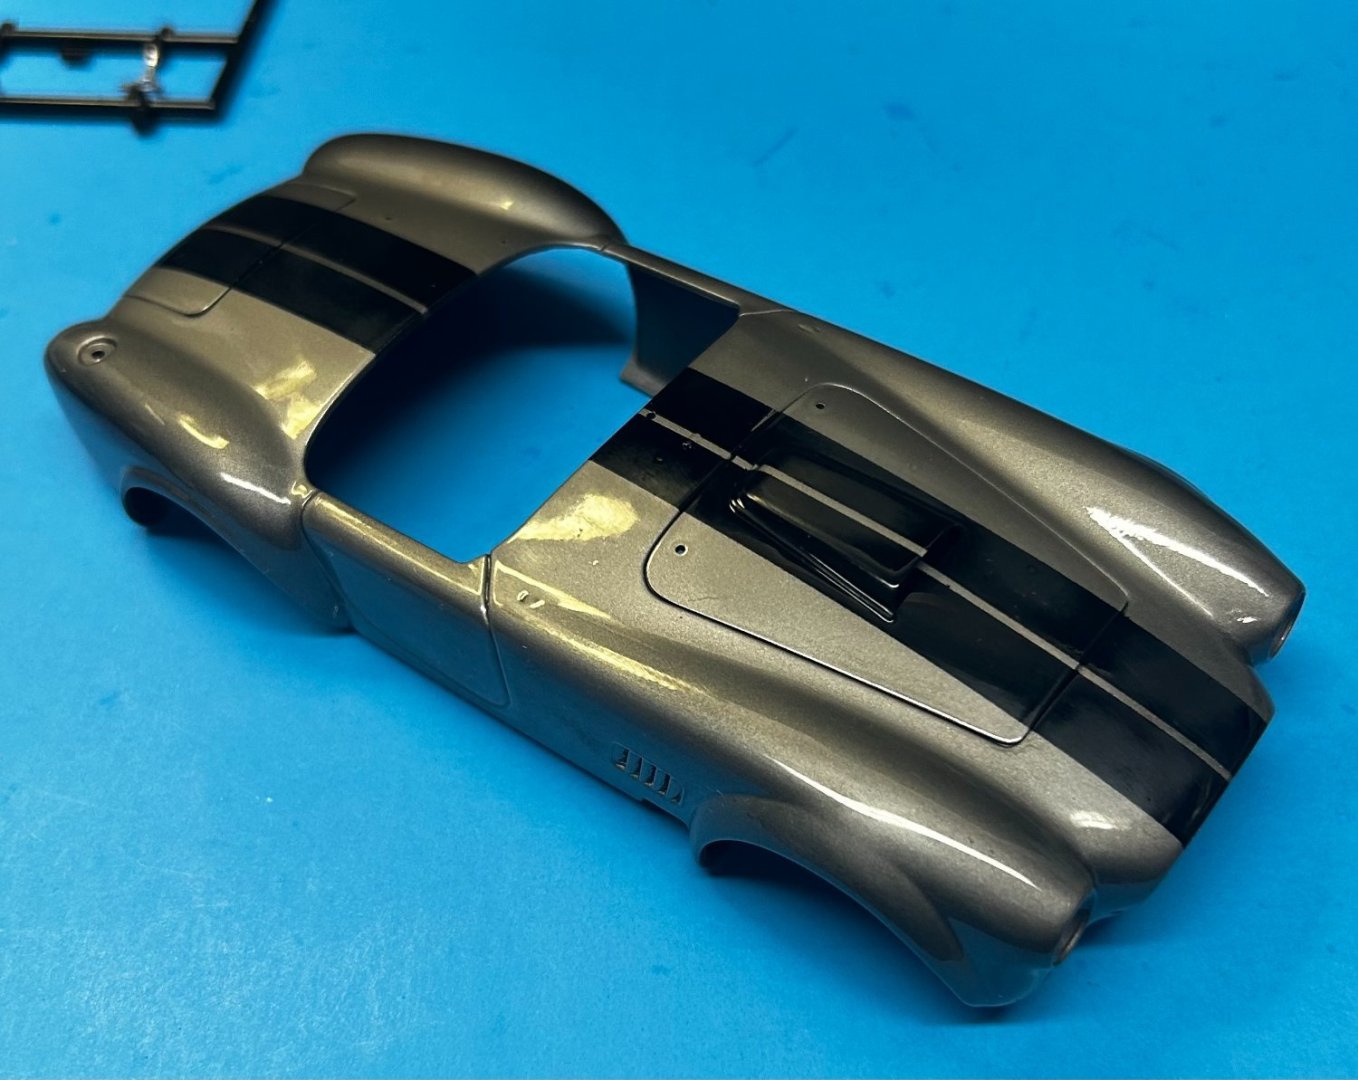
2K Clearcoat, Custom Creations paint.


- 67 replies
-
- 14
-
-
-
Shelby 427 S/C Cobra by CDW - FINISHED - Fujimi - 1:24 Scale
CDW replied to CDW's topic in Non-ship/categorised builds
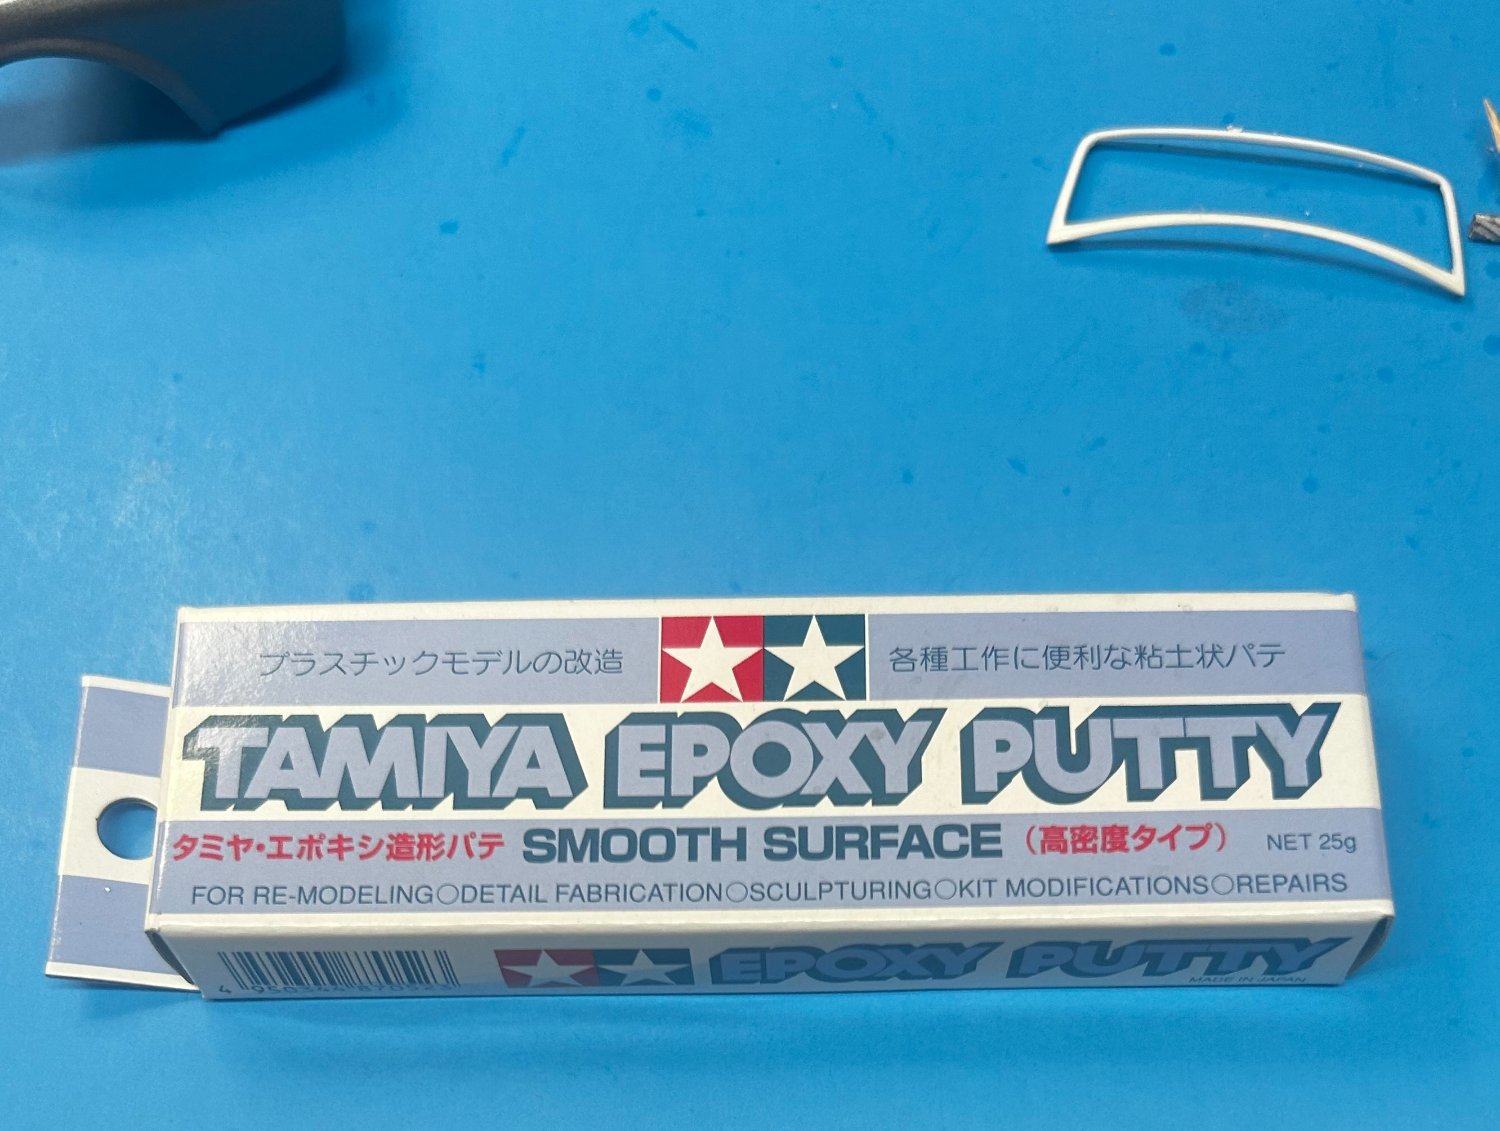
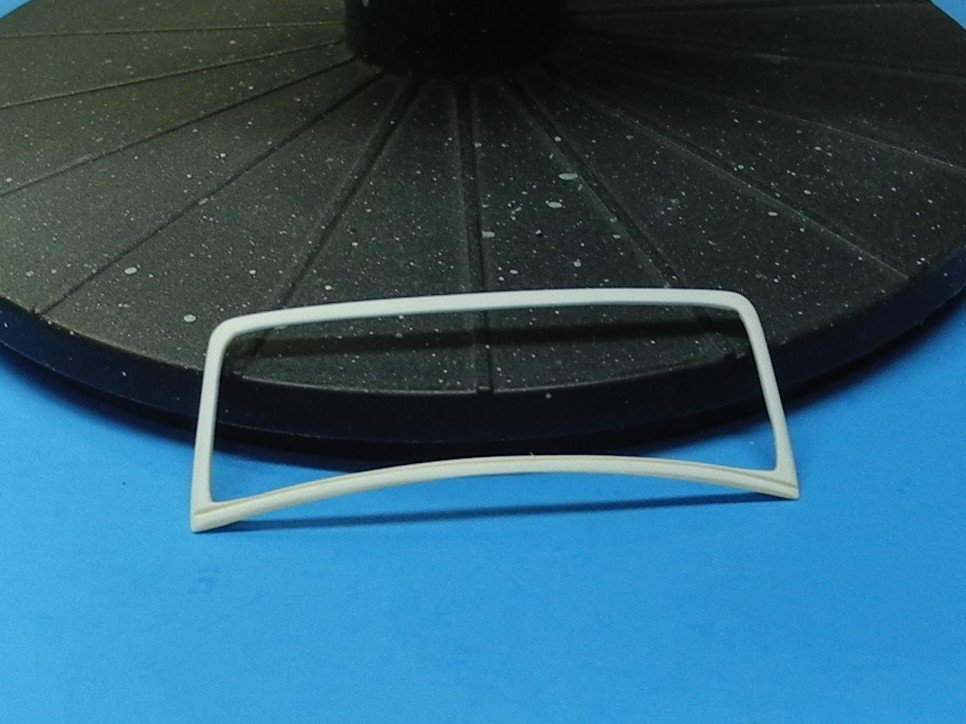
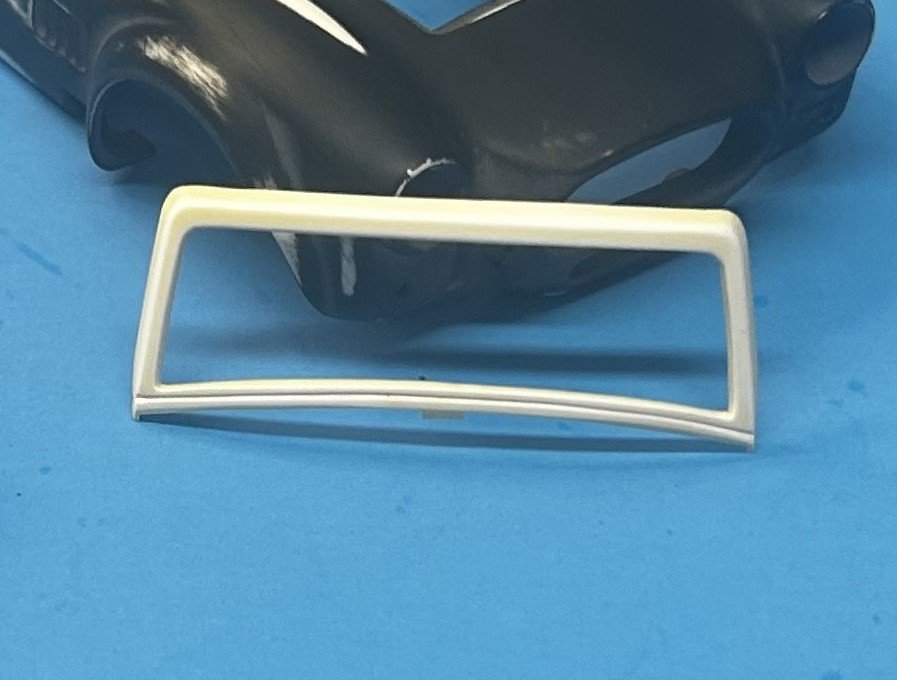
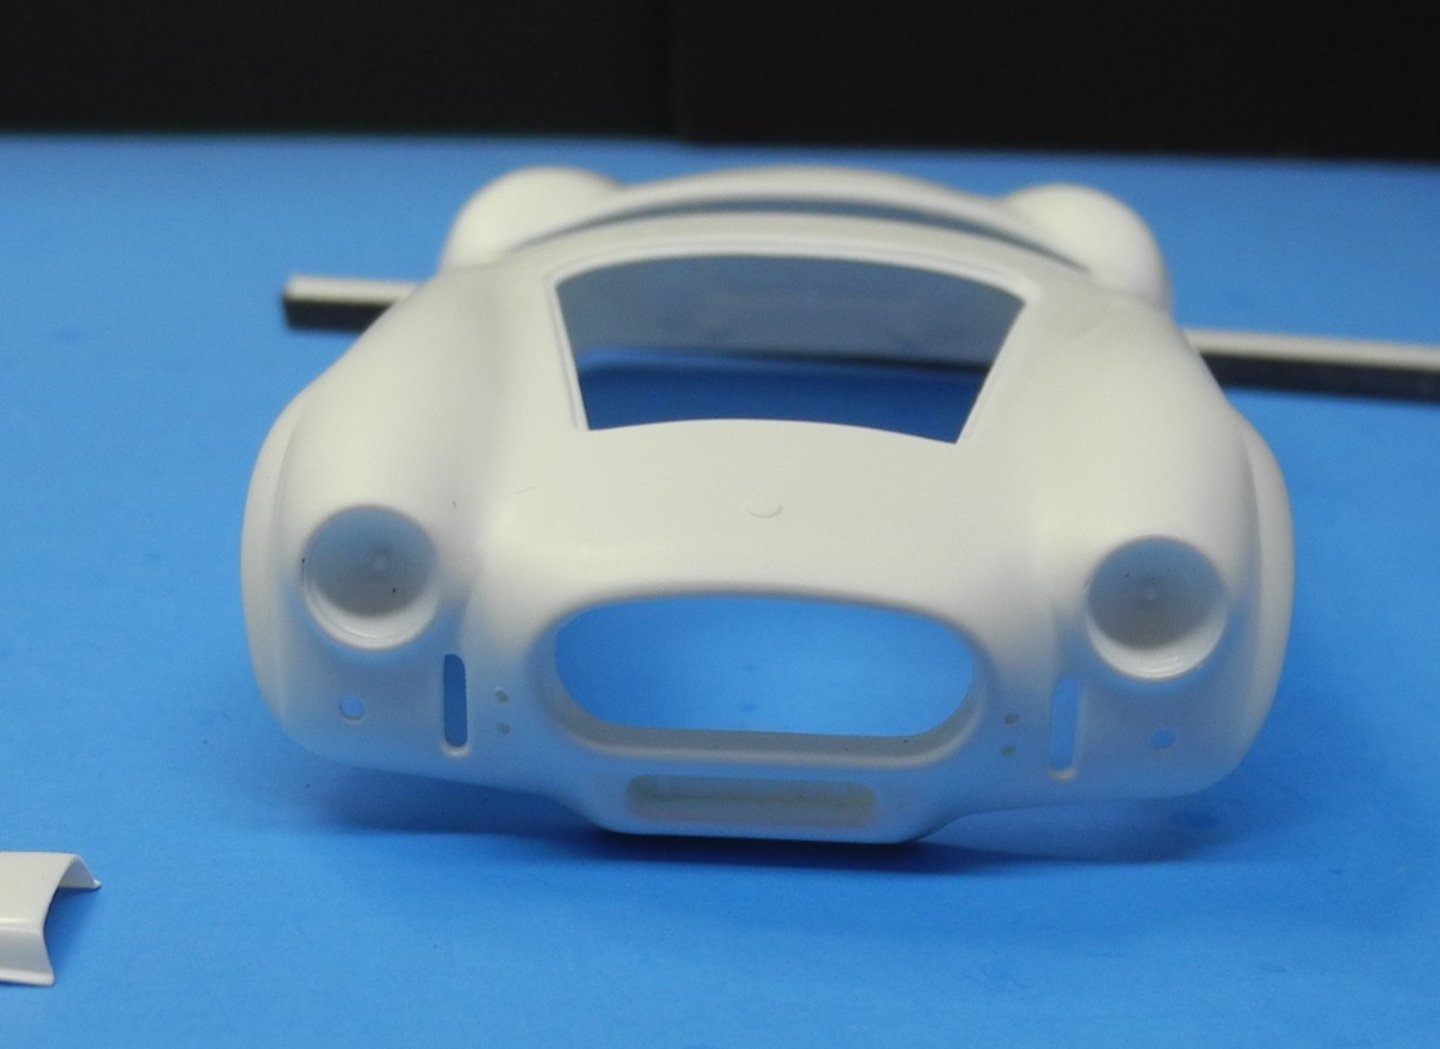
A cardinal rule when build a model kit is to test fit everything in advance. In this case, I failed to test fit the windscreen frame before starting the body work. This came back to bite me in the rear end, but fortunate for me, I had another Fujimi Cobra in the stash. This allowed me to use the body of it (identical bodies) to correct the ill-fitting windscreen frame. The bodies have recessed locations underneath that are supposed to be opened up to fit the windscreen. The instructions don't tell you this, but you figure it out once you try to fit the parts together. Unfortunately, if you open the holes you'll find out the holes don't match the locating pieces on the windscreen. I marked these locations on the bottom of the kit body. Don't open these holes! To get an even, smooth fit to the contour of the body, I've used Tamiya epoxy putty on the bottom of the windscreen where it meets the body. I kneaded up a small amount of the 2-part putty then rolled it into a small diameter "snake". Then placed the putty snake along the bottom of the windscreen. Before setting the windscreen into place on top of the body, smeared a light film of vaseline on the body to serve as a barrier, or else the putty when it dries would stick to the body. I set the windscreen in place over the light film of vaseline then pushed it down to fit the body contour. The excess putty that squeezed out both sides of the windscreen was carefully trimmed away well before the putty set up. I'll now leave this in place until the putty cures, then remove the windscreen for painting and inserting the glass. It's a nice smooth fit now, no gaps between it and the body. As soon as I remove the windscreen, I'll wash and clean the body of any vaseline before packing it back into the model box. The windscreen will need washing and cleaning as well, maybe a light sanding, we'll see.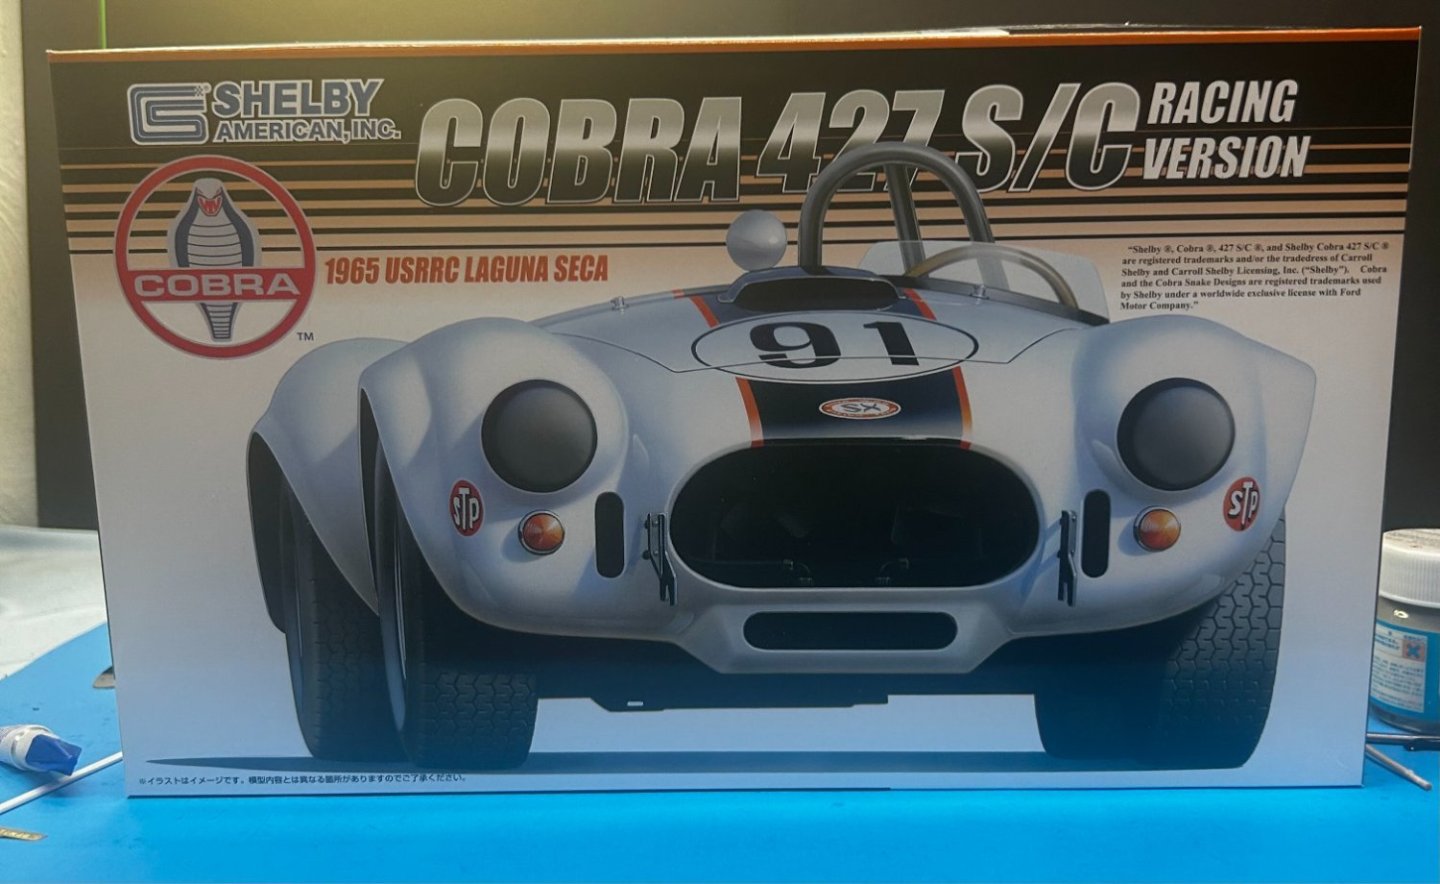

- 67 replies
-
- 12
-
-
Shelby 427 S/C Cobra by CDW - FINISHED - Fujimi - 1:24 Scale
CDW replied to CDW's topic in Non-ship/categorised builds
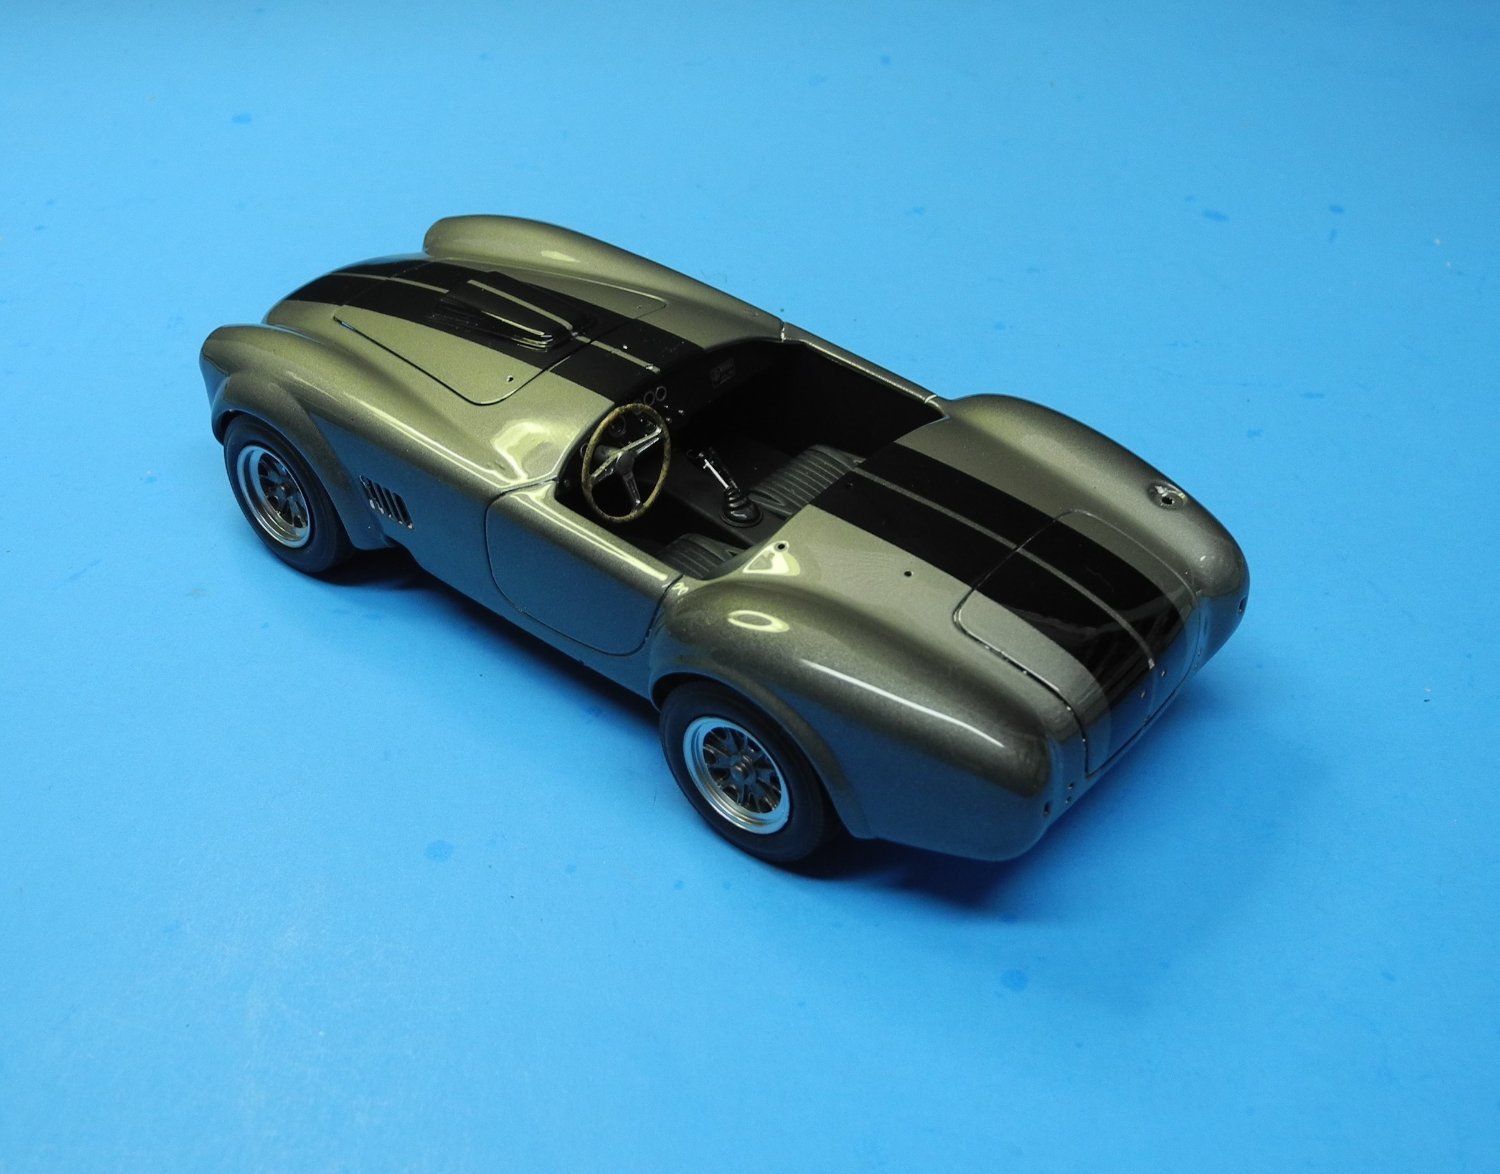
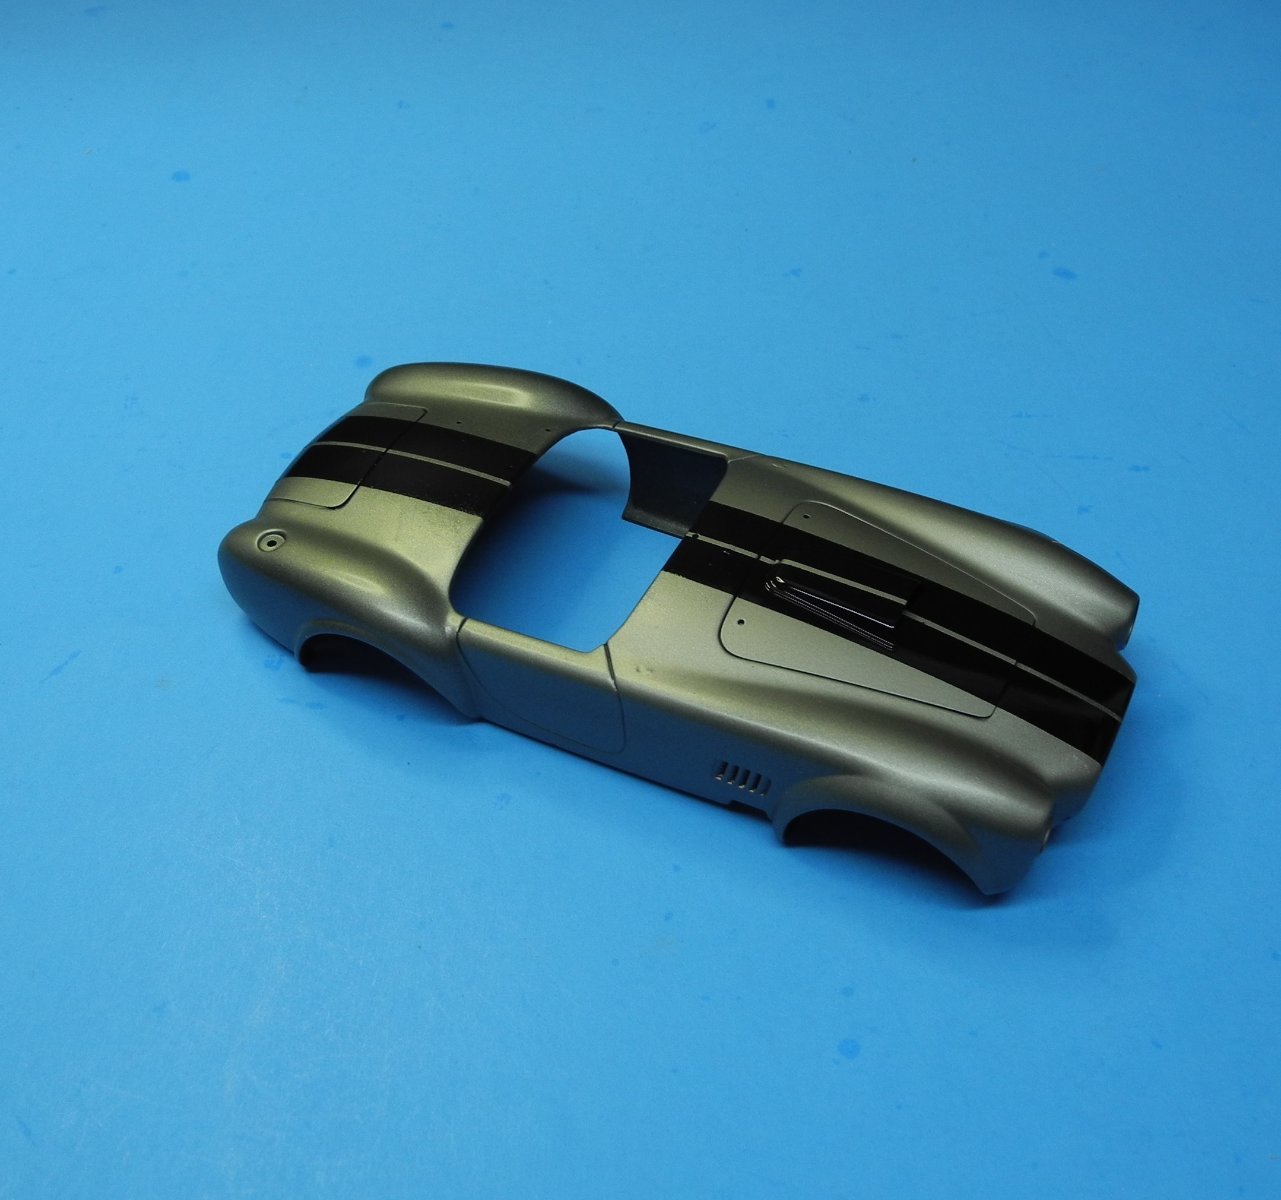
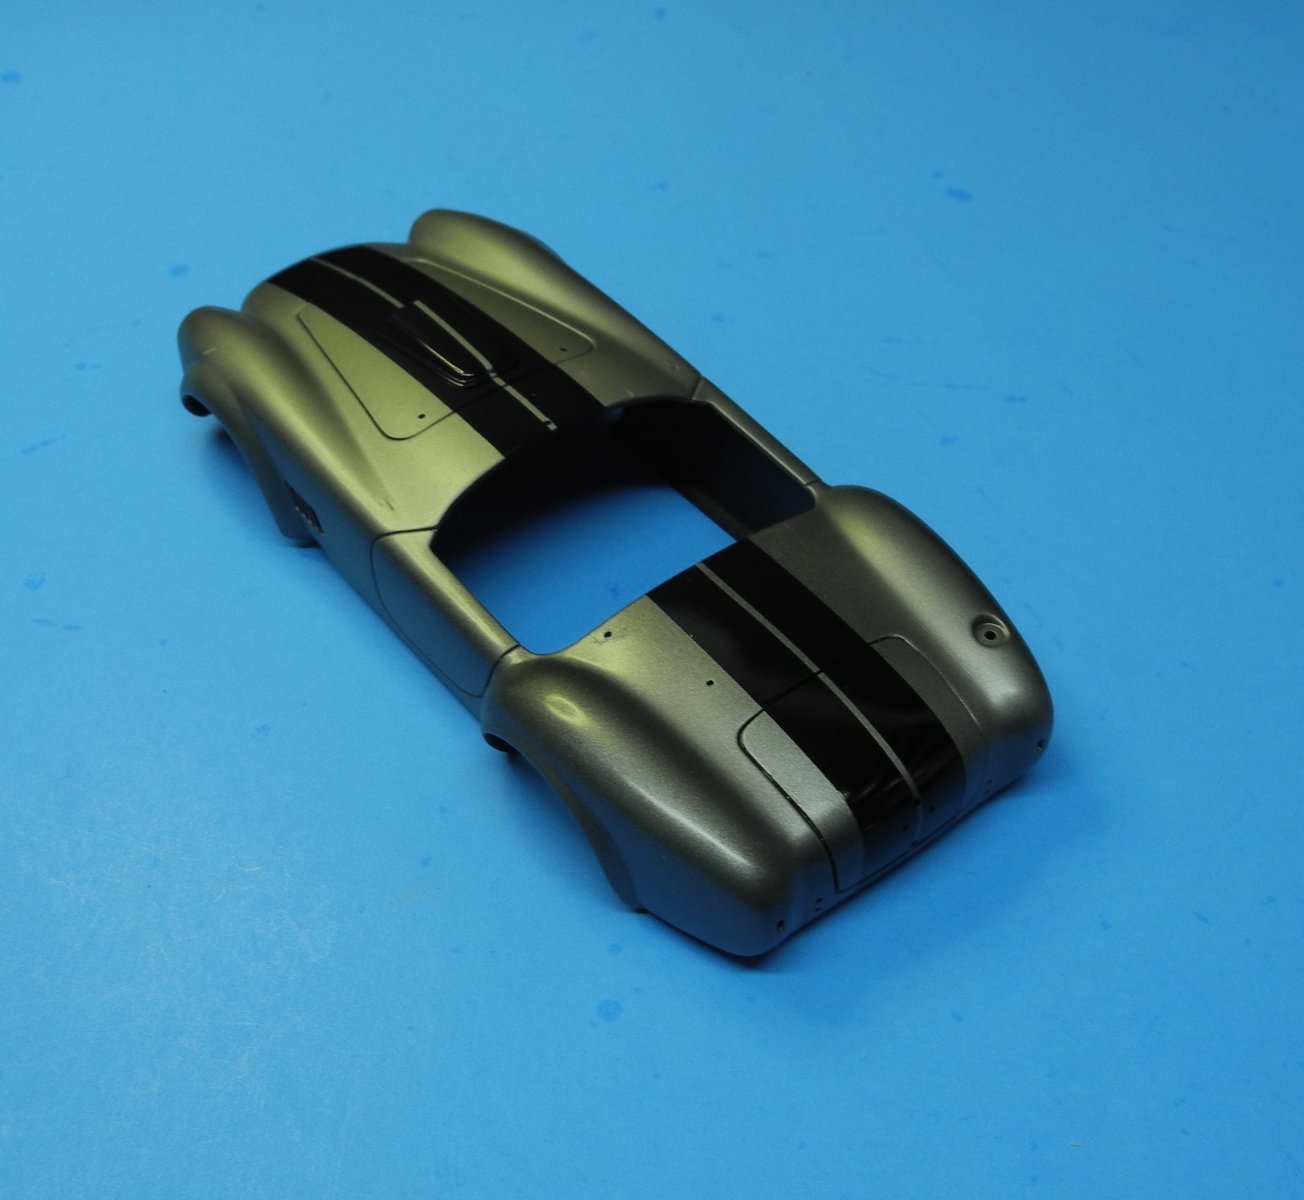
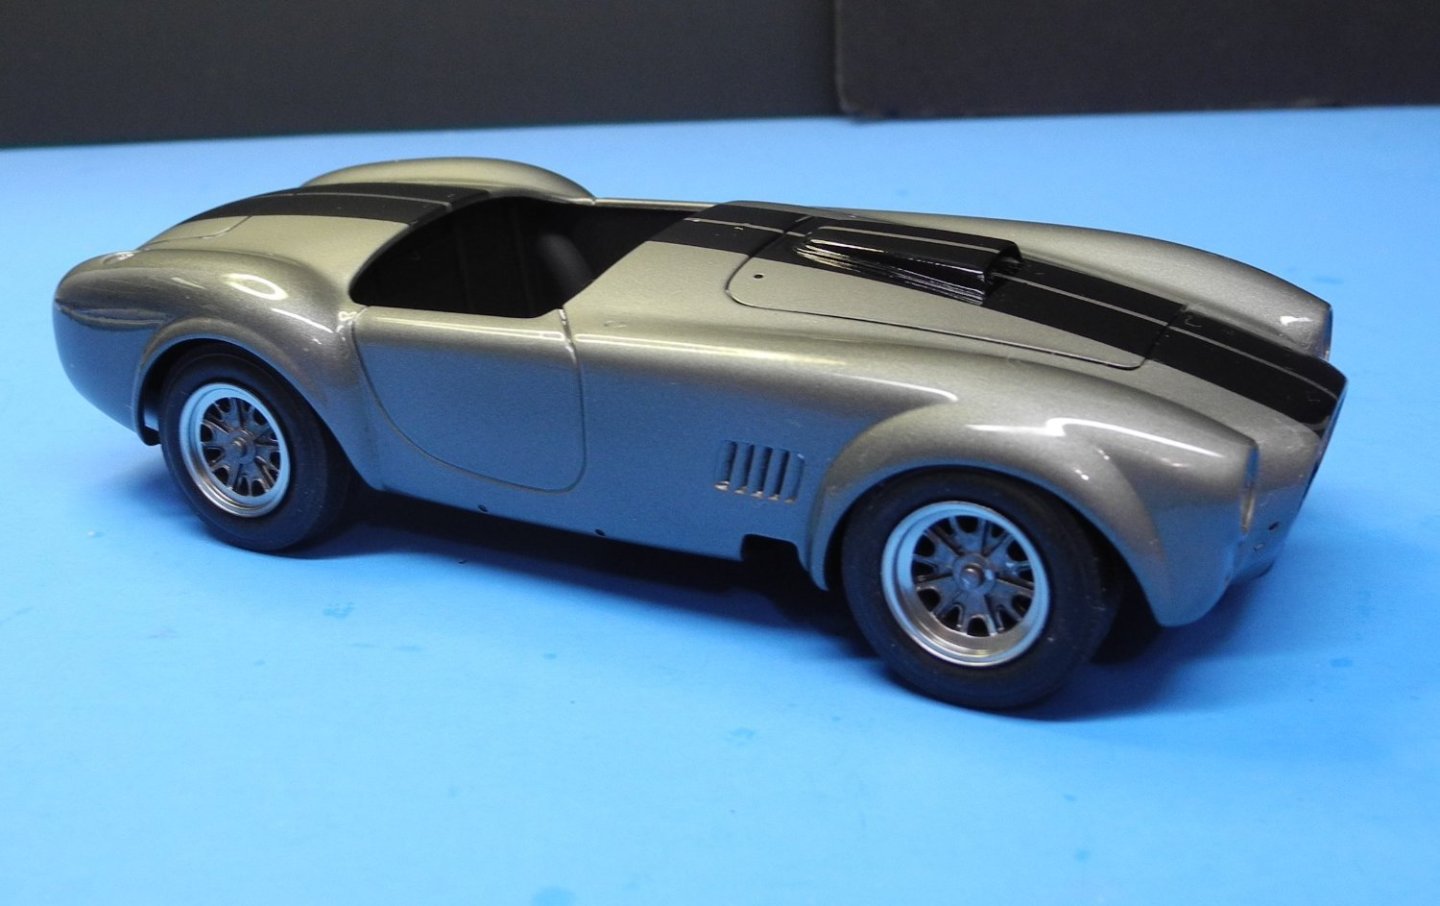
Painted the stripes today. A couple of small places on the metallic gray paint had a peculiar reaction to the Tamiya masking tape. I will try to work these out as best I can but will live with it. Don't intend to strip it down and start over a second time. Odd thing is, this only happens to me when I'm using the 10mm Tamiya tape. At first, I thought it was because of an old roll I was using (on a different model) and I threw the old roll away and started with a new, fresh roll. But here is the same problem again this time on another model using 10mm tape. Never happens with other sizes of Tamiya tape, only the 10mm. Weird.


- 67 replies
-
- 12
-
-
-
Shelby 427 S/C Cobra by CDW - FINISHED - Fujimi - 1:24 Scale
CDW replied to CDW's topic in Non-ship/categorised builds
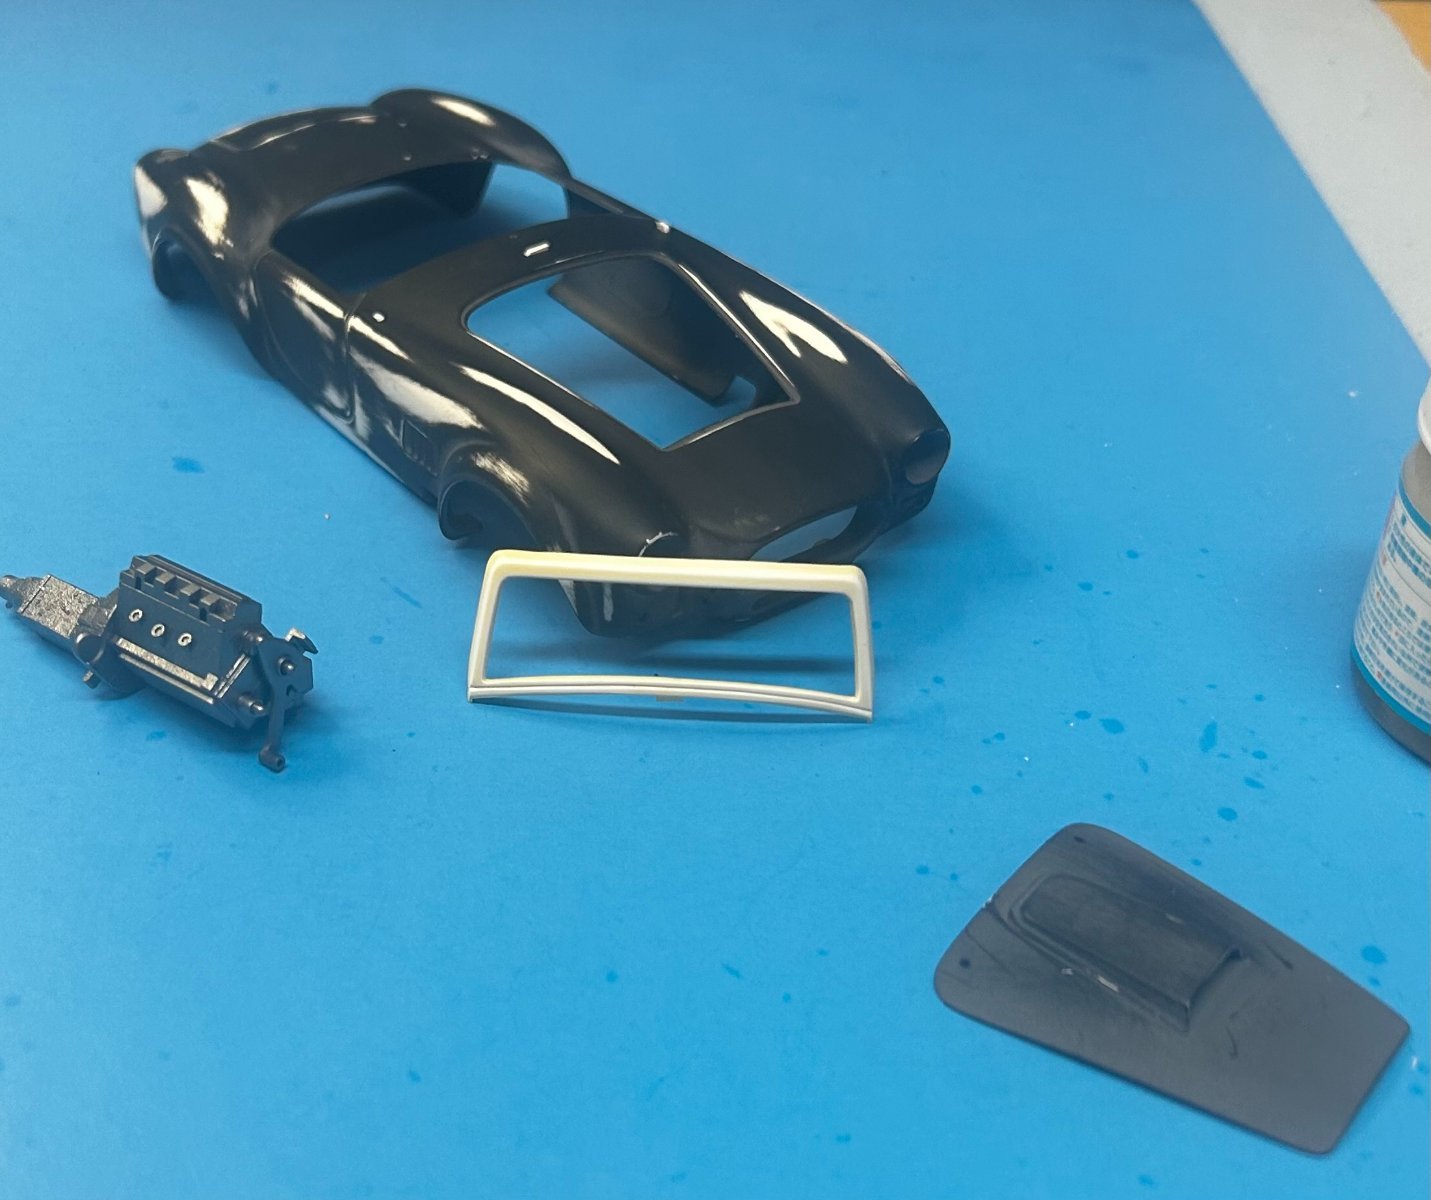
The intake manifold has the distributor molded in and rather poor in detail. I’m going to drill it out and replace it with this aftermarket distributor.
- 67 replies
-
- 12
-
-
Shelby 427 S/C Cobra by CDW - FINISHED - Fujimi - 1:24 Scale
CDW replied to CDW's topic in Non-ship/categorised builds
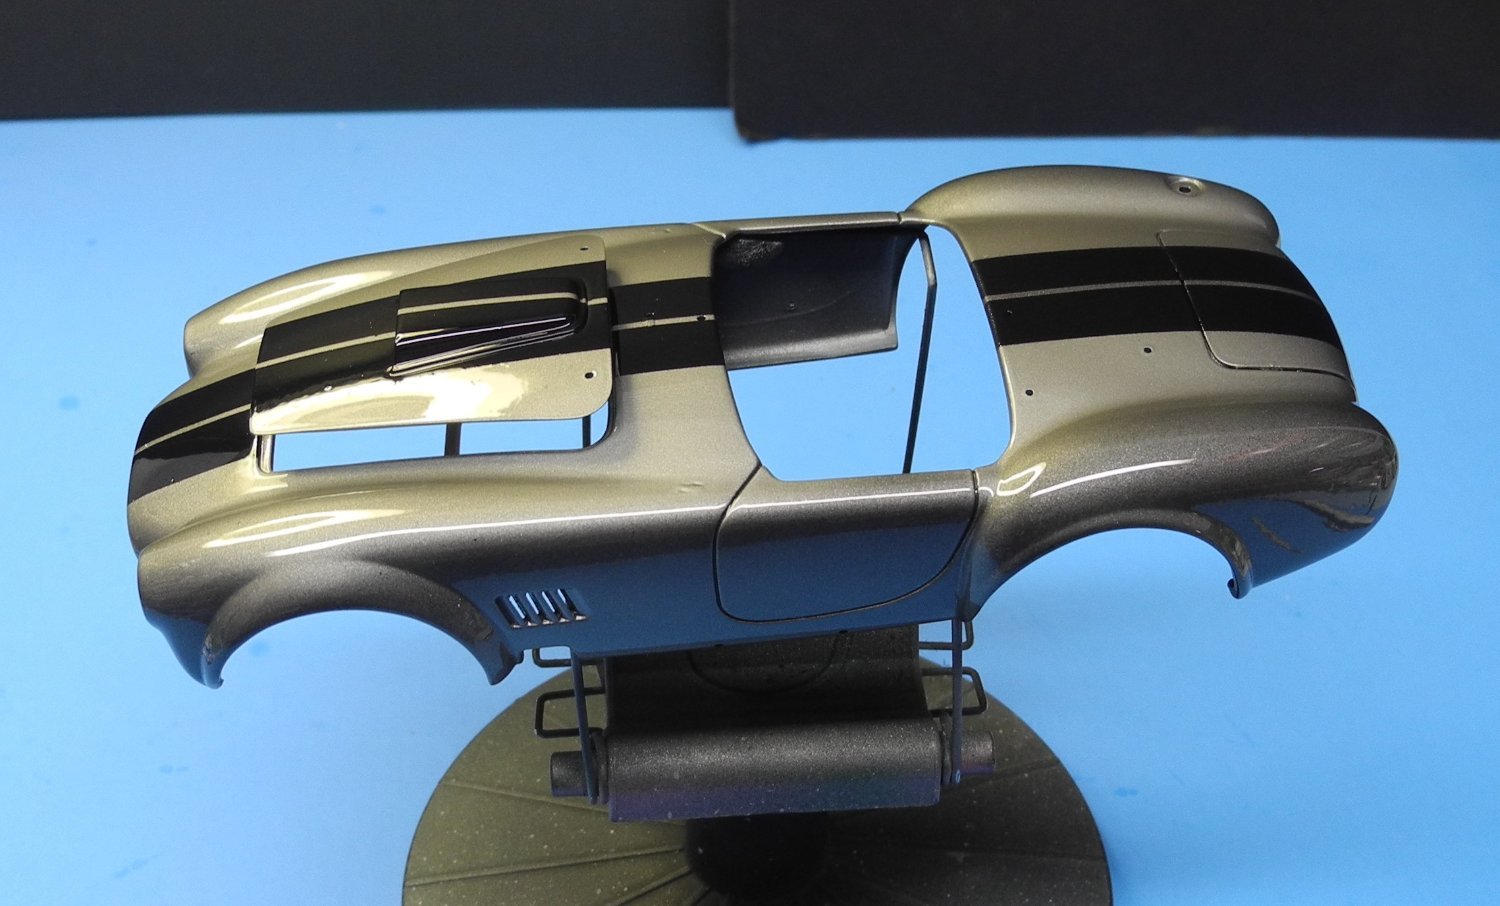
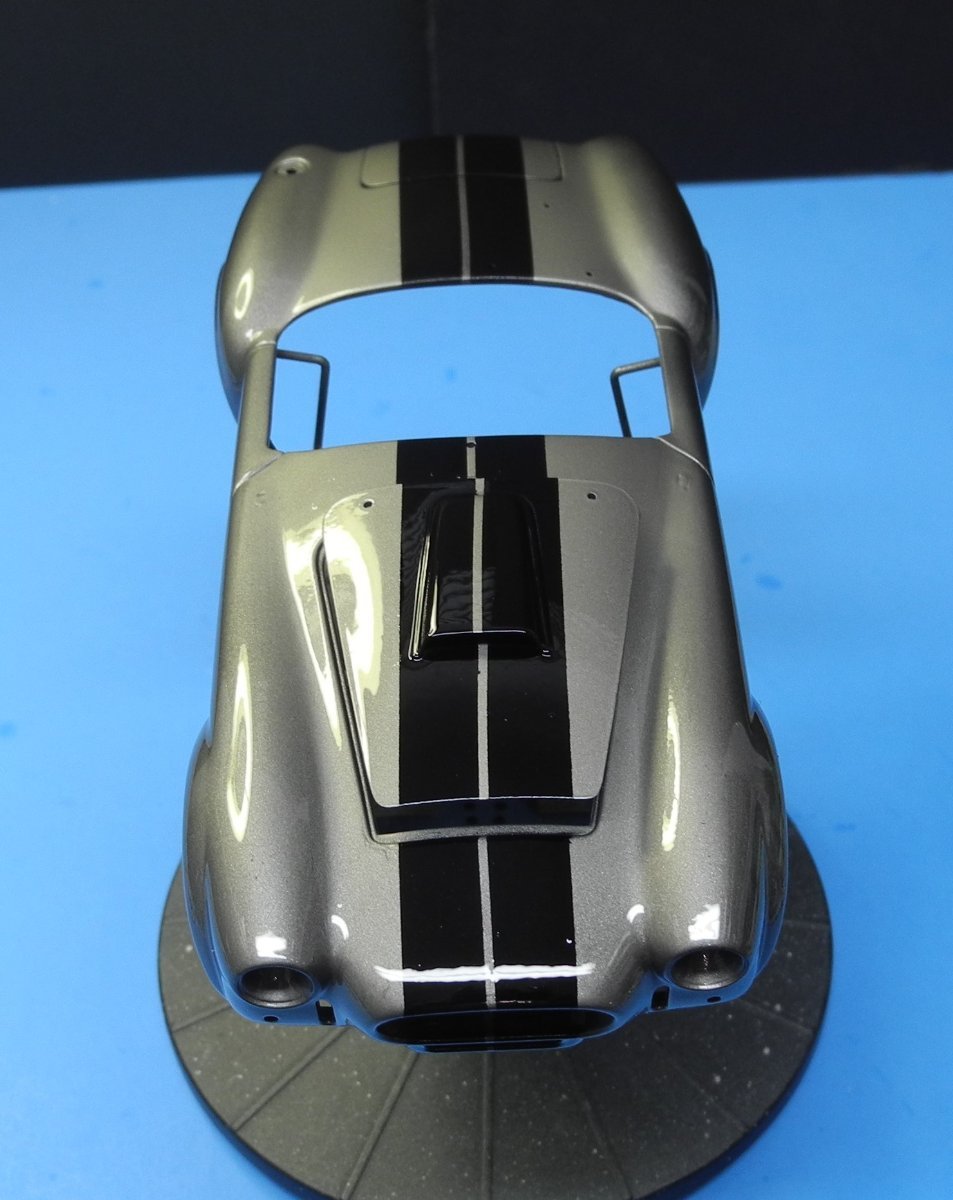
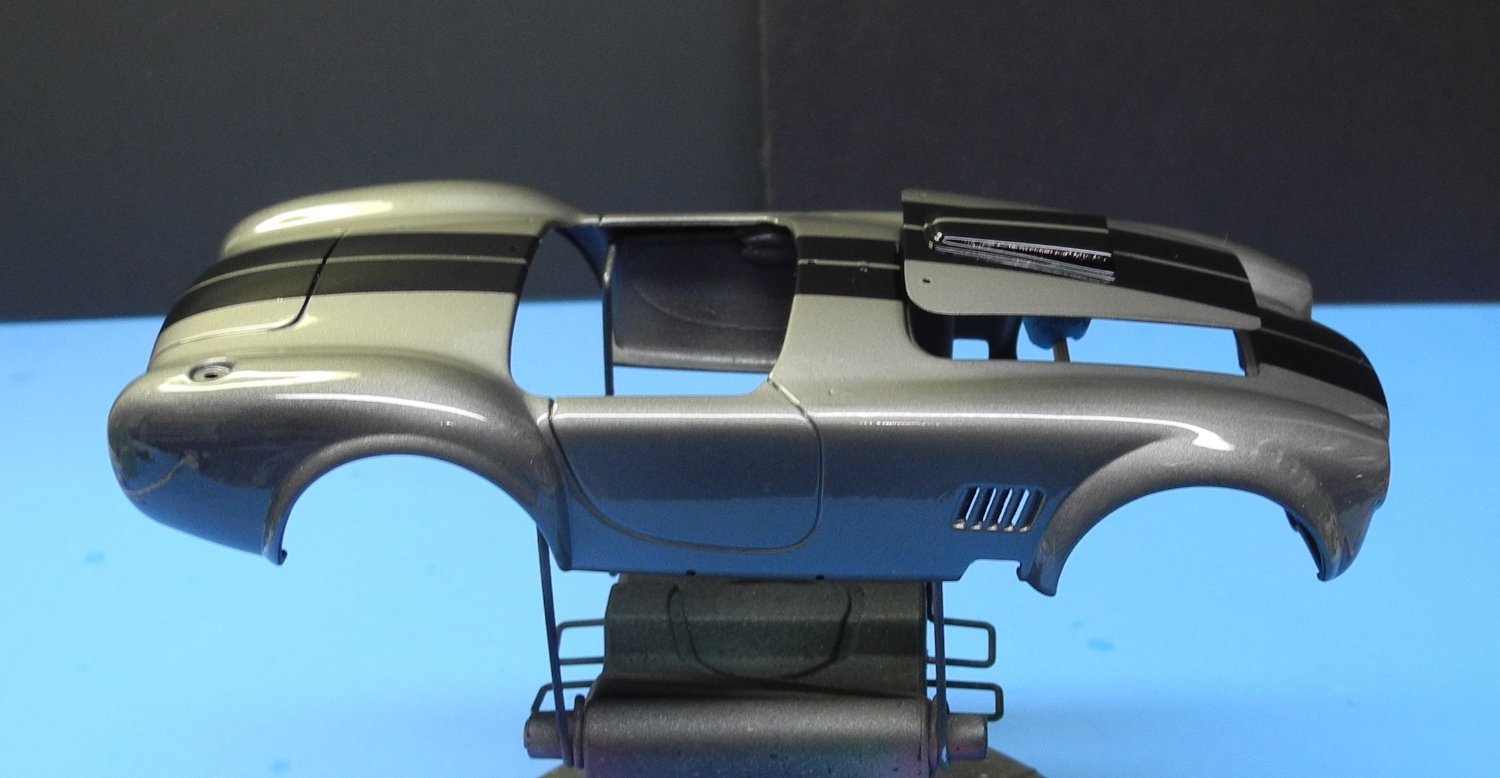
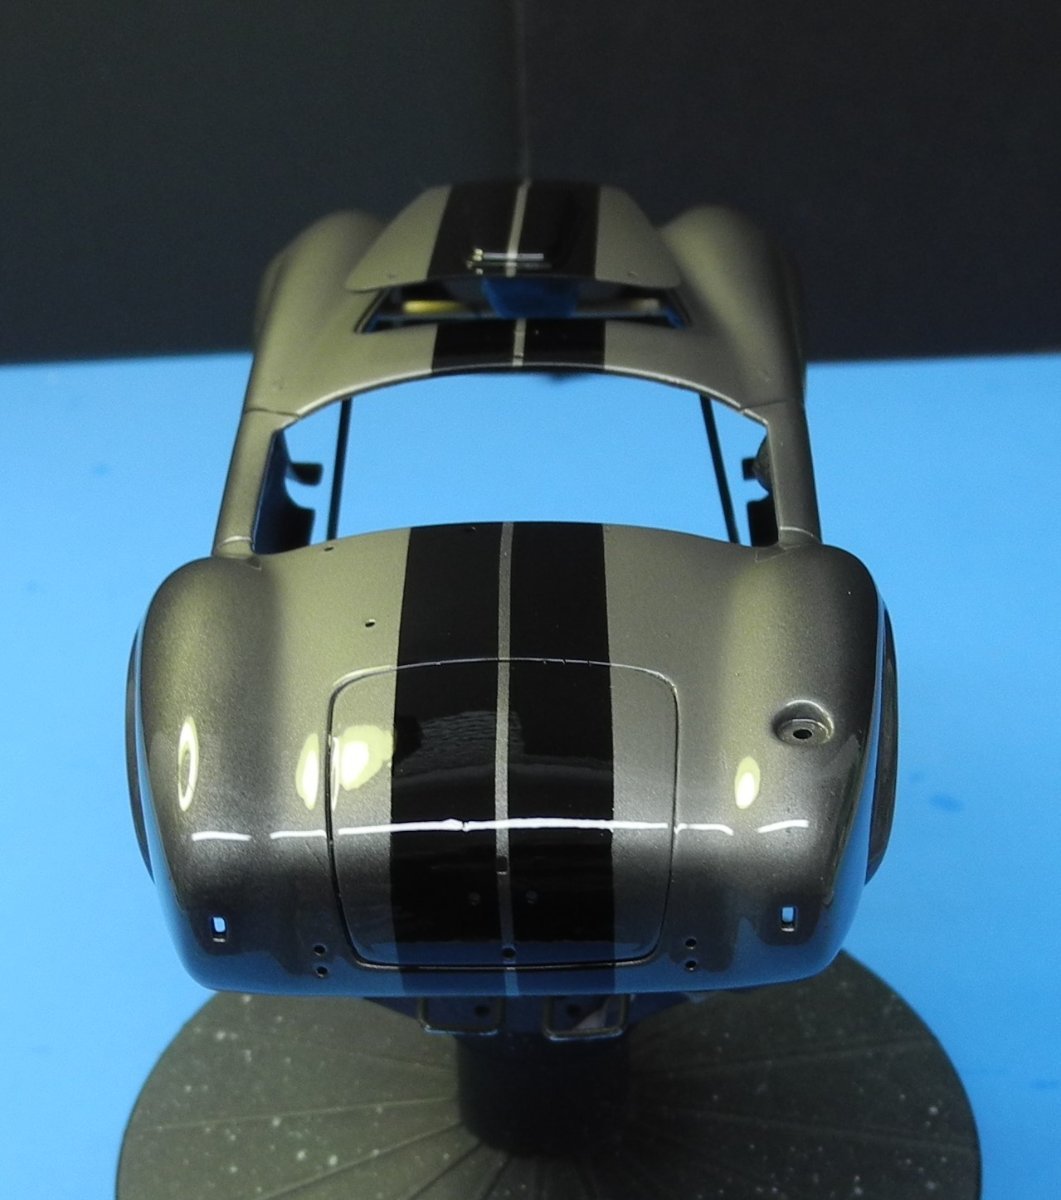
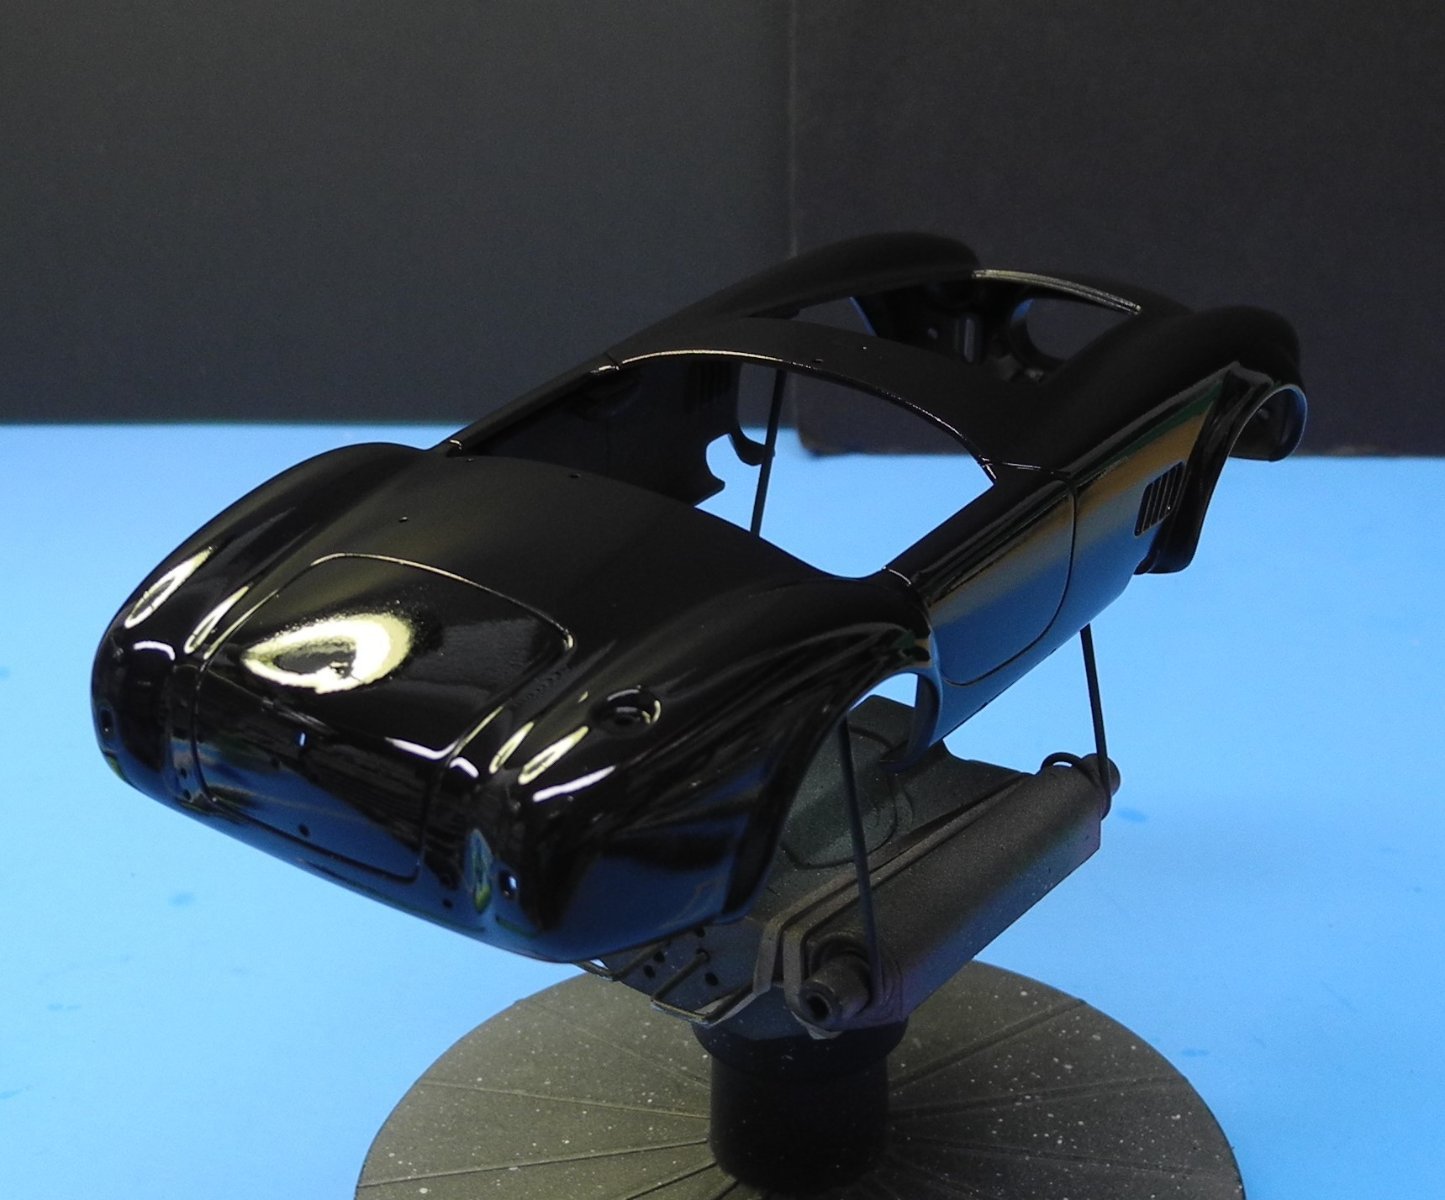
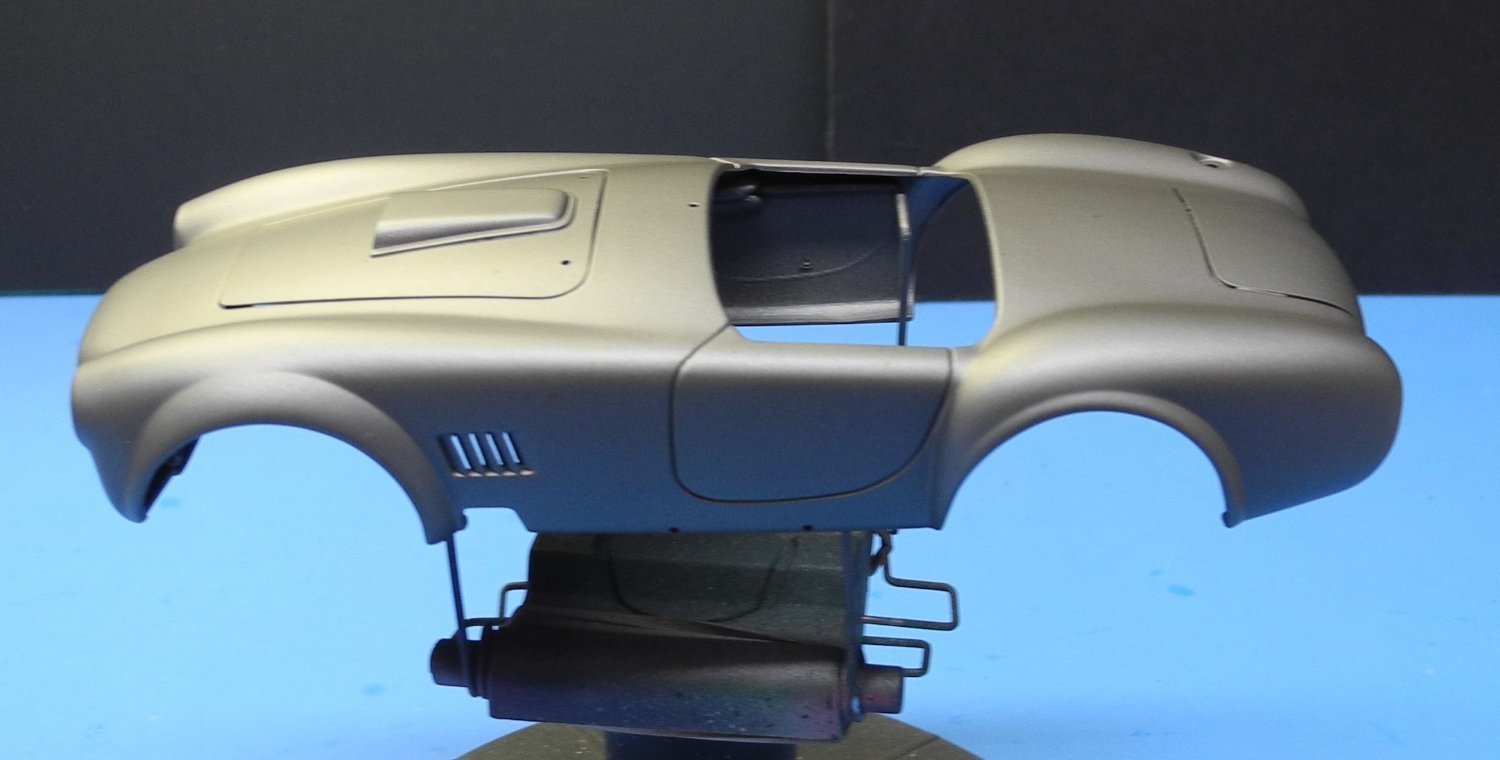
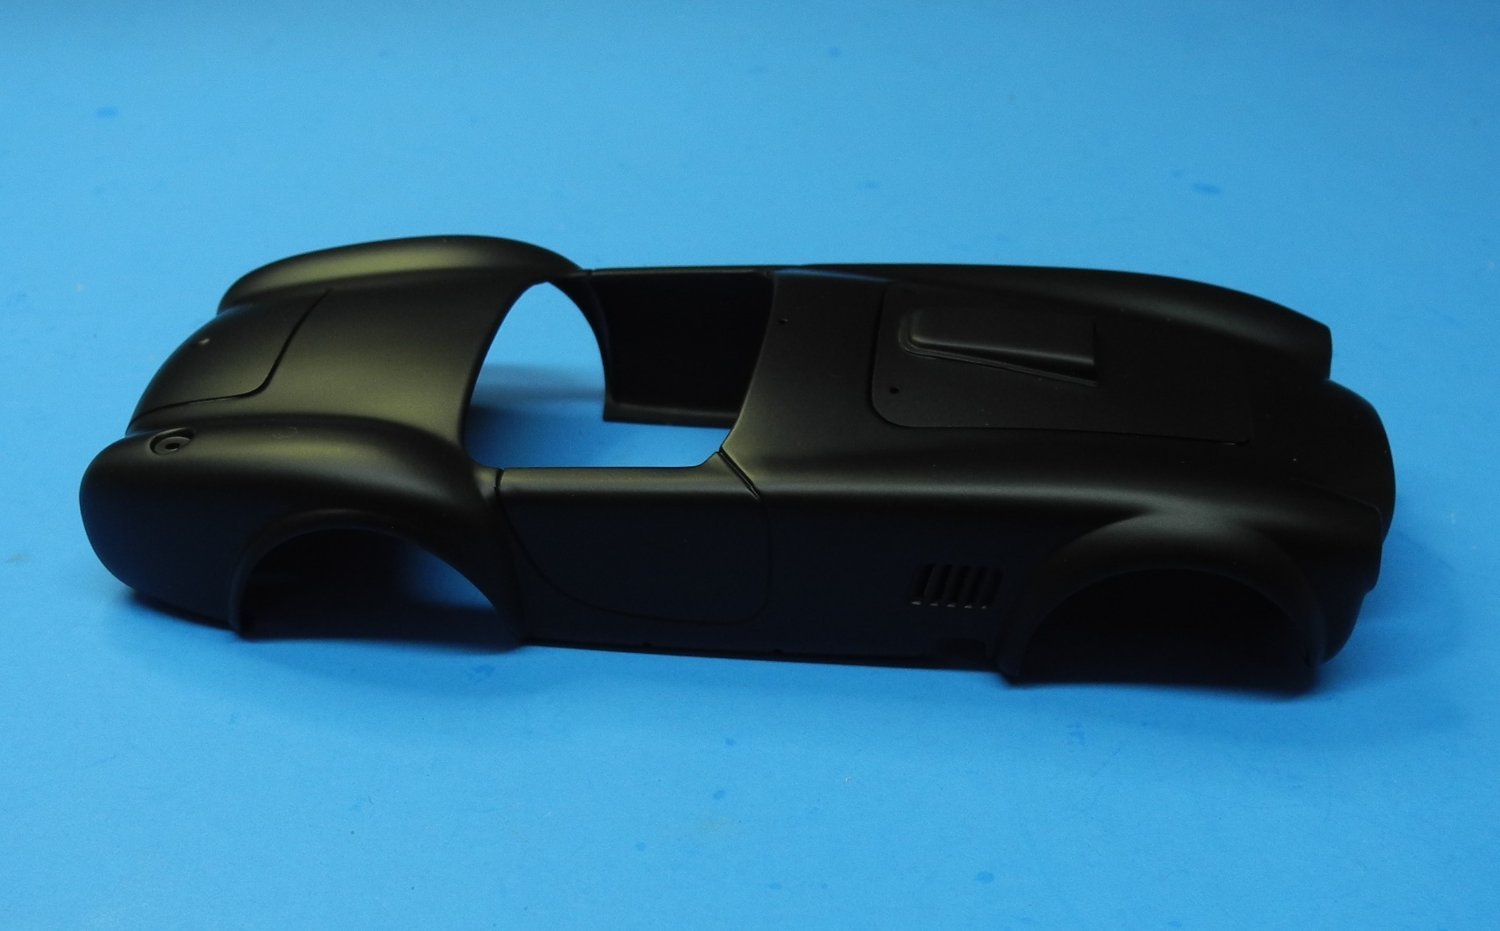
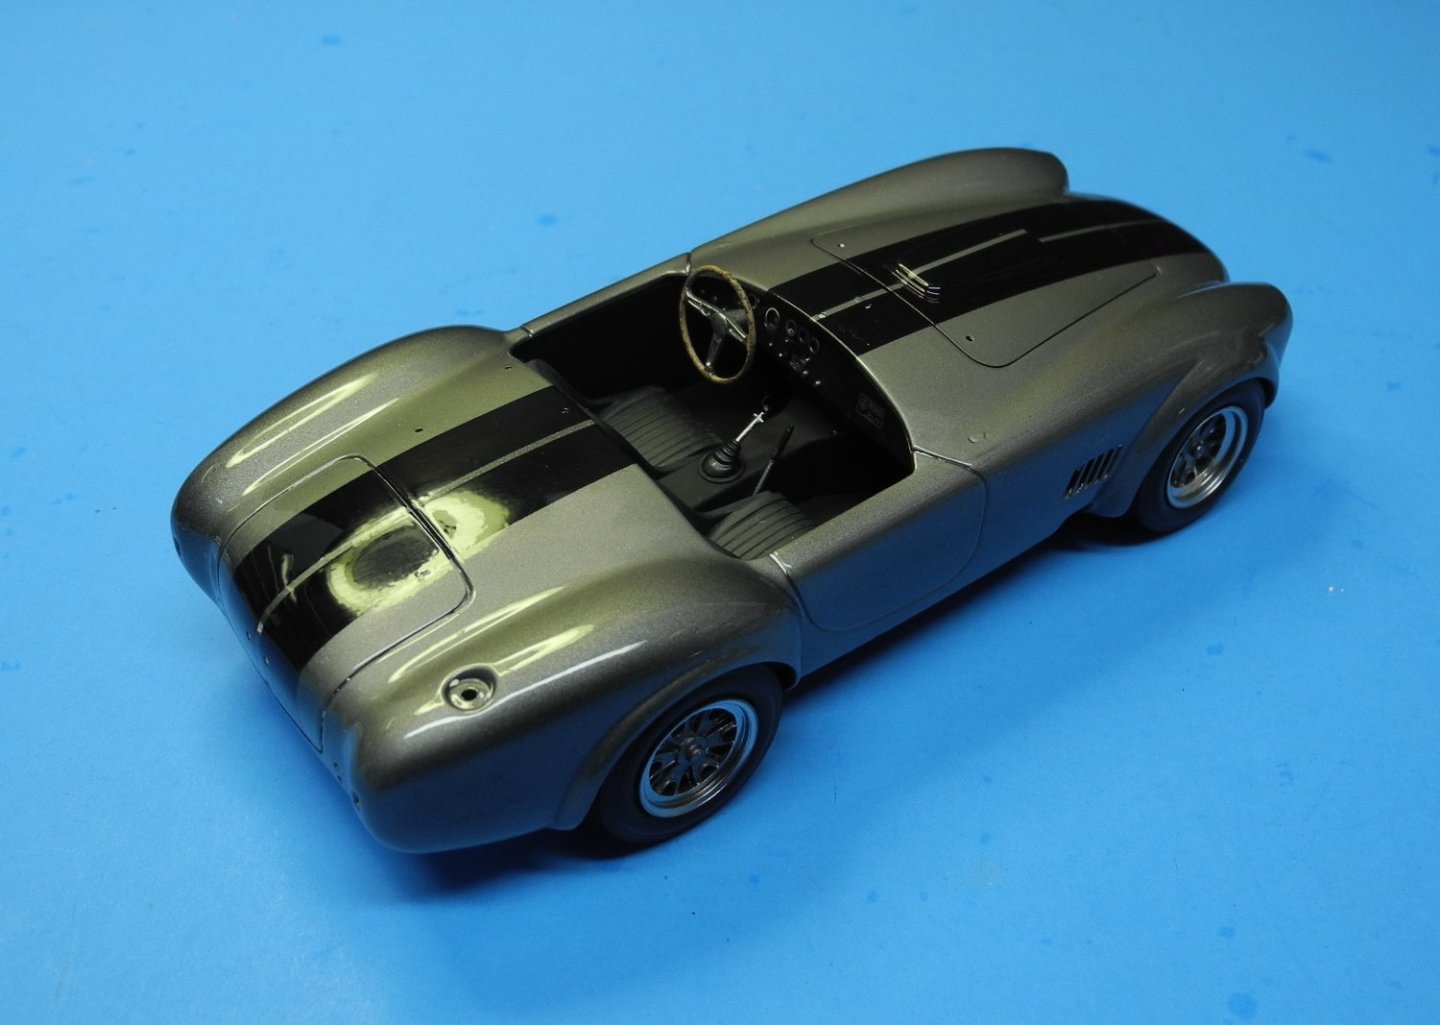
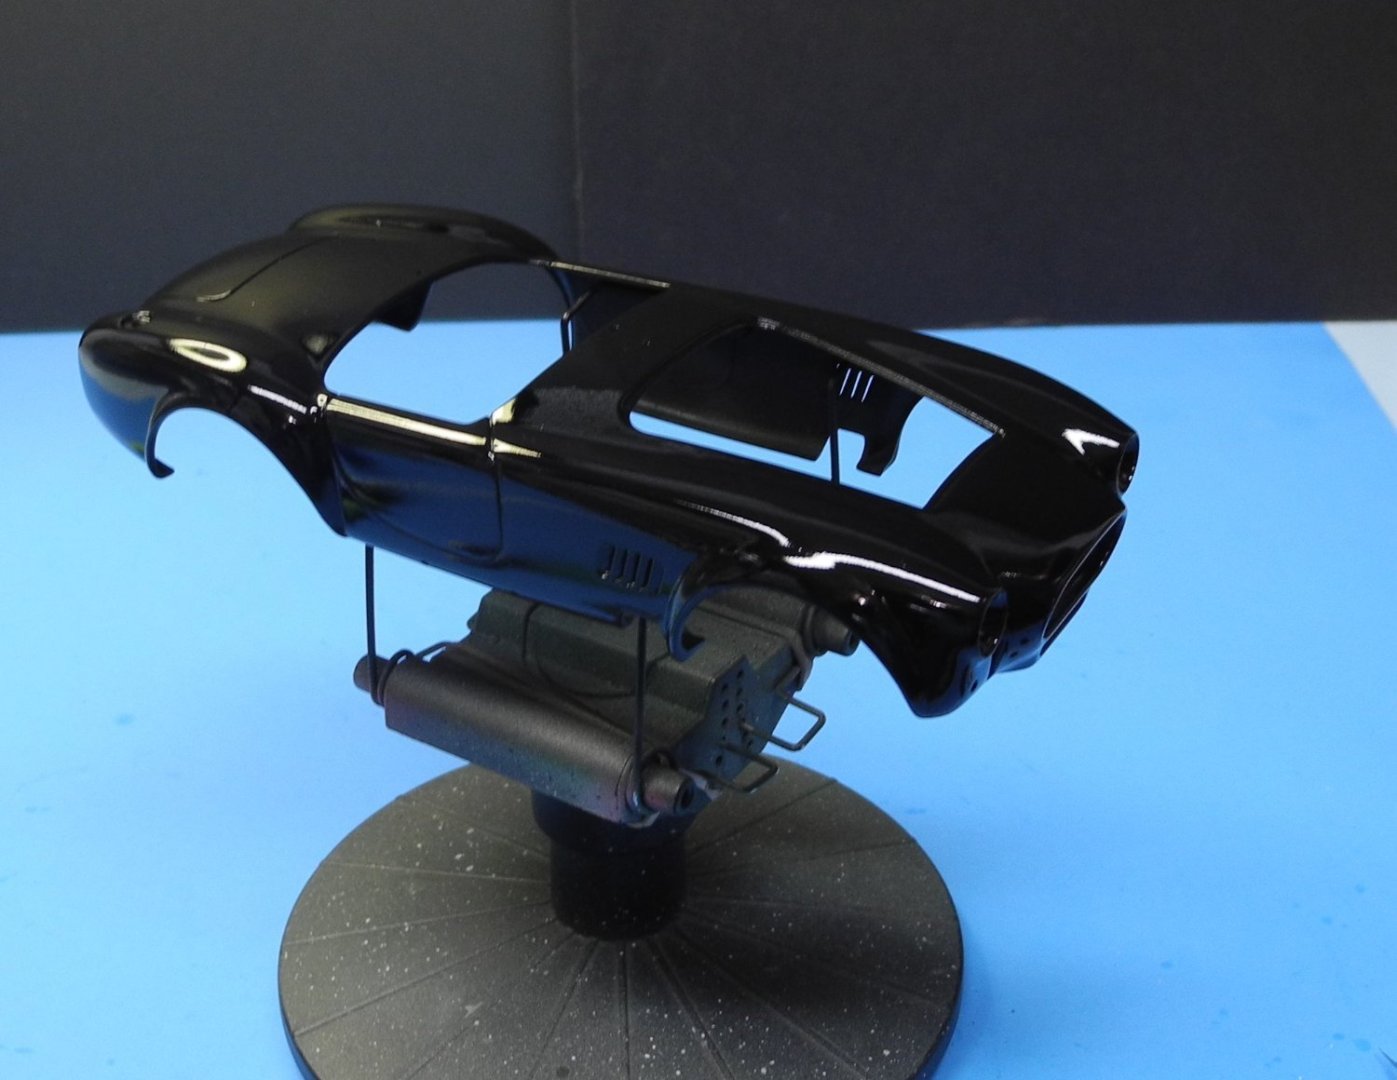
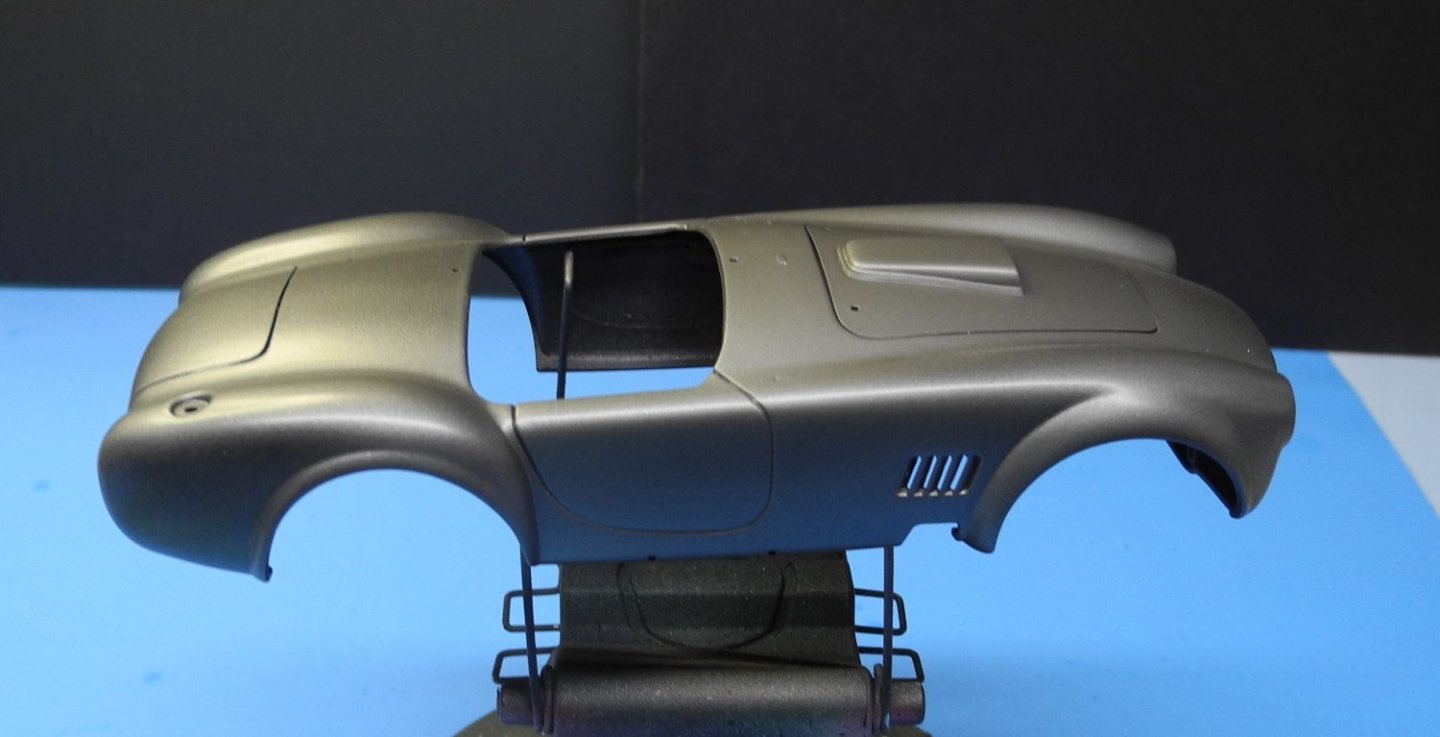
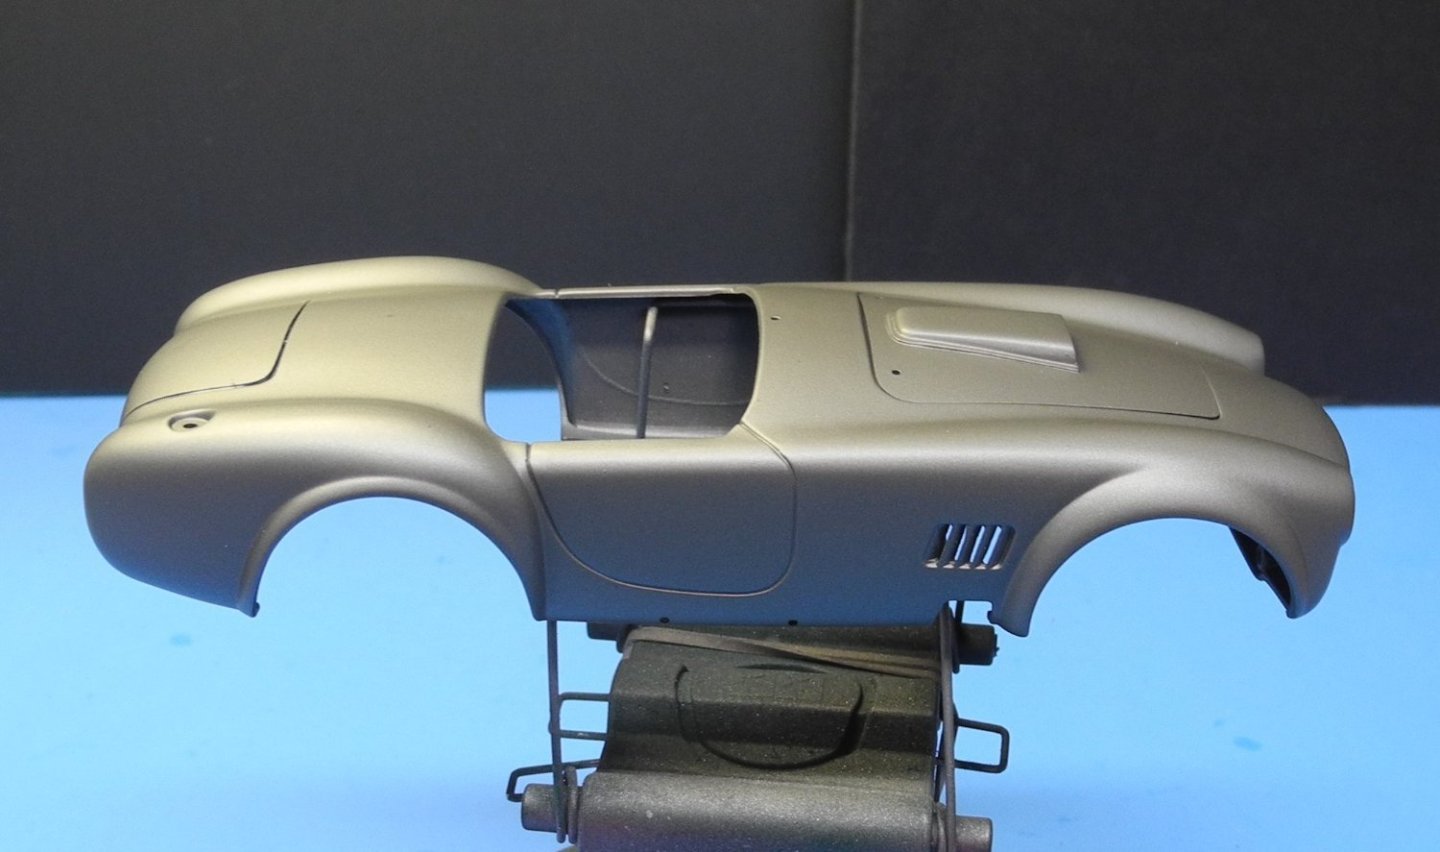
I wasn't happy with the way my metallic gray went down, so I stripped the body down and started over again. This time gloss black was applied over the primer surfacer. Last I sprayed on my metallic gray with some gloss clear mixed in. The stock windscreen frame looks horrible in my opinion. I filed it down to a more aesthetically pleasing shape. The shape of the bottom of the windscreen does not evenly conform with the shape of the body. In a later step/s, will correct this problem with Tamiya epoxy putty.


- 67 replies
-
- 15
-
-
RGS Rotary Snowplow by yvesvidal - DURANGO PRESS - On3 - 1/48
CDW replied to yvesvidal's topic in Non-ship/categorised builds
Wow, that looks perfect! -
Shelby 427 S/C Cobra by CDW - FINISHED - Fujimi - 1:24 Scale
CDW replied to CDW's topic in Non-ship/categorised builds
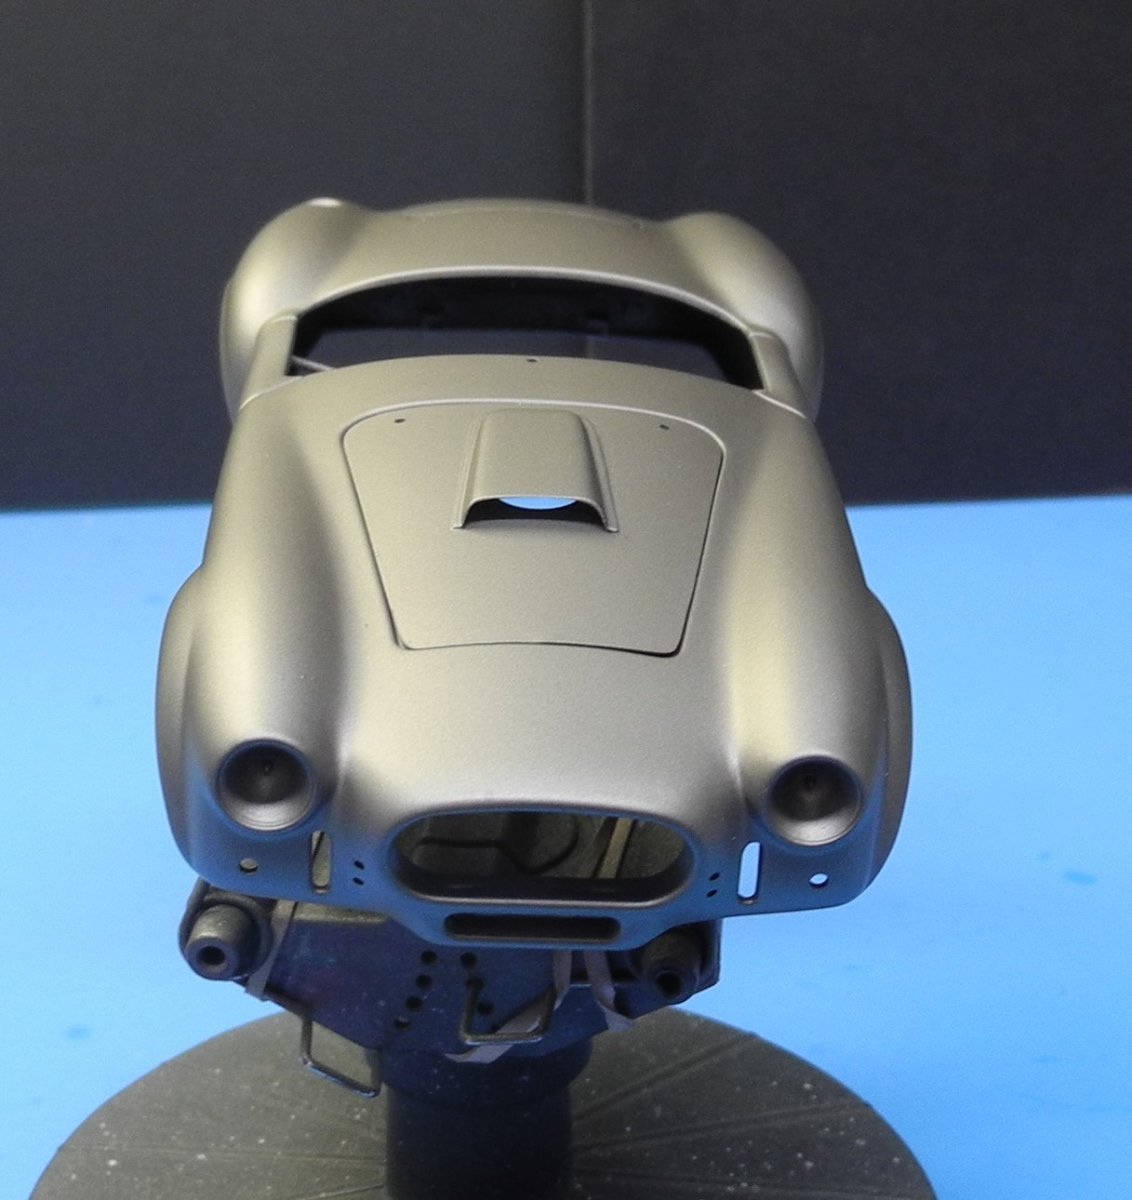
I forgot to mention, the front and rear of the body has raised detail where the Cobra decal emblems go down later. I cut those raised areas away and sanded them smooth as I can cut sheet styrene for the emblem decals and add them at the end of the build. It will look better and not interfere with the masking for the stripes. -
Shelby 427 S/C Cobra by CDW - FINISHED - Fujimi - 1:24 Scale
CDW replied to CDW's topic in Non-ship/categorised builds
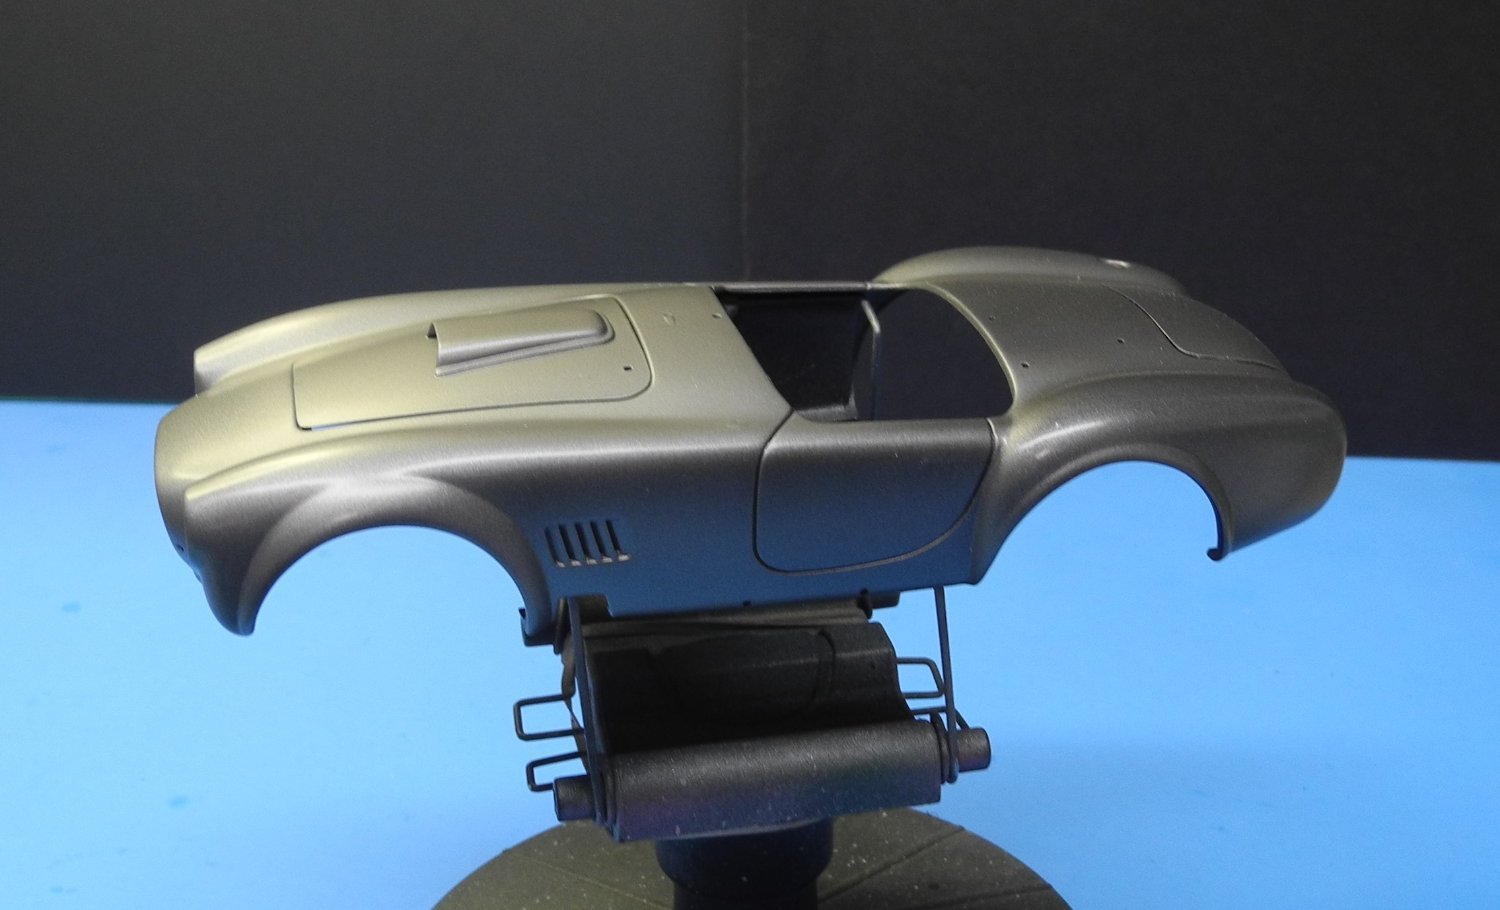
I've done a custom mix for metallic gray. Will be doing my stripes in black. Heavy on the clear coats and polish to follow.

- 67 replies
-
- 15
-
-
Shelby 427 S/C Cobra by CDW - FINISHED - Fujimi - 1:24 Scale
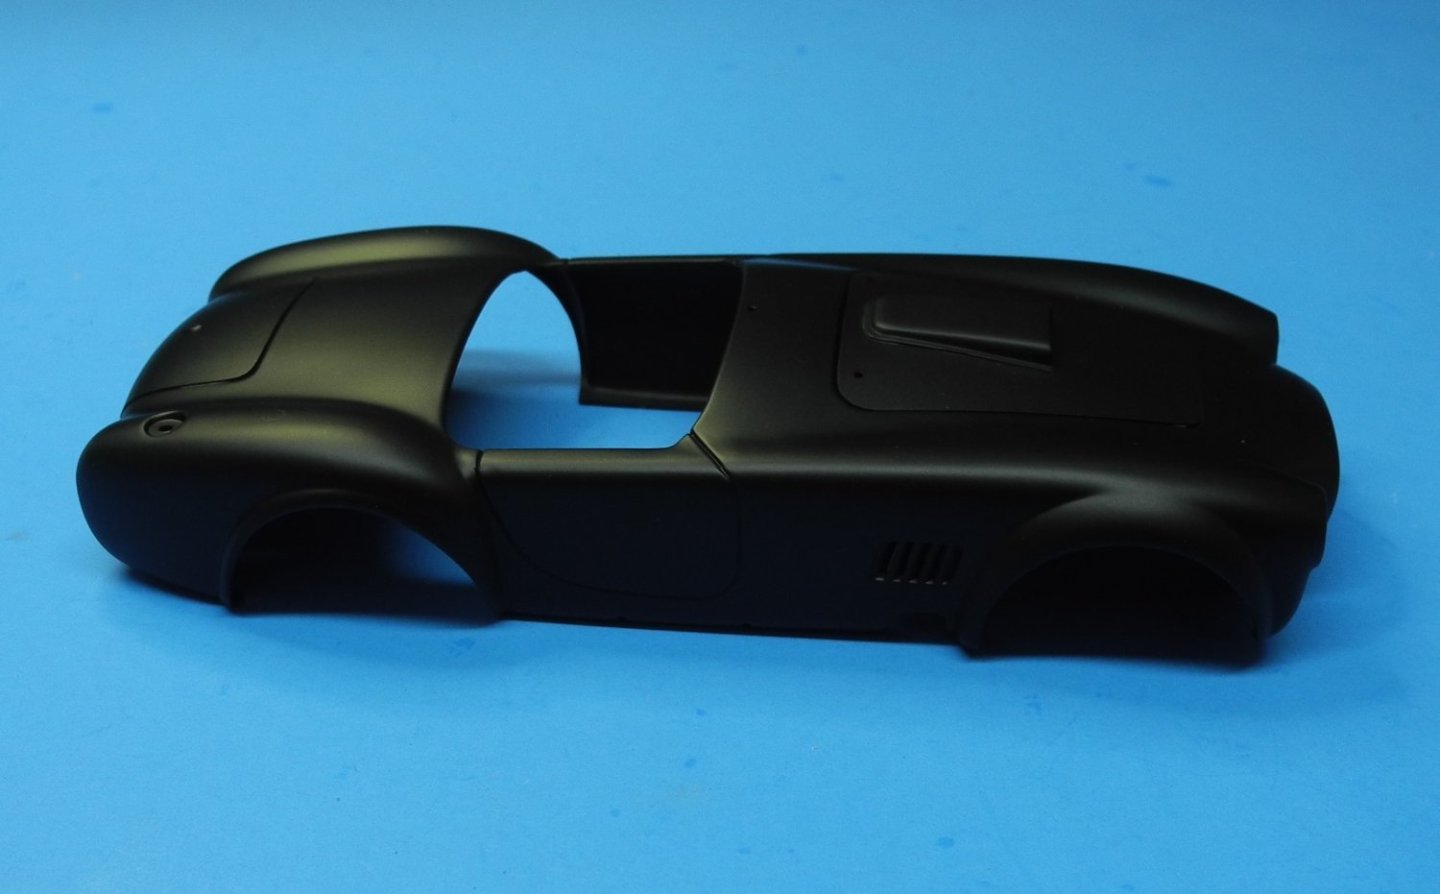
CDW replied to CDW's topic in Non-ship/categorised builds
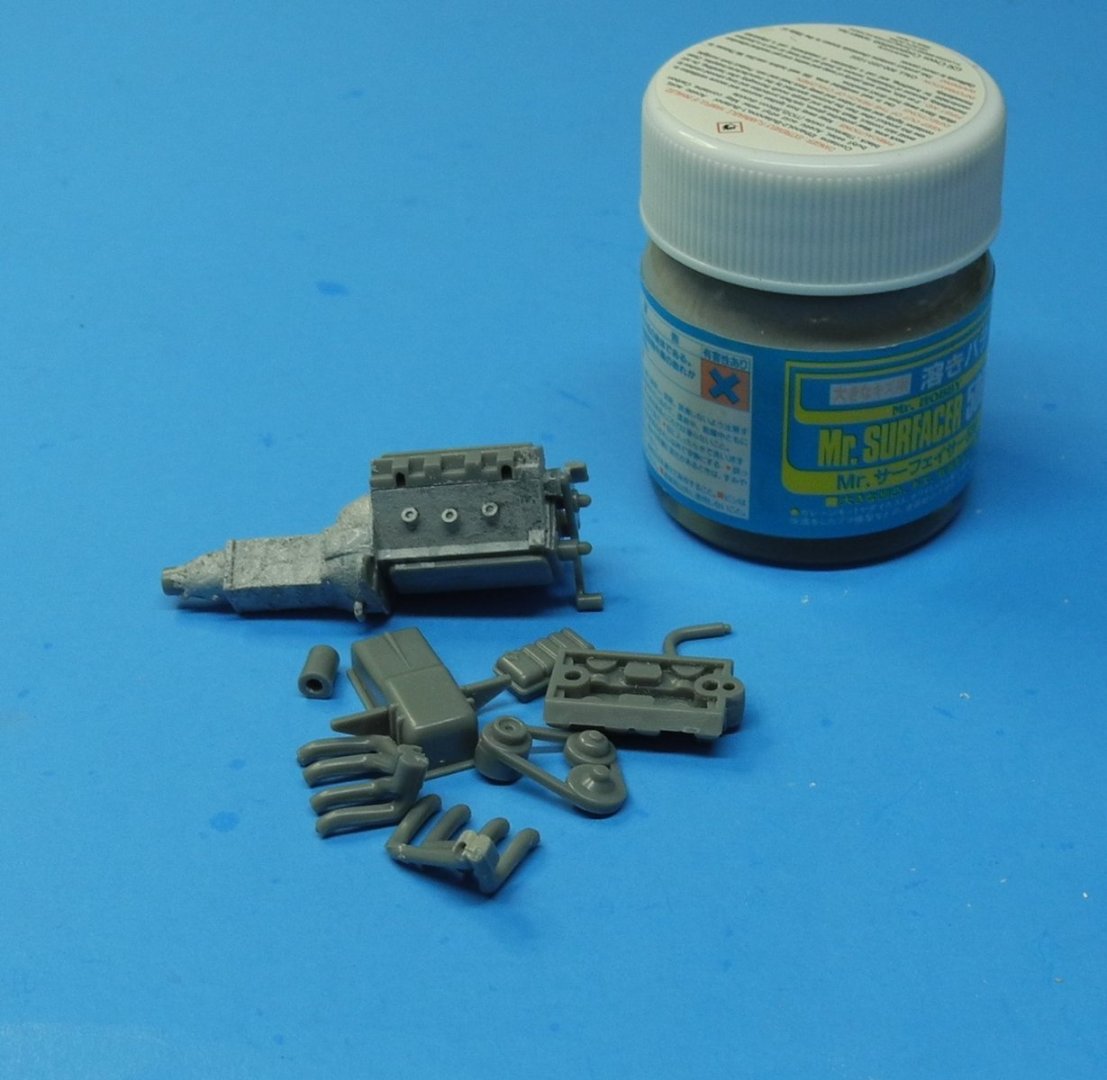
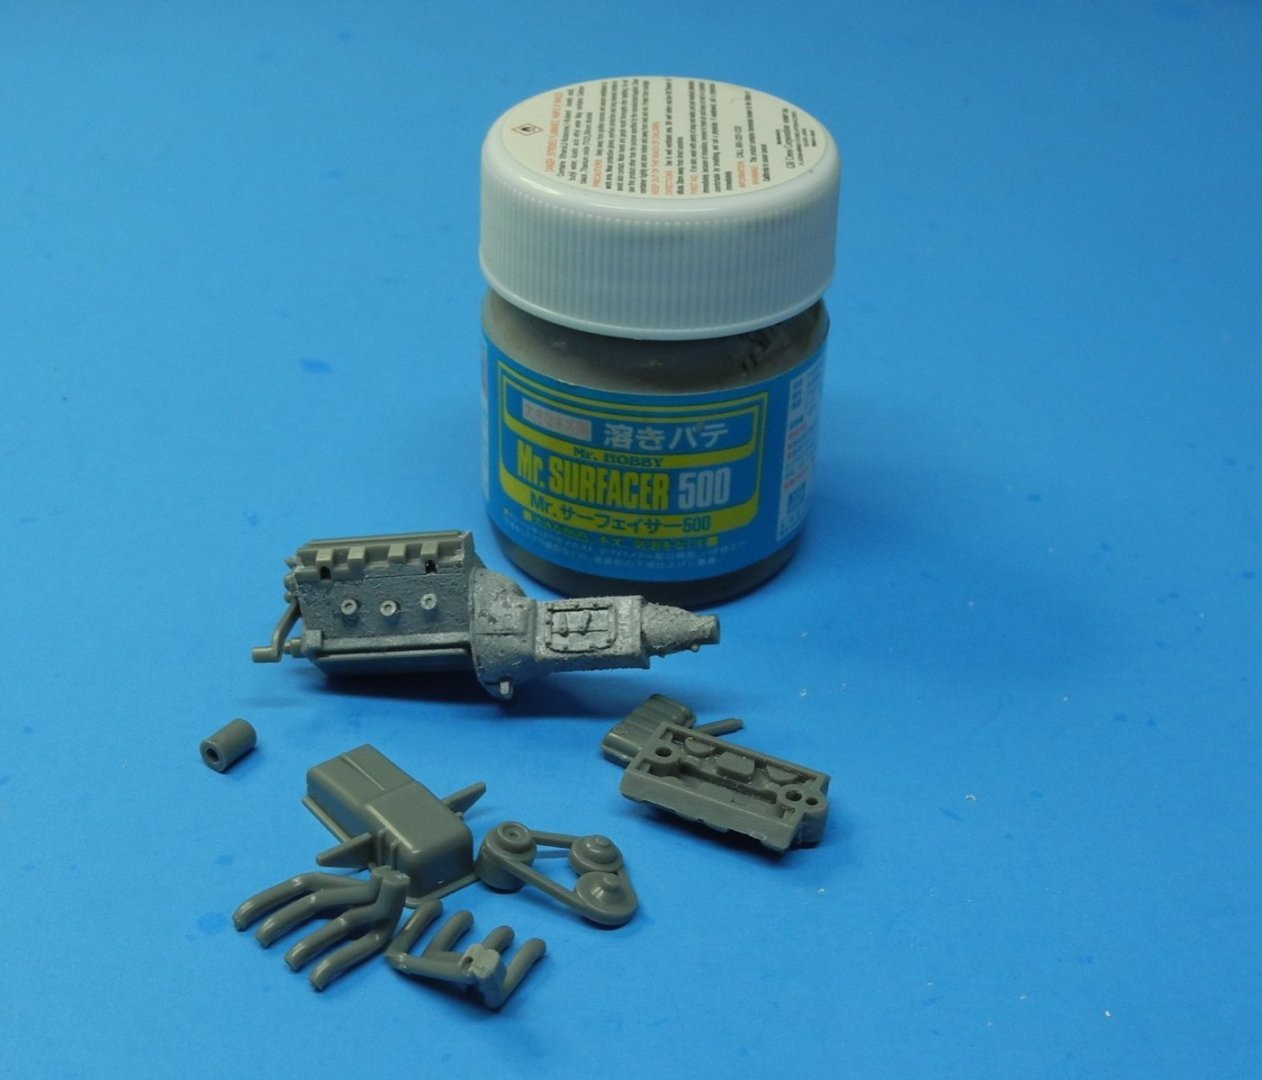
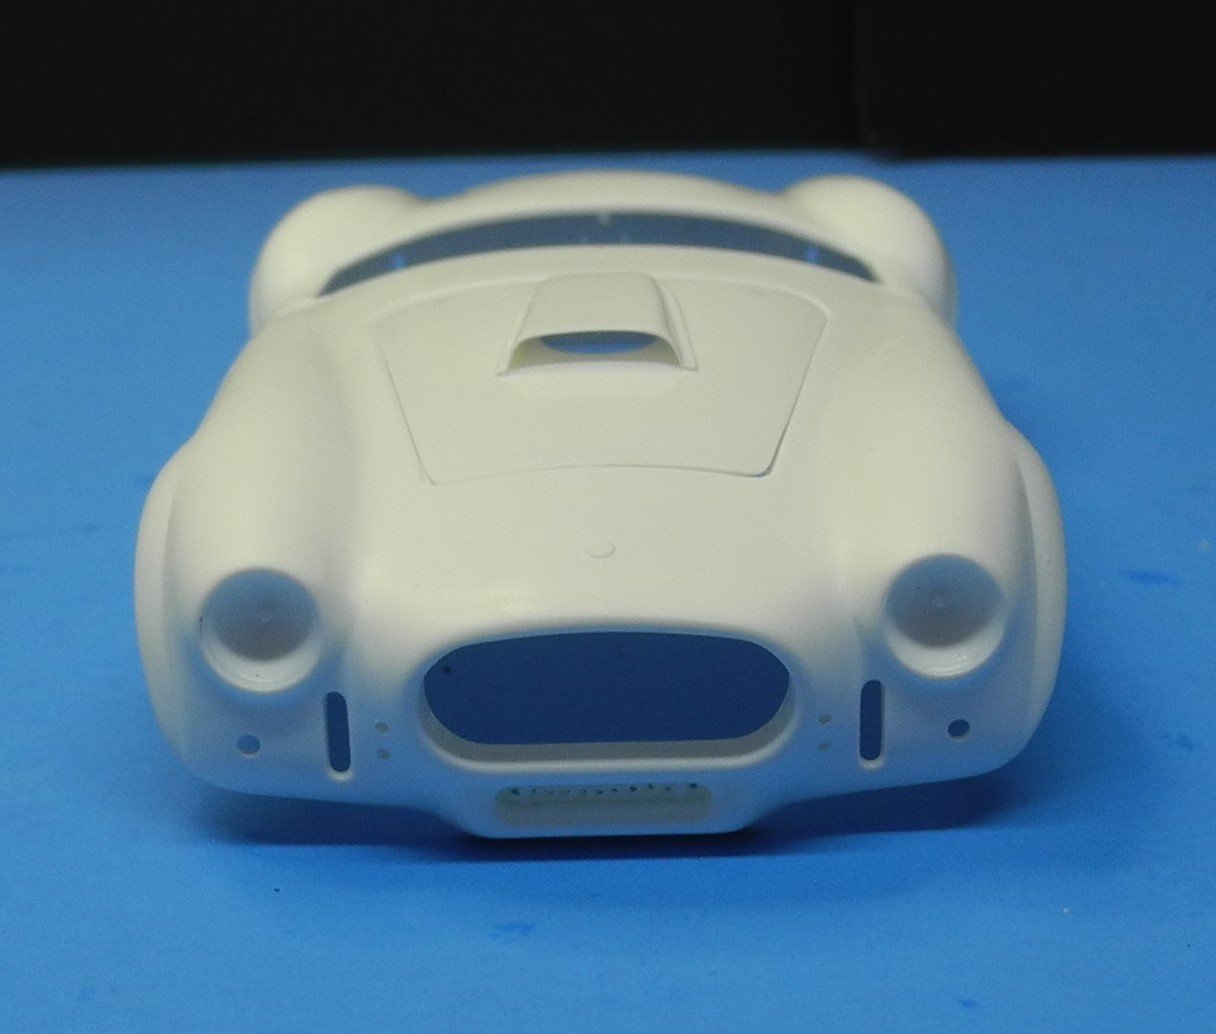
Here's the body all primed out in black. As you've probably guessed by now, I won't be finishing it in traditional blue color as seen on the box art. The engine assembly is a straight forward and simple affair. I like the way the simplicity resulted in a good fit, but was disappointed the plastic was molded in a very smooth finish and lacked the texture of a cast block and transmission. To correct this a bit and add some texture before painting, I dabbed on Mr Surfacer 500 using a stiff brush.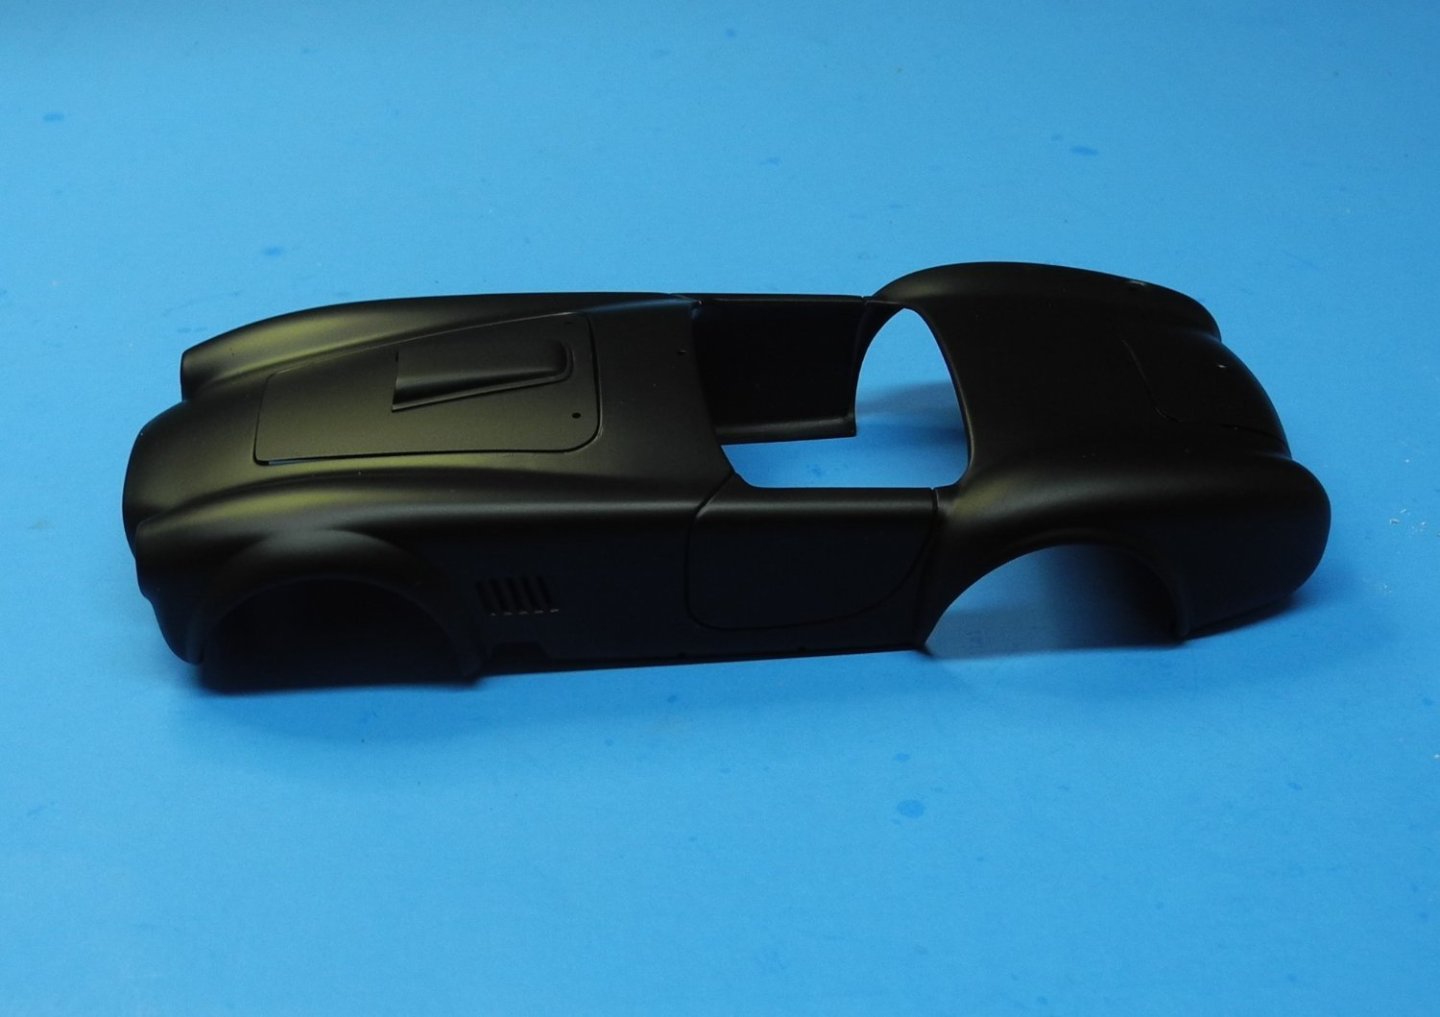
- 67 replies
-
- 15
-
-
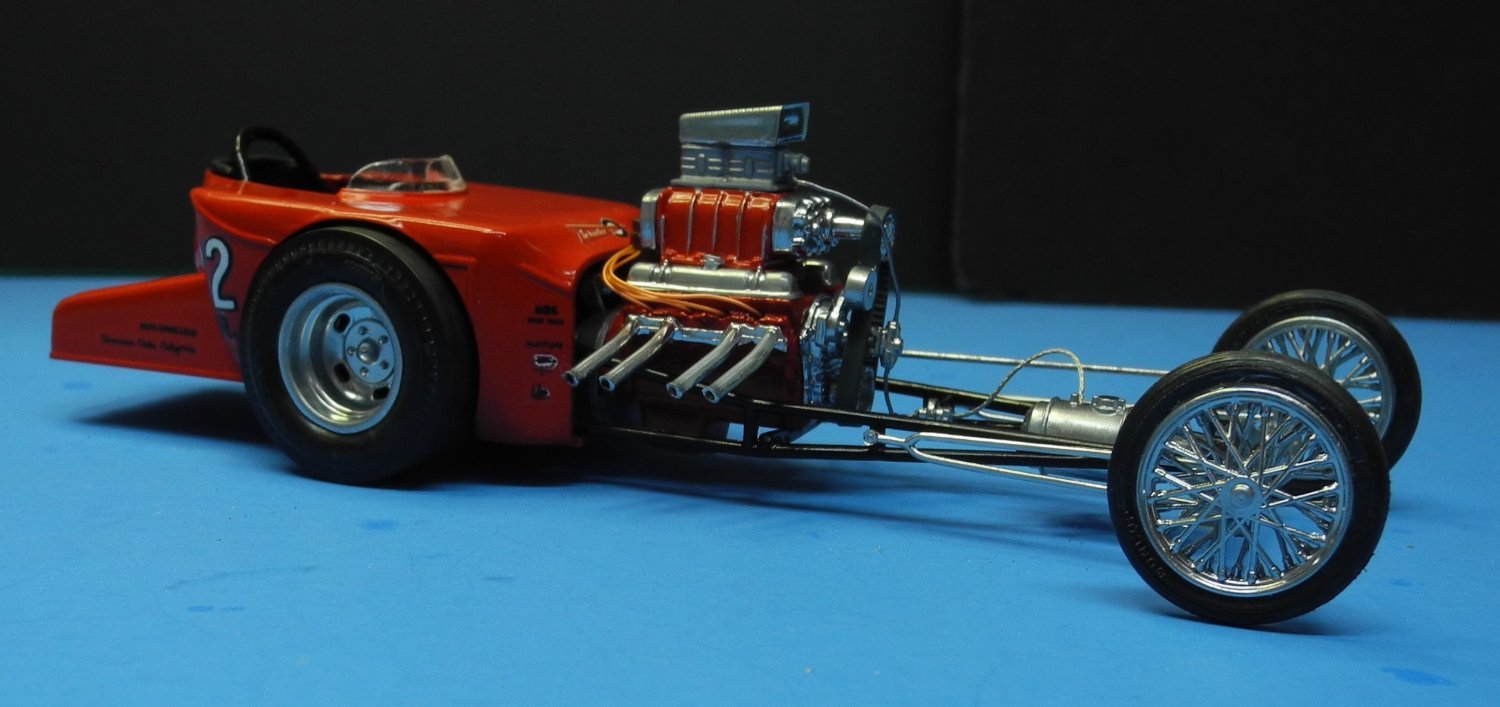
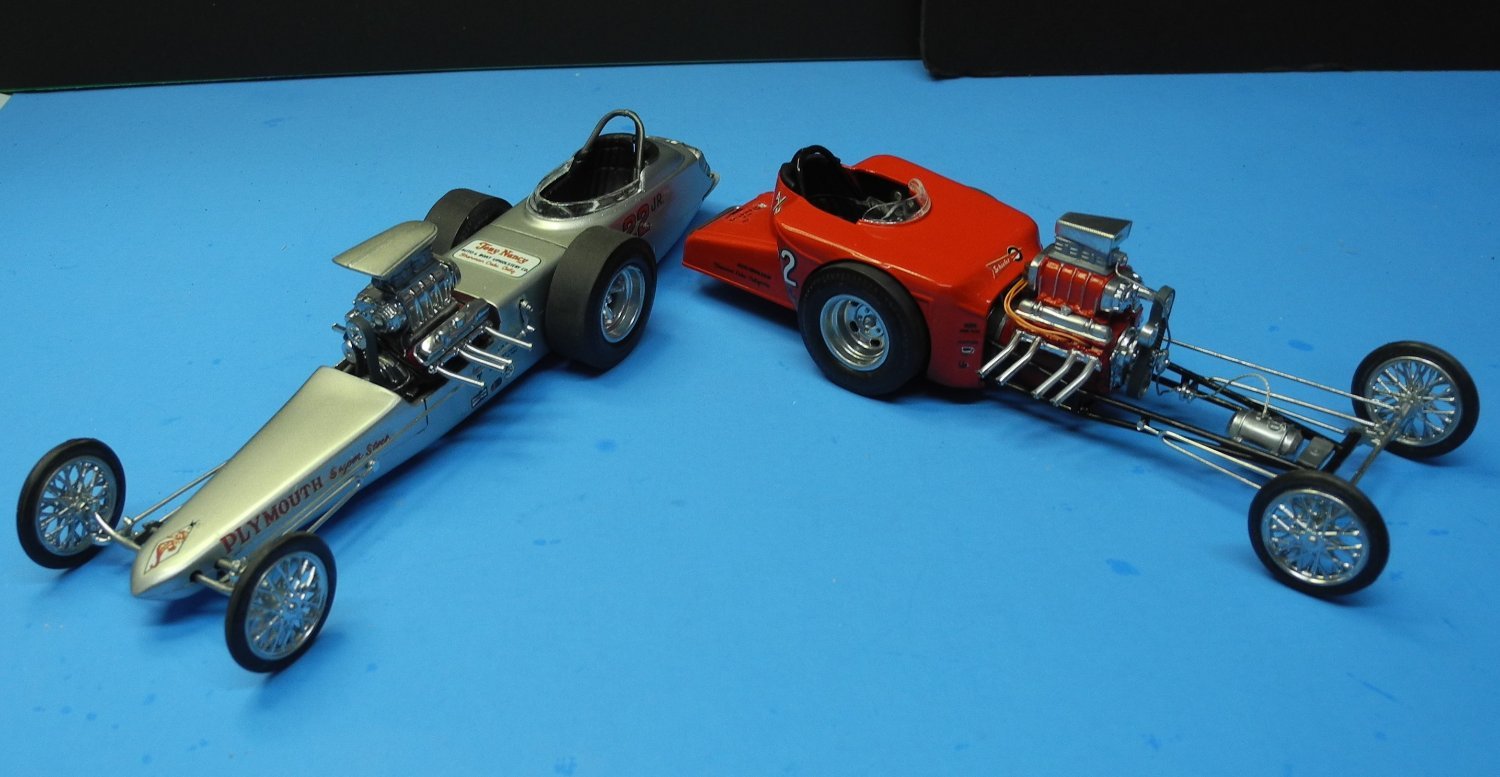
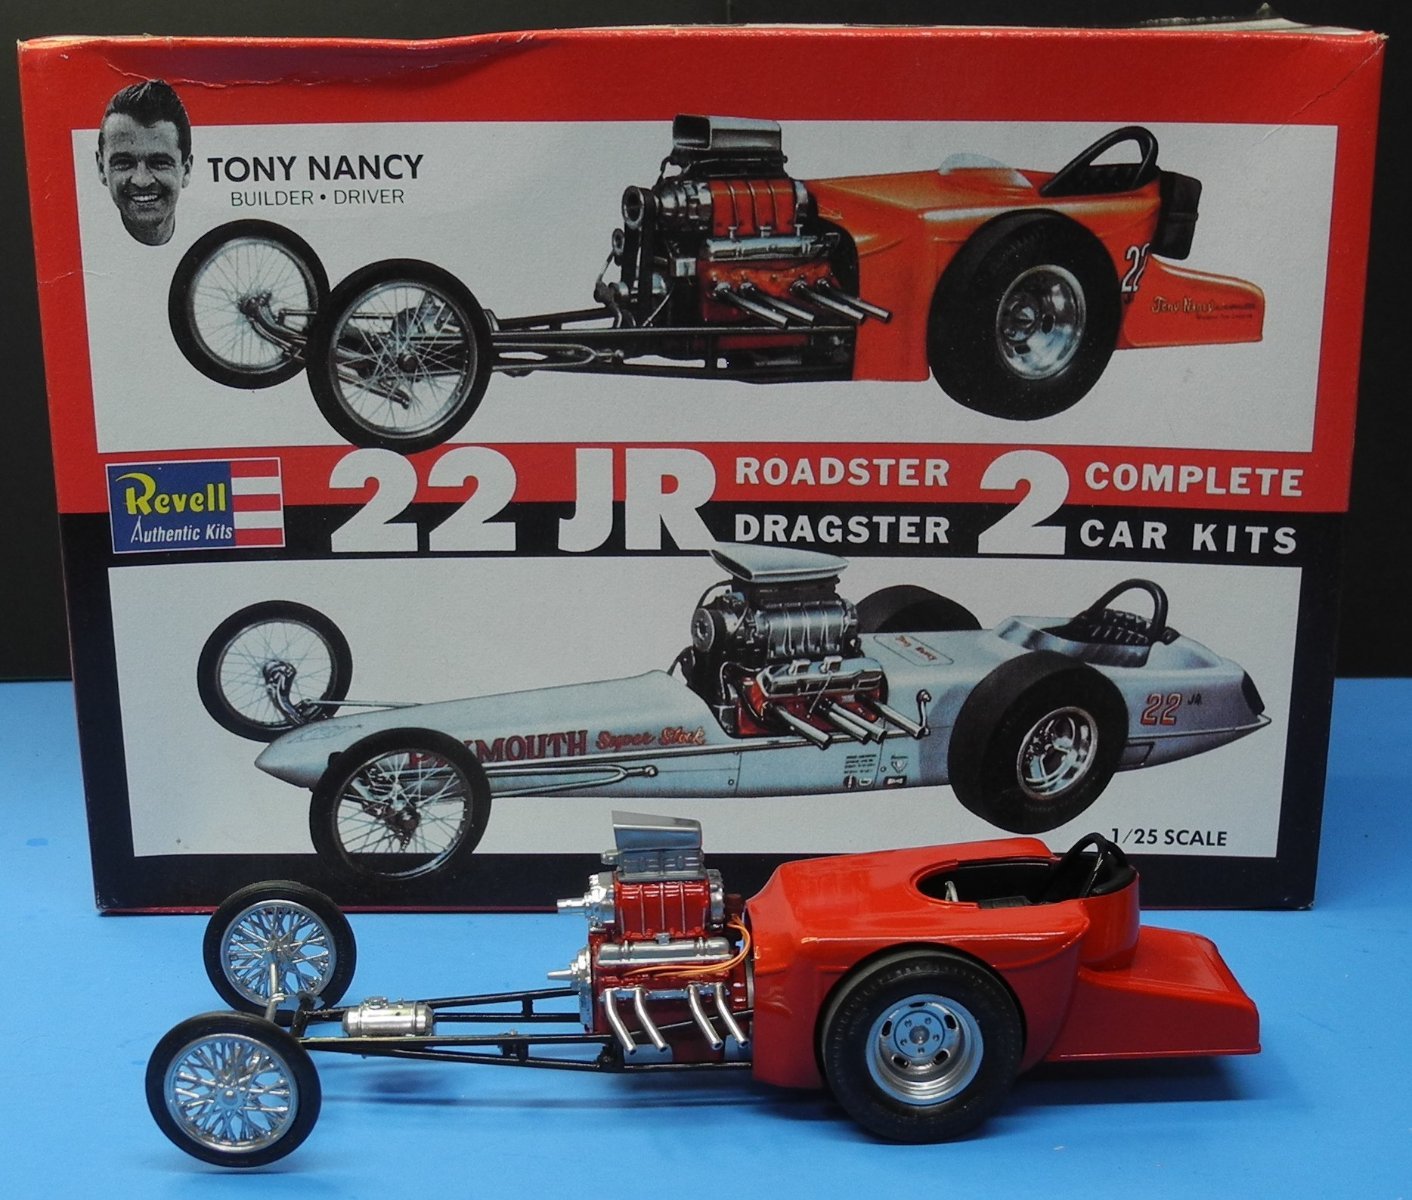
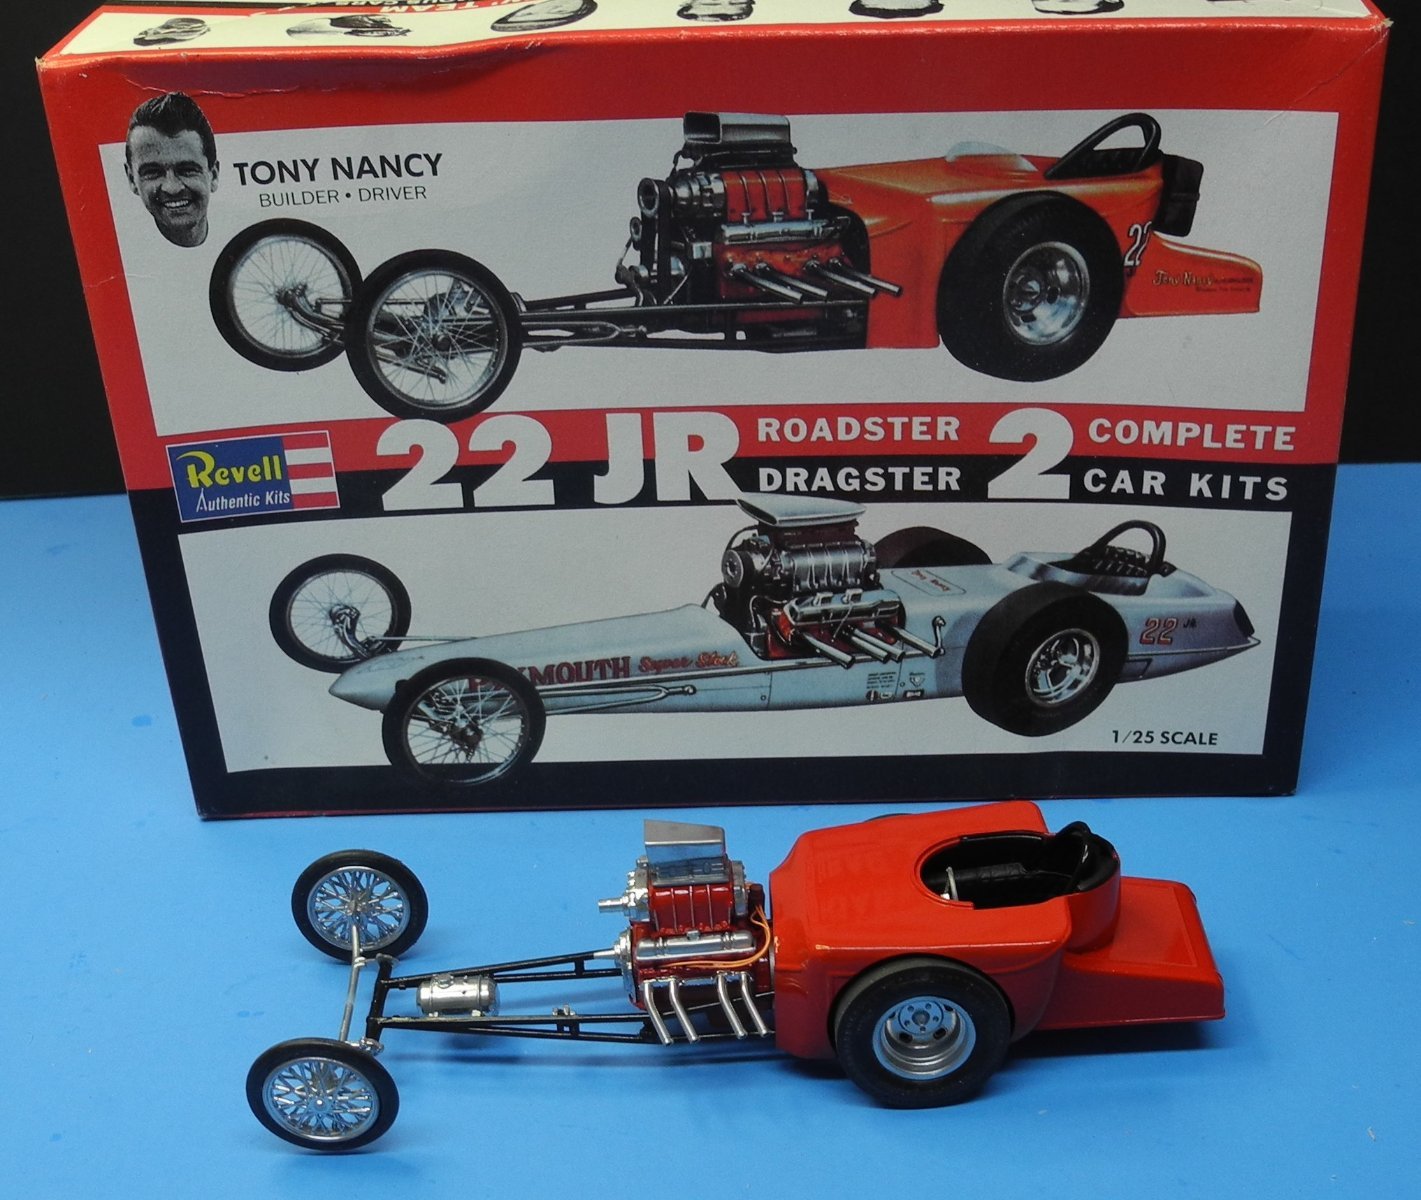
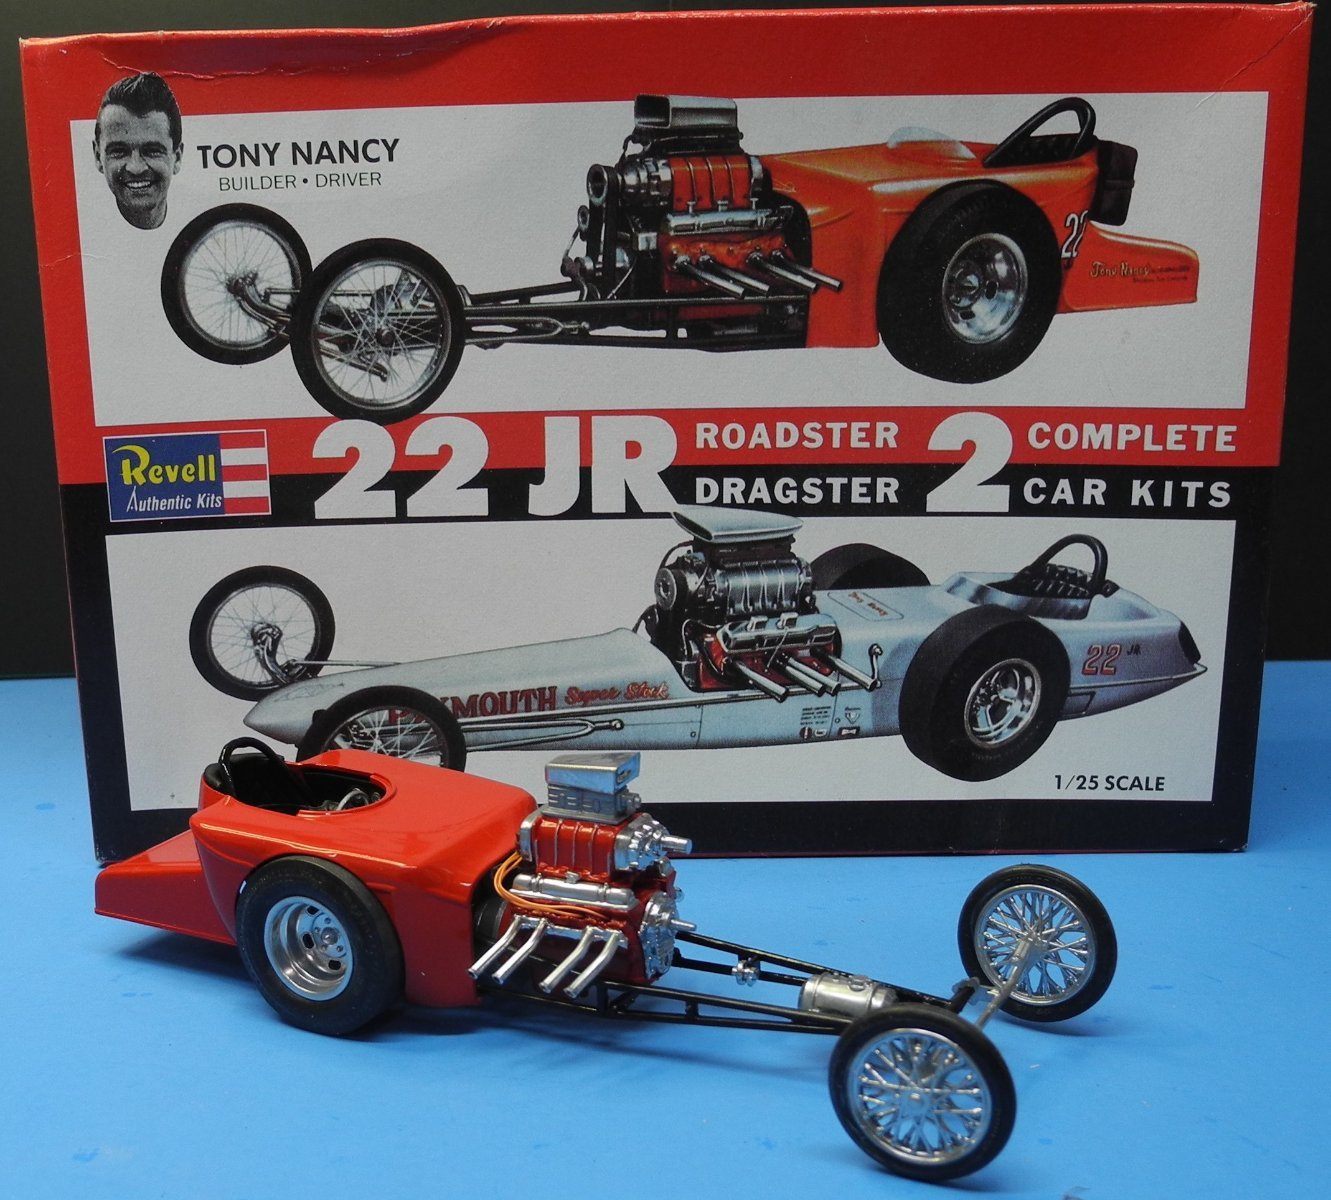
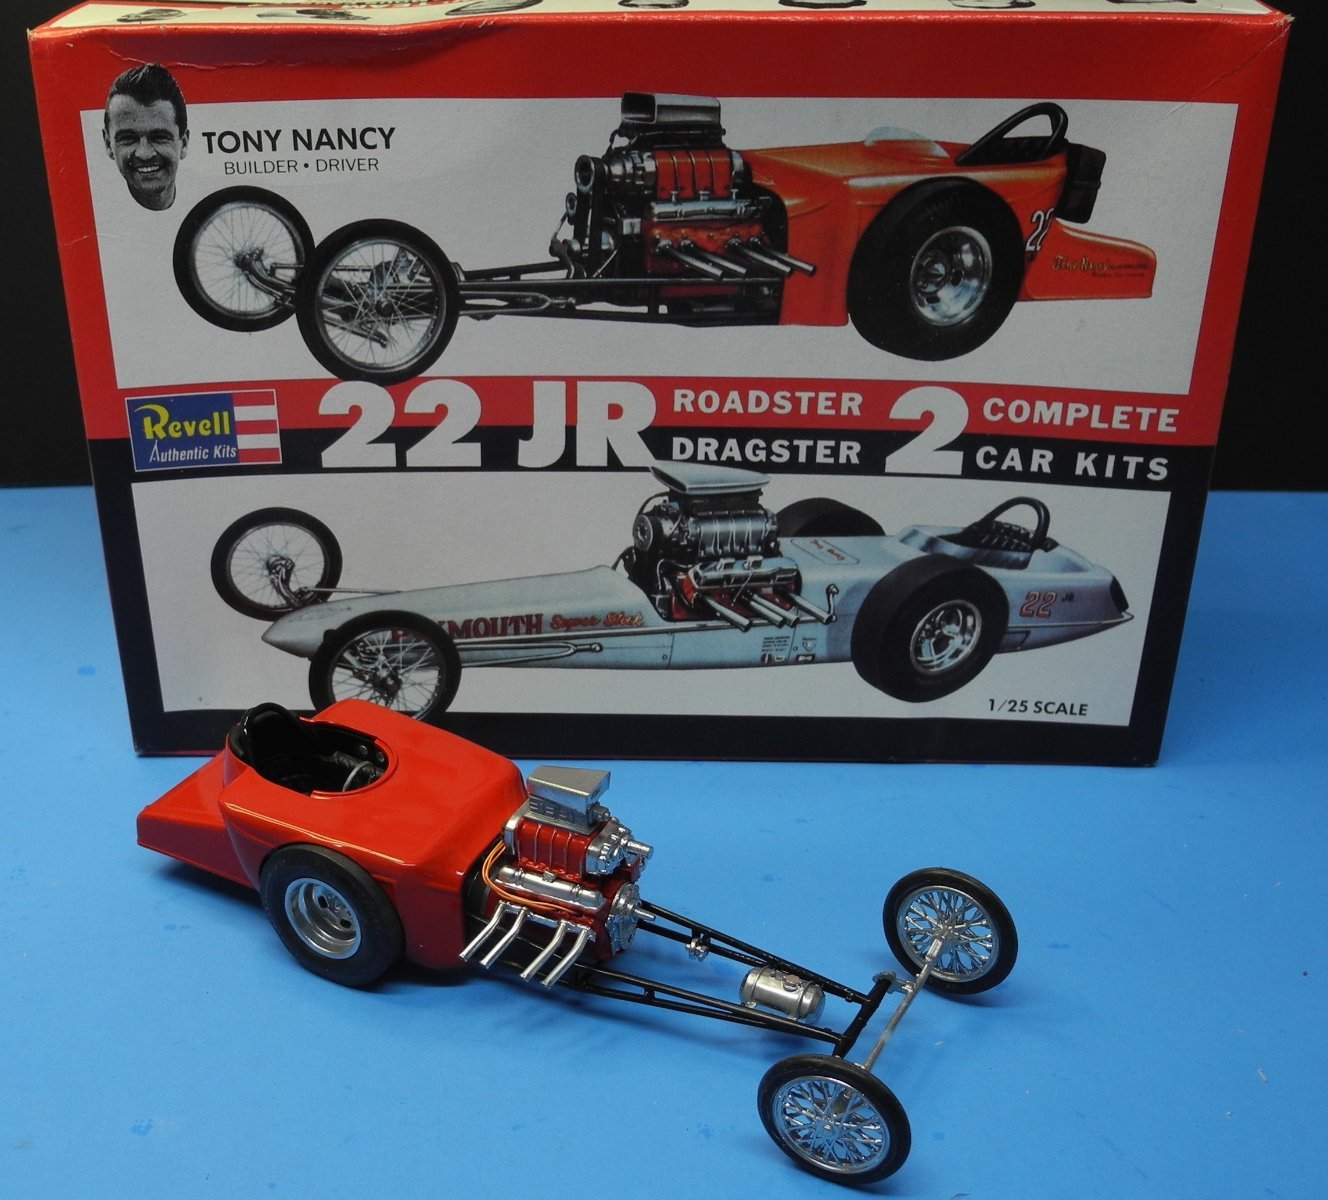
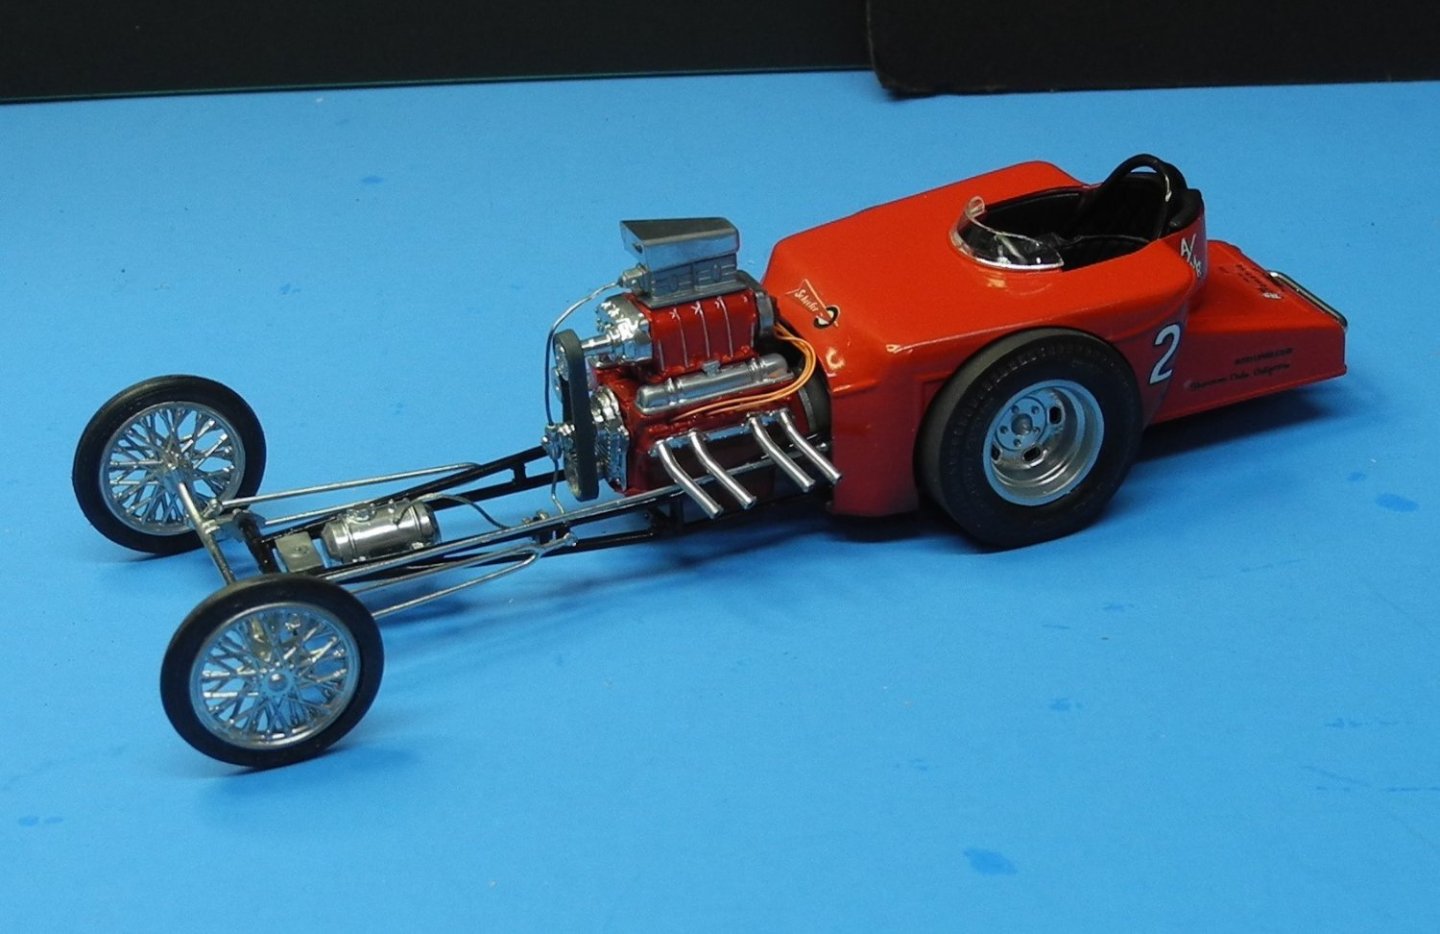
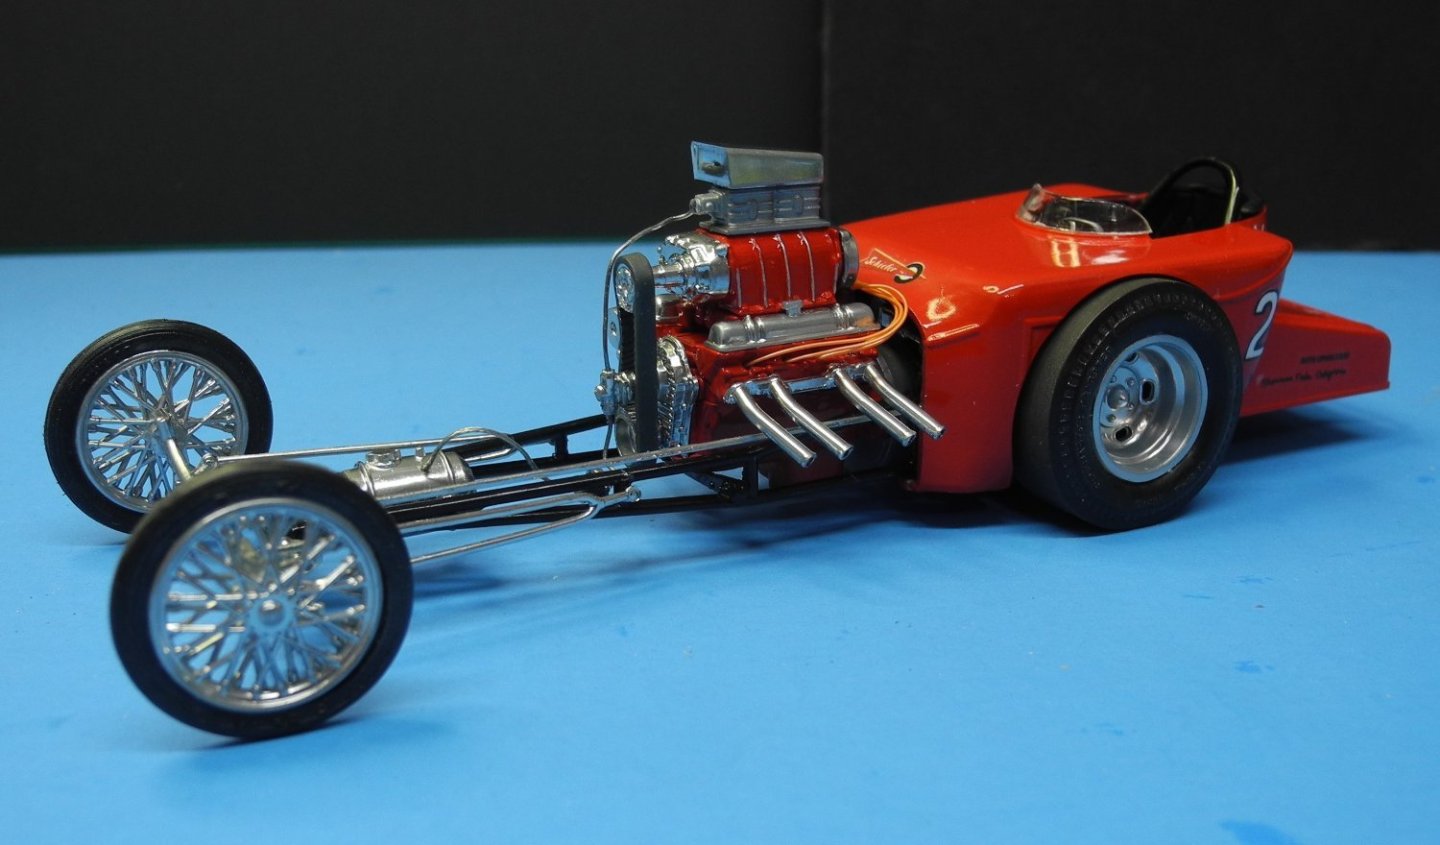
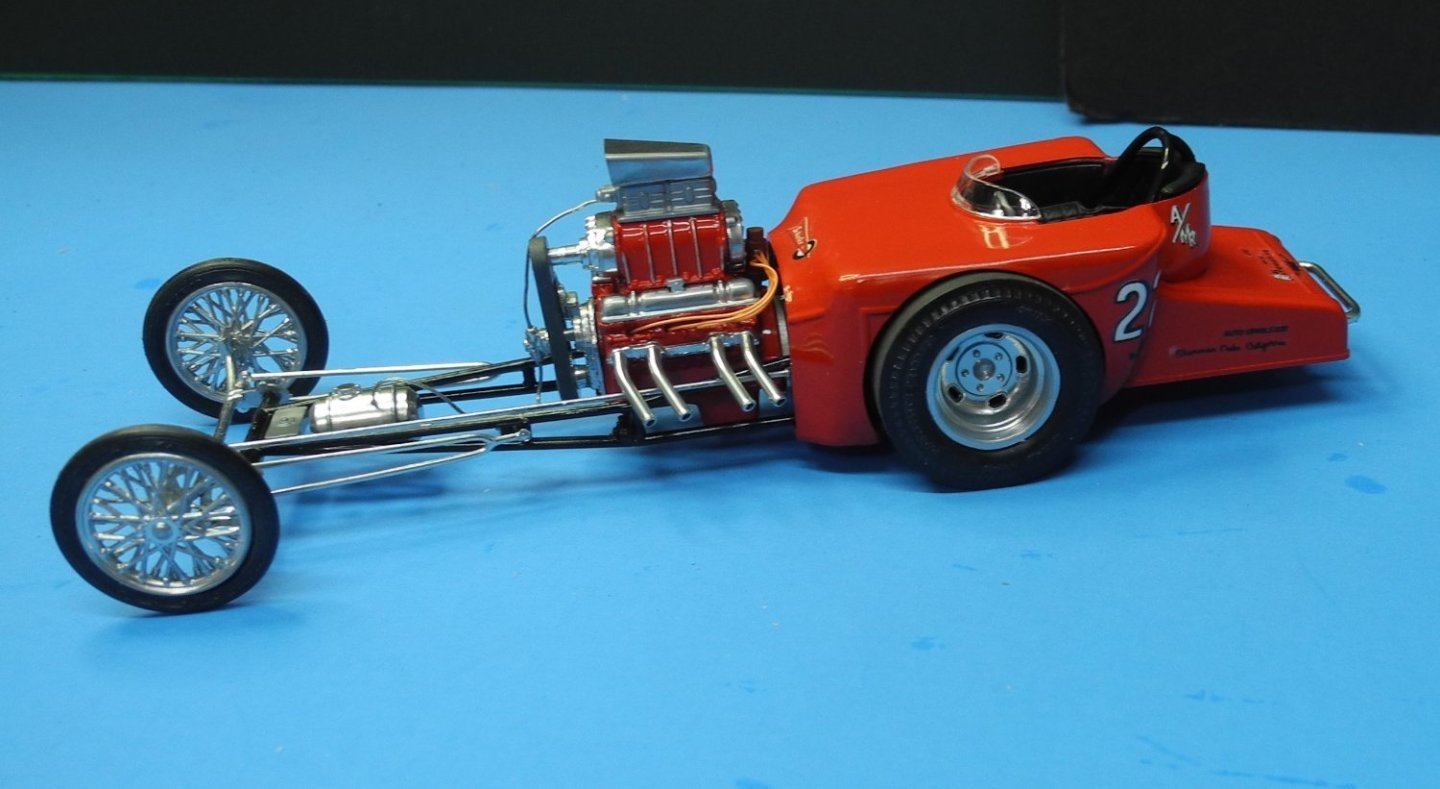
Tony Nancy 22 Jr Roadster by CDW - FINISHED - Revell - 1:25 Scale
CDW replied to CDW's topic in Non-ship/categorised builds
My hometown drag racing hero growing up was "Big Daddy" Don Garlits. Here in this video, he talks about his life in drag racing. In the early part of the video, he talks about driving down Florida Avenue and his first race at the intersection of Buffalo Avenue. That intersection was only blocks away from my home. He was truly a neighborhood hero long before he gained national fame. If you have time to watch it, watch this video as I believe you will enjoy it. -
Shelby 427 S/C Cobra by CDW - FINISHED - Fujimi - 1:24 Scale
CDW replied to CDW's topic in Non-ship/categorised builds
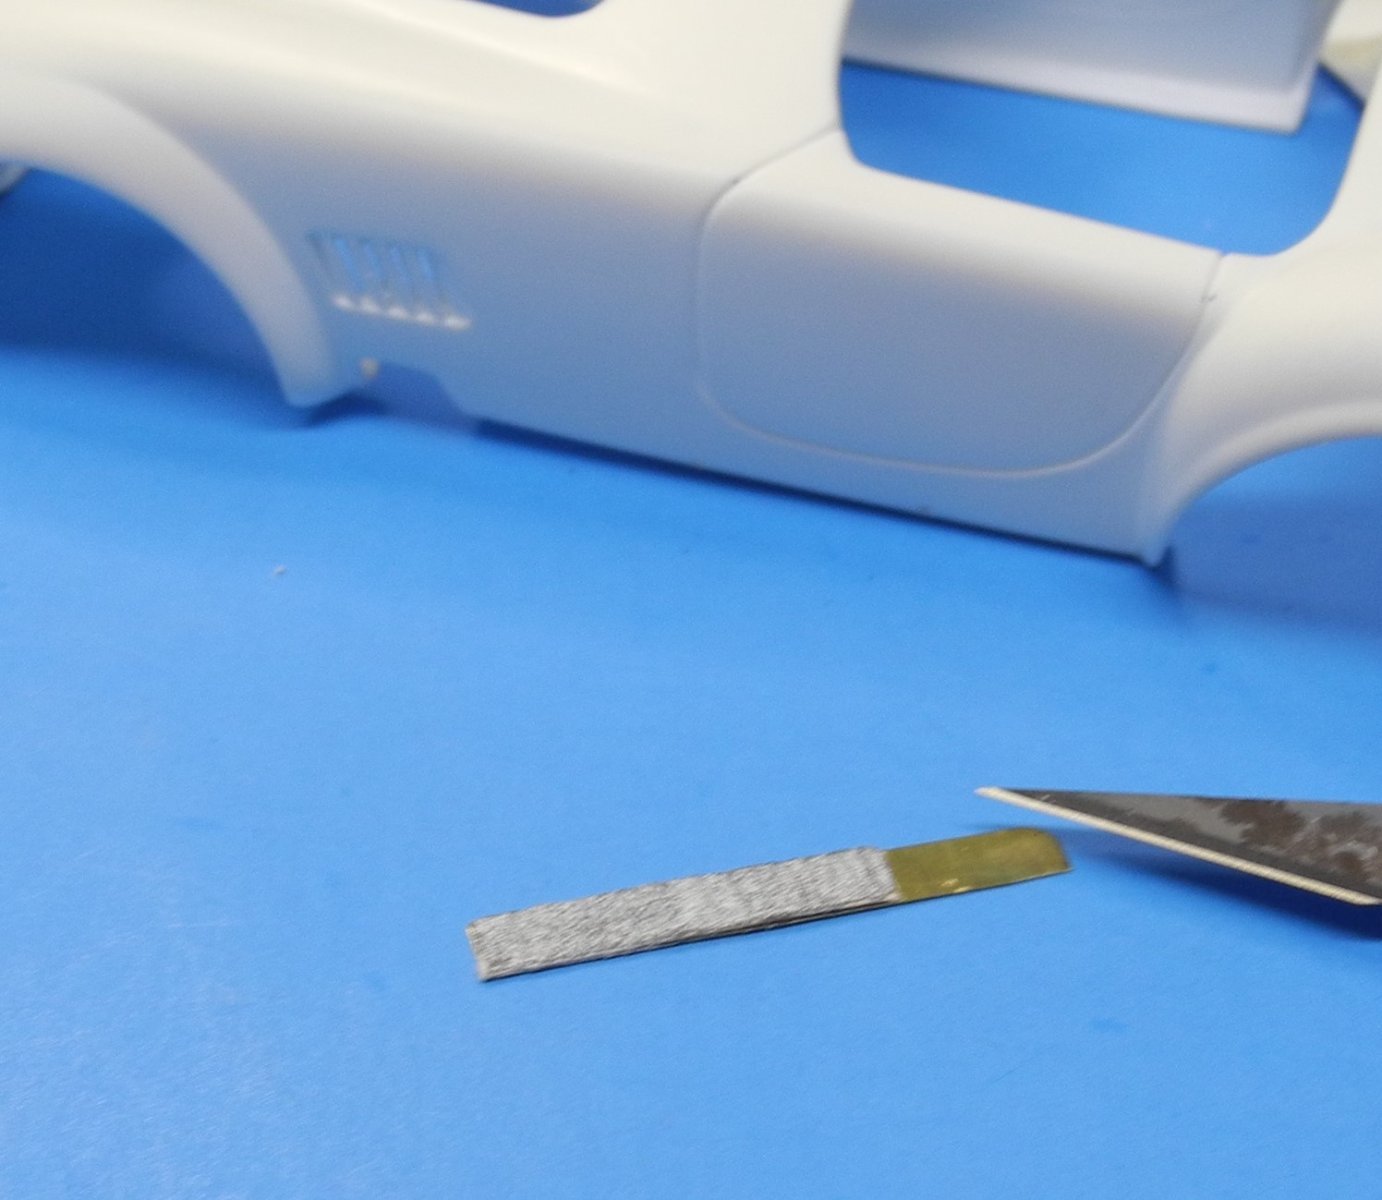
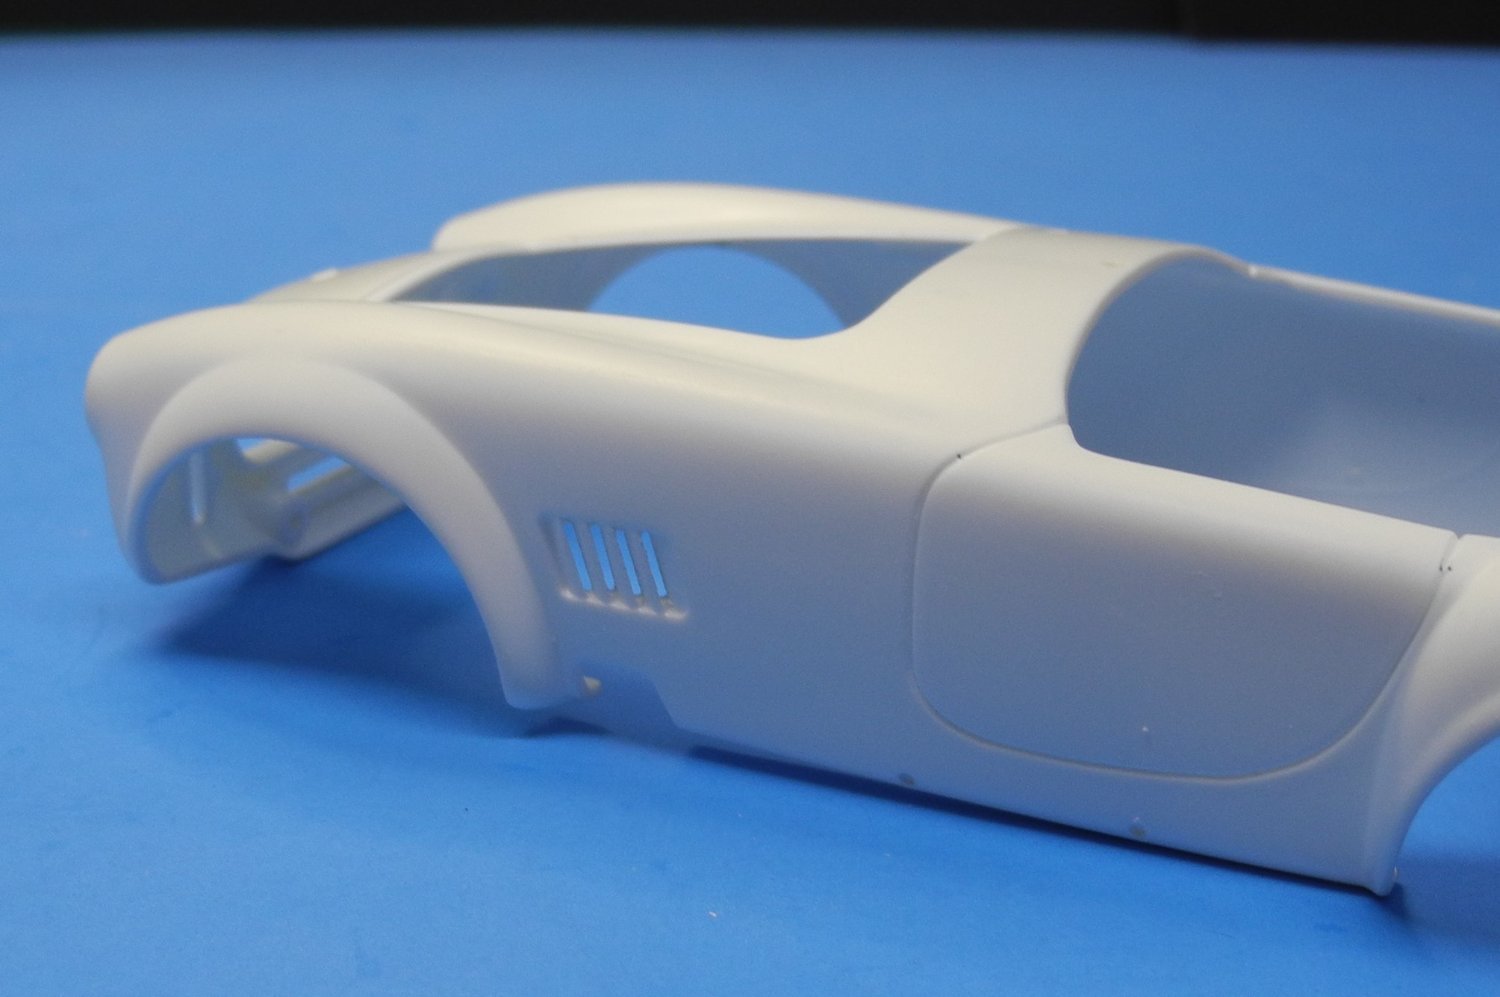
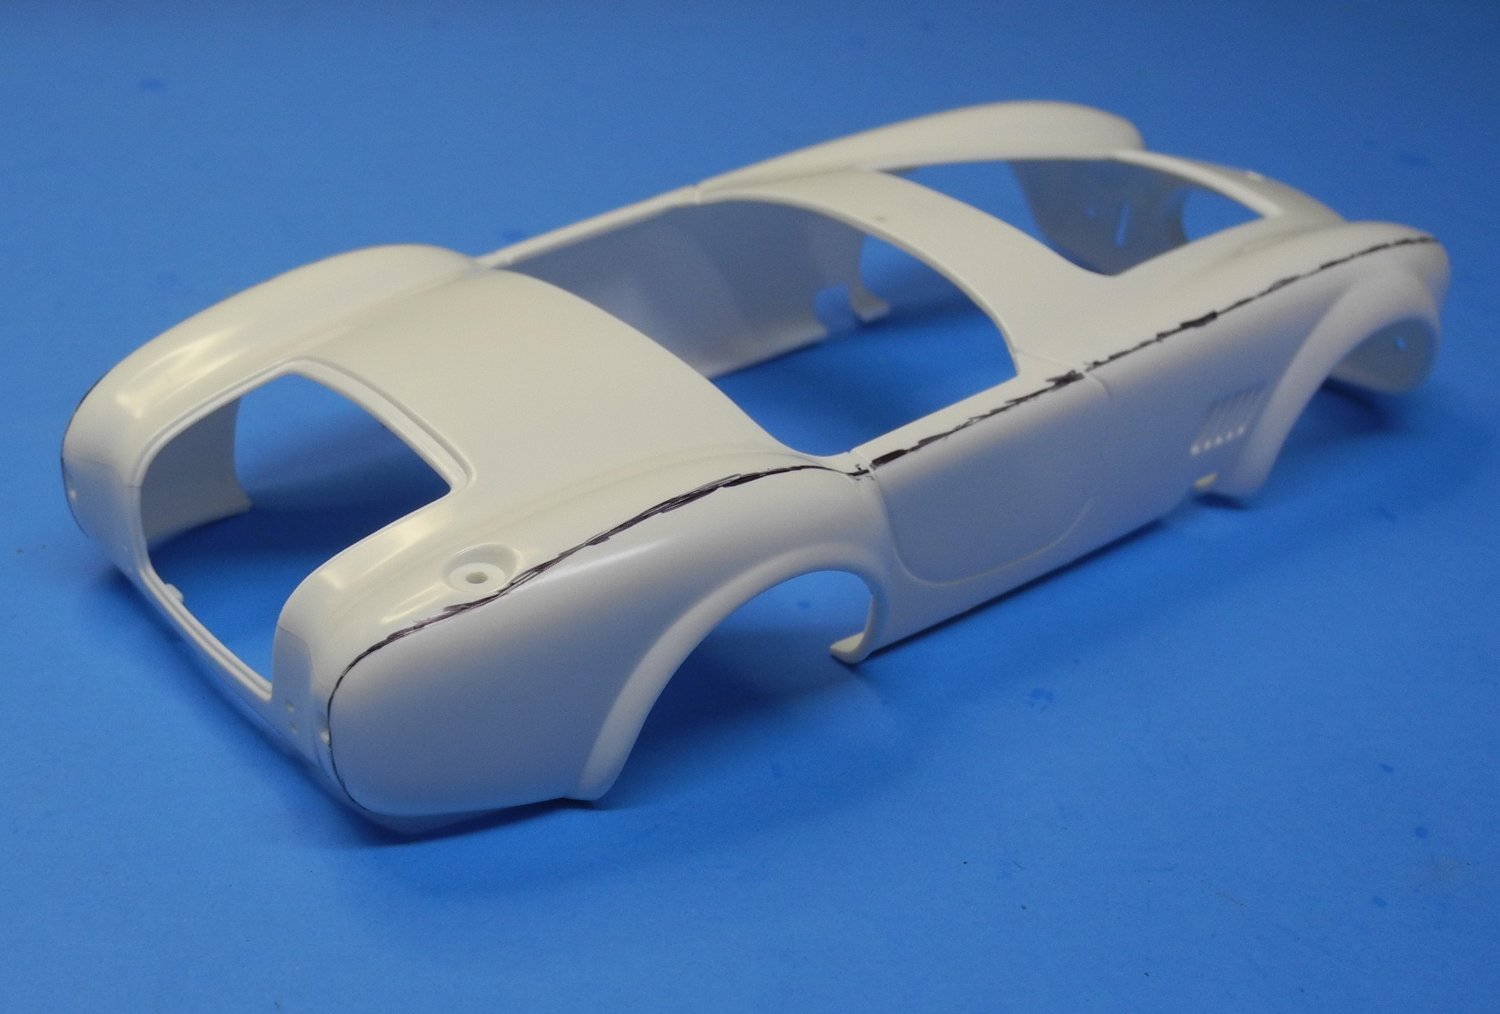
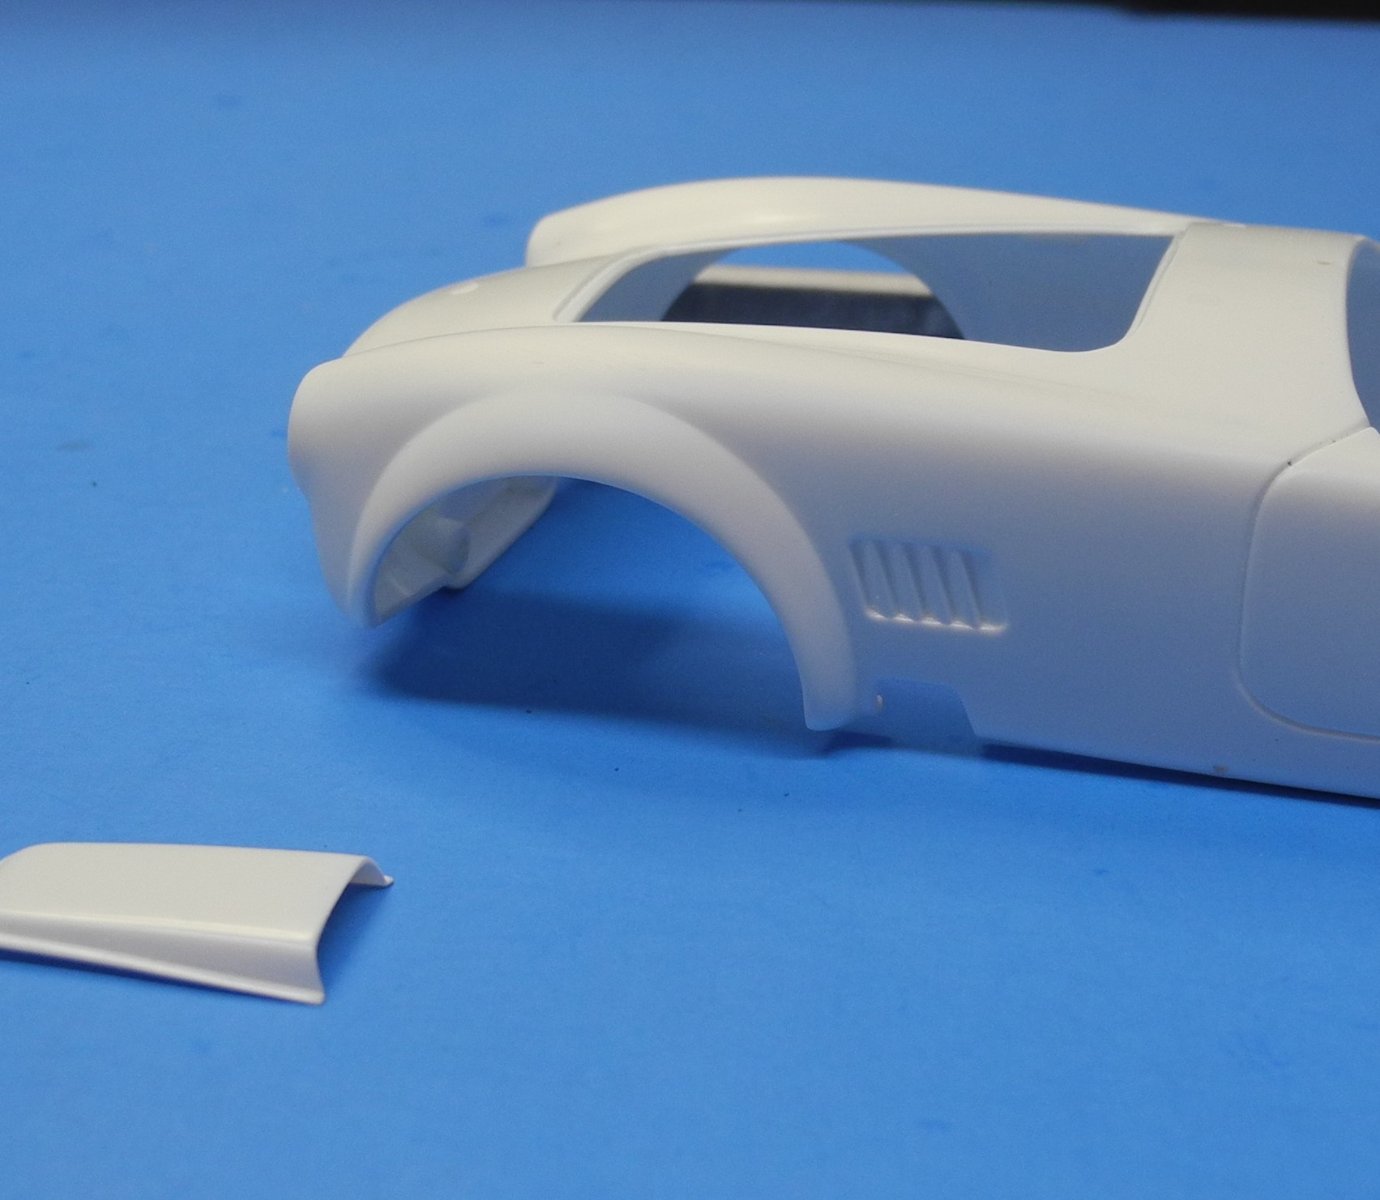
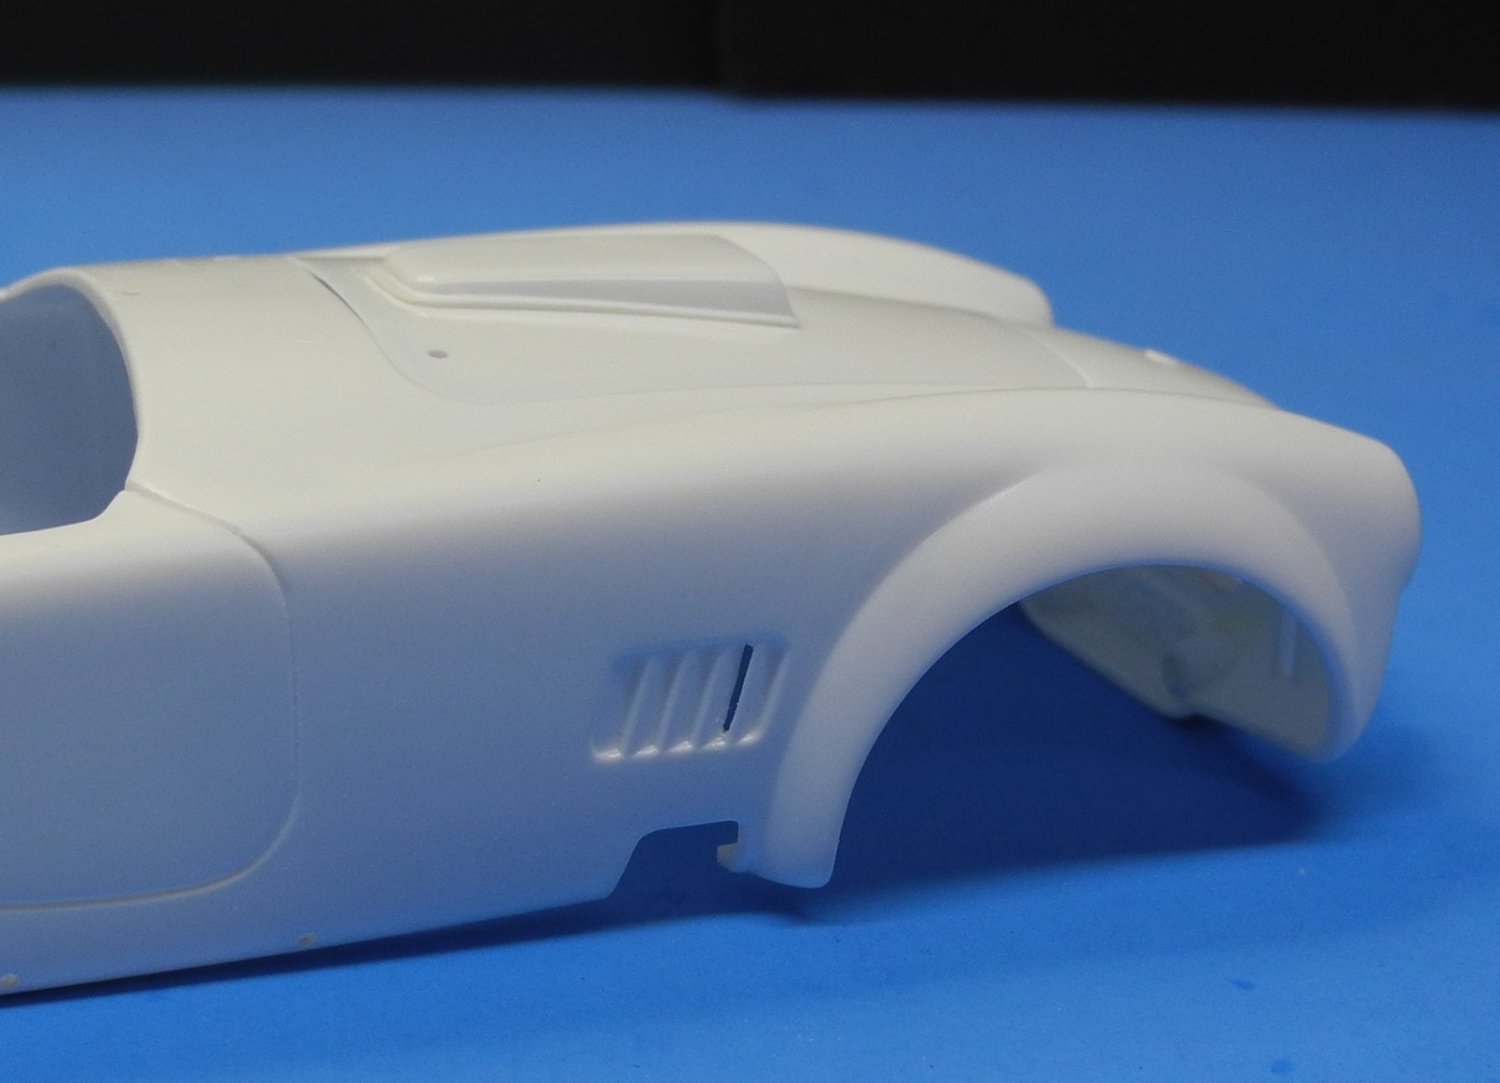
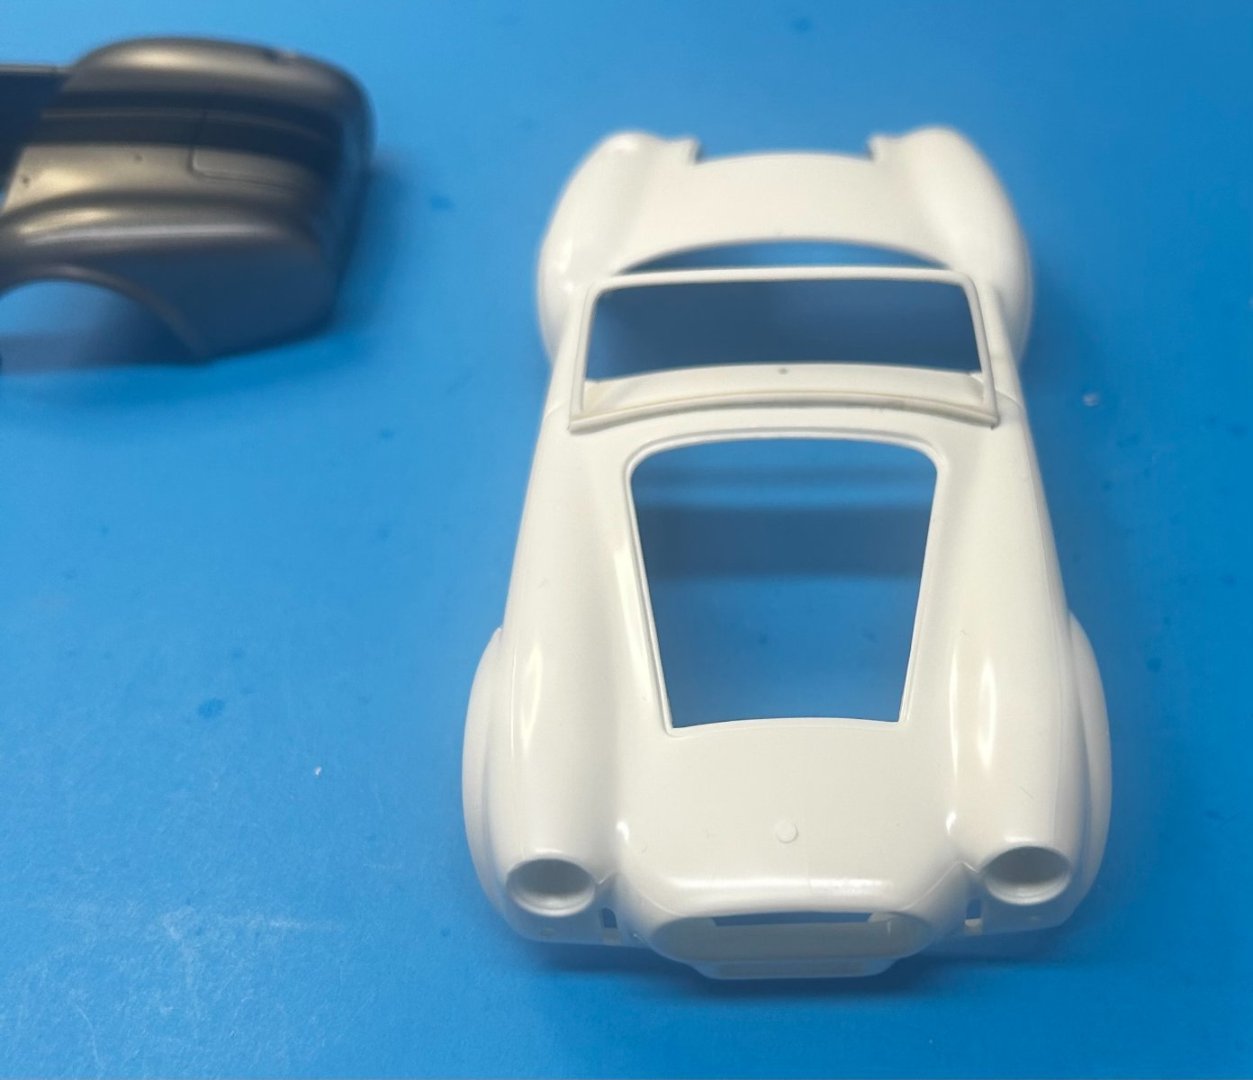
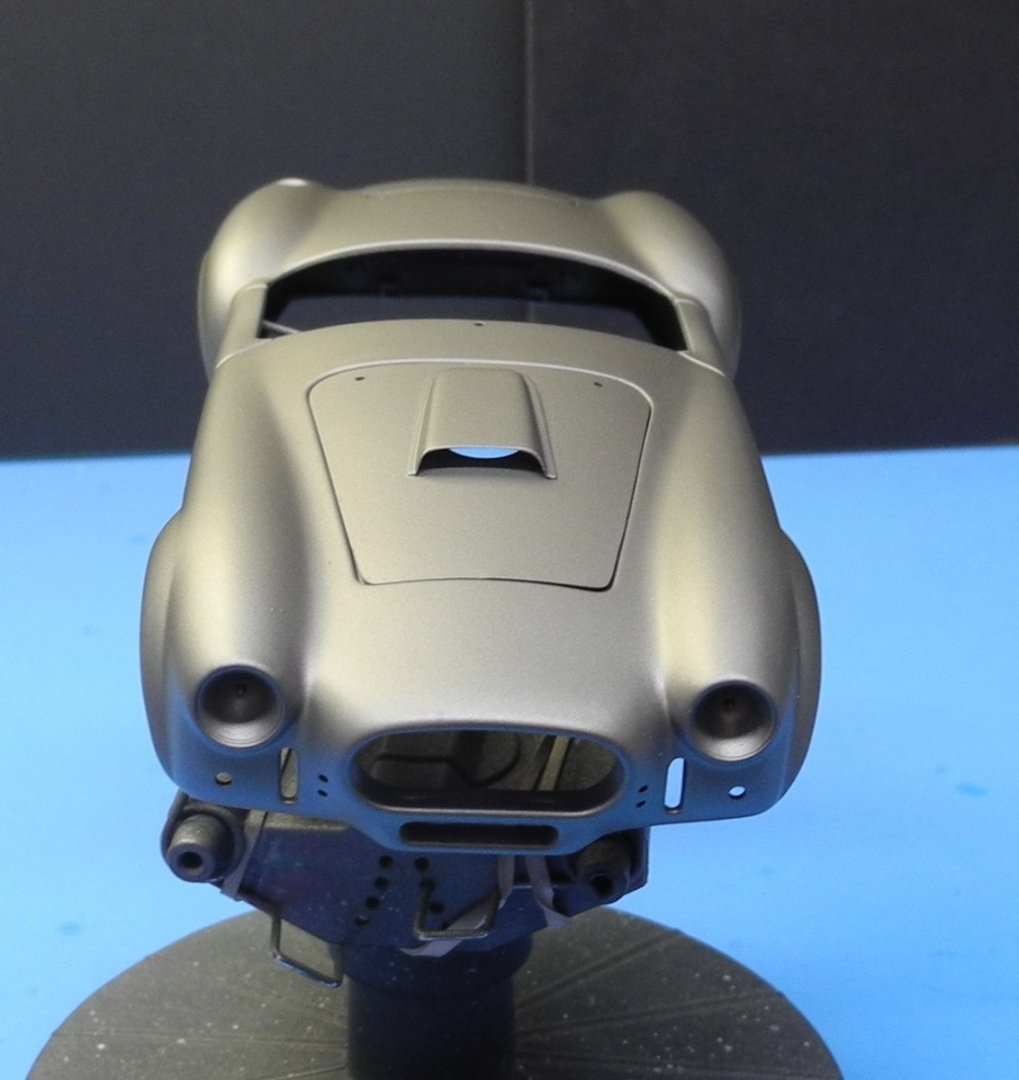
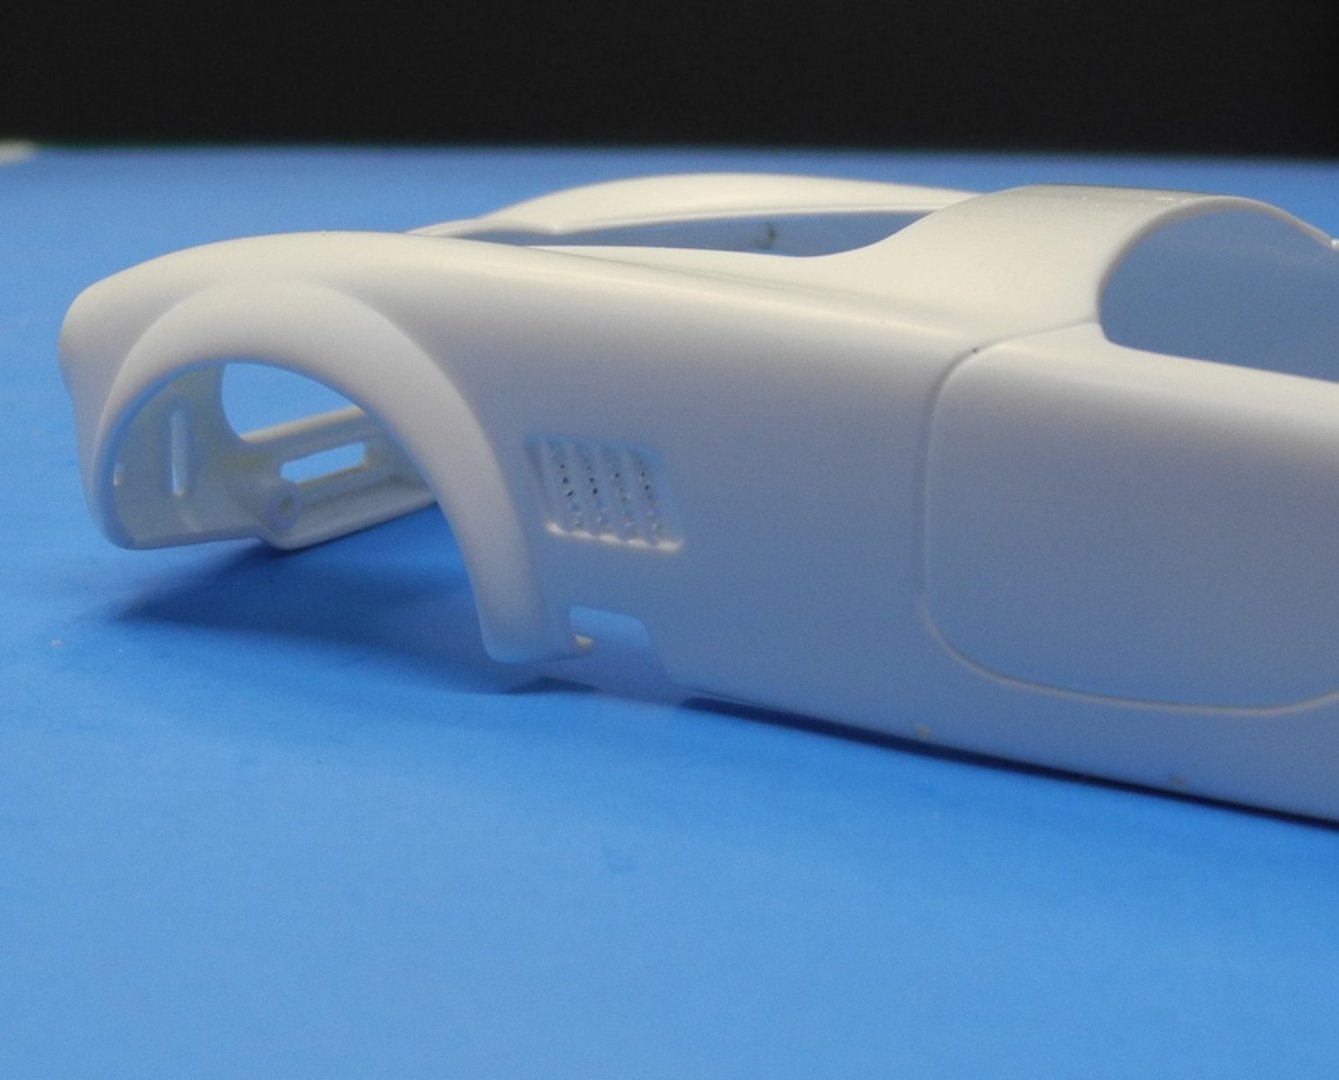
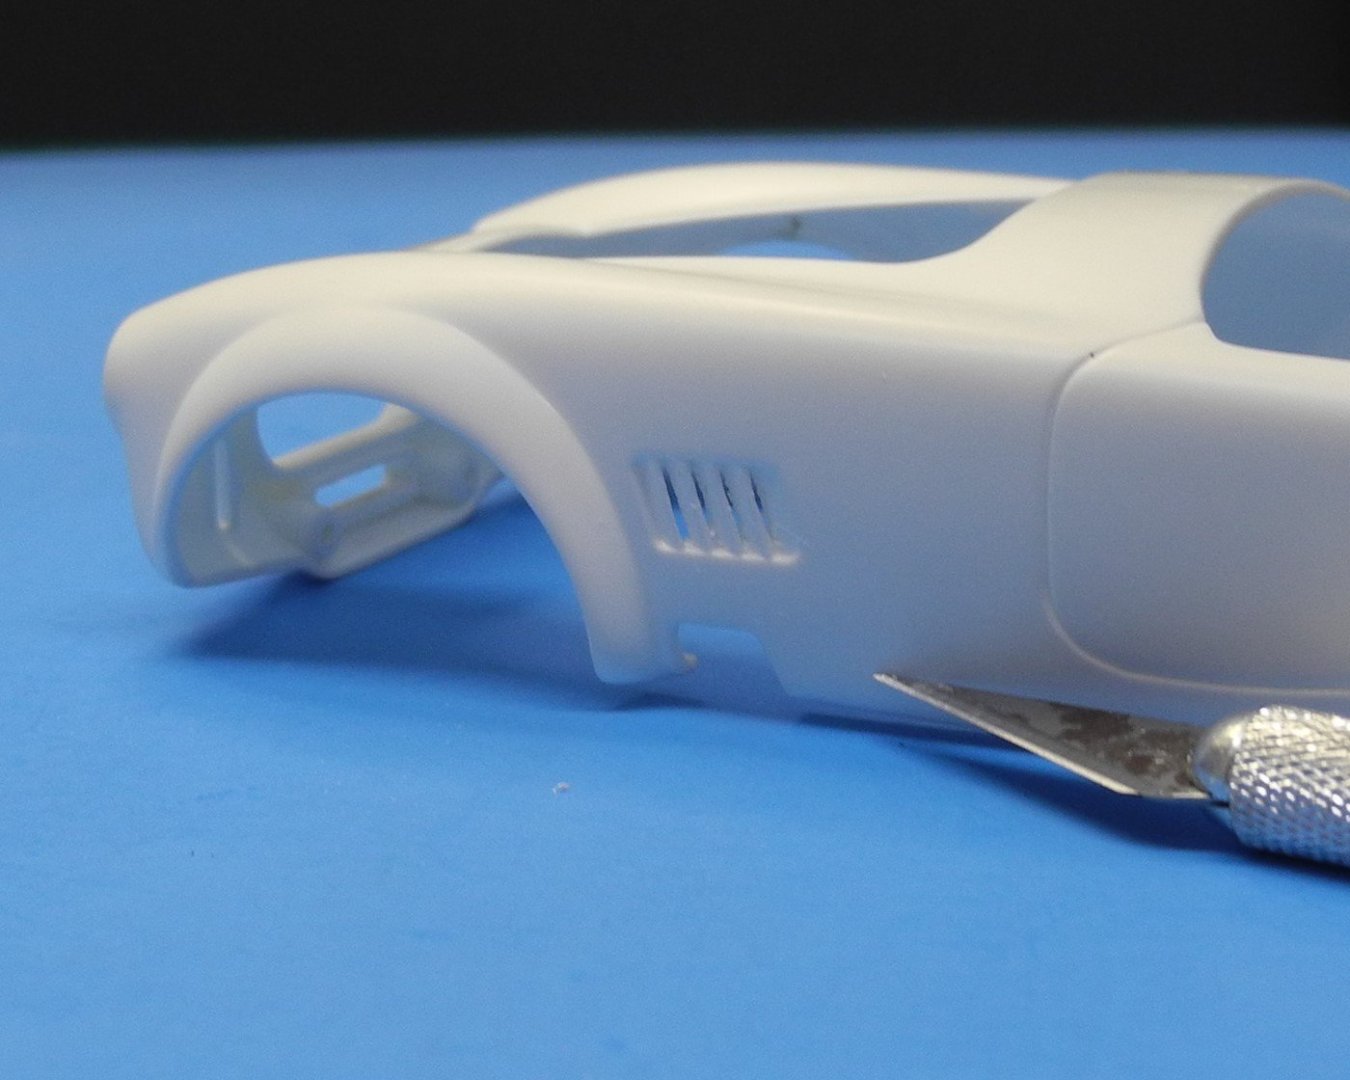
Got finished with opening the louvers on both sides of the body as well as the area below the grill opening. I'm satisfied with the results so won't need to cut out and replace the louvers after all. This is how I did it. First drilled many small holes between louvers using a micro drill bit and vise. Next use an XActo knife with a fresh blade to slowly and carefully open the space between the holes that were drilled. Using a piece of scrap photo etch fret or some similar thin gauge metal, glue/attach a piece of sand paper to create a fine file. Carefully work the tool between the slots that were cut with the hobby knife, then file these openings smooth. Here are the final results. I'll give the body a coat of primer tonight so that it has plenty of time to set up before I work with it some more tomorrow.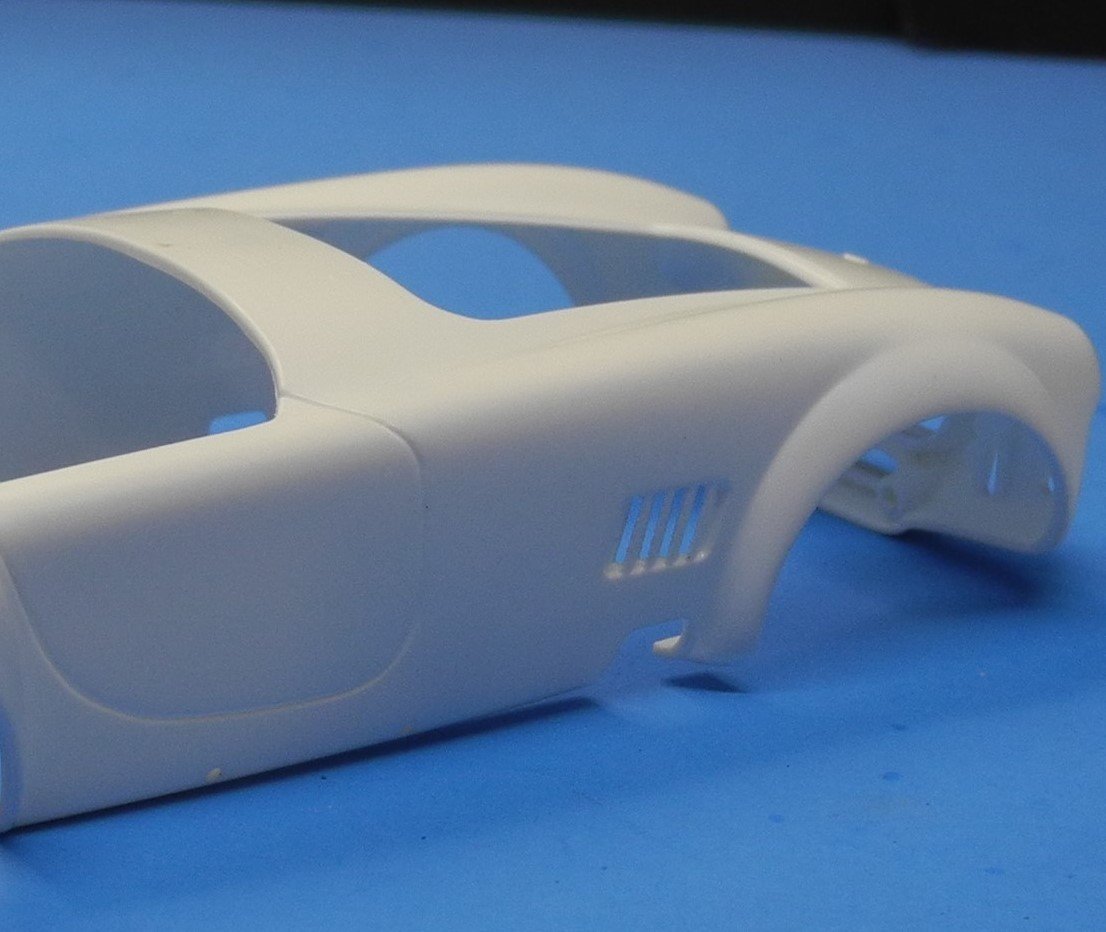


- 67 replies
-
- 14
-
-
-
Shelby 427 S/C Cobra by CDW - FINISHED - Fujimi - 1:24 Scale
CDW replied to CDW's topic in Non-ship/categorised builds
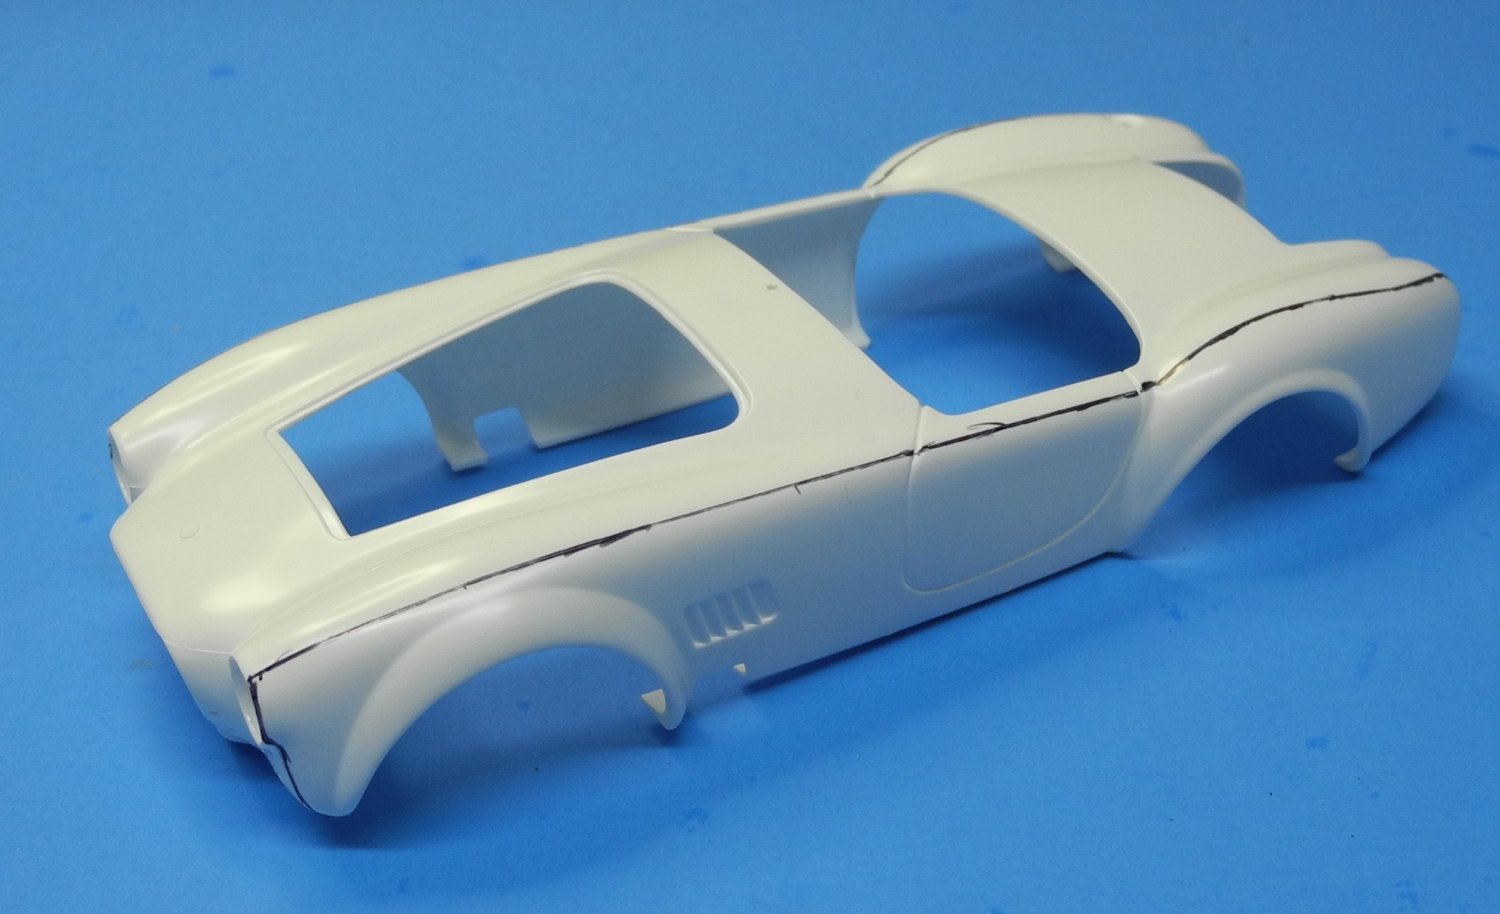
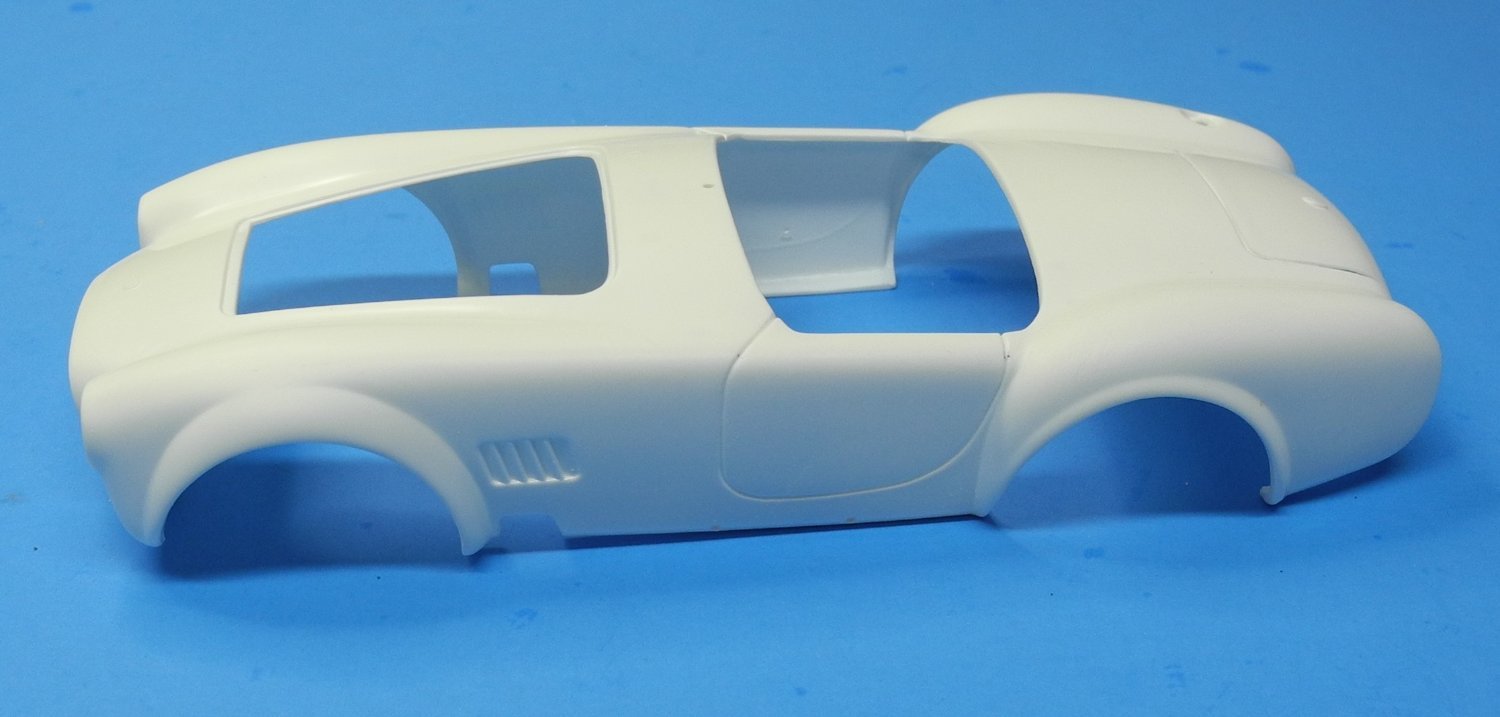
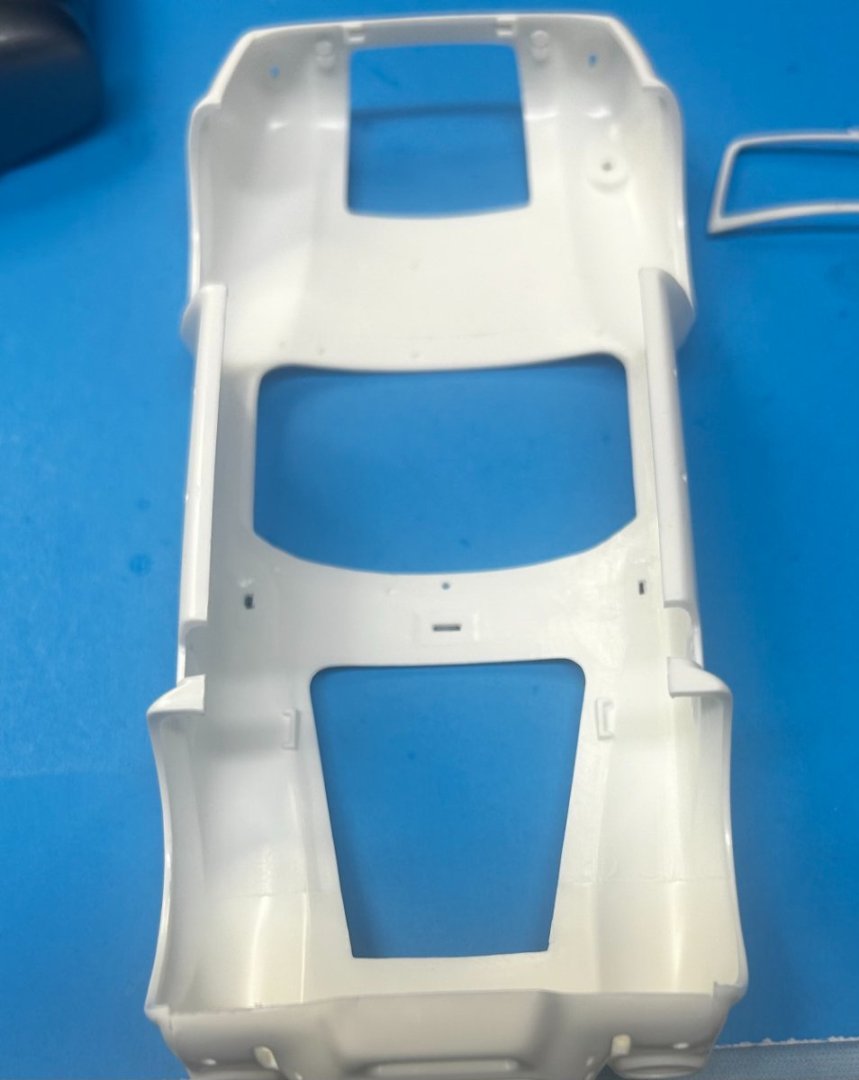
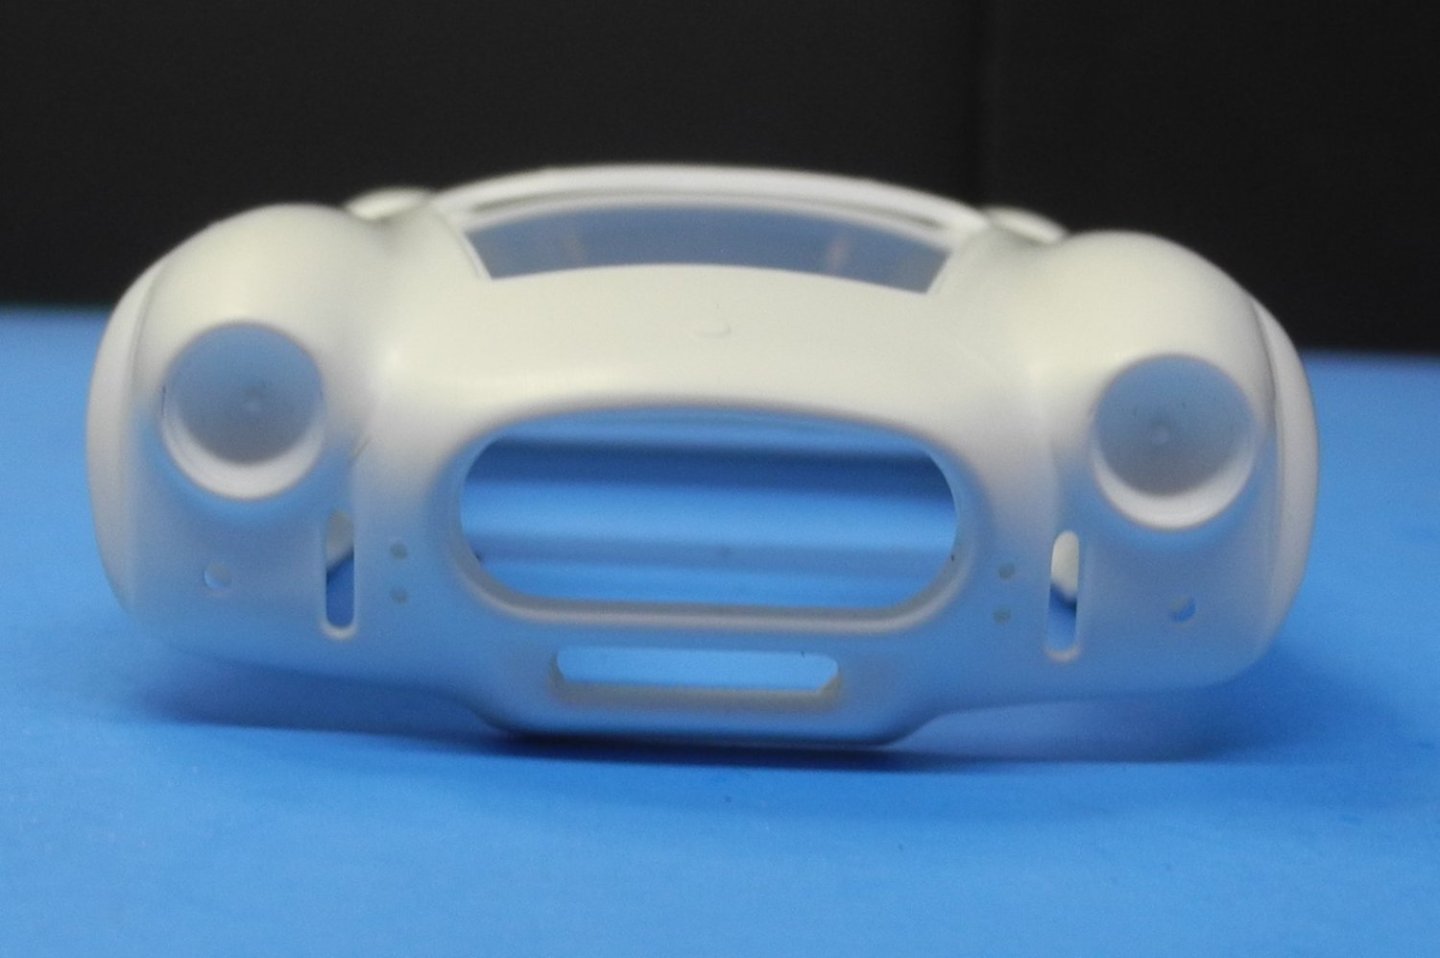
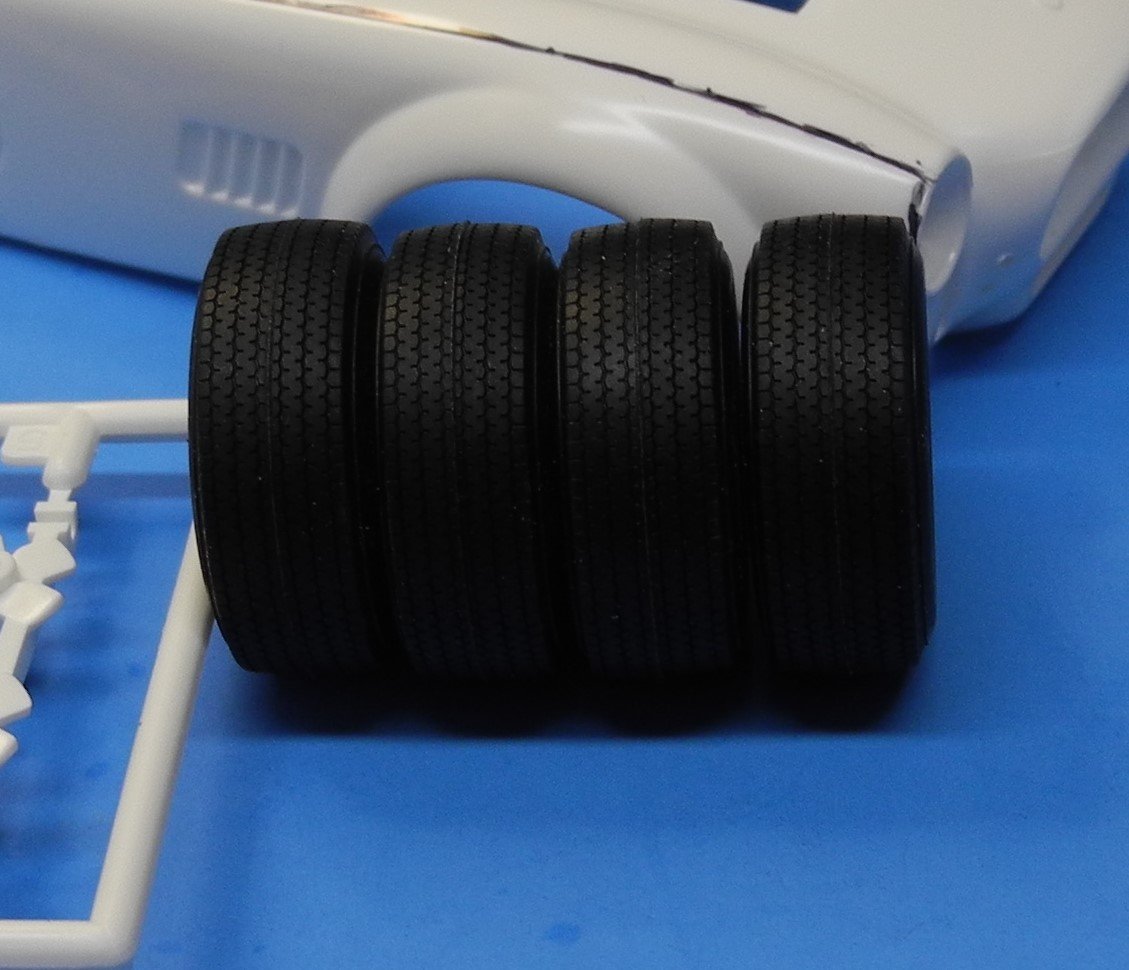
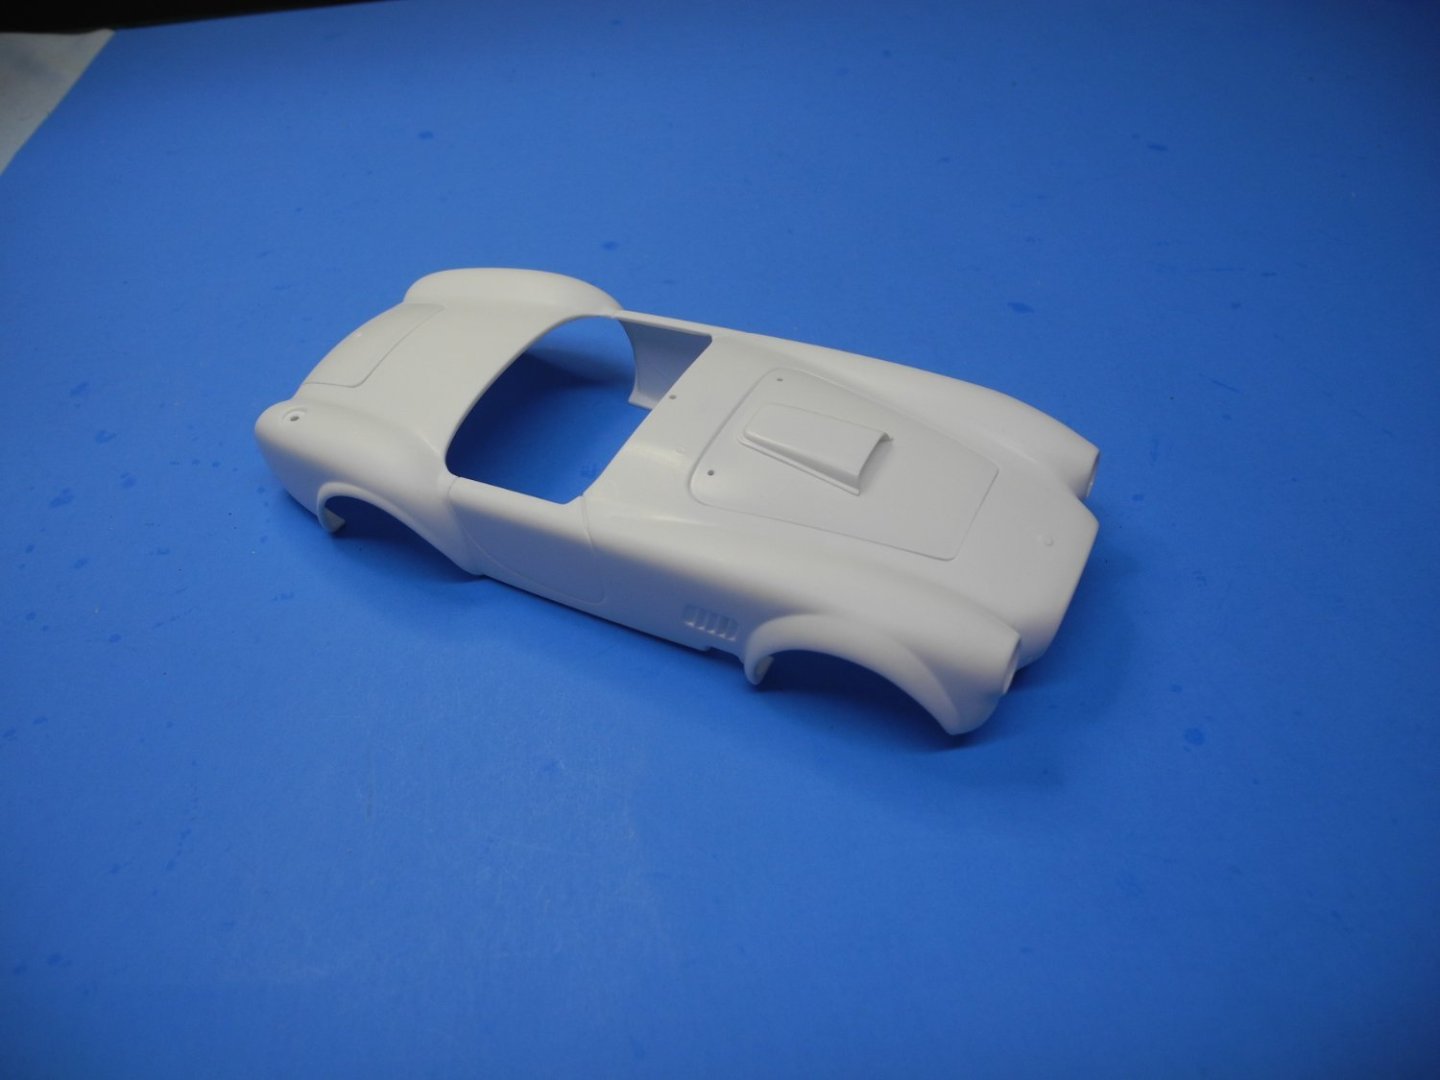
So we begin with the body this time. I want to finish it first so it has plenty of time for the paint to cure out before too much handling. The body has some mold seam lines that need to be removed. The black marker identifies the lines and makes it easy to see when they are removed with a sanding sponge. The bonnet, scoop, and trunk lid are molded separately so they can be displayed opened or closed later on. There's a nice set of no name tires in the kit. There's a little mold seam down the center of each tire that can easily be dealt with using a fine sanding stick later. Here I've sanded those nasty seam lines away in rather short order using 400, then 800 grit sanding sponges. I'm focusing here on the louvers and an opening in the lower front of the body just below the grill opening. The louvers need to be opened up, and I want to also open up that area under the grill. As it comes from the box, that area has an oil cooler molded in the opening which I will replace later on after the area is opened up. Here I've started drilling out the opening in the front of the body as well as drilled and cut out one louver. I may decide later to cut the louvers out completely and replace them with some made from scratch if i don't like the way they look after drilling and cutting. I'm going to glue my trunk lid into a closed position but will leave the bonnet as a functional unit.


- 67 replies
-
- 16
-
-
Tony Nancy 22 Jr Roadster by CDW - FINISHED - Revell - 1:25 Scale
CDW replied to CDW's topic in Non-ship/categorised builds
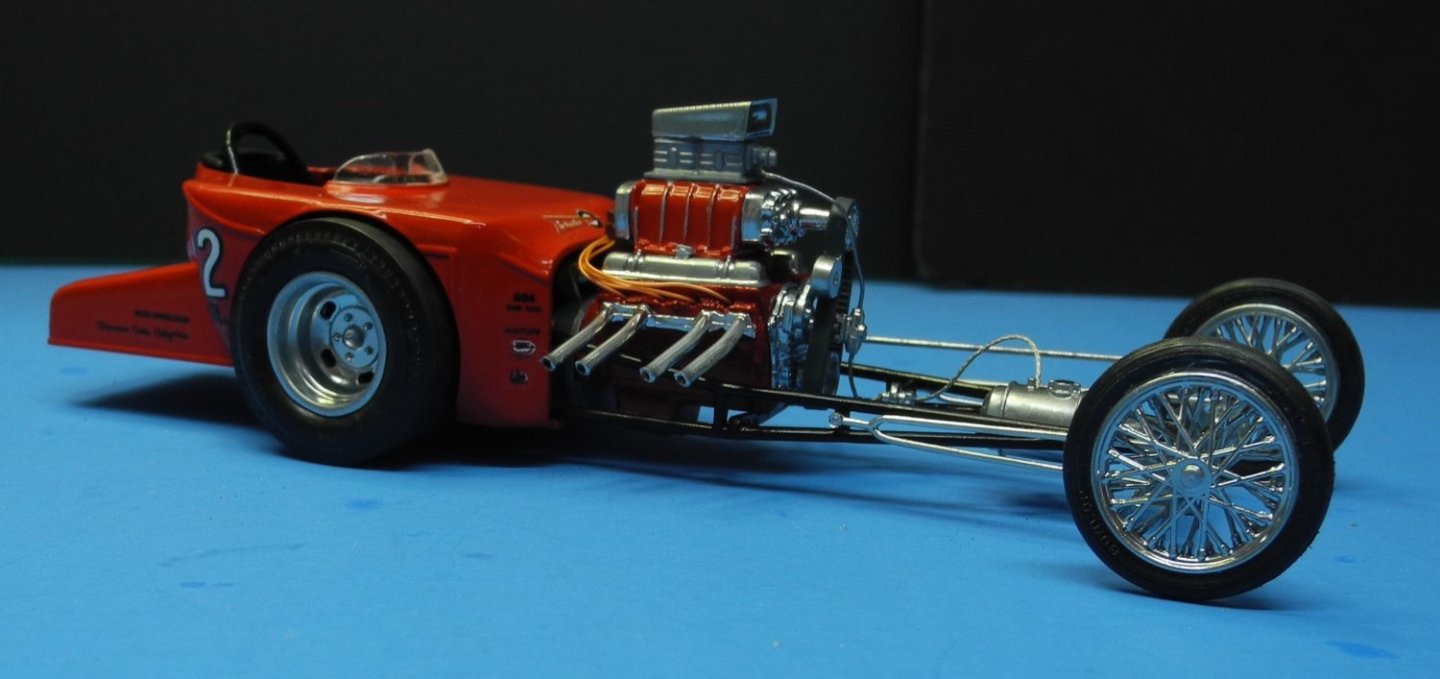
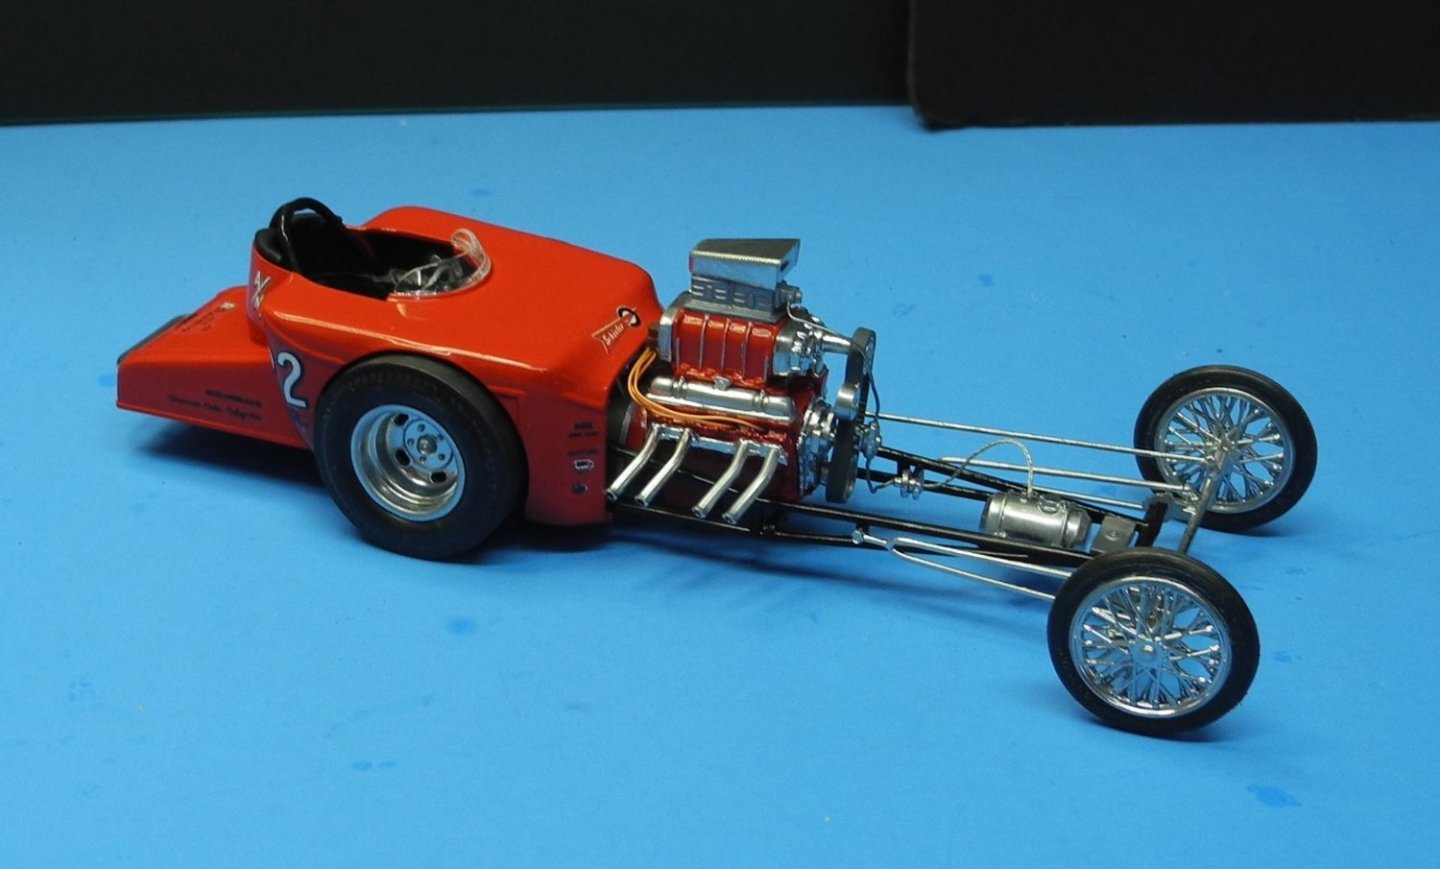
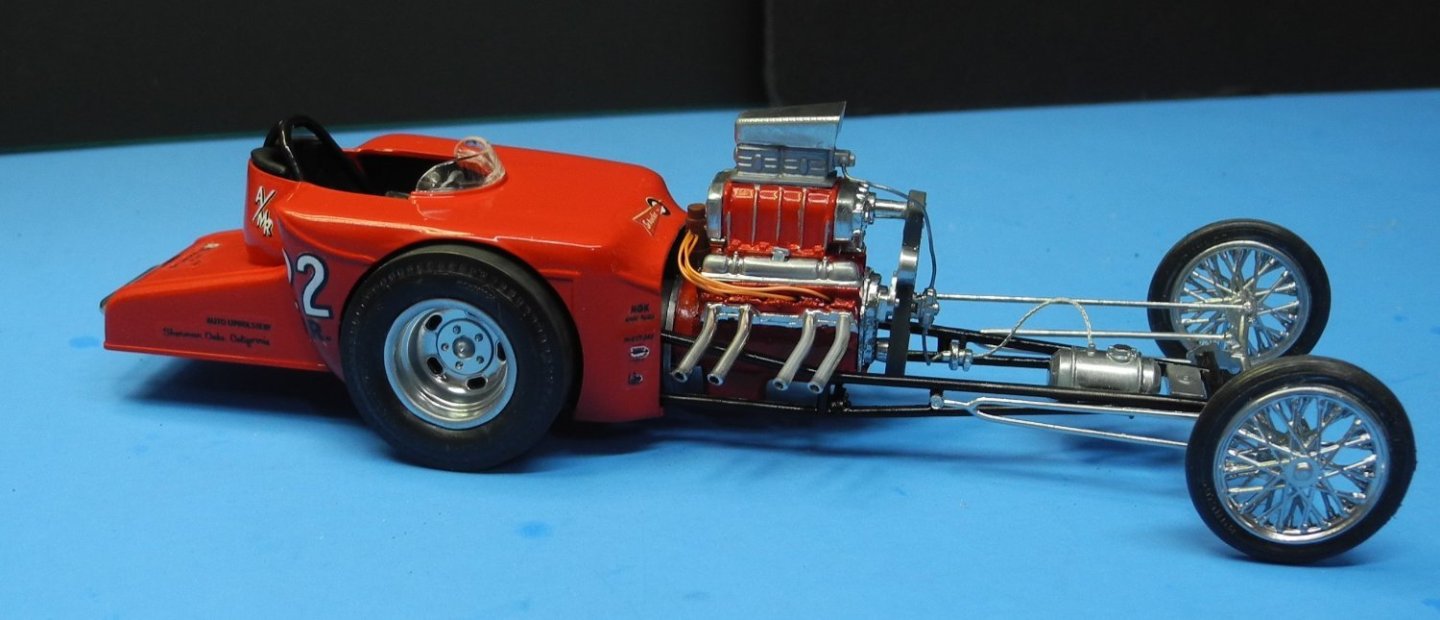
She's done. Take note, the firewall as it comes from the kit does not come close to fitting. The outline is okay, but the cutout for the engine, transmission, drag link are totally off. The whole firewall needs to be built from scratch. I didn't learn of it until the near end of this project. The drag link doesn't measure out correctly either. As it stands, you can't see this error because it goes under the body, but if the body was off the chassis, it would be plain as day. For that matter, most people will never notice the firewall is missing but it does bug me. Anywho, this is all I intend to do with these two models. They were a fun build and a departure from the complicated kits I've been building lately. Thanks to all of you for following along, your comments and your likes. Mucho gracias. PS: after looking at my photos, I realized I left off the parachute. I'll add it on later.


- 30 replies
-
- 15
-
-
-
Tony Nancy 22 Jr Roadster by CDW - FINISHED - Revell - 1:25 Scale
CDW replied to CDW's topic in Non-ship/categorised builds
Getting very close to finish now but must take a short break to get some other things done. Unless the creek suddenly rises, should finish her up this weekend.


-
Tony Nancy 22 Jr Roadster by CDW - FINISHED - Revell - 1:25 Scale
CDW replied to CDW's topic in Non-ship/categorised builds
Great find! Thanks Bruce. Revell had those "parts packs" back then. I've got a few of them still. Frames, engines, wheels, bodies, wheels and tires, etc. Another old Revell kit I'll try to build soon is the old Orange Crate. I've got several copies of it in my stash. As a youngster, it was a very difficult kit to build without butchering it because so many of the parts were fragile to take off the sprues. My tools were very limited in those days. -
Tony Nancy 22 Jr Roadster by CDW - FINISHED - Revell - 1:25 Scale
CDW replied to CDW's topic in Non-ship/categorised builds
He has a set for the Airfix Bentley and a set for the Italeri Alfa Romeo. You get 5 wheels for the Alfa and four for the Bentley. 1/12 set of 5 hand laced rims for wheels / tyres Italeri Alfa Romeo 8C2300 | eBay 1/12 SET OF 4 wire rims for Bentley Airfix / Heller / MPC. TYRES NOT INCLUDED | eBay