CDW
-
Posts
7,755 -
Joined
-
Last visited
Content Type
Profiles
Forums
Gallery
Events
Everything posted by CDW
-

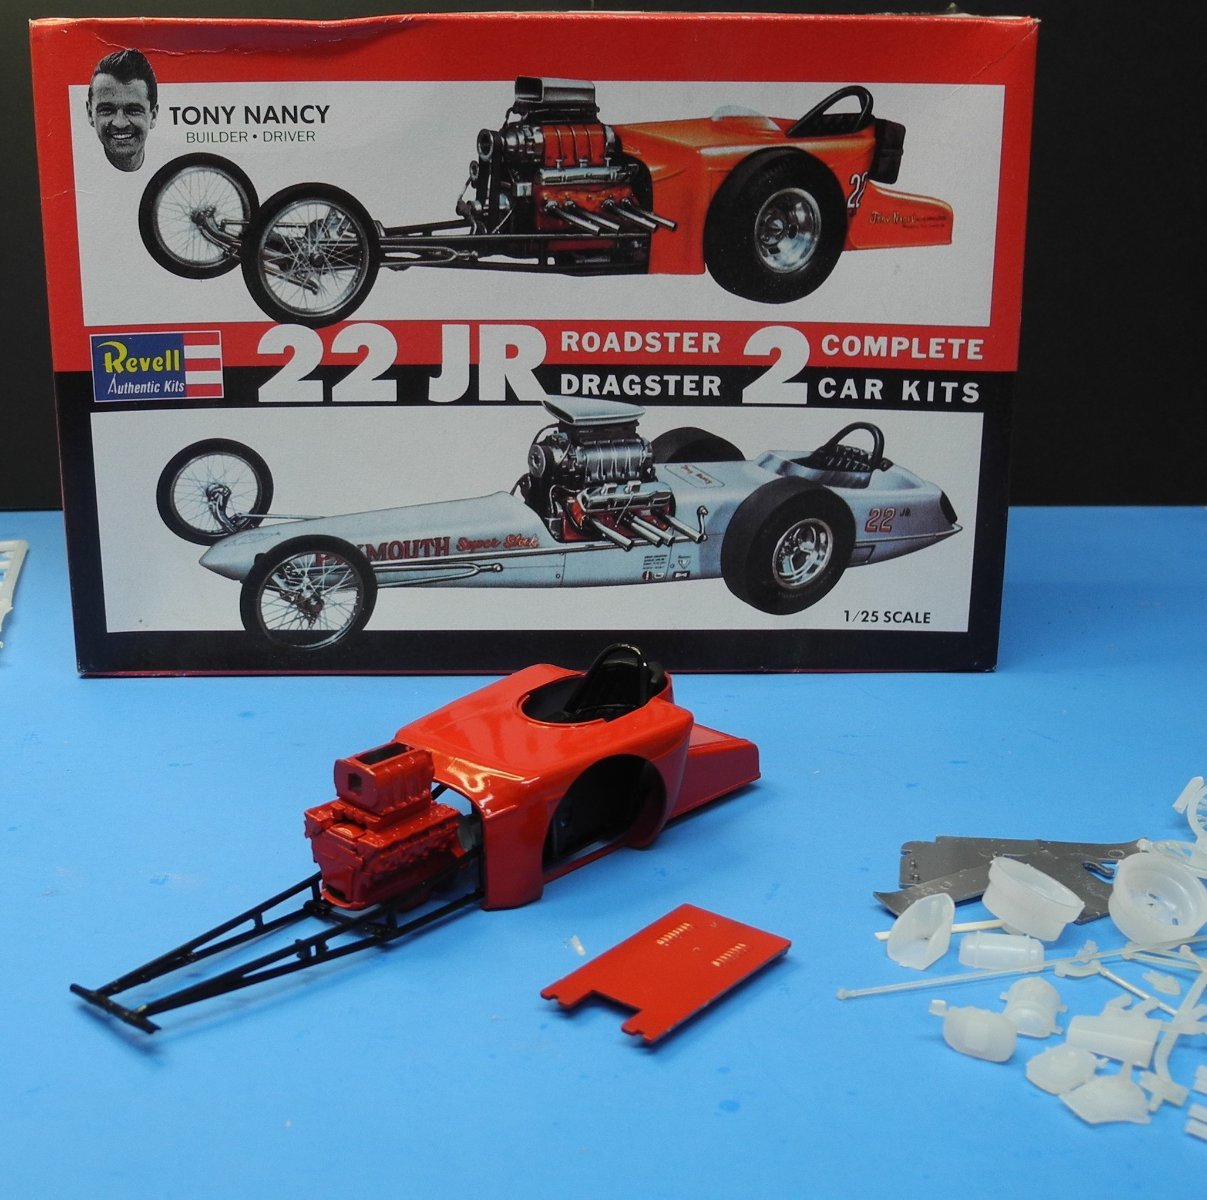
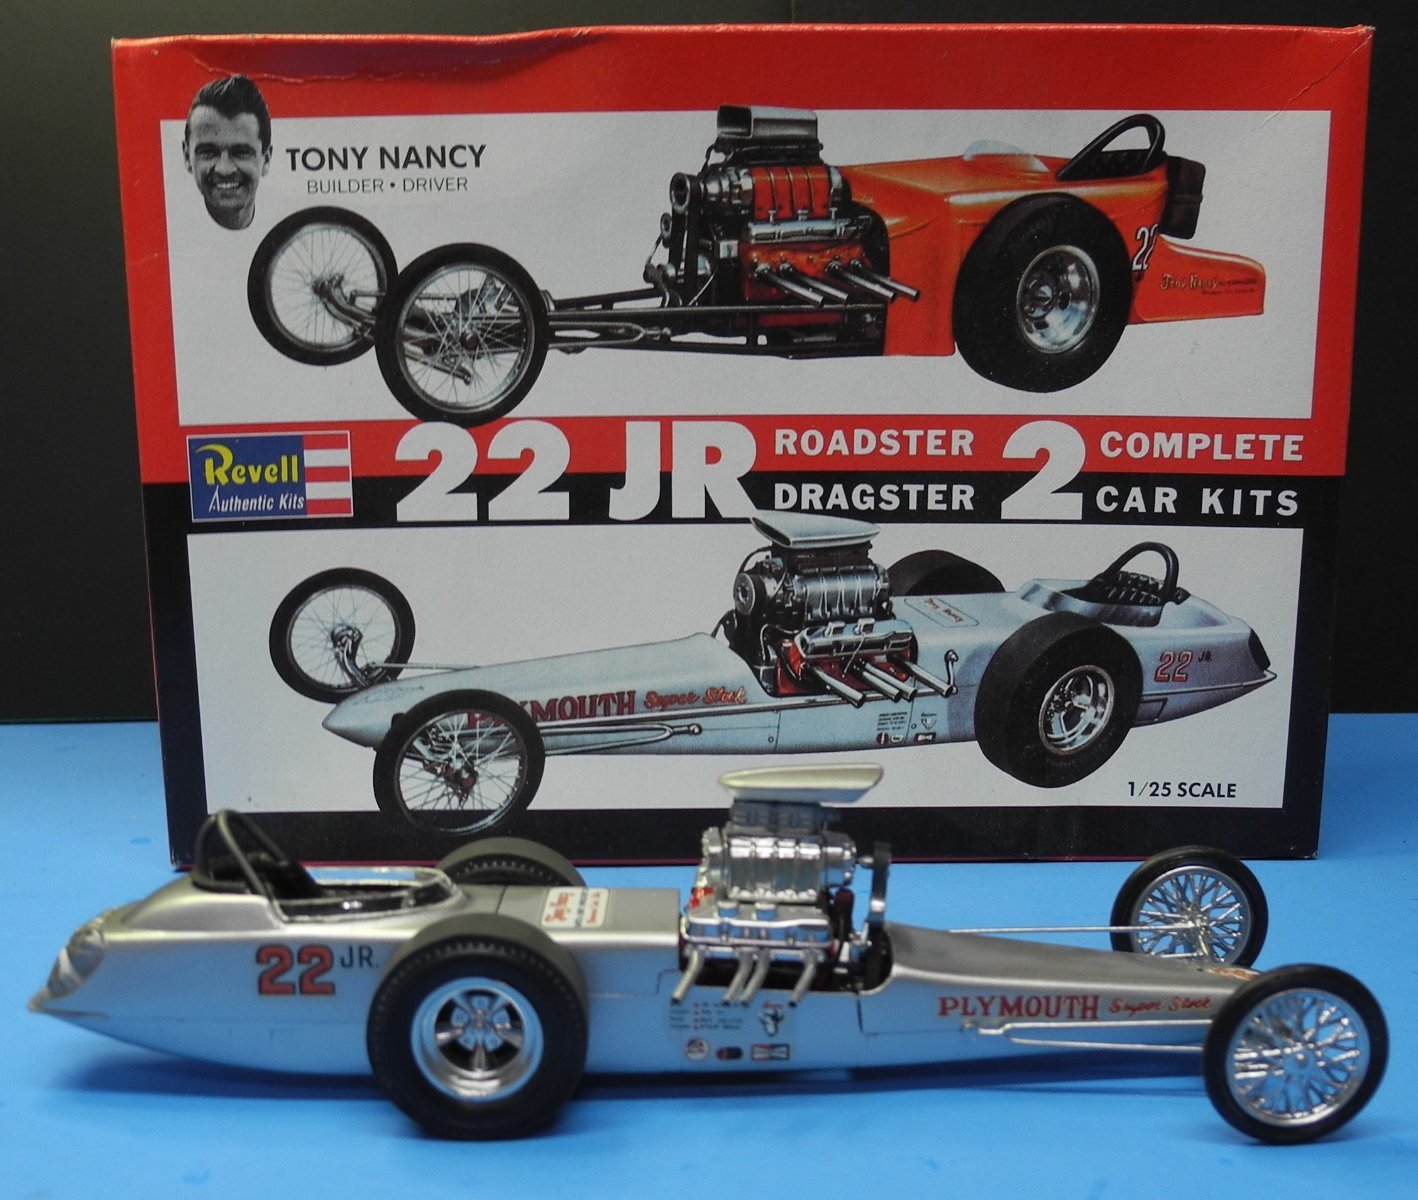
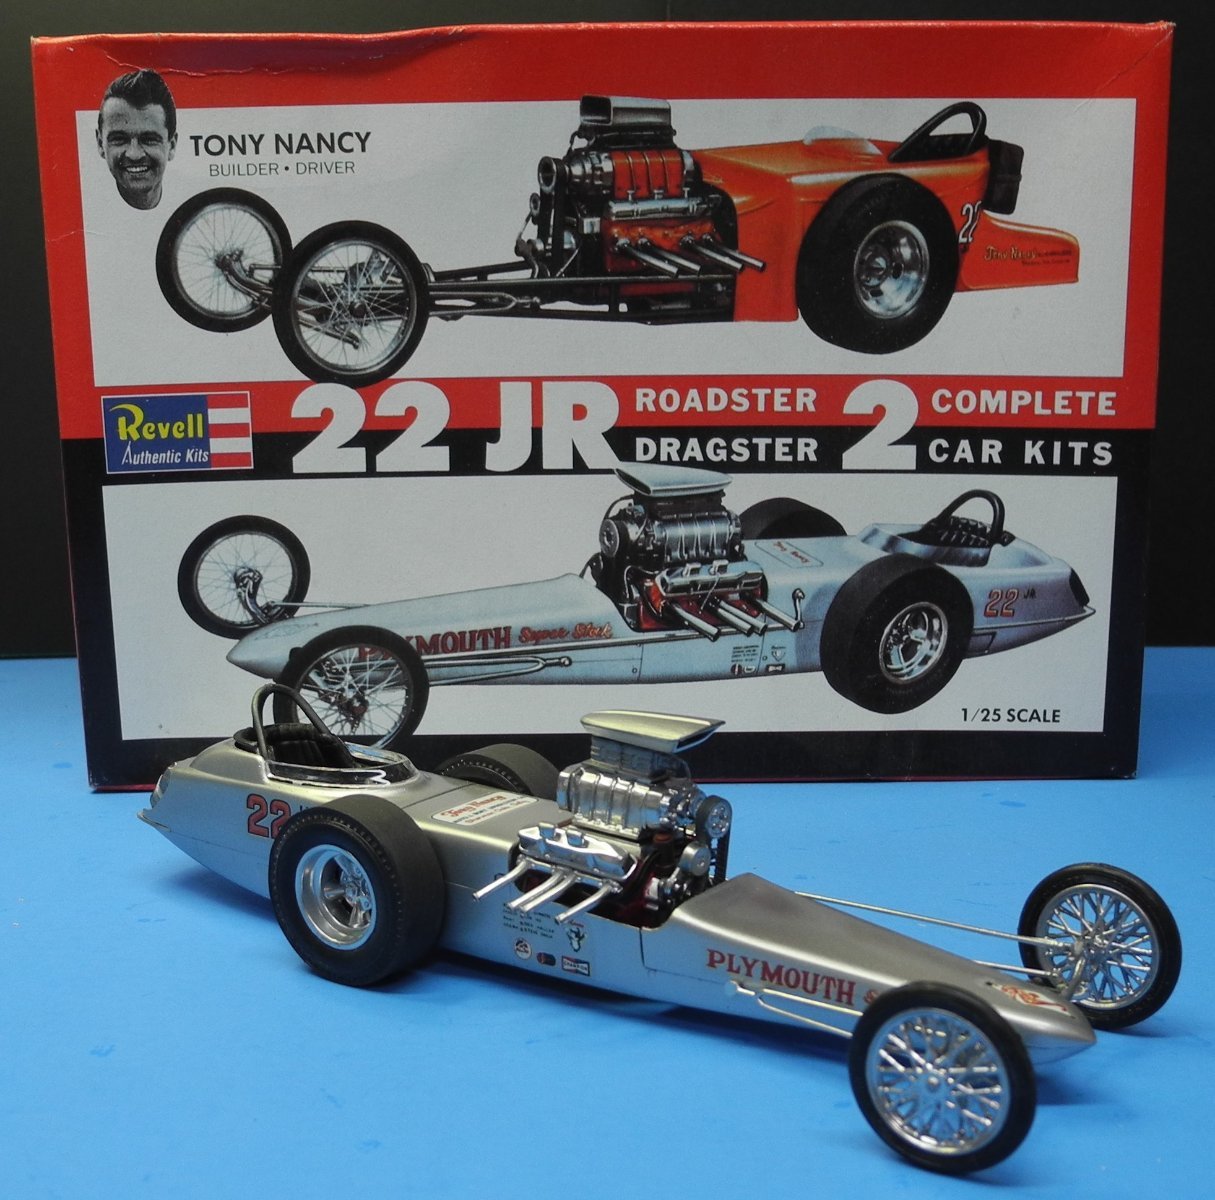
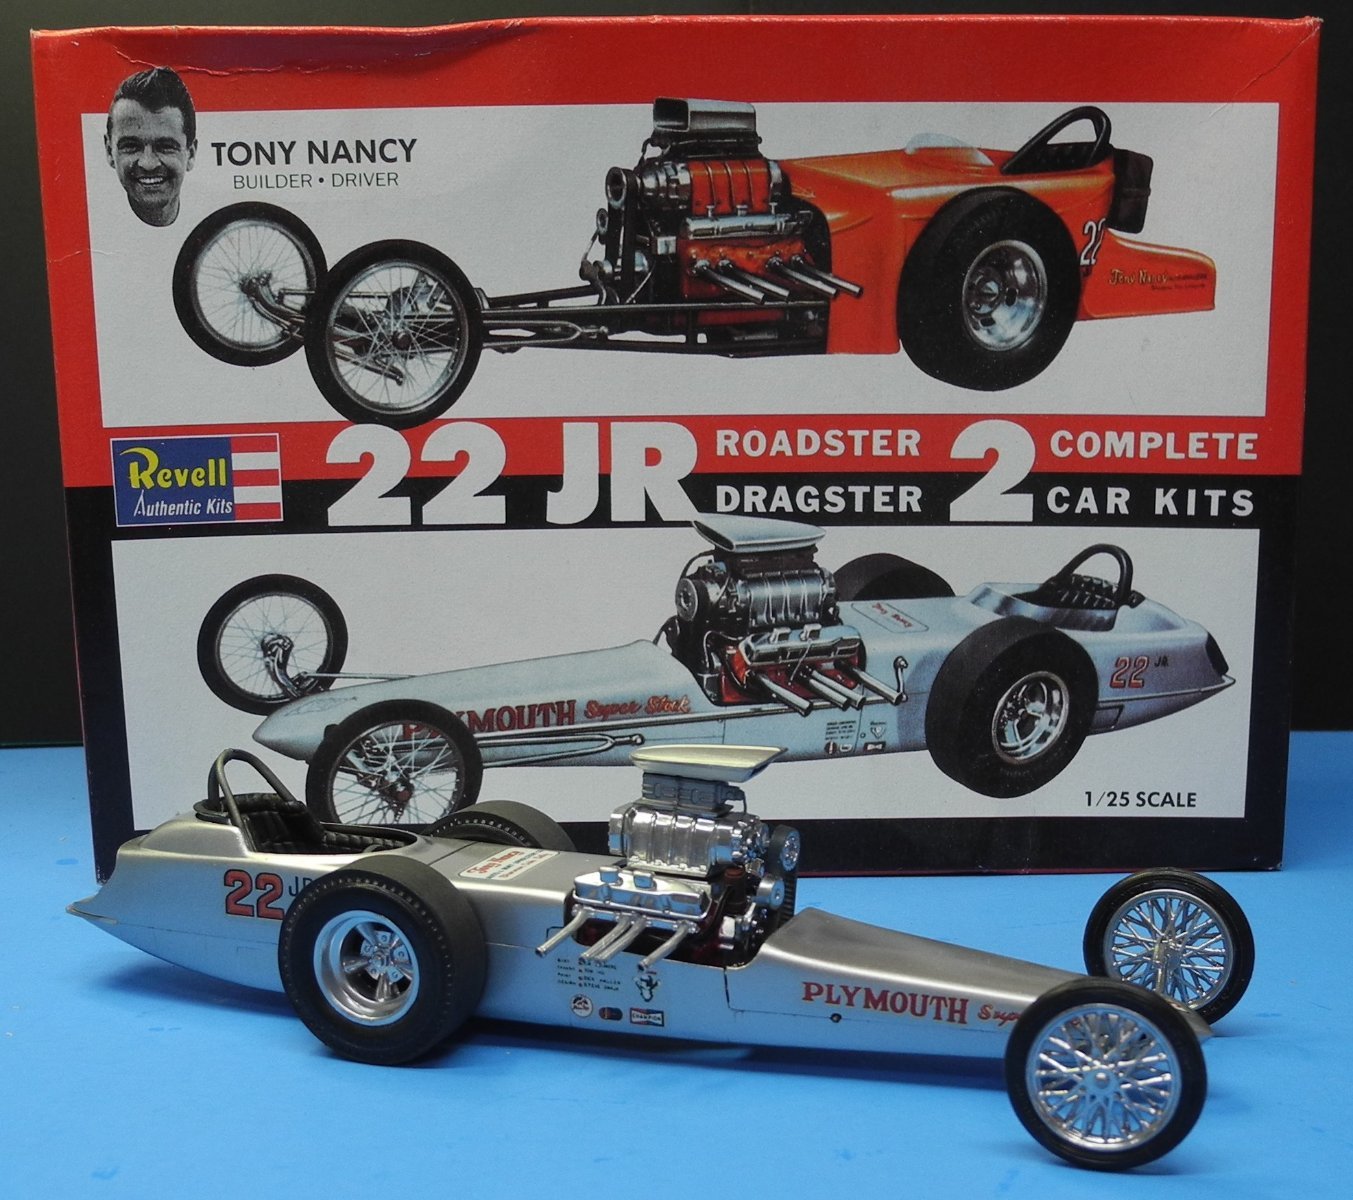
Tony Nancy 22 Jr Roadster by CDW - FINISHED - Revell - 1:25 Scale
CDW replied to CDW's topic in Non-ship/categorised builds
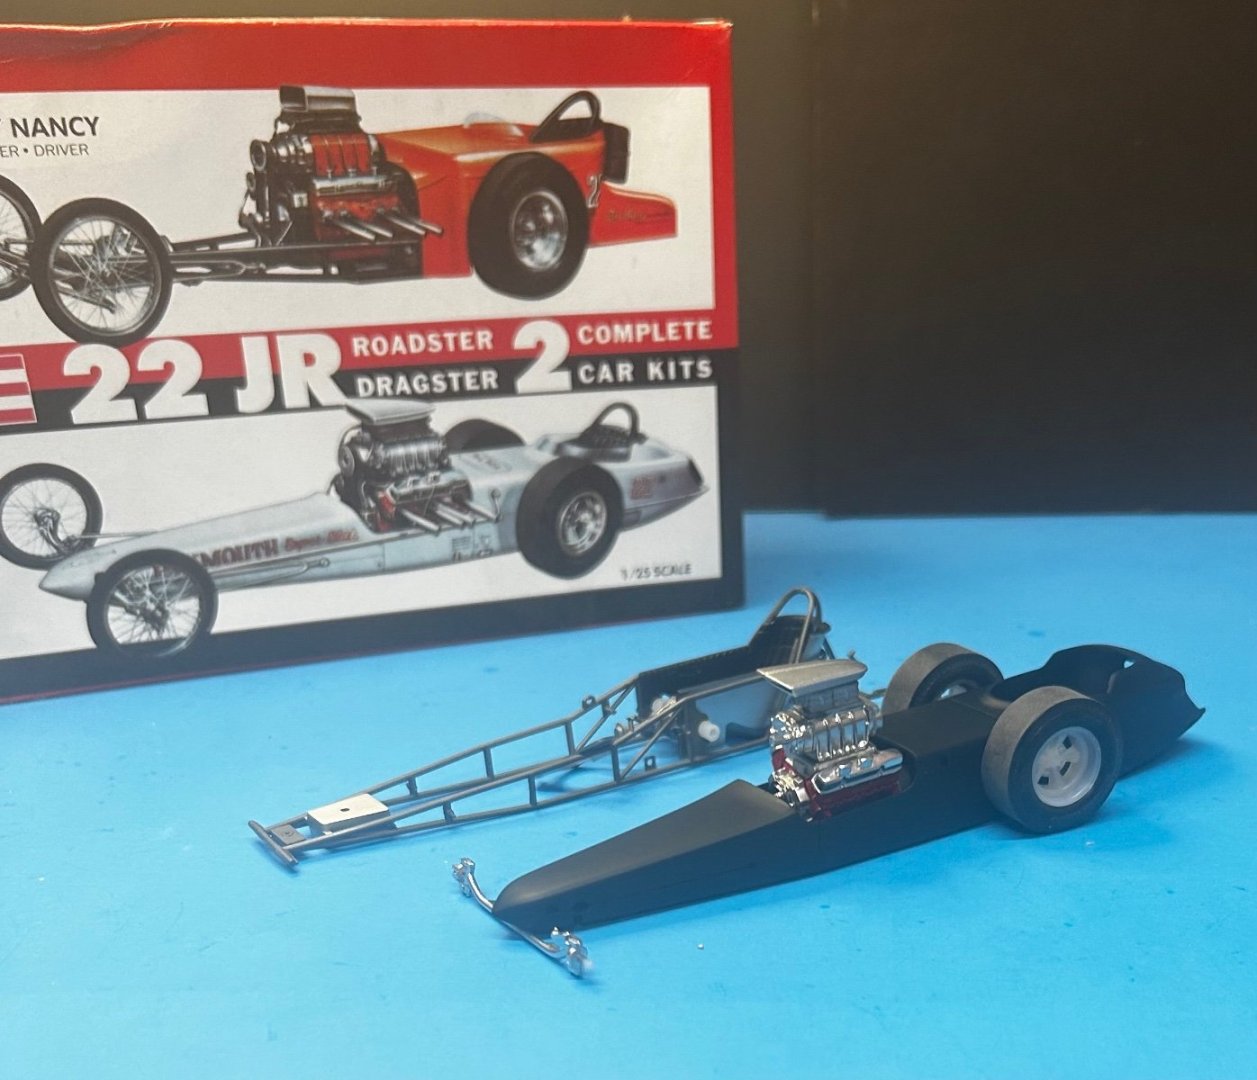
These dragsters need the "wire wheel treatment" for those front motorcycle wheels. I was in too big a hurry to do it this time around. The front wheels are not glued on so I can do it later if I decide to do so. Who knows, maybe I'll find a vendor who is doing them for sale. I found a vendor for my next 1:12 scale Grand Prix cars that need wire wheels. A fellow from France, around $100 per set of four. Well worth it in my opinion. -
Tony Nancy 22 Jr Roadster by CDW - FINISHED - Revell - 1:25 Scale
CDW replied to CDW's topic in Non-ship/categorised builds
Thanks EG! -
Tony Nancy 22 Jr Roadster by CDW - FINISHED - Revell - 1:25 Scale
CDW replied to CDW's topic in Non-ship/categorised builds
A little more progress today in between matters of greater importance. Still working on that garage. Installed the ducts and air conditioning unit today. Soon will have my climate-controlled garage/shop up and running.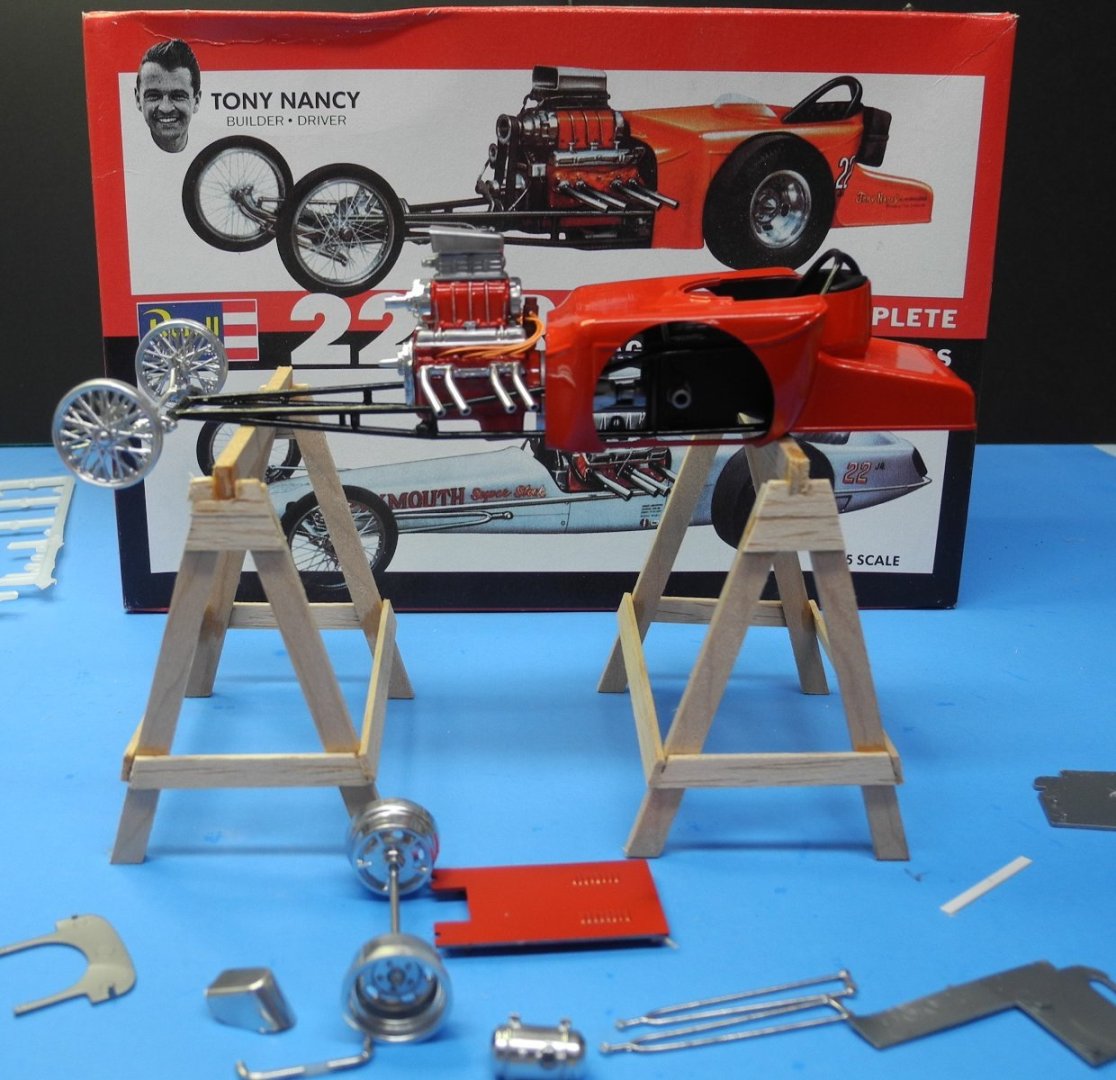
- 30 replies
-
- 12
-

-
Shelby 427 S/C Cobra by CDW - FINISHED - Fujimi - 1:24 Scale
CDW replied to CDW's topic in Non-ship/categorised builds
I bought the AMT "race team" kit that comes with a 289 Cobra, a dual axle trailer and a '53 Ford pickup truck. Haven't opened the box to check the contents yet. AMT GRAND PRIX '53 FORD COBRA RACING TEAM 1/25 SCALE MODEL KIT 849398019726 | eBay -
Shelby 427 S/C Cobra by CDW - FINISHED - Fujimi - 1:24 Scale
CDW replied to CDW's topic in Non-ship/categorised builds
In the Fall months of 1963, my dad was new car shopping at the Ford dealer. They had the roadster in the middle of the showroom floor behind ropes, so wouldn’t let you touch it. I remember it very well. -
Tony Nancy 22 Jr Roadster by CDW - FINISHED - Revell - 1:25 Scale
CDW replied to CDW's topic in Non-ship/categorised builds
She who must be obeyed detoured my model building for garage cleaning and organizing duties the past two days. As such, progress has been slower than I hoped for. None the less, I still think I'll have this baby wrapped up before the weekend is done. We'll see. Here's where it stands at the moment. Most of those parts and pieces on the right need chrome paint. A few other small parts other colors but most of the painting is done now.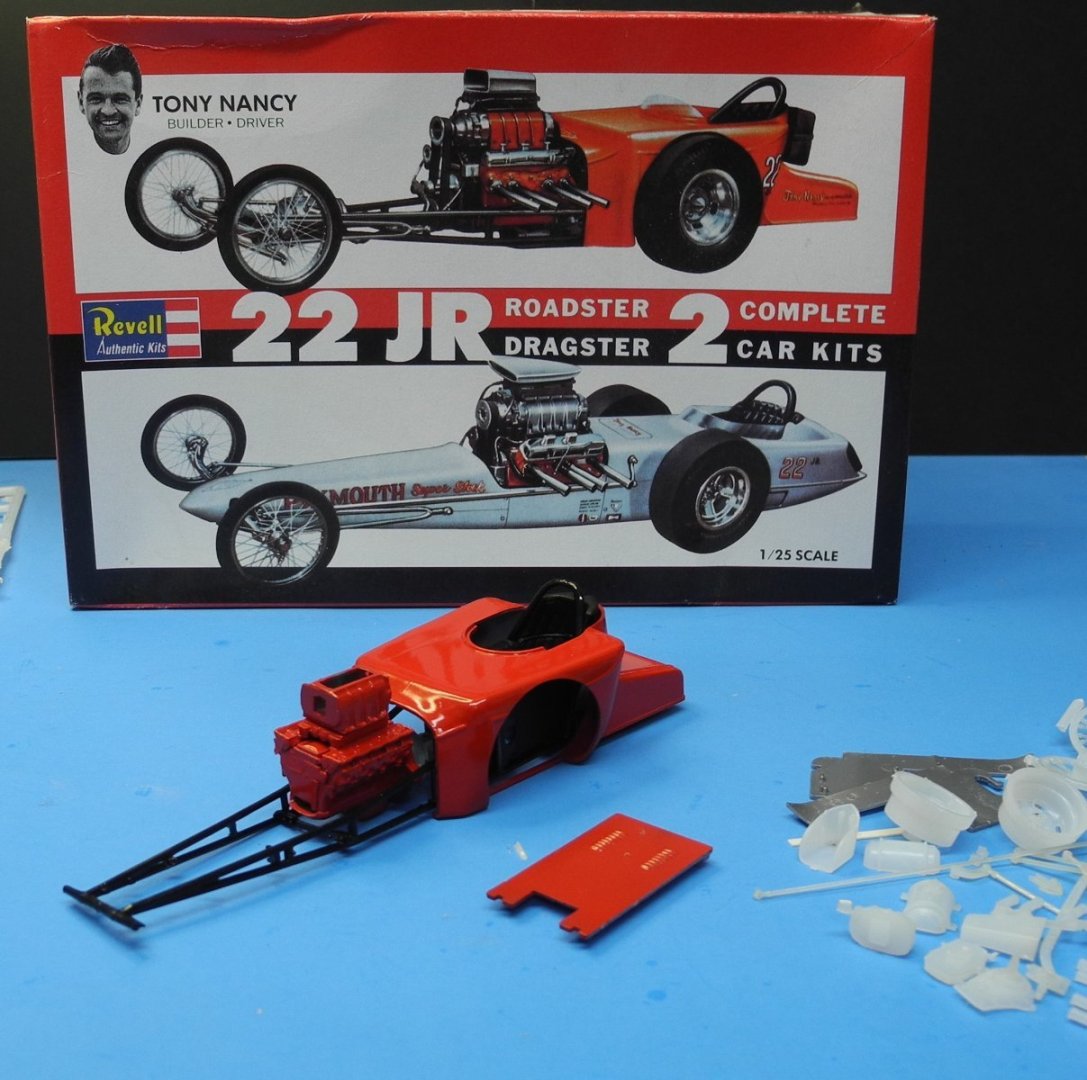

- 30 replies
-
- 10
-
-
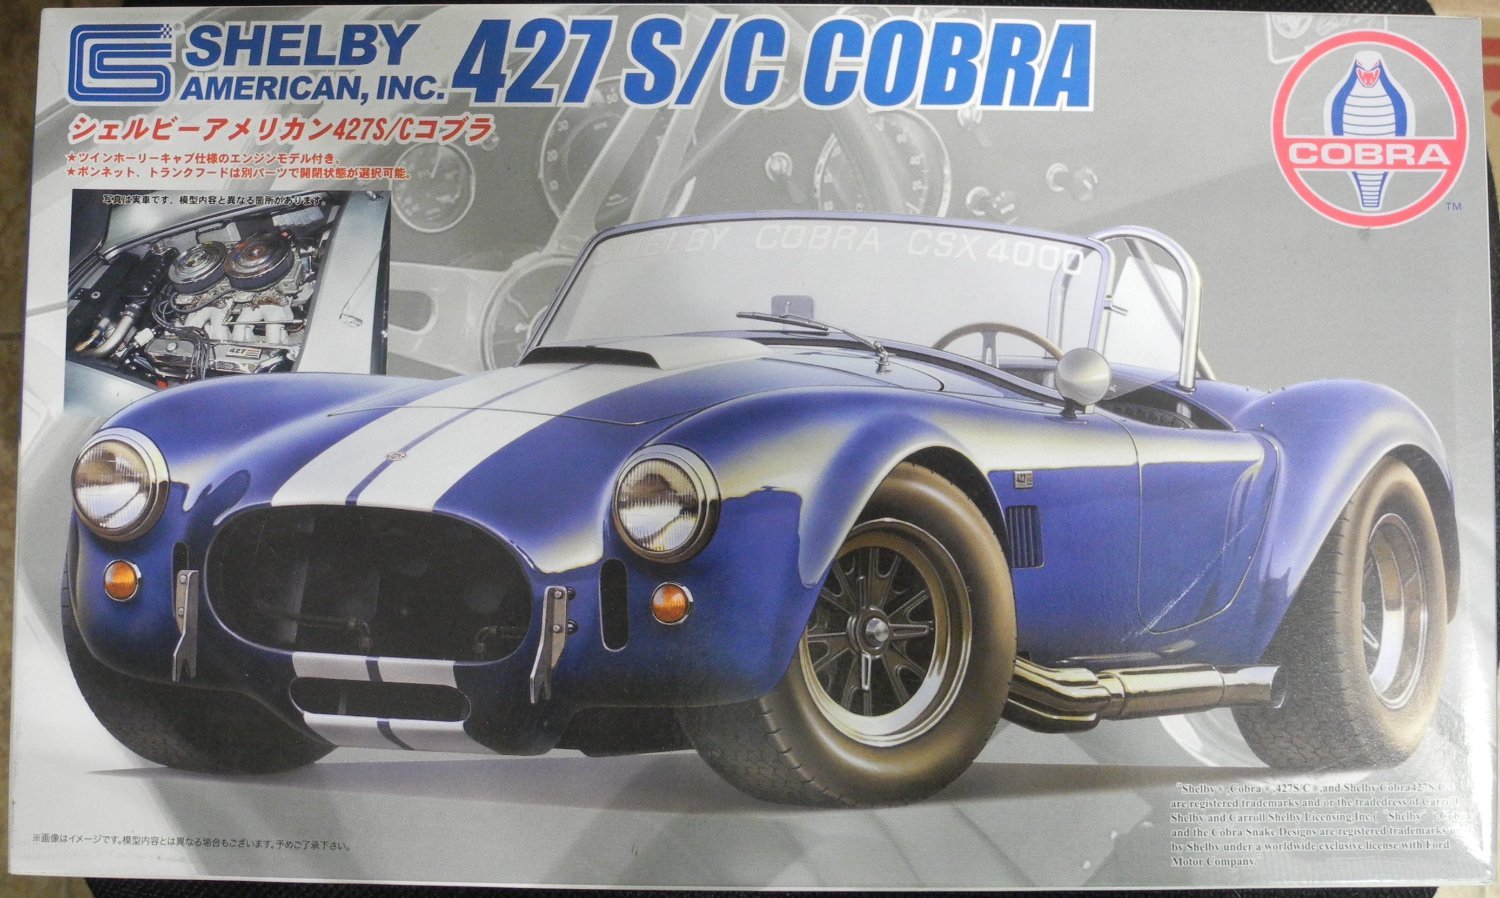
When I finish my current project, hopefully by this weekend, I'll be starting this Shelby 427 S/C Cobra next. I'll build the kit primarily out-of-the-box, with a few aftermarket items such as hose and fittings and scratch built modifications here and there. Hope you follow along and enjoy the project.

- 67 replies
-
- 12
-
-
Tony Nancy 22 Jr Roadster by CDW - FINISHED - Revell - 1:25 Scale
CDW replied to CDW's topic in Non-ship/categorised builds
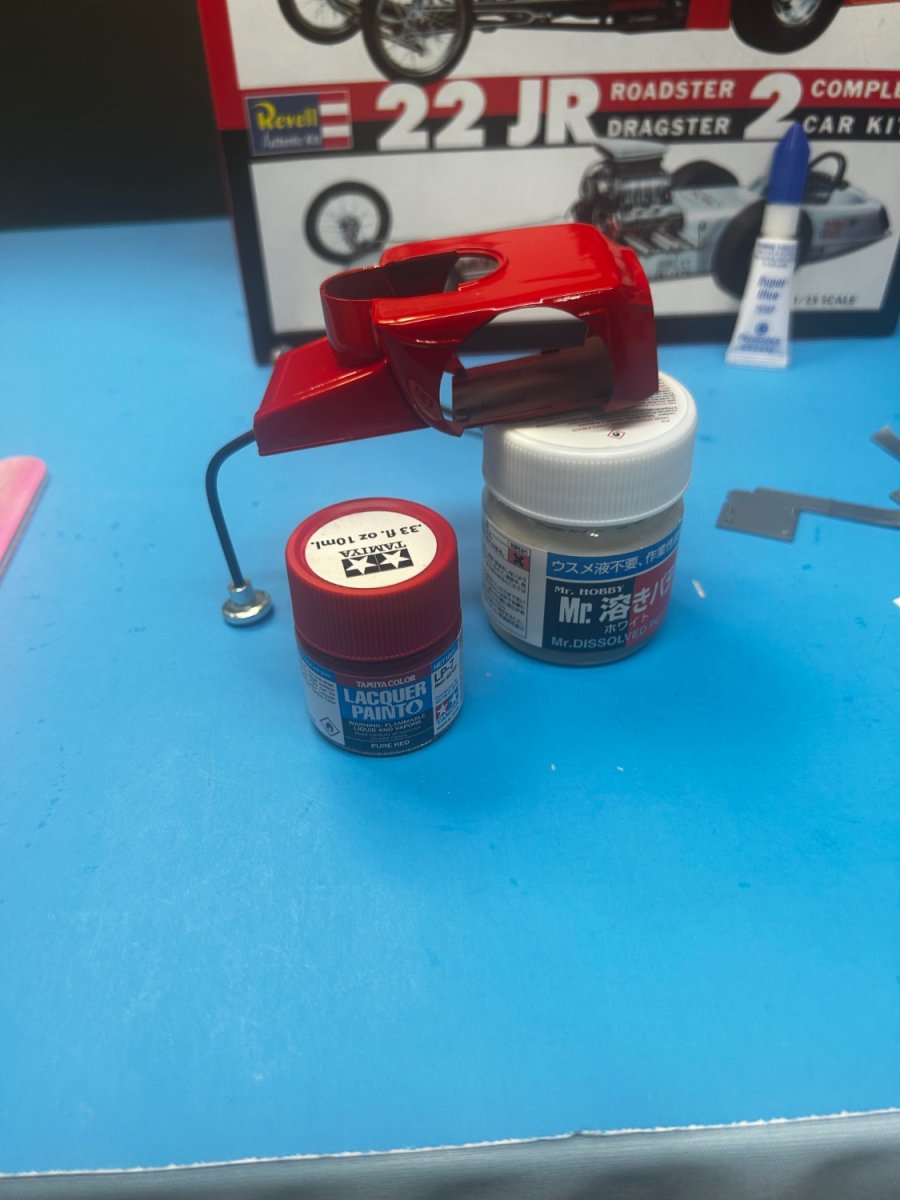
Tamiya pure red lacquer

- 30 replies
-
- 13
-
-

-
Tony Nancy 22 Jr Roadster by CDW - FINISHED - Revell - 1:25 Scale
CDW replied to CDW's topic in Non-ship/categorised builds
Sanded, then wet sanded before primer was applied. I think it's ready for paint now, so will move on to the engine, drive train and chassis.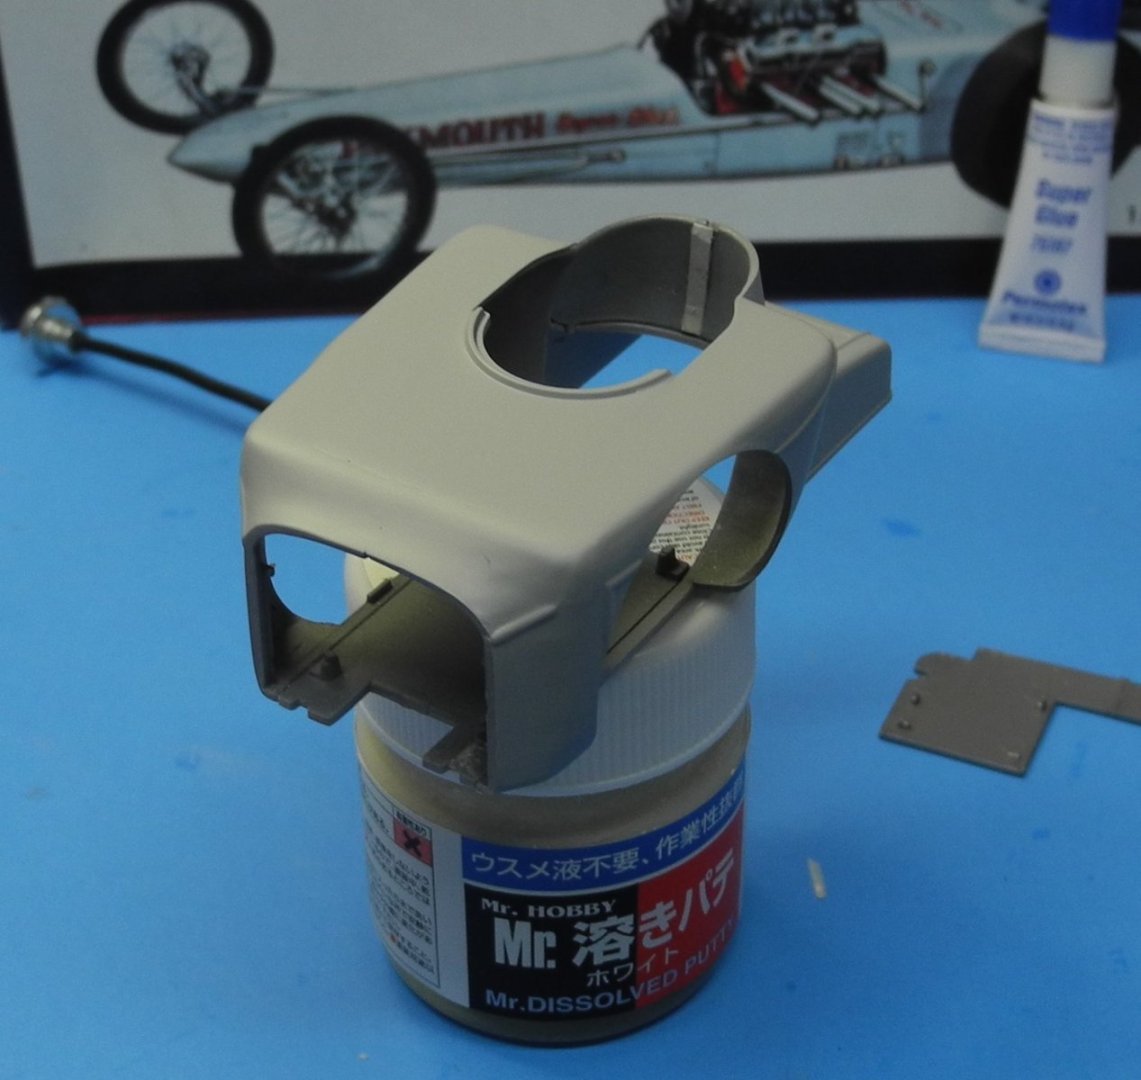
- 30 replies
-
- 13
-
-
Tony Nancy 22 Jr Roadster by CDW - FINISHED - Revell - 1:25 Scale
CDW replied to CDW's topic in Non-ship/categorised builds
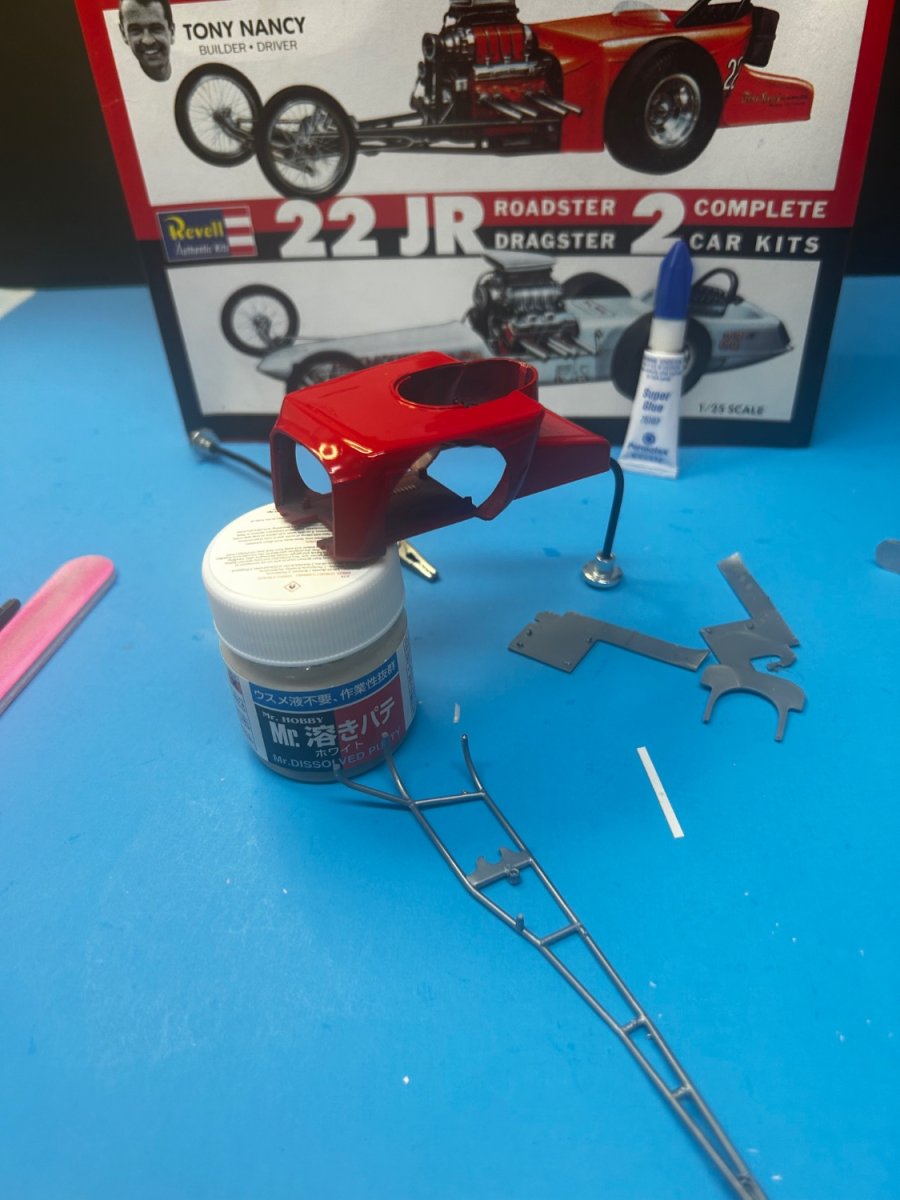
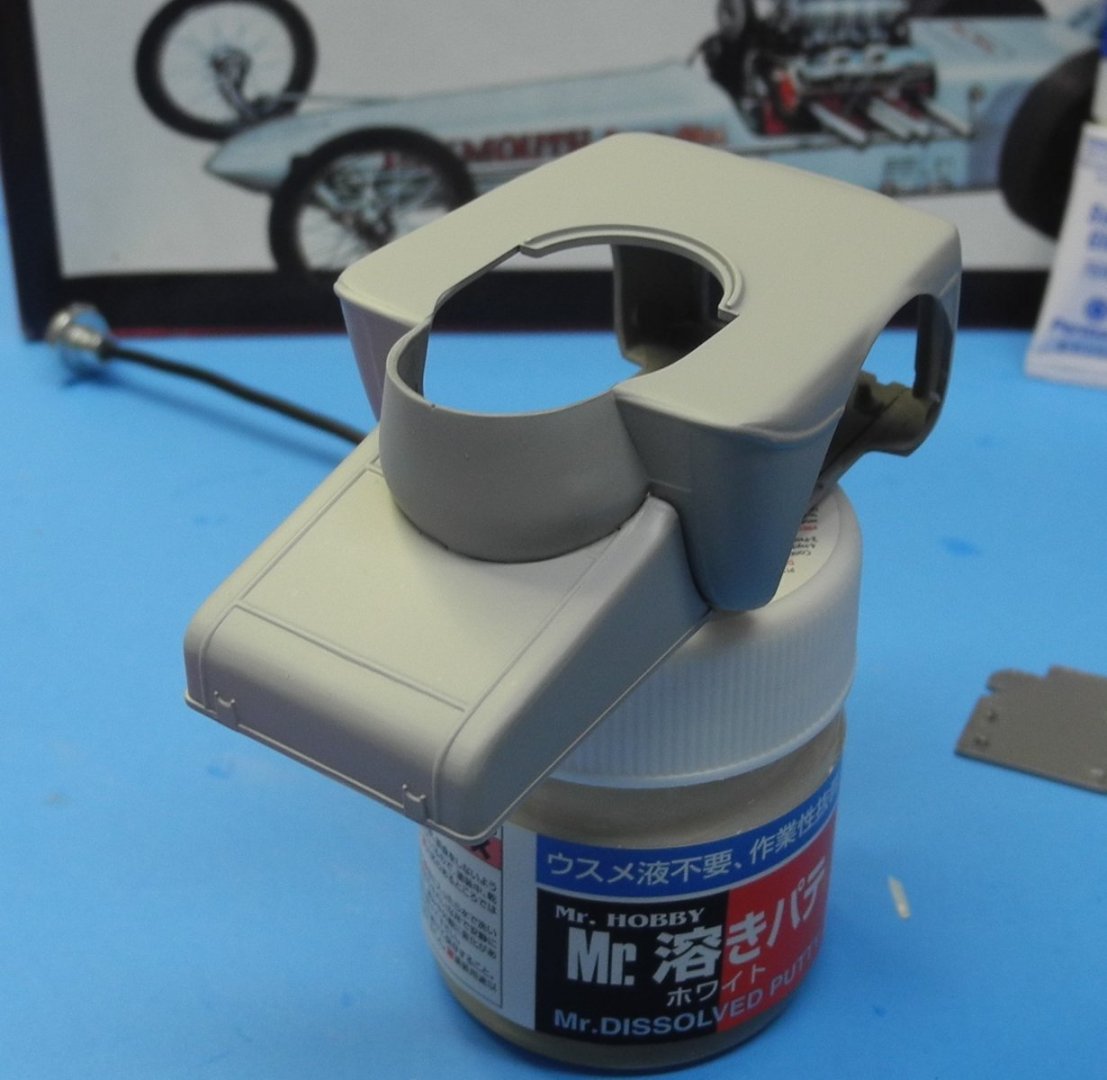
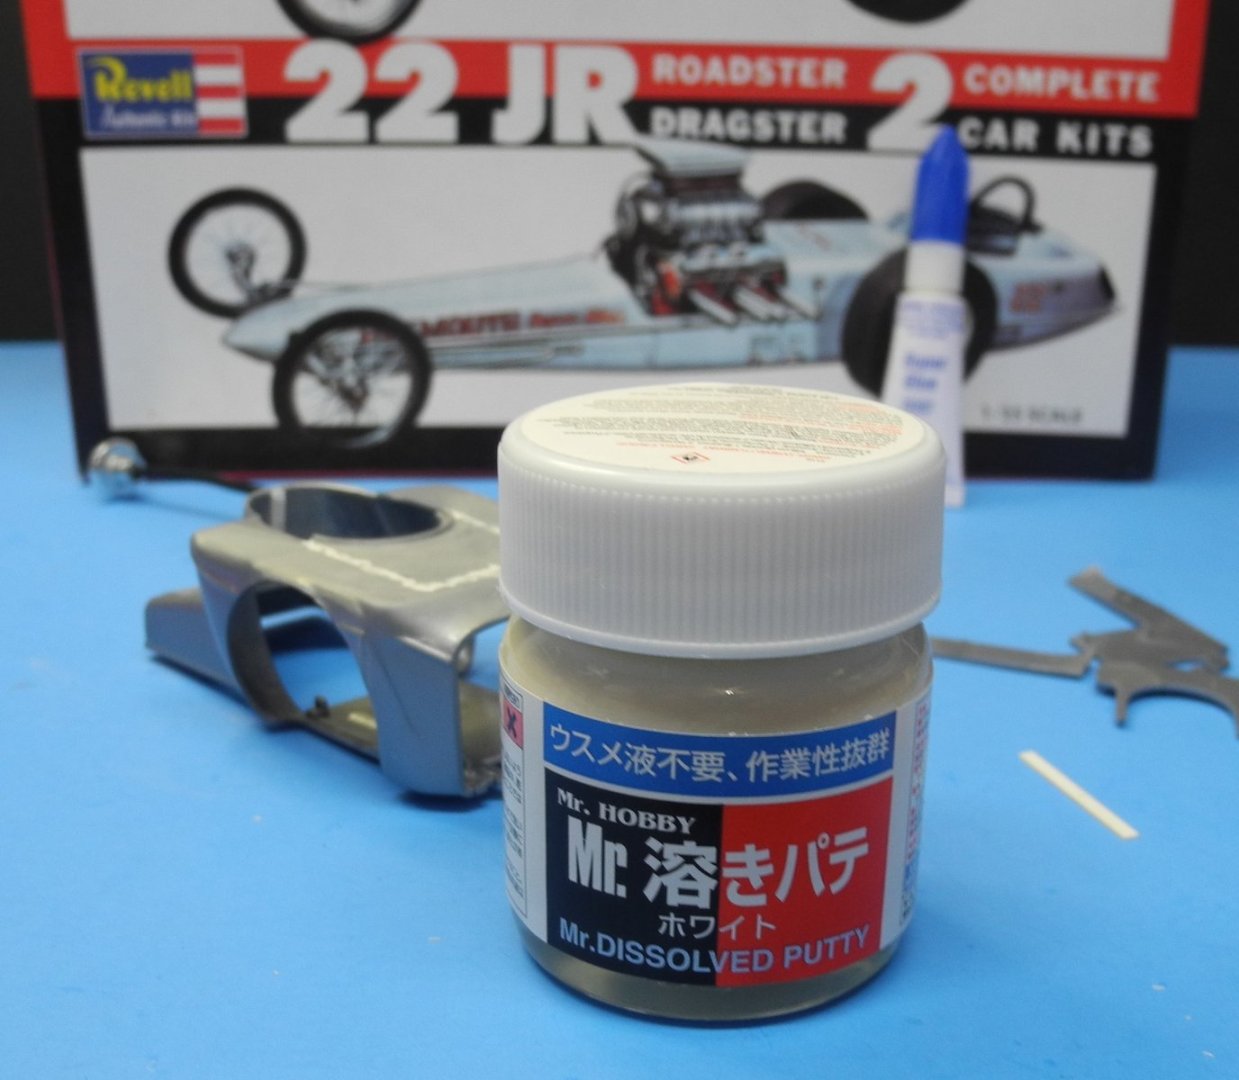
Another good one to try is Tamiya 2-part polyester putty. I had to order it from Japan to get it, couldn't find a hobby supplier in the USA that had it. Found it on Amazon international. Mr Disolved Putty is great for seams and small sink marks but larger areas that need putty may be better served by the polyester putty. -
1/200 Trumpeter IJN YAMATO - issued by MRC/Gallery Models
CDW replied to yvesvidal's topic in REVIEWS: Model kits
Unless we get ourselves one of those big commune style tubs, a model like that is WAY too big to float in our bathtubs at bath time. 🙂- 104 replies
-
- 3
-
-

-
- MRC/Gallery
- Yamato
- (and 1 more)
-
Tony Nancy 22 Jr Roadster by CDW - FINISHED - Revell - 1:25 Scale
CDW replied to CDW's topic in Non-ship/categorised builds
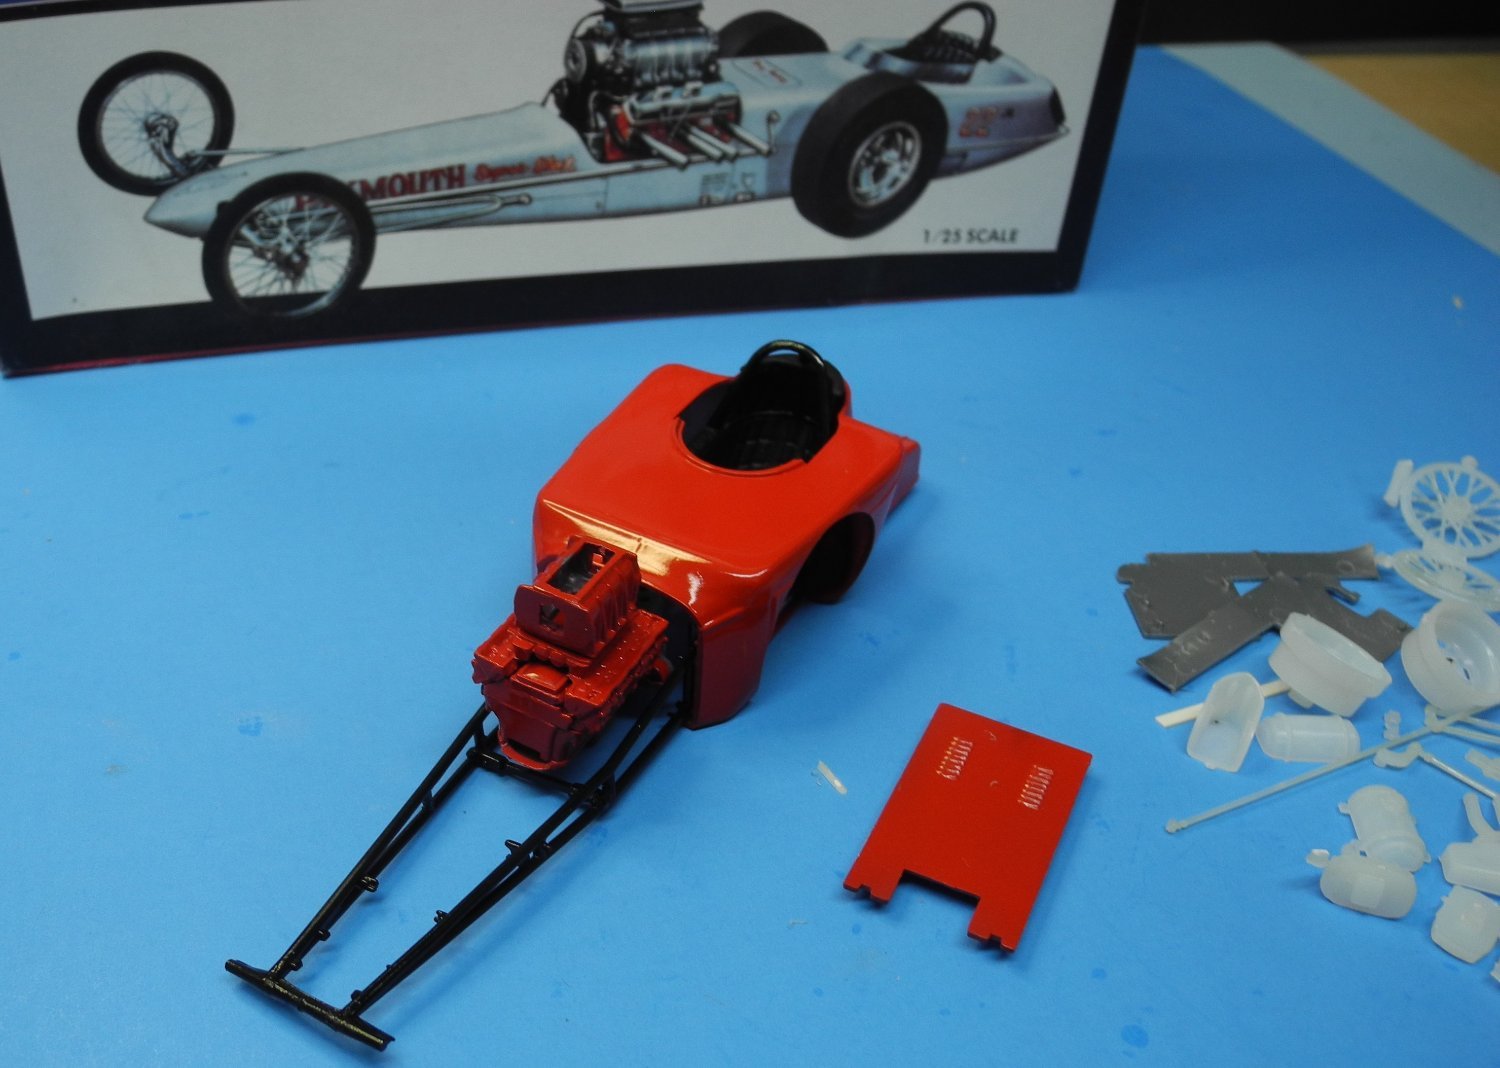
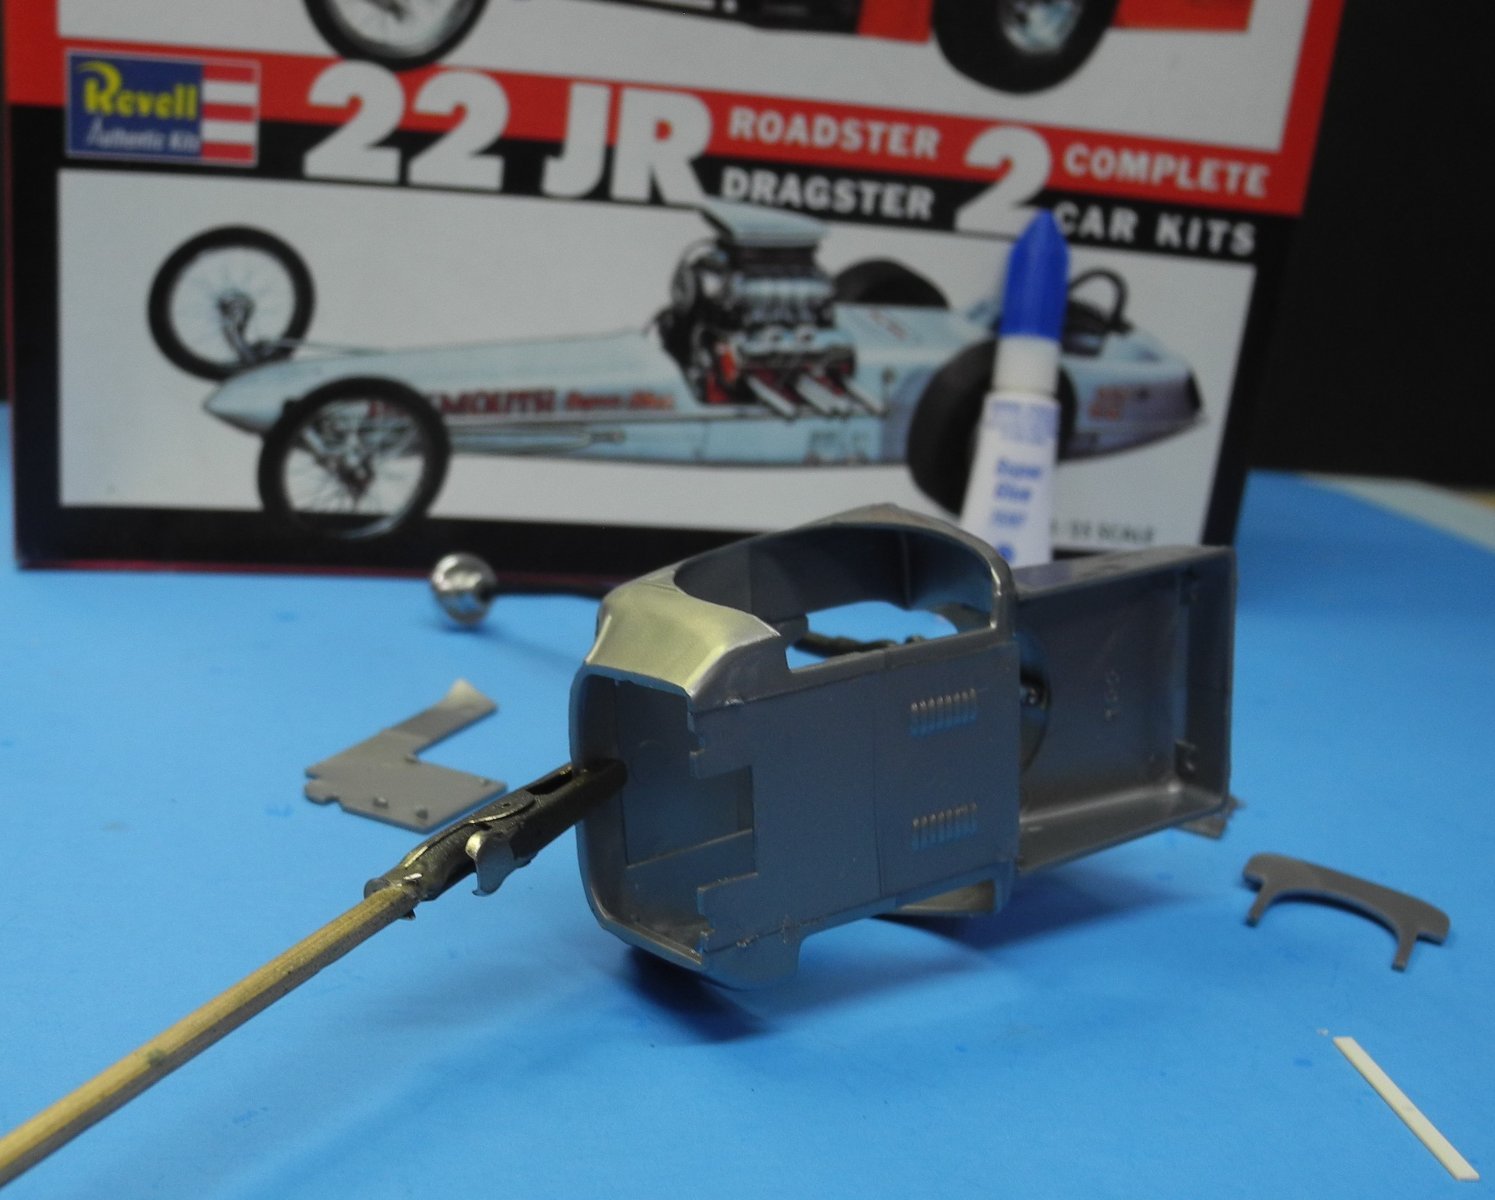
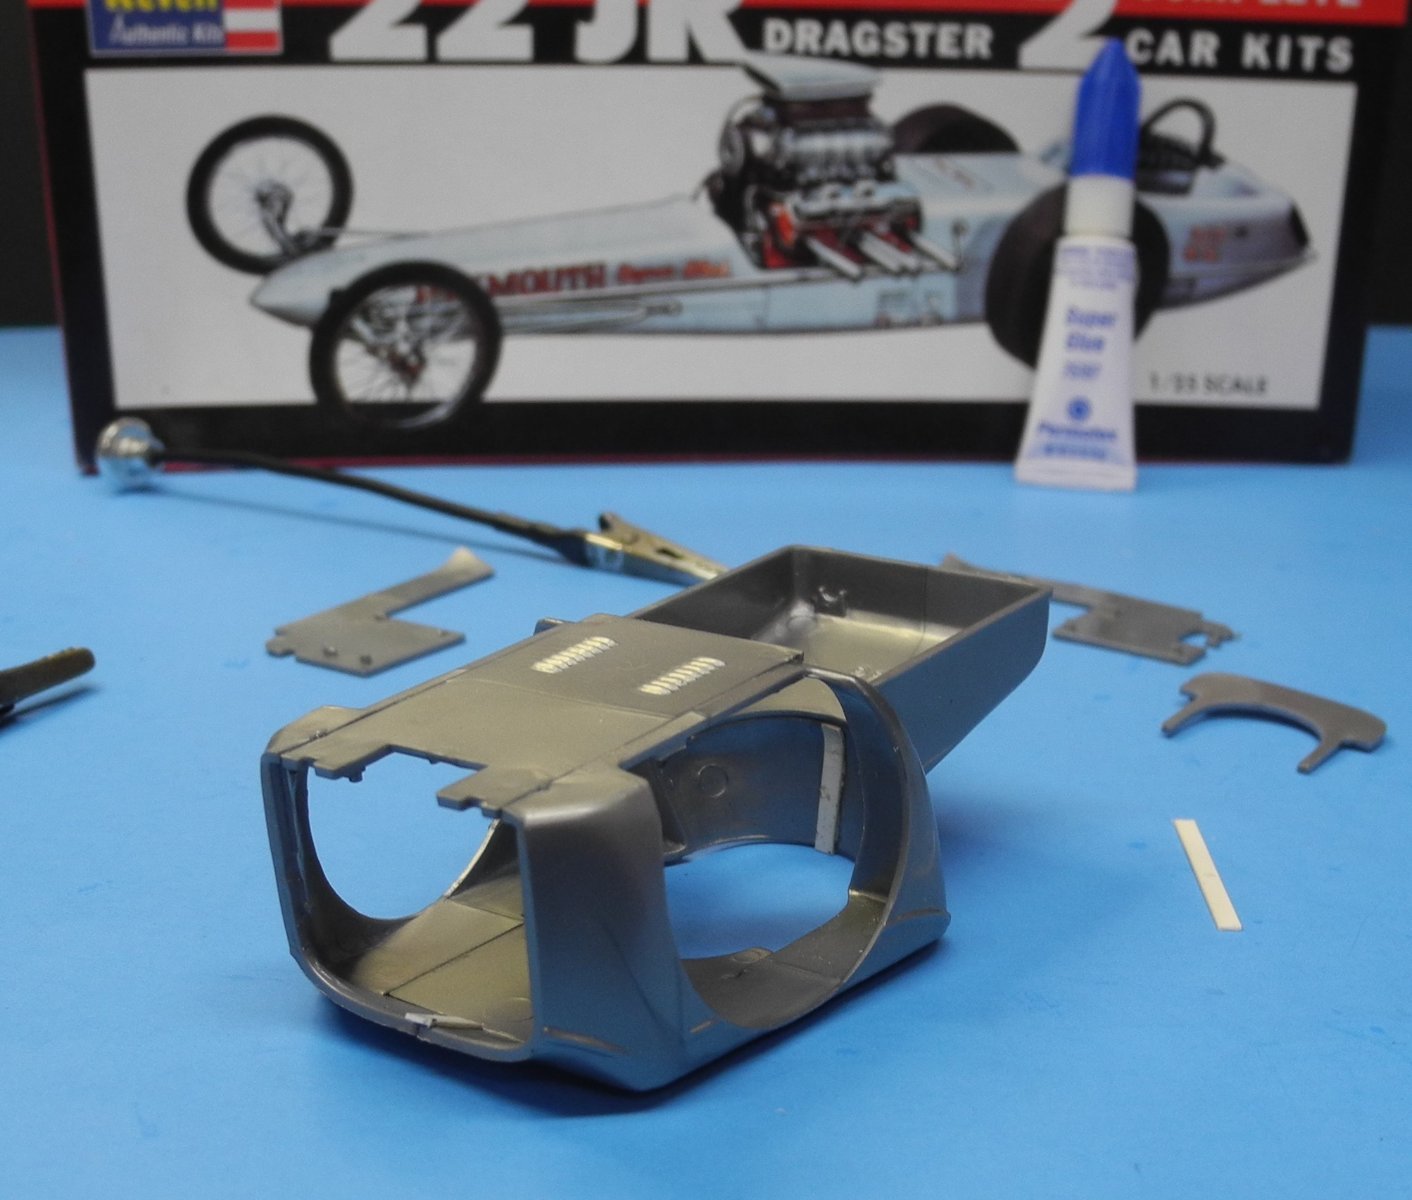
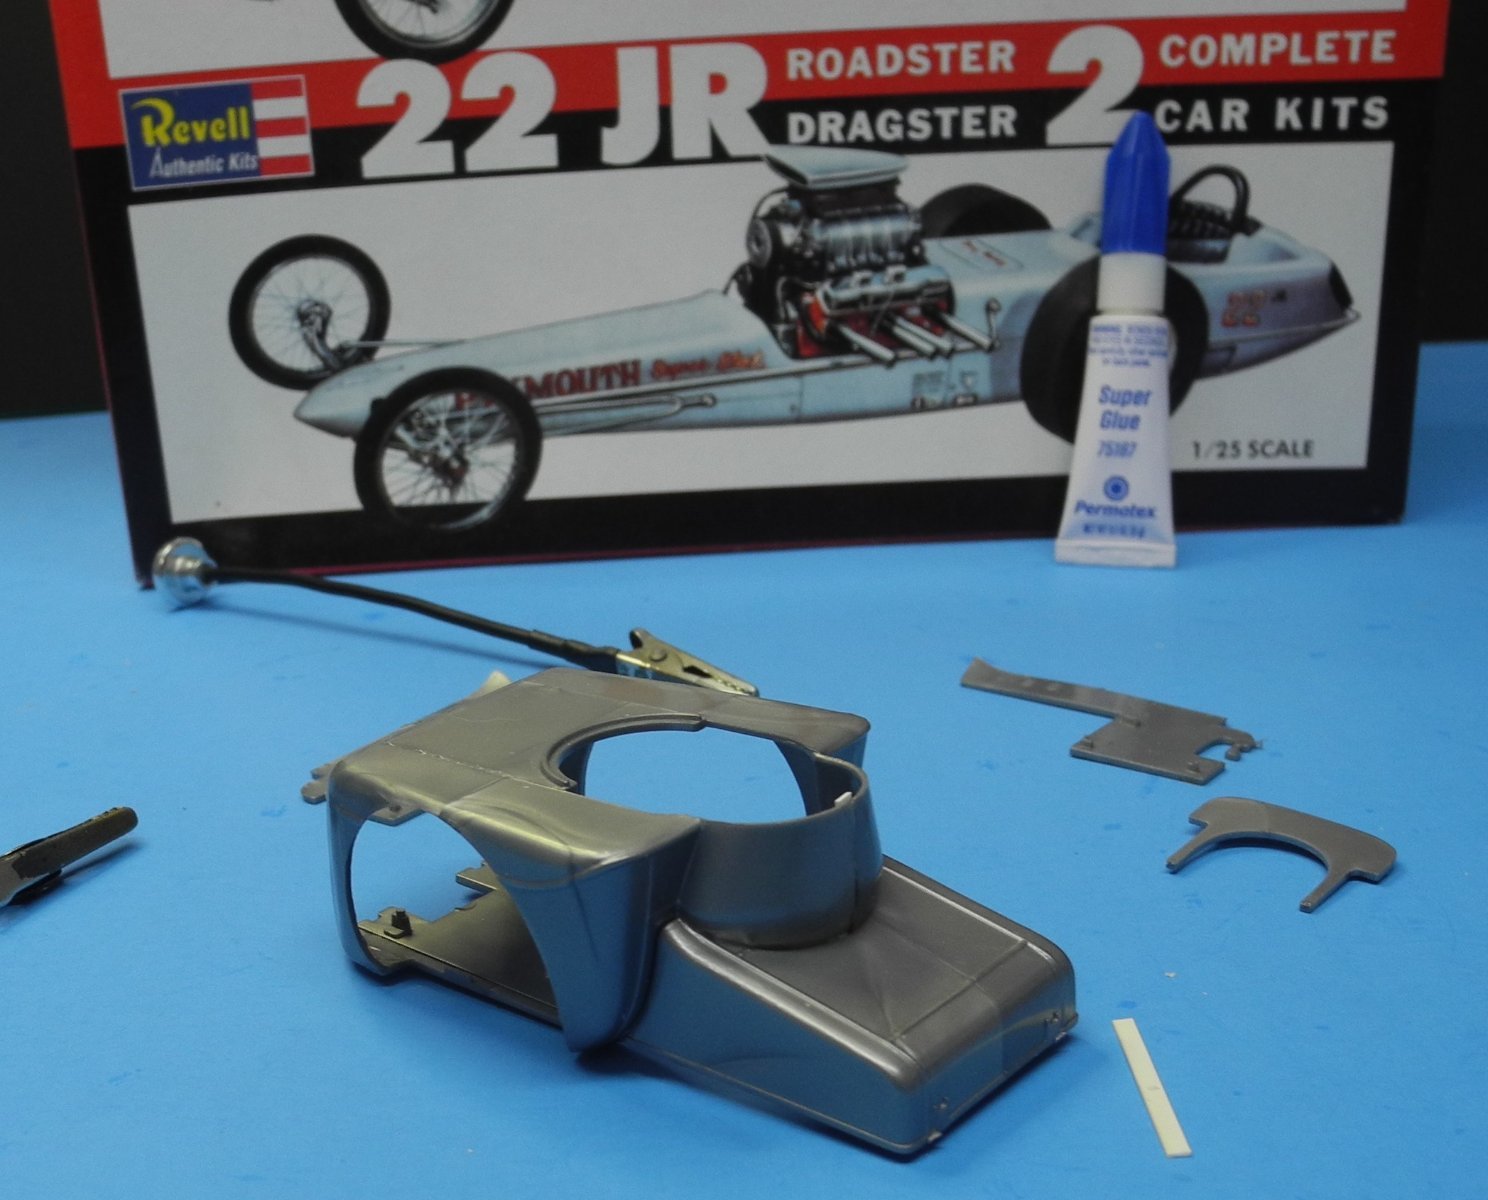
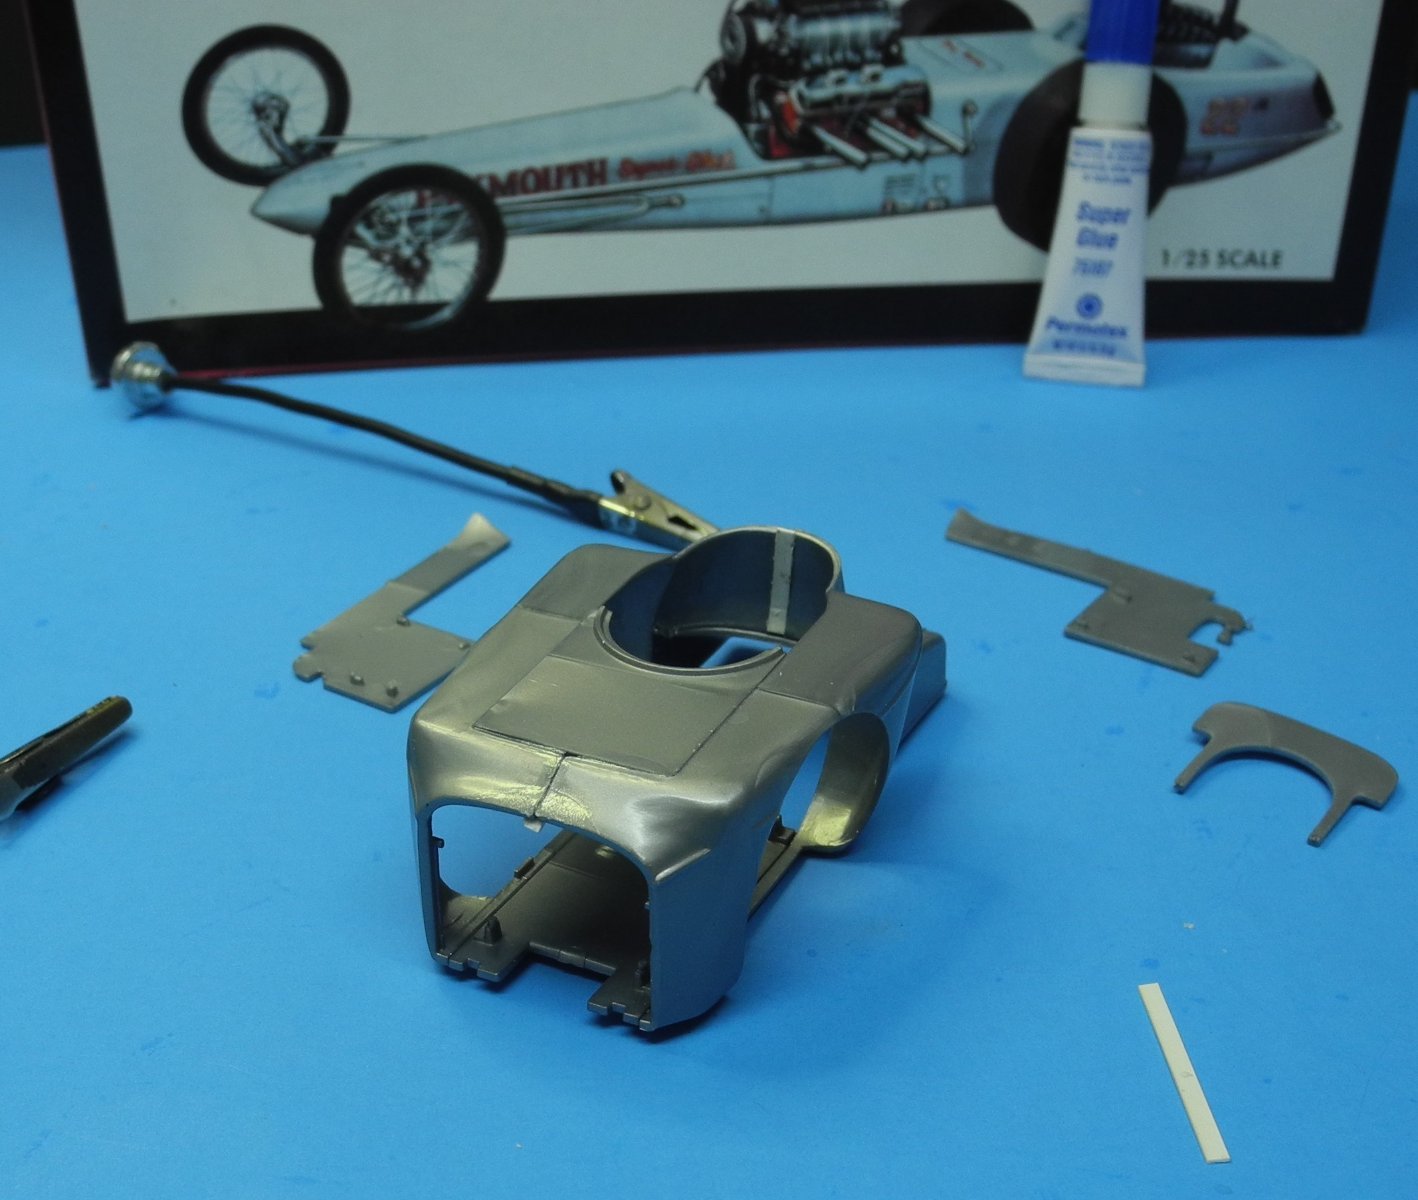
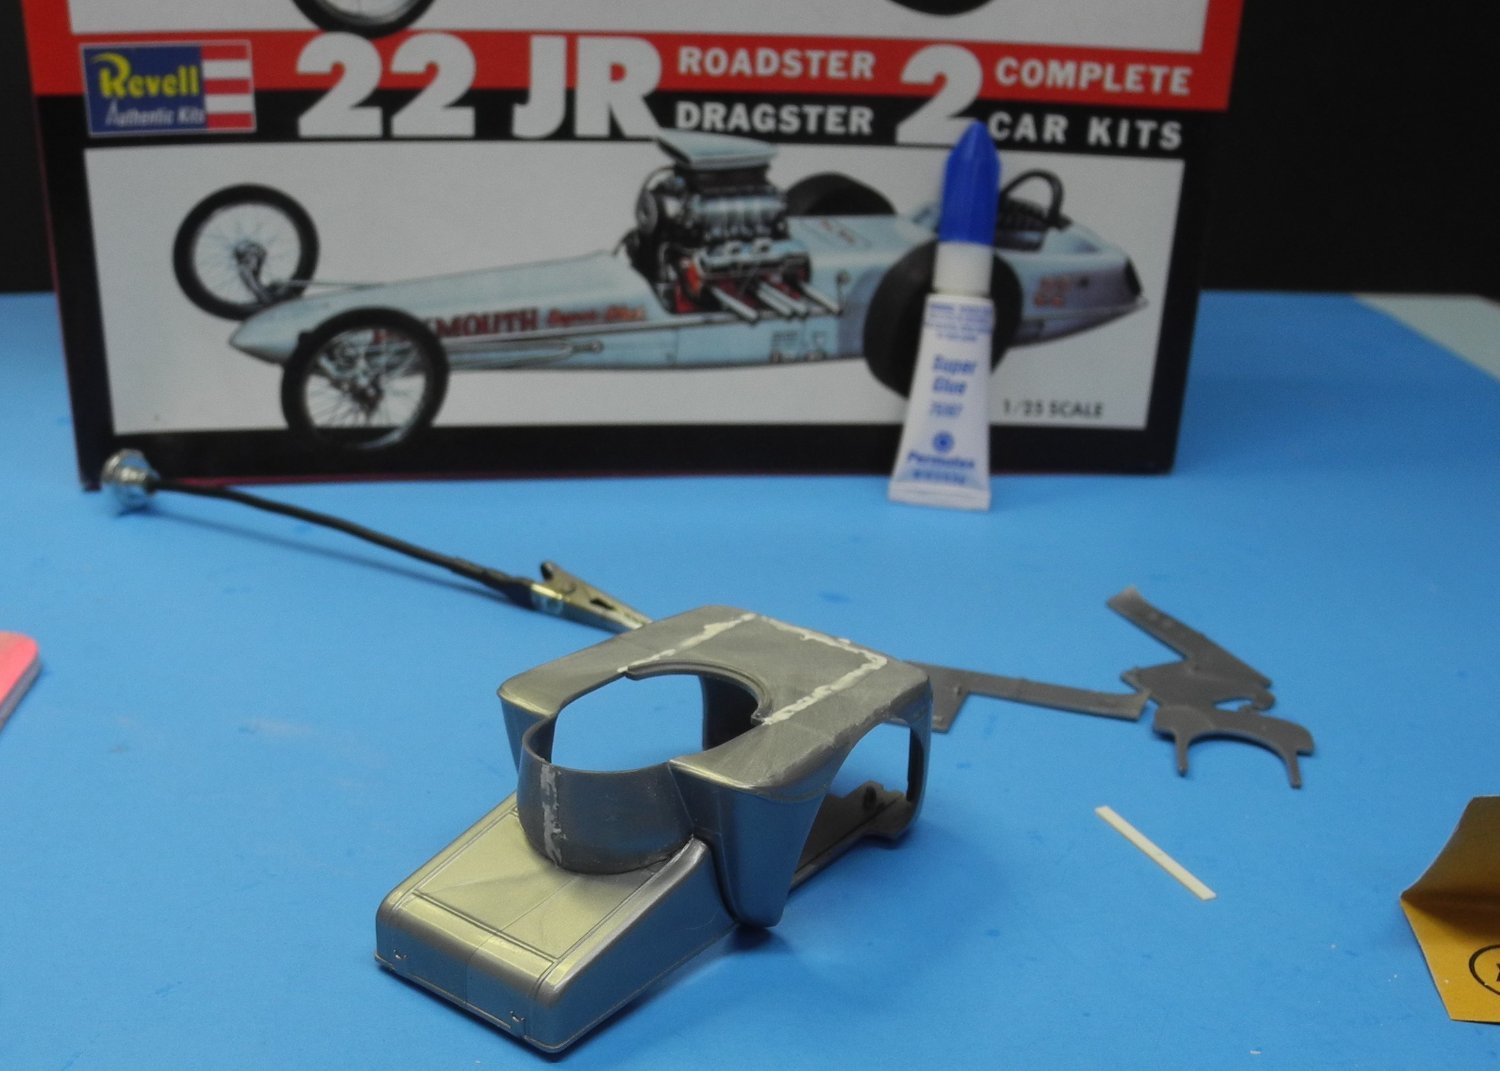
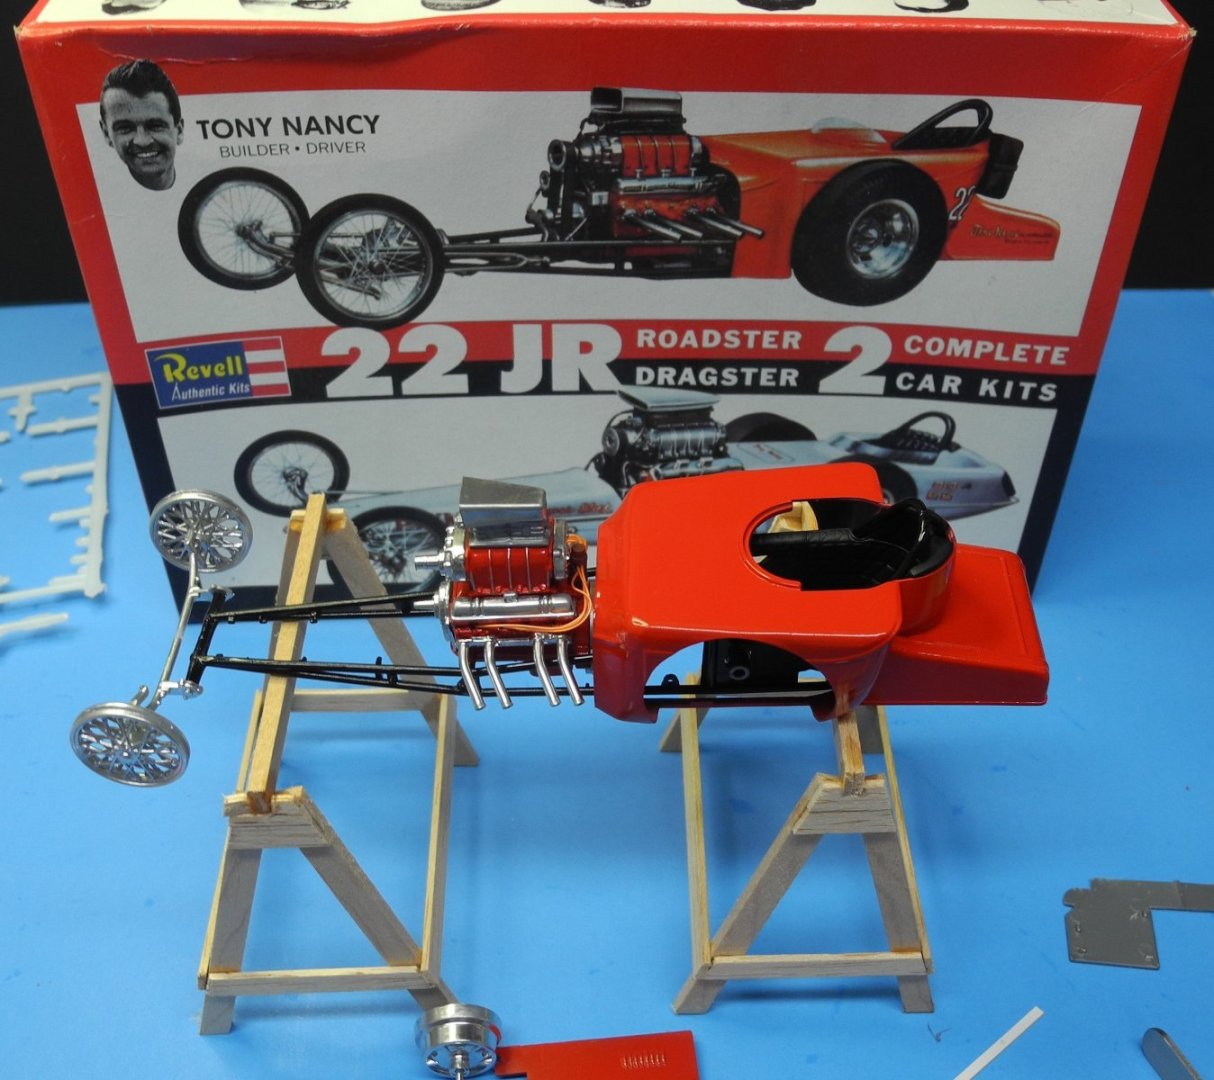
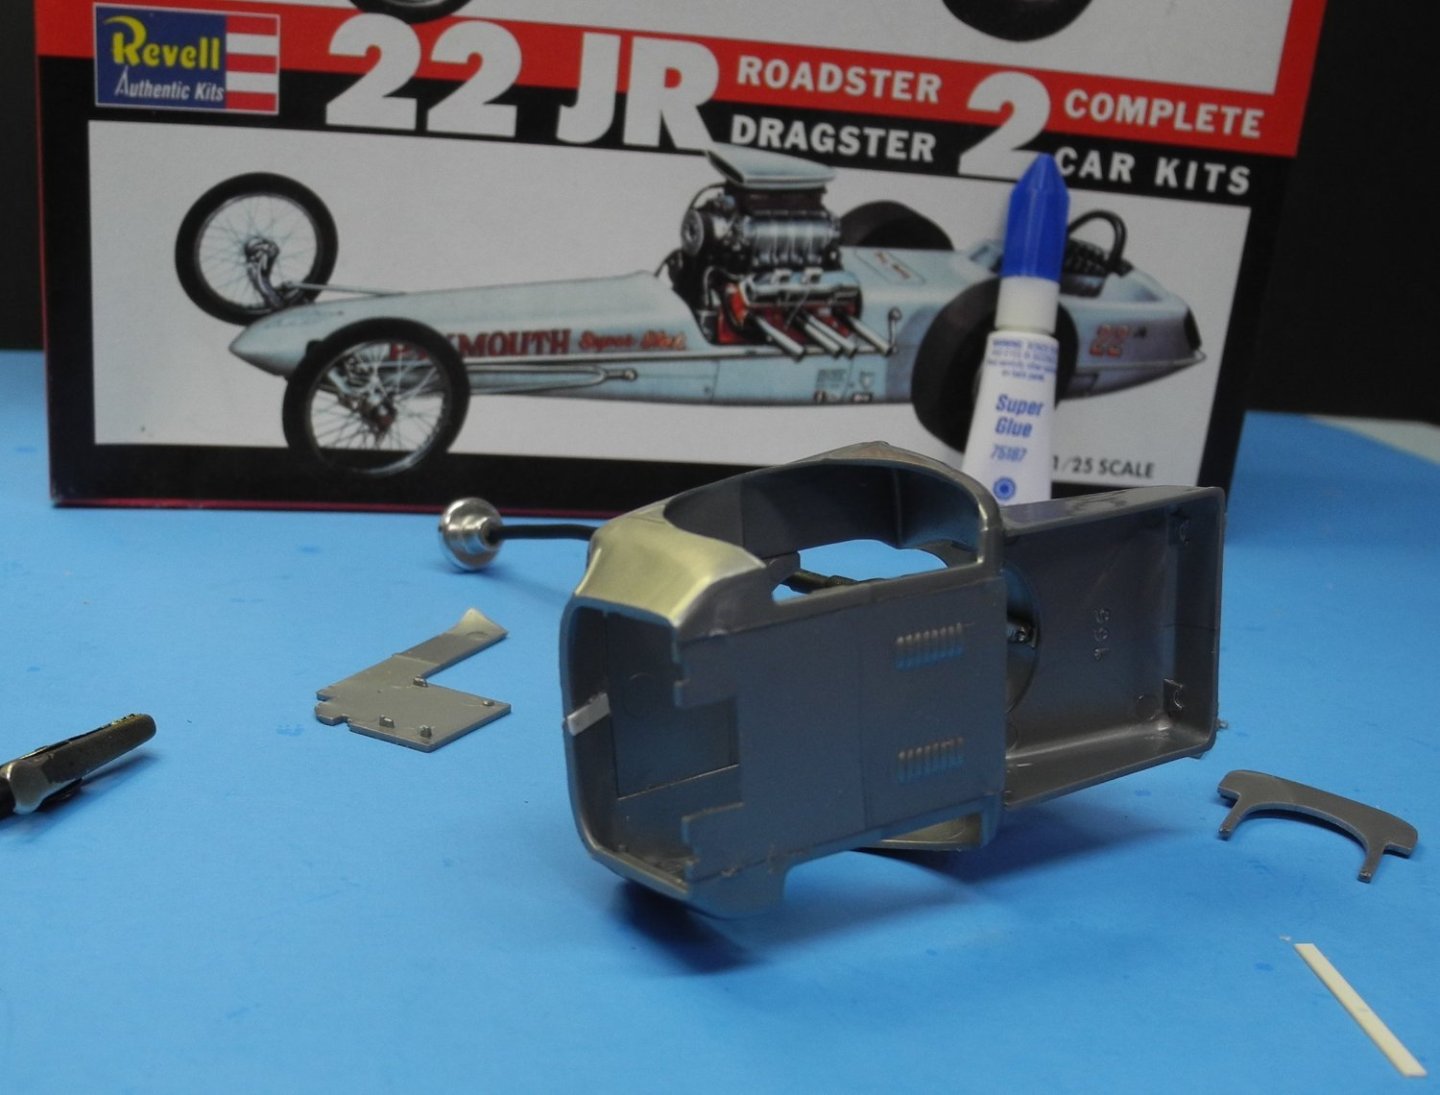
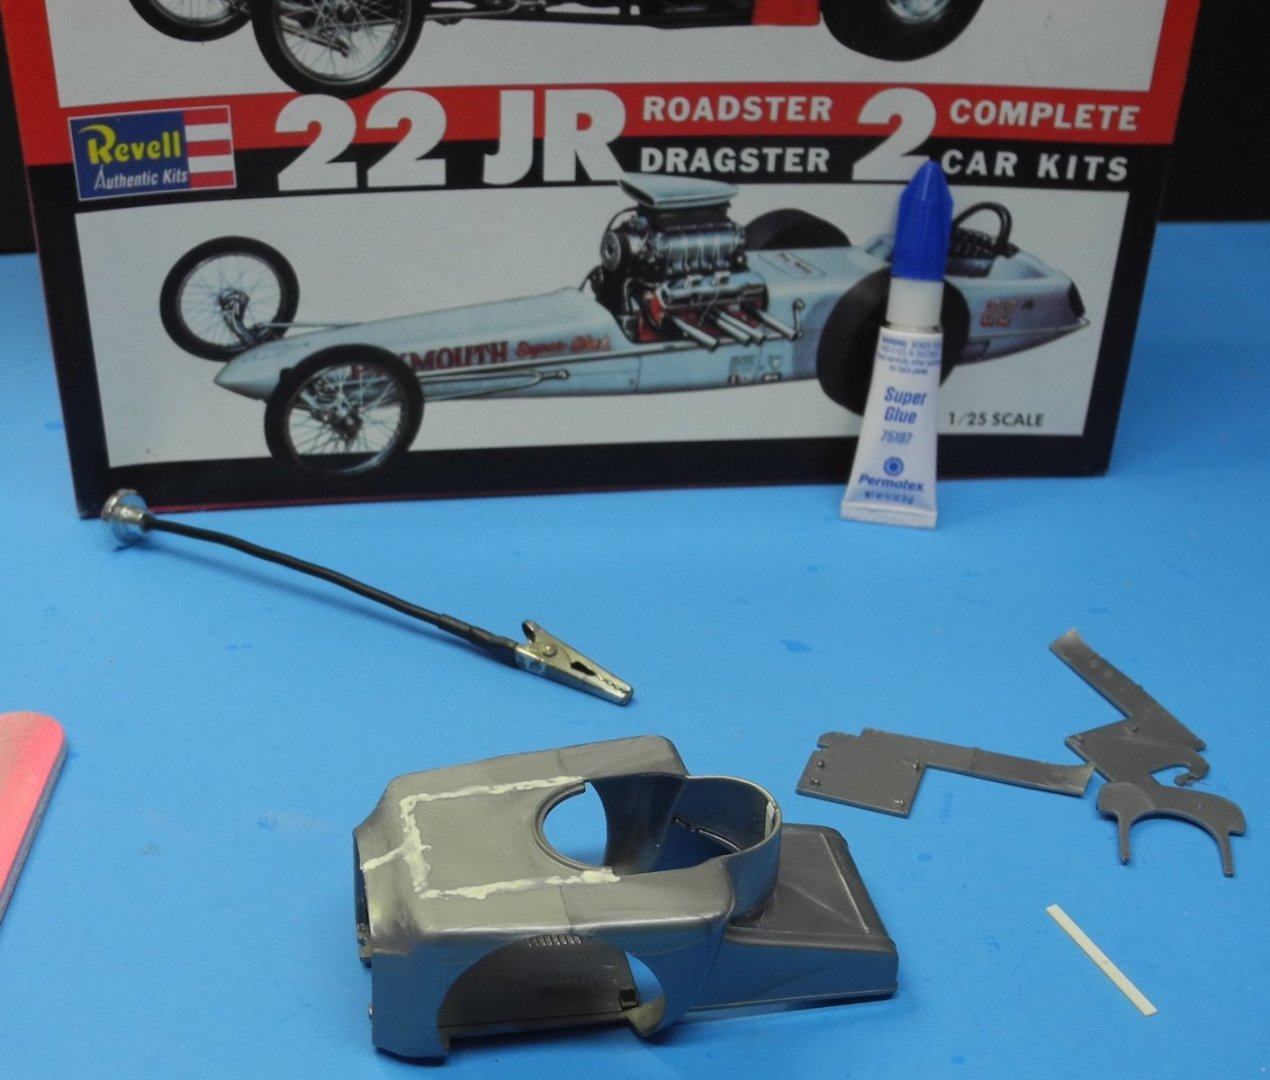
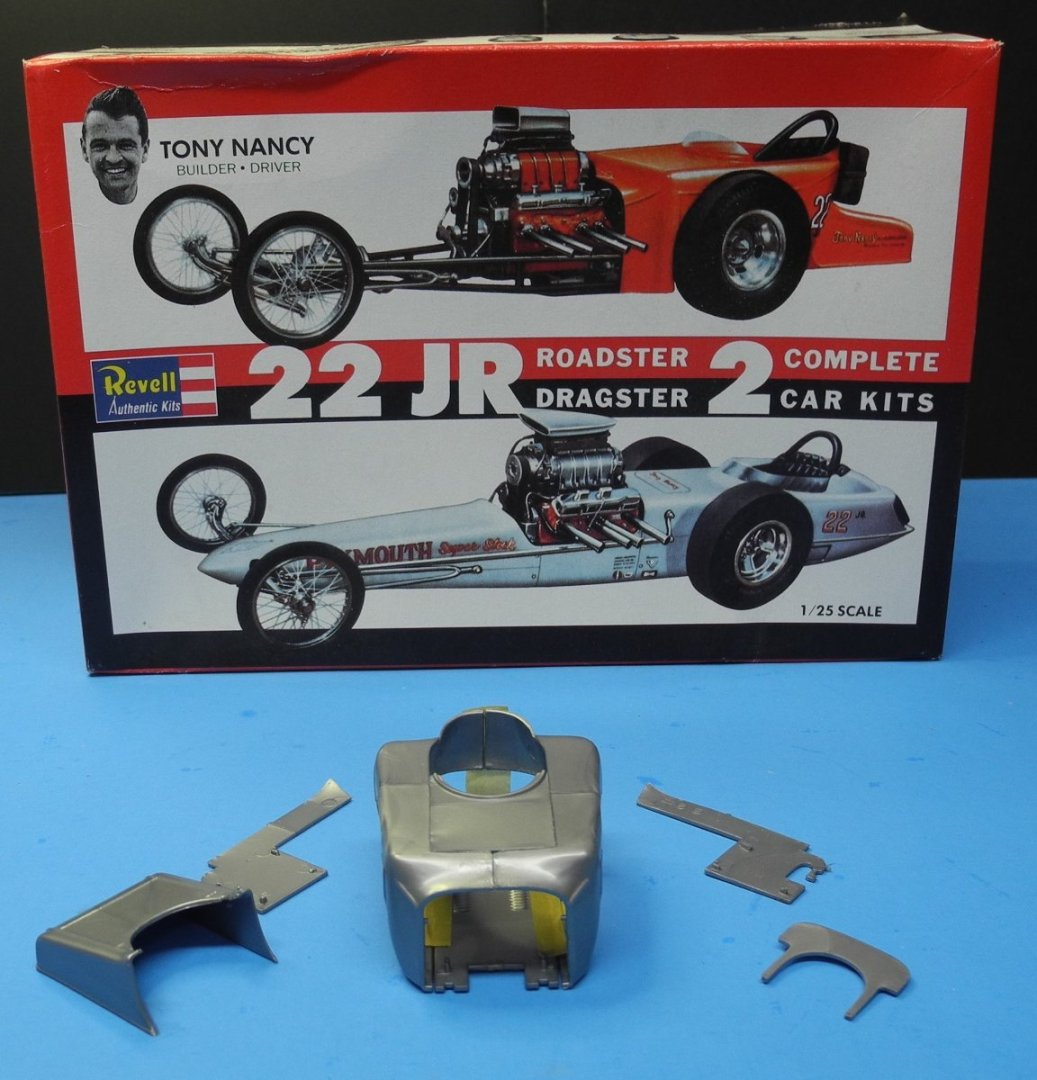
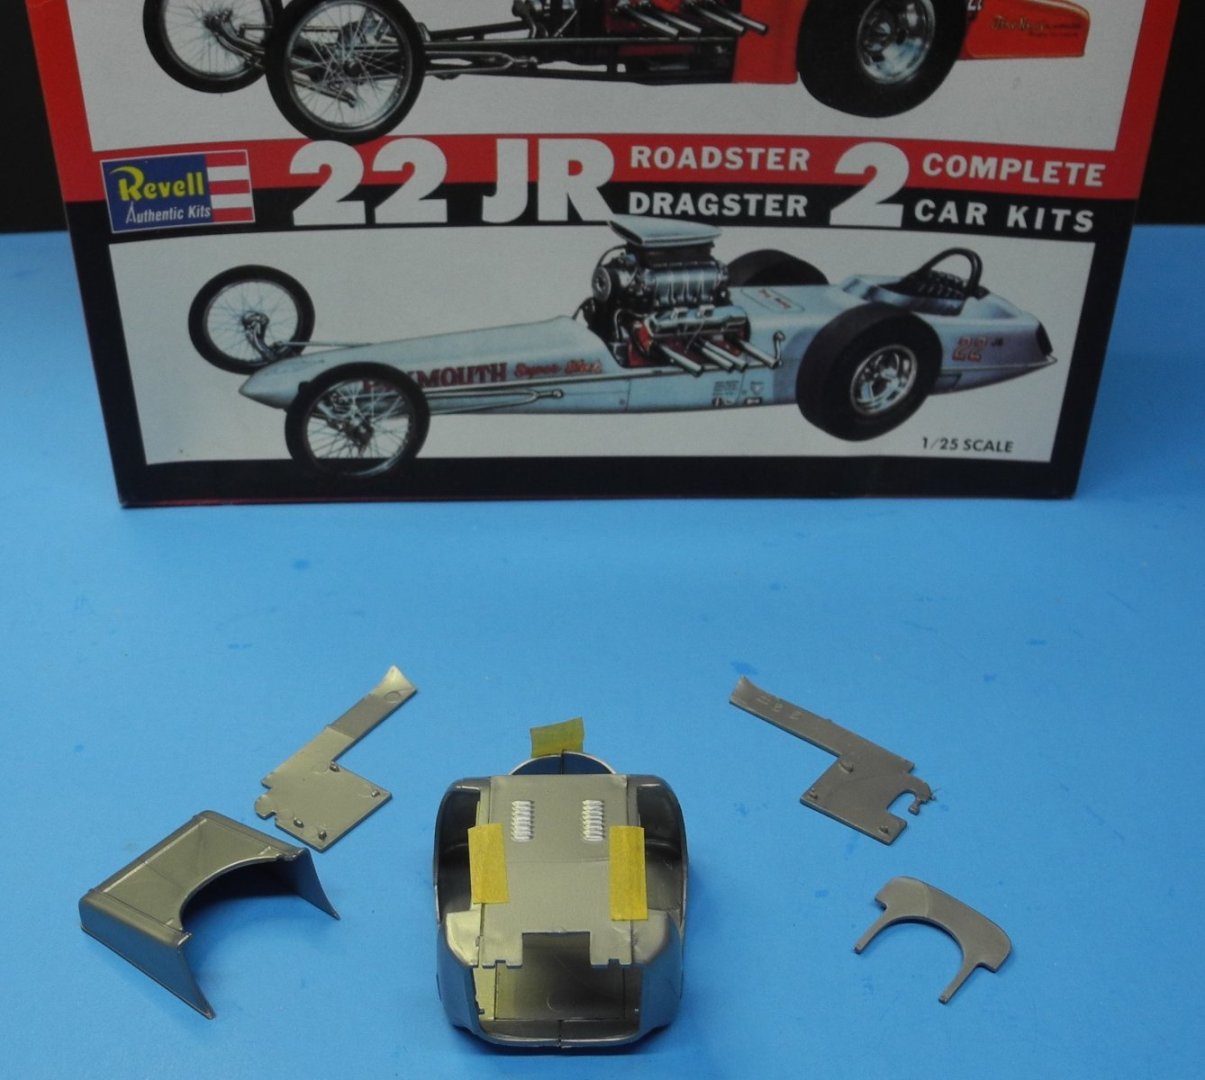
I used thin super glue to temporarily glue the floorboard to the body shell; to add rigidity to the sanding process that will follow. Styrene strip stock was added to reinforce the joints in the body panels and clamped down to achieve a tight bond. The joints were given a sanding to level out the plastic panels. I'm satisfied the current alignment will give a presentable finish. Not perfect, but presentable. After sanding, gave the joints a Mr Disolved Putty treatment. I've grown to like this putty for the quick drying and easy sanding qualities it gives. After sanding the putty, if I am satisfied, will apply primer and look for any minor imperfections that may need more work.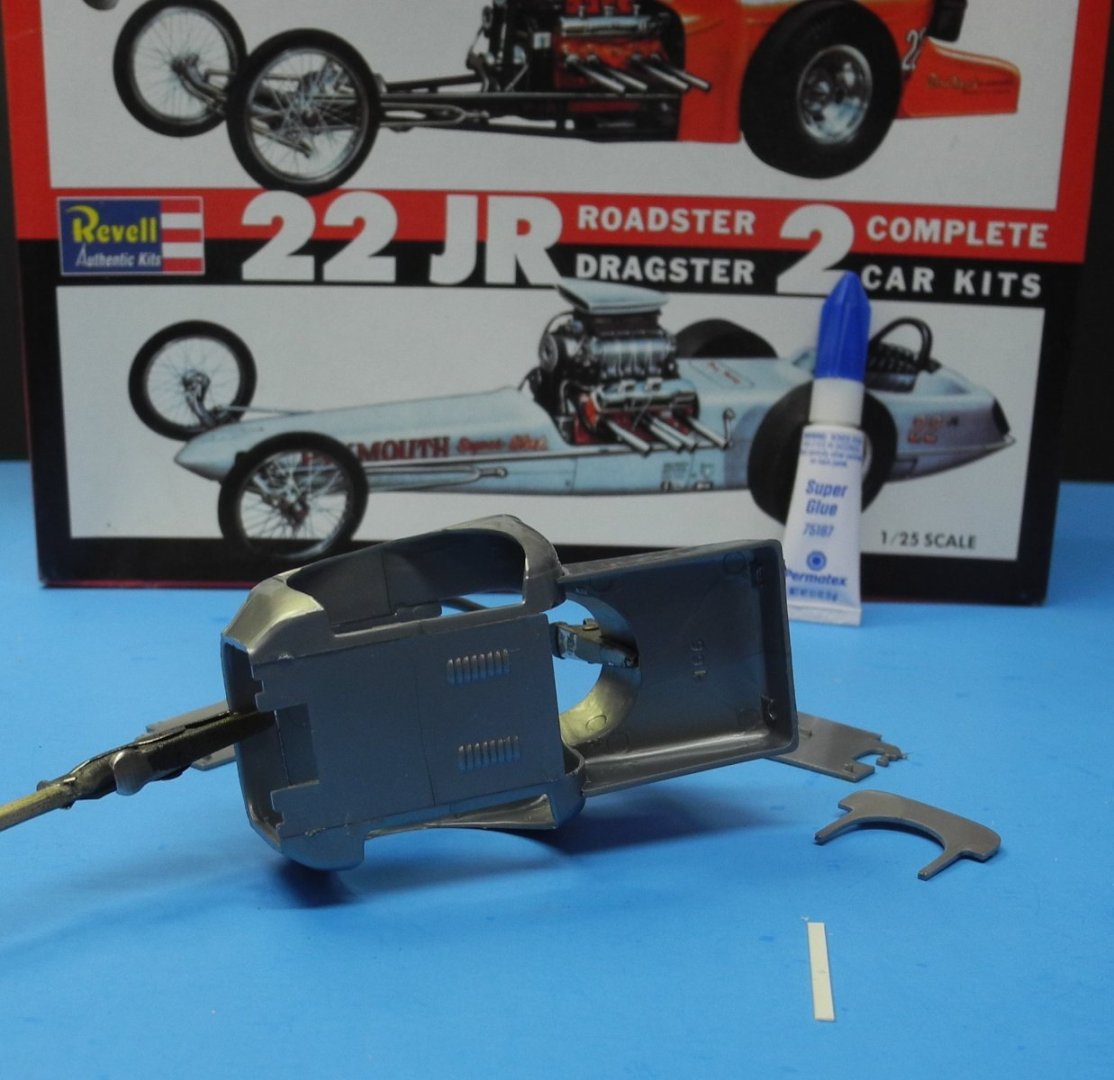


- 30 replies
-
- 13
-
-
Tony Nancy 22 Jr Roadster by CDW - FINISHED - Revell - 1:25 Scale
CDW replied to CDW's topic in Non-ship/categorised builds
The crazy part about doing this, I have a near-perfect body shell that's all molded in resin in a single piece. But if I used that here, it just would be a cop-out. Can't relive the original experience taking the easy way out. Later on, I'll do something more modern with the resin body shell. -
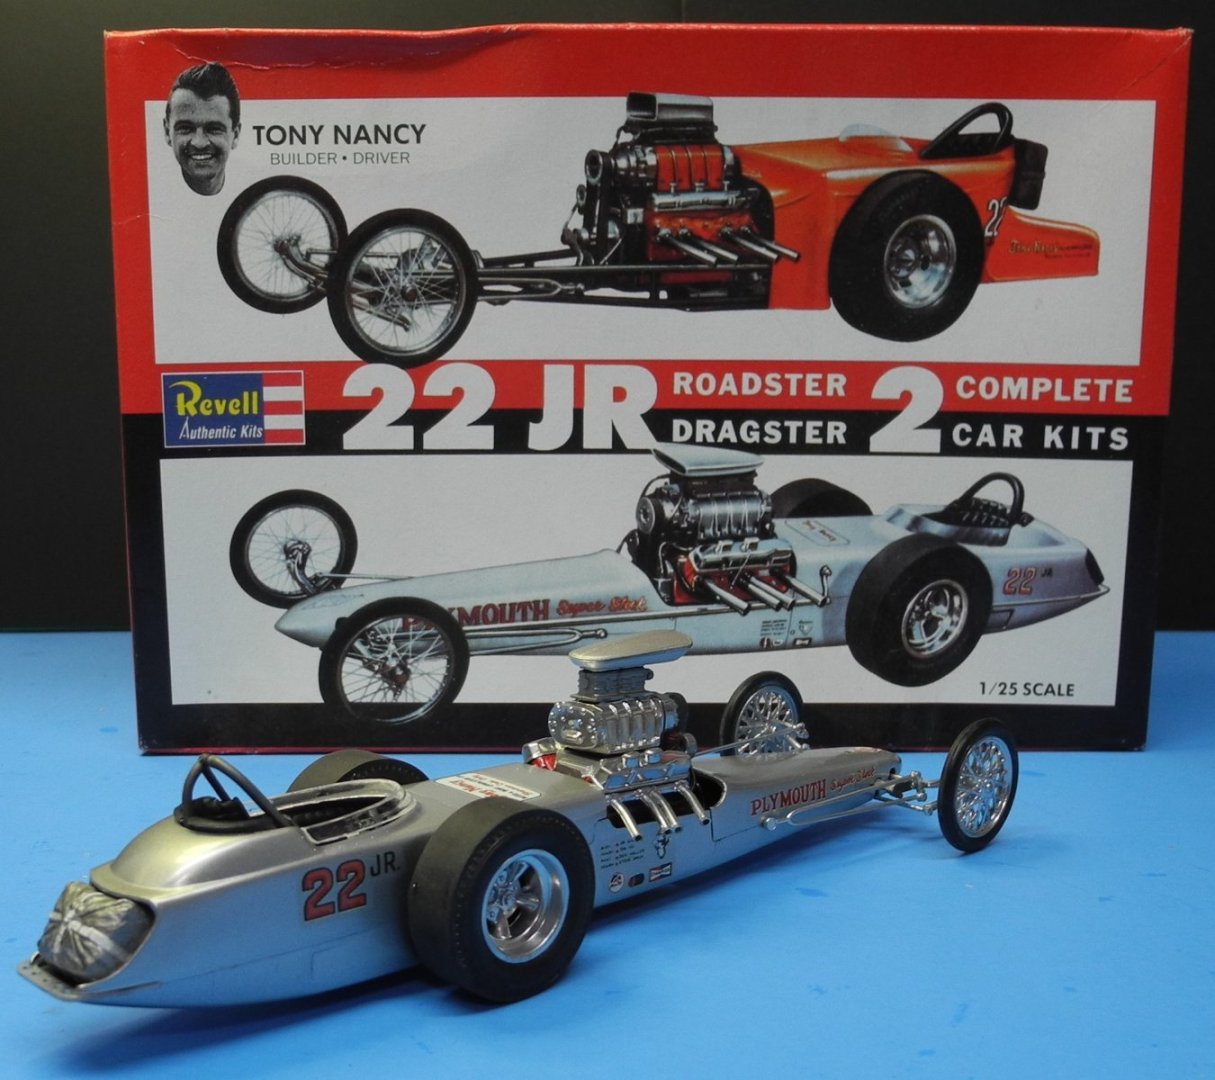
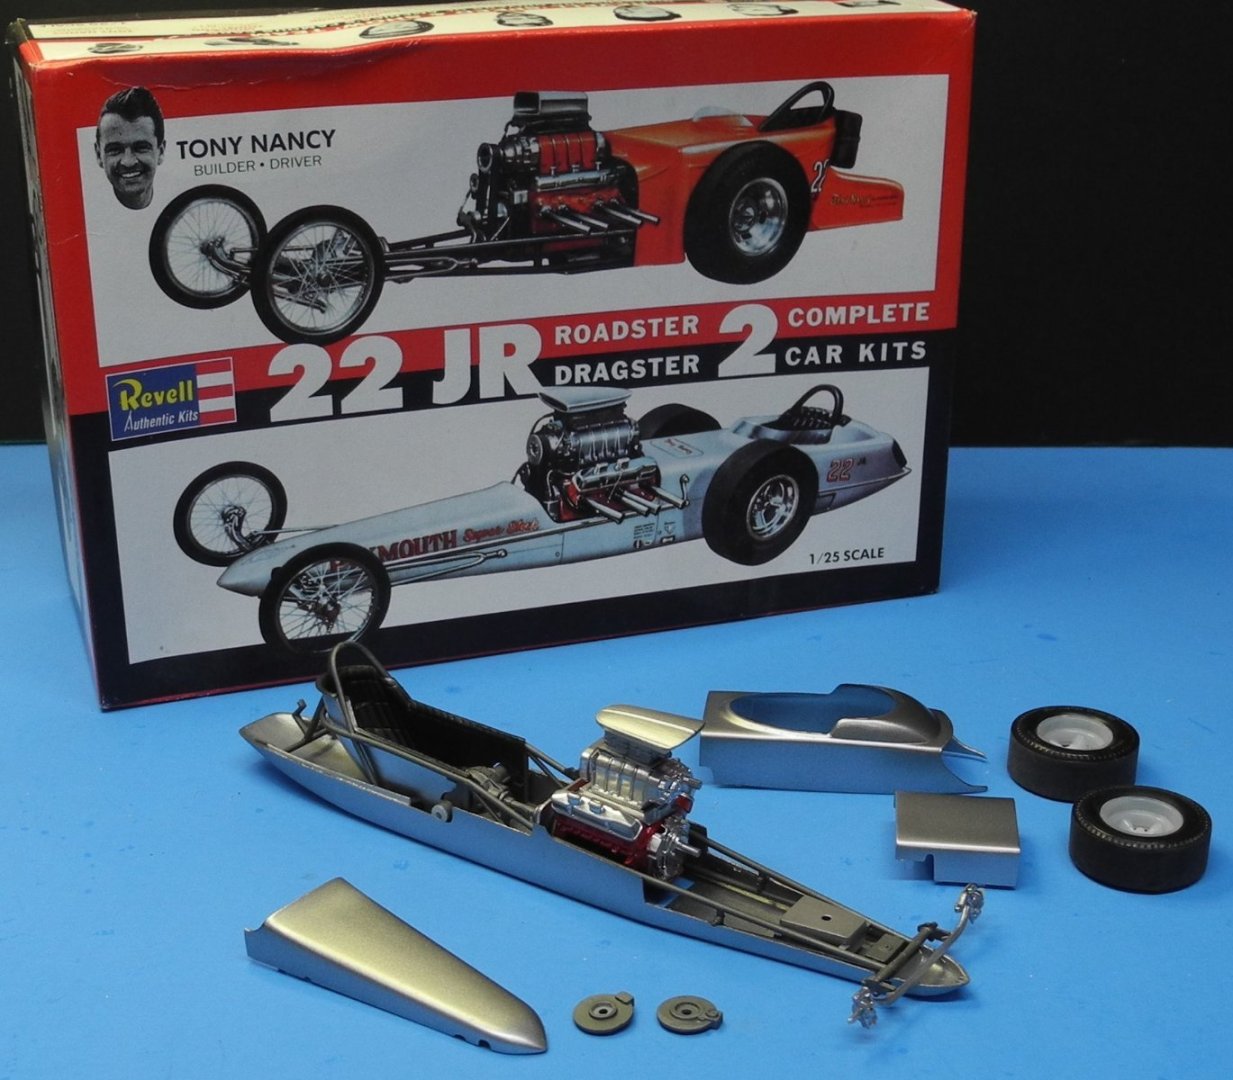
Here we go with the Roadster portion of the Revell double kit. Changed my mind and decided to go ahead and build it now rather than wait. One of the reasons I hesitated on this particular build is because of past experience and memories of having built this model before. The roadster body shell is a real pain in the rear to prepare, being that it is assembled in no less than 8 pieces, and those pieces are by no stretch of the imagination a good fit. Anyway, I'll try to give it a good shot and see what I can do to make it presentable. No guarantees. I don't intend to spend a too much time on it but there will be reinforcement, filling and sanding to do before primer and more sanding. Let's give it a go for old time's sake. You'll notice I have the floor pan taped in place...this is to keep the body pieces in the correct alignment while the glue dries on the upper parts of the body. Same thing with the rear portion of the body, just taped in partial alignment while the glues dries in the front. All these glue joints will require some strips of styrene on the inside of the body shell for reinforcement. There's not enough surface area to keep the glue joints together through the rigors of filling and sanding without it. The lower body pan must stay removable in order to install the finished body on the chassis at the final stages of the construction process.
- 30 replies
-
- 11
-
-
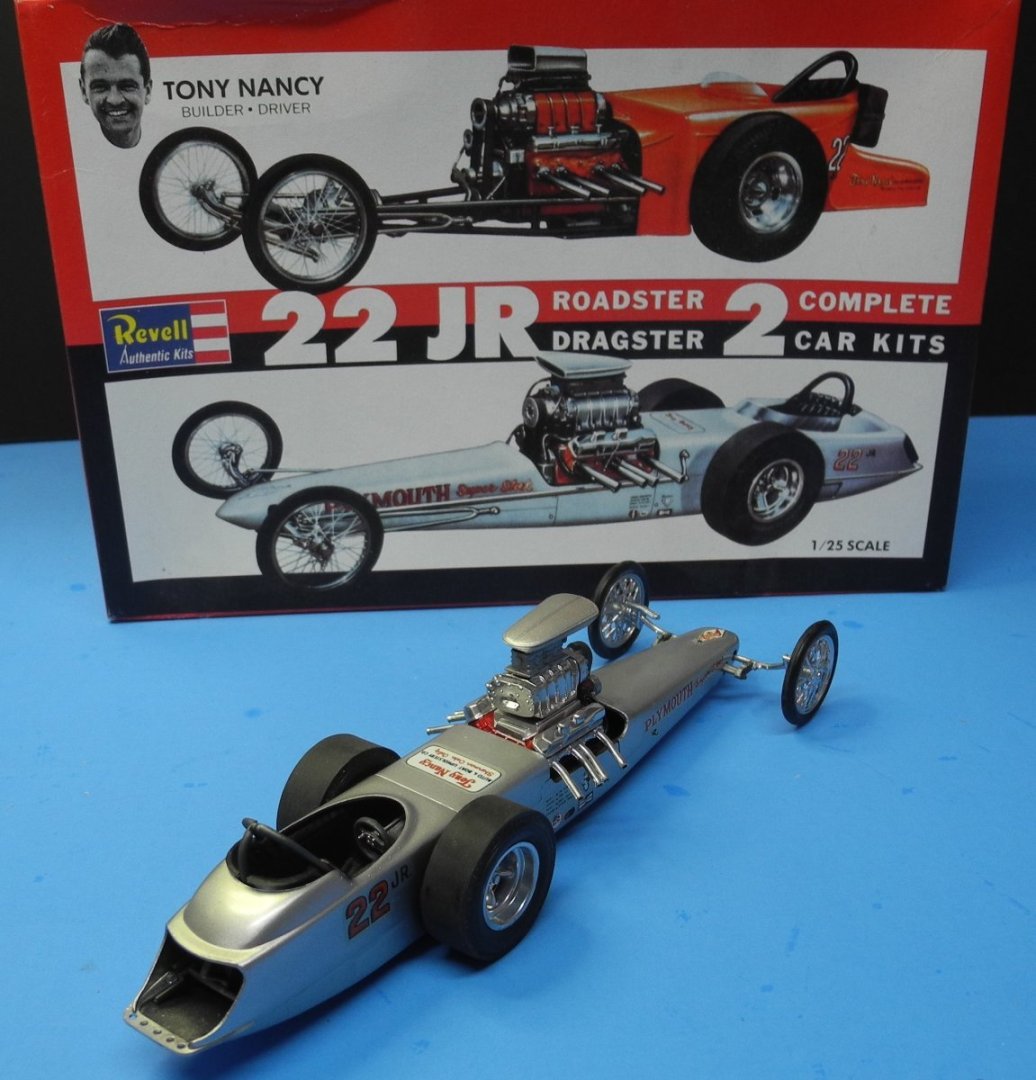
Tony Nancy 22 Jr Dragster by CDW - FINISHED - Revell - 1:25 Scale
CDW replied to CDW's topic in Non-ship/categorised builds
This will complete my work on the dragster. The roadster will follow at a future date. I have a ton of these old, nostalgic, unbuilt car models in my collection. Can't spend too much time on most of them to have any chance of building them all. Maybe one week each at the most. Some I will make an exception for as the kit may be interesting enough (to me) to warrant more time. Thanks for following along, for all your "likes" and comments. It's been fun!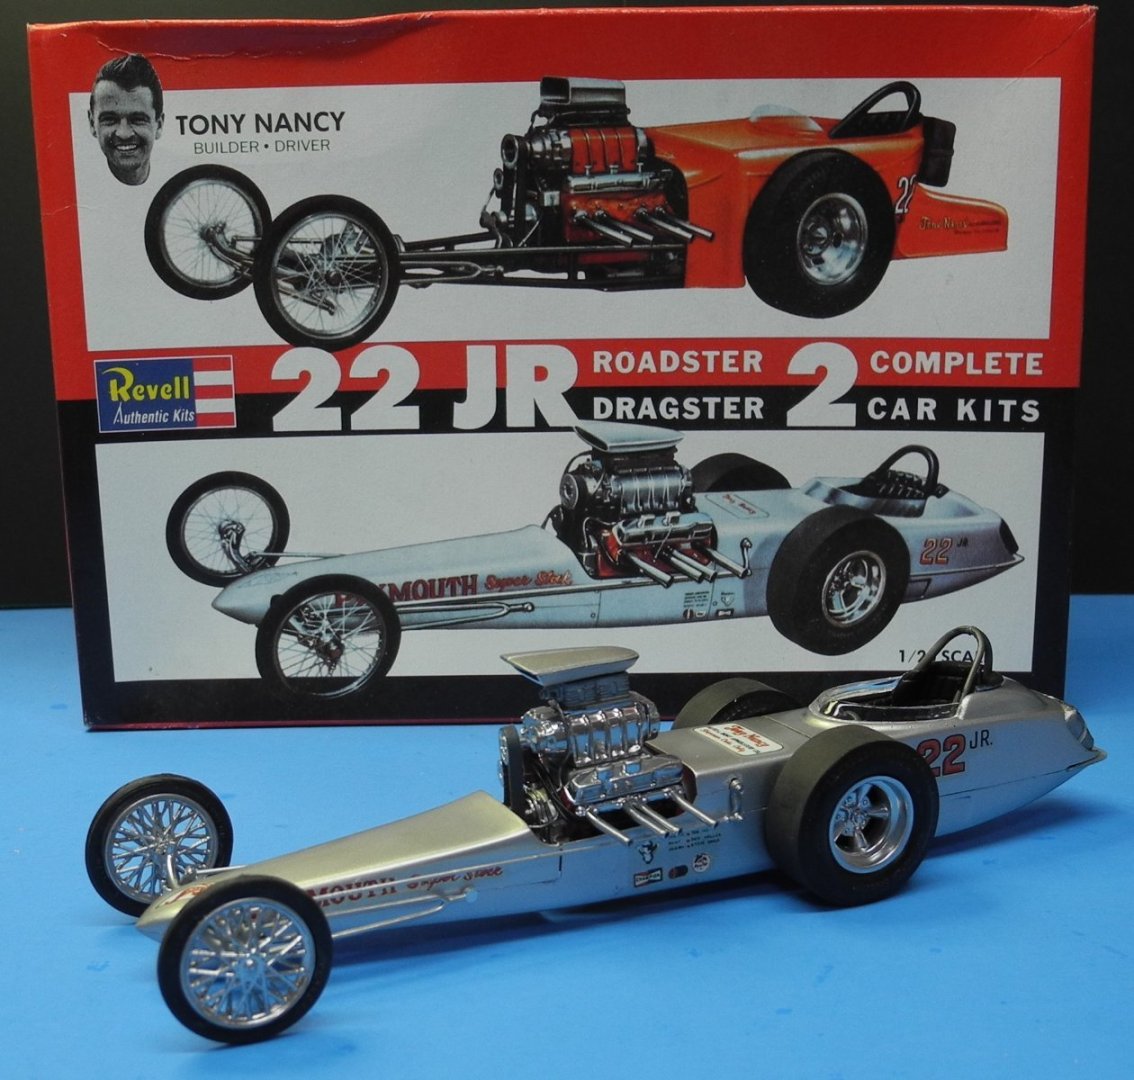


- 24 replies
-
- 15
-
-
-
Tony Nancy 22 Jr Dragster by CDW - FINISHED - Revell - 1:25 Scale
CDW replied to CDW's topic in Non-ship/categorised builds
I wanted to finish the model today, but ran out of gas, figuratively speaking. The decals are old (1994) and were cantankerous. I was lucky they worked for me at all. Very thick. Decal colors were suboptimal at best but back at the time, they were par for the course. If you tackle one of these old kits, be prepared to spend a lot of time cleaning up parts. Every single part need attention and some of the parts should actually be replaced or reworked. As it is, they will build into a decent shelf model but won't be contest material on their own merits. I added ignition wires and a rudimentary fuel line. Other than that, everything is box-stock. When I take back up to finish, need to install the radius arms, the tie rod, drag link, parachute, and windscreen. If everything works out, will post final pictures for this one over the weekend.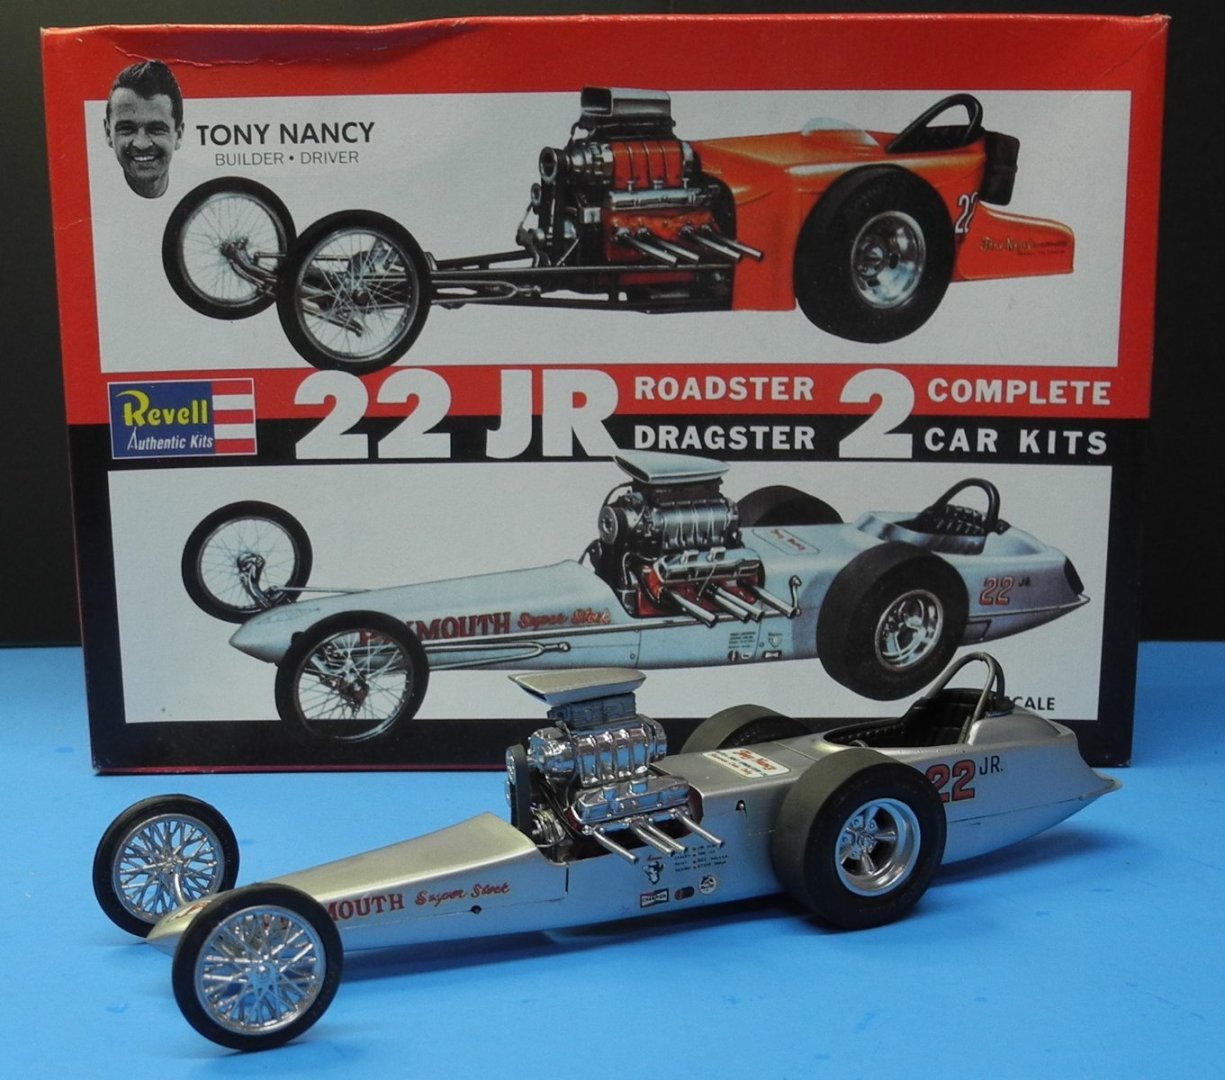

- 24 replies
-
- 13
-
-
Tony Nancy 22 Jr Dragster by CDW - FINISHED - Revell - 1:25 Scale
CDW replied to CDW's topic in Non-ship/categorised builds
Thanks Bruce. I mixed a few drops of white into the color cup of my airbrush and the result was a much more subdued, subtle silver, closer to the box art. It's not an exact match but much closer than before. Once the decals are applied, I think it will be okay. -
Tony Nancy 22 Jr Dragster by CDW - FINISHED - Revell - 1:25 Scale
CDW replied to CDW's topic in Non-ship/categorised builds
Comparing the silver to the box art, it looks like the 1:1 car had some white mixed in with the silver. I'll experiment with some white mixed in with my silver to try and get a closer match. -
Tony Nancy 22 Jr Dragster by CDW - FINISHED - Revell - 1:25 Scale
CDW replied to CDW's topic in Non-ship/categorised builds
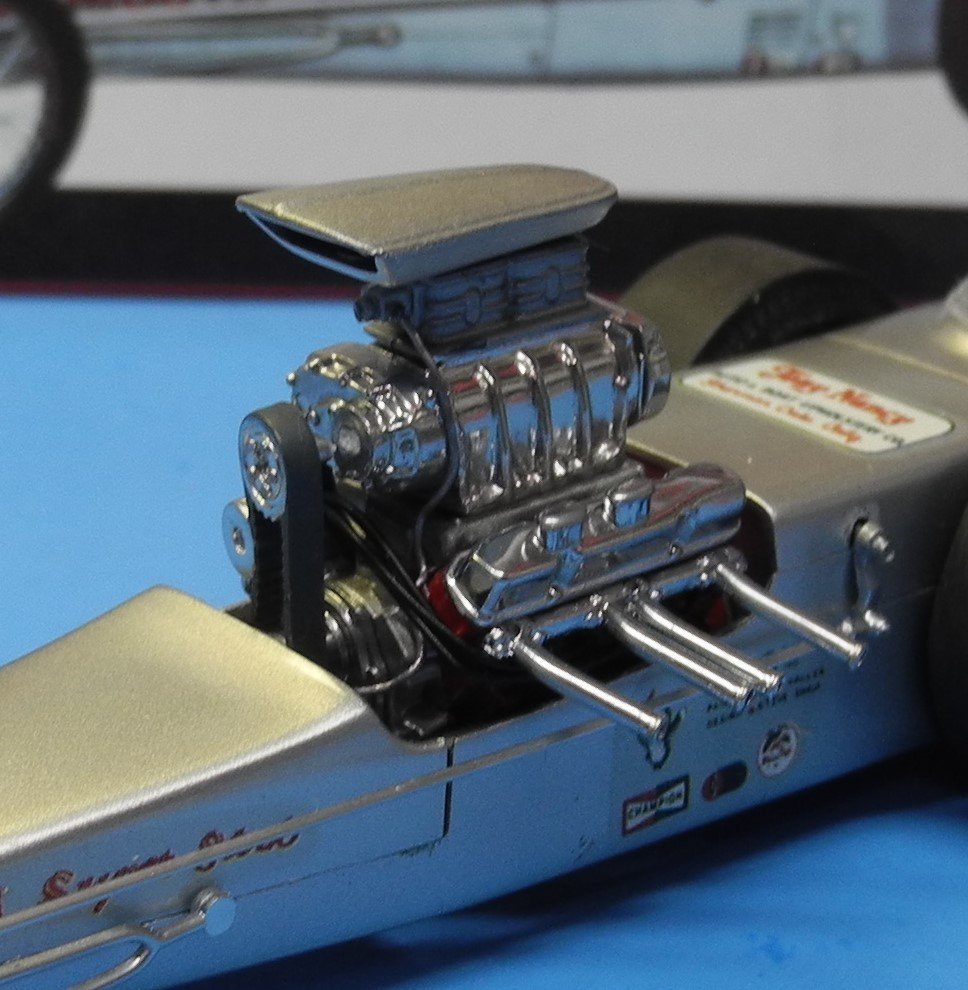
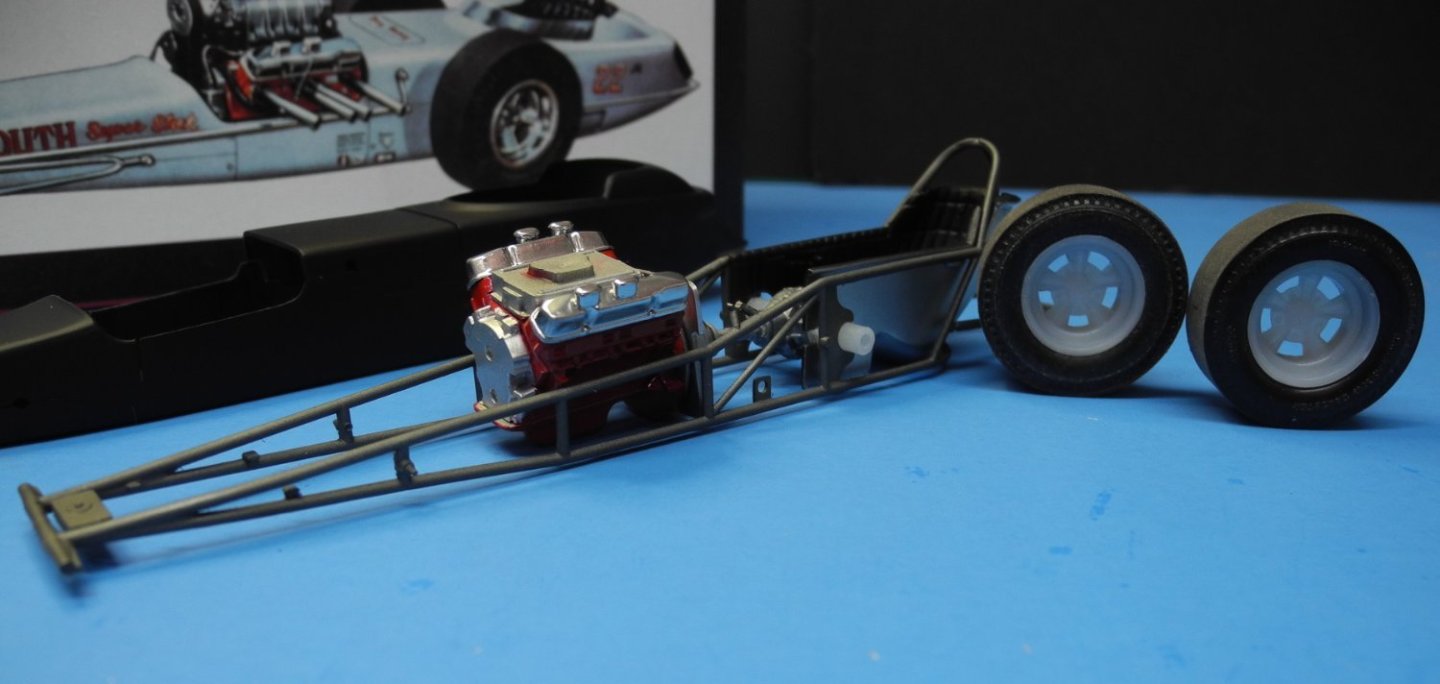
Put the first coat of silver on each body panel, then dry fit the chassis into the lower body shell. Will paint and build out the remaining pieces that are internal to the body shell, add fuel lines, a magneto and ignition wiring before gluing down each body panel. After that will mask off the engine and interior compartment before giving the entire assembled body another coat of silver to unify the color. When spraying metallic paint, it's next to impossible get each individual body panel to look the same without it all being sprayed as one unit.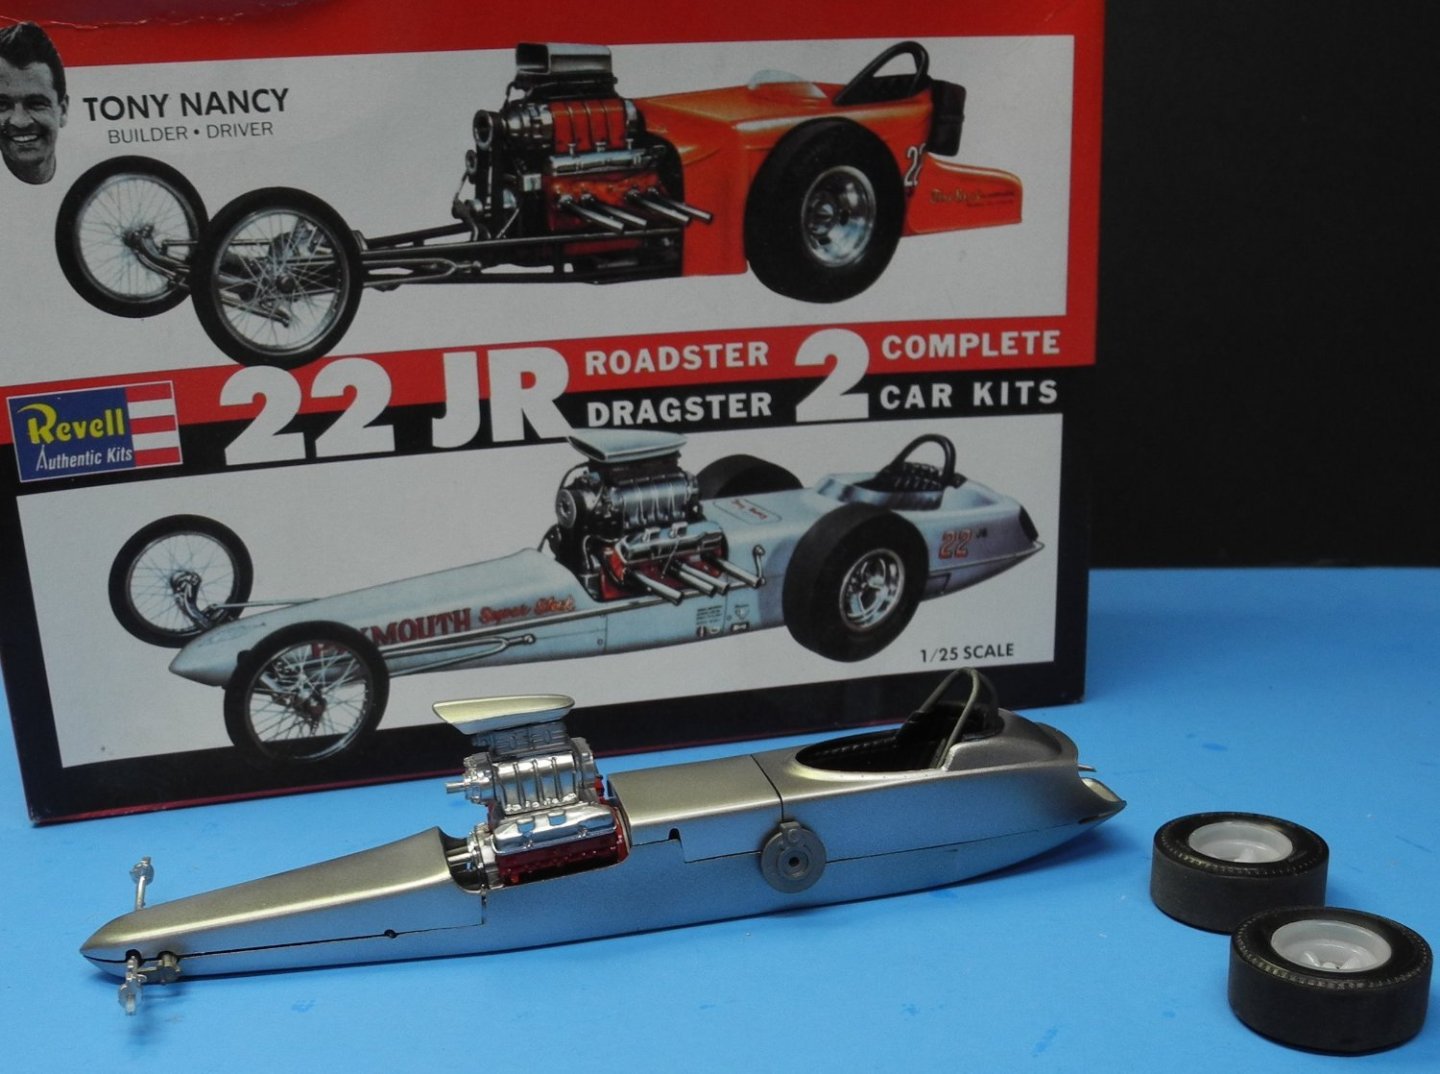
- 24 replies
-
- 11
-
-
1/200 Trumpeter IJN YAMATO - issued by MRC/Gallery Models
CDW replied to yvesvidal's topic in REVIEWS: Model kits
@yvesvidal Could one of these be incorporated into the model, to be removable to show the turret detail? Could be very interesting. FUJIMI 1/200 Equipment Series No. 3 Battleship YAMATO Type 94 46cm Triple Turret 4968728020358 | eBay- 104 replies
-
- 3
-
-
- MRC/Gallery
- Yamato
- (and 1 more)
-
Tony Nancy 22 Jr Dragster by CDW - FINISHED - Revell - 1:25 Scale
CDW replied to CDW's topic in Non-ship/categorised builds
- 24 replies
-
- 10
-
-
Tony Nancy 22 Jr Dragster by CDW - FINISHED - Revell - 1:25 Scale
CDW replied to CDW's topic in Non-ship/categorised builds
Spending an inordinate amount of time cleaning up the parts. Every single part requires attention. Even the little slots in the wheels have flash to clean up. 😄 Chassis is painted in Tamiya gray metallic lacquer. Engine block Tamiya red lacquer. Other metallic shades are various AK Xtreme Metal paints and a few are the AK Super Chrome ink. Trying out a dry fit here. Lawn maintenance received full attention today. Very little time for modeling. Tomorrow is another day.
- 24 replies
-
- 11
-
-
Tony Nancy 22 Jr Dragster by CDW - FINISHED - Revell - 1:25 Scale
CDW replied to CDW's topic in Non-ship/categorised builds
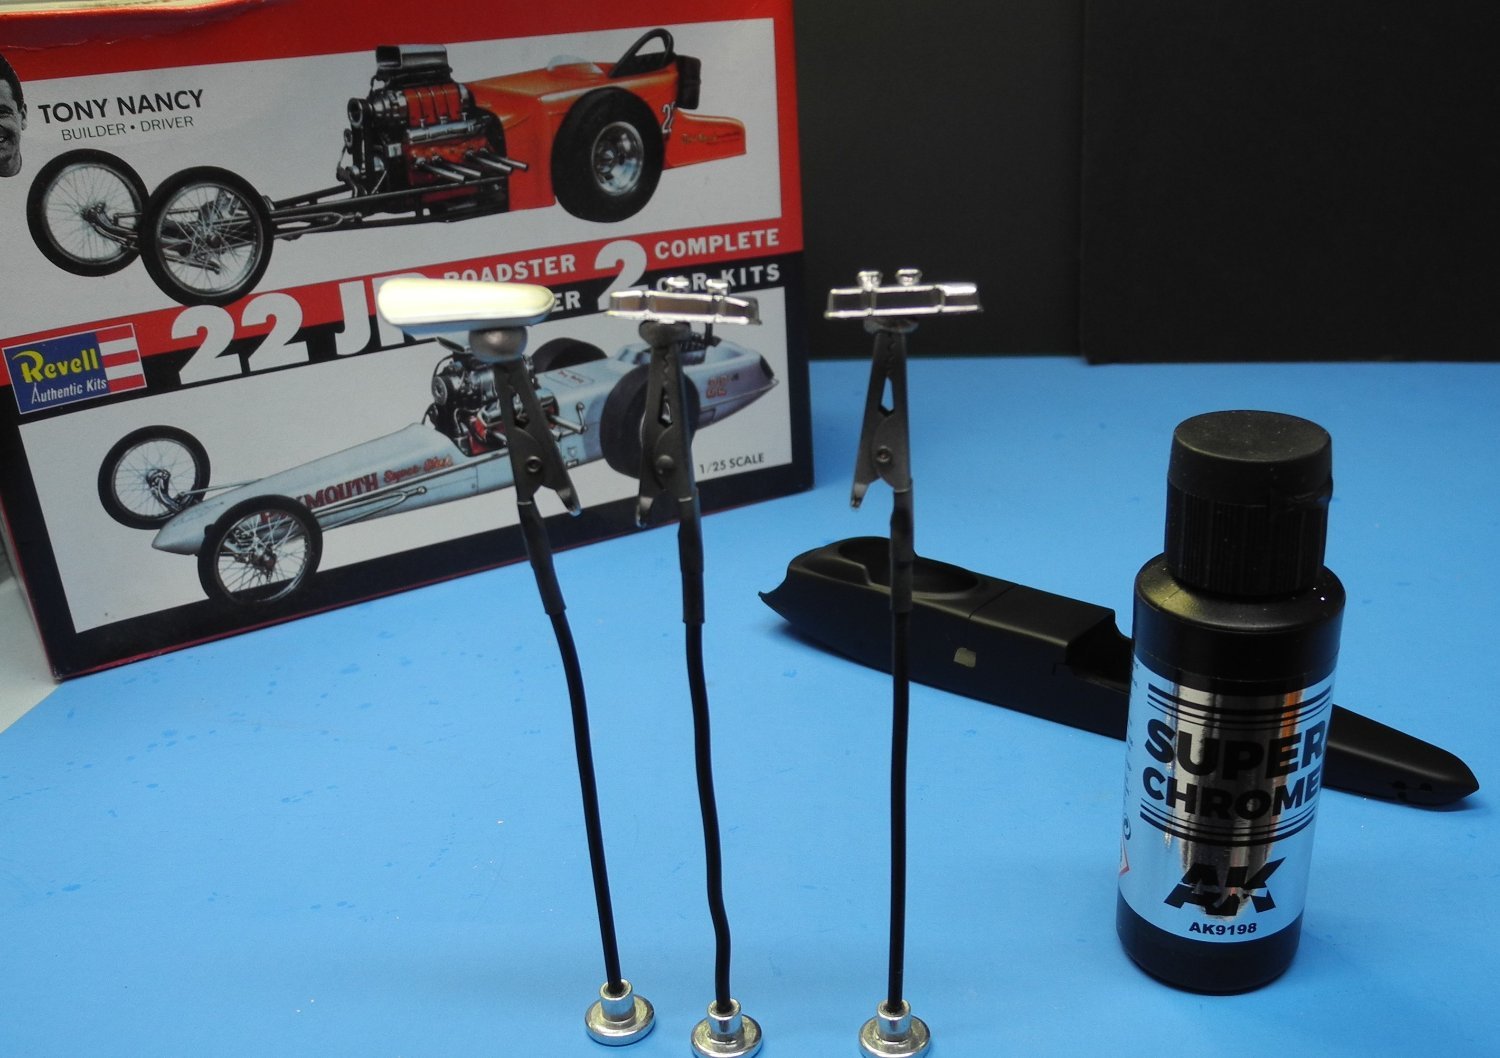
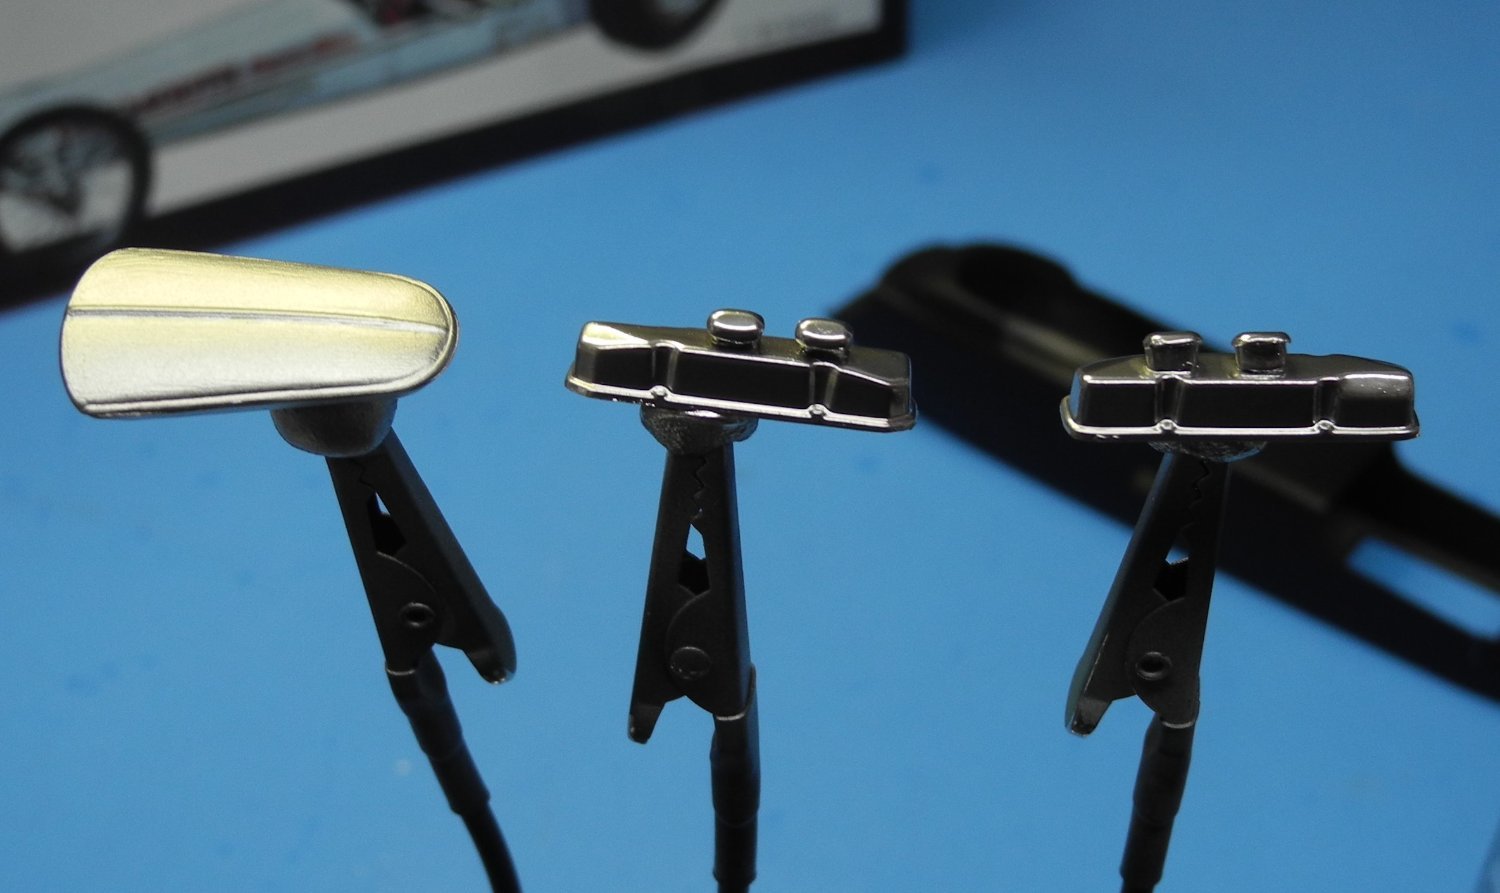
I wanted to show you another "chrome" paint. This one is manufactured by AK and called Super Chrome. The bottle calls it an ink, not paint. It likes to be sprayed on in a heavy coat, not light mist coats as you might do with Alclad chrome/metallic paints. Very easy to apply. Does not require a base coat but needs a smooth surface. I applied a much reduced Mr Surfacer 1500 black base under my parts which goes down very smooth. The part on the left was painted with AK Xtreme Metal aluminum. The two valve covers painted with the Super Chrome ink. To me, it's a very convincing chrome finish and much better than the funky chrome plating that was on the parts originally. In the background is my body shell painted in Mr Surfacer 1500 primer. The body will be painted with Mr. Color super silver, then clear coated with lacquer, decals, then more lacquer over the decals.

- 24 replies
-
- 14
-
-
Tony Nancy 22 Jr Dragster by CDW - FINISHED - Revell - 1:25 Scale
CDW replied to CDW's topic in Non-ship/categorised builds
Don’t you love the way spellchecker ‘corrects’ spelling incorrectly? soluble not solvable (my previous post). Working from my iPhone. 🫤 -
Tony Nancy 22 Jr Dragster by CDW - FINISHED - Revell - 1:25 Scale
CDW replied to CDW's topic in Non-ship/categorised builds
The body shell is intended to come apart in order to reveal the entire chassis assembly later on. Mine won’t be removable. In order to get a smooth body shell, I temporarily glue the panels together using acrylic glue. After sanding, the panels can easily be taken apart to fit the chassis inside. The glue is water solvable.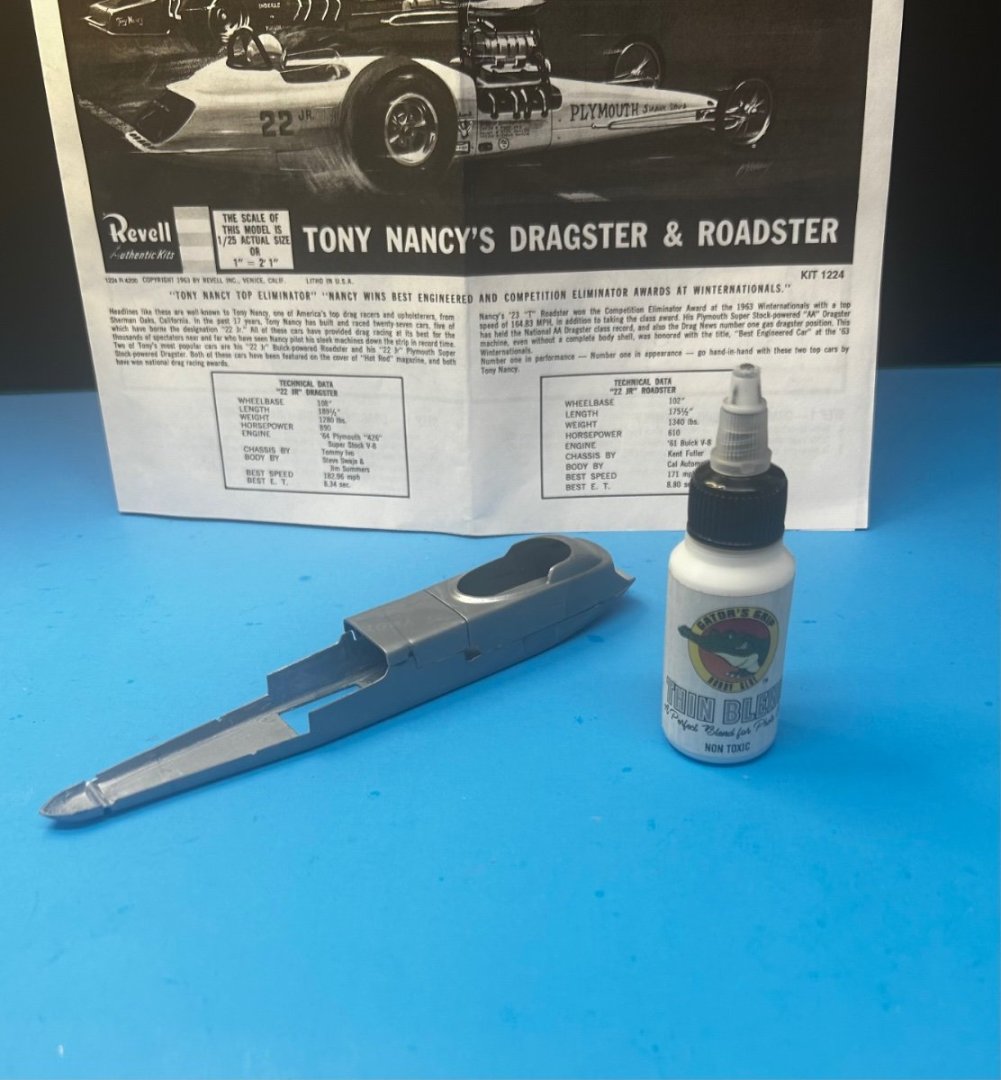
- 24 replies
-
- 13
-