mikiek
-
Posts
2,276 -
Joined
-
Last visited
Content Type
Profiles
Forums
Gallery
Events
Everything posted by mikiek
-
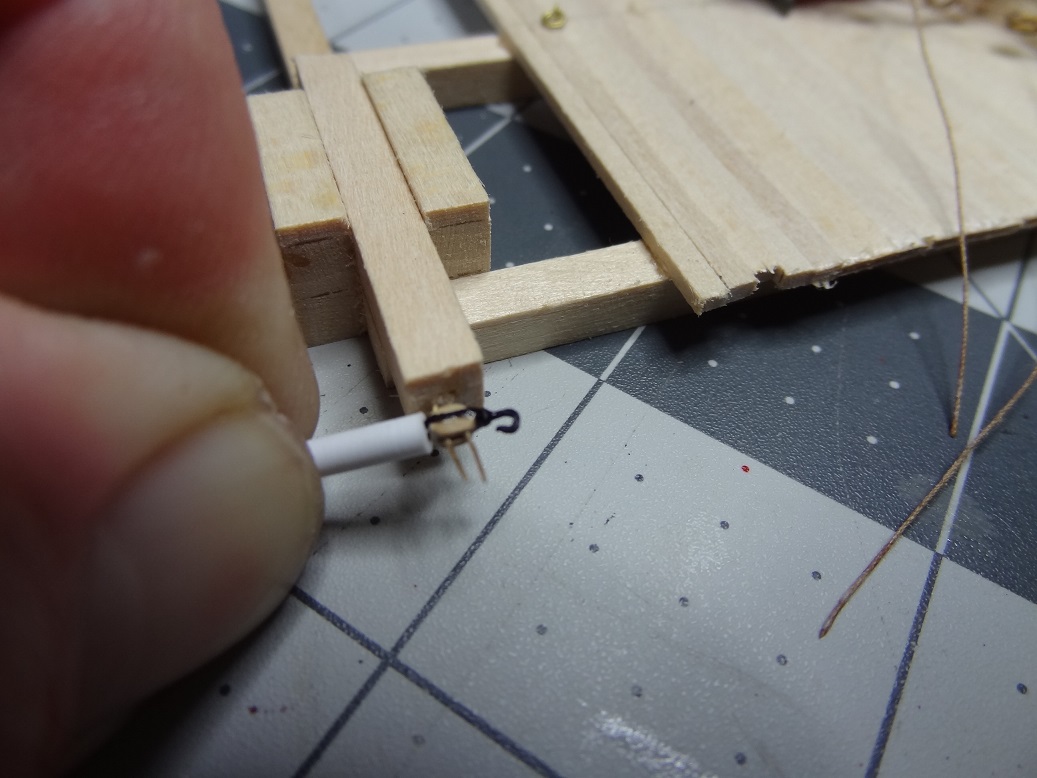
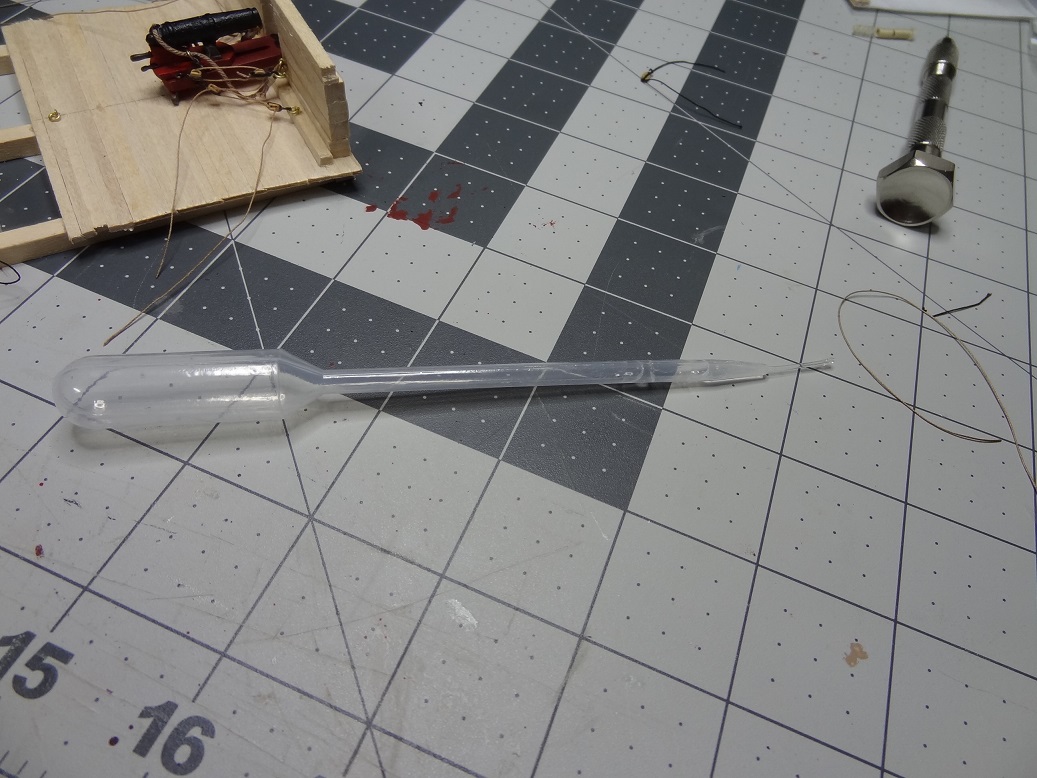
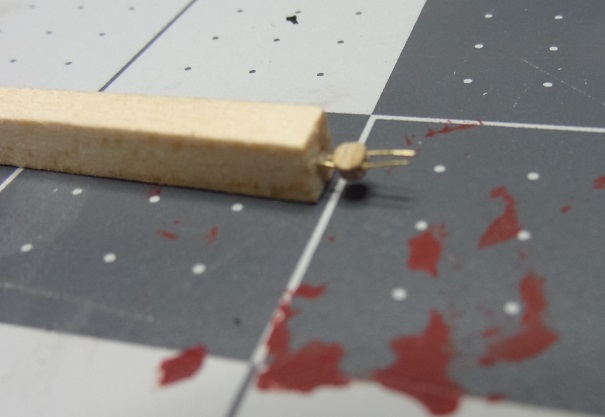
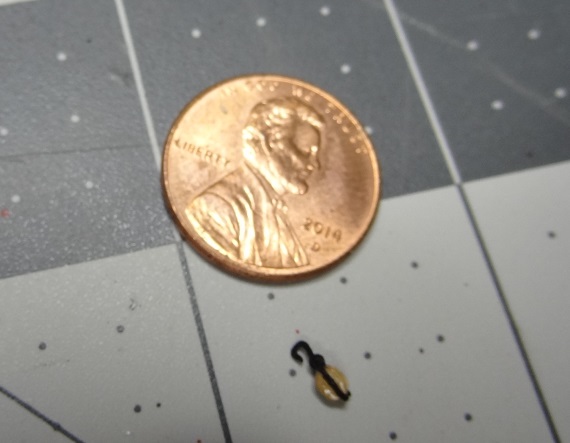
 Another sleepless nite. Second in a row. So I'll see if I can show the stropping of the 3mm hooks (brass) to the 3/32" blocks and have it make sense. I will claim right now I did not originate any of these ideas. I just combined steps from a number of other sources into something that worked for me. First off, the stuff is tiny! Pretty much too small to work with without holding them in tweezers or some other type of grippers. I used 1 pair of locking tweezers with the rough inner surface to hold the hook or block and another pair that comes to a fine point to hold the thread. One other thing I will show is a very fine CA applicator. I just found out about these a few months back and figured everyone must know about them. However a work associate who claims to be a modeler for 30+ years (cars & planes) had never heard of them so I'll show them here in case there are others. It's just an eyedropper of sorts with a VERY small tip. Once you get some CA inside (I use medium) you can apply the tiniest of dots to a surface. Very useful - I apply all my CA with these things. The CA will stay workable for a week or so and then you just toss it and get a new one. One of the best tools I have come across. One other step that is used a lot is to dip the end of your ropes in some CA (medium again), wipe it down and let dry. This stiffens up the end so that it threads into the small holes easier. After it dries you can also cut the end at a sharp angle to make a point which also makes it easier to thread. You can squirt a blob of CA onto a piece of wax paper and it will stay usable for some time. What we want to end up with is a 3mm photo etched hook stropped to the 3/32" block. I ruled out wire pretty quick. It would have had to be very thin and probably hard to work with plus it would need to be painted or blackened which would be problematic. Instead I used .008 black rope. The 3/32 blocks are difficult to hold to work with so I made a jig to keep it and free up a hand. So cut a piece about 2"-3" long and dip one end in CA to harden. Trim the end to a point. Grab a hook with the locking tweezers so that the loop at the end of the hook is exposed. Grab the rope with the pointed tweezers and thread thru the loop. Here you can see the result and also the jig I mentioned. Next ream out the holes in your block. You don't have to enlarge them but do make sure they are open all the way thru. Put the block onto the jig. No that's not blood. Just some dried Chili Red paint. I glued a couple of square strips to the mock up station to hold the jig. Slide the hook to the midpoint of the rope and then fold the rope in half grabbing both ends between thumb & finger. Wet down the ends, just a swipe over your tongue should do then thread the ends thru a piece of tube (I used styrene). The hole in the tube needs to be small. Leave a bit of a loop on the side with the hook. Position the loop over the block on the jig. Line up the thread with the grooves in the block holding the ends of the thread with thumb & finger. Once lined up grab the tube with tweezers and slide it up tightly against the block. Hold it in place there with thumb & finger. This makes it easy to hold everything in place. If needed, straighten out the hook so it extends straight out from the block and then put a dot of CA at the base of the hook so it holds that position (learned that one the hard way). Put another dot of CA on the thread and block to hold that side in place. Count to 10 and then carefully slide the tube off. At this point you should have thread secured to the top side of the block. Quickly grab the end of that thread with tweezers. With the other tweezers grap the thread on the bottom side of the block. Gently pull it tight and then over onto the top side and lay it flat and parallel with the other thread. If your CA is still not dried this will hold the thread in place. If it is dried add another small dot. Either way count to 10 again then let go. Slide the block off the jig. Apply a dot of CA to what was the bottom side of the block. The thread on both sides of the block should be glued now. Let the glue dry for a few minutes and then trim the ends. For the carronades, repeat 179 more times Please note, in a recent post I have decided to upsize the parts. At least that's the direction for today. I will be using a 1/8" block and am also going to try 4mm hooks. I will use the same size rope (.008) for stropping the hook. Hope this may help someone. At the very least it will help jog my memory 6 months from now
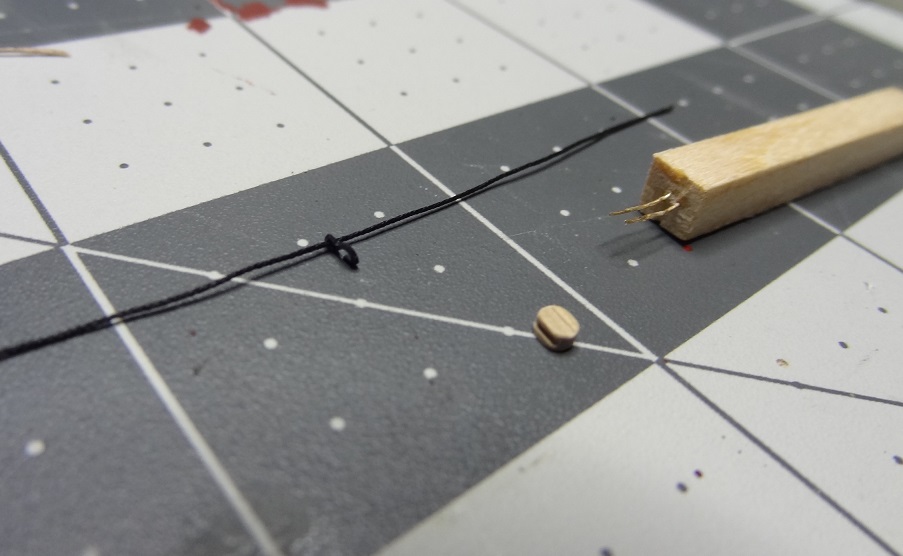


- 843 replies
-
- 4
-

-
- niagara
- model shipways
- (and 2 more)
-
I'm no lathe expert and I'm sure my technique is all wrong. But the rest allowed me to put some pressure on the stick and it sanded down a lot faster.
- 648 replies
-
- 3
-
-
- niagara
- model shipways
- (and 1 more)
-
Joel - I'm trying to get some sort of perspective with your carronade pic. Any idea of the size of the tackle rope or breech line?
- 843 replies
-
- 2
-
-
- niagara
- model shipways
- (and 2 more)
-
Is all your cherry the same color? The mast stock looks more red. Have you tried a steady rest on your lathe? It sure helped me.
- 648 replies
-
- 2
-
-
- niagara
- model shipways
- (and 1 more)
-
I'm really beat tonite. Was almost NOT going to do any building, which would have been the first day in months I haven't done something. However, I've been thinking about all the loose ropes in the mock up and what I will do with them. If you haven't seen the pix Joel posted, scroll up a few posts and check out the carronade. THAT is how I want to rig mine. So I took a tackle off the gun and clipped each block in a holder. I was about to try to wind the loose rope around the ropes between the blocks and it hit me. The .008 rope is just too thin. It looked terrible when I tried to wrap it like the pic. I'm not sure it could be coiled. So what now. I knew I should have gone to bed I have quite a few sizes of rope, so the thought was go up from .008 to .012 . Have you ever tried cramming .012 rope into a 3/32 block? I don't know that it's possible without seriously reaming the holes. I also have various sized blocks so I went from 3/32 to 1/8. The bigger rope fits. So I rigged up a tackle with that combination, but even the .012 didn't look all that good when I wrapped the extra up. Well, I have .018 rope as well. This is about the size where the thread really starts looking like miniature rope. And .018 will fit in the 1/8 blocks after running a #73 bit thru the holes. So I rigged up that combination. Looking better! That's as big as I will take it for now. I need to seriously study Joel's pix and see if I can figure out what is closest to that. The blocks in the pic don't seem that large but the rope does. The block/rope proportions don't seem the same in my mock ups. I'm going to leave it there for tonite.....
- 843 replies
-
- 2
-
-
- niagara
- model shipways
- (and 2 more)
-
Probably not. If the pin has a snug fit (in the hole and the carriage) I think it will keep the carriage from moving. Also still not sure about gluing the sled to the carriage. With some solid hooks, all that tackle works. I think it would be cool to be able to show people. Maybe glue most of the sleds but leave a couple free for demos.
- 843 replies
-
- 1
-
-
- niagara
- model shipways
- (and 2 more)
-
Darrell - I'm with you. The historical version is what I am working towards. See page 7 post 129 of my log. Joel (jbshan) has 2 excellent write ups on the historical Niagara. He's done a lot of research and put together some interesting theories - all of which I buy into. There are a number of excellent books regarding the Battle of Lake Erie. Understanding the conditions and reasoning behind the building of Niagara has helped me shape the image of what I want my build to look like. My problem is/was that I had already started the build before I became aware of it all. If you are the book reading type I can dig up a few titles if you like.
- 648 replies
-
- 3
-
-
- niagara
- model shipways
- (and 1 more)
-
Hey Darrell - don't know if your kit had this but mine has 2 sizes of belaying pins. The majority of them I believe are for rigging. There are 20 that are a hair longer and thicker and I was considering using those. However they do stick up a little high. At the very least, I was probably going to cut the handles off some pins and use the pin part. I have the pics ready for the stropping demo. I'll try to write it up tonite. If I recall I think you said you had ordered some of the hooks. I hope they were the brass variety. I found the plastic type to be unsatisfactory for this type of use. They tear easily and if they have been stropped it is almost impossible to reuse the block. So you lose a hook and a block and have to re-reg the entire tackle.
- 843 replies
-
- 2
-
-
- niagara
- model shipways
- (and 2 more)
-
Thank you Elijah. That pitted look was the result of leaving the Britannia in the blackening solution longer than prescribed. I think overall I like the look too. The problem is I didn't do all the barrels then, so for consistency's sake I will have to try to duplicate the process for the rest of them.
- 843 replies
-
- 2
-
-
- niagara
- model shipways
- (and 2 more)
-
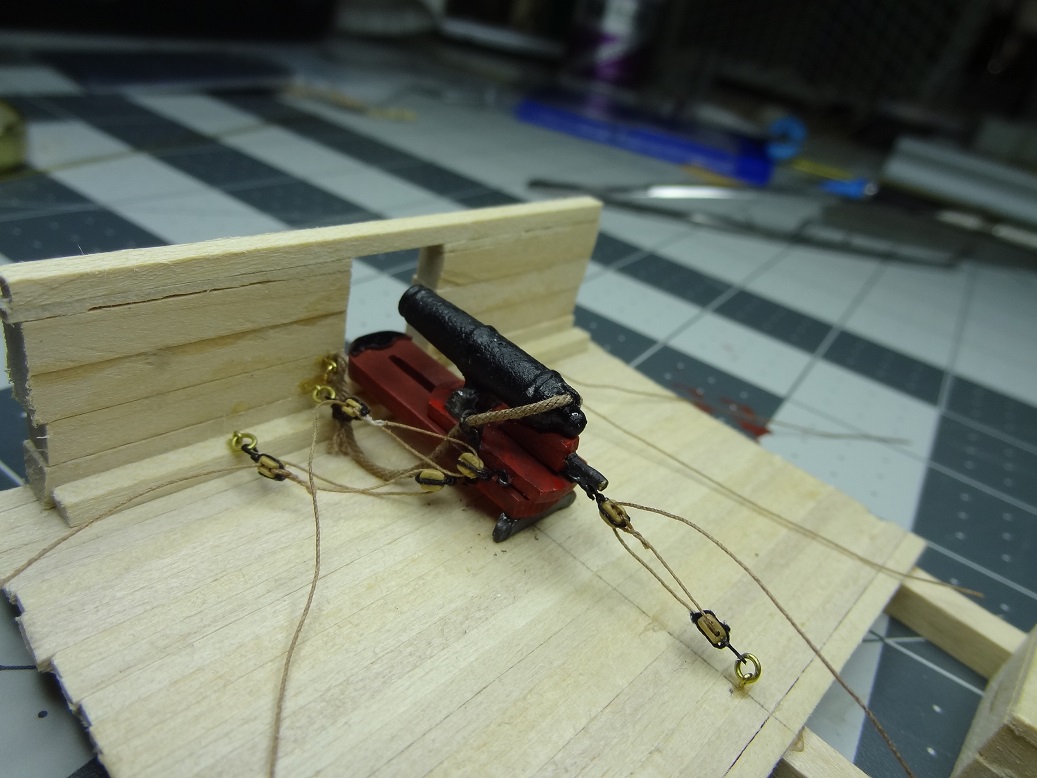
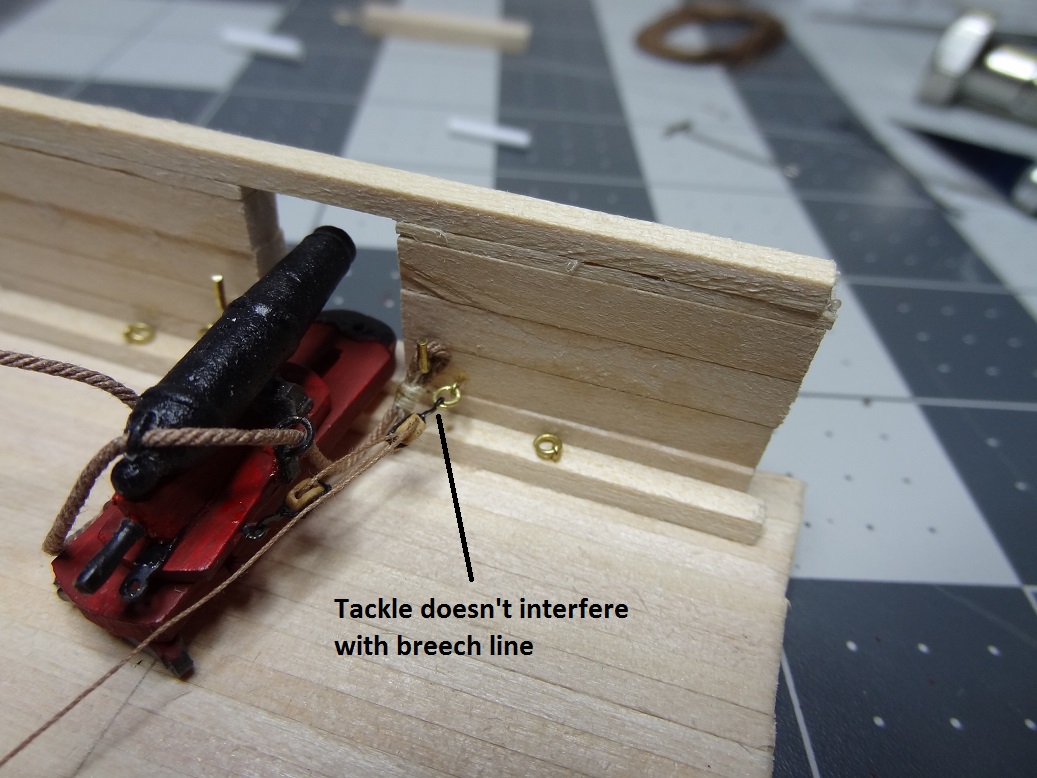
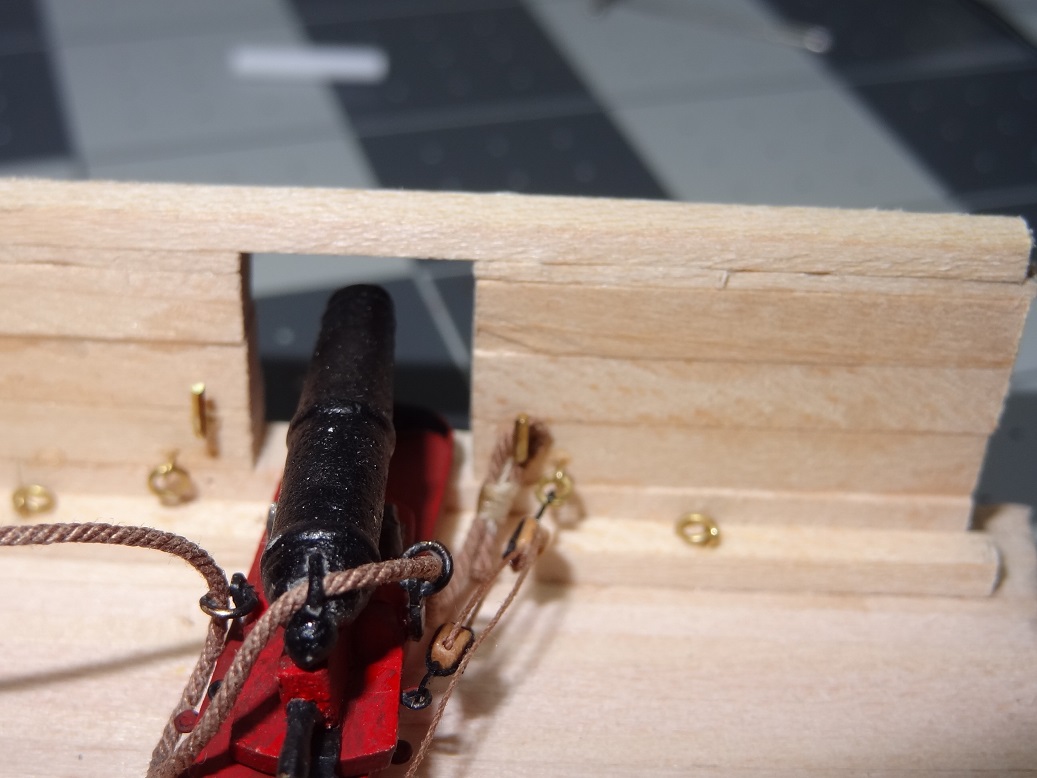
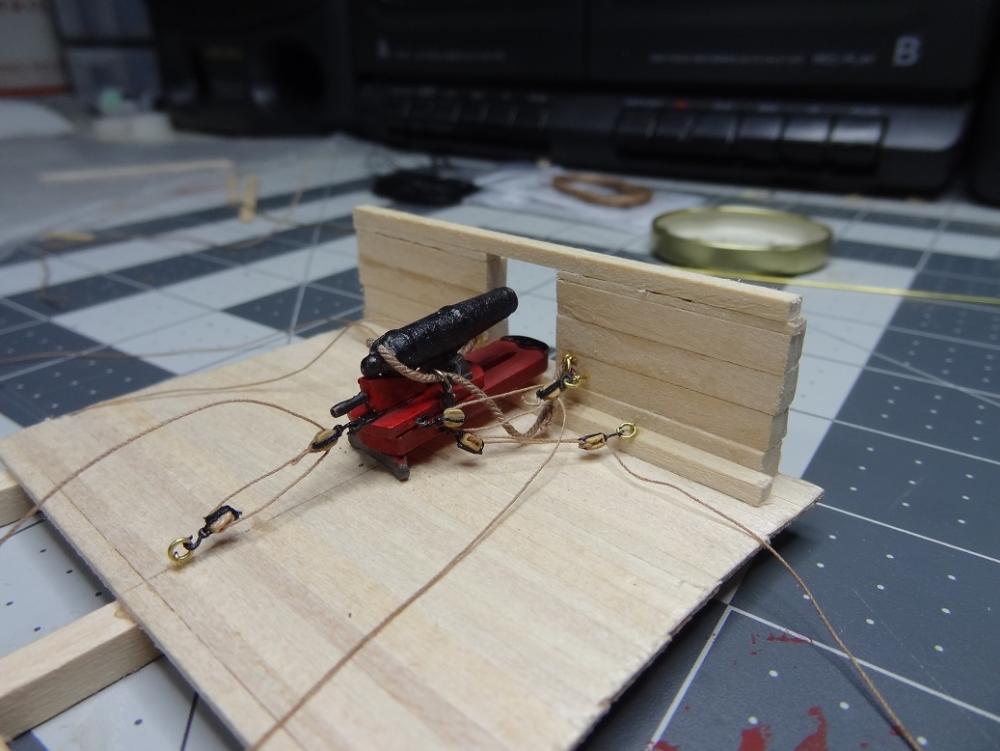
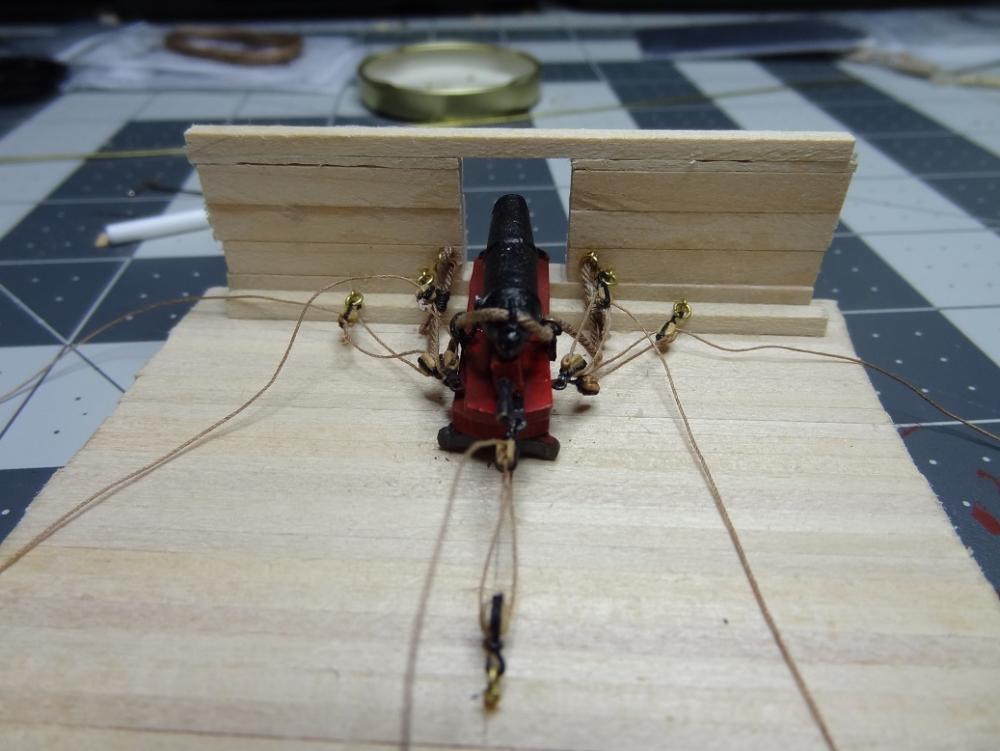
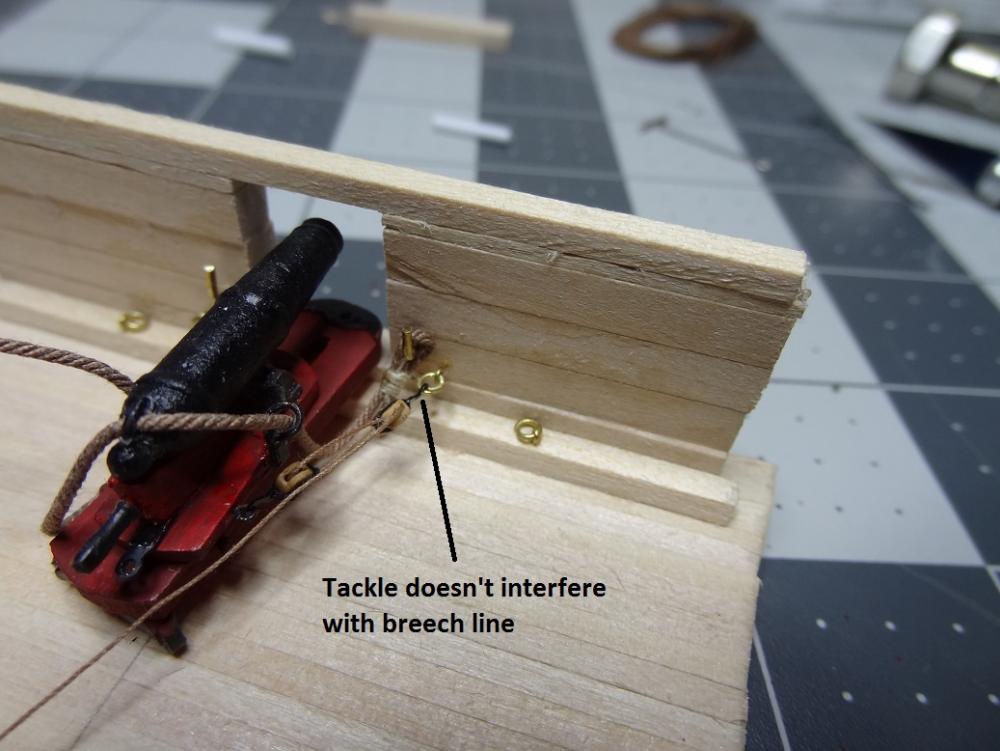
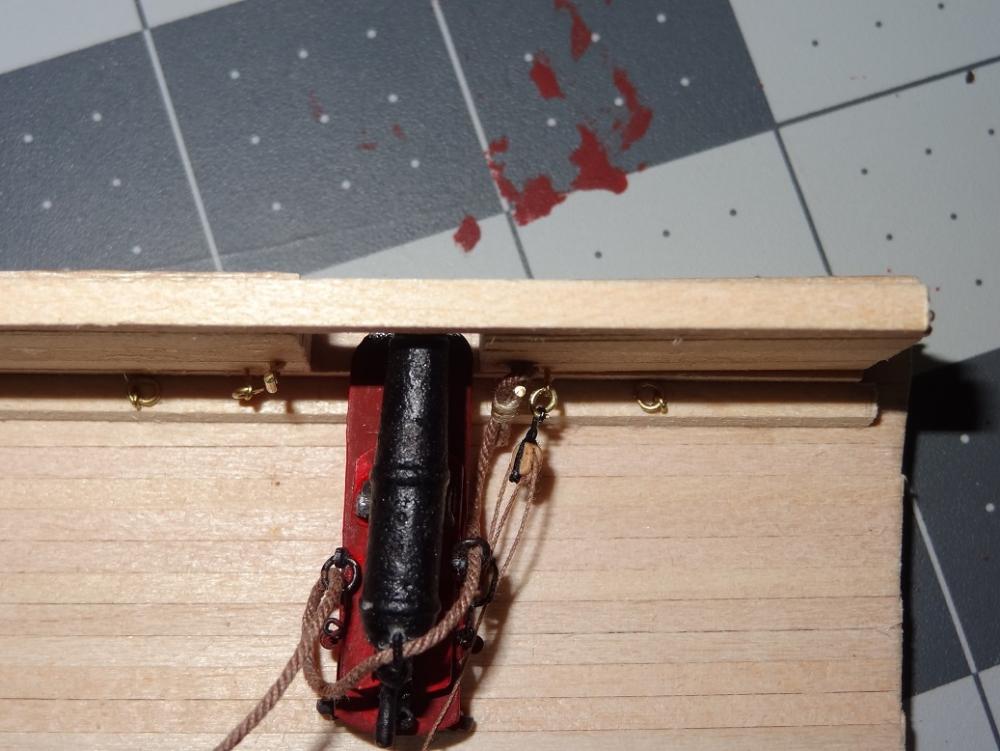
Well, I came to a completion of sorts. One carronade rigged up (in the mock gun station) with everything that I would like to show in my build. Some improvements are needed which I will mention below. Although, I have deviated from my schedule almost an entire weekend, I think the mock station was/is a good exercise. It allowed me to see quite a few combinations of ropes, blocks,etc. I have also learned a few do's and dont's regarding the gun instalation. It should make the actual installation more straightforward. I guess I'll go thru some pix with comments: Please excuse all the loose ropes in the tackles. I used photo etched hooks (the plastic type) and have found out the hard way they are too flimsy to take any stress - like pulling tight on a tackle. Too bad because I think they look great. I have some brass hooks on order. 5 tackles and a breech line per gun. 7 eyebolts with split rings. I mentioned in an earlier post I moved the lower port eyebolt outwards some. Plans call for them to be over each other, but I thought the tackle & breech line would interfere with each other. You can see now they have a bit of space between them. As far as part size, I ended up using what I tried originally. I'm pleased with the combination - I was able to get the complete rigging without taking up a lot of real estate. All these parts came from Syren Models: 3mm hooks .008 light brown rope for rigging .035 light brown rope for breech line 3/32" single blocks As I mentioned in my reply to Joel, I like the way the extra tackle line is handled in the pics he posted. Probably not battle ready but very tidy. I think it looks a lot better than coils - those always look a little contrived to me. As far as a real installation I think I will get some measurements between eyebolts for each tackle. Then, assuming the brass hooks are stronger, I can make a jig to hold 2 blocks at the proper distance to rig up. I can make them up at my convenience, a few at a time. With the hooks stropped to the blocks it would be a simple matter to install them - hook one end to a bulwark eyebolt, hook the other end to the gun. Speaking of jigs, I will do another post of how I stropped the 3mm hooks to the 3/32" blocks. I got a little smarter as I went on. Nothing new or revolutionary, just a combination of several techniques I have come across.

- 843 replies
-
- 2
-
-
- niagara
- model shipways
- (and 2 more)
-
So now it is simply Hurry up and wait (for the order)
-
So maybe I'm on target there. That's good to hear! I really want to put all the rigging in as long as it looks OK In the 2nd pic I like how they stowed the extra rope on the upper tackle. Wrapped between the blocks rather than coiled on the deck. Less clutter. It also looks like a double block was used for the lower tackle. Your pix show more detail (and more rigging) than the mockups at the Niagara museum. Back out to the garage........
- 843 replies
-
- 2
-
-
- niagara
- model shipways
- (and 2 more)
-
Right on with the boxwood! One thing to keep in mind (a lesson I have learned) is the kit is a representation of the Niagara build of today. Choices were made, deviations implemented for modern times, smaller crew, etc. Building an exact replica was not possible as there is nothing but a few paintings and verbal descriptions of the original. The original colors were most likely not the colors seen on the replica. In fact there is one school of thought that given the build circumstances at the time, it may not have been painted at all. Even if it was, the colors available in Erie at that time (can you say out in the stix) would have been extremely limited. Many say the entire exterior hull was black. The question is are you just following the kit - I think not (no problem there). Are you wanting to build a 20th century replica, get closer to the real thing or do your own thing?
- 648 replies
-
- 3
-
-
- niagara
- model shipways
- (and 1 more)
-
Good pix Joel. I wasn't finished with the mock up tackles - the breech line and the tackle to the upper sled were done first because it appeared obvious that they would be intermingled. So I did those 2 first just to confirm. Moving the lower rings out helped "clean" this up. Not to plans, but it looks like a fairly common placement. The Constitution breech line holders are interesting, but given the build conditions for Niagara would probably be a luxury item. I'll go back to eyebolt and use one of the larger split rings included with the kit. I got that idea for the bar from the Model Shipways Carronade Station kit. Should have the mock up completed shortly. I'm still planning on 2 tackles per side, 1 in the rear and the breech line. Will certainly appreciate your judgement on sizing when I post the pix. I think if anything, I feel I am on the small side, but the next size up was giving that crowded look.
- 843 replies
-
- 2
-
-
- niagara
- model shipways
- (and 2 more)
-
That's good to hear Mark. I've ordered some and will try them out. Can they be blackened like any other brass part?
-
Darrell - what size drill bit does it take to make a hole for one?
- 648 replies
-
- 2
-
-
- niagara
- model shipways
- (and 1 more)
-
May have just answered my own question. The hooks I have are some sort of plastic. Is photo etched brass any stronger?
-
I've just had my first experience with photo etched parts. I'm trying to use some 3mm rigging hooks at the ends of my tackles for some carronades. They look great, but the slightest load on them will tear them. I have to wonder if they will hold up at all if I used them for general rigging. Is there any way to strengthen these parts? If it was wood I would probably put some thin CA over them.
-
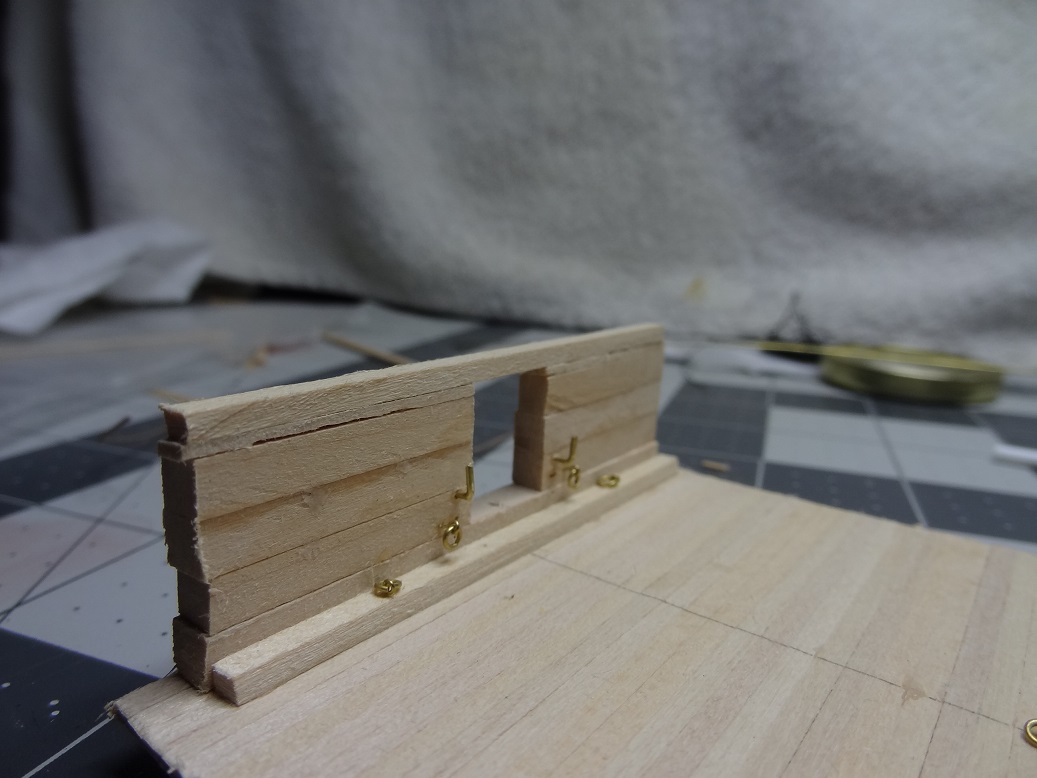
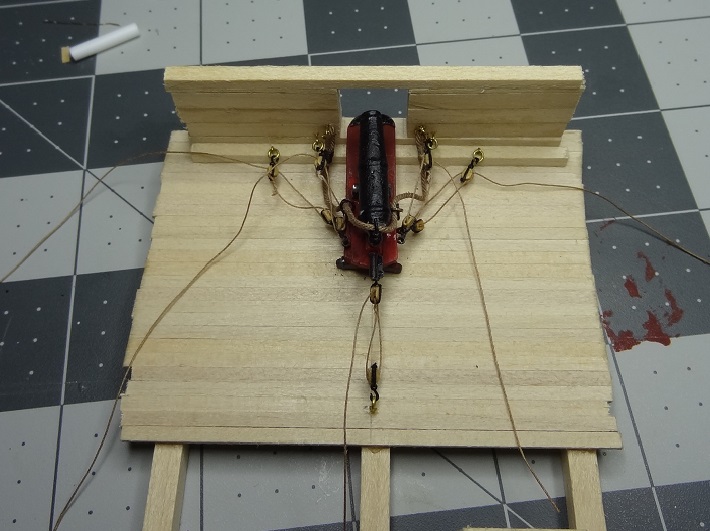
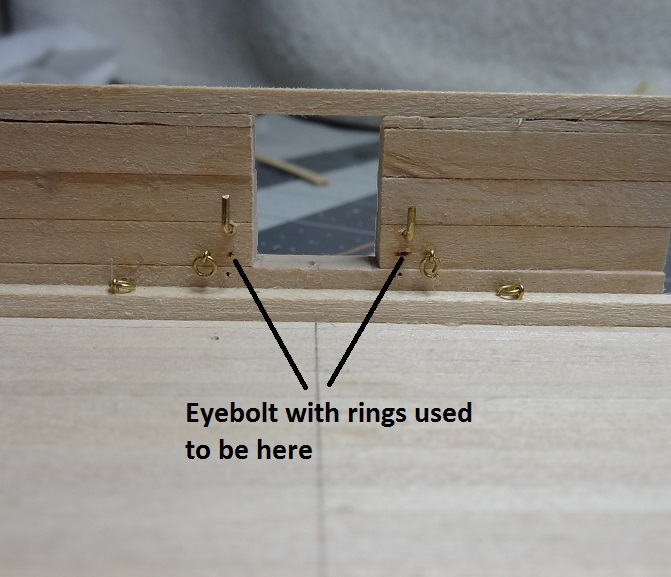
Maybe a slight deviation in plans. I am considering a change in the eyebolt pattern for carronades. The new idea goes something like this: I swapped out the upper eyebolt/ring with a bar to catch the breech line. This deviates from the plans but I have seen this on several builds. It makes sense. Why would you seize the breech line to a ring? It would make it tougher to unfasten if needed. With the bar, the seized loop at the end of the breech line just drops over the bar - much simpler. Of course now I am redesigning a ship that sailed 200 years ago The bars will need a little dressing up, but I think the concept is good. I've also moved the lower eyebolt out some. When the upper eyebolts were over the lower, I noticed that there is a big mess with the tackle and the breech line. They were both taking the same path to the bulwark and easily get tangled. Now they can both go their own way. Much cleaner. Here's a look: Since I've already drilled the holes in the real bulwark (at least on port) I'll have to go back and fill/paint the lower hole and move them out. That stinks but I like the result. I'm hoping to get a few more tackles in this evening.


- 843 replies
-
- 2
-
-
- niagara
- model shipways
- (and 2 more)
-
They said "it's all gravy" after the first one....
- 843 replies
-
- 2
-
-
- niagara
- model shipways
- (and 2 more)
-
Thanks Brian - I'm kicking and paddling as hard as I can and my head is barely out of the water. At some point I will have to decide how far I want to go with the guns, but I figured I would go all out on a sample and then decide if I want to cut anything out. I think doing everything is possible, but I am really concerned about hitting that fine line called "too much". Having the gun station has proved to be a good move. It has helped me see a few things that may require some adjustments on eyebolt placement. It's a great place to practice and try things. More to come...
- 843 replies
-
- 2
-
-
- niagara
- model shipways
- (and 2 more)
-
Now you have me looking into some sort of a cordless hand drill. What took you probably 2-3 seconds per hole took me about a minute. And I'll bet yours are better.
- 648 replies
-
- 2
-
-
- niagara
- model shipways
- (and 1 more)
-
Darrell - all the parts came from Chuck - the rope, blocks and hooks. You can't go wrong with his products. I think I have come up with a way to strop the hooks to those blocks, a few more repetitions and I'll post something. I'm going to pull out the serving machine today and see if it's possible to seize the brown rope to the blocks. The one I did was glued and if you look close you can see it doesn't extend out from the block center (like it would if it was seized) it comes out from one side which makes the first loop to the other block look crooked. Anyways, I stroped several blocks and will now string them up.
- 843 replies
-
- 2
-
-
- niagara
- model shipways
- (and 2 more)
-
Are you planning on keeping it schooner rigged as the Constructo plans show or brig rigged?
-
That Dremel sure beats the pin vise!!!!! Catheads look nice and solid. Are you going to paint all the cherry parts or stain?
- 648 replies
-
- 3
-
-
- niagara
- model shipways
- (and 1 more)