HOLIDAY DONATION DRIVE - SUPPORT MSW - DO YOUR PART TO KEEP THIS GREAT FORUM GOING! (Only 72 donations so far out of 49,000 members - Can we at least get 100? C'mon guys!)
×


mikiek
-
Posts
2,276 -
Joined
-
Last visited
Content Type
Profiles
Forums
Gallery
Events
Everything posted by mikiek
-
 That is some beautiful wood Don. It would be a shame if you weren't able to show it. Some very interesting hull lines as well. Where do you see things going south?
- 653 replies
-
- 7
-

-
- trabakul
- marisstella
- (and 1 more)
-
Really?!? A man over the side? I was halfway joking when I mentioned that. I'm going to figure out the proper length for each piece of rope and cut them all at one time. I suppose I could cut the breech lines now but I think I could only seize one end and install that eyebolt. Before the other end can be seized the line needs to be reaved thru the breech ring at the back of the barrel.
- 843 replies
-
- 2
-
-
- niagara
- model shipways
- (and 2 more)
-
I think I am straight on the catheads now. It took a good bit of filing on the inside elbow to get the upper arm to extend at the proper angle. No pix for that as I still have to add the eyebolts, finish painting and install them. The rest of the day was pretty grueling - fixing split rings to eyebolts, trimming, blackening and installing. These were for the carronade rigging on the starboard side. Also quite a few cleats. I'm trying to get all the close in bulwark parts in place before doing the carronade rigging because when the rigging is done, doing anything on the bulwark will be difficult. I am skipping the mooring cleats - as the historical ship most likely didn't have them. Got to get back on my soapbox for the dividers again. I was raving about them back during hull planking. They were a tremendous time saver today. In placing all those eyebolts, I never made a single measurement. I just spread the dividers between points on the plans and then put the dividers at the same points on the model. Very quick. Very simple. Very consistent. I just hope the plans are right. Pix are not real thrilling, just a snapshot of where I'm at. You may notice there are still some holes in the bulwark. These are for the eyebolts that hold the breech lines. Since the breech lines are seized to the eyebolts I don't want them in the bulwark now. I will do the seizing as part of the carronade rigging process and glue the eyebolts at that time.

- 843 replies
-
- 3
-
-
- niagara
- model shipways
- (and 2 more)
-
Looks good Darrell - I tried the premade siezing as well. Mine came out too big. I'll give the straight pin a try. Make sure you ream out the holes in those blocks. Voice of experience. The shear quantity is daunting, it's one of those psychological walls we have to get over.
- 648 replies
-
- 3
-
-
- niagara
- model shipways
- (and 1 more)
-
All good info. I like the knee idea better than the wire. I've been using the kit supplied cleats but don't care much for the preparation they require. Glad to know I can file away on the catheads. I was getting concerned that my bulwarks had too much angle at the bow. I'm struggling a bit cutting those grooves. Been trying an Exacto but I'm not getting the precision I need. I looked up catting and fishing (Lever has a page for it too). I'm wondering how they got the cat block hooked to the anchor ring? Swing it around until it finally hooks? Send someone over the side? The pix I see from Googling anchor linings kinda look like another slab of planks on top of the hull. I can't make out what you used for the anchor ring and pudden.
- 843 replies
-
- 1
-
-
- niagara
- model shipways
- (and 2 more)
-
That never happens, does it? You gotta love this hobby.....
- 653 replies
-
- 6
-
-
- trabakul
- marisstella
- (and 1 more)
-
Yes, these help. However, I had to do quite a bit of filing on the inner elbow to bring the top part of the CH down. It was literally sticking out at almost 45 degrees. Now it's about 10-15 degrees, which looks more like yours. I notice you have a second knee brace on the side as well as the one underneath. Quick addition - I like the wood cleats. And your nibbing strake looks fantastic!
- 843 replies
-
- 1
-
-
- niagara
- model shipways
- (and 2 more)
-
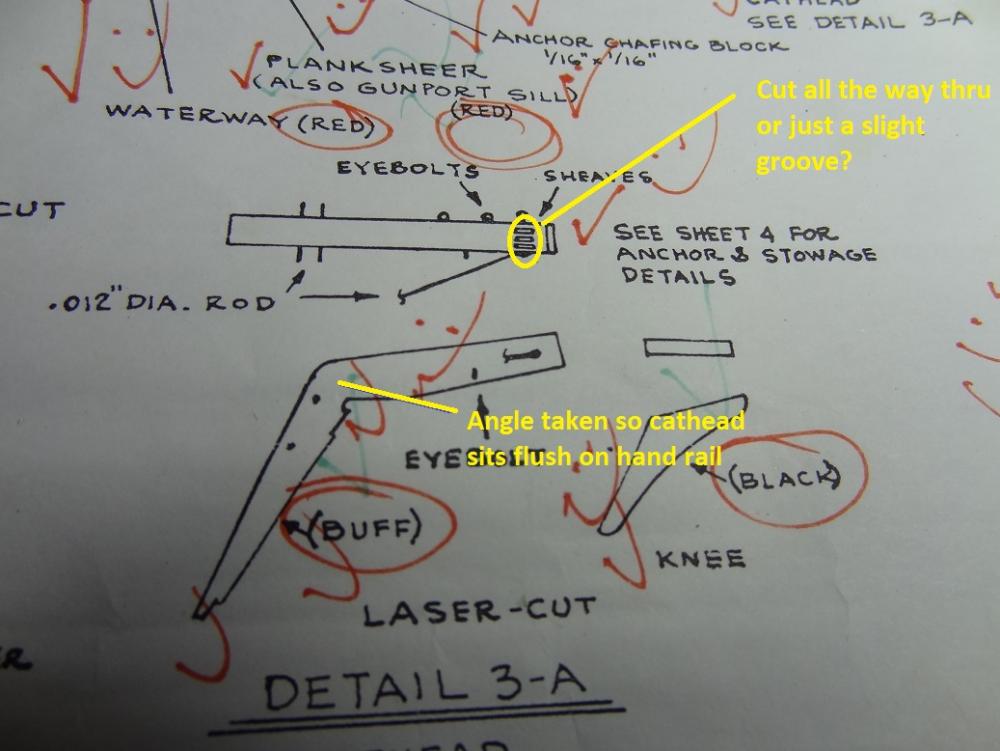
Another cathead question. The plans show 3 sheaves at the top end of the CH. If I understand things, in real life that would have been a groove cut thru the cathead (well actually 3 grooves), a wheel inserted into the grove, held in place by a rod (axle) running from one side of the CH thru the wheels and out the other side of the CH??? Assuming this is correct, what is the proper rendition for a model? Do I cut the groove all the way thru? That doesn't sound right as I have no wheel to put in. What I was thinking was drilling 2 holes then cutting a slight groove in between them. This pic also shows how much of the CH I had to file in order for it to sit flush on the bulwark and on the rail.
- 843 replies
-
- 1
-
-
- niagara
- model shipways
- (and 2 more)
-
I had started what I thought might be a quick question on Darrell's Niagara thread. It is looking like the discussion may go on for a bit, so rather than hijack Darrell's log I am moving the comments to my log. Hope this works..... >> From: Mike Darrell - going back to your post #18, are your cathead shapes identical to the laser plywood parts? I'm asking because I just cut out the laser parts and they don't even begin to fit in place correctly. I did file out a notch for the rail. If the upper part of the CH sits flush on the rail then the lower part extends out and away from the inner bulwark. If I make the lower part sit flush on the bulwark then the upper part angles up a little and doesn't sit well on the rail. I'm trying to decide if I need to file out a big chunk at the inner elbow of the CH. Or maybe make one that's shaped to fit. << >>From: Joel Detail on sheet 3, lower right. The tail wants to be against the inner bulwark planking. The outer part should angle up and out. Make your notch to allow the full width of the cathead to sit on the rail. The small knee should help you determine the angles. << >>From: Mike Joel - what I am missing from the plans is a view from the bow looking aft. When I hold the tail to the inner bulwark, the other end sticks up at maybe a 30-40 degree angle. I got more confused then as several pix from build logs seem to show the outer part almost horizontal. If I let the upper piece lay horizontal then of course the tail does not touch the inner bulwark. It almost seems like the elbow of the cathead needs to be closer to a 90 degree angle - or those other pix are wrong. As far as the knee goes, it appears it should get some filing to get around the outer rail and to sit flush against the underside of the cathead. The instructions/plans don't say anything about doing that. <<
- 843 replies
-
- 1
-
-
- niagara
- model shipways
- (and 2 more)
-
Since it looks like I may have a number of questions reagarding the catheads I am moving this discussion over to my build log. Sorry Darrell, didn't mean to get your log off track.
- 648 replies
-
- 3
-
-
- niagara
- model shipways
- (and 1 more)
-
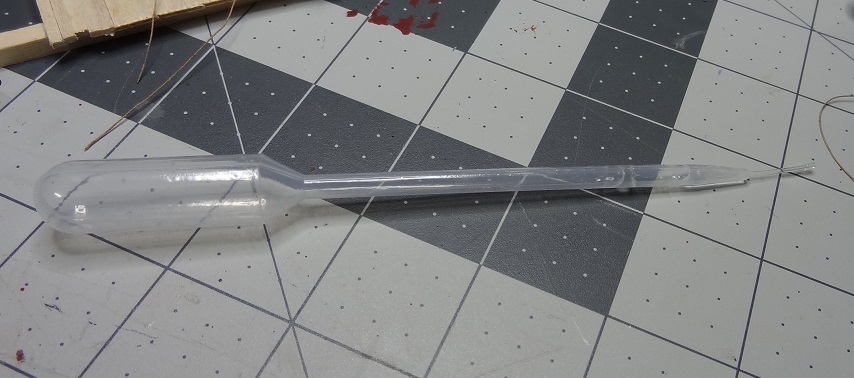
Skip - these applicators have been a great help in applying CA. The thin stuff is a little hard to work with but medium works well. The CA stays usable for a week or so in the apllicator. Also, my apologies Don for the reply about saw blades. I did not intend to get things off track. However I will say I learned something from them.
- 653 replies
-
- 9
-
-
- trabakul
- marisstella
- (and 1 more)
-
Joel - what I am missing from the plans is a view from the bow looking aft. When I hold the tail to the inner bulwark, the other end sticks up at maybe a 30-40 degree angle. I got more confused then as several pix from build logs seem to show the outer part almost horizontal. If I let the upper piece lay horizontal then of course the tail does not touch the inner bulwark. It almost seems like the elbow of the cathead needs to be closer to a 90 degree angle - or those other pix are wrong. As far as the knee goes, it appears it should get some filing to get around the outer rail and to sit flush against the underside of the cathead. The instructions/plans don't say anything about doing that.
- 648 replies
-
- 3
-
-
- niagara
- model shipways
- (and 1 more)
-
Darrell - going back to your post #18, are your cathead shapes identical to the laser plywood parts? I'm asking because I just cut out the laser parts and they don't even begin to fit in place correctly. I did file out a notch for the rail. If the upper part of the CH sits flush on the rail then the lower part extends out and away from the inner bulwark. If I make the lower part sit flush on the bulwark then the upper part angles up a little and doesn't sit well on the rail. I'm trying to decide if I need to file out a big chunk at the inner elbow of the CH. Or maybe make one that's shaped to fit.
- 648 replies
-
- 2
-
-
- niagara
- model shipways
- (and 1 more)
-
Better late than never. I just picked up this kit, but it might be a while before I dive in. Lead on Bob.
- 206 replies
-
- 4
-
-
- battle station
- panart
- (and 1 more)
-
Don - question from an ignorant beginner, how many teeth in that saw blade? Looks like a fairly low count. I was under the impression that cutting thin strips required a high tooth count. From that, I have been using a 230 count blade. It cuts OK but the teeth really get gunked up.
- 653 replies
-
- 5
-
-
- trabakul
- marisstella
- (and 1 more)
-
Hey, transom looks good. Don't know if your plans call for it but you could consider some sort of fashion piece. You would have to hand carve it but it is made to sit on that corner of the hull and transom to cover the joint. This pic might give you an idea what I'm talking about. I got to thinking about the half & half paint/copper idea. I believe several of us have suggested it, my reason was that I hate to see that beautiful wood covered up. What might look pretty nice instead would be to go ahead and copper both sides - doesn't it end right about at the waterline? Then stain (instead of paint) the remaining wood on both sides. A dark stain would give the impression of a black paint job but would add a rich look you just won't get with paint. Regarding the possible curve of the garboard. Don't forget that even if the gap does start to close up quicker than you anticipated, there are planking techniques to deal with that. A drop plank, where 2 planks turn into 1 right at the bow, can help that situation. I get the feeling you will probably have to do at least a few stealers as well. The deadwood area at the stern looks like it will end up wider than the rest of the hull. No fault of yours, just the design of the boat. I found the basic planking document in the MSW library very helpful in that regard. It gives a good description of what they called correction planks..

- 701 replies
-
- 8
-
-
- phantom
- model shipways
- (and 1 more)
-
First off, that is some gorgeous wood! It's hard to say because pix don't show the 3D view very well. Not your fault, it's just the way it is. If anything, I would say the garboard may be extending into the bow a little too much. But you can judge that. The key is you don't want the garboard turning up at all at the bow. In your next to last pic it kinda looks like it might be turning up some - maybe just the camera angle. I can say from experience, if it goes too far into the bow (even if the GB looks level) the next strakes will start to turn up. One view you didn't show was your transom. How is that working out?
- 701 replies
-
- 4
-
-
- phantom
- model shipways
- (and 1 more)
-
Would look kinda cool but then reality sets in. That rail around the cockpit area would be annoying enough to have to step over to get to the wheel. If you had to step over and down? At nite?
- 701 replies
-
- 4
-
-
- phantom
- model shipways
- (and 1 more)
-
You're right Joel and that is a terrible habit of mine. I tend to build 1 assembly from start to finish. VERY inefficient! With these carronades, I'm doing my best to get all of 1 step done, i.e. cutting the hooks, before moving on to stropping them. Only problem is some of this stuff is so small I can only do a limited number before I start seeing double. On the good side, there is always lots of other unrelated tasks I can do when I need a break. You saying your Niagara has no guns?
- 843 replies
-
- 1
-
-
- niagara
- model shipways
- (and 2 more)
-
That's what we are all here for. After I get all the hooks cut and blocks reamed I will have to go back to all the inner bulwark fixtures. I have a terrible fear of missing something on the plans and not being able to fix it down the road. I'm not sure why, but the carronade thing really wore me out. I may put Niagara on the shelf for a few days and work on Enterprise a little bit - still in the very early stages on that one. The smell of different wood....
- 843 replies
-
- 3
-
-
- niagara
- model shipways
- (and 2 more)
-
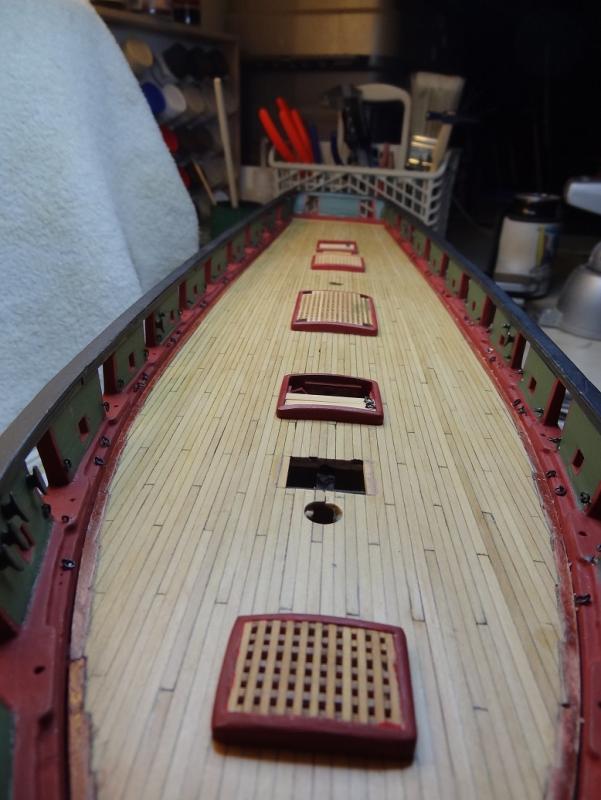
Posted a pic in my log. One coat white primer, 2 coats Deck Tan.
- 648 replies
-
- 3
-
-
- niagara
- model shipways
- (and 1 more)
-
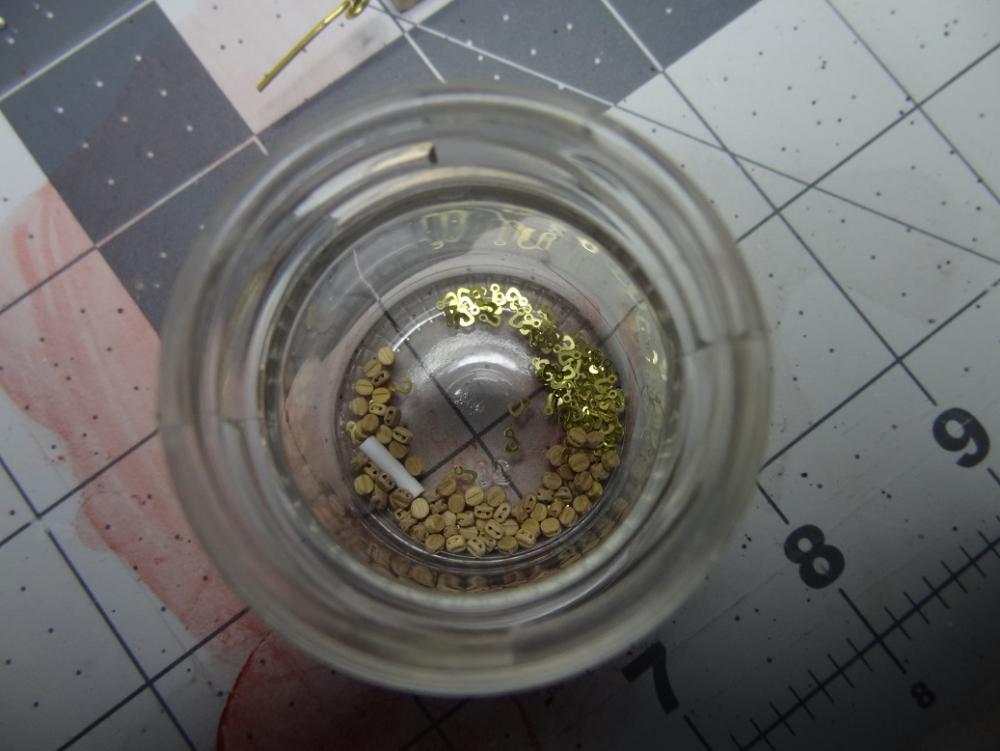
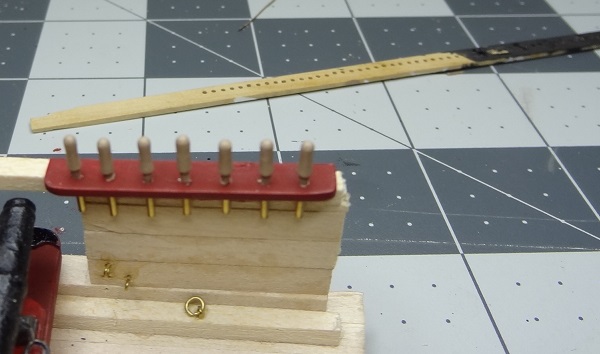
Well, here's what I have been doing the last few nites. I'm maybe about 1/3 finished. Picked up some true sprue cutters today. I'll see how they do at cutting out those PE hooks. A few weeks back I was questioning the kit belay pins. I had used a few for other purposes and so was a few short. Was debating more brass kit pins or move to wood pins instead. Brass pins need to be colored. Wood pins are not quite the same size. I ended up ordering more brass pins. Here's what they look like painted with Tamiya Deck Tan. Just one of hundreds of small decisions we make during the course of a build. In the background you can see a wood strip I drilled out to hold the pins (and cleats) while painting them
- 843 replies
-
- 2
-
-
- niagara
- model shipways
- (and 2 more)
-
Forgot to ask - Darrell how did you cut the camfers in the posts for the rails? I have really struggled to get 4 consistent cuts.
- 648 replies
-
- 3
-
-
- niagara
- model shipways
- (and 1 more)