mikiek
-
Posts
2,276 -
Joined
-
Last visited
Content Type
Profiles
Forums
Gallery
Events
Everything posted by mikiek
-
 I went back & forth - wood or brass as it didn't appear that I had enough kit supplied brass. Was going to go wood but a comment in a post I made said the wood can break. I ended up ordering more brass from Model Expo. They don't need any sizing just coloring. Tamiya has a Deck Tan that is about the color of a light wood. So I've ended up with the kit brass pin, painted. You gotta consider that once there is a big coil of rope hanging off, the actual pin will barely be visible.
- 648 replies
-
- 3
-

-
- niagara
- model shipways
- (and 1 more)
-
Nice idea with the curved blade Ken. Even better with the tape on the PE card. That is what's taking so long now - cut the part, lift up the card with knife, move the card, grap the tweezers, pick up part, put it in bowl, get card, get knife,....... With that tape I can just cut then move to the next part and cut again. I have literally several hundred hooks to cut out.
- 843 replies
-
- 2
-
-
- niagara
- model shipways
- (and 2 more)
-
Man - it seems as though another of my posts has been lost. To summarize that: 1. Decided on the part sizes for carronades. 3/32" single blocks 3mm brass photo etched hooks .008 black rope for stropping the hooks .012 light brown rope for tackle rigging .035 light brown rope for breech line .008 dark brown rope for seizing the breech line 2. I will be making 5 tackles per gun 2 for lateral adjustment 2 for running out 1 for hauling back 3. Eybolt pattern will be 1 on each side in the waterway; for lateral tackles 1 on each side about 3/16" out from port edge and 1/8" up from waterway; for breech line 1 on each side about 1/16" out from port edge and 3/16" up from waterway; for running out tackles 1 about 1" behind the lower carriage; for haul back tackle NOTE: this does not match the plans exactly but is close enough for me and a little easier to work with 4. I will be positioning the barrels almost fully hauled back. The breech line will be almost tight. 5. Had hoped to have all the tackes actually work - for demo purposes - but I'm not sure this is possible. Ropes don't slide thru blocks all that well which can put undo stress on the tackle rigs. So now it's a matter of getting the parts prepped for assembly. I will be reaming out the blocks, cutting and filing the hooks. I have to go visit my father in the hospital this weekend so I am taking the necessary equipment to do some of that there when there is time to kill. Speaking of photo-etched - this is my first experience with that. I have been cutting out the hooks with an Exacto but it is leaving small nubs on the parts which are rather difficult to file off. Does anyone have some suggestions on the best way to cut photo-etched (brass) parts?
- 843 replies
-
- 2
-
-
- niagara
- model shipways
- (and 2 more)
-
They look good Darrell. When you drop your deck in for a look have you pressed down around the deck edges? When you do that, the deck should end up with a crown that runs down the centerline. Highest at the centerline, lowest at the waterway. I mention this because you will need to sand the fore and aft base of your structures to fit over the crown. I feel your pain re the nickle and dime sized parts. Unfortunately, there seems to be no getting around it at this stage. You have the right idea by 'walking away' for a day or two.
- 648 replies
-
- 3
-
-
- niagara
- model shipways
- (and 1 more)
-
See if this works. Interesting history and some good artwork. Of course this is only one mans rendering after a lot of research. I do keep the pdf in my library.
- 648 replies
-
- 3
-
-
- niagara
- model shipways
- (and 1 more)
-
Joel posted links to a few write ups he put together in my log. A lot of that and my thinking is formed by some common sense and putting 2 & 2 together. In my mind some of the determining factors were: 1. Erie (the assembly point) was a small village/town barely accessible by land. There was access by water. It was primarily just subsistence living there, no real trade or industry. All shipbuilders and associated crafts were imported for the construction. 2. The boats built there were built for 1 fight, not long term usage. Follow up battles by either side were not anticipated as the losing squadron would either be captured or decimated. This would make one assume that only the items needed for a battle would have been built/installed. Also items that might be detrimental to a battle - i.e. deck structures - were likely left out. 3. Other than wood, almost all materials were either imported or improvised, again leading to the assumption that only what was absolutely needed was installed. 4. Since sorties were of short duration and usually some shoreline was nearby, a lot of items required for long term voyages would be left out i.e large food and water stores. Just my W.A.G.
- 648 replies
-
- 3
-
-
- niagara
- model shipways
- (and 1 more)
-
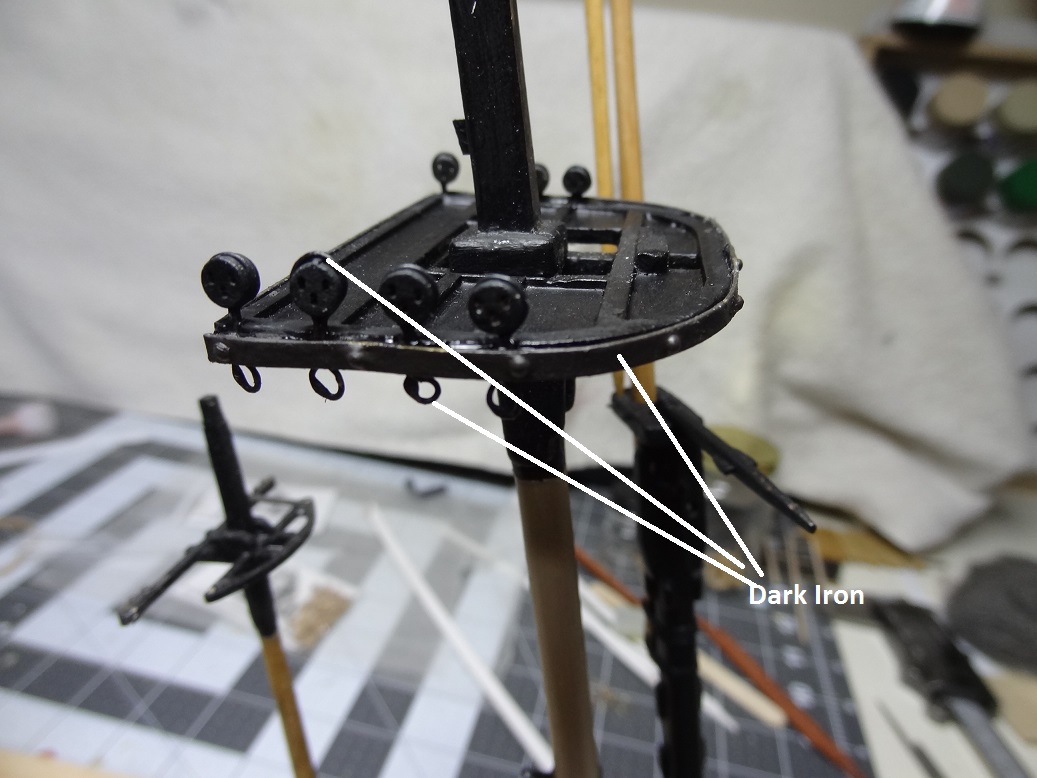
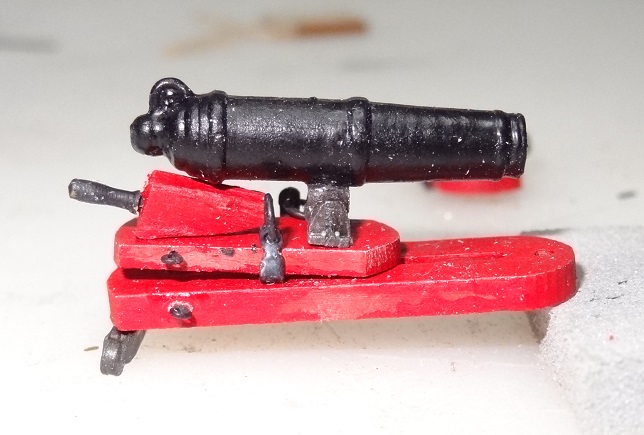
I used to blacken but got tired of getting the black all over everything - it rubs off. Tamiya makes an acrylic paint called Dark Iron and I have started using that. If you do blacken, one thing I found that helps is after blackening put a coat or two of flat/matte lacquer on it. It seals up the black pretty well. If you remember the carronade pix in my log, that is what was done for the barrels. I can hold those in my hand and nothing rubs off.

- 701 replies
-
- 5
-
-
- phantom
- model shipways
- (and 1 more)
-
That will certainly give you 2 different looks - kind of a cool idea. I have never coppered so I don't know what is involved. The only thing I can think of is when looking at the stained side would you see the edges of the copper plates at the bow & stern?
- 701 replies
-
- 3
-
-
- phantom
- model shipways
- (and 1 more)
-
I wasn't overly impressed with the kit capstan either. I thought about dressing it up with some "ironwork" but simple is the mantra. Darrell, the capstan is something you might have some fun with. If you could get some pics of capstans for that period. Joel do you really think there might have been a windlass?
- 648 replies
-
- 3
-
-
- niagara
- model shipways
- (and 1 more)
-
Good job on the nibbing strake!
-
Of course on the flip side, the coppering would probably be a good experience.
- 701 replies
-
- 3
-
-
- phantom
- model shipways
- (and 1 more)
-
I agree with Brian. It's a lot of trial & error. Hopefully it doesn't take too many attempts. If you like the color of your planking Minwax Natural Stain might be an option. No real color it just gives the wood a 'wet' look. That's what I've been using on the boxwood. If you take a damp rag and wipe the planks, you will get an idea what it looks like. BTW - according to the plans what color was the hull (the uncoppered part) supposed to be?
- 701 replies
-
- 3
-
-
- phantom
- model shipways
- (and 1 more)
-
Ah yes, the capstan. Just out of curiosity, do they use it in the modern version?
- 648 replies
-
- 3
-
-
- niagara
- model shipways
- (and 1 more)
-
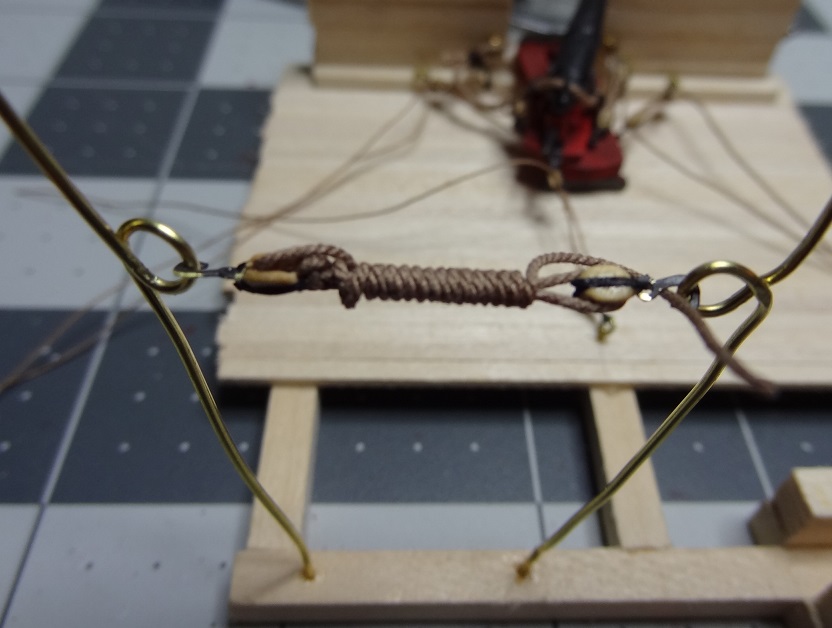
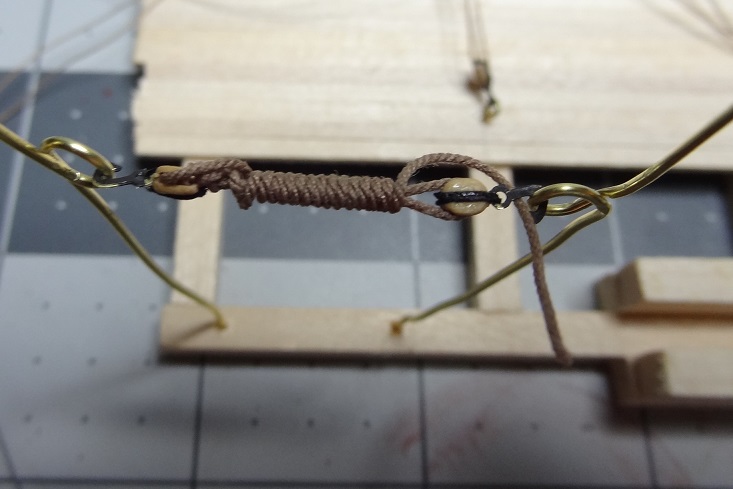
I think this is becoming a lesson of scale. What can be done and what can't. Tonite I built a tackle with 3/32 blocks and .012 rope. It looks OK. I even did the wrapping of the excess between the blocks like the picture. That's where things went south. It looks funny. The rope is too small to really see what it is. I have no problems going with the smaller parts - I'd like to be as accurate as I can. I just don't like the excess rope coiled on the deck so the wrapping seemed like a viable alternative. I'm thinking about maybe not having any excess. Just enough rope to reave the blocks and then glue the loose end somewhere. At that scale it might not look too bad.
- 843 replies
-
- 2
-
-
- niagara
- model shipways
- (and 2 more)
-
You've no idea how many attempts I made at squaring off the companionway. When Joel mentioned that the original probably didn't have any structures, it didn't take but a second for me to get on that wagon. Nice idea!
- 648 replies
-
- 3
-
-
- niagara
- model shipways
- (and 1 more)
-
All opinions are welcome Chuck. The reason for the .025 rope in the tackles is I want to wrap the excess between the blocks -per the pic - rather than coils on the deck. I tried .008 and .012 rope and when I did the wrapping, it just didn't look right. Too much like thread and not enough like rope. The .018 rope looked better but I thought the .025 looked best when wrapped. But honestly, I threw that all together last nite and have not yet hooked it to the carronade so maybe I'll think differently then. Perhaps at that scale, I'm expecting too much. You can see some of my other attempts with smaller parts in earlier posts. I'm still in decision mode, so I will take your input into consideration.

- 843 replies
-
- 2
-
-
- niagara
- model shipways
- (and 2 more)
-
Nicely done Darrell - your wood working skill is shining thru.
- 648 replies
-
- 3
-
-
- niagara
- model shipways
- (and 1 more)
-
Man - it's never easy. Just got word from Chuck that he will not be able to produce the plastic hooks anymore. I was hoping to get some of the 4mm size for the carronade rigging. Too bad, I think they would have been the ticket. I still have quite a few of the 3mm plastic hooks, so the decision is 3mm plastic (they look the best but are a tad small and not terribly strong) or 4mm brass (best size but don't look as good as the plastic-too flat). I'll let you guys know when I decide.
- 843 replies
-
- 2
-
-
- niagara
- model shipways
- (and 2 more)
-
Hey everyone - it's taken some time but I am starting to get an idea of what I will use for carronade rigging. I've tried a lot of combinations of different parts - all from Chuck at Syren - and am just about there. I have one more item I want to try with the hooks, but here is what I will be using: 1/8" single blocks .008 black rope for stropping the hooks .025 light brown rope for the tackles .035 light brown rope for the breech line 4mm hooks - material T.B.D. The hooks is what I am still looking at. First I used the 3mm plastic version. They looked good albeit a little small, so I picked up both some 3mm and 4mm brass hooks. While I still may use them, I don't like the look quite as much as the plastic hooks. The brass are fairly flat, whereas the plastic had a slight 3D look to them. The brass will also need to be colored, either blackened or painted. I do like the 4mm size vs the 3mm. I was going to order some 4mm plastic hooks last nite but Syren may be out at the moment. I am following up with Chuck to find out when they will be available. The .025 rope allowed me to wrap the extra between the blocks - similar to the carronade pic that Joel posted here a few posts back. I like this look compared to the coils, especially considering there will be 5 tackles per gun. All those coils lying on the deck would not look good IMO. Here's a few pix with the combination listed above and the 4mm brass hooks. Your comments and impressions are welcome.
- 843 replies
-
- 4
-
-
- niagara
- model shipways
- (and 2 more)
-
Those dang pictures! Always showing us what we don't want to see Thanks for the update Don. Can't wait to see how things progress.
- 653 replies
-
- 4
-
-
- trabakul
- marisstella
- (and 1 more)
-
Hey buddy - I agree with Ian. Consider showing your work and just keep the build all wood.
- 701 replies
-
- 4
-
-
- phantom
- model shipways
- (and 1 more)
-
Transom is quite nice! That is a tough one. Didn't realize you will be coppering. Are you going to fully plank first? If yes, I have one suggestion. After you complete your first band - the upper one - do the garboard and the first 2 or 3 strakes up from that. The garboard can be a bear - lots of twisting & bending depending on the hull shape. The first few strakes after the garboard can be tough also. The reason for the suggestion is you may need to readjust your bands after that. Don't forget that like we soak and bend planks, you can soak and twist them as well. That sure helped me. The thing to remember is if you twist the strip clockwise for the port side you will need to twist it counter clockwise for starboard.
- 701 replies
-
- 3
-
-
- phantom
- model shipways
- (and 1 more)
-
Darrell - A while back I ordered a bunch of rope. Many sizes and colors. Same with the blocks. That's what allowed me to do what I have done the last few days. I hate to sound wishy washy but I have already changed once. The .008 rope was too thin to do anything with all the extra - so I rule that out. The next size up rope - .012 - just doesn't fit in the 3/32 blocks. So 1/8 is the only choice. Even that rope didn't look all that good when the extra was wound up. So .018, which also fits in the 1/8 block looks to be the best so far. I had one of each size laid out and tried to shoot a pic but it really doesn't show the difference. The .018 rope with 1/8 blocks are what I am leaning towards. You have some options with the extra rope and they are still small enough so it doesn't get crowded. I did try a 5/32 block and it is starting to look too big. The only thing I didn't try was the next biggest rope .025 in the 1/8 block. None of those 3 look bad, but the .018 rope will look better coiled or wound up between the blocks (like in Joel's pic). The .018 dictates a 1/8 block. Original hooks were 3mm but I have ordered some 4mm. If you look at Joel's carronade pic, the hooks are almost as big as the blocks. I hope they will be easier to hook on to the split rings as well. The hooks should arrive by the end of the week. Chuck is in NJ so you would probably have them in a day or so. One thing to consider - if you are replacing blocks for the guns you should probably do it across the board. So take stock of the other blocks on the materials list and get the equivalent from Chuck. If you have any concerns, send him an email. He is quick to respond and can help you decide how to replace the other blocks. Vague enough?
- 843 replies
-
- 2
-
-
- niagara
- model shipways
- (and 2 more)