mikiek
-
Posts
2,276 -
Joined
-
Last visited
Content Type
Profiles
Forums
Gallery
Events
Everything posted by mikiek
-
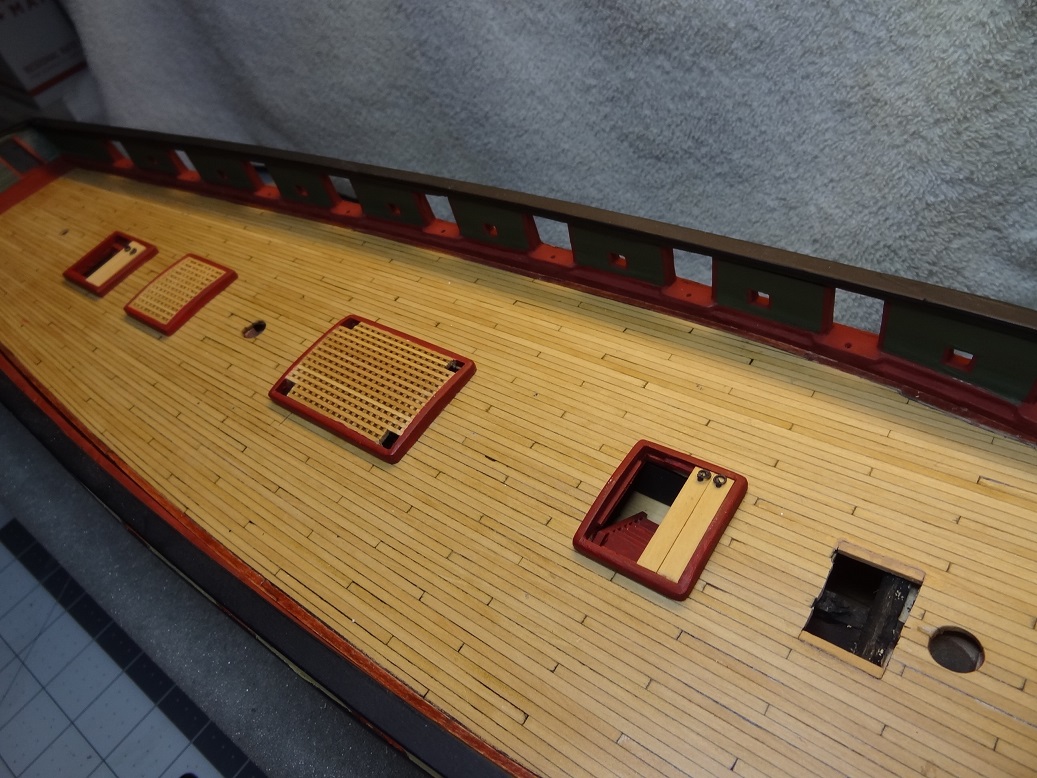
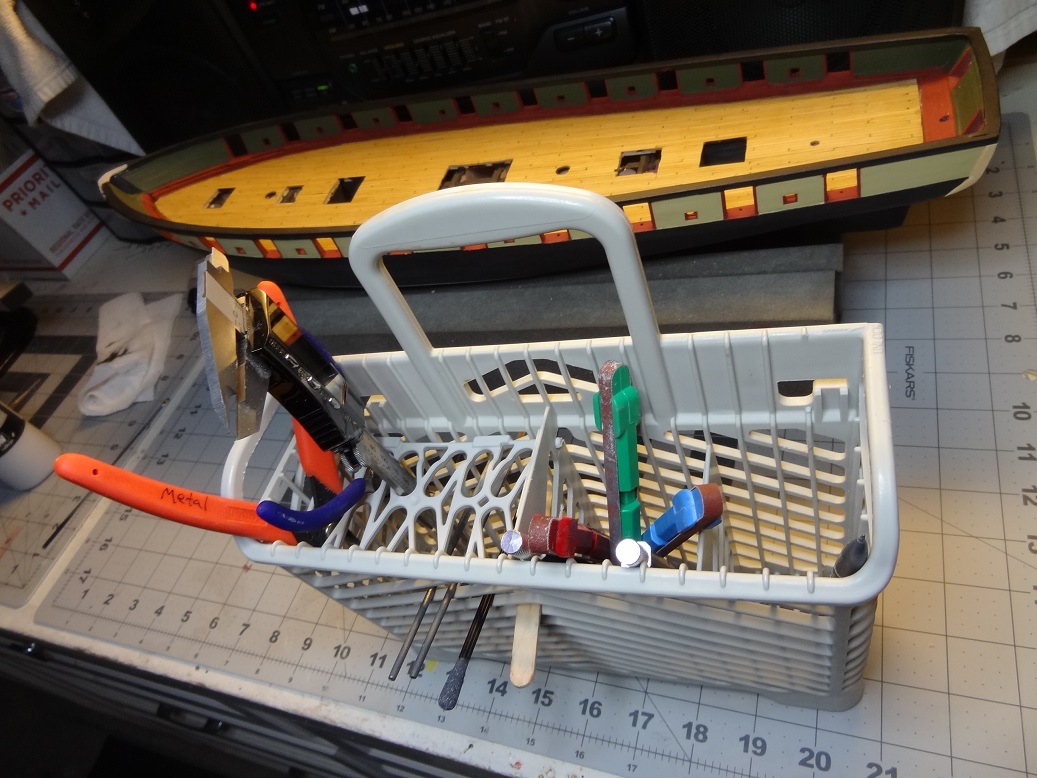
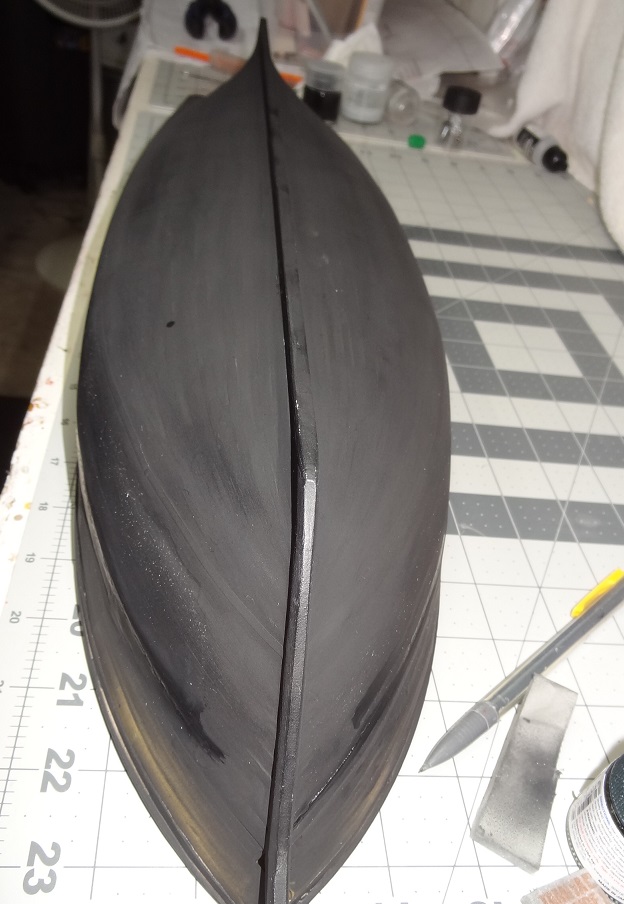
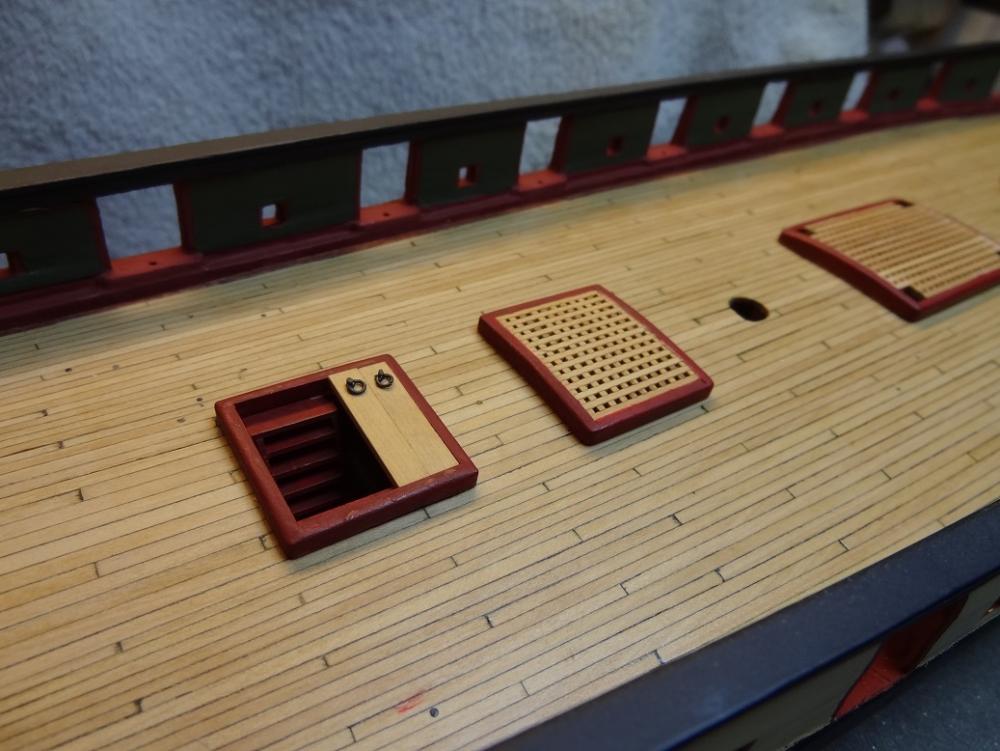
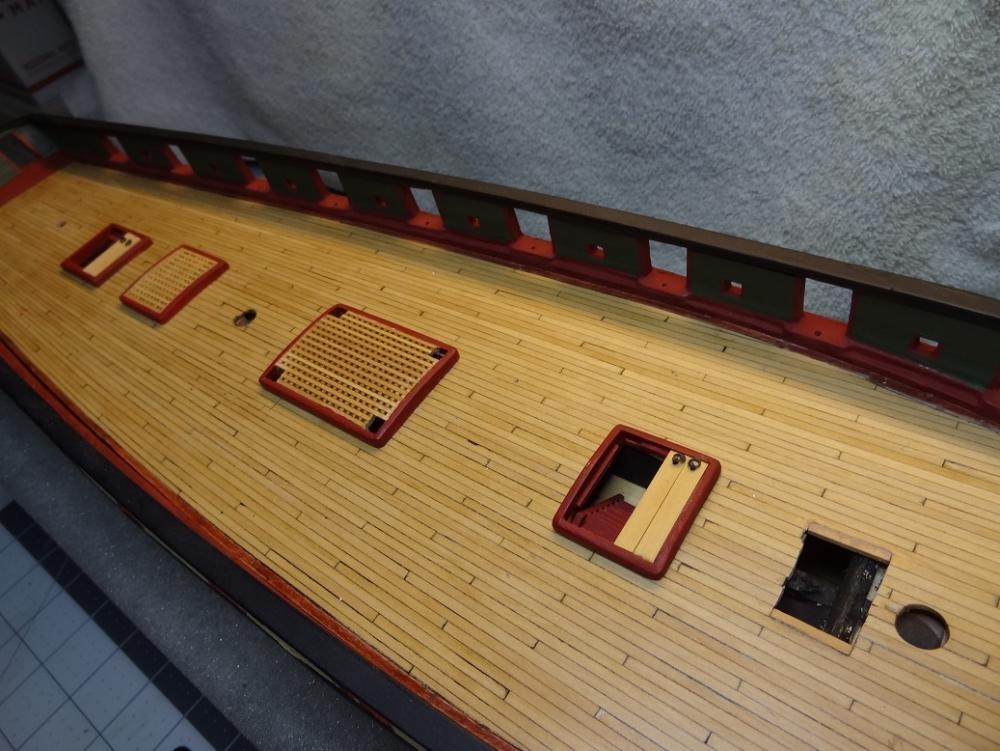
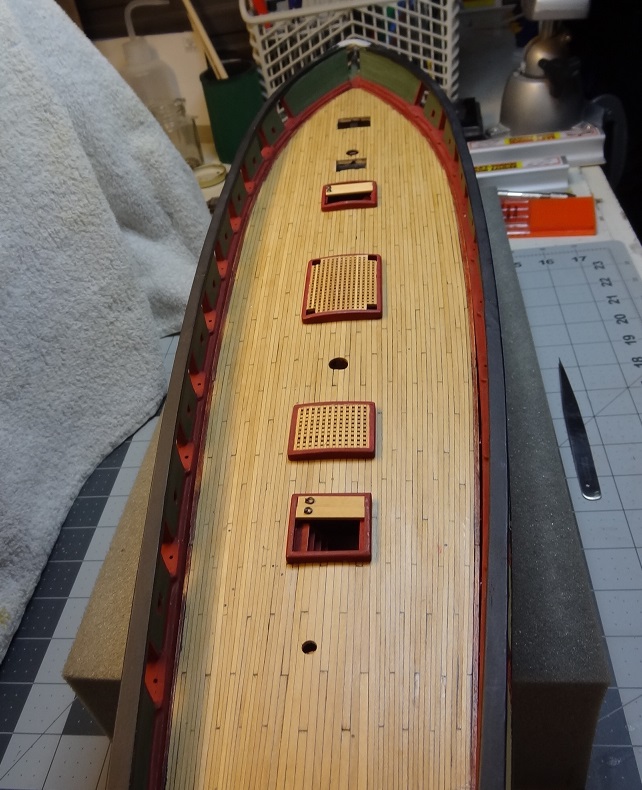
 Brian - here is where the showing off starts (if you can call it that). I started going down my list of items that need to be made/installed on and around the hull - my "honey do" list. There were some things that would make the deck more deck-like. The grates have been made for some time but I did not want to glue them down until the deck was installed. Another item was to glue the chock rails at the bow. I started looking at this and realized that the hand rail is not lined up on center. The joint where the starboard and port rail meet was a bit to the port side of center. I wasn't about to tear that off and redo so I ended up sanding the center over to starboard a little. Sounds confusing, but I think you can see what I mean in the pic. Had to do some appliance replacements yesterday including the dishwasher. This is the silverware basket from the old one. Might make a good tool holder. As you can see, you put put items in it from the top or the sides.
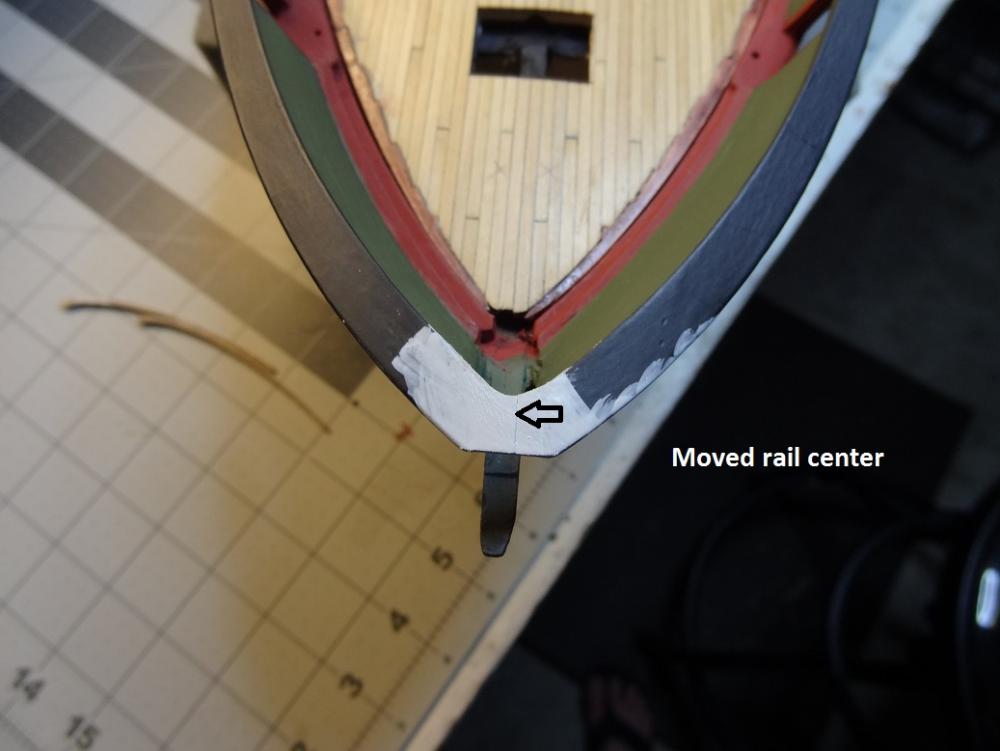

- 843 replies
-
- 5
-

-
- niagara
- model shipways
- (and 2 more)
-
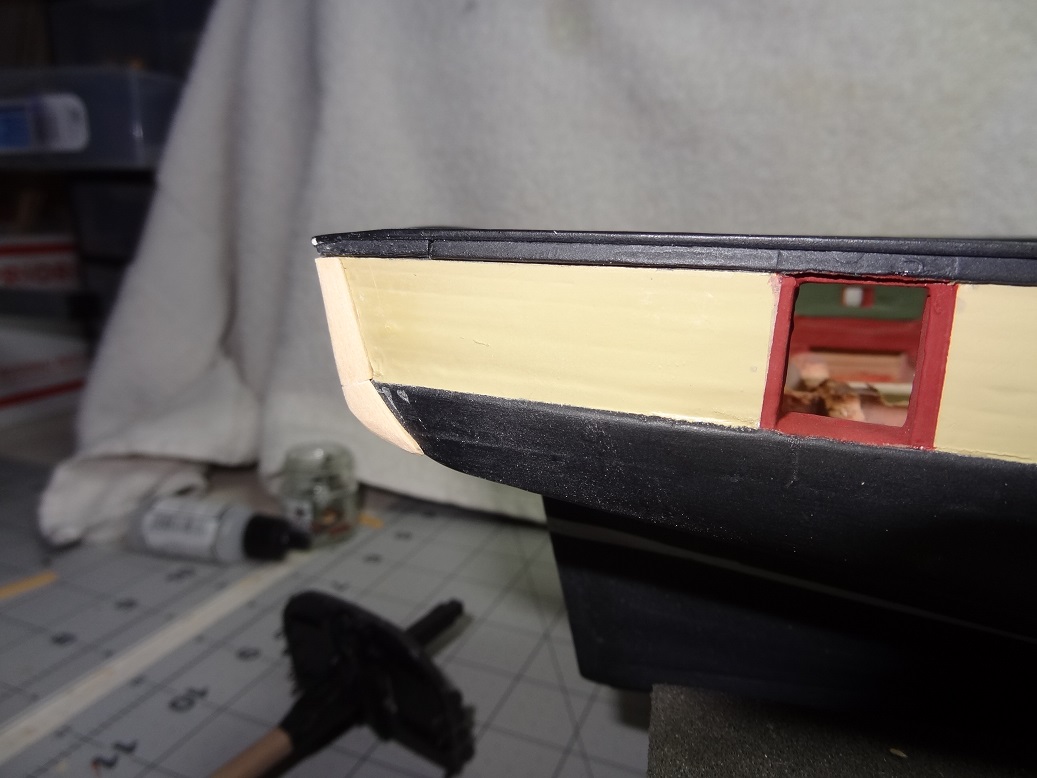
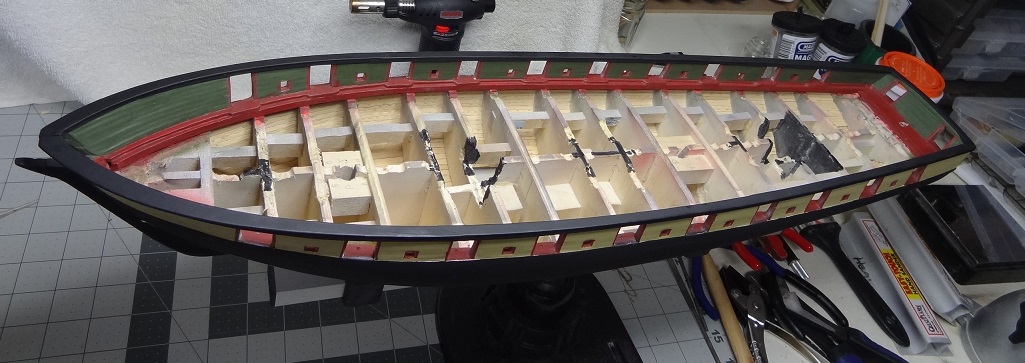
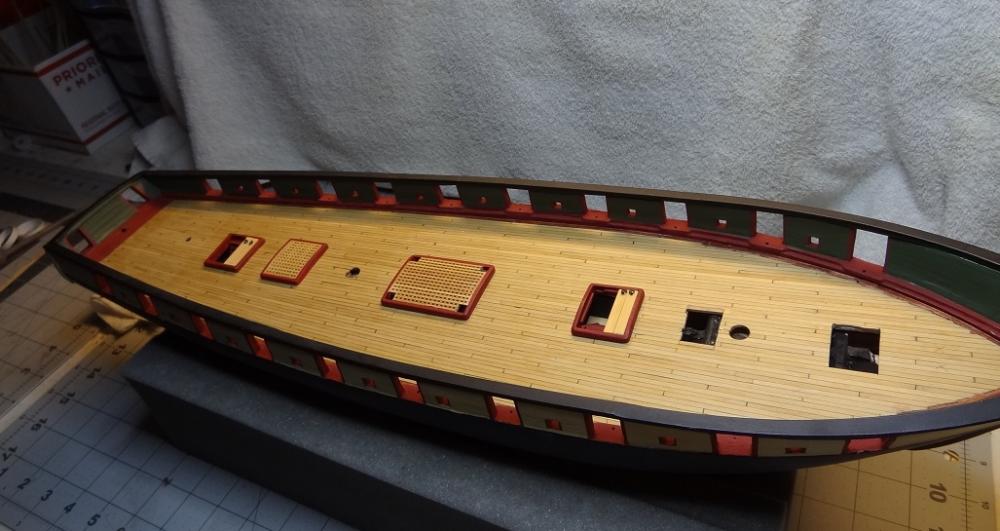
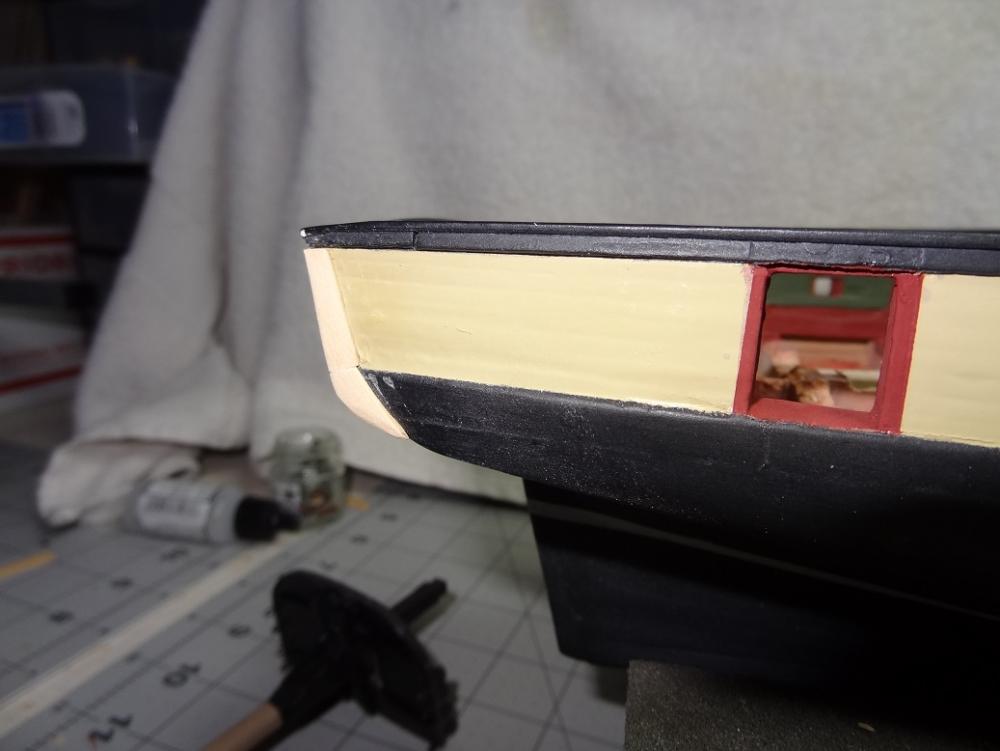
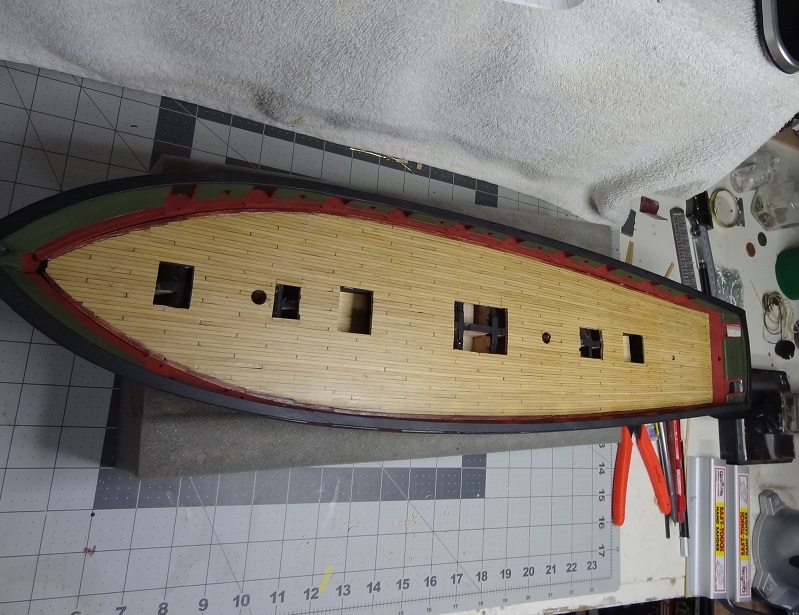
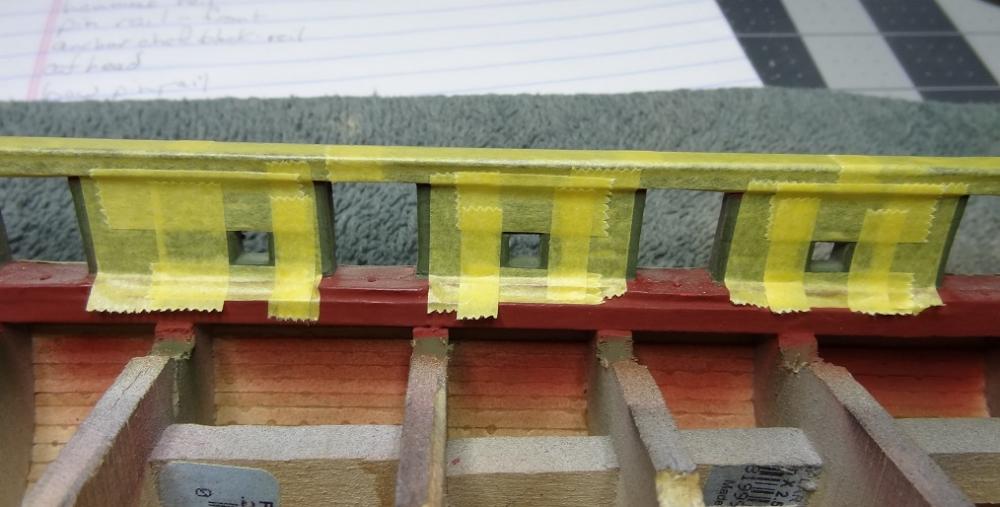
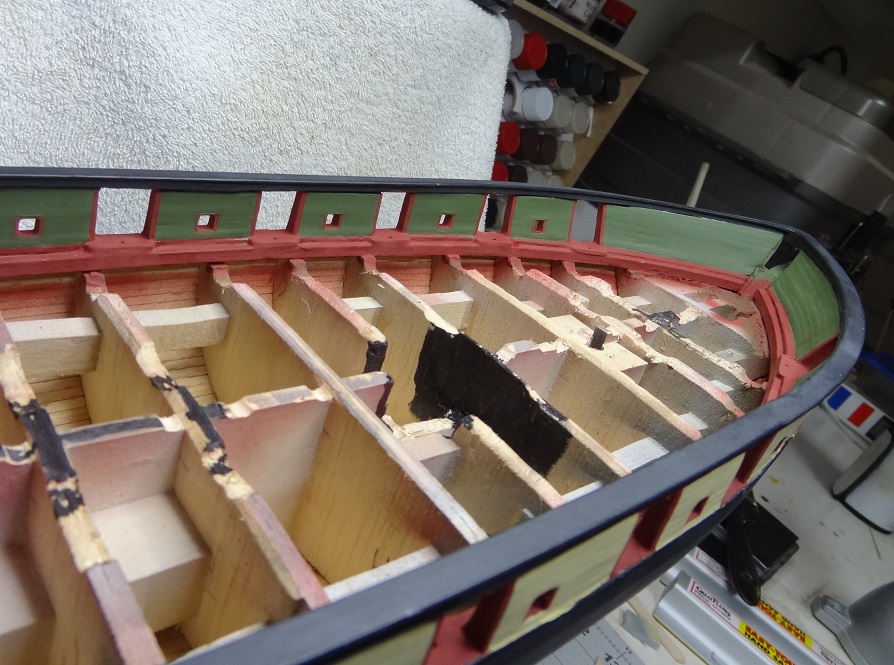
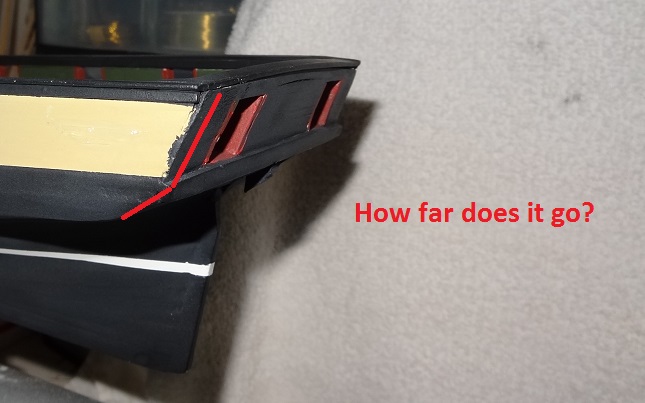
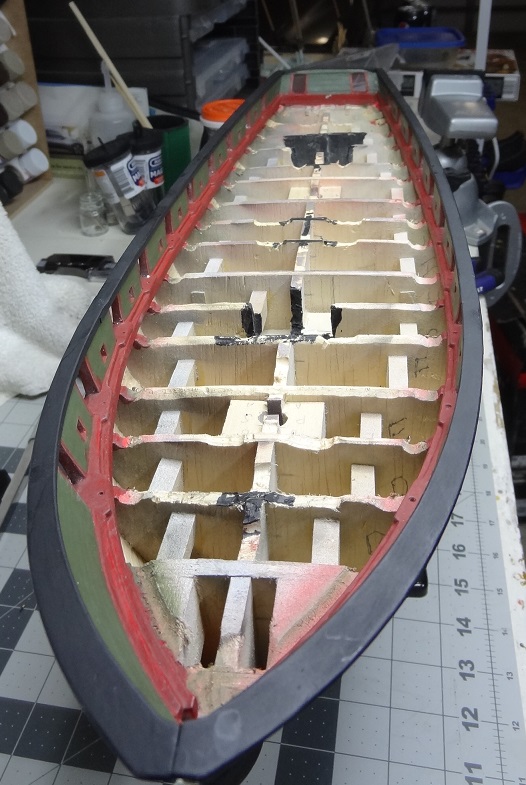
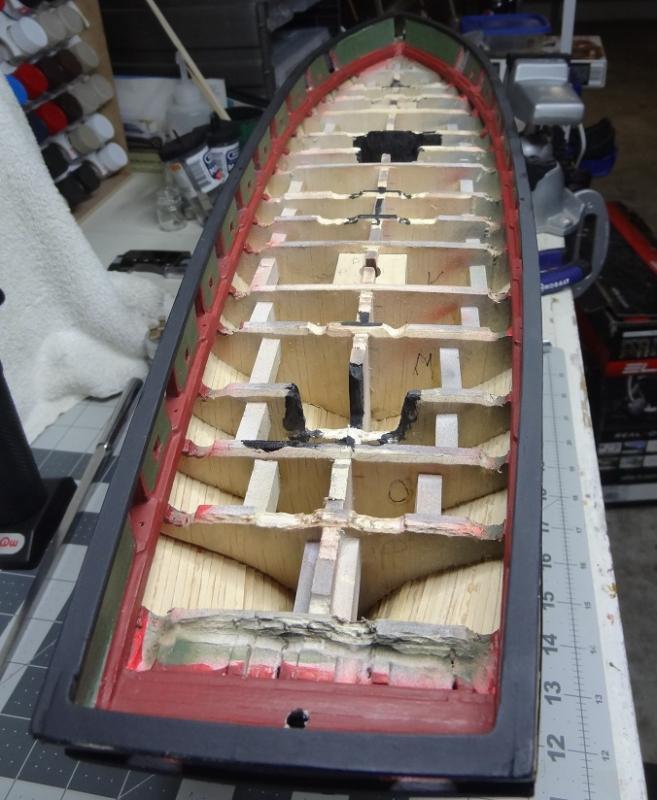
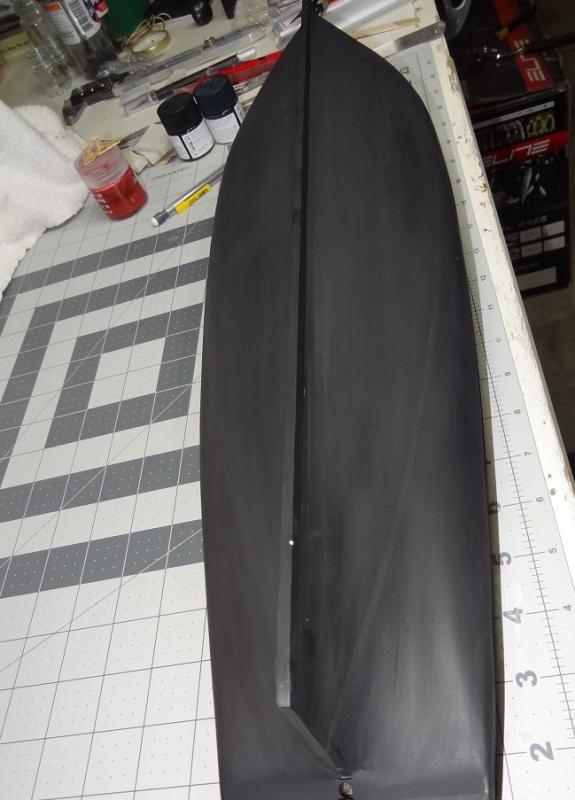
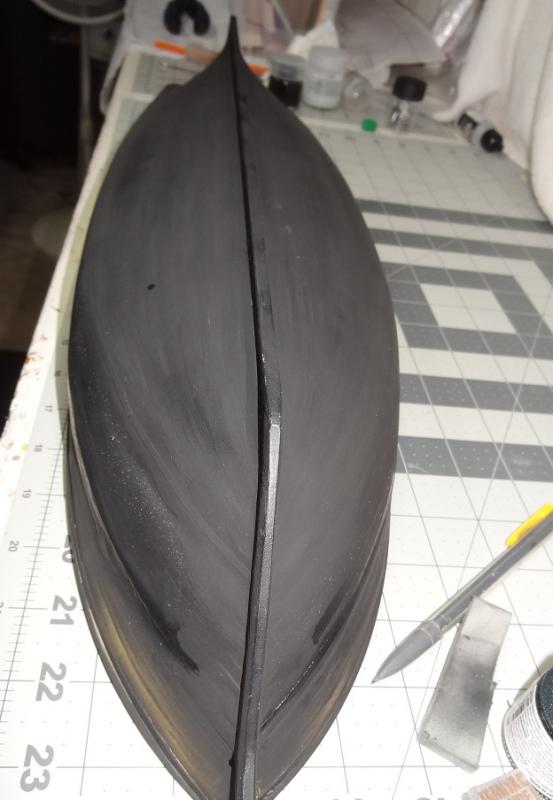
Very weird - I seem to have lost a post. It was about making the fashion pieces for the stern and installing the deck. The fashion pieces ended up being 2 parts, both made from a 1/4"x3/32" strip. There was a bit of chiseling and carving out to get a good fit - the reasoning behind the larger sized strip. I left some overhang at the transom. Don't know if this was done on Niagara but I have seen it on other ships. I have also installed the deck. With all the shrinkage and swelling I have seen it go thru in the past months I decided it was time to make it permanent. It went in without any real issues, the only hard part was I had to hold it down while the glue set. No way to get clamps in there. There's a few small gaps between the nibbing strake and waterway. I'm thinking the best way to fill those would be white glue with some of the red paint. I would prefer to use filler, but given that all the painting is finished and I would have to sand down the filler and risk scuffing the paint, I don't see that as an option.


- 843 replies
-
- 3
-
-
- niagara
- model shipways
- (and 2 more)
-
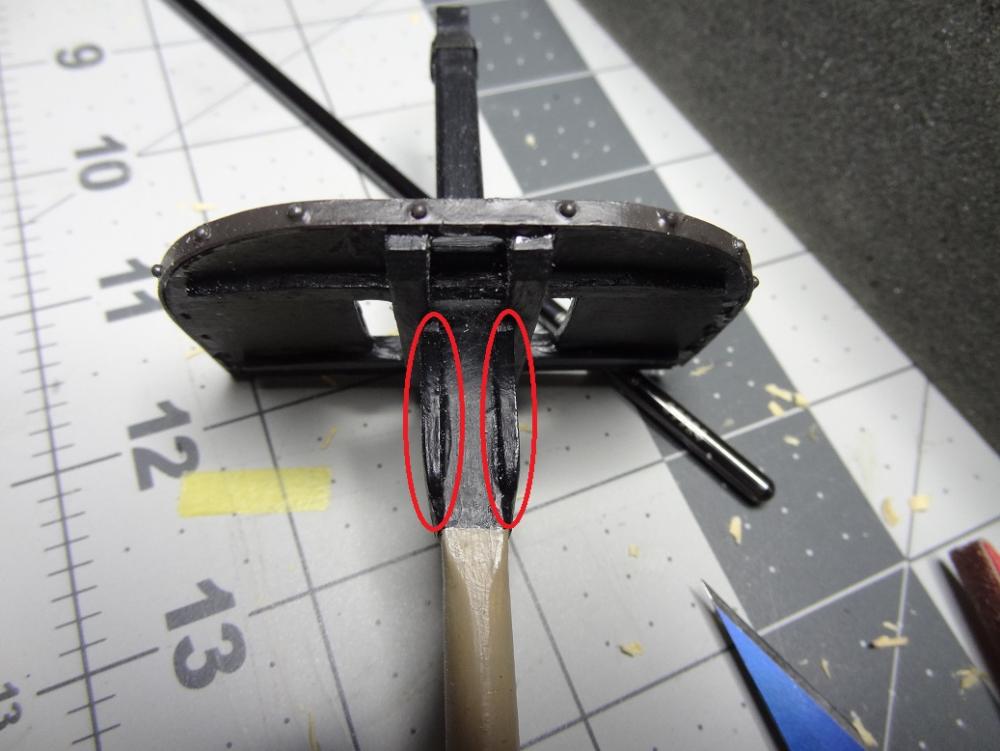
Ehh - not a big deal. If I recall I just put the masts in the boat, squared them off and then eyeballed the cheeks.. If your tops are done, you can set them on the cheeks to verify. Use white glue to glue the cheeks and wait a minute or so. By then you won't have to hold them but can still slide them around if you need to.
- 287 replies
-
- 2
-
-
- niagara
- Model Shipways
- (and 1 more)
-
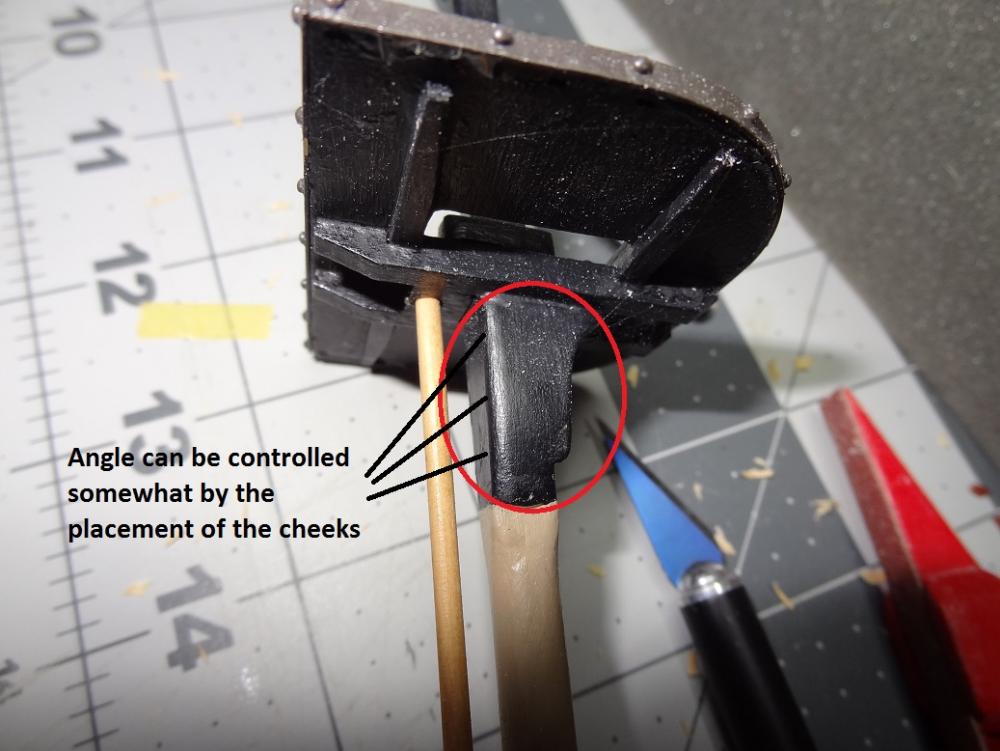
The mast surface where the cheeks will be glued is square at that point. You can make that angle almost anything you want and just sand the cheek edge flush . Don't forget the masts are raked. I believe the cheek angle is done so that the tops will be level instead of taking on the angle of the rake. Pardon the cobwebs the masts have been sitting on a stand for months now.
- 287 replies
-
- 3
-
-
- niagara
- Model Shipways
- (and 1 more)
-
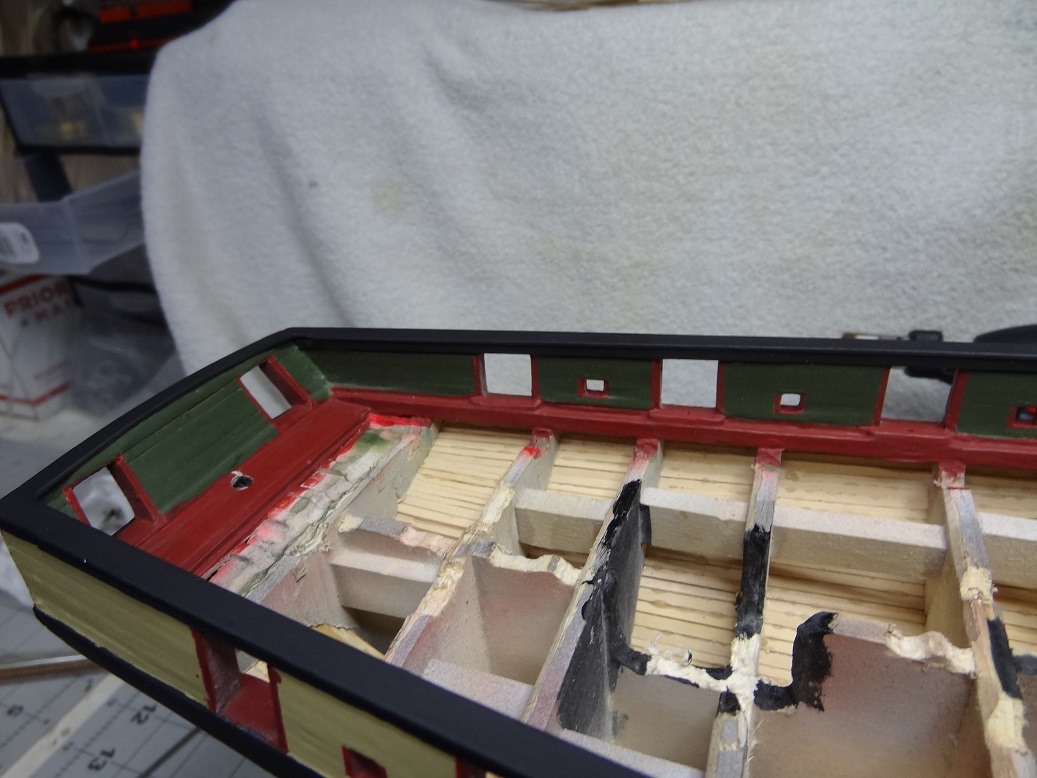
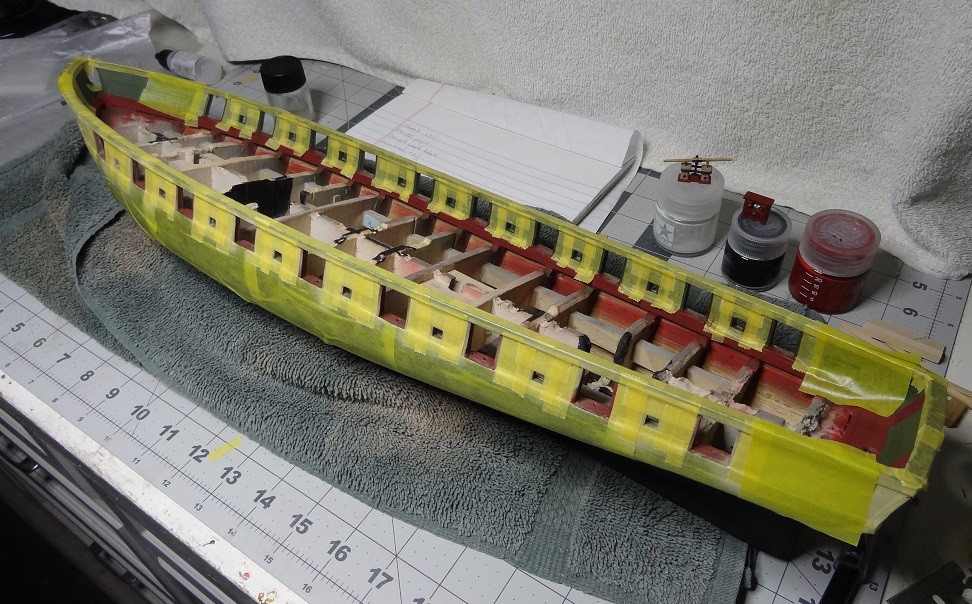
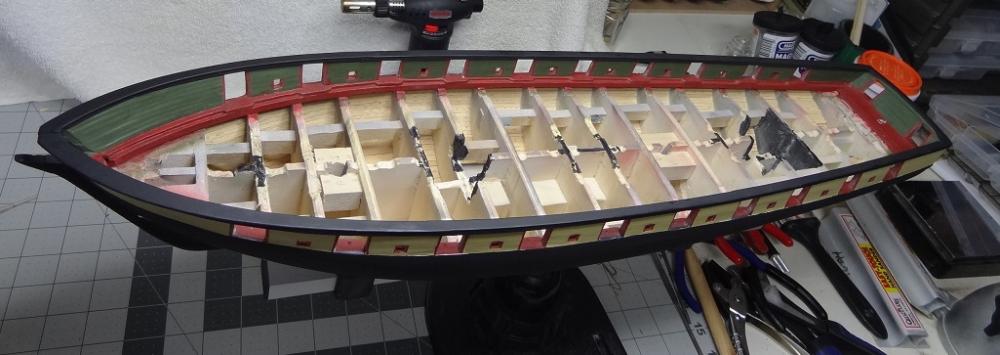
Was playing around with the deck and fitting it into the hull. First off remember that everything lives in a garage that is not climate controlled most of the time. I remember back when I was shaping the nibbing strake I had it sized so the deck dropped in but it was a pretty tight fit. A few days later I was horrified when I dropped the deck in again and it fell right in. There was a lot of space around it. Had no idea how I was going fill the space. Seems like over the months sometimes it drops in, sometimes not. Right now it doesn't - not even close. All I can figure is the weather? It's warm and very humid now. Back when I was building the deck it was cool/cold and relatively drier. I suppose there are more paint layers on the waterway now, maybe a little thicker there. It's really weird. I'm going to bring it into the house tonite and see what happens tomorrow.
- 843 replies
-
- 2
-
-
- niagara
- model shipways
- (and 2 more)
-
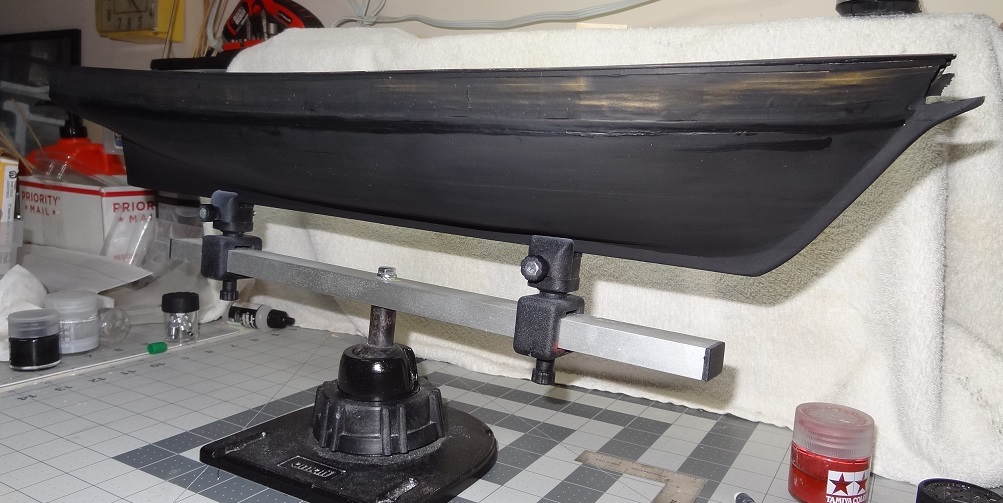
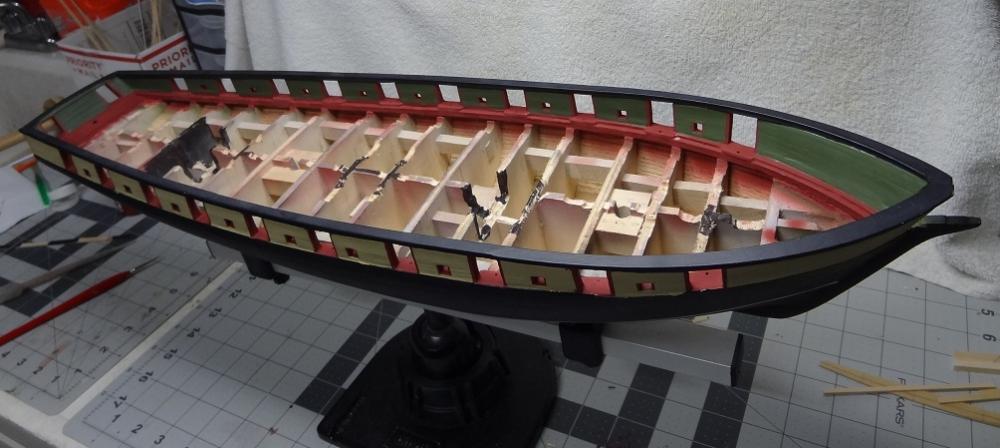
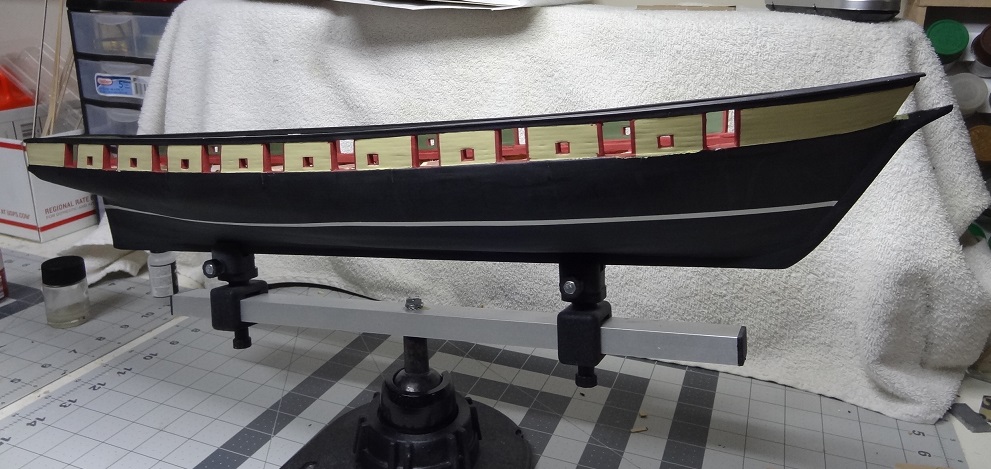
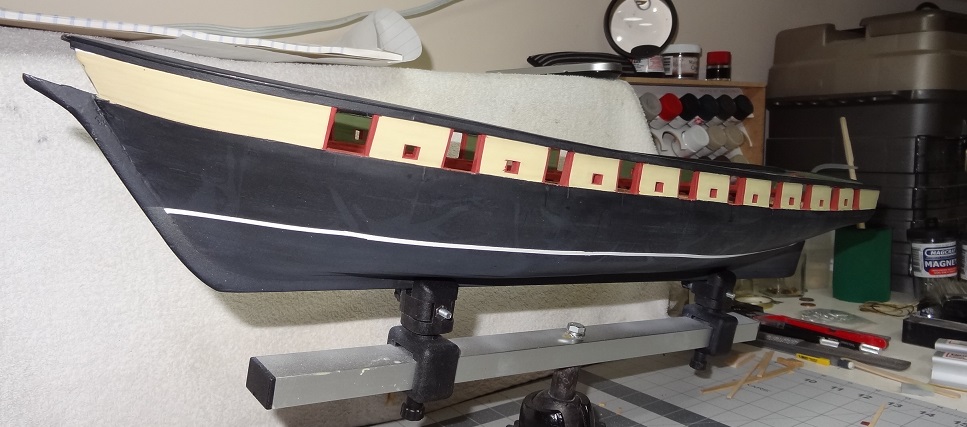
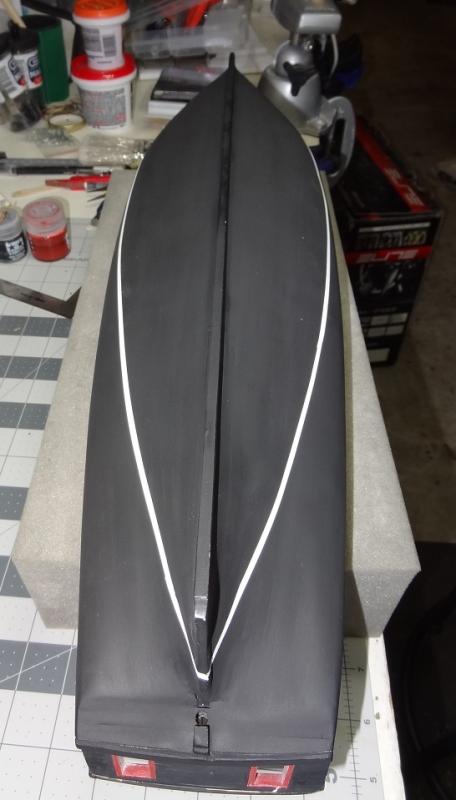
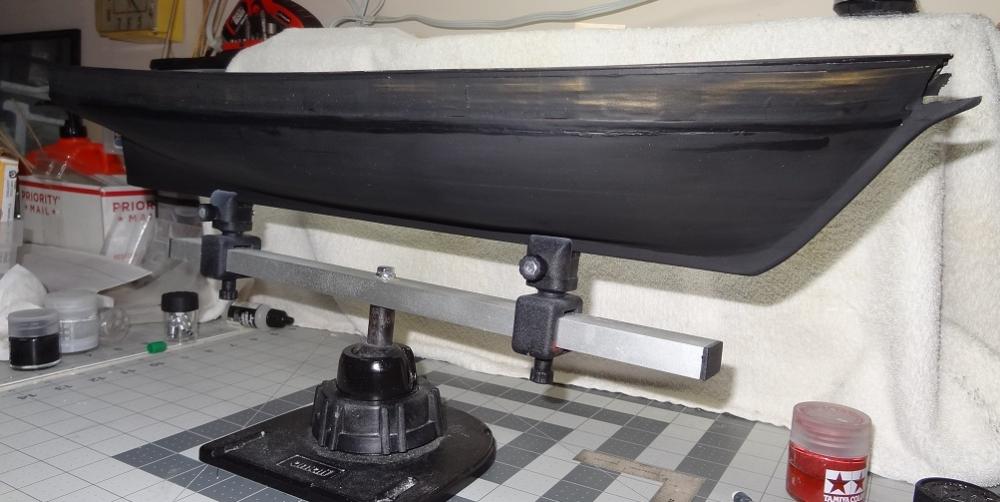
Hit what I will call a milestone today. Hull painting is complete. A few posts back I mentioned completing the lower hull with the waterline. That looked so nice I felt obligated to repaint the bulwarks and waterways. That and the fact that when I changed tones of red paint I tried to hand paint over the original color. That was about 85% successful - still a few spots of bright red that I was nervous about trying to get by hand - and in the end it all looked hand painted. The airbrush finish was gone. It was inevitable I suppose. Now it was a little trickier. The first (and second) time I didn't have to worry about planks on a hull and handrail, both fully painted. So I needed to plan the order of surfaces to paint. So it went something like this 1. Mask & seal the lower hull from the upper gunwale down 2. Mask & seal the handrail 3. Spray the plank shear & waterway with the new red. At this point I didn't care about overspray. 4. Mask & seal the waterway where it meets the inner bulwark. Also masked lower portion of gun ports. 5. Spray inner bulwark green. Of course this covered over the red trim of the oar/gun ports. 6. Spray outer bulwarks Dijon Yellow. This also sprayed over the trim. 7. Remove masking from gunport lower. 8. Mask & seal inner and outer bulwarks so only the port trim is exposed. Very tedious - took about 2 hours. 9. Spray all trim - inner and outer - red. Sure hope my sealing works! Elapsed time was about 3 days for all this. Finished the trim this evening and pulled off all the masking. Wow! I'm really pleased! Just the tiniest spots of bleeding under the tape - touched that up with a detail brush. The edges around the trim are the sharpest yet - the time taken for the masking was worth it. The sealing step has really paid off. I used to do this with whatever color paint I was trying to protect. However using the Clear paint is a lot easier as I could apply it over any color at the same time. This was a time saver as I had various areas of black, red, green and yellow to seal. The clear will go over them all. I'm going to let the colors dry overnight and then hit everything with a few coats of Clear tomorrow for protection. The only down note is that at some point I will have to give the lower hull one last coat of black. It is showing every speck of dust, dings and fingerprints. You can already see it in one of the pics. Without a doubt it will get more abuse before I'm done. Speaking of pics: Ready for trim painting Some day I will learn how to photograph models So moving on, I have a list of items from plan pages 2 & 3 . Everything from cleats to pinrails to oar holders. And somewhere in all that I WILL install the deck.
- 843 replies
-
- 3
-
-
- niagara
- model shipways
- (and 2 more)
-
Would love to see some options for wood type. Entry level = basswood. Premium level = boxwood or walnut or other exotics. Or maybe you could call it Painted level vs Stained level. I have no problem with paying extra for premium wood. At the moment I am having Jason replacing the basswood included in my kit's "on the shelf"
-
Great idea Chuck, and thank you! I was/am a complete beginner with no modeling, woodworking, metalworking experience. Working on first build Model Shipways Niagara. The MS plans and instructions are decent - probably more than enough for an experienced modeler. However at times, in my position, I have been frustrated by what seems to be an assumption on the designer/author part that the reader IS experienced. I think a lot of potential builders out there have this perceived notion that what we do is far too complicated. They never even try because of that. So one suggestion is that some of the quality kit manufacturers produce a few very simple builds and advertise them as such. Included should be detailed instructions on every piece that is to be assembled - similar to the old plastic car/plane kits. A practicum should almost be required or at least offered for an additional fee. Maybe not everyone is in my position, but I would have gladly paid an additional $50-$100 for a complete Niagara praticum. A good example is the Niagara rigging phase. The instructions do say standing before running, shrouds before stays but that's about it. The plans implicitly tell me "OK make it look like this". There's a lot missing in between. Sure I can petition this forum or maybe Goggle something up but that is the extra work that frustrates me. If the instructions can't spell out every detail they should at least point me to a solid source that can Assembly steps should include a bit of all the things we do - planking, rigging, bending some brass, shaping some wood, painting but not months worth of any of those. I realize there are "beginner" kits out there. However from what I have seen it appears the designers do not always approach the build AS a beginner. I don't like to point fingers online but I will this one time. My 10 year loves helping with my build and it's not just doing something with Daddy. She really gets it. I wanted to find a kit for her to build. As I said earlier, with a little bit of everything but not too much of anything. Some offerings looked a little cheesy, others a bit too much. We decided on and ordered a Mini Mamoli. The kit contents were very reasonable and the materials were better than average. HOWEVER we would not have gotten past the first step of the instructions if I had not had some build experience. And the kit is rated as a beginners kit. I don't know if all this is helping but I guess overall I am saying if we want more new people (beginners) to try our hobby, I think it needs to be more attractive to them and easier for them.
-
Best Paint Brush?
mikiek replied to mikiek's topic in Painting, finishing and weathering products and techniques
I am assuming a fairly wide brush. Also fairly thick? How about the shape of the tip - flat, rounded, tapered, chiseled? -
I'm a little frustrated at my inability to get nice smooth coats of paint when hand brushing. I'm talking mainly large areas with acrylic paint. I've tried most of the suggestions both for technique and paint mixing and still the result is it looks hand brushed. Got to wondering about my brushes. Honestly I don't remember the brand or bristle type. They were a set of 4 at about $25 so they weren't cheap if that means anything. So my question is - say price was no consideration, what brush would you use to paint large areas of a model? A brand name would be great. Otherwise type, size, bristles would help. BTW - I do have an airbrush so that doesn't count here.
-
The problem with a dark color. The black hull is killing me! Any and every thing shows on it. Even body oil from hands/arms. This evening I started wrapping it in a towel while applying masking tape. I need some velvet gloves. Thanks for the feedback. I think I have enough to give it a try now. One more thing that I just couldn't visualize.
-
That's a big help Joel. Does it wrap around over the transom in the back? In the pic it looks like it is thickest at the top and gets thinner towards the bottom?
-
The plans and instructions for Niagara are a little vague regarding the fashion piece at the stern. From the side it looks like it starts at the hand rail, goes down the edge of the transom then takes a little jaunt to cover the edge of the counter planks. From the stern it looks like it comes down from the rail and then turns in a bit. In other words it's not flat. I'm wondering about the best way to make this part. Try to bend some strips? Carve/chisel out a thick piece of wood? Something simpler that I am not thinking of?

-
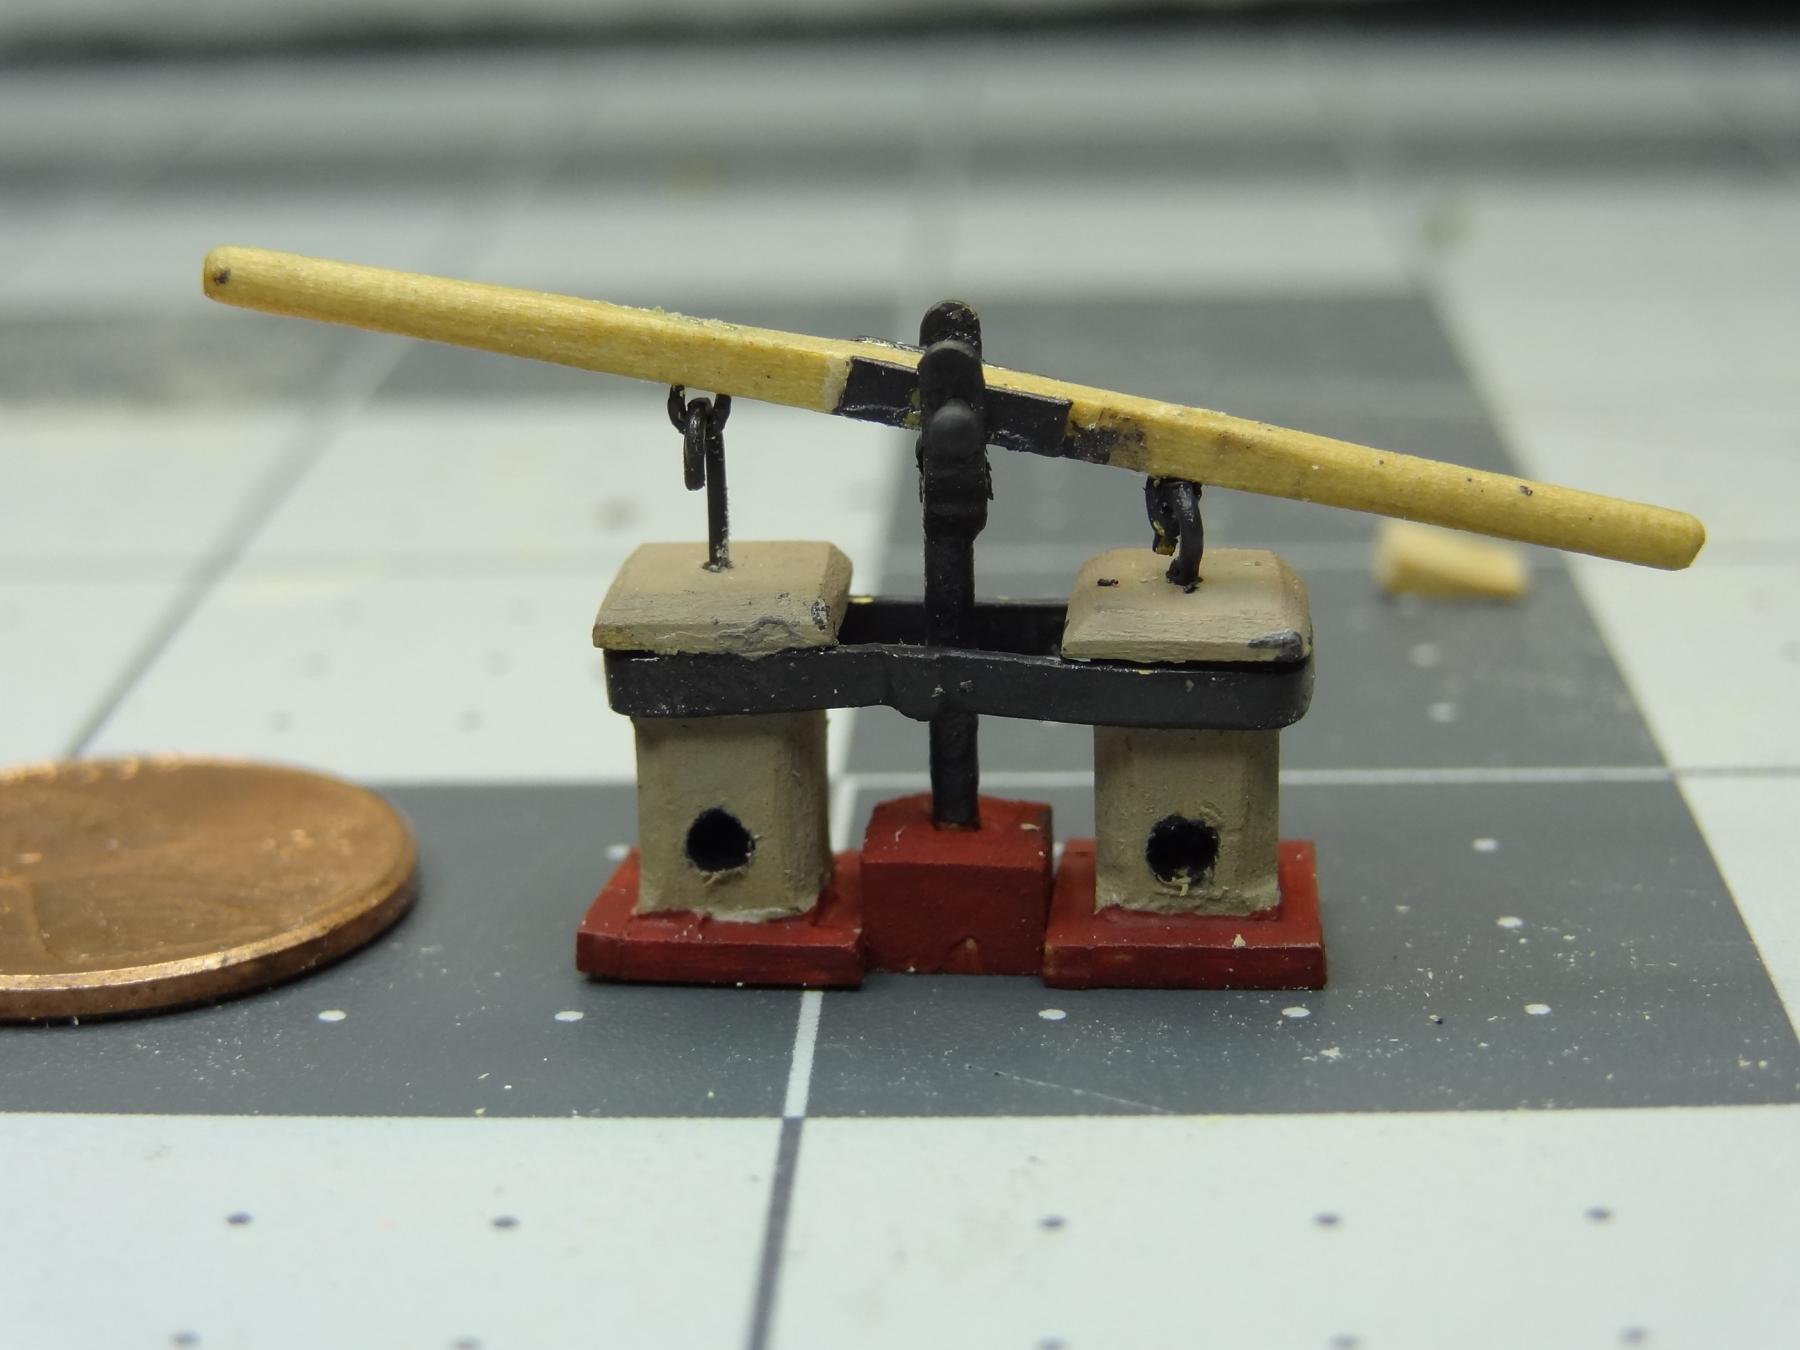
Deck Toys! Just toying around. Been debating whether or not to repaint the bulwarks one last time. They need touch up, and I could try to do it by hand. But since the hull looks so nice I'm thinking masking and airbrushing. Obviously that would give me a lot better finish. With all the masking I have done, I should have invested in 3-M. I'm also going back over the hull and deck plans to identify all the little parts & pieces that go on and around the deck area. There's enough on my list to keep me busy for a month.
- 843 replies
-
- 3
-
-
- niagara
- model shipways
- (and 2 more)
-
Opinions on Sherline DRO for Lathe
mikiek replied to rtropp's topic in Modeling tools and Workshop Equipment
As always - depends on what your making. I have DRO on my Sherline. The biggest downside is cords running everywhere. Also be aware (as I was not) if you like the bigger wheels they are not available with DRO. The DRO wheels have the sensors in the housing and cannot be replaced. I'm just turning spars and the like, so I probably could get by just fine without DRO. -
Hey Don - I just noticed your signature. Didn't realize you have done the Amati version. Is it fair to compare?
- 653 replies
-
- 3
-
-
- trabakul
- marisstella
- (and 1 more)
-
Thank you Elijah. It's a good feeling when you hit some obstacles and your solutions work out. Painting has not been one of my favorite tasks with this build. But then I ask myself - what if all this were to be stained rather than painted?
- 843 replies
-
- 2
-
-
- niagara
- model shipways
- (and 2 more)
-
Wow, seeing those first few shots makes me want to get out the belt sander. Don - your best guess, I can see where some of those blocks might be needed between a few of the wider bulkheads. Do you think they are necessary between all of them?
- 653 replies
-
- 5
-
-
- trabakul
- marisstella
- (and 1 more)
-
Paint Over Varnish?
mikiek replied to mikiek's topic in Painting, finishing and weathering products and techniques
That's good feedback Don. Thanks. And you are not kidding about the vulnerability of the black. I feel like I should be wearing gloves when I pick it up. I just wasn't sure if painting on top of varnish and then having to varnish over that was a good idea or not. I will try it out on some scrap first. I went out of my way to mix the black extremely flat. I need to see what effect the varnish will have. -
Thanks Joel. Could not agree more! The interior combination and exterior combination are now a lot easier on the eyes. Much more understated than before. Looks like a different ship. I'm very pleased with the outcome.
- 843 replies
-
- 2
-
-
- niagara
- model shipways
- (and 2 more)
-
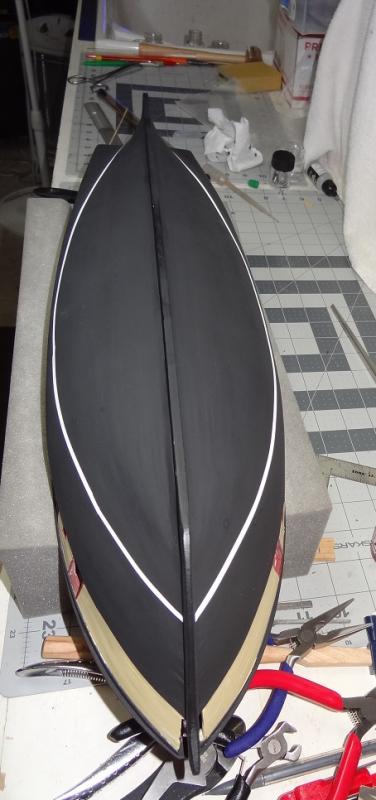
Hey John - glad nothing worse happened to you. Water in the garage must be run of the mill for you by now. Hopefully everything is on tables. I'm a block over and usually 14' above lake level. Also at the top of a hill, so flooding doesn't worry me much. I can get cut off though and probably did. Did not lose power however we must have gained quite a bit for a second or two. The strike didn't blow a single breaker but I'm still finding things that don't work any more. So far - network switch, cable wireless receivers, electric ignitor on gas stove, one of the sprinkler systems (spray heads stuck open and running thru all the rain), dishwasher, blower motor for Jacuzzi in bathroom. I'm still trying to figure out if it was a spike in the electrical system or just so close that some sort of electromagnetic energy just fried things. Back to boatworld for a second - Elijah, it takes sooo long to get all the masking down. Besides that waterline mask was a strip of tape about 1/8" wide and I doubt I could get it back exactly where it was. You'll know what I'm talking about when you get to painting. The good news is painting is done! I tried several ways to fill that gap without making a huge mess of the hull. Filling with primer didn't help. Then I tried white glue but it didn't spread evenly and after it dries it's like sanding a rock. Finally went back to the filler painting method - I knew this was the best option but also the messiest and would require the most repainting. Since I was so low on hull color, that concerned me. So I sanded a lot and reprimed the gunwale area, mixed the last of my Evil Black and started spraying. I've finished with about 1 airbrush cup of paint left. I think what saved me was the double action in the airbrush. Still being new to that I usually just press down on the air and throttle the paint all the way back. This time (twice) I was paying close attention to that and spraying at about half volume. I actually finished the first coat with paint left over. All the masking tape did just that. The waterline masking worked. No bleed over anywhere! I am totally sold on applying clear paint over the tape edges. I started doing that on the bulwark repaint and since then have had no wicking or bleeding. Even with the airbrush spraying right up close. Don't remember who told me to do that but it is a great technique and well worth the extra time. One issue now, the black on the hull is so flat, anything will make it look dirty. And after spraying so lightly, the smallest ding takes of the black and the gray primer shows thru. Even hand and fingerprints show up. I need to get something over the paint pretty quick. The problem is I know, given the stage I'm in, there will be a lot more bumps and dings before it's all over. If I varnish now, I will likely have to touch up with paint later on and I imagine that means varnishing again after that. Another idea is spraying on a few coats of clear paint. Probably not as effective as varnish for protection, but might be good enough so that I can hold off on the varnish until I'm done with the build. Sounds like I am talking myself into the paint option. Well, I was going to hold off until tomorrow to log all the painting stuff. Since I shot my mouth off I guess I better go take a few pix. Here ya go: I'm happy with the decision to go all black on the hull. It's very close to what I have been imagining for some time now. That Evil Black reminds me of a black hole. All those pix were taken with flash, and yet there is no reflection. It just sucks up the light. I believe I mentioned previously I was repainting the hand rail from buff to black. I think that one small move changed the whole character of the paint scheme. Even the forest green inner bulwark color is more palatable now. I'm really pleased. I think the Buff was adding a lot of contrast to the green and red. With the black it all just looks simpler. It all comes together nicely. These shots also give a decent rendering of the Chili Red I mixed for the trim. In a few of them you can see spots of the old fire engine red it replaced. That will be covered by the deck - he hopes. A little touch up on the red and I will be ready to set the deck in. Have you heard that before?


- 843 replies
-
- 4
-
-
- niagara
- model shipways
- (and 2 more)
-
Just finished airbrushing (Tamiya acrylic) the hull of my current build - it's a VERY flat black. I'm already noticing dirt and dust build up, after just half a day . Also, seeing hand prints, I Imagine from oils on skin. Lastly, there is already a small scratch making the gray primer underneath noticeably visible. I want to get some protection on the hull quickly. I have some Valejo polyurathane varnish so that would be an option. My Murphy says there will be more scratches during the build. What I am wondering is if I go with the varnish, down the road can I touch it up with paint again? I think that is probably not a problem but would most likely have to do another coat of varnish after the paint? I do also have some Tamiya flat clear paint. Would that be of any help? I like this idea as I am not ready to varnish the entire build yet. If a couple coats of clear paint would offer some protection it seems like this would be my best choice for a temporary solution. What do you guys think?
-
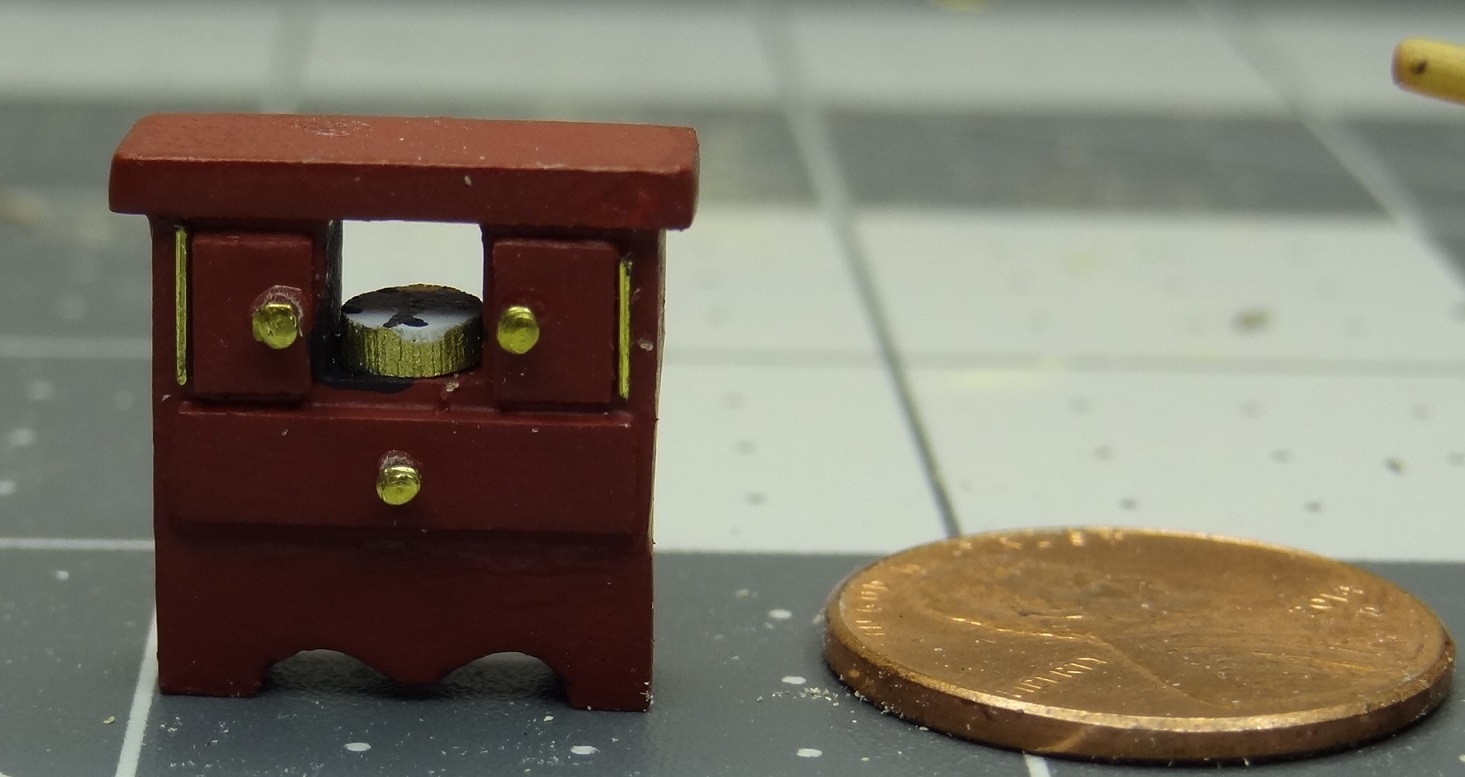
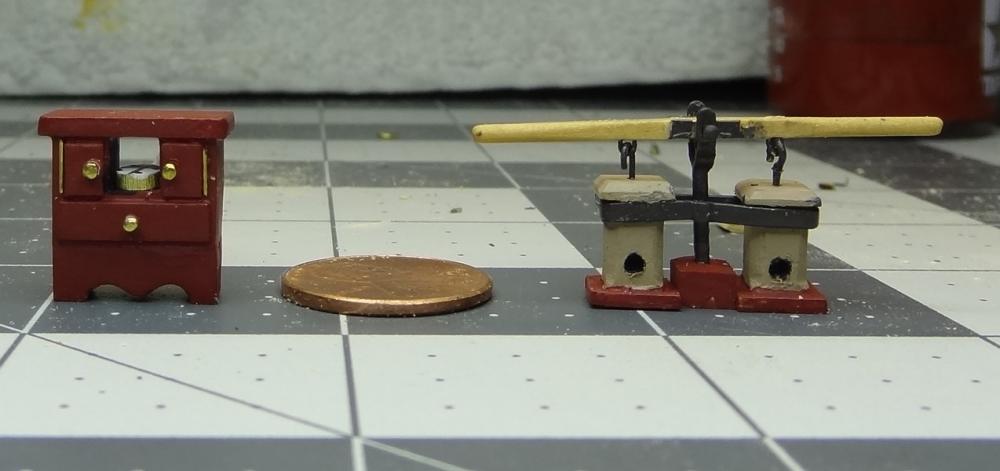
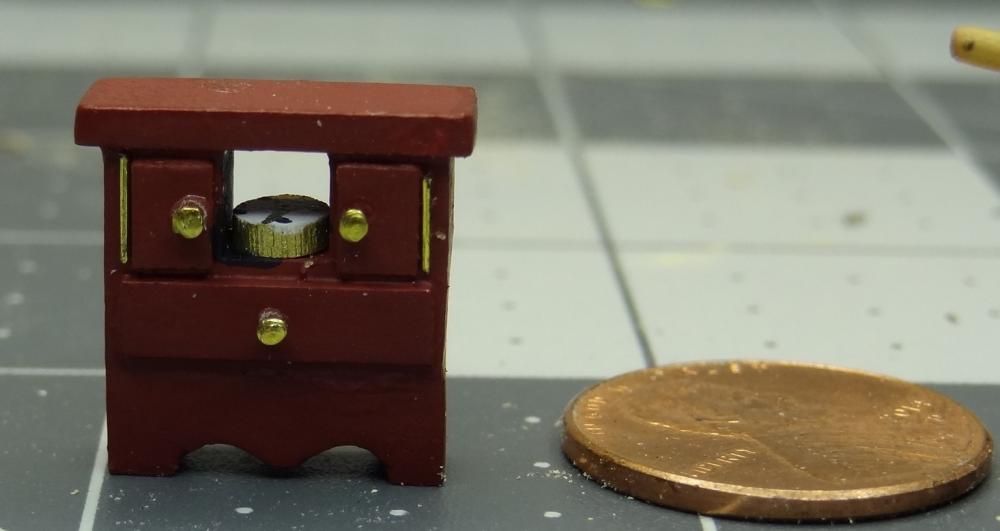
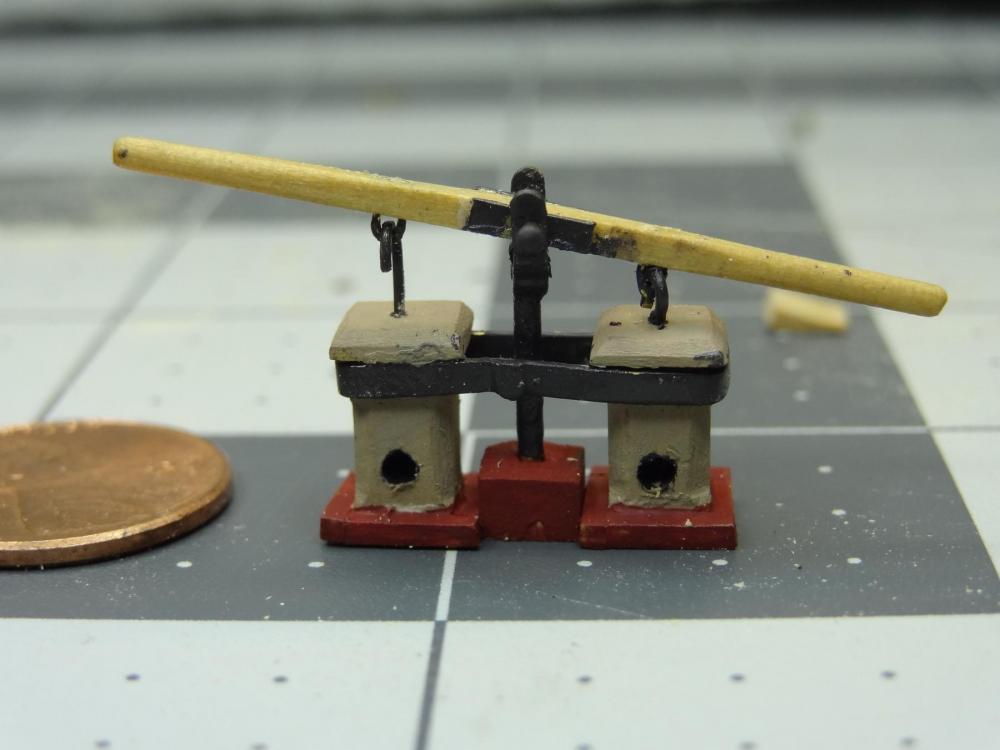
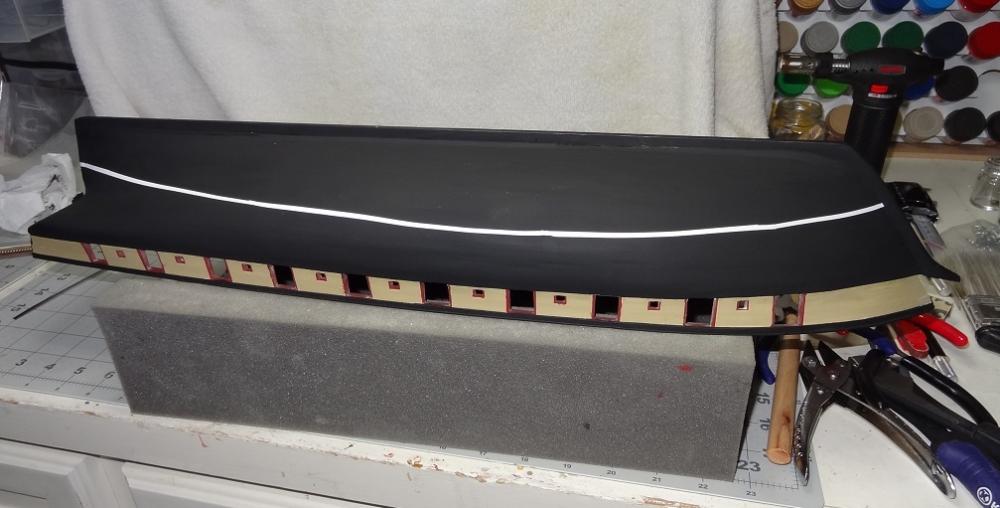
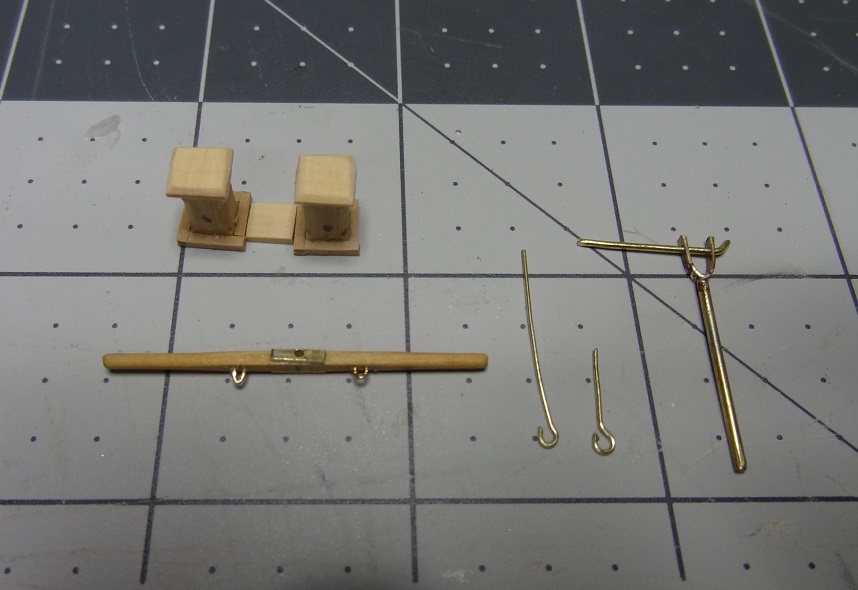
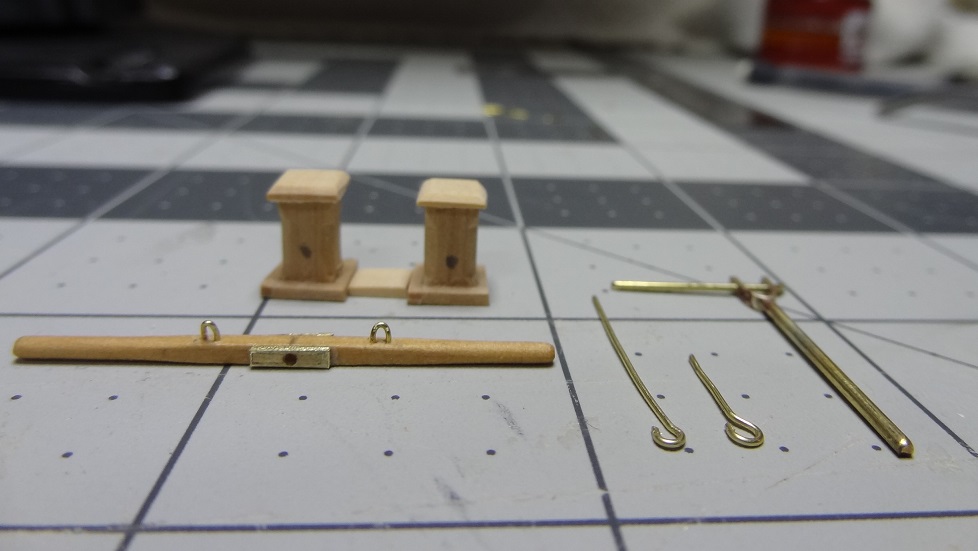
As of this evening, still painting. I have a very bad habit of slathering on the paint with the airbrush. Overall, the results have not been that bad. This time, I am trying to do it properly, ultra light coats and lots of them. I'm not sure what I prefer. My biggest gripe with light coats is if you have to do any sanding, you'll eat right thru the paint and be back to the primer - or worse. This came to light the other nite. I noticed this huge ugly gap between the gunwale and the first plank. I've been staring at this hull for weeks - cleaning up the tiniest of gaps in the planking. Never saw this big honking gap looking right at me. I first tried to fill it with some white glue - not very effective. So half way into the painting I am going back to filling again, which I suppose means sanding and priming as well. I hate rework. If that isn't enough I am running out of the base color paints for Evil Black. Ordered more today, but given the weekend and holiday it may not be here until Weds or Thurs next week. So I will need to go sparingly with what I have. Also, I am a bit concerned about leaving the waterline masking on for that length of time. Hopefully it will still peel off and not take the underlying paint with it. It's already been on a lot longer than I had anticipated. Niagara is masked over the inner and outer bulwark - above the gunwale, below the rail. I mentioned I was going to repaint the rail from buff to black (it looks really nice) . So I have overage on the masking from the hull and overage from the rail. The masking is now mostly black which makes the hull look a little weird. Here's a few pix The waterline masking is visible here. You can probably see the glossiness of the glue where I tried to fill that gap. I've also made some progress on the deck pump. Haven't painted or assembled yet but here are the parts (still in progress). Heck it might come out a little better than I expected. A little off topic - if you have heard about the rain and flooding in Texas, I am right in the middle of it. Actually yesterday we were under the very worst of it. A neighbor had 8" in his rain gauge and it was still coming down. Had a lightening strike in the back yard. That was wild. We all know the sound of thunder after the lightening. This was a completely different sound more like an explosion and it happened at the same instant as the strike. I was looking out the window right at it. I don't know what physics are behind it but I guess the air must have vaporized or something. One second I'm seeing he trees out the window, the next second it was as if in a fog - couldn't see a thing. A second or two later back to trees again. I have a number of small electrical items that were fried Thanks for reading!
- 843 replies
-
- 6
-
-
- niagara
- model shipways
- (and 2 more)
-
Mill Column for Sherline Lathe
mikiek replied to mikiek's topic in Modeling tools and Workshop Equipment
Thanks for the dims Al. -
Mill Column for Sherline Lathe
mikiek replied to mikiek's topic in Modeling tools and Workshop Equipment
David, my usage will be mostly wood making the small parts we do in our modeling. No intentions of trying to make anything bigger.