


Modeler12
-
Posts
1,716 -
Joined
-
Last visited
Reputation Activity
-

 Modeler12 got a reaction from mtaylor in coloring handmade rigging line
Mark and Chuck, I wonder how serious this really is!!!
I made a small ship model about 25 years ago and dyed the white cotton sails with a tea mixture (and don't ask me what kind of tea it was, but probably Lipton). The model has been sitting on a shelf since then and the sails still feel as soft and healthy as the day I dyed them.
I know that acids will harm cotton and tea does have a mild acidic value, but after the dyeing has been done and the cloth is dried, the acid becomes more stable, unless the cotton absorbs moisture again. I agree that using other materials may be advisable, but I also think that using tea for sails, for example, should not be a major concern.
Acid free paper is now common, but paper has survived thousands of years without that treatment.
The sails I made for my current project uses a very light weight muslin with a beige, natural color. But if it had not been available I would have used a mild tea soak again. Just to be safe, I might have washed the dyed cloth in a slightly alkaline solution afterwards.
-
 Modeler12 got a reaction from avsjerome2003 in coloring handmade rigging line
Mark and Chuck, I wonder how serious this really is!!!
I made a small ship model about 25 years ago and dyed the white cotton sails with a tea mixture (and don't ask me what kind of tea it was, but probably Lipton). The model has been sitting on a shelf since then and the sails still feel as soft and healthy as the day I dyed them.
I know that acids will harm cotton and tea does have a mild acidic value, but after the dyeing has been done and the cloth is dried, the acid becomes more stable, unless the cotton absorbs moisture again. I agree that using other materials may be advisable, but I also think that using tea for sails, for example, should not be a major concern.
Acid free paper is now common, but paper has survived thousands of years without that treatment.
The sails I made for my current project uses a very light weight muslin with a beige, natural color. But if it had not been available I would have used a mild tea soak again. Just to be safe, I might have washed the dyed cloth in a slightly alkaline solution afterwards.
-
Modeler12 got a reaction from avsjerome2003 in coloring handmade rigging line
I made rope on my ropewalk using threads that were recommended here before. Then I dyed some with water soluble stains and thus far they look ok to me.
I have been a woodworker for several years and stained many cabinets, etc. Personally I don’t like the common Miniwax products and rely on a water base stain made by General Finishes. http://www.woodcraft.com/search2/search.aspx?query=stains
It is easy to use, gives great coverage and stays good in the can ‘forever’. I use the Espresso color for standing rigging and a couple others for the running rigging lines. I might add that Golden Oak is my favorite. I have used it on oak furniture but also like the looks of it on rope for running rigging.
The discussion of threads I used is covered in the following site.
http://www.brentjes.com/ropewalk.html
I hope this helps (or adds to the confusion???).
-
 Modeler12 got a reaction from flying_dutchman2 in Seawatch Books outside of the US
Ok how about this?
You pick the book you want to buy, let me know and I buy it for you in the US. I receive it and open the book and look through it, put it in a postal box and send it to you in Europe as 'used book' estimated value $8. Postal rate priority mail $12.35. What and where do the import duties come into play? Would your postman collect?
I know this is rather naive, but could it work?
-
 Modeler12 got a reaction from ken thomson in Using a drill press for other operations.
I did something similar, Snowmans.
Below are some pictures of my drillpress setup for drum sanding. The larger drum is from my Shopsmith and is 2 3/8 inch diameter. The smaller one is a Dremel drum at ½ inch. I made the platform using two pieces of 2x2 and some ½ inch plywood. It is held to the drillpress table from underneath with two hex-head screw; so it can be removed quite quickly. You can see two holes which are in an arc (the post is the centerline). Thus I can simply rotate the table to change from one drum to the other (after replacing one for the other, of course). Later I may add another one to the right of the large opening.
One nice usage for this kind of setup is to touch up the edges of laser cut parts. I think we all know that the thicker bulkhead parts, for example, have a slight bevel to the edge. That is because the laser beam looses power as it goes through the material and the back side is sometimes barely cut. These drums can take care of cleaning this up very quickly and give me a square edge.
-
 Modeler12 got a reaction from tarbrush in USS Constitution by Modeler12 - FINISHED - Model Shipways
This is just an introduction to the new build log for my Conny. I will shortly add details about my current status and highlights of my past log. Please, bear with me while I am getting used to the new format and revisit my memory banks.
-
 Modeler12 got a reaction from gleason in Using a drill press for other operations.
I am curious how some of you may have adapted other 'tools' to your drill press.
Here are a couple that I have made and used several times in the past. I posted this before, but perhaps it is worth repeating.
Mounting a Dremmel type of high speed tool to the quill. I used a 3/4 inch piece of plywood and mounted that to the quill as shown below. The Dremmel (actually an old Monkey Ward unit) tool fits snugly in a large hole and that way I can drill tiny holes rapidly and more accurately than doing this by hand. This came in very handy when I had to drill numerous 'rivet holes' in the bulwarks of my Conny. See below.
I have also adapted a circular saw blade (made by Thurston http://www.thurstonmfg.com/) to my drillpress. This allows me to cut wooden strips to various thicknesses.
-
 Modeler12 got a reaction from CaptainSteve in USS Constitution by Modeler12 - FINISHED - Model Shipways
One more set of pictures and then I am where I left off a couple weeks ago. What I have not covered are the rope-walk I made for the rigging lines, a fixture to make rope coils, nor a lot of other details that are covered on my web site.
I have made the masts and spars using an old Shopsmith. The picture below shows how I adapted a ‘follower’ to support the center and an end plate for the thin dowels. The dowels were too flexible so I did not use gouges to form the tapers. A lot of filing took care of that. This was before I got a mini lathe for Christmas.
I made six sails for the Conny. They include the spanker, three top sails and two jibs. Since the spanker is easy to install before the shrouds and stays are in place, I went ahead with the rigging. Right now the mizzen mast is glued in place and next comes the lower section of the main. Obviously I will have to add the shrouds before the upper parts of the masts are installed.
Strangely enough I still have not made the bowsprit nor the rail netting. I will have to buckle down and get going again. But first I need to learn how to use this new format!!!!
-
Modeler12 got a reaction from mtaylor in How To : Add Pictures in your Posts and PMs
Thanks Dan. I tried this and it works. I was getting nowhere before. Of course I was able to add pictures with the Attach File but did not realize that you can than also insert this in the text section.
Note to Ray. You have to type text first, then insert the picture as Dan showed. Then you can add text underneath the picture you just inserted and continue with more text after (perhaps) hitting the enter key.
-
 Modeler12 got a reaction from SteveM in USS Constitution by Modeler12 - FINISHED - Model Shipways
Another example of doing things a bit different was the transom. The cookbook said to install the planks one by one. I decided to make a copy of the drawing (which are close to the correct scale) and glue the planks and gun hatches to that. I was then able to trim and mount this pre-assembly to the hull.
One reason for doing it this way was that I wanted to make sure the planks would match those coming from the sides. I wanted the white trim pieces to lign up correctly.
I might add that the name Constitution was made by printing a black background on paper and then adding on top of that the letters in white. I had to juggle the font and size to match the name plate, but it came out ok.
-
 Modeler12 got a reaction from Ferit in USS Constitution by Modeler12 - FINISHED - Model Shipways
This is just an introduction to the new build log for my Conny. I will shortly add details about my current status and highlights of my past log. Please, bear with me while I am getting used to the new format and revisit my memory banks.
-
 Modeler12 got a reaction from john a joosten in USS Constitution by Modeler12 - FINISHED - Model Shipways
Thanks Jim. I will have to check your progress next. But let me continue with a couple comments about the next steps on my Conny.
First a suggestion about the hatch covers. They come as laser cut pieces framed with baswood. I decided to replace that with walnut that I bought from Hobby Mill. I also used simple miter cuts for the corners. See below.
Installing the rivets for the bulwark was going to be a tedious job. The cookbook said to do this one by marking and drilling one hole at a time after the planks were glued in place. Wrong!!!]
I decided to predrill the holes in each board using the setup on my drill press with a Dremmel type tool mounted on the quill. This took a fraction of the time. I then glued four of these board edgewise and glued in the rivets. Now I could cut this into sections as shown below.
I should also have installed the outside planking of the hull before the bulwark because the alignment of the little posts and sections between the port holes was not all that great. It would have been better to have a smooth looking outside hull.
-
 Modeler12 got a reaction from Ryland Craze in A small hand-held power sander
John the sander is very light and vibrations are minimal. I have never had a problem having parts vibrate loose. Keep in mind that this thing is not like you typical 'power sander'. It is designed for refubishing scroll sawn furniture pieces. It comes with different attachments that refine the type of contours you can sand. You might do a web search under Black & Decker, Mouse to see more.
One of the pictures I showed above was when I decided to redo the deck of my Conny. I did not like the scratches and gouges I had and used the mouse to completely strip the deck. I did have to repaint the green bulwarks towards the bottom, but that was not too bad.
I might add one more comment. One of the reviews on the web mentioned that the person burnt out the motor. I think that is because some people put too much force on the little guy thinking that more pressure does a faster job of sanding. That, of course, is false. You should let the sander do its job and just guide it along. It comes with different grades of paper, etc.. etc..
-
 Modeler12 got a reaction from butch in What is your favorite hand tool(s)??
OK Wayne. Since you like your toothbrush, how about this one?
I took an electric toothbrush, cut the bristles off and glued on a piece of sandpaper. I made some more out of wood, drilled a hole so they could be mounted on the vibrating shaft, and voila . . . another tool to keep things clean and smooth.
Oh, be sure to use a vibrating toothbrush, not the rotating type.
-
 Modeler12 got a reaction from Marcus.K. in Making cloth flags
Let us rebuild. But where to start?
Prior to the ‘2013 collapse’ we had a section dealing with making flags. Let me refresh what at least my approach was after receiving input and help from other members of this forum. I am terrible with names, but one fellow in Hilversum, the Netherlands, led the way with his approach. Here is what followed:
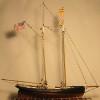
A flag printed on one side of a sheet of paper was the start, but not very interesting. See first picture below. Other suggestions on the forum dealt with hand painting and even using crumpled cans. But
the one that I liked best was to use transfer paper. The idea is to print the mirror image of a flag on this special paper and transferring it to a piece of light weight cloth using a hot iron with lots of pressure. The first pictures below show the paper flag and my first tries using the transfer paper made by the Dharma Trading Co. It took some practice and several rejects. Printing on one side of the cloth did
not transfer well to the back. Our Dutch friend (help me Lou) showed how he had done this process on both sides. That led me to the following approach.
Scale the flag to the size you want and make one real and one mirror image. Print both of these on a sheet of the transfer paper. Take one and with a very hot iron (your wife’s will do) and no steam, press the image onto the cloth. Carefully slide the iron across to make sure the whole area is pressed uniformly. After the recommended time, let the cloth cool and remove the blue backing. You should
have a clear image on the cloth.
Trim the second image part way as shown below. This makes it easier to index and position the second pressing. Lou made four targets which I tried also but did not need. After the second pressing has cooled, peel off the backing and now you should have a nice flag that can be trimmed and folded (wrinkled) or whatever you decide to do with it.
A couple comments about ‘mistakes’. If the flag has printed words, print one image with the mirror image of the words and deleted the words on the second side. It is very difficult to align both sides.
Be sure to align front and back in the same order. The blue admiral flag below was flipped the wrong way and the result did not look like stars.
-
 Modeler12 got a reaction from 1492 in Using a drill press for other operations.
I am curious how some of you may have adapted other 'tools' to your drill press.
Here are a couple that I have made and used several times in the past. I posted this before, but perhaps it is worth repeating.
Mounting a Dremmel type of high speed tool to the quill. I used a 3/4 inch piece of plywood and mounted that to the quill as shown below. The Dremmel (actually an old Monkey Ward unit) tool fits snugly in a large hole and that way I can drill tiny holes rapidly and more accurately than doing this by hand. This came in very handy when I had to drill numerous 'rivet holes' in the bulwarks of my Conny. See below.
I have also adapted a circular saw blade (made by Thurston http://www.thurstonmfg.com/) to my drillpress. This allows me to cut wooden strips to various thicknesses.
-
 Modeler12 got a reaction from gknightiv in What is your favorite hand tool(s)??
OK Wayne. Since you like your toothbrush, how about this one?
I took an electric toothbrush, cut the bristles off and glued on a piece of sandpaper. I made some more out of wood, drilled a hole so they could be mounted on the vibrating shaft, and voila . . . another tool to keep things clean and smooth.
Oh, be sure to use a vibrating toothbrush, not the rotating type.
-
 Modeler12 got a reaction from trippwj in What is your favorite hand tool(s)??
I am sure we all have a favorite. I, for one, like the hemostats I have.
Although I use tweezers a lot, I find that a hemostat works better to hold tiny parts such as blocks, rings and pins. I can grab a piece and clamp in the jaws, then let go of the handles and mount the thing in a vise or hold it for sanding etc.
I have three of them (two straight, one curved). To allow me to grab things that are a bit larger than the hemostats can handle, I have bent the handles of one so the clamping force is not severe.
I have found this to be much better than using the aligator clips, for example.
-
Modeler12 got a reaction from ken thomson in USS Constitution by Modeler12 - FINISHED - Model Shipways
This is just an introduction to the new build log for my Conny. I will shortly add details about my current status and highlights of my past log. Please, bear with me while I am getting used to the new format and revisit my memory banks.
-
 Modeler12 got a reaction from JohnMeksa in Making cloth flags
Let us rebuild. But where to start?
Prior to the ‘2013 collapse’ we had a section dealing with making flags. Let me refresh what at least my approach was after receiving input and help from other members of this forum. I am terrible with names, but one fellow in Hilversum, the Netherlands, led the way with his approach. Here is what followed:
A flag printed on one side of a sheet of paper was the start, but not very interesting. See first picture below. Other suggestions on the forum dealt with hand painting and even using crumpled cans. But
the one that I liked best was to use transfer paper. The idea is to print the mirror image of a flag on this special paper and transferring it to a piece of light weight cloth using a hot iron with lots of pressure. The first pictures below show the paper flag and my first tries using the transfer paper made by the Dharma Trading Co. It took some practice and several rejects. Printing on one side of the cloth did
not transfer well to the back. Our Dutch friend (help me Lou) showed how he had done this process on both sides. That led me to the following approach.
Scale the flag to the size you want and make one real and one mirror image. Print both of these on a sheet of the transfer paper. Take one and with a very hot iron (your wife’s will do) and no steam, press the image onto the cloth. Carefully slide the iron across to make sure the whole area is pressed uniformly. After the recommended time, let the cloth cool and remove the blue backing. You should
have a clear image on the cloth.
Trim the second image part way as shown below. This makes it easier to index and position the second pressing. Lou made four targets which I tried also but did not need. After the second pressing has cooled, peel off the backing and now you should have a nice flag that can be trimmed and folded (wrinkled) or whatever you decide to do with it.
A couple comments about ‘mistakes’. If the flag has printed words, print one image with the mirror image of the words and deleted the words on the second side. It is very difficult to align both sides.
Be sure to align front and back in the same order. The blue admiral flag below was flipped the wrong way and the result did not look like stars.