
DONATION DRIVE - SUPPORT MSW - DO YOUR PART TO KEEP THIS GREAT FORUM GOING!
×


ikkypaul
-
Posts
83 -
Joined
-
Last visited
Content Type
Profiles
Forums
Gallery
Events
Everything posted by ikkypaul
-
Welcome Amy, I think you are going to enjoy your projects more and more because there are so many aspects that I have found more and more interesting as I go on. Go well, and wishing you all success. Paul
-
Welcome from NZ too. With your experience of some model building I m sure you will enjoy the voyage - could have said the journey, but that doesn't sound all that appropriate. Paul
-
hello Torstein, and welcome to MSW. I really like your lively sense of humour, which I believe is an essential quality in a model builder. And the other is patience! Especially when on a very long and repetitive task, like stitching on a bolt rope to whole set of sails for a square rigger (windjammer)! Go well with your project - I look forward to seeing your progress. Paul from the antipodes.
-
Welcome Neil from NZ way down under! I feel a little bit of kindred spirit with you because my current project is restoration of a ship model built by an 11 year-old Uncle a year or so before 1900, and I am treating it as a memorial to him. He served in big square riggers from age about 15, then went off to WWI in 1915, survived that but died in Cologne of the 'flu' while on occupational force duties. I am certain you'll enjoy MSW and wish you ssvery success.
-
 Thank you Piet, it is a labour of love - and respect for my uncle who started this model.
- 53 replies
-
- 2
-

-
- clipper
- restoration
- (and 1 more)
-
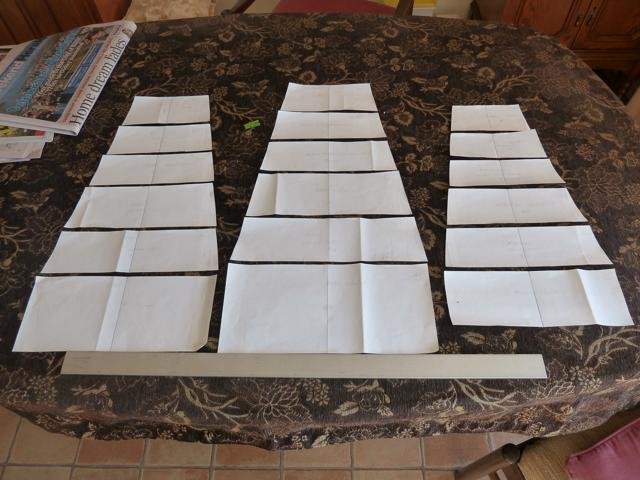
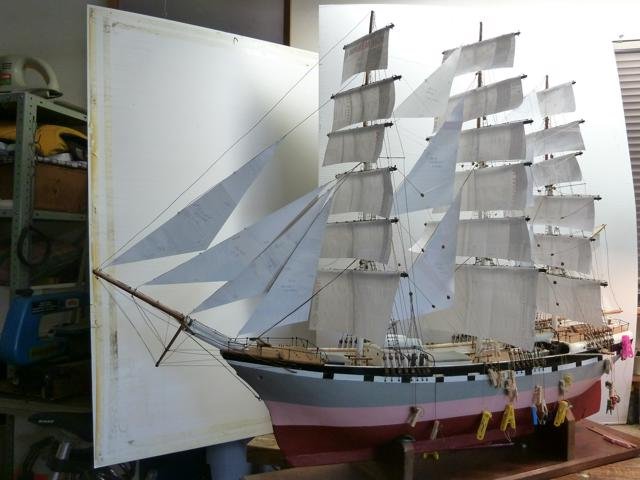
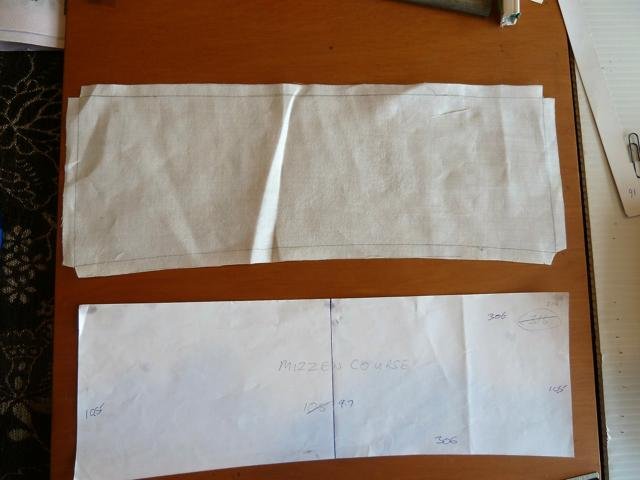
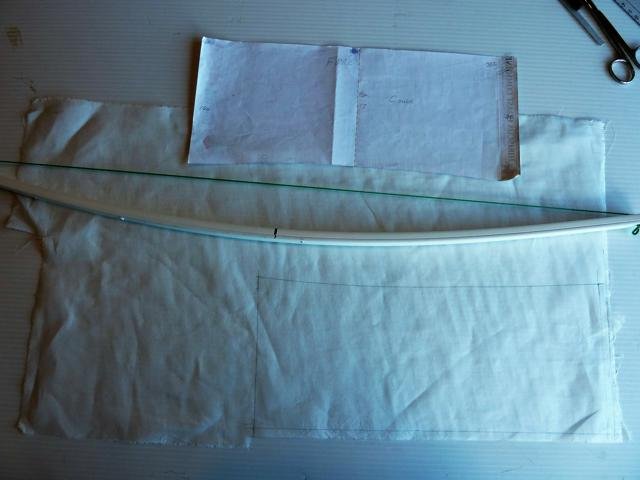
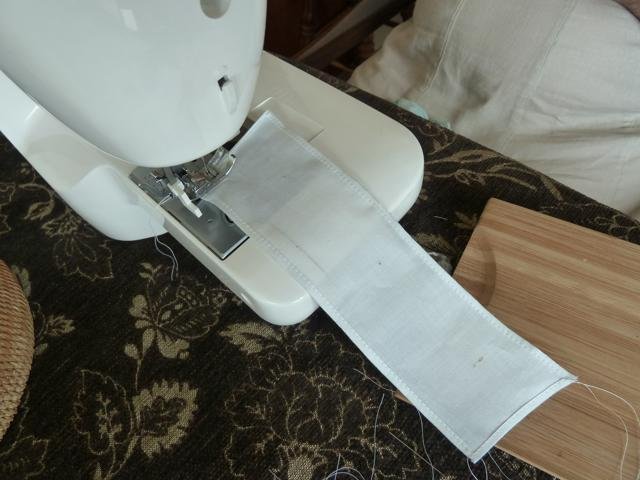
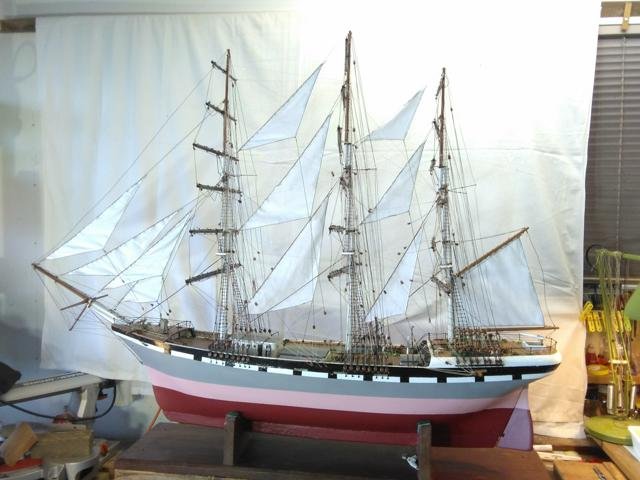
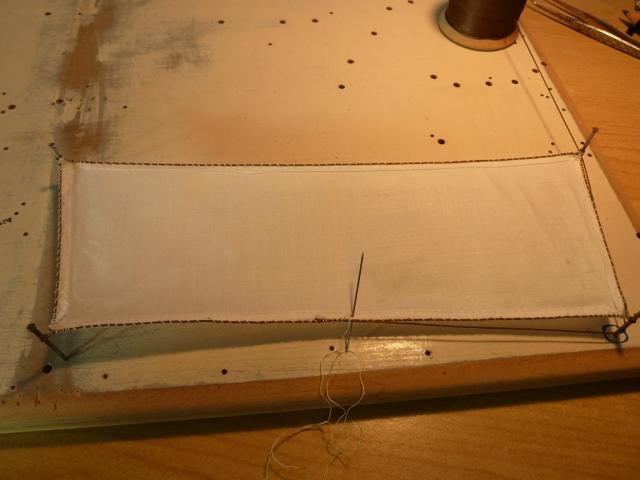
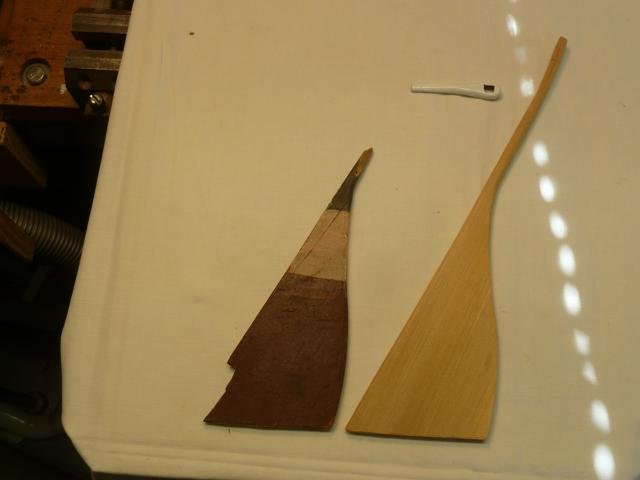
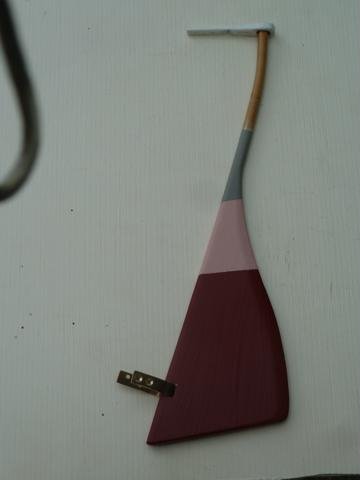
Build Log. Restoration of Full Rigged Sailing Ship Model Posting #7 7 February 2018 My Posting #6 (21 August 2017) touched on restoration of suchitems as ships’s boats, rudder, deckhouse. Now came the pattern-making for the 29 sails, 11 fore and aft, and 18 square sails. With no original sails to work from this was a considerable task involving much reading and analysis of sail plans of actual square riggers, as well as study of photos of real ships, and even spending a day at sea on the restored 1874 barque “James Craig” based in Sydney NSW, to appreciate and understand the principles of sail-making. For you windjammer enthusiasts a day trip on her outside the Sydney Harbour is a “must do” if you are visiting this lovely city. Of concern was getting the sails to be in realistic proportions to each other on each mast, and then each mast’s sail set from mast to mast. After much sketching and measurements – length, height and roaches – I was able to cut the prototypes out of paper. Laying them out on the floor in their proper order suddenly brought home to me what a “wind machine” the ship in real life would be! Setting the curves (roaches) for the lower edge of the sails was achieved by using a piece of plastic electrical cable conduit to make a bow (as in archery) and setting the bend by adjusting the length of the string between the ends. This gave a perfect template for each sail – they all had unique curves! (See Photo) To check them for fitting to each yard, I ‘blue-tacked’ them in place – this resulted in slight adjustment of some of the roaches to ensure the eventual workability of the running rigging, particularly the braces. For the sails I used the linen backing of a sheet of draughtsman’s blueprint ‘paper’ which is the fabric encased in wax. A friend about 40 years ago recommended using this linen as being suitable, and so it has proved. Boiling this in water with a little dishwashing liquid, I was left with the fine linen, something like ‘lawn’ fabric – very fine and soft textured. Once satisfied with the patterns, cutting out the sails ensued and my method is as indicated in the photo of the mizzen course (Crojack). My very understanding wife now came to my aid, and the dining table became the sail loft! She hemmed each of the 29 sails on her sewing machine – with very pleasing results. Purists might say the hems are a little over scale but a practical result was priority. Bolt-roping was my next challenge – using a thread of 0.5mm diameter and sewing it onto the sails with 0.1mm diameter thread, the result is as you see in the photo. Keeping a tension on the sailcloth during the stitching was made easy by the use of a jig with numerous holes for pins to locate the corners of the sail, and using tiny paper clips (mini bulldog clips)and rubber bands to a pin. Rings (hanks) for bending the fore and aft sails was the next step. These I made from brass rod of 0.81mm diameter, wound round a 3.0 mm shank of a crochet hook like a spring, then cut off with fine side cutters. 190 such rings were required. Spacing them along the luff of each sail was determined by scaling down from the 27inch - 36inch range given in Underhill’s “Masting & Rigging”. Then the bending on of the fore and aft sails as shown. A bradawl hole in the sails enabled the rings to be fitted and closed. A crude but effective method.
- 53 replies
-
- 13
-
-
- clipper
- restoration
- (and 1 more)
-
Intex - welcome to MSW! You are not alone in restoring. My project is restoring a 3 master full rigged ship which is about 120 years old. You'll find my blog under a Restoration heading. I wish you well - it can be a very satisfying effert. Paul from NZ
-
A very impressed new member who wants to push boundaries.
ikkypaul replied to Vitanaut's topic in New member Introductions
Greg - welcome to this MSW forum, I hope you will find some satisfaction in yourquest. Doesn't Japan have some large scale floating residential accommodation? Paul- 4 replies
-
- 2
-
-
- architecture
- vlfs
- (and 2 more)
-
Hello gentleman,,, I am a new member ,,
ikkypaul replied to Jaan Ojala's topic in New member Introductions
Welcome Jaan Ojala. Wishing you a Happy New Year and fruitful voyage into model building. Paul -
Happy New Year Scipios! You will your journey (voyage) on this build, a very rewarding experience. Paul
-
Something I have always wanted to try
ikkypaul replied to StönCüld's topic in New member Introductions
StönCüld - welcome to MSW. You'll find this experience an on-going adventure until completion! Go well! Paul -
Welcome RandyM enjoy the experience. Currently: restoring an 3 mast full rigged ship, scale 1:55, built in 1899.
-
Welcome lupacexi! I am sure you will find support and helpful hints for most aspects of model ship building. Paul - from Auckland NZ
-
Welcome Keith! You are obviously highly organised so I think you will find great satisfaction in a ship build. 2018 - your year of the ship! Paul
-
Ron - welcome back! Here's wishing you great success with your shipbuilding programme. Paul
-
And another welcome to this forum from "down under" (New Zealand in my case). I hope you will enjoy the ride. Paul
-
Welcome to MSW - all the best in your endeavours. Paul
-
Welcome Mike, I hope you'll get an answer to your issue on the deck. All the best Paul
-
Welcome dooder 85. Go for it - you'll have fun and learn heaps! Paul
-
Welcome Adrian! Sounds like many of your family work with a keel beneath them! Paul
-
Hello Jim, and welcome to MSW. Although from NZ (in the RNZN) I spent 1962 in HMS Hermes (mainly Mediterranean) - a fabulous year. My current interest is in the restoration of a 119 year old model of 3 mast square rigged ship (see blog). I really like your painting. All the best, Paul
-
Nek0 - welcome! Your English is fine, and very readable. Paul
-
Hello "Kilickthere" - welcome! Is you forum name a reference to the type of old anchor - or to the Royal & Commonwealth Navies' colloquial term for a Leading Seaman? What ever - here's to a good and fruitful time withModel Ship World. Paul
-
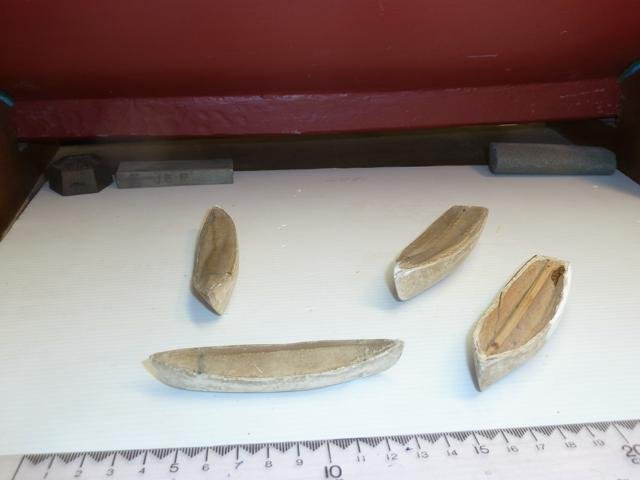
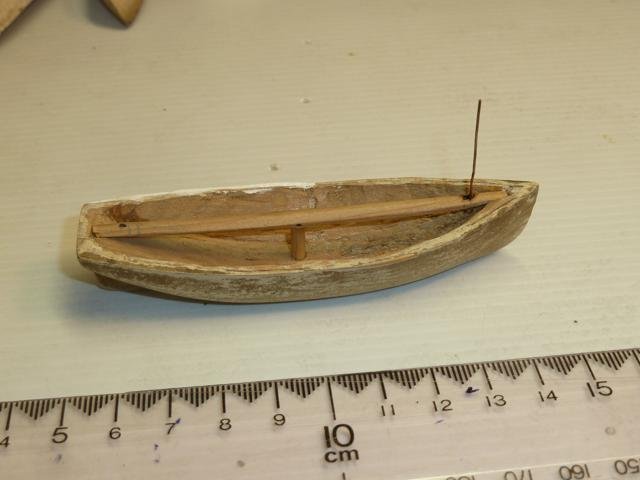
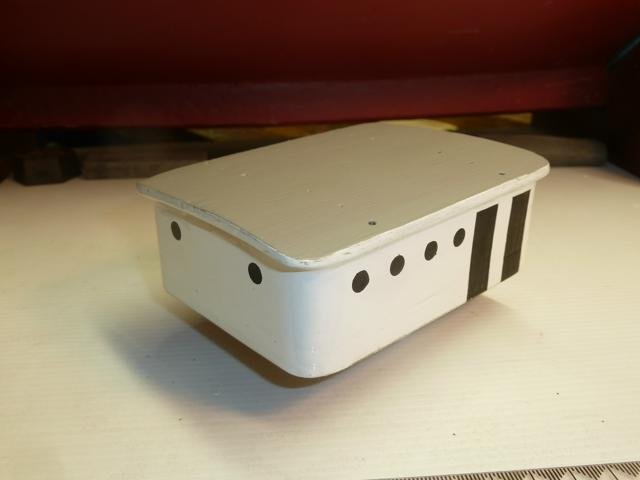
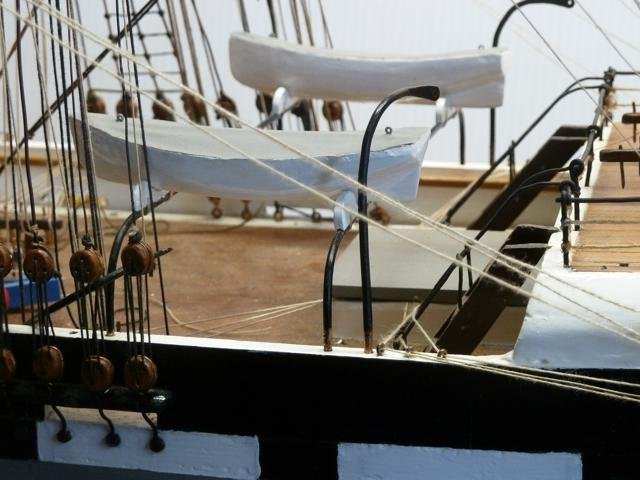
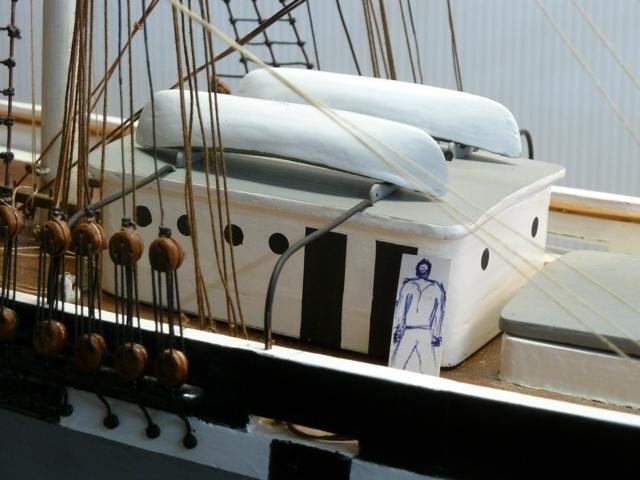
Build Log. Restoration of Full Rigged Sailing Ship Model Posting #6 Then some light relief was the restoration of the ship’s boats, deckhouse and rudder. See photos below. There are four ship’s boats all of which, if full scale, would be about 17 feet long. Two are what I’d call lifeboats like a small whaler, that is, with a sharp sterns. These are stowed upside down on the deckhouse roof. The other two could be termed as jolly boats, and they are on the tiers beneath the davits. Julius carved them from blocks of wood and hollowed them as can be seen in the photo. They are covered with sail cloth which is stretched over a fore and aft ridge pole then painted. Deckhouse. Again made from a solid block of lightweight wood. Rudder. The original didn’t survive the ravages of time! I made the new one from a piece of our lovely straight-grained NZ Kauri. This timber (lumber) was highly sought after by the explorer/navigator Captain James Cook on his late 18th Century voyages, for spars in particular. The tiller is original.
- 53 replies
-
- 11
-
-
- clipper
- restoration
- (and 1 more)