MORE HANDBOOKS ARE ON THEIR WAY! We will let you know when they get here.
×


JRB9019
-
Posts
249 -
Joined
-
Last visited
Content Type
Profiles
Forums
Gallery
Events
Everything posted by JRB9019
-
Well, there you go Martin - something to put on your 'Bucket List' - "Go to Switzerland, enjoy a bottle of Merlot del Ticino. Note - DO NOT jump in to Lago Maggiore unless it's mid-summer!!!!! P.S. Sorry for highjacking your log Peter!!
- 293 replies
-
- 2
-

-
- pickle
- caldercraft
- (and 1 more)
-
Thanks Peter I look forward to Lee's book. Yes, I am very lucky with the Library here - pure coincidence about the modelling books I think! Re Merlot? Yes, it's OK in the North, although Dole or even Maienfelder was nice. However, you just can't beat sipping a good Boccalino of Merlot del Ticino, sitting in the sunshine in Ascona overlooking the lake - unless it's another good Boccalino of Merlot del Ticino followed by a Restretto and a good local Grappa - oh happy days indeed!!!! Meanwhile back to model making I guess!
- 293 replies
-
- 2
-
-
- pickle
- caldercraft
- (and 1 more)
-
Hi Peter Wonderful progress you are making. I noticed that you have added further belay points to the Pawl bit assembly - good thinking!! Föhn? It's an interesting phenomenon. It only seems to provide the nasty headaches on the Northern side of the Alps. Down in the Ticino I never had any problems - but there again, life in the Ticino is much more laid back - so no stress anyway - and the Merlot tastes better!!! Research? I've re-ordered Mr Hartlands Seamanship in the age of sail from my local Library - and I was delighted to find they also stock your recommended Mr Lee's Masting and Rigging etc. I also noted that Peter Goodwin's Granado was a good source of info - so I went crazy and ordered that which arrived yesterday. That is a fasinating book indeed, all the details of the sails that I was looking for and, as you know, so much more besides. What I cannot believe is that, with all the detail shown in the book, the only thing missing is.......... any belay plans. Every other minute detail is listed so I cannot quite understand this .... .........Angry Growl !!!!!!!! Still, the book is going to be really useful when I do start to build my Granado next year sometimes... Regards John
- 293 replies
-
- 2
-
-
- pickle
- caldercraft
- (and 1 more)
-
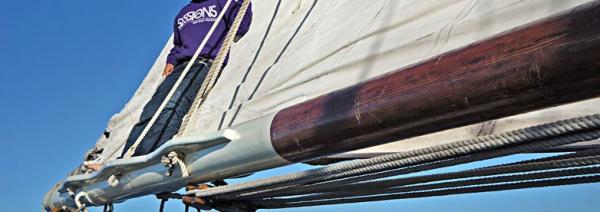
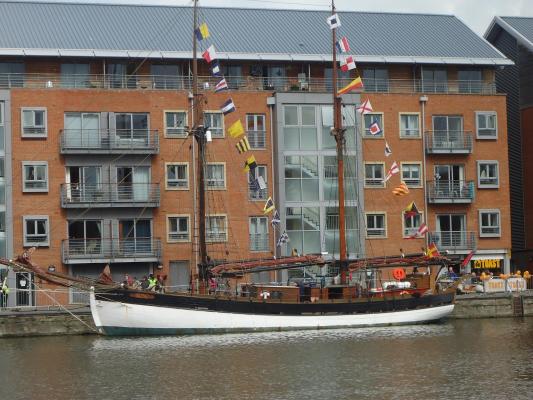
Peter Going back to our discussion re. furling the Gaffsail and how could they have done this as the Driver Boom extends way past the Transom....... I remember you suggested adding horses to the boom, but yesterday, I came across a photo on a website of a Pilot Cutter that also offers sailing days/holidays. Scrolling around, I found a photo that could shed some light in the subject.... Here you will see that a ledge (for want of a better word) has been attached to the Boom which is obviously big enough to stand on. I wonder if this is the answer??? For more (great looking - and "oh, that looks like a great holiday") photos, the website is: http://www.workingsail.co.uk/sail/charter-picture-album-2/ Scroll down to see more! Regards John
- 293 replies
-
- 1
-
-
- pickle
- caldercraft
- (and 1 more)
-
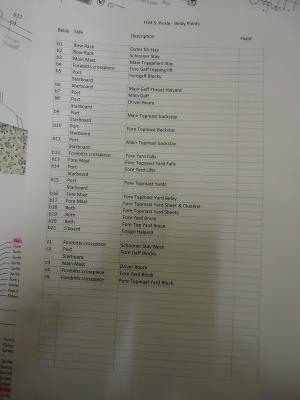
Many thanks to all of you. Some wonderful and very helpful comments. Peter, your list is very useful. Yes, I have noted the Anatomy of the Ship - I believe there is one of the Granado which will come in handy for my next build anyway. It was going on my Chrismas list - perhaps I might add it on the 2015 Christmas List and get it now as "someone forgot"!!! RichardG, maybe I should write such a book then - one I understand the subject myself!! I also like your spreadsheet idea for future reference. As you will see below, I have created a document that lists the information which is a start! Here's an extract: Belay Side Description Fixed? b1 Bow Rack Outer Jib Stay b2 Bow Rack Schooner Stay b3 Main Mast Main Topgallant Stay b4 Forebitts crosspiece Foregaff topping lift b5 Port Foregaff Blocks b5 Starboard Jersey City Frankie - I agree with the idea of drawings - I've actually started to do that. Firstly, I have made a drawing of the bowsprit so that I understand the three foresails on my ship (PIckle). I have also taken copies of my plans showing the Belay points. These are only listed as e.g. B1, B12 etc. so I have researched my instruction book so that I have been able to label each point with the correct name - that has helped a great deal. As I suggested in my log, I think it would help of the manufacturer added a table to those belay and rigging plans that actually lists the Belay points, where the rope comes from and what it actually is. I have created a document that lists the above information which is a shown above! I have just made a drawing of the main and topsail - which is where all the problems start!! ...... and the reason for it all? Because I am wishing to add sails to my Pickle and therefore need to understand all the figging so that I can work out what additional rigging and belay points I will need - so that I can add them while I can still access the deck BEFORE I clutter the deck with Deck furniture and masts etc....... Thanks for your help. John

-
Hi all, I have some fantastic books that tell me all about fixed and running rigging and give me lots of detailed information about every single rope. block, beley line that is needed. What a pity that I almost don't understand a word!!! Every book that I have seen is written in a technical manner and, although I have even tried to understand things through works such as The Elements and Practice of Rigging and Seamanship by the Historic Naval Ships Association, it's is really hard work. Does anyone know if a simplified version that actually explains all the terms used in one go? So, for example, if I wanted to know all about what 'ropes', blocks and beley points are used for each sail where could I look? Before anyone suggests, I do have Lennarth Petersson's Rigging Period Ship Models which does show the lines and beley points, but it is still very difficult to understand what all the shown items are actually for - e.g. this is a line that is used to hoist / set / take down a sail....... Any ideas anyone? Many thanks.
-
Thanks Peter Oh yes, the good old Swiss Föhn winds - and the headaches that go with them!!
- 293 replies
-
- 1
-
-
- pickle
- caldercraft
- (and 1 more)
-
Peter, this looks really good, I'm impressed with the quality of your work. I've just realised that as I have decided to finish my Pickle with furled sails, she will not have the Main Gaff hoisted, but it will be down on top of the furled main Gaff on top of the Driver Boom. Of course, the Fore Gaff will remain with the sail furled against the fore-mast. The end result will leave a rather 'empty' stern section, but I guess that's thw way it's going to be. At least there is no foremast Driver Boom, otherwise Pickle would have looked rather bare. Here's another picture of Ruth to show you what I mean:
- 293 replies
-
- 1
-
-
- pickle
- caldercraft
- (and 1 more)
-
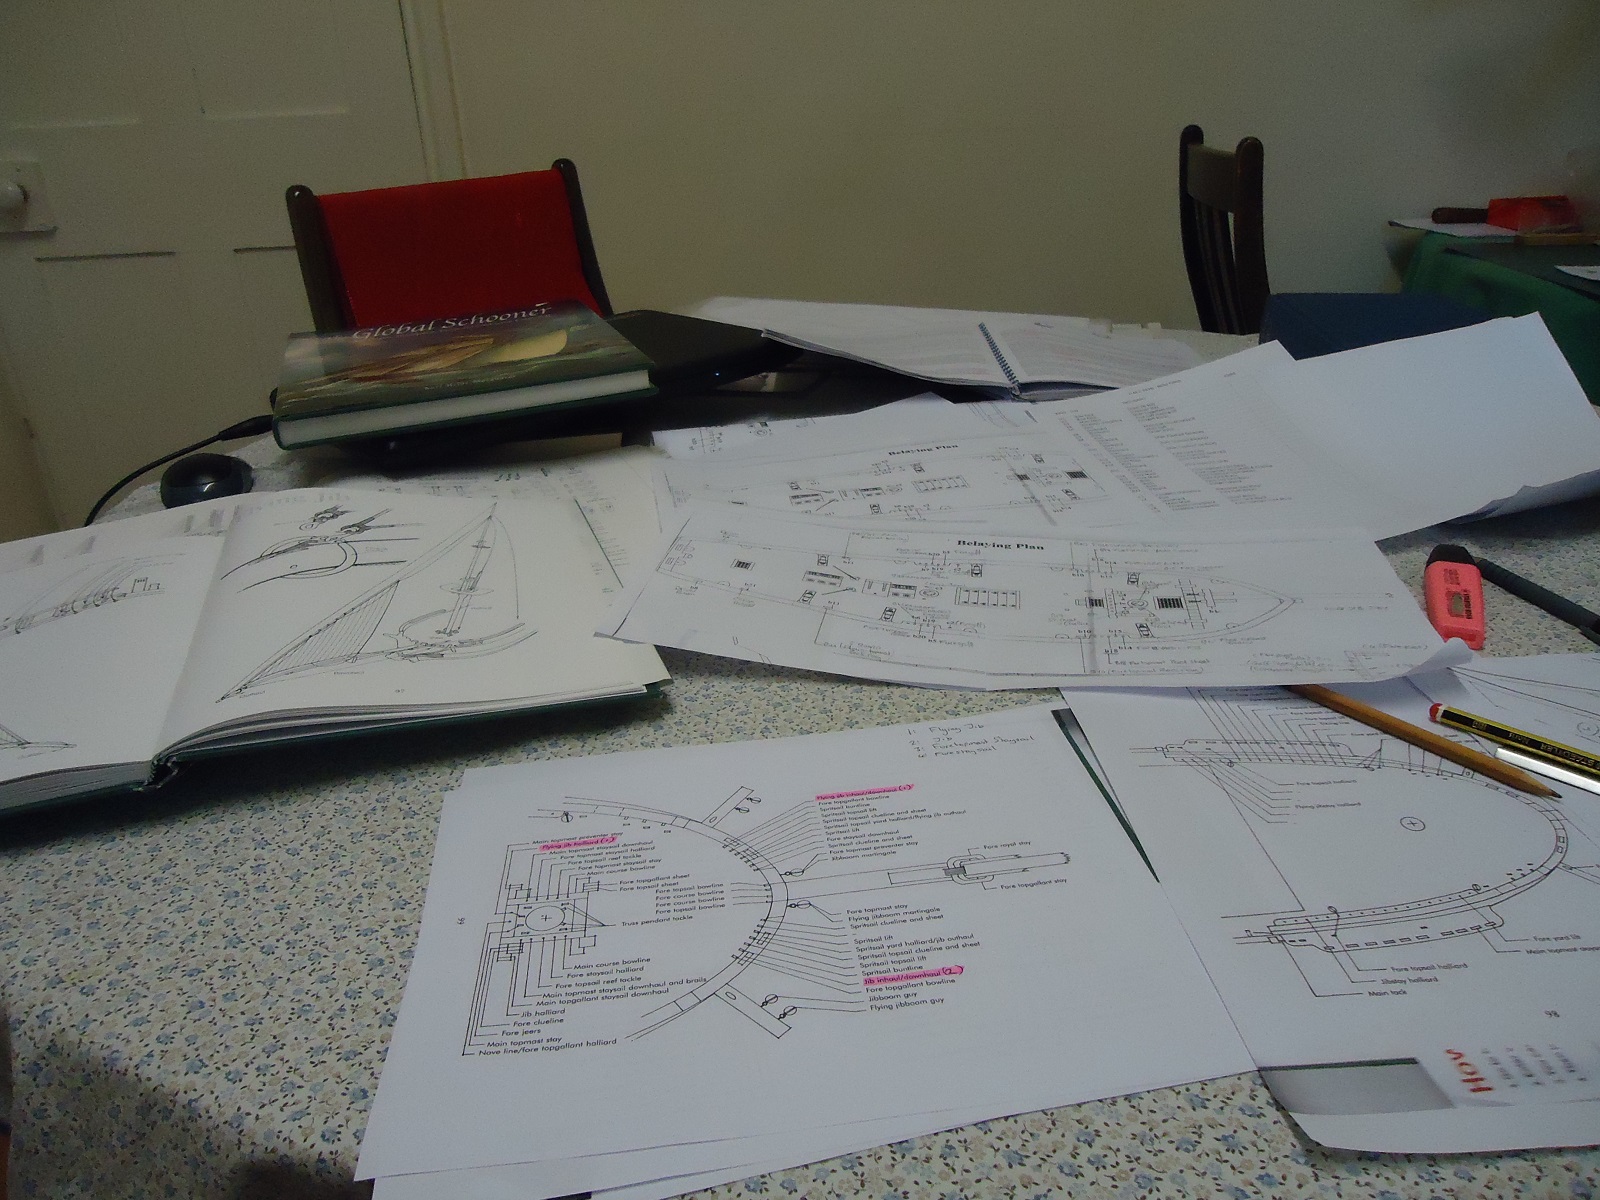
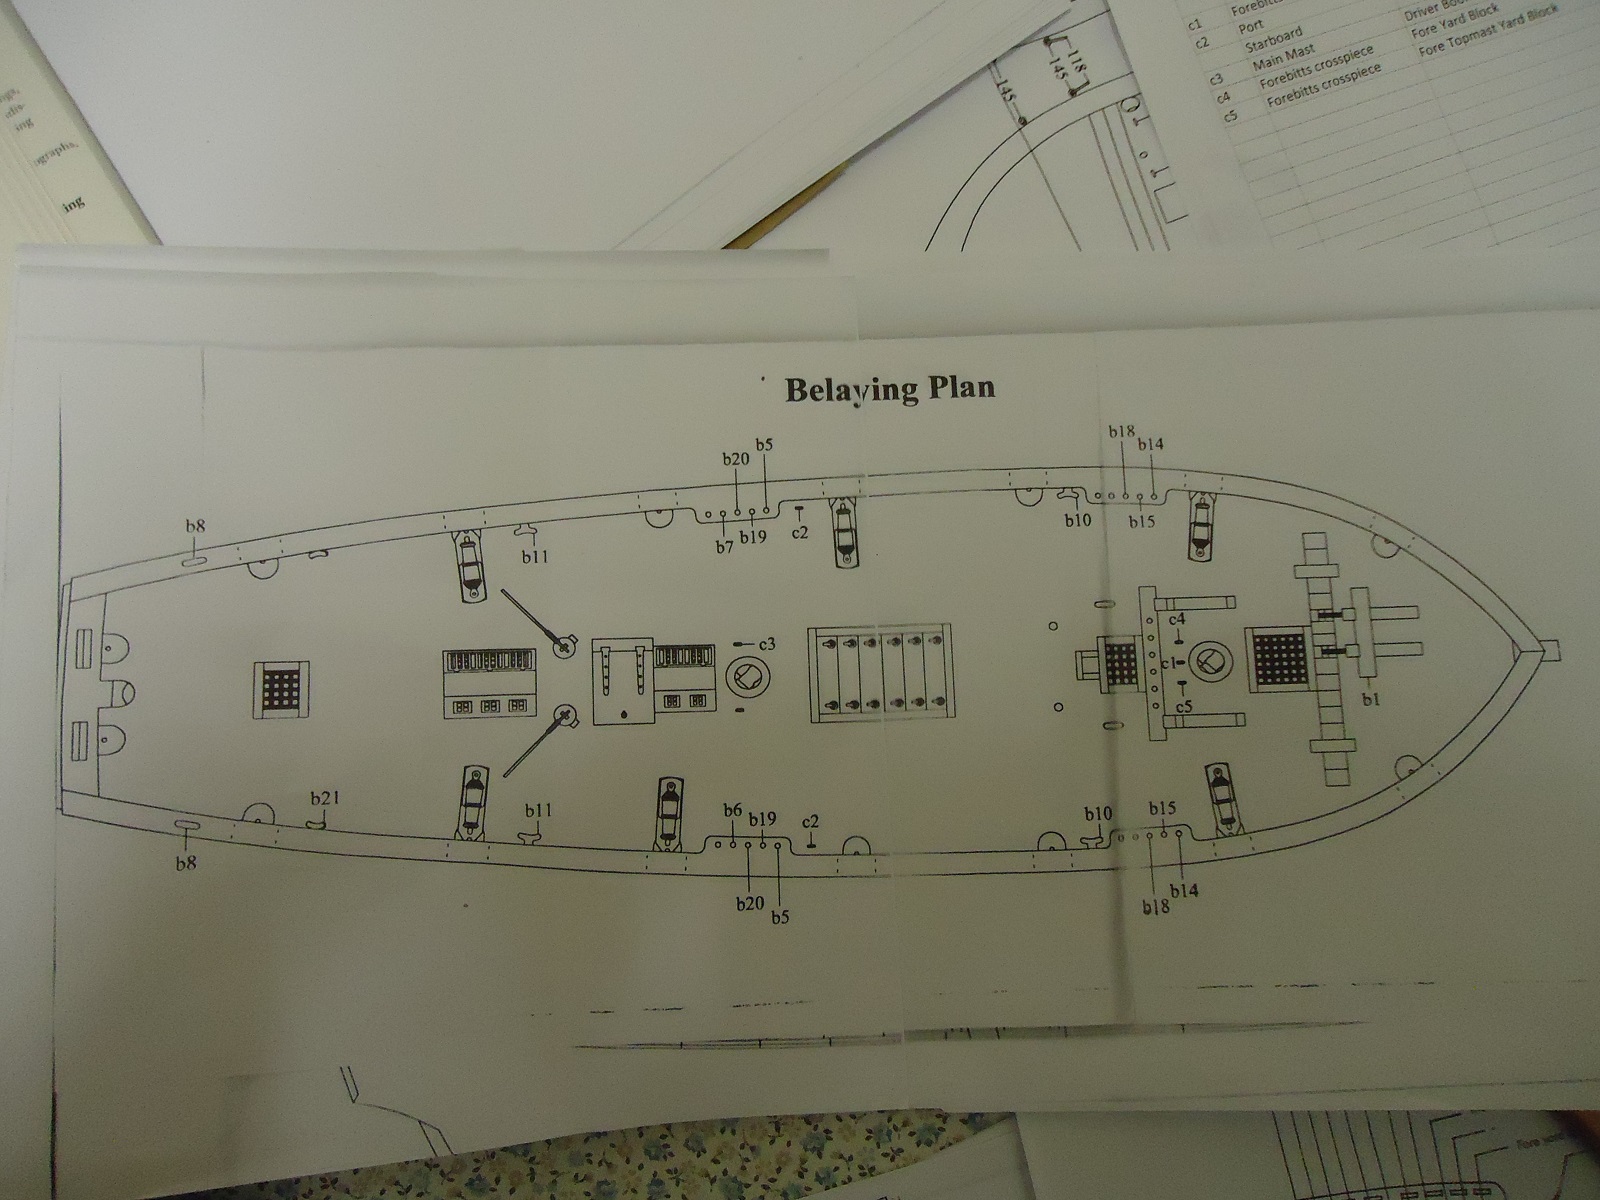
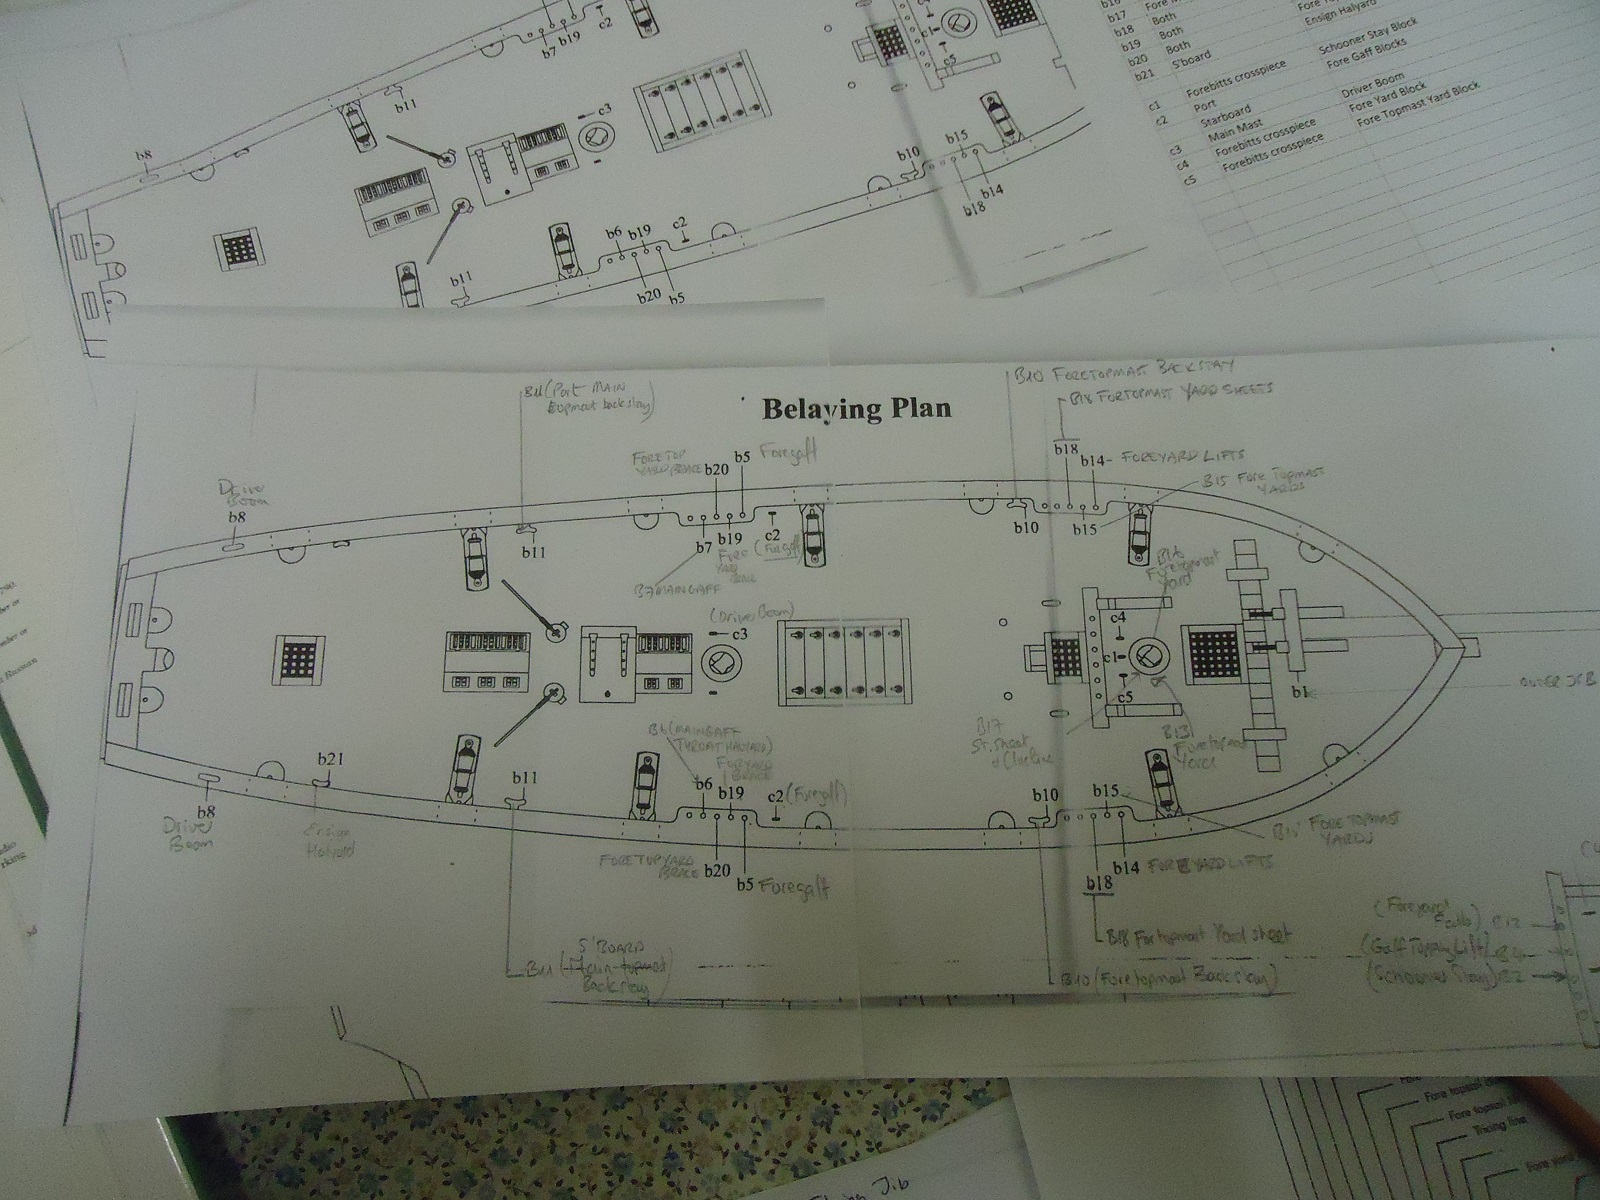
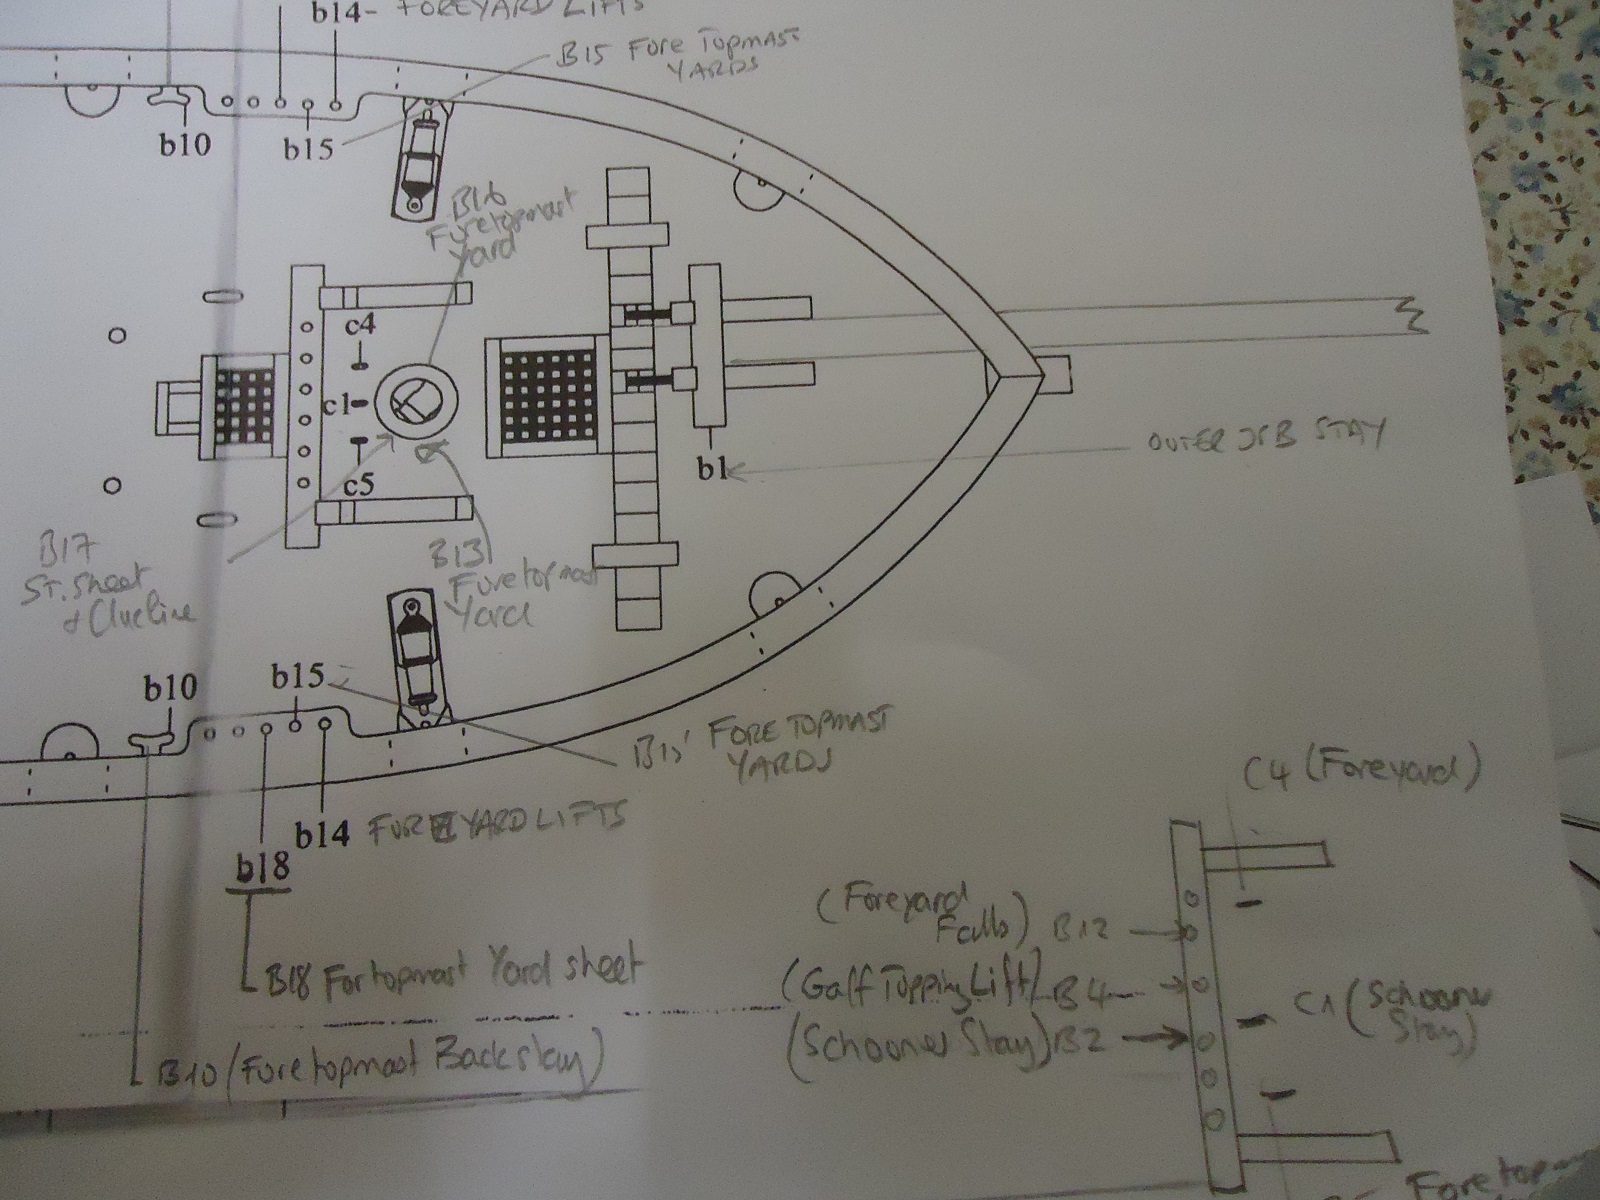
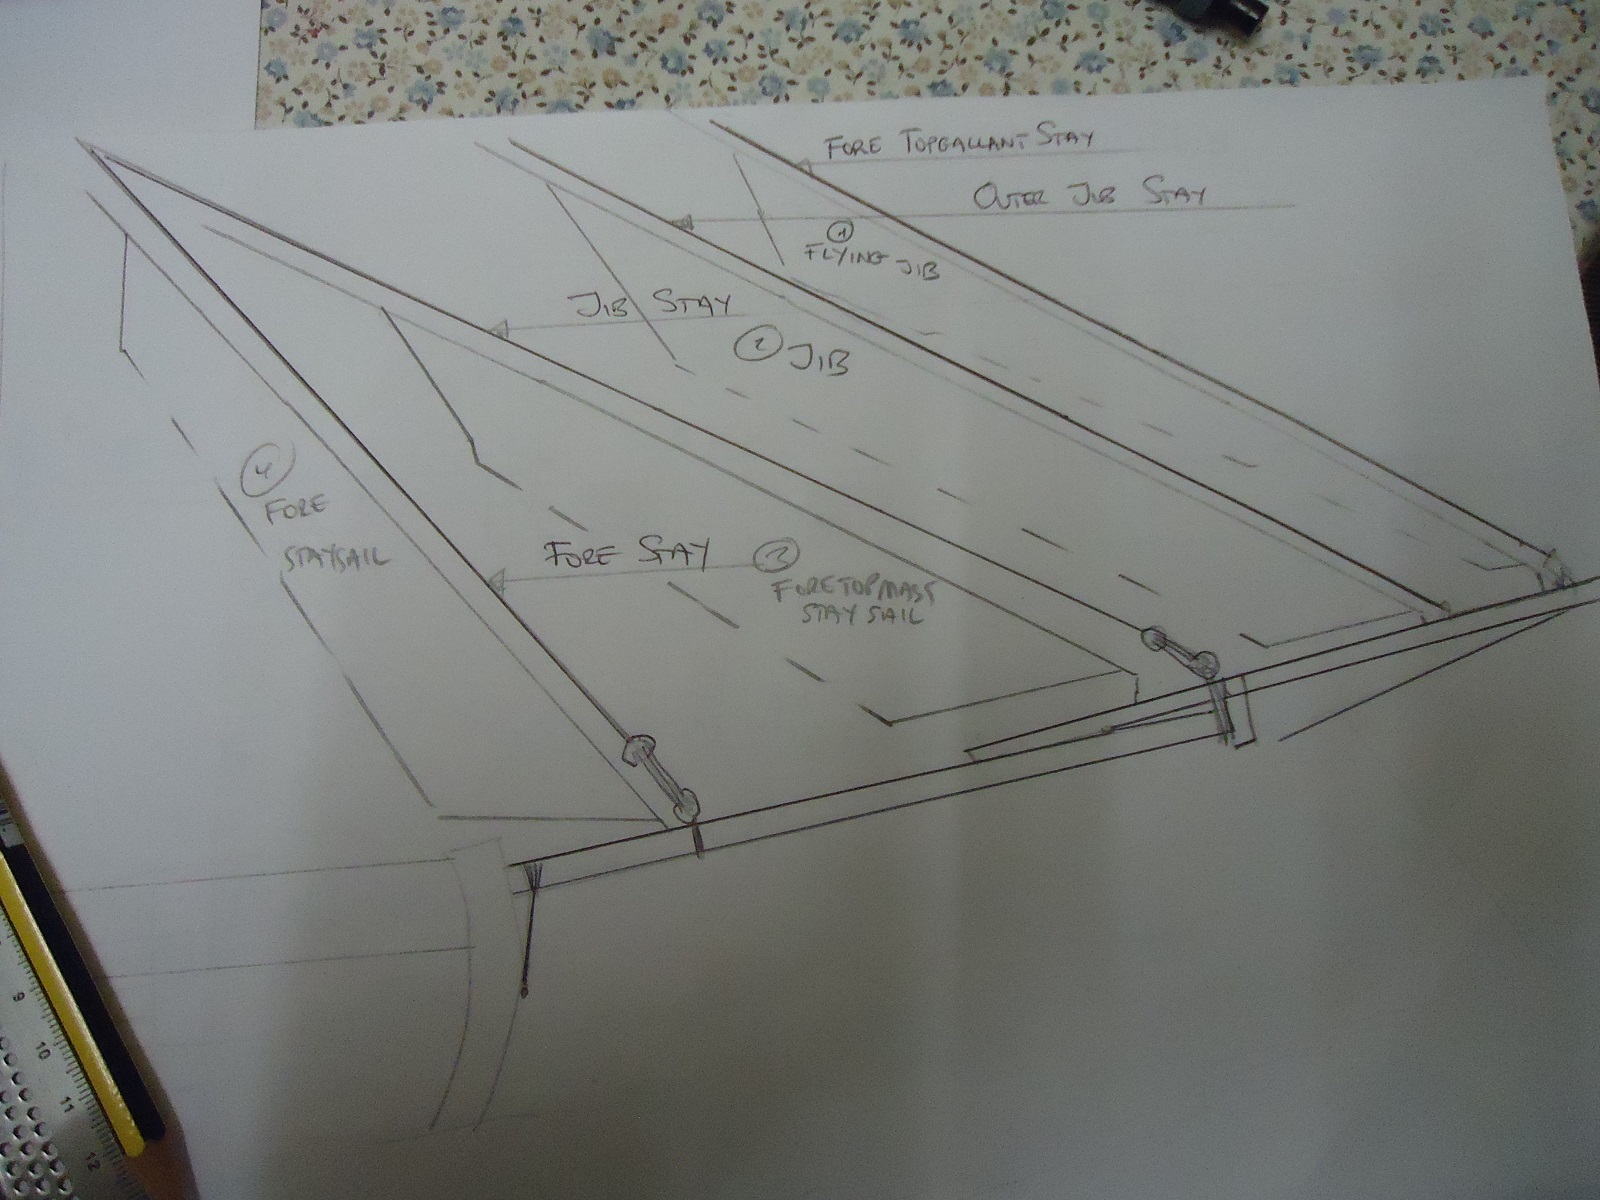
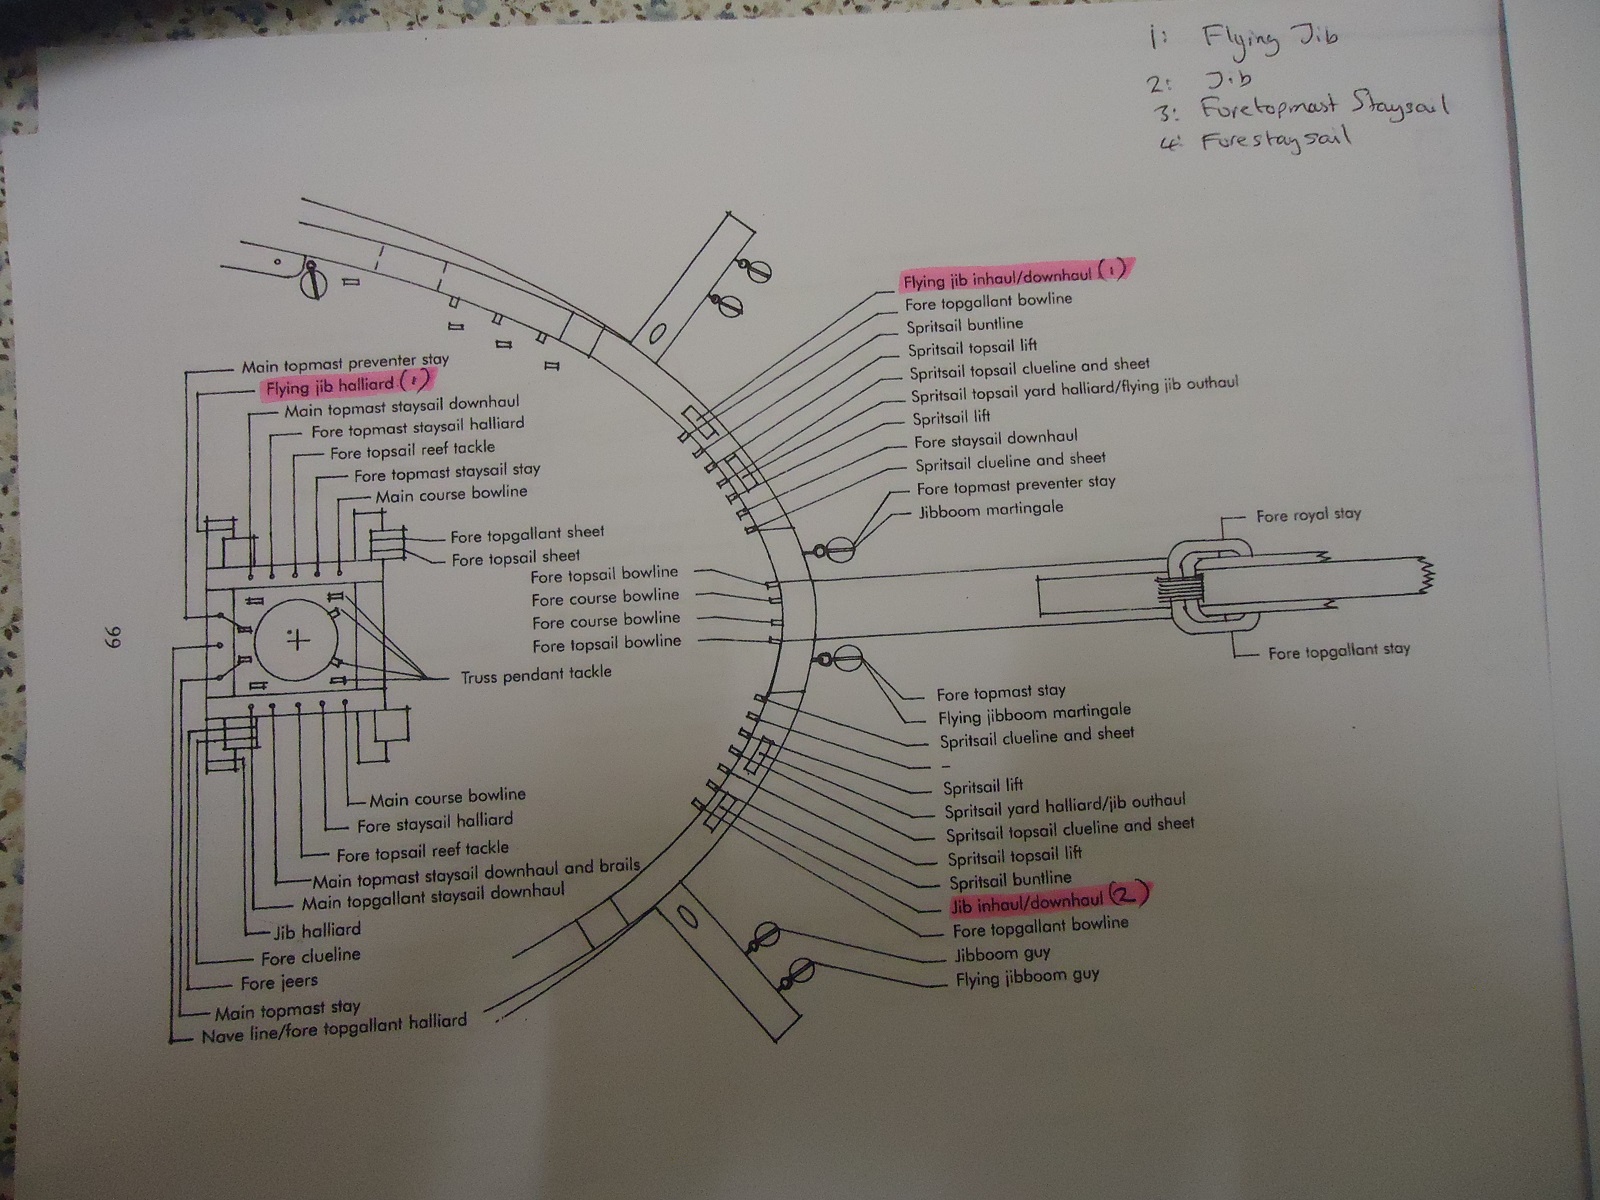
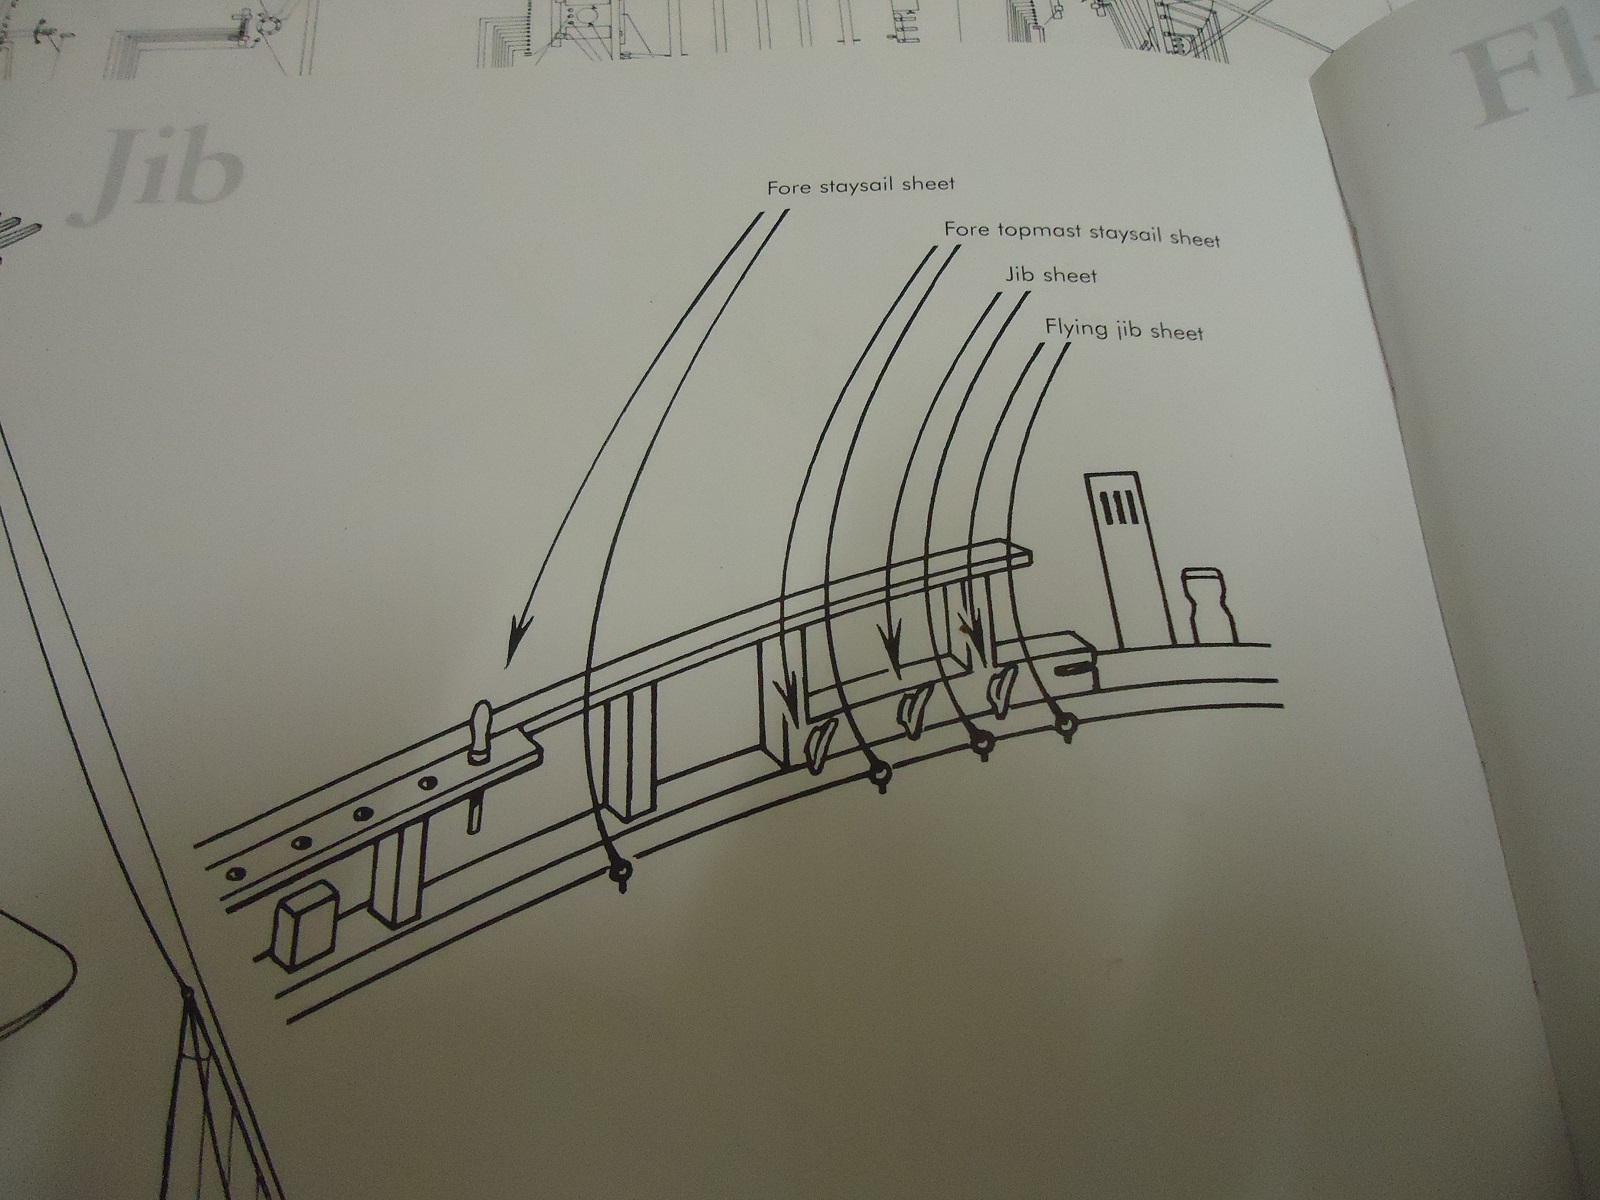
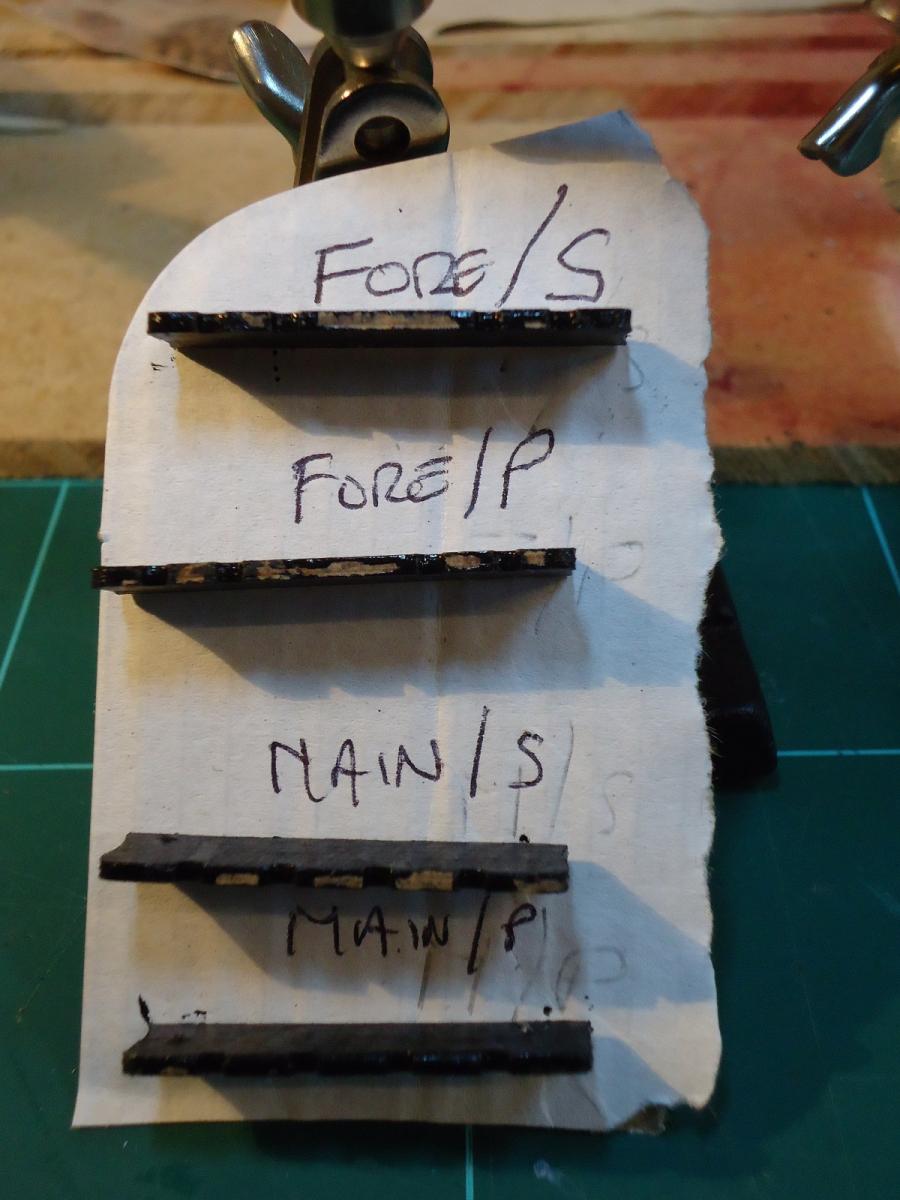
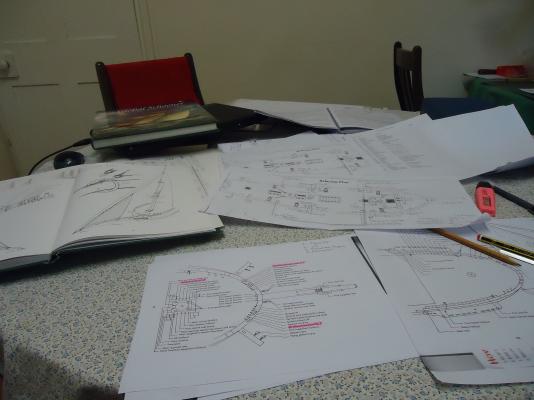
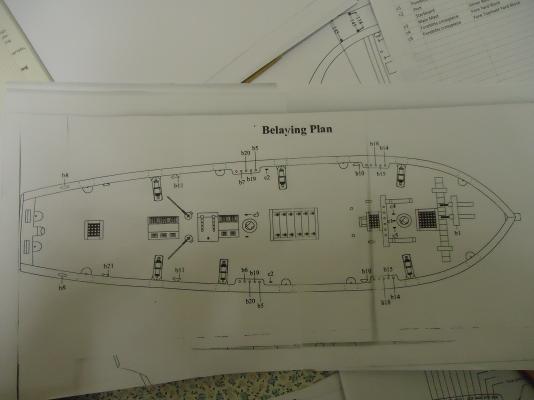
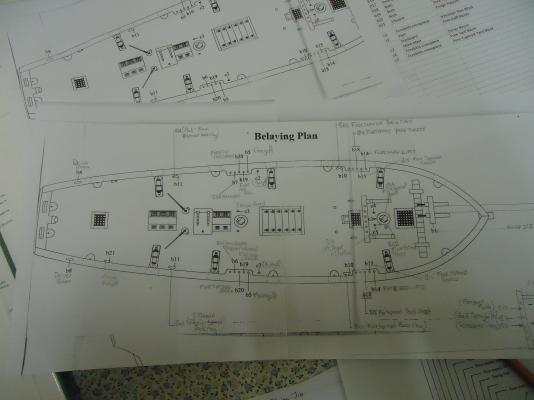
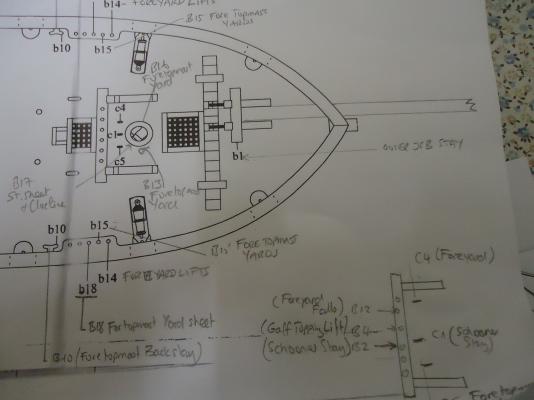
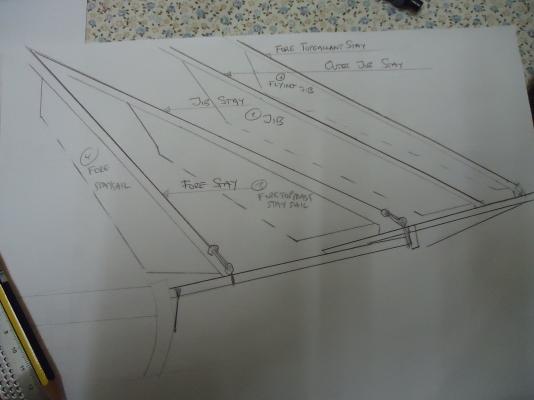
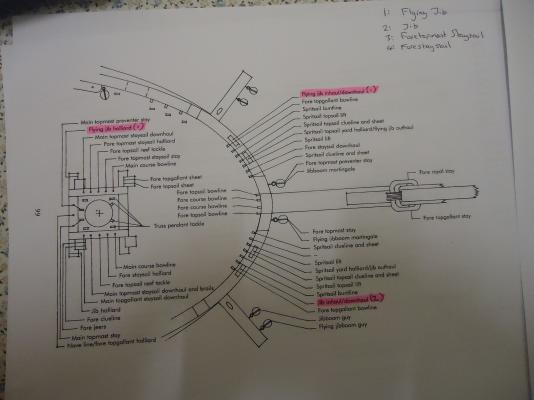
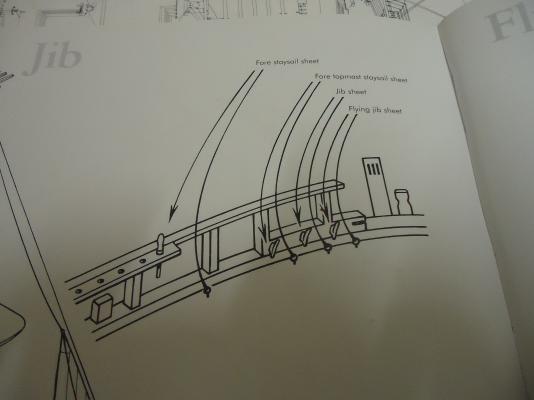
A little Research I decided to take a little break from the build and carry out some research.... As mentioned, I am planning to add sails to Pickle - but I am planning to furl mine. To make sure everything is as it should be, I plan to add all the apprproriate lines - uphaul, downhaul and sheets. Therefore, before I started to fix all the deck furniture i.e. the Windlass and Pawl Bitts and the skylights and companionway, I wanted to add all the additional fittings and beley points that I was going to need for the sails. Better now while I still had plenty of space to work in. First things first, it was time to some research. Out came Pickle's plans and my trusty books: - Karl Heinz Marquardt's The Global Schooner and Eighteenth Century Rigs and Rigging and - Lennarth Petersson's Rigging Period Ship Models I quickly realised that if I was needing to identify and add belay points, fixtures and fittings, I needed to understand what was already there. I looked at the plans and the construction book, but all I could see were B and C numbers without telling me what they were for. Perhaps JotiKa could add some sort of table to list the points with thier names/purposes, which would be a help. So, what to do? Firstly, I photocopied two half's of the beley diagramme from the plans onto A4 paper, then lined them up and stuck them together. The end result was: Next, I created a quick spreadsheet, listing all the belay points and then took the construction book and identified each of the belay points and added them to the spreadsheet. This task was made a lot easier as I had downloaded a PDF version of the construction bookm so could use the seach function to identify everything quickly. The end result of all that was: So, armed with my new-found knowledge, I was able to go to my printed belay plan and add the titles to all the belay and anchor points. This will help once I start rigging, I'm sure.... Here's the pencil draft version. I plan to make a neater version once I am finished with everything. So, now that the 'standard' lines and belay points had been identified, it was time to do some research to find out what else I was going to need. Back to basics, first of all for the bow section, I made a sketch of the bowsprit, added and labelled the different stays and finally, sketched in and labelled the different sails... The next step was to find different diagrammes from my various books and photocopy those. Now it was time to identify all the new lines and points that I was going to need - these will all get in added to my master belay plan once I'm done. Hmmm, I'm quite enjoying this! John
-
Thanks Peter - I'll bear that in mind next time!
-
Singing Peter? I thought that Yodelle would be more appropriate - which would possibilly better explain the "pitch oscillations"!! Not sure about the horse - I need to investigate - I am sure we will be soon swamped with professional explanations anyway!! John
- 293 replies
-
- 1
-
-
- pickle
- caldercraft
- (and 1 more)
-
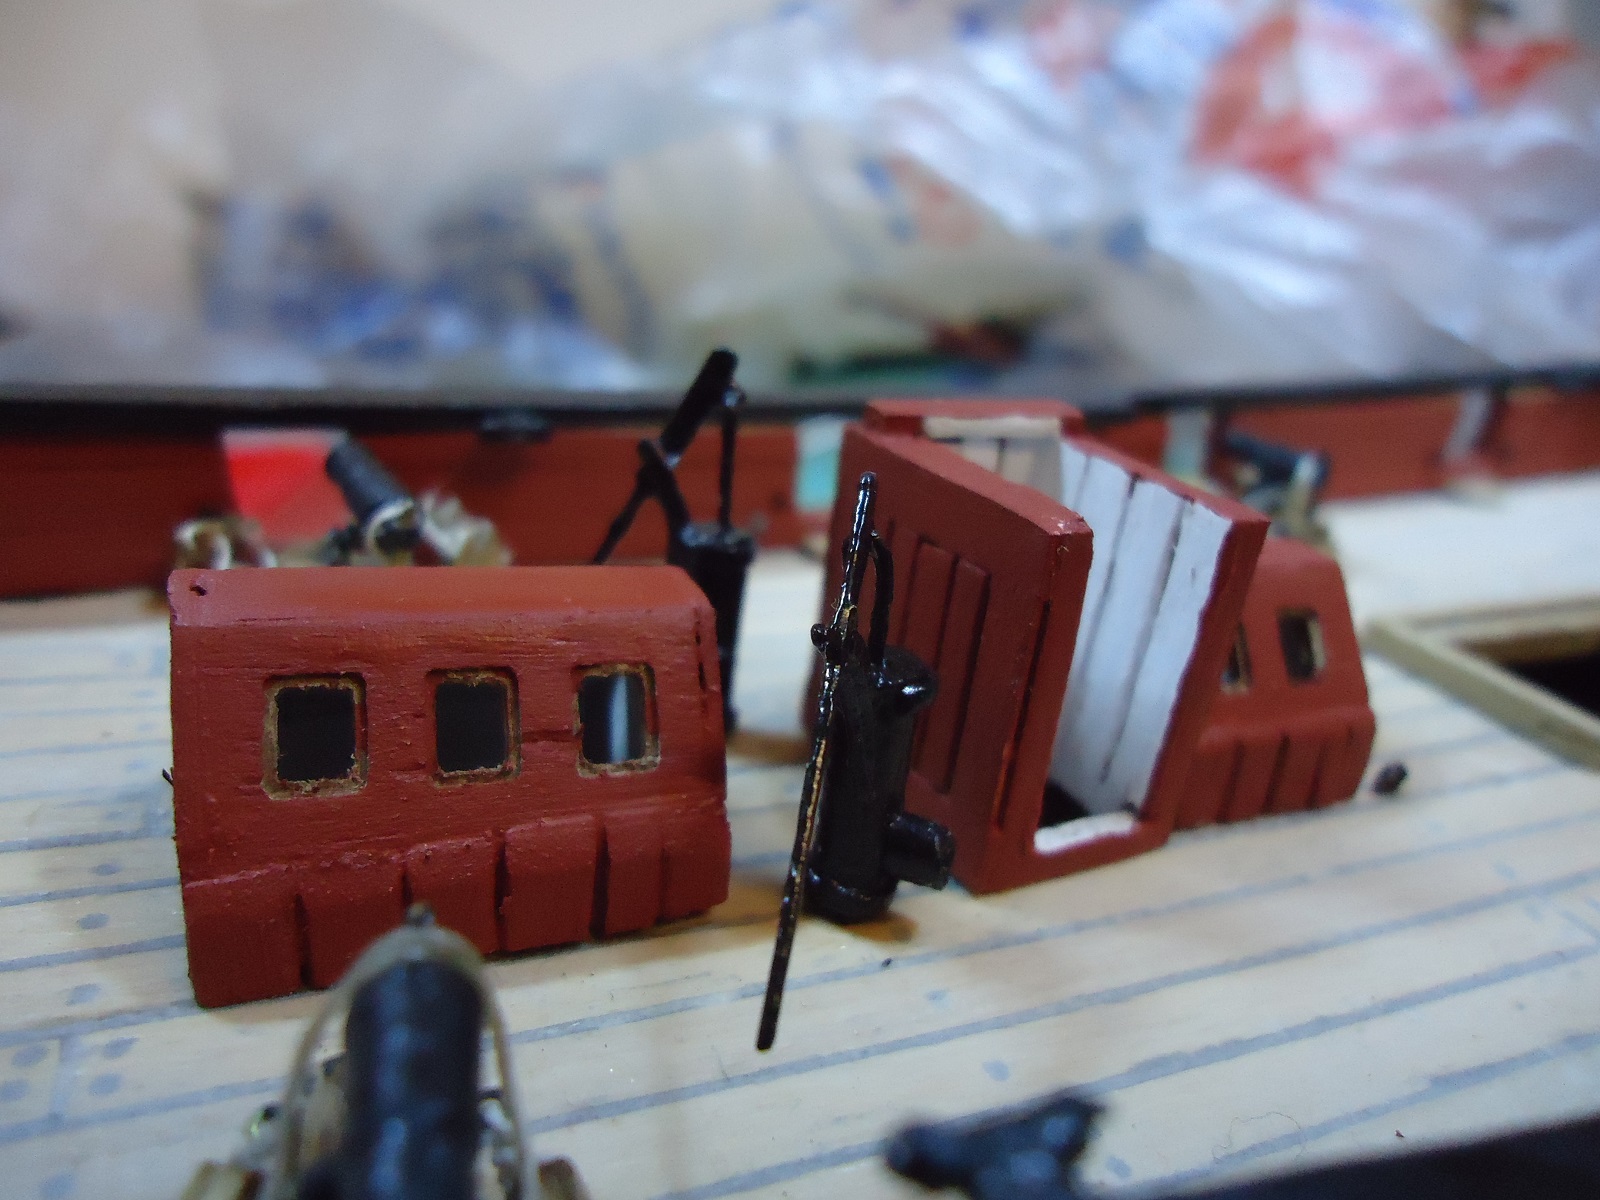
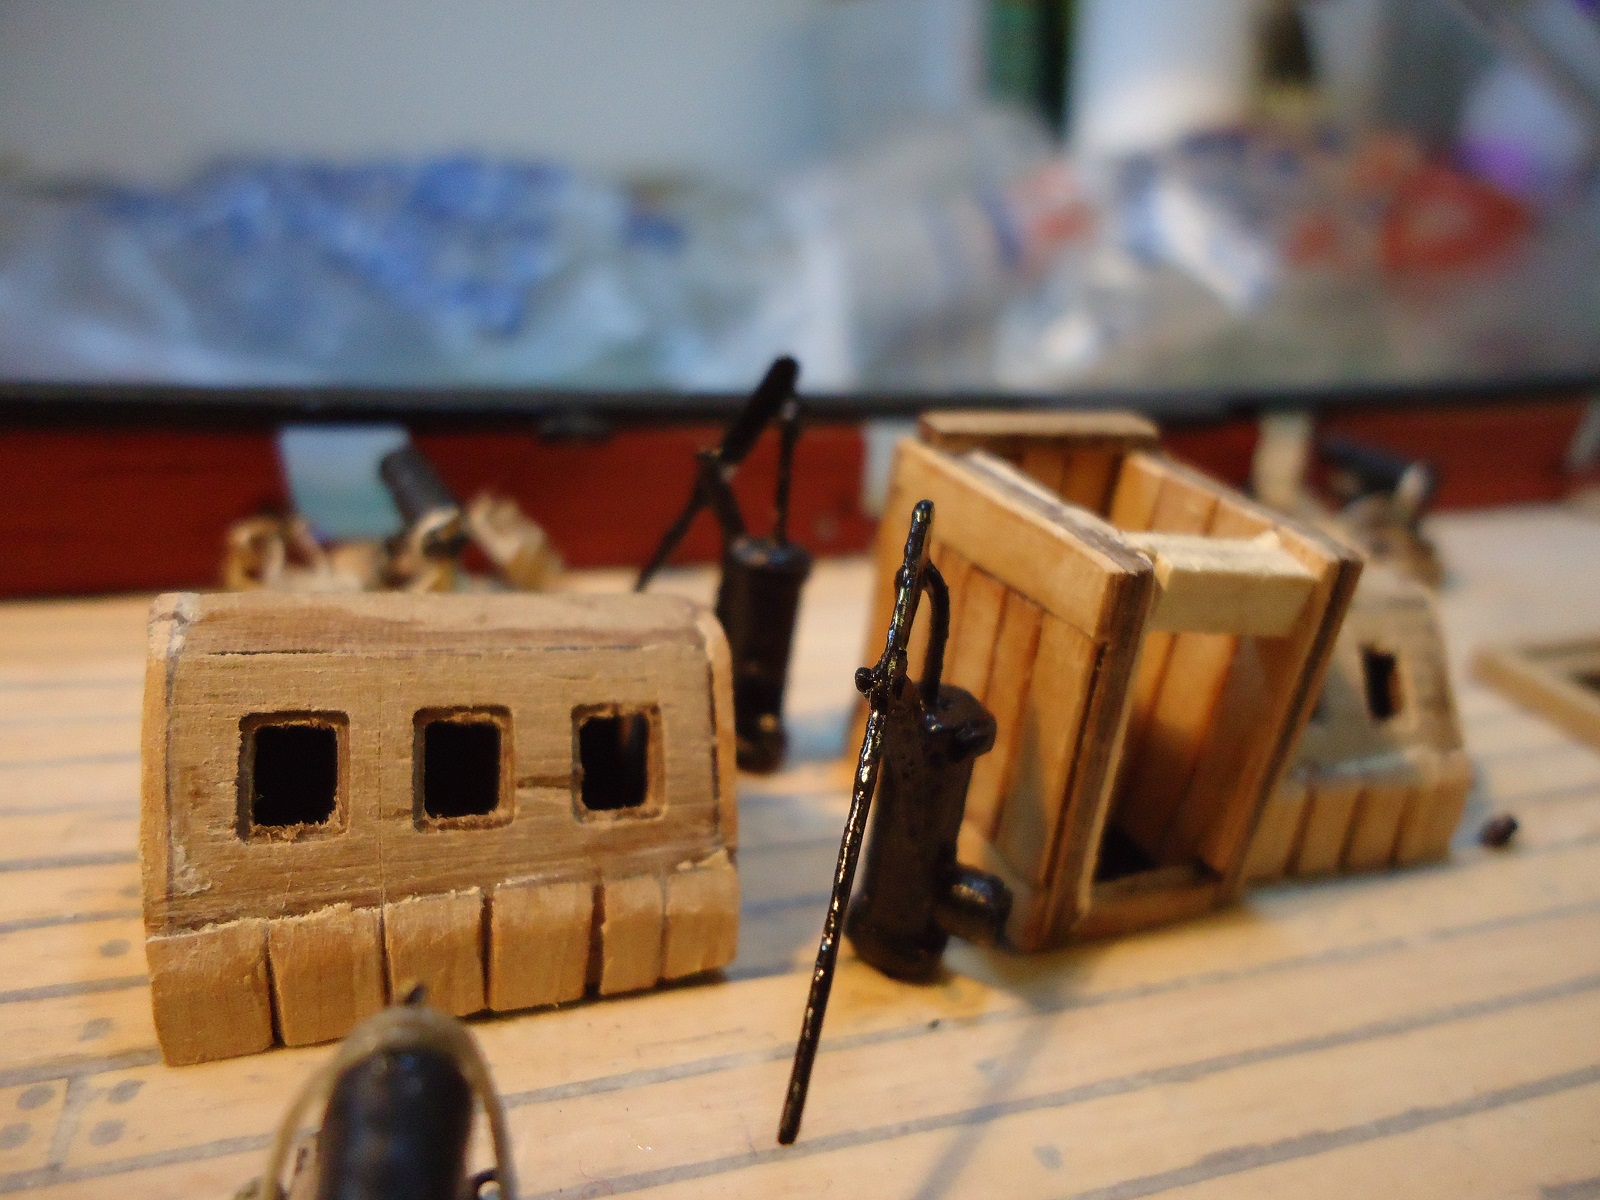
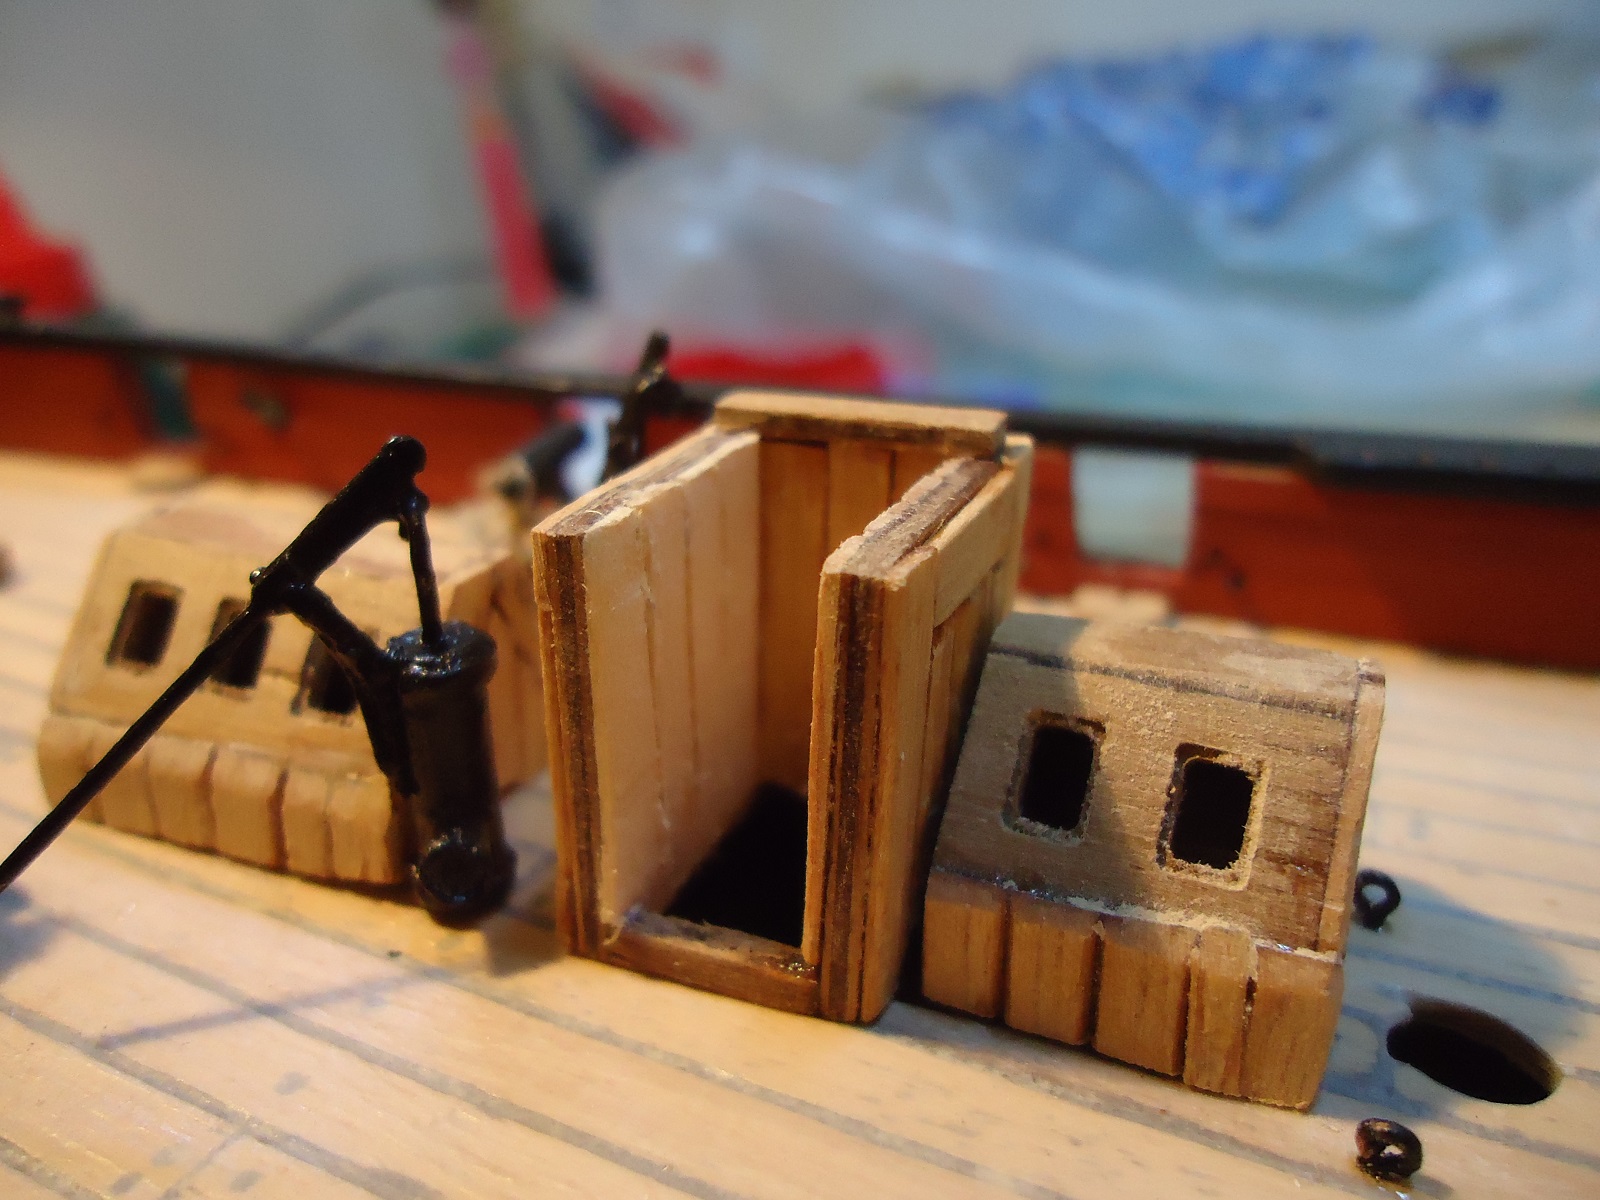
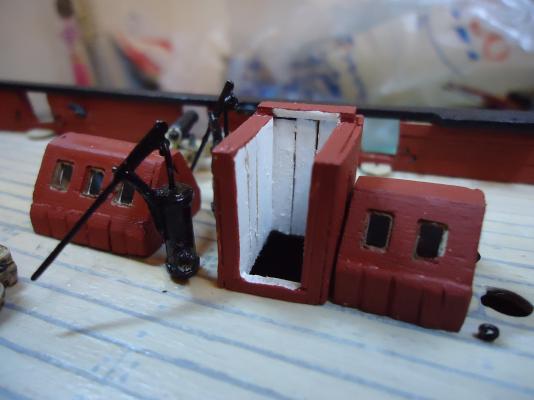
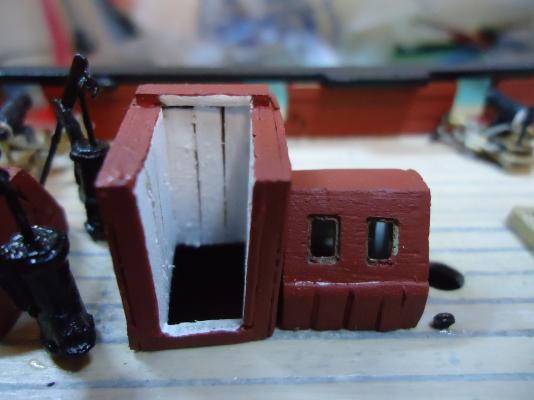
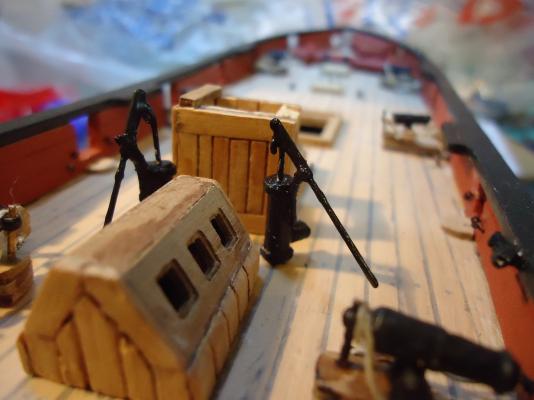
Skylights and Companionway – Part Three Finished the skylights and companionway with a final light sanding and then I painted the inner surfaces in white and the outer with Red Ochre. I was careful here not to fill in the gaps when I was painting so that the individual cladding planks were still visible. Eventually, I will be finishing the structures off with black beading/coving around the bottom of each piece – but you'll have to be patient!! There is still a lot of work to do yet with the fitting of window frames, bars and the companionway top still to come with a final touch-up of the paintwork that also needs doing. In the meantime, here’s a couple of pictures of the painted structures:

-
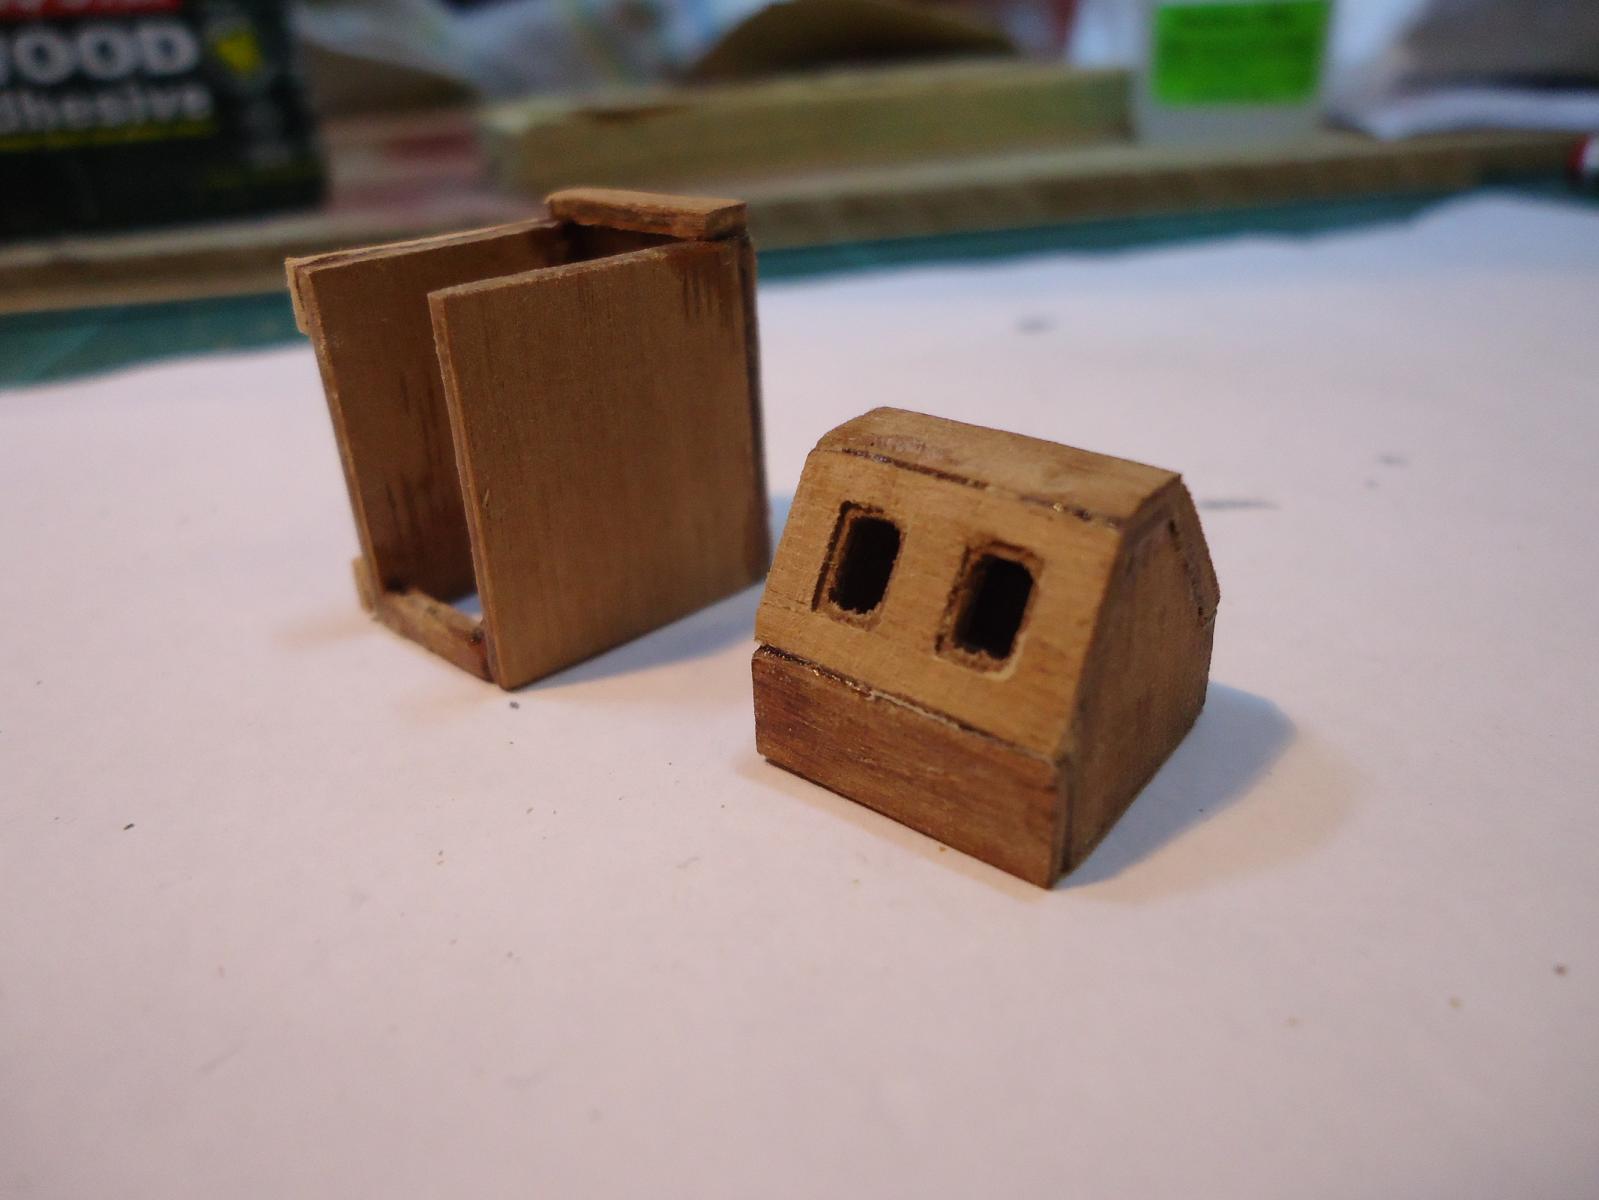
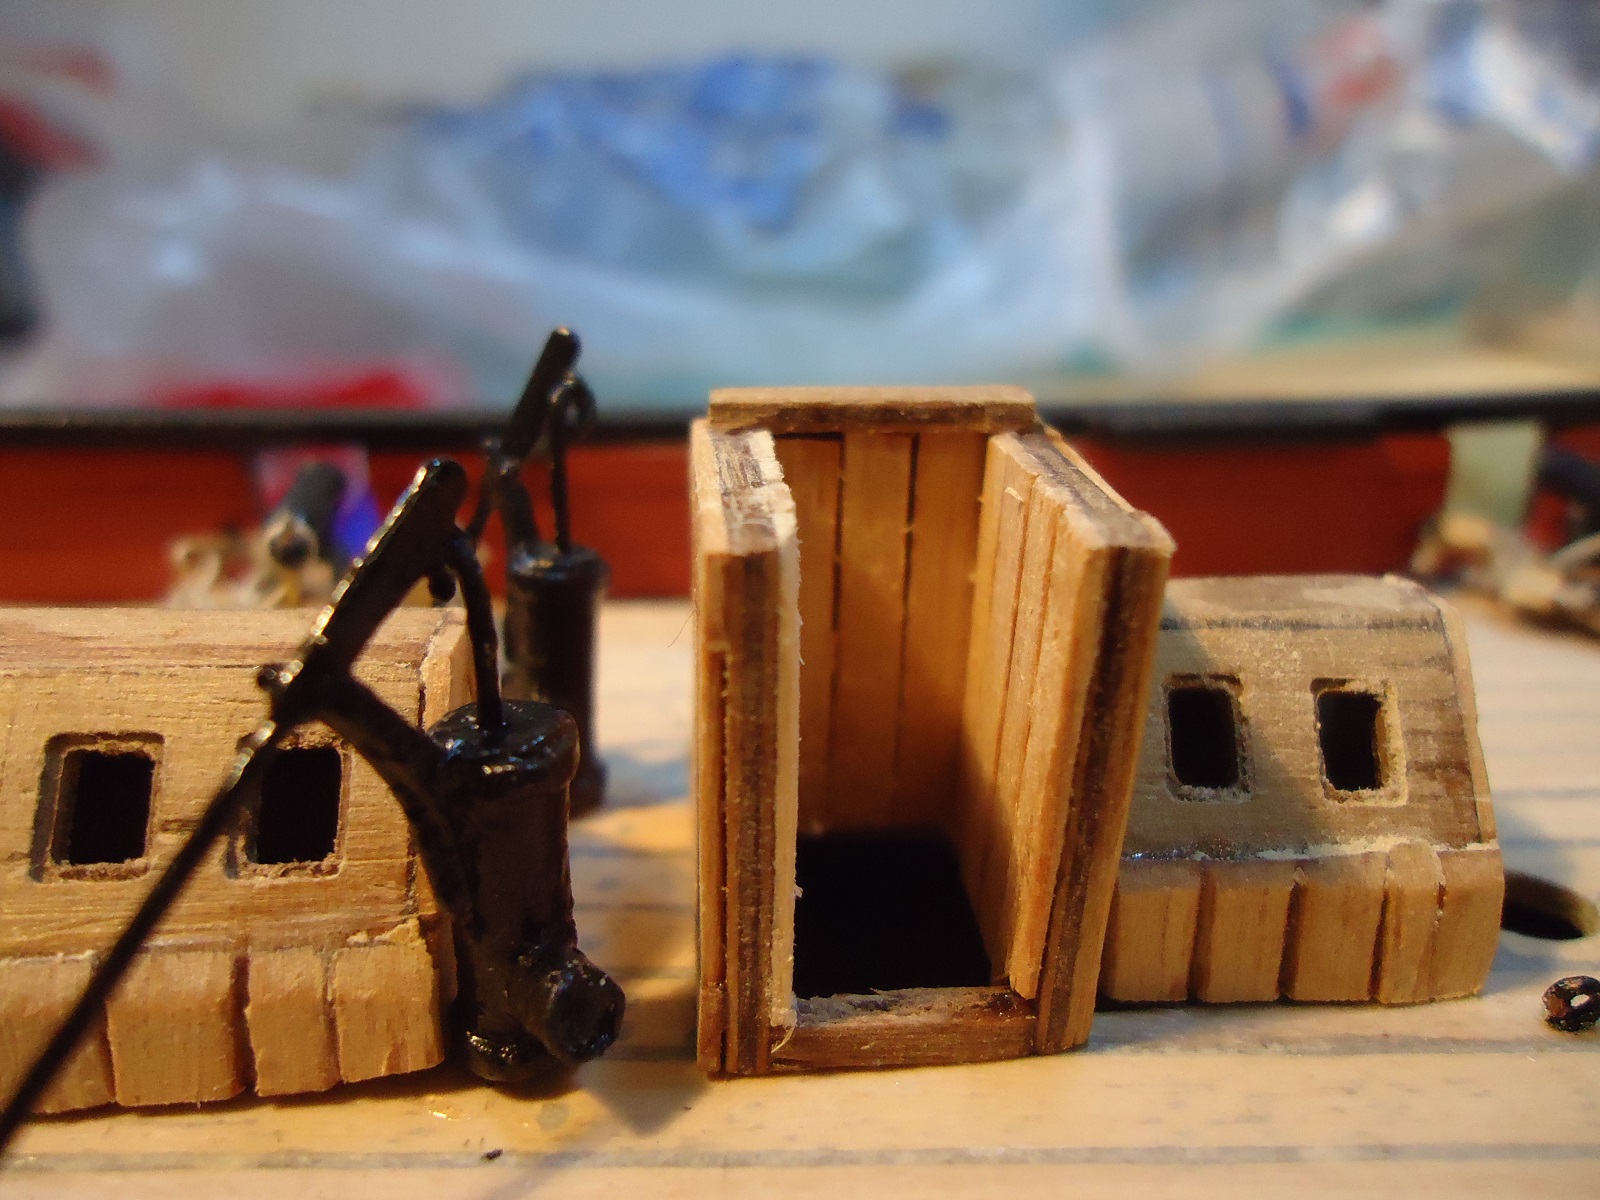
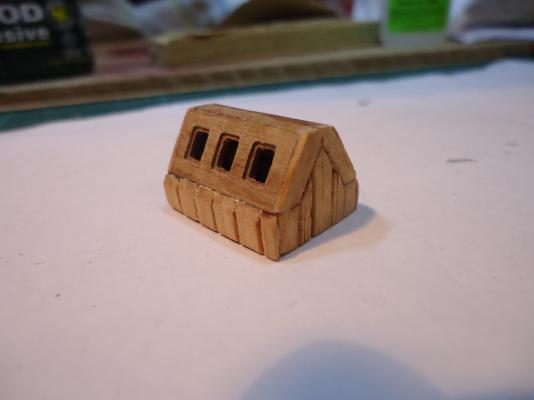
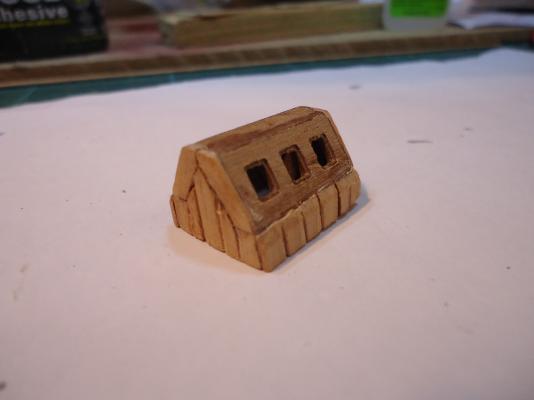
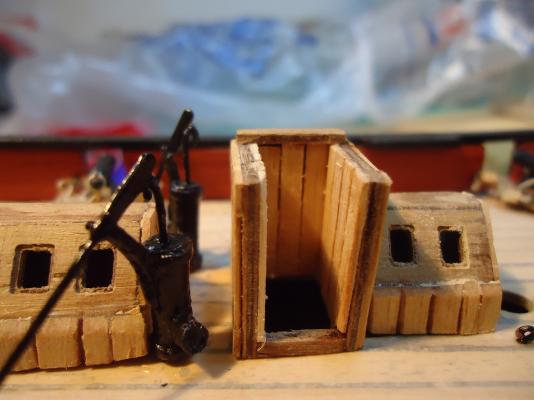
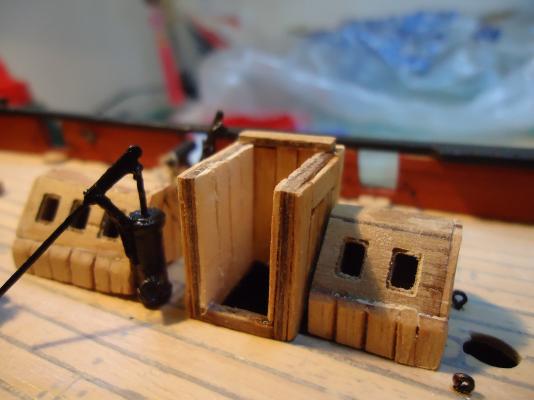
The Build – Phase 10 Skylights and Companionway - Part Two Back again after lots of distractions, Using the method explained previously, I completed the initial build of the two skylights and the basic companionway. I had long thought about the Skylight and companionway finish. I like others were not really happy with the plain wood finish that was suggested in the kit instructions. So, I decided to teach myself some more modelling skills and started to think about cladding the outside of the skylights and companionway and then cladding the interior of the companionway. My first attempt was with the larger skylight – which looked great until I saw the close-up photographs!!! Oh, by the way, the gaps have been left on purpose so that once painted, I will still be able to see the individual planks - well, that's the plan anyway!! Still, here’s a couple of shots. I then spent a few hours cladding the second skylight and the companionway exterior and interior. Not quite as easy as I thought it would be. I used spare deck planks for the cladding but quickly realised that they were far too wide, so I spent quite a while trimming and cutting to a reasonable size. Eventually, I finished off then placed the strutures on deck to see what they looked like….. On the previous photo you might have noticed a piece of wood spanning the entrance to the companionway. It wasn't until I had glued the companionway together that I noticed that one side was bending inwards. I therefore cut this truss and wedged it in - obviously cutting it down to size after I had finished the cladding After a while, this seems to have worked as can be seen in the next two photographs... Time to think about the paintwork........


-
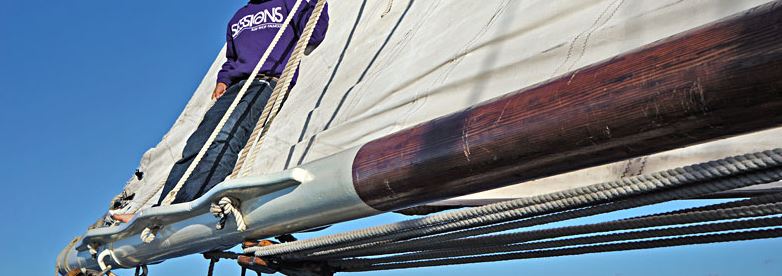
WOW - not much more to say really!!! On a side note - if, during a blow, the sail was lowered and tied to to boom as is done these days, I wonder how they managed to do the last 10-12 feet or so that extend past the stern...... (P.S. Not a critisism, just intrigued - it's bad enough having to furl and tie a main on a modern yacht when she's tied up in the Marina!!!) John
- 293 replies
-
- 1
-
-
- pickle
- caldercraft
- (and 1 more)
-
Hi Rick Great work - Pickle looks really good. So, it's time for the eyelets.... My advice, if you haven't already done so - make a template of some sort. Here's comments from my build: "After messing around with the first few measurements using all sorts of devices, I came across the idea of making a template. I took a piece of waste planking and measured, marked and finally drilled holes for all four of the required positions (i.e. 2 each side of each gun-port). It was then easy to simply place my template against each gun-port side and drill/mark the position for each hole through my pre-drilled template. I then removed the template and completed the hole drilling using a drill vice. Finally, I cut to length and using super-glue fitted all the eyelets around the gun-ports". I also seem to remember seeing much more sophisticated versions in some logs - main thing is - whatever works for you!! Enjoy John
-
Morning Peter. I was on the net this morning and suddenly found a link to sailing holidays on Facebook. Out of interest, I clicked and arrived at a site I thought you might be interested in - not necessarily for the holidays (although they look pretty cool) - but really for the photo's of the schooner. A couple of great shots showing the rigging that you are currently working on. I haven't posted the photo's as I'm not to sure about ownership, but here's the link. www.classic-sailing.co.uk/voyages/devon/just-%C2%A3295-offer-leader-short-easter-cruise-west-country-sailing-break-easter Regards John
- 293 replies
-
- 1
-
-
- pickle
- caldercraft
- (and 1 more)
-
True Captain - now you point it out! Interesting never the less!! I am just wondering how soon the kit makers catch up with what does seem to be the historically correct colour....
-
Just watched a fasinating video relating to the 10 year Victory restoration. Seems that after intense research, it has been established that the well-known 'yellow' and black were actually not the colours that Victory presented herself in. Interesting times for new Victory builders I guess - how long before the noew paints will be available - and will they be used???? Here's a link to the Video from the Victory restoration site - enjoy: http://www.hms-victory.com/restoration-log/hms-victory-her-true-colours John
-
Holding Small Items
JRB9019 replied to mikiek's topic in Painting, finishing and weathering products and techniques
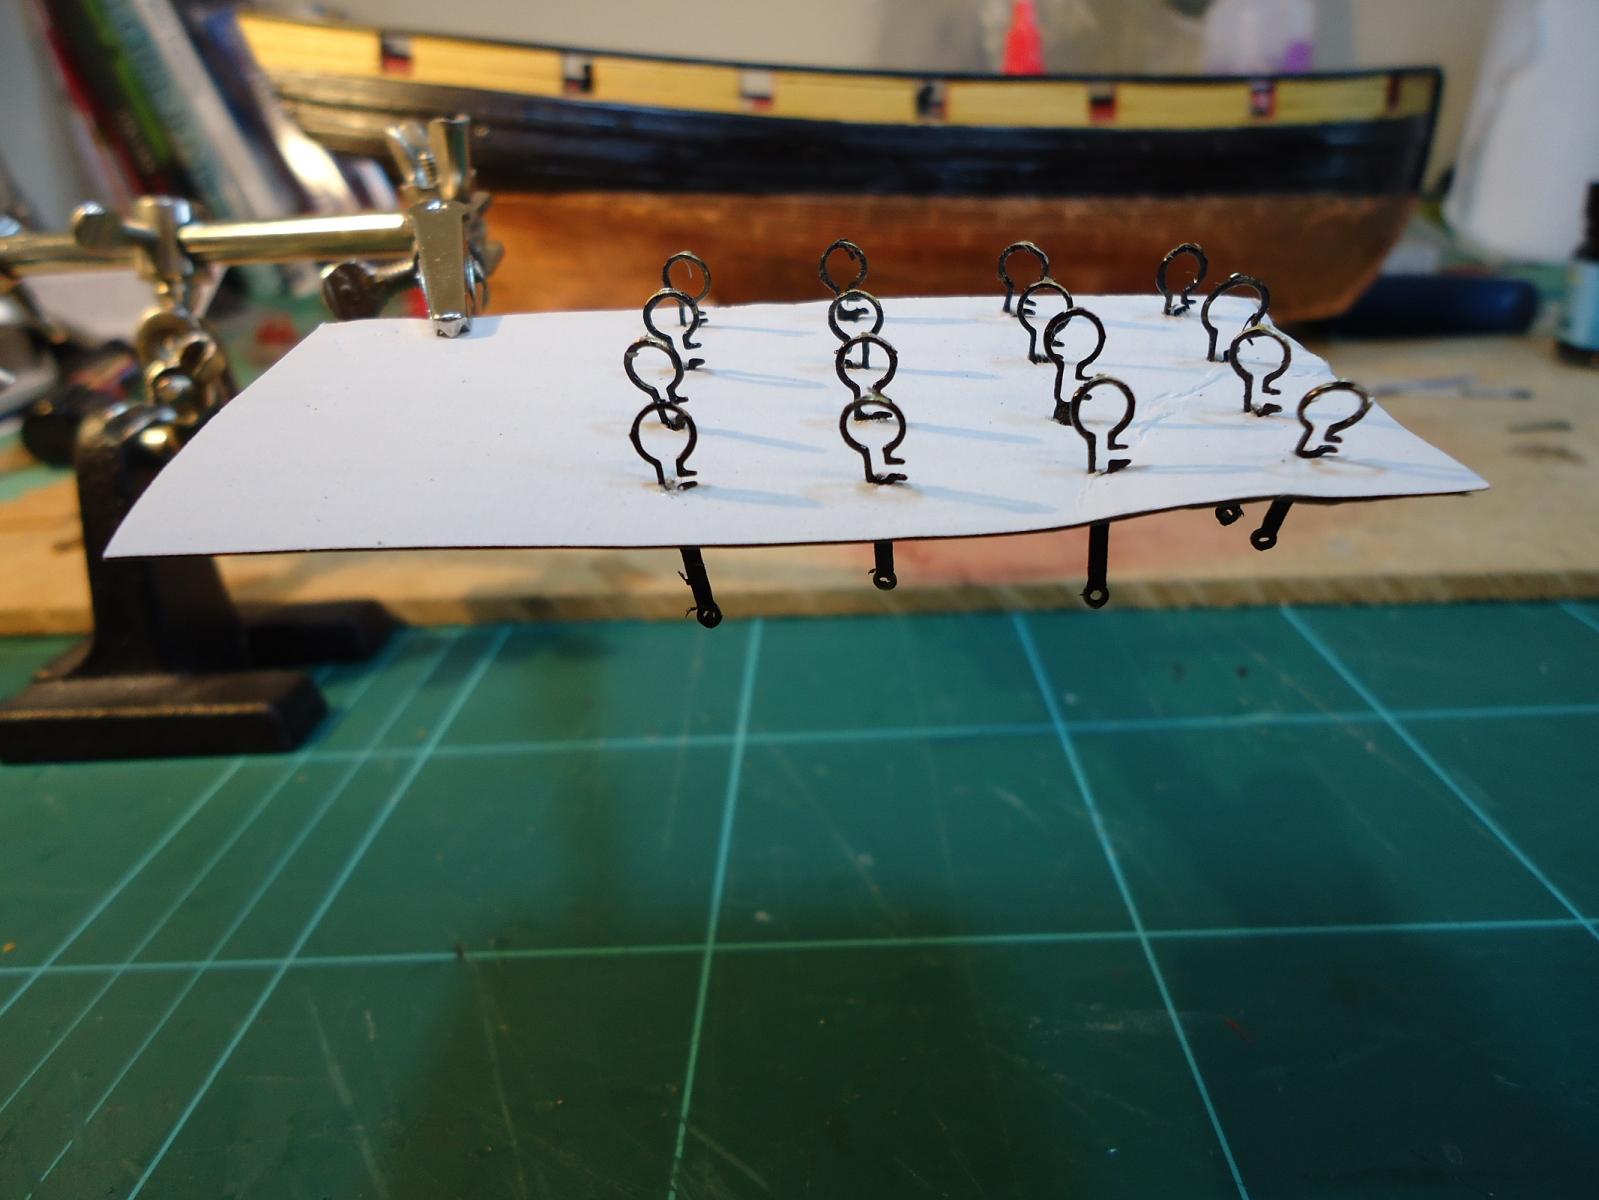
Hi Painting small objects isn't easy as we all know. Yes, I use the good old jewellers help with the magnifyer and arms and clips. But I've also found the easy way for multiple small items is to use a piece of cardboard. Drill approriate holes through the card and stick your items to be painted through. If the holes are small enough, the pieces even tend to stay still when being painted. Here's a couple of examples: Hope that helps...... John

-
Nice one Peter - the rigging looks fantastic. You do worry me about the Deadeye Strops though. I'm stil waiting for replacements to come from Jotika as I broke 5-6 trying to fix them. So what you are saying is - even if I manage to attach the Deadeye Strops in the first place, there is a change they will break when I start rigging? Oh, great - I can;t wait....... You commented "The standing rigging is finished - now comes the hard part." - blimey, if all this has been "easy" so far, what on earth are you going to attempt now? John
- 293 replies
-
- 1
-
-
- pickle
- caldercraft
- (and 1 more)
-
Many thanks Joe. Yes, I've also earmarked Timmo's log also. Re the walnut planking - I used the same for Pickle. I seem to have been lucky as I had not one strip that caused problems. With all my planking I used to put 1-2 strips in the sink - covered with lukewarm water for 15 minutes or so, then when I was ready, out came one strip, in with a new one and so on. This allowed to bend the wood without any problems, tools or clamps. I just used paper clips using the previous plank as support to clip the new plank to as I went along. I will no doubt be in touch in future so thanks for the offer of help. Just a little matter of finishing Pickle then - so this time next year I might be just about ready to go. John
-
Hi Joe Thanks for your response. I found your Build Log earlier and will be taking a good look there. You mention modifications? Can I presume that your suggestions are found in your log? One modification that I have made to my current Pickle build is the addition of furled sails - well they will be added once I get something built to attach them on - I'm getting towards finishing the deck furniture, so am already starting to work out the additional beley points etc. I am getting hooked on Granado the more I look in to this, so I look forward to a 'cuppa tea' and a good read of your log!! Regards John
-
Thanks for your insight Peter. Yes, I too have looked at Badger and have been rather uneasy as to the mast height. It almost looks as if the top spar on each mast has been put on by mistake. I seem to remember reading somewhere that the logical height of the main-mast is in direct proportion to the length of the vessel via a calculation that was used throughout the Navy. If that is the case, then this is why most ships appear to be balanced. Badger seems to be the only one that bucks the trend... Many thanks for the tip on the book link. I've found one on Amazon so will be adding it to my shopping wish list. On reflection, I agree that Granado is quite a step up, whilst Badger would be (more or less) a duplication of what I've already done. Time to start saving my pennies - £235 is a big step...... Someone elsewhere suggested I have a look at Armati kits........ time for a google session then. Current results? Granado 1 Badger 0
- 293 replies
-
- 2
-
-
- pickle
- caldercraft
- (and 1 more)
-
Nice one Rick Time to get the capping rails sorted!
-
Hello all, Although only about half way through building my Pickle, thoughts naturally turn to the "what next" question. For ages, I had always planned to build Badger as a seemingly natural progression from Pickle. ...and then I had a look at your Granado build - now that looks interesting!! I checked out the build logs and manuals available at Caldercraft/Jotika - looks a lot harder than Pickle that's for sure.... So, should it be Badger or Granado? Any comments welcome from anyone on here - but please - not the "Oh, do both" one!!!!