

Chariots of Fire
-
Posts
16 -
Joined
-
Last visited
Reputation Activity
-

 Chariots of Fire got a reaction from Canute in Brass Strip Stock
Thanks, Roger. I will keep that in mind. I have some of the brass sheet you are talking about. Any limits on thickness of the sheet that you know of?
-
 Chariots of Fire got a reaction from mtaylor in Brass Strip Stock
Thanks, Roger. I will keep that in mind. I have some of the brass sheet you are talking about. Any limits on thickness of the sheet that you know of?
-
Chariots of Fire got a reaction from Canute in Source for 1/16th x1/64 brass strip?
Looks like others are having the same issue I am. KS was a good supplier but not any more. I think I will try the paper cutter option and see what happens. I'm looking to get some 1/64" x 1/8" strips. They don't have to be long as I am making some truck springs out of them and the longest is about 3".
-
Chariots of Fire got a reaction from Canute in Brass Strip Stock
Wondering what you are finding (if there is any such thing) as a substitute for KS strip stock now that they have stopped making it. I'm in need of some 1/64" thick by 1/8" wide stock for making some truck springs. I know this is not a nautical theme but brass is such a useful material in ship model construction, I thought of this forum. Any help you can give would be greatly appreciated.
-
Chariots of Fire got a reaction from mtaylor in Brass Strip Stock
Wondering what you are finding (if there is any such thing) as a substitute for KS strip stock now that they have stopped making it. I'm in need of some 1/64" thick by 1/8" wide stock for making some truck springs. I know this is not a nautical theme but brass is such a useful material in ship model construction, I thought of this forum. Any help you can give would be greatly appreciated.
-
Chariots of Fire got a reaction from mtaylor in Source for 1/16th x1/64 brass strip?
Looks like others are having the same issue I am. KS was a good supplier but not any more. I think I will try the paper cutter option and see what happens. I'm looking to get some 1/64" x 1/8" strips. They don't have to be long as I am making some truck springs out of them and the longest is about 3".
-
Chariots of Fire got a reaction from mtaylor in Brass piano hinges
Thanks for the responses everybody. Guess the search goes on. The hinges I mention used to be available in the US but no more. They came from the UK but when I tried a re-order I was informed the person who was making them no longer was. Here was my solution. Non-ship model related but the idea is there. I ended up using several Micro-Mark H style hinges with small brass rod spacers in between. Once painted It won't be that noticeable I hope.
-
 Chariots of Fire got a reaction from popeye the sailor in Bluenose by Retired guy - Model Shipways - scale 1:64
What great craftsmanship! I built the Billings #600 Bluenose (1:100 scale). Not nearly as detailed as yours.
-
 Chariots of Fire got a reaction from GrandpaPhil in Bluenose by Chariots of Fire - FINISHED - Billing Boats - 1/100
Last summer I got a Billings 100 scale kit of the Bluenose. My wife expressed an interest in having a model of a schooner so we did some on-line shopping and ordered the kit. It took some time but finally came last June. Laser cut parts were excellent and easy to remove from the wood. Plastic parts remind me of car kits of the '60's. So much more detail in today's extrusions. Nevertheless I used most of them. Planking the hull was a lengthy process as it is impossible to pin the wood to the bulkheads without pre-drilling the holes. Not being an expert at this kind of building I followed the general method of planking the hull but with the pieces being so small (1/8" x 1/16" roughly) it was difficult to taper them. So in some areas a separate filler piece was shaped and inserted. Then as the hull was sanded smooth I used ACC in some of the gaps and let the sanding dust fill them in. It worked quite well.
The kit instructions were less than desirable. Numbers in some of the drawings indicated what some of the standing and running rigging were but there were no corresponding numbers for some lines in other views making it difficult to determine where the lines should go. But with some on-line investigation Most of the work was able to get done.
We decided that the sails would be furled. Kit material was way to heavy and thick for the scale of the model unless it was to be built in full sail. Even then, doing the necessary folding of the edges, etc would have been very burdensome and time consuming. Probably not the way most furled sails would be done but the effect was good for this build was to use single ply facial tissue. I superglued the edges of the material sufficient to allow a pin hole to be punched through about every half inch for tying the sails to the booms. For the jib sails, I made small brass wire loops, ran them through the holes and closed them up. Thread was then run through each loop. This allowed the sail to be bunched up in front. The rest was tied off.
Here are a couple of photos of the work in progress and the final result which we are generally pleased with.
The deck pieces were also laser cut but had no lines for planking. I drew lines with a fine drawing pen and then coated the deck with clear polyethylene.
I made a jig out of sheet plastic and cut two holes the size of the deadeyes. In between I cut a slot. The deadeyes were put in the holes with the pre-drilled thread holes aligned and then threaded them. Using a jig assured that all of them would be the same. Two jigs were made because the deadeyes were of two sizes. The shrouds were put in place first and ratlines were individually tied with clove hitches and secured with ACC. Then the ends were cut off. In the photo above the booms were raised but were lowered in the final build with furled sails.
I'm sure there is plenty to pick apart by those of you who are a lot more expert at model boat building than I am. So go easy on the criticism, although it will be graciously accepted.
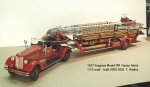
Here's a 1/25 scale model of a piece of fire apparatus that is more my type of building. It is a combination of sheet plastic, sheet brass, resin castings and is scratch built except for the tires and wheels. It represents a 1954 Maxim 750 gpm pumper. The real one is still around and was photographed and measured for the build.
-
.thumb.JPG.33e8fc9704bbb01f03cf31c187b62df9.JPG) Chariots of Fire got a reaction from Retired guy in Bluenose by Retired guy - Model Shipways - scale 1:64
Chariots of Fire got a reaction from Retired guy in Bluenose by Retired guy - Model Shipways - scale 1:64
What great craftsmanship! I built the Billings #600 Bluenose (1:100 scale). Not nearly as detailed as yours.
-
Chariots of Fire got a reaction from Retired guy in Bluenose by Chariots of Fire - FINISHED - Billing Boats - 1/100
Last summer I got a Billings 100 scale kit of the Bluenose. My wife expressed an interest in having a model of a schooner so we did some on-line shopping and ordered the kit. It took some time but finally came last June. Laser cut parts were excellent and easy to remove from the wood. Plastic parts remind me of car kits of the '60's. So much more detail in today's extrusions. Nevertheless I used most of them. Planking the hull was a lengthy process as it is impossible to pin the wood to the bulkheads without pre-drilling the holes. Not being an expert at this kind of building I followed the general method of planking the hull but with the pieces being so small (1/8" x 1/16" roughly) it was difficult to taper them. So in some areas a separate filler piece was shaped and inserted. Then as the hull was sanded smooth I used ACC in some of the gaps and let the sanding dust fill them in. It worked quite well.
The kit instructions were less than desirable. Numbers in some of the drawings indicated what some of the standing and running rigging were but there were no corresponding numbers for some lines in other views making it difficult to determine where the lines should go. But with some on-line investigation Most of the work was able to get done.
We decided that the sails would be furled. Kit material was way to heavy and thick for the scale of the model unless it was to be built in full sail. Even then, doing the necessary folding of the edges, etc would have been very burdensome and time consuming. Probably not the way most furled sails would be done but the effect was good for this build was to use single ply facial tissue. I superglued the edges of the material sufficient to allow a pin hole to be punched through about every half inch for tying the sails to the booms. For the jib sails, I made small brass wire loops, ran them through the holes and closed them up. Thread was then run through each loop. This allowed the sail to be bunched up in front. The rest was tied off.
Here are a couple of photos of the work in progress and the final result which we are generally pleased with.
The deck pieces were also laser cut but had no lines for planking. I drew lines with a fine drawing pen and then coated the deck with clear polyethylene.
I made a jig out of sheet plastic and cut two holes the size of the deadeyes. In between I cut a slot. The deadeyes were put in the holes with the pre-drilled thread holes aligned and then threaded them. Using a jig assured that all of them would be the same. Two jigs were made because the deadeyes were of two sizes. The shrouds were put in place first and ratlines were individually tied with clove hitches and secured with ACC. Then the ends were cut off. In the photo above the booms were raised but were lowered in the final build with furled sails.
I'm sure there is plenty to pick apart by those of you who are a lot more expert at model boat building than I am. So go easy on the criticism, although it will be graciously accepted.
Here's a 1/25 scale model of a piece of fire apparatus that is more my type of building. It is a combination of sheet plastic, sheet brass, resin castings and is scratch built except for the tires and wheels. It represents a 1954 Maxim 750 gpm pumper. The real one is still around and was photographed and measured for the build.
-
 Chariots of Fire got a reaction from ccoyle in Bluenose by Chariots of Fire - FINISHED - Billing Boats - 1/100
Last summer I got a Billings 100 scale kit of the Bluenose. My wife expressed an interest in having a model of a schooner so we did some on-line shopping and ordered the kit. It took some time but finally came last June. Laser cut parts were excellent and easy to remove from the wood. Plastic parts remind me of car kits of the '60's. So much more detail in today's extrusions. Nevertheless I used most of them. Planking the hull was a lengthy process as it is impossible to pin the wood to the bulkheads without pre-drilling the holes. Not being an expert at this kind of building I followed the general method of planking the hull but with the pieces being so small (1/8" x 1/16" roughly) it was difficult to taper them. So in some areas a separate filler piece was shaped and inserted. Then as the hull was sanded smooth I used ACC in some of the gaps and let the sanding dust fill them in. It worked quite well.
The kit instructions were less than desirable. Numbers in some of the drawings indicated what some of the standing and running rigging were but there were no corresponding numbers for some lines in other views making it difficult to determine where the lines should go. But with some on-line investigation Most of the work was able to get done.
We decided that the sails would be furled. Kit material was way to heavy and thick for the scale of the model unless it was to be built in full sail. Even then, doing the necessary folding of the edges, etc would have been very burdensome and time consuming. Probably not the way most furled sails would be done but the effect was good for this build was to use single ply facial tissue. I superglued the edges of the material sufficient to allow a pin hole to be punched through about every half inch for tying the sails to the booms. For the jib sails, I made small brass wire loops, ran them through the holes and closed them up. Thread was then run through each loop. This allowed the sail to be bunched up in front. The rest was tied off.
Here are a couple of photos of the work in progress and the final result which we are generally pleased with.
The deck pieces were also laser cut but had no lines for planking. I drew lines with a fine drawing pen and then coated the deck with clear polyethylene.
I made a jig out of sheet plastic and cut two holes the size of the deadeyes. In between I cut a slot. The deadeyes were put in the holes with the pre-drilled thread holes aligned and then threaded them. Using a jig assured that all of them would be the same. Two jigs were made because the deadeyes were of two sizes. The shrouds were put in place first and ratlines were individually tied with clove hitches and secured with ACC. Then the ends were cut off. In the photo above the booms were raised but were lowered in the final build with furled sails.
I'm sure there is plenty to pick apart by those of you who are a lot more expert at model boat building than I am. So go easy on the criticism, although it will be graciously accepted.
Here's a 1/25 scale model of a piece of fire apparatus that is more my type of building. It is a combination of sheet plastic, sheet brass, resin castings and is scratch built except for the tires and wheels. It represents a 1954 Maxim 750 gpm pumper. The real one is still around and was photographed and measured for the build.
-
 Chariots of Fire got a reaction from Kevin in Bluenose by Chariots of Fire - FINISHED - Billing Boats - 1/100
Last summer I got a Billings 100 scale kit of the Bluenose. My wife expressed an interest in having a model of a schooner so we did some on-line shopping and ordered the kit. It took some time but finally came last June. Laser cut parts were excellent and easy to remove from the wood. Plastic parts remind me of car kits of the '60's. So much more detail in today's extrusions. Nevertheless I used most of them. Planking the hull was a lengthy process as it is impossible to pin the wood to the bulkheads without pre-drilling the holes. Not being an expert at this kind of building I followed the general method of planking the hull but with the pieces being so small (1/8" x 1/16" roughly) it was difficult to taper them. So in some areas a separate filler piece was shaped and inserted. Then as the hull was sanded smooth I used ACC in some of the gaps and let the sanding dust fill them in. It worked quite well.
The kit instructions were less than desirable. Numbers in some of the drawings indicated what some of the standing and running rigging were but there were no corresponding numbers for some lines in other views making it difficult to determine where the lines should go. But with some on-line investigation Most of the work was able to get done.
We decided that the sails would be furled. Kit material was way to heavy and thick for the scale of the model unless it was to be built in full sail. Even then, doing the necessary folding of the edges, etc would have been very burdensome and time consuming. Probably not the way most furled sails would be done but the effect was good for this build was to use single ply facial tissue. I superglued the edges of the material sufficient to allow a pin hole to be punched through about every half inch for tying the sails to the booms. For the jib sails, I made small brass wire loops, ran them through the holes and closed them up. Thread was then run through each loop. This allowed the sail to be bunched up in front. The rest was tied off.
Here are a couple of photos of the work in progress and the final result which we are generally pleased with.
The deck pieces were also laser cut but had no lines for planking. I drew lines with a fine drawing pen and then coated the deck with clear polyethylene.
I made a jig out of sheet plastic and cut two holes the size of the deadeyes. In between I cut a slot. The deadeyes were put in the holes with the pre-drilled thread holes aligned and then threaded them. Using a jig assured that all of them would be the same. Two jigs were made because the deadeyes were of two sizes. The shrouds were put in place first and ratlines were individually tied with clove hitches and secured with ACC. Then the ends were cut off. In the photo above the booms were raised but were lowered in the final build with furled sails.
I'm sure there is plenty to pick apart by those of you who are a lot more expert at model boat building than I am. So go easy on the criticism, although it will be graciously accepted.
Here's a 1/25 scale model of a piece of fire apparatus that is more my type of building. It is a combination of sheet plastic, sheet brass, resin castings and is scratch built except for the tires and wheels. It represents a 1954 Maxim 750 gpm pumper. The real one is still around and was photographed and measured for the build.
-
Chariots of Fire got a reaction from mtaylor in Furling sails
Thanks, Guys. I will try the silk span and see how it goes. Saw the video above and it helped out a lot.