
MORE HANDBOOKS ARE ON THEIR WAY! We will let you know when they get here.
×


Mickgee
-
Posts
40 -
Joined
-
Last visited
Content Type
Profiles
Forums
Gallery
Events
Everything posted by Mickgee
-
Hello guys, I've never run across pics showing iron or rope hoops around upper masts. How were they held together? I'm building the Occre 'Dos Amigos' and applied rope hoops round the lower fore and main masts. Weren't there any on the other mast segments? Thanks, Michael
-
What a wonderful project, truly inspiring. I haven't read every single page, just areas that apply to my own project, and have already learned and knowing now to proceed, I'll gladly follow your procedures. Thanks to you sir, for sharing this wonderful adventure. Greetings from Germany, Michael
- 3,618 replies
-
- 4
-

-
- young america
- clipper
- (and 1 more)
-
A drill press....wonderful idea, wish I had one big enough. Snow, 600mm is a fairly long mast at 8mm diameter. I've tapered them at 450mm by clamping the dowel in a regular drill, hold it between my knees and in one hand coarse sandpaper, the other a rasp. Using both hands keeps the wobbling down to a controllable level too. Drill at lowest rpm though! For a mast, don't worry about the chuck marks on the wood, this area goes below deck anyway. Upper masts though will need more care, yards too. Same method though, just a bit different technique. You'll see how after the mast ordeal. At 600mm and 8mm, you're probably looking for less than 6mm at the tip. This should be achievable in about 15 minutes. Good luck and let us know how it came out, OK?
-
Marking the waterline is one thing and fairly simple. Finding, or determining the waterline is a new ball game. I've found no better way than to just eyeball the hull. The Lynx, a Baltimore Clipper type, has two masts. My Dos Amigos a very similar build. No matter which way, it always seems to be the midline between the masts. When this is level, the boat just looks right. So, from the deck, or even the gunwales at each mast, find the level point between the two. Certainly not mathematical or scientific, but I absolutely cannot deduce this line with any of the available equations. The boat just sits right, my opinion, when the fore and main masts at the deck, are level. Nice model RF, good luck to you. Michael
-
Model Shipways Bluenose, Sails or not
Mickgee replied to Worldway's topic in Masting, rigging and sails
Hello Derek, This is indeed a good and healthy consideration. I go through this every time I build a ship. The Bluenose in my opinion, needs sails. Another one is the Cutty Sark, my opinion. Why not the best of both worlds, and apply a stormy sail rigging? I did this on the Cutty Sark, and I love it. The cloth is there, but not like in a light breeze and sunshine. Greetings, Michael -
Hi Steve, what I really like is the fact that smaller boats are in no way lesser quality or easier to build. Great also the attention you've shown with your jig. I like. I'd love to follow this further. Lots that can be learned with project. Michael
- 190 replies
-
- 2
-
-
- pinnace
- model shipways
- (and 1 more)
-
casting metal parts including cannon
Mickgee replied to rtropp's topic in Metal Work, Soldering and Metal Fittings
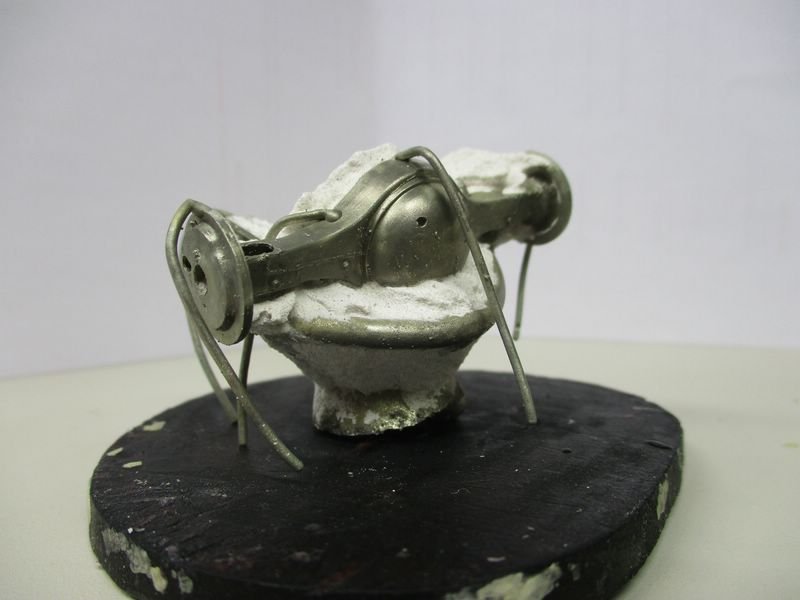
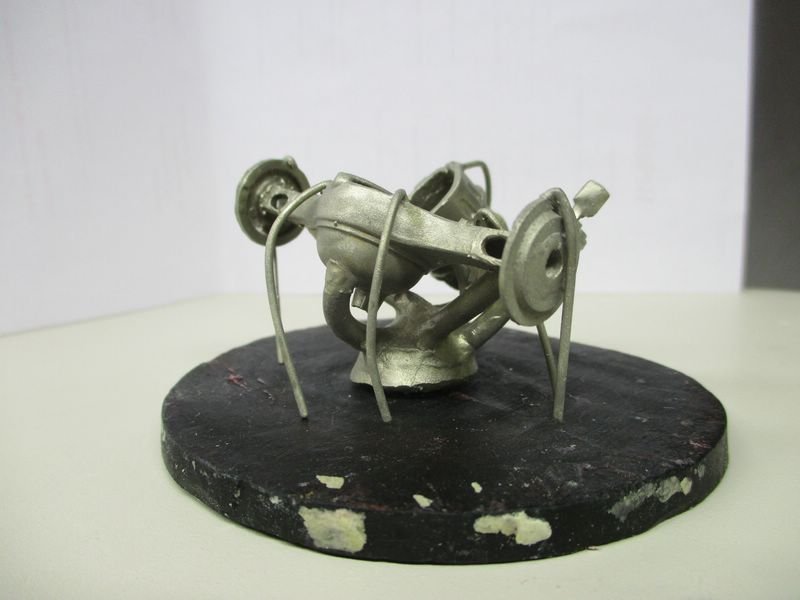
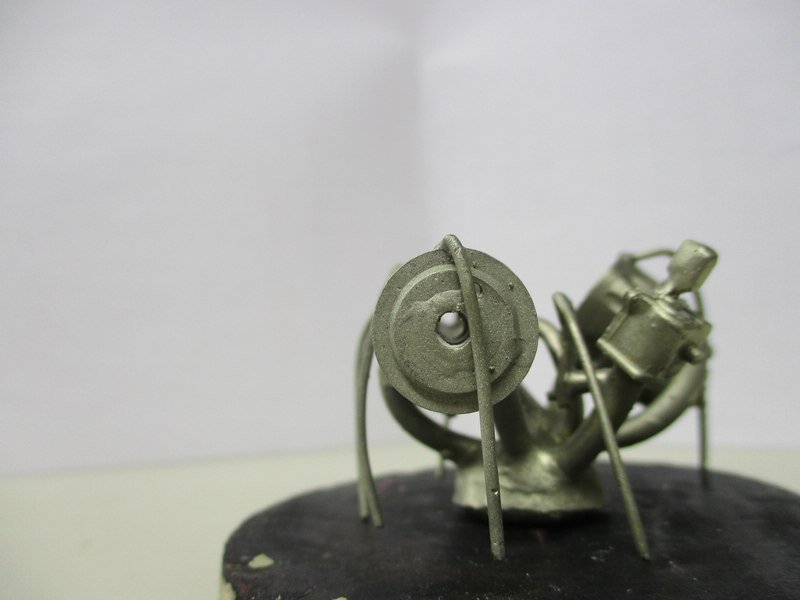
The cooled down mold is now broken open. The investment is fairly soft. Lets have a look to see if everything cast out properly; The mass is just pinched off, then it's best to sandblast the remaining material away. The dust is quartz and dangerous, do not breathe in. I have a suction cabinet; Getting there; Great! No voids, no unwanted clumps of metal. Let's get moving; A high speed handpiece with lots of torque, and a mounted separating disc, cuts off the sprue leads to get the individual parts for finishing; Here the parts finished and ready for further assembly; The finished product upside down, and it looks pretty good; This is meant to be an insight for casting metals using investment for high heat metals. Not a thing for the regular modeler for sure. Just with some preparation and a little practice and guidance, an ambitioned modeler could do the prep work and give the mold to a jeweler or dental type acquaintance. This stuff happens a lot, no problems. I hope Richard you don't mind me posting this sequence. Michael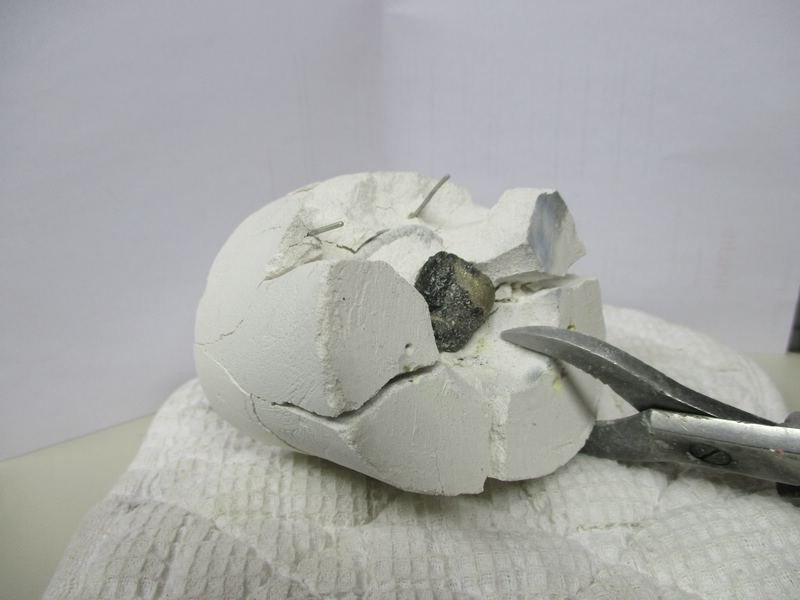
-
casting metal parts including cannon
Mickgee replied to rtropp's topic in Metal Work, Soldering and Metal Fittings
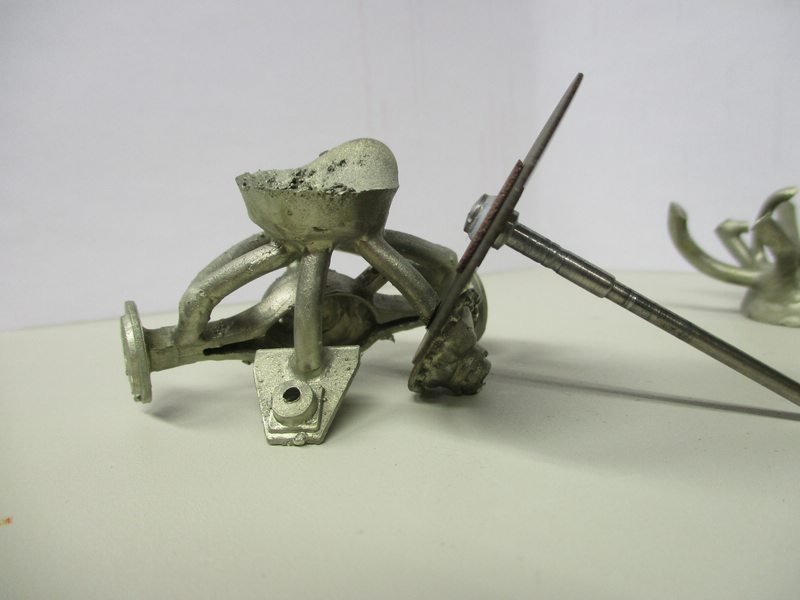
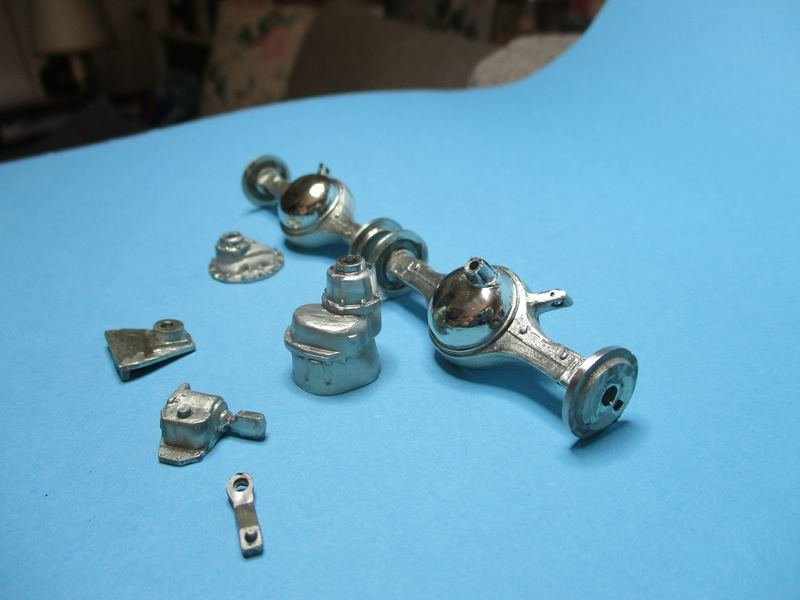
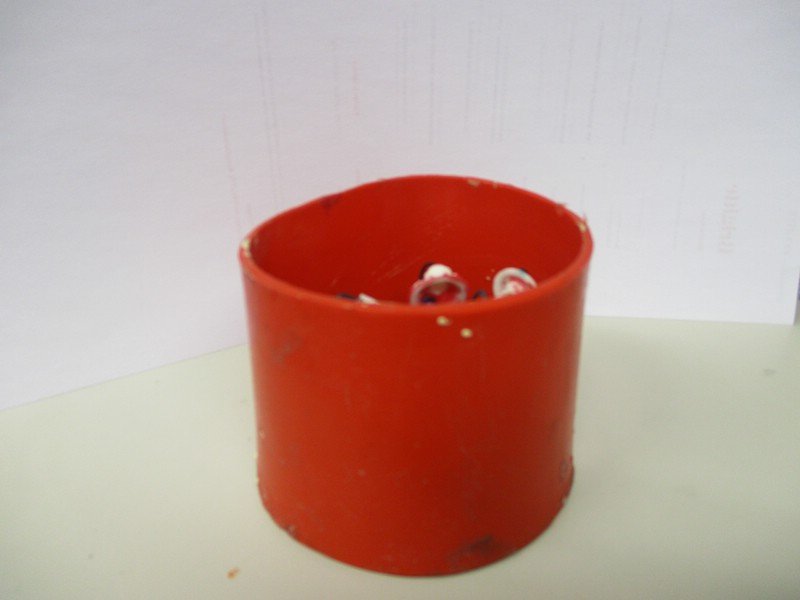
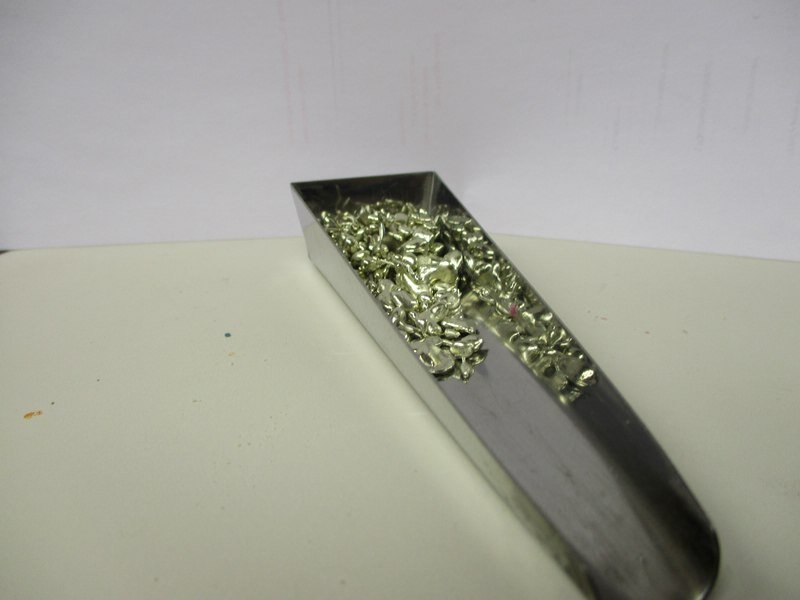
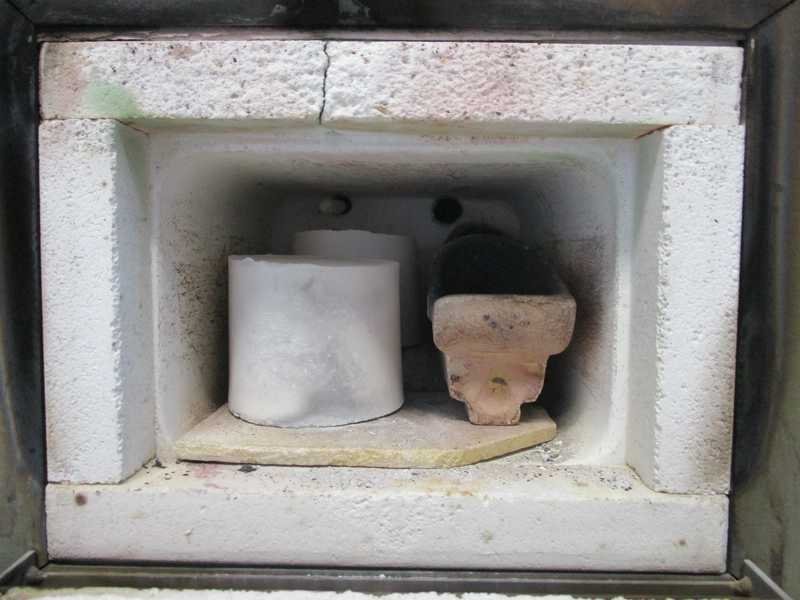
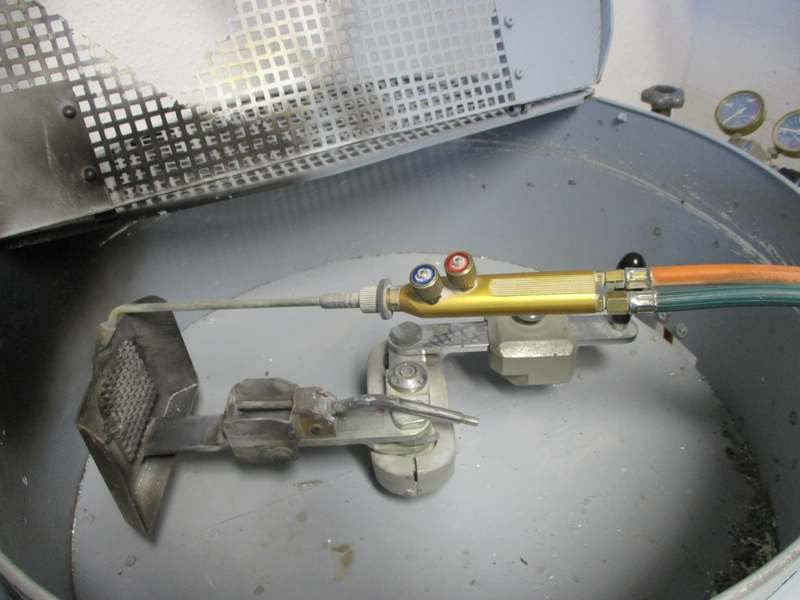
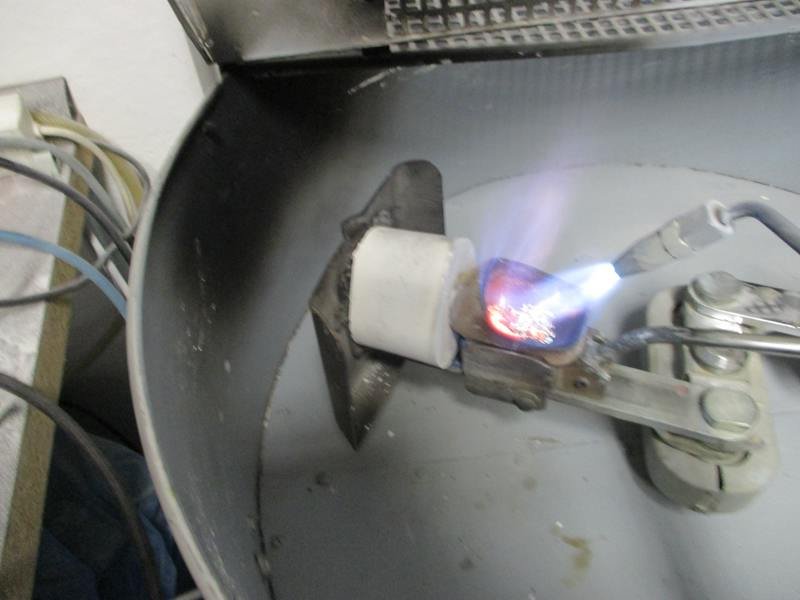
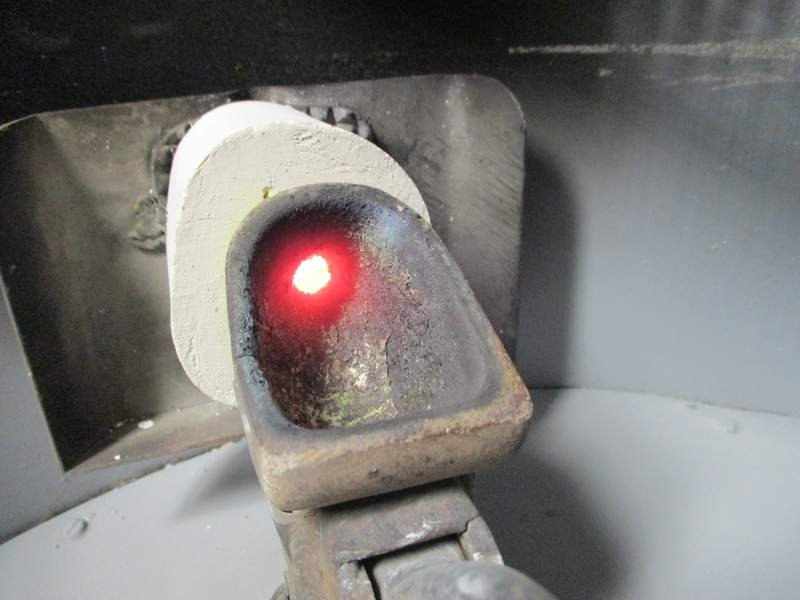
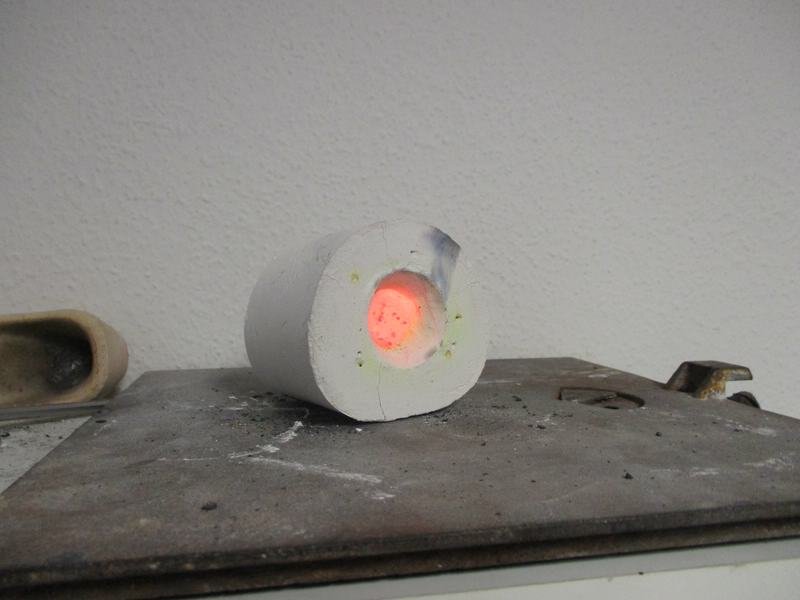
Guys, if you don't mind, Richard asked for links concerning casting parts in brass in his original post, the theme of this topic. I've been doing this stuff for some 45 years. I don't have a link, but from former modeling forum builds I have some pics showing the casting procedure as I know it. The parts here are for a 1:25 scale car or truck model. My models are fabricated entirely from metal, excepting the resin or plastic bodies. Further on I'll show a few pics, the results are truly astounding, very real looking, and real metal motors just look, well real. Here the step by step procedure for investment casting of small parts using the lost wax technique. This is a rear axle housing for a model Peterbilt truck in plastic, as in the kit; The parts have 4mm sprue leads waxed onto the housings. A Bunsen burner and specific waxes are used to connect the sprue leads. When heated up, the wax will melt and a tunnel remains where the molten metal will be thrown into with centrifugal force; The thinner blue leads are for ventilation. It's hot in there, lots of metal coming in, the voids have to be evacuated to make a safe place for the molten metal. Another view. Realize, the axle housing has the front and back already fused together. Inside is hollow, but it's imperative the liquid investment material can flow into the very last crook and cranny, inside the housing. If not, a void exists, and this void becomes after the casting procedure a big clump of solid metal! Not good, and can usually be filed under "failure". Next a ring will be placed around this so that investment material can be poured in. The investment is a powder and liquid mass that flows readily from a rubber bowl, just dump it in; Side view; Here the investment is set, in this case 20 minutes, then pushed out of the ring former. You can see the small 1.5mm vents at the base. These are very important, and help to guarantee a high quality and dense metal casting result; The funnel shaped hole is where the crucible is slid into place when the form is heated up. More brass, nickel, alpaka and chrome/cobalt (a steel) the form is glowing red hot. Same temps approximately for gold, silver and similar metals. Here a funnel to feed the metal, in this case alpaka, or German silver (very similar to brass); A wonderful metal for hobby use. It does not tarnish when cast, and is hard but still malleable for polishing and working with normal hobby rotating instruments and burs. Here the investment mold in the oven, or kiln as ceramic folks say. The crucible has to be heated up as well or it will burst when heat from a torch to melt the metal for casting is applied; Here a "broken arm" casting machine, a centrifugal forced method to cast molten metals, with a torch for propane/oxygen gas mix. Cool enough for lesser metals, hot enough for steels, adjustable; Ready to go. The crucible is in the cradle, the metal pellets have been added, investment mold is situated and affixed, the heat is on; Done. The broken arm spins like crazy and throws the molten metal into the mold. The mols id pulled from the cradle with long pliers and laid away to cool down for about an hour; To be continued;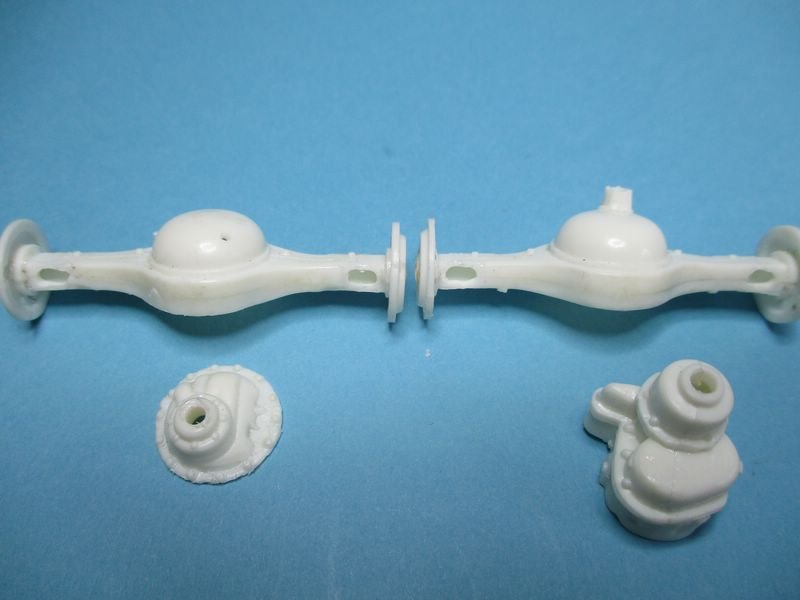

-
casting metal parts including cannon
Mickgee replied to rtropp's topic in Metal Work, Soldering and Metal Fittings
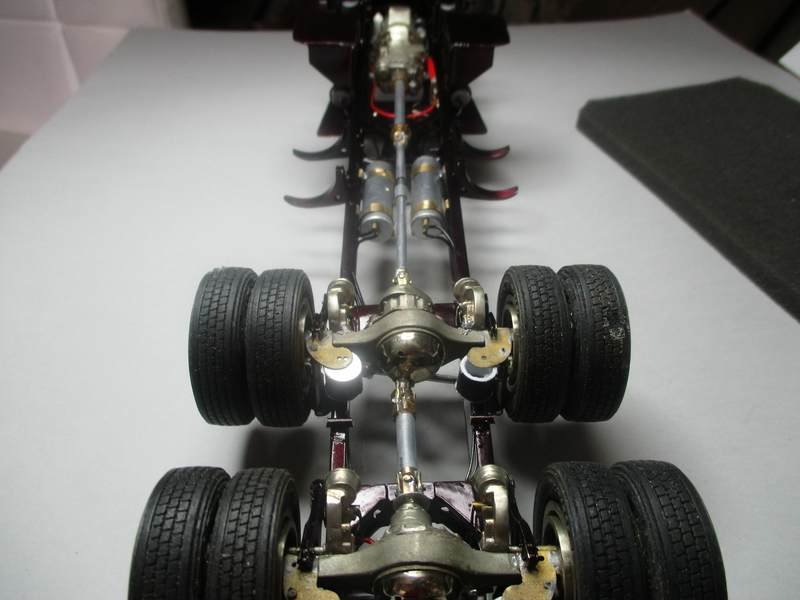
I have a lot of experience in investment casting, the end result is only as good as the mold you want to reproduce in metal. So here the important part is preparing and making molds. The molds made by xken above really look magnificent. Instead of brass, I like Alpaka, or in the US it's called new German silver, a brass and copper mix. A kilo costs around $50, which would make for a lot of cannons. Here a 1/25 scale Diesel motor for a Peterbilt truck model I did 2 years ago. The motor has a lot of individual cast parts, this pic shows the finished assembly. The silver looking metal is cast nickel, the pale gold is German silver; A ship with a deck full of metal cannons would have considerable weight! The method used by Watson above, would be the way to go for a large number of objects. -
The wonderful greetings are encouraging, many thanks. So, I'm having a closer look at the Dos Amigos' hull. Some pics are on the agenda very soon. As stated earlier, there was an issue with the bow planking, and I just lost momentum. This was about 5 years ago. The urge is returning.
-
My 1st wooden ship has long single strips for the 2nd planking. The 2nd ship I used 4 different lengths, staggered. The longest plank is a scale 10 meters (about 33'). This is on a 1:50 model. So, from the deck on down to the keel, the plank run is every 4 layers, redundant. I like the look, and the difficult bends were easier too, my opinion. Plus, there are no very short planks to compensate. I like the look, and the overall planking ordeal went a lot smoother and fluidly than the 'single plank method'.
-
Thank you gentlemen. I'm really thrilled with the fine builds and the photography shown and looking very much forward to getting the smell of worked wood in the hobby room again. Here an offer of my last ship completion, actually a scratch rendition of AL's Le Hussard from the 70's. I won an auction on Ebay, only the hull had the 1st planking finished. It was a catastrophe, warped and ugly. So this build has really nothing to do with the kit. It's longer, higher and wider, none of the kits' features were applied, so I'm calling it a scratch endeavor. The build was not documented, this was before my digital days. I plan on making a documentation of the Dos Amigos, a soon as I can figure out how to proceed with the bow planking. I'll go again now to the gallery and have a look around. Michael
-
Hello fellow modelers, I'm Michael Gray, born in Florida, retired now and living in Germany. After several years of scratch building model cars in brass, I think it's time to return to historical sailing vessels in wood. My fleet could use a new commissioning. The Occre Dos Amigos is in the works, nice ship my opinion. The wood doesn't make it though, but that's been taken care of already. So I'm slowly getting my hands and fingers up to the task, the hull has it's 1st planking, the deck is finished. But I'm stumped at how to apply the 2nd planks to the bow. I miscalculated how to do it, and am not sure if butted in is the way to go or not. It's not too late, just this step caused me to put the model aside, 5 years ago! But more of this later on, with pics of course. There are lots of very fine models here, breathtaking. You guys are great, Respect! I'll be working on my learning curve, and have a lot of looking around to do. What a wonderful pastime. Many thanks, Michael