


Mickgee
-
Posts
40 -
Joined
-
Last visited
Content Type
Profiles
Forums
Gallery
Events
Everything posted by Mickgee
-
Best type of micro drill bits for metal
Mickgee replied to BETAQDAVE's topic in Metal Work, Soldering and Metal Fittings
Hello wefalck, a couple of your observations, especially concerning a quote, are incorrect. For instance, I didn't state directly that carbide was a steel. Also, I didn't write to drill holes with a bur, I used this method as an example, later on writing that the proper bit is better suited for drilling holes. This was used as an example, not to be taken as a method I'd prefer. When a true drilling bit breaks, it's mainly because the initial mark was not indented to keep the bit on track, or too much pressure was applied, plus heat causes the material to break down. I'm writing about drill bits of under 1mm diameter. Color coding as written, pertains to how rough the cut will be, the better quality burs have an immovable color ring, it's painted on. Concerning HSS, I rarely wasted time and expenses going this route as the material just dulled too quickly. Also, the only time a carbide bur would break was when overheated while grinding or the sideward pressure applied was too great, which would show that an improper technique was applied. You may have noticed before some of these "carbides", or hardened steels are still magnetic, suggesting there would still be steel involved. Sometimes the hardened heads are attached to steel shafts, not all of time though. Again, depends on the quality and size. Of course a modeler can choose whichever method he deems fit. I chose with this reply to clear up a few of my points since you seemed to misrepresent or misunderstood what I'd previously written. I try to make clear statements to keep things like this at a minimum, I'll try harder for the future. -
Best type of micro drill bits for metal
Mickgee replied to BETAQDAVE's topic in Metal Work, Soldering and Metal Fittings
Carbide is the only way to go. Lesser quality steel will become blunt quickly, they'll become more expensive than carbide soon. Dave, the selection Toni showed is a wonderful collection. The colored bands are only a reference to the coarseness of the individual bit. Their individual usage is for the most part a matter of speed used and/or material that needs cutting/grinding. For drilling holes, for instance in brass strips, a drill press or at least some kind of device that keeps the rotating instrument steady is a must in most cases. Also, using the correct bit for the deed is good advice. For instance, drilling small holes with a round bur does work, just the bur, even a carbide bur will dull soon. Whereas a bit used only for drilling holes will last 5 times longer. I've been acquainted with metal/carbide burs for 47 years. Greetings, Michael PS: I forgot to add, a wonderful source for every imaginable bit form/shape is from the dental industry. Often, a dental depot will sell burs and bits less expensive than a hobby shop. You might have to twist their arm to sell you some, but most will happily agree. The plastic bands around the shaft are red = coarse, blue = middle, yellow = fine. I believe there are also green bands, but I haven't a clue as to their usage, never had one. -
Cleaning Small parts prior to blackening
Mickgee replied to src's topic in Metal Work, Soldering and Metal Fittings
Hello Sam, I agree with mtaylor about lot of work for a few small pieces. Also, those etching brushes you showed are an excellent choice. I've always preferred the glass fiber brushes, they're exceptionally suited for this task. Brass brushes tend to clutter up easily, and also offer a small amount of particles which negate previous steps. Here's the deal. The very small metal parts show many smooth surface areas if you look at these under magnification. Brushing the small surfaces with a light, abrasive "pencil tool" will slightly roughen up the surface, and this procedure will help the blackening agent to better grip. Even if you choose to paint, same positive effect. I'd suggest just lay the parts on a glass slab, and spray them automotive brake cleaner. Dry the rest, dump them in alcohol, you're ready to go. Air drying will proceed quickly. I'm a retired master hand craftsman of the watchmaker branch. We do this stuff and related, on a fairly regular basis. Metal prep is a must, but doing too much too often is a waste of time. We want best results without unnecessary events. Good luck to you, sir. I'm happy that you give small things such great attention. Michael -
My First Attempt At Metal Blackening
Mickgee replied to Osmosis's topic in Metal Work, Soldering and Metal Fittings
Hello Art, I just ran across this informative post, many thanks. I'm a fan for using toilet bowl cleaners for other heavy duty cleansing issues, I'll surely add brass blackening to the list. For other uses, the stuff will eliminate all plaque and other deposits from removable dentures, with no harm to the base appliance. One can spend lots of time and cash for a thorough cleaning of dentures....or use toilet bowl and pipe cleaner as a remedy. Fact, this is no BS. I know a thing or two about teeth, not to worry. Now, say aahhh... Michael -
Hello Fireman,
My name is Michael, alias 10thumbs on the ModelCarsMagazineForum.
Are you the gentleman who fabricates scratch built brass fire engine models, especially old timers and those that go deep into the woods which most of us don't ever see?
Anyways, I just ran across your query on brass piano hinges, can't help you there, just curious if you are whom I assume.
Greetings to Maine, and hope you can find a hinge source.
Michael
-
Stain
Mickgee replied to Jörgen's topic in Painting, finishing and weathering products and techniques
Hello Jörgen, we'd all be pleased if you let us know how things turned out. We're always looking for other methods and materials to use so your input will be appreciated. Good luck and have fun. Michael -
Stain
Mickgee replied to Jörgen's topic in Painting, finishing and weathering products and techniques
Hi Passer, yes, stain before gluing the 2nd planks. Here an example of mahogany strips that I treated with black water based stain. The strips were stained before application. Once glued into position, the sanded planks become a little lighter of course, but can be easily re-stained after gluing and sanding smooth. See the lighter spot on the planks near the keel? Here the same area after being re-stained and then sealed; When the glue covers the previously stained planks, the stain remains as is, because the glue seals the pores, but the rest can be sanded and re-stained, no problems at all with this particular black hull. Michael -
Stain
Mickgee replied to Jörgen's topic in Painting, finishing and weathering products and techniques
Hello Jörgen, personally, I prefer water based stain. This would be a powder that is poured into very hot water, then stirred shortly. Use a jar with a screw lid, and the stain will keep for many years. Water based stain dries quickly, like within 30 minutes. Please note, the wood should be stained before assembly, as it will not penetrate any glue that you may use for joining wood pieces, and the original wood color will remain visible. Good luck and have fun. Michael -
Thank you Mr. EdT. I'm truly amazed although I don't seek your level of expertise. What I do love is to realize what is possible, this you show very well, and this is for me a wonderful incentive to progress a step or two further with my own project. Just wonderful, many thanks for showing your efforts. Michael PS: Concerning the old photos with the tilted main yards, of course they were used for hauling bulk goods. Yet another reason for heavy winches located behind masts.
- 3,618 replies
-
- 3
-

-
- young america
- clipper
- (and 1 more)
-
Rigging lines located inside of shrouds?
Mickgee replied to Mickgee's topic in Masting, rigging and sails
Thanks guys for the feedback. Dafi, in your 1st pic I see 3 lines, fairly large, coming down. Do you have a shot of how you did all of them from the inside of the ratlines? Your model looks wonderful. In other words, of the finished model? Thanks Jan for the directions to an excellent build, I don't remember seeing anything quite as stunning as this project. I realize too that sails are better handled from the deck, but how these lines get there is what interests me the most at this time. I think I'll give Mr. EdT's America yet another view. What a wonderful project! Thanks guys for your interest. Michael -
Rigging lines located inside of shrouds?
Mickgee replied to Mickgee's topic in Masting, rigging and sails
About as thick as a big man's arm would be my guess, fairly stout. That's just another reason that I enjoy about watching "Master and Commander", you can get a real idea about the size of rigging. All throughout the movie are lots of closeup shots. Michael -
Rigging lines located inside of shrouds?
Mickgee replied to Mickgee's topic in Masting, rigging and sails
Bingo! This pic is from flick, the deck of the Cutty Sark; Here other shots of rigging running down the shrouds and ratlines; http://www.alamy.com/stock-photo-the-top-deck-of-the-cutty-sark-in-greenwich-london-105044403.html Case closed. Michael
-
Rigging lines located inside of shrouds?
Mickgee replied to Mickgee's topic in Masting, rigging and sails
Hi Mike....yes, I think "higher up the masts" is a key phrase with this subject. I've done some searching, further on now, it appears as if the running rigging from the top sails, run down the mast to the main crosstree, then they flare out to run down the inner sides of the lower shrouds, then probably tied off right there at the belaying pin banks. This would be spot on with the ship I'm building. Otherwise, the mast area gets terribly crowded if the all of the running rigging runs all the way down the masts to the deck. Anyway, what other reason would there be so many belaying points and racks along the gunwales, meaning directly below the ratlines? I'll be rigging the ship in this manner. Michael -
Rigging lines located inside of shrouds?
Mickgee replied to Mickgee's topic in Masting, rigging and sails
Hello John and Mark, I've never noticed running rigging being attached to the ship side of shrouds. I wish I could post more uploaded pics that I ran across just recently. John, at this time there is nothing specific to ask, this being a general question. My current project is getting close though to the pint where I have to decide which sails will be mounted, and which will be furled. I'm leaning in the direction of having the gallant yards lowered with furled sails. Great to know of the possibility of using the shrouds for the the top gallant sails. Excellent feedback guys, greatly appreciated. Michael -
Hello Members, This link shows pics of running rigging that appears to follow the inner side of shrouds and ratlines; http://www.alamy.com/stock-photo-sailors-furling-the-sails-of-sailing-ship-stavros-s-niarchos-operated-39301266.html I've seen this on several ships on similar websites. I won't upload any pics here for fear of copyright issues. What is their purpose? Which part of a sail rigging do they belong? Thanks in advance. Michael
-
Great looking model Mike! I always liked the Niagara model, just now I see it's too intricate for me nowadays. You've done well, be proud. Michael
- 843 replies
-
- 2
-
-
- niagara
- model shipways
- (and 2 more)
-
Hi Mike, I visited your Niagara project and saw this link. Cleaning dirty old ship models is a task for sure. Every couple of years I give my fleet a bath too. The first time I did this was after many years, afterwards I learned every three of four years is good. All of my ships are on open shelves, between floor to ceiling bookshelves. The 40+ year old plastic Cutty Sarks & Co. are not a problem, some even have cloth sails, are had become quite grungy. Even cloth sails can get clean again, not to worry. My two wooden ships get bathed as well. The grimy dust does not blow off with compressed air, just the recent dust levels, no grunge though. I spray mine with a strong household cleaner, pump spray type, let it soak a couple of minutes, and start scrubbing with different small paintbrushes. Spray again and rinse off under a shower! Yep. The ship gets a big storm of water. Blow the water off with comp. air or use a hair dryer. First off, the wood on my models has been sealed in some form or another. No risk here that wood will loose color. The sails get even a better looking patina! Cleaner too. All ship models can be easily cleaned. Even the rigging gets rid of dirty dust bunnies. I'm not aware of current household cleaning agents currently on the US market. Just I'd recommend a type that does not develop too much foam, as this could make for a mess in connection with a water rinsing. Michael
-
Mike, On another note, don't fret with the current hand/eye syndrome. In my case, I call it 'age'. I'm 66, slowly learning to 'listen' more, it'll work out. Your good times will come tomorrow, or whenever you feel like doing some intricate procedures. I'm with ratlines currently, and realize when the shakes set in just take a break, soon after I can continue. There is no rush. False is, thinking the project will soon end! Not good. Keep on keeping on at your own pace and prevail. No time limit. You are doing just fine. Michael
- 843 replies
-
- 3
-
-
- niagara
- model shipways
- (and 2 more)
-
Hey Mike and Don, mind if I join you? It's a little stormy outside, shooting the breeze and telling good stories sounds right to me. Michael
- 843 replies
-
- 4
-
-
- niagara
- model shipways
- (and 2 more)
-
Thanks Mike, I appreciate you stepping up, now I'll have to find out if Syren sends to Europe. Your lines do look good, easily seen as you have nice sharp closeups. I agree with you too, not every single thing has to be absolute top notch as lots of lesser quality items and areas are only seen with a camera. I'll follow your project along towards completion. Greetings, Michael
- 843 replies
-
- 3
-
-
- niagara
- model shipways
- (and 2 more)
-
Hello Mike, That's a fine looking model, you've done well, I really like. Question please: The lines you show for the rigging, I suppose these aren't those supplied with the kit. They look a lot better than anything I've ever had. Could you give some insight? Greetings, Michael
- 843 replies
-
- 3
-
-
- niagara
- model shipways
- (and 2 more)
-
Excellent! Thank you Henry, this clears up any thoughts or misconceptions. Michael
-
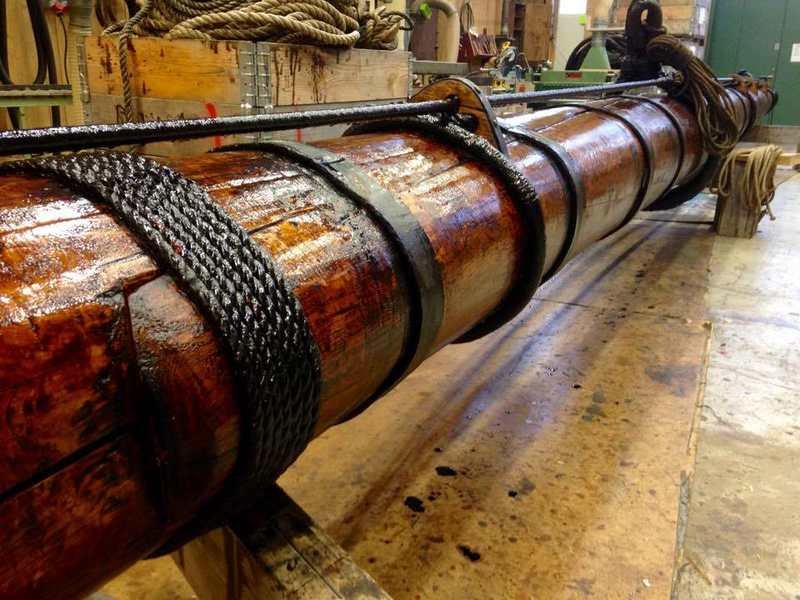
On another note, what about the yards? I know for sure the larger yards were built. What about the upper yards, let's say the mars and upper mars? They must of been very, very heavy. Last week, this was found on Pinterest, unfortunately author is unknown to me. This is the best documentation I've ever seen! Michael Michael
-
Henry, wonderful info, thanks much. Even on big ships, like the 'Victory', I've seen no bands other than on the lower masts. Yes, in the city I live in (in Germany), all through the forests are signs of the historical nature of the present area. Along with other info, there is a reference to the mass depletion of forests during the wooden ship ages, hence all forest here have been planted, and the run is very aligned. Exception being the occasional refuge for the monarchy for hunting purposes. These still have natural growth. Thanks Henry for the clarification. Michael