Osmosis
-
Posts
626 -
Joined
-
Last visited
Content Type
Profiles
Forums
Gallery
Events
Everything posted by Osmosis
-
 Thank You. Once again waiting for paint to dry. In the mean time I did all the rigging I could on the mast and booms prior to stepping which I am hoping will happen tomorrow. I still have not settled on a display stand design I guess I had better get on that I will need it soon. I also have to start thinking about a second build. Any recommendations?
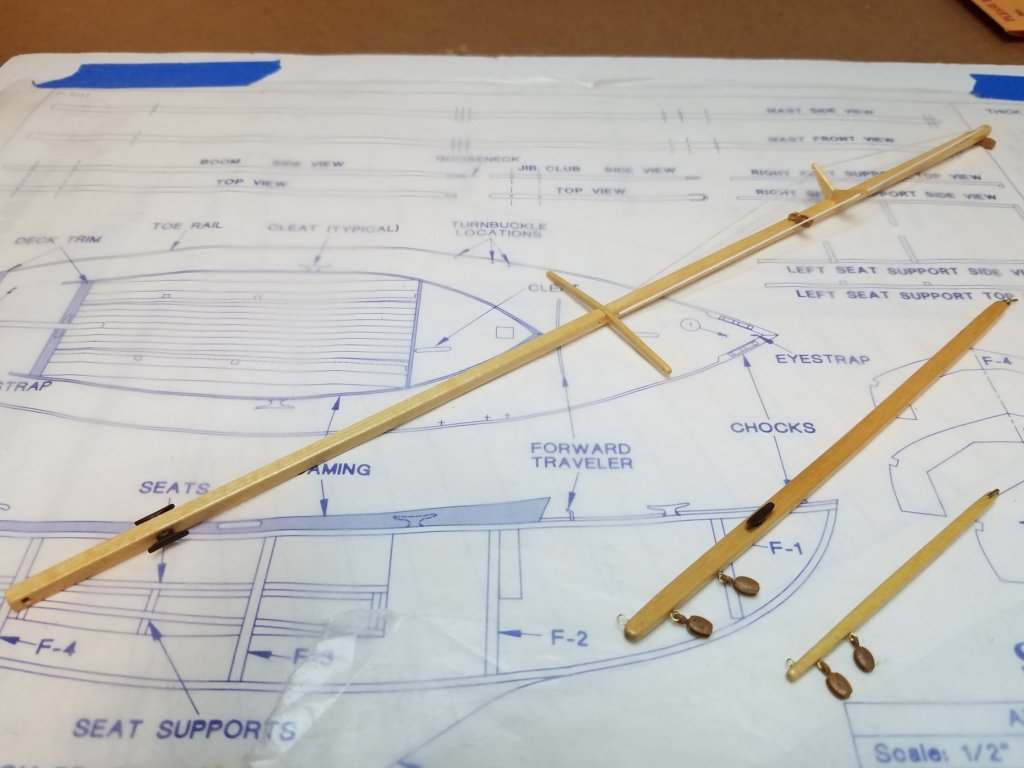
- 36 replies
-
- 9
-

-
- sakonnet daysailer
- Midwest Products
- (and 2 more)
-
Thanks Tiger, It is good to know there is someone close by If I should get too stuck. I spend more than my share of time at the Coco Creek Casino playing poker.
-
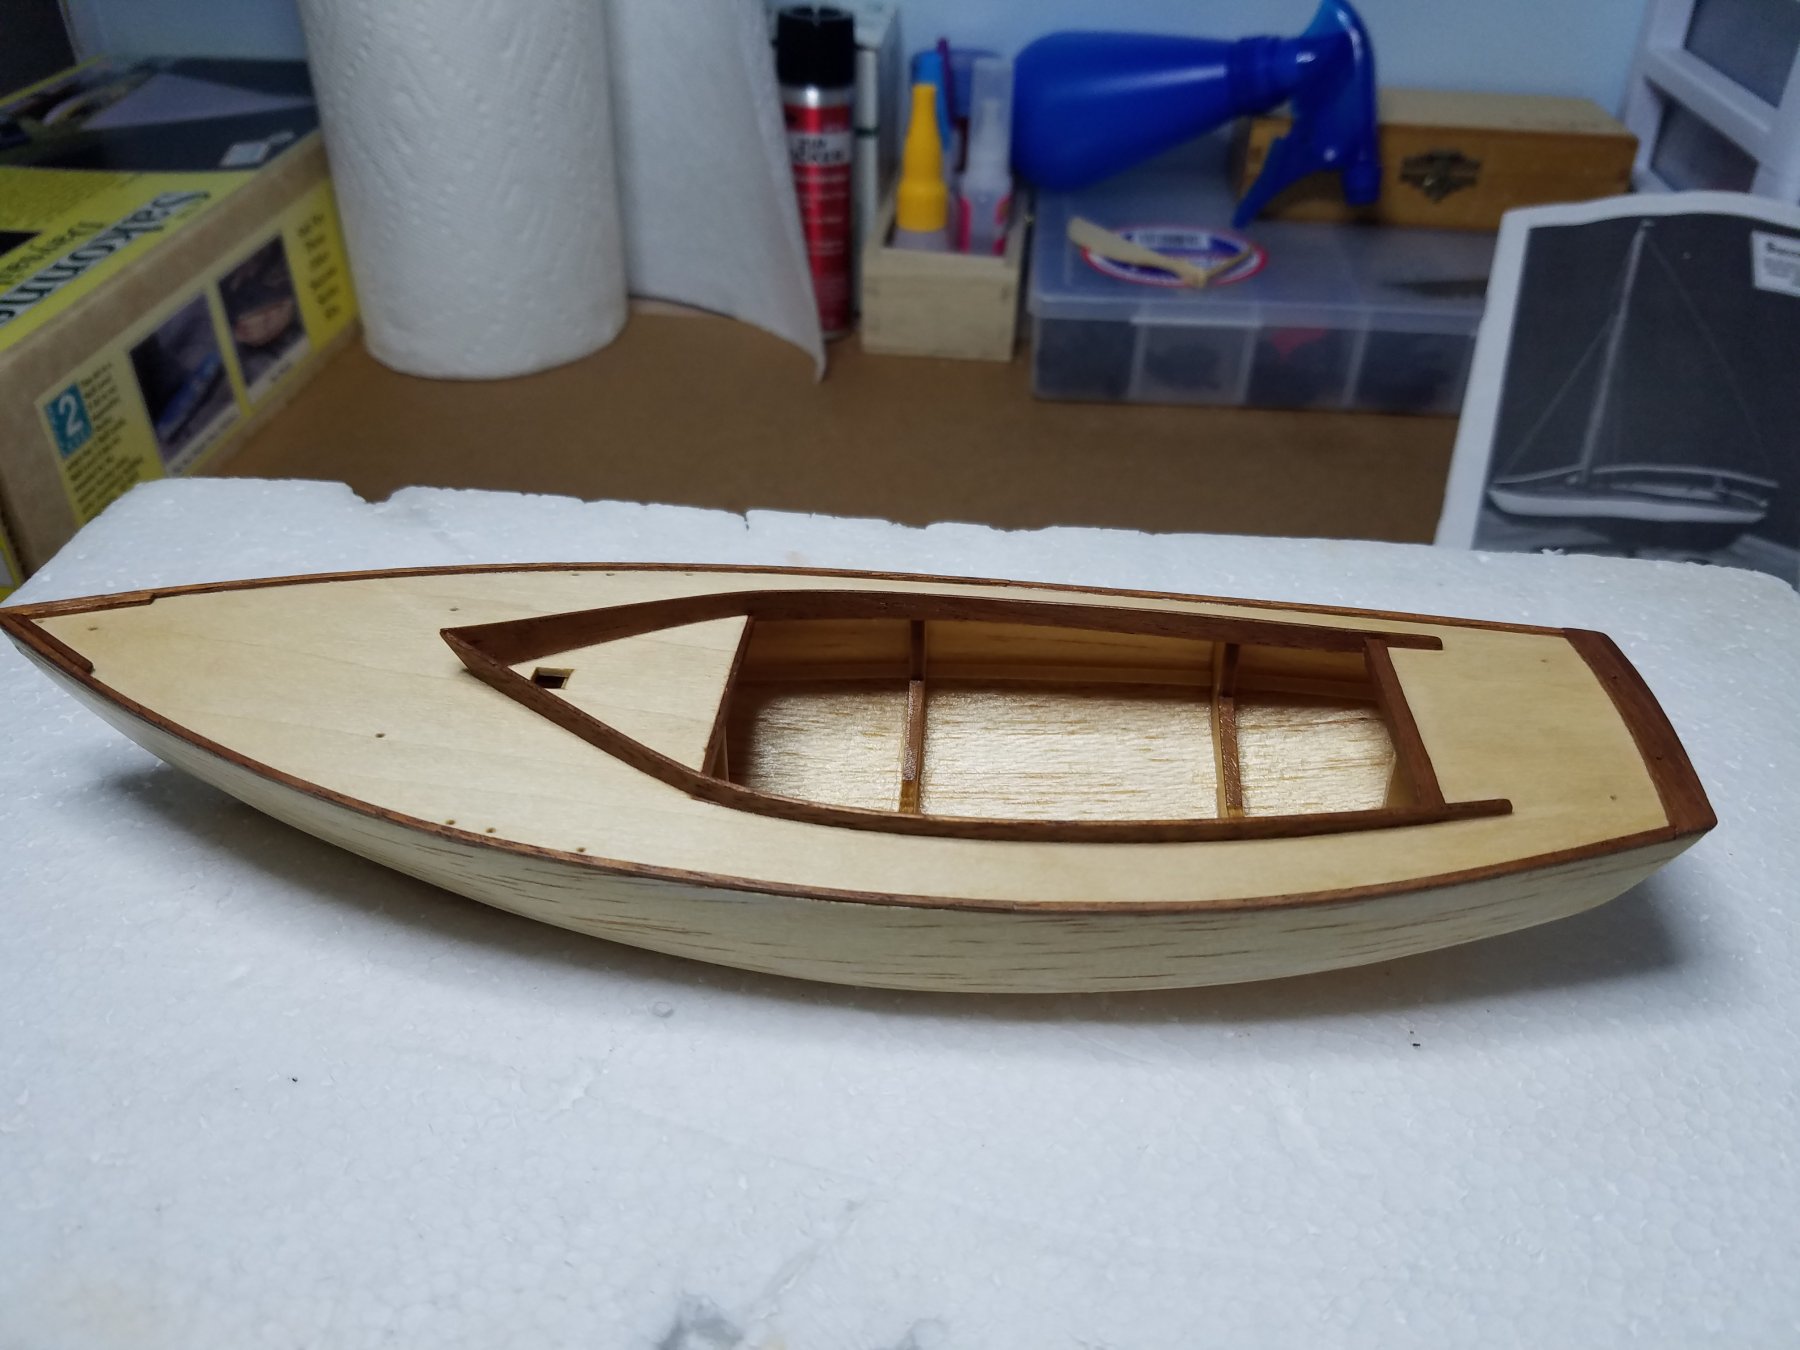
Well finally got the first coat of poly on the top side deck and trim. Two coats on the mast and booms. I really hate sitting around waiting for paint to dry but don't want to rush it at this stage. I was very pleased to see how the poly evened out the color on the mahogany where the thin CA had soaked in. The kit supplies two different spools of rigging line. One very heavy black braided thread and one thinner brown twisted thread. I am guessing that the black would be for the standing rigging and the brown is for the running rigging even though the instructions don't specify. Searching the internet for pics of completed models I could not find any that used the black thread at all. I was thinking of getting a spool of heavy silver thread to use on the standing rigging. Something that looks more like the stainless wire rope we use on out RC yachts. This is where I discovered and joined MSW so from now on I will update as the build progresses.


- 36 replies
-
- 8
-
-
- sakonnet daysailer
- Midwest Products
- (and 2 more)
-
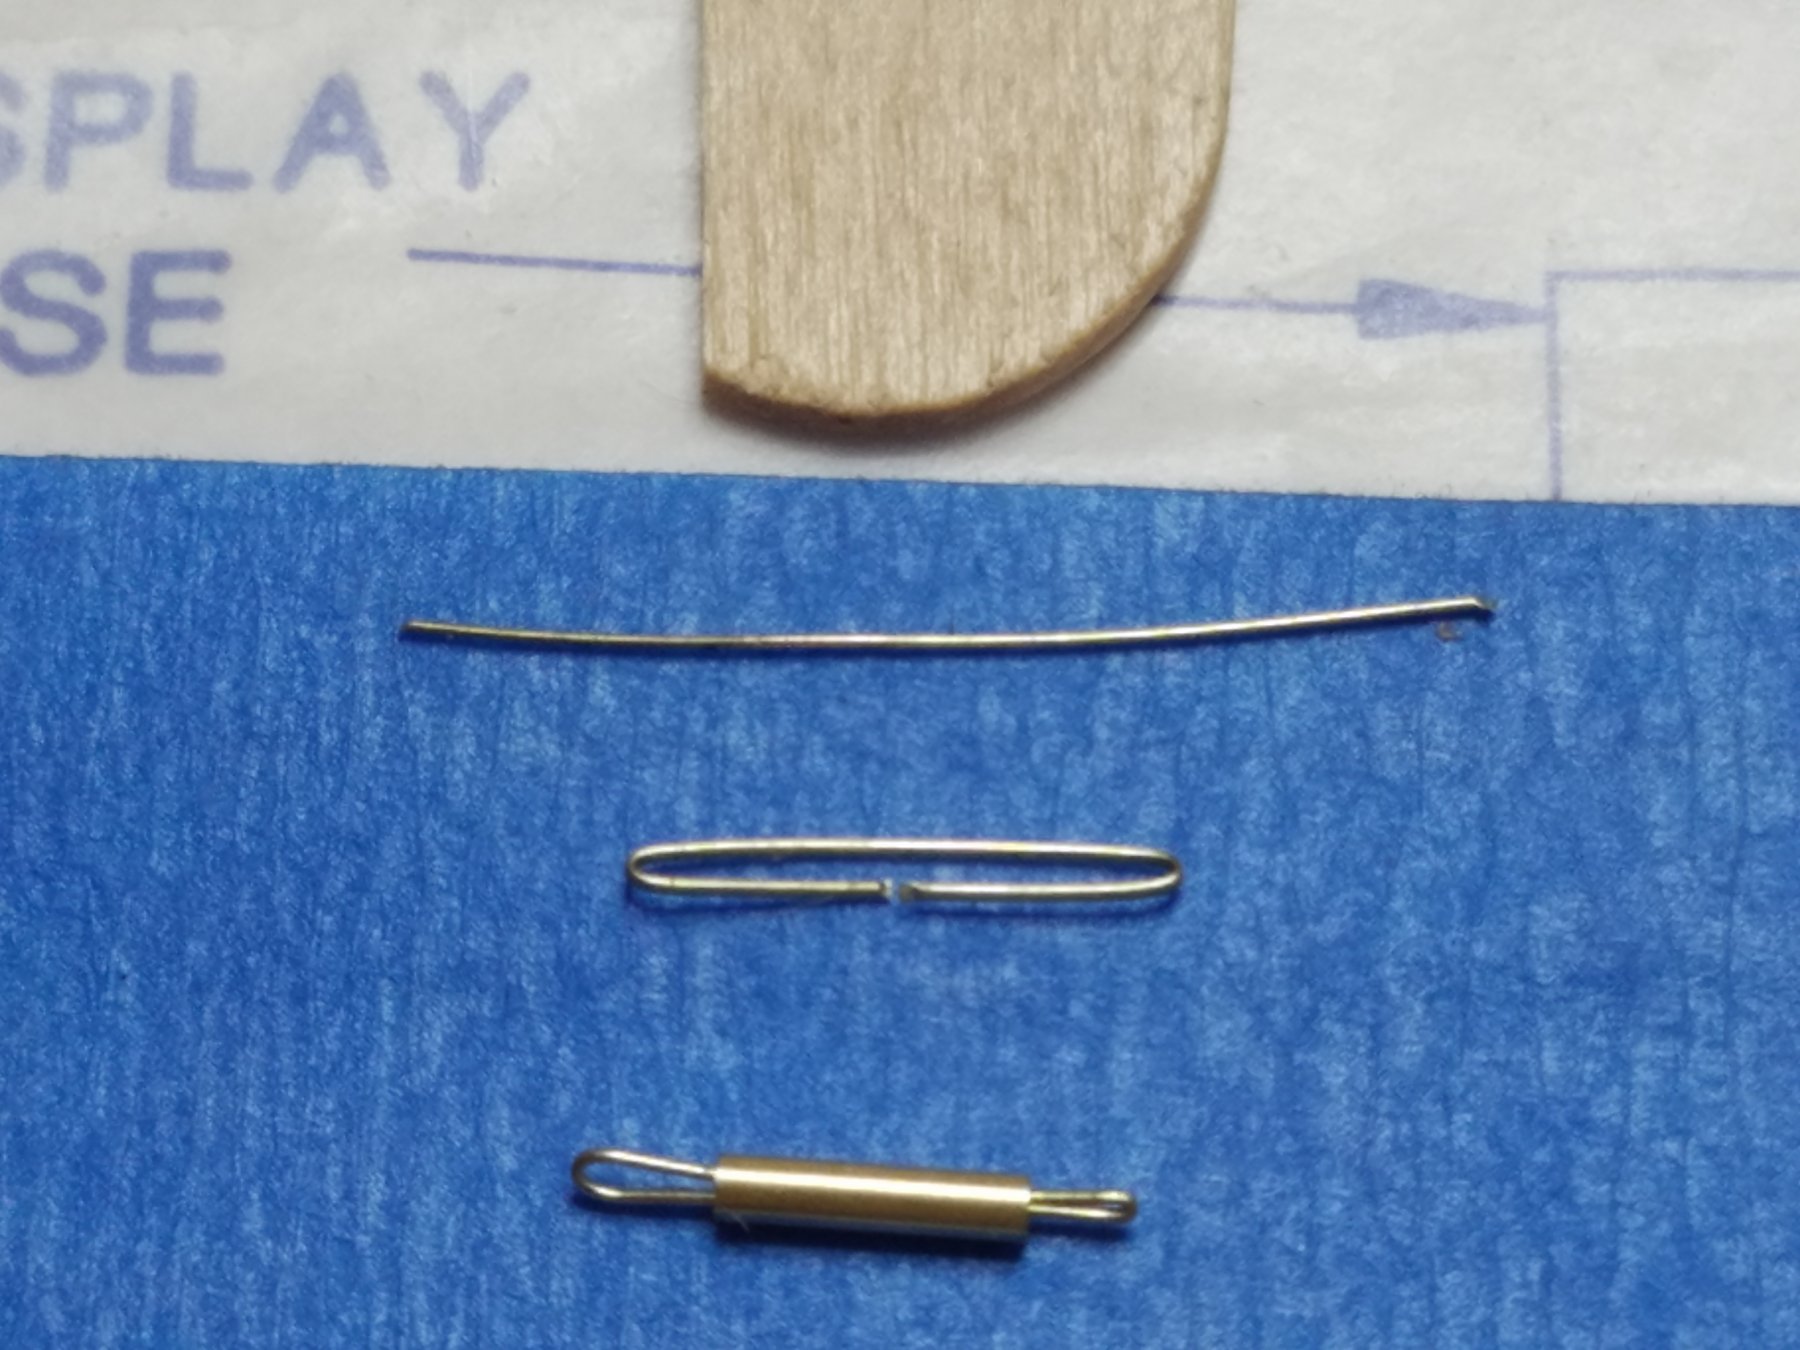
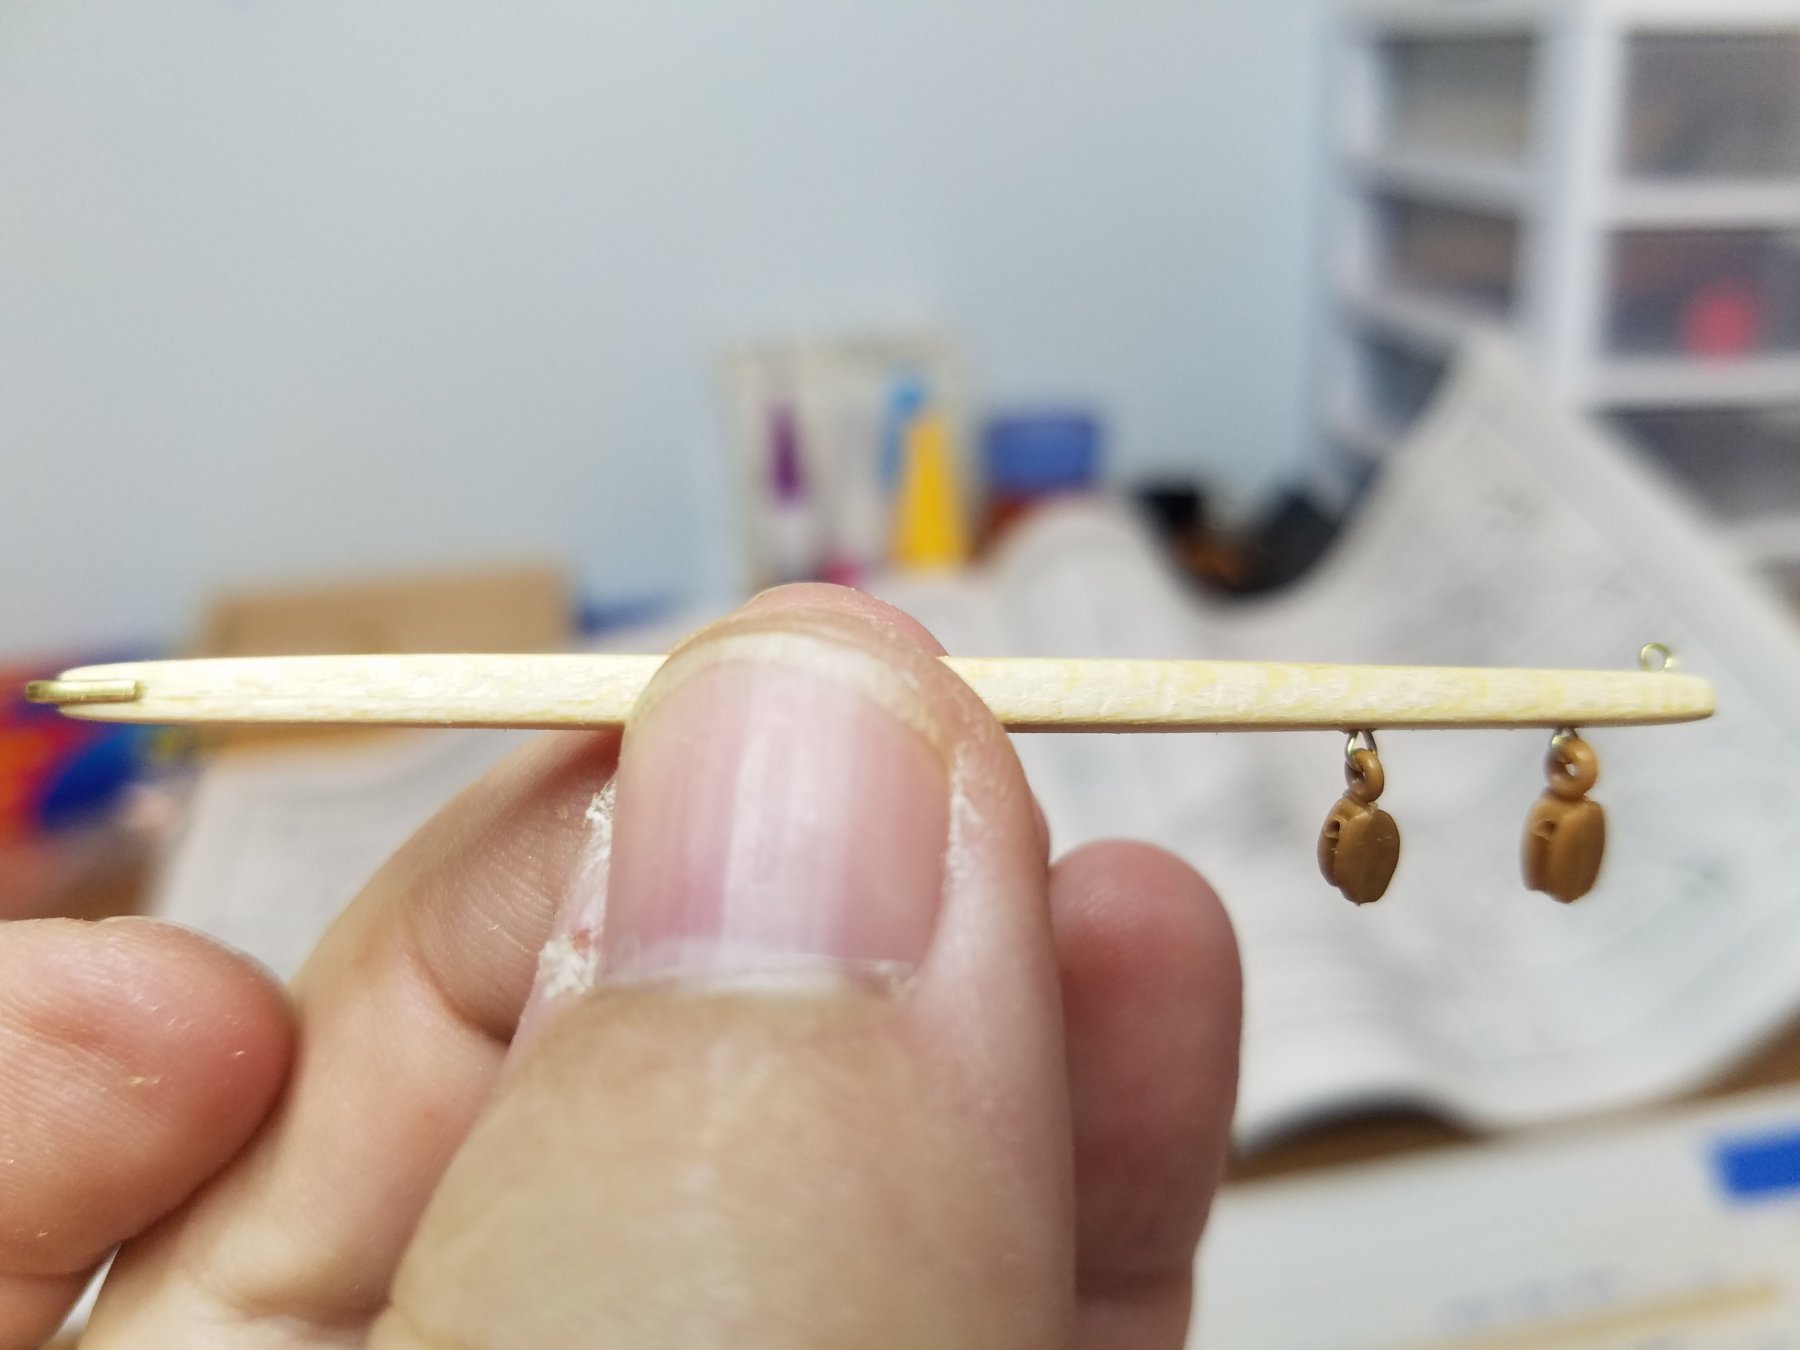
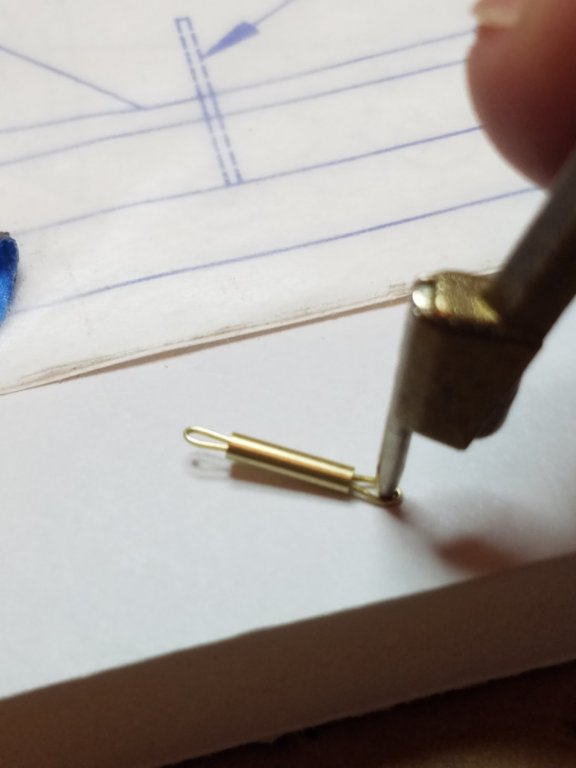
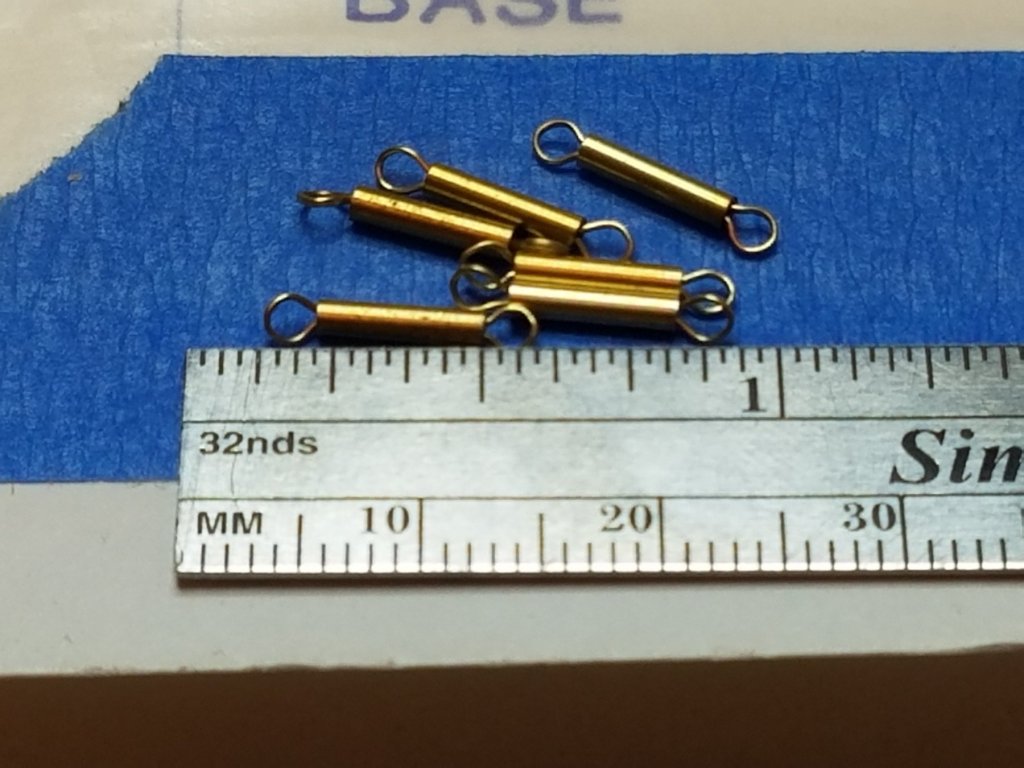
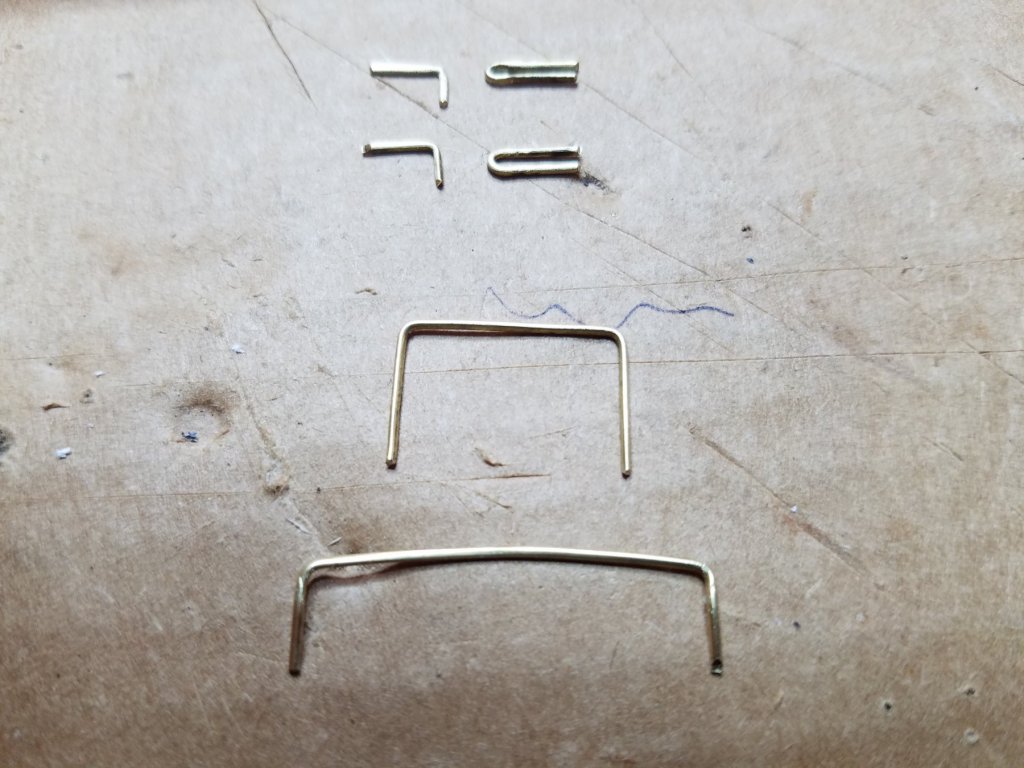
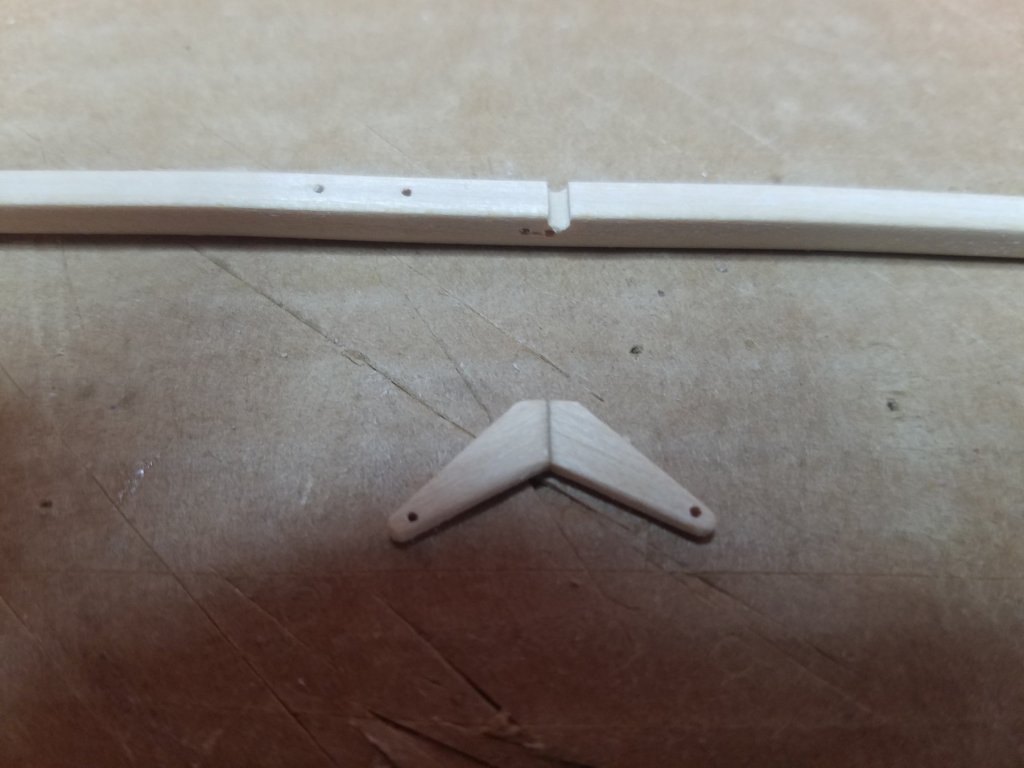
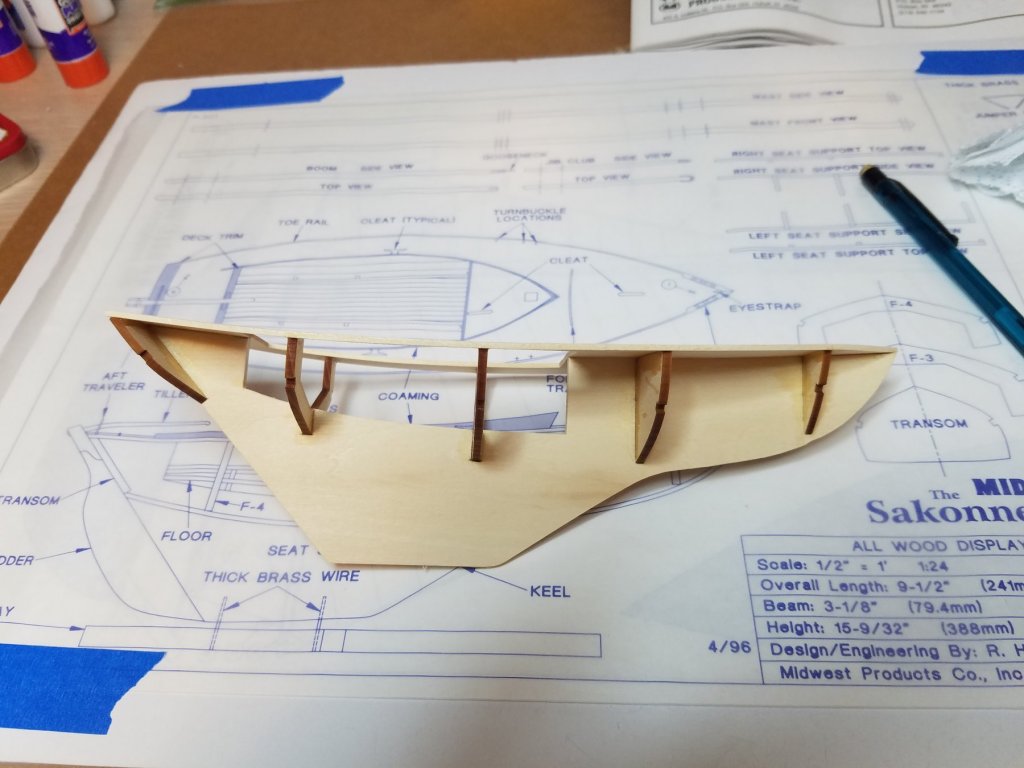
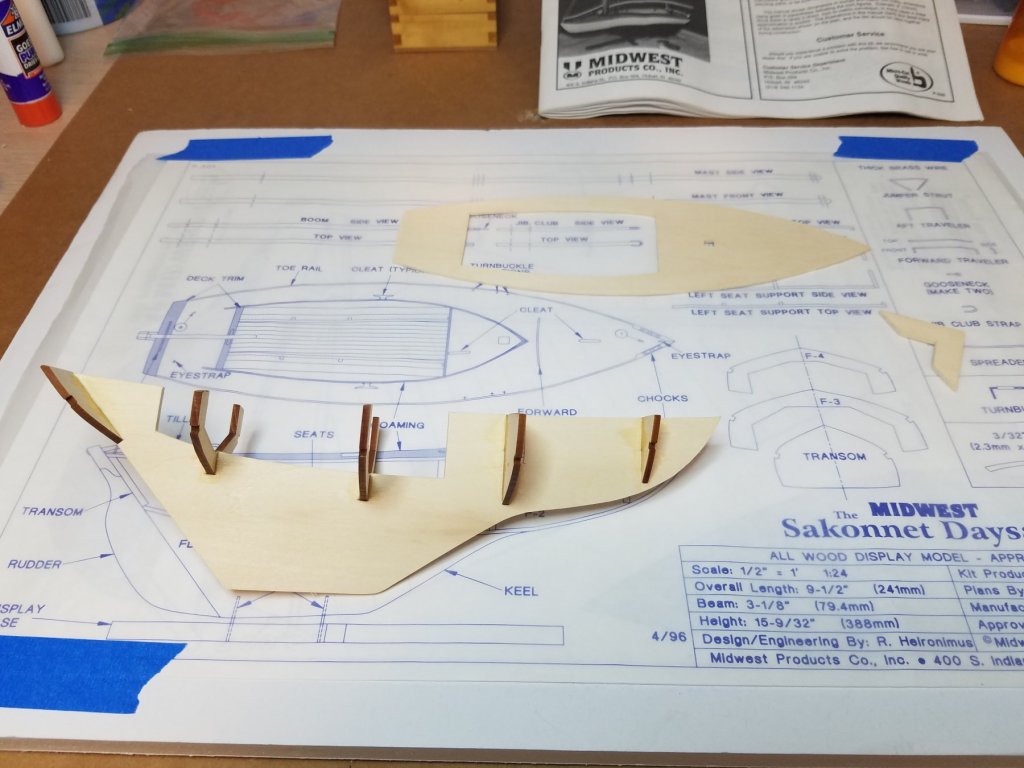
A little more staining tonight. Then I turned my attention to the turnbuckles. The Instructions would simply have you bend a 1-1/2" piece of thin brass wire in half. Push it through a small piece of brass tube . Open the loop in the folded end then glue the other free ends into a hole in the deck. In my opinion making the turnbuckles look as if they have taken too much Viagra. I decided to try to make them appear to be what they are supposed to represent. I started with a 1" piece of thin brass wire. I wrapped this around a thin strip of wood 1/2" wide. Then I pinched one end almost completely flat. This end I pushed through the piece of brass tubing. Using the pointy end of my compass (it seemed about the right size) I opened up the loops on both ends. In about a half an hour I had 6 little turnbuckles ready to go.

- 36 replies
-
- 5
-
-
- sakonnet daysailer
- Midwest Products
- (and 2 more)
-
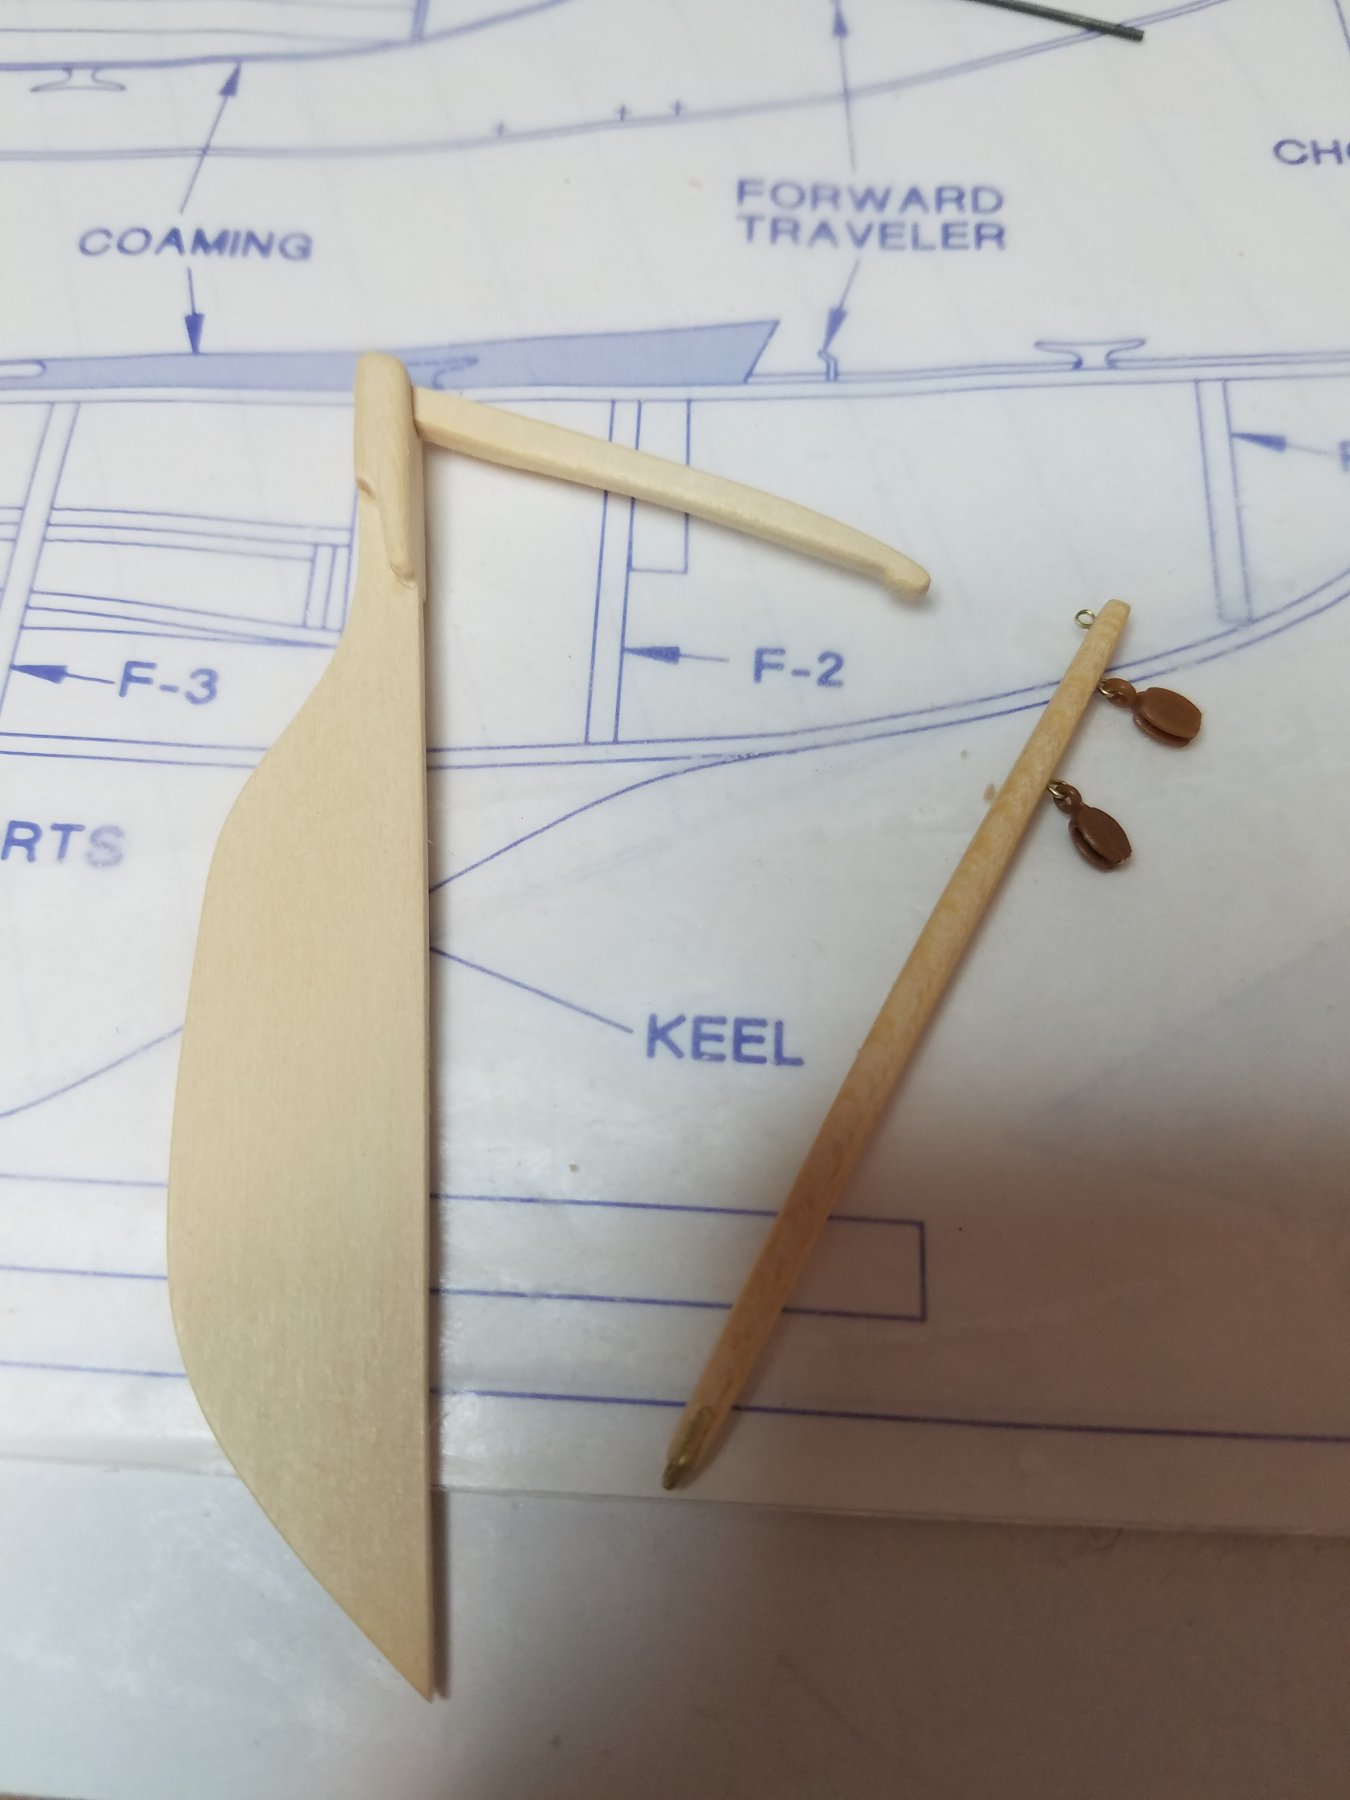
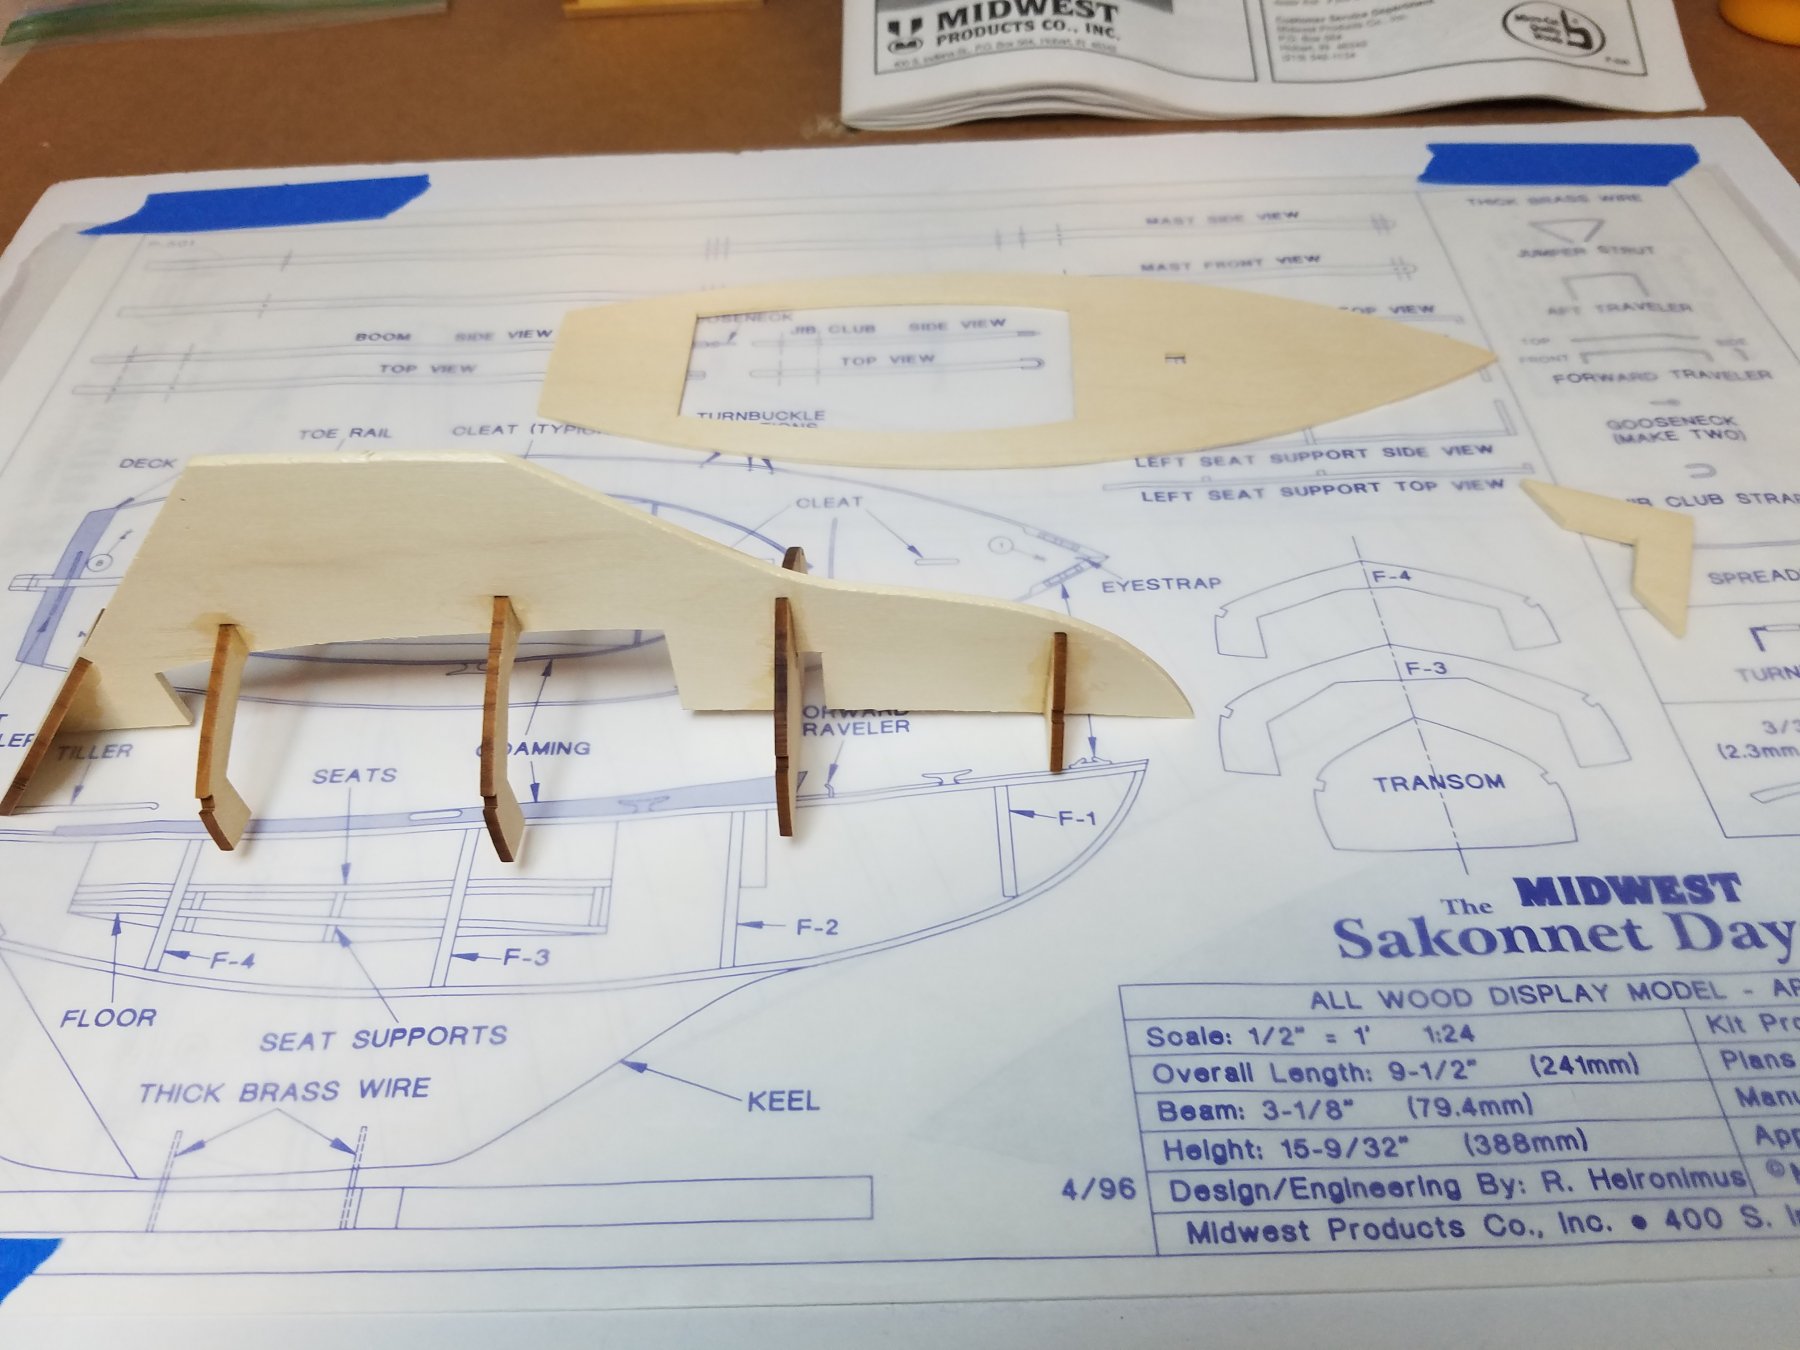
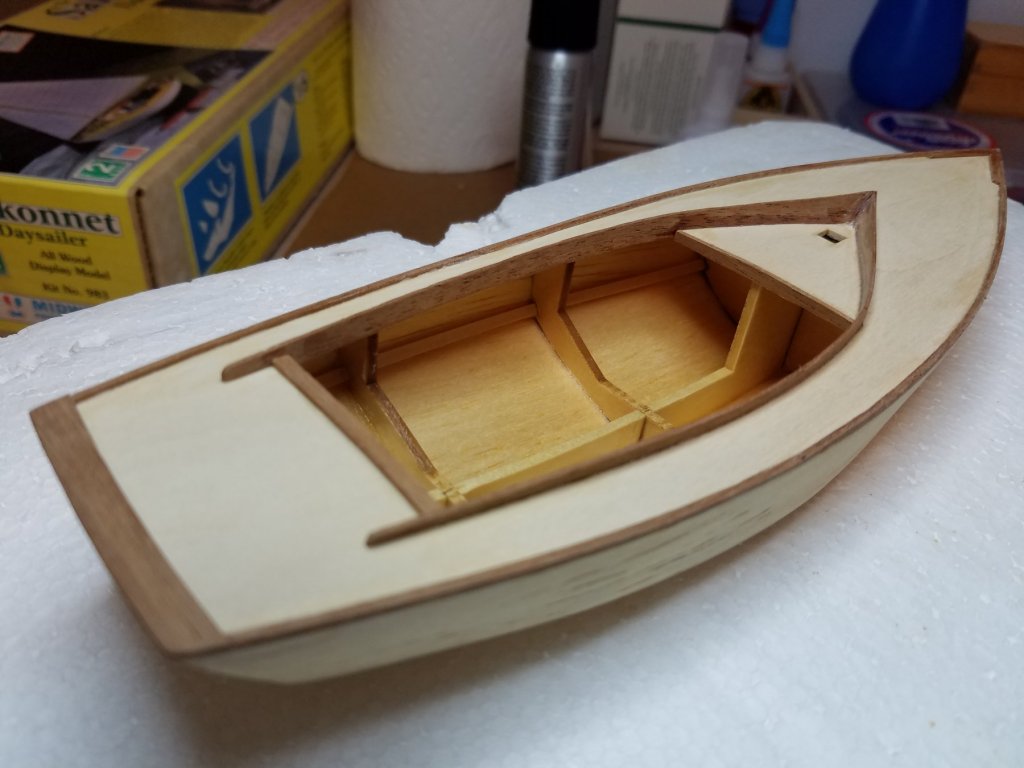
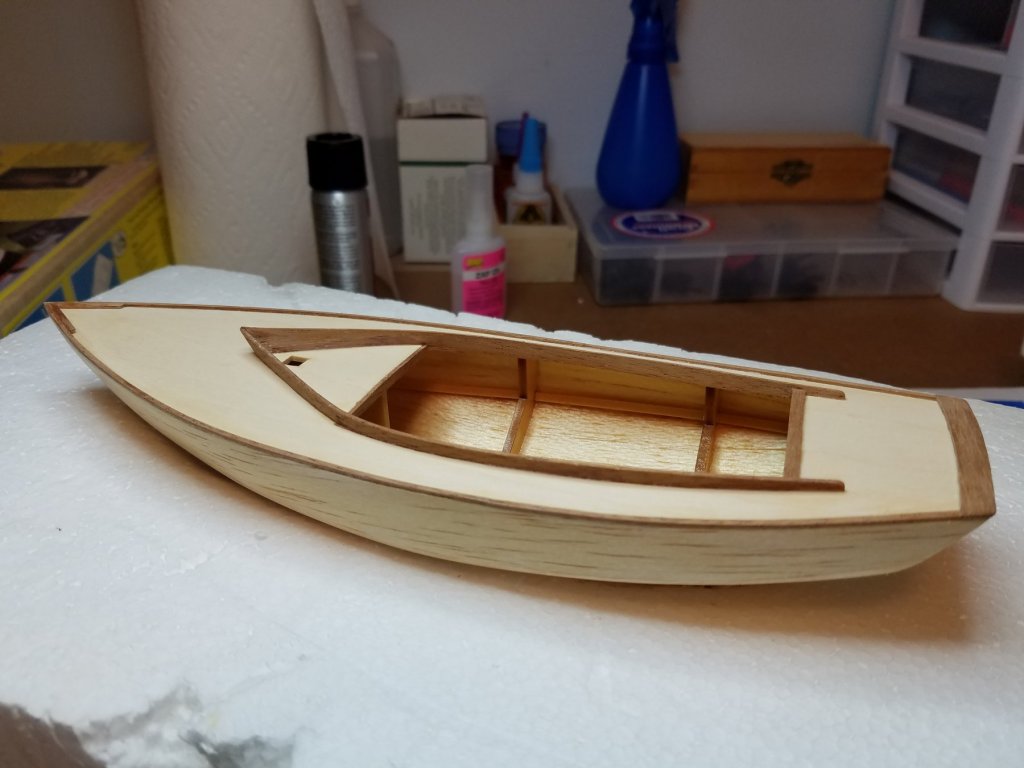
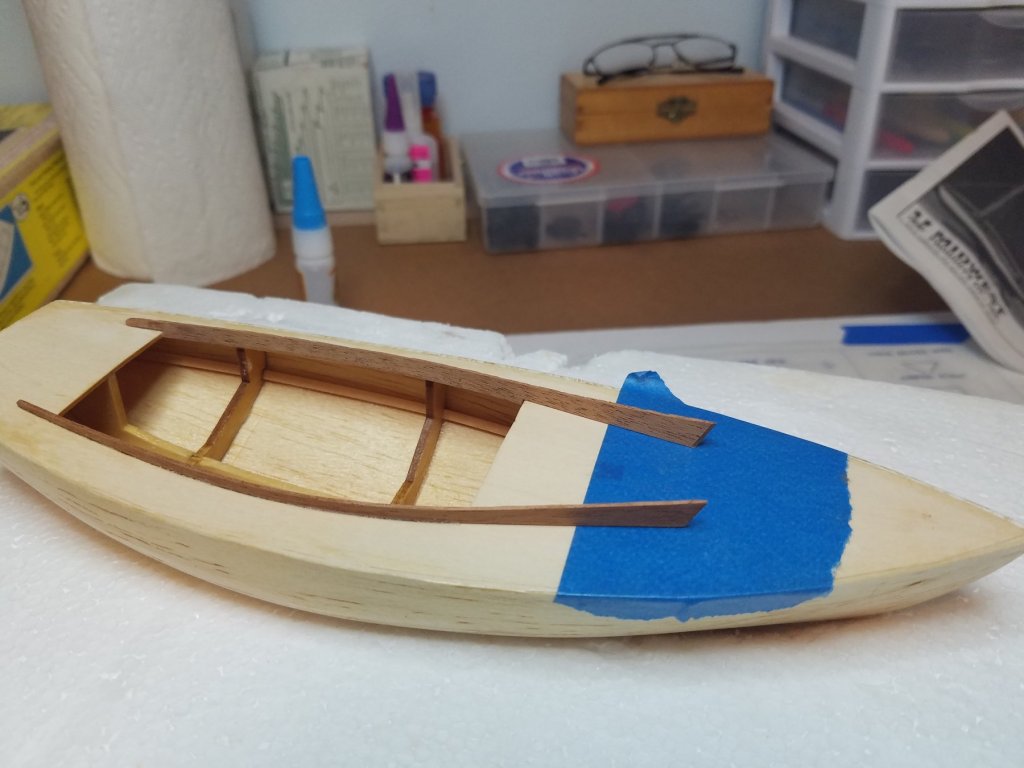
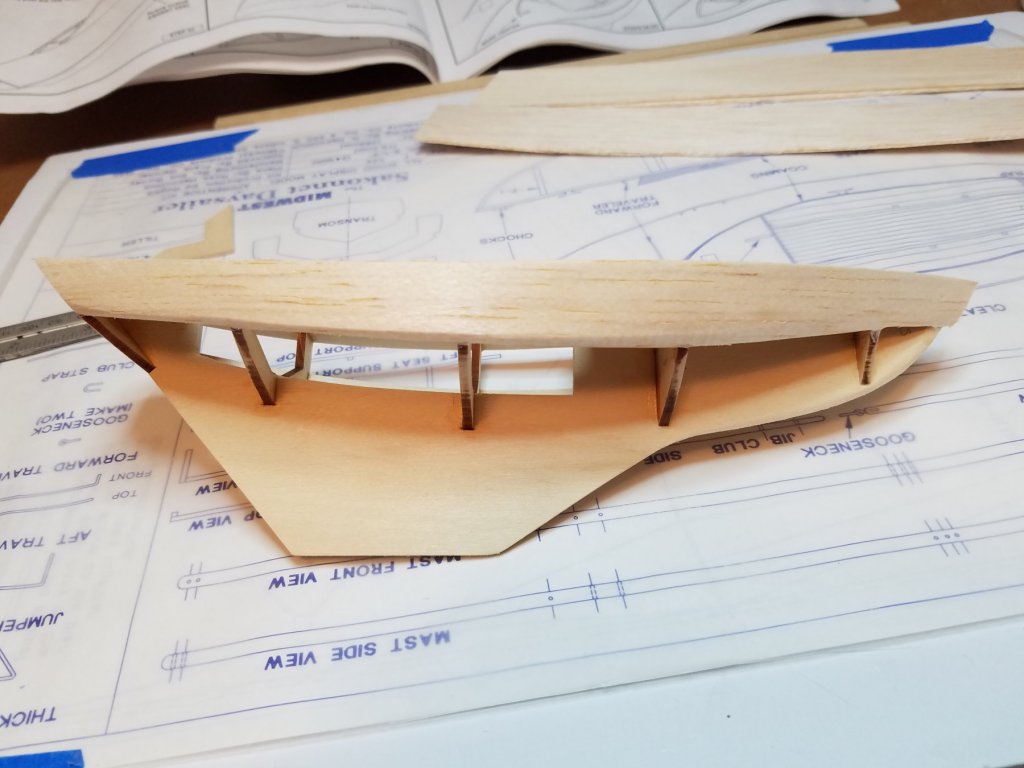
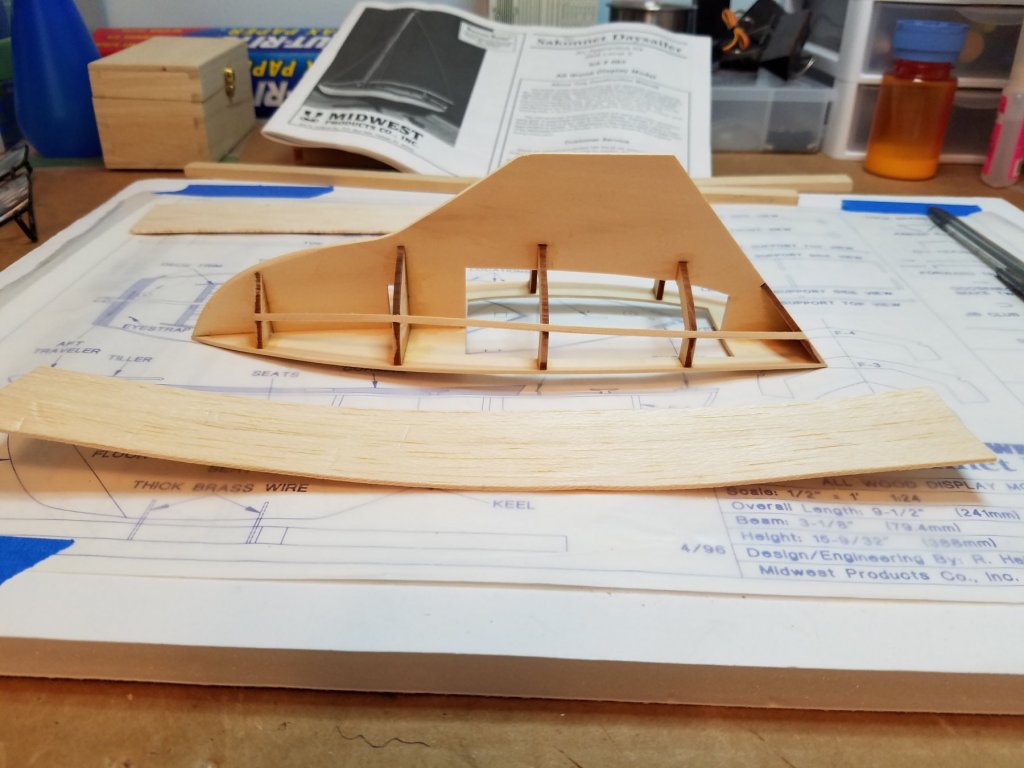
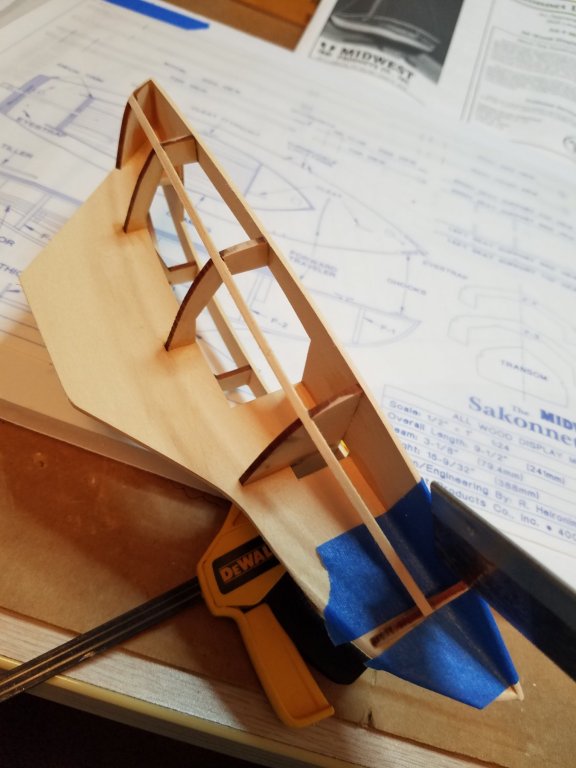
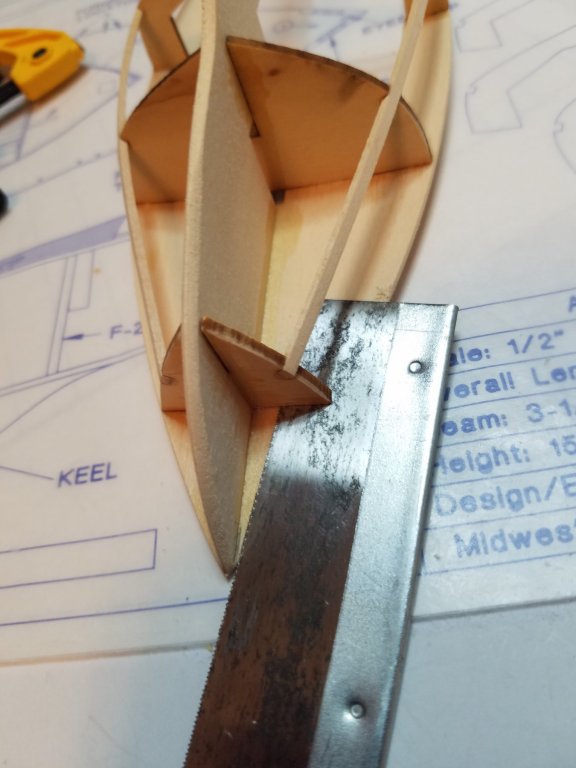
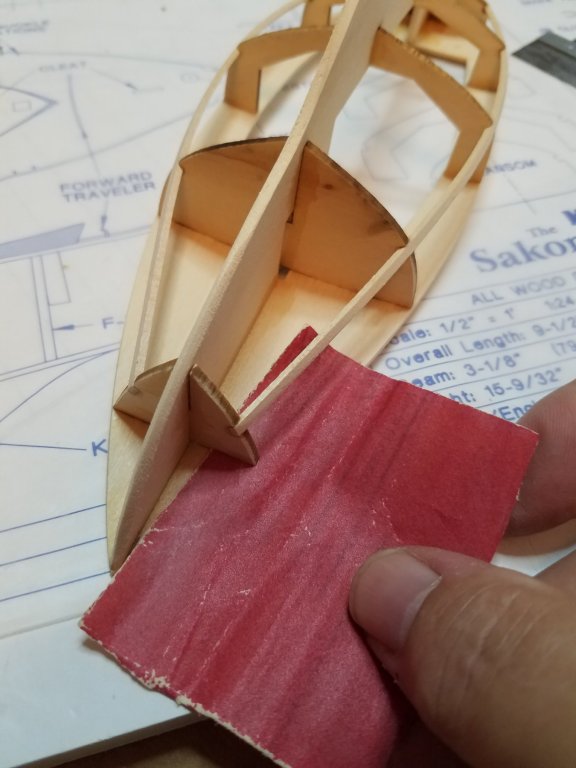
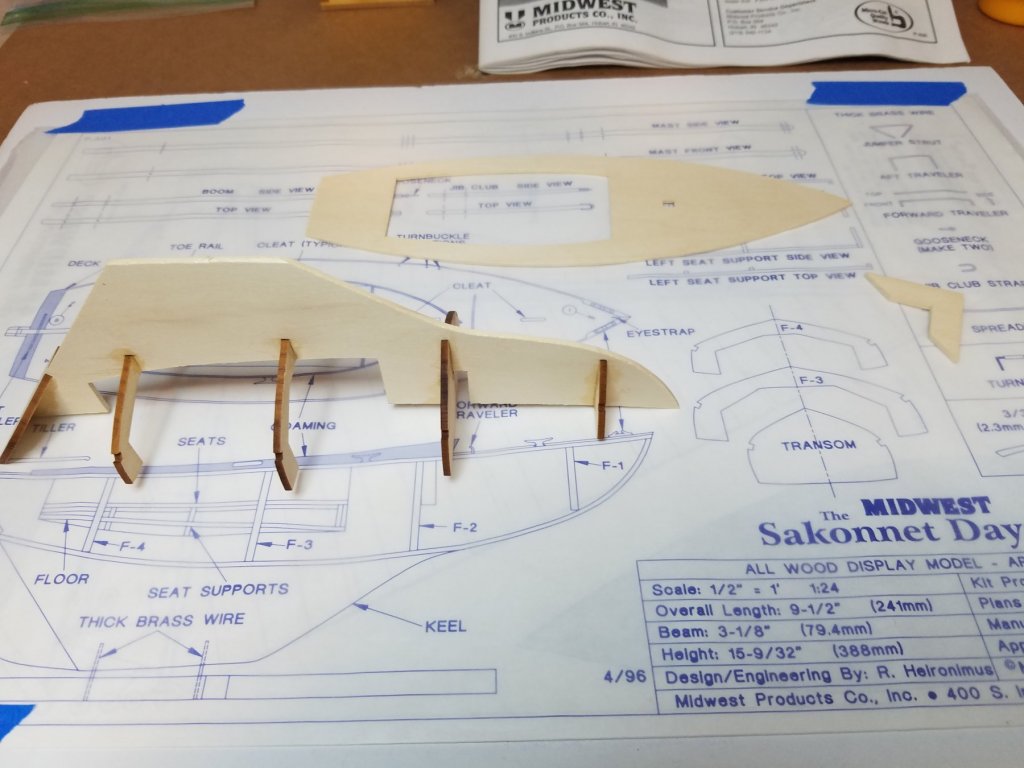
Not much progress tonight. Drilled a bunch of holes in the deck for mounting hardware. Did some final sanding on the deck and hull. Made up the travelers fore and aft. I had a bunch of brass wire left over so I decided to make up some really basic pintles and gudgeons for mounting the rudder instead of just gluing it on like the instructions call for. I went back over the instructions and remembered I had skipped making the seat supports earlier so I made them up and that is about it for tonight. Stain and more Poly tomorrow.

- 36 replies
-
- 4
-
-
- sakonnet daysailer
- Midwest Products
- (and 2 more)
-
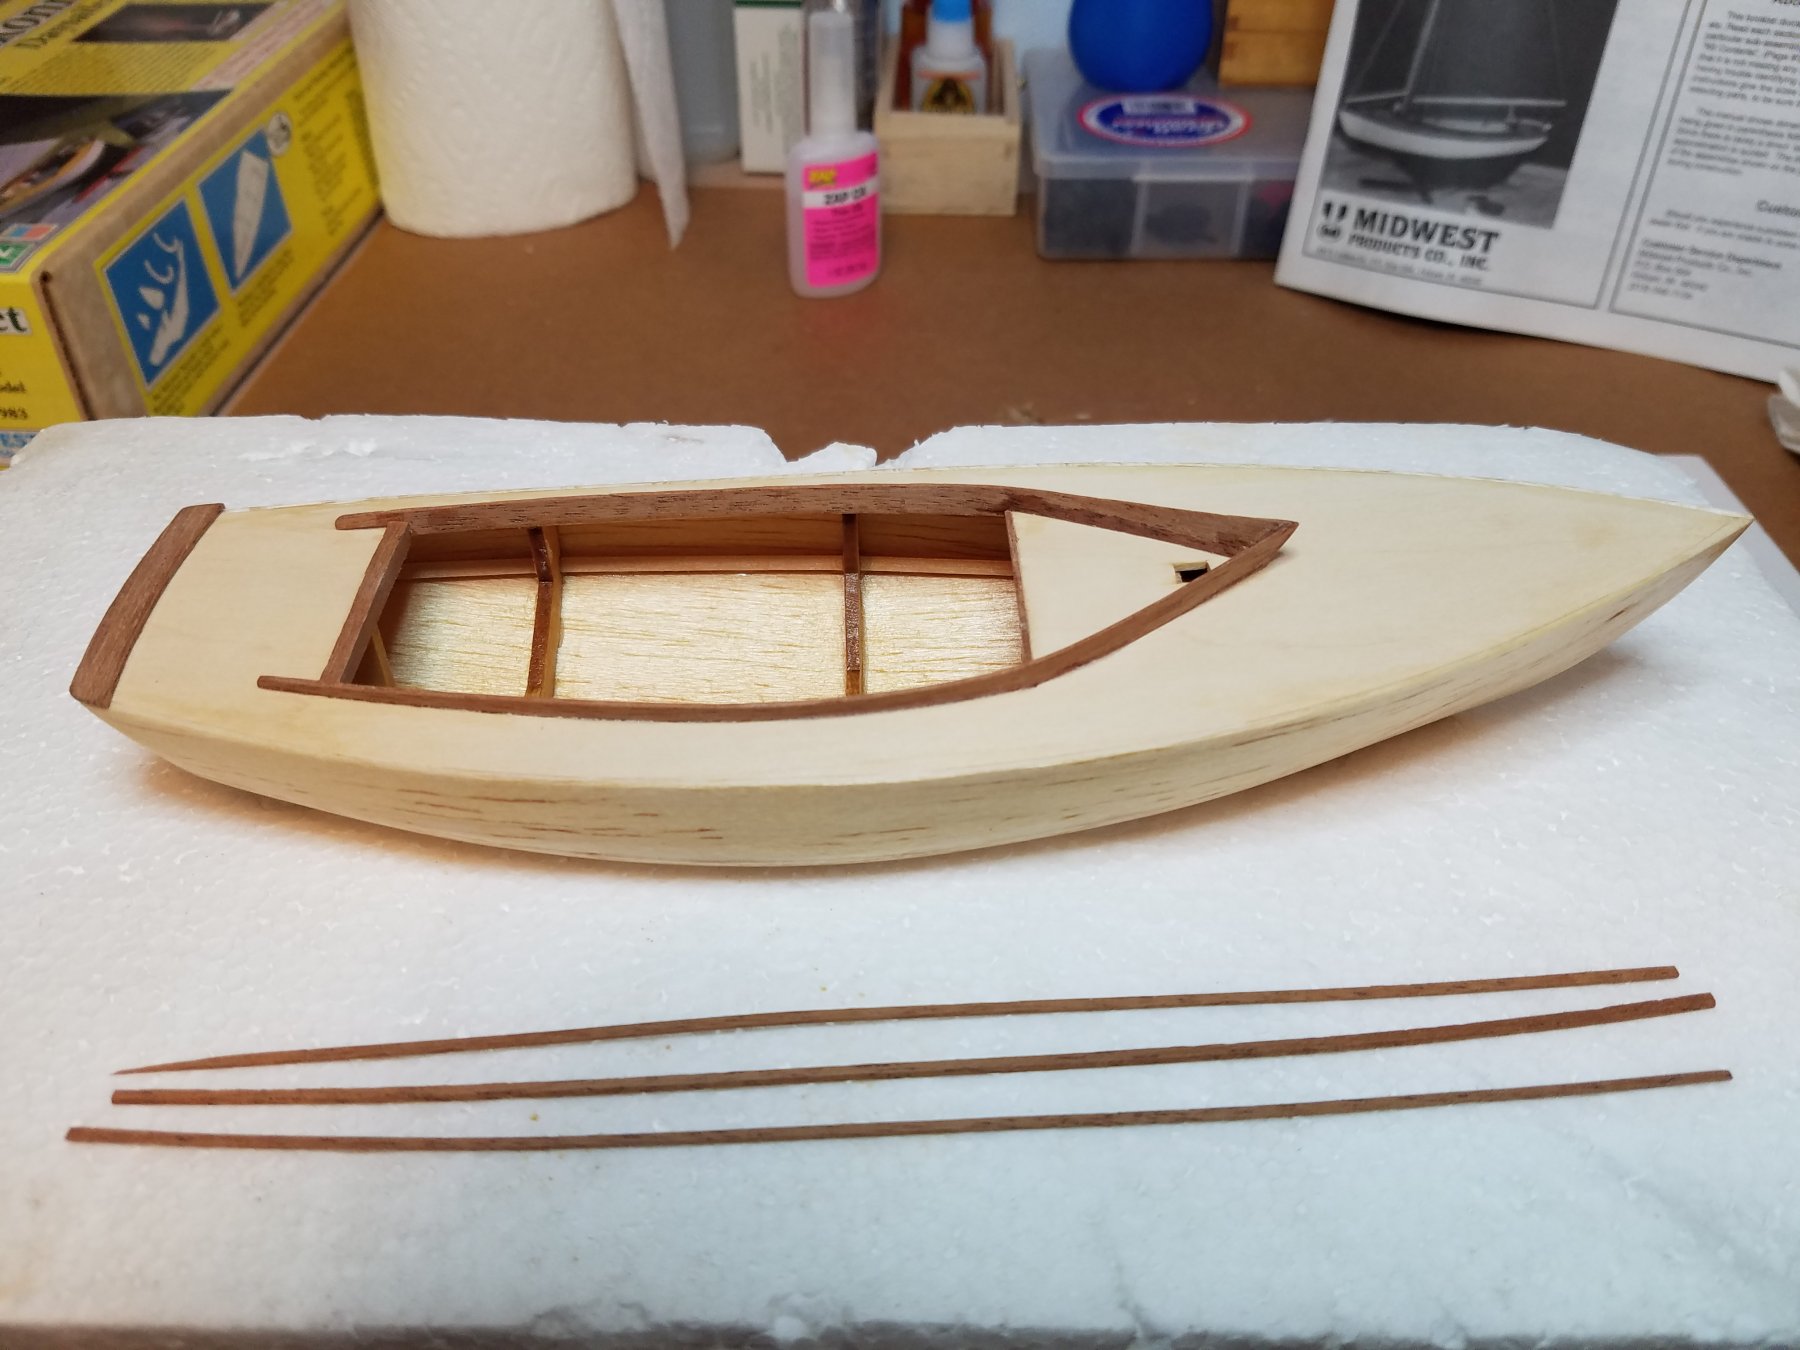
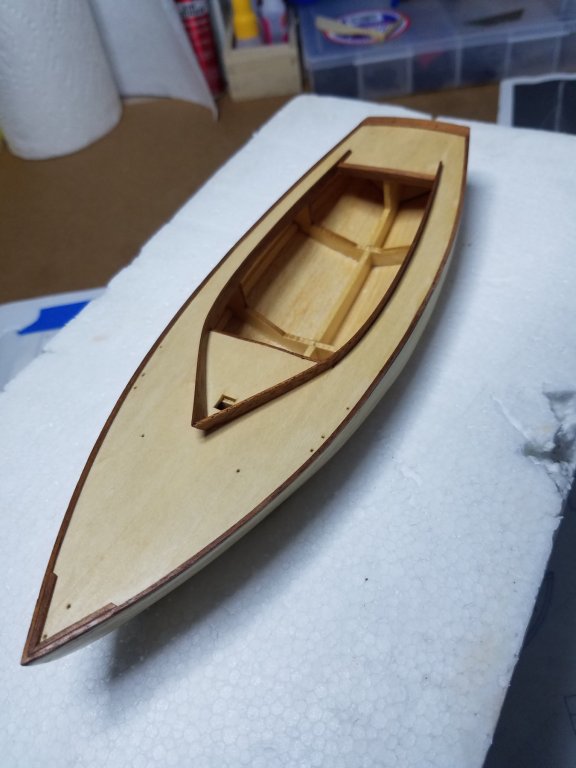
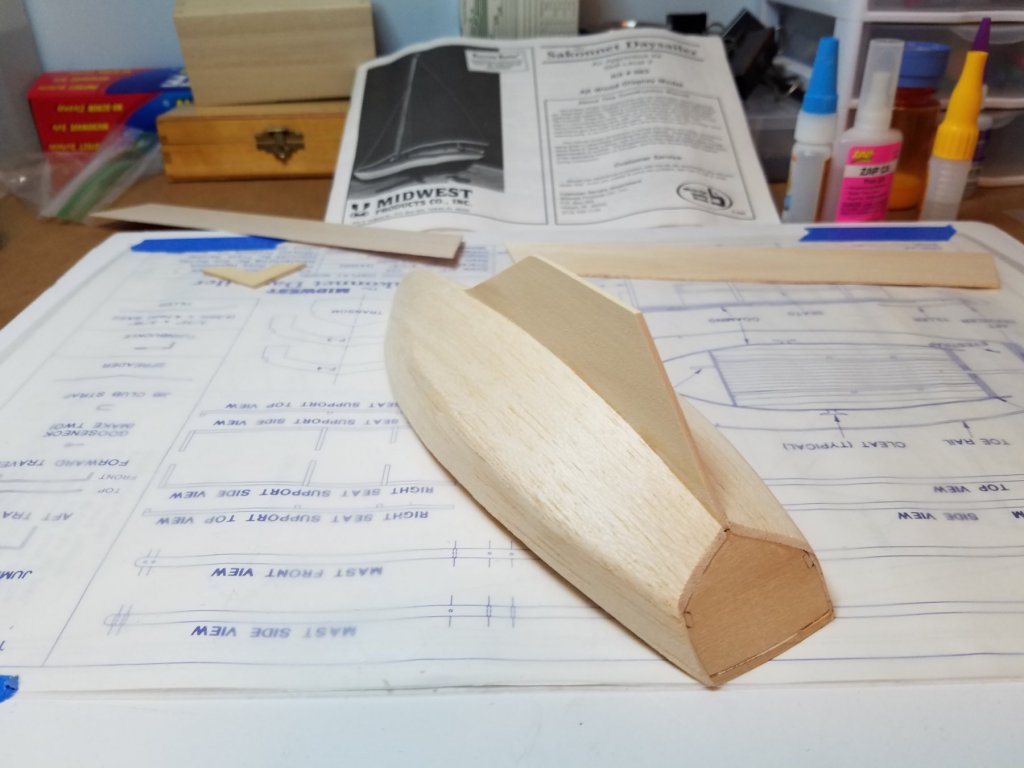
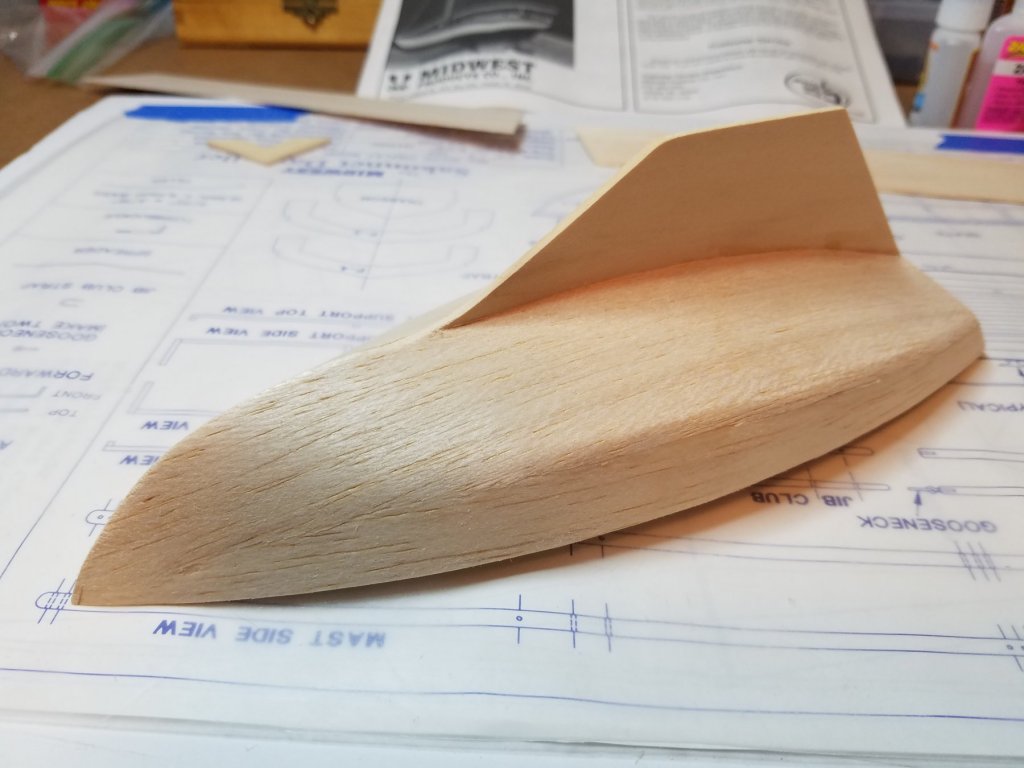
Well after getting all schooled up on CA and Accelerator I got back to work and got the front end joint on the coaming all buttoned up. Then I turned my attention to the rest of the mahogany trim work. Then I got to the step that I hated from the first time I read the instruction. Applying the kit supplied toe rail. I did not like this for a couple of reasons. 1) I just knew I was going to mess up the glue up of such a tiny piece of trim and 2) I hated the fact that after applying all the nice mahogany trim pieces, that now they wanted me to paint and apply this little 1/32x1/32 strip of balsa. So I decided to use a little of the scrap mahogany to make my own toe rail. There was plenty left over to cut a bunch of 1/32x1/16 strips about 6" long. and the fact that the glue takes much longer to cure on the mahogany actually worked to my advantage with problem 1. All trimmed and ready for the layout and drilling of a few holes on the deck then final sanding and finish.

- 36 replies
-
- 6
-
-
- sakonnet daysailer
- Midwest Products
- (and 2 more)
-
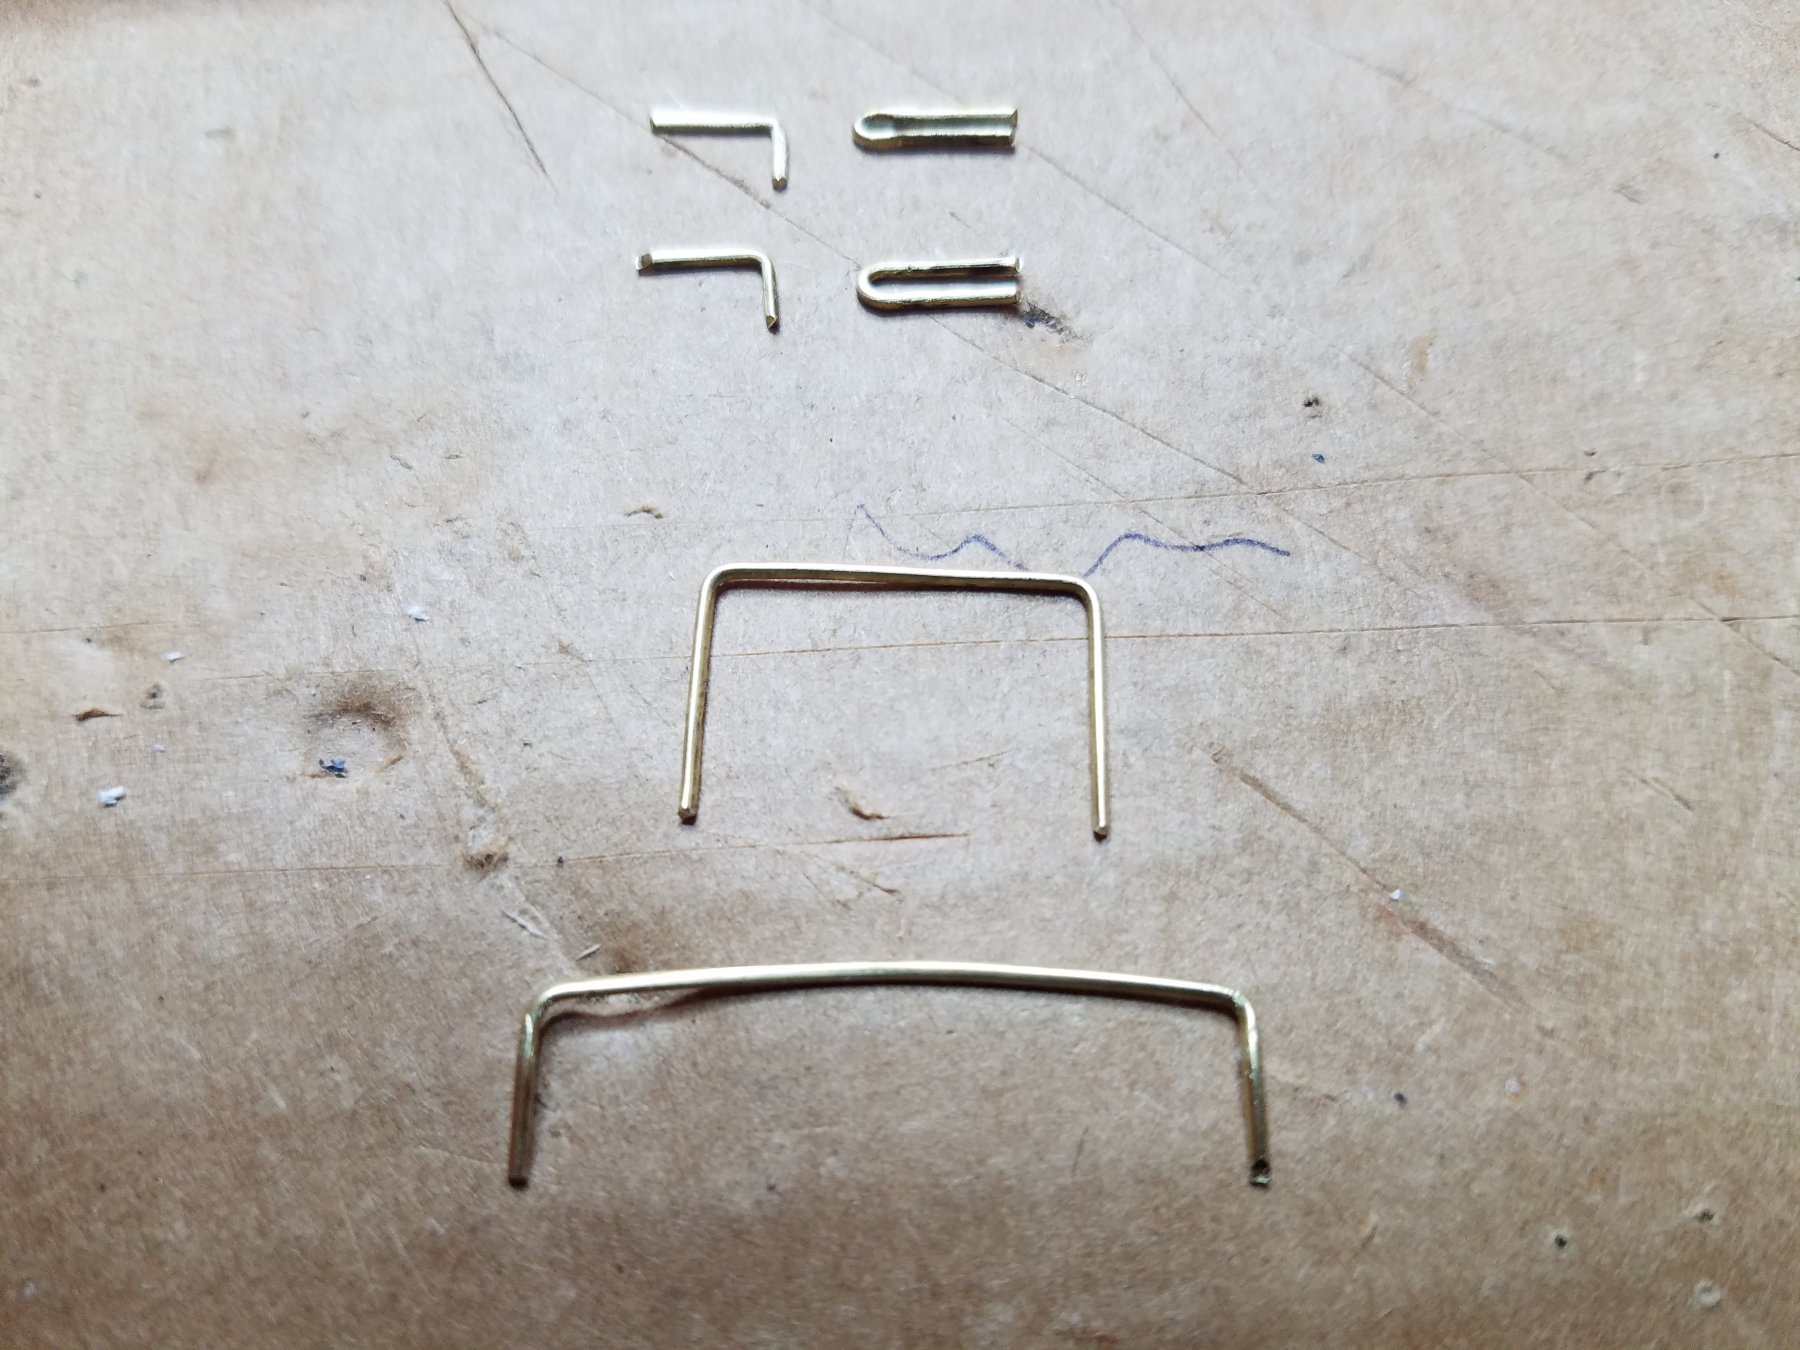
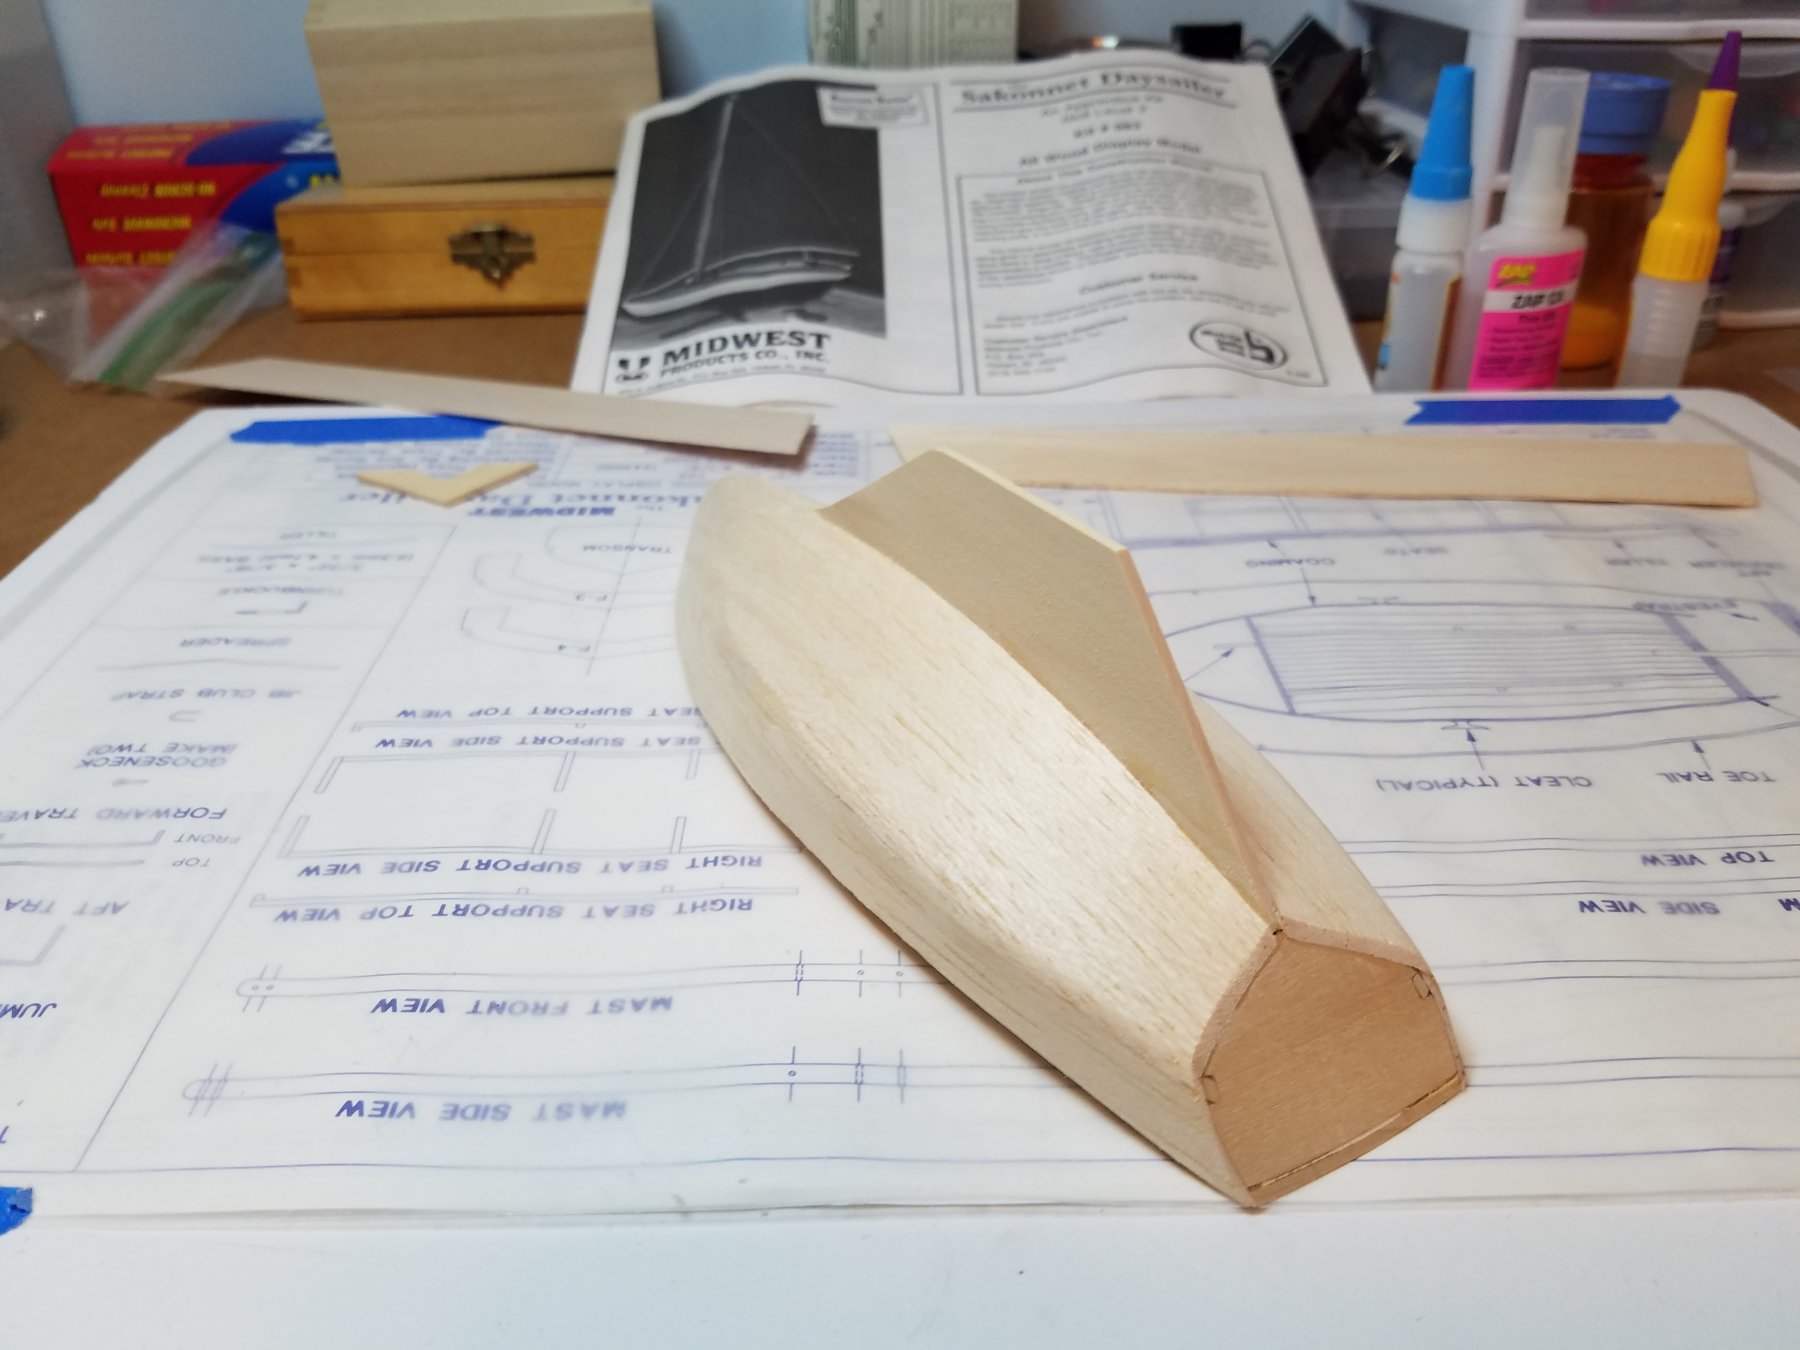
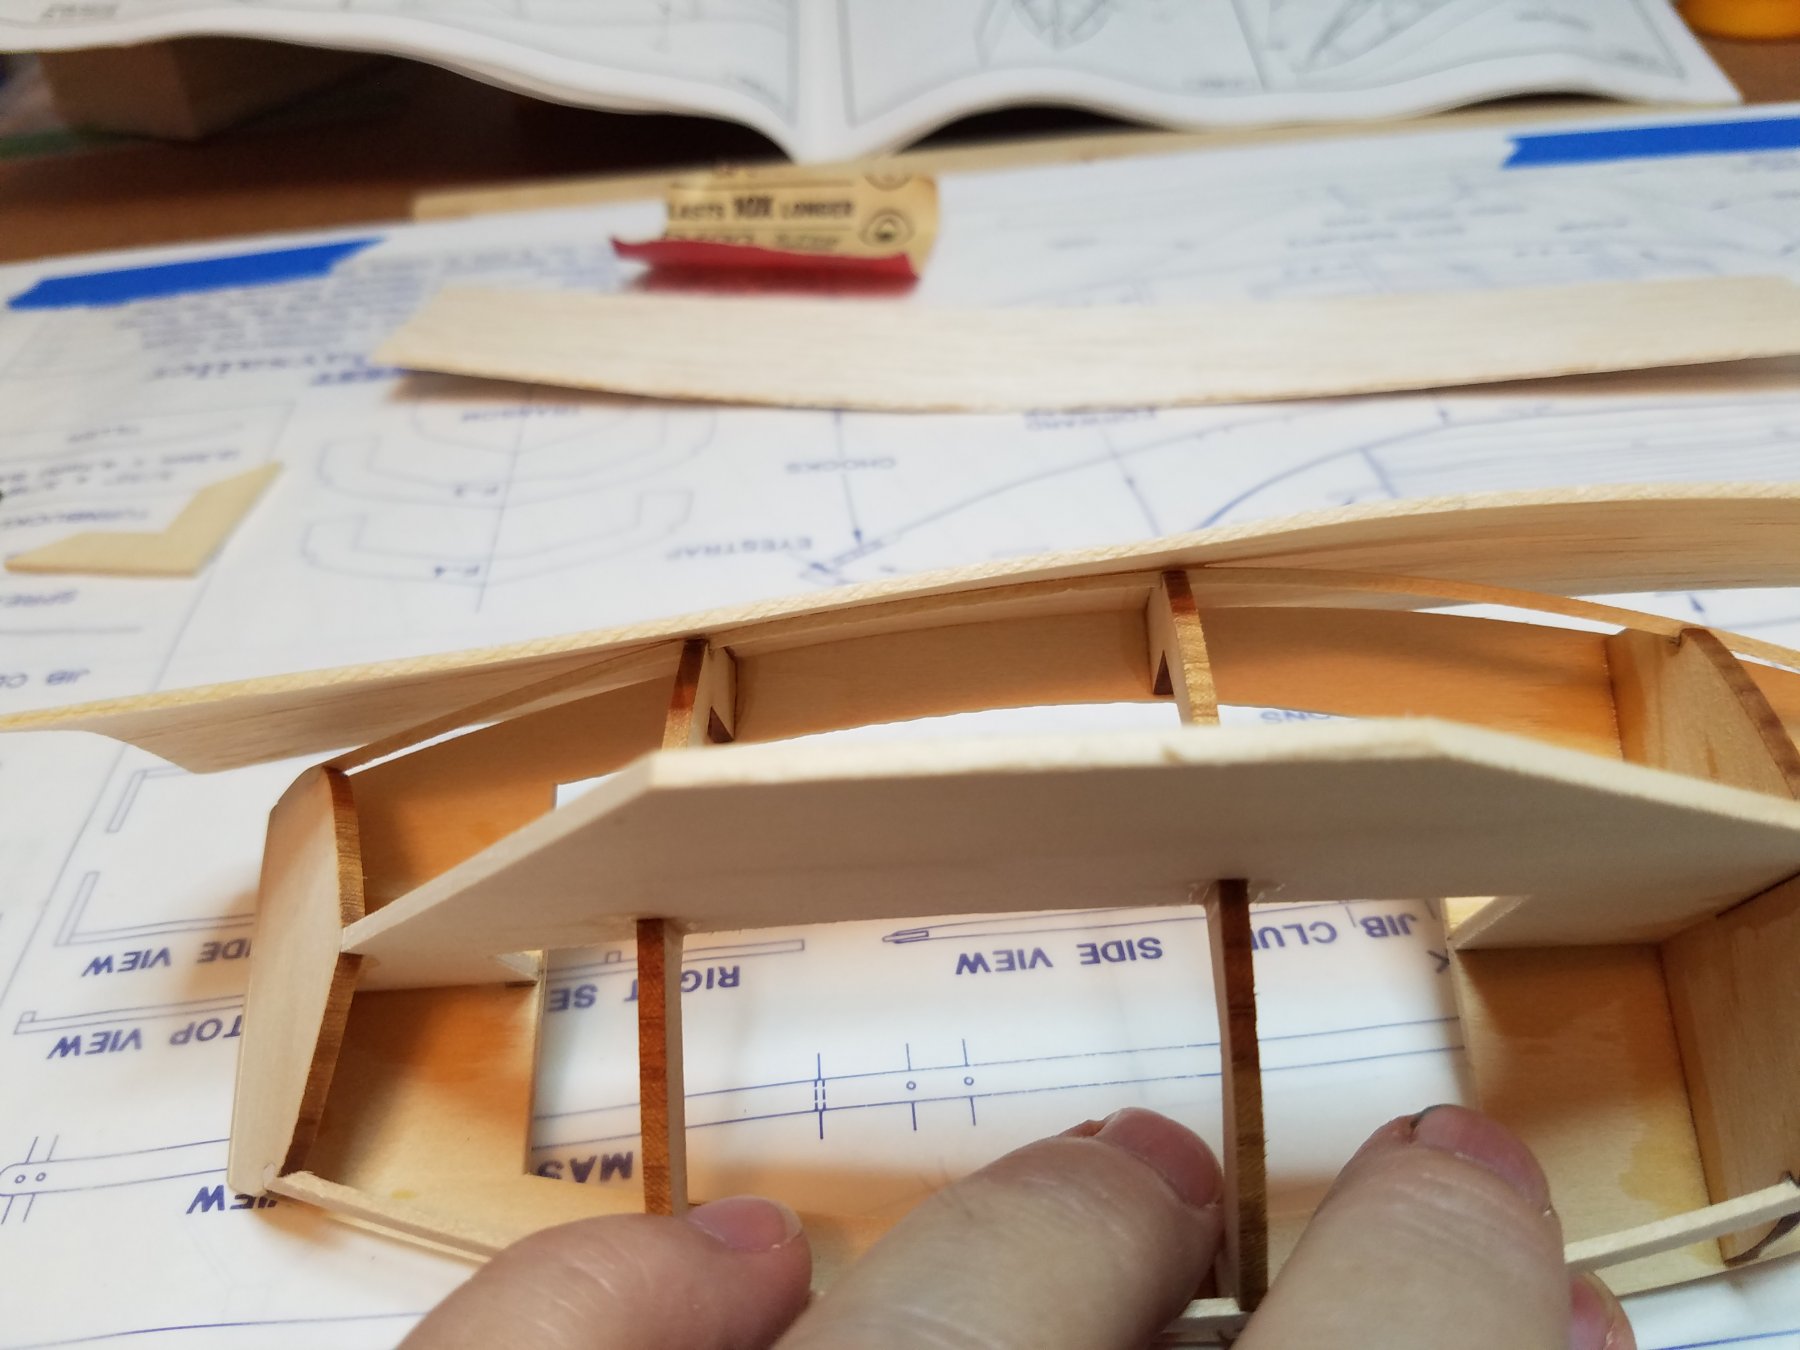
After quitting for the night last night I came to the conclusion that I could not replace the spreader and leave the wire jumper strut. So first thing this morning I got started making and installing a new jumper strut out of the same 1/16x1/4 basswood. Then I tried my hand at some more tiny metal work. My sausage fingers are not really meant for this kind of stuff but I managed. Then I got started on the mahogany trim. That is were I started to notice that the same CA glue I have been using throughout the entire build seems to have no effect when gluing Mahogany to mahogany. Mahogany to basswood no problem. I have tried sanding and wiping down with isopropyl alcohol still no deal. I have tested the glue on other materials and it works so I can rule that out. The spot I am working on is kind of an awkward glue up so it is especially frustrating to get everything in position then hold it there for a minute or so only to have the glue laugh at me. Has this ever happened to anyone else? Obviously there is a solution could someone please let a rookie in on the secret?


- 36 replies
-
- 5
-
-
- sakonnet daysailer
- Midwest Products
- (and 2 more)
-
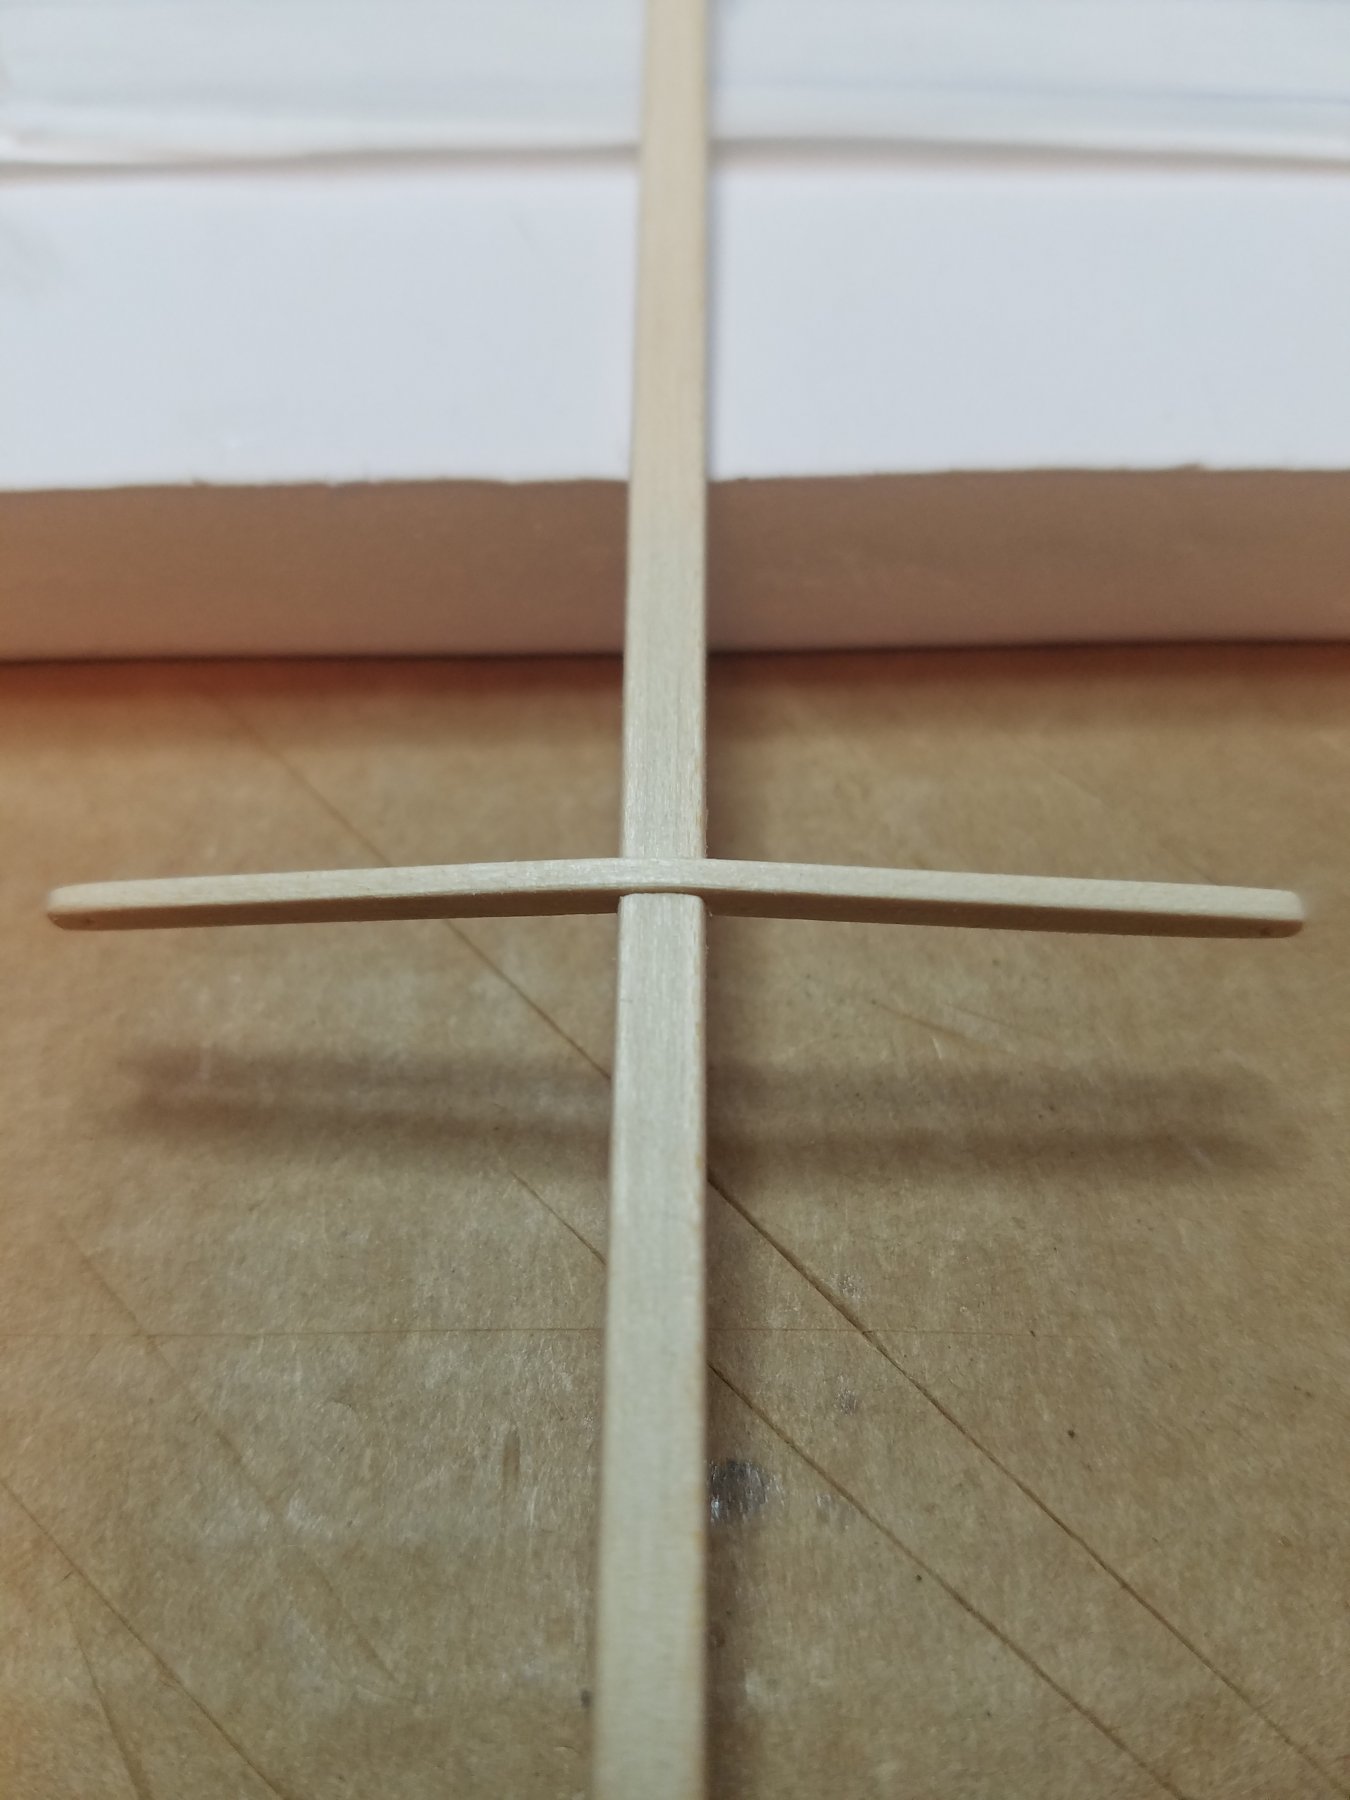
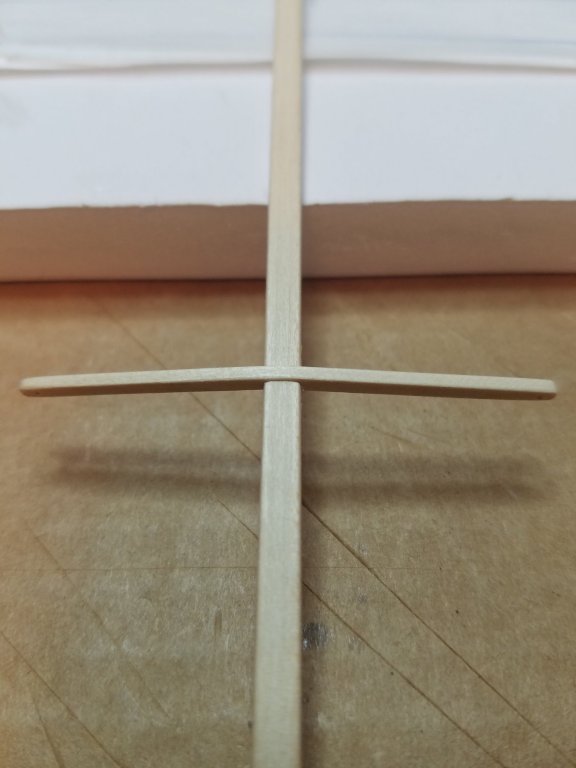
Well at last some progress to report. Started shaping the mast and main boom tonight and realized how much I hated the kit idea of a piece of wire for a spreader with the shrouds just glued to the ends. I thought I could do better so here are my results. I had a strip of 1/16x1/4 basswood laying around so I cut a piece 2" long the same size as the wire spreader. Gave it a fore to aft swept shape. Then drilled a 1/32 hole in each end and sanded it with 400 grit to knock the edges off. Then using my razor saw and a flat edge cutting jewelers file I very carefully did I mention VERY carefully cut a slot a little over half way through the mast at the location specified for the spreader. Then it was a simple matter of gluing tab A into slot B. I think it gives it a little more character if not at least a unique look.

- 36 replies
-
- 5
-
-
- sakonnet daysailer
- Midwest Products
- (and 2 more)
-
We just got power back after the storm so I hope be able to get the hobby room back in order and get back to work soon. It was full of patio furniture up until yesterday. Lol
-
Well it looks like I will be busy putting up hurricane shutters and prepping for a pretty big blow to arrive next weekend. The forecast tracks have Irma pretty much coming right up my street. So I don't expect much progress for the next few days at least. Good Luck to anyone else that might be in its path.
-
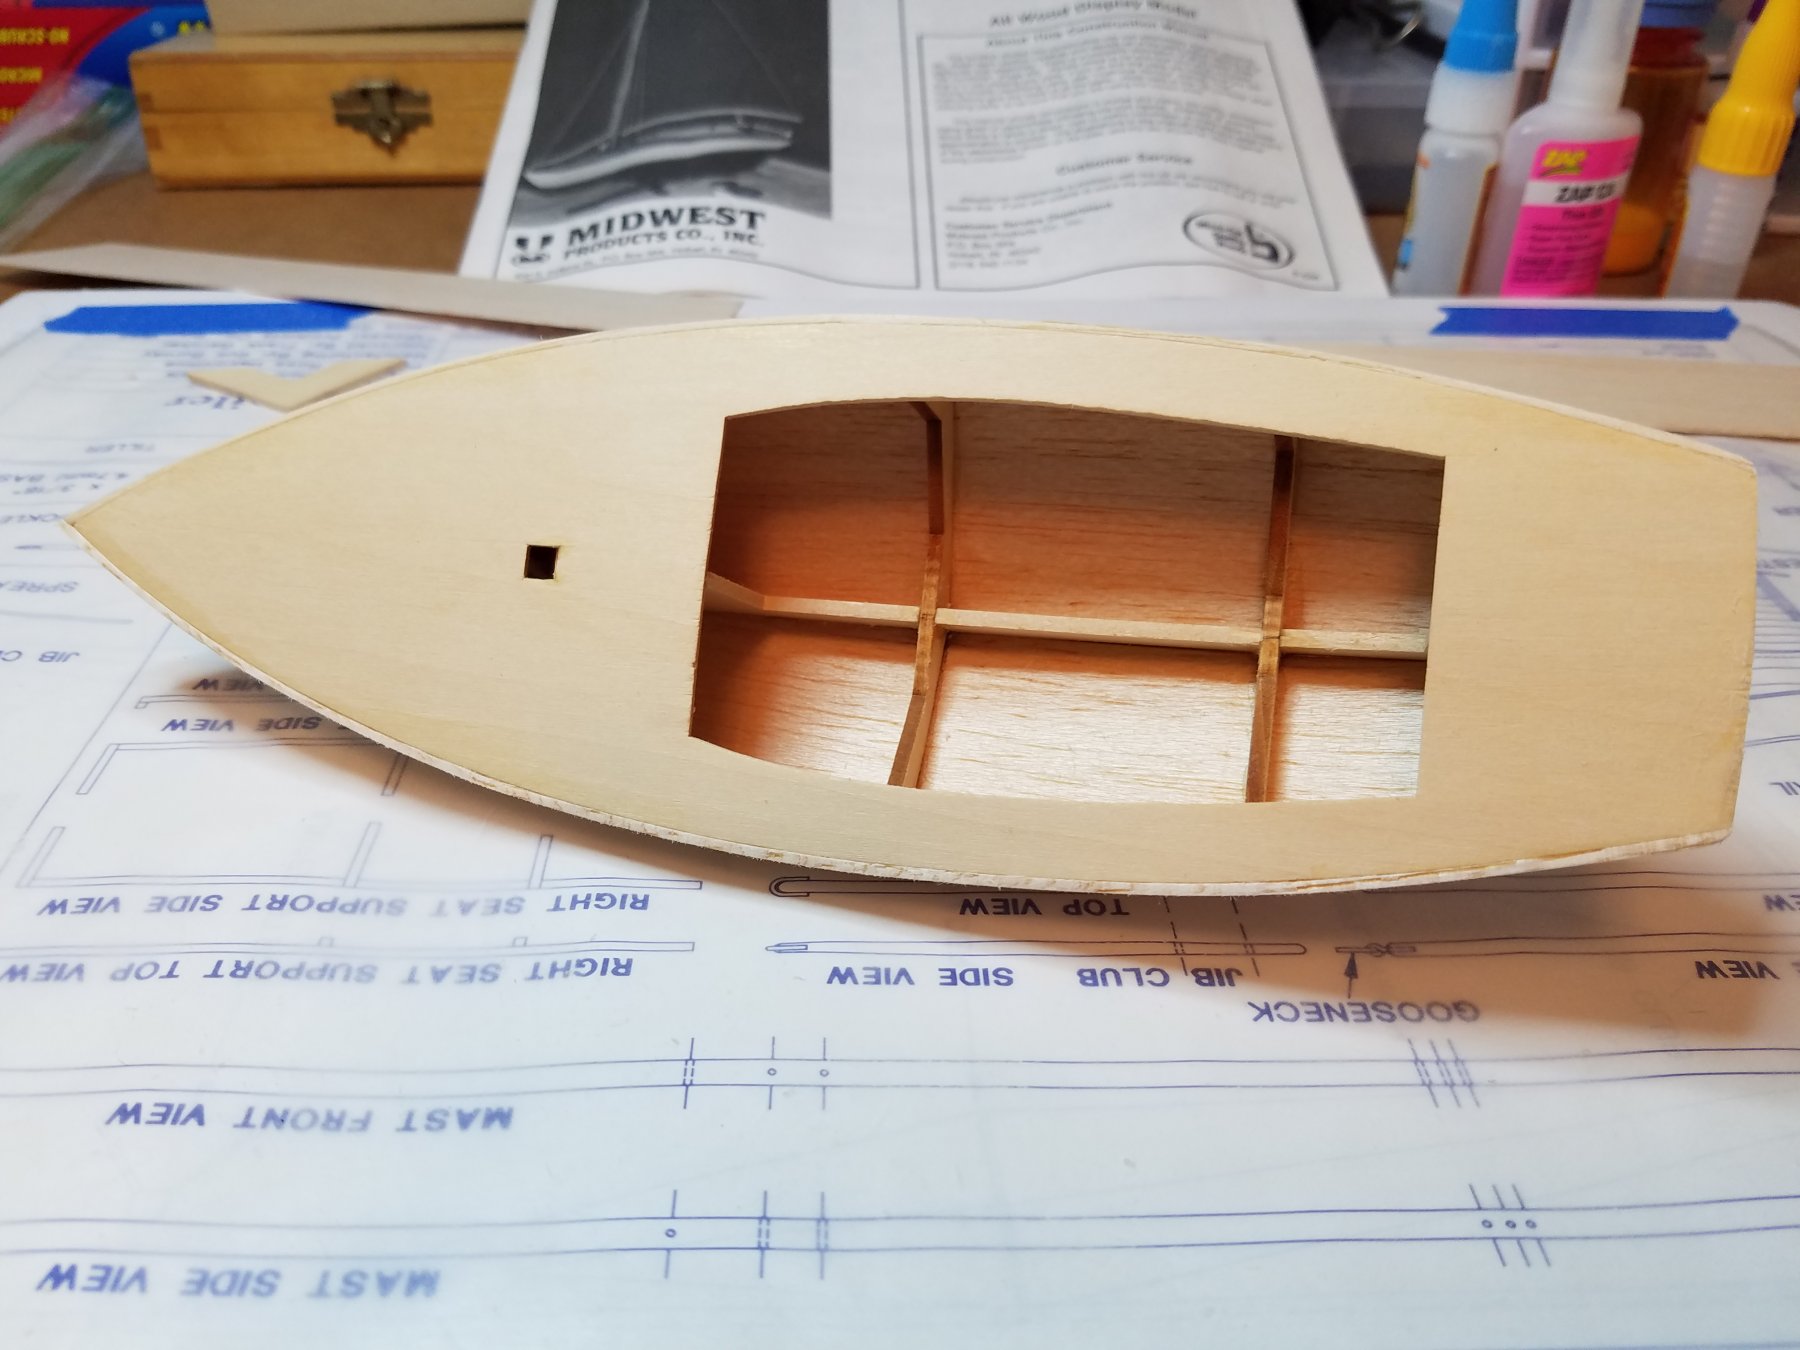
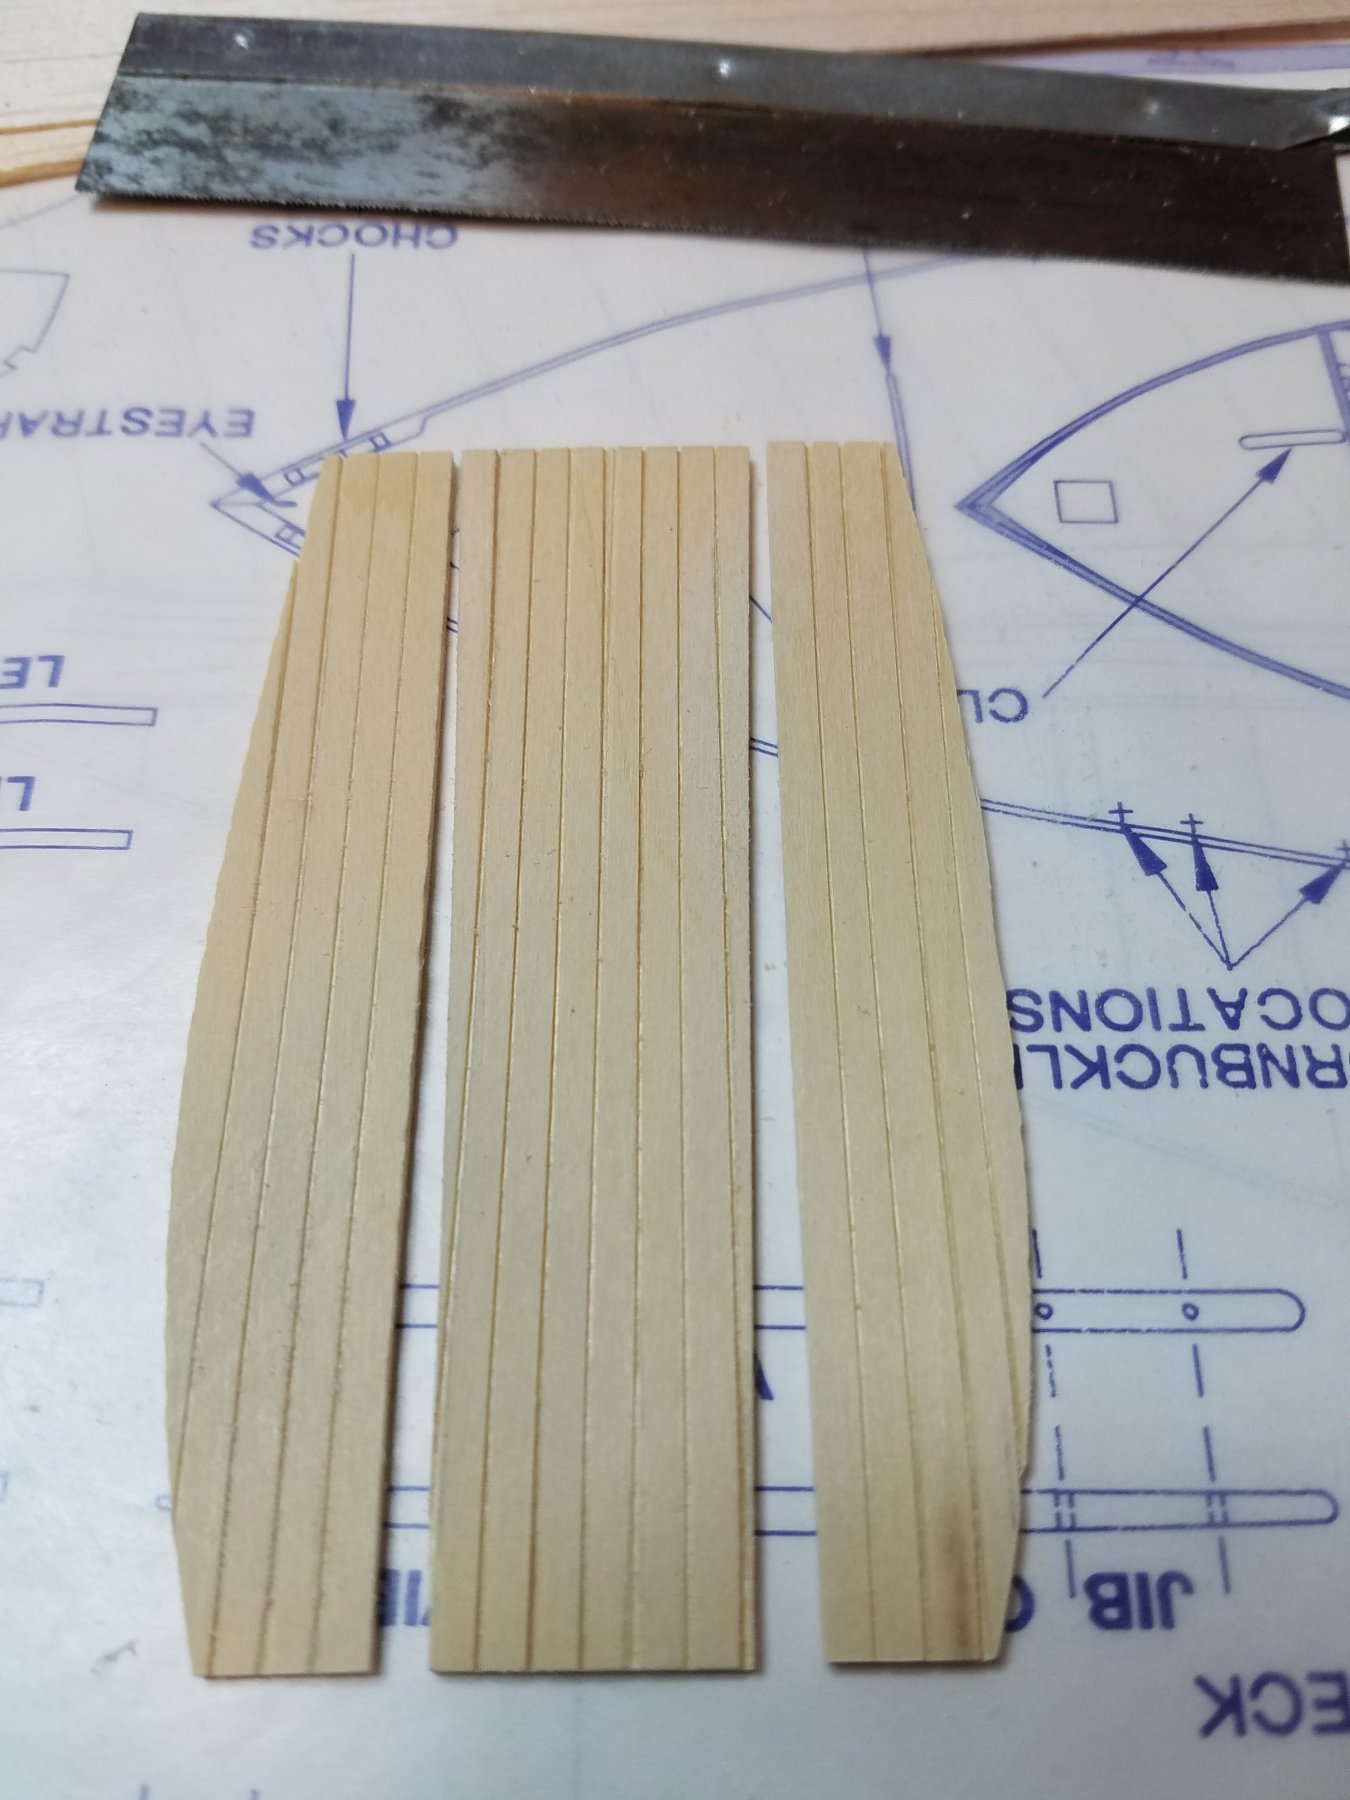
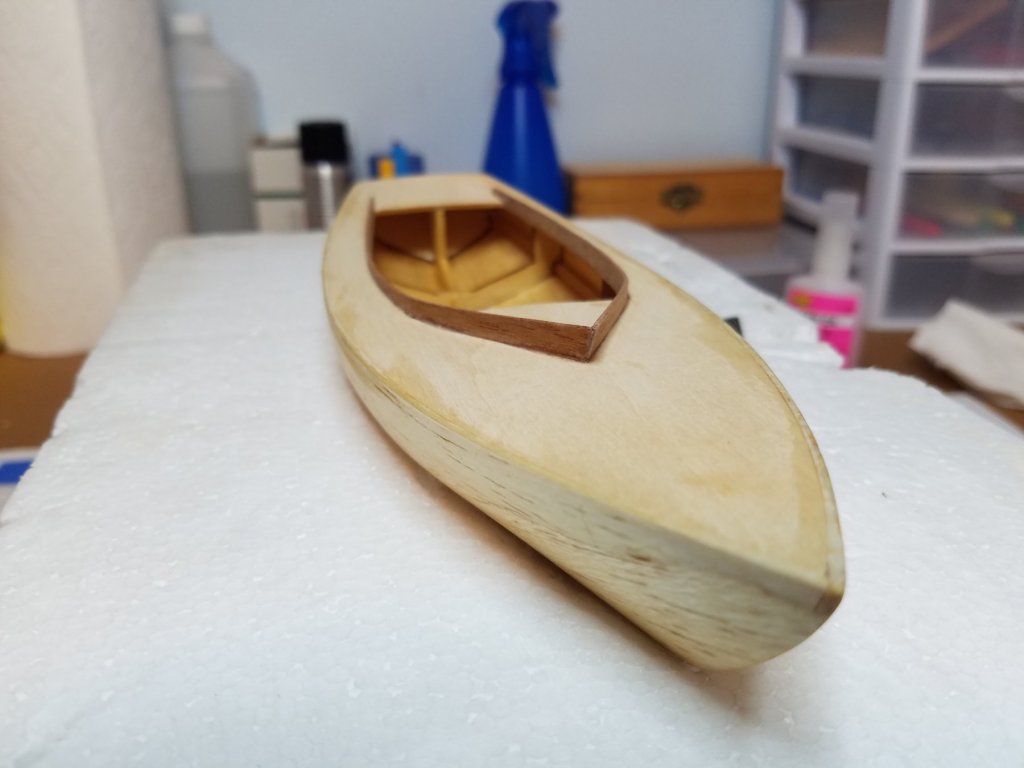
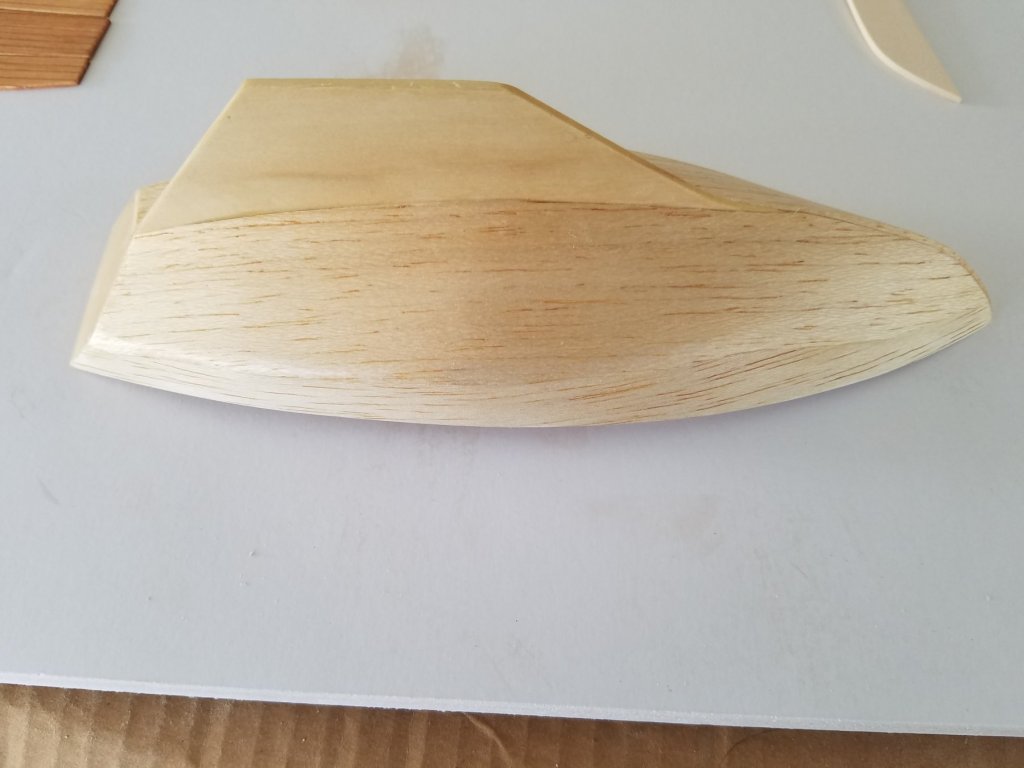
I decided that not only would this be a learning and experimental experience but also an opportunity to clean out the shed a little. I have some stain and oil based poly left over from when I built my new kitchen cabinets a while back I think I will try it out here. I have used the oil based poly on my RC sailboats over the years to water proof the radio boxes and other exposed balsa and basswood components so I know that will not be a problem. Not so sure about the stain. I started out today staining the floor and seat boards. The kit plywood did not stain as well as I had hoped. I really soaked it too. It did nicely highlight the saw cuts I made though it also raised the grain as expected so some light sanding to do yet. Then I turned to the hull I wanted to give the balsa skin a couple of coats of poly in order to 1) raise the grain for final sanding 2) To toughen it up a bit. It is going to be handled quite a bit during assembly so I thought I could at least minimize the dings and rub/nail marks. I did not put any on the deck surface as there is still some finishing details before that is ready. Two coats inside and out and it looks pretty good. While literally waiting for paint to dry I tried my hand at some small wood shaping and trim making details. First up was the rudder and tiller, shaping the tiller was kind of neat, the rudder itself was pretty straight forward as per the instructions. Next was the jib club. Drilled sand shaped the wood. Trimmed the flashing ( I realize that this was supposed to represent stropping but the blocks are already over sized and ti was so inconsistent I thought it looked better) off of the tiny blocks and formed all the brass eyelets. A lot of fun and it turned out fairly nice I think. Finally a coat of poly on the rudder, tiller and jib club and that should do it for today.


- 36 replies
-
- 5
-
-
- sakonnet daysailer
- Midwest Products
- (and 2 more)
-
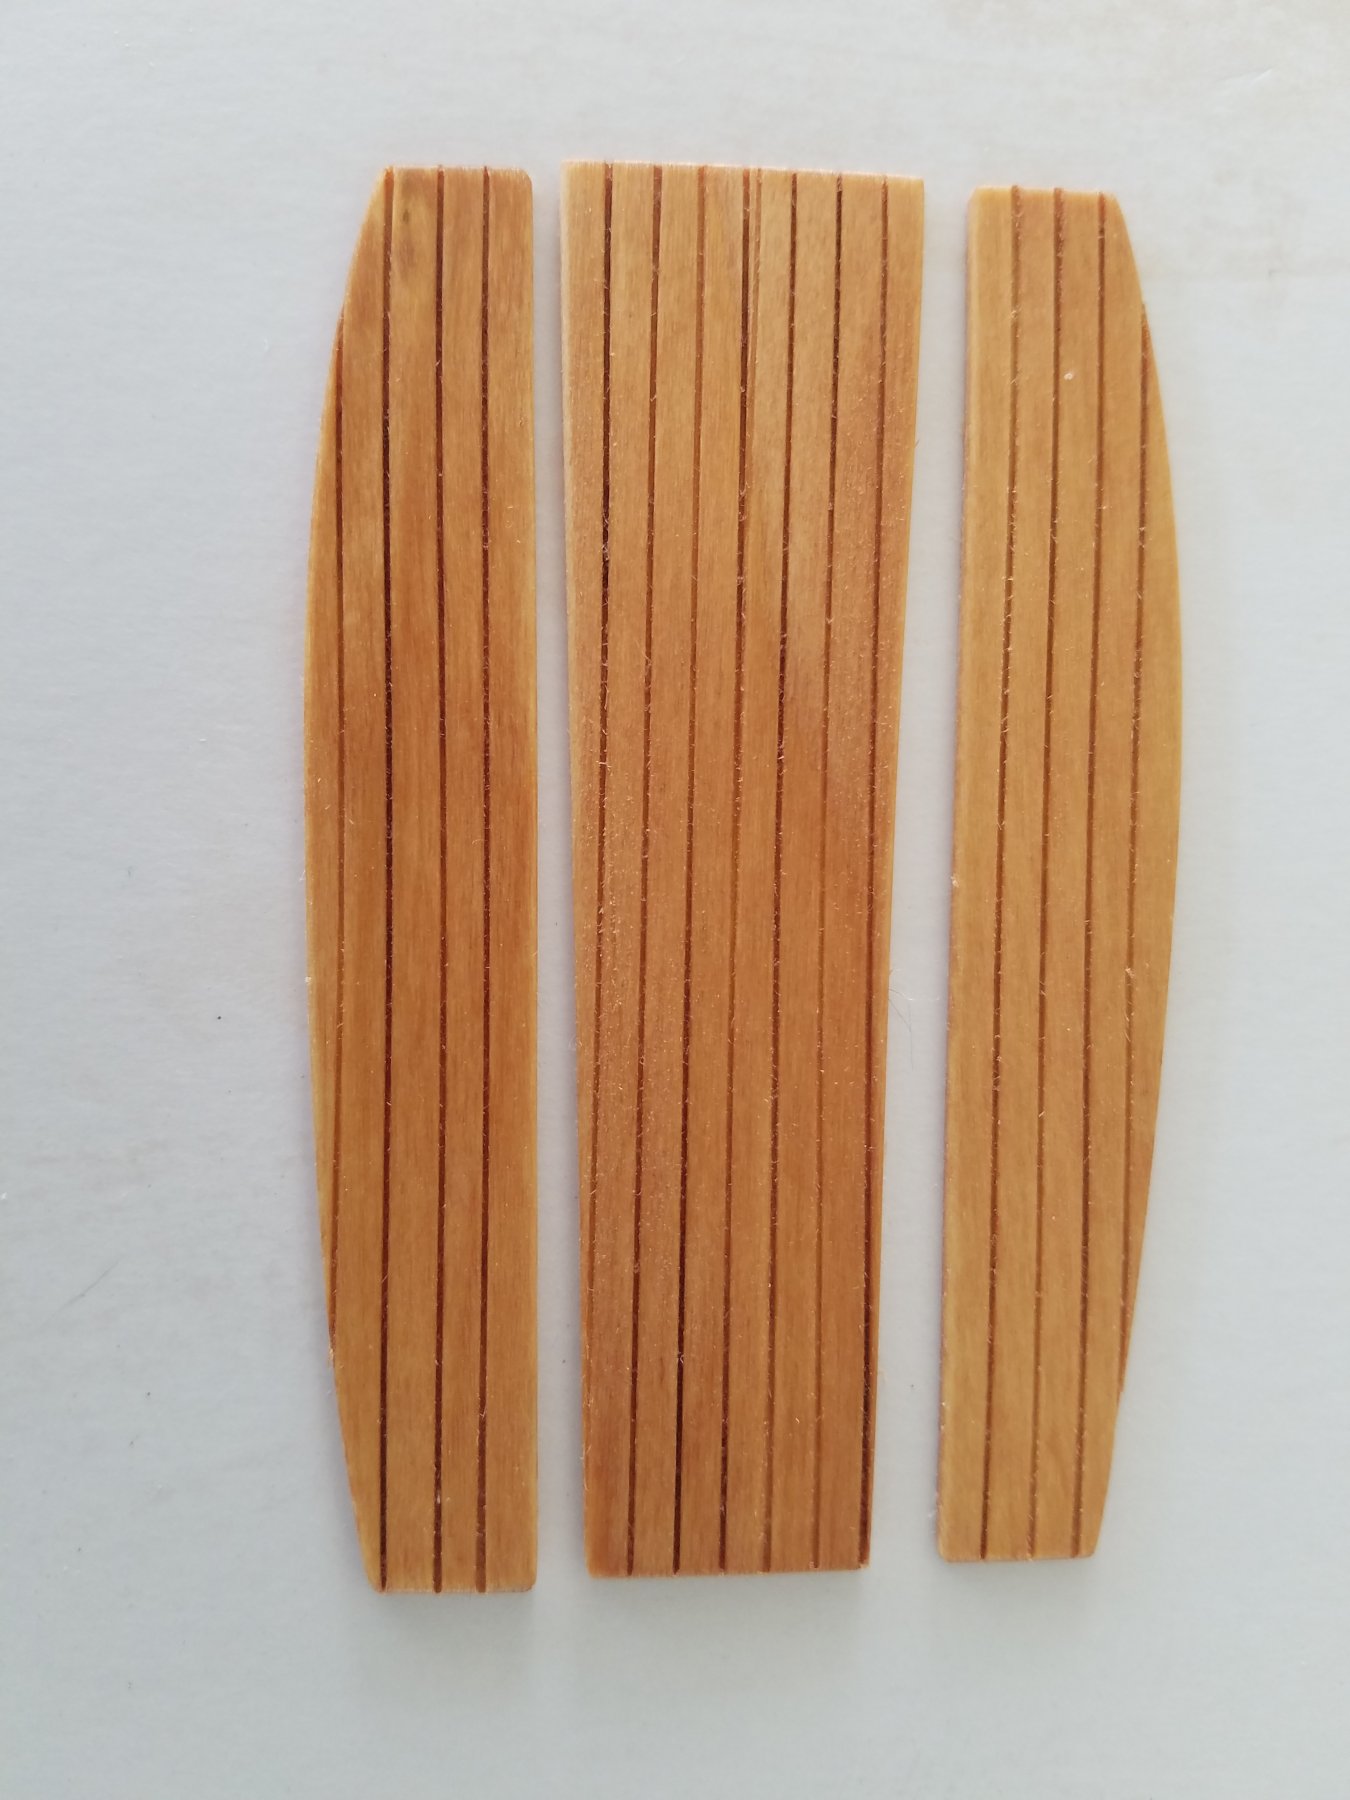
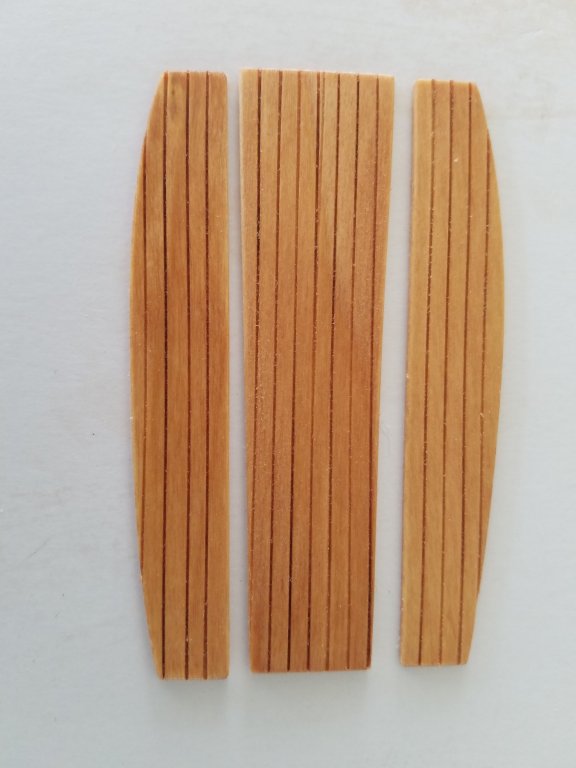
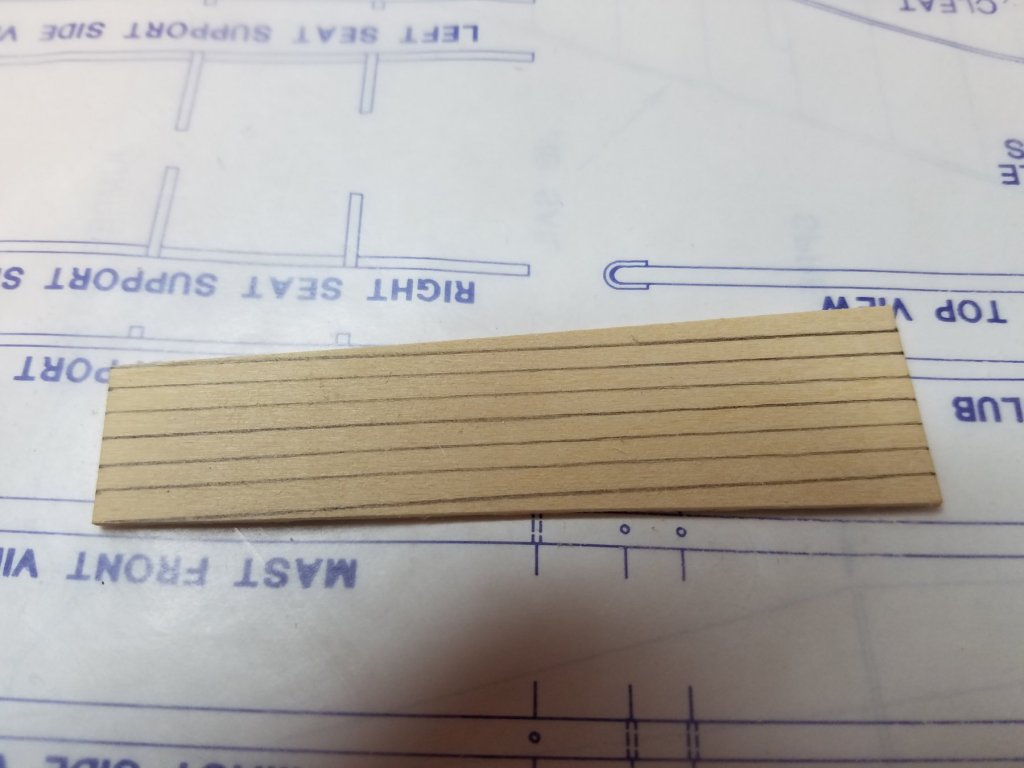
After a couple of false starts and a quick trip to the LHS for a sheet of 1/16" balsa I finally got it figured out. The sheeting is on and trimmed and sanded down to 400 grit. I got started on the mast and booms, all the holes are drilled and will begin shaping them tomorrow. Also started on the inside deck and seat slats. The instructions called for laying out the seams with pencil then staining. That just did not seem good enough to me so I decided to mark them then make a kerf cut with my razor saw. After I stain them tomorrow I will run the saw down the cuts again prior to sealing them. I thought being my fist build I would try a few things to see some different effects.


- 36 replies
-
- 9
-
-
- sakonnet daysailer
- Midwest Products
- (and 2 more)
-
The first side panel is on and trimmed. One down three more to go. Now I am not quite sure how to proceed and the instructions are not clear. Do I trim the bow seam in the side panel on the centerline running fore and aft or at an angle to the centerline following the shape of the opposite side so that the port side panel overlaps the stbd side. Not sure if that is explained clear enough.
- 36 replies
-
- 4
-
-
- sakonnet daysailer
- Midwest Products
- (and 2 more)
-
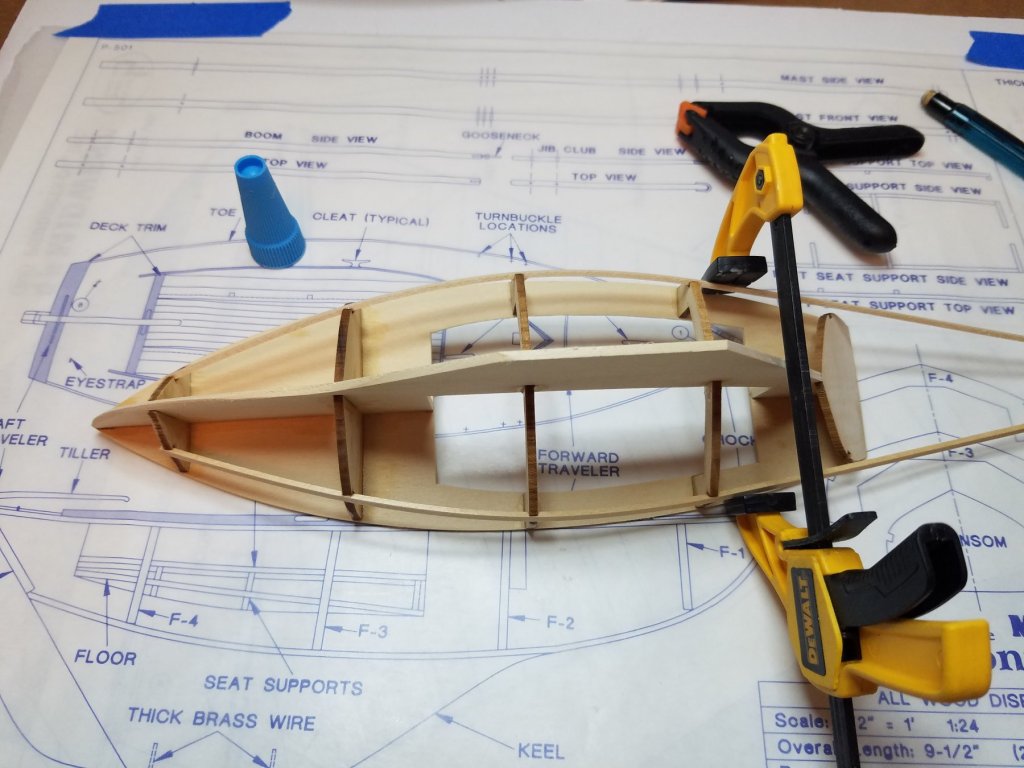
I have to admit I was a bit nervous at this stage. But I seem to have done ok. As per the instructions the starboard side sheet is glued to the deck, the chine, F3 and F4. Once I had it in place and bent correctly I did not want to let it go but I finally did and it seems to be holding. I am going to wait a while and let it dry some before continuing.


- 36 replies
-
- 4
-
-
- sakonnet daysailer
- Midwest Products
- (and 2 more)
-
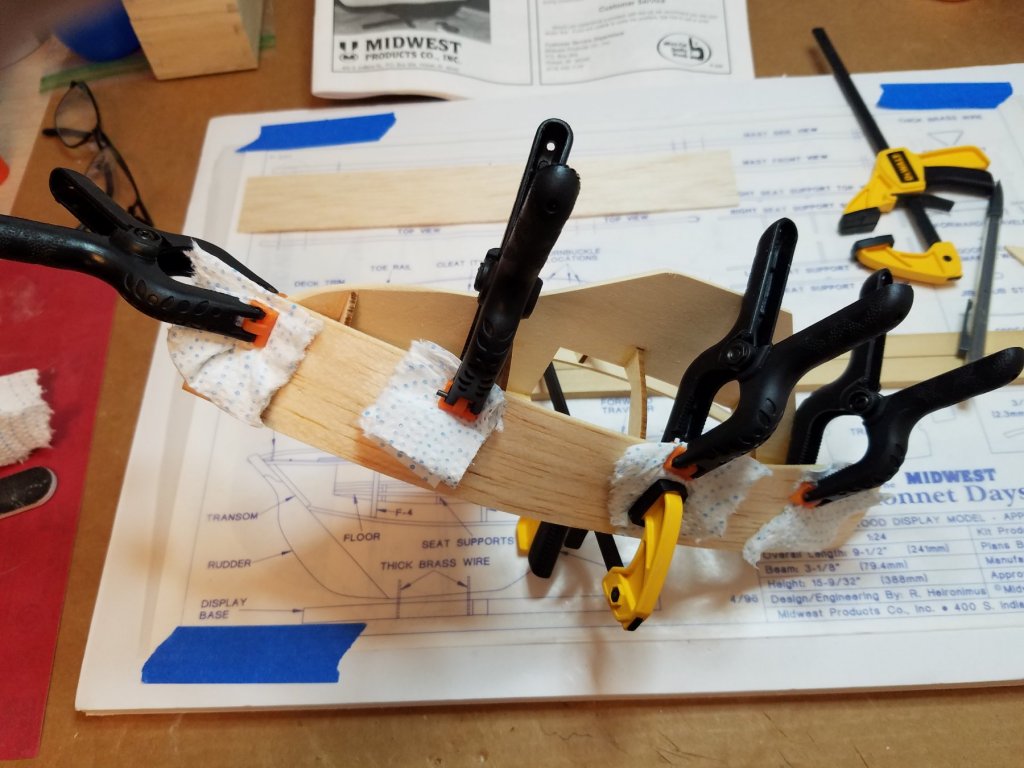
I thought it would make things a little easier if I could form the side panels a little prior to gluing them in place. I sprayed the first one with 50/50 ammonia and water as in the instructions then clamped it to the hull until it was dry. I thought I would get more curve than this but I think any little bit will help in the actual glue up. I folded up some paper towels in order to prevent the clamps from leaving marks in the soft (really soft) balsa sides but it did not help. Fortunately the side panels are quite a bit over sized so it should not be a problem.
- 36 replies
-
- 5
-
-
- sakonnet daysailer
- Midwest Products
- (and 2 more)
-
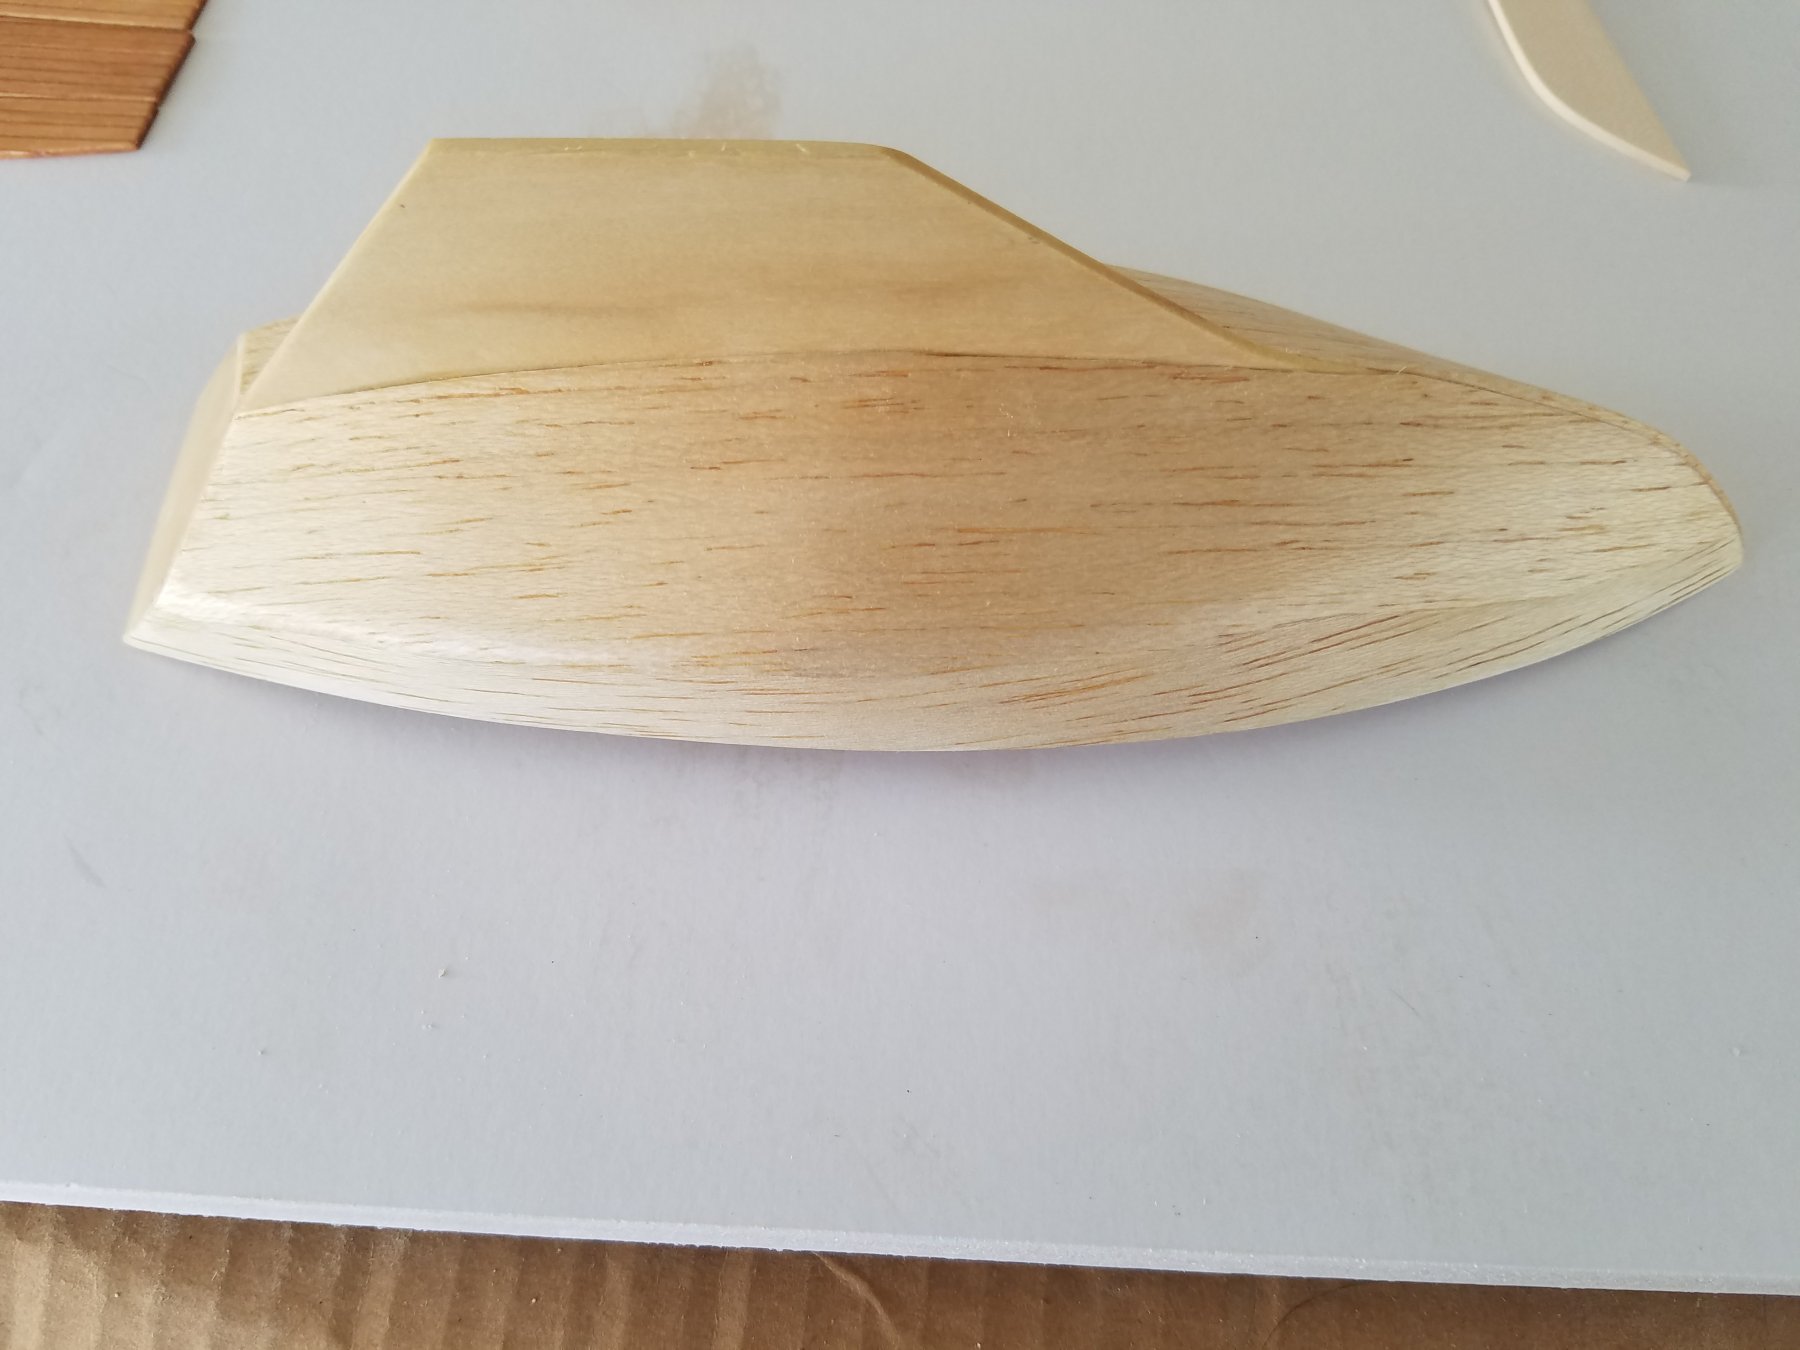
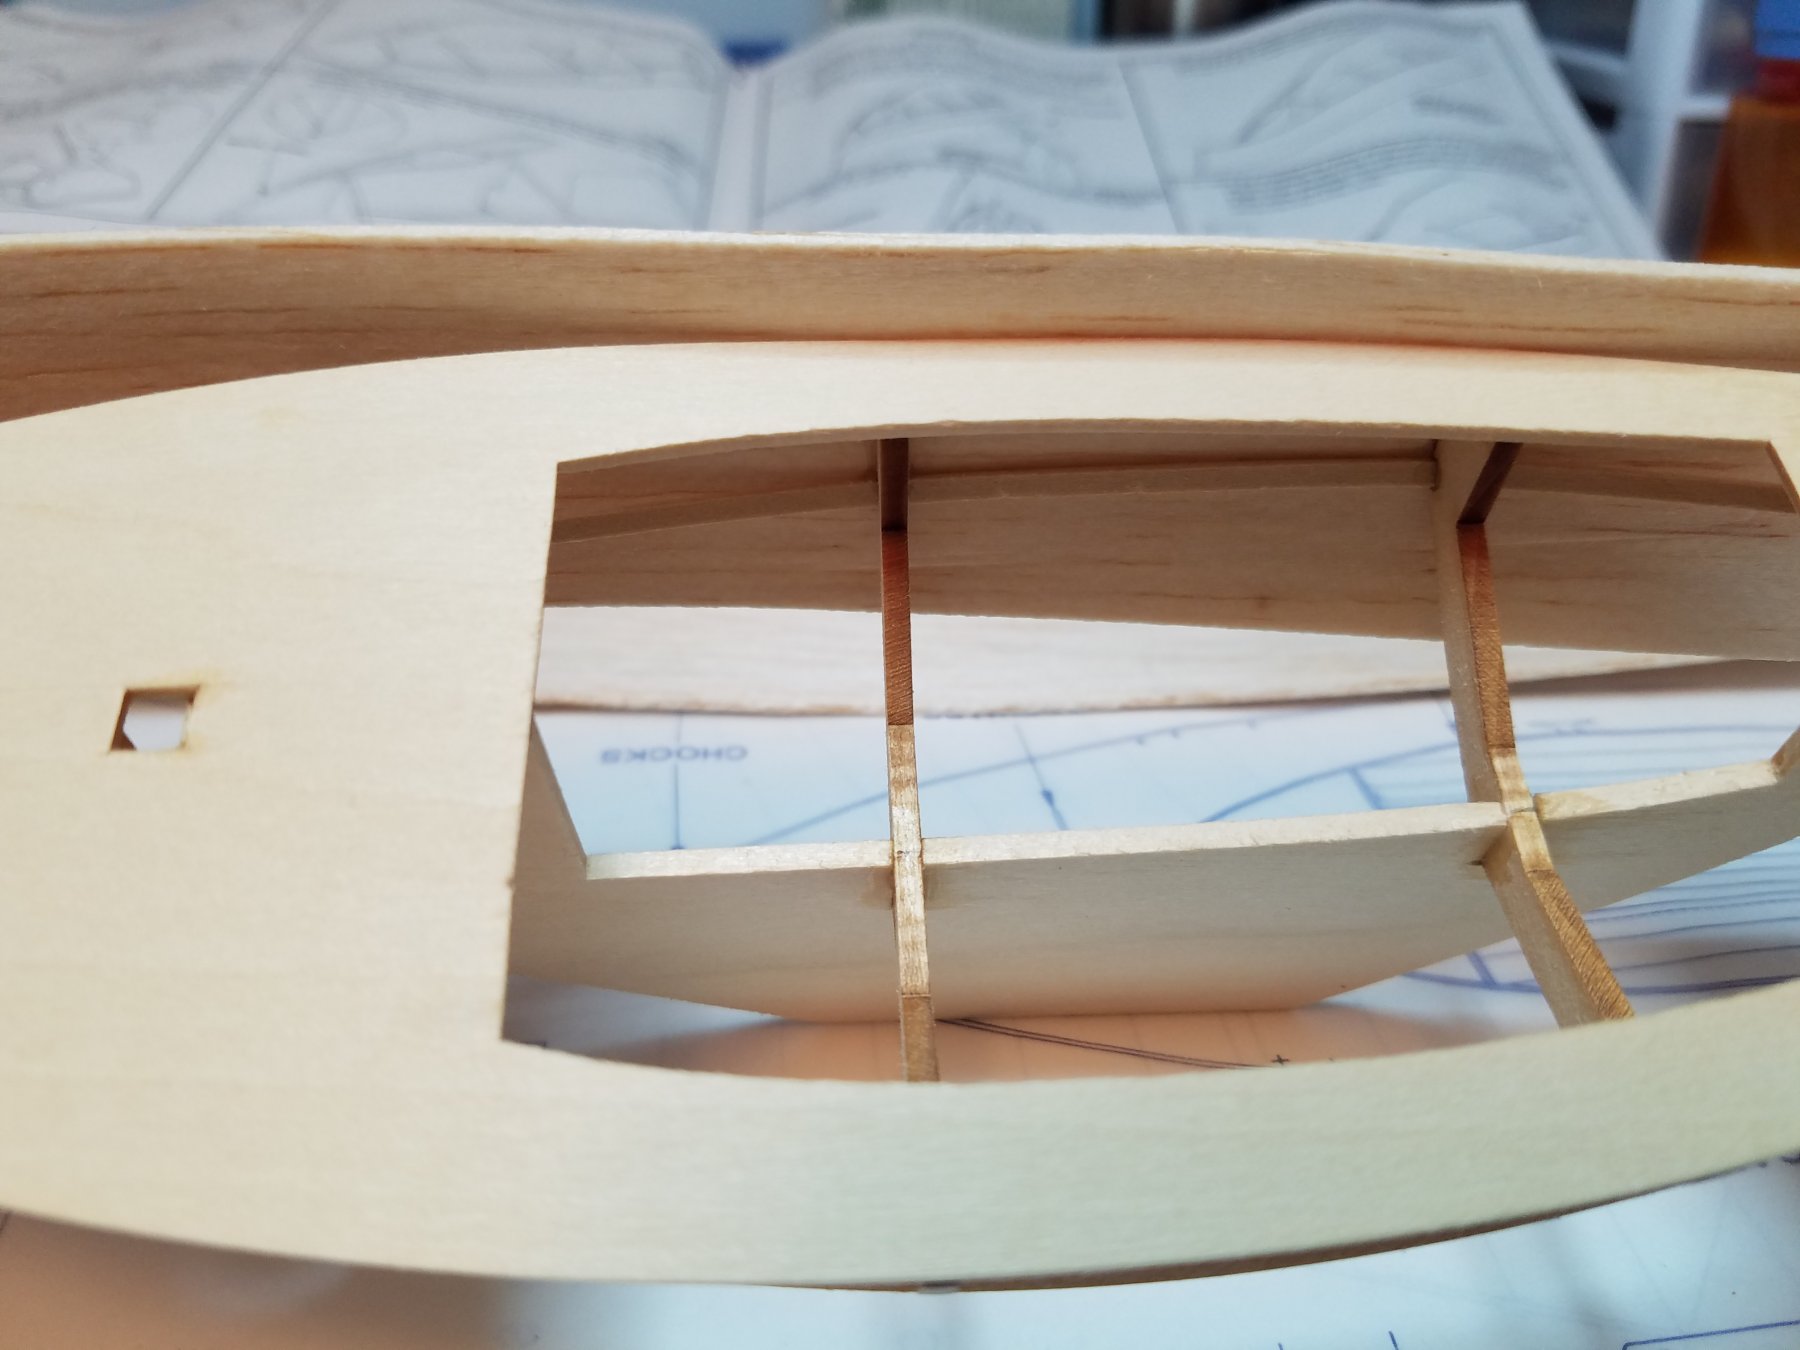
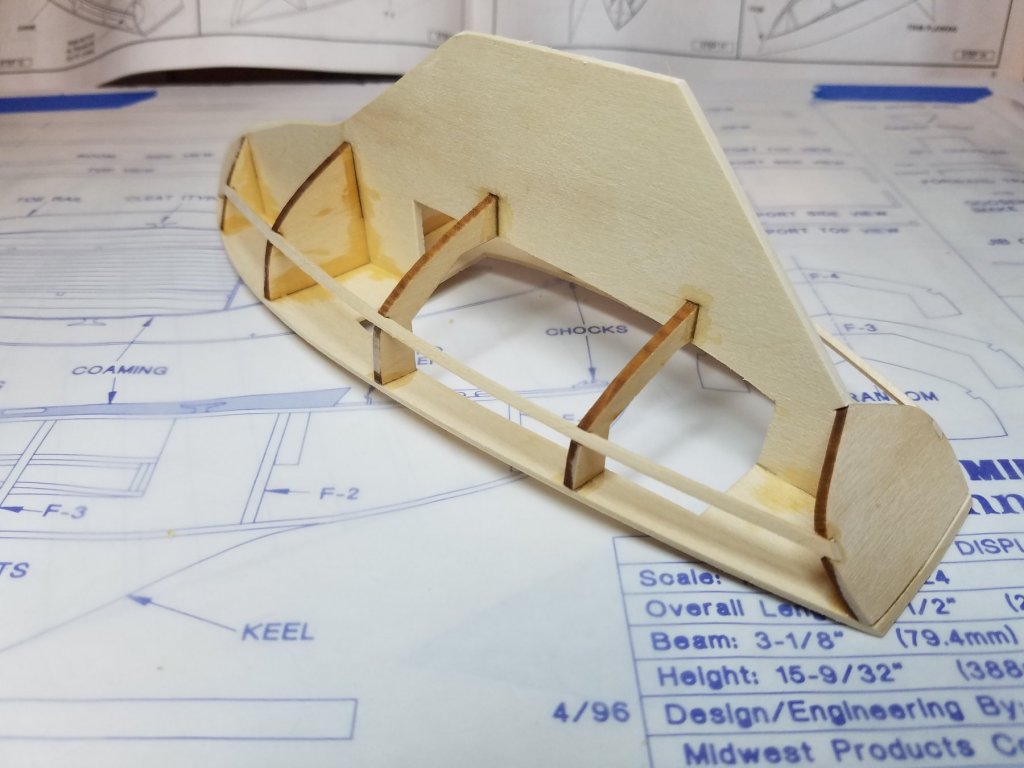
Well I decided I could not live with the warp and I am afraid that trying to sand it out would leave the deck too thin besides blowing through the first layer of the plywood. So I decided to make a kerf cut with my razor saw at the glue line between the deck and F1. Then reglue it using some medium CA and what do you know it seems to have worked. One thing I forgot to mention is that even though I am 60 I still work a regular job every day so my building time is limited to a couple of hours in the evening during the week and after my honey do's are done on weekends. So if progress seems slow it is that and the fact that I am being overly careful.
- 36 replies
-
- 7
-
-
- sakonnet daysailer
- Midwest Products
- (and 2 more)
-
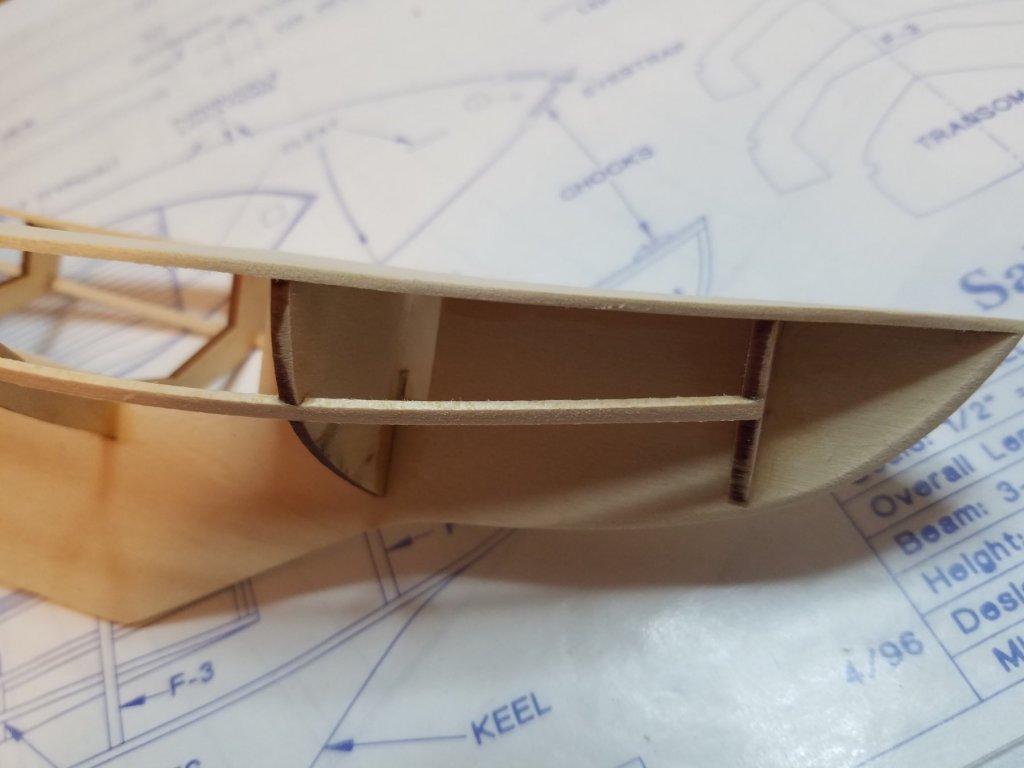
After sanding the sheet containing the deck it was removed and trim sanded as with the other parts and glued in place. The chines were installed and trimmed flush at F1 and the transom. The deck edge was sanded flush with the ribs and the leading edge of the keel was beveled as in the instructions. That was when I noticed the "warp" in the deck on the starboard side at F1. Even though I thought that all the ribs were lined up perfectly, obviously F1 was off by a smidge. Oh well we will deal with that tomorrow.

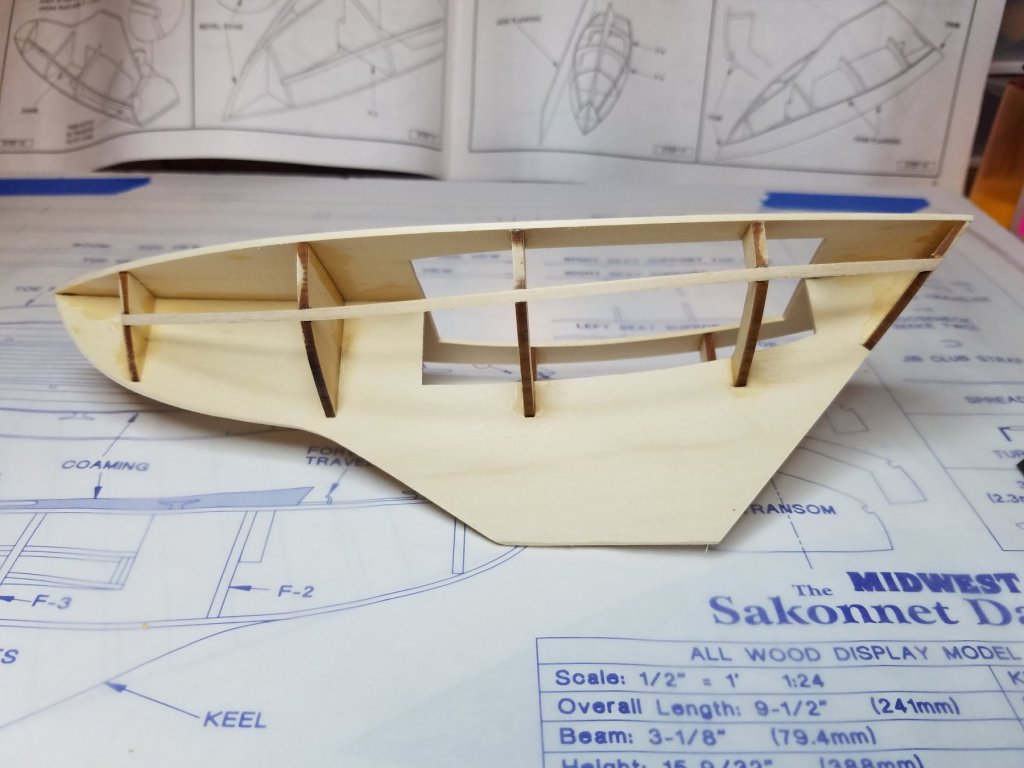
- 36 replies
-
- 6
-
-
- sakonnet daysailer
- Midwest Products
- (and 2 more)
-
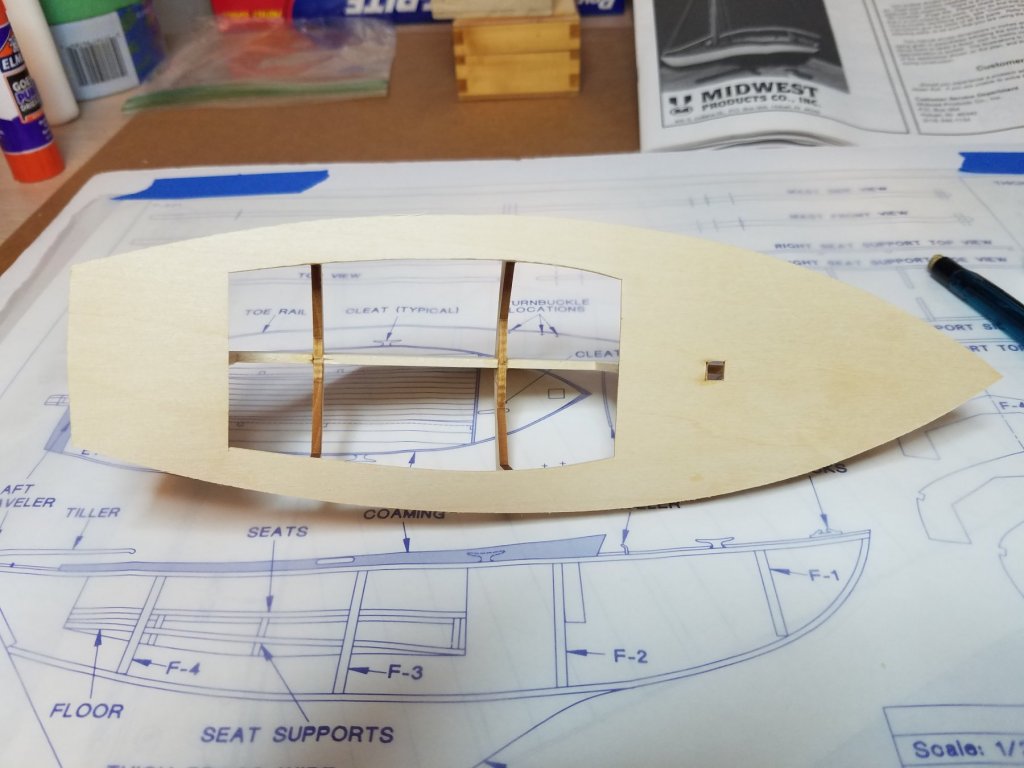
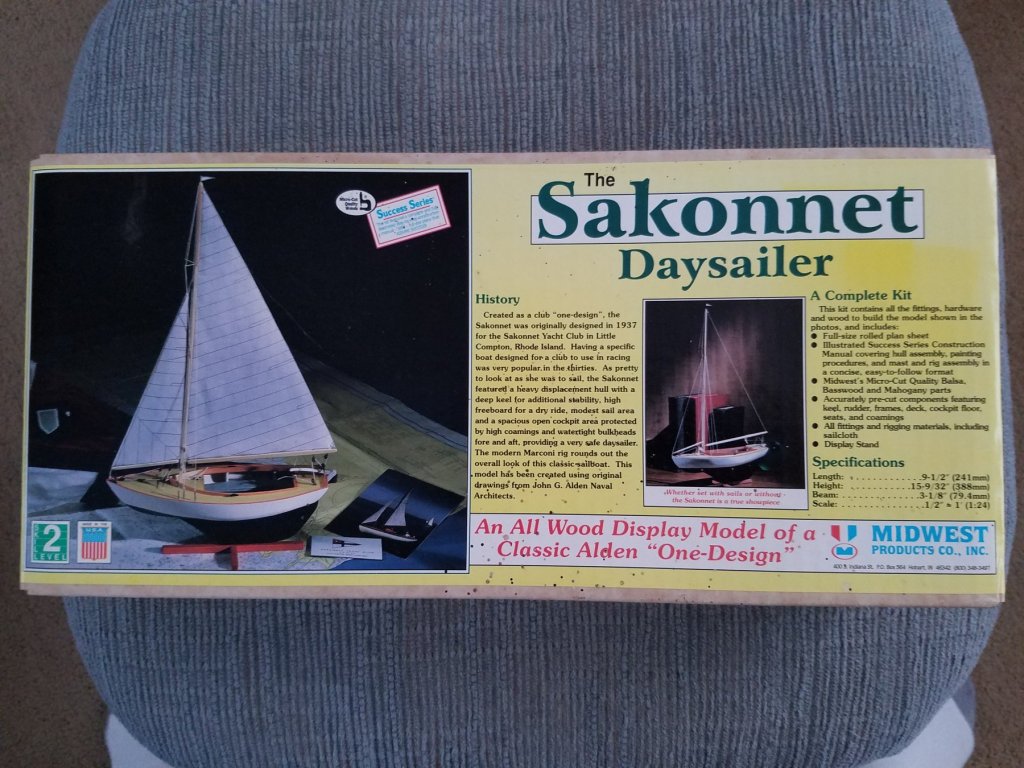
I opened and examined the kit. After laying out the full sized plan on my build board I sat down to read through the rather lengthy instruction book TWICE! (that was always one of my downfalls in previous build attempts). After reading the instructions, I sanded both sides of the sheets containing the keel and ribs with 400grit sand paper. Once the "fuzzies" were gone I removed the parts from the sheets and trim sanded the edges with 400 grit sand paper. Finding enough fingers and clamps to hold the ribs in place and square was a real challenge but using the trick in the instruction book to cut off a corner of the keel sheet and using it for a small square really helped. By notching the back side of it I was able to clamp it in place freeing up one hand to do the actual gluing. I used thin CA while holding the parts in place.
- 36 replies
-
- 5
-
-
- sakonnet daysailer
- Midwest Products
- (and 2 more)
-
Hello, This Build log is being copied from another forum it was actually started three weeks ago. I am actually a little embarrassed to even put this here after reviewing all of the beautiful workmanship on this site. But we all have to start somewhere even at 60 yrs old. So here goes. This will be a log of my first complete build of a wooden boat kit. Like many people I have made many attempts over the years to build one of these to completion only to get half way through and run out of patience or just have life get in the way. Now that I am sixty years old I seem to have developed the patience for this sort of thing and my only daughter is all grown up, married and has blessed my wife and I with our first grand daughter so I am promising myself that this one will get finished no matter what. Also with the internet it is so much easier to reach out to people of like mind and skills and draw on their experience to solve problems that would have previously stopped me in my tracks. I recently came by this kit locally on Craig's list for thirty bucks so I figured what the heck. The same fellow had an 1/75 AL Bluenose for $75.00 I should have grabbed it too I suppose. The box was a bit mildewed (not unusual in Florida) but the kit is complete. I actually got a head start so let me bring you up to date day by day.
- 36 replies
-
- 7
-
-
- sakonnet daysailer
- Midwest Products
- (and 2 more)
-
Hello everyone and thanks for all the warm welcomes.
-
Hello Everyone, My name is Art Smith and I am located in Pompano Beach Fl. I am 60 yrs old and totally new to model ship building. Although like a lot of people I have made attempts over the years but one thing or another kept getting in the way. I have already started my first build and a build log on the RC forum I belong to. I will try to copy it here or at least post a link in the appropriate section. Looking forward to being active around here for the time being it will be more questions than answers but I will try to help where ever I can.