


twintrow
-
Posts
496 -
Joined
-
Last visited
Content Type
Profiles
Forums
Gallery
Events
Posts posted by twintrow
-
-
Could be just an illusion, but she seems to be riding awfully low in the water (as in too low). Must have taken on enough stores for a long West Indies tour!!! But absolutely beautiful none the less.....and a great job of rendering.
Tom
-
Woodworkers choice has Oak Veneer. Here is an example. In the store they have smaller pieces, less expensive.
Tom
http://search.woodworkerssource.com/search?keywords=oak+veneer
-
I don't mind drilling. I'd like a hundred to put in my supply bin. The when you get underway, get more.
Come to think of it, that may not be a bad marketing method, few bucks less to drill your own?? And like ME sell in bulk as well.
It seems there are never enough blocks when I need them.
Tom
-
I'm ready to order Chuck as soon as you are ready to ship!!
Tom
-
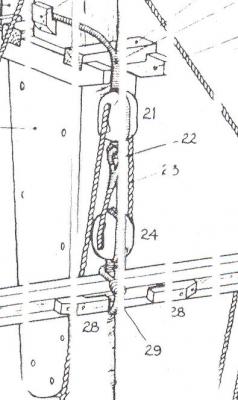
These look much better!,
little remark: You should make sure you're blocks are the correct side up in the strop:
the little hole should in most cases be nearest to the strop.
Jan
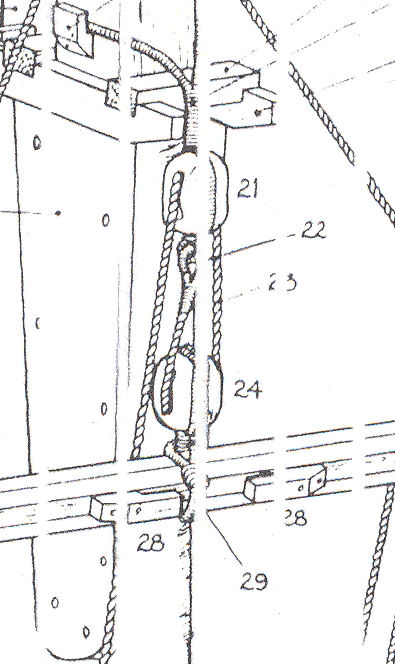
I've seen that description made before and instinctively feel it is misleading. The hole nearest the top would be used if the rope was come from below the block and returning downward from the block (as in 21 in the photo). Conversely, when the rope was coming from above and returning above the block the hole would be nearest the bottom of the block (as in 24 in the photo).
Makes sense to me anyway.
Tom
-
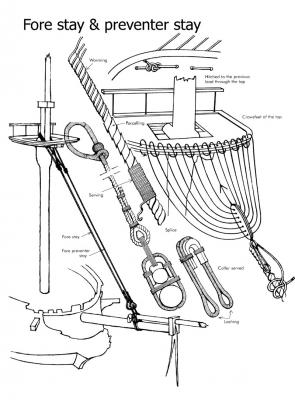
Here is a pic of the preventer stay, it represents how each of the stays would be served. Yes, the eye is also served.
Sorry I missed that to begin with. Click on the pic to enlarge. You can se the eye, the mouse clearly, and the eye served.
good luck
Tom
-
Served. With a mouse stopper.
PS A main point in serving a line, is to reduce the effects of abrasion against any nearby surface. So since the stays are looped over the masts they would be served all along the loop as well.
-
Thanks for that Chuck. Looks to me like this could almost be a "generic" practicum for a similar type build.
Extremely useful and very well done.
Tom
-
I usually use a clinch knot when tying directly to the eyebolt.
Here is a demo of how to tie the clinch knot. It comes out looking like a served lashing.
Tom
-
Outstanding, thanks for going to the trouble to locate them Garward. Looks like thy were using about an 18 Ga hypodermic needle.
Have to give that a try.
Tom
-
Garward
Would it be possible for you to demonstrate the technique, on how you make the treenails with the needle, how to prep the needle and how they are inserted.
We had a thread on this on the old MSW I believe from Woodeater.
thanks
Tom
-
I never use the polishing grit meant for rocks and stones in the tumbler, just the sandpaper.
I use the method for making the block blanks shown on Jerzy Bin's site (http://www.jbmodel.eu/). Then throw them in the tumbler. I also use the ones supplied with the kits sometimes, but they are so unrealistic sometimes that it is easier to make new blanks than spend the time cleaning up the kit ones. The kit ones usually are drilled off center as well, that can't be fixed unless you fill the holes with wood putty and redrill.
I experimented with 80, 100 and 120 grit papers in the tumbler and the 100 seemed to do the best job in the shortest time. The 80 was too aggressive and the results were uneven (different densities in the wood I guess).
Eric O., I've not used that kind of tumbler. It is true that when you run a batch of 2 or 3mm blocks, many of them can get under the sandpaper so it must be sealed tight against the tumbler walls.
Tom
-
Overdale
I use a rock tumbler from Harbor Freight $29, sometimes less on sale. I lined the barrel walls,and the top and bottoms with 100 grit, I let it run 24 to 48 hrs, while checking every few hours. Seems to do a good job for a large number at a time.
I then usually end up finishing about 50% of them off by hand.
Tom
-
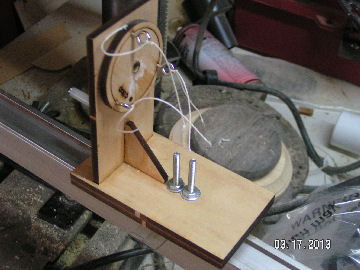
When my wife suggested new draperies for the family room she wanted to throw away the old vertical blinds. Naturally I said no, there must be a use for that big aluminum bracket!!
So after it laid around a few weeks (as new ideas often do), I decide to try and make it my "track" for the MS rope walk.
I stripped off the mounting brackets but kept the plastic center mounting brackets.
I drilled couple holes in them and mounted each end to the two brackets. I kept these because they slide freely in the aluminum angle.
Th overall bracket is 10" long so I set each of the two MS rope walk parts a foot in at each end.
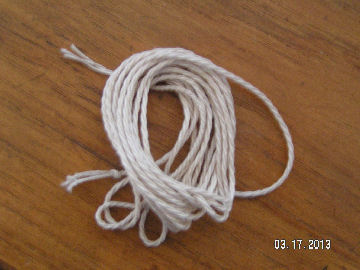
Strung some crochet and made the first attempt.
While counter winding (the first step in the MS instructions) the winding handle sliped and would no onger turn the eyes, So I went to the left side and counterclockwise rotated until the rope threds looked like rope ;o)
I didn't wax the thread first which I think I should have done. And as you can see in the photo the rope is not evenly wrapped end to end, near the right hand side it was closer or tighter wrapped.
I cut it off the device and tied the ends. It only unwrapped slightly.
Any further suggestions on technique are welcome and solicited.
My overall opinion is that it will work well and create 9' lengths of rope very nicely when mentioned bugs are fixed.
I was disappointed that the MS crank did not perform as advertised, way too flimsy.
Tom
-
Another source is
http://www.cornwallmodelboats.co.uk
Look under ship fittings by company or search for cannons. They are in the UK but have pretty fast service.
Tom
-
Rich look at Hubert's site "Shipbuilding for Dummies" cost is $40 for life, worth every dime!!
Here is link to "Zip Seizing" his technique. http://www.shipmodeling.ca/subs/aa123.html#1 Look for #9 tip.
Any problems with viewing let me know. Hubert is very helpful and occasionally posts a video tip here on MSW for non members as well.
Tom
-
I was thinking the same thing John, thanks I'll try it out.
Tom
-
Excellent info Banyan, very helpful.
One issue I have when coiling rope (lines) to attach to belaying pins, is that the coil tends to stick straight out, not hang loosely as in the photos of "real" lines. I've tried running the thread through a 50/50 dilution of white glue, getting it wet. Sometimes it forms a little better.
Is it the type of thread being used that causes it to not lay realistically, or the technique?? Also, and maybe obviously, the larger the scale, the better the rope looks.
thanks
Tom
-
Check out Cornwall Model Boats, the link below will take you to Amati accessories, they have lanterns. There are other mfg listed with accessories as well.
http://www.cornwallmodelboats.co.uk/acatalog/amati_lanterns.html
good luck
Tom
-
I really like the looks of a wood all over ship. At the same time I am trying to be as authentic as possible while building and to accomplish that some hulls have to be coppered to reflect the real ship. So I guess the way to solve the dilemma is if you want a completely wooden ship, and be authentic too, build one from that era.
Having said that, there is (was) a model shown here before of the Constitution not coppered, an it was beautiful ;o)
As has been said many times here, "it's your ship, build it the way yo want to".
Tom
-
-
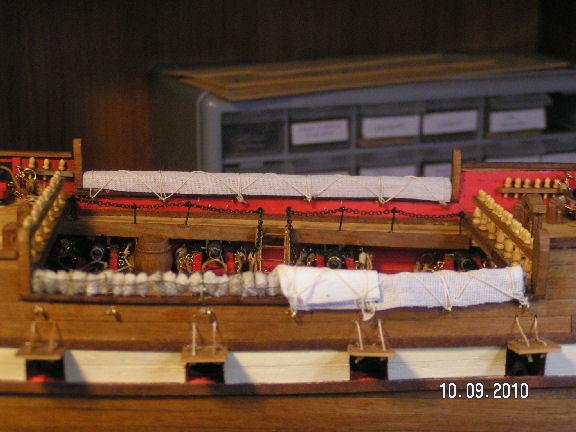
Daniel
The 1st shot is of my HMS Snake, I elected to only show a few hammocks and covered the rest as when at sea.
Hammocks are scale 2'x6', lashed 7 times, folded and stowed.
2nd is of my South Caroilina, same thing as with the Snake, this shot shows the cover lashing better.
Tom
- Siggi52, peter todhunter, rkwz and 1 other
-
 4
4

Kits in SA
in Wood ship model kits
Posted · Edited by twintrow
I never understood why countries impose import taxes on products and/or services that are NOT AVAILABLE in that country. Obviously it is to make money for the government to waste, and to encourage buying in country made products when available, but seems unfair to the people of the country.
Then to add insult to injury, not charging folks in other countries the VAT, such as Great Britain not charging VAT when Americans buy from companies in England.
Not intended to cause any political arguments, just an observation.