
mati
-
Posts
122 -
Joined
-
Last visited
Content Type
Profiles
Forums
Gallery
Events
Everything posted by mati
-

Papegojan 1627 by mati - FINISHED - 1/48
mati replied to mati's topic in - Build logs for subjects built 1501 - 1750
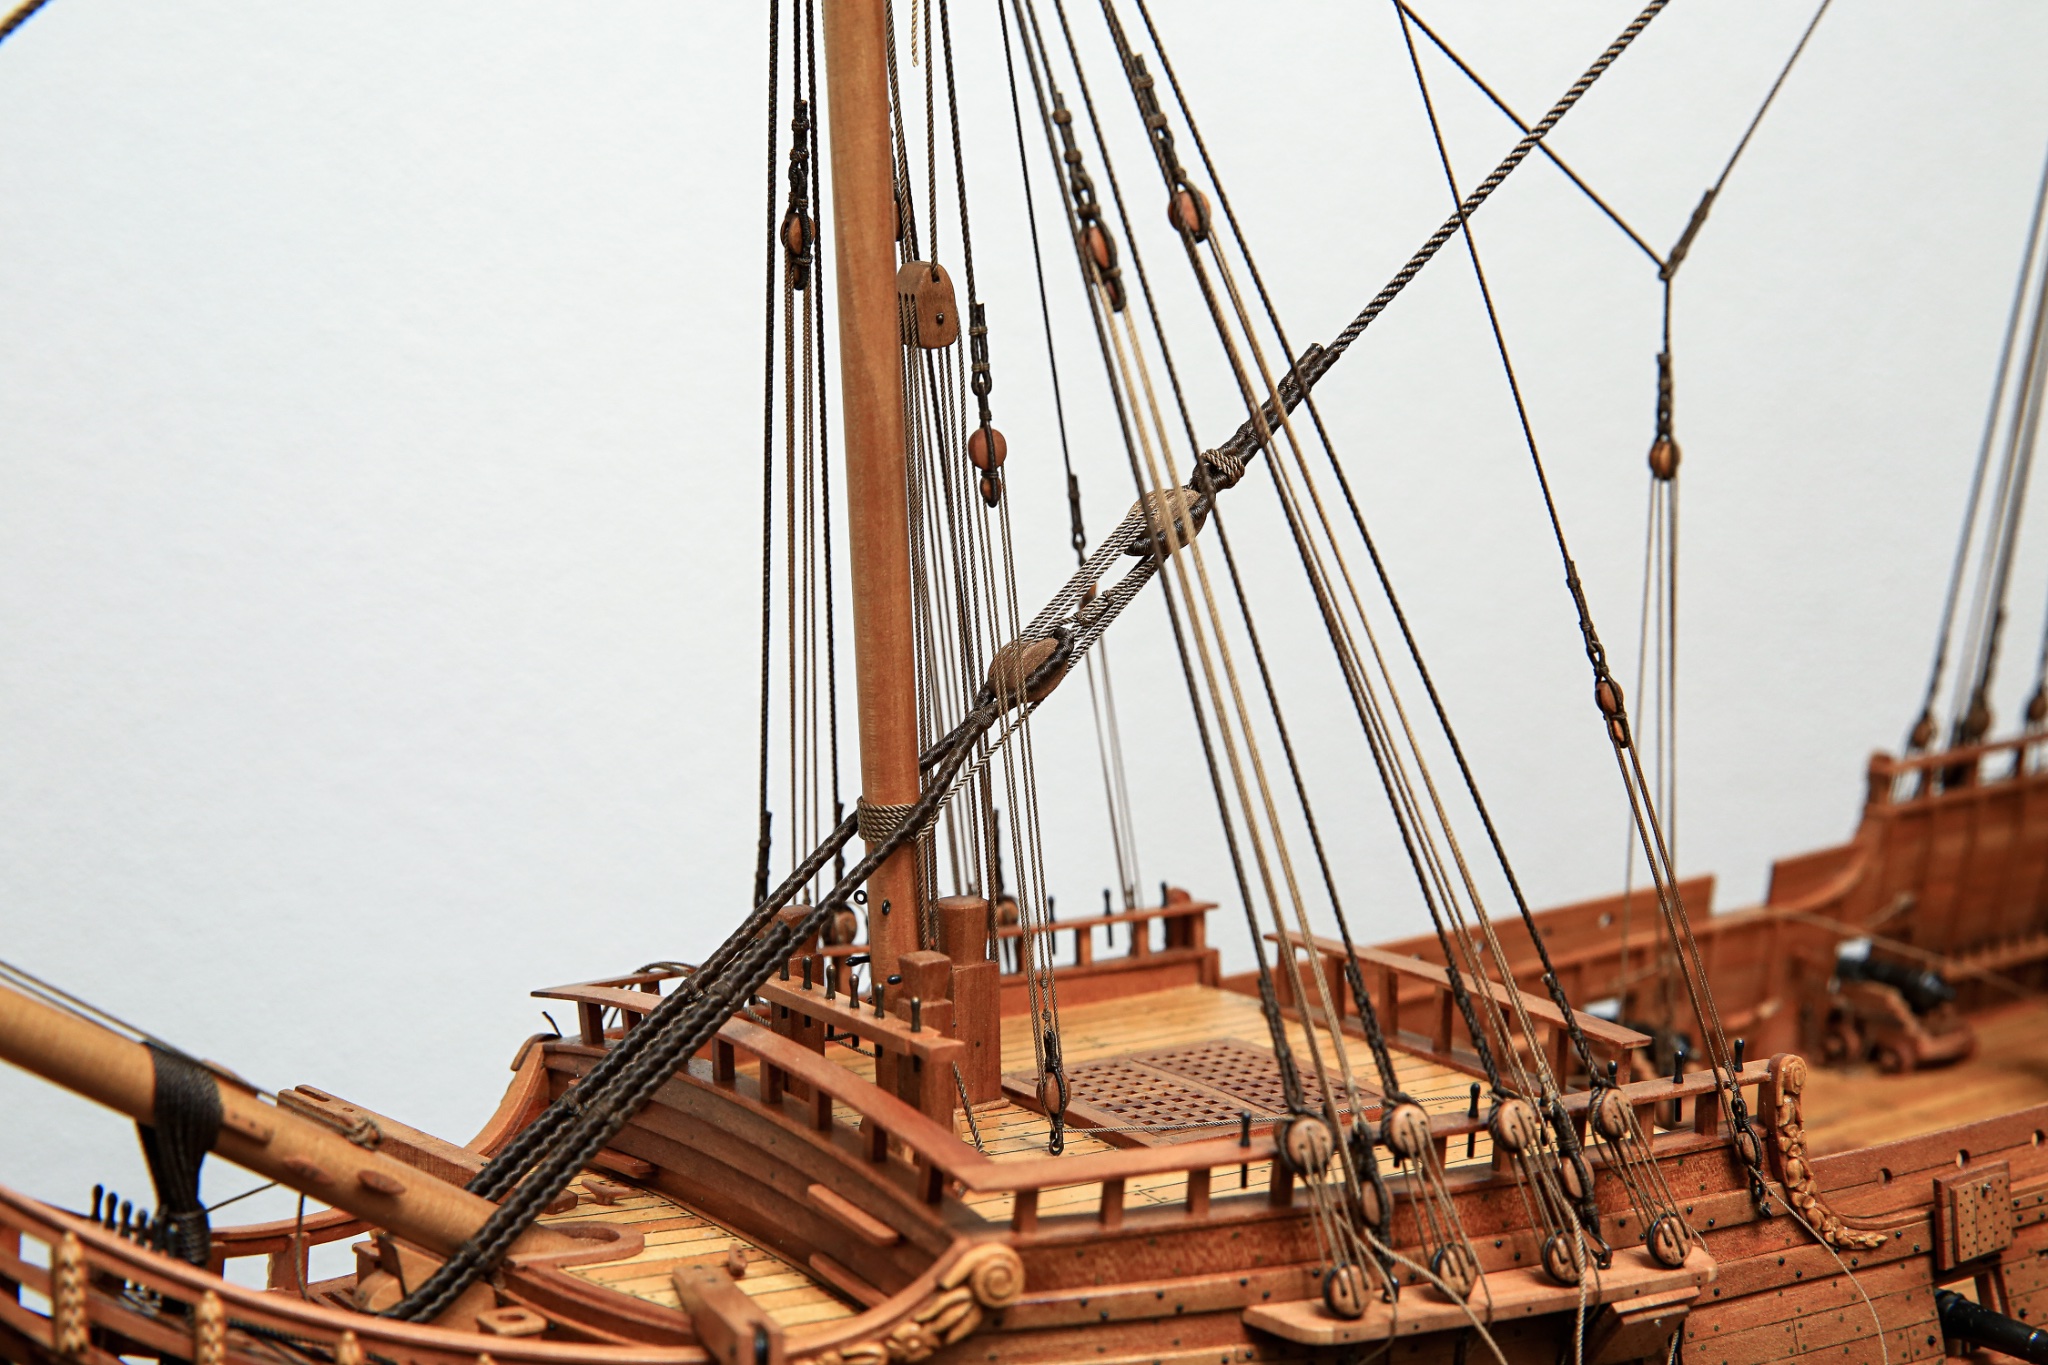
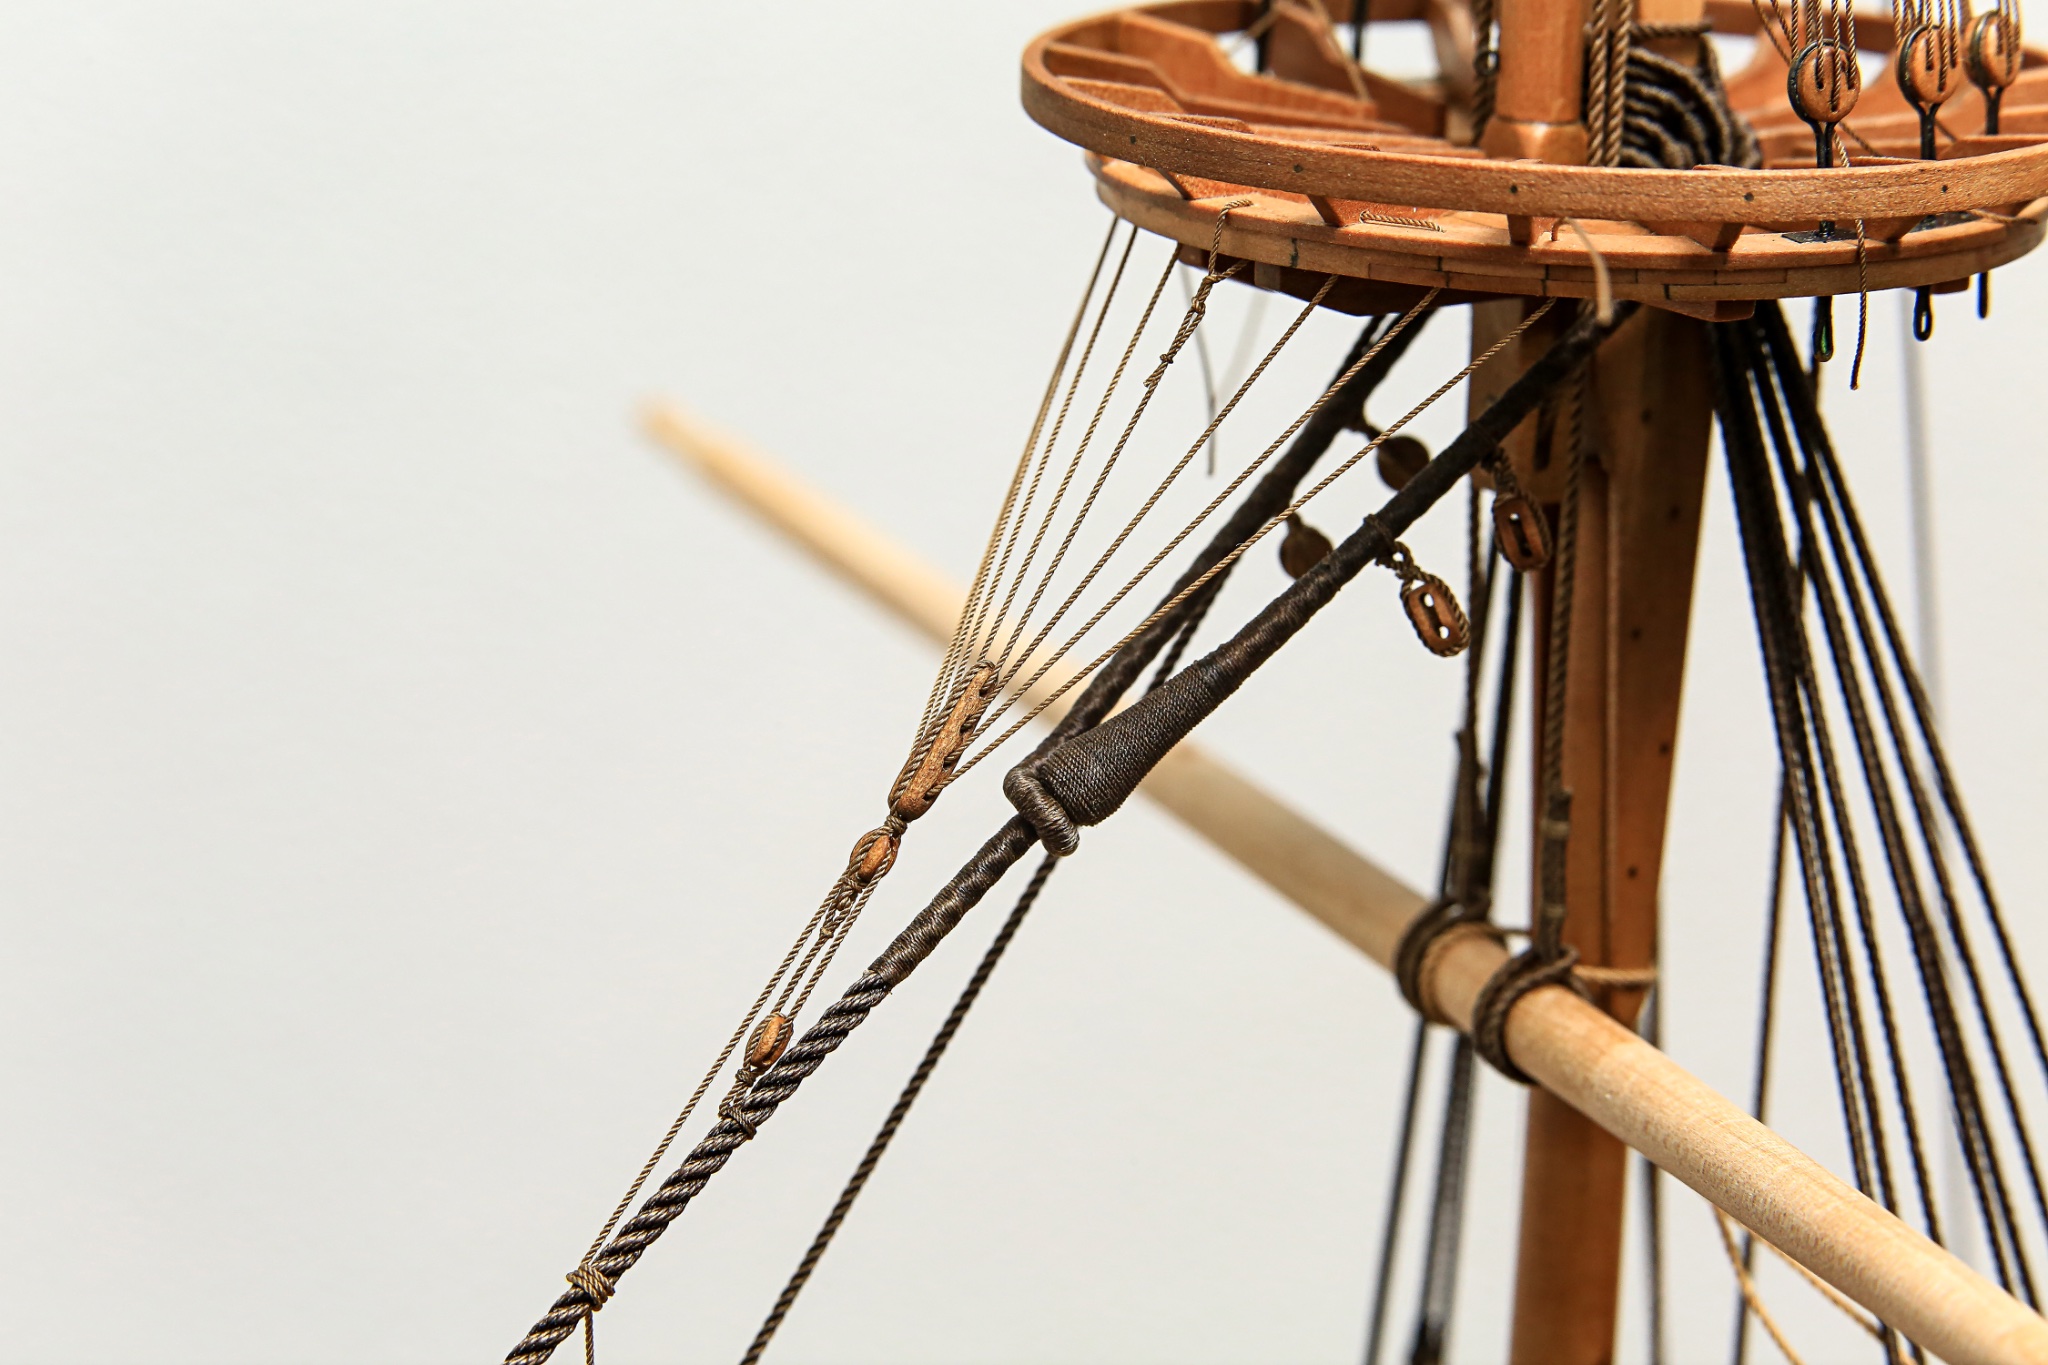
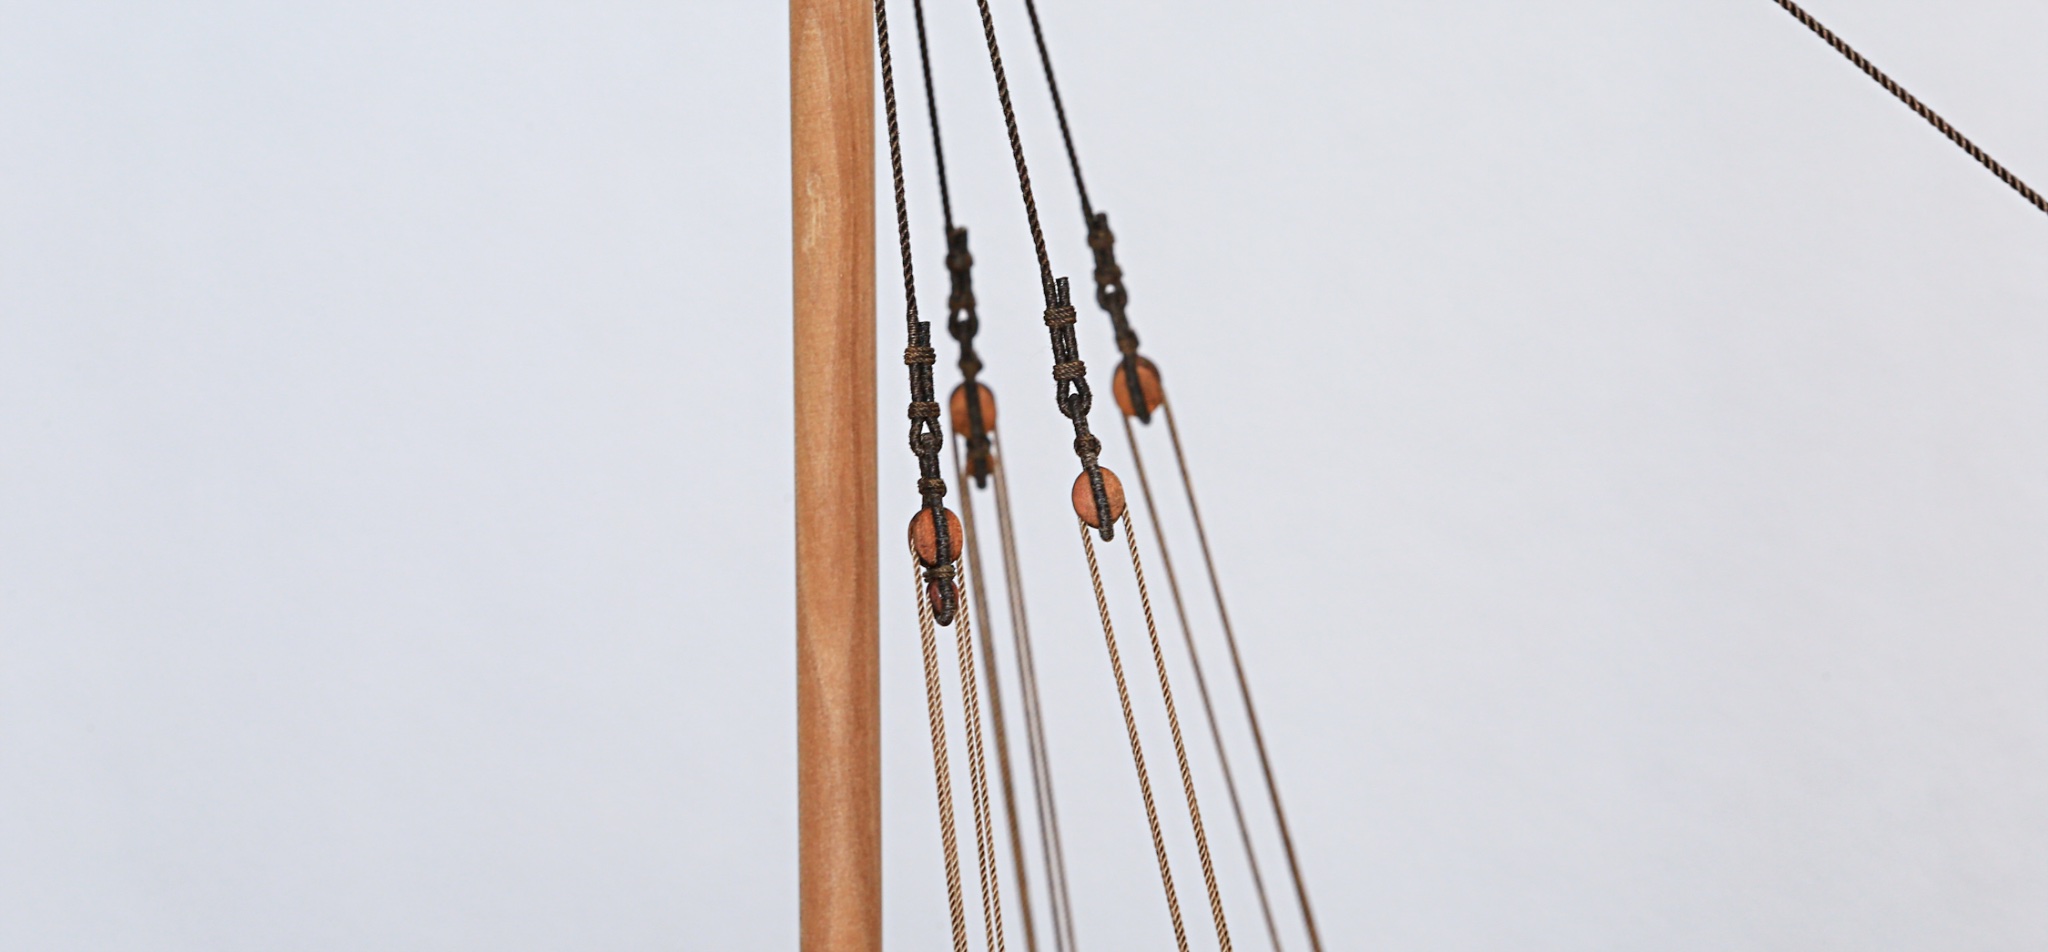
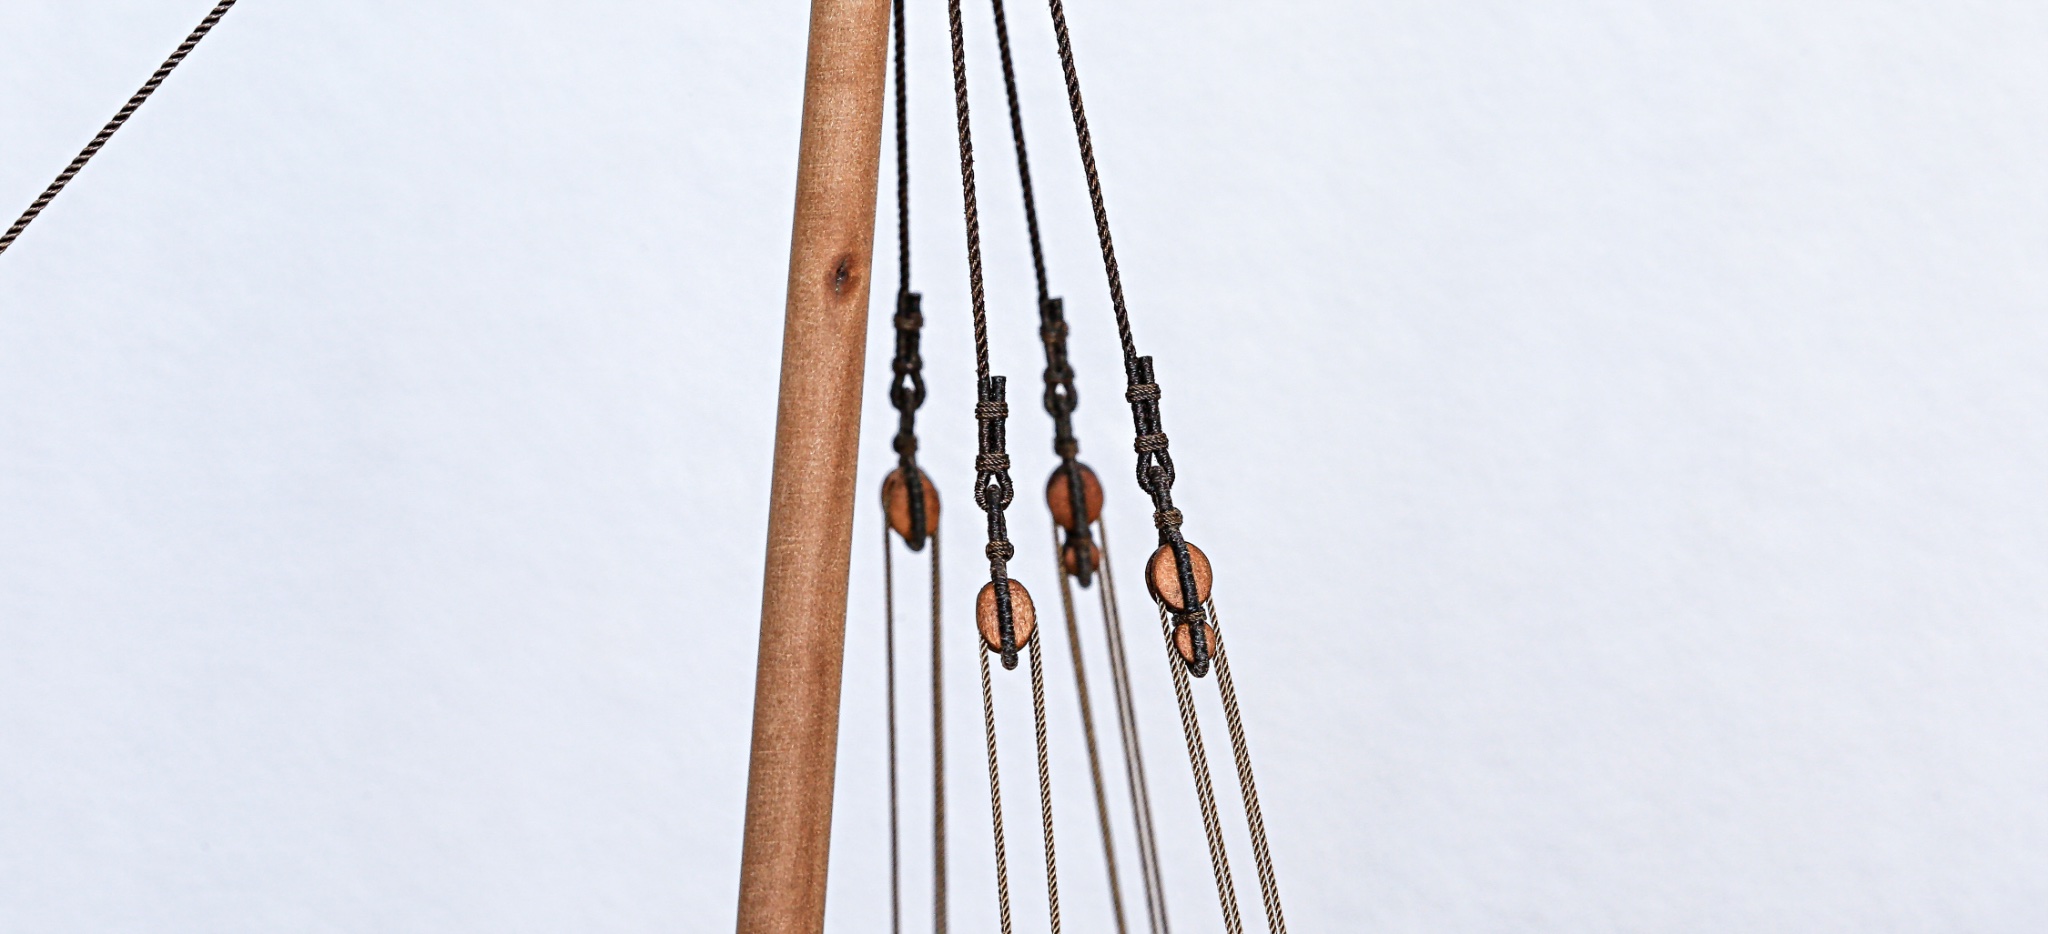
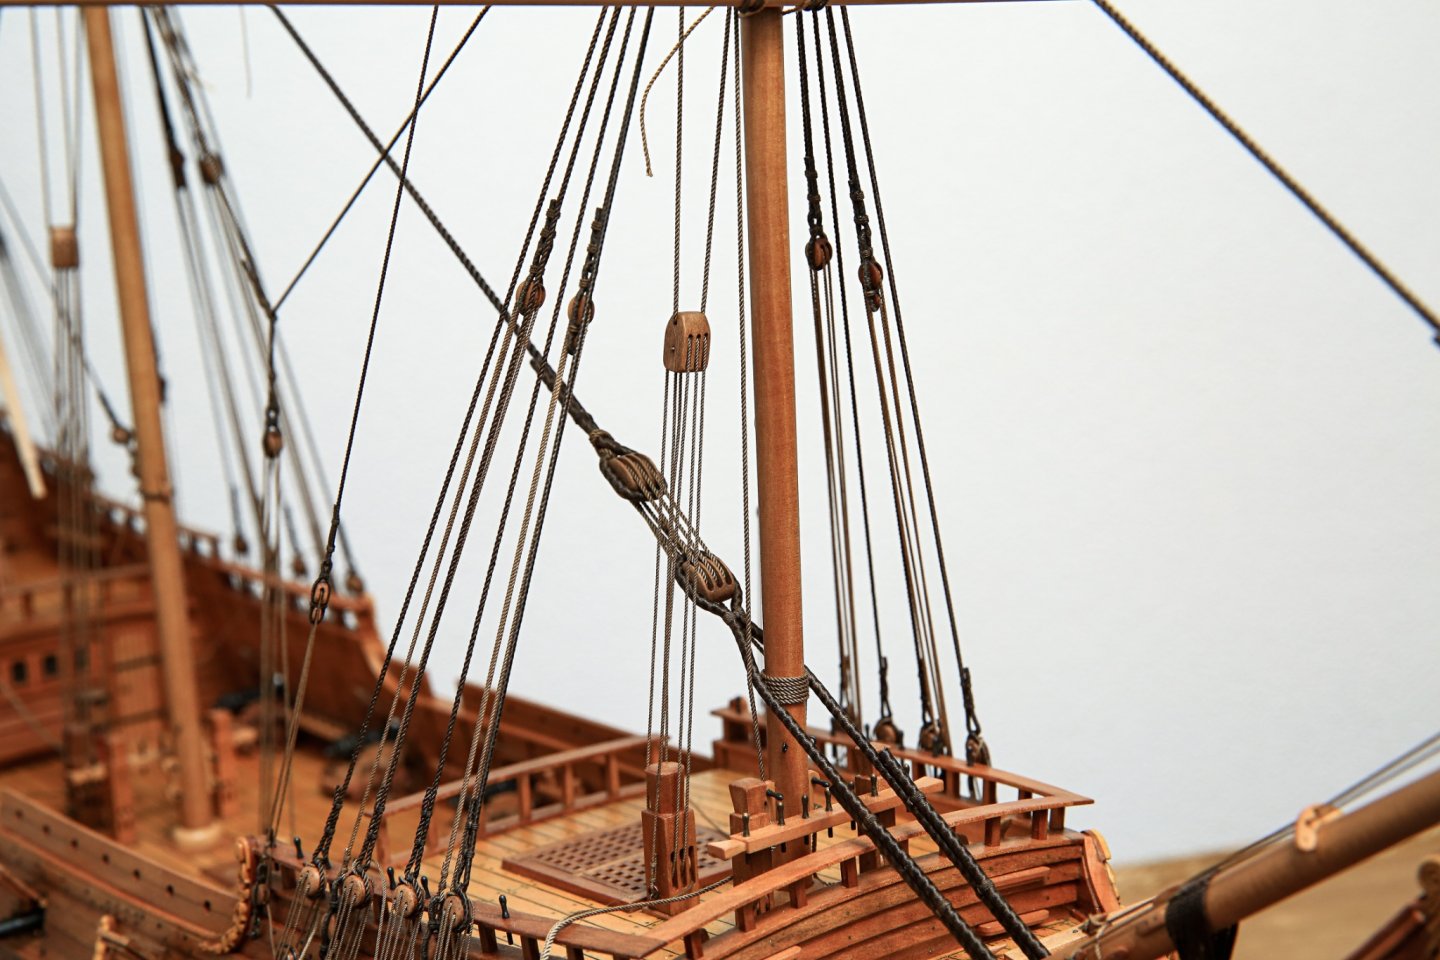
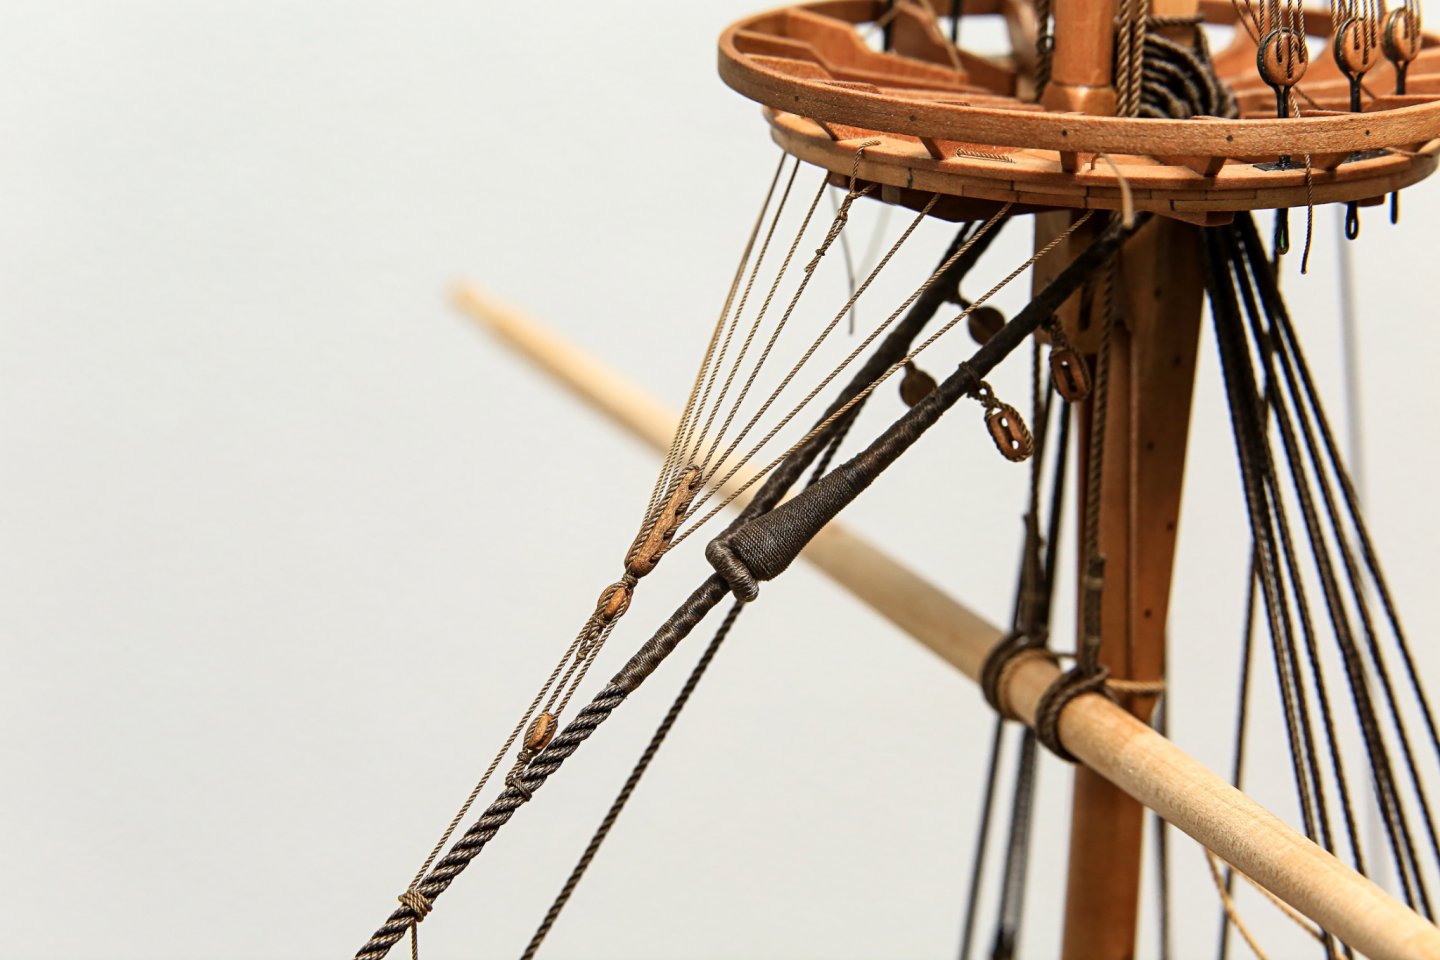
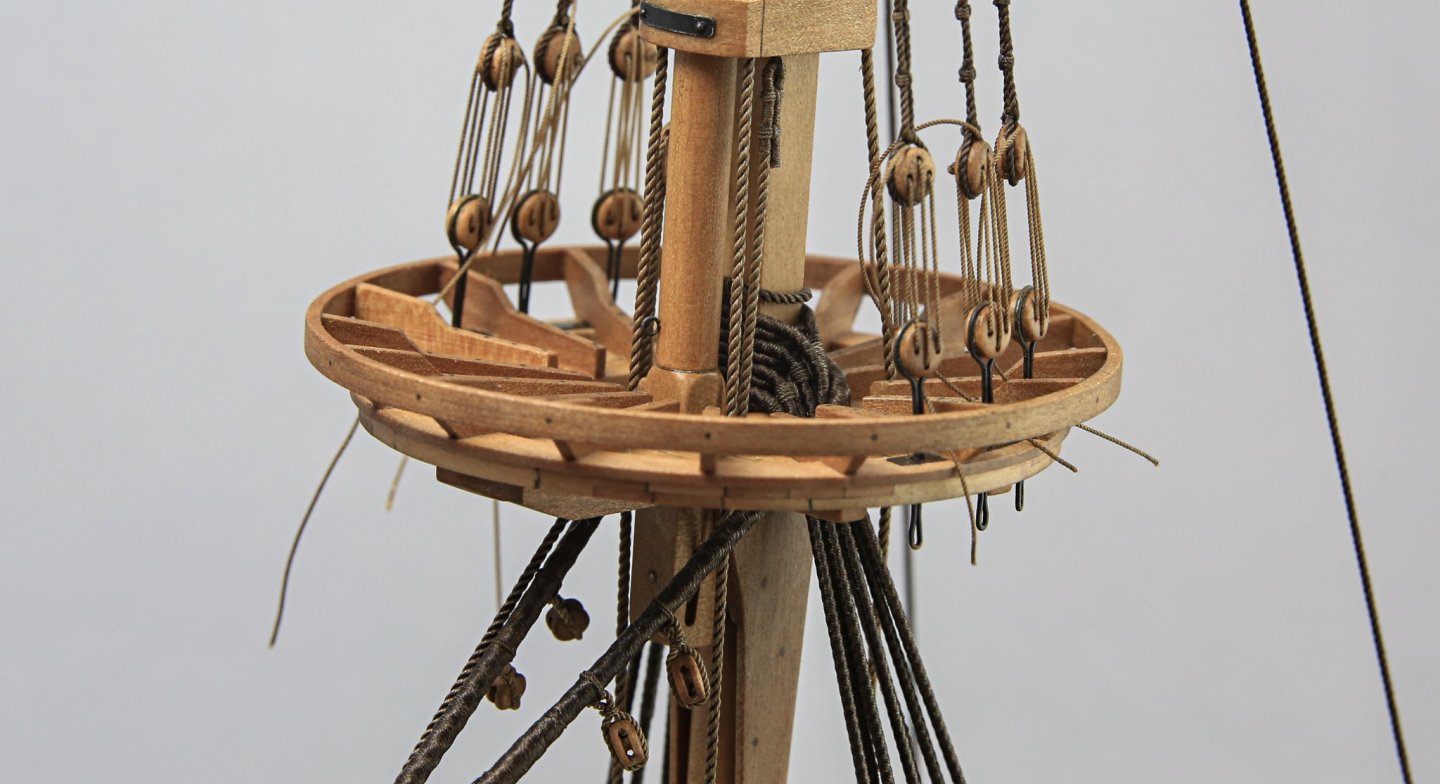
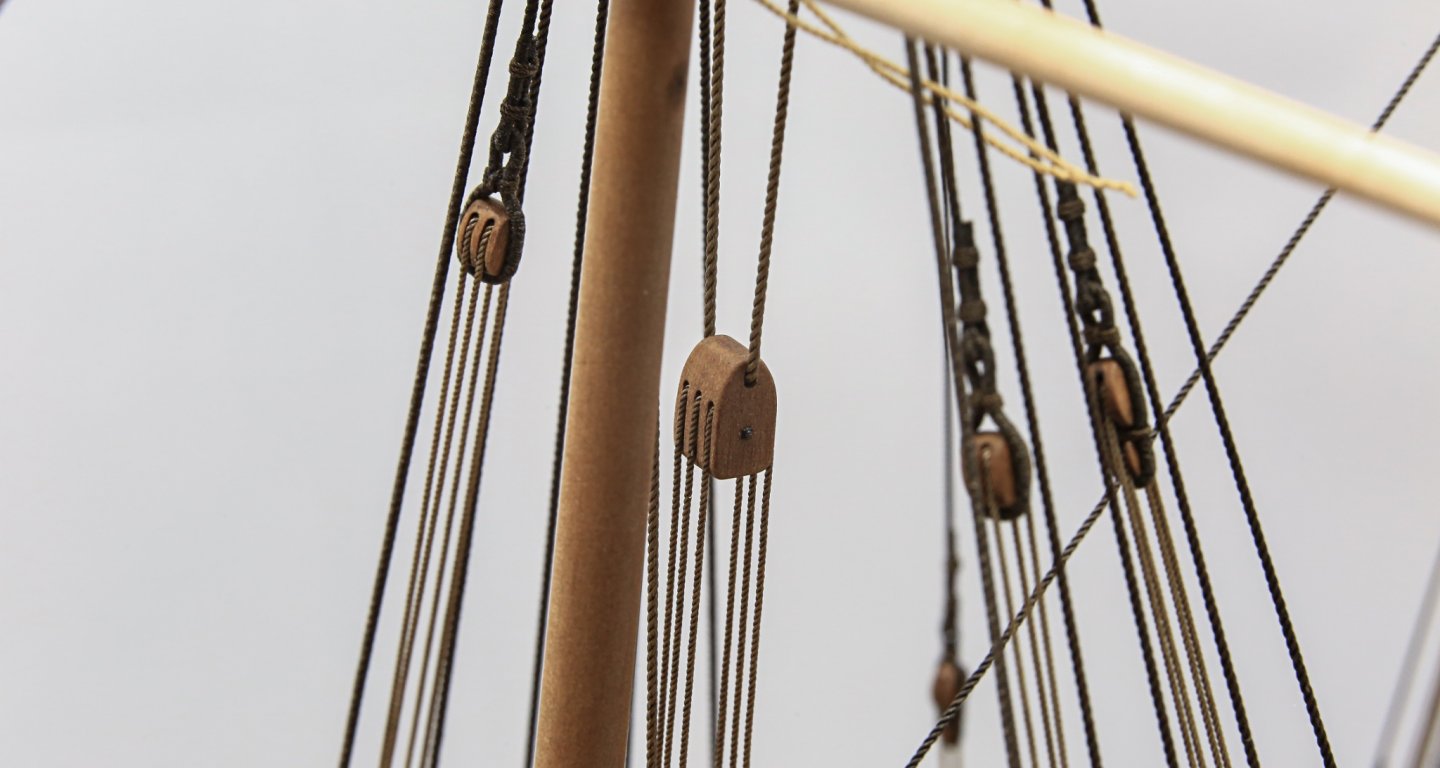
Hi All, Recently someone took my inspiration, so I had some time off from my model 😆😆 Anyway, it came back so here's some update. Standing rigging it's almost completed. Just futtock shrouds are missing. I guess it's good time to start doing final tension adjustment... All leechline and buntline blocks got their place on the shrouds. Also, you can see crowfoot on mainstay (interesting piece of rigging, used as a preventer for sails to go under the top) Enjoy the photos! At that stage model looks like as below Cheers, Matt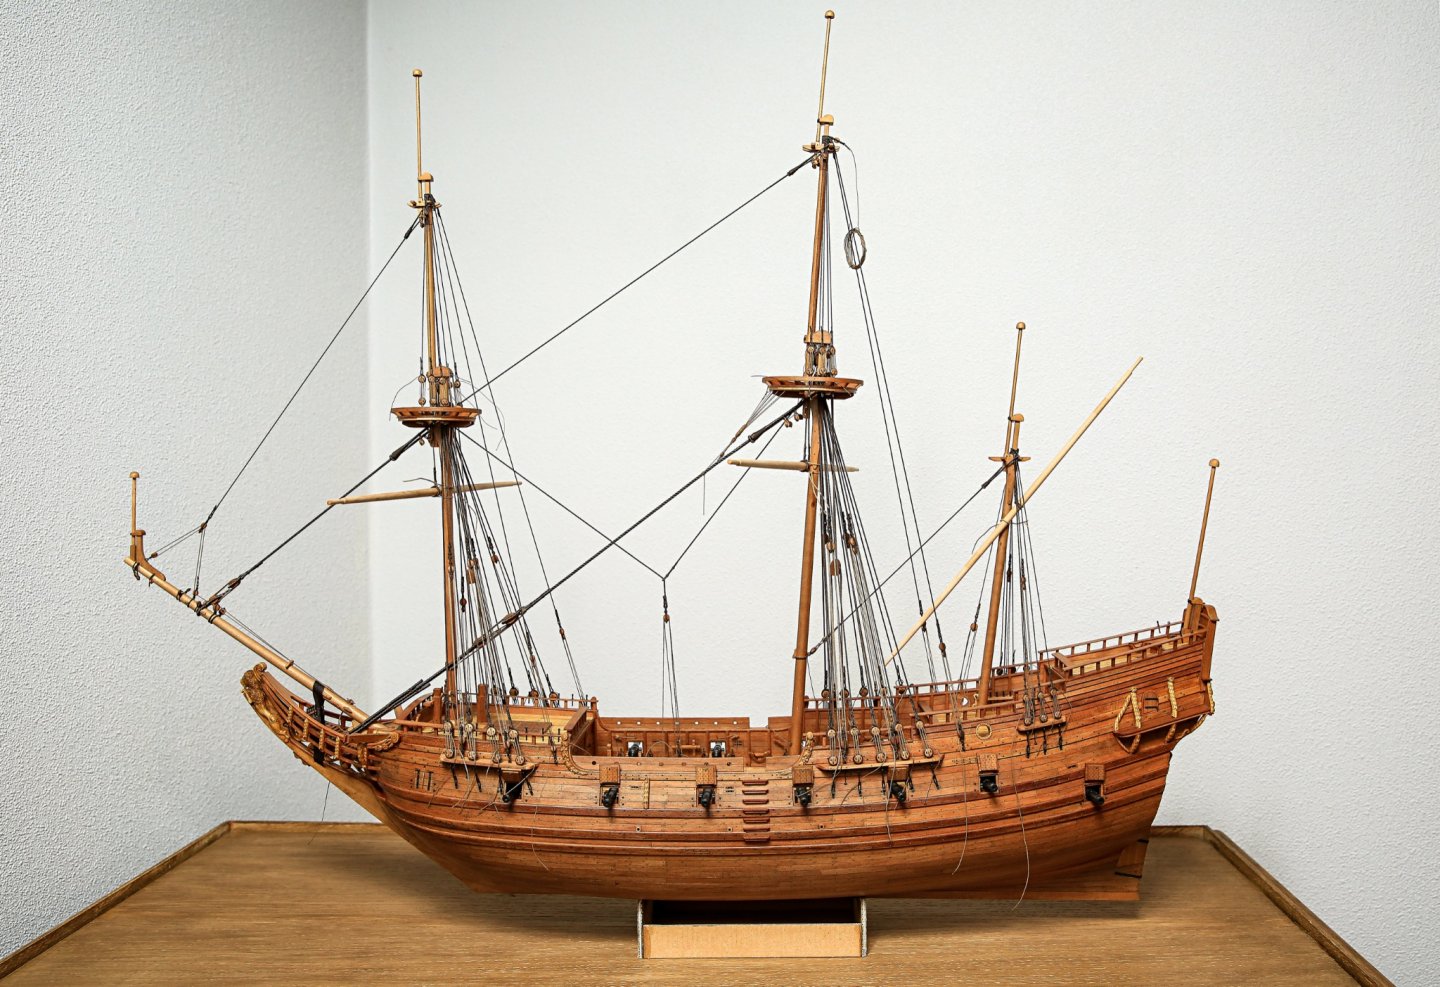


- 222 replies
-
- 18
-

-

-
Papegojan 1627 by mati - FINISHED - 1/48
mati replied to mati's topic in - Build logs for subjects built 1501 - 1750
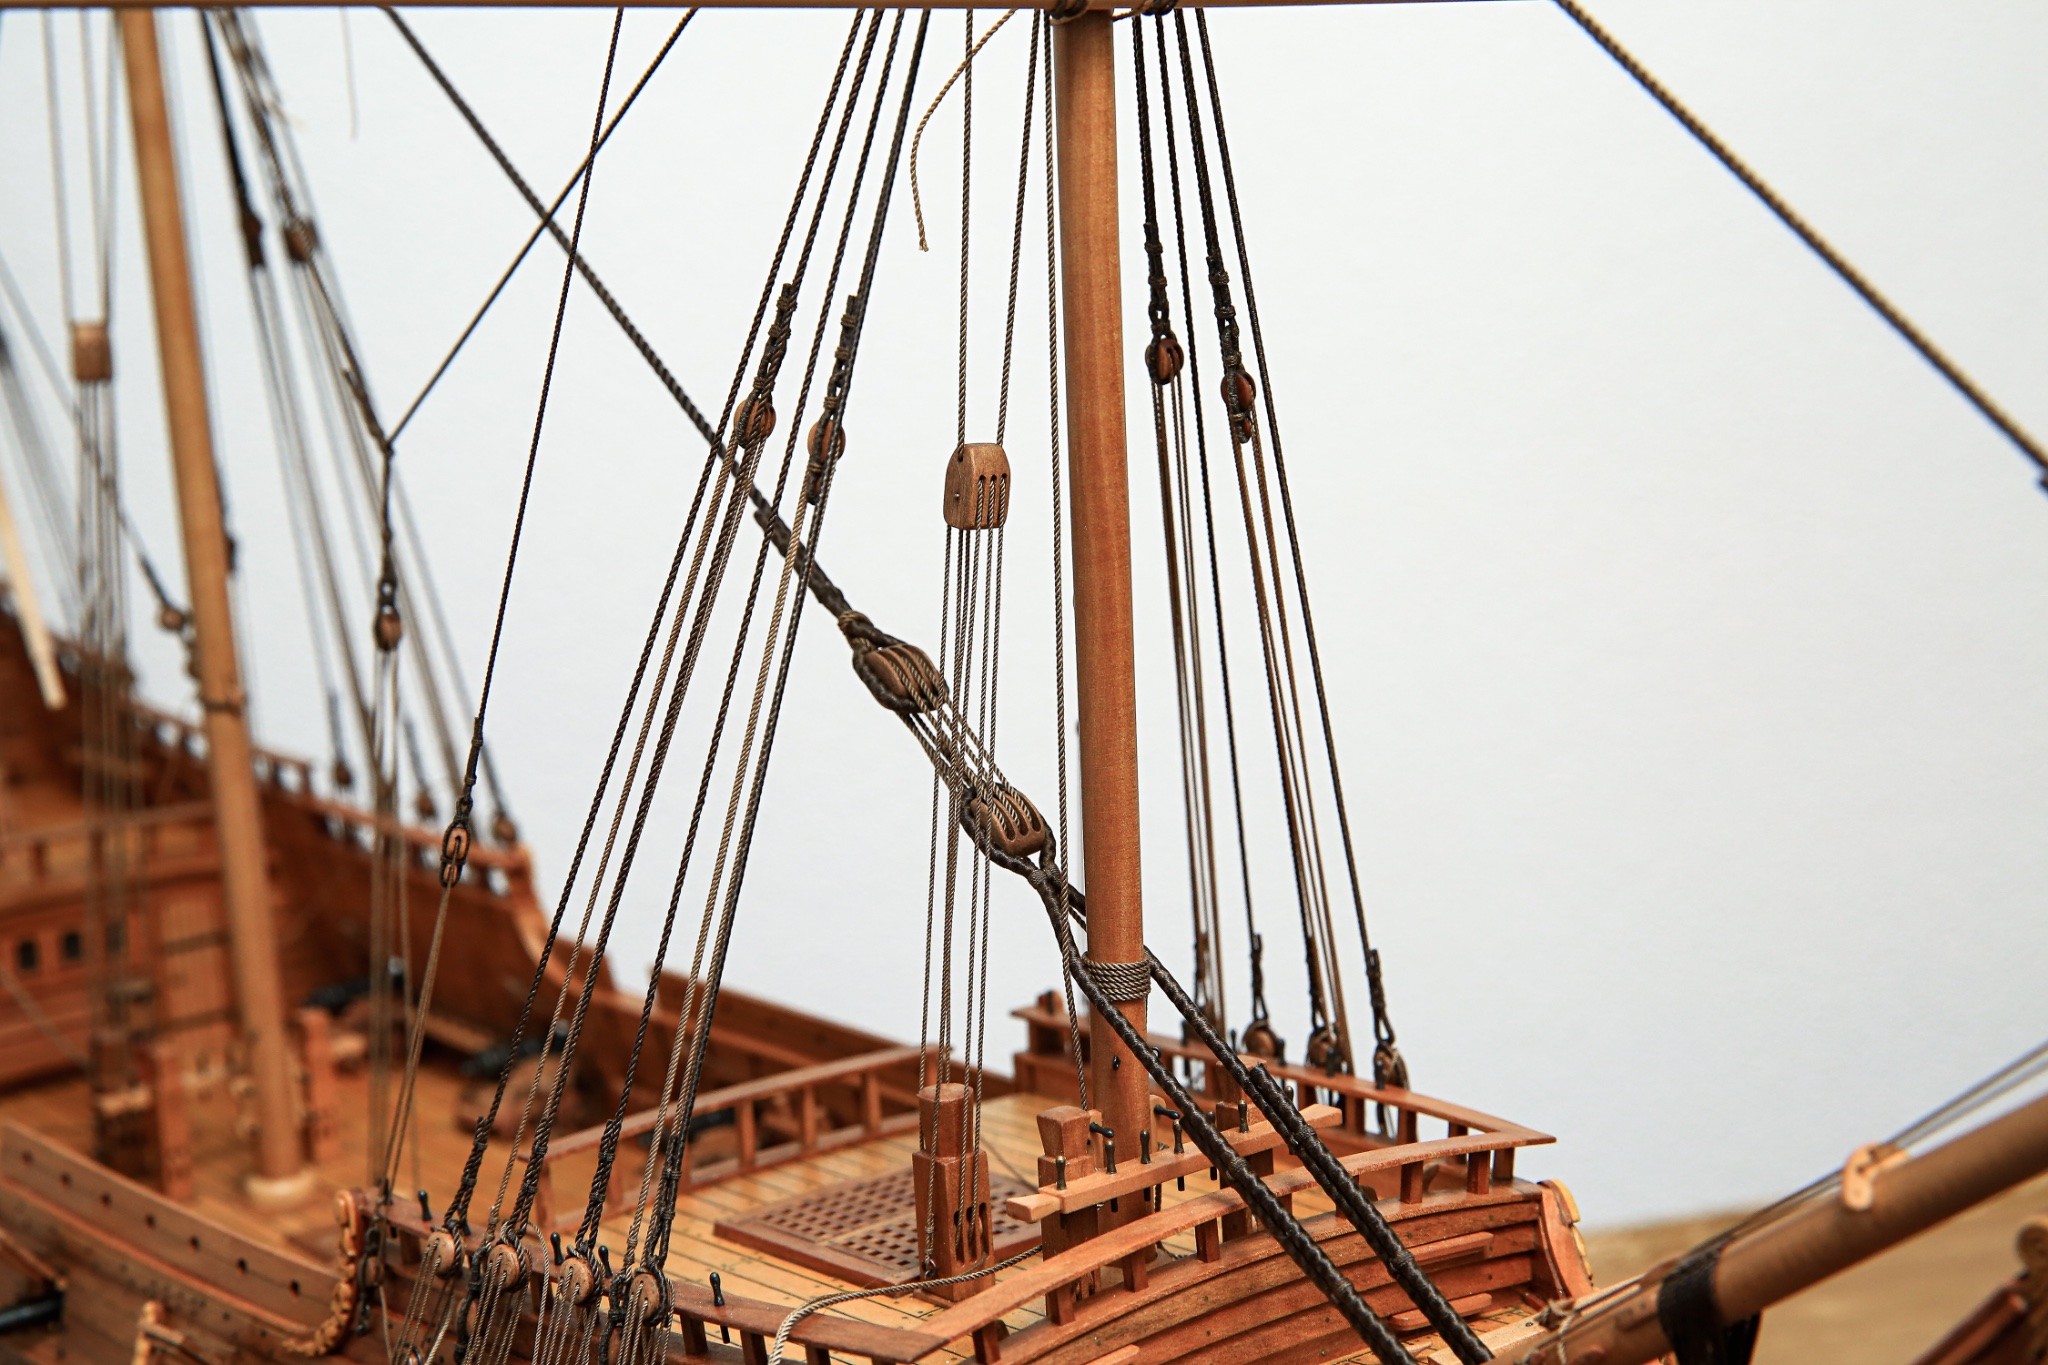
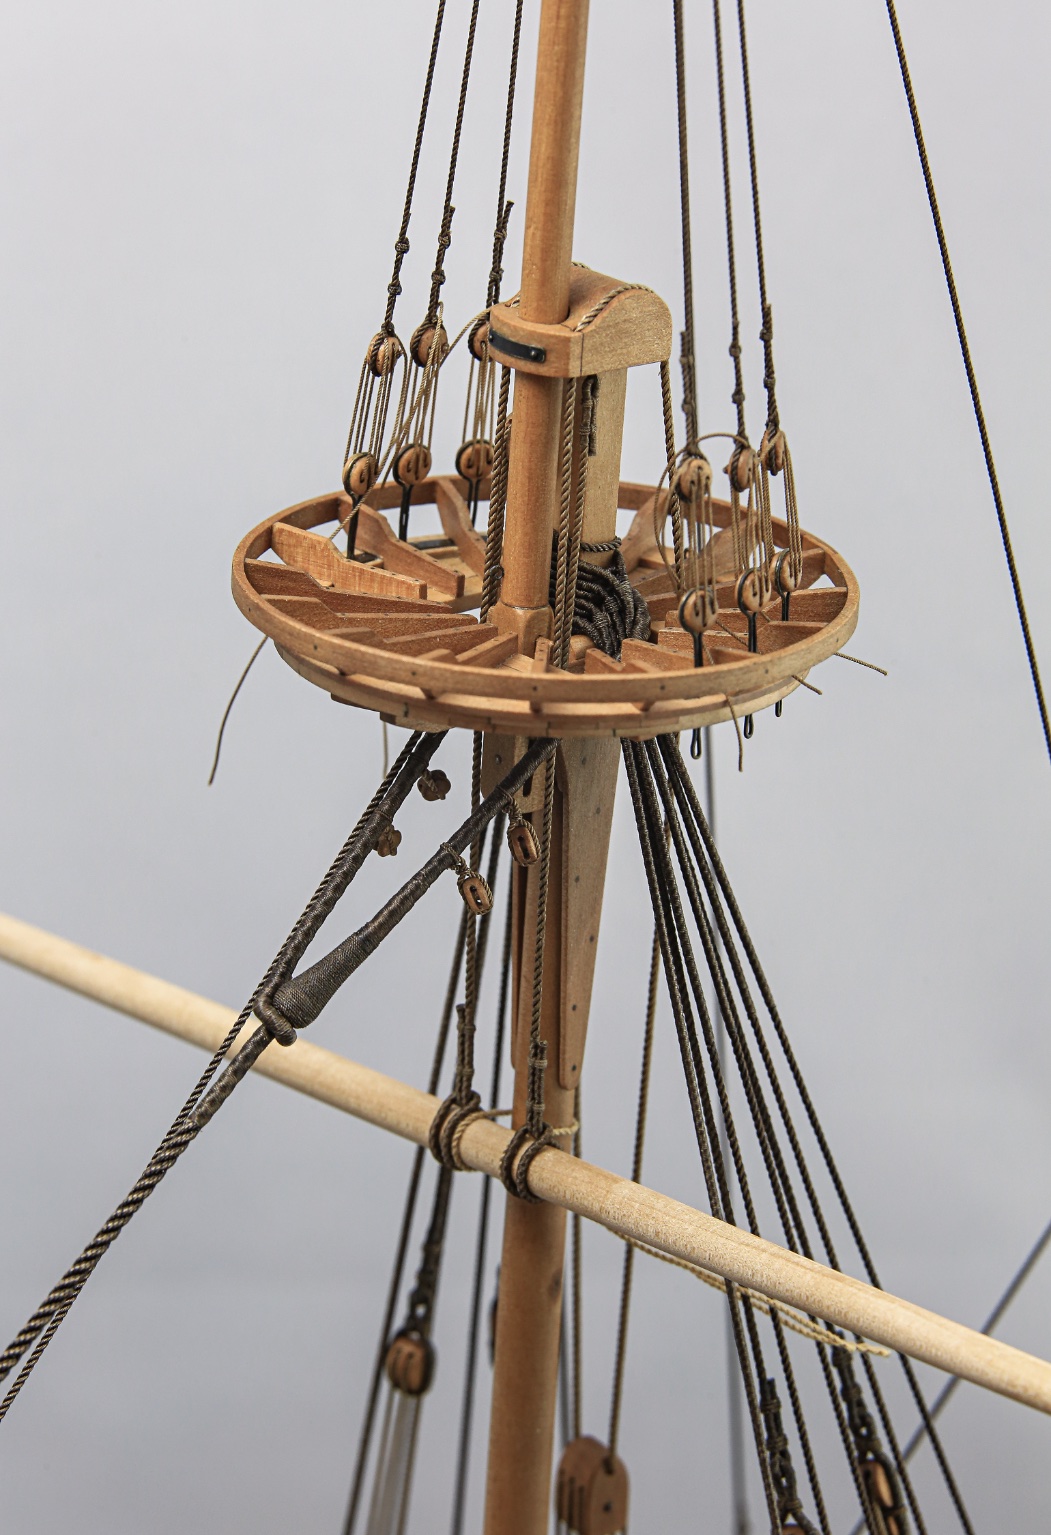
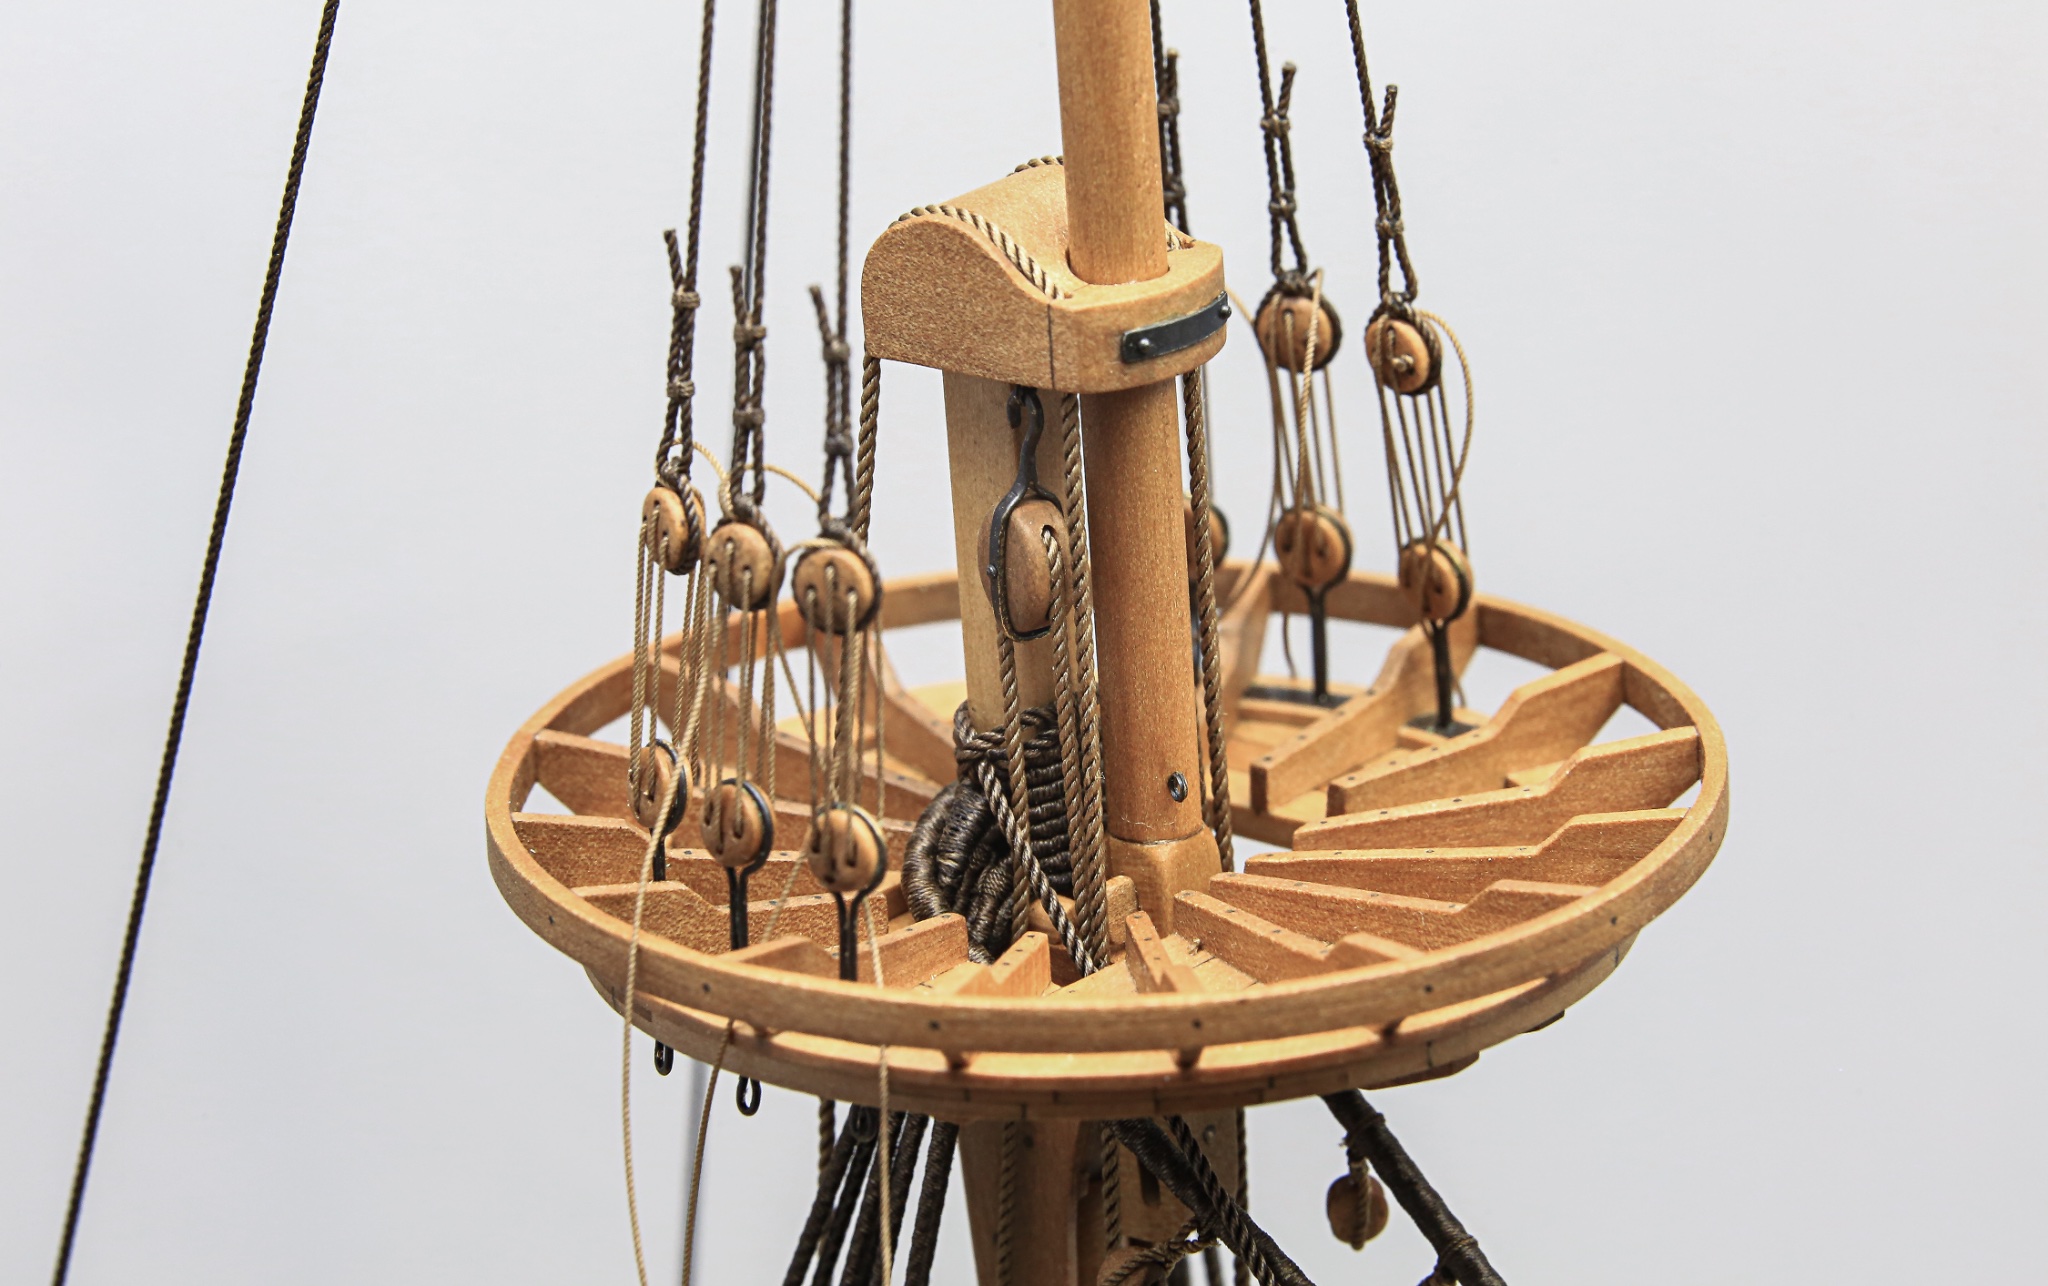
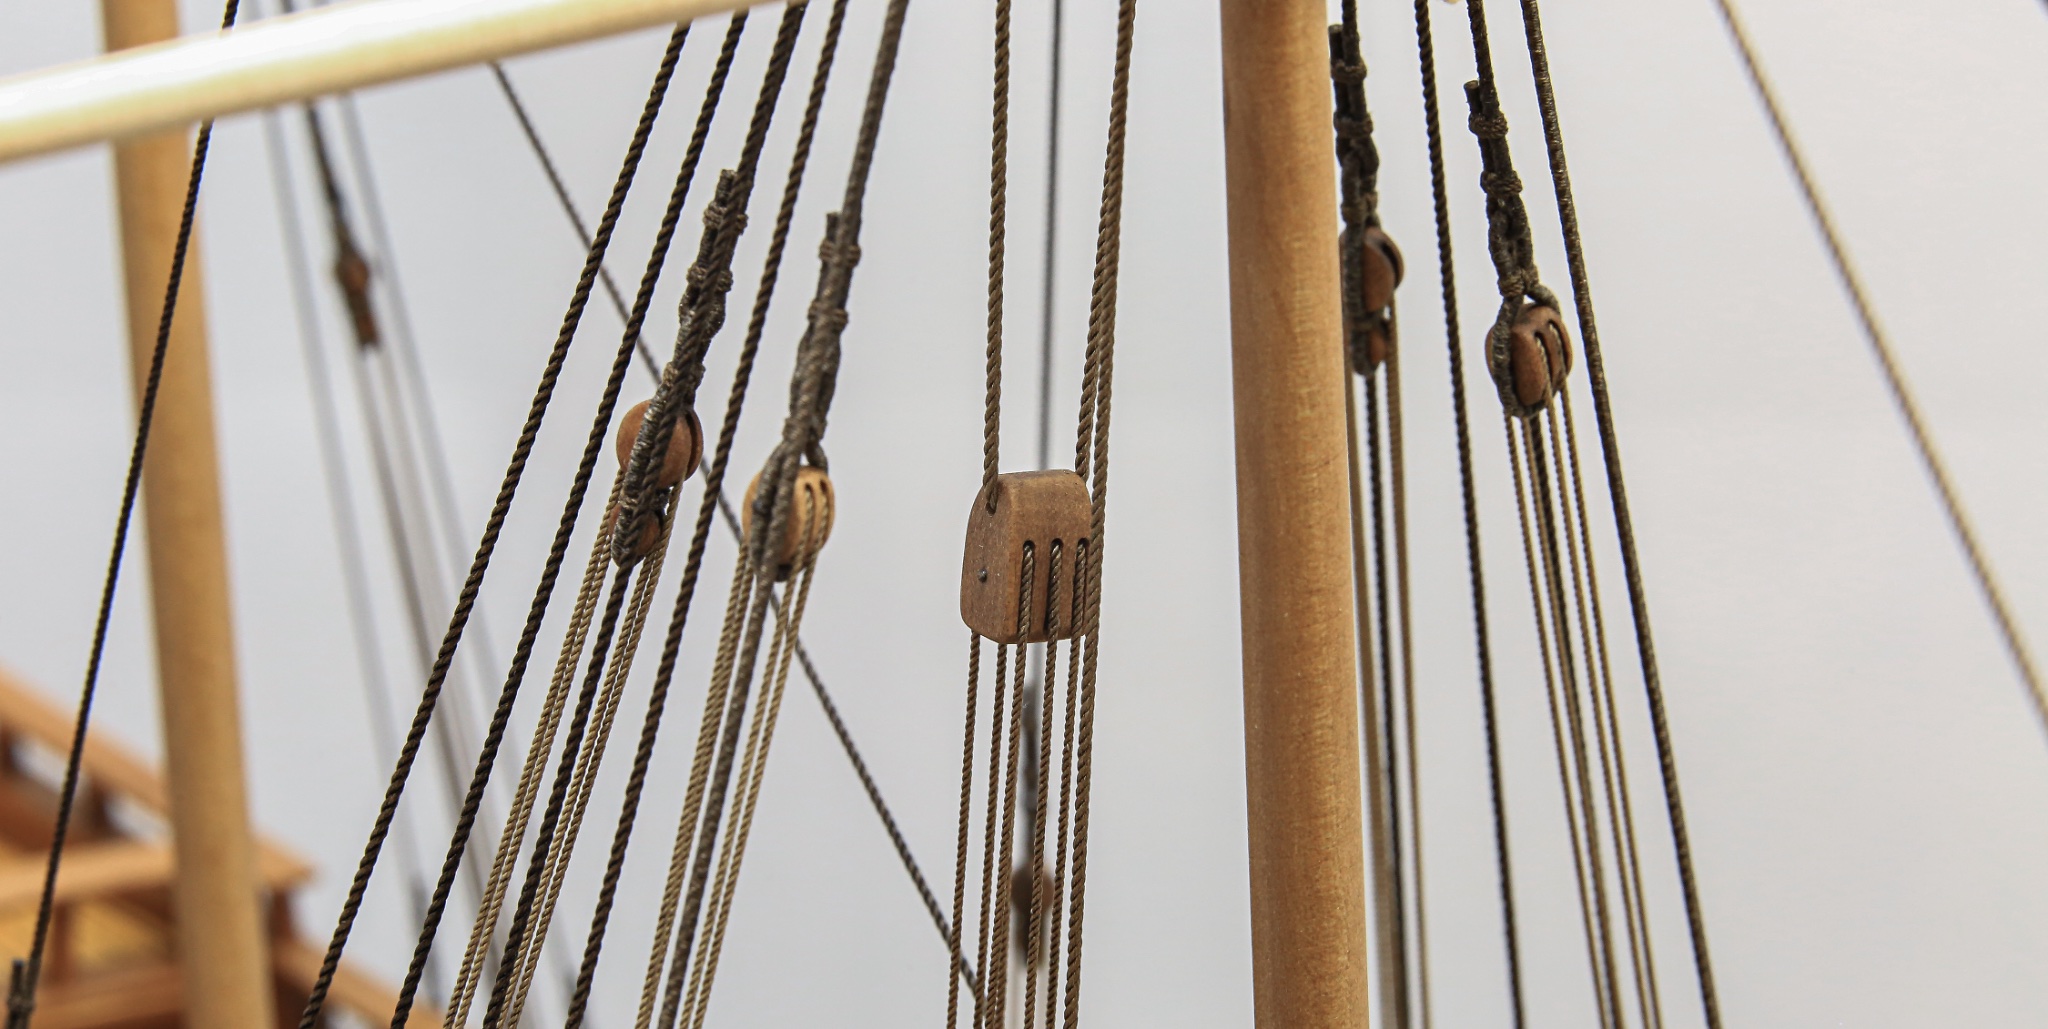
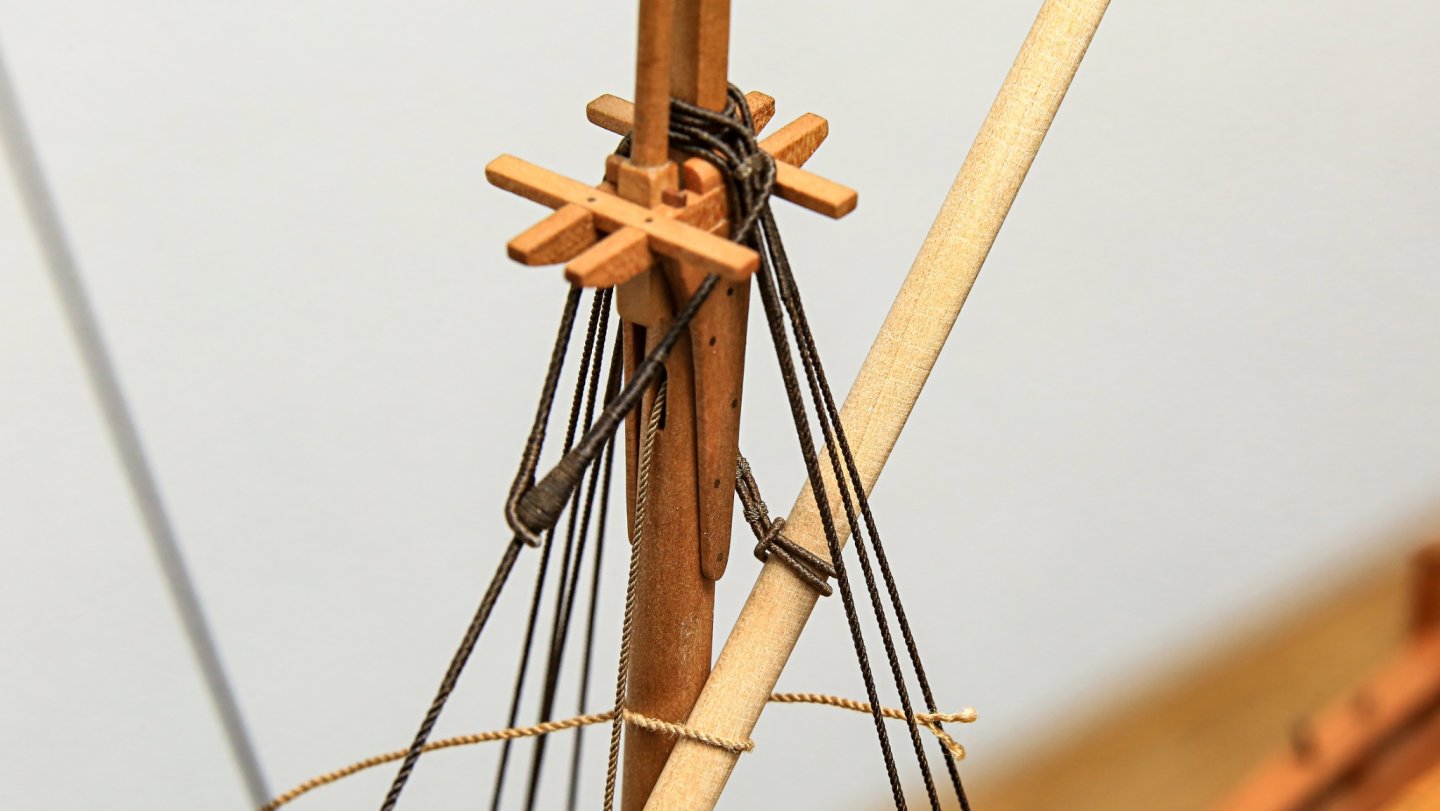
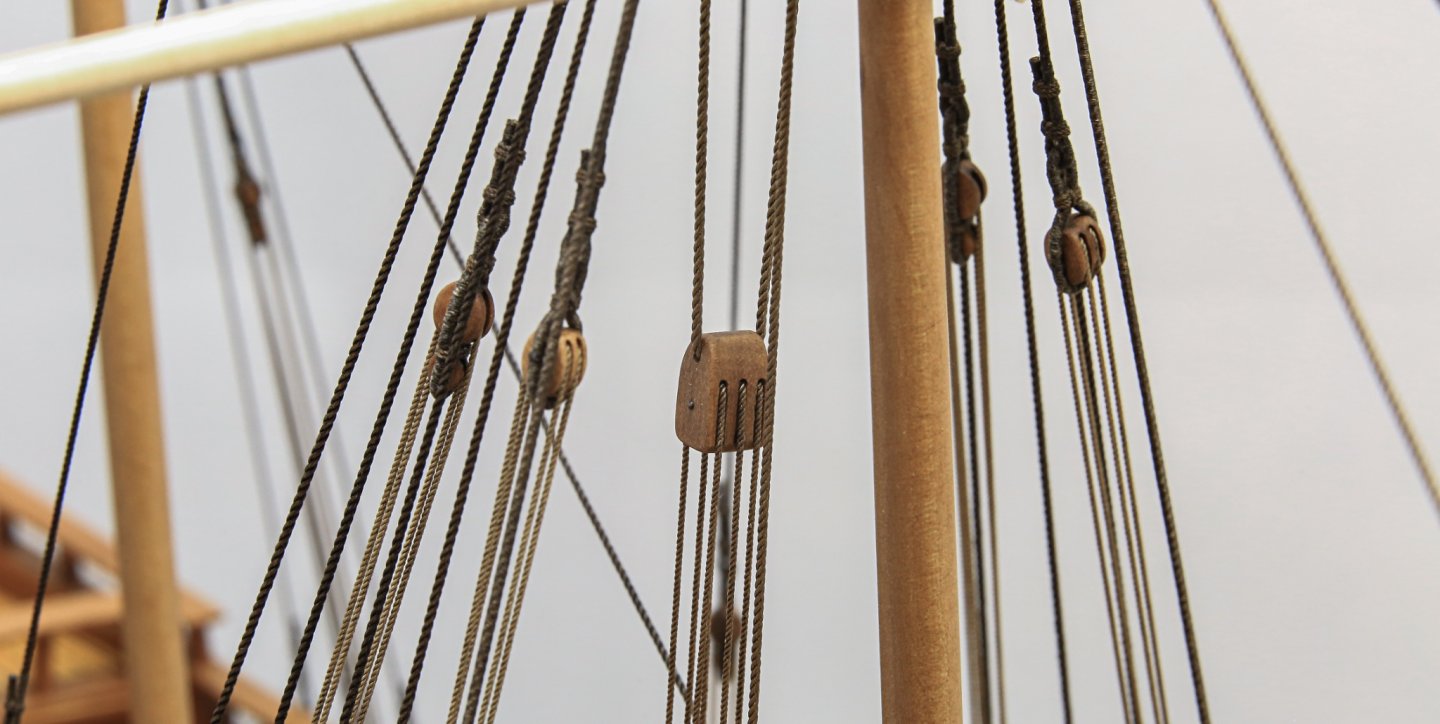
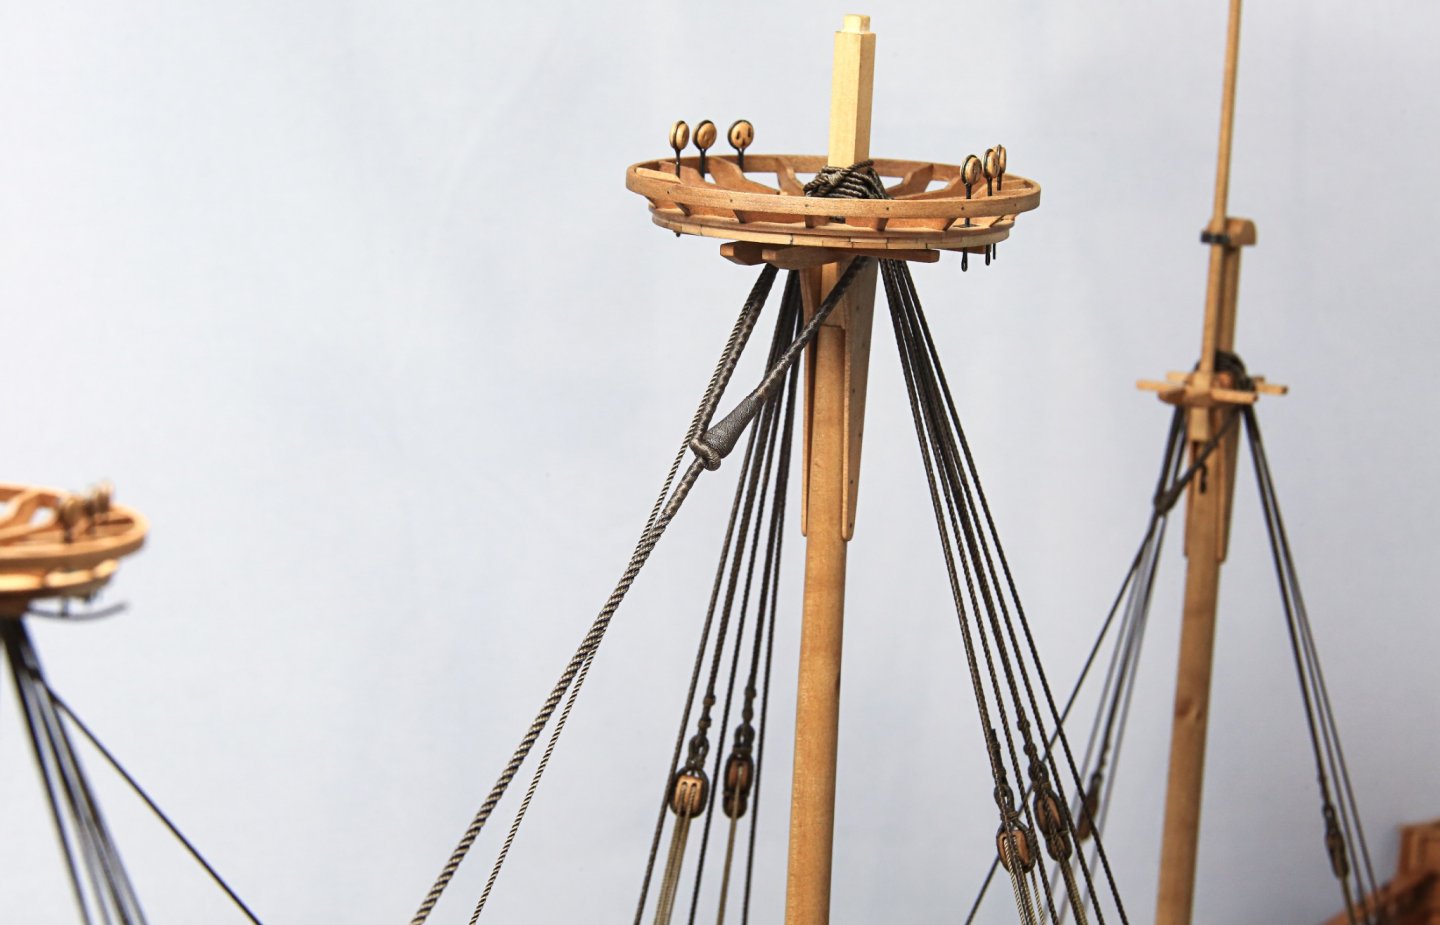
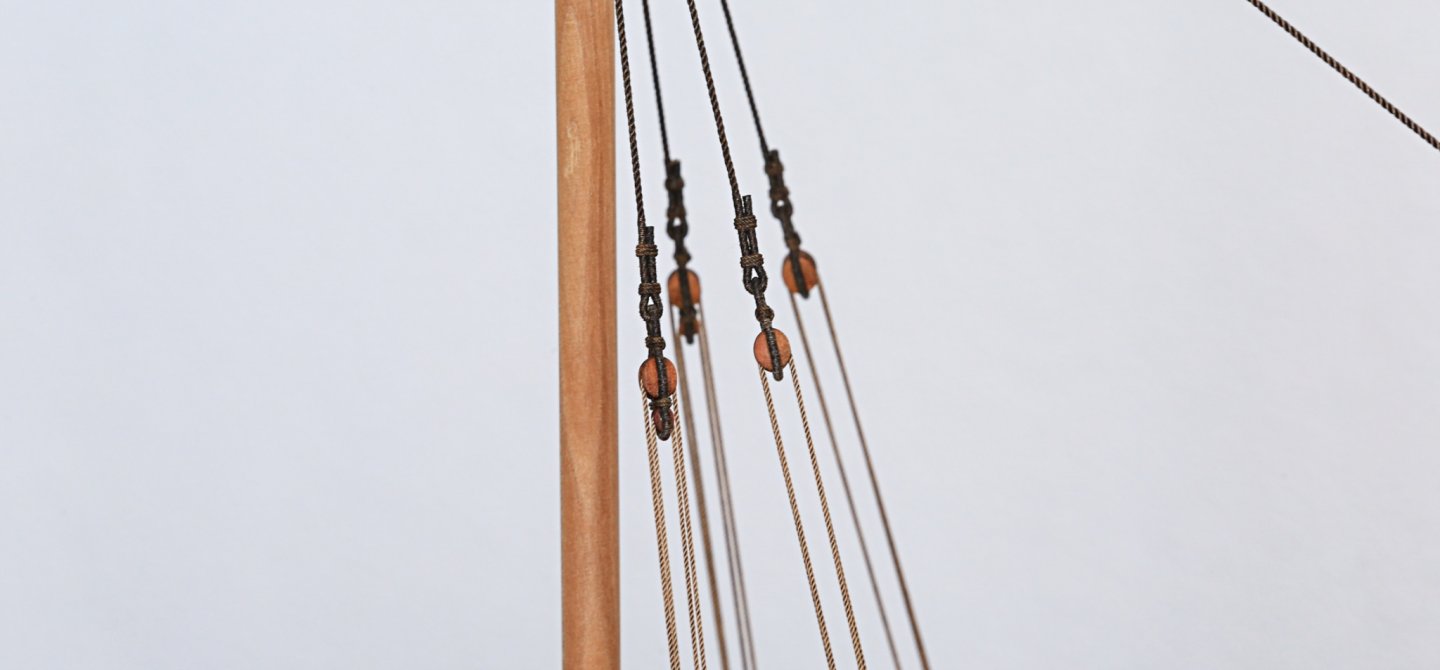
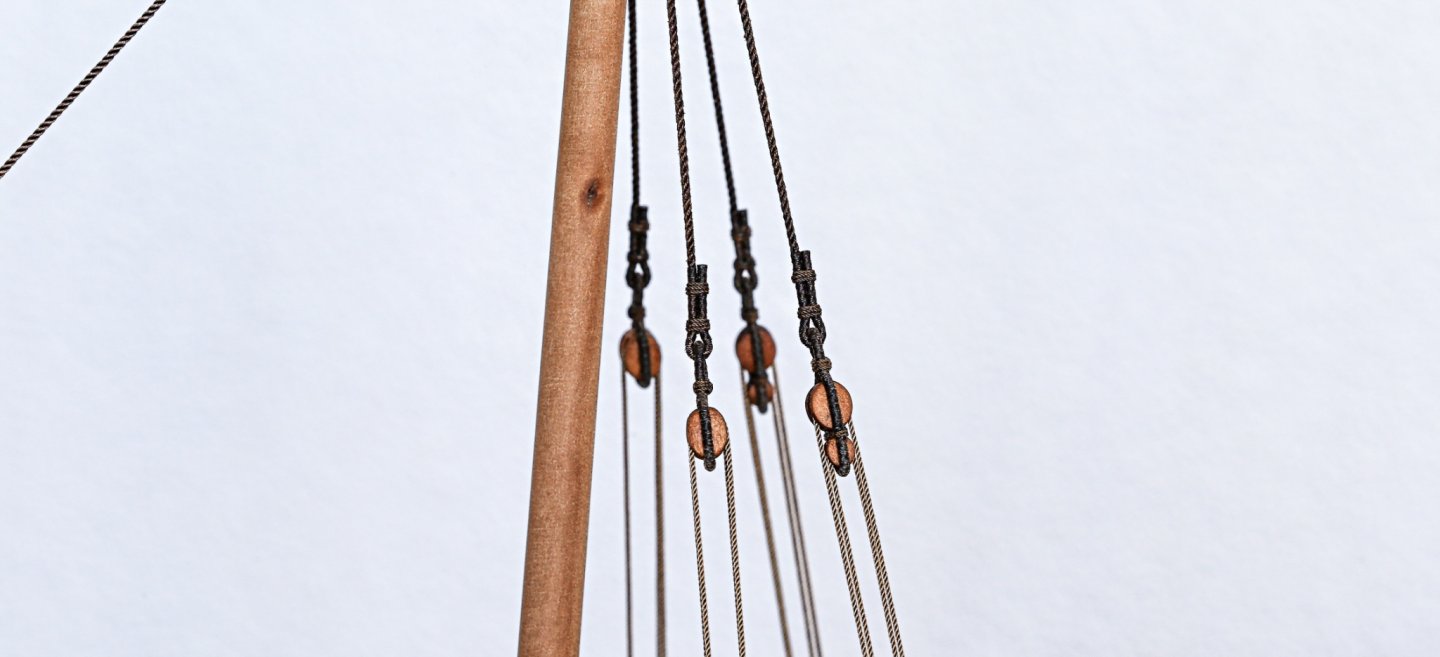
Hi All, Another episode of ropes and accessories 😋 So currently I'm working on "upper level" of standing rigging like top shrouds and stays. However, it's a good time to consider some other parts to install at that stage, so meanwhile I'm adding stuff like topmast rope and block or leechline and buntline blocks attached to the sides of main shroud eye. It will be easier now and this way when there is some more space for fingers and not many ropes around.... later it might be 🤬🤬🤬 You can see also, that I've manage to do main yard halyard with one of the biggest block (ramshead) on this ship, hanging quite high above the deck 😏 Main yard is just test fitted and it will be removed. Now it's time to jump to foremast top as it has similar "setup", but with just a little bit smaller rope diameter and blocks sizes. Then last stay, which is fore topmast stay and somewhere in between futtock shrouds... and I will be ready to start with standing rigging tension adjustments and most likely fixing it in permanent position (hopefully 😳 ) Cheers, Matt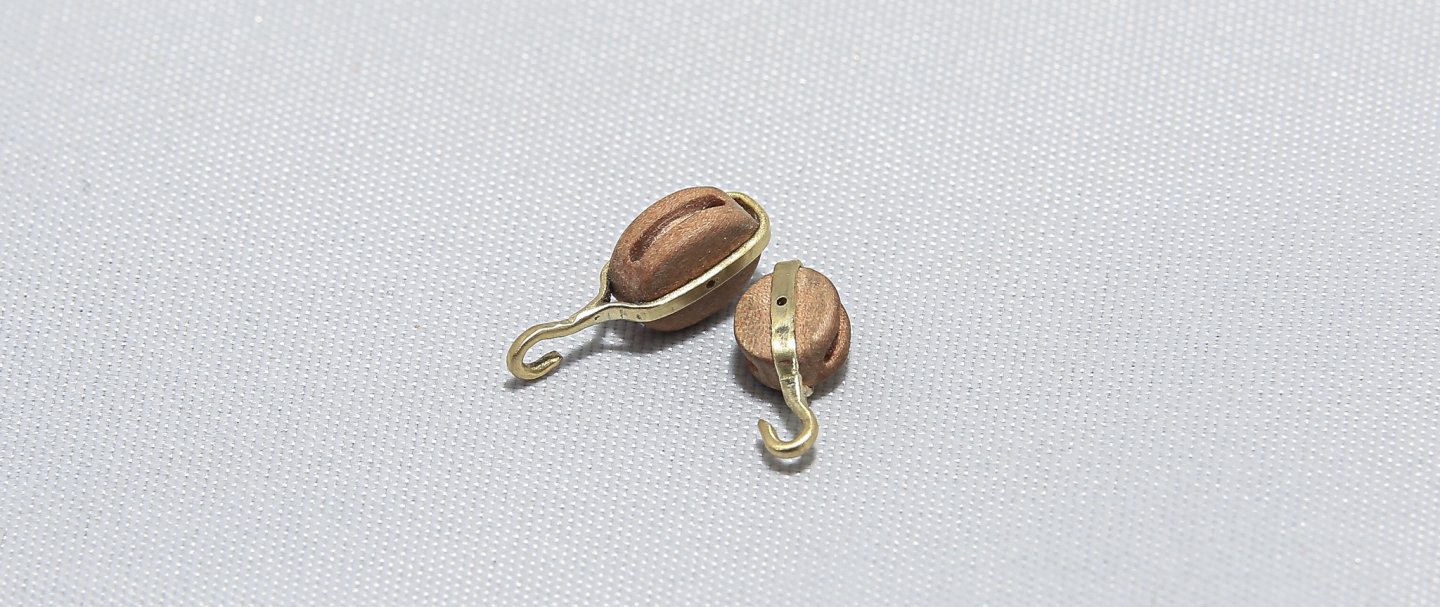


- 222 replies
-
- 15
-
-
Papegojan 1627 by mati - FINISHED - 1/48
mati replied to mati's topic in - Build logs for subjects built 1501 - 1750
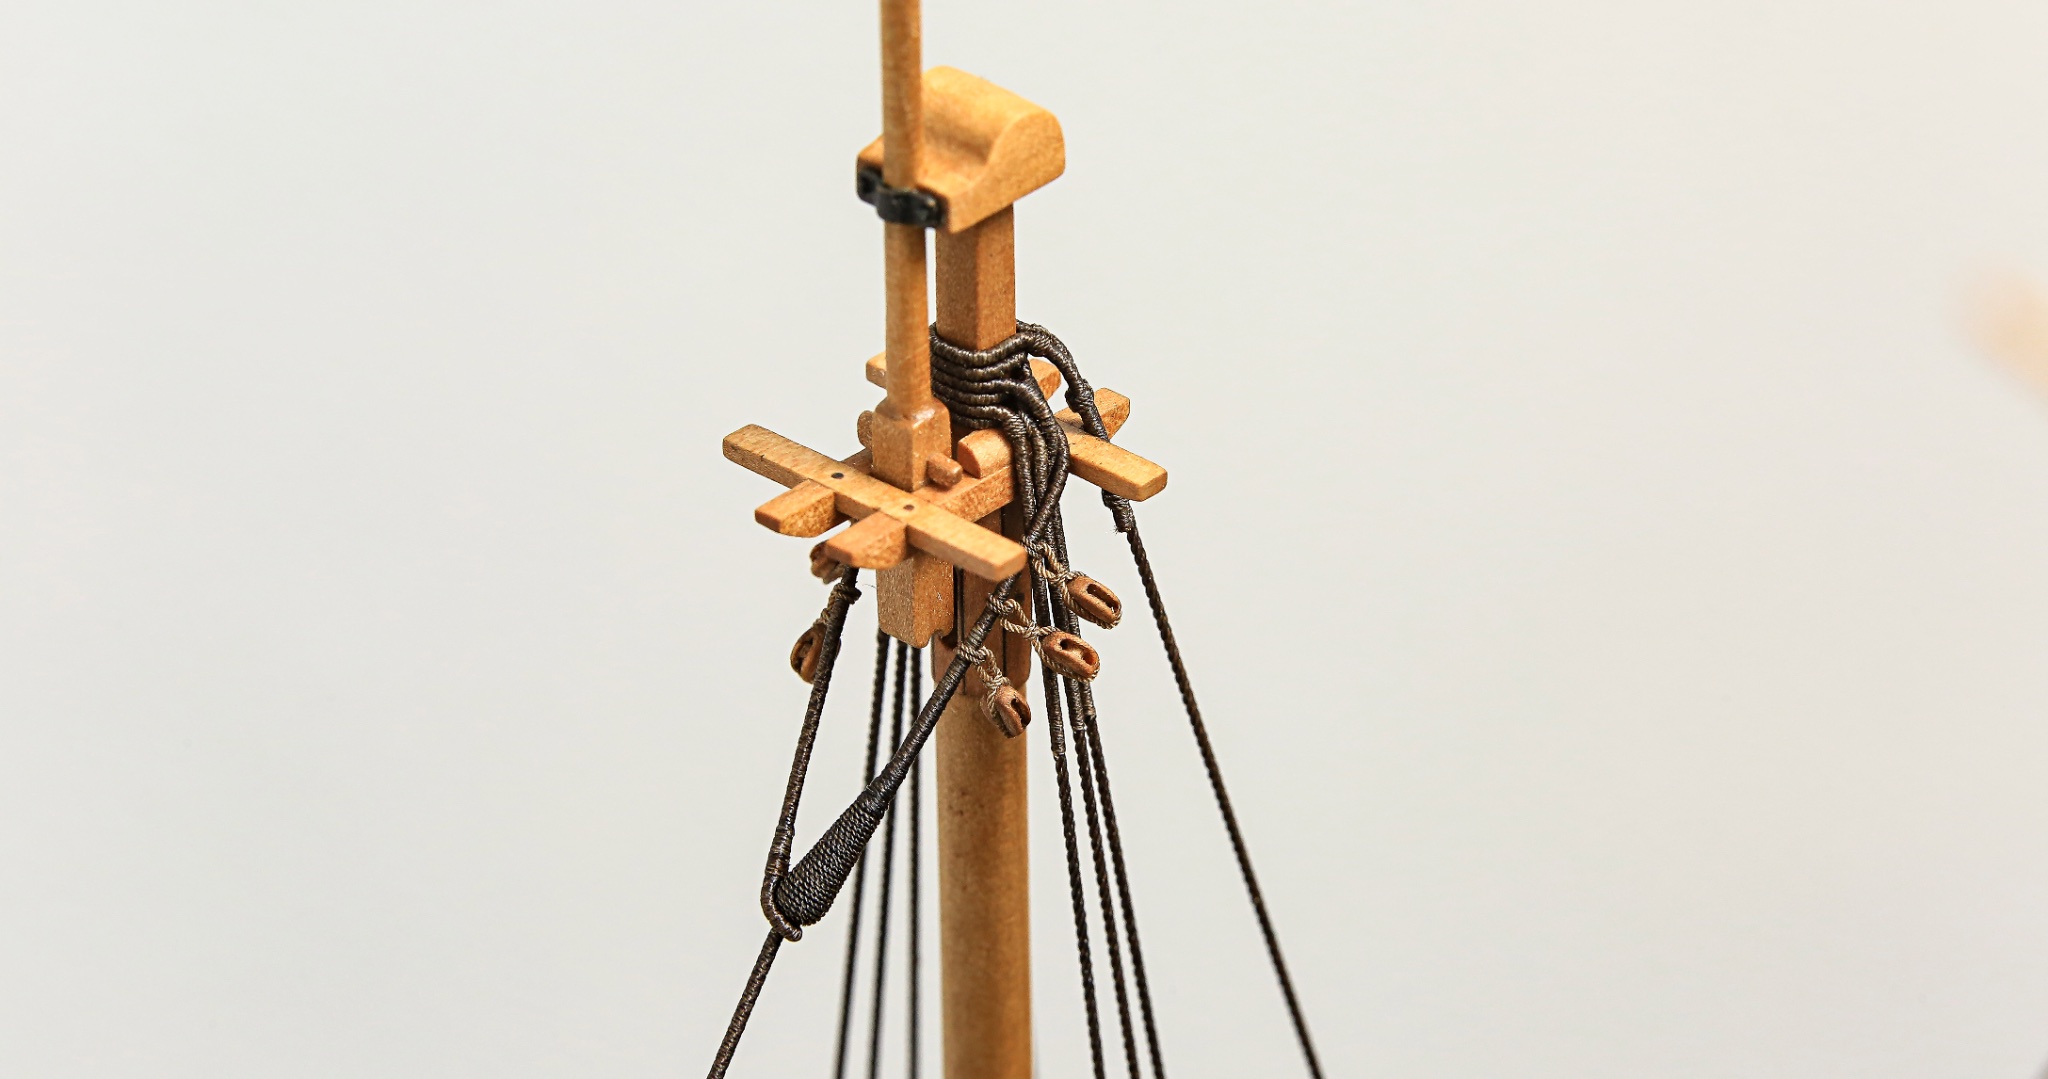
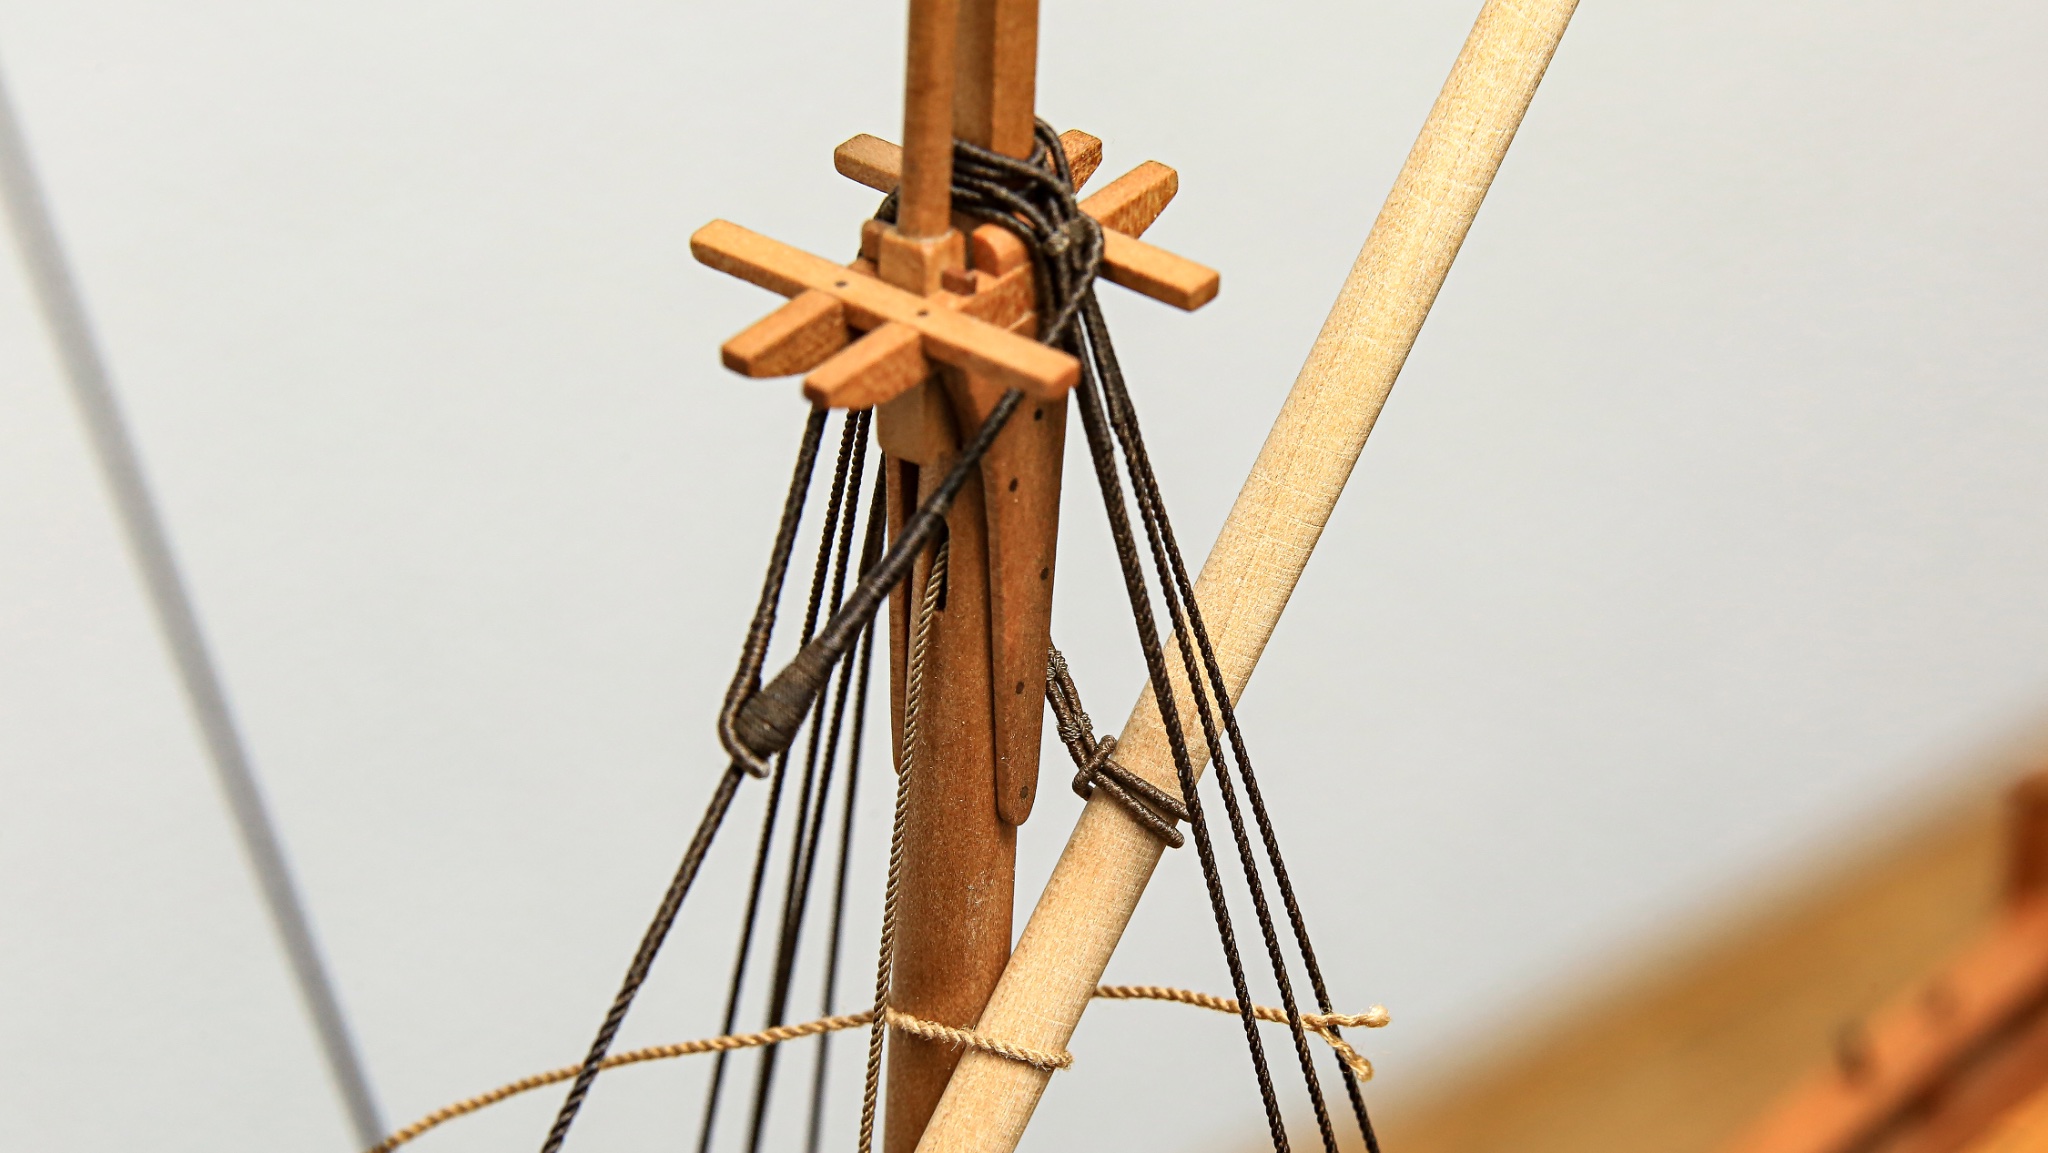
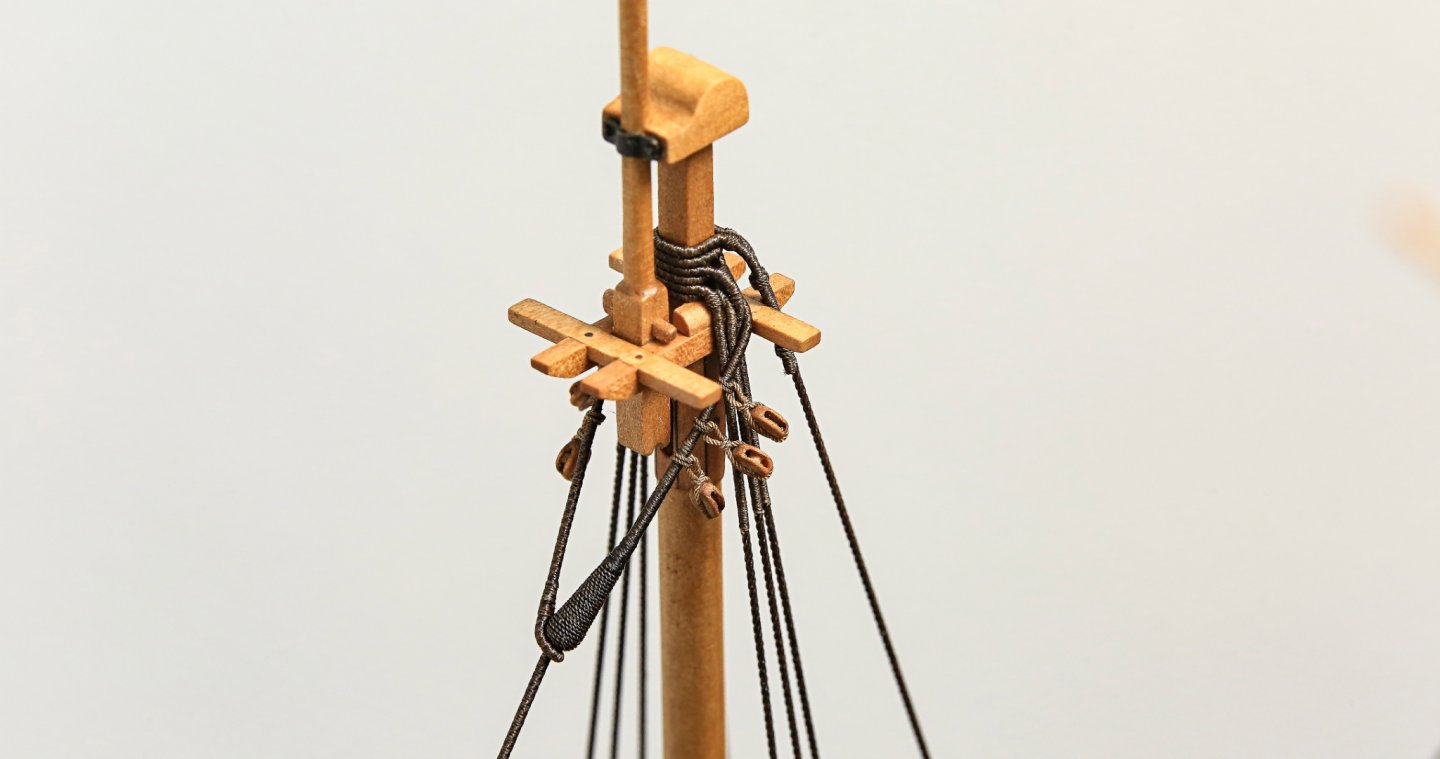
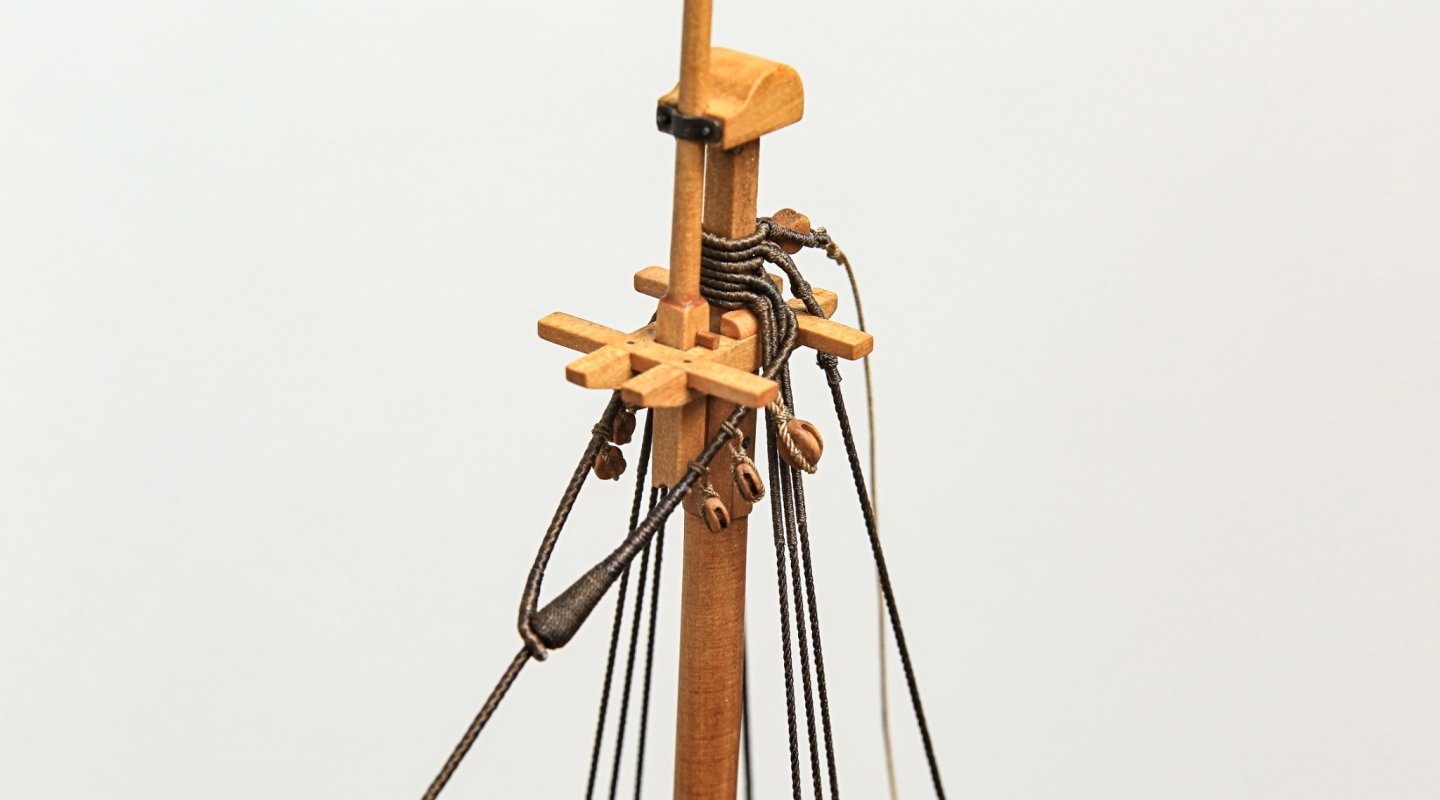
Hi All, Thank you for your very generous likes guys! So another small update from me. Now I can say that standing rigging on level 1 is done Time to slowly climb on upper level. Foremast stay done Gammoning also done. Cheers, Matt

- 222 replies
-
- 14
-
-
Papegojan 1627 by mati - FINISHED - 1/48
mati replied to mati's topic in - Build logs for subjects built 1501 - 1750
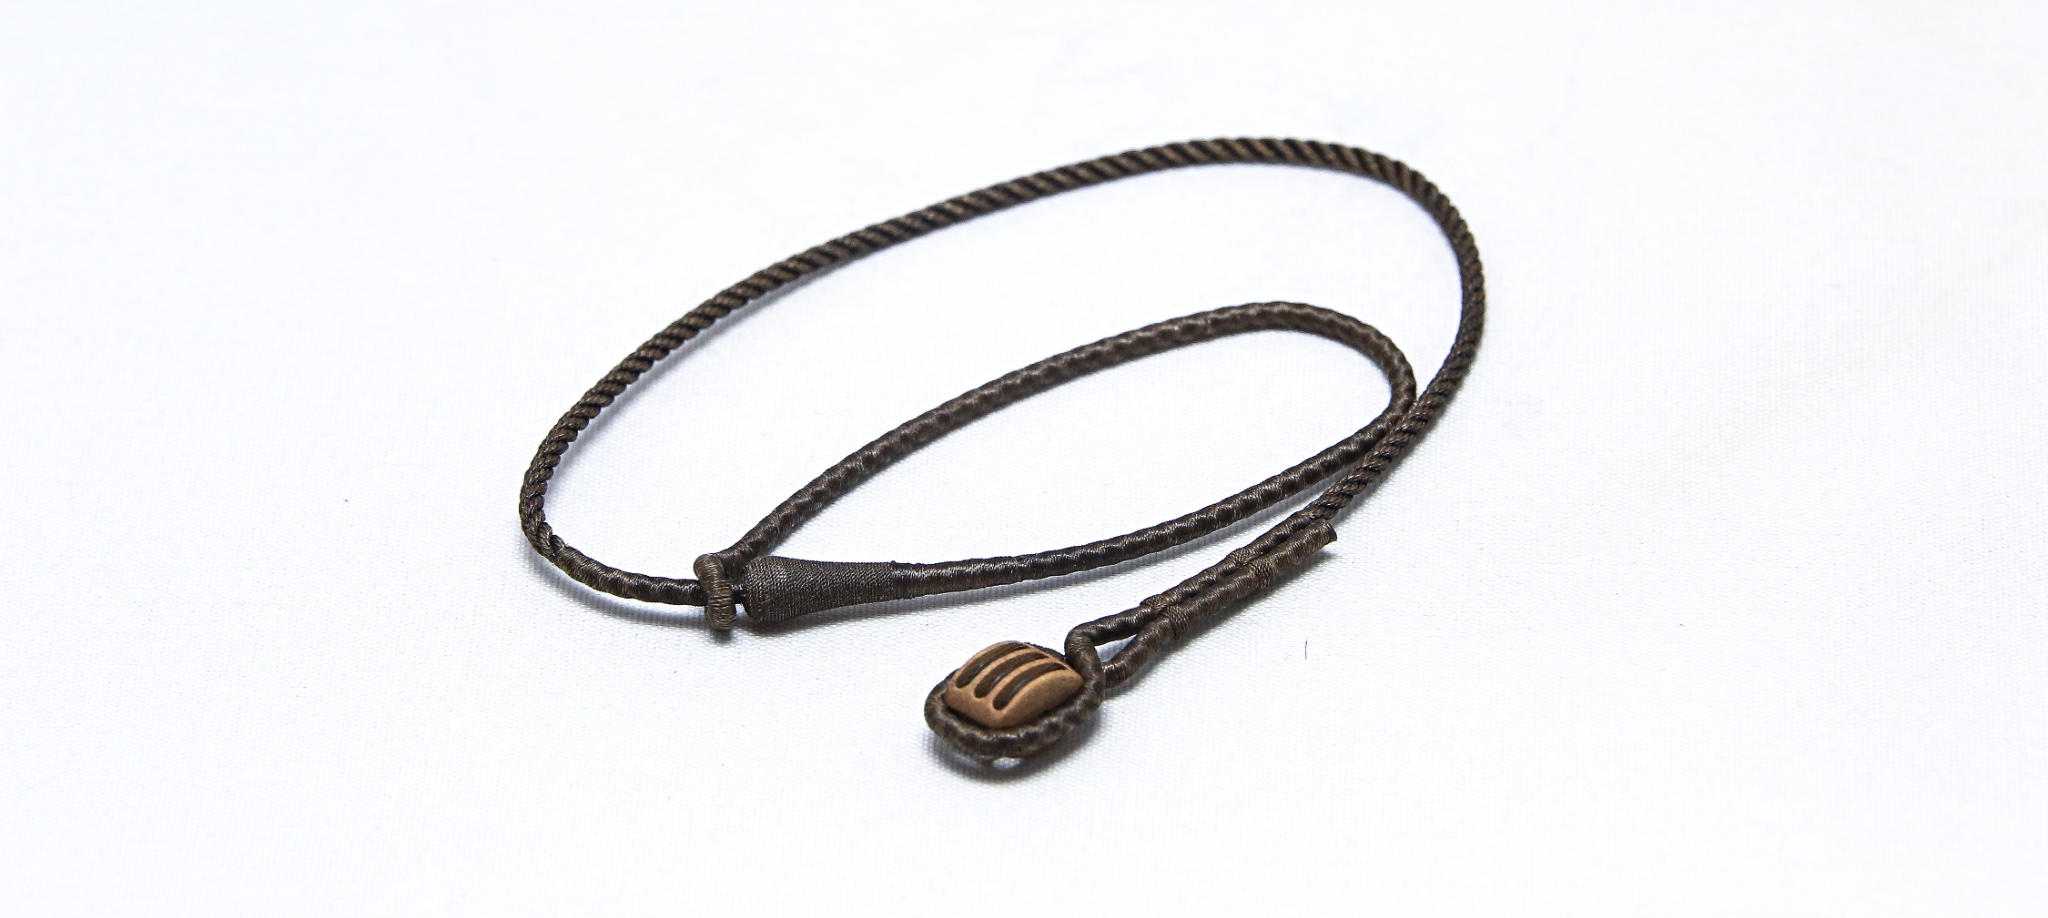
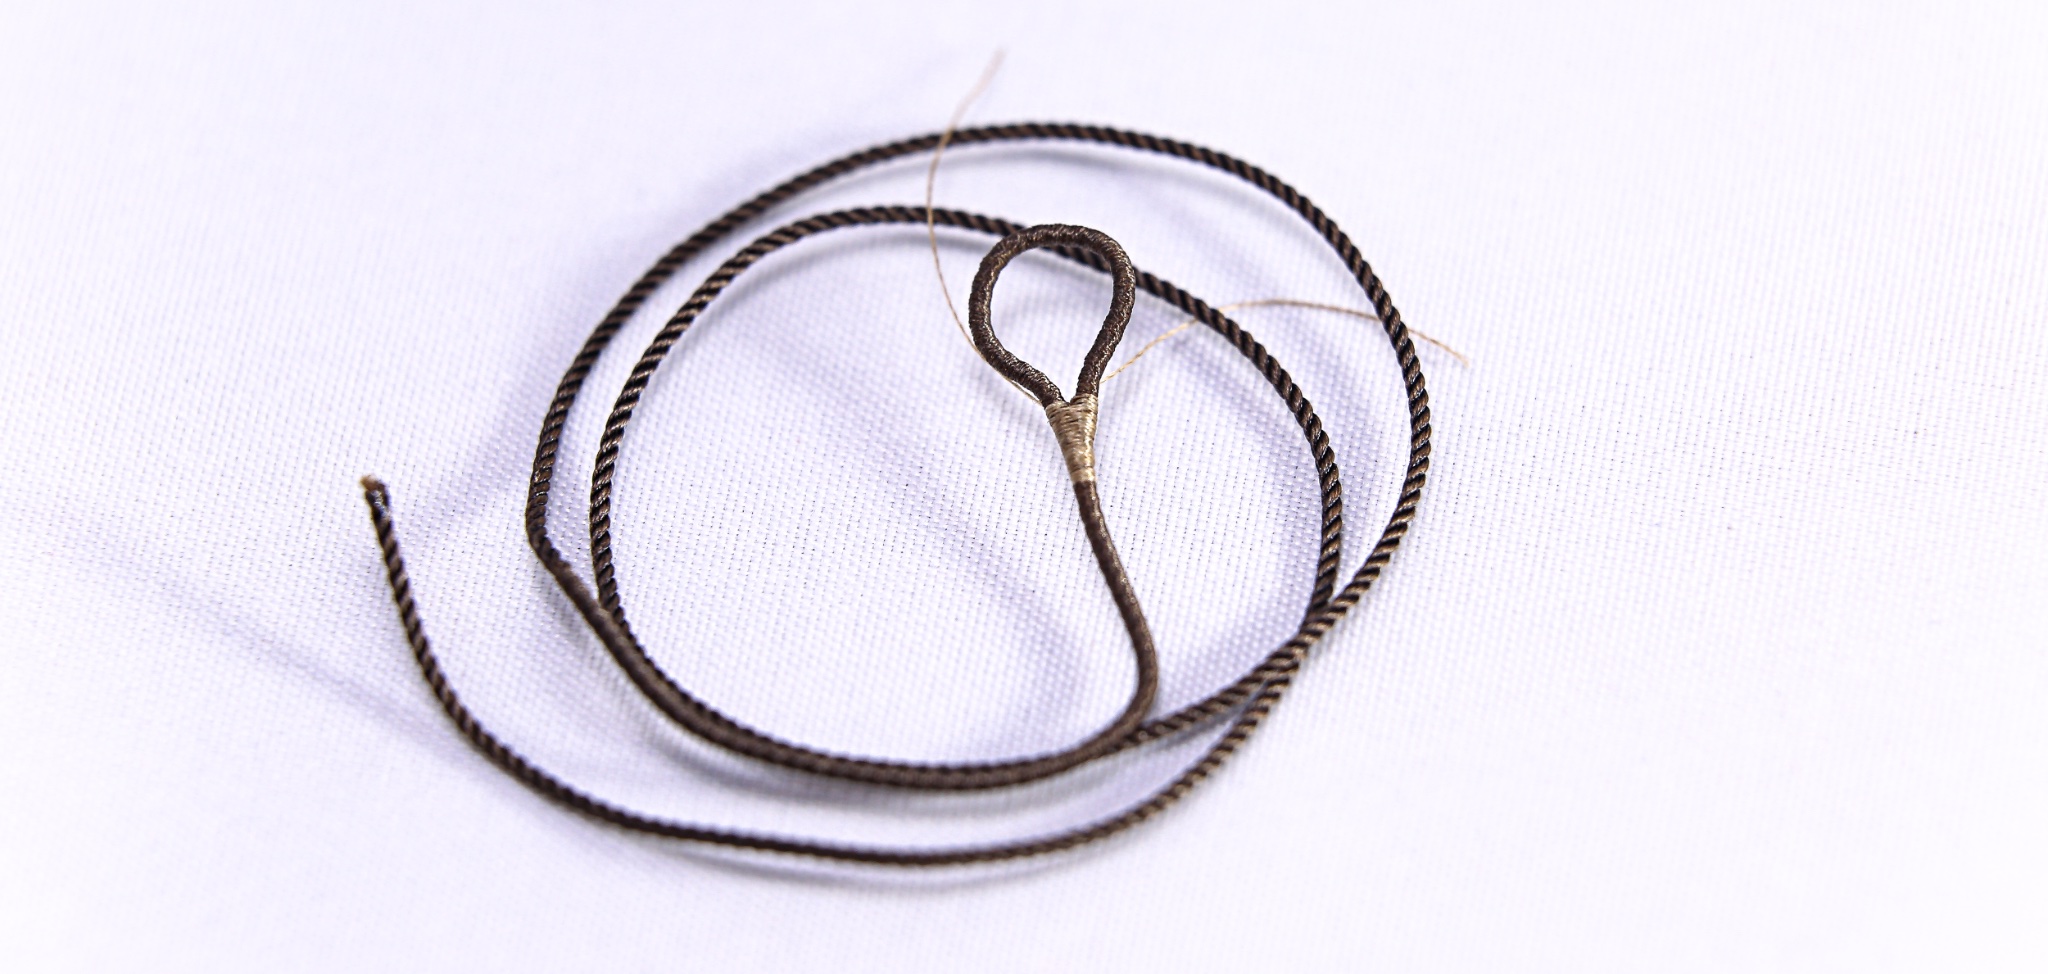
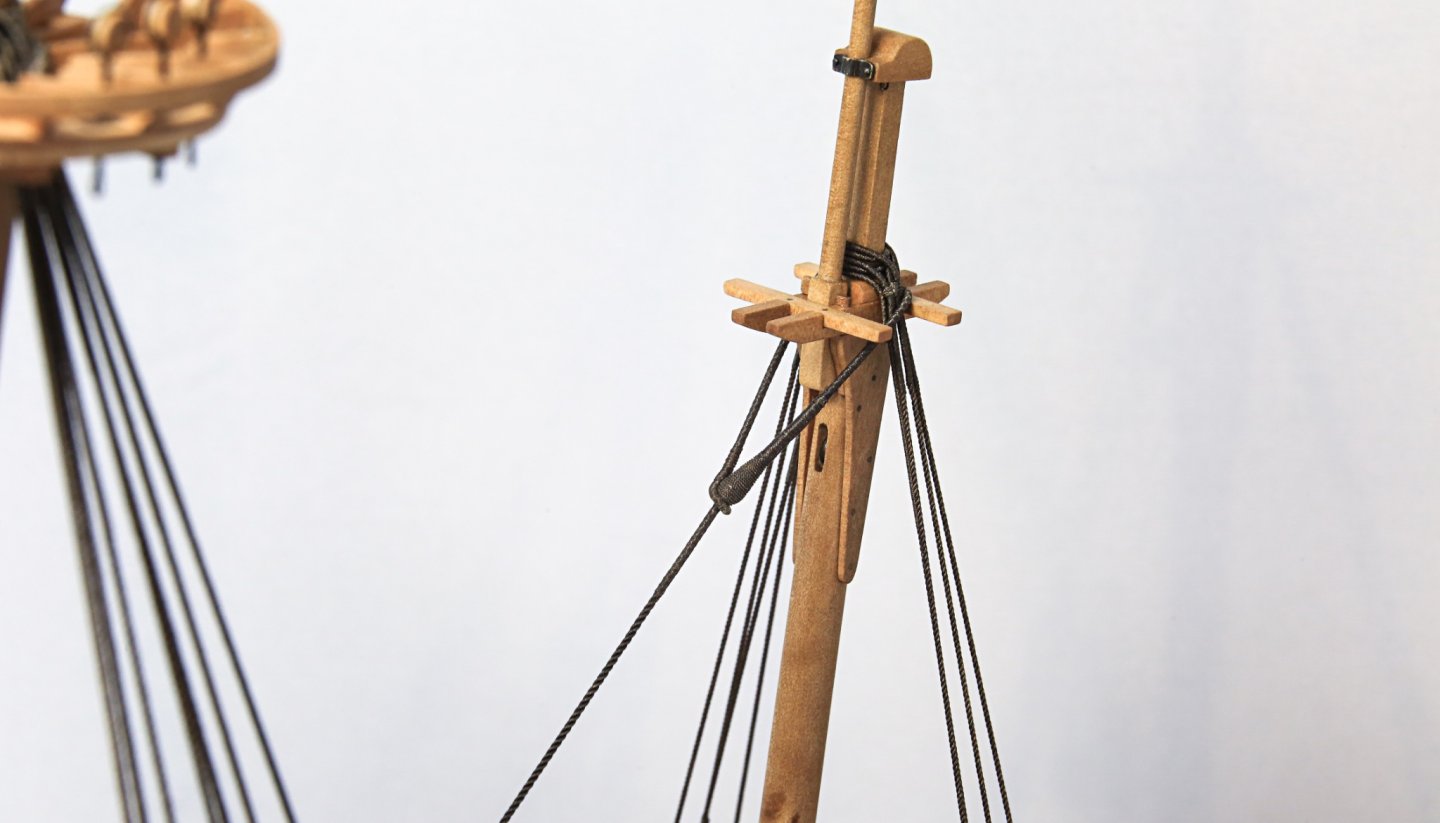
Hi All, I have some update on my build. Rigging situation is slowly progressing Shrouds are done. Obviously ratlines are still missing, but they will be rigged when all standing rigging will be done and only after final tension adjustments. Next step was to place my hands on stays. First... mizzen mast stay, then main mast and fore mast. You might notice one "shortcut" on the stays. Mouse... it's not 100% accurate. I was planing to do vertical threading and horizontal daring to achieve well known basket weave covering of the mouse, however I was kind of unhappy with the result and look. Especially on mizzen where mouse is quite small (also on the main topmast and fore topmast stays) . Main mast and fore mast stays are noticeably thicker and mouses are bigger so it was easier to achieve desire covering. ...but then I've ended up with two different covering on the mouses. I've decided to match the look of bigger mouses to smaller. That is why I've done just simple serving on the mouses using ~0,18mm rope. Compromise, which I'm not proud of ...but in the end looks ok... I guess Also due to the thickness of mainmast and foremast stays it was necessary to do worming on them to fill the groves for serving... otherwise surface of served rope become very uneven. For smaller diameter ropes I'm serving rope without worming.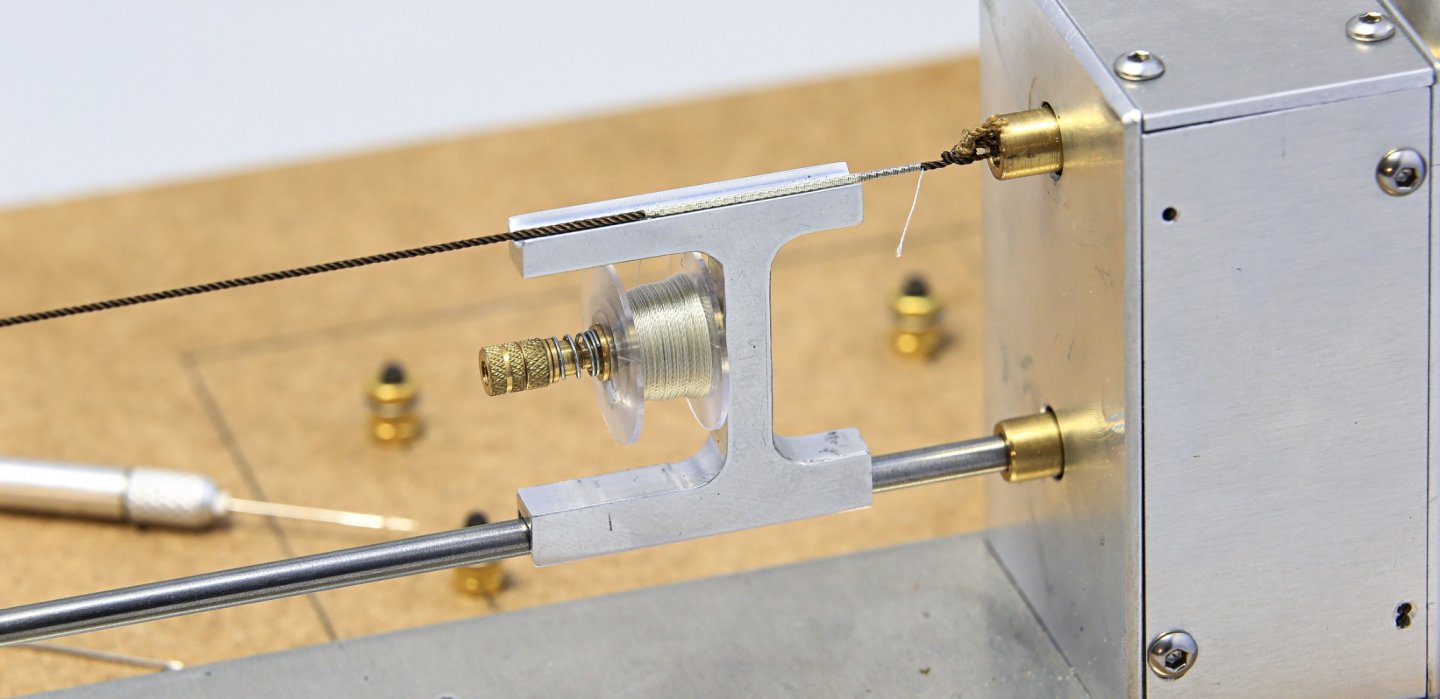


- 222 replies
-
- 11
-
-
Hi Siggi, This is definitely one of the best HMS model build on the planet. I'm always looking forward for updates, because I really enjoy your work! Cheers, Matt
-
Papegojan 1627 by mati - FINISHED - 1/48
mati replied to mati's topic in - Build logs for subjects built 1501 - 1750
Hi Guys, Not much inspiration today... so just a small update 🙃 So far mizzen and main mast are done with shrouds and lanyards. Just one more to go... foremast. Few quick photos. Single shroud and my way of making eye. I'm cutting end of served rope at angle and forming an eye. One drop of CA to keep this in desire shape and hand made serving over the glue point. Main mast head with laid sequence of tackles and shrouds. ...and quick shoot on channel with lanyards. Cheers, Matt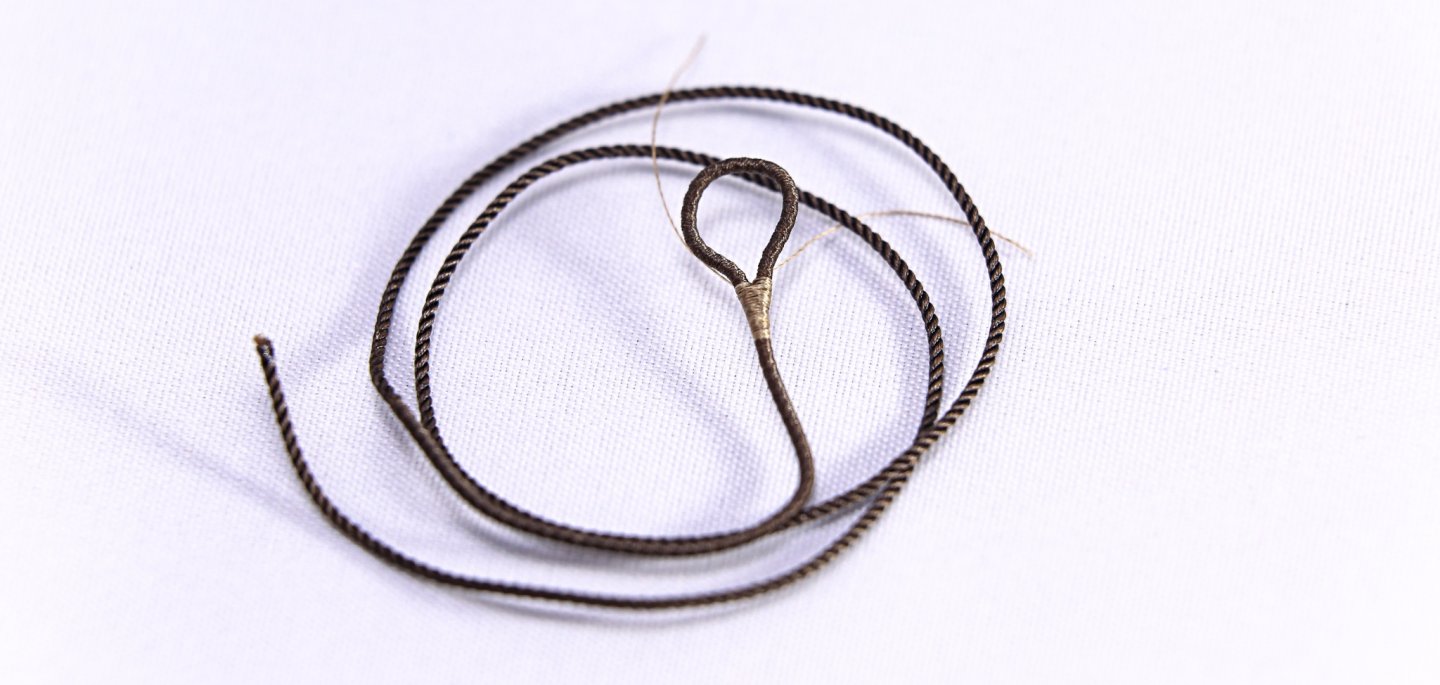

- 222 replies
-
- 10
-
-
Papegojan 1627 by mati - FINISHED - 1/48
mati replied to mati's topic in - Build logs for subjects built 1501 - 1750
Hi All, Currently I'm involved in unequal fight with shrouds and lanyards 😆 Maybe it's not perfect... but I'm doing my best to do it properly. At the moment I have completed mizzen mast and I'm in the middle of main mast. Obviously lanyards are loose at that stage. Final adjustments will be done when all shrouds and stays will be in place. For equal distance between deadeyes I'm using this happy jig 😛 Rope of main mast lanyards 0,4mm Mizzen mast "ready" however excess of the ropes still not circumcised to final length 😆😛 Rope of mizzen mast lanyards 0,25mm See you next time! Cheers, Matt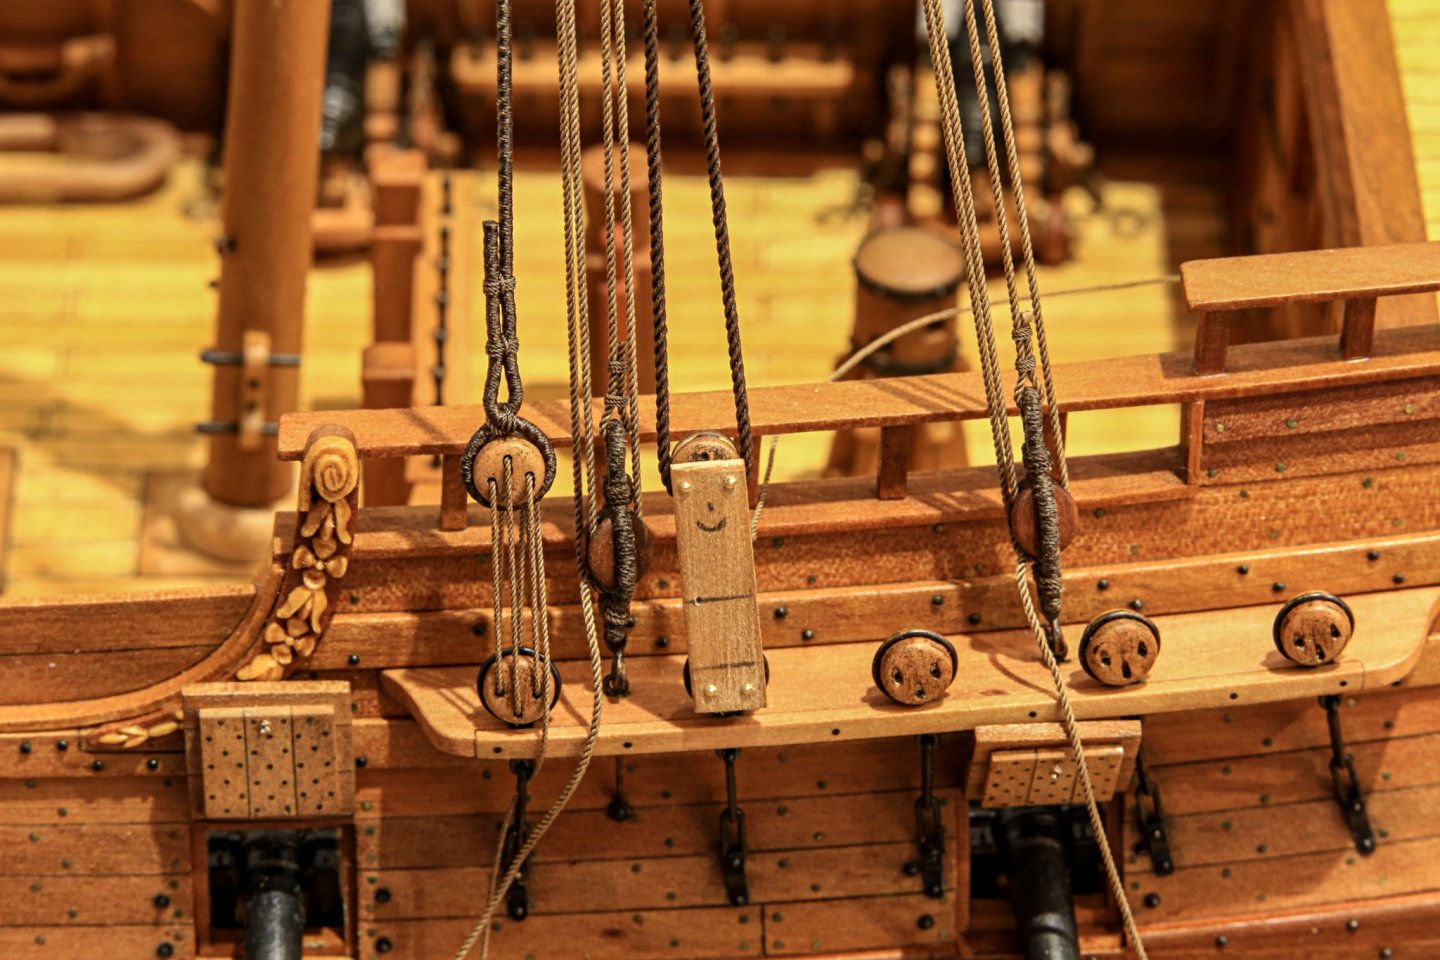

- 222 replies
-
- 12
-
-
Papegojan 1627 by mati - FINISHED - 1/48
mati replied to mati's topic in - Build logs for subjects built 1501 - 1750
Thank you Henry and Farbror 🍻🍻 Hi Tomek, It's not a big secret I'm using polyester threads and to create on them tar imitation sometimes might be challenging. So it's necessary to have proper "mixture" which won't rub it off. My secret: bitumen 😅 So far I'm happy with liquid bitumen from Idea Decoupage by Maimeri. I'm pretty sure any other will work. Process is quite messy... I'm using jar with just a little of bitumen. Dumping rope inside the jar and using brush I'm dabbing bitumen all over the rope. Not too much because at the end you will wipe it off anyway. When still "wet" I'm wiping the excess. After couple hours when bitumen is dry using white spirit (mineral spirit) I'm wiping ropes again until happy with result. In term of white spirit... the cheapest as possible.. fancy expensive from art shops doesn't make sense... I'm getting my from hardware store. For standing rigging I'm not diluting bitumen. For running yes... to quite thin mixture. Bitumen works great to cotton as well. Cheers, Matt
-
Papegojan 1627 by mati - FINISHED - 1/48
mati replied to mati's topic in - Build logs for subjects built 1501 - 1750
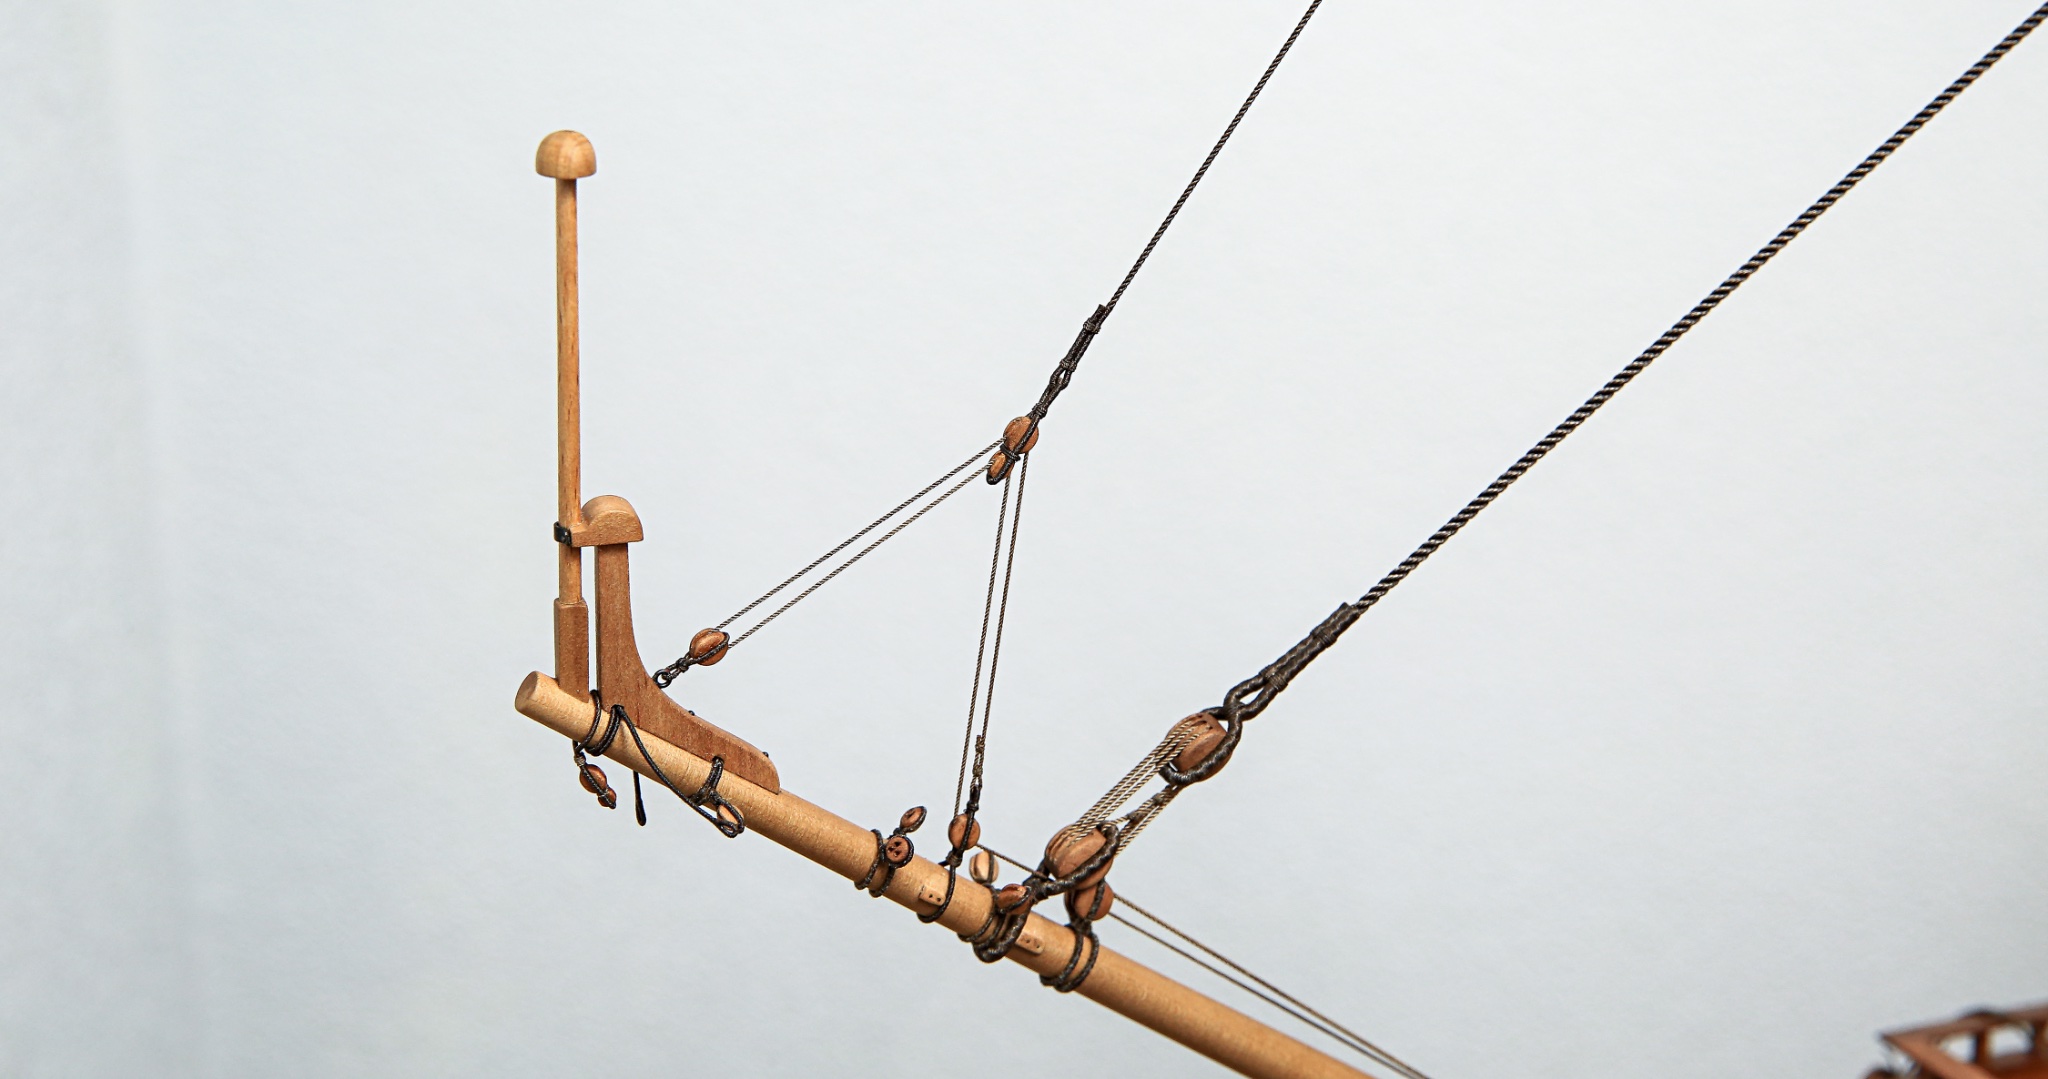
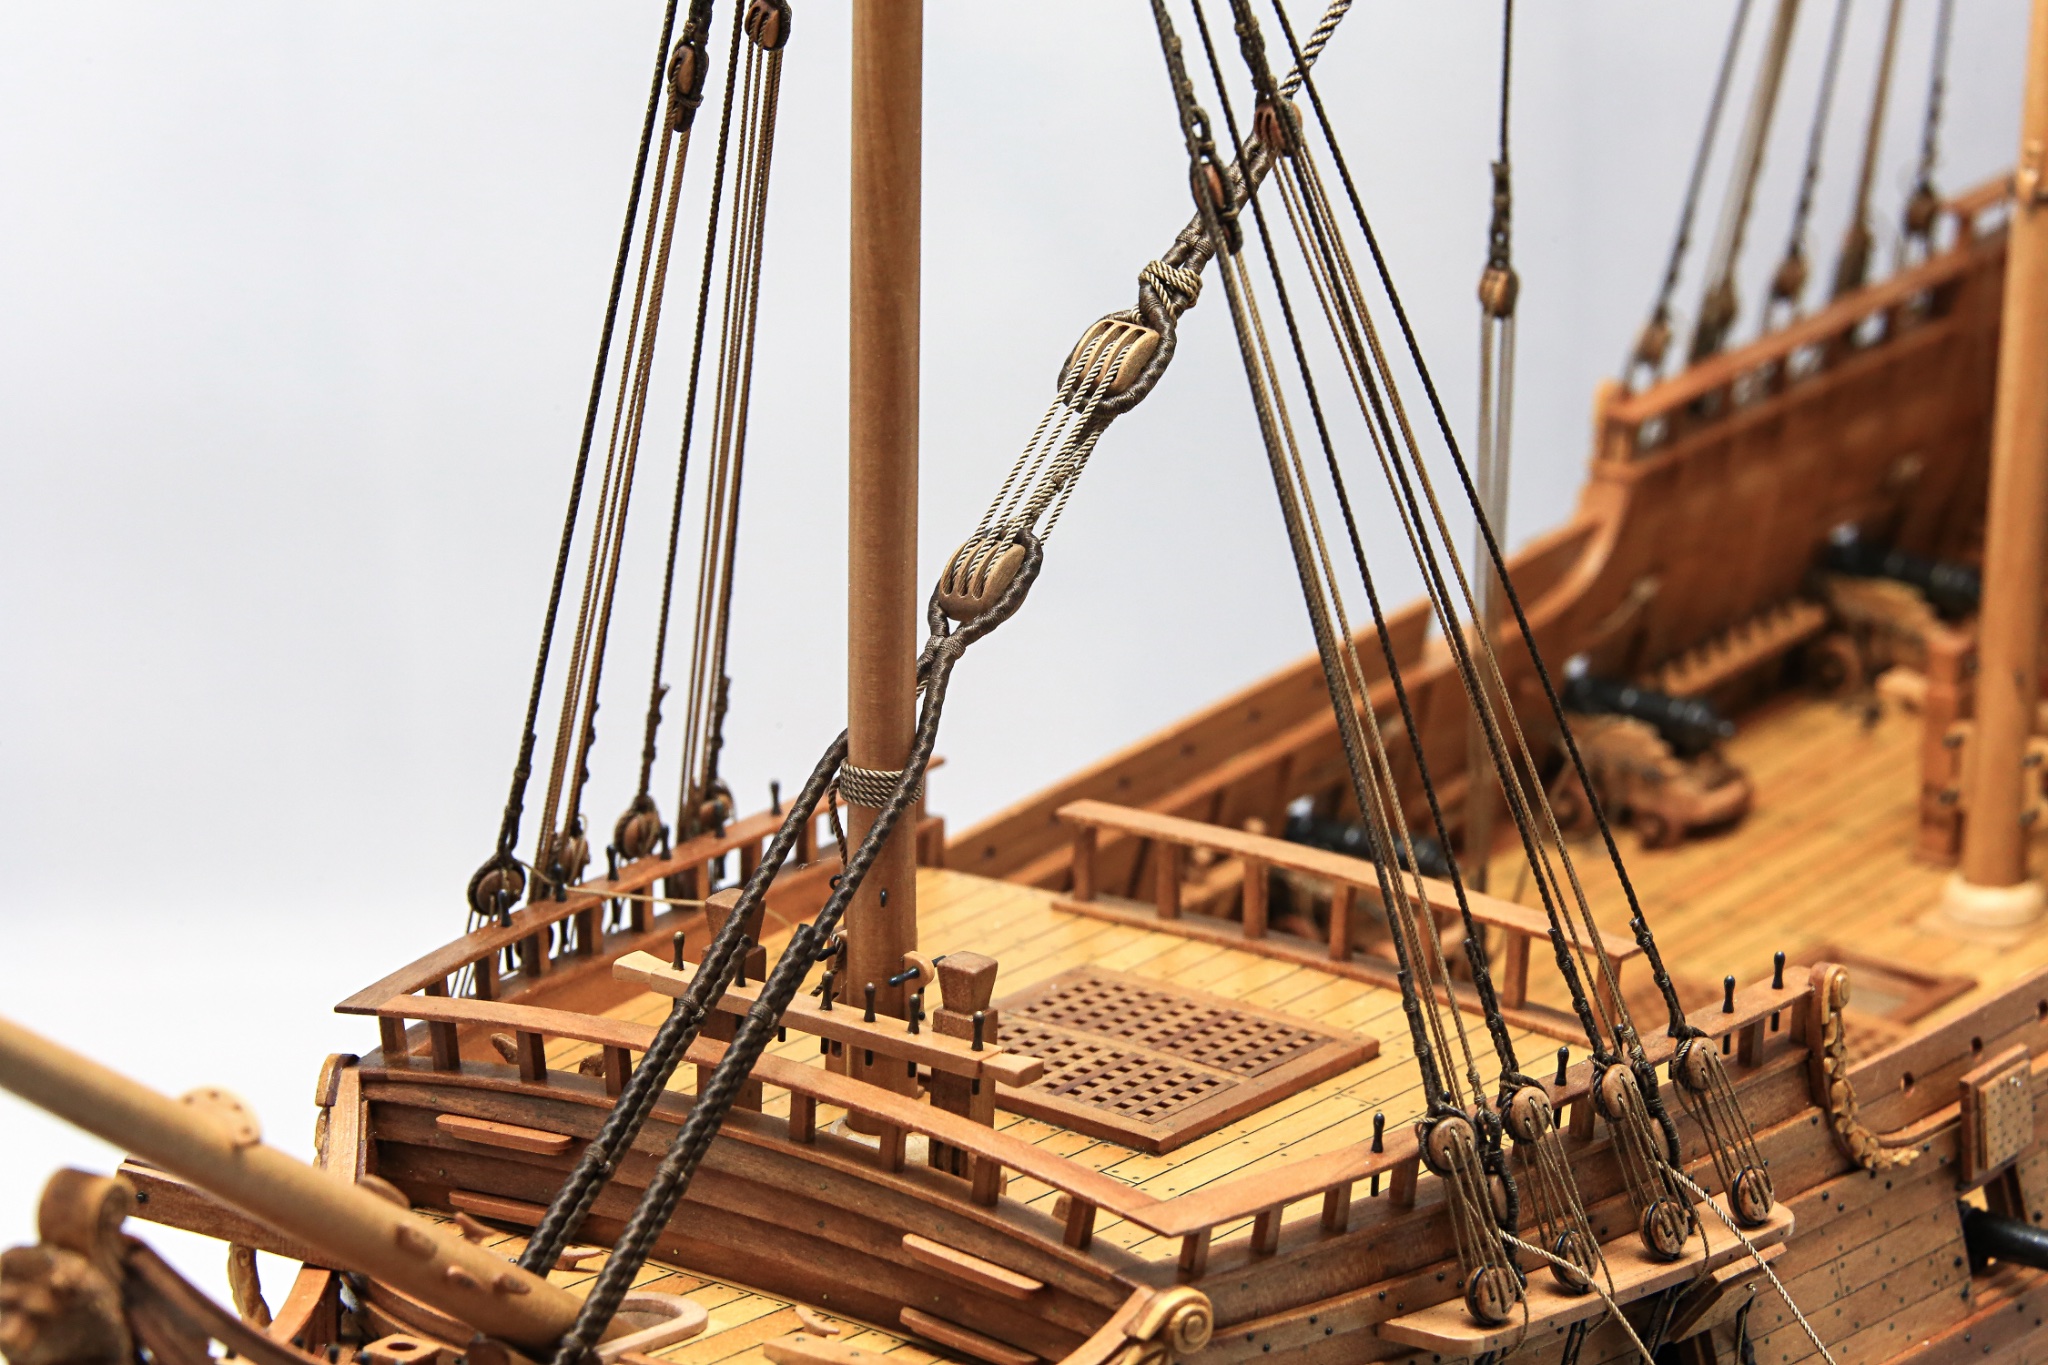
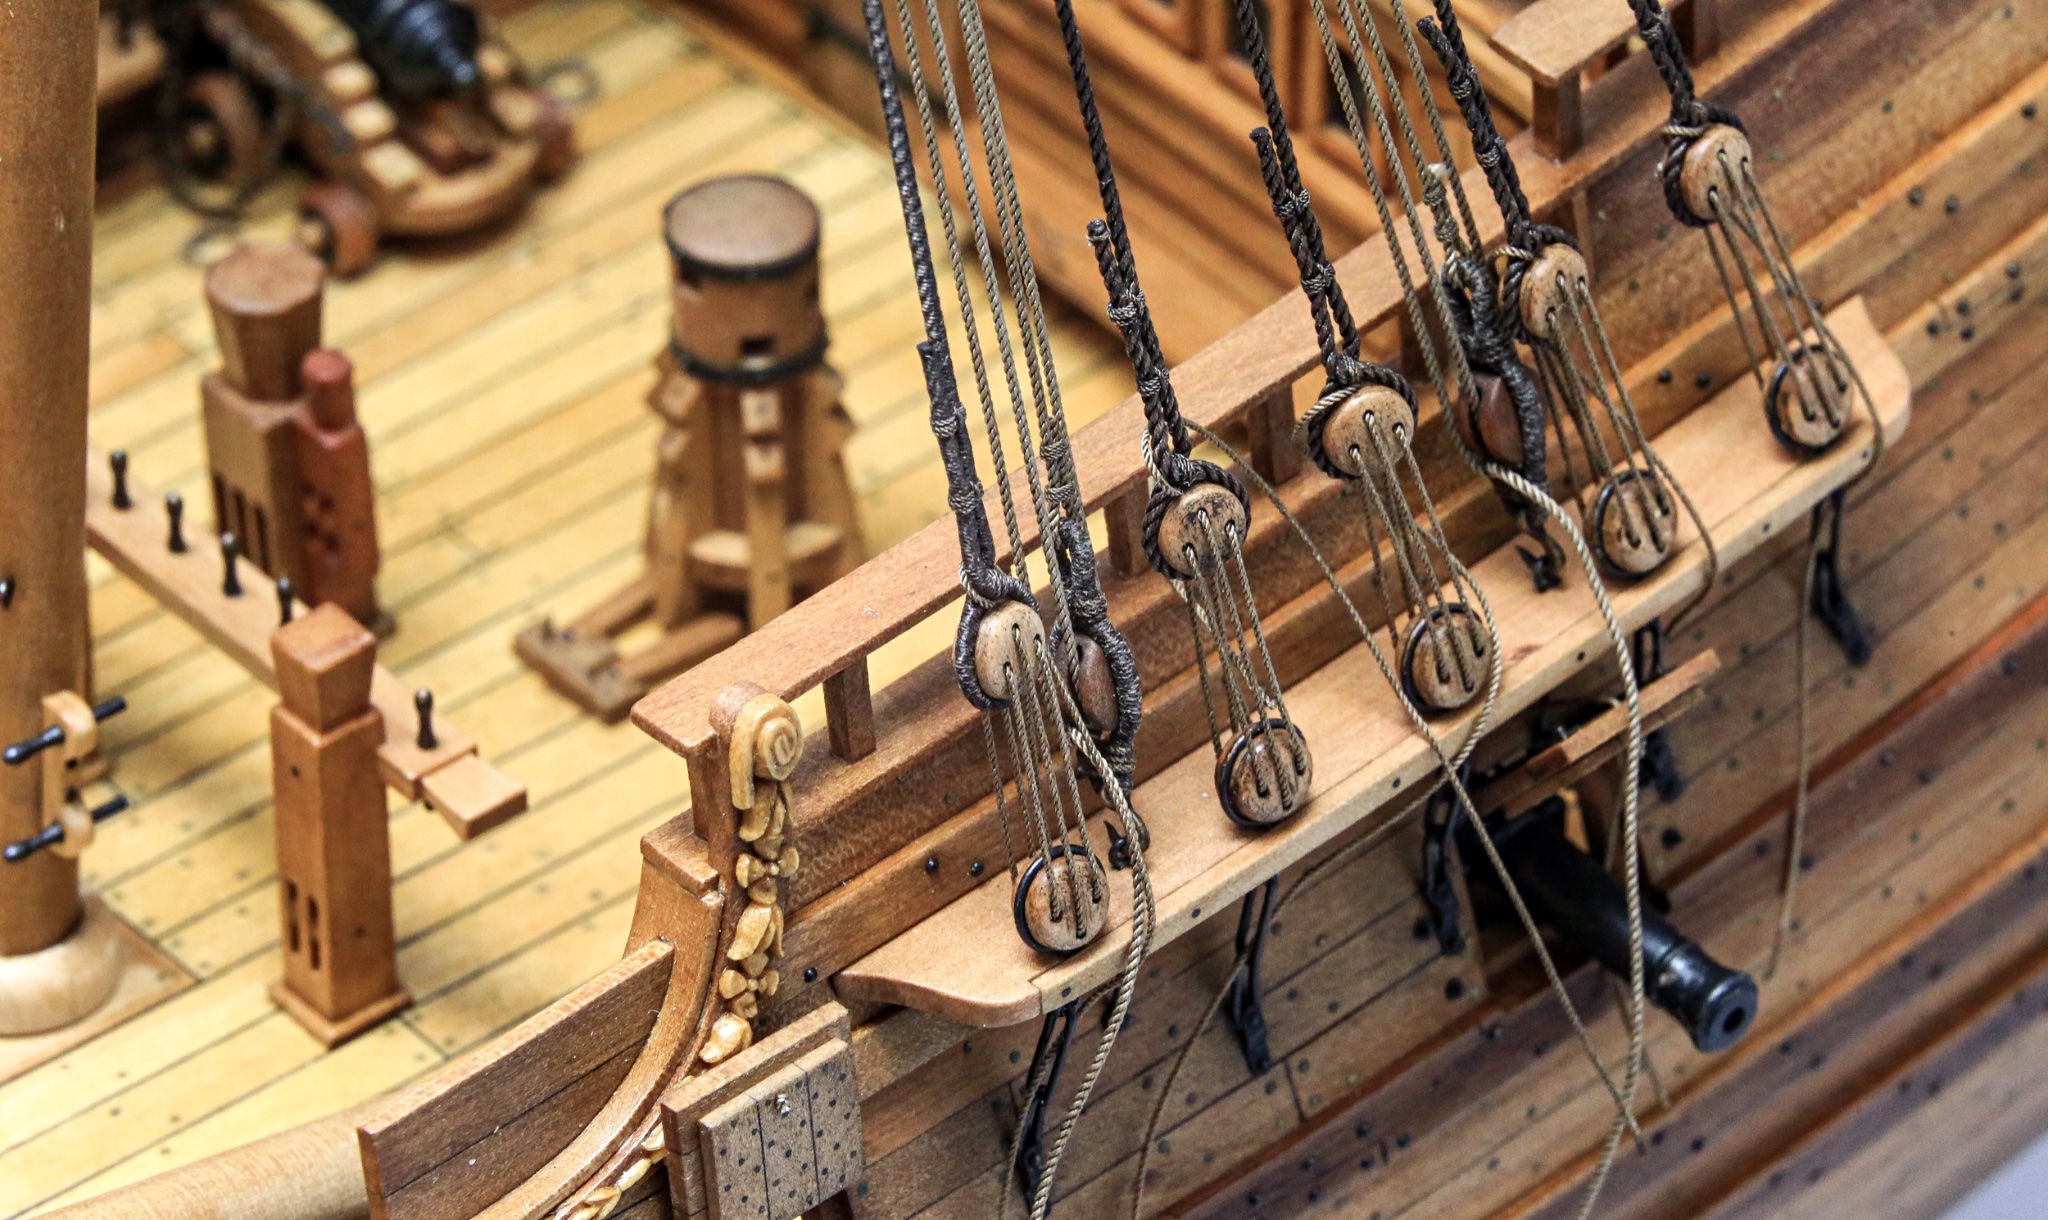
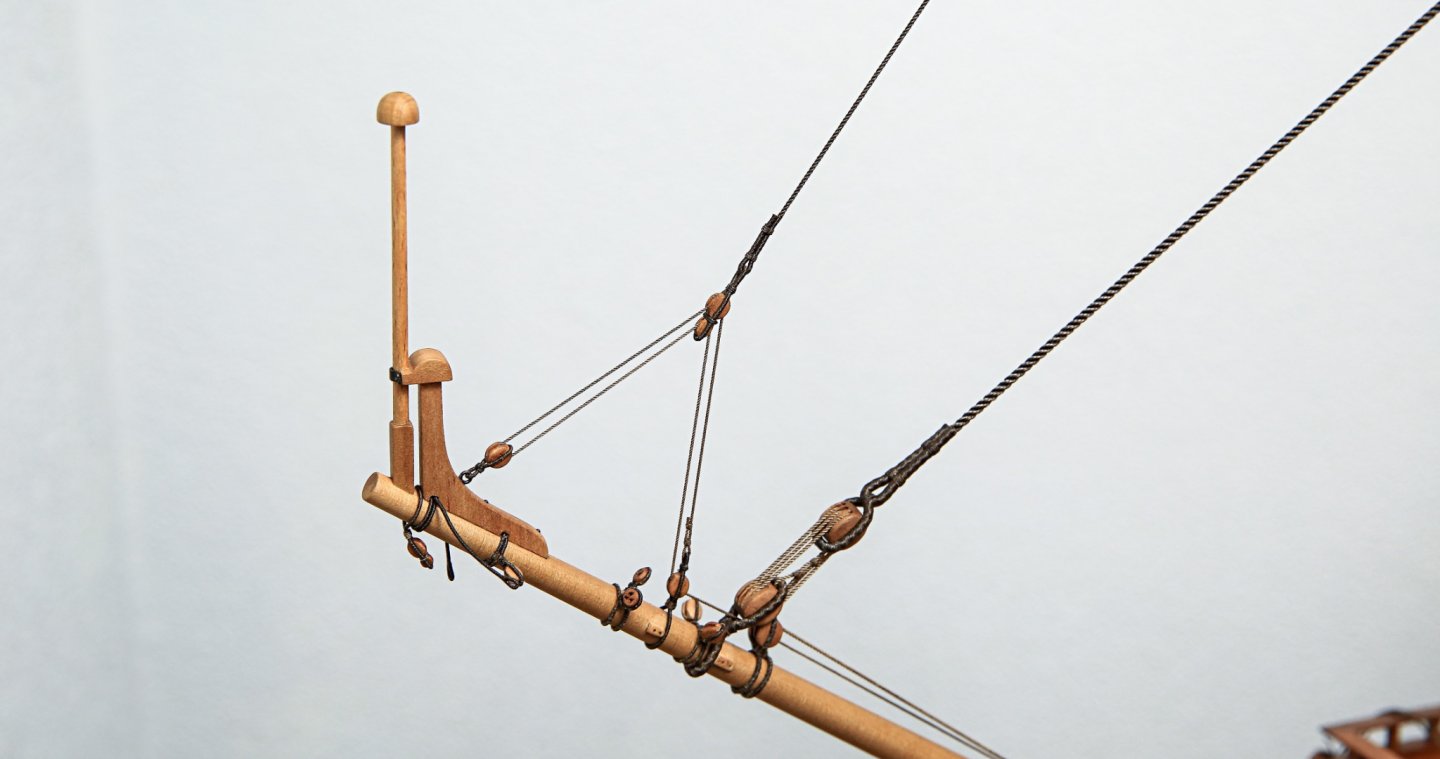
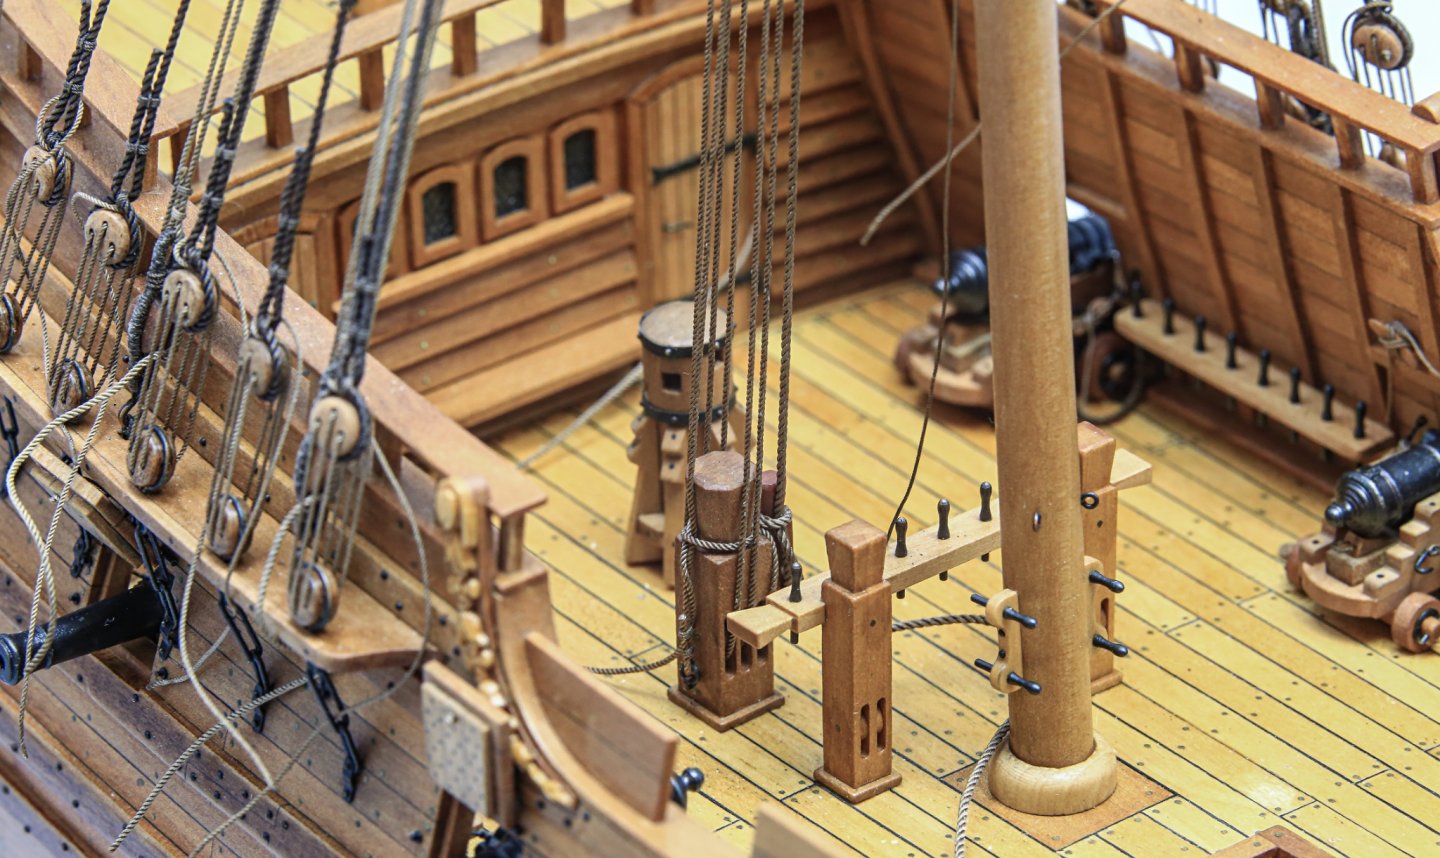
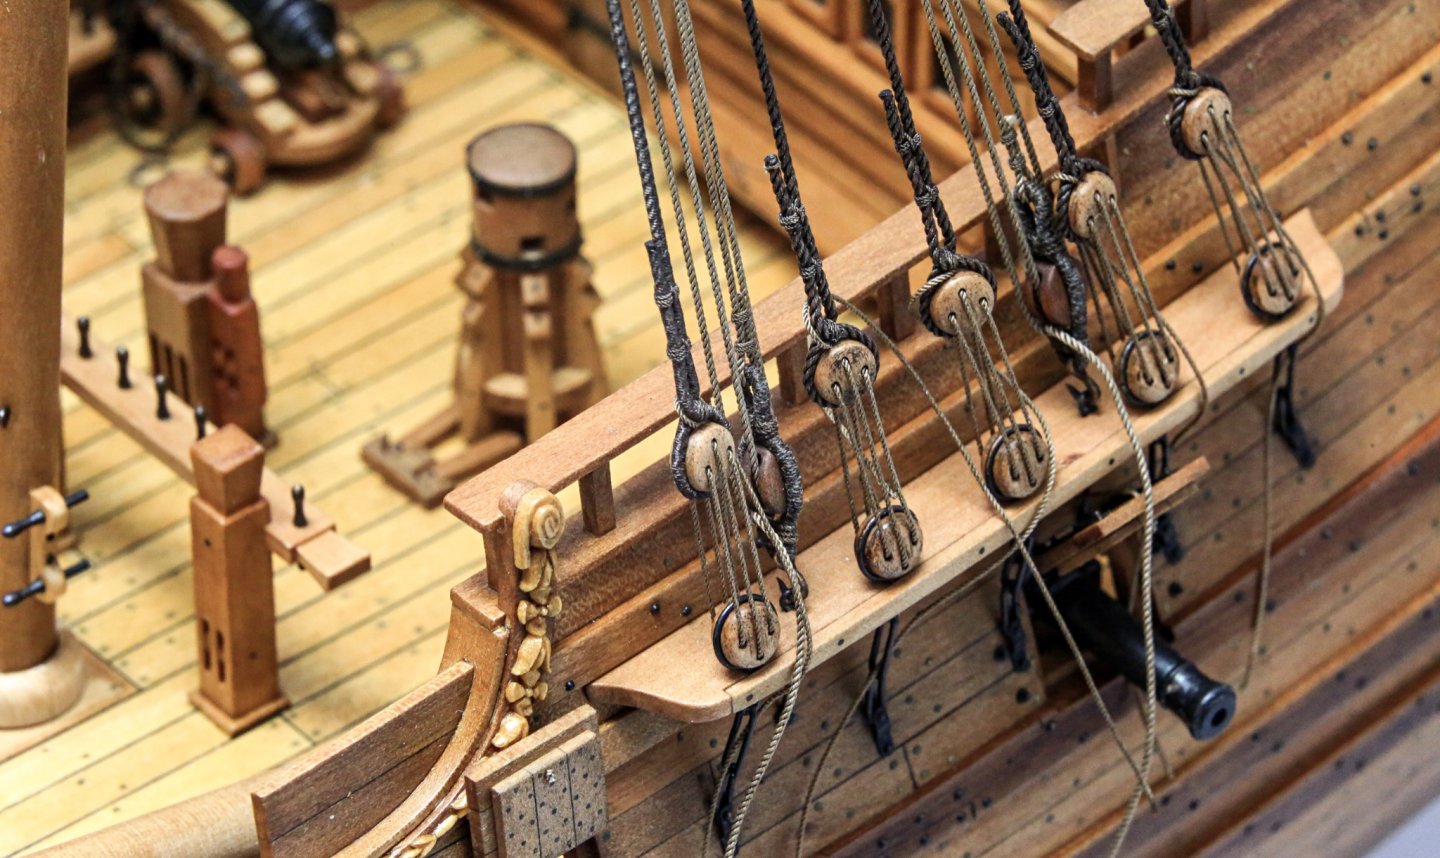
Hi All, This time... finally some rigging 🍻 Side tackle and garnet tackle. For the time being garnet tackle pendant and guy will be removed as it will go over the shrouds. Obviously running rigging is not yet fixed permanently. It will be necessary with shrouds and stays to do some tension adjustments. Garnet tackle and side tackle were used for loading purposes and also for some heavy job on board... lifting of heavy ropes, cannons, etc... When not in used side tackle were not rigged and garnet tackle pendant and guy were secured. Next step... shrouds. Cheers, Matt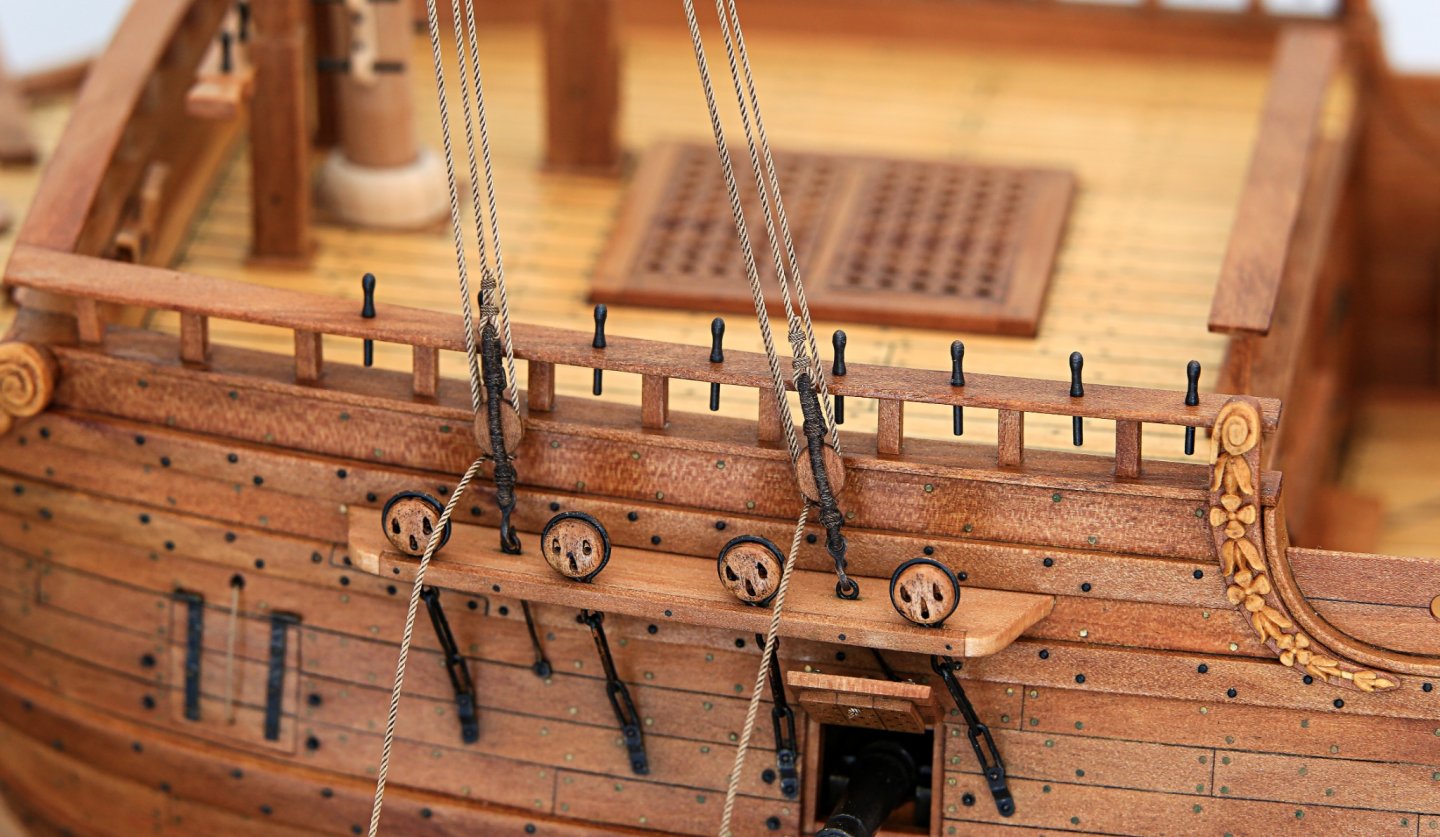

- 222 replies
-
- 15
-
-
Papegojan 1627 by mati - FINISHED - 1/48
mati replied to mati's topic in - Build logs for subjects built 1501 - 1750
Hi All, This time another small update. I've managed to complete all side tackles blocks. Next step - pendants and rig them using above blocks to channels eyebolts. Cheers, Matt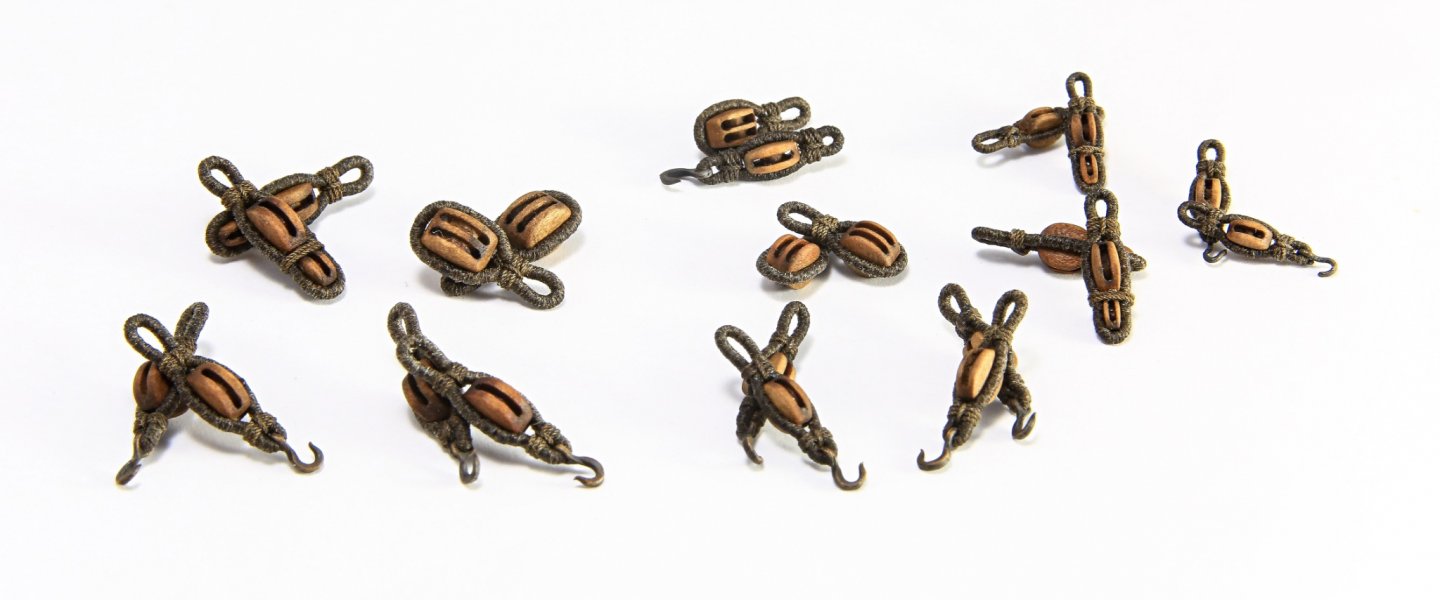
- 222 replies
-
- 11
-
-
Papegojan 1627 by mati - FINISHED - 1/48
mati replied to mati's topic in - Build logs for subjects built 1501 - 1750
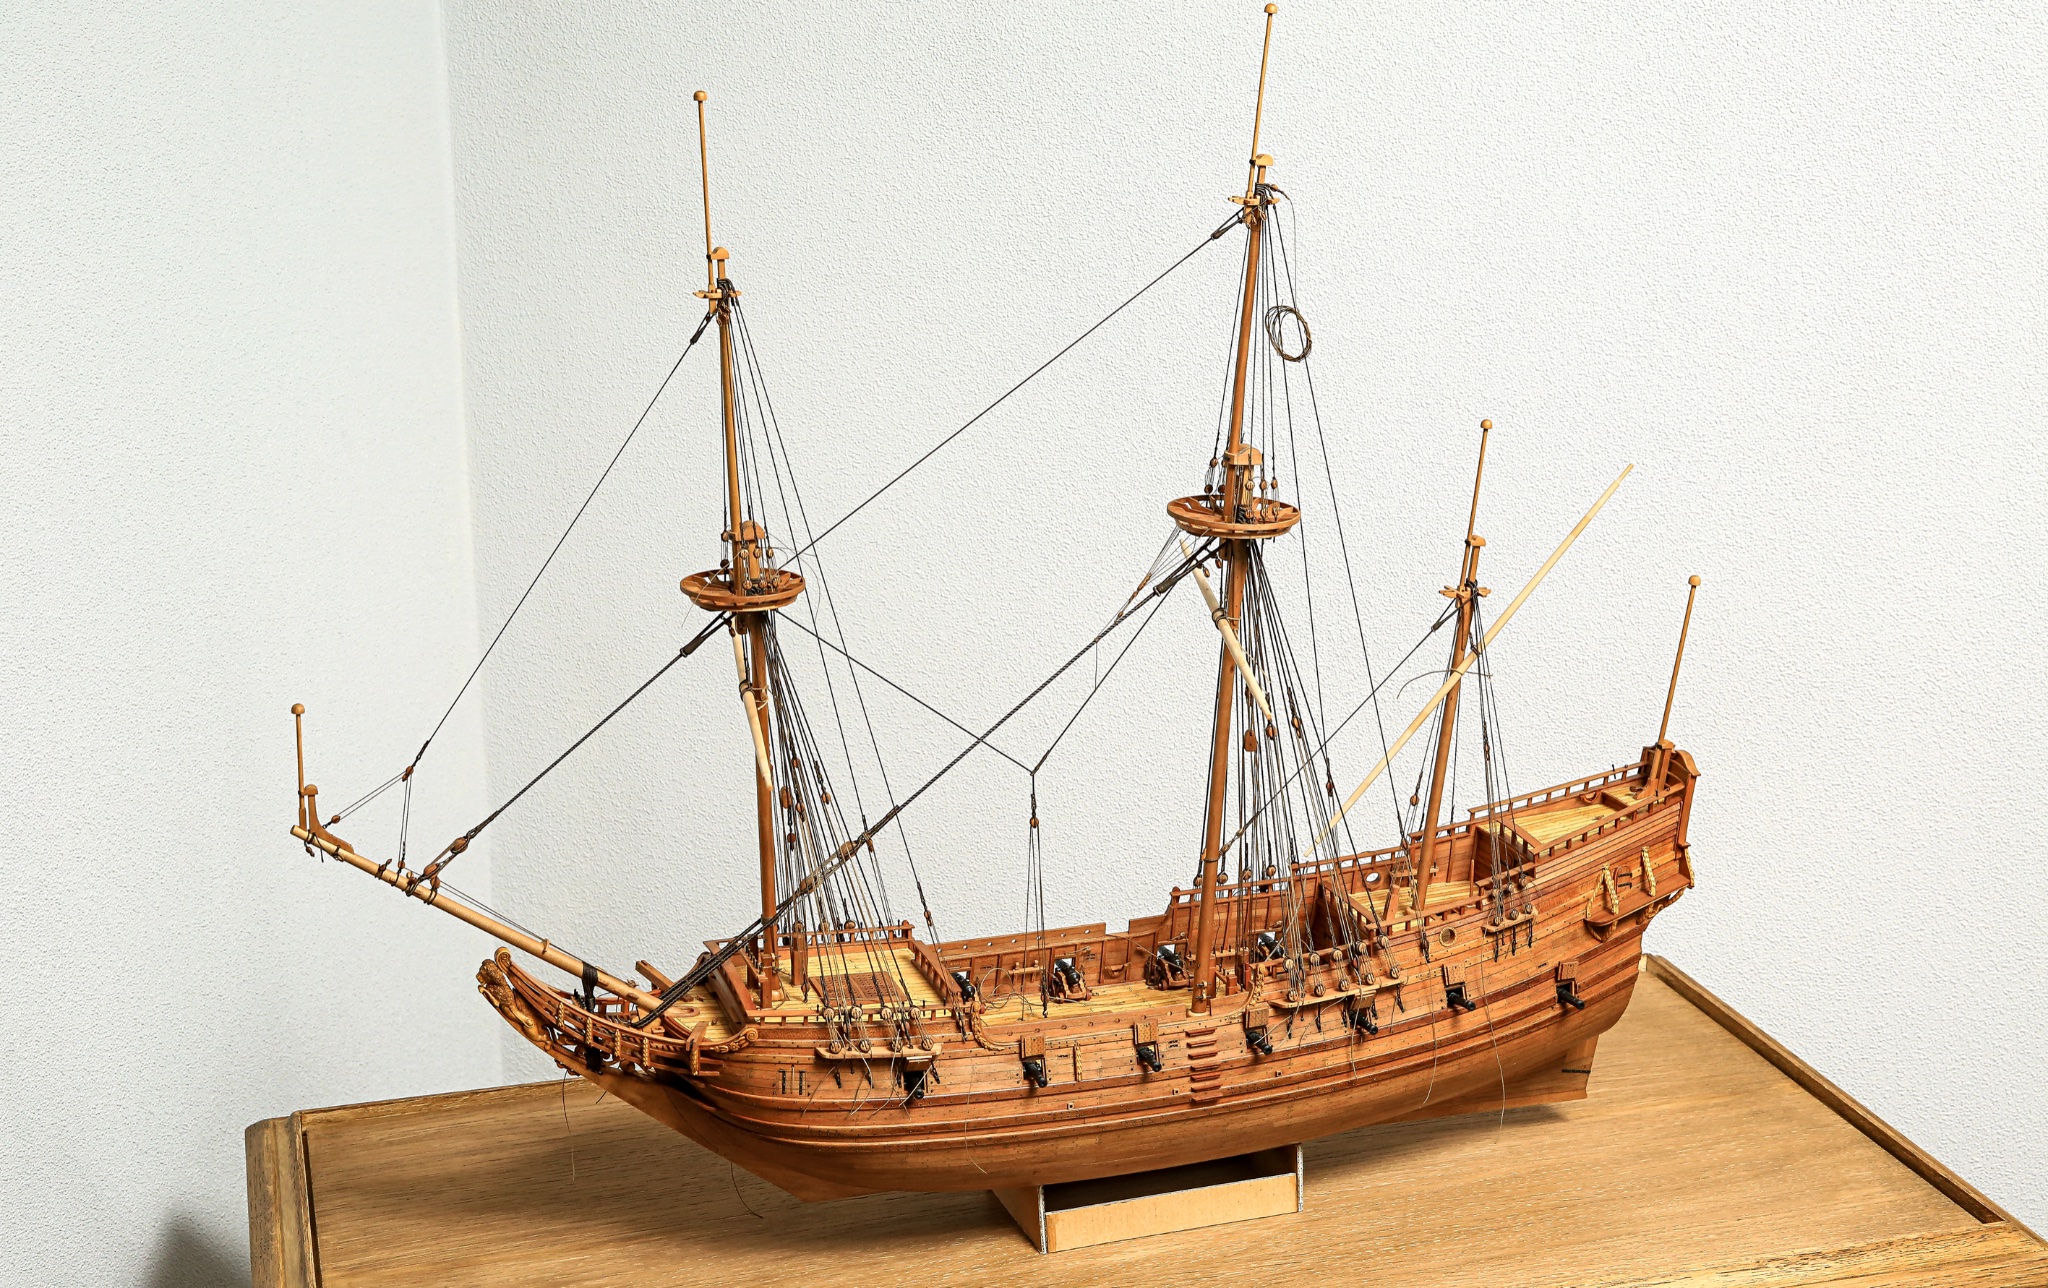
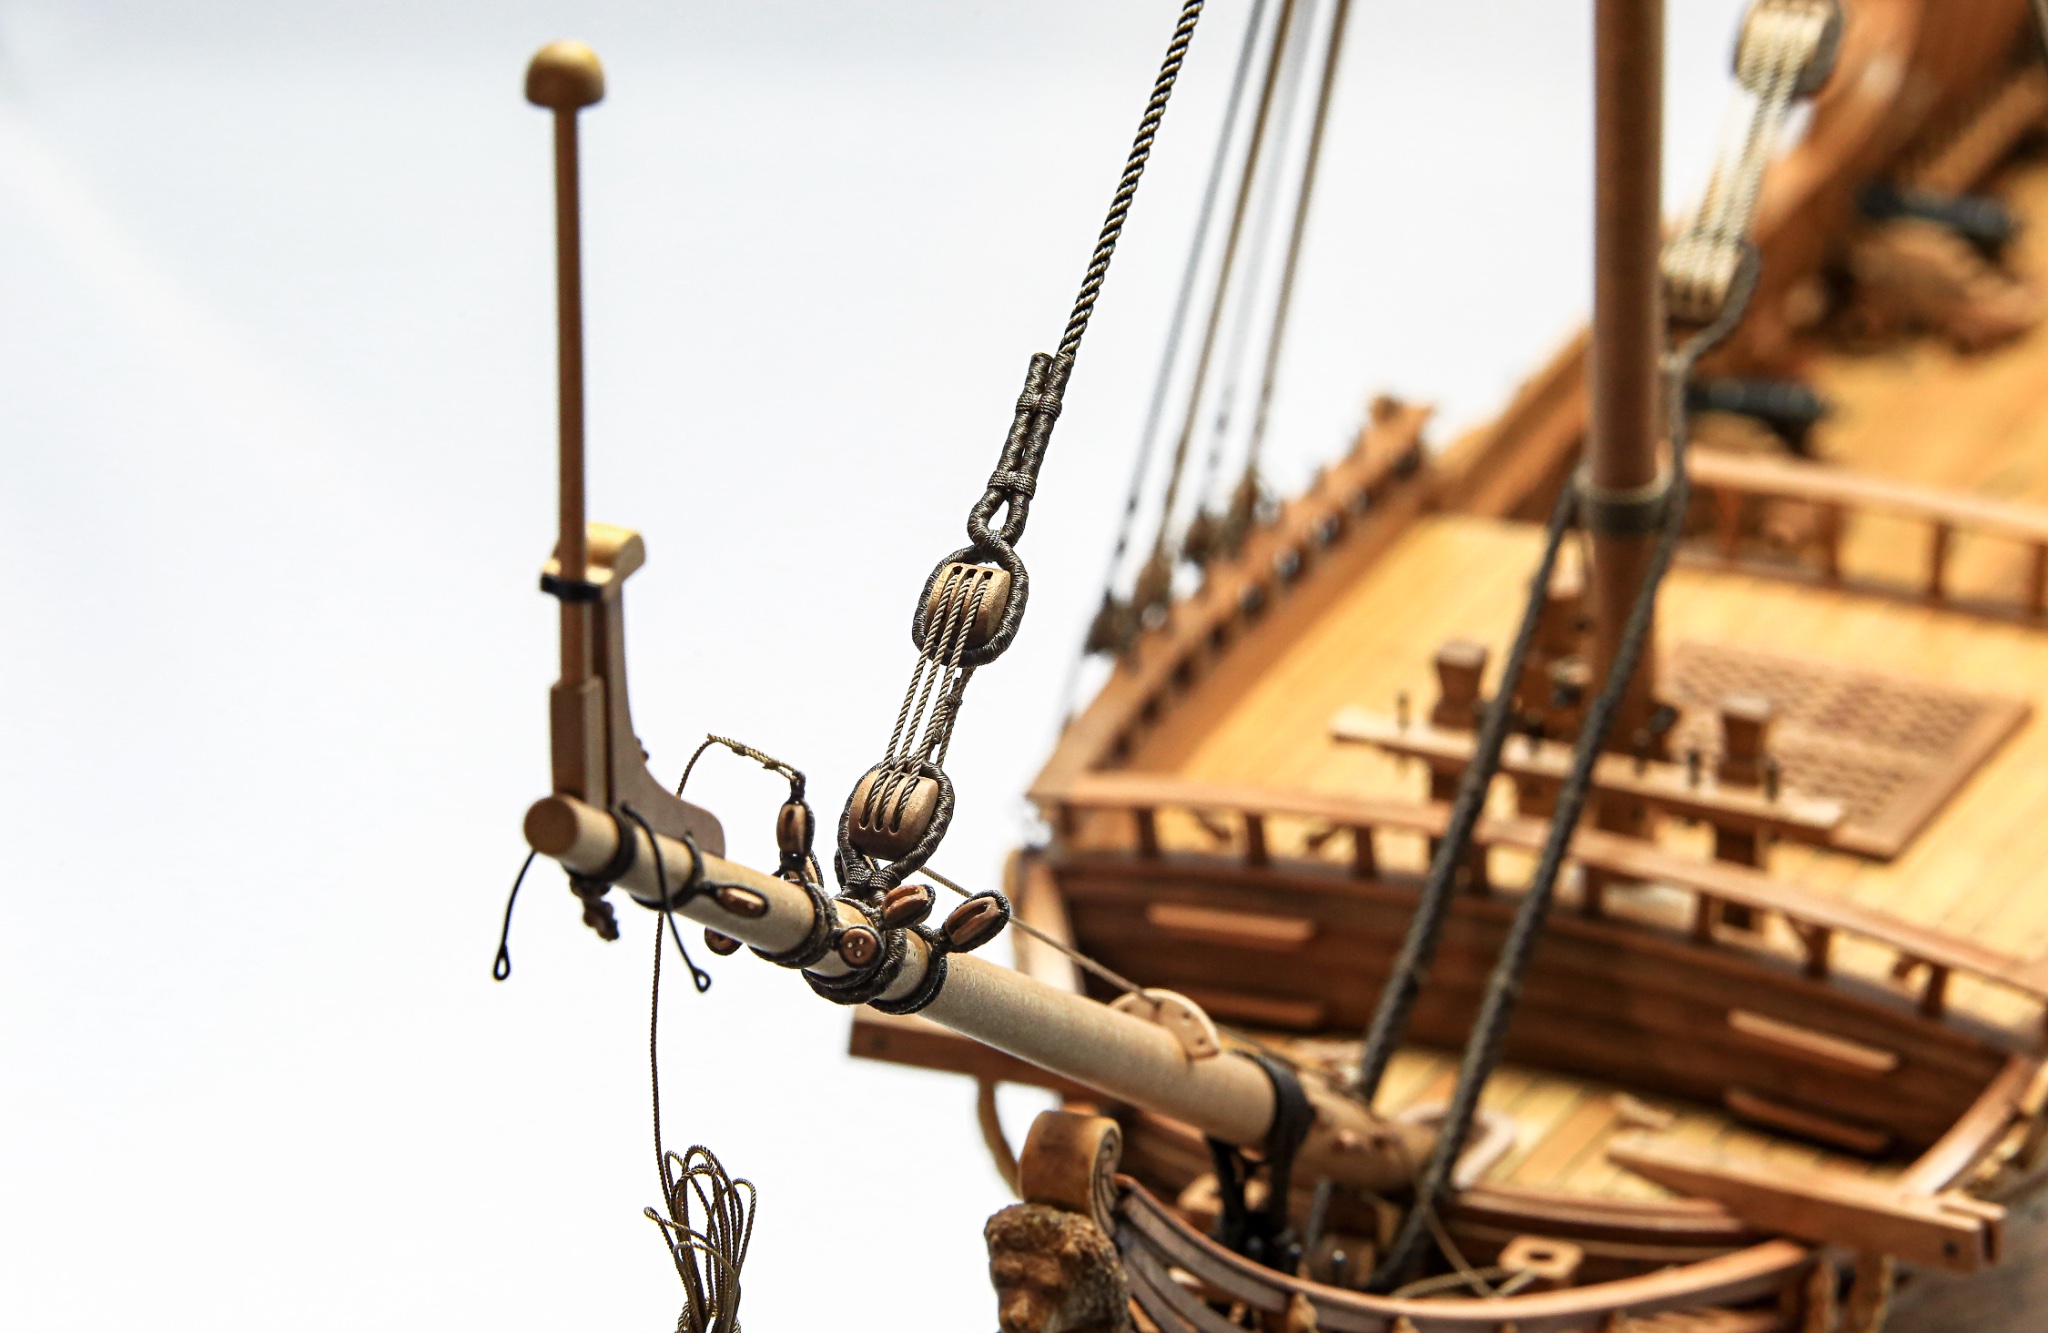
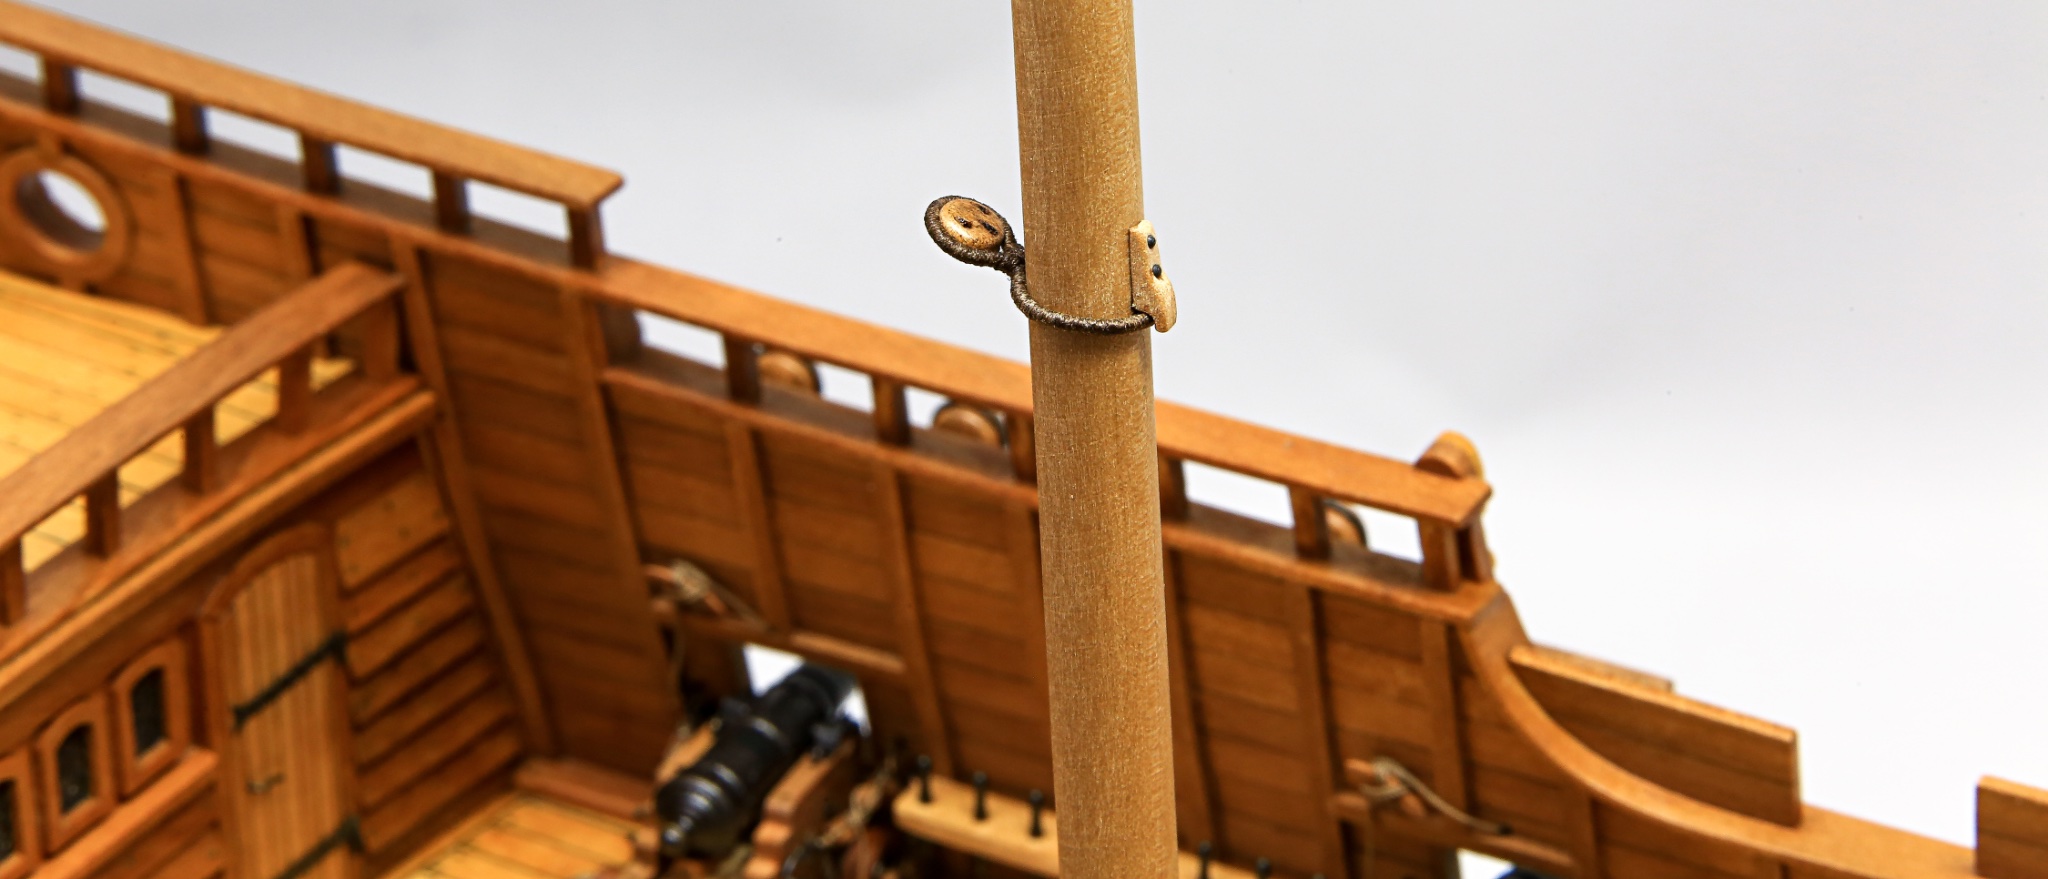
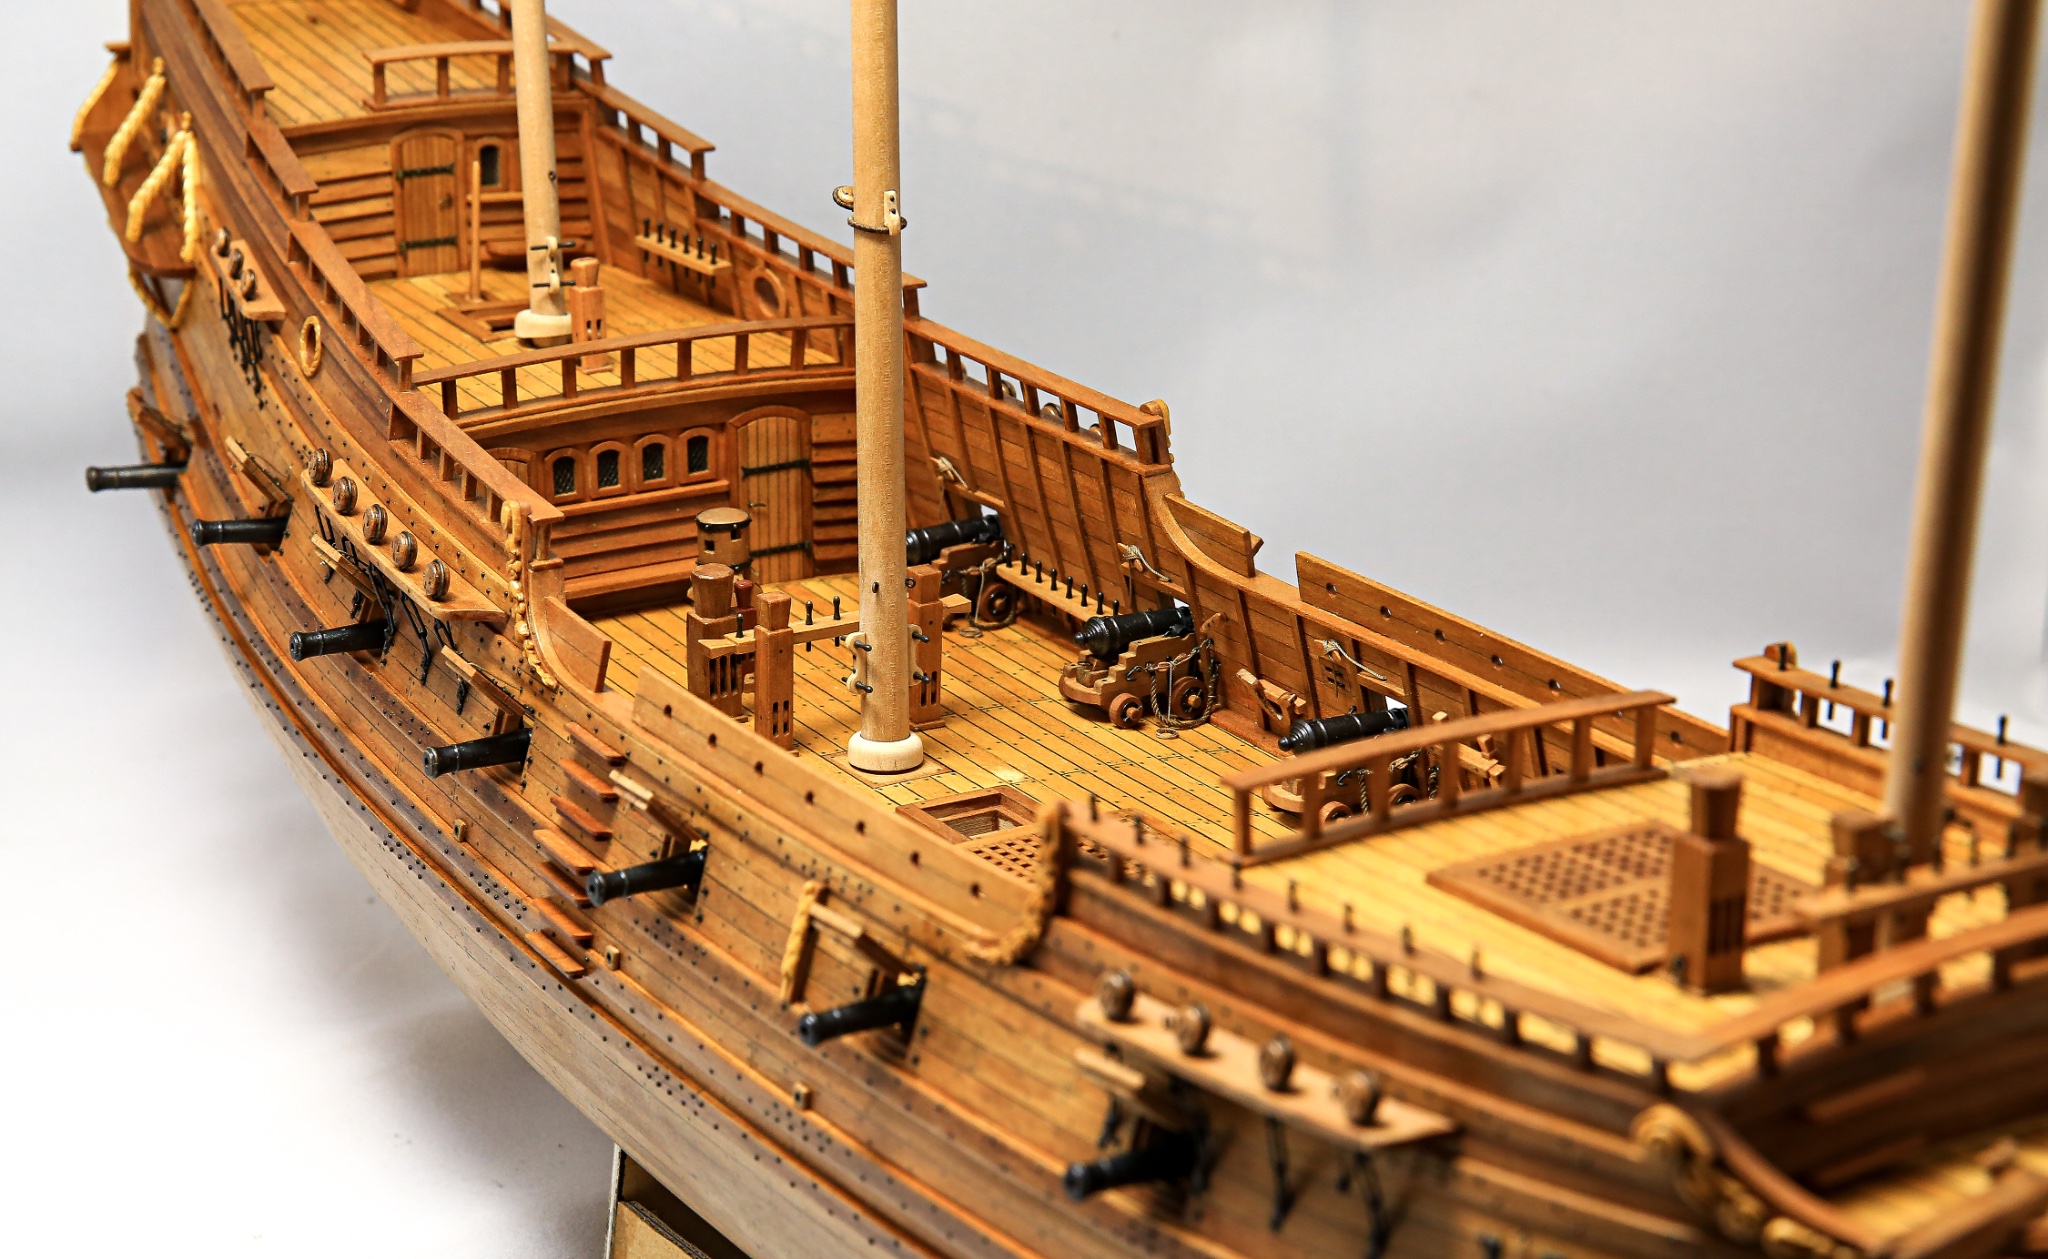
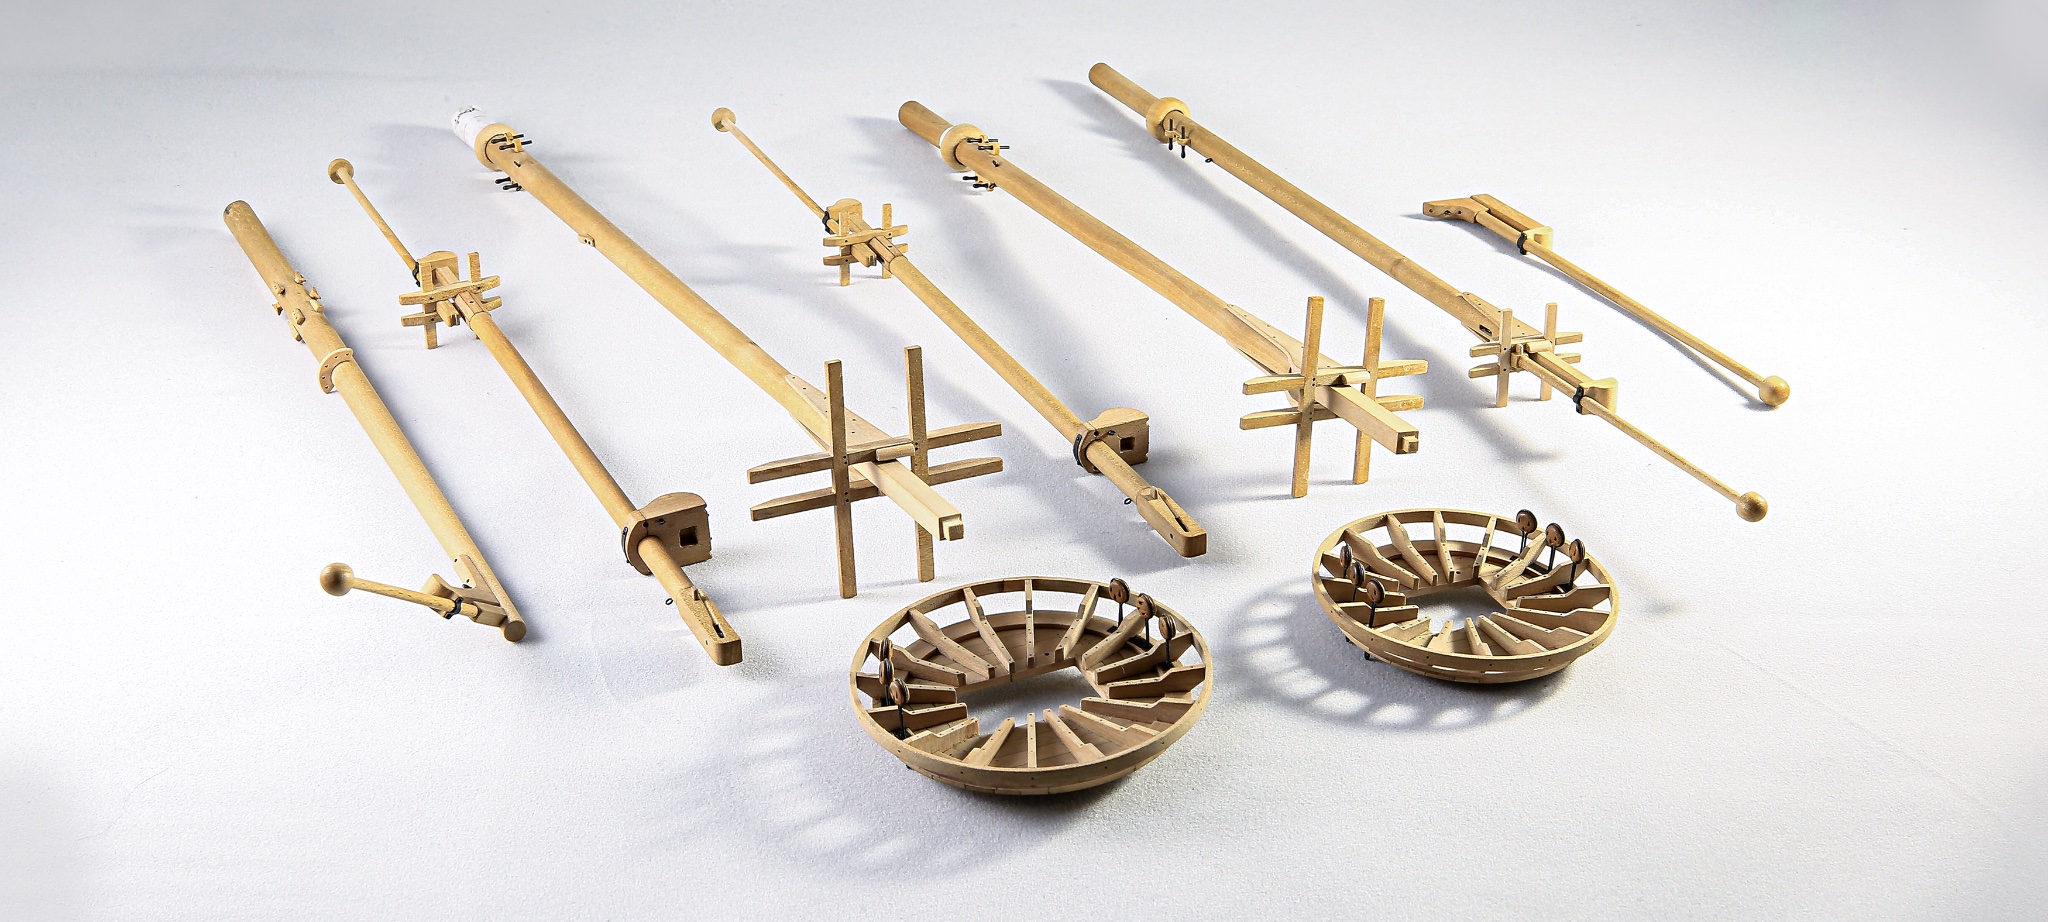
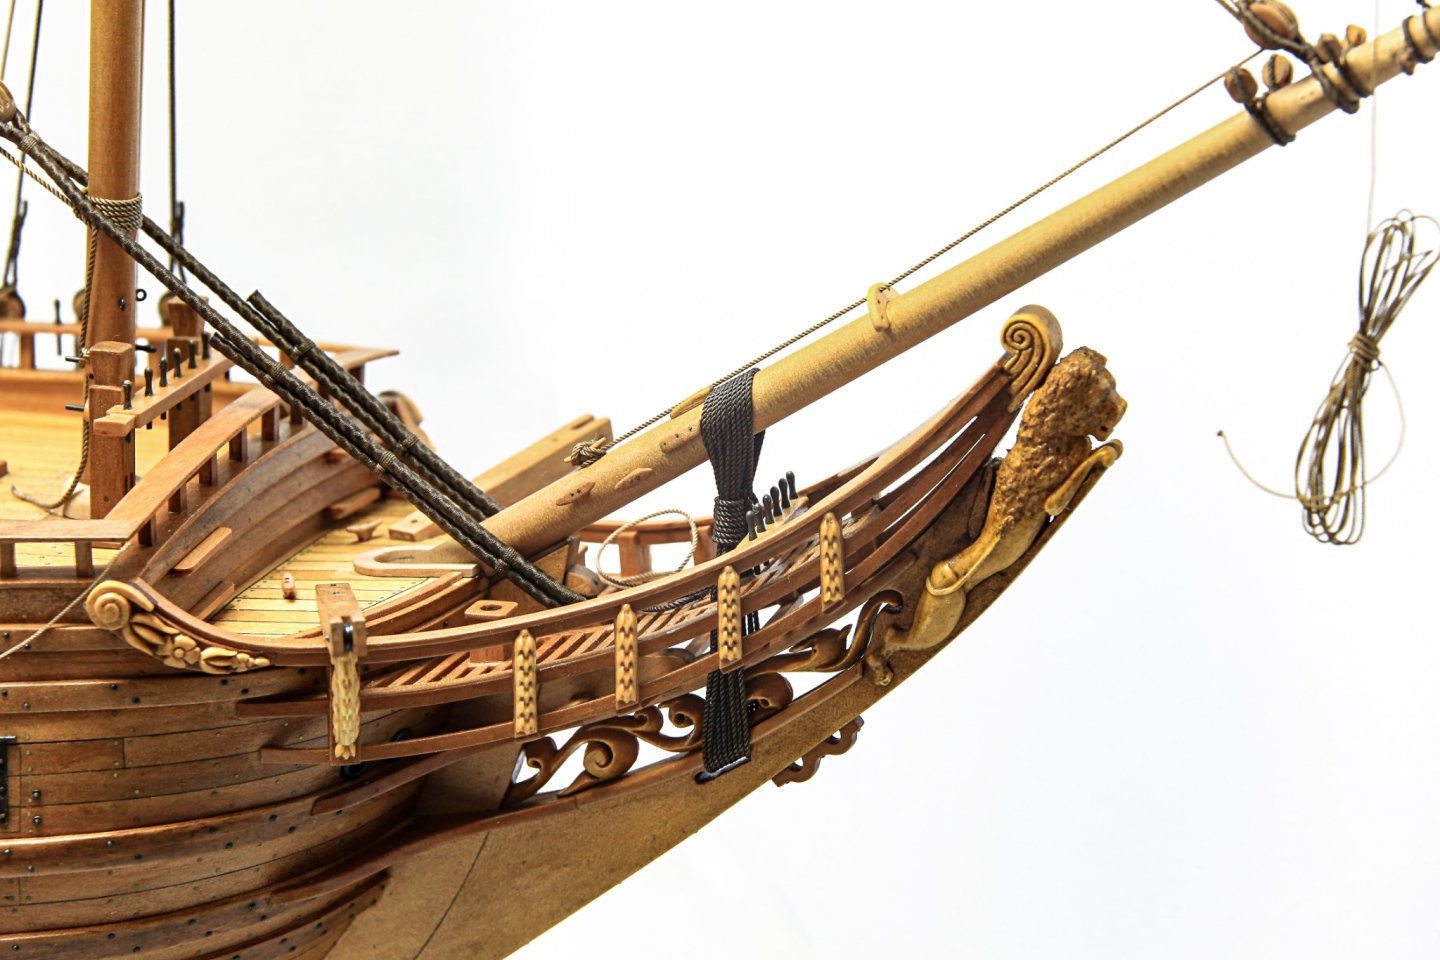
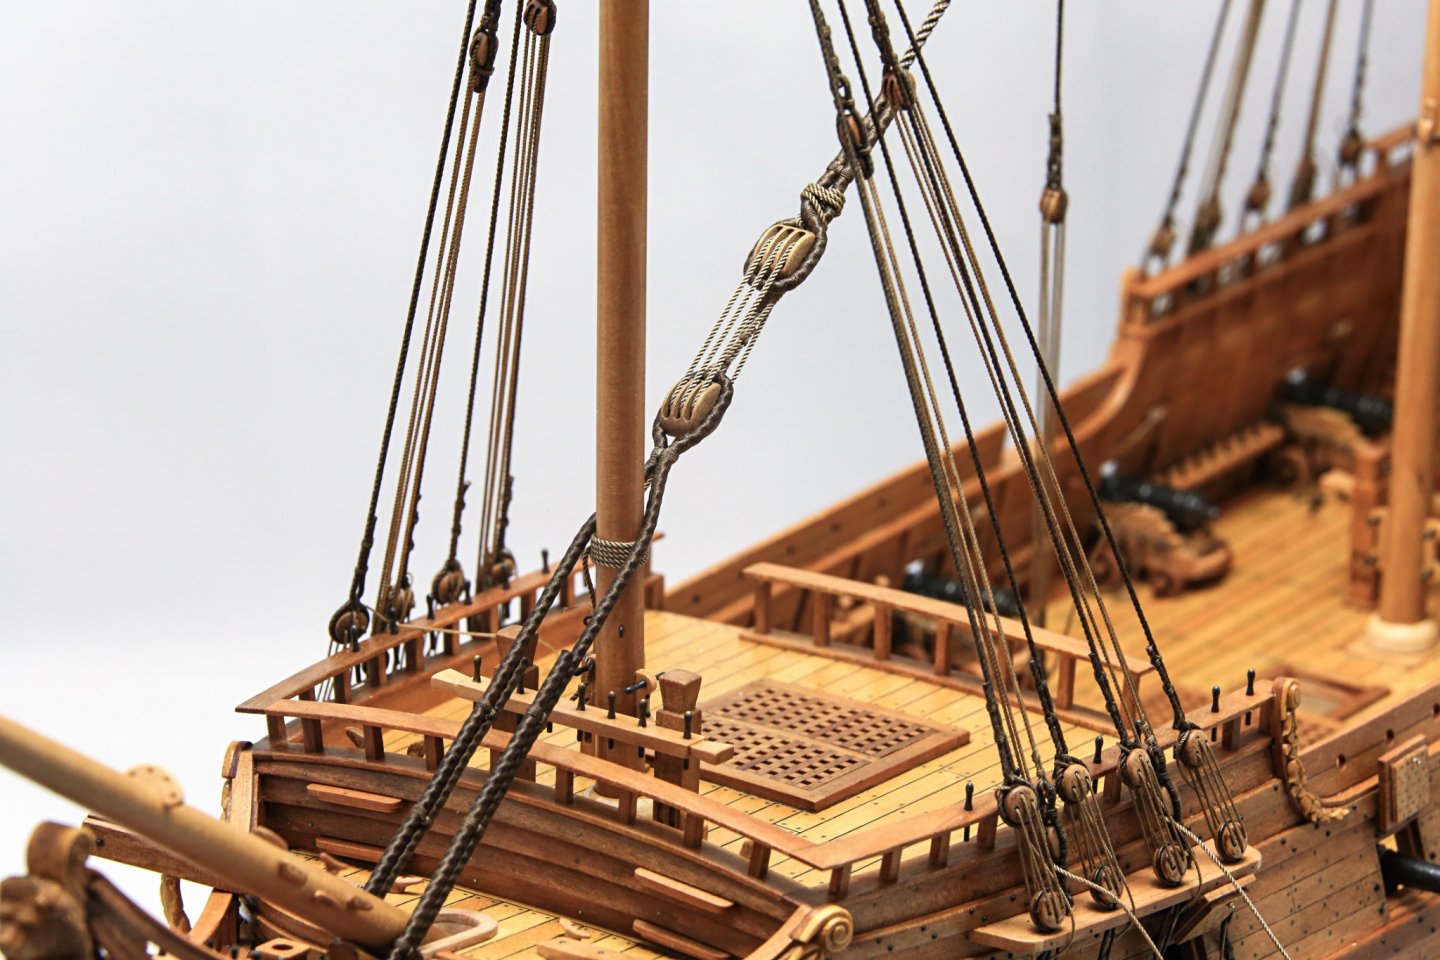
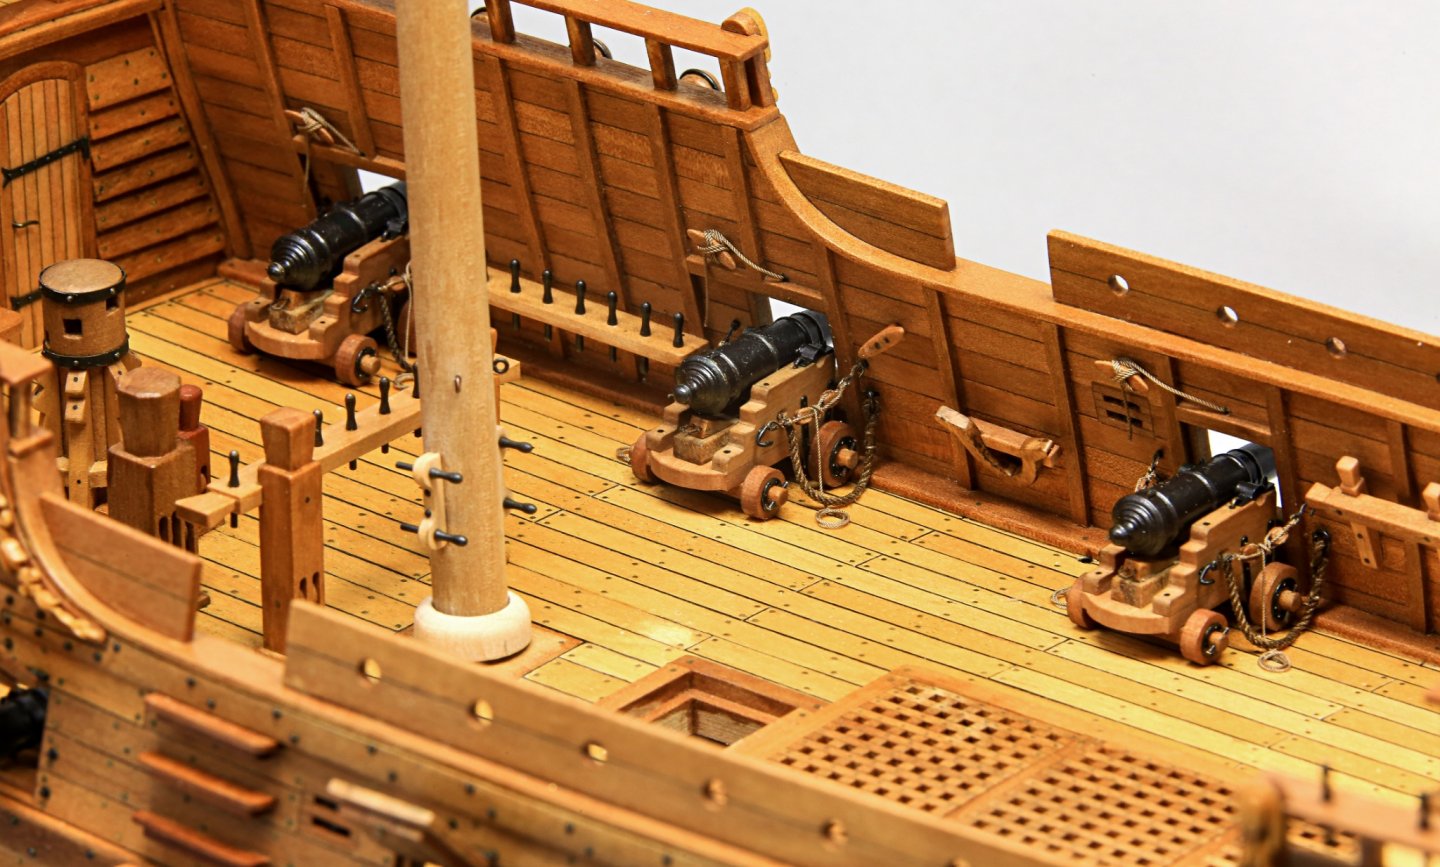
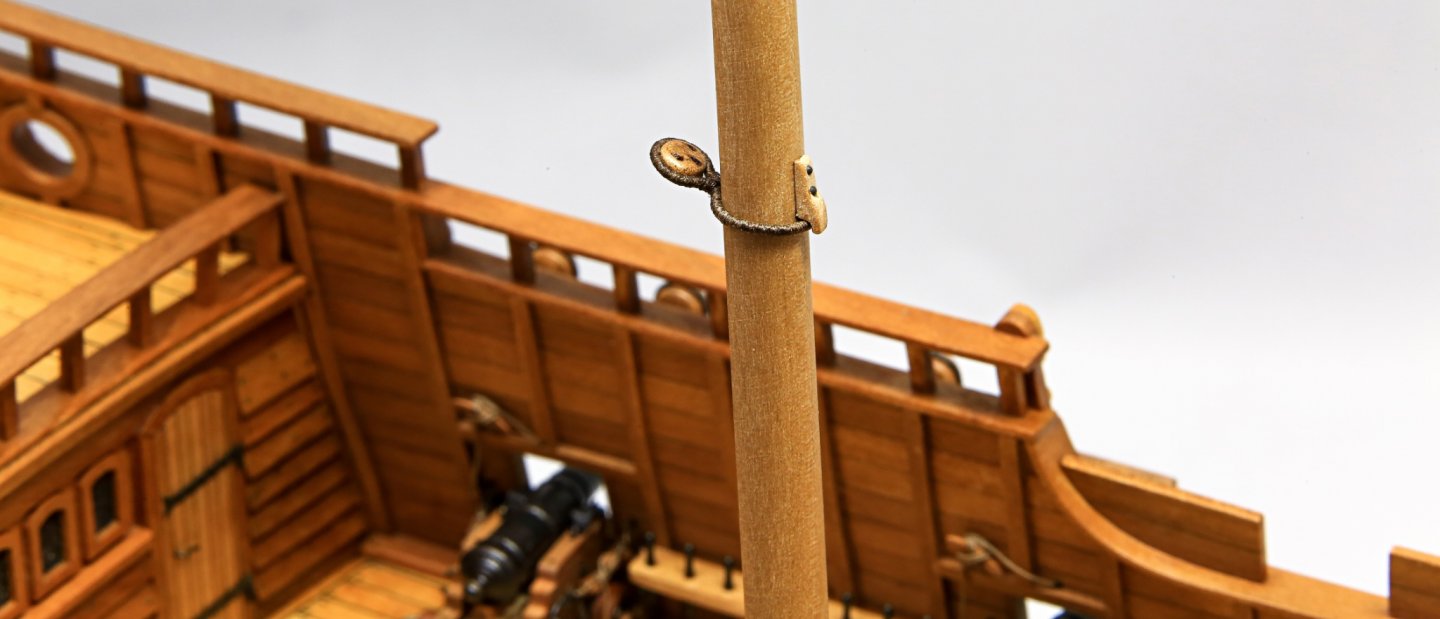
Thank you Michael! 🍻 Hi All, Another small update. Ropes, Blocks & Rock'n'Roll 😆 I've started with bowsprit. It's just easier to do it when is not attached due to quite few blocks as you can see... rather than moving whole model and for sure damaging something I'm just missing few stoppers for stropped blocks, which were protection for sliding on the bowsprit and can stay at the same time whole time. Lower part of main mast also received deadeye which is a part of mizzenmast shroud. Double block on the flagstaff, which is part of mizzen sheet. All gun tackles and breeching ropes done... so ship is ready for battle Cheers, Matt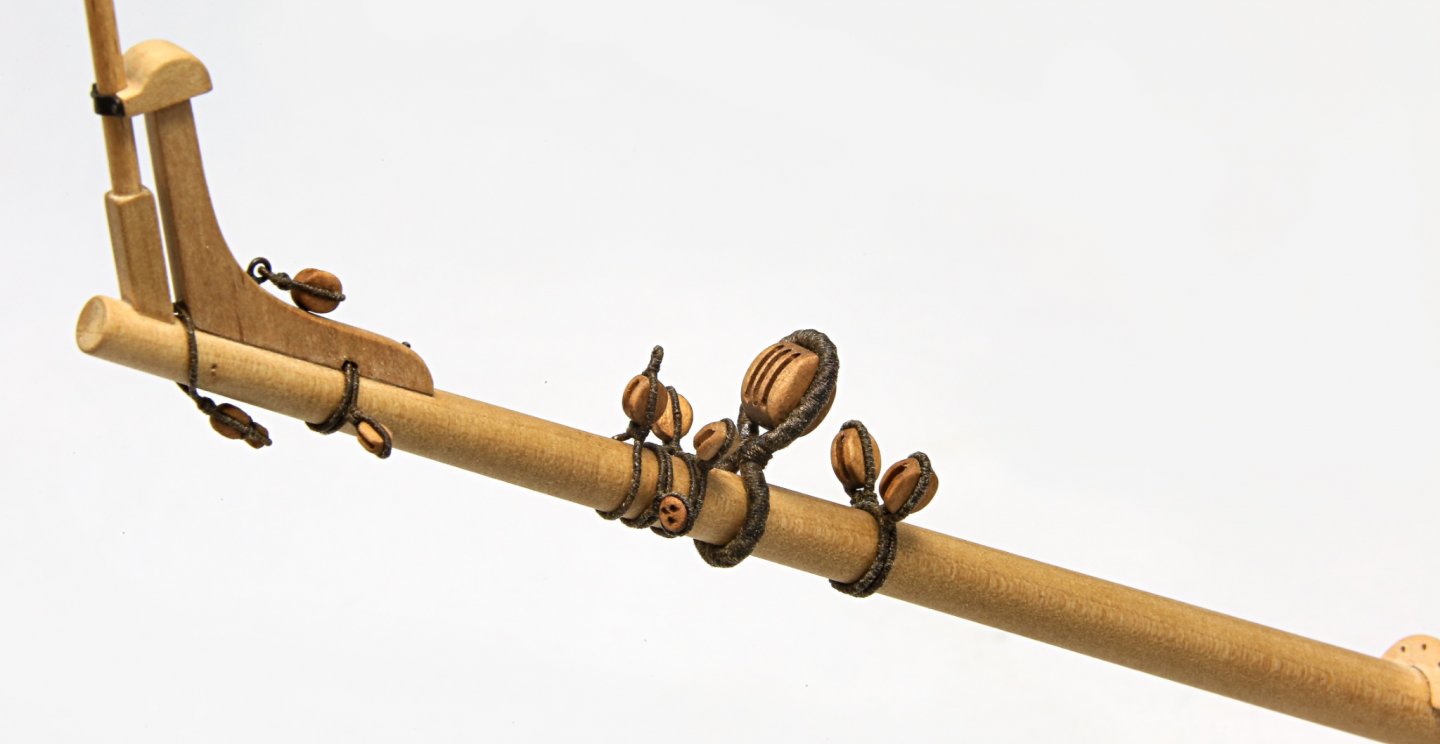


- 222 replies
-
- 18
-
-
-
Papegojan 1627 by mati - FINISHED - 1/48
mati replied to mati's topic in - Build logs for subjects built 1501 - 1750
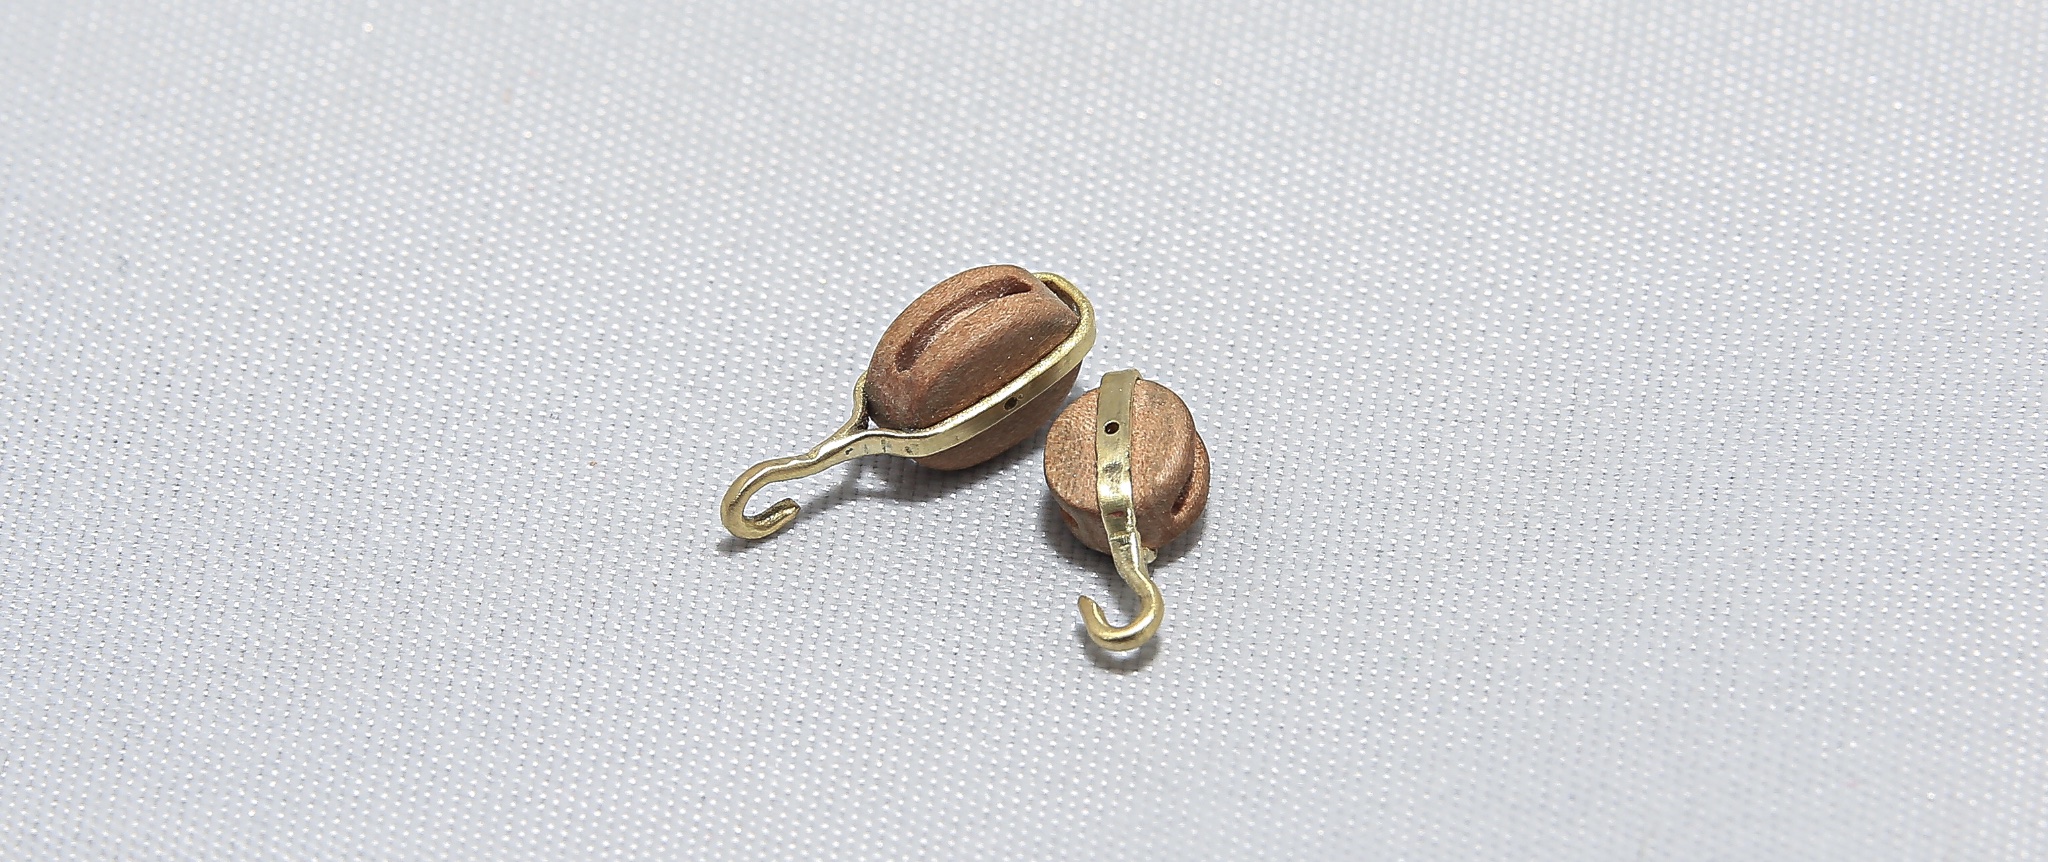
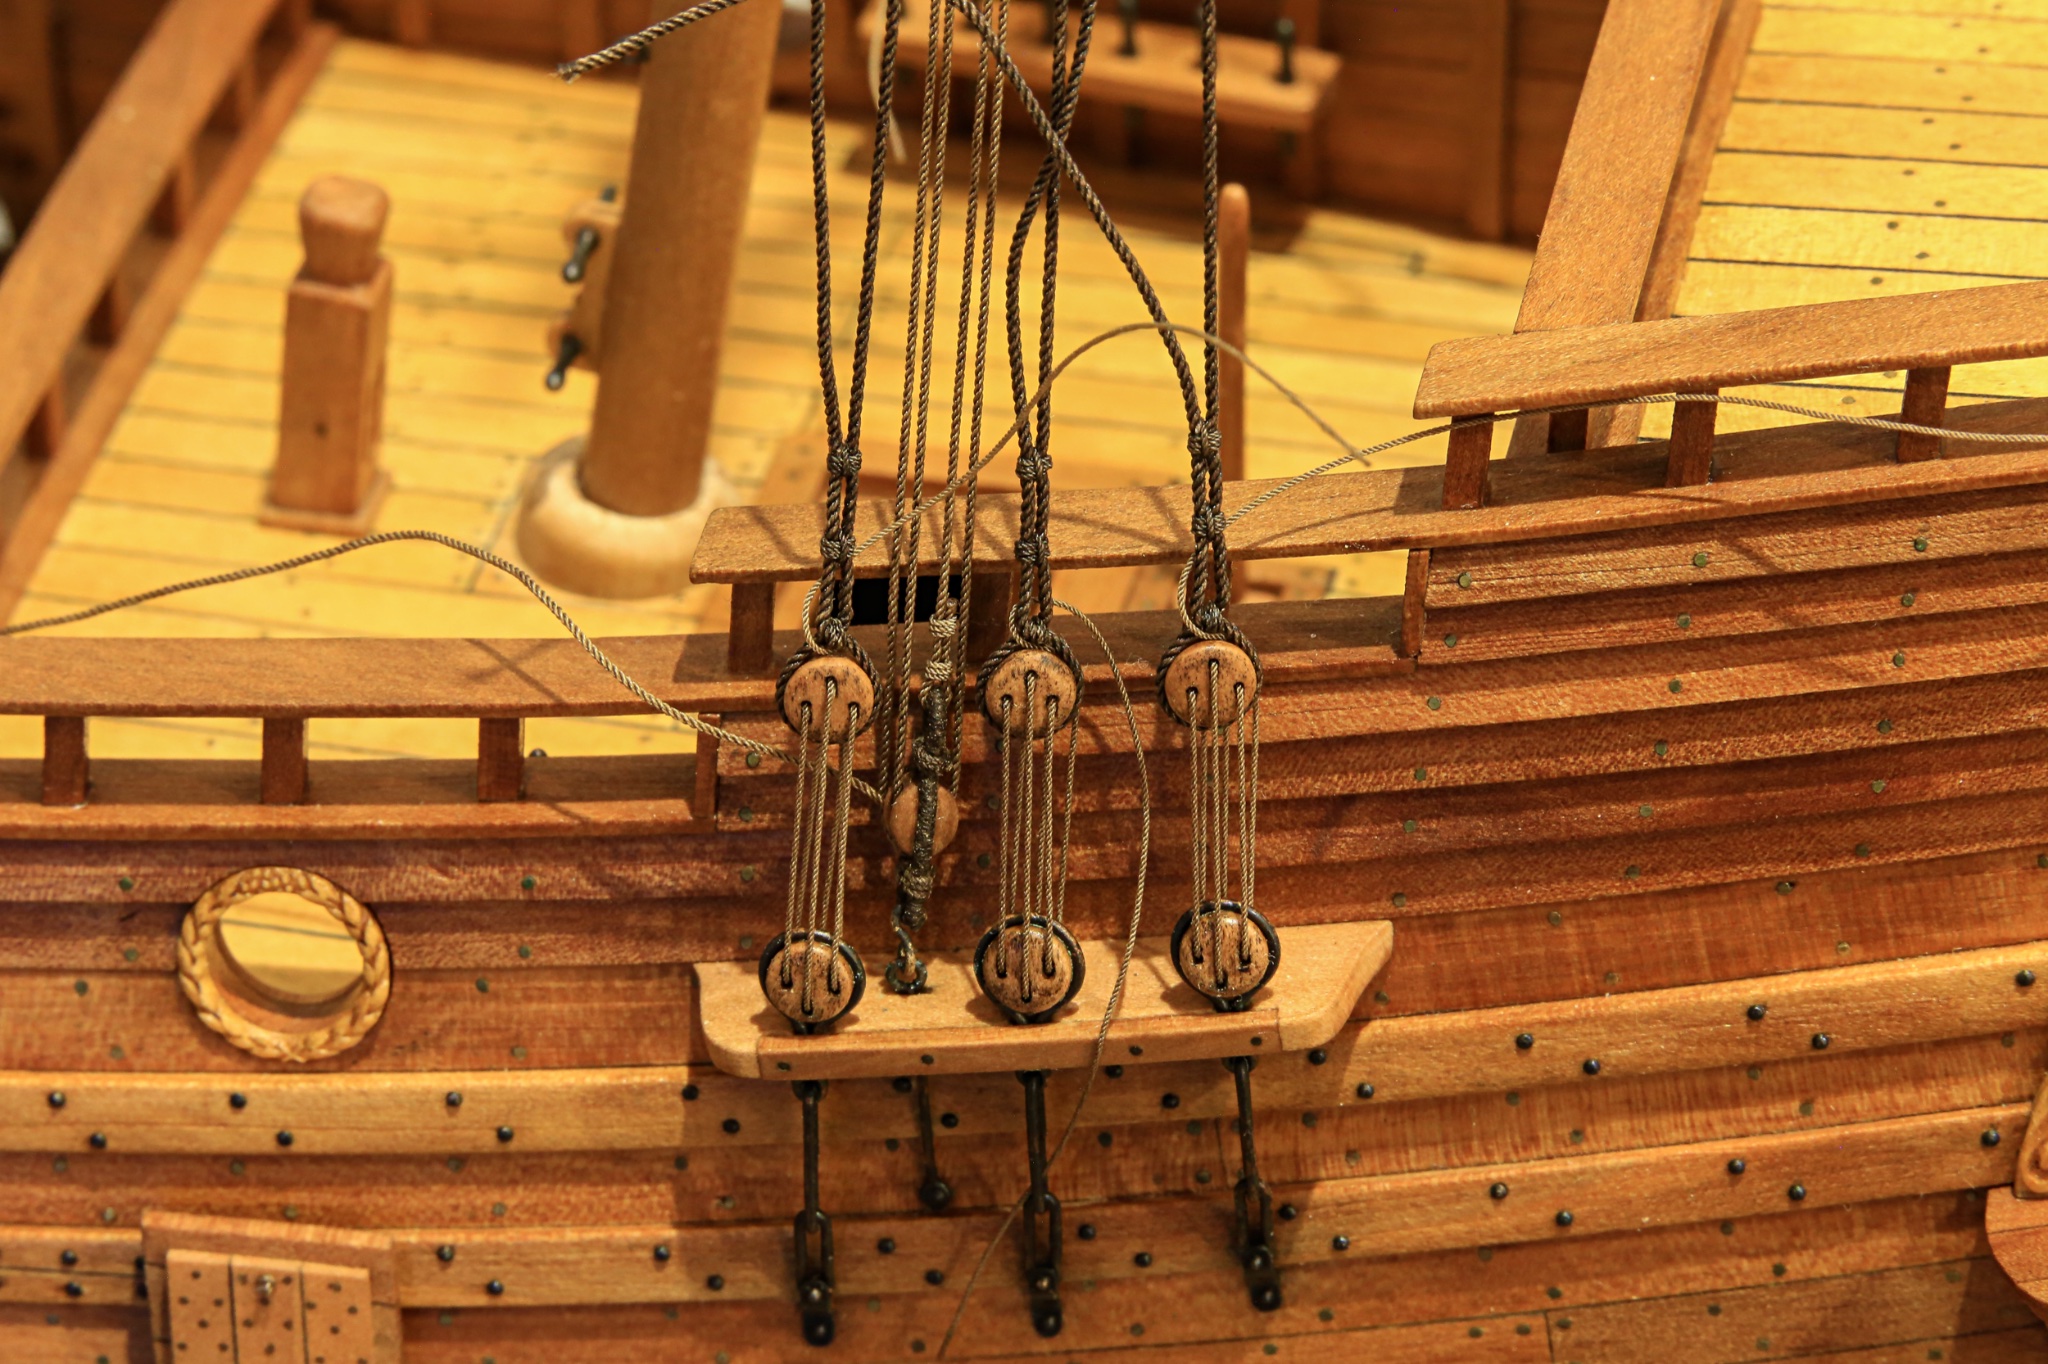
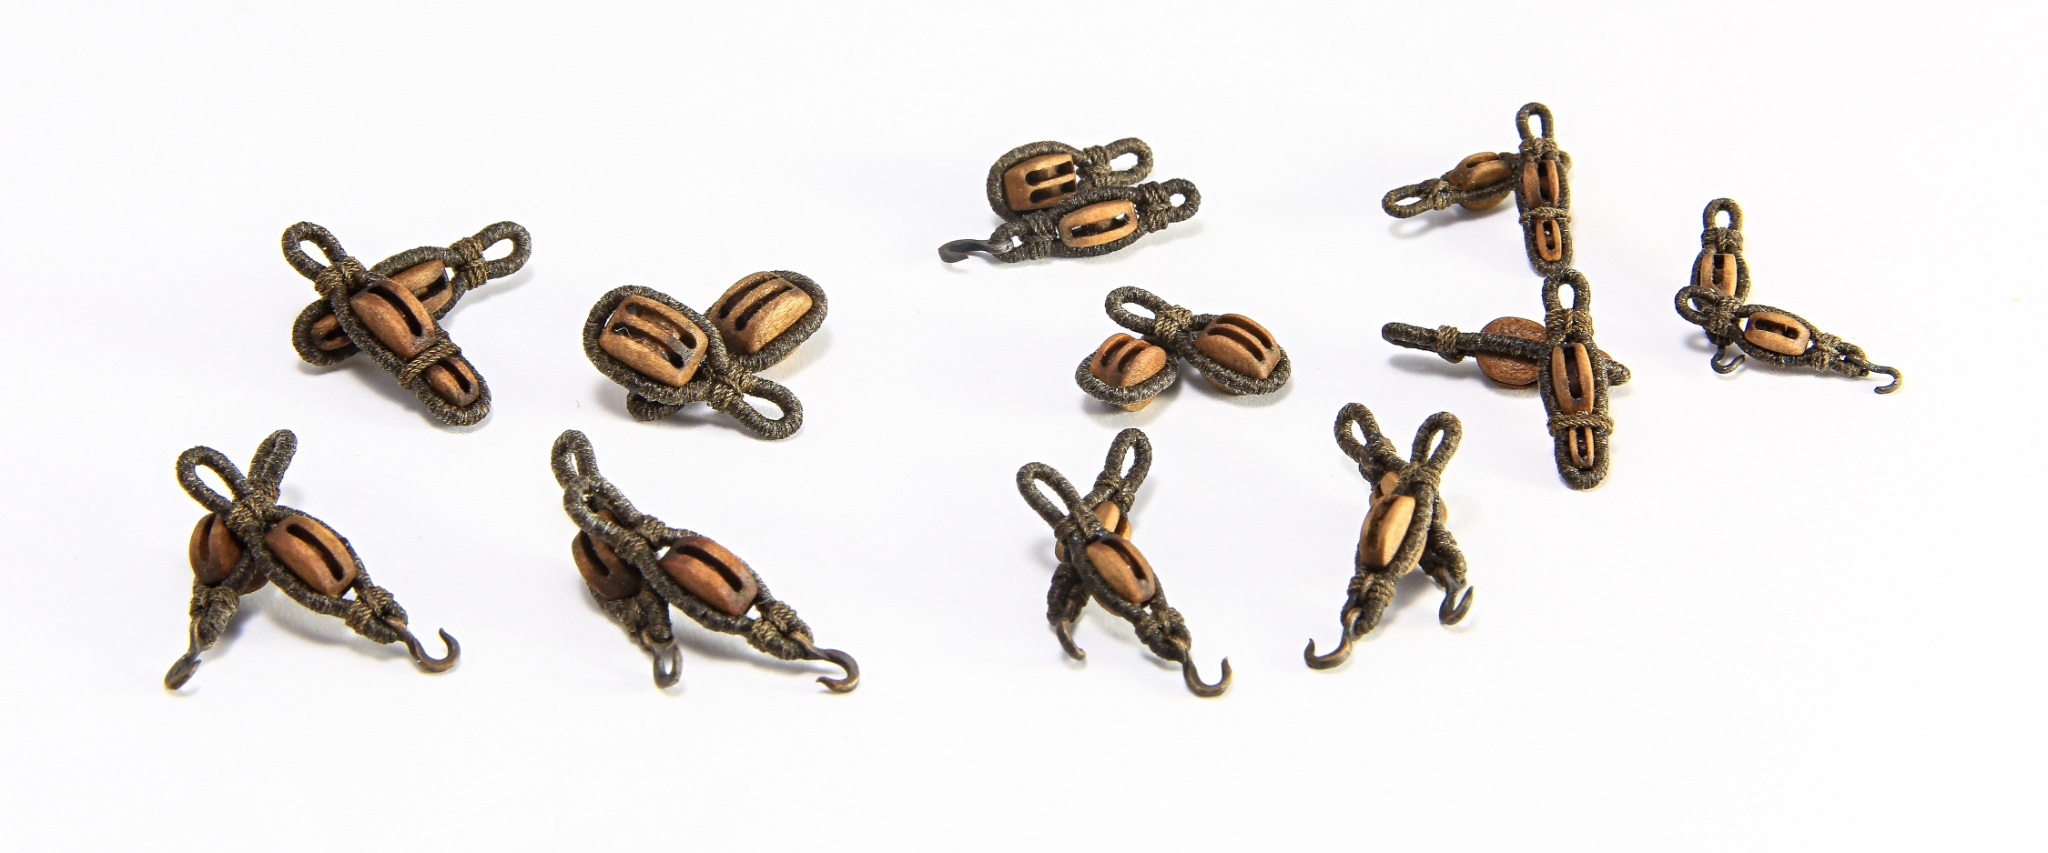
Hi All, I have small update with progress on Papegojan. Currently I'm working on so far most annoying details... gun tackles Blocks 2mm, rope - around 0,25mm At the same time I'm working on gunport lids tackles - rope 0,35mm Here's how it looks so far... Blocks are made of pear wood. Long time ago they were made by my friend Mirek on CNC. They were patiently waiting for their turn. If someone is looking for blocks (I hope admin don't mind if i past the link ?? 🤔) http://www.szkutnik-model.pl/index.php/elementy-drewniane/bloczki-jufersy-serca @SZKUTNIK has them now available on his online shop. Cheers, Matt
- 222 replies
-
- 12
-
-
-
Papegojan 1627 by mati - FINISHED - 1/48
mati replied to mati's topic in - Build logs for subjects built 1501 - 1750
Thank you Mr Ab Your publications helped me a lot. Especially with rigging because I couldn't find any solid information about Papegojan. Unfortunately I've discovered too late The ships of Abel Tasman otherwise I would build Heemskerck. ...but it becomes my bible to suport this build. Kind regards, Matt -
Papegojan 1627 by mati - FINISHED - 1/48
mati replied to mati's topic in - Build logs for subjects built 1501 - 1750
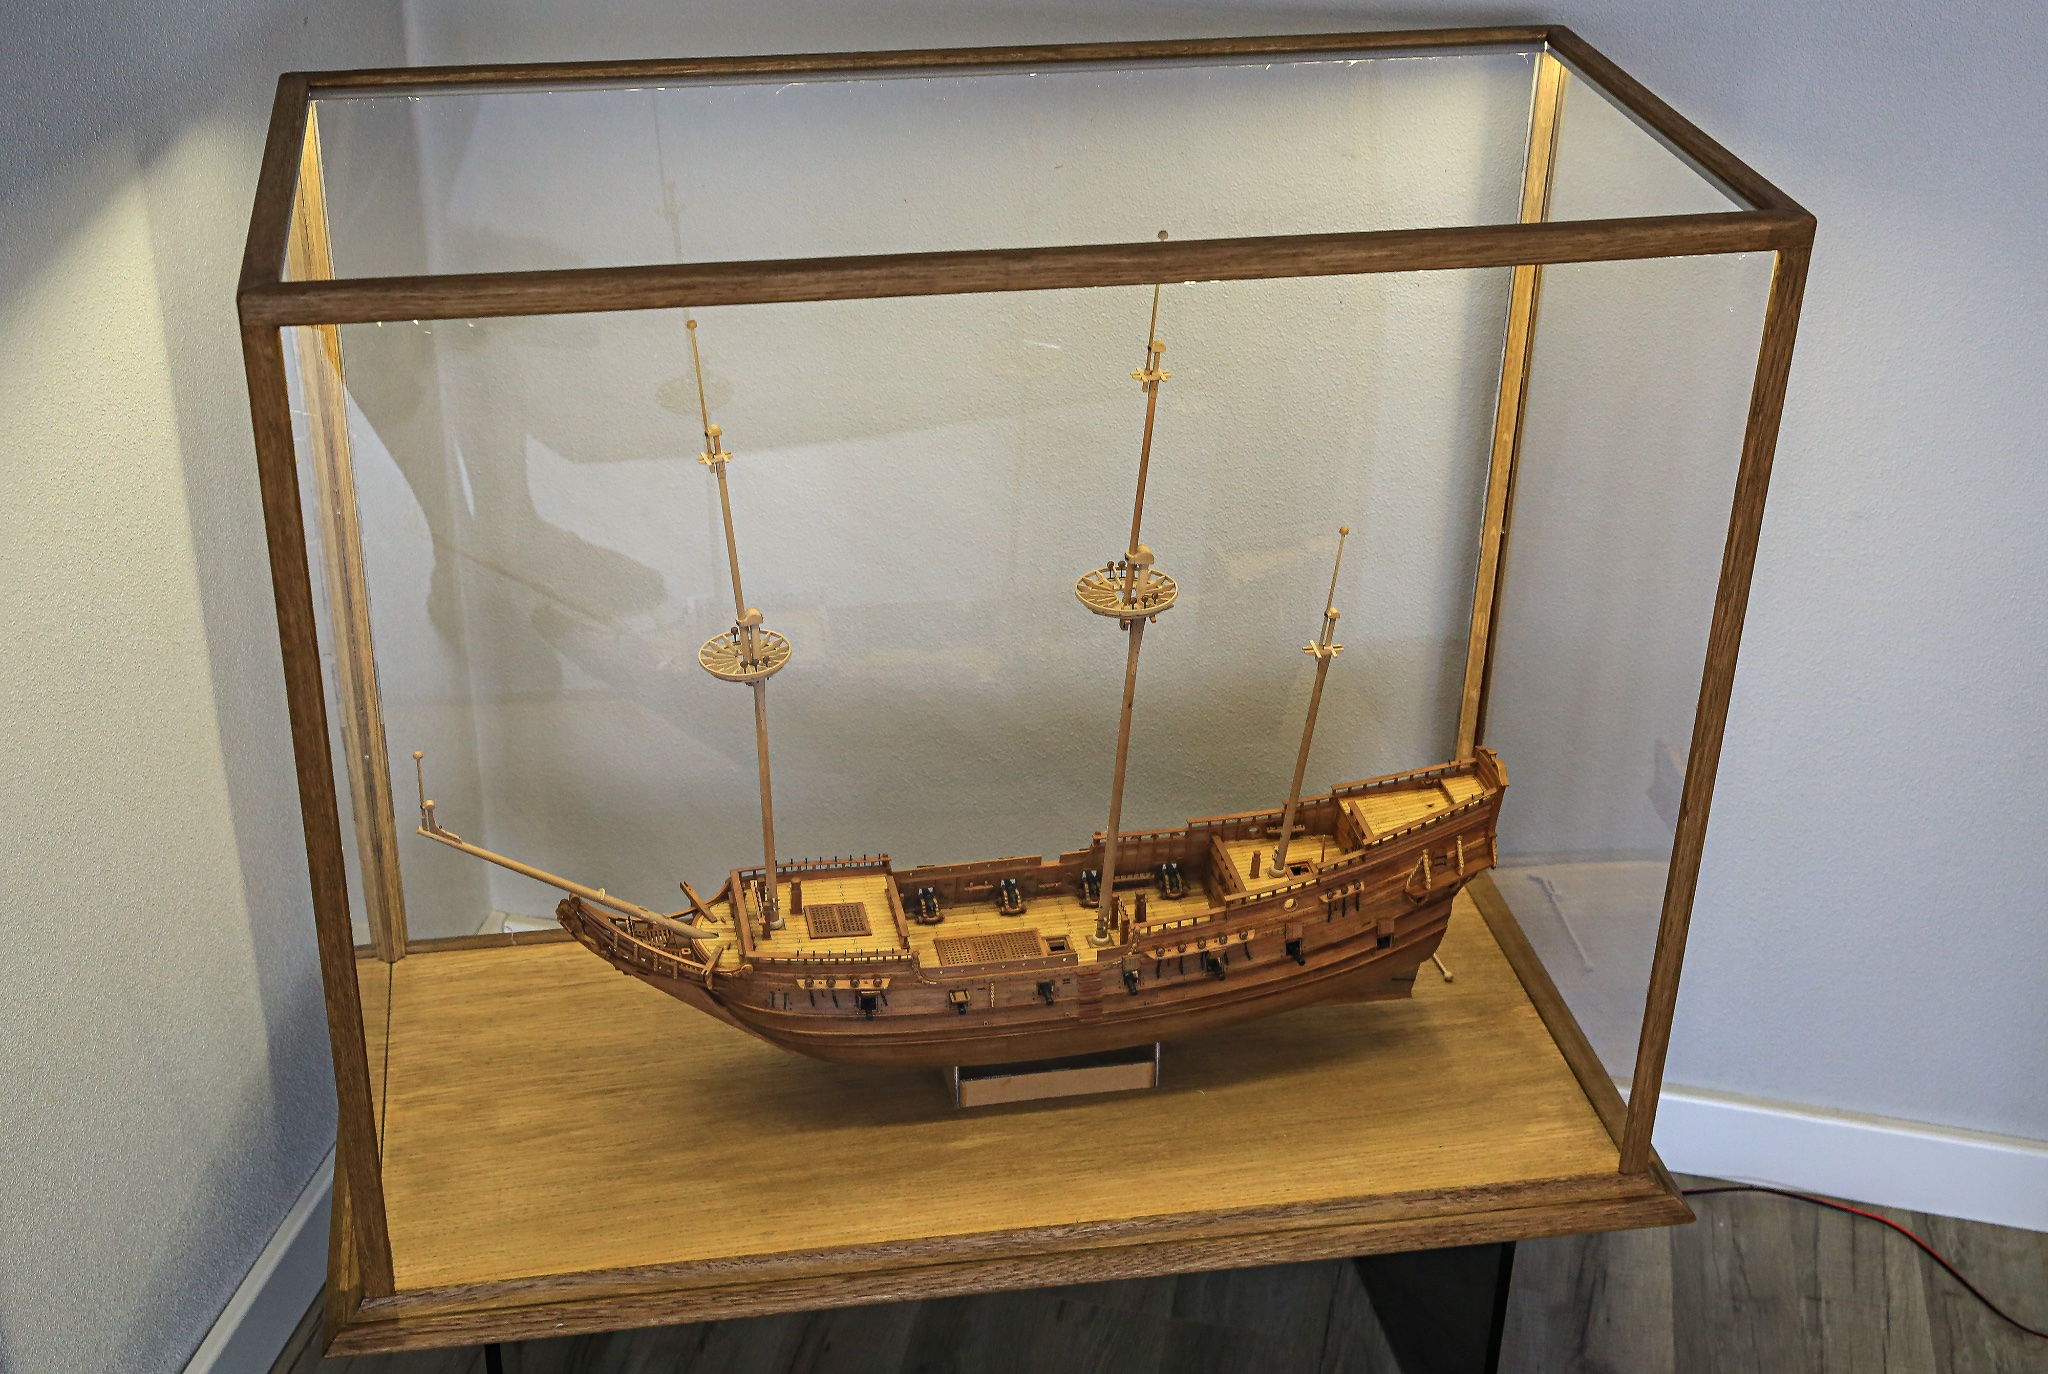
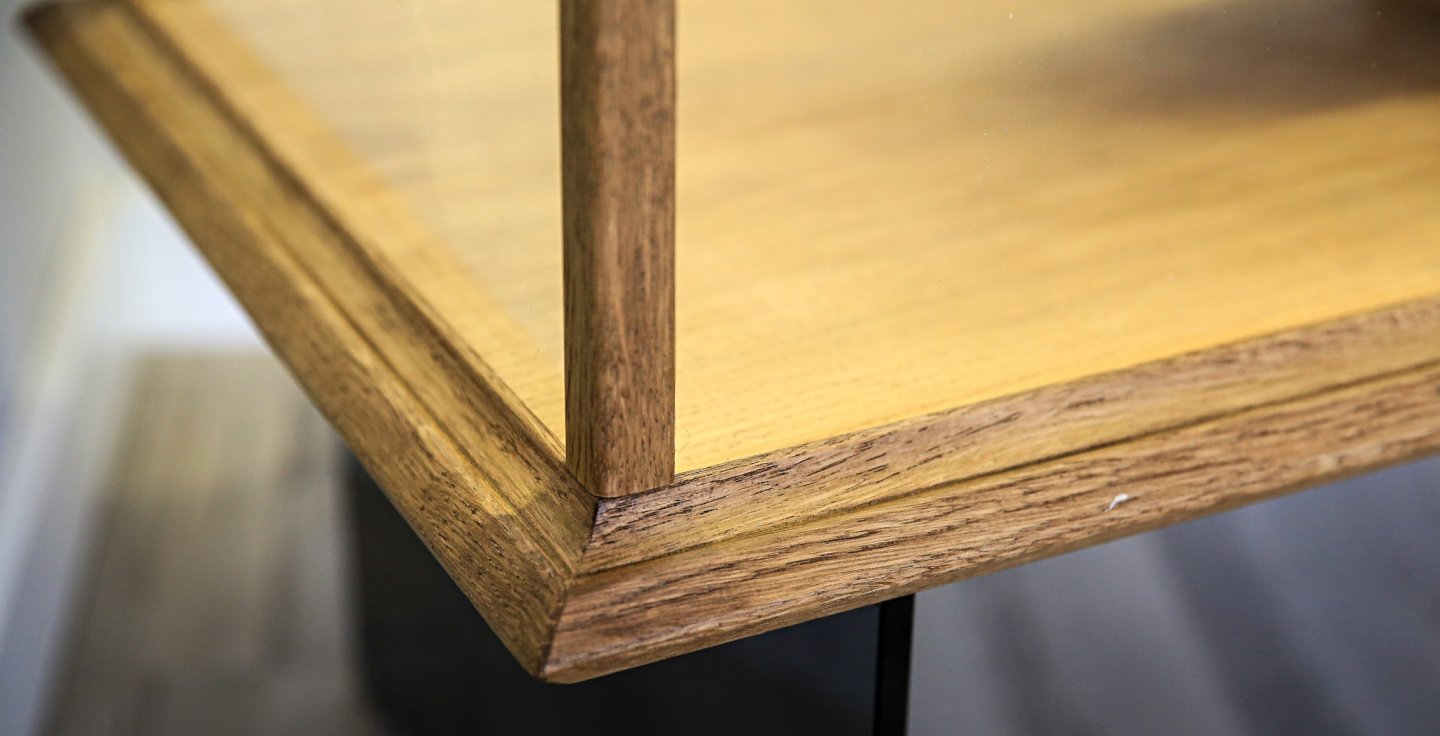
Hi All, Recently not much going on with my model itself, however I've manage to build new shelter for it. Materials, which I've used: 2mm polycarbonate glass sheets 20x20mm Oak profiles for the frame. Oak veneer for the base. Showcase has "roof" 12V LED lighting with dimmer. Obviously model stand is still temporary solution 😁 Dimensions of the showcase: 840 x 730 x 380 mm Showcase will be supported by 50cm wooden legs. Cheers, Matt
- 222 replies
-
- 13
-
-
Papegojan 1627 by mati - FINISHED - 1/48
mati replied to mati's topic in - Build logs for subjects built 1501 - 1750
😆😆😆 -
Papegojan 1627 by mati - FINISHED - 1/48
mati replied to mati's topic in - Build logs for subjects built 1501 - 1750
I'm not sure why he stopped... but I might assume that's because of time needed to make one rope. It's time consuming unfortunately. However, I highly encourage everyone to build or buy ropewalk. Making your own ropes will eat a lot of time but will pay off with beautiful rigging. Process is rather easy... just beginning might be frustrating when first few ropes will snap caused by wrong weight or to tight twist at first stage on 3 individual yarns. When you find correct way, balance weight to number of threads... rest will be piece of cake Cheers, Matt -
Papegojan 1627 by mati - FINISHED - 1/48
mati replied to mati's topic in - Build logs for subjects built 1501 - 1750
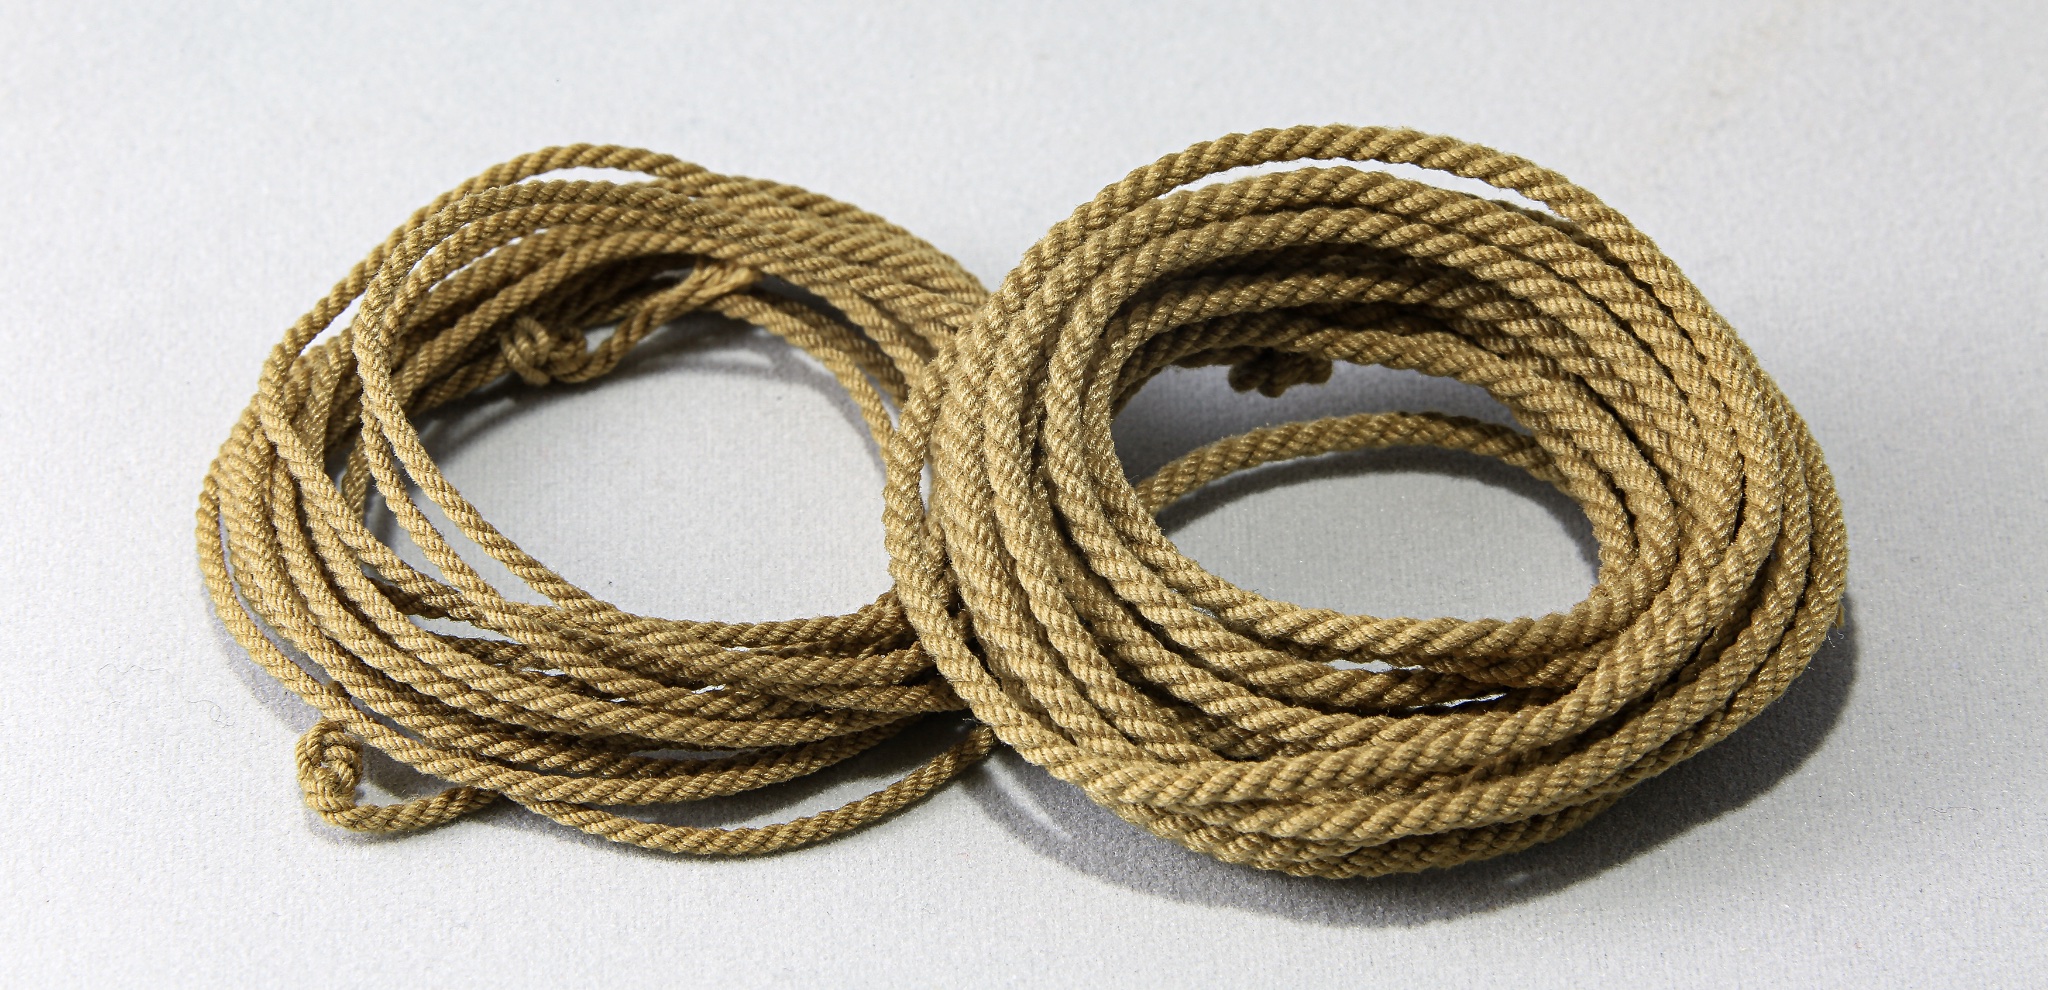
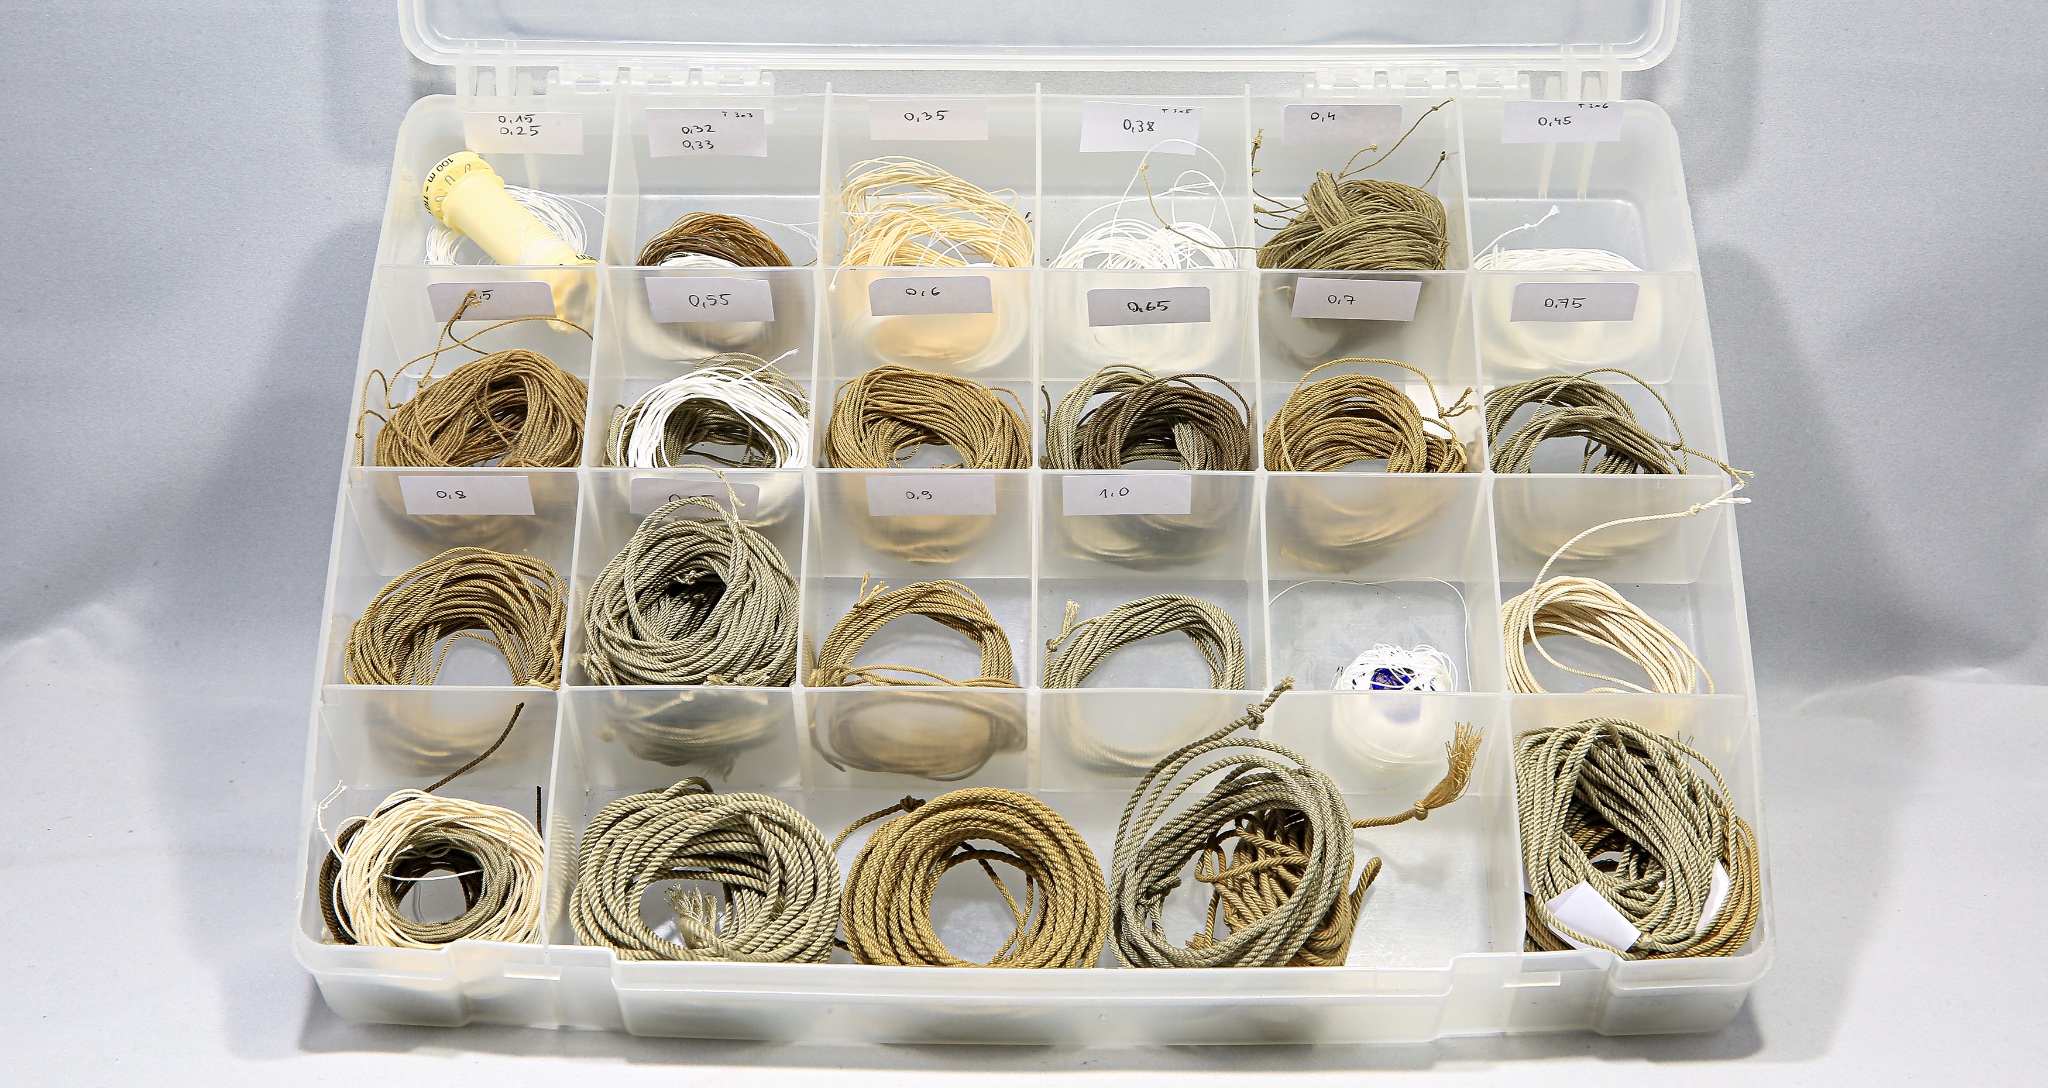
Hi, Thank you Chuck Radek, I'm buying threads from Ariadna. It's Polish thread factory with long history from Łódź. I must say it's really cheap... Talia 120 - 5000m cost around $3,50. https://sklep.ariadna.com.pl/talia/197-nici-talia-120-5000-m.html Talia 180 - 5000m it's even cheaper... around $2,80 https://sklep.ariadna.com.pl/85-talia-180 The finest thread is Tytan 360 - 5000m also for around $3.50 https://sklep.ariadna.com.pl/114-tytan-360 Hmm... such a shame, but their website doesn't have english version. Anyway... if you need help with ordering or translating just give me a shout. I will help you. In term of ropewalk... yes... it's great tool. If you want proper rigging on your model it's must have. However, I know some modelers that can manage without fancy ropewalk and still with great result. Ropewalk, which I have it's just very convenient, efficient and easy to use tool if you know how. Cheers, Matt -
Thanks Mike! That's what I thought... pencil I'm using the same method Waiting for your next update! Take care!
- 607 replies
-
- 2
-
-
- winchelsea
- Syren Ship Model Company
- (and 1 more)
-
Mike, Thanks for showing to us your build... it's just pure ship modeling porn 😂 I love this super clean build. Really impressive. Two questions... if I may... 😉 What are you using to imitate hull and deck caulking? Graphite... pencil? Friezes are printed on regular paper? They look so good. Some time ago I was doing some tests with decals (like from plastic model kits) With some setting and softening solutions they lay very so well on prepared wood giving some nice texture from planking. Cheers, Matt
- 607 replies
-
- 2
-
-
- winchelsea
- Syren Ship Model Company
- (and 1 more)
-
Papegojan 1627 by mati - FINISHED - 1/48
mati replied to mati's topic in - Build logs for subjects built 1501 - 1750
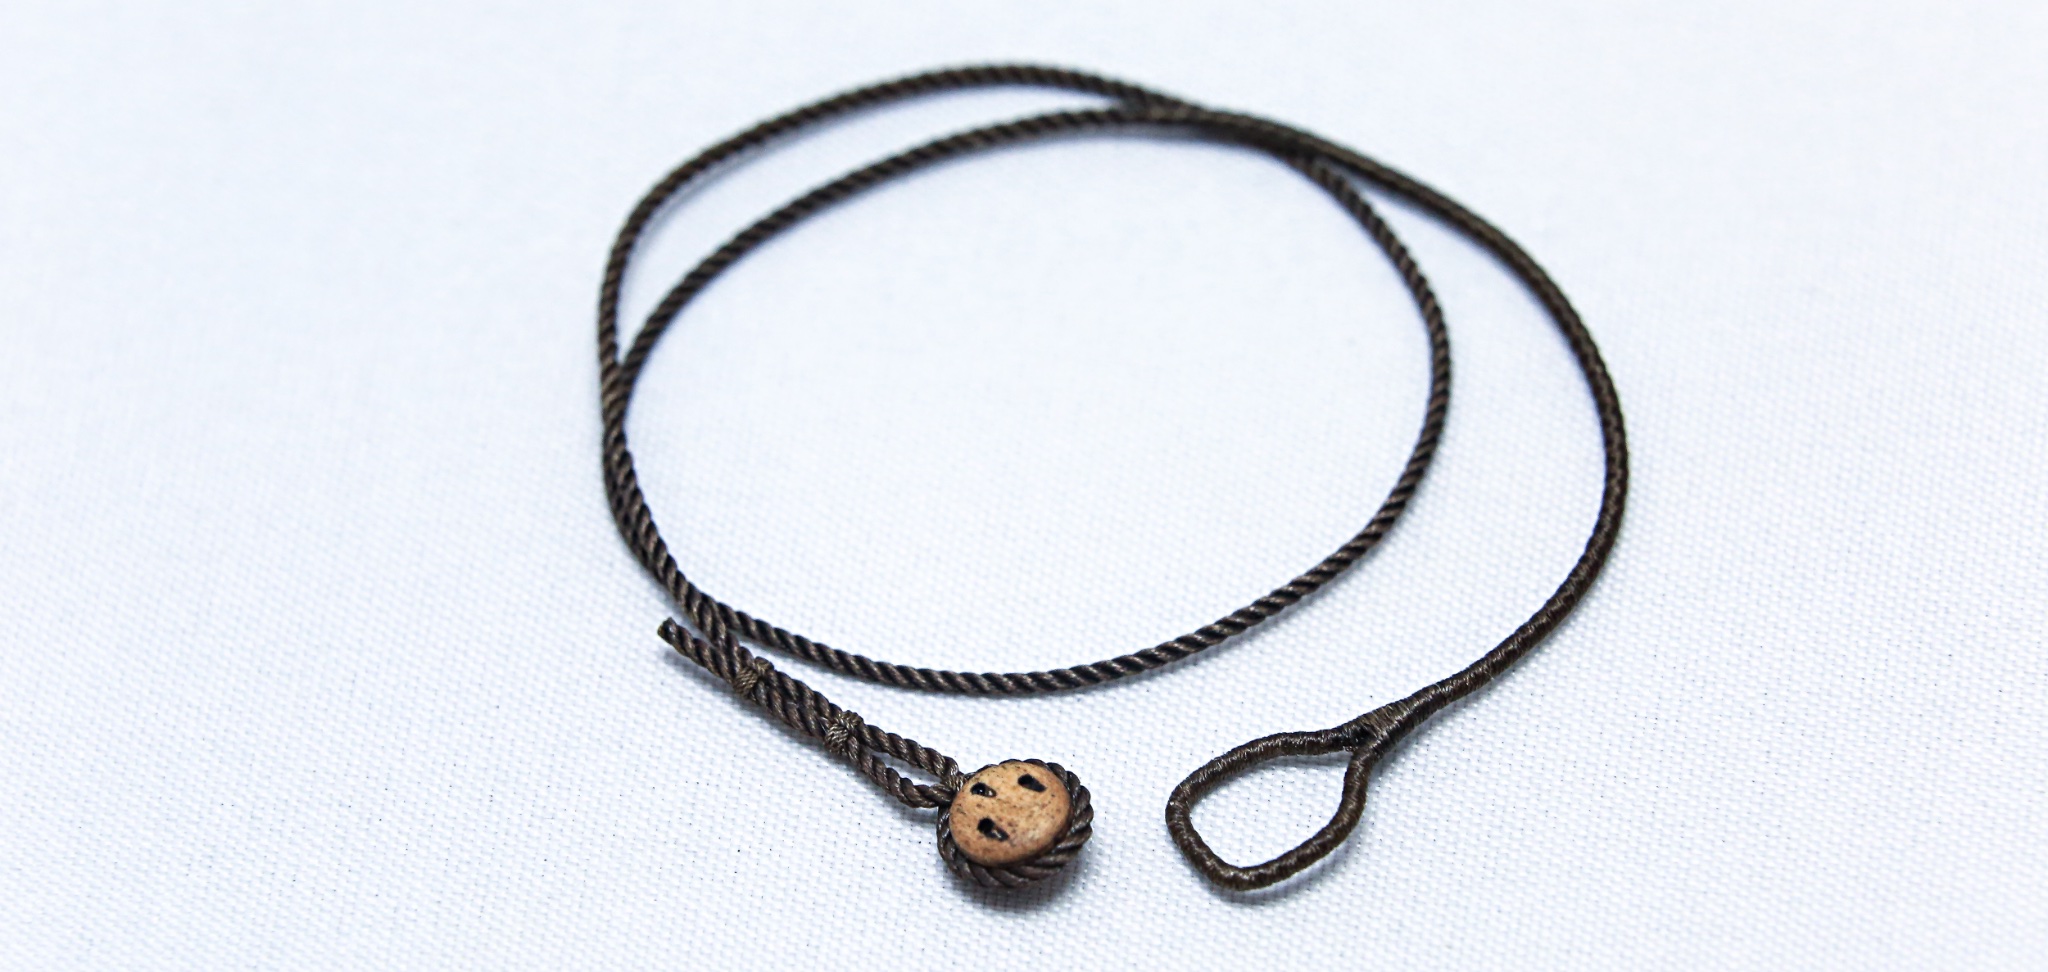
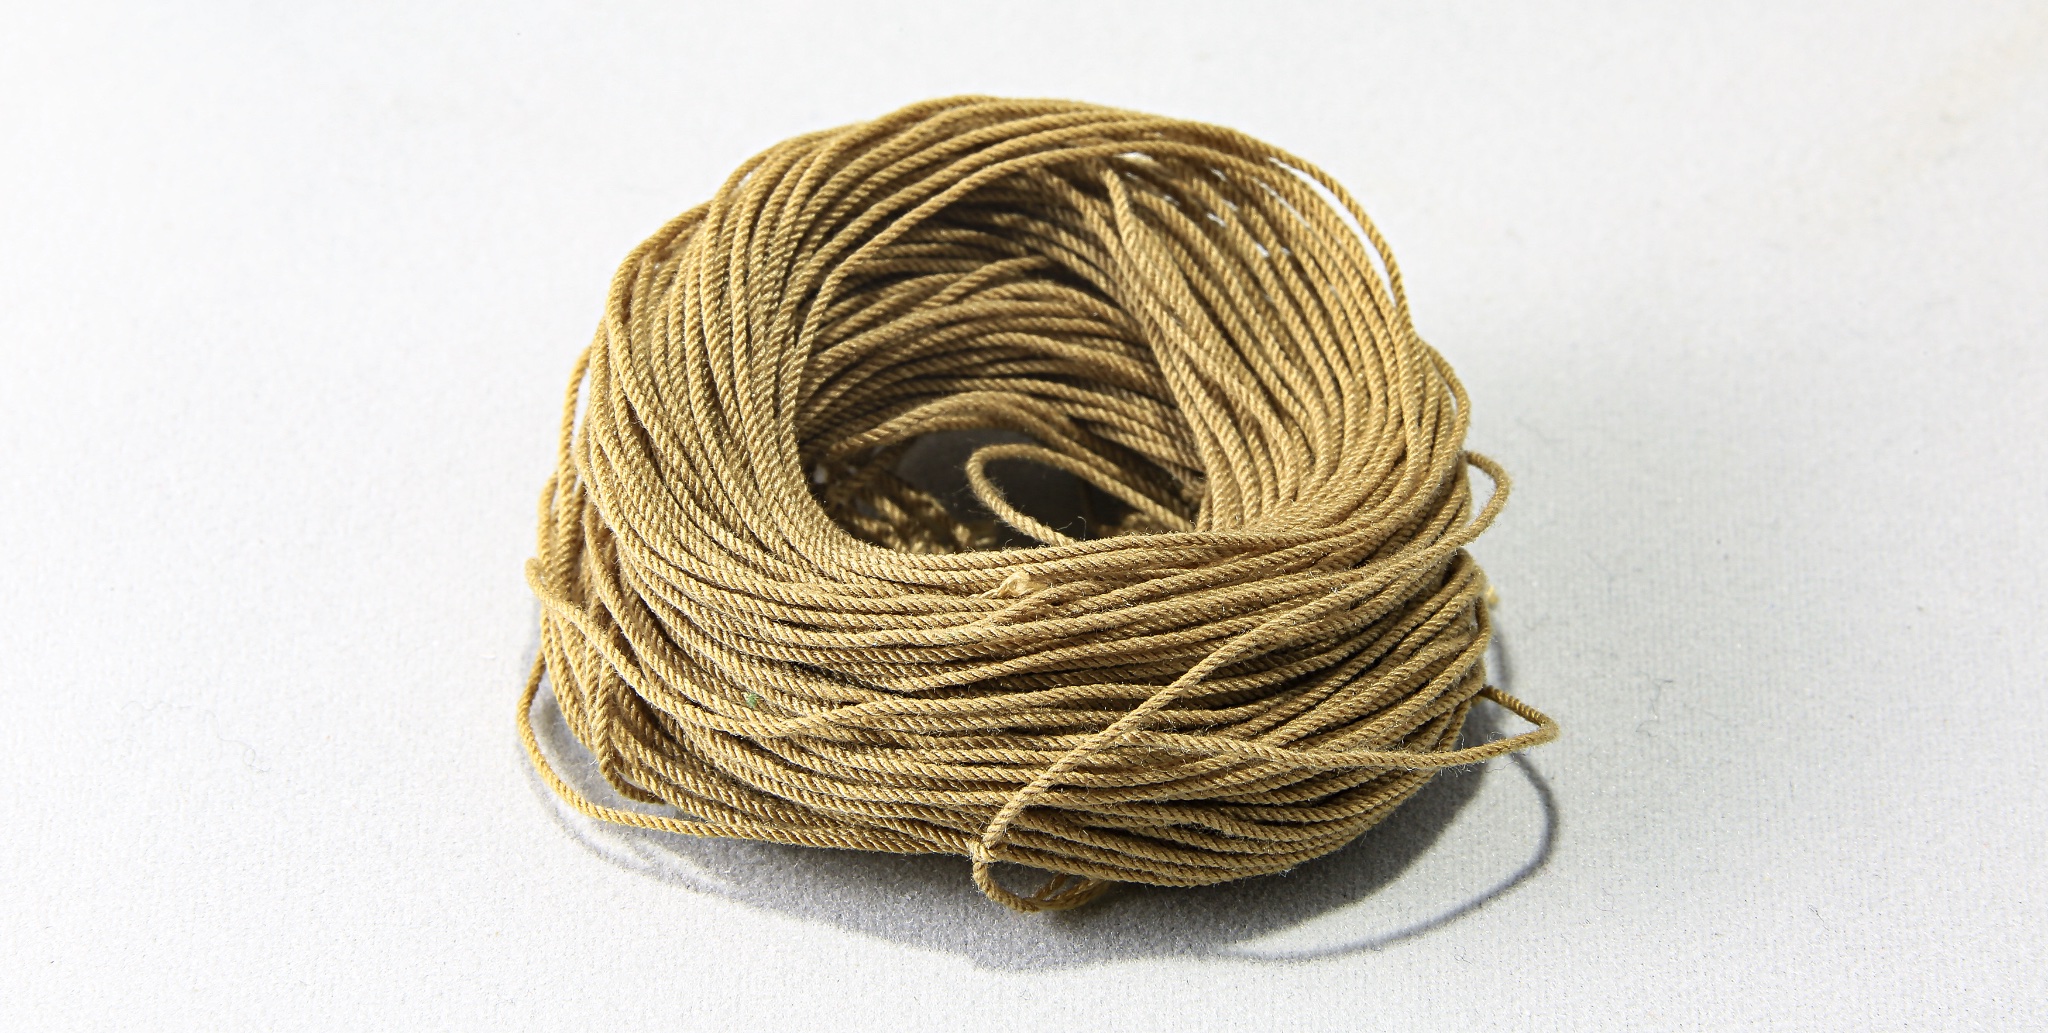
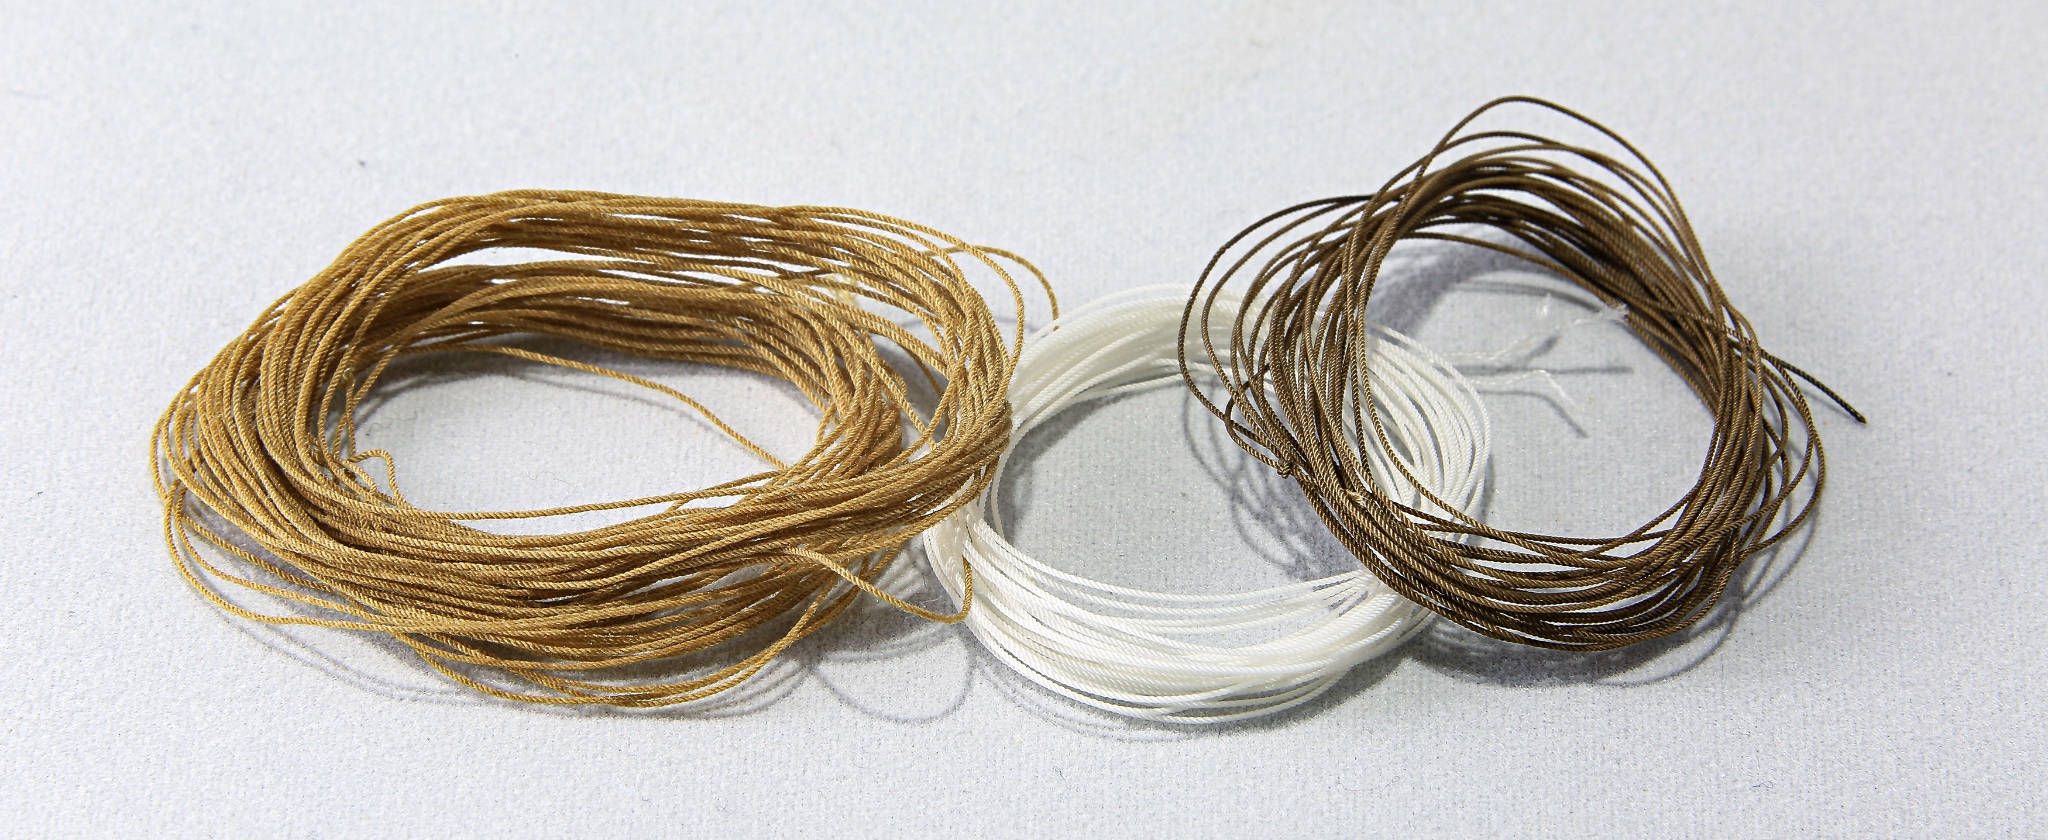
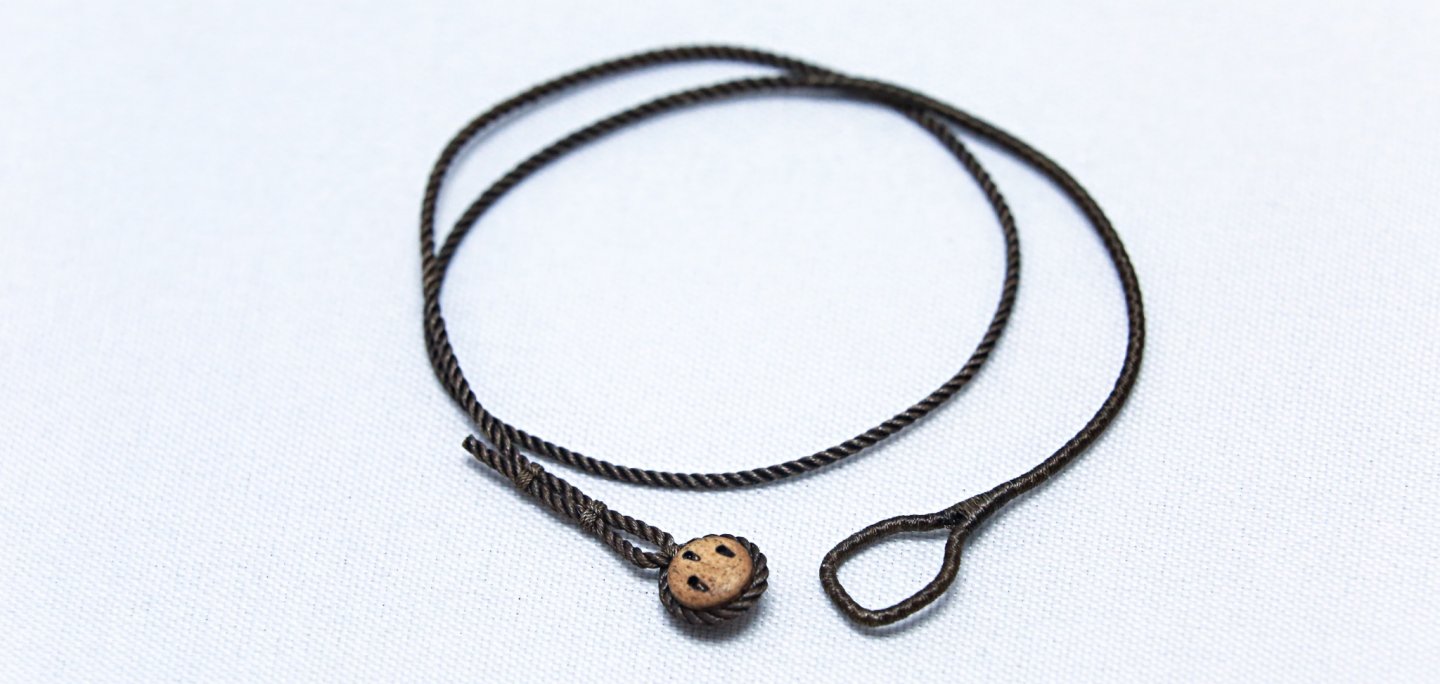
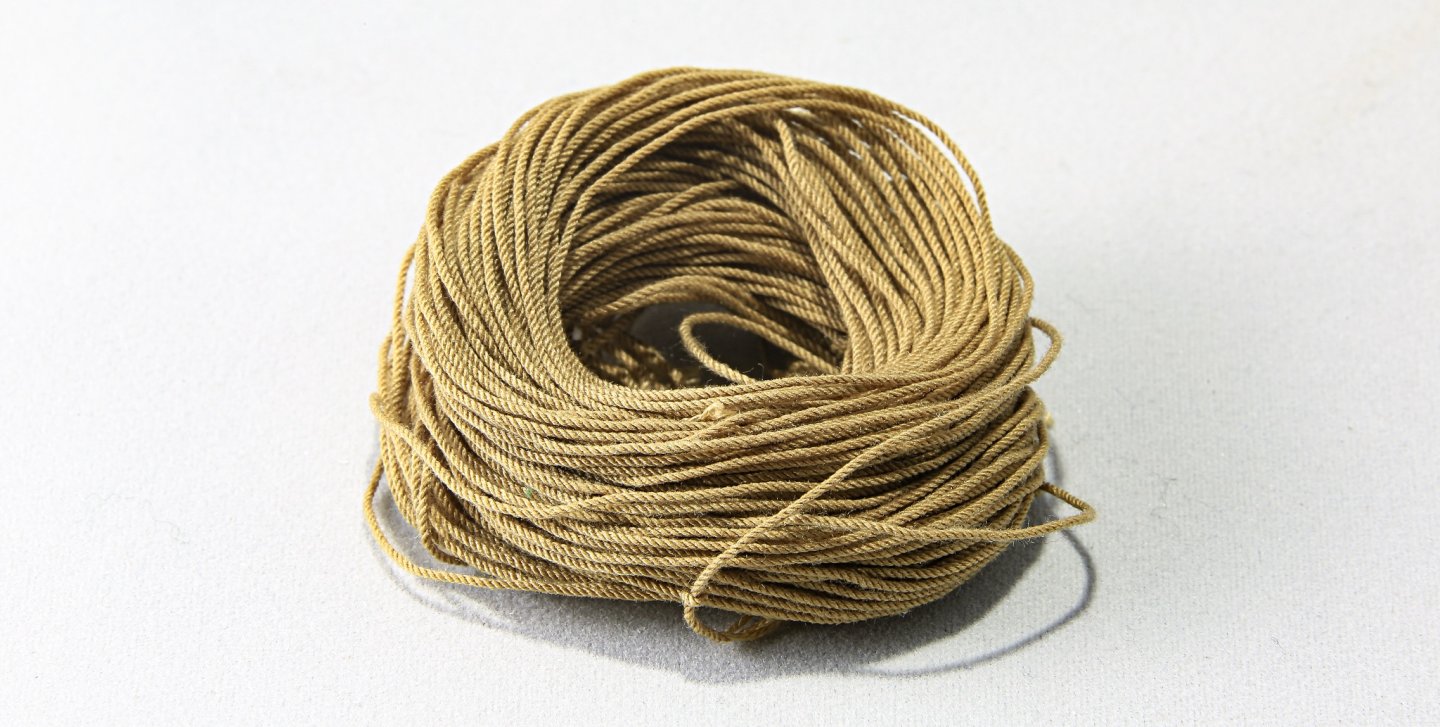
Hi All, Ropes situation is progressing. I think at that point I have maybe 90% ropes done. For sure I will run out of some running rigging ropes... but missing ones I will do as required. Next step is to add some tar and impregnation 😉 Below some photos. Anchors cables Main and fore mast stays ...and few with smaller "caliber" 😆 ...and my chocolate box 🙃😂 Cheers, Matt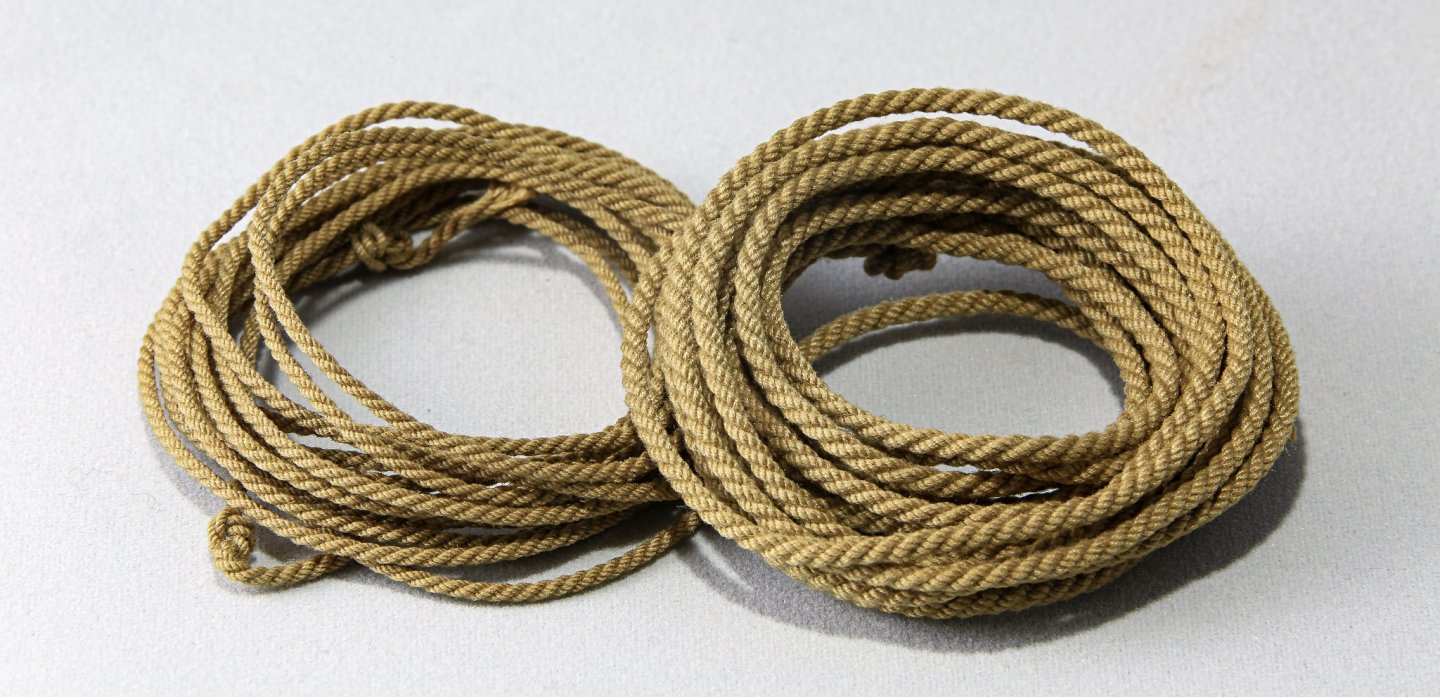


- 222 replies
-
- 14
-
-
Papegojan 1627 by mati - FINISHED - 1/48
mati replied to mati's topic in - Build logs for subjects built 1501 - 1750
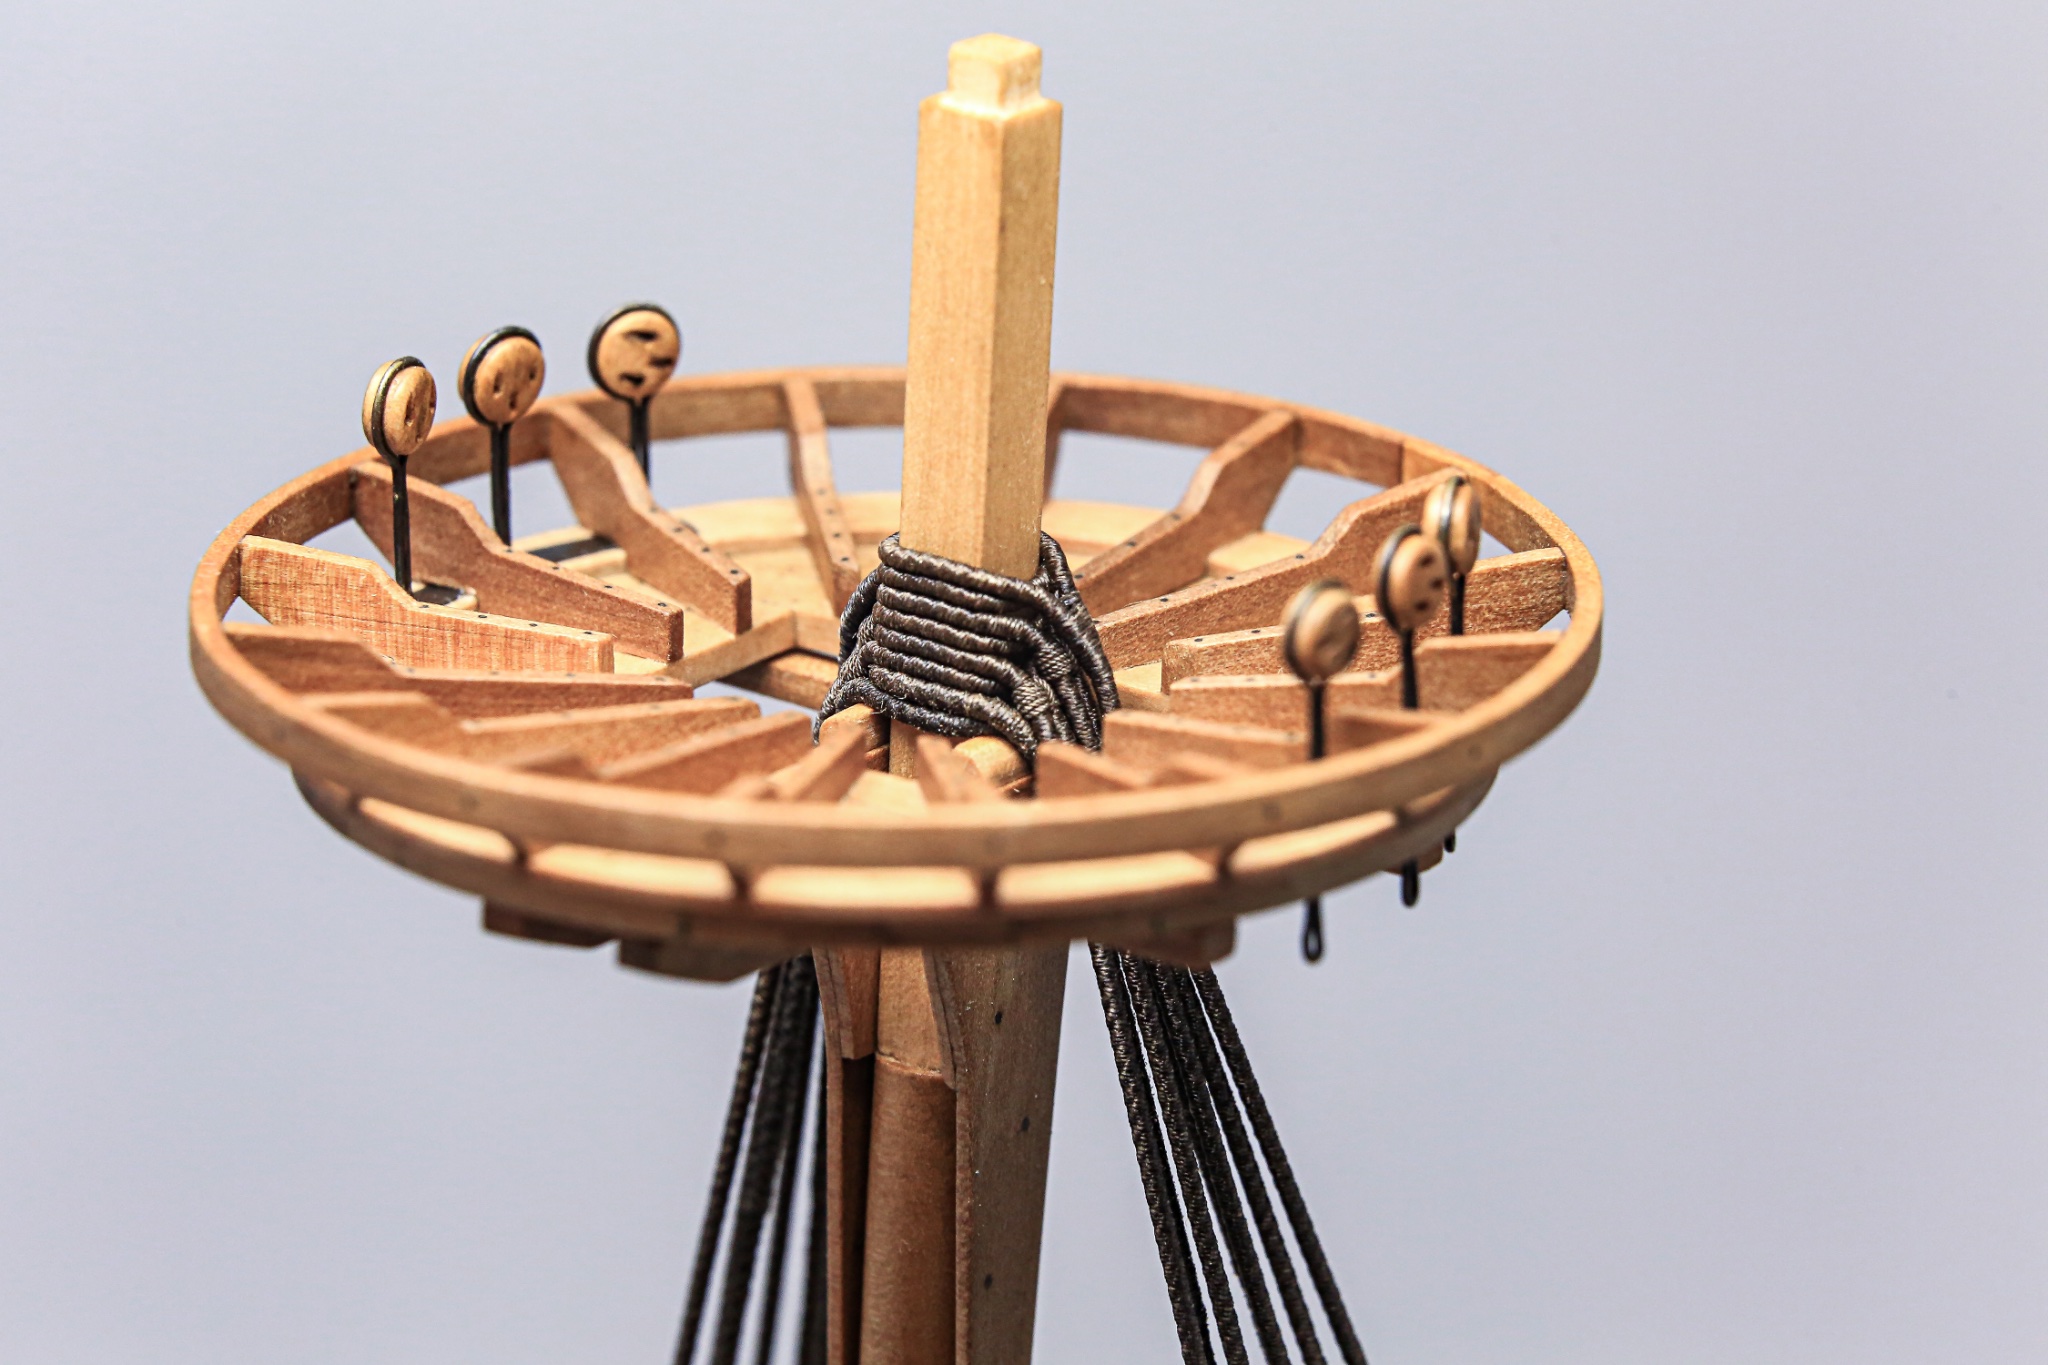
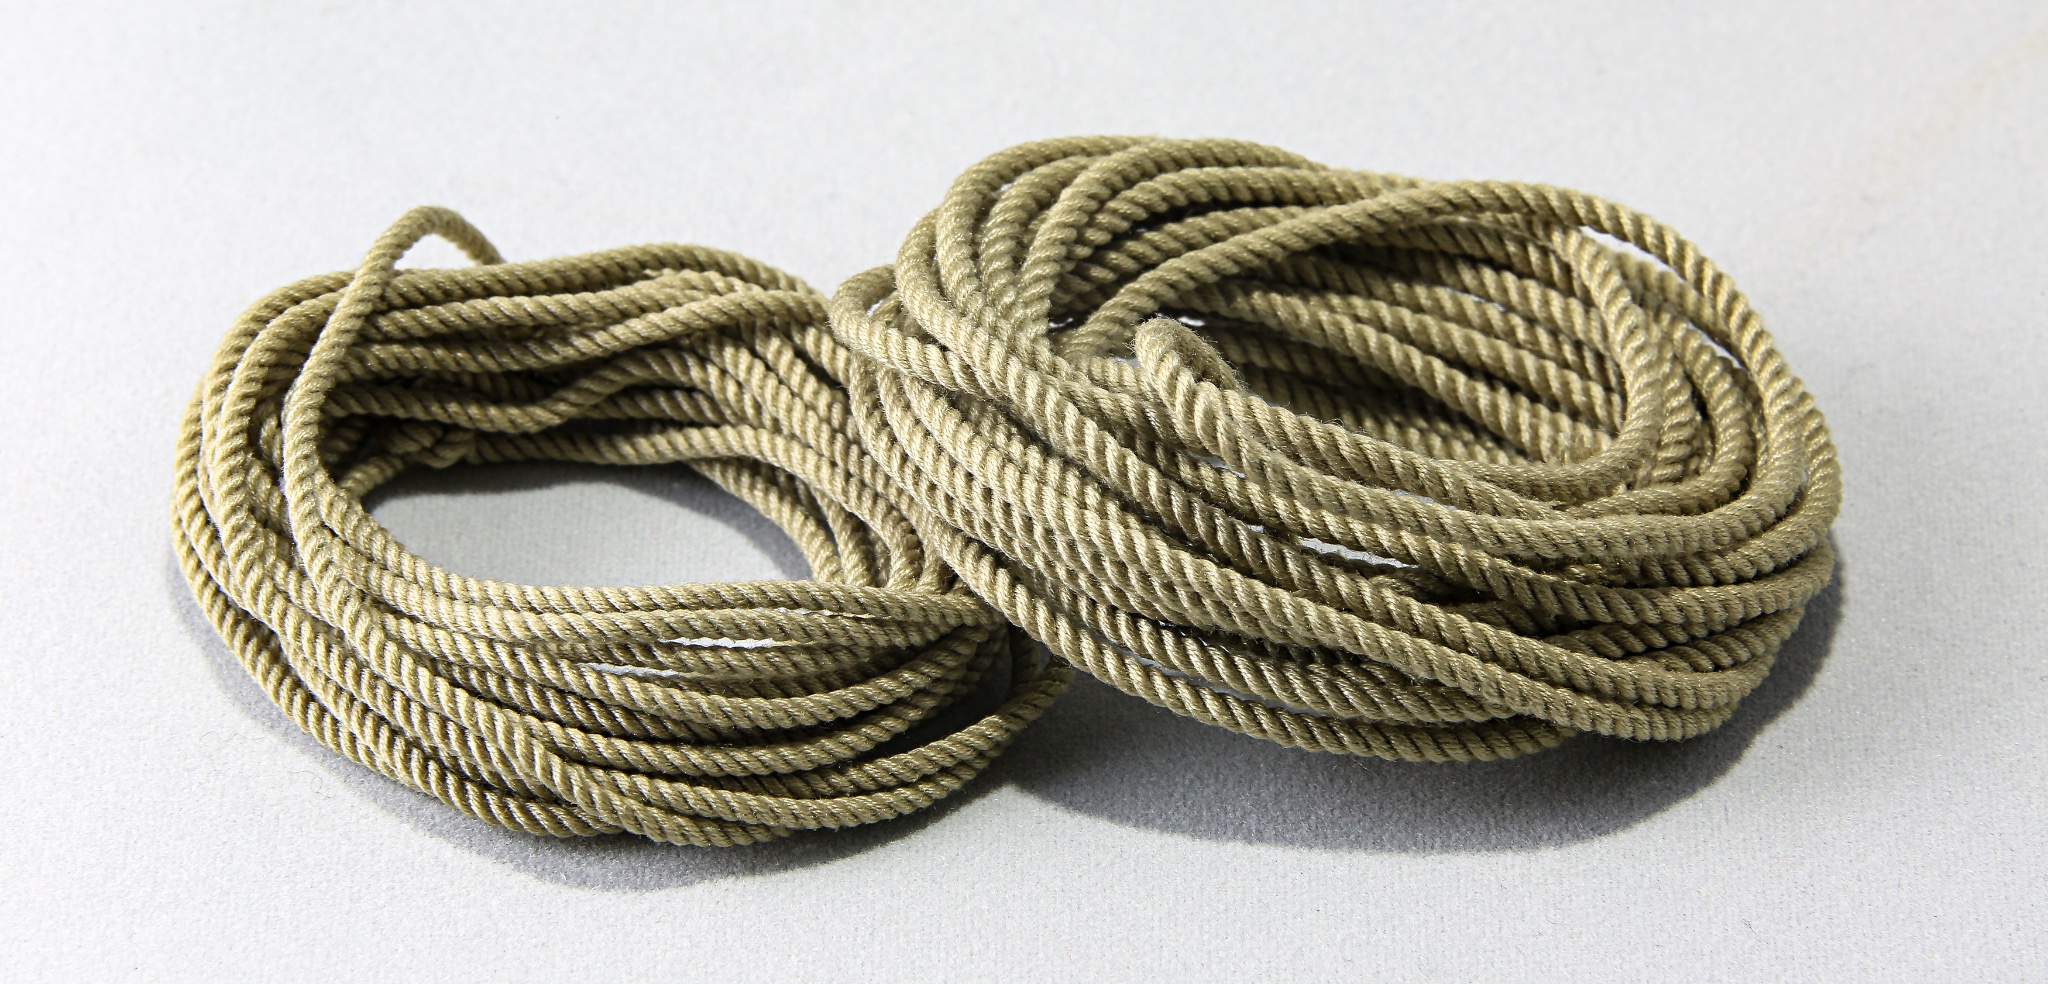
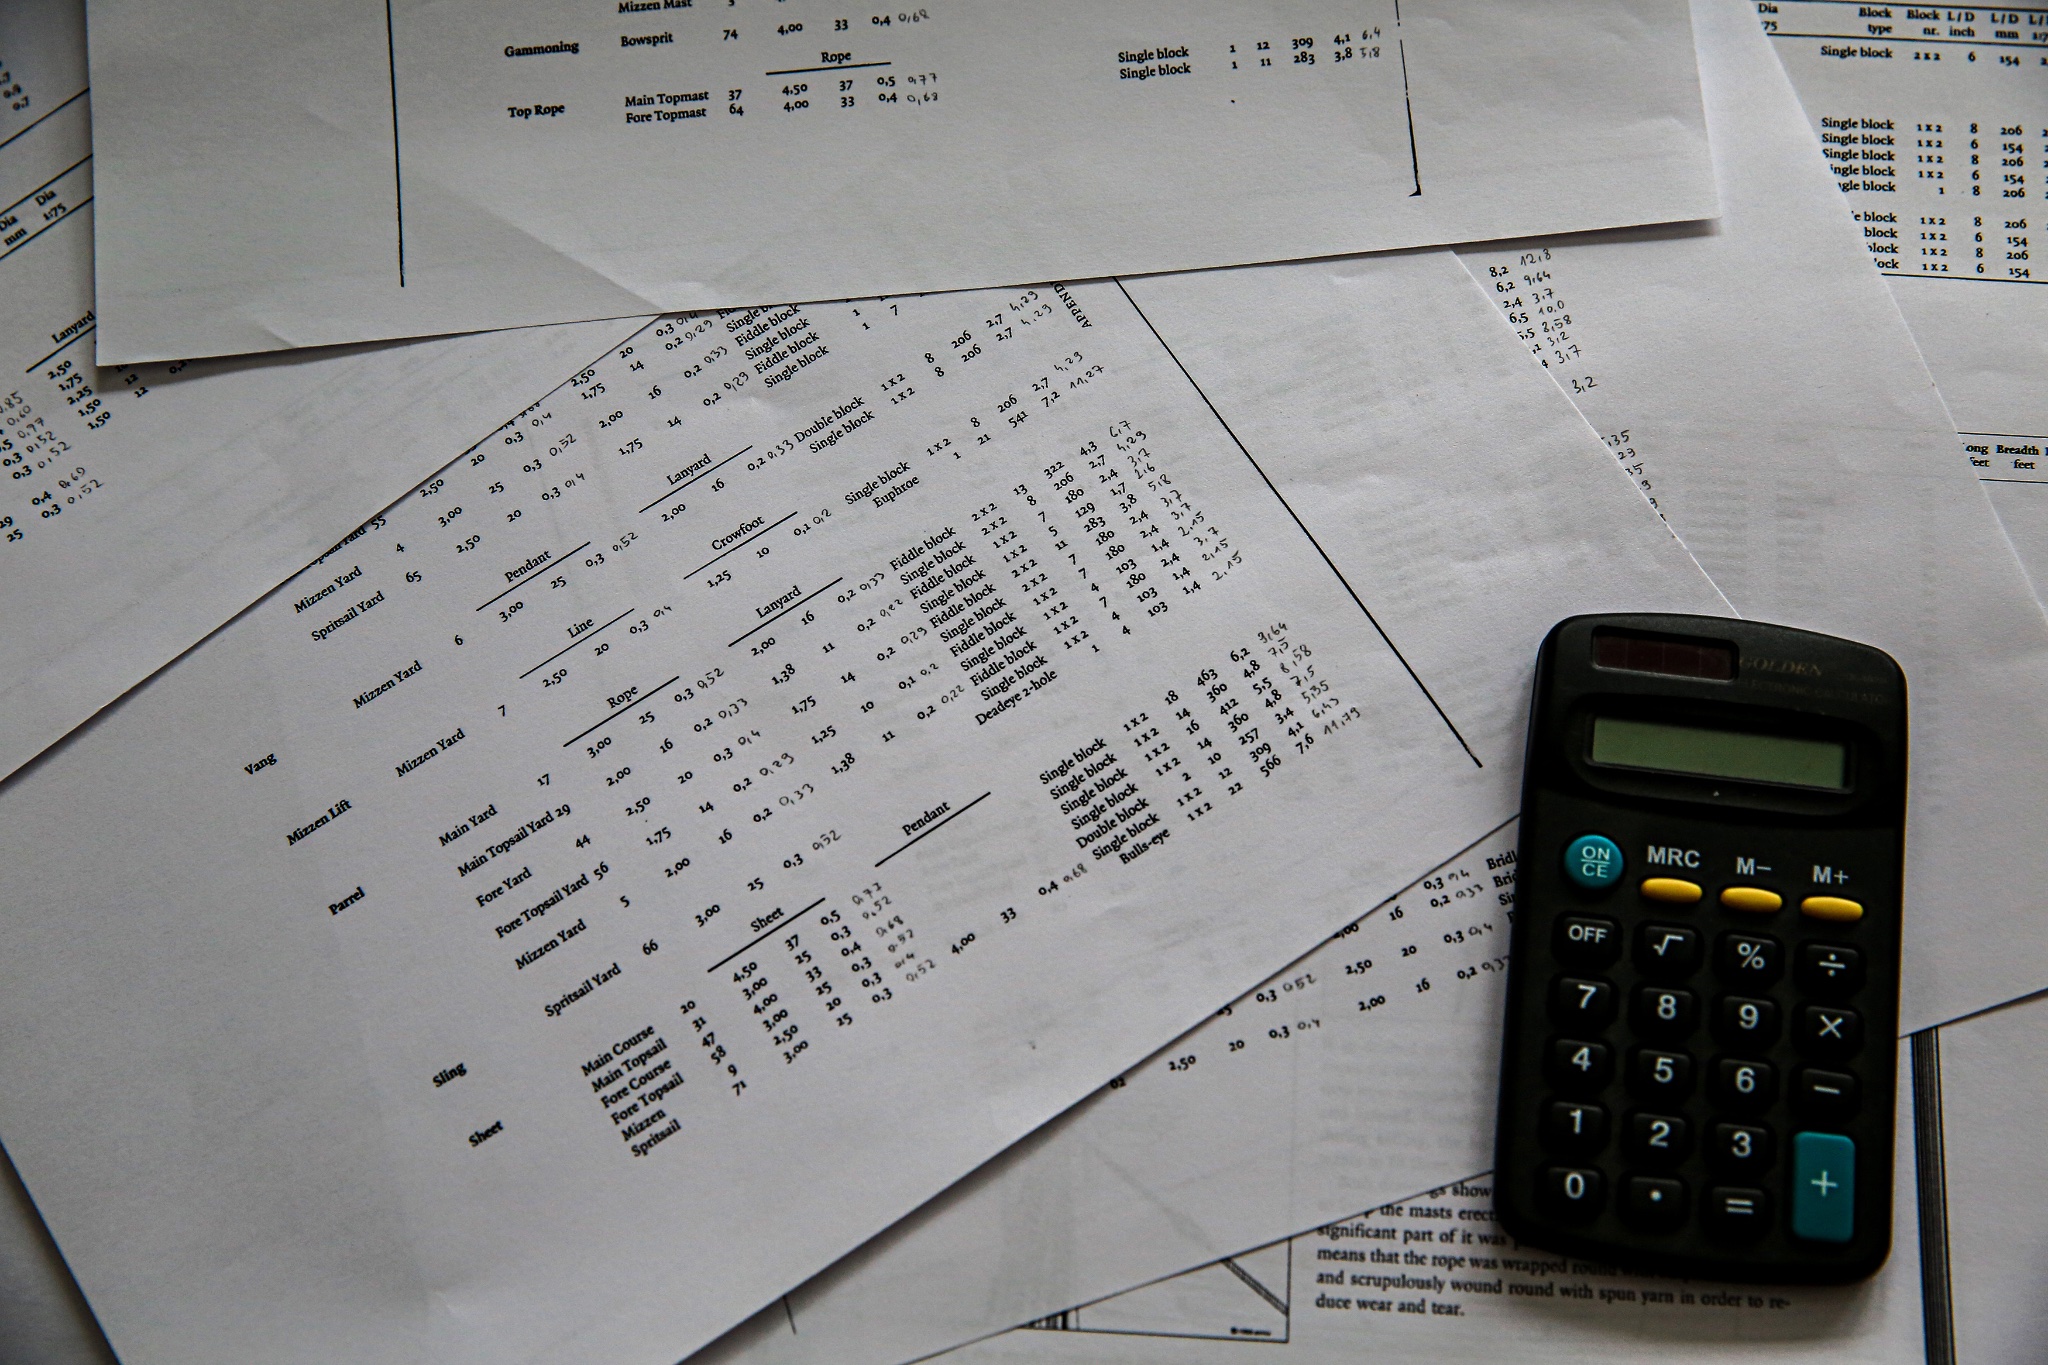
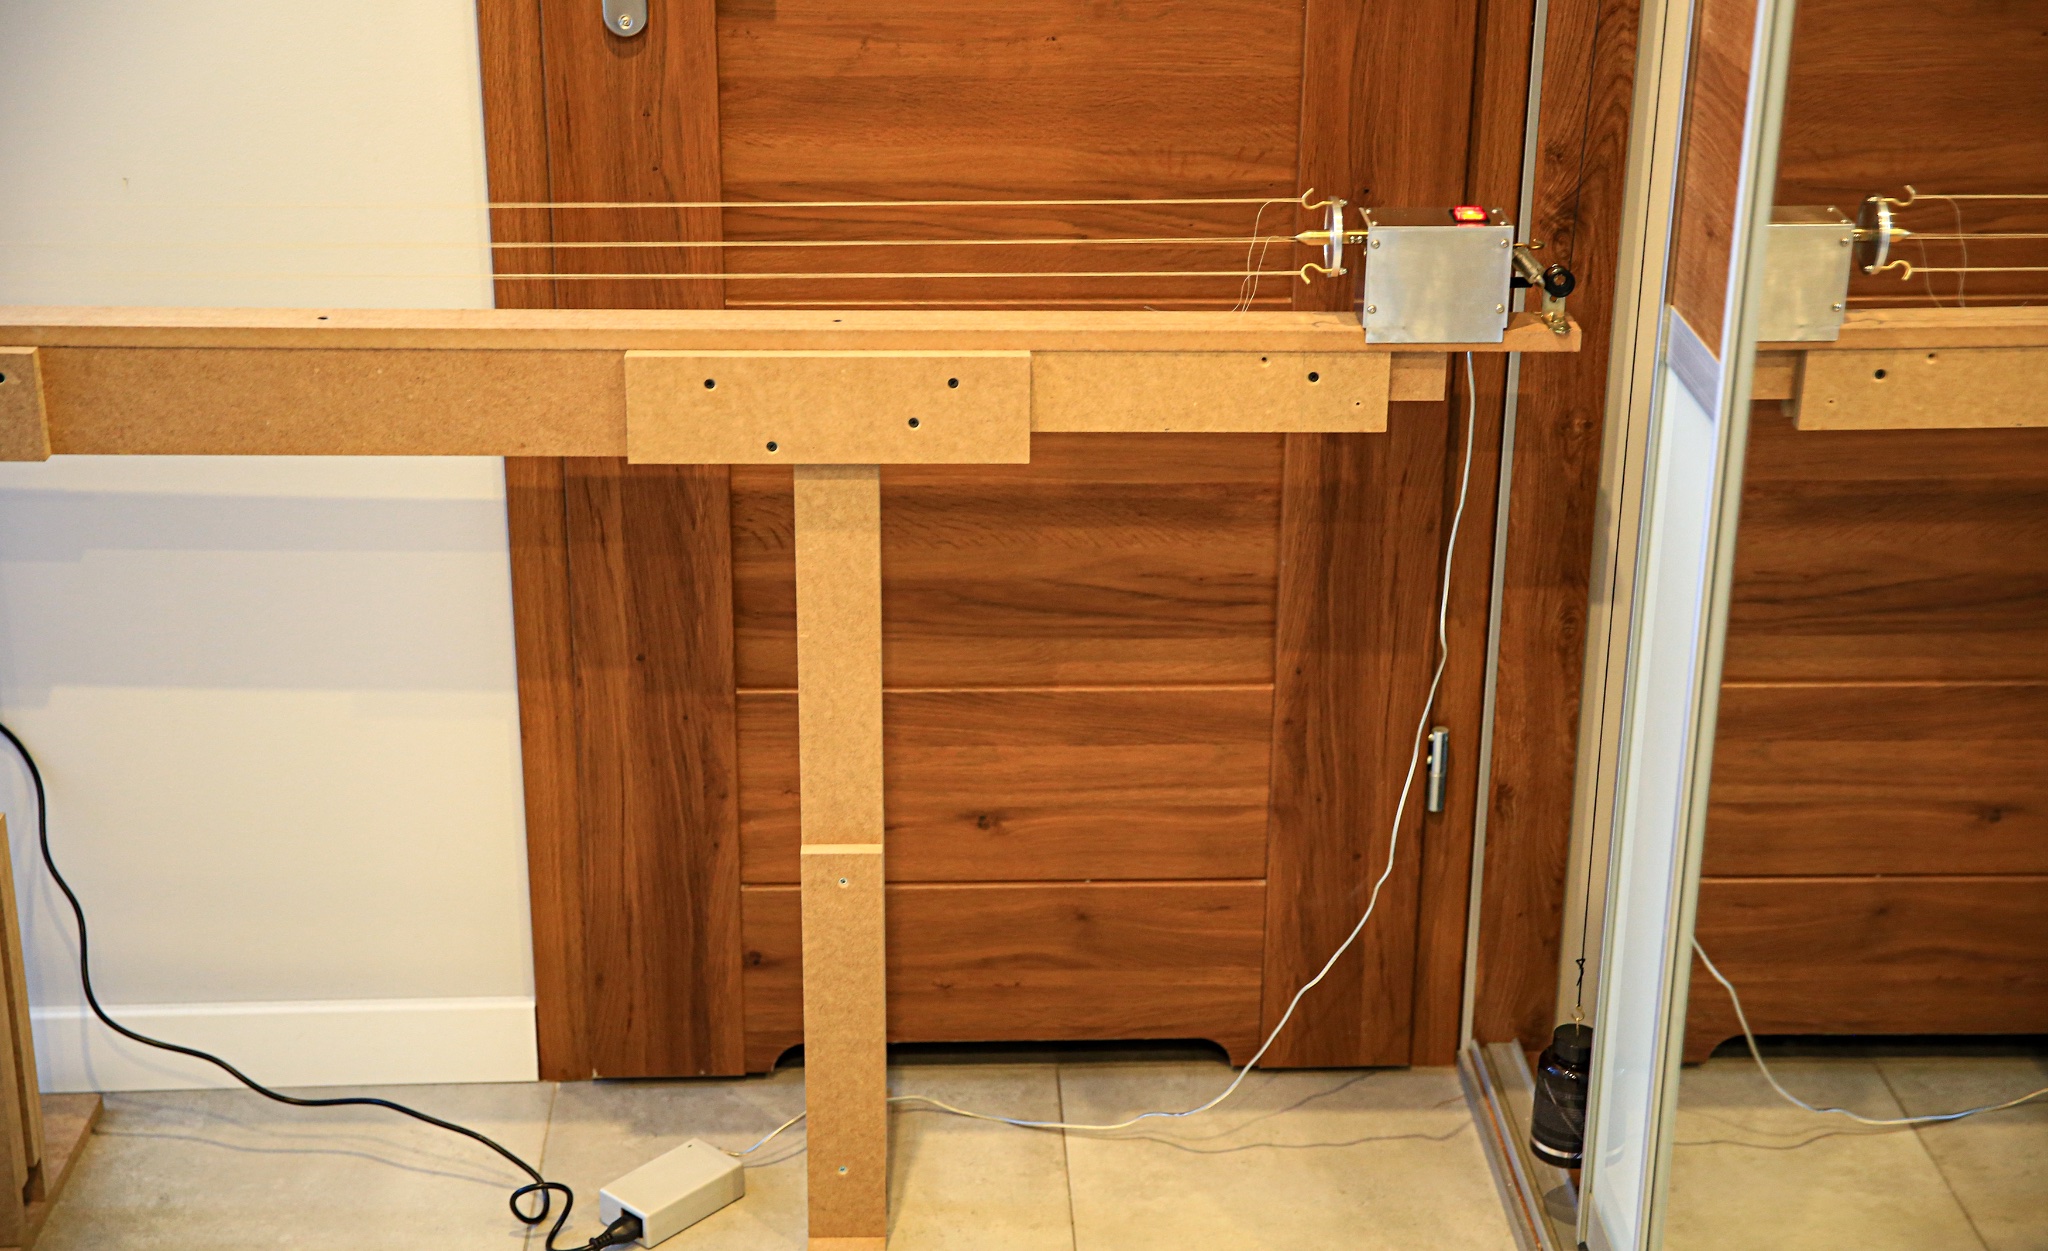
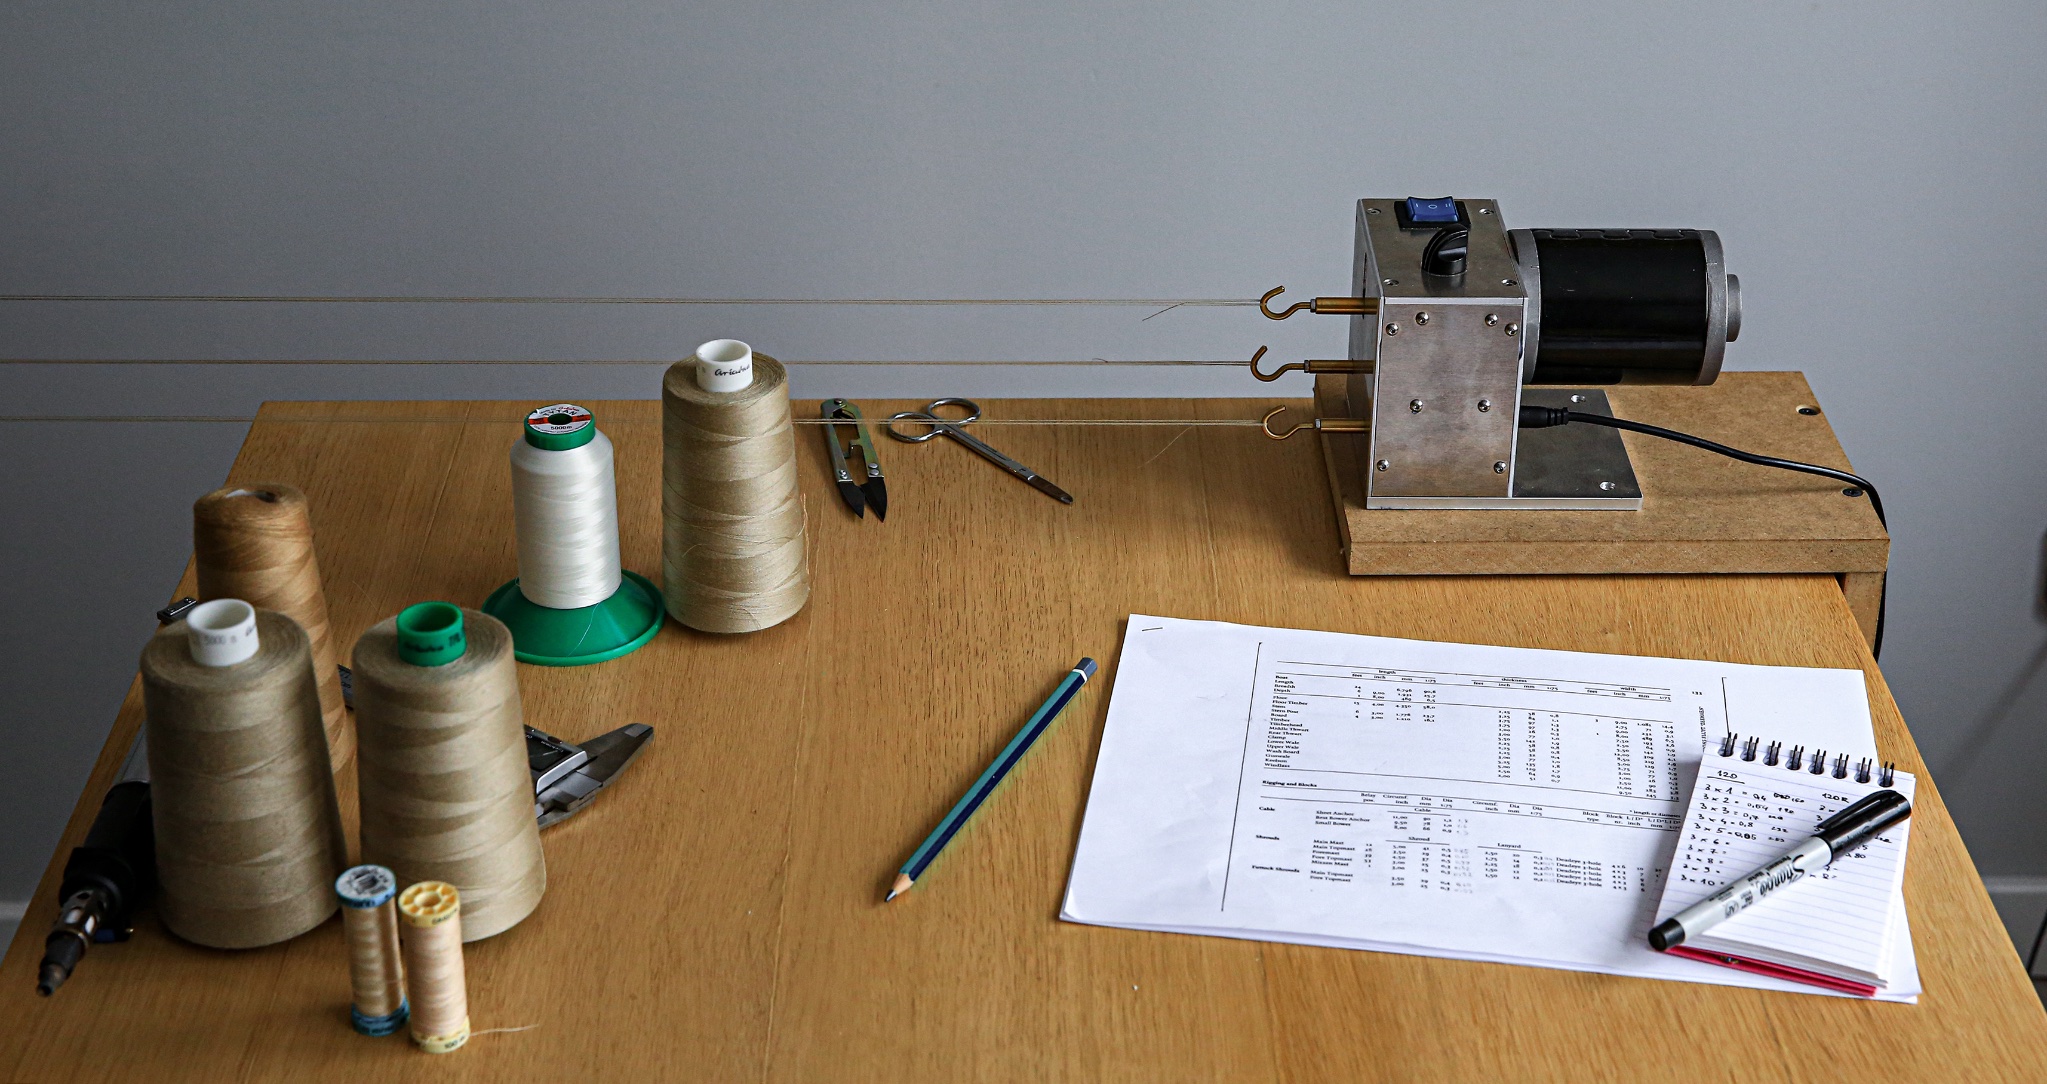
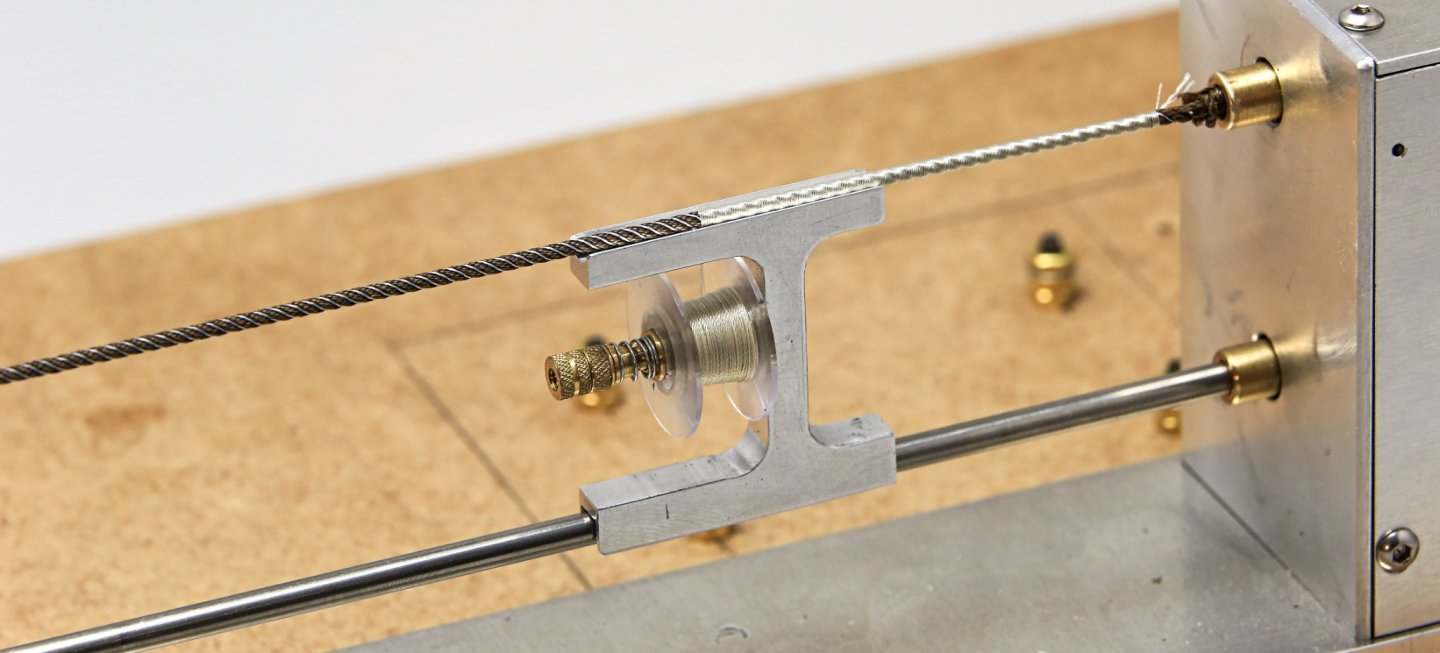
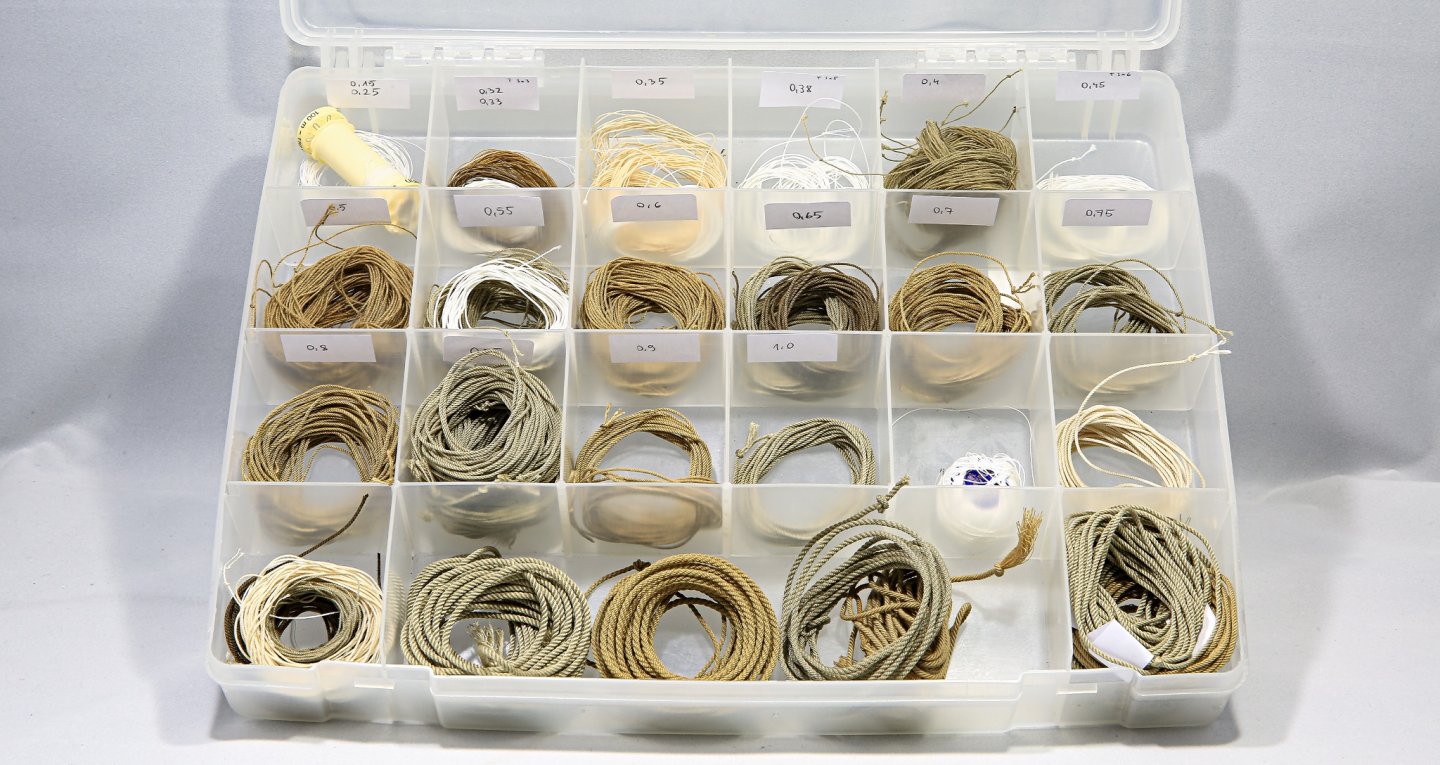
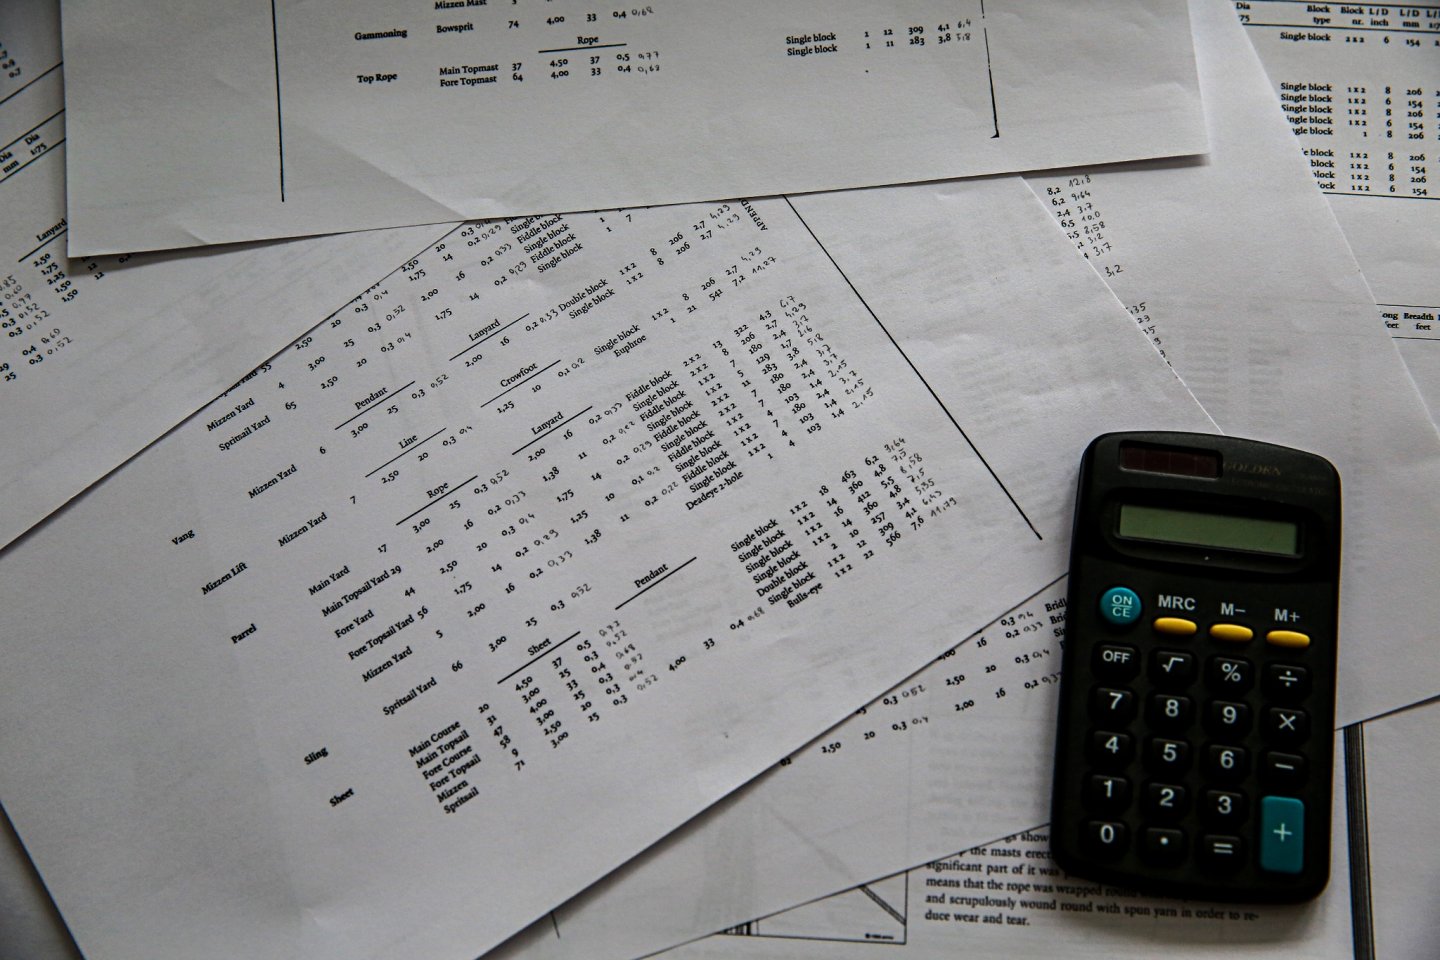
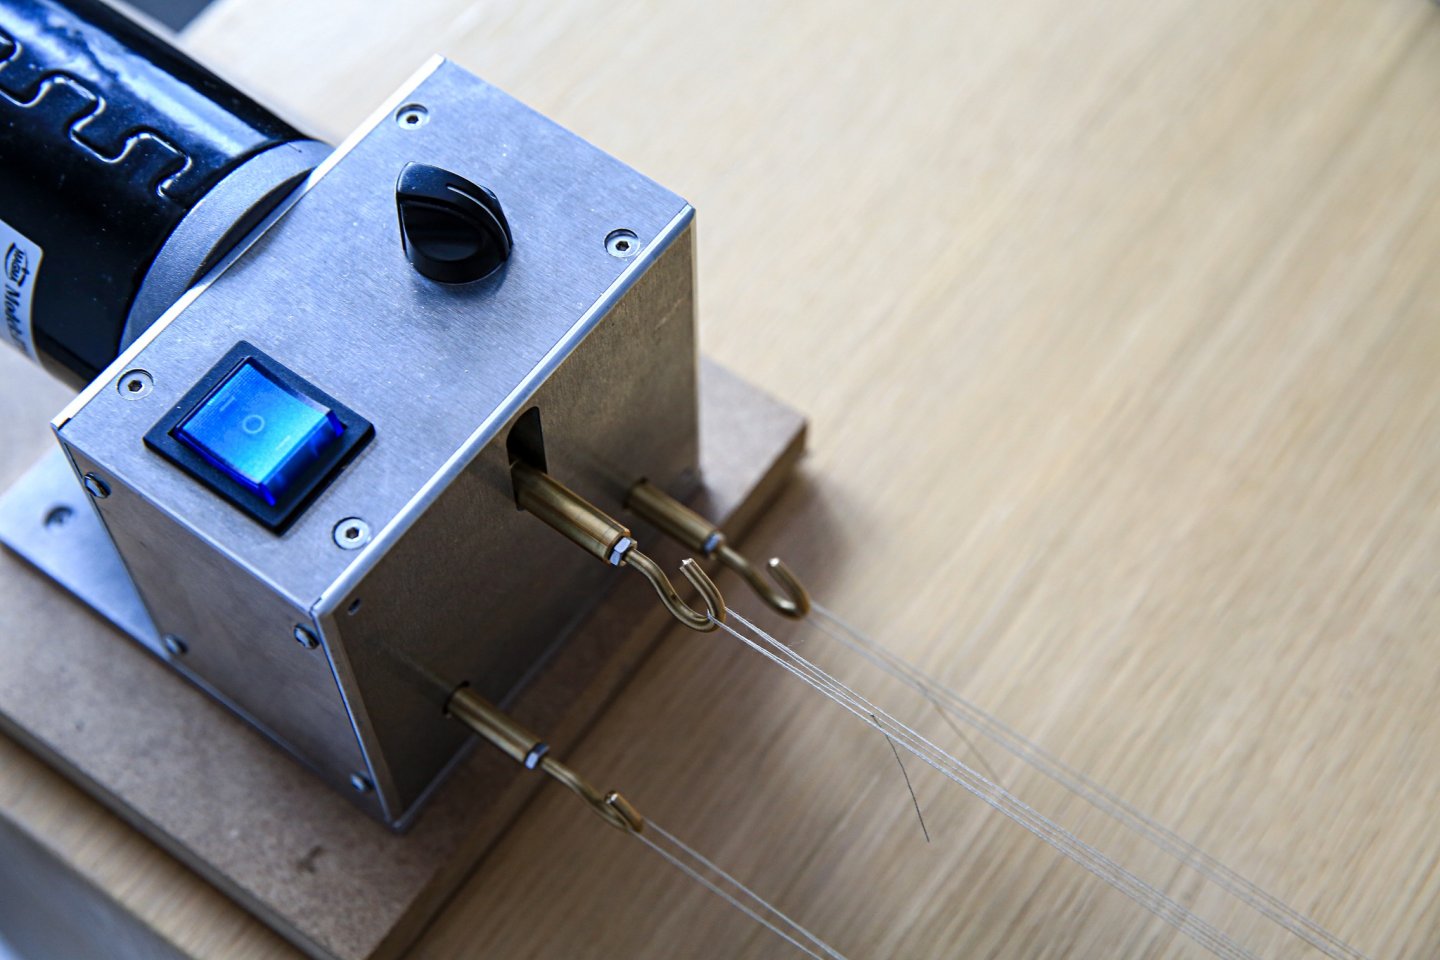
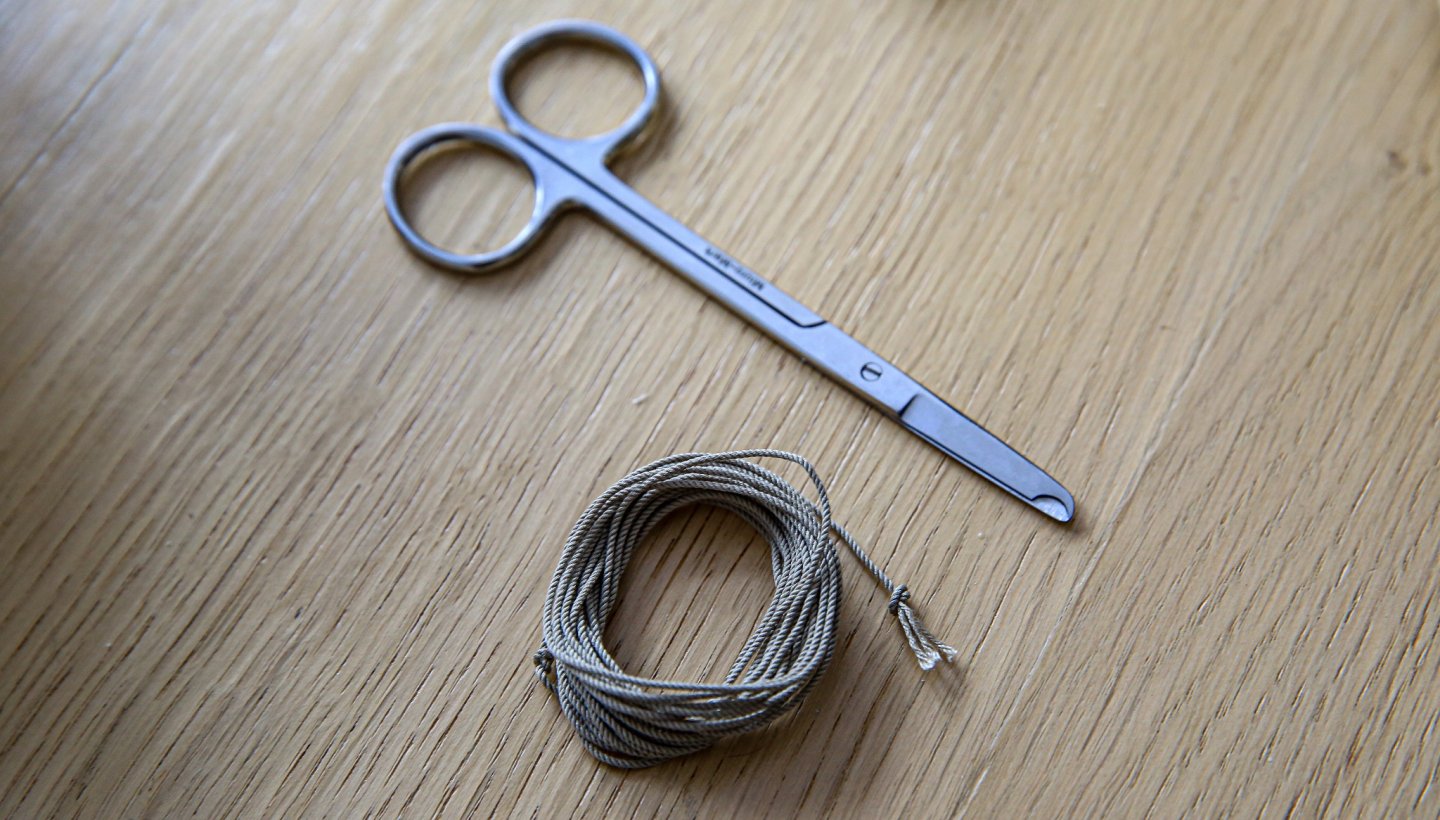
Hi All, Chris and Sam many thanks!!! You are very kind Ondras thank you. Your model looks great too. I'm following your build 😉 I have some small update Masts are almost completed... just few little details missing... which probably nobody will never notice... but I have to do them otherwise my soul will wander forever in the limbo 😂 Caps were made using mill and for final touch just sand paper and files. Also I've made imitation of iron fittings secured points for breeching and gun tackle. Scuppers are also visible above wales. At that point I'm working on ropes. It's taking a lot of time... I'm on day 3 😆 ...luckily I'm almost done with ropes... just few meters of 0,15mm, 0,2mm and 0,3mm missing. For my model I've decided to use as a reference best source I could imagine. Ab Hoving and his publications about pinnaces. Amazing mine of knowledge 🤯 So I've xero copy few pages from the book and recalculated whole rigging according to scale of my model... and I believe it's more or less accurate. Hopefully 😆 Having above numbers there was nothing else to do than start my ropewalk, which was made by one of my friend Roman also modeler form Poland. Super solid. Great tool For my ropes I'm using polyester threads no. 120 and 160. Also for smallest diameters no. 360. For "smallest" rope I'm using 3x1 threads no. 360, which gave me 0,15mm rope and for the "biggest" rope (except anchor cables), which is Main Mast Stay 3x16 thread no. 120, gave me 1,65mm rope. And just small "sample" Cheers, Matt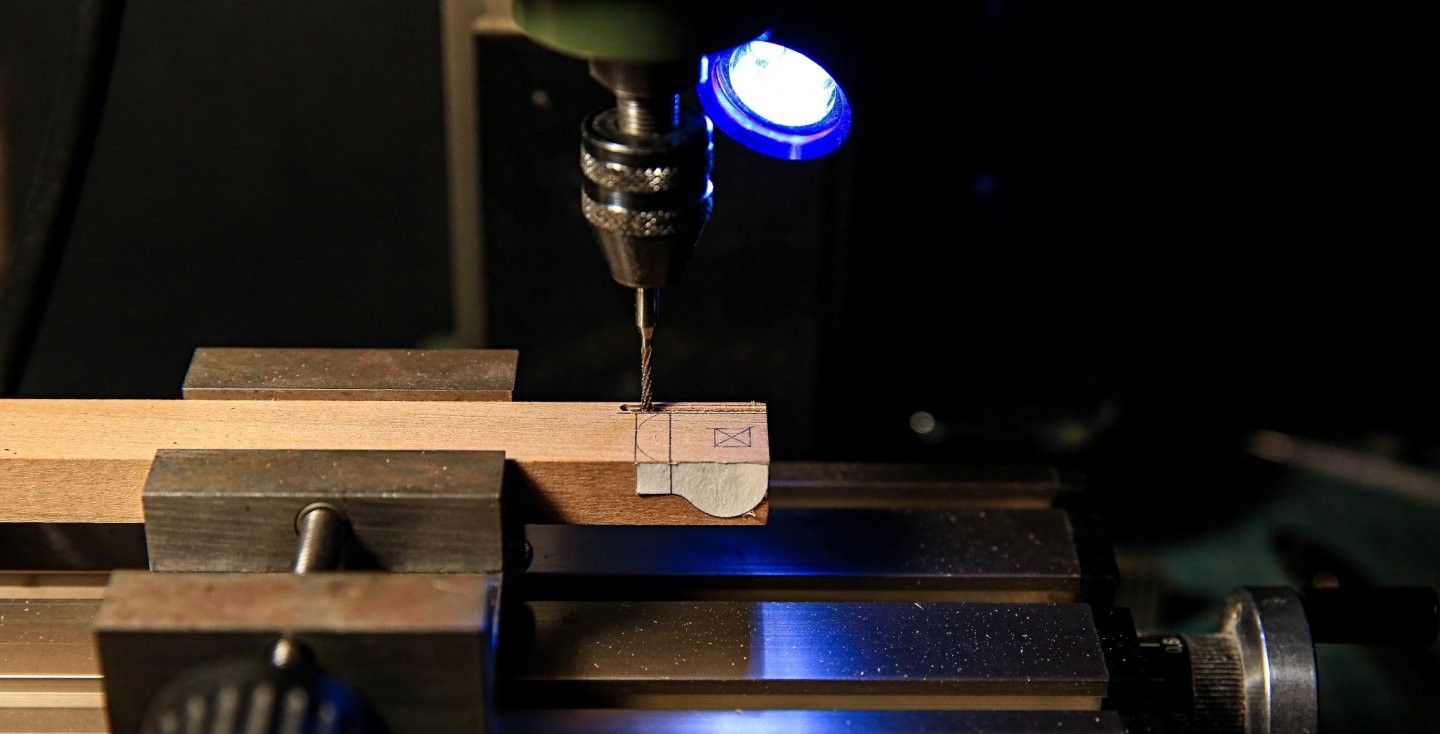


- 222 replies
-
- 11
-
-
Hi Siggi, Quality level of your model is beyond the scale!!! At that stage it's already a masterpiece... damm... when it will be competed that will be insane! 🤯🤯 Are you planning to build the model full rigged? Siggi... also I'm constantly forgetting to ask you... what kind of alloy you were using for casting your guns? Cheers! Matt
-
Papegojan 1627 by mati - FINISHED - 1/48
mati replied to mati's topic in - Build logs for subjects built 1501 - 1750
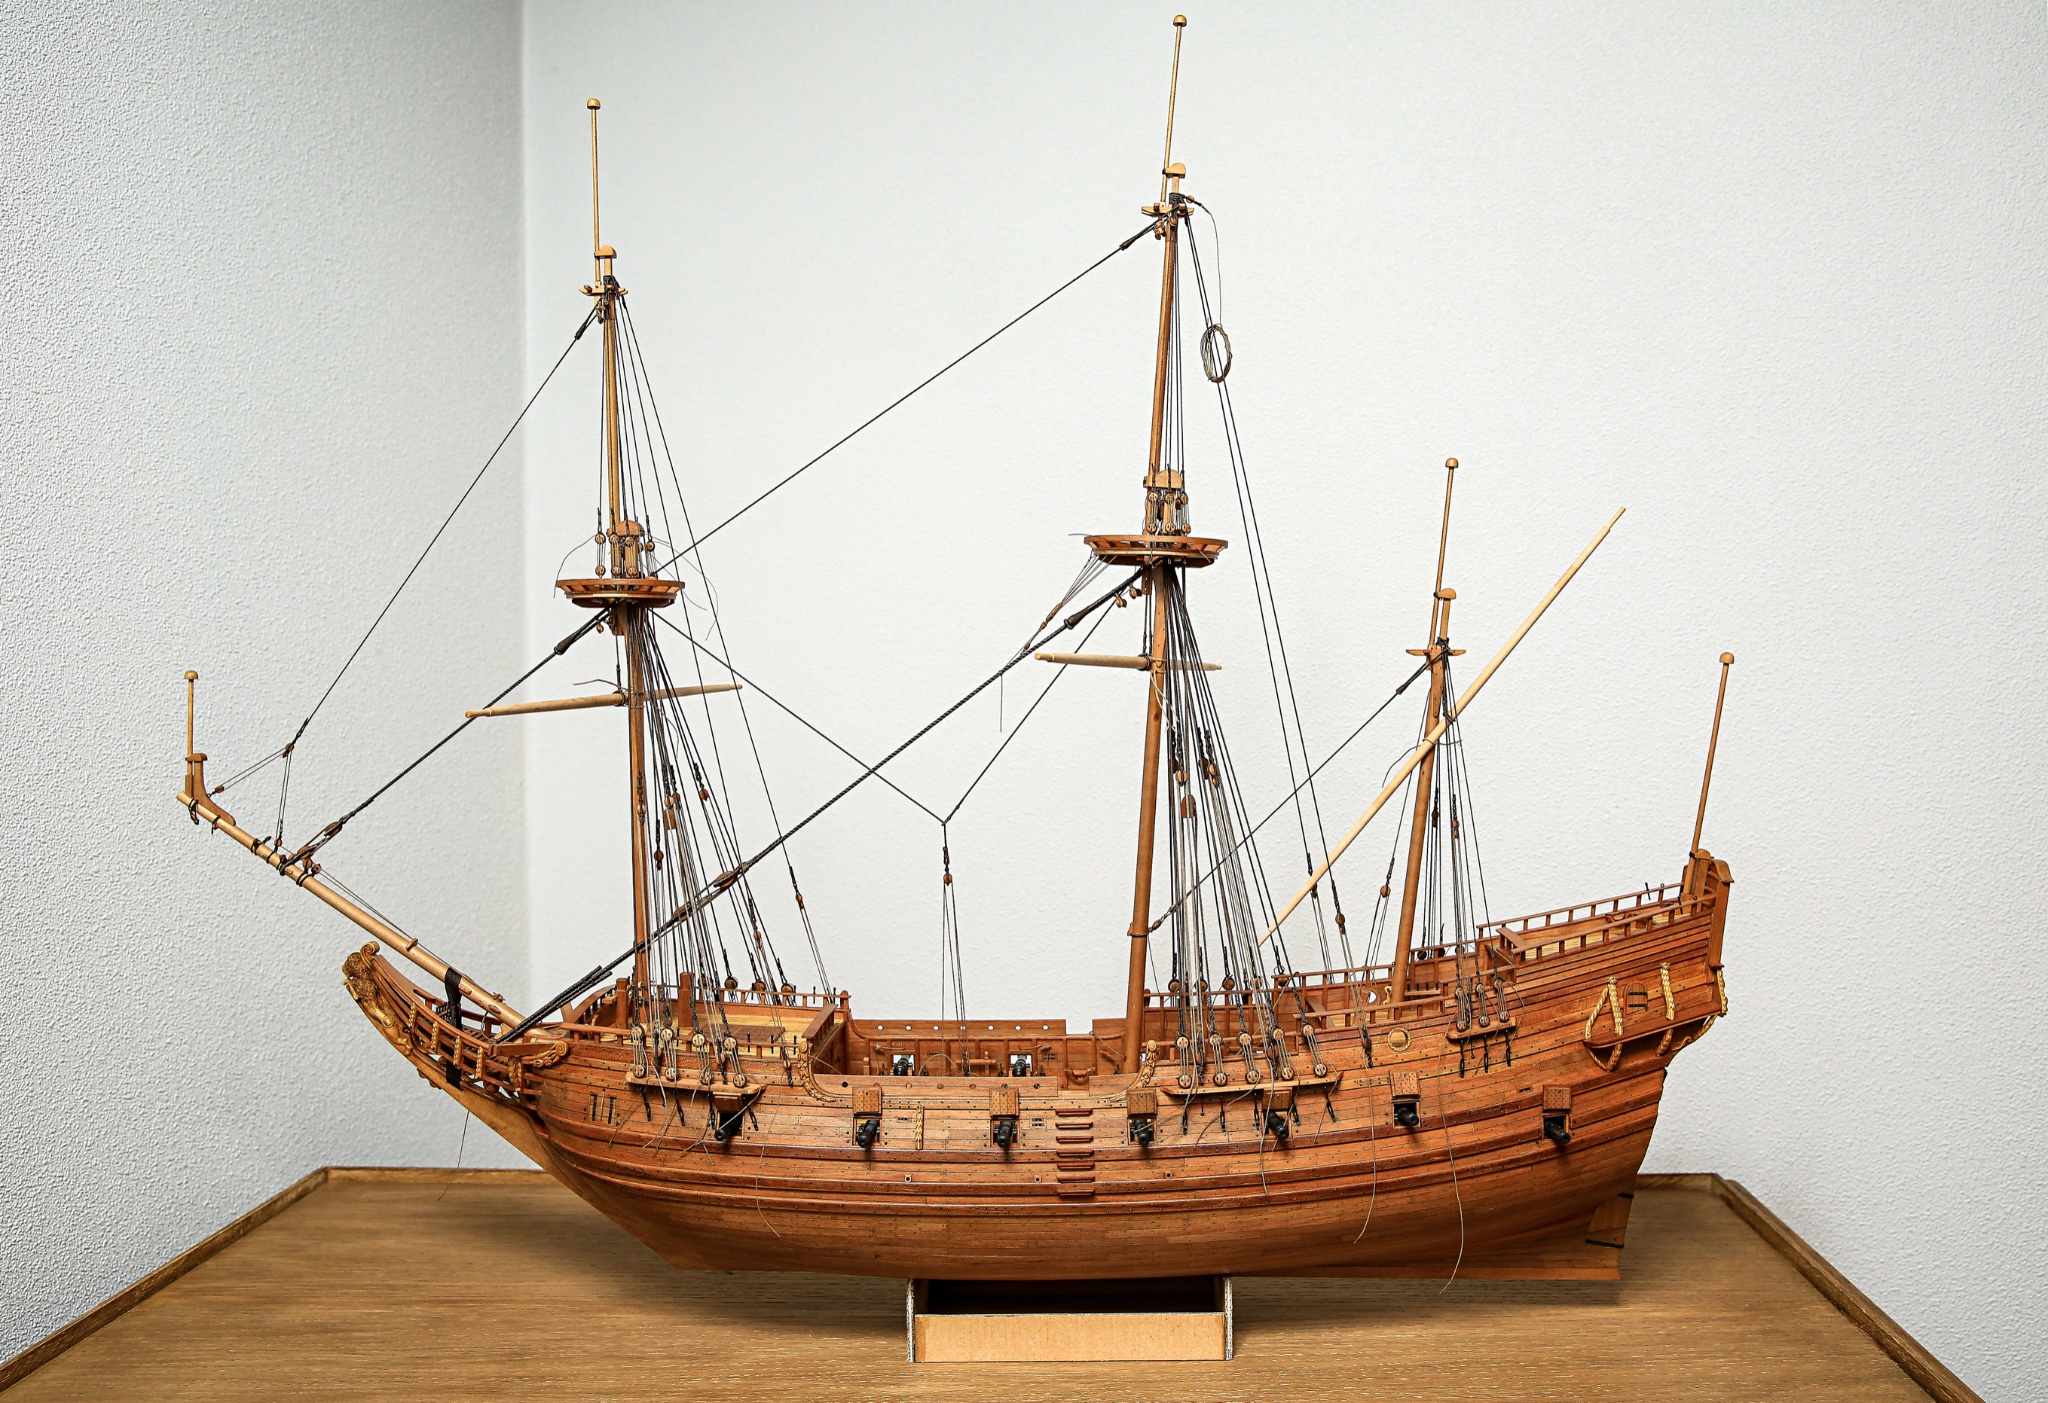
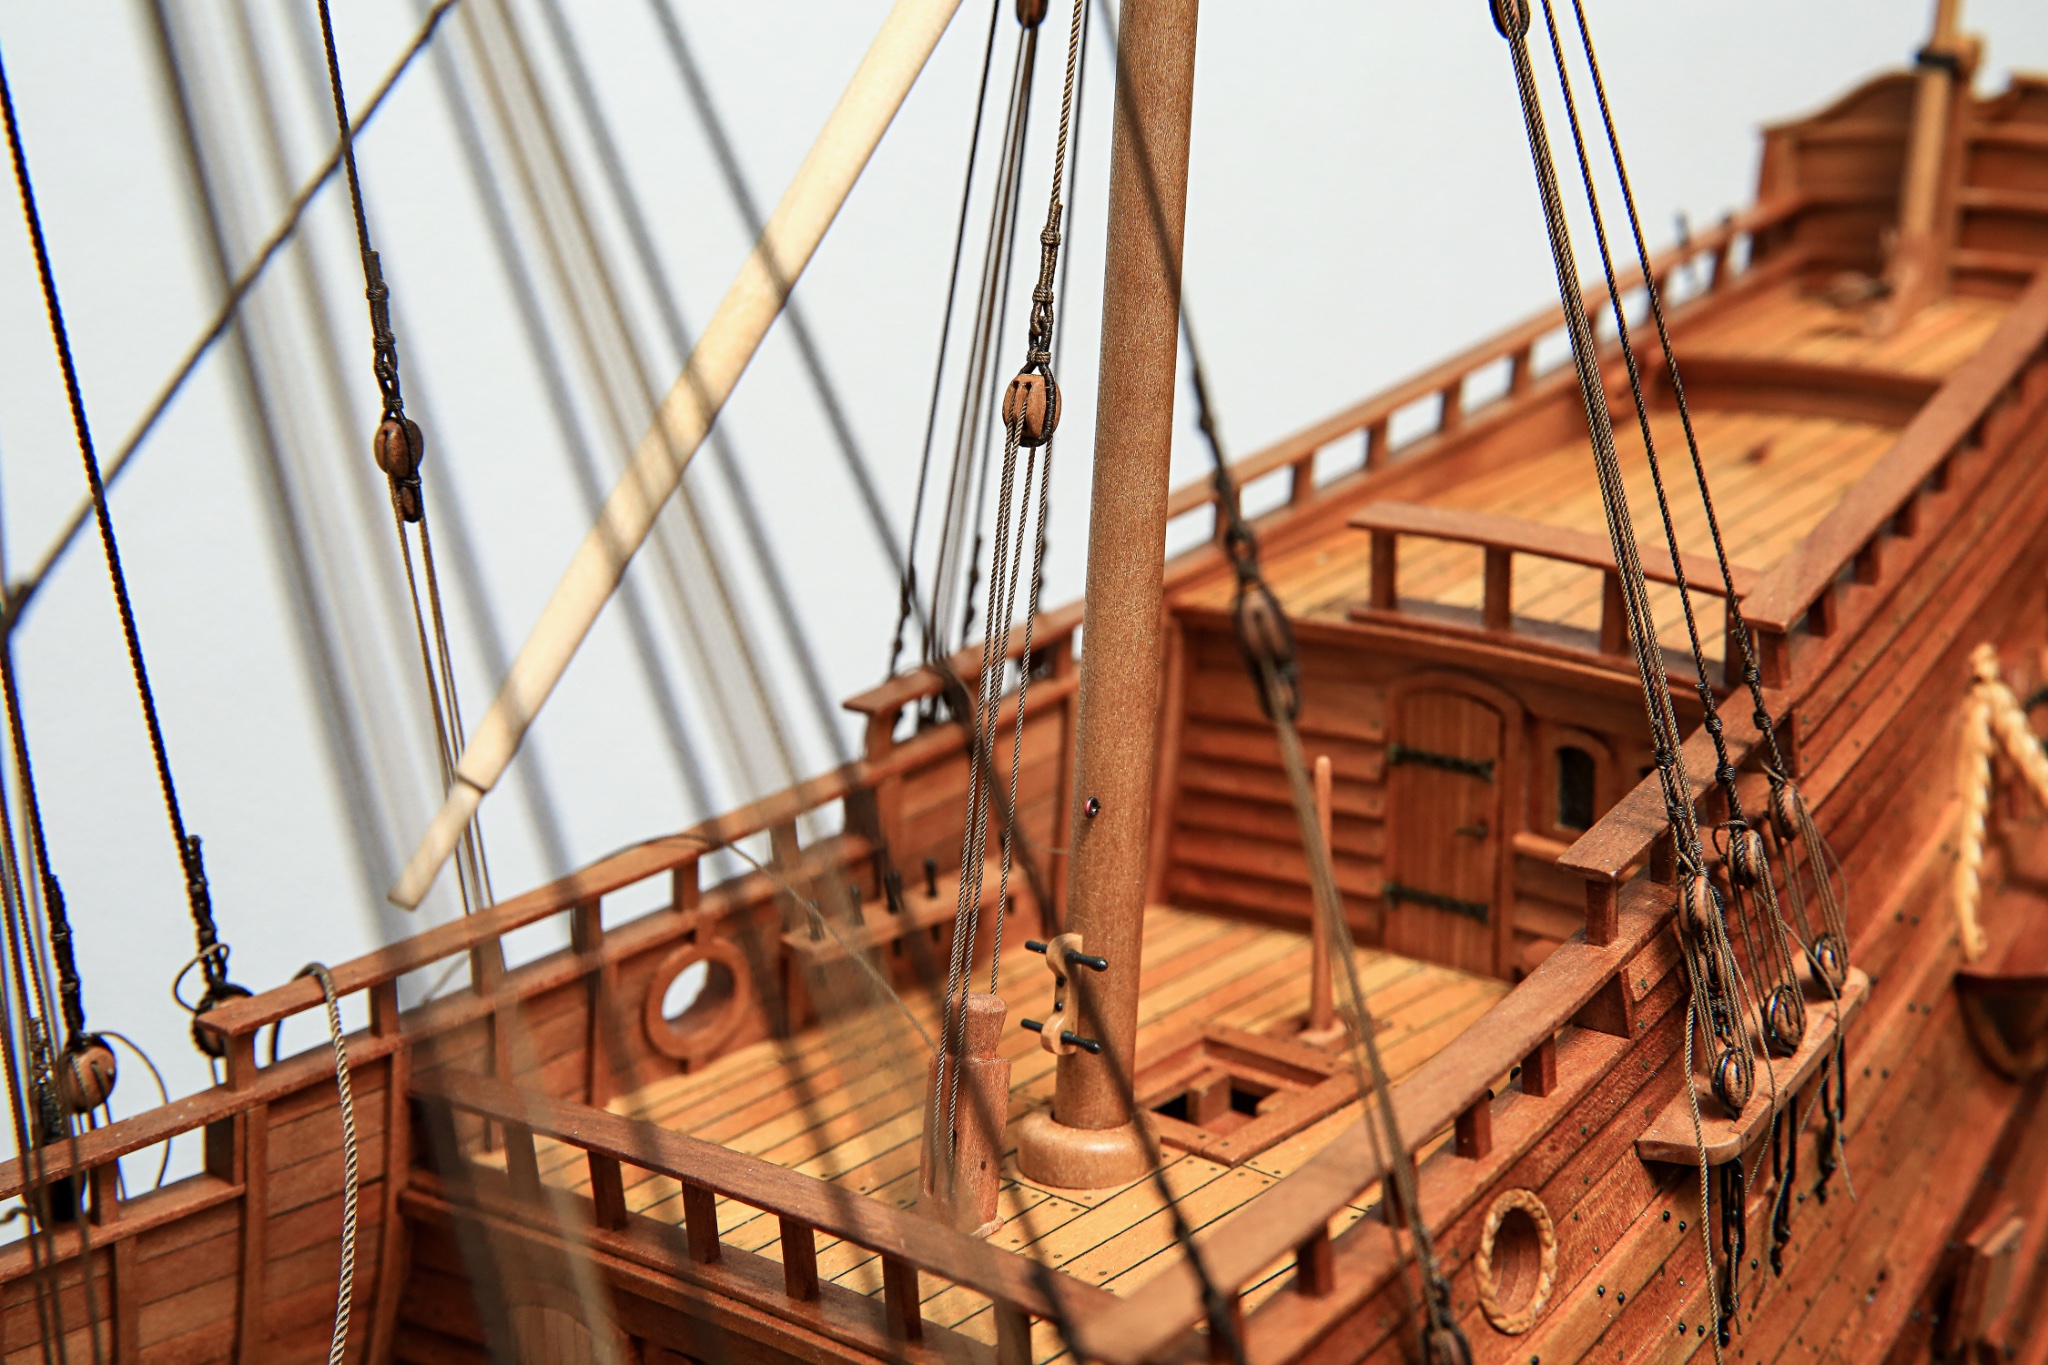
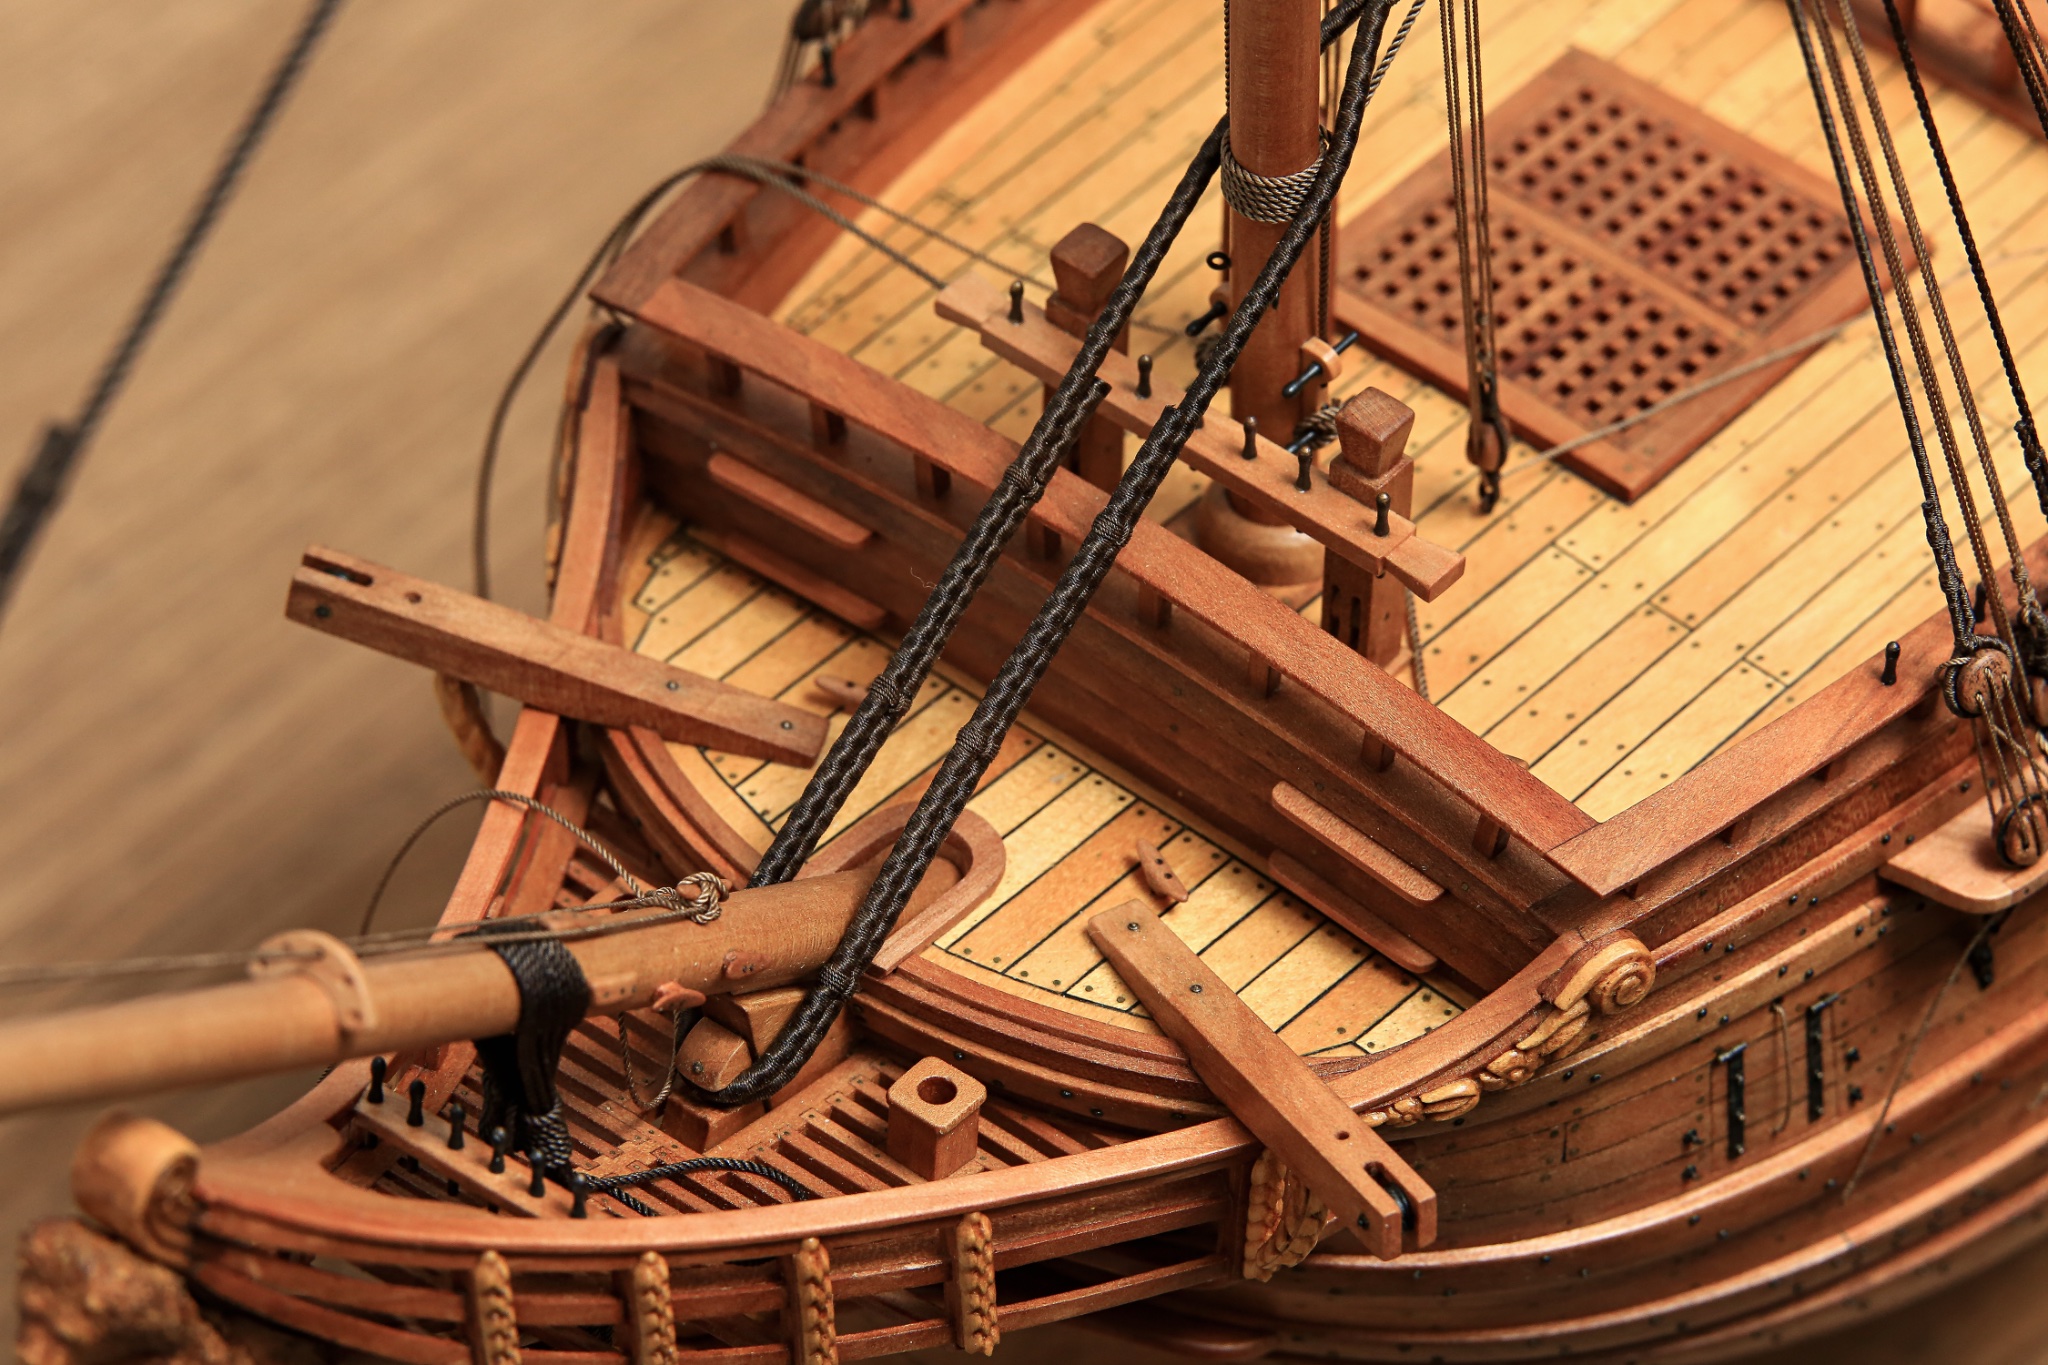
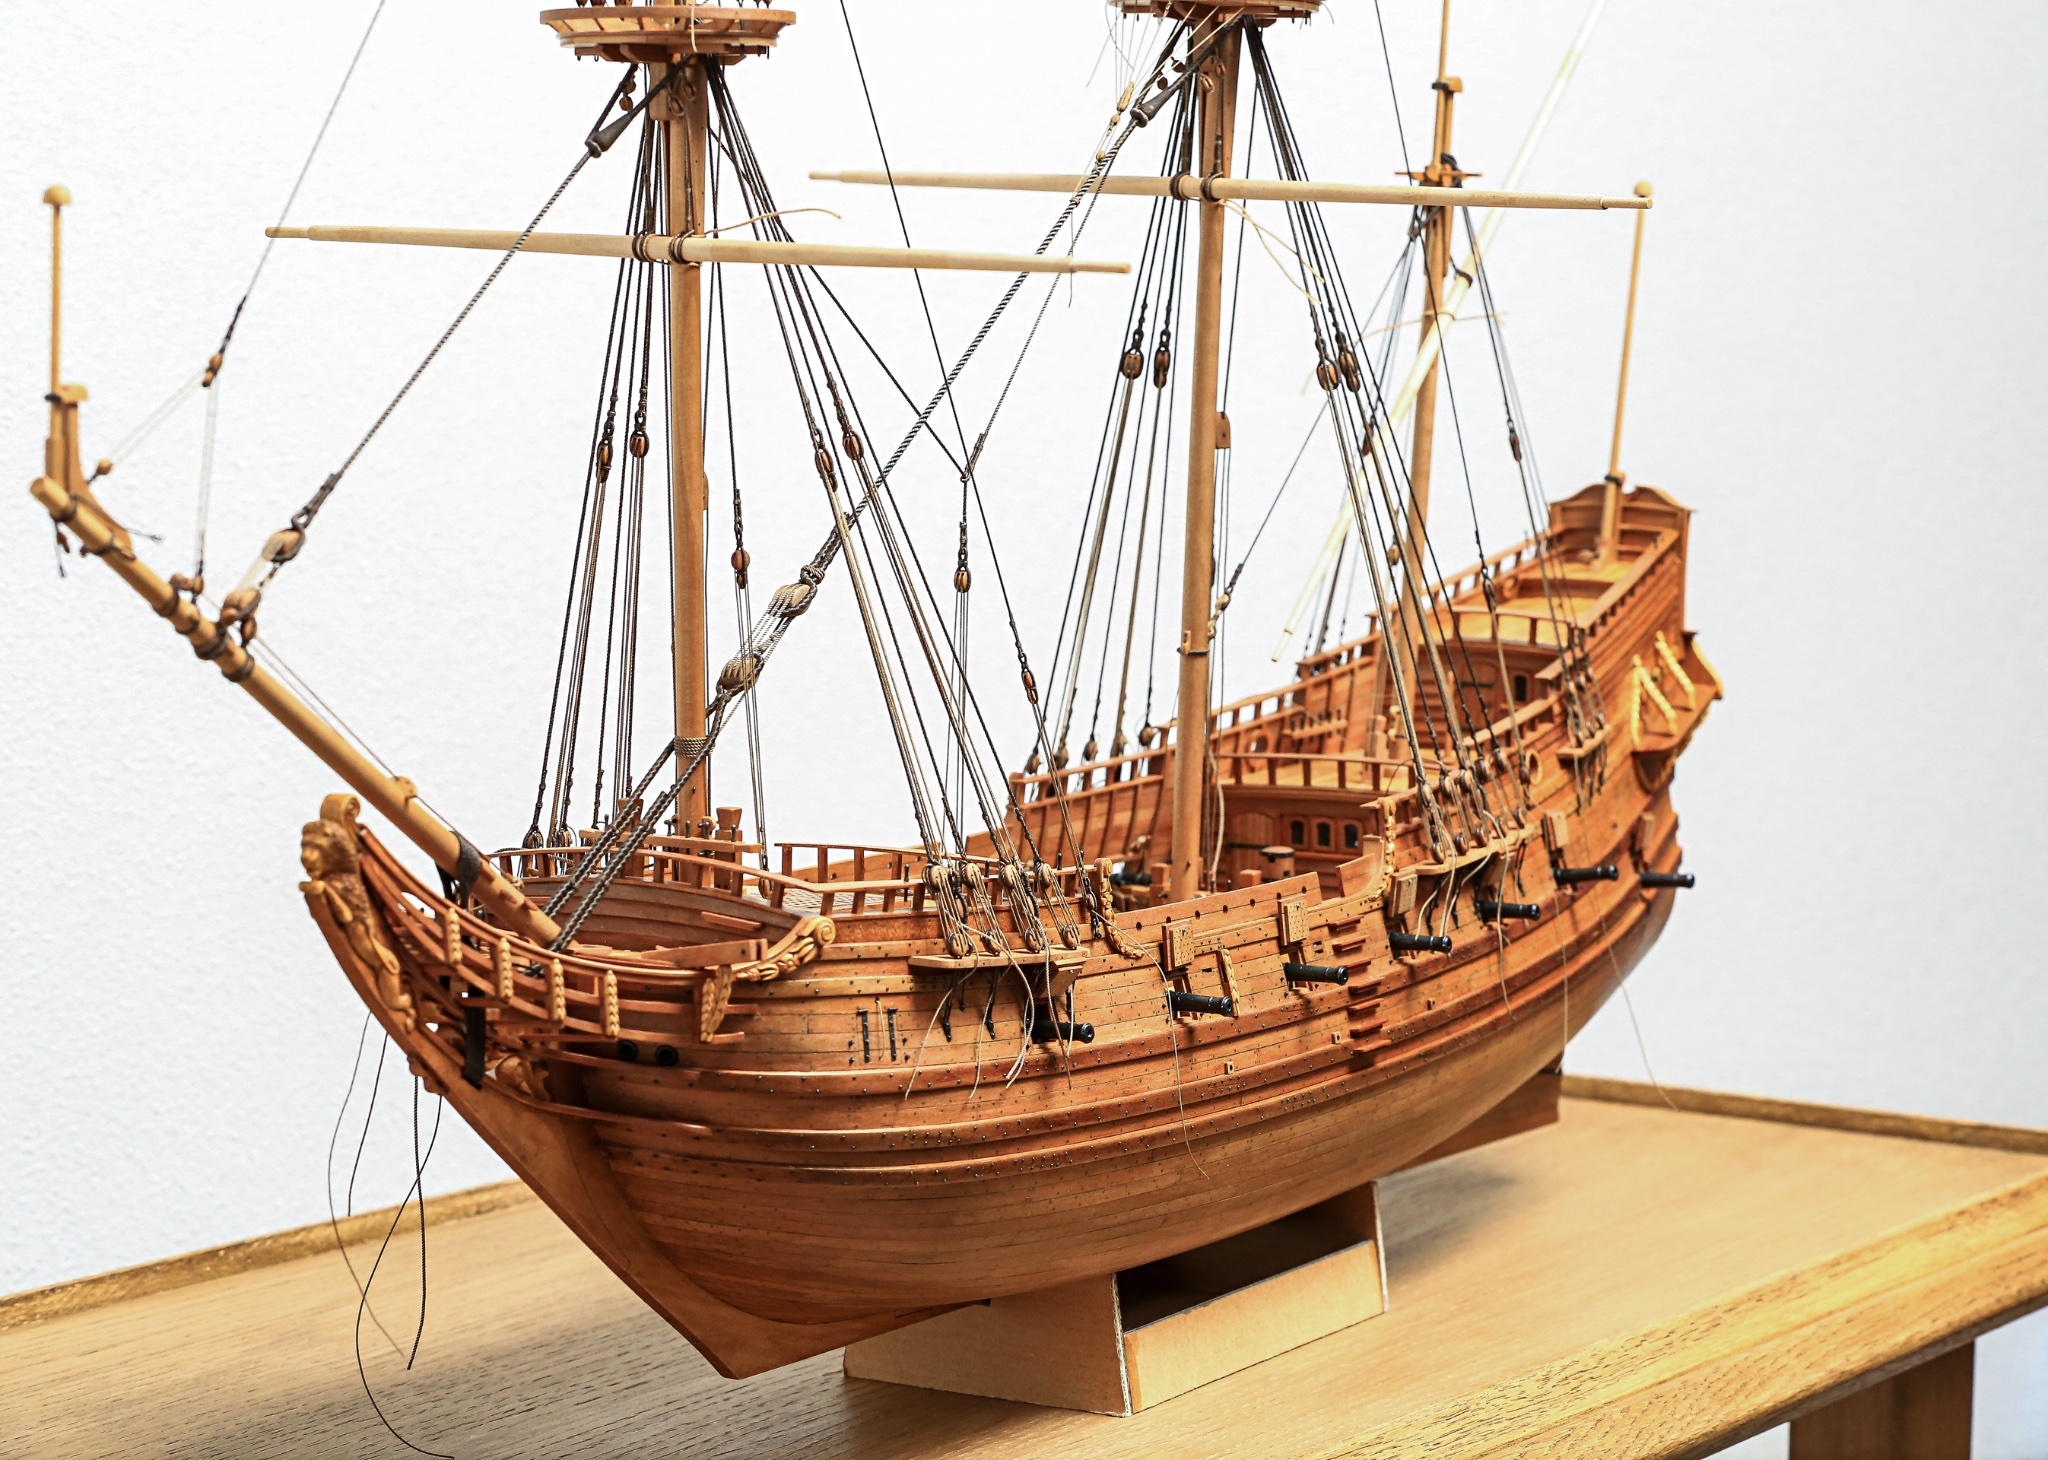
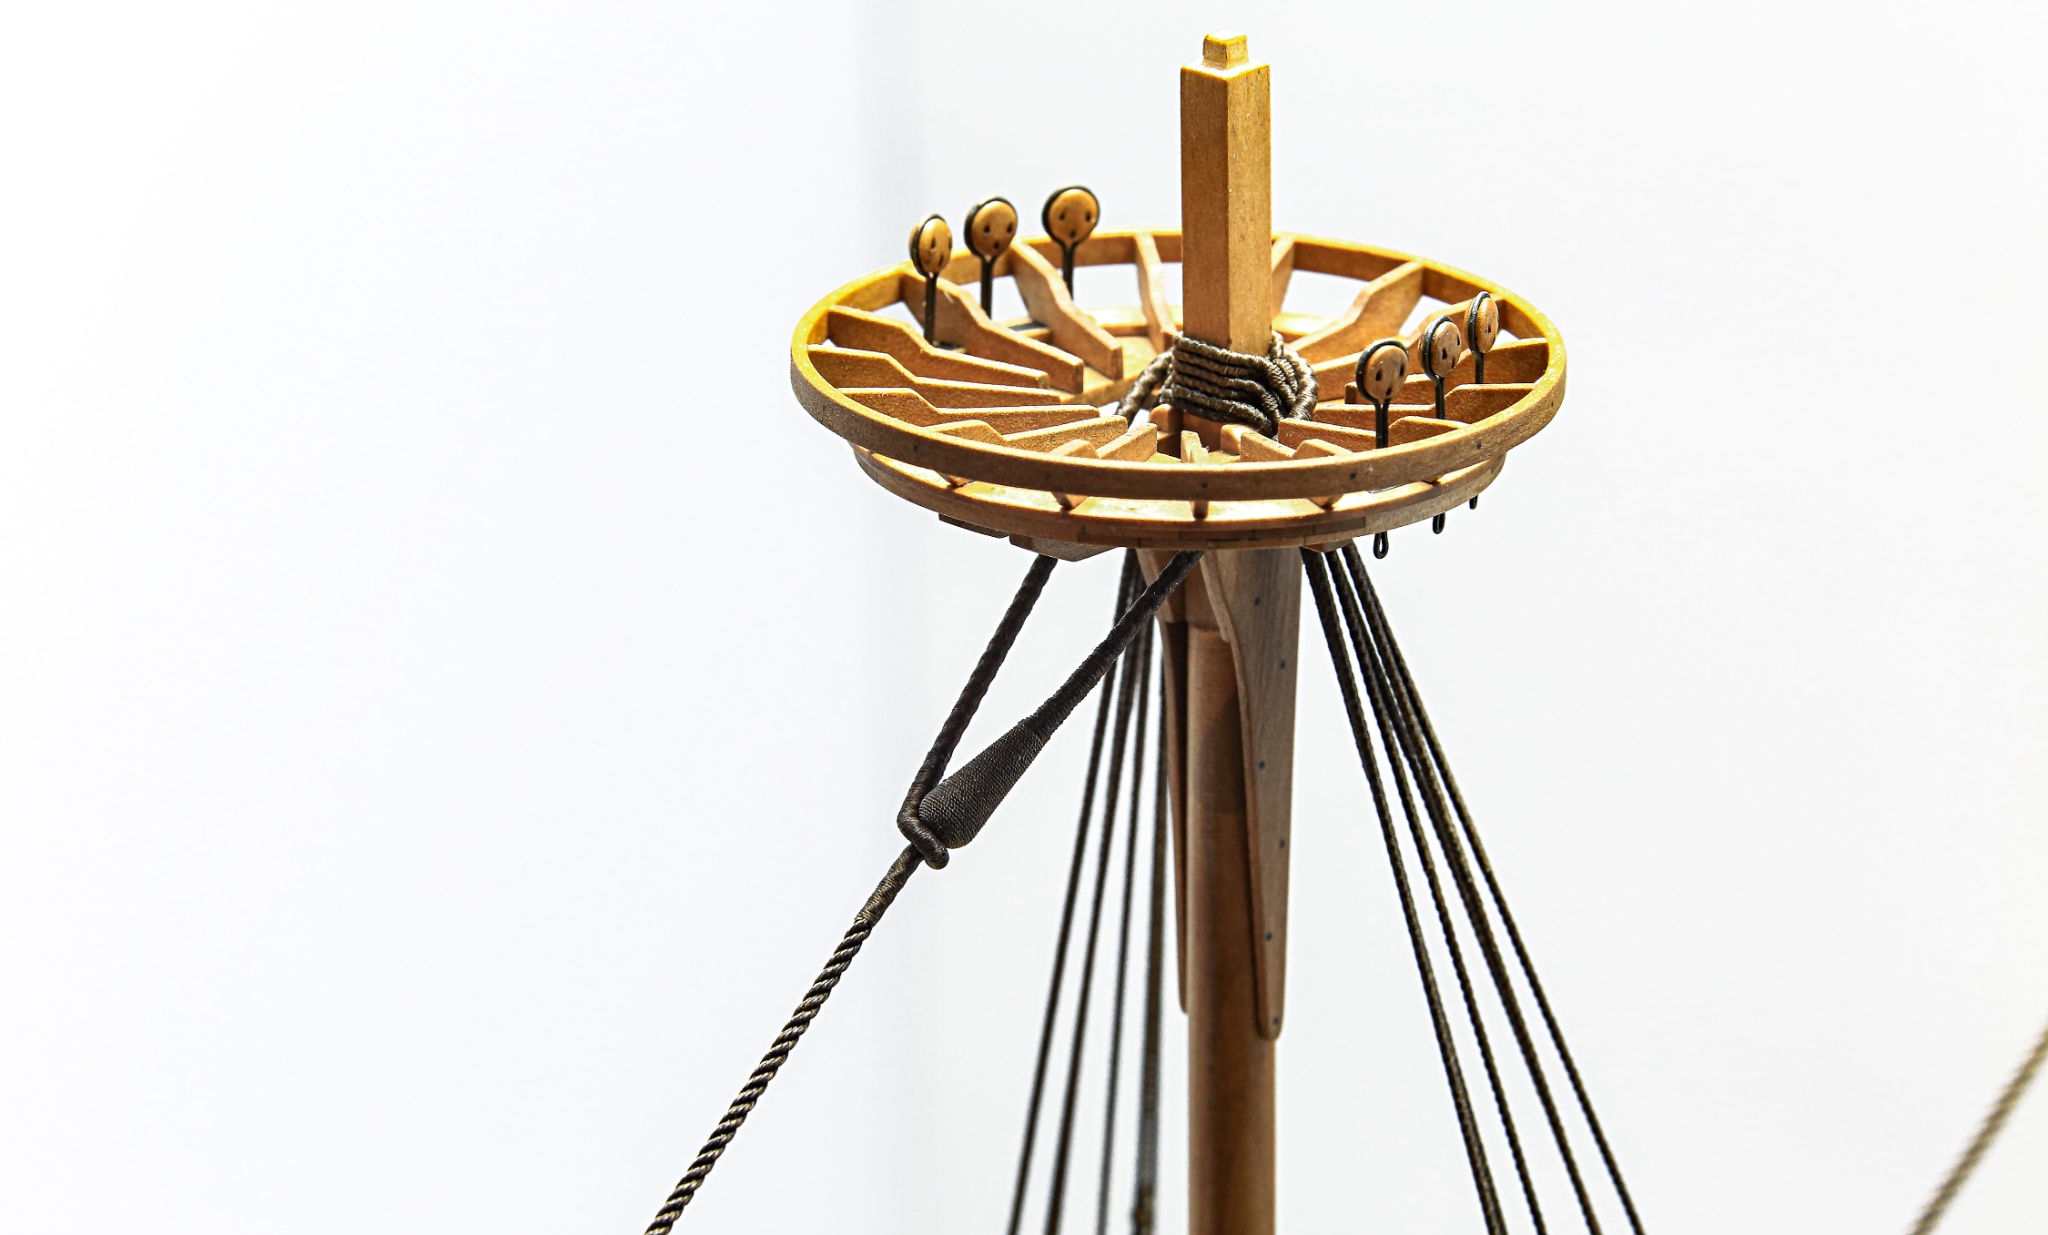
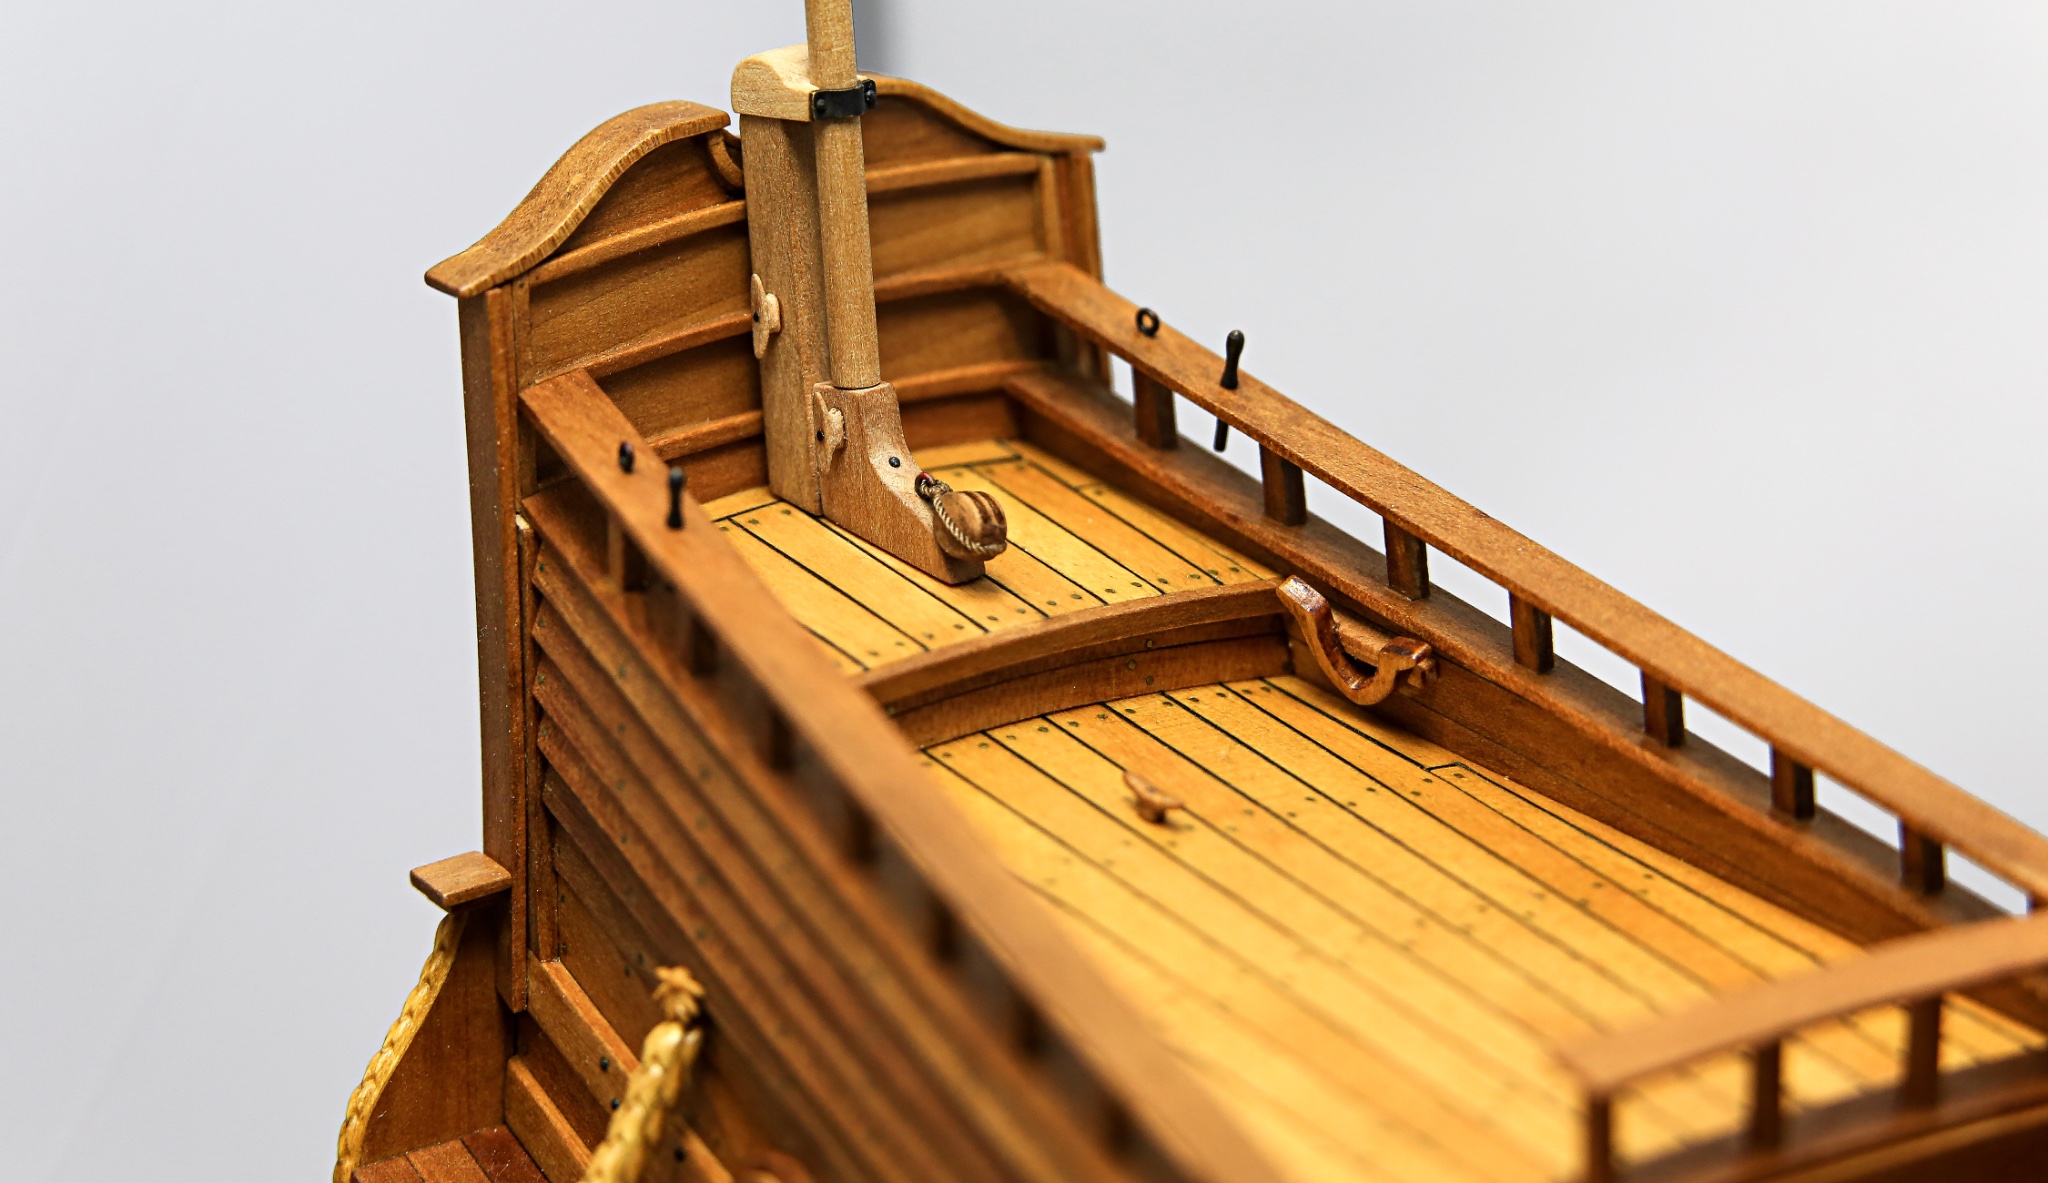
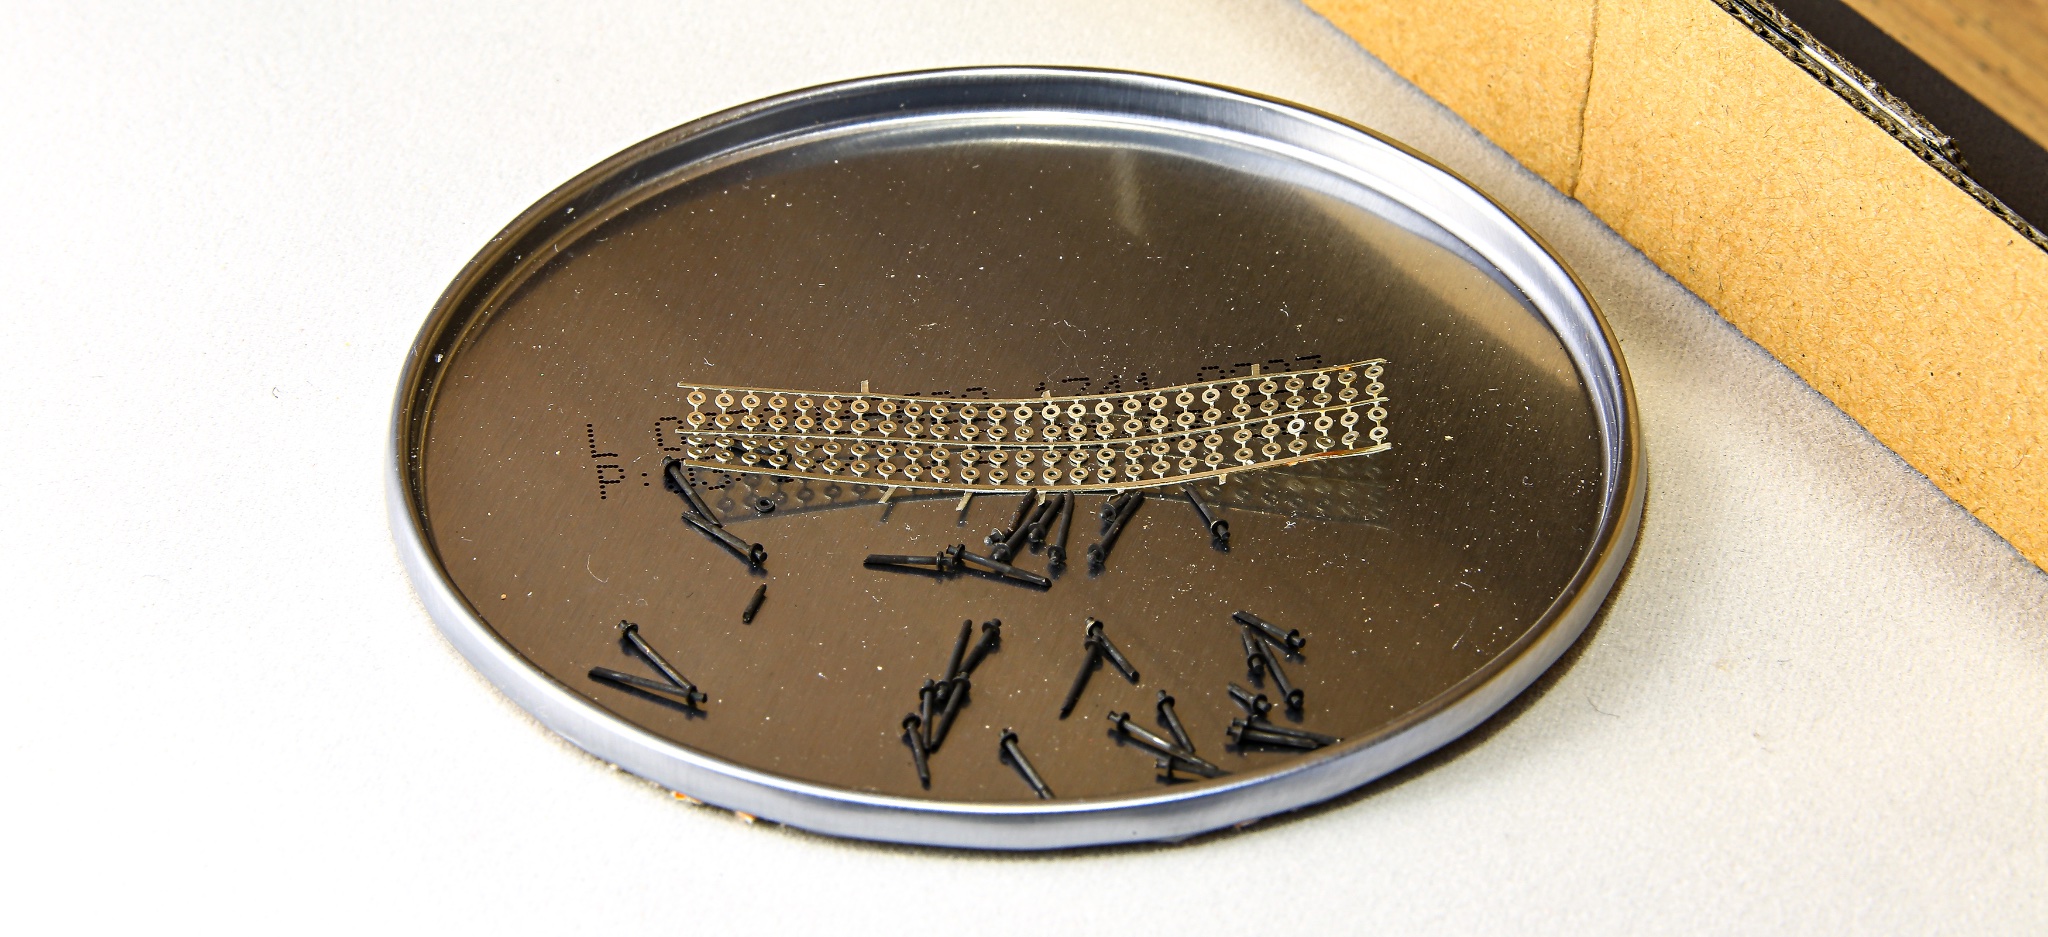
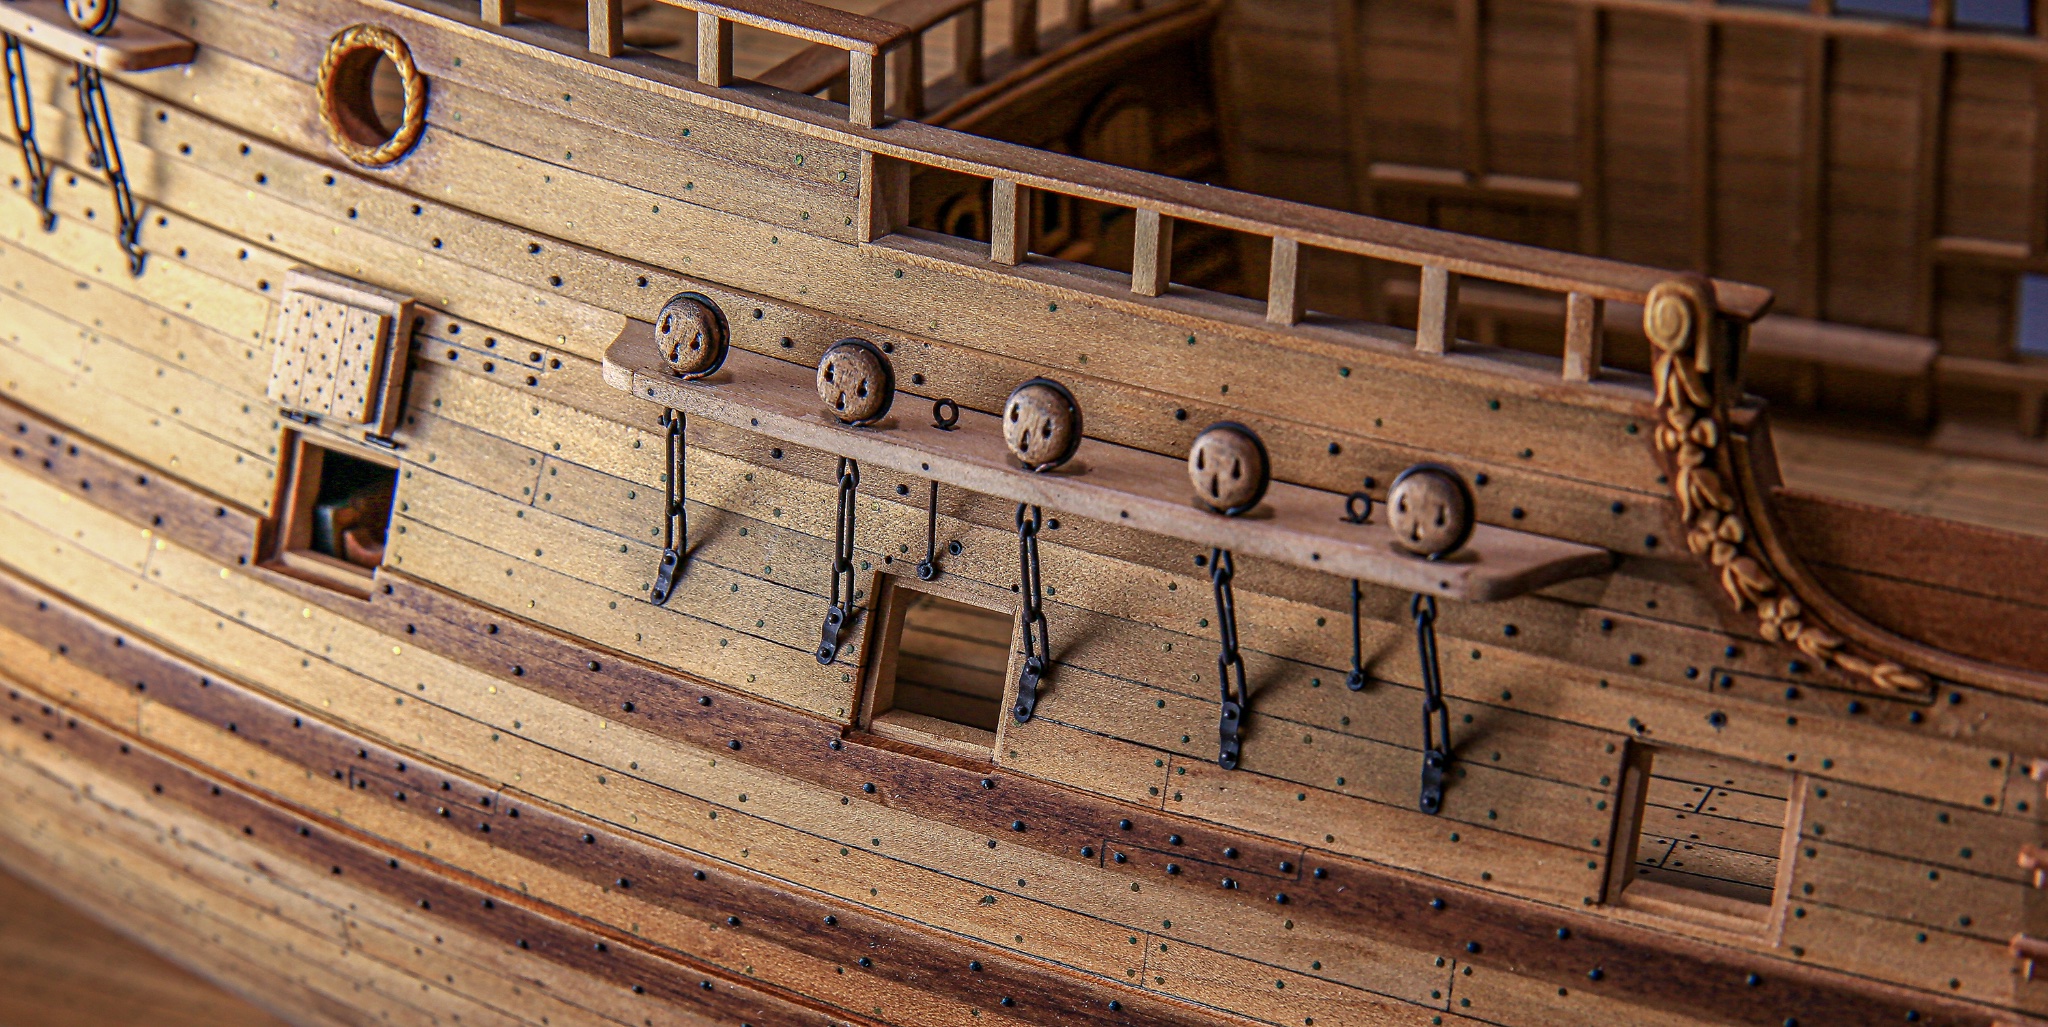
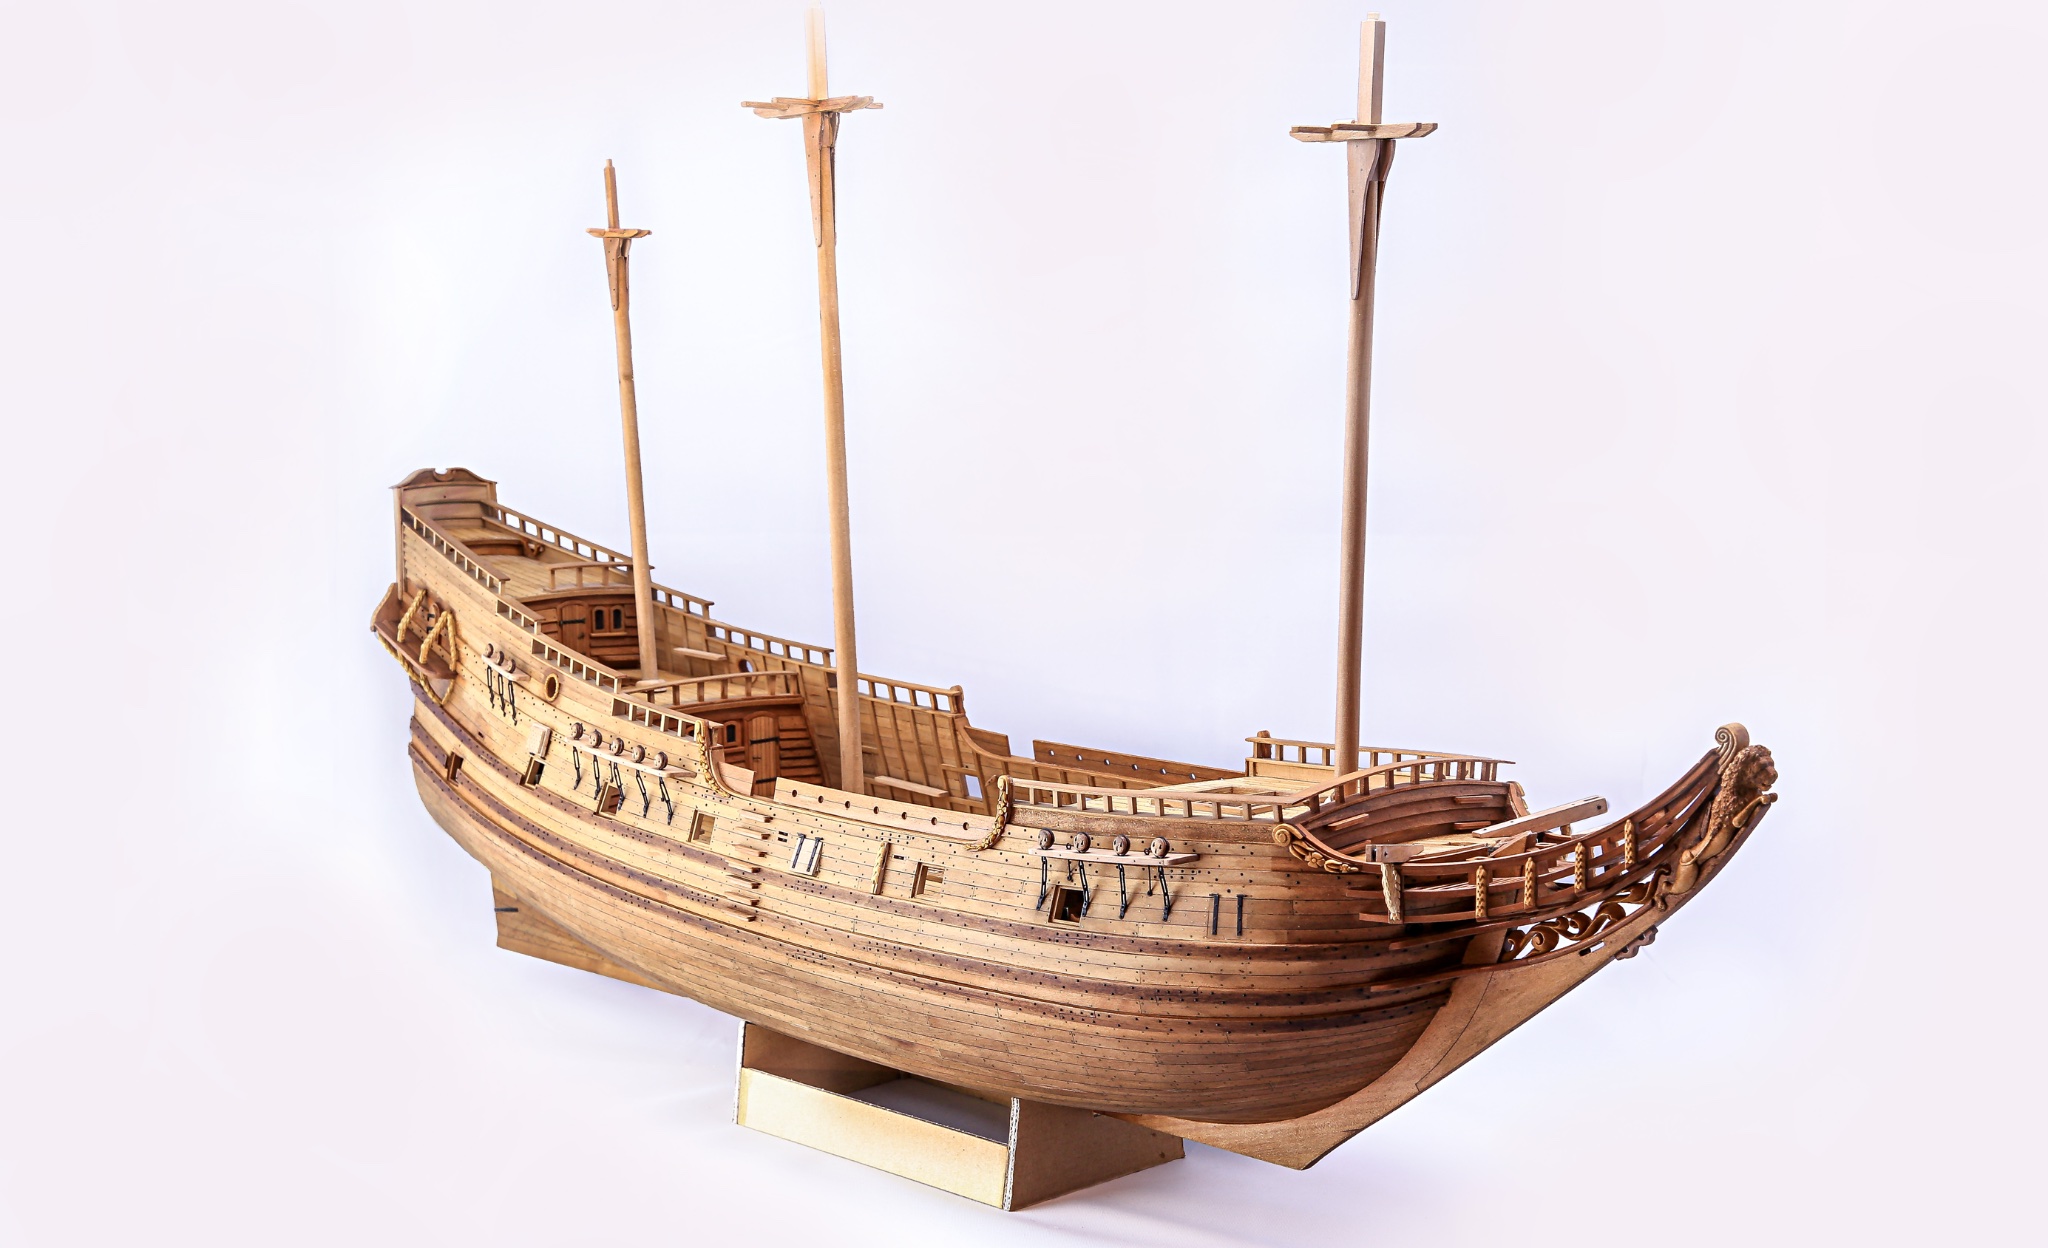
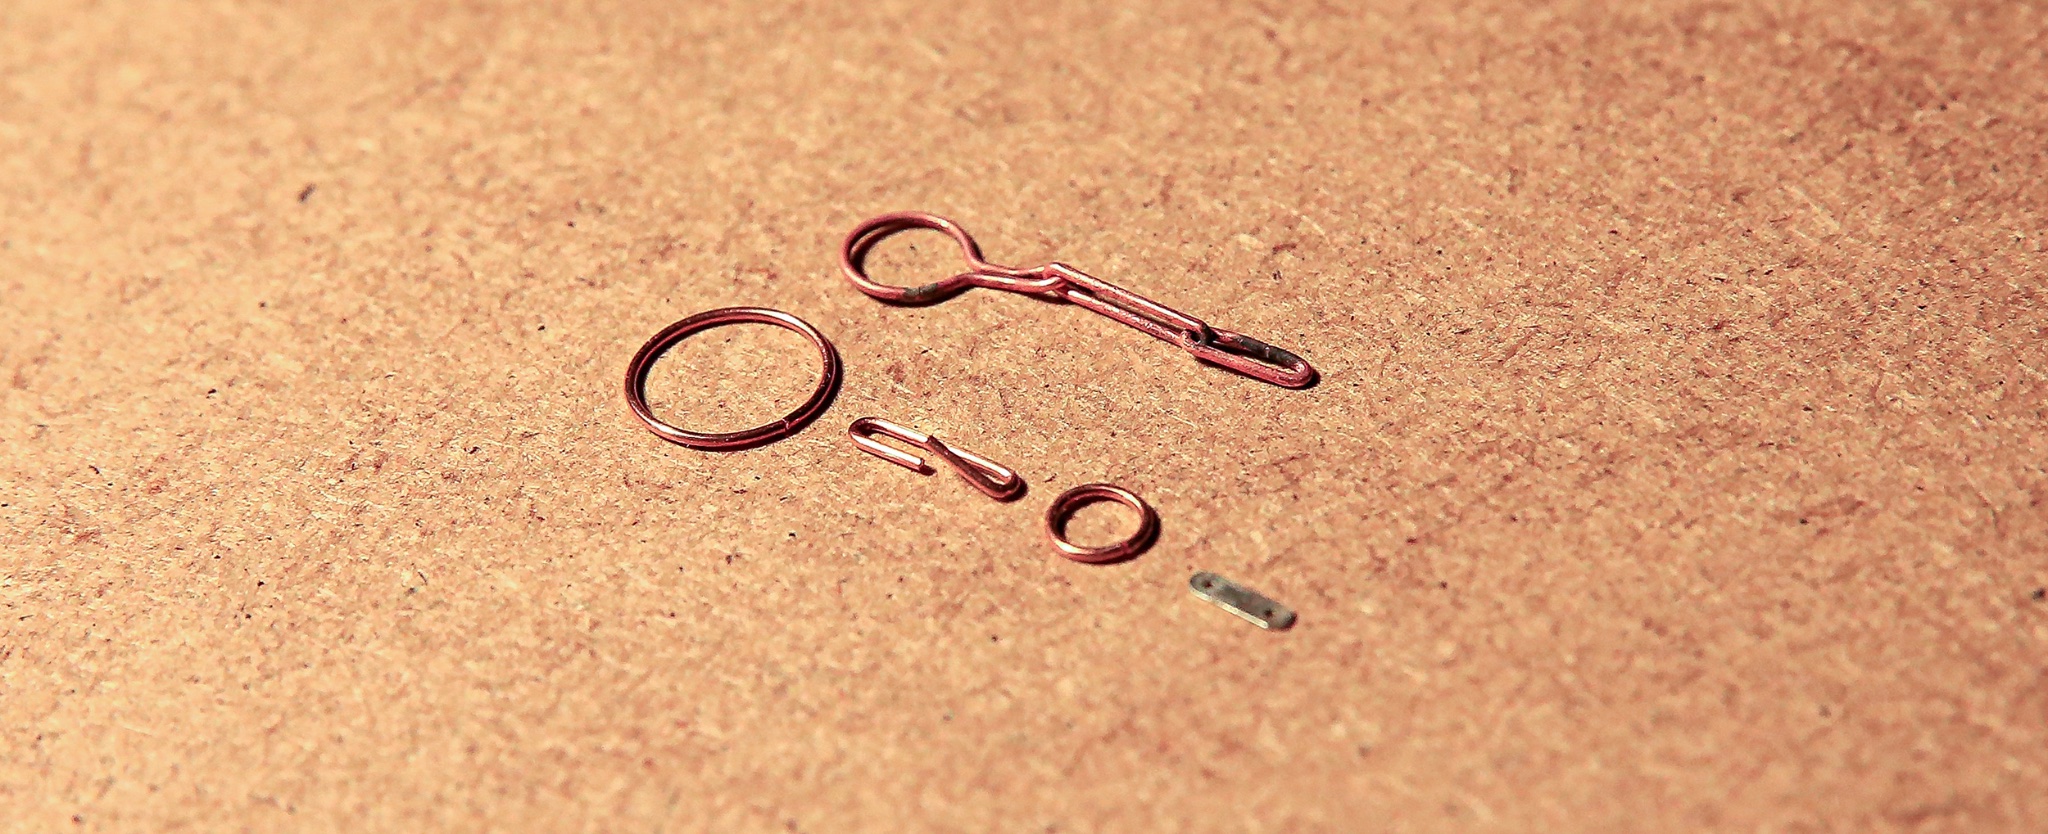
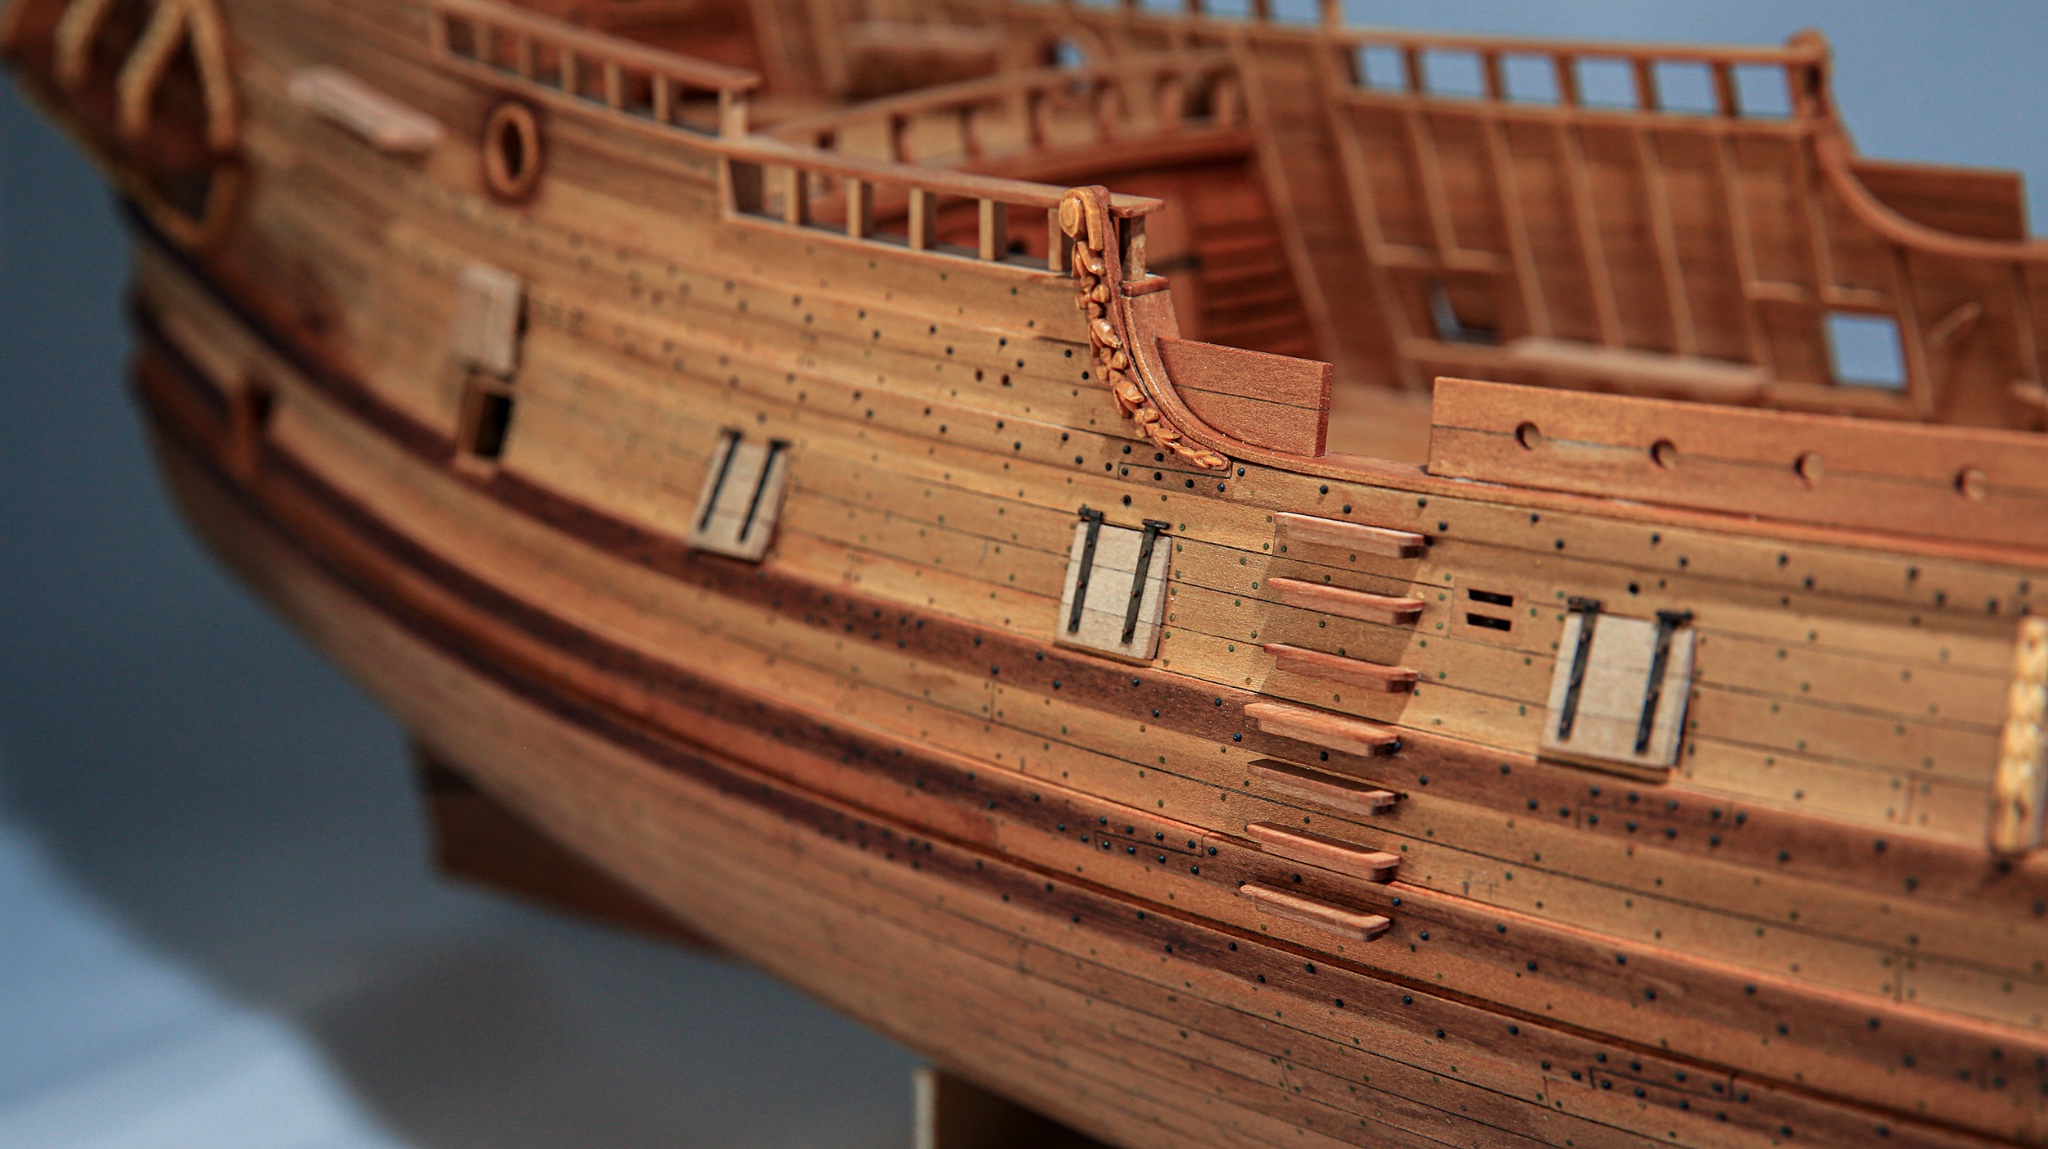
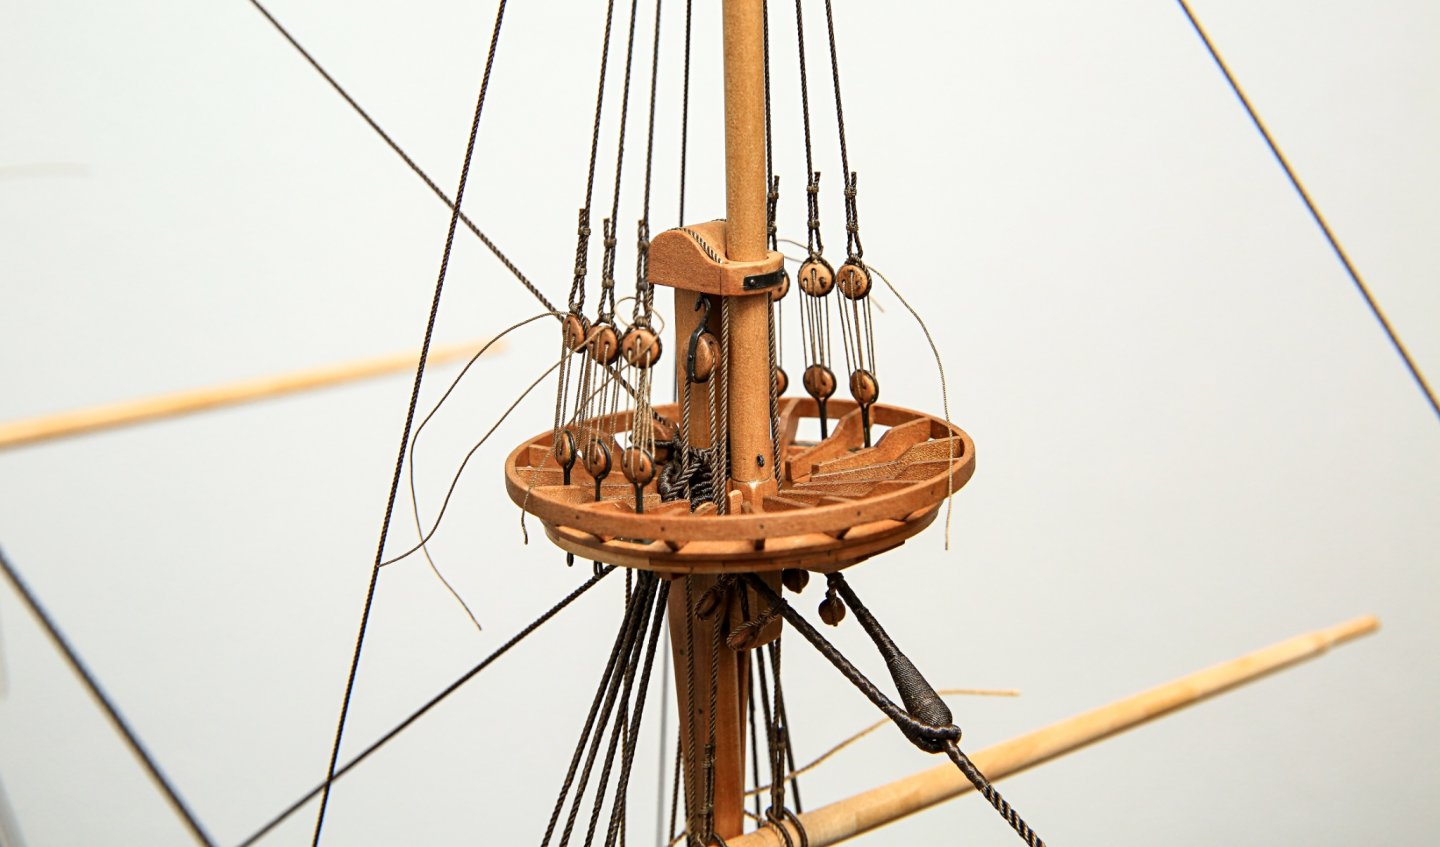
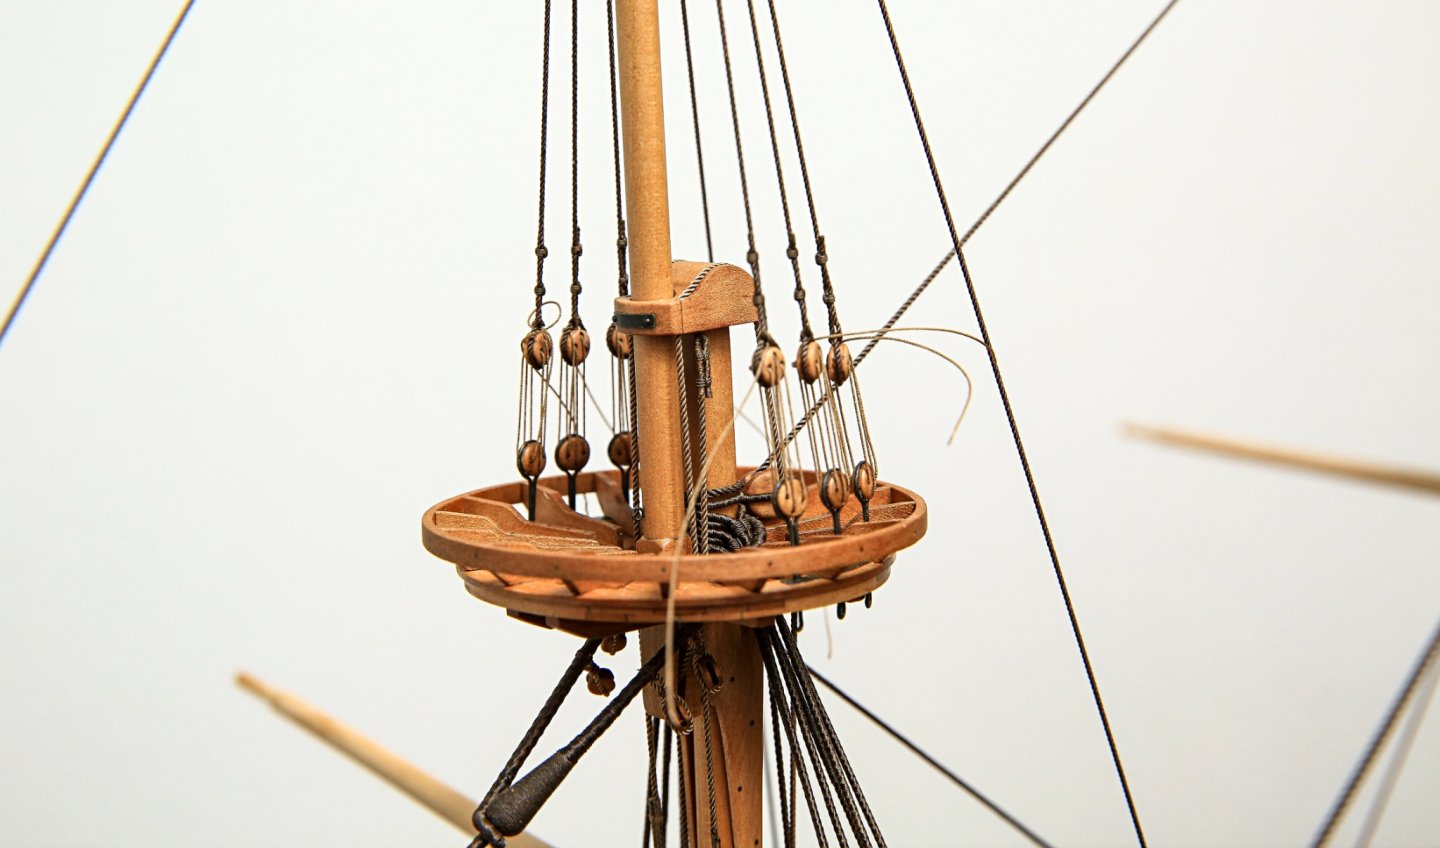
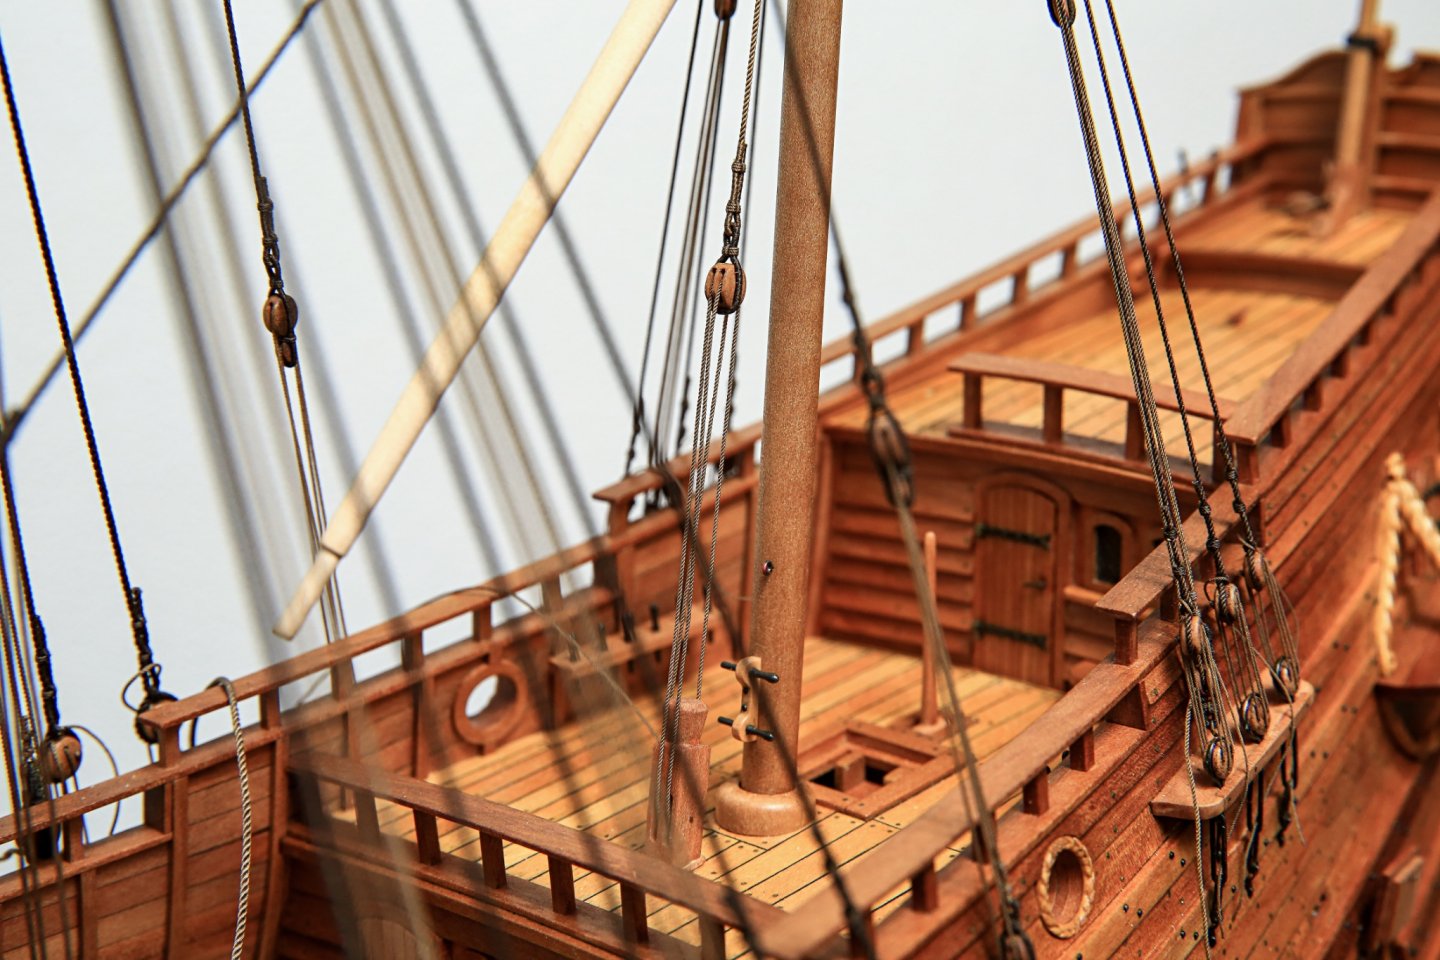
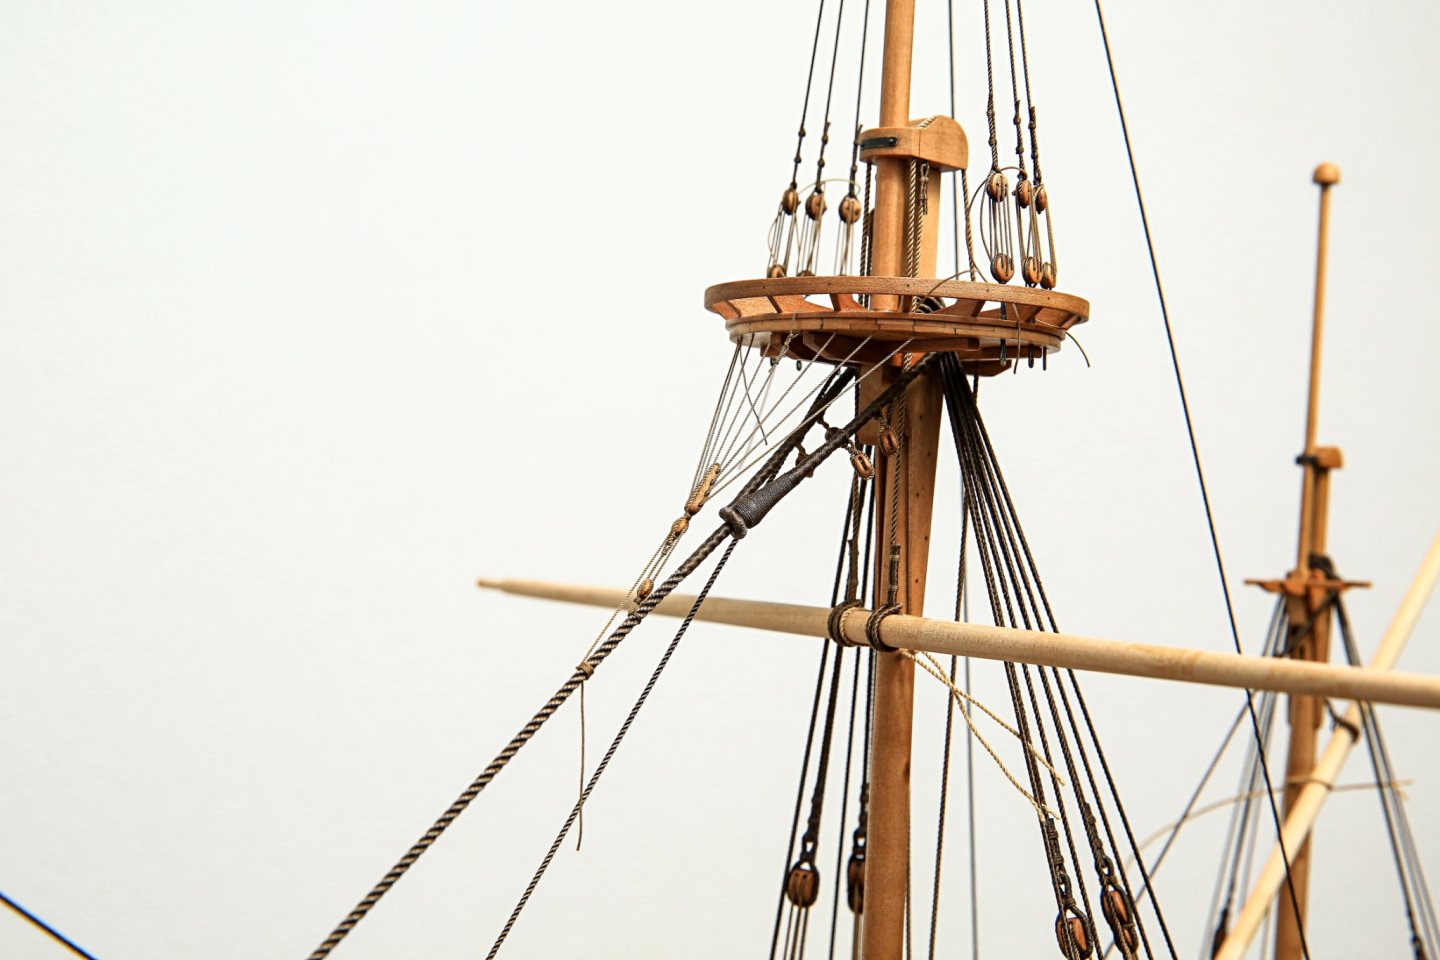
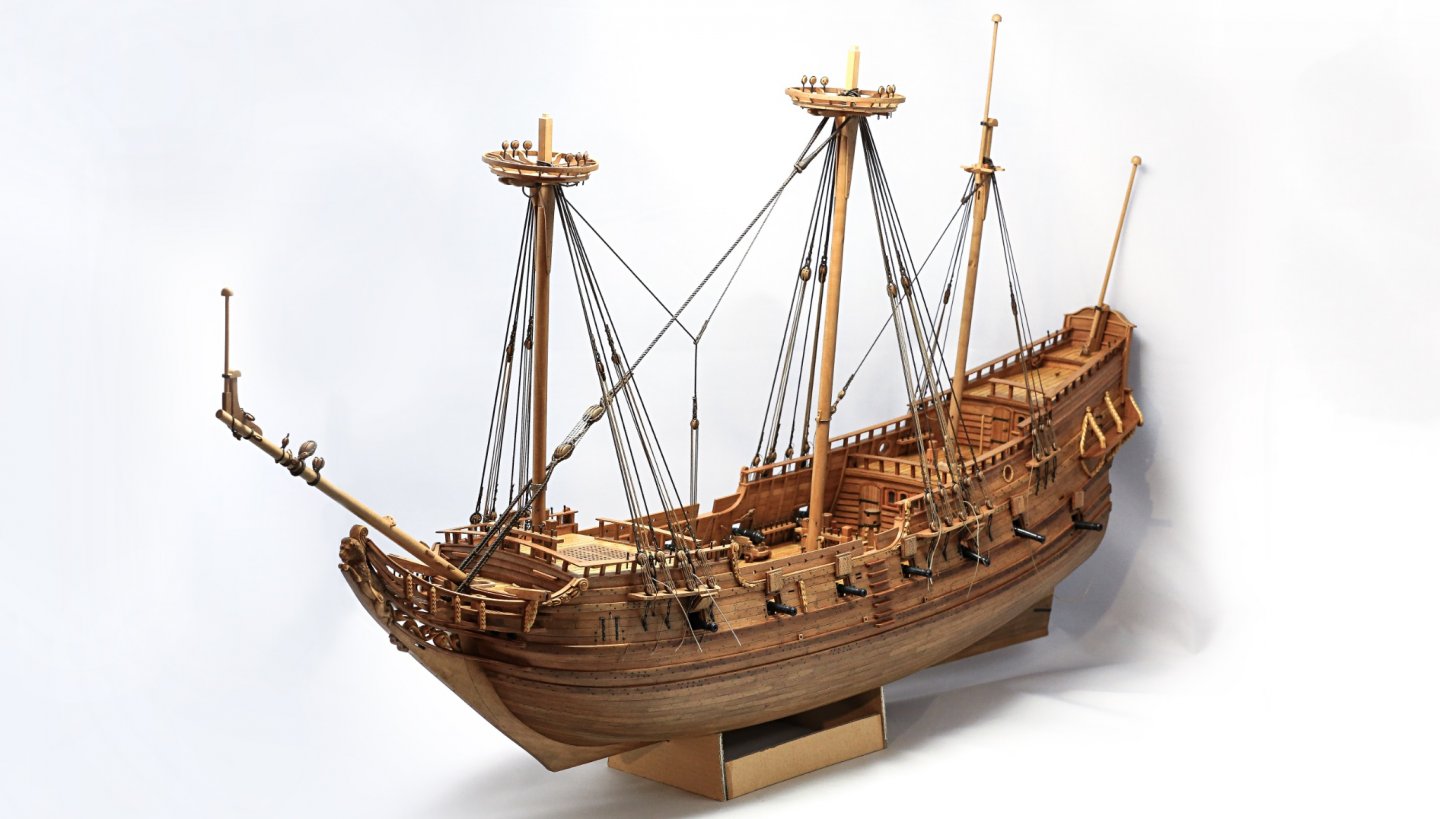
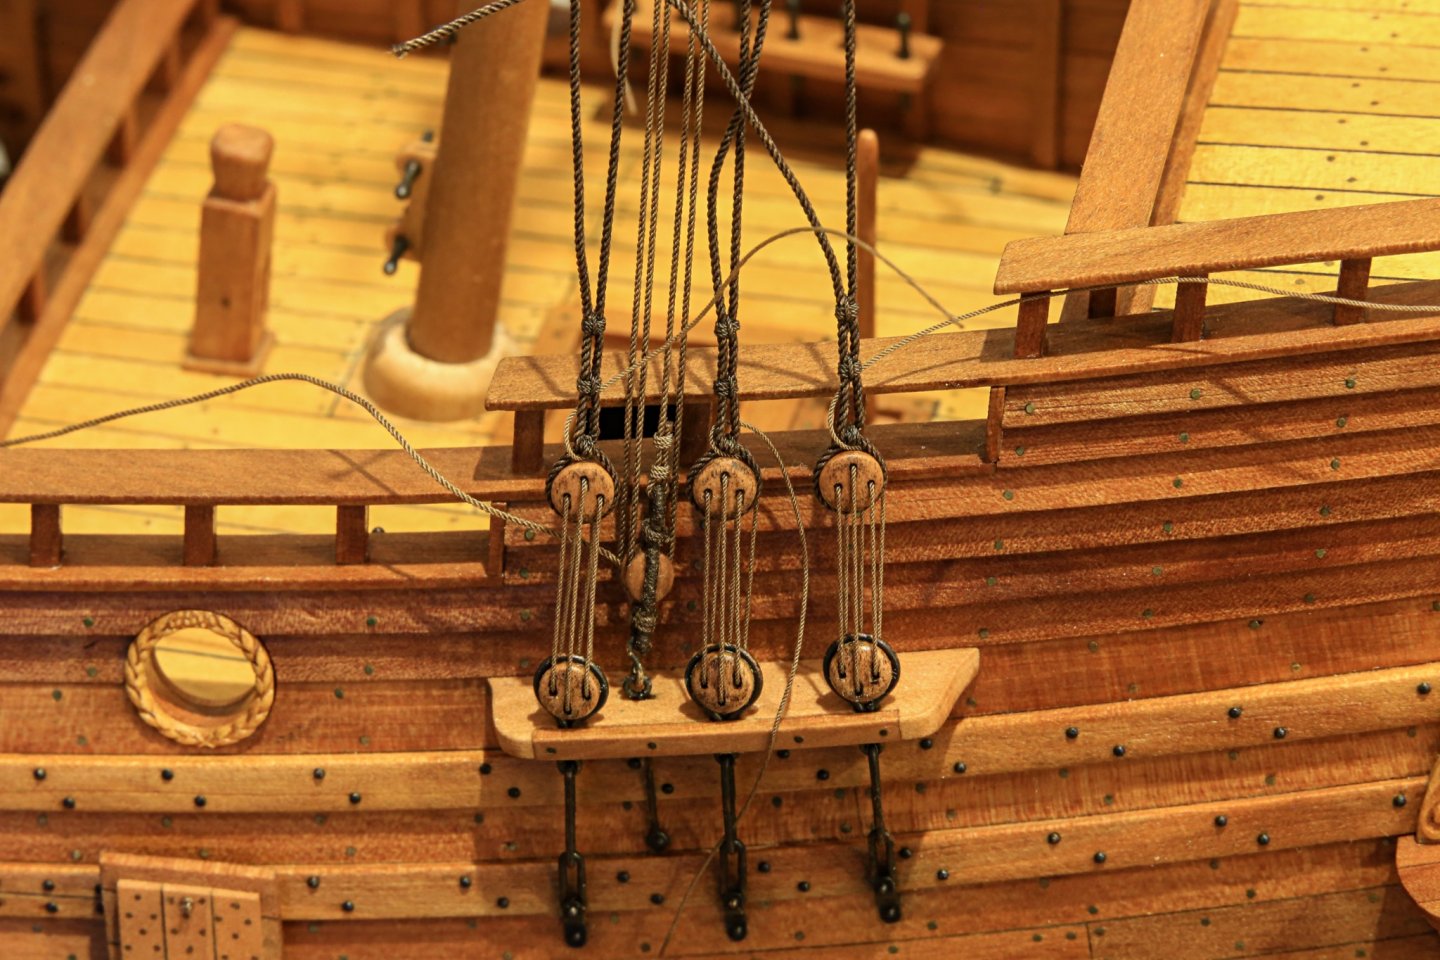
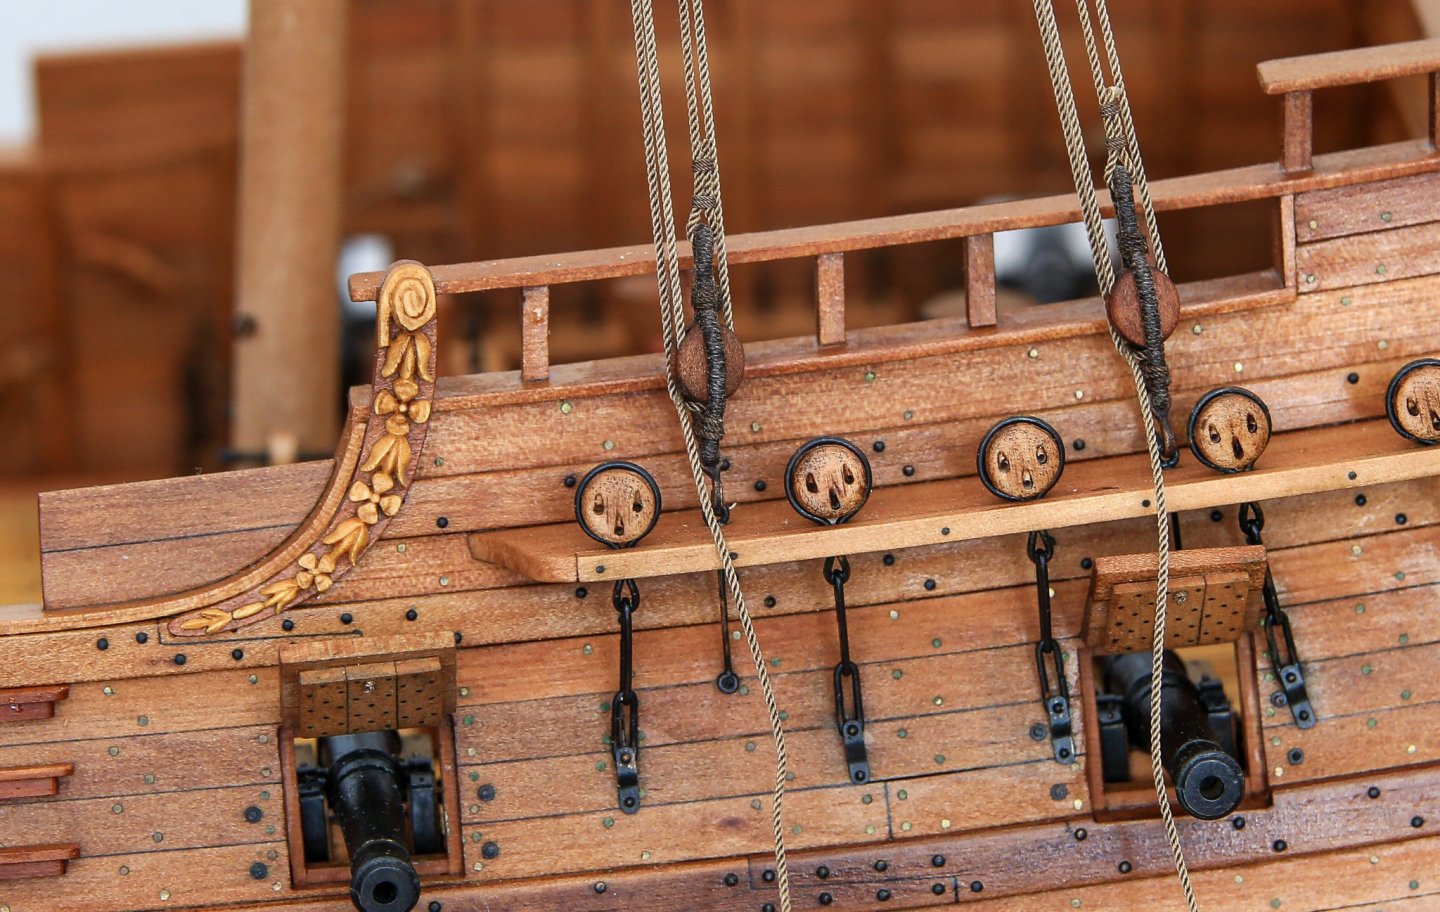
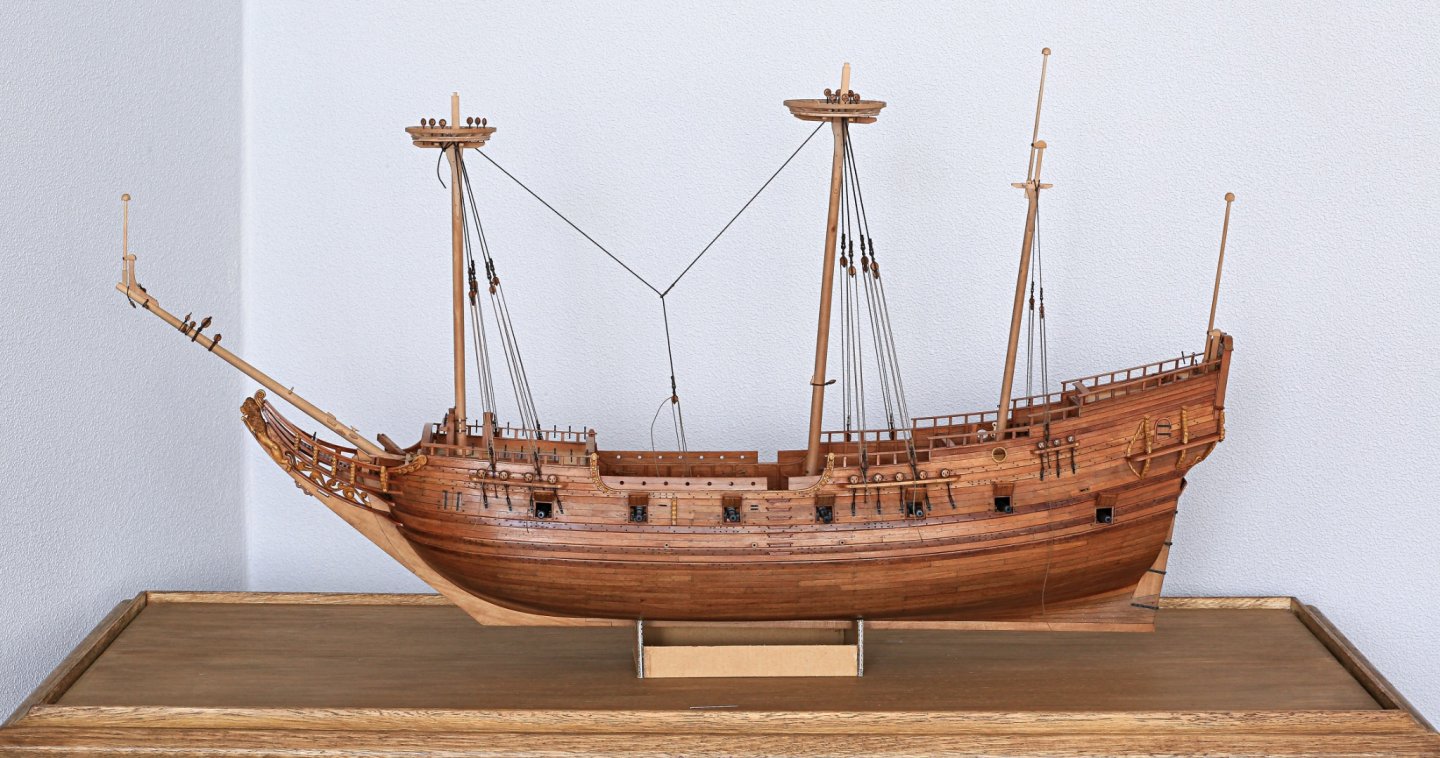
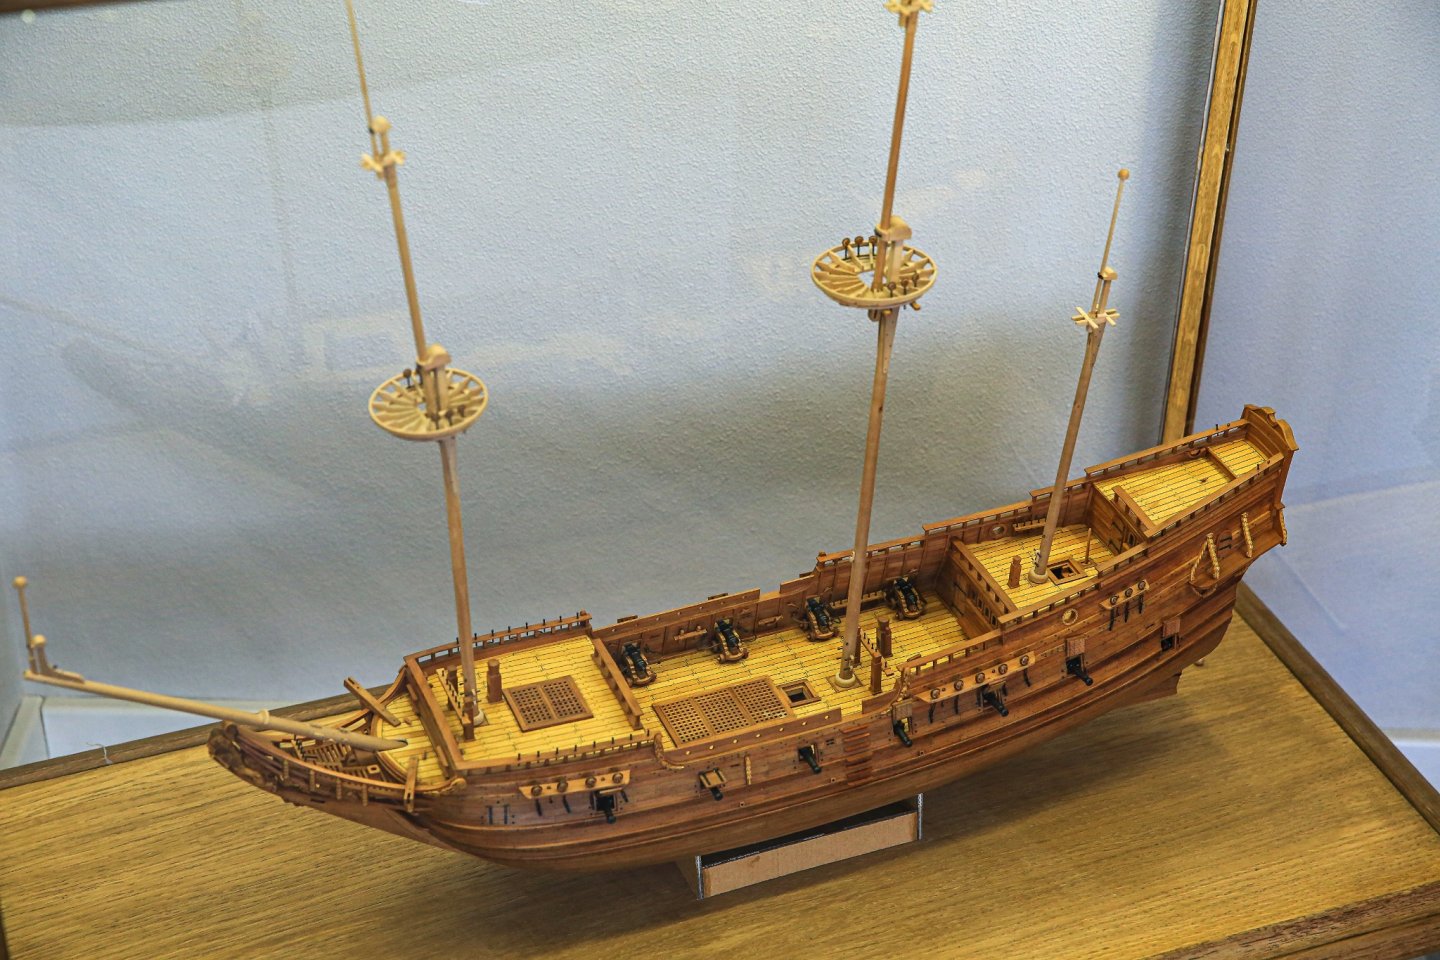
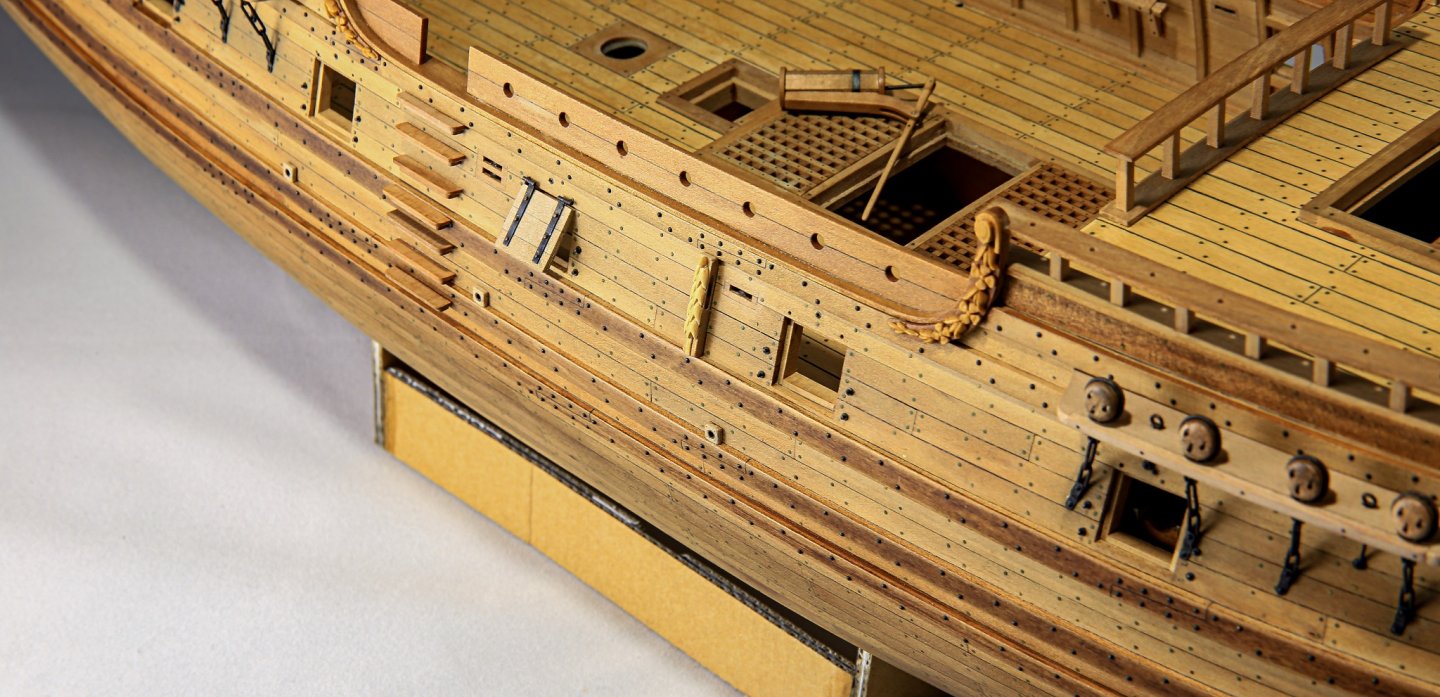
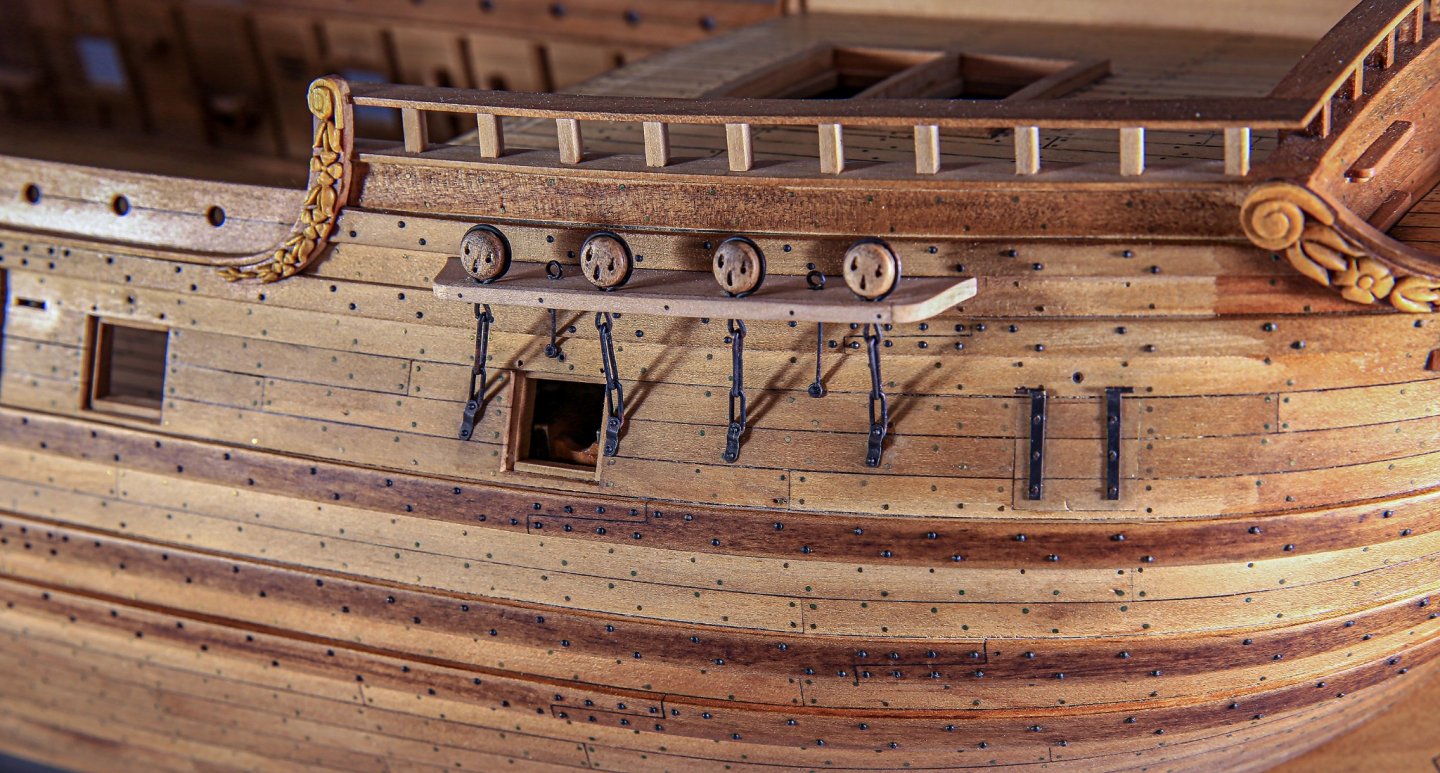
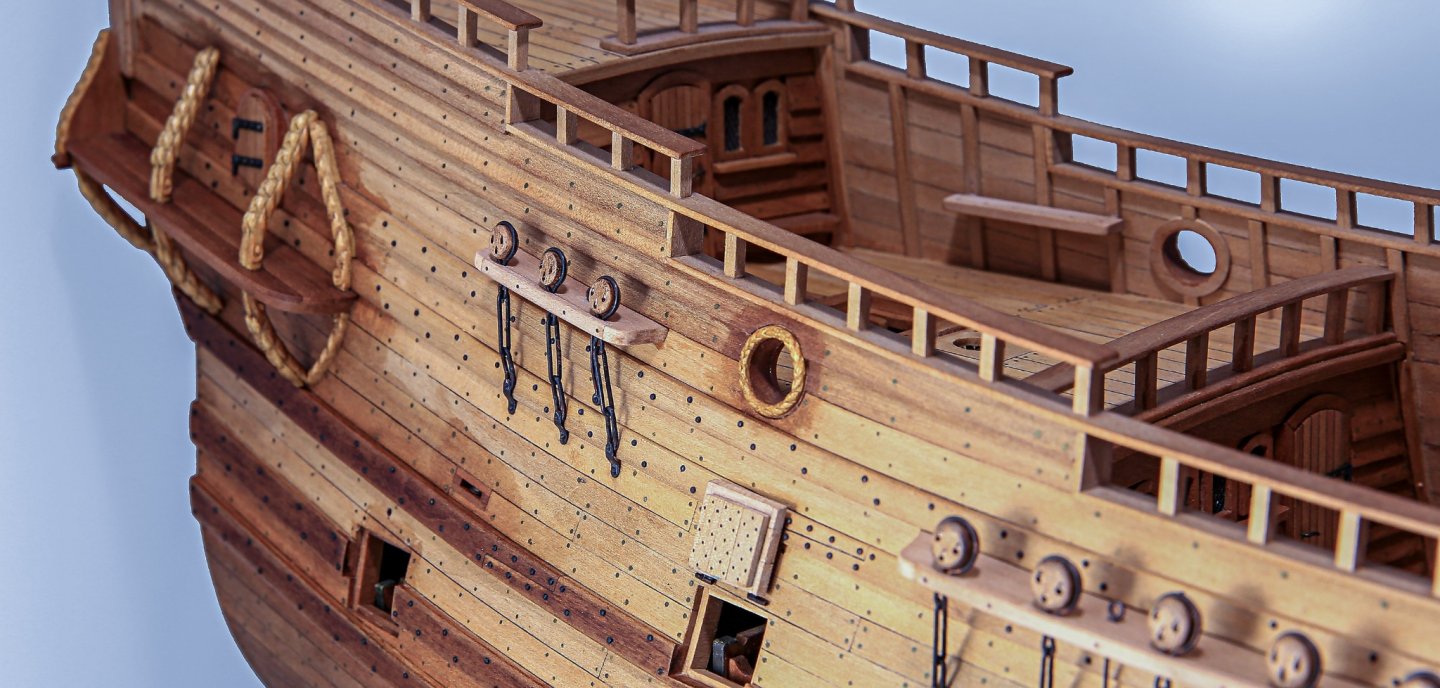
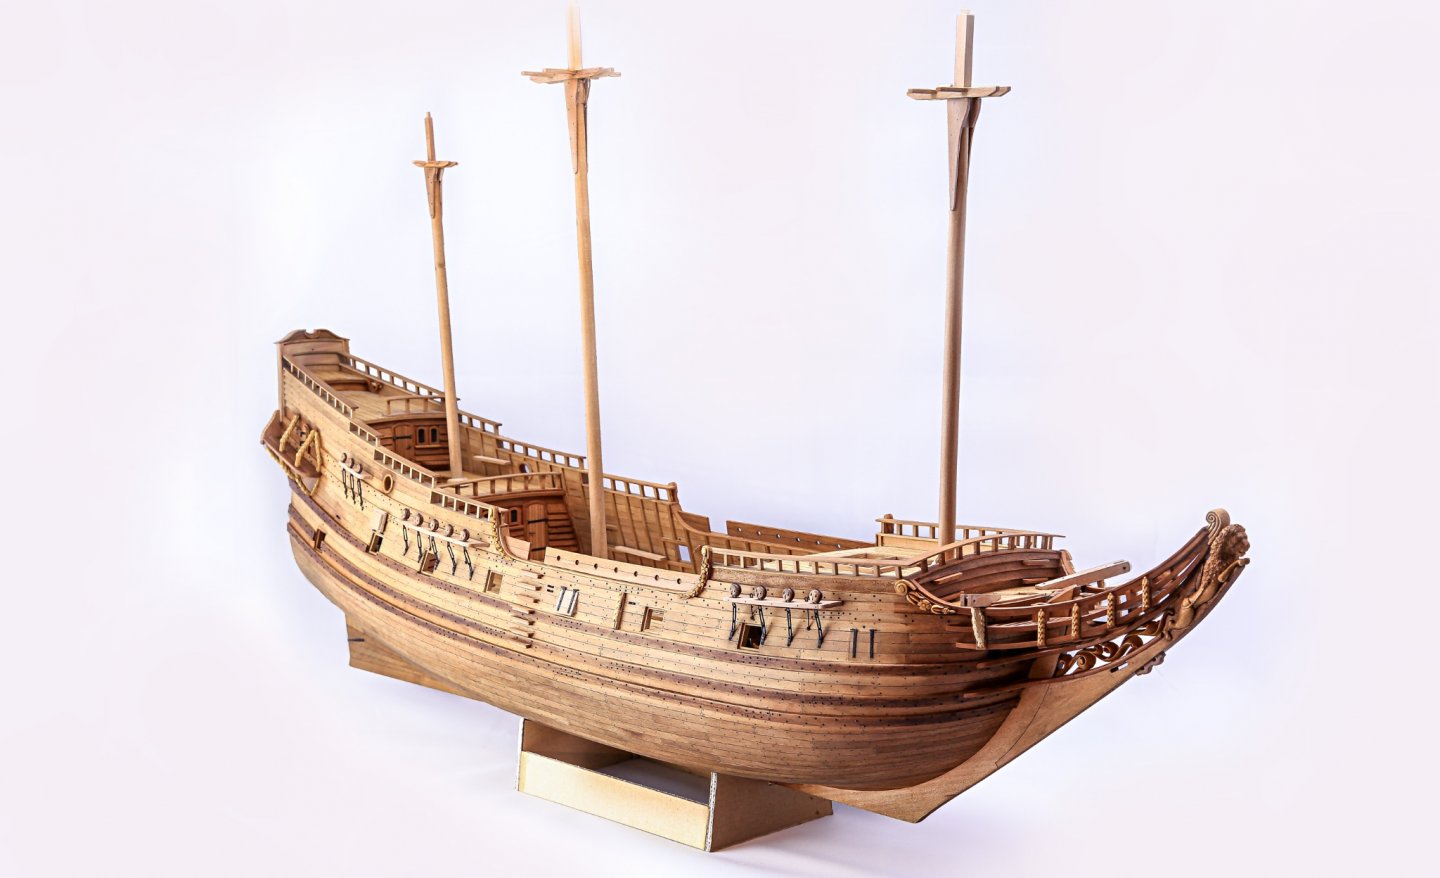
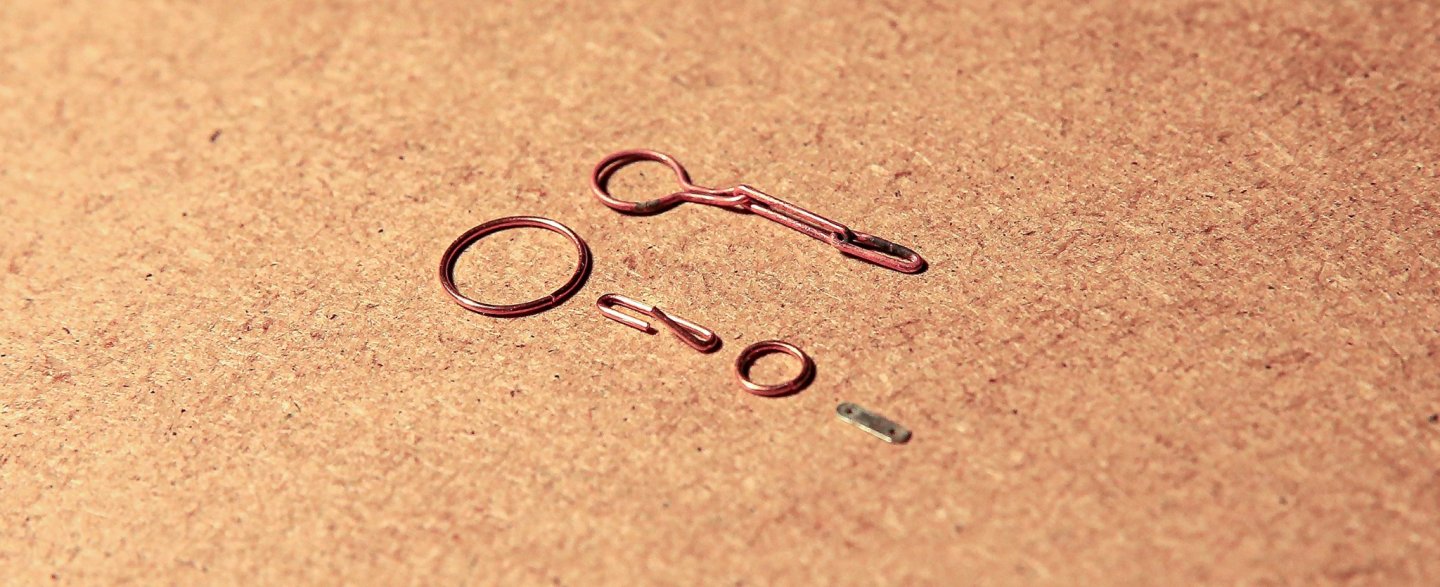
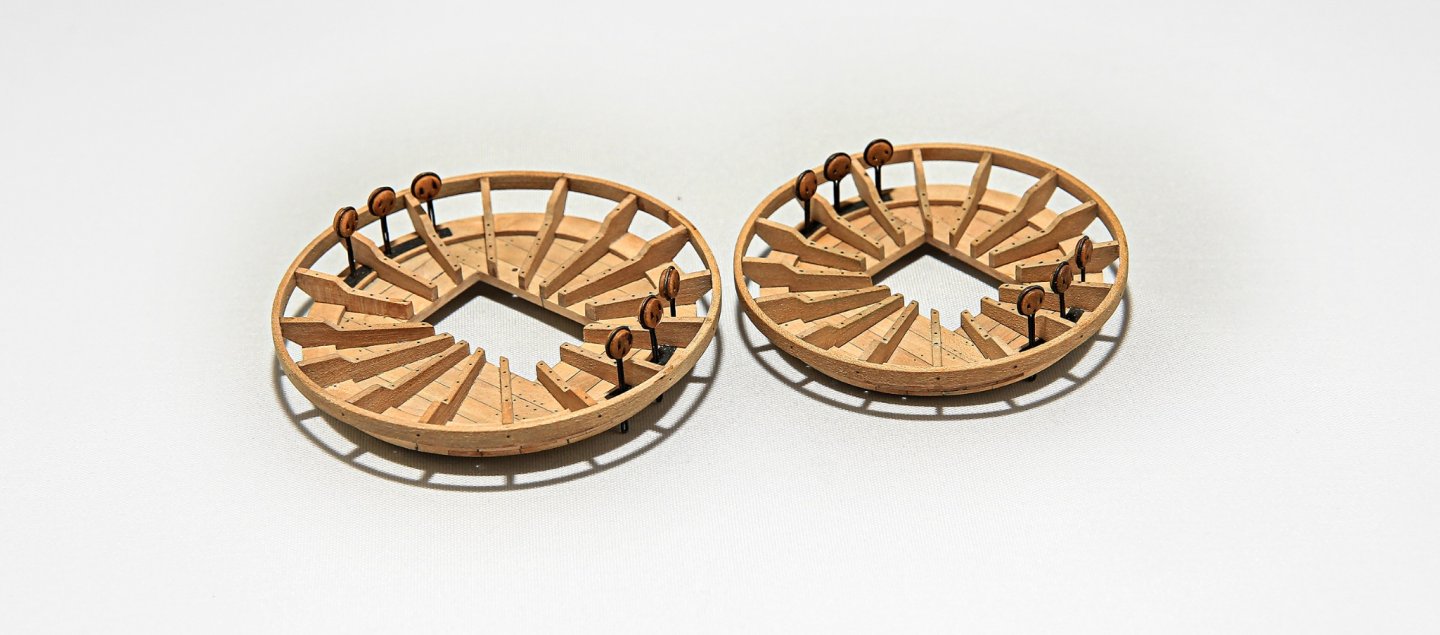
Hi All... after a long time 😂 Finally I've managed to pull myself together and sit behind the desk to push some work ahead 🙃 For those who were waiting for or wondering if topic will be continued... I have some small updates 😉 Basically I'm trying to complete all deck fittings and some other little hull "accessories". Also I've completed channels with deadeyes and chains. Chains... nothing fancy... just copper wire (0.6mm) and silver solder. External ladder Fore and main mast tops finally together 😂 And some beauty shot of whole model Cheers! See you soon!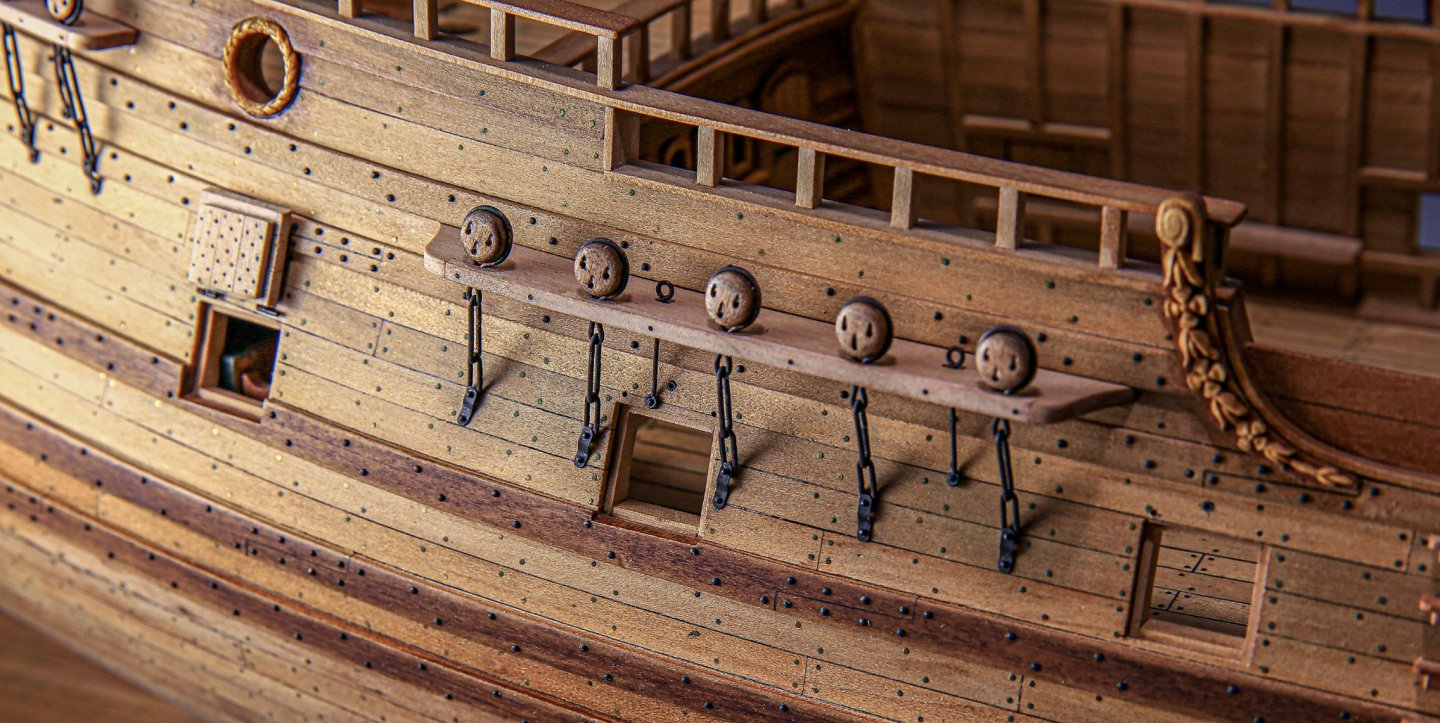

- 222 replies
-
- 16
-
-
-
Hi Siggi I have to say that I'm always impressed when I see work like yours. It's just a begging of the build but already we can see that is gonna be amazing model. Your previous models are smashing!! How come I've missed them earlier? Really looking forward to follow your updates. Can't wait to see more photos! Good luck! Take care and kind regards, Mateusz
-
Mike I'm looking in each update from your side Simply beautiful... You're right there is a difference comparing photos. Thanks for names of the paint... I really like red hue which you achieve. Looking forward for another update
- 452 replies
-
- 6
-
-
- cheerful
- Syren Ship Model Company
- (and 1 more)