

robert952
-
Posts
922 -
Joined
-
Last visited
Content Type
Profiles
Forums
Gallery
Events
Everything posted by robert952
-
 Sure. Give me a few days. On images I'll clean them up, probably 2 shots per page. For text pages I'll just scan them. The section is called "Muscongus Bay or Friendship Sloops." I'll post to WeTransfer so they come across full size. PM me email addy.
 -
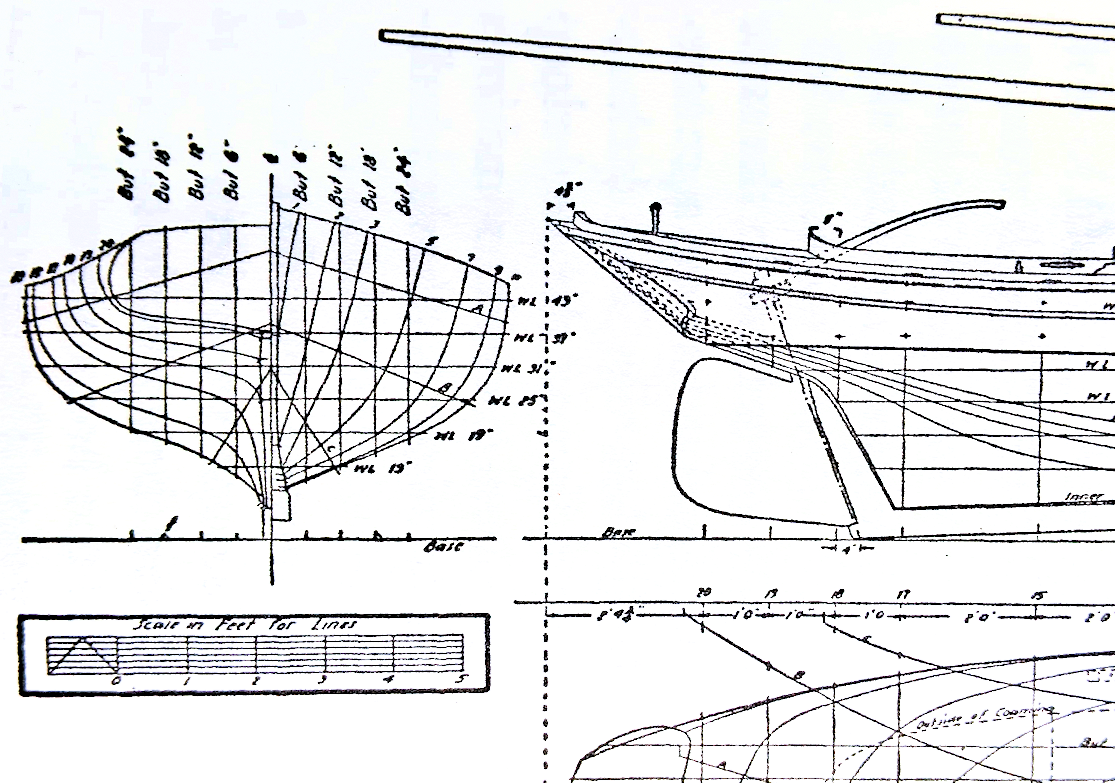
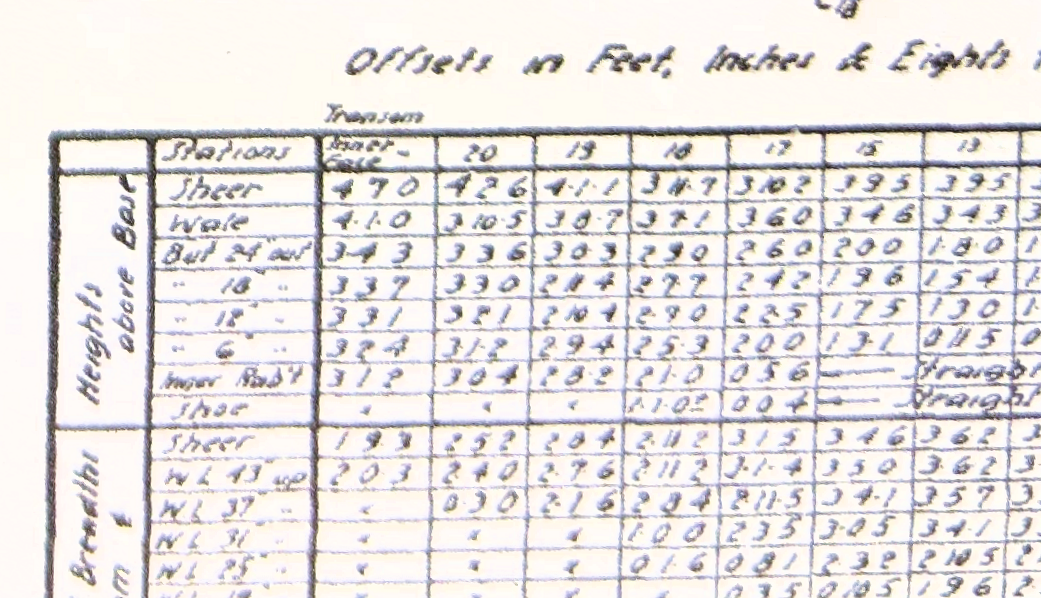
I have Chapelle's book. I used this book for my current project of the peapod. As stated, the book is a wealth of information on smaller craft. The pics are small as you suspect. The image @Dee_Dee posted above is 9" X 6" as a full page image in the book. Here's how I used the drawings in the book. I took pictures of the pages and drawings using my cell phone (Google Pixel 3a XL. Any camera will do, obviously.) I made sure I lit the image up and held the page flat as possible. I find a photo works better than scanning the page. It gives more options to tweak the results at higher resolutions over a scanner. Here's details from a shot of the same image in Chapelle's book I took today. I tweaked it using a photo editor: 'faked' the white balance; played with brightness and contrast. I had to straighten it along a horizontal line. (I can hold hold the camera steady or I can do straight...can't do both apparently). It's a bit of trial and error to get the results you want. The photo editor I use is PaintShop Pro. You can use GIMP (free downloadable software) and, of course, Photoshop. While the numbers are a bit smudged, they are readable for the most part or you can at least take a good SWAG at the numbers. With the scale on the image you have a decent chance at measuring details. And it is not any worse than some drawings I have seen. BTW, this a reduction of 50% of my original image. I wanted to show a larger area of the page and not have the website reduce the image much. Here's details of the offset table to show the detail at full size of the image (assuming only a small amount of reduction by the website. This was at the edge of the photographed area and not as evenly lit but you can see the numbers are readable. (And easier than using a magnifying glass.) Just an option on using a resource with decent line plans.
-
Congrats on completing a nice looking model. And a big thank you for taking the time to put details in your build log. I know I pick up a tidbit or two from reading them. I know it takes quite a bit of extra work to put these logs together. Your work on the log and allowing us to share your adventure are greatly appreciated.
- 55 replies
-
- 4
-

-

-
- Norwegian Sailing Pram
- Model Shipways
- (and 2 more)
-
Looking forward to the magazine. Good luck on this adventure.
-
From various posts and articles, my take is it helps to stiffen and shape the sales, particularly if you want them unfurled and show the sail full of wind. I also recall reading that you can mix color in with the PVA to put a tint onto the cloth since some material is too white.
-
Me too. I haven't worked much on my little project. Got to buckle down and get working on it.
-
I was looking through my 'following' list and wondered how the build was going. I knew it had been a while since your post. I didn't realize how long. Great progess and looks fantastic. Hope to see more on this build.
-
Thanks for sharing this. Interesting. I had lost track (well, quit following) the rebuilt after the fire. Glad the Cutty Sark is looking good.
-
I love seeing the use of LEGO blocks (or similar). Their precision seems a big advantage. I wonder if I can talk my grandson out of a few of his LEGOs.
-
Joining in on this build. I look forward to seeing picks (even uneventful ones)
-
The decision to weathering a model becomes one of the many facets each modeler looks at when deciding on a build and how to approach it. Example, as you appear to have done, I've read posts on the subject of weathering copper. My personal taste when looking at a model with bright copper hull plating it's too shiny. I haven't done a model with coppering, but I feel I would tone down the copper with some form of weathering. Similar with rigging and sails and part of the look of sails. I think some of that 'weathering' comes from a matter of making sails that look to scale and possibly effect how much details the modeler wants in the sails. Pristine sails don't stay pristine for long. So a little weathering would still be an accurate "as built" representation. Weathering does provide one thing a lot of modelers want to do: differentiate thier build by others of the same ship. Again, a aspect of the hobby that varies from one modeler to the next. Additionally, as you point out, weathering models (wood or plastic) requires a set of skills that have to be developed and honed. Some builders want to learn new skills and may look at weathering. Bottom line: What does the modeler want to accomplish? What challenges is the modeler willing to tackle? What interests in a given ship or subject does the modeler have? I think the answer to these questions determines how much (or little) weathering is done. As for your current build, take the weathering to whatever level you want. There is not a right or wrong answer. And, I can't say I have ever found adefined 'tradition' that directs how to build. The decision on your current build is up to you. I this all gives you answers some of your questions.
-
Not surprised by the quick sales. A quick look at the articles and authors would make this look like a 'must have' addition to the library.
-
Possible Planking Clamp?
robert952 replied to Thunder's topic in Modeling tools and Workshop Equipment
The things one can learn on this forum. I had to go exploring to further my knowledge. This kit which includes something like above looks like a modeler's tool kit. The cutters with the curved blade looks like possible sprue cutter. -
Tagging along for the ride.
-
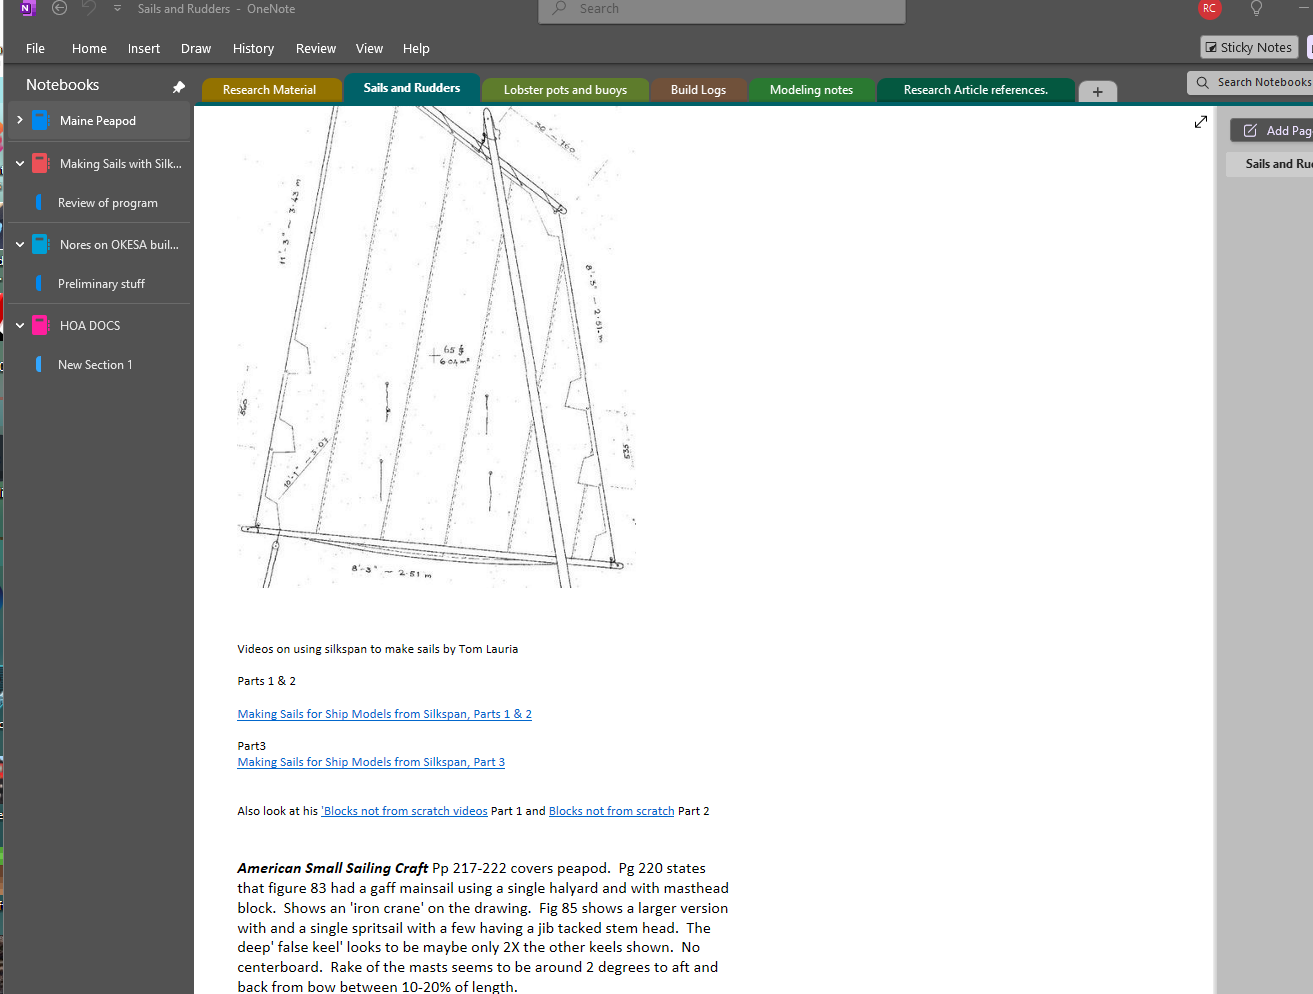
I agree: research is a must before you cut a single piece of wood or use a single drop of glue. Even if you only read through the instructions a couple of times. I will add a software that I am beginning to use more often: OneNote. If you have Word/Excel/PowerPoint you likely have access as it's part of the Office 365 suite. I use this to organize my notes (Sails, build log links, magazine articles). OneNote has a good OCR (Optical Character Recognition) that will copy text from an image that you can paste into whatever software (including OneNote). Here's a screen shot of my Maine Peapod file (Sails Tab). Just c;ick and drag images, weblinks, etc from websites. Great way to organize notes and research.
- 167 replies
-
- 3
-
-
- Norwegian Sailing Pram
- Model Shipways
- (and 1 more)
-
Great looking model. Nice job.
-
For a first attempt, pretty good. You seem to have the general curves around the bulkheads. I assume that's what you meant; bulwarks usually covers a structure above the weather deck. So you succeeded in bending the planks to fit. The instructions or material may not be up to par on this model. (You mention 'inexpensive kit.') Some kits do a better job of explaining some of the processes and giving instructions in varying degrees of detail. You might want to consider beveling the edges of the planks so that they fit closer to each other. As you lay planks along the sides, bevelling along the edges will allow you to fit and clamp them closer. That said, you could use wood filler to fill in the gaps. Then continue with sanding and shaping the hull on this build. And don't get discouraged. We all started out with the first time in the hobby. You said you are happy with the results. That's an importan part of enjoying the hobby. Often we are our own worst critics. However, if you are happy with the results, that's great. You will find a lot of help here on MSW. (Though for some reason I went to the planking tutorials and got an 'oops' message and it seems that there may be a problem with downloading the pdfs as I saw another post topic on the matter. I was going to post the link to those. Hope this provides some of the type of feedback you were wanting. Keep up the learning process and continue with this build.
-
Great looking model. I enjoyed reading the build log. I even picked up on the way you handled the brass work on the pintles. Enjoy the hobby and your next build.
- 81 replies
-
- 4
-
-
- Norwegian Sailing Pram
- Model Shipways
- (and 1 more)
-
A few of us have to make the same mistake a few times as we fine tune our skills. With the wide range of skill sets here, you will find something that works for you. When you find something that works, go for it. Another motto I like: "It aint a hobby if you have to hurry."
-
Congrats on the model and welcome to MSW!
-
I have enjoyed following your other builds. I look forward to watching you progress (and watching your progress) on this build.
- 133 replies
-
- 1
-
-
- Ranger
- vanguard models
- (and 1 more)
-
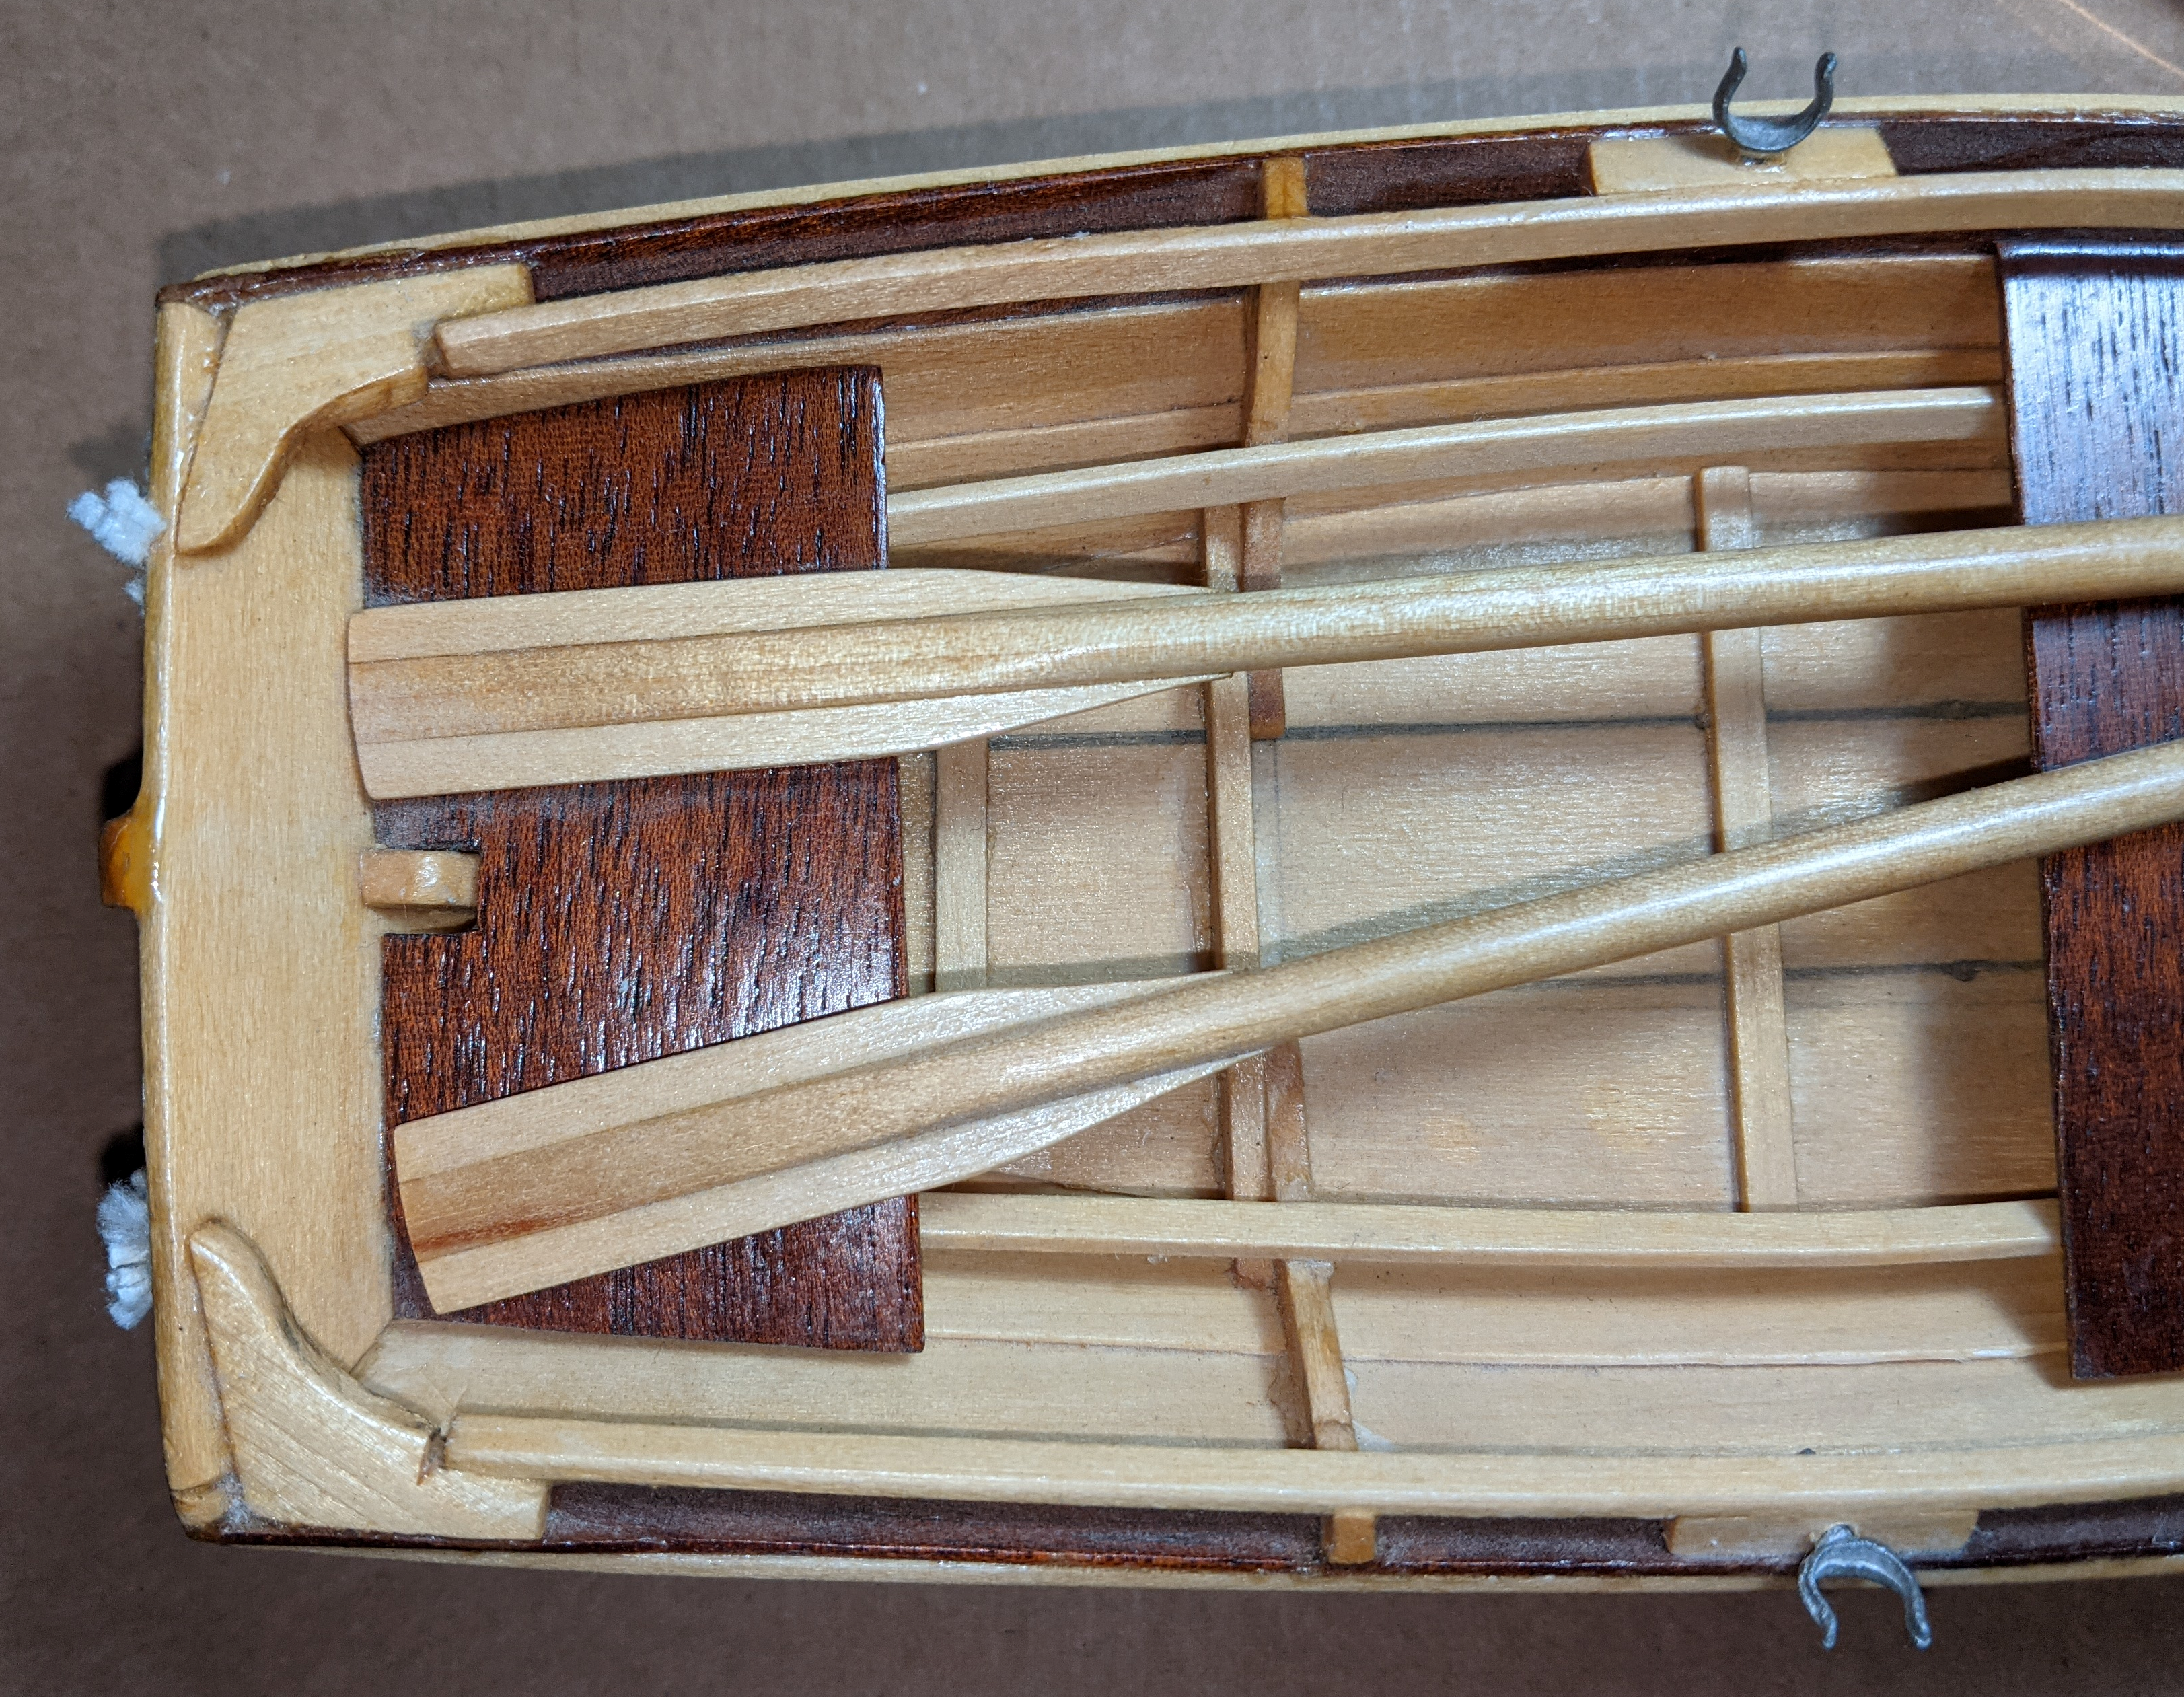
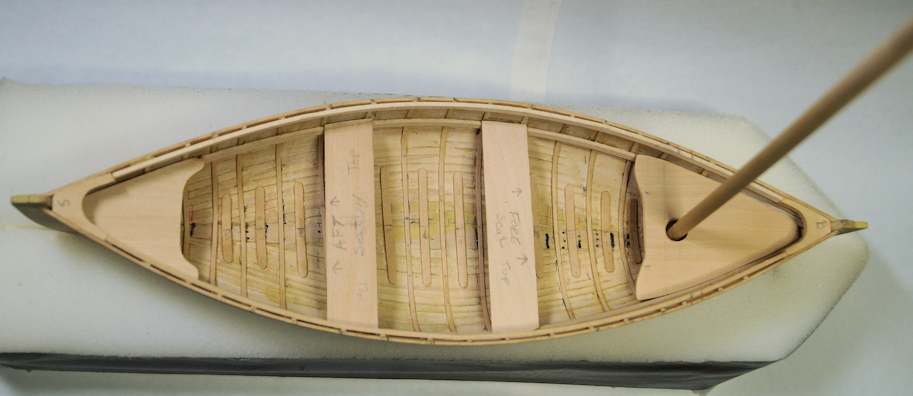
Seats 'dry fit' in place. Just a quick update. Going off script (ok, instruction manual sequence). The instructions basically saves painting to the last part of the project. I think it will be easier to paint before the seats and knees get installed. Besides, the rub rail and row block are mahogany. No need to risk gettig paint on those. I got to thinking it would be better to be sure the seats fit properly before I started painting. That way the seats can be painted the same color as the hull inside. And I won't mess up the painting too much when I do a final installation. I worked up the bow seat with the support hole for the mast. I have enough 'wiggle room' to set the rake (4-5 degrees give or take). In the photo, the mast is a 1/4 in dowel from my 'lumber yard.' Too bad it is an inch or so too short to be the right height in scale. Just means I have to go buy another dowel. However, it shows that diameter (which is close to the .22 inches per the drawing) looks good. This bow seat means that the positions for the other mid-boat seats had to be shifted. I hope to keep the oarlock close to its mid-boat position. Looking at the images, I may need to move the forward seat a bit more towards the bow seat. I'll split the difference to leave some 'leg room' between the forward seats. I will start work on the rudder next. That way when I paint, I can paint everything at the same time and have the same color(s) if I should need to custom mix the paint. As I look further ahead and having done some research for the sail, I have some concerns on the actual size of the sail. But more on that later. My plans are to show the sail furled on the model, so exact size of the sail is not as critical.

- 44 replies
-
- 7
-
-
- maine peapod
- peapod
- (and 4 more)
-
Here's my thoughts from my 'wood working period.' A lot of the choices depends on the final look you want. After sanding the wood smooth and using a tack cloth to capture the sawdust. I apply stain usually only once. The stain usually ended up too dark with a second coat. Your results may vary. As I said, depends on the look you want. If the grain was raised I then lightly sand or use steel wool. Tack cloth to pick up sawdust. Then a top coat like polyurethane with a finish I want for the piece (gloss, matte). Usually two coats, three if the surface will see actual heavy use (floors. desk tops). Steel wool (fine soft type) and tack cloth between coats. For the couple of models I have left natural, I have used tung oil and hand/cloth applied. Again two or three coats to get a smooth finish. I find tung oil also works well on natural unstained wood. I never used a glaze. Mom used 'stain' for her antiquing projects as it had different colors available and seemed to allow a second color for streaks and such. It was more likely a glaze but for her glaze was limited to ceramics and was fired. I think the choice of terms was so that I would bring the right can of stuff to here when she was working on some project. Laquer for my tastes was always too shiny. But that's me.