

robert952
-
Posts
922 -
Joined
-
Last visited
Content Type
Profiles
Forums
Gallery
Events
Everything posted by robert952
-
 I'd refer to the Bob Ross aspects of "happy accidents' on the outcome of the plank colors. I agree, brings out the planking job very nicely.
- 82 replies
-
- 1
-

-
- half hull planking project
- half hull
- (and 2 more)
-
Good start. Making mistakes and learning from them is all part of the process. Looking good so far.
- 12 replies
-
- 2
-

-
- Lowell Grand Banks Dory
- first build
- (and 1 more)
-
Gorgeous model. WIll look great hanging on a wall. That's one advantage of half-hull models when it comes to displaying them.
- 82 replies
-
- 2
-
-
-
- half hull planking project
- half hull
- (and 2 more)
-
Your journey continues. I am coming along for the ride. I believe you can never have too many clamps. I have a 16X22 inch tub with various sizes and types of clamps including the old standby of spring type clothes pins, plus push pins and small nails. (I even swiped several straight pins from the Admiral's sewing kit.) They are organized roughly by size, type and strength.
- 37 replies
-
- 3
-
-
- Model Shipways
- muscongus bay lobster smack
- (and 1 more)
-
First, welcome to the 'dark side.' I hope you enjoy your experiences as you continue with other projects. I think you have done a great job on your first build. A neat, clean and and good looking boat. Most of us aren't 'critical,' per se, but gladly give feedback and answers. And you will always be more critical of your work than anyone else. By the way, you can search the forum for other build logs before you start a project to get an idea of 'what issues' with the model. Just remember, your experience may differ. One person may have a problem that another doesn't. An area of assembly that seems to have been perfect for others may drive you up the wall. And the differences aren't always skill related. Sometimes it's that one boxed model may have differences in material, how it came through the manufacturing process or other issues related to the model itself that changes the 'issues' that show up. As @druxey points out, problem solving becomes part of every build process. As I look through and read other builds, I am amazed at how many ways people clamp, wedge, tape and otherwise hold planks, strakes and wales in place. My motto "if it works, do it." Yours is a unique solution that did a nice job. I'll file it away in my mental tool box for future use. Others here might be better suited to answer this area. Personally, I think they would look fine if they were faired a bit more. However, they don't look bad they way you have them. So, don't take my thought as something to change. For future builds, try to find other photo references for the model you are building. That will guide you on the details you want to include in your build. However, as a cautionary note, do not expect to find 'the absolutely most correct way to do <whatever>. ' Remember, each boat builder has their own approach. So, two dories (skiffs or rafts) built by different people will have differences in their final product. While there are characteristics that make a boat a dory, dinghy, or skiff, there's differences within any given category depending on builder, regional and design requirements. I point out my previous comments on differences in a specific type of boat. As to the instruction manual, I'd bet just about every one who has built more than three or four models have come across an instruction manual seems to miss some detail. I doubt the perfect instruction manual exists. Even when you read comments and build logs from the model designers you will often find a comment along the line of, "I might do <something> differently if I had to do it again." That takes us back to the problem solving challenges. As long as you're happy with the results, that's what counts. We all have found times we have to redo something because of a small mesurement that was off. There are those who would look at something and see that it is off. Many probably would not see a 1/16" differences (at least with my poor eyesight). The good side is that you probably learned some key skills like: cutting a new piece, removing the errant piece, and making it all fit better. Personally, I don't use shellac. There are those who use it and can advise you better than I. The key point comes down to: what kind of finish to you want. Something flat or matte, something with a sheen, something to show what a typical example would look like painted. I have a couple models that I left as a 'natural wood' look. I tend to look at a model and determine if it will look good with just a clear coat. Usually I am a 'paint to hide' kind of fellow as my finishing work still needs a lot of work. Again as pointed out, you have a very neat workmanship. So, what ever finish you decide on will look good. The reall big keys are when you look at the finished project: 1. Did you enjoy building the model? 2. Though it may be perfect, are you pleased with the results? 3. Did you learn from the experience, in general as well as specific skill sets? I hope you found some of my ramblings helpful and an anwer to your questions.
- 5 replies
-
- 3
-
-
- Lowell Grand Banks Dory
- Model Shipways
- (and 1 more)
-
nice looking model. Congrats on finishing it.
-
I sometimes use the process our QA manager used (back in the days I had a job): File to hit; hammer to adjust; paint to hide. BTW - the manager was always top notch and a stickler for details. He prefaced the above line with "When I was in the Army the process was:..." When it is all done, only you will see the "flaw" (or even know it's there). The pram is looking very nice.
- 33 replies
-
- 3
-
-
- Model Shipways
- Norwegian Sailing Pram
- (and 1 more)
-
Interesting timing. As I was looking through my followed content and noticed I hadn't seen anything from you. Real Life (RL) has a way of changing our priorities. (Even as a retired person, that is true.) Glad to see this posts. Everything looks very good! Keep up the great work. I look forward to other updates.
-
To be clear, the $3 was for the 'study plans' a single sheet showing general shape and layout. Plans for the actual boats cost quite a bit more. But as you say, seem reasonable.
- 69 replies
-
- 2
-
-
- Lowell Grand Banks Dory
- Model Shipways
- (and 2 more)
-
You might check to see what a piece of basswood would cost. Local hobby shops or online sources usually carry basswood for other crafting purposes. You can use the original cut out of the piece to trace the board to avoid issues with the repaired piece. You may be surprised how well the repaired piece will hold up. But, you are correct, it may hold up for the bending to fit. While I am a 'cat tolerator,' I applaud anyone who takes in a stray (cats or dogs) even if it's just temporary to find them a good home. The Admiral and I are 'dog people.' That lightning strike did a number on your property. Hopefully the repairs are close to complete if not already done.
- 31 replies
-
- 2
-
-
- Lowell Grand Banks Dory
- Model Shipways
- (and 1 more)
-
Shaping up to being a top notch build. Great work.
- 65 replies
-
- 1
-
-
- Maine Peapod
- Midwest Products
- (and 1 more)
-
Nice looking model. Hope when I get around to the one in my stash, it looks this good. As FYI, you may want to look at Chesapeake Light Craft (www.clcboats.com). They have a lot of kits you can build including a pram or they sell plans only. Cost of plans only seem reasonable to me. But then I am not in the market to build a prototype. At least it's a starting point when you start looking to build your own. I did use information on this site when researching my peapod. There videos and such pointed me in a direction for additional research. I forked over three bucks for study plans of their peapod. They have a few 'build logs' for some of the boats, too.
- 69 replies
-
- 1
-
-
- Lowell Grand Banks Dory
- Model Shipways
- (and 2 more)
-
Hopping on board this log. Following logs on this one as it is in my stash.
-
Looks great. Though the instructions don't say to add shims, it seems to be a necessity for this stage of the build on this model. It seems too easy to cut a tad too much off of a plank even with careful sanding. I hope I can get mine this smooth. And I agree, the inside of the hull will be a bear to work on. I plan to experiment with thinning out the filler a bit. I read somewhere that makes it easier to get the filler in the gaps and makes sanding it smooth easier. Did your hull 'pull in' when you took it off the form? Mine didn't. The instructions indicate that you may need to keep the center 'bulkhead' in place until you have the ribs installed. Just curious. I still have the board in place just in case. However, nothing has changed.
- 65 replies
-
- 2
-
-
- Maine Peapod
- Midwest Products
- (and 1 more)
-
The wider painter's tape (a.k.a. Frog tape) is a couple inches wide and burnishes into position nicely. And, yep, worked well around the bow and stern. I still held the planks in place until the glue partially set. Then I taped it as tight as I could to hold them overnight. Also, though probably obvious, I worked on both sides for each plank and pulled them together with the tape at the bow and stern. Thanks for the kind words. After I put some 'stuff' on the walls, our 'feel moved in' check list will be complete and approved by the Admiral. So I can get back to model work. No promises as to exactly when though. (I have actually taken some sand paper to the model but no serious work.)
- 65 replies
-
- 1
-
-
- Maine Peapod
- Midwest Products
- (and 1 more)
-
Hard to say. This hobby, and working in wood, requires a lot of experimenting to find what works best for each of us. Your method sounds feasible and workable. I didn't have much trouble bending the soaked wood, but holding a couple of planks in place did require some finessing with painter's tape and rubber bands. I did have some challenges similar to what you are seeing. If you look at the drawings in the manual on pages 9 &10, the last few planks were not planks in the strictest sense. The ended up looking like shaped 'fill in' pieces with the last 2-3 just laying on the bulkheads. The bottom is relatively flat on each side of the center plank. I also had to add a couple of "splinters" cut to fill in a couple of gaps. You have to look closely on post 19 of my current build log (link below) you will see such on each end of the plank against the center bottom plan. I often follow the motto: File to fit. Hammer to adjust. Paint to hide. Doesn't look as sharp as what you are doing. (And the filler is giving me challenges on fairing the hull.) But I figure my lack of skill can be fixed with filler and paint. Well, that's my dream. And it's all part of the learning process as skills improve.
- 65 replies
-
- 1
-
-
- Maine Peapod
- Midwest Products
- (and 1 more)
-
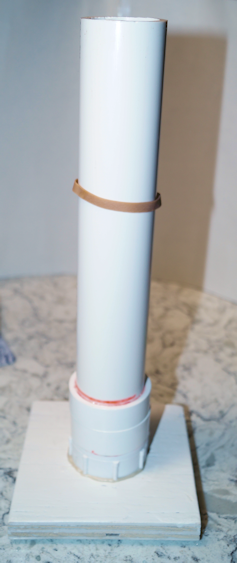
For your future planking projects you may want to consider soaking the planks. I have a PVC fixture I put together. Filled it with hot water and soaked each plank for a few minutes. Typically 5-6 minutes since I used very hot water. When reading through the logs, 10 or more minutes pop up often. Then I was able to get the curve and that little twist needed on the pieces attached to the stem. The challenge for me was to be sure that the plank stayed in place until the glue dried. While CA would have dried faster, I like the ability to tweak a board using carpenter's glue or similar PVA. I spent a bit holding the plank in place by hand. I left the wet planks in place overnight until they dried out before working the next one. A couple of times I used a hair dryer to speed the process when I wanted to progress more than a plank per side.
- 65 replies
-
- 2
-
-
- Maine Peapod
- Midwest Products
- (and 1 more)
-
Glad you found it useful. I picked up an tidbit or two from yours also.
- 65 replies
-
- 2
-
-
-
- Maine Peapod
- Midwest Products
- (and 1 more)
-
Deck planking
robert952 replied to tony1745's topic in Building, Framing, Planking and plating a ships hull and deck
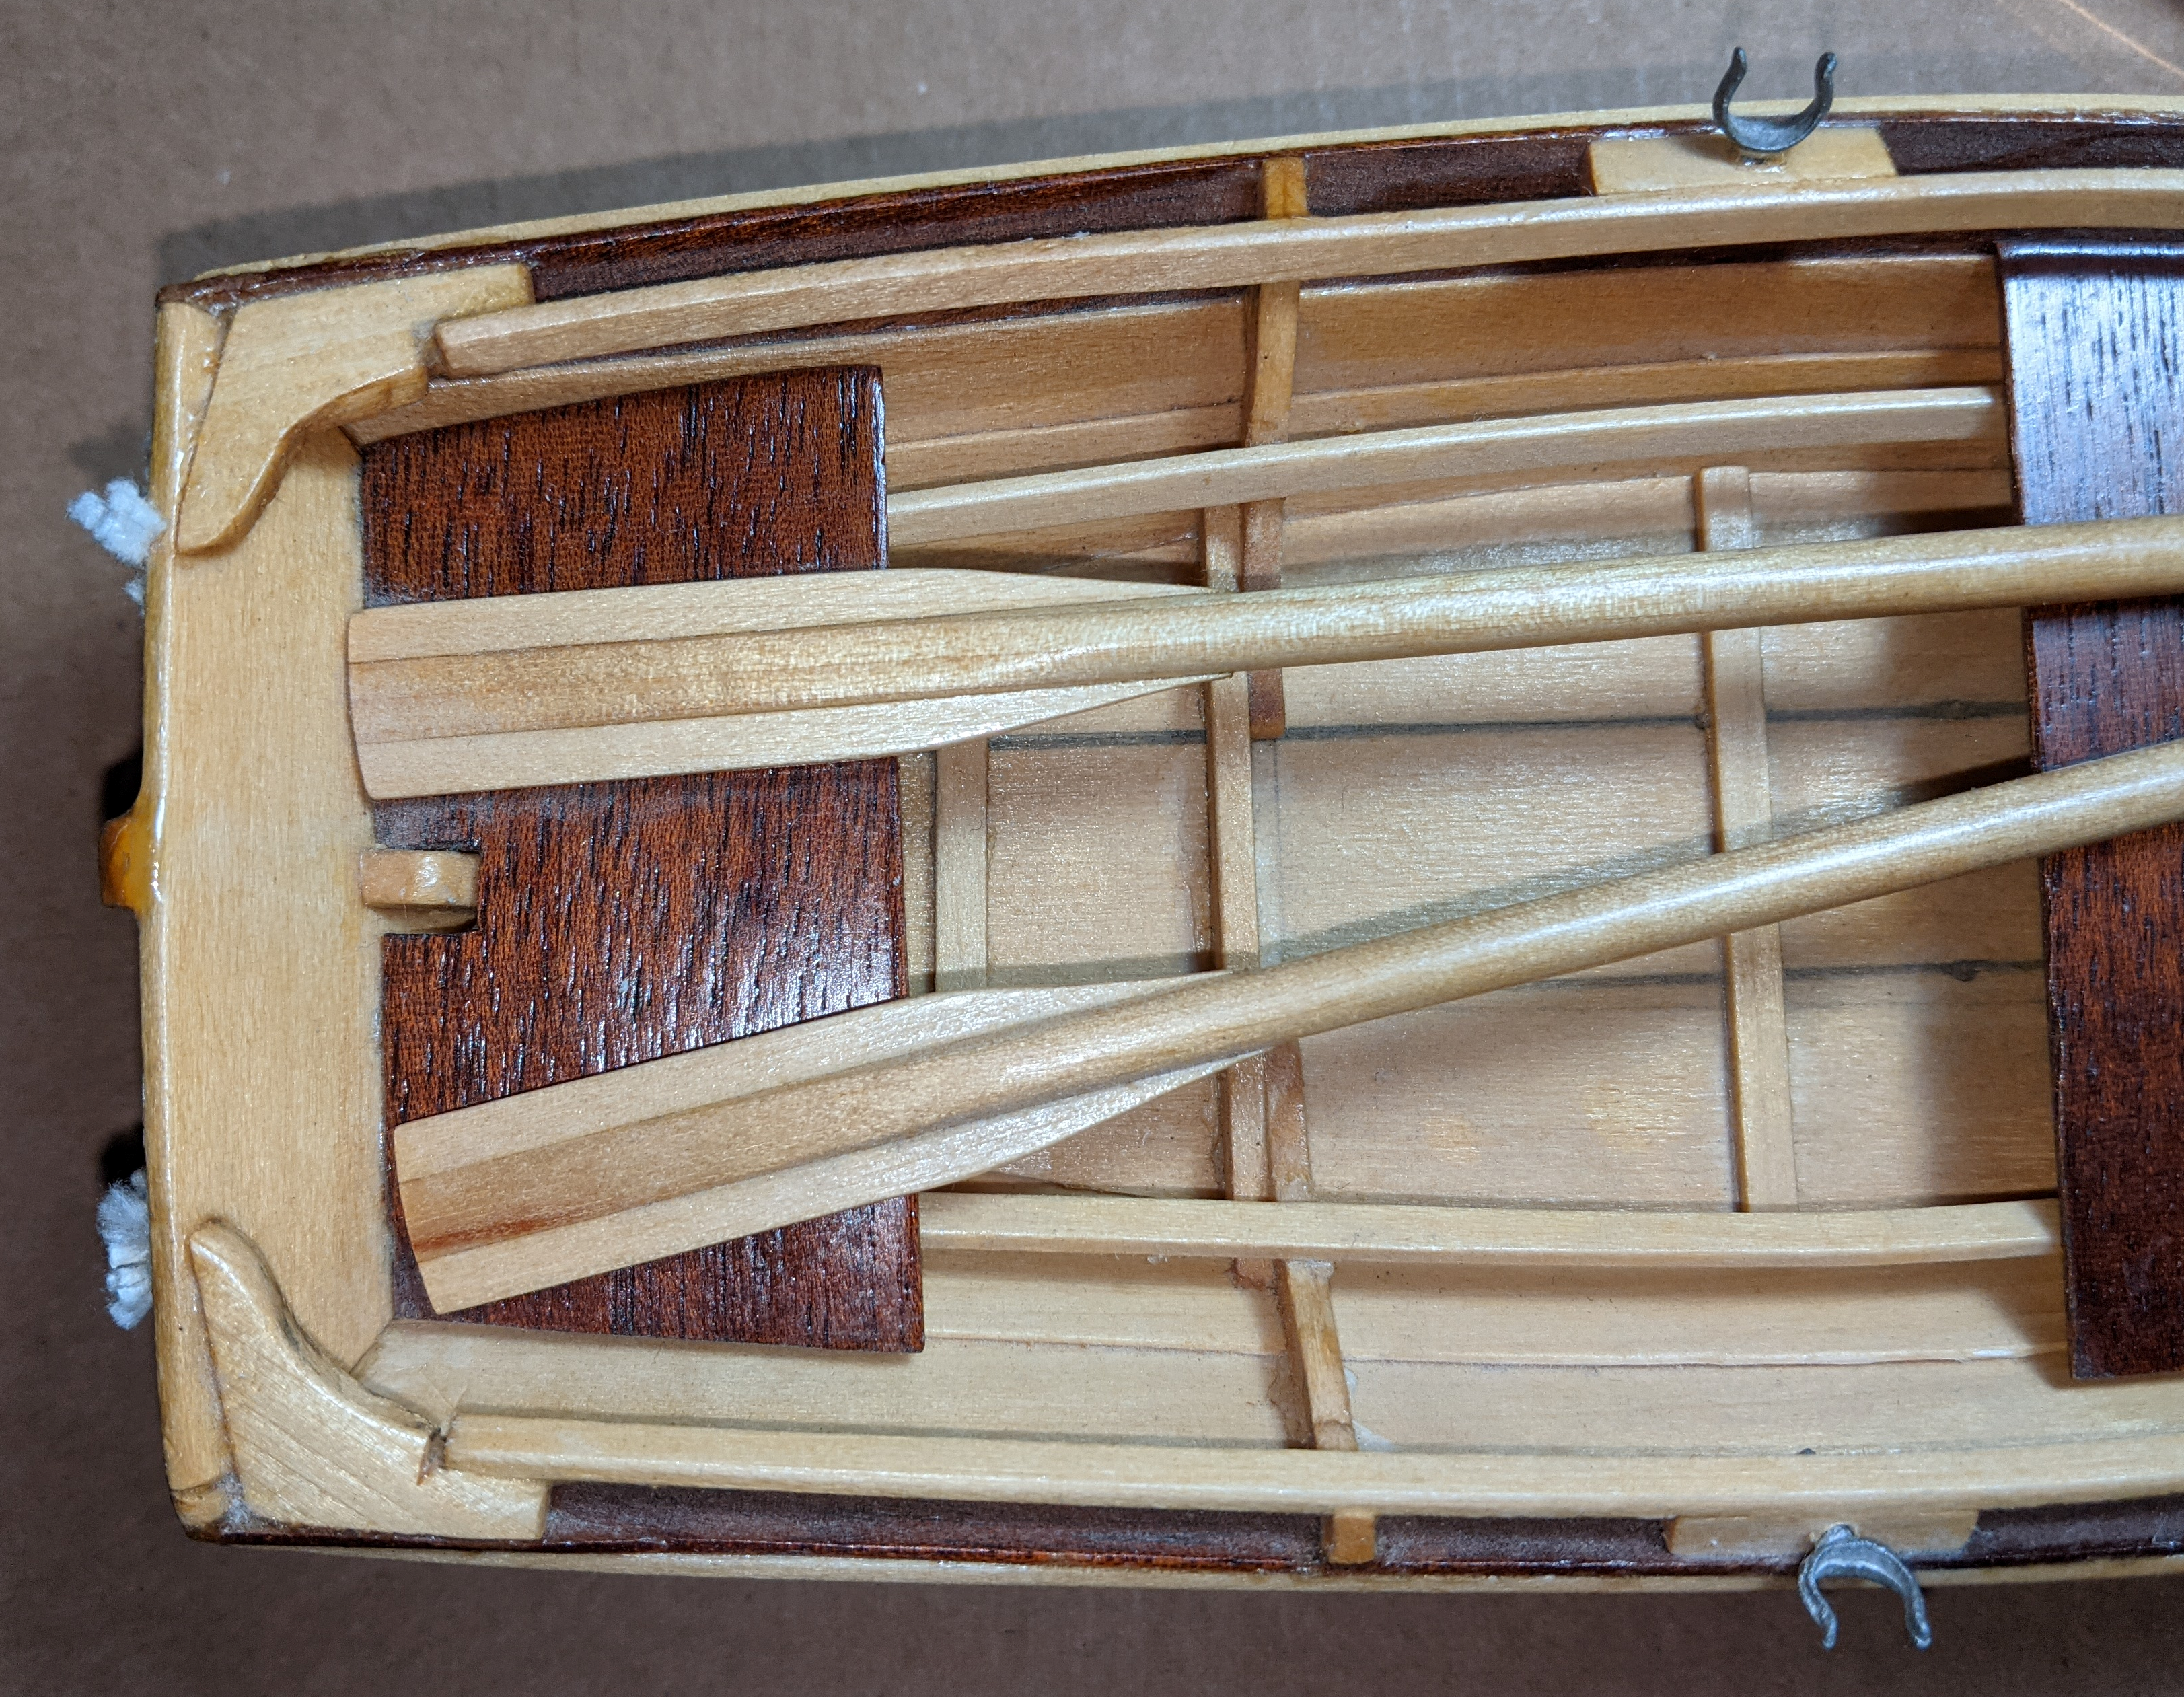
My 2kb worth, I would put the halves in place and plank it in situ. It would seem easier to shape the planks as you install them to fit the actual shape of the curves. This image is from Planking Techniques for Model Ship Builders by Donald Dresser (pg. 106). As you see it's not a smooth curve which you would be difficult to duplicate on the deck pieces and then fit them into place. I am not sure if you need to allow for a waterway shown also above. Edit: Forgot to mention that the lower right image shows cutting off the frame piece above the false deck before planking. I hope this helps.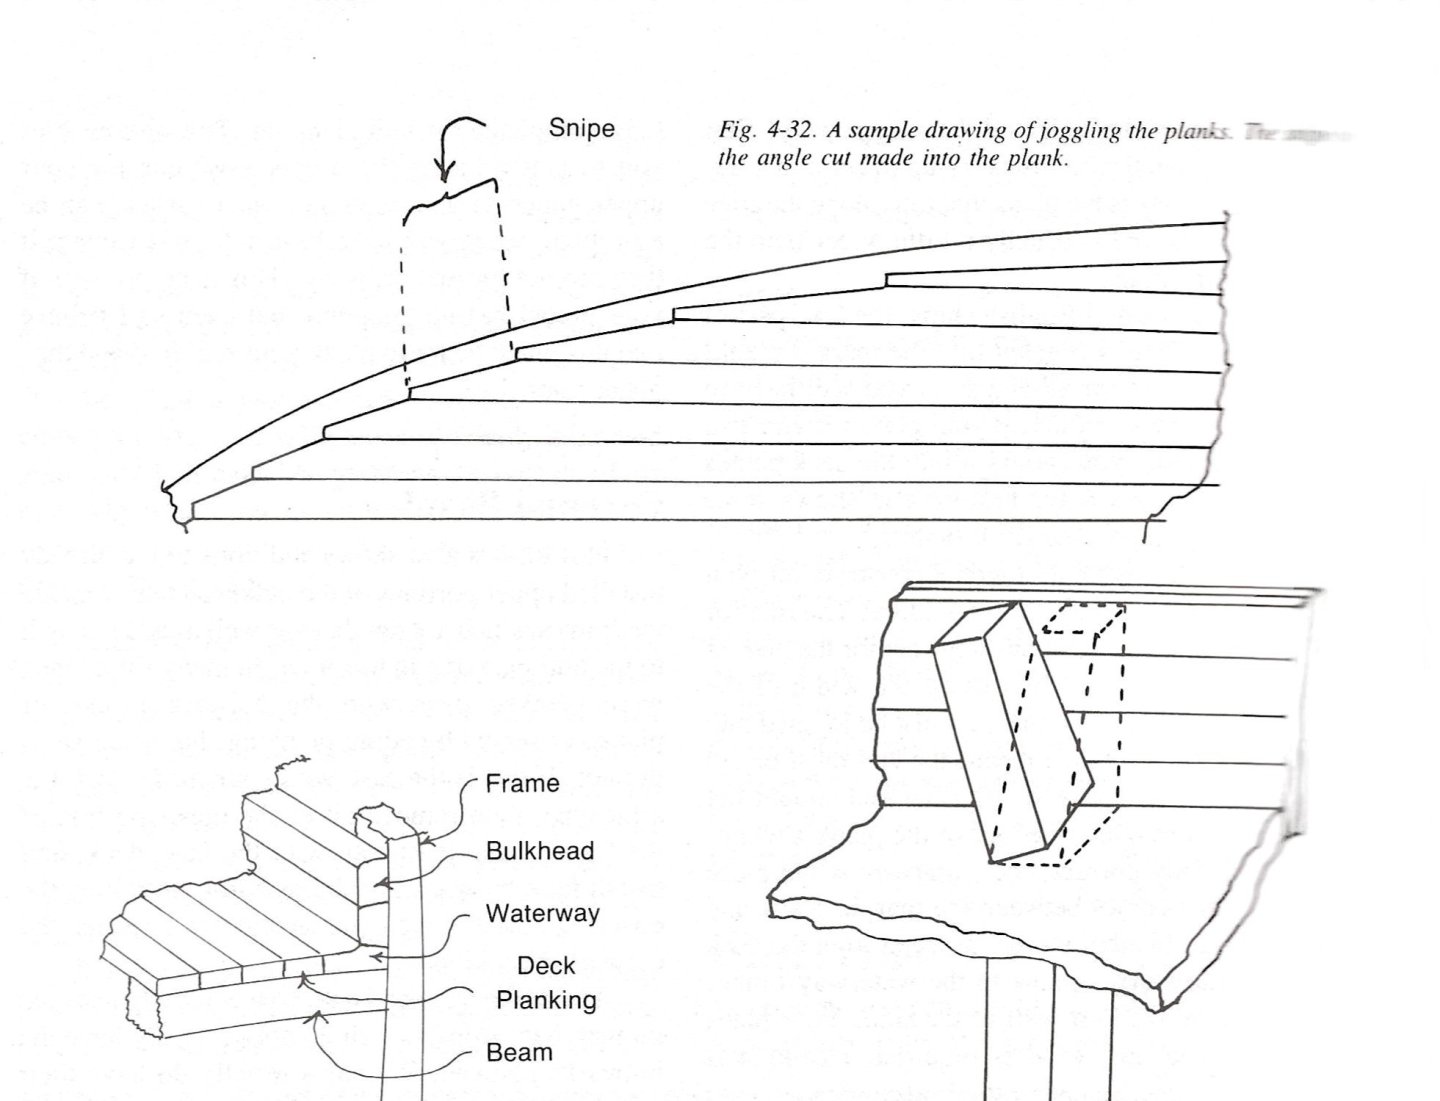
-
😃 Don't you hate when that happens. The model is really shaping up and looking good.
- 69 replies
-
- 4
-
-
- Lowell Grand Banks Dory
- Model Shipways
- (and 2 more)
-
You are off to a good start. I've read through countless build logs. Just about every kit seems to have some minor issues with fitting things as the instructions indicate which require tweaking in some form. You seem to be on track to resolving those on this model. I am interested in seeing your progress as you seem to be caught up with where I am at on the build. (A couple more small home projects and I should be able to get back to my build.
- 65 replies
-
- 2
-
-
- Maine Peapod
- Midwest Products
- (and 1 more)
-
Sounds like you have solved the matter. However, to add to the tool kit, I used an app called Scale Converter by Scalar Pink. Available on Google app store. It doesn't solve the problem of having to find your phone. However, it is self contained and doesn't require a web connection to use. It does other functions I have found useful including mm to inch, and decimal to fractions.
-
As to the painting, I think we all come up with a system that works for us individually. I do look where I will paint and determine when to paint what. If an area I plan to paint is going to be difficult to get to (example under a seat seat riser or in a tight corner), I'll paint during assembling, before the area gets covered up. My concern is always that I may do something to mess up the paint job as I continue assembly. (Particular a problem I have with plastic models and the seemingly inevitable errant drop of adhesive.) I use a small tray. From what you imply, if I poured paint on a plastic sheet, it would start drying too soon for me. Even with the metal tray, I make sure the paint doesn't dry out too quickly. I usually have a solvent (water or thinner depending on the paint I am using) in one of the cups to help out with that. Also I can clean the brush to make sure the paint doesn't start drying out while paining. You can find similar at local hobby/craft/art supply shops or online. I think I've had this one 'forever.' As I peruse the net, they seem to be less than a couple bucks each (especially in bulk - 16 plastic for under $10 on Amazon). At a hobby shop probably 2-3 bucks for one. For me the advantage is that I can have multiple colors ready to go and even put some water or thinner in one of the cups which I use to clean the brush as needed. I don't do a lot of mixing of colors, but I try to pour out a consistent amount of paint and using an eyedropper measure any 'solvent' (water, thinner) as I thin the paint. Not an exact science, just a rough count of drops or '1/2 of an eye dropper full' (though I do have graduate droppers that I may start using more). Ask a dozen people, you'll get a dozen pieces of advice and experiences. Most modelers would likely agree with thinning paint before application. How thin is always tough to determine: ratio of paint to thinner. The factors depend on type of paint used, artist brush vs air brush, drying time between coats and the list goes on. (I won't touch the 'sealant/primer' discussion, but that can effect the finish, too.) The bottom line is to find what works for you. I think that's what we all do. And we learn that 'if I am working with this paint, this process works best.' I'd suggest practicing on scrap material using different techniques until you find the finish you like. As to some previous comments (sorry for delay as I am catching up on reading some logs in detail), you are going through the same processes we all go through. As you have found on this model, there can be quality issues. However, you also found that these issues might get hidden during the assembly process. As a lot of people say, do your best and do what it takes to 'look good' to you. If it's not as good as you like, improve the next time. It's a process, not a procedure. You are doing fine and the model is coming together nicely. Side bar: I watched "The Blue Angels" documentary on the Navy's air demo team. Through out that film (available on Prime) they all say the same thing: strive for perfection even know though you know you will never reach it. Each pilot is their own most severe critic. They tell each other to do the best you can, learn for your experiences, and move on. Seems very appropriate for many endeavors, including model building. (BTW, I thoroughly enjoyed the movie and recommend it for air enthusiasts. Great camera work. They fly 18 inches apart. The 'in cockpit' video sure looks a lot closer than 18". 😲 )
- 69 replies
-
- 4
-
-
- Lowell Grand Banks Dory
- Model Shipways
- (and 2 more)
-
I try to catch the logs for small boats. Sorry I missed this one. However, I read through it and found it well done. Thanks for sharing. Nice model and mounting. Congrats on a nice looking model.
- 30 replies
-
- 1
-
-
- Grand Banks Dory
- first build
- (and 2 more)
