HOLIDAY DONATION DRIVE - SUPPORT MSW - DO YOUR PART TO KEEP THIS GREAT FORUM GOING! (Only 24 donations so far out of 49,000 members - C'mon guys!)
×


dmalcolm72
-
Posts
57 -
Joined
-
Last visited
Content Type
Profiles
Forums
Gallery
Events
Everything posted by dmalcolm72
-
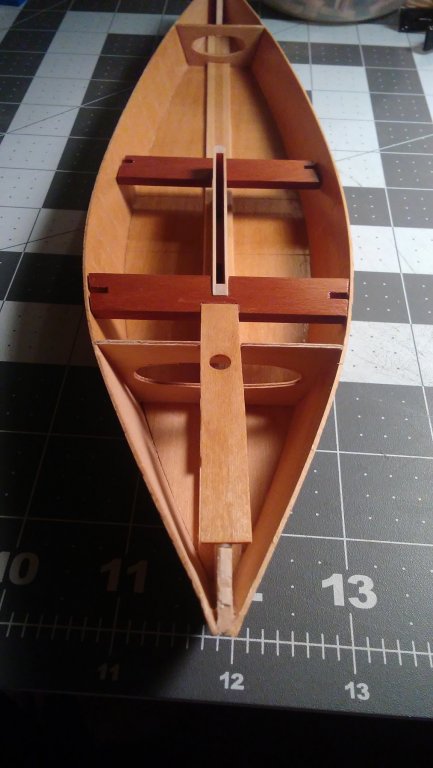
 Got the thwarts, king plank, and centerboard case glued into place. Now it can cure while the Commodore and I are relaxing in the sun...
 -
Haven't gotten much done on the Longboat lately, but there are other rewards...

- 25 replies
-
- 1
-

-
- 18th century longboat
- model shipways
- (and 1 more)
-
Well, I kind of slacked off this week. But I did get some work done. I'm actually working on a second boat concurrent with this one. It's a Chesapeake Bay Crabbing Skiff by Midwest. I spent most of the week working on the skiff. I did get two more planks on the longboat, though. This will be the last work I get done for a while; the Commodore and I are taking a much deserved long, tropical holiday. Sun, sand, tropical breezes, and for me: lots of diving.

- 25 replies
-
- 2
-
-
- 18th century longboat
- model shipways
- (and 1 more)
-
Well, I kind of slacked off this week. But I did get some work done. I'm actually working on a second boat concurrent with this one. It's a Chesapeake Bay Crabbing Skiff by Midwest. I spent most of the week working on the skiff. I did get two more planks on the longboat, though. This will be the last work I get done for a while; the Commodore and I are taking a much deserved long, tropical holiday. Sun, sand, tropical breezes, and for me: lots of diving.
- 25 replies
-
- 4
-
-
- 18th century longboat
- model shipways
- (and 1 more)
-
Got the thwarts, king plank, and centerboard case glued into place. Now it can cure while the Commodore and I are relaxing in the sun...
- 13 replies
-
- 2
-
-
- crabbing skiff
- Chesapeake Bay Crabbing Skiff
- (and 2 more)
-
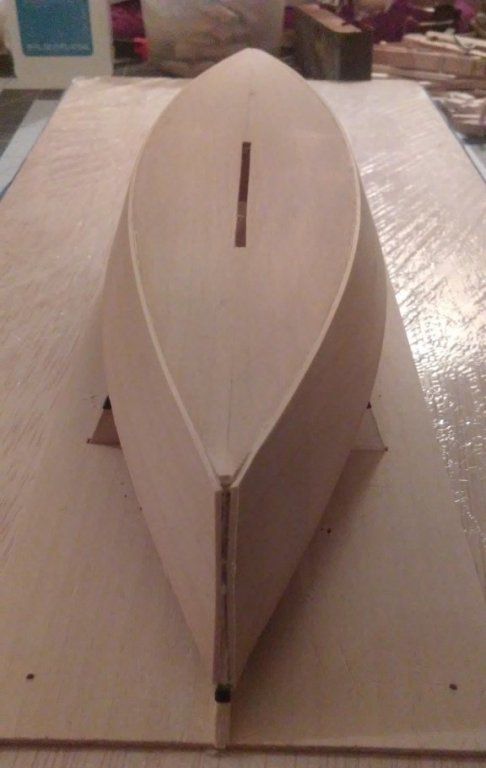
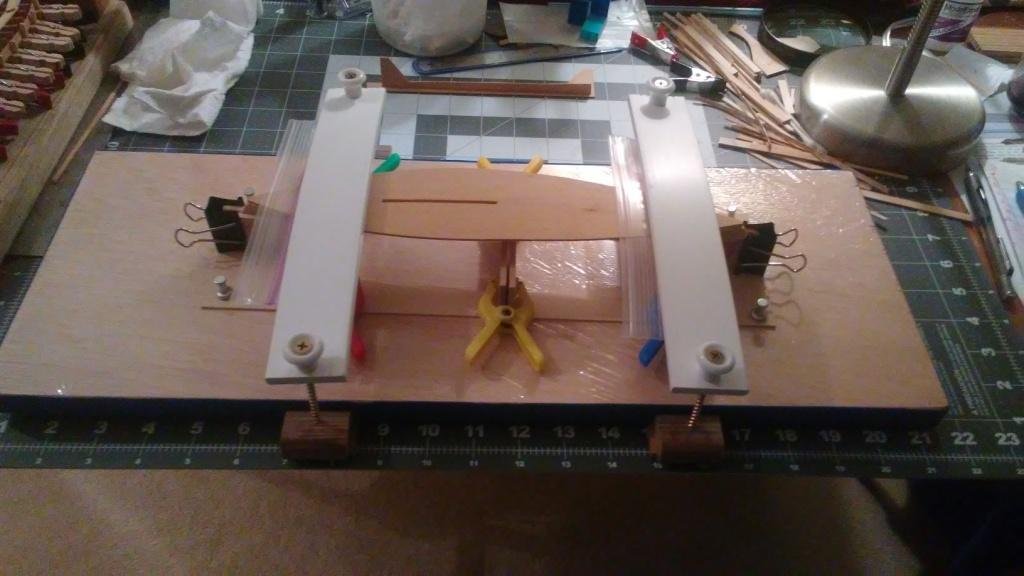
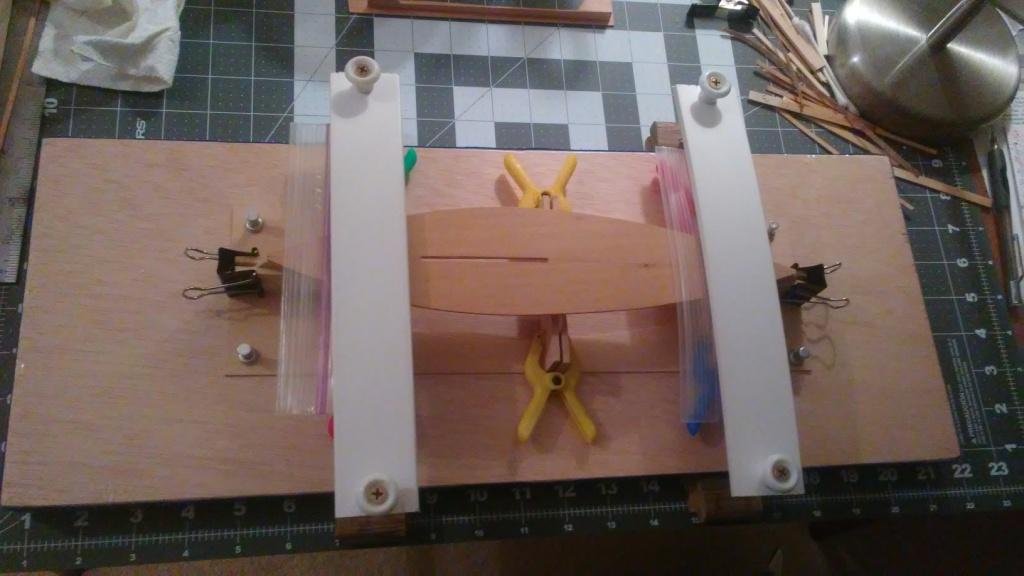
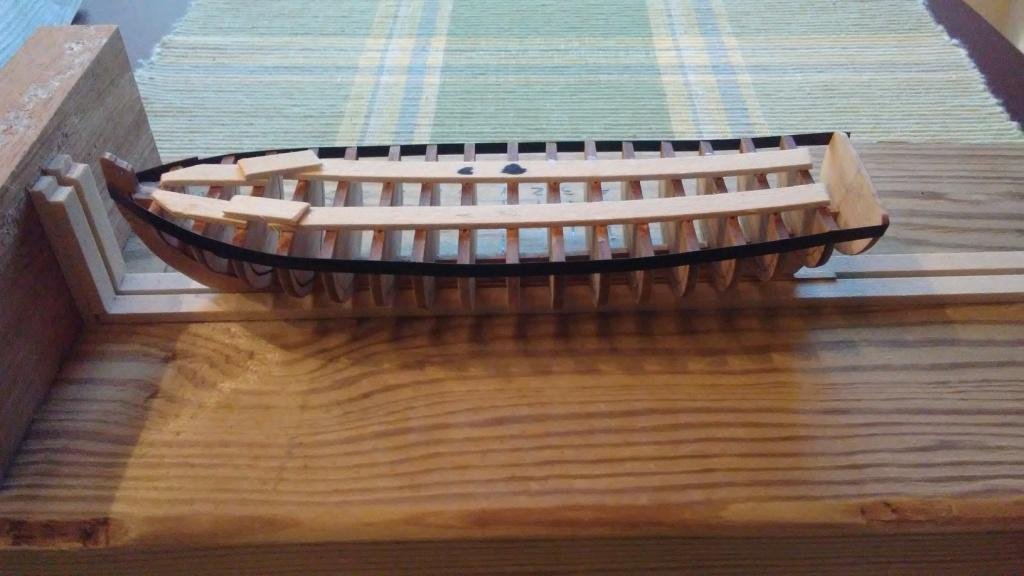
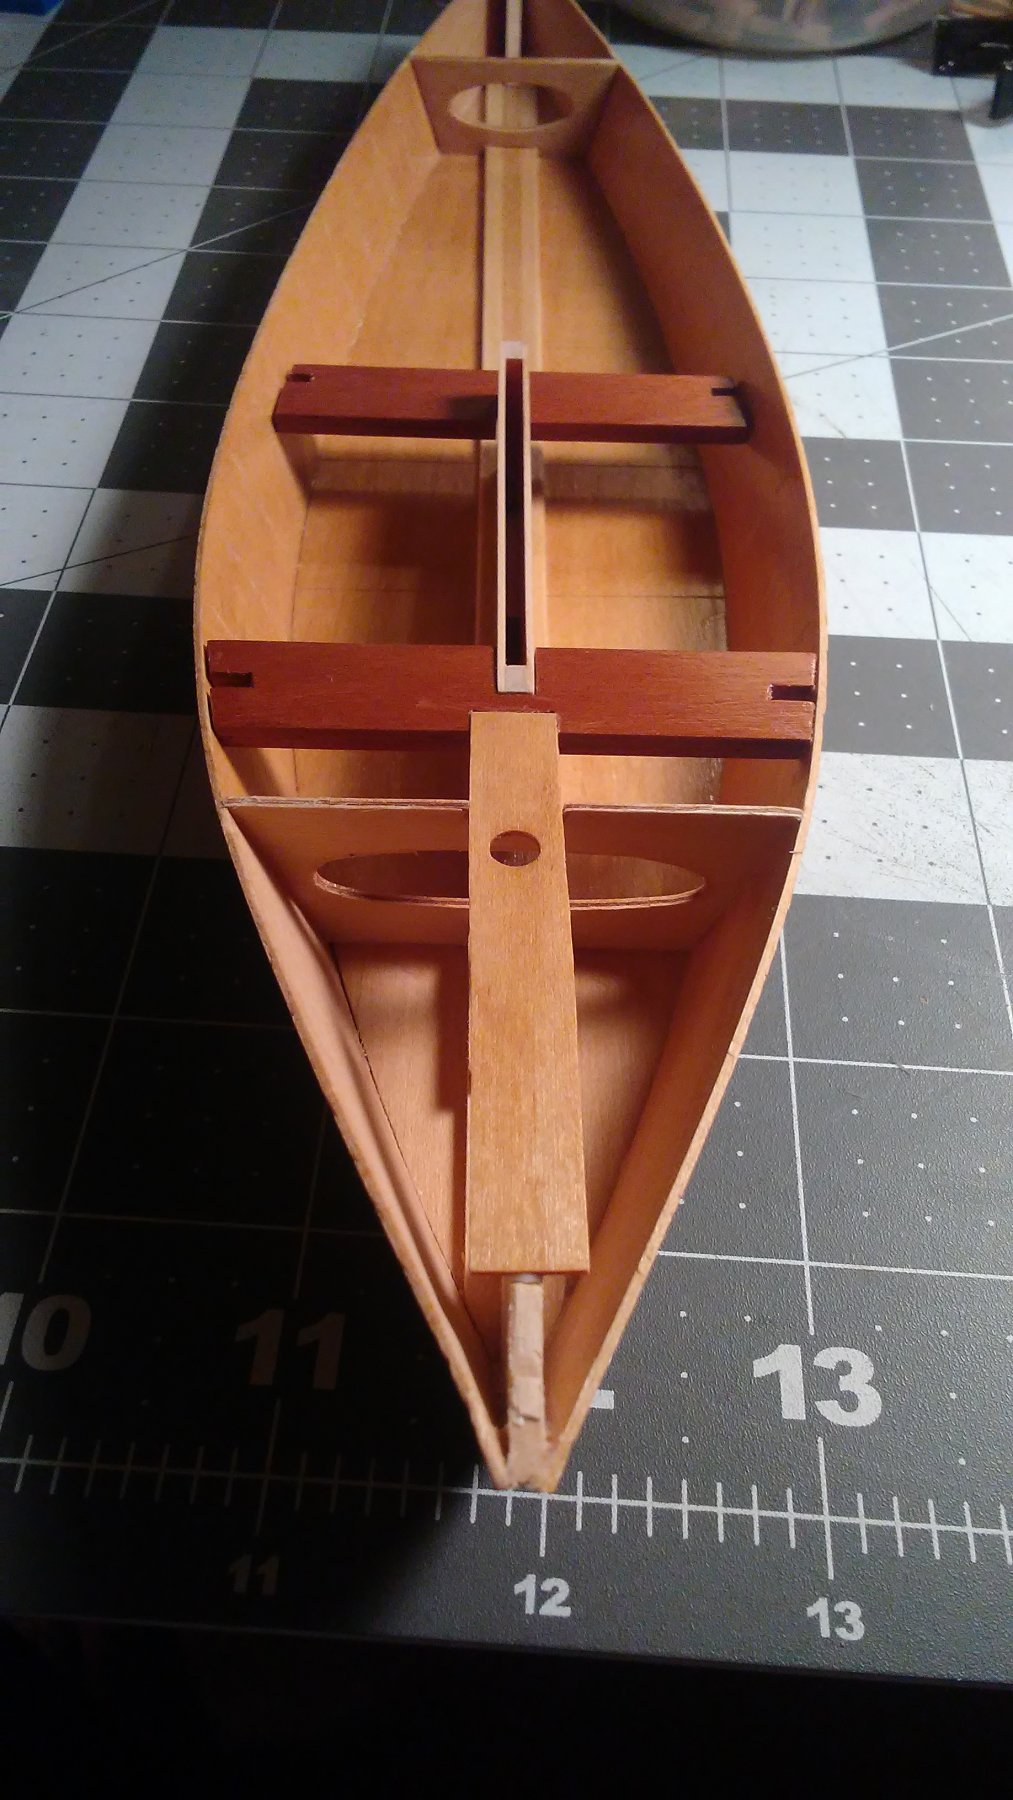
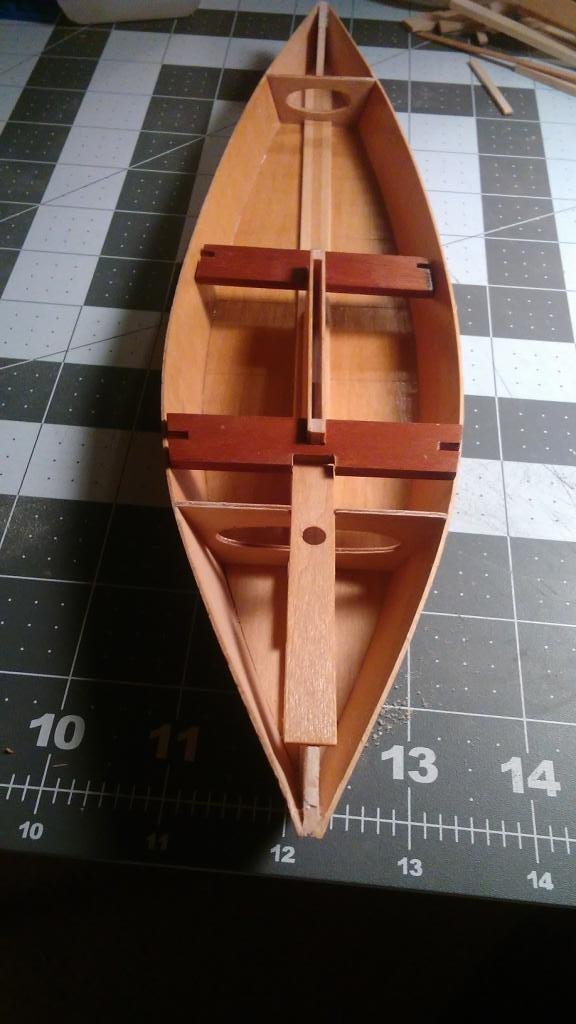
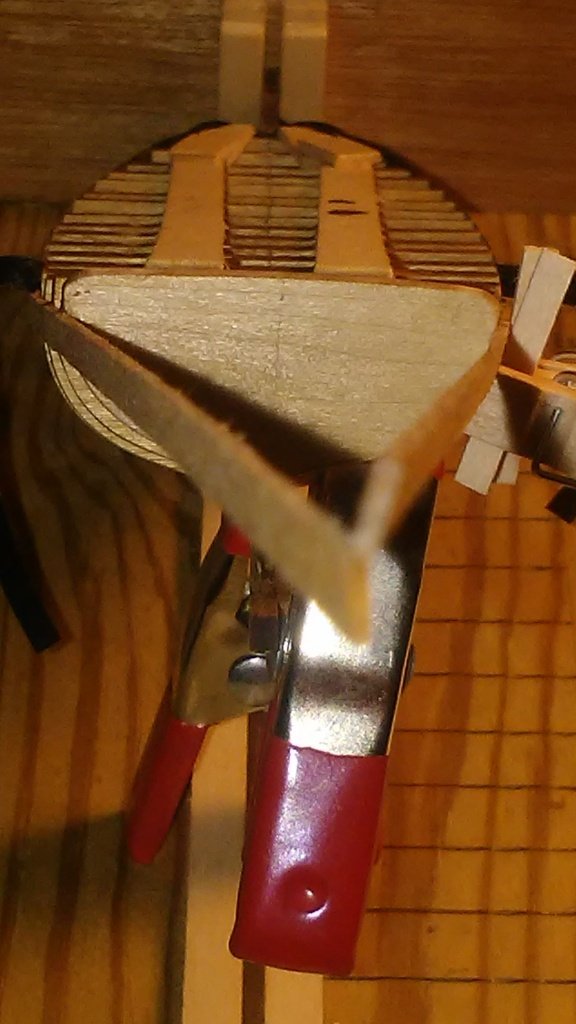
Have been working diligently on the centerboard case and the associated pieces (mast step, forward and aft thwarts, king plank). I stained the mast step with Minwax cherry and allowed it to dry. I dry fitted it with the mast to be sure it was open sufficiently to accept the mast. I sanded it and then glued it into position. The thwarts, king plank, and the centerboard case all have 3 coats of clear on them with sanding between coats. I dry fit the pieces yesterday: Looking ahead I saw that there are two small pieces of molding to be installed on either side of the centerboard case. The instructions call for the use of 1/16 x 1/16 basswood, but if the boat will have mahogany trim on the gunnels, it would make sense to have mahogany trim on the case. There was ample scrap to cut a piece of 1/16 x 1/16 from the 1/16" mahogany sheet that provided the thwarts. I scribed it with my knife using the "TLAR" method to determine the width of the piece (TLAR = "That Looks About Right"). In assessing the dry fit it occurred to me that I need to insure the King Plank is flush with the forward thwart. To do this I cut a small piece of scrap and glued it into the notch for the King Plank. This insures a level plank when I fit these pieces together. I have got to get the centerboard case and the rest of the internal assemblies installed today. The Commodore and I are headed out on an extended voyage in a couple of days so I won't get any modeling done for a while. But sunshine, tropical breezes (and drinks), and scuba diving are definitely on the horizon. 🌴🌊🌴🌊🌴🍹☺️


- 13 replies
-
- 2
-
-
- crabbing skiff
- Chesapeake Bay Crabbing Skiff
- (and 2 more)
-
Here's wishing you and the Admiral all the best this Holiday season and throughout the new year. I sincerely pray that circumstances get better in the short, and long, term. Saludos, Don
-
As one to another, welcome "old timer!" 😁 I've got a few years on you, youngster, so mind my cane, pull up a stool and let's share a pint or two! Seriously, I joined only a couple of months ago and have found nothing but support and encouragement. The old hands here have been there, done that and provide a wealth of information. Have fun!
-
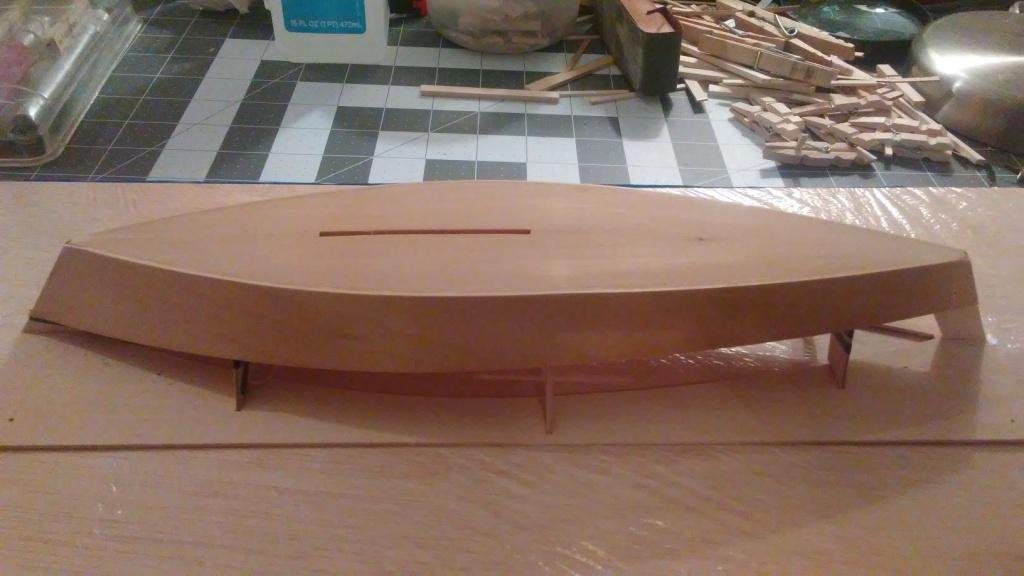
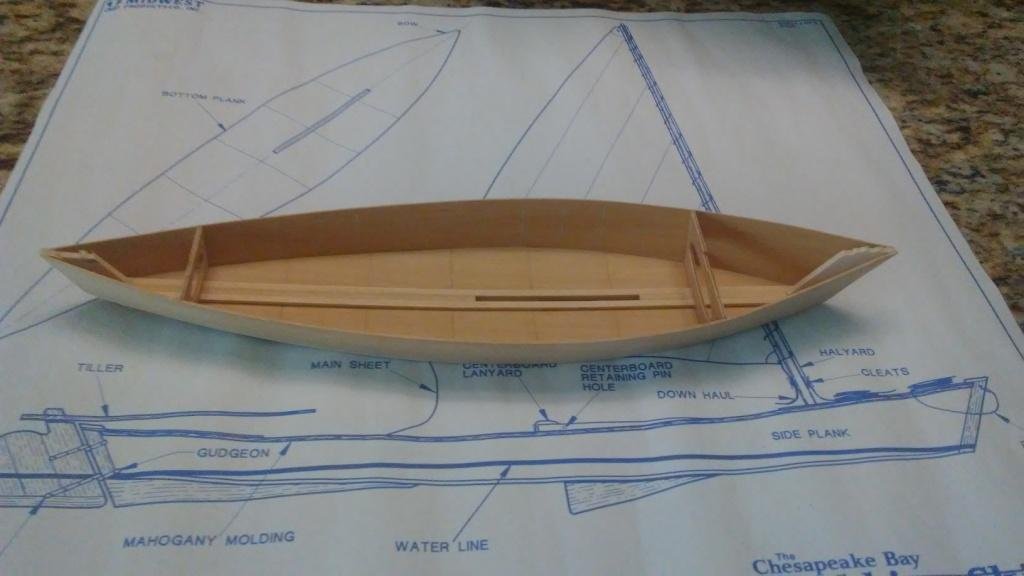
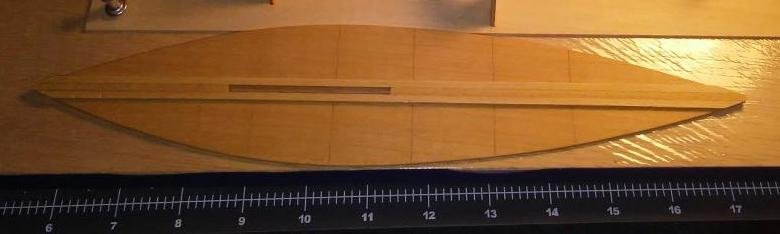
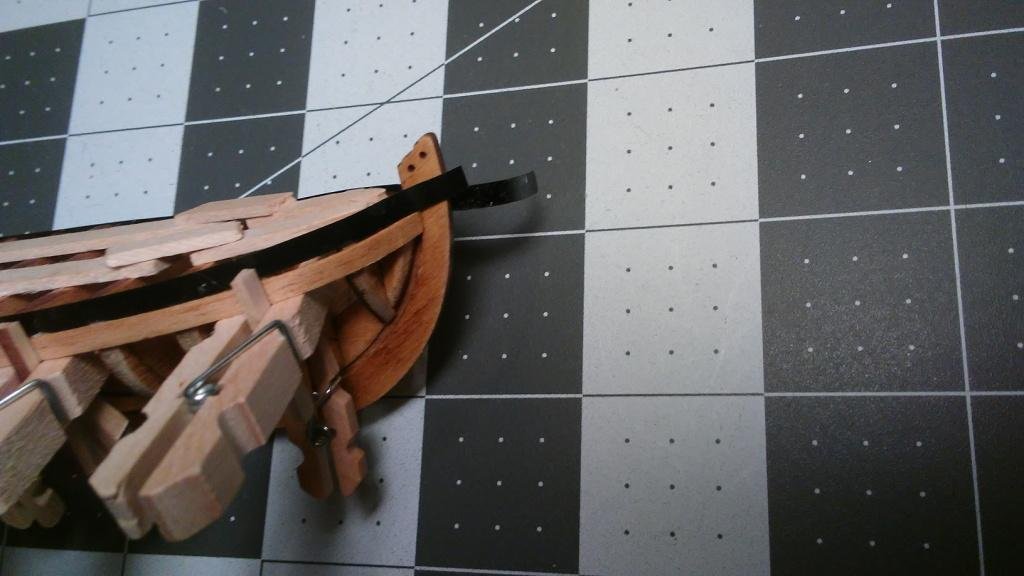
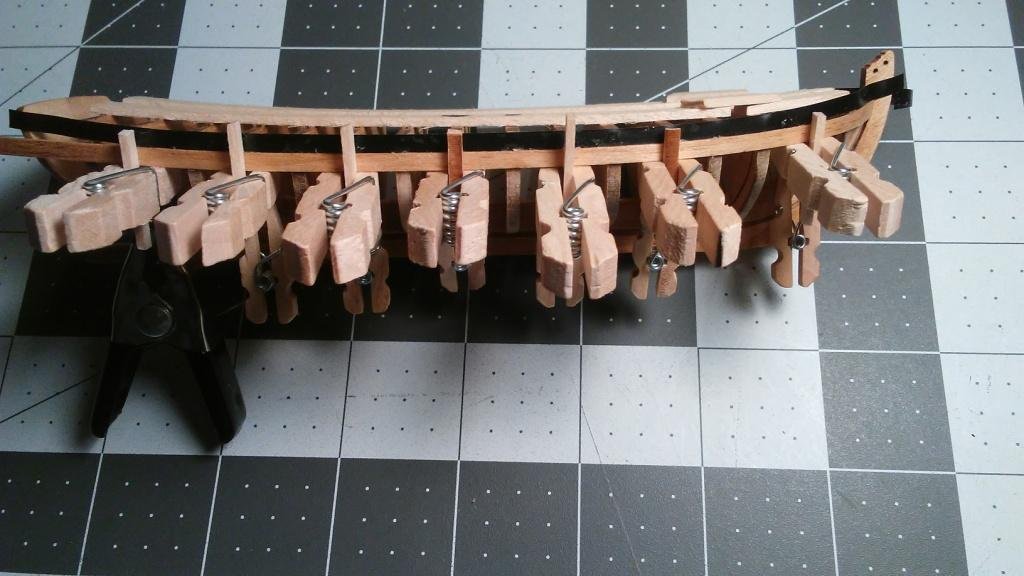
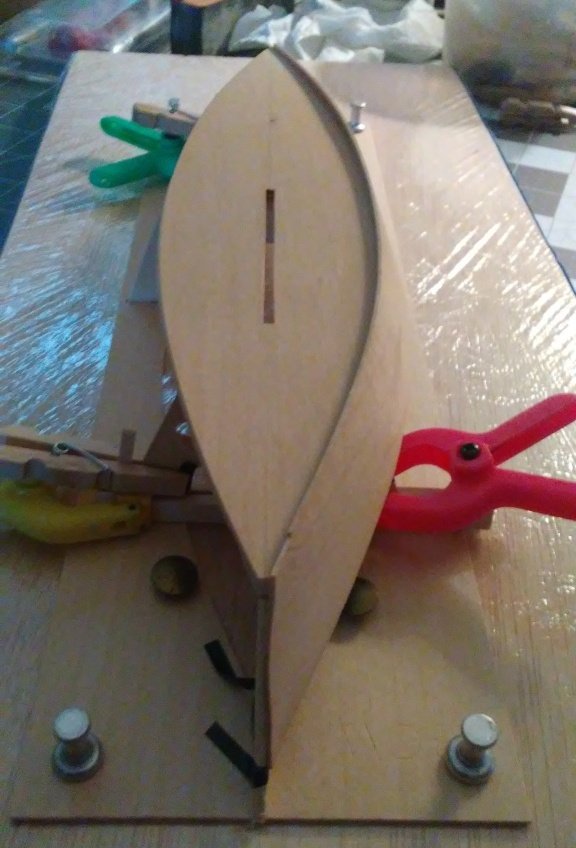
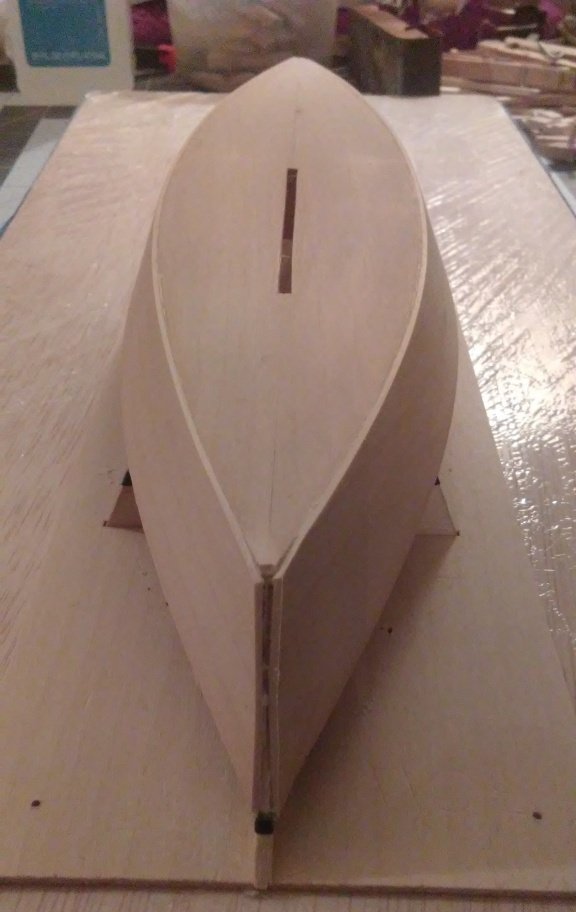
Now that the Keel is on the frame, and I'm satisfied with its alignment I moved on to planking. This is "way easier' on the Skiff as opposed to the Longboat. But I had to figure out how to clamp the plank in place because I'm using PVA glue instead of CA. I used black artist's tape to mark the alignment points on the forward and aft bulkheads and on the stem and stern. Unfortunately my sanding on the the stem and stern posts left much to be desired. The wood was pretty soft and I was a little aggressive in my efforts. Also, redoing the planking a couple of times to get it right resulted in softening of the wood plank and subsequent warping. I'm hoping I can clean it up before I paint and when I install the stem and stern caps. I never did come up with a good clamp for this activity, so it reverted to two hands and a modicum of patience. And here's the result... Once the starboard side was dry and cured I glued on the port side.Here's the finished planking on the frame: The pictures below show the finished hull after removal from the building jig. Yesterday and today I've been working on the thwarts and the centerboard case. I've elected to coat the centerboard inner faces with a gloss finish (it was already stained as described above. I'll add additional photos in the next installment... I spent a good deal of time agonizing over what type of finish to use on the "natural" surfaces of the model. Ultimately I decided to use Minwax's Polycrylic in a clear gloss finish. This is due in part because of the ease of clean-up for my brush (soap and water) and the fact that the painted surfaces will be done in acrylic paint. Because it's acrylic I can use it for a "finish" coat on the painted surfaces, if necessary.


- 13 replies
-
- 4
-
-
- crabbing skiff
- Chesapeake Bay Crabbing Skiff
- (and 2 more)
-
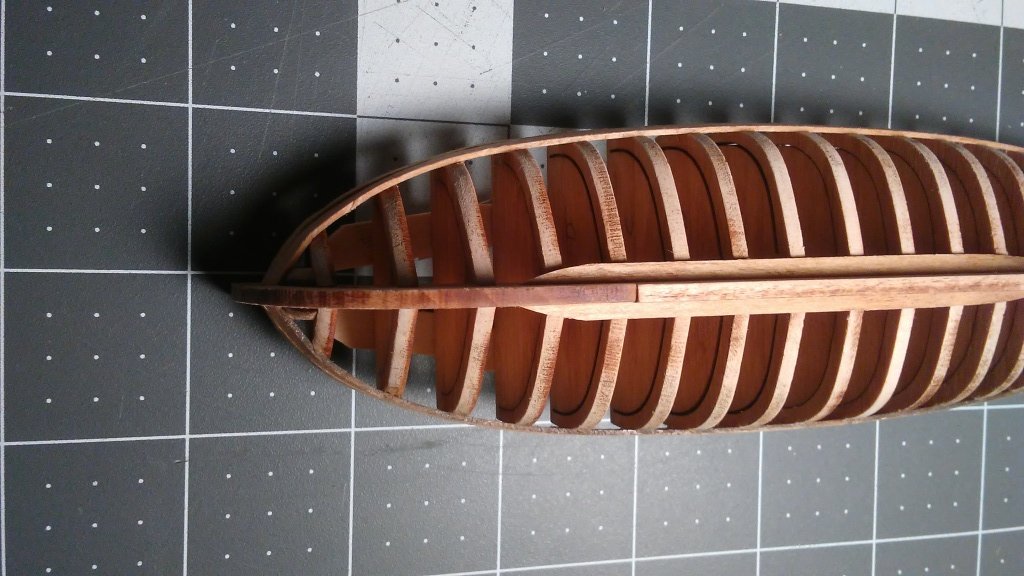
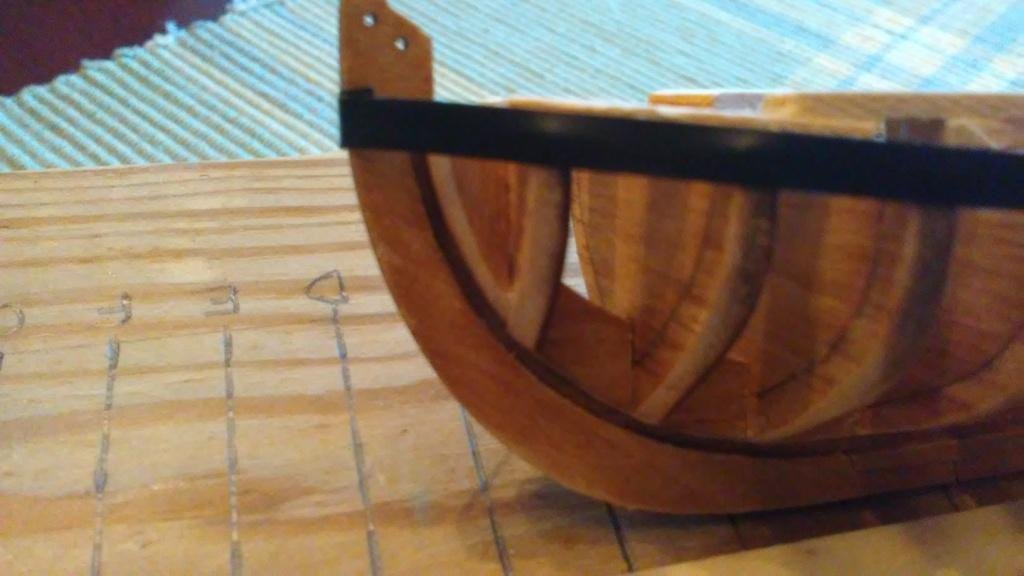
I made tick strips for each of the bulkheads on each side...a total of 32 strips. I then went bulkhead by bulkhead and marked the free space. When I compared the spacing with the diminishing grid, it looked like I needed eight full-width planks. Rather than line everything off at that spacing, I decided to add one more plank above the garboard strake on each side and re-measure my spacing. That has now been accomplished and as Chuck's instructions suggest...I now have 4 small victories...👏👏🙂 As you can see in the pictures below, I used a pencil to darken the edges of the planks to simulate tarred caulking. I think I got this suggestion from Chuck's build log. I does look good! Port Side: Starboard Side: Bow view:
.jpg.289f62b01df7278968dfb6173d840668.jpg)
.jpg.a67d4132f1152e0a05d46d36236bcb7f.jpg)
.jpg.4a6f13c1d2d6ee6cc4f0b0b3a58d3a65.jpg)
- 25 replies
-
- 3
-
-
- 18th century longboat
- model shipways
- (and 1 more)
-
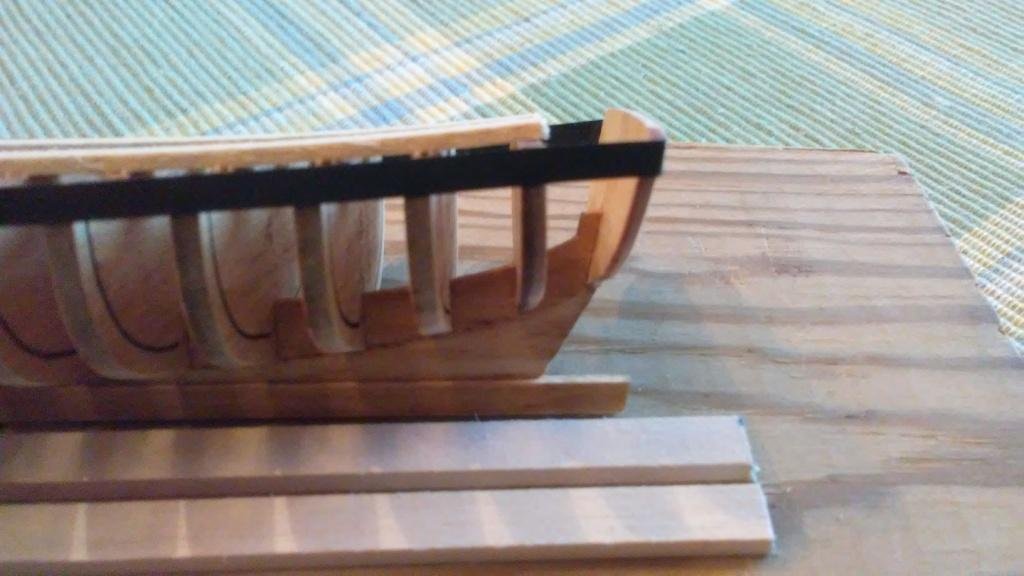
It's been a while since my last update, but it hasn't been without activity... I got both of the sheer planks on the frames and discovered the transom wasn't true...off came the planks and I redid the transom. You can see the center line is off. Then I redid the sheer planks. Everything looked good at this point. Next up were the second planks. Done and looked good...but... The third plank on the port side did not lay flat with the second plank when dry fitting. It turned out I needed to sand a couple of the bulkheads some more to have a smooth transition. Got the bulkhead sanded, dry-fit the first two planks on both sides to verify a smooth transition and then re-did the assembly: Finally I think I'm good to move on to the garboard strakes. I glued them in last night: It looks like I need to smooth the curve on the starboard strake a little bit, but I think I'm ready to go now to lay out the remaining planks using a diminishing grid for each bulkhead. I may have gotten my sheer plank a little low on the bulkheads; I think I'll end up with 11 planks on each side. I expect I should be lining out the planks tonight, tomorrow and into the weekend.

.thumb.jpg.029b9f7add820ad75b6a7db048260625.jpg)
- 25 replies
-
- 4
-
-
- 18th century longboat
- model shipways
- (and 1 more)
-
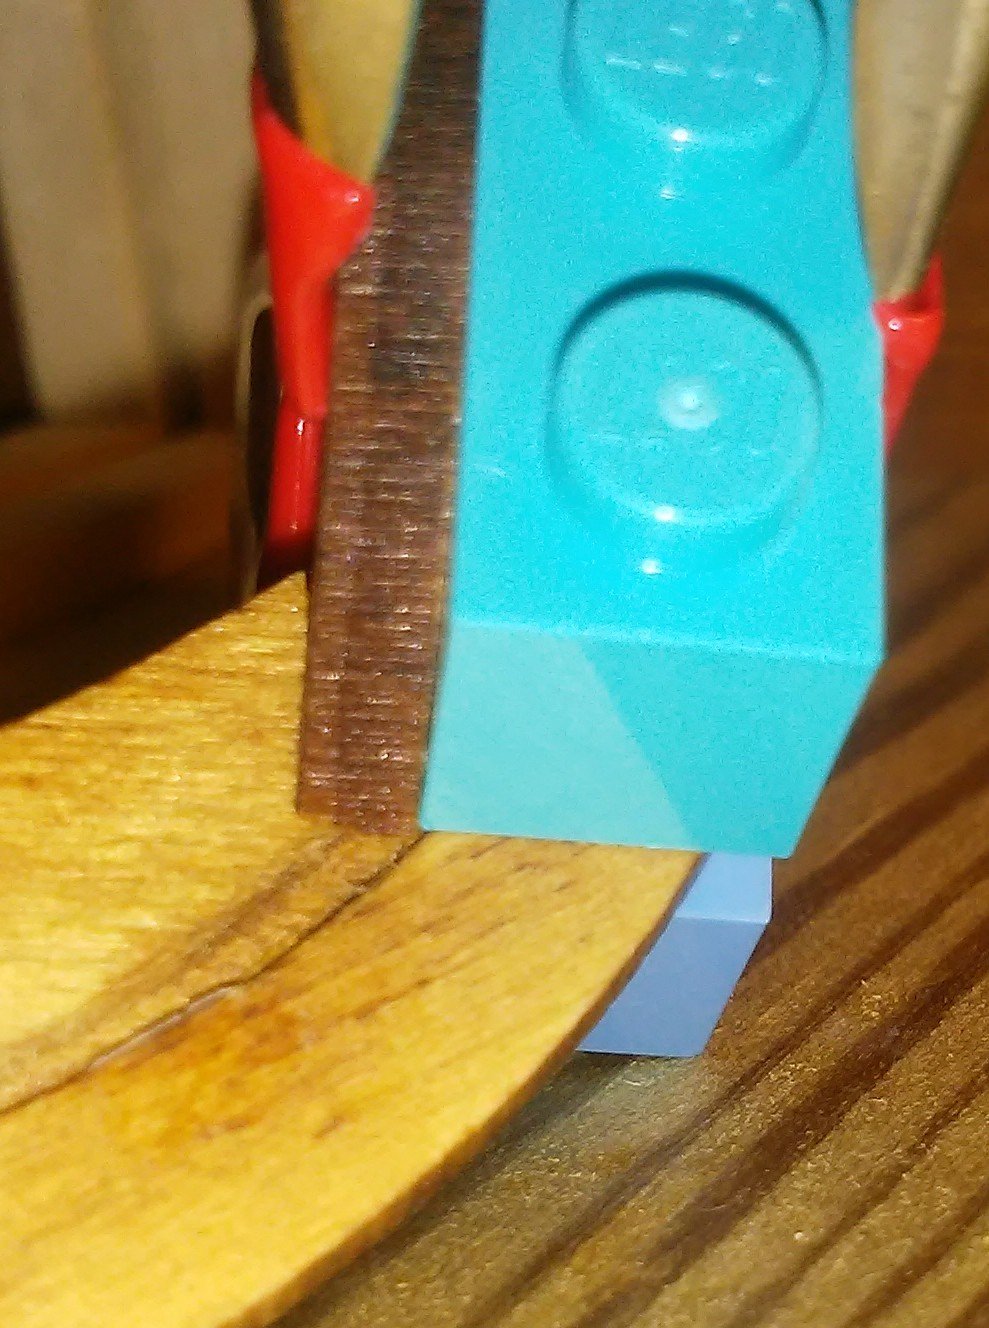
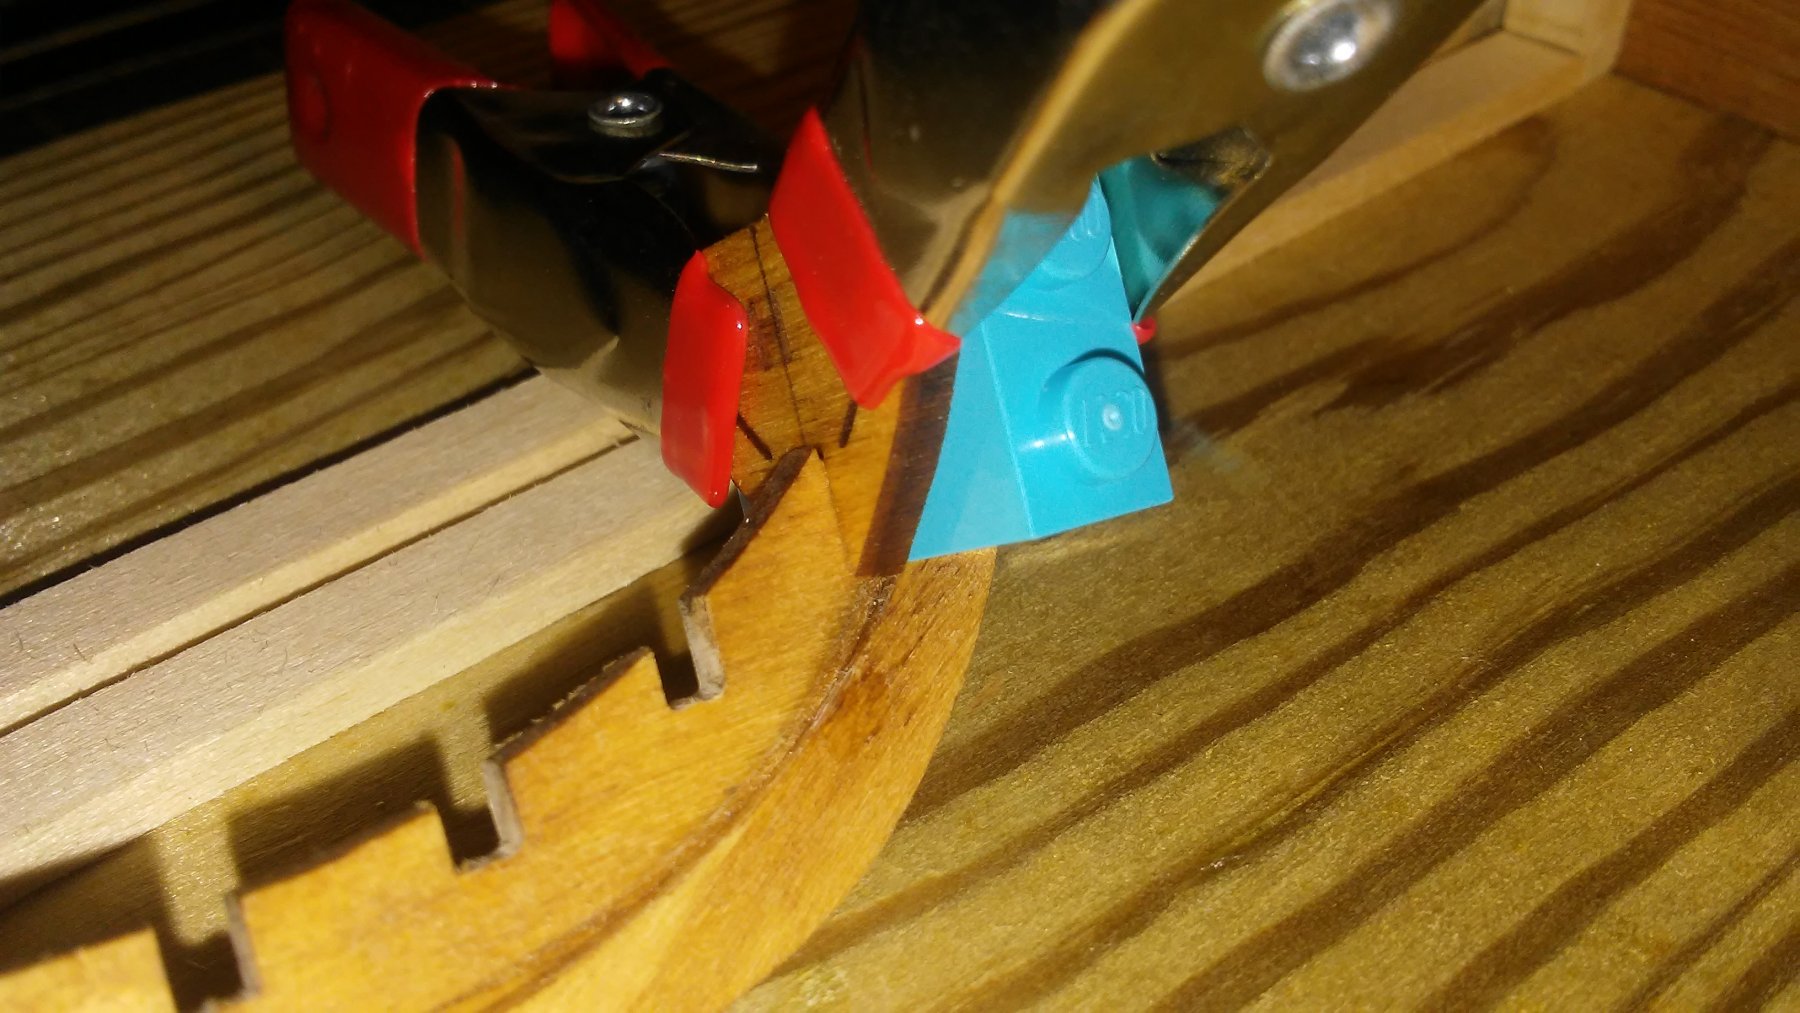
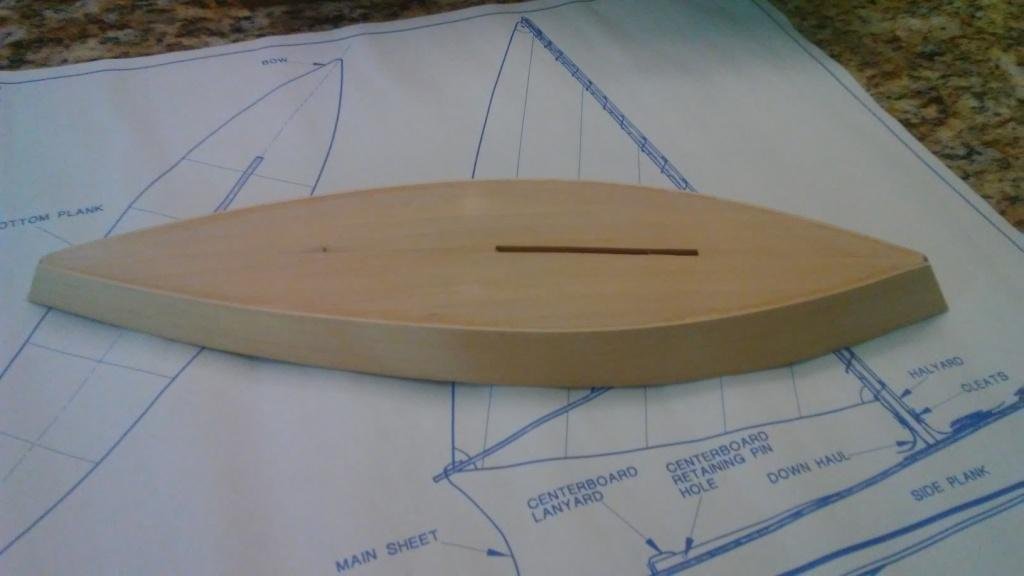
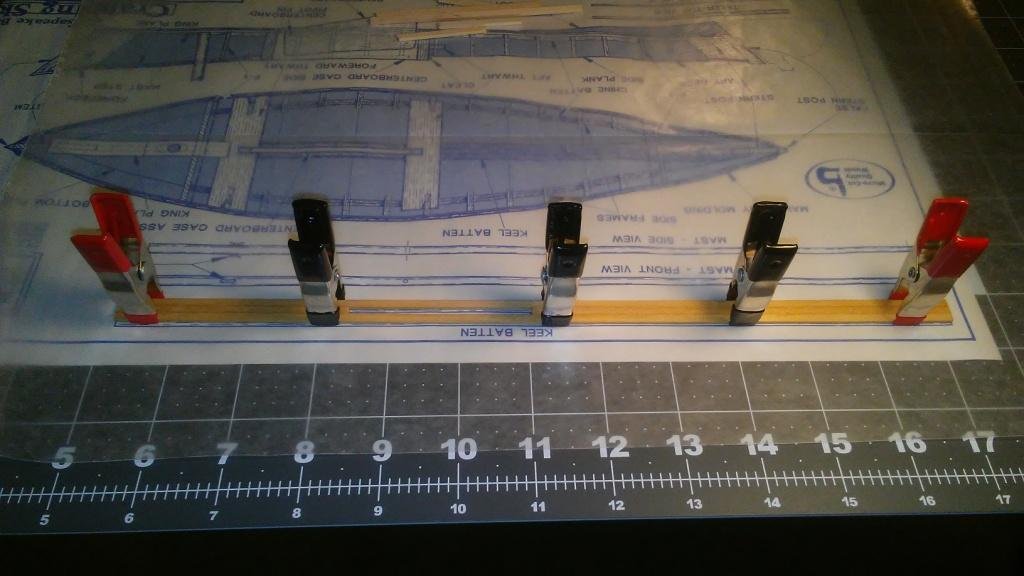
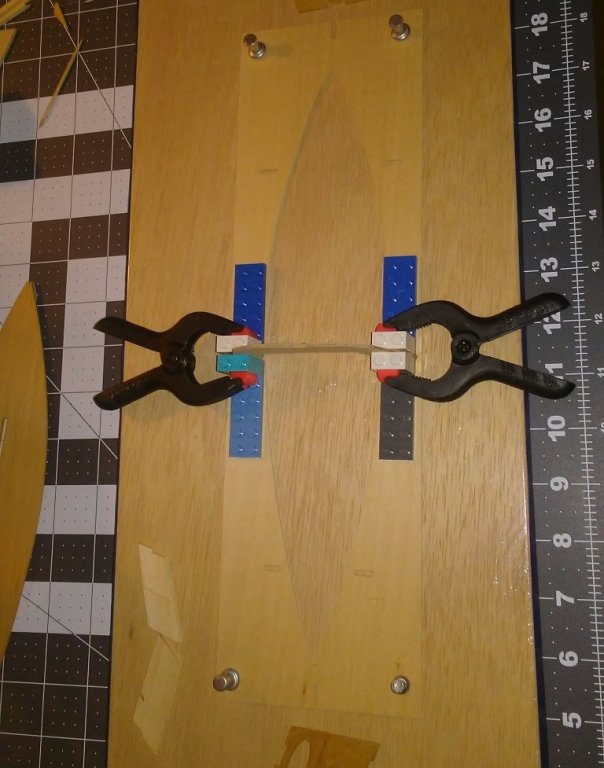
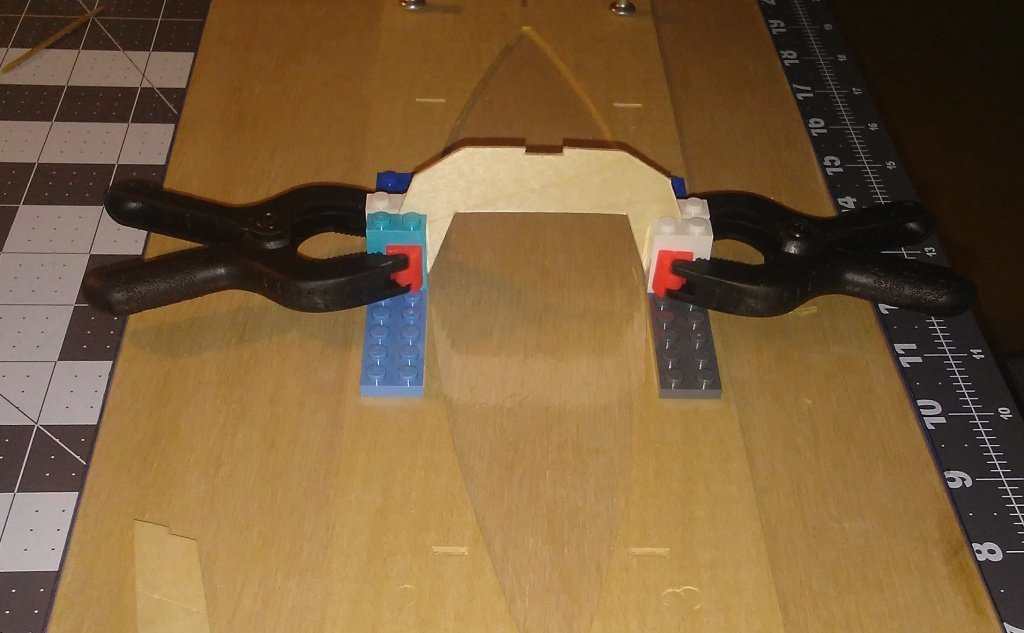
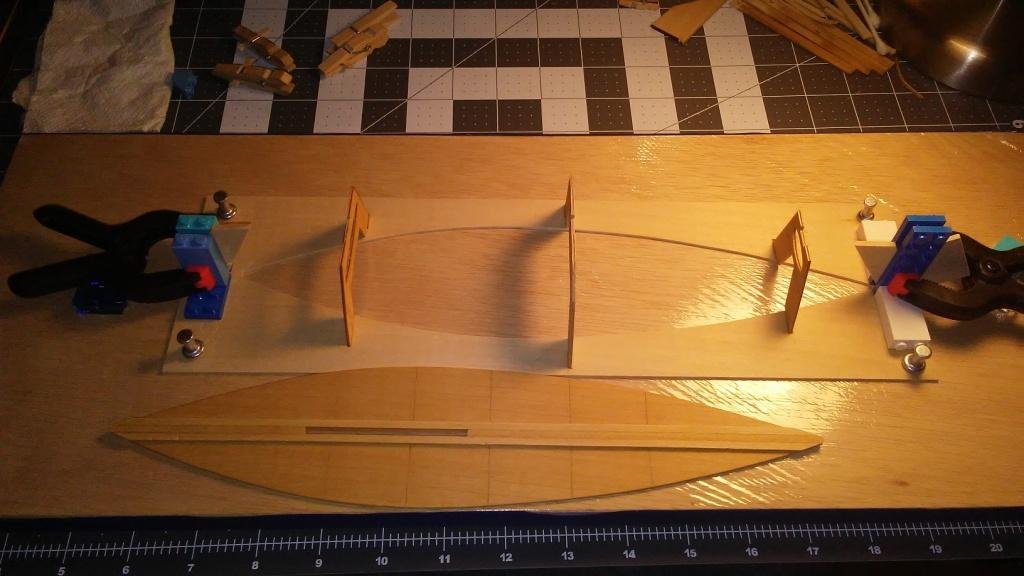
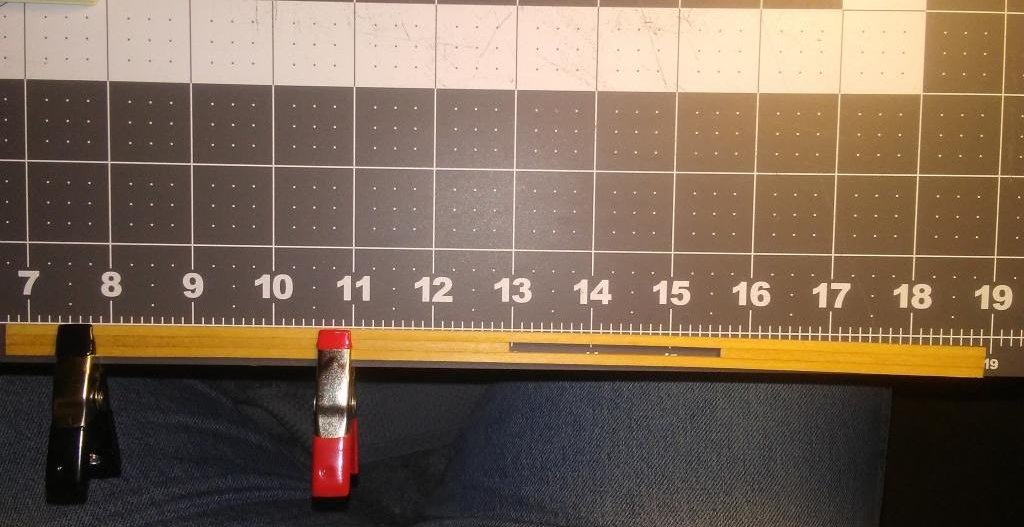
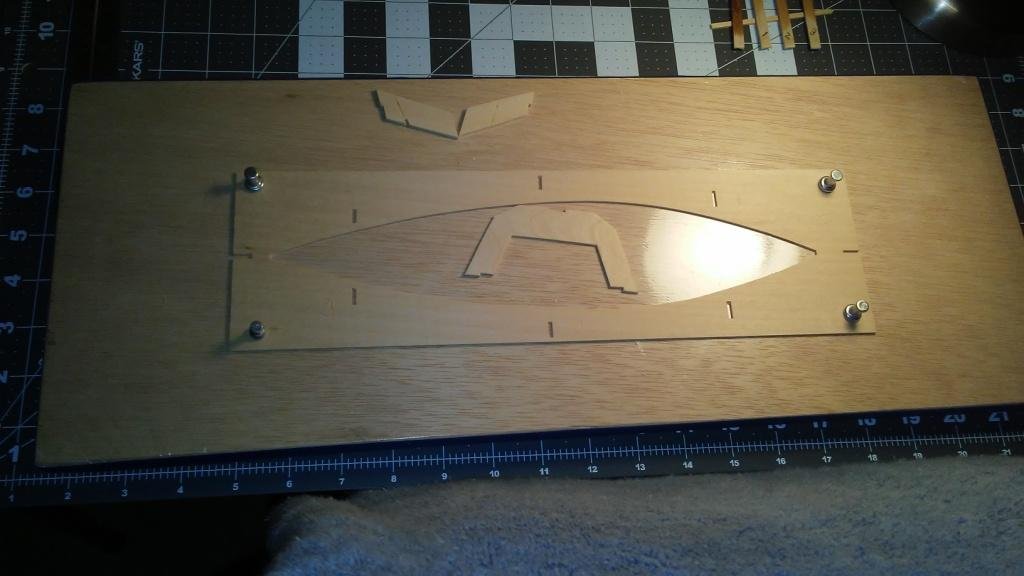
I have got to get more diligent in keeping this log updated... I stained the keel plank, keel batten, and the forward and after bulkheads with a 50:50 mix of Minwax Golden Oak and Clear. Per the instructions I assembled the keel batten by laying out the pieces on the plan sheet. Before gluing I covered the plans with a piece of waxed paper that was clear enough to see the plan drawing. After coating the contact surfaces with white glue I clamped the pieces together and set aside to dry as shown below: While this was drying, I assembled the building jig. The instructions call for cutting a corner from a die-cut sheet to use as a square. I opted instead to use some Legos and clamps to square the pieces to the base. I used the same technique to finish assembling the jig When it came time to assemble the Keel Plank and the Keel Batten, I found the Keel Batten was not straight: This was corrected by dampening the batten and "edge-bending" it. I then dried it with the Commodore's hair dryer. The result was acceptable and I was able to glue it to the Keel Plank. Below is the assembly after trimming and light edge sanding. The next step was to glue the keel down to the jig bulkheads and the stem and stern posts. The trick was going to be to bend the keel to fit the required curve. Using wood glue for assembly meant I needed to come up with a way to clamp the keel in place while the glue dried. I played with this for several days trying to come up with a solution and then it occurred to me I could use a "bookbinder's clamp" to secure the keel in position. There wasn't a lot of slack, and I had to re-do a couple of the jig supports to get everything squared and trued, but the concept worked. Below is the Keel Assembly clamped to the jig: The edges of the sides and of the keel have all been sanded and test-fit. Now it's time to glue the side planks...after I figure out how to align them and then clamp them to the keel. I've got some ideas but would welcome additional suggestions. That's it for now on the Skiff. Back to work on the Longboat now...
- 13 replies
-
- 2
-
-
- crabbing skiff
- Chesapeake Bay Crabbing Skiff
- (and 2 more)
-
Very nice! I'll update mine this evening.
-
Hi! I just found your thread on the Longboat. I elected to make it my first build also and am taking my time so that I minimize my errors. You've moved farther ahead than I have, I've just finished the two sheer strakes tonight. I hope to get a second strake on at least one side tomorrow. I think I'll pull up a stool and watch as your build proceeds.
-
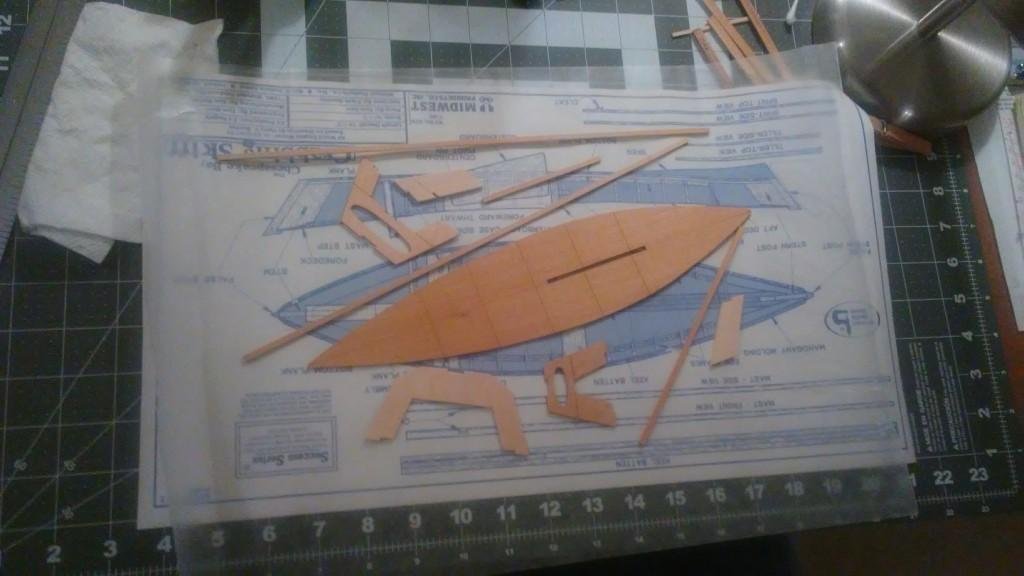
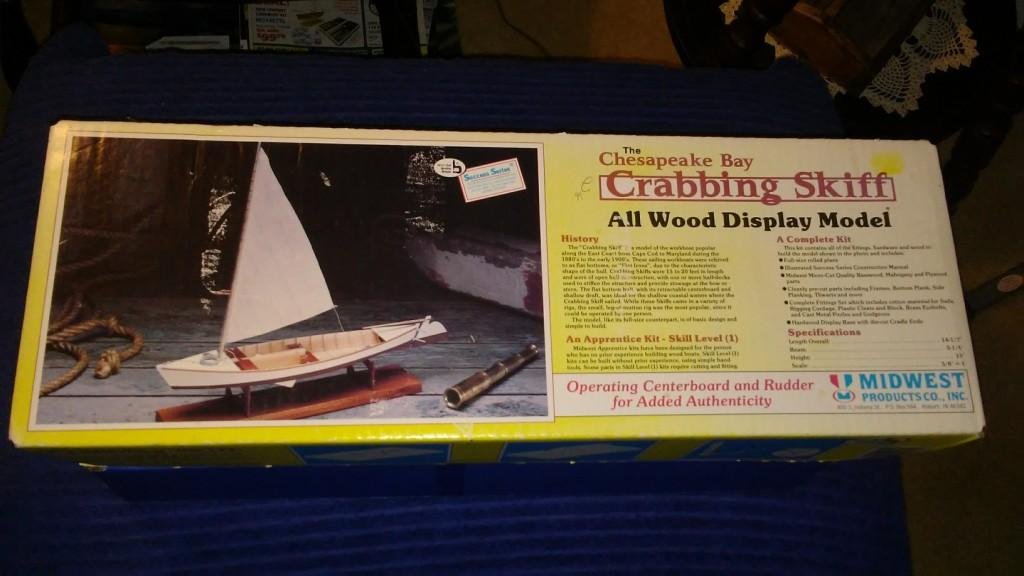
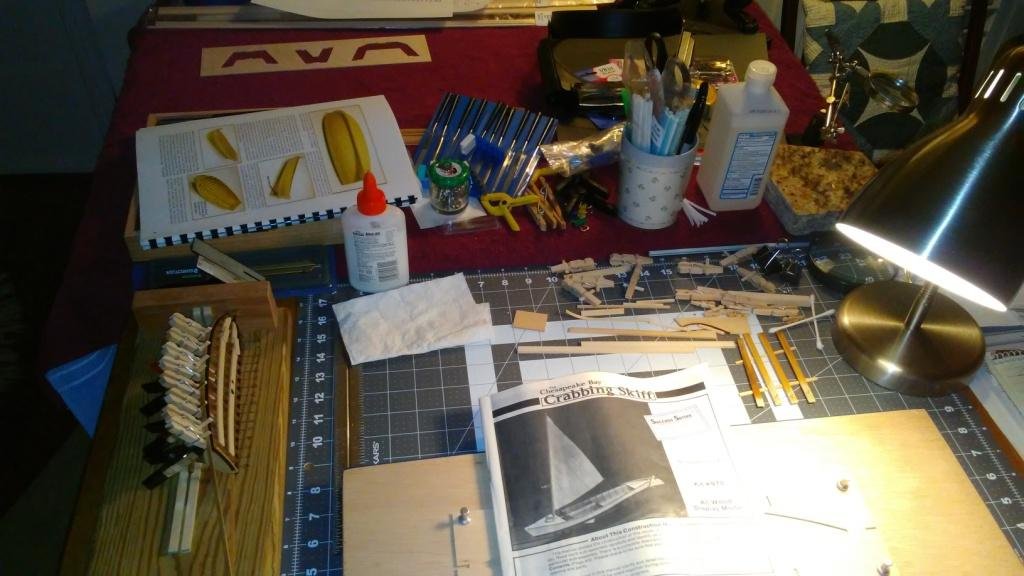
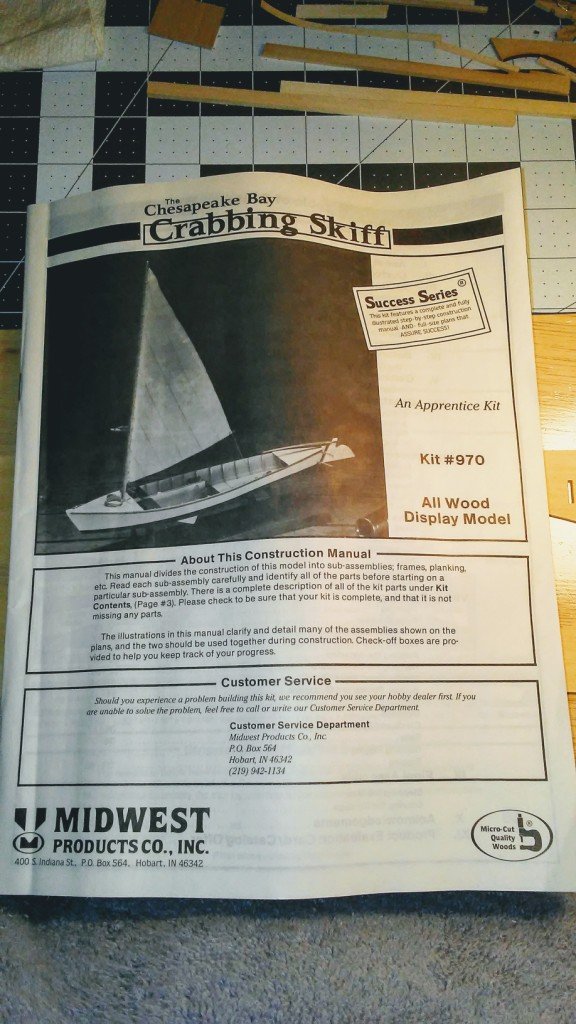
Obviously, with Midwest no longer producing wooden ship models, this kit is NOS (new old stock). It was given to me with the proviso that I maintain a build log of my progress. So-o-o-o-o...here goes... I am also concurrently building the Model Shipways 18th Century Longboat - I am currently in the planking process on the Longboat. Because I've taken Chuck's advice to heart: "...treat each plank as a small milestone," and I'm using Elmer's white glue, my progress planking will be fairly slow. Because of the slowed pace on the Longboat, the Commodore suggested I start the Skiff and produce two models at the same time. So today I got started... All of the parts were in sealed bags so I anticipate no issues with having all the materials. I am concerned about the plastic cleats and block. I'm going to have to find cast cleats and a wood single block...to scale. Also the rigging line looks a little dodgy; this may need to be upgraded too. Here's the instruction manual. It looks like it may be a great tool to learn techniques as well as to build the model. In preparation for assembling the building jig I cut out the bottom plank and gently sanded it with 400 grit paper. I used my granite block to try to get as close to square as possible on the edges. Then it was time to assemble the building board. As you can see below the stem and stern posts have been cut out of the blanks and sanded square on the mating surface. The center support is also on the board. The bottom plank, the two interior bulkhead supports, and the four pieces for the keel batten were stained with a 50:50 blend of golden oak and clear Minwax and are downstairs drying. So that's the progress so far. Below is most of my work area. The Longboat is on its jig with a myriad of clamps holding the port sheer plank as it dries.

- 13 replies
-
- 6
-
-
- crabbing skiff
- Chesapeake Bay Crabbing Skiff
- (and 2 more)
-
Two nights ago I began installing my first sheer plank. I ended up beginning twice because the first start didn't seat the end of the plank in the bow rabbet. Redone and lesson learned. I think that this time it's gonna take. I started by water-soaking the plank and then pre-bending the bow curve and adding a slight side bend for the sheer line. I made the side bend by producing a copy of the plan showing the sheer line and placing a thick plastic sheet over top of it. Then I clamped a wet plank over it and tried to match the curve as closely as possible. I used the Commodore's hair dryer to speed the drying and to allow it to "set." Then I started the assembly. First I glued the end of the plank into the rabbet and then to the first 4 or 5 bulkheads and clamped into place. I allowed the glue to set and dry for a few hours and then glued the plank down another 4 or 5 bulkheads. I completed all but the last bulkhead and transom last night. Each time I glued more points I adjusted the curve slightly to match my tape. This morning I glued to the last bulkhead and the transom. Below are pictures of the first plank going in and clamped in place. I'm hoping to start the sheer plank on the port side later today. The plan is soaking right now!
- 25 replies
-
- 1
-
-
- 18th century longboat
- model shipways
- (and 1 more)
-
Thanks for the support.
-
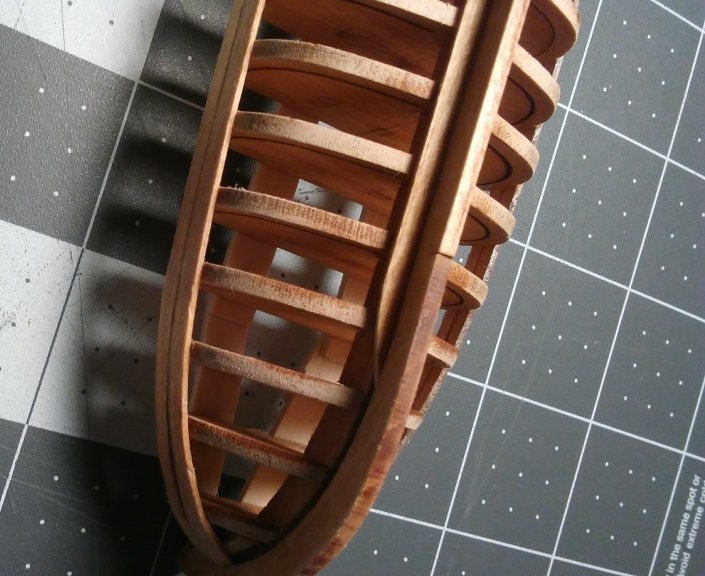
This past week has been spent fairing the bulkheads and thinking about how to proceed. The Commodore has been concerned because I seemed to be doing more reading, thinking, cursing, and grumbling than "actually working." But, as I explained to her, this was critical to my next steps. Never having done this before I was exceedingly nervous about putting sandpaper and file to my delicate bulkheads. I finally elected to attempt to fair the bulkheads before I installed the bow fillers and transom. I laid a piece of planking on the frames and carefully formed it to the general curve of the hull to get an idea of where to sand. As mentioned in several of the build logs, and as was evident from the fitting of a plank, the bulk of the work was on the first 3 bow bulkheads. I worked both sides alternately and continued judging progress with my plank. I finally go to a point where I felt I'd gotten everything as close as I could to "right." I then fitted and faired the bow fillers. Once all of these were done I glued in the transom...twice. Once I got it in and it looked square and true I very carefully sanded it to line up with the stern bulkheads. On the final check with my plank I found one bulkhead that appeared to have been oversanded. I spent a couple of days playing with it and trying to make a shim to install. Finally I noticed that I "might" be able to bring it in by sanding down an adjacent bulkhead. I carefully tried that and found that I was able to get a fairly true line with that minor adjustment. As a final step before planking, and in preparation, I marked the bulkheads according to the sheer line on the plans. Unfortunately the instructions say the line is 1/16" below the top of the bulkheads amidships, but the dimension on the plans is 7/64". I ratioed all of the dimensions off the plans knowing that the 7/64th was actually 1/16" and allowing for 1/32" at the stem. I then marked the dimensions on each bulkhead. I then "lined" the top of the starboard sheer strake with 1/8" artists tape and adjusted it to give me a smooth sheer line. Making tick strips, I next measured the dimension from the rabbet (or bearding line) to the tape. I used this to insure that my tape on the port side was in exactly the same position so that both sides would be even. Below is a photo of the hull faired and with the tape installed: The photos below are of the bow and stern faired and taped: Now, on to planking...another new task!
- 25 replies
-
- 2
-
-
- 18th century longboat
- model shipways
- (and 1 more)
-
Thanks Paul. I had actually added stiffeners at the bow but didn't include the picture. Here it is:
- 25 replies
-
- 2
-
-
- 18th century longboat
- model shipways
- (and 1 more)
-
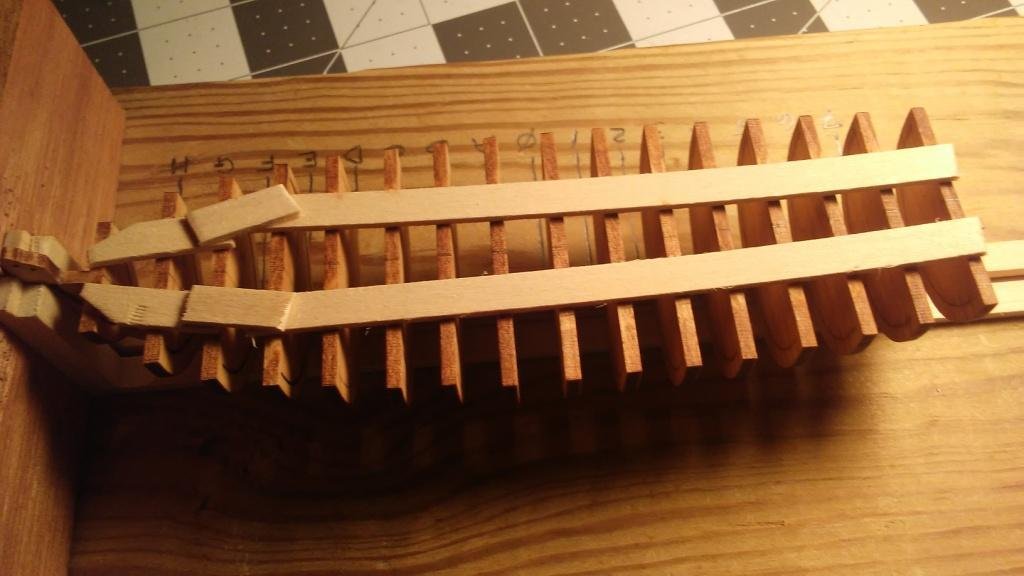
The bulkeads are installed (some more than once) and I think I'm ready to begin fairing the hull. I have some reading to do before I do that. I want to get an idea as to how I can best do this. Again, it's all new to me! Below are pictures of the completed bulkheads before I installed the stiffeners:
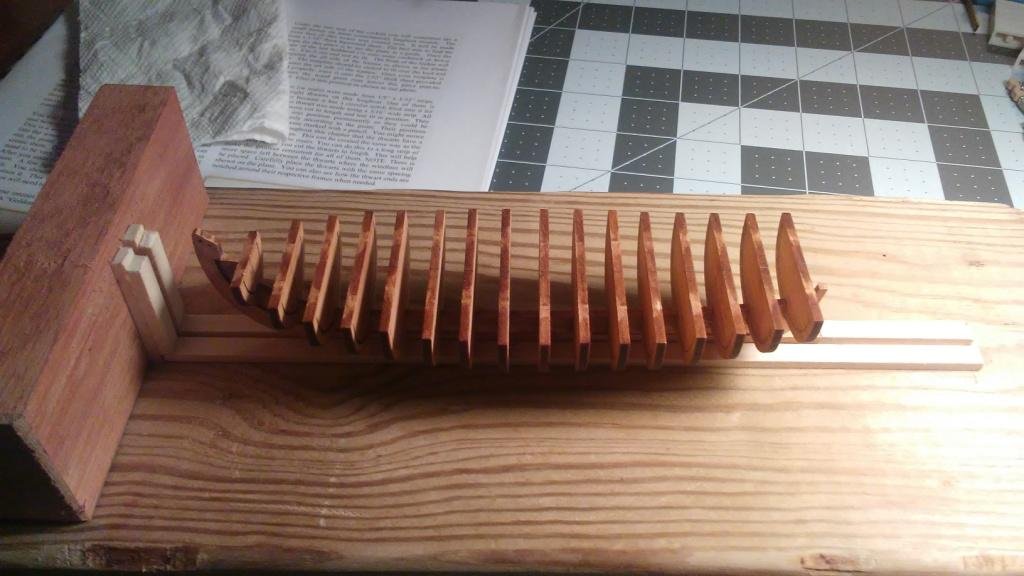
.jpg.537a56c15dcc34df1a3e5879d6b62708.jpg)
- 25 replies
-
- 1
-
-
- 18th century longboat
- model shipways
- (and 1 more)
-
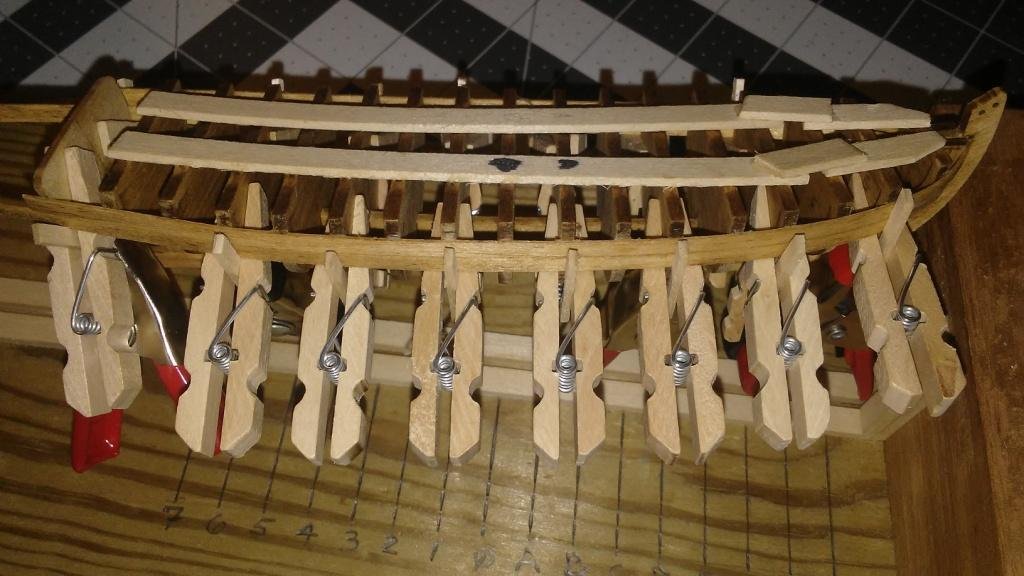
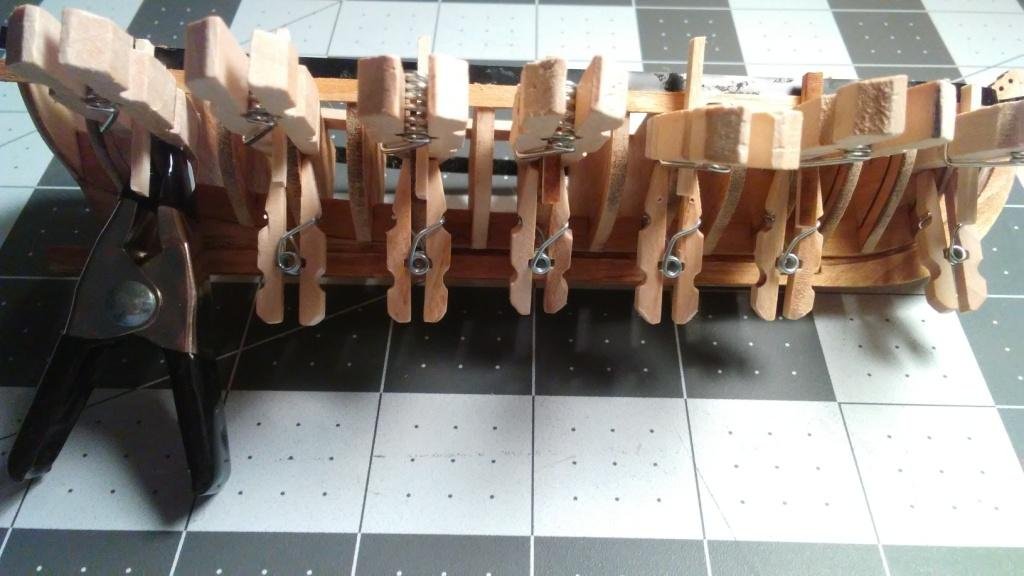
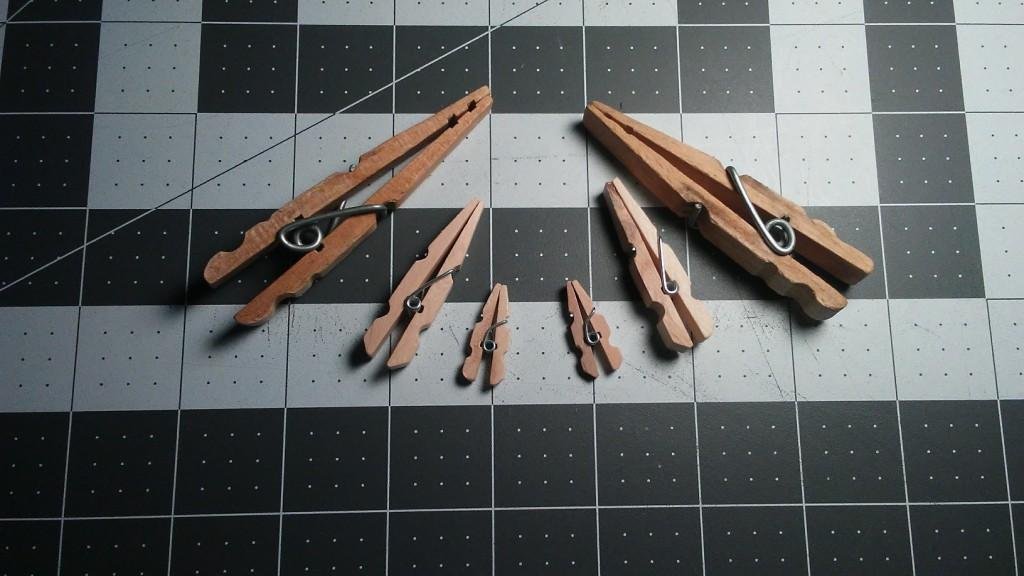
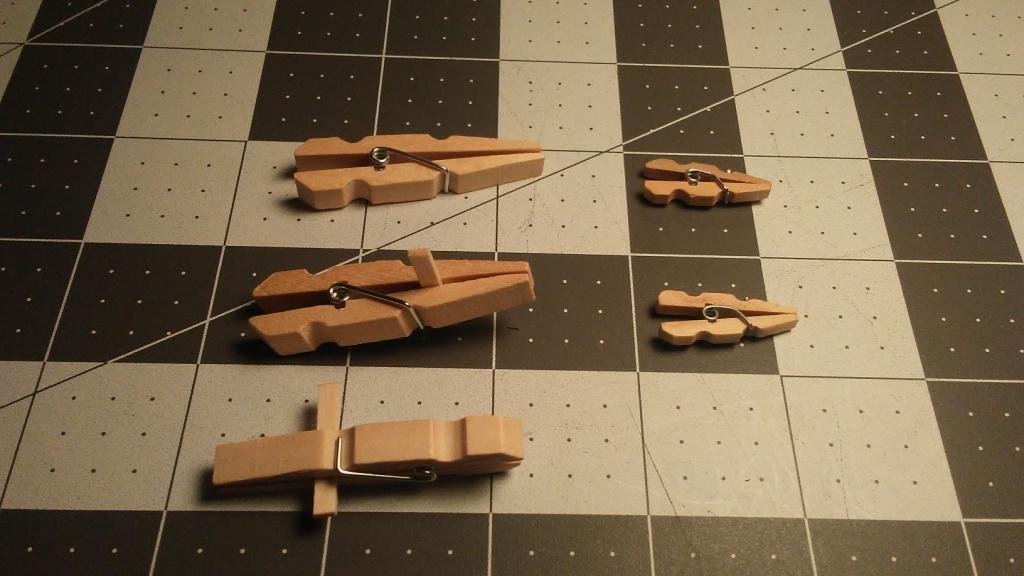
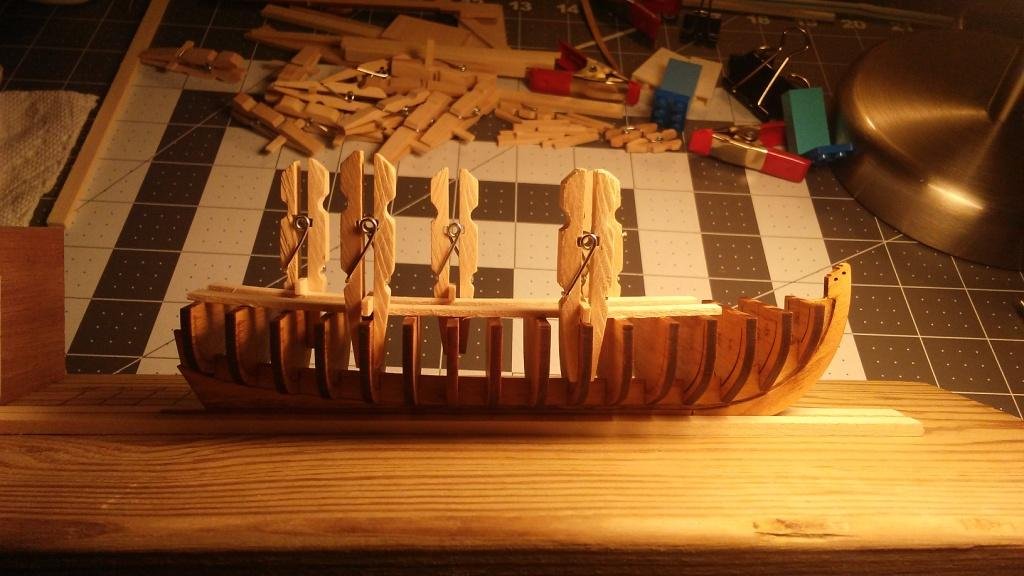
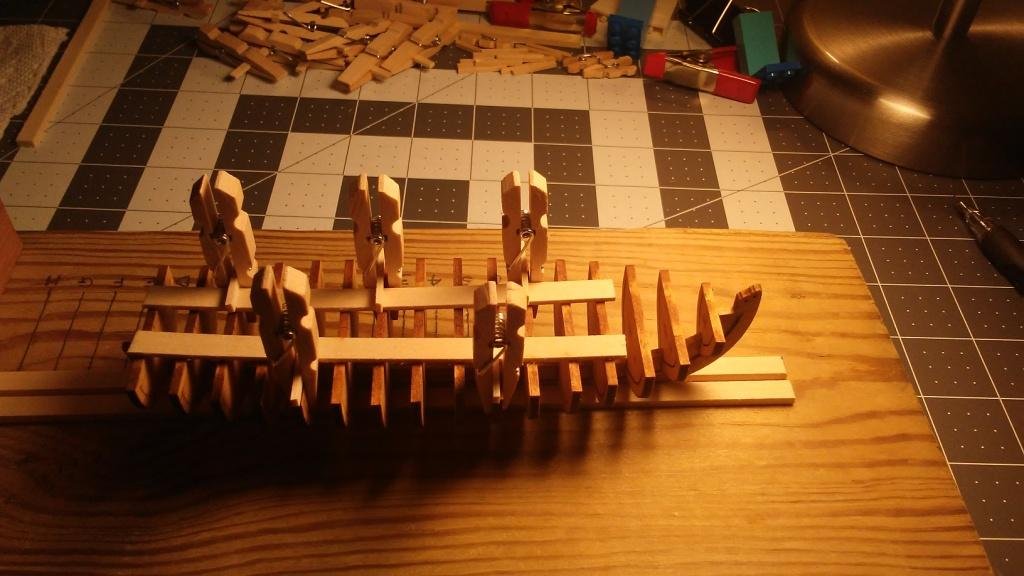
While browsing "Tips & Tricks" I came across "Homemade Clamps" by fnkershner. I want to send thanks for a great idea for making clamps from clothes pins. I had three different sizes of pins and made three sizes of clamps. I then glued a small cross piece to one leg that will allow me to clamp planks to the bulkheads. I used these clamps to hold the my stiffeners to the tops of the bulkheads as the glue dried.
- 25 replies
-
- 2
-
-
- 18th century longboat
- model shipways
- (and 1 more)
-
Välkommen! Welcome! The photoshop is absolutely incredible!
-
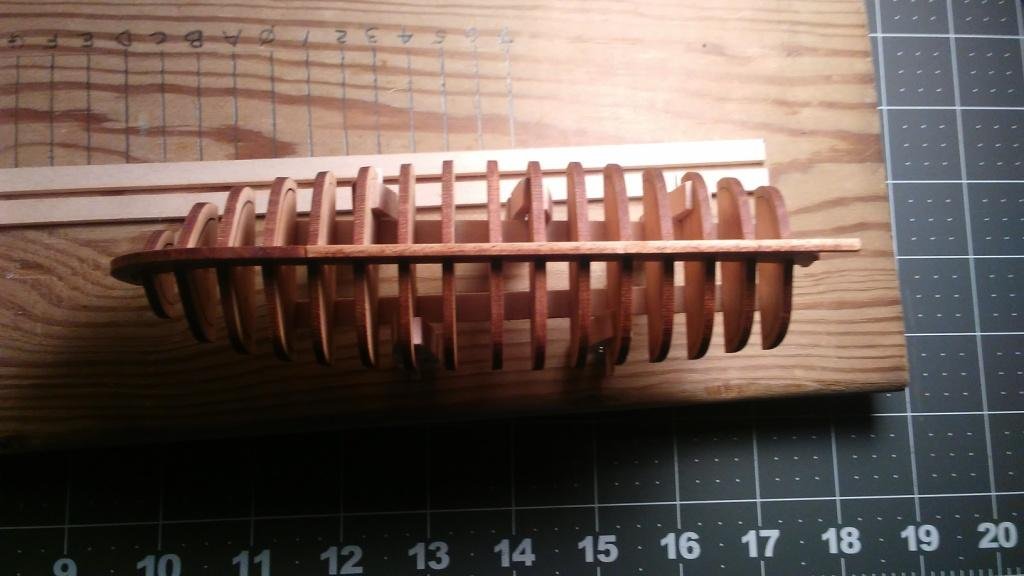
Well, I started installing the bulkheads. I decided to start forward and work my way aft. I decided on using a combination of the slide from a carpenter's combination square and some Legos, both with spring clamps. I've marked the bulkhead section centerlines and then I "eyeball" it with the center of the keel. I use the square and the Legos to set square and plumb. So far it looks pretty good to me. I'm trying not to overthink it and fret if it's not 110% perfect. So far I get a sense of satisfaction every time I complete one bulkhead and prep another.
.thumb.jpg.bc7de1d8440b1fca970db036dc0a2ac6.jpg)
.jpg.e28c45e7294be05cf17403e74894d723.jpg)
- 25 replies
-
- 1
-
-
- 18th century longboat
- model shipways
- (and 1 more)
-
I decided to start at the stem with the bulkheads. I got "H" glued in place this afternoon and it looks to be true and square. I am a little concerned that the bottom of the bulkhead intrudes into my rabbet but the top of the bulkhead is flush with the top of the false keel stem. From the drawing the top of the bulkhead (frame) is flush with the stem but the bottom is too far down. I suppose I can sand the bottom of the bulkhead when I fair the bulkhead. Does this sound right?


.jpg.8ab676bfdcffc4d1cbcbeaabb5430a21.jpg)

.jpg.1292cfd73db996ba963fae625d415733.jpg)