Arthur Wayne
-
Posts
103 -
Joined
-
Last visited
Content Type
Profiles
Forums
Gallery
Events
Everything posted by Arthur Wayne
-
That will work. I tried wide tape at first but found frosted scotch tape worked better for me and that what mattered most was transposing the shape of the installed strake onto the tape and then the wood. As long as you mark where the bulkheads are you can transpose the width and connect via French curve as you have planned. I found getting the tape to lay in the same plane as the plank you are creating helped a lot. Your planking looks excellent so far so I doubt you will run into trouble now.
-
I had to chamfer the edge of just about every single strake. What I did was chamfer only the inside of the top edge of the strake I was installing. I also noticed if you soak the strakes, they tend to bend at the bulkhead and not between bulkheads making the stair step much worse. Ideally the strakes should arc from bulkhead to bulkhead. I hope that makes sense!
-
I don't know if this will solve the problem you describe, I noticed the planks want to form a straight line between bulkheads as viewed from the edge of the plank. This required me to pre-bend them so they maintained a curve from bulkhead to bulkhead.
-
I think your boat is looking great! It was wise to rework the strake, one ill fitting strake at the beginning will result in a bunch of ill fitting strakes at the end! Strake #6 is the trickiest to get right, now that you have that tackled you shouldn't have any trouble at all with the rest.
-
DrPS good catch! I just looked back through the instructions and they do call for using 3/8" wide planks (a total of 4) for the #12 and 13 strakes. With 2 more going to the floorboards that leaves 4 left. Oddly enough the parts list doesn't mention them being used for strakes, it calls out using them for floorboards and platforms. If you look at the 1/48 scale longboat kit the platform planks are wider than the strakes. To answer your question more directly, I'm not sure there would be enough left over to make the platforms if you use 4 of them for strakes.
- 95 replies
-
- 1
-

-
- Model Shipways
- 18th Century Armed Longboat
- (and 1 more)
-
Luckily I didn't run into that issue DrPS but something I failed to mention in previous posts concerns the bow and stern platforms. The directions detail using the 1/4" x 1/16" plank scraps to create the platforms which is what I used. Long after they were installed I was looking at the wood I had left in the kit. Curiously there was a stack of 3/8" x 1/16" planks leftover and I wondered where on earth those were supposed to go. After looking at the Parts List under Wood Strips and Sheets section I noticed these are for the bow and stern platforms and the floor boards. I only used 2 for the floor boards so that leaves 8 for making the platforms. In the end I think using these wider planks would have been more akin to what is seen on the Medway Longboat.
- 95 replies
-
- 1
-
-
- Model Shipways
- 18th Century Armed Longboat
- (and 1 more)
-
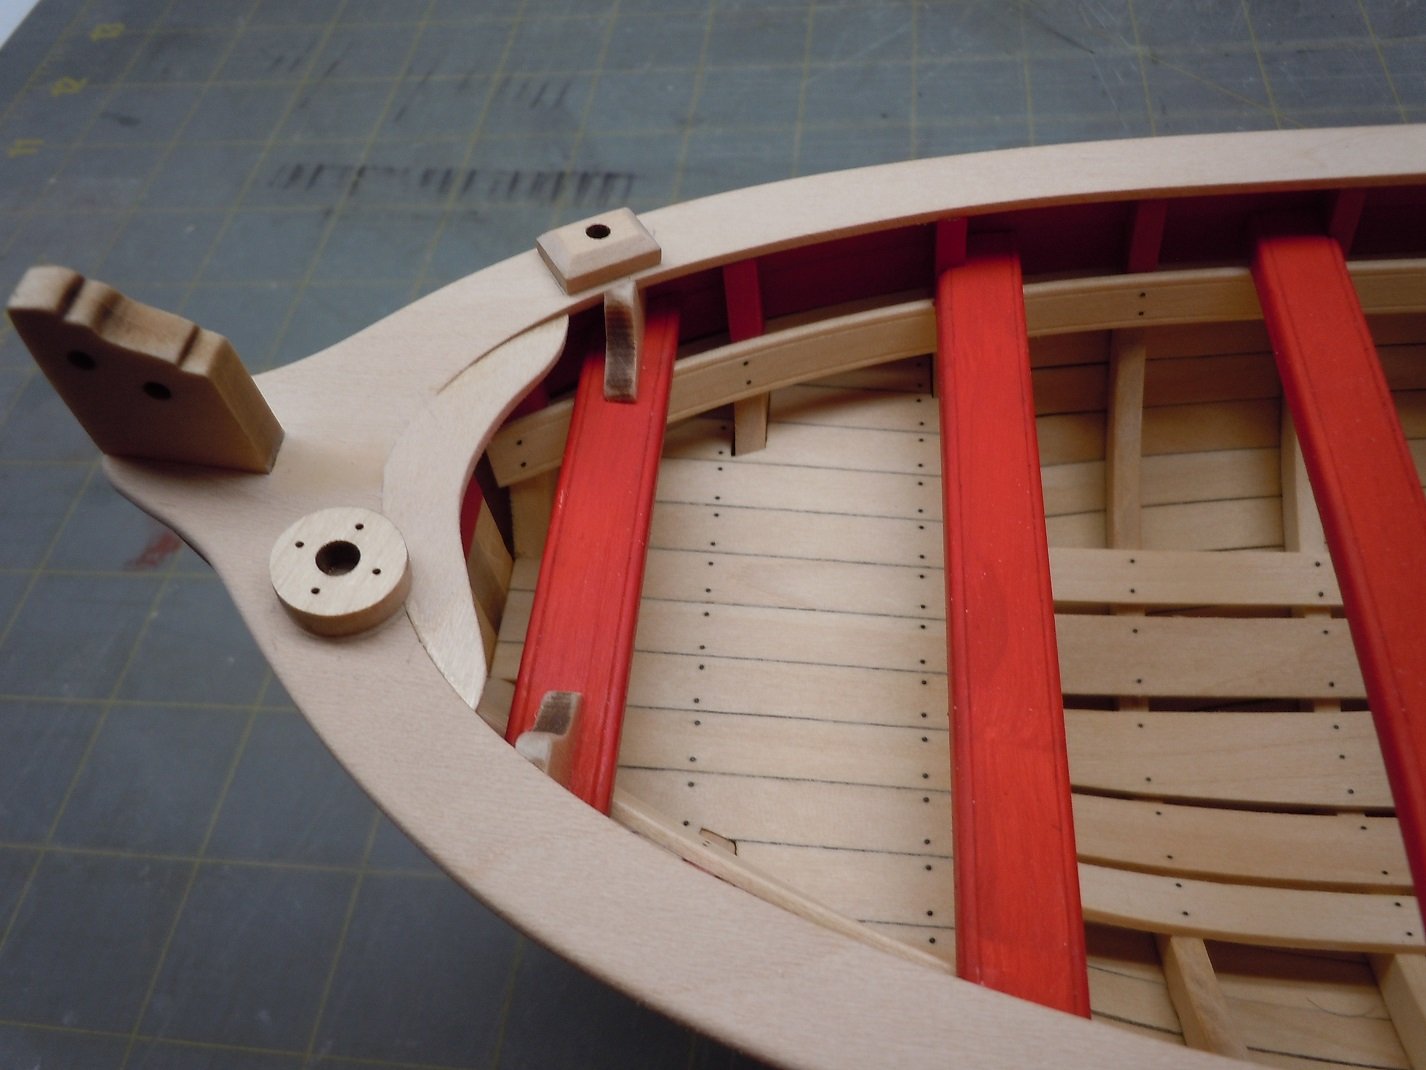
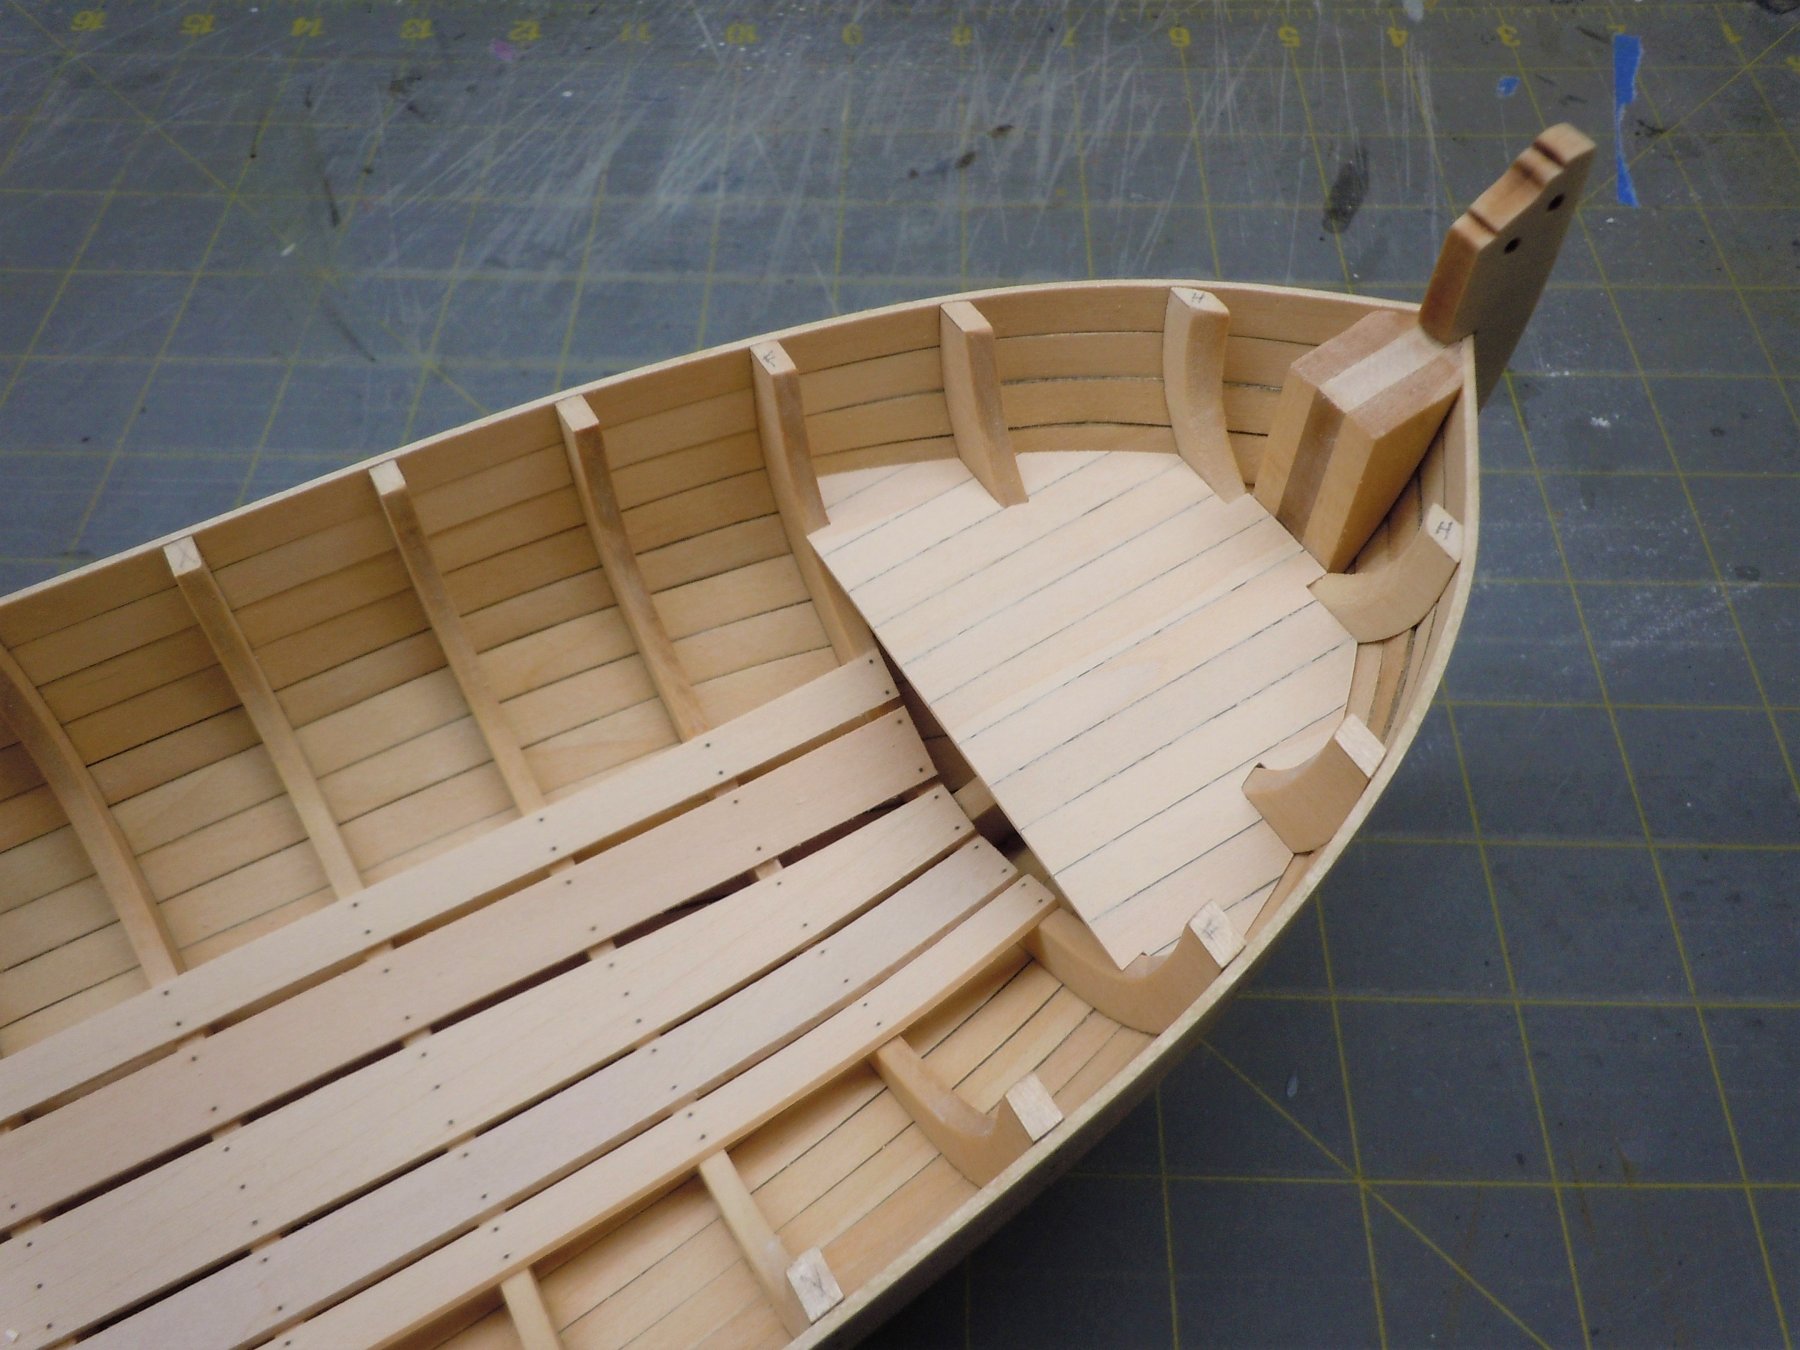
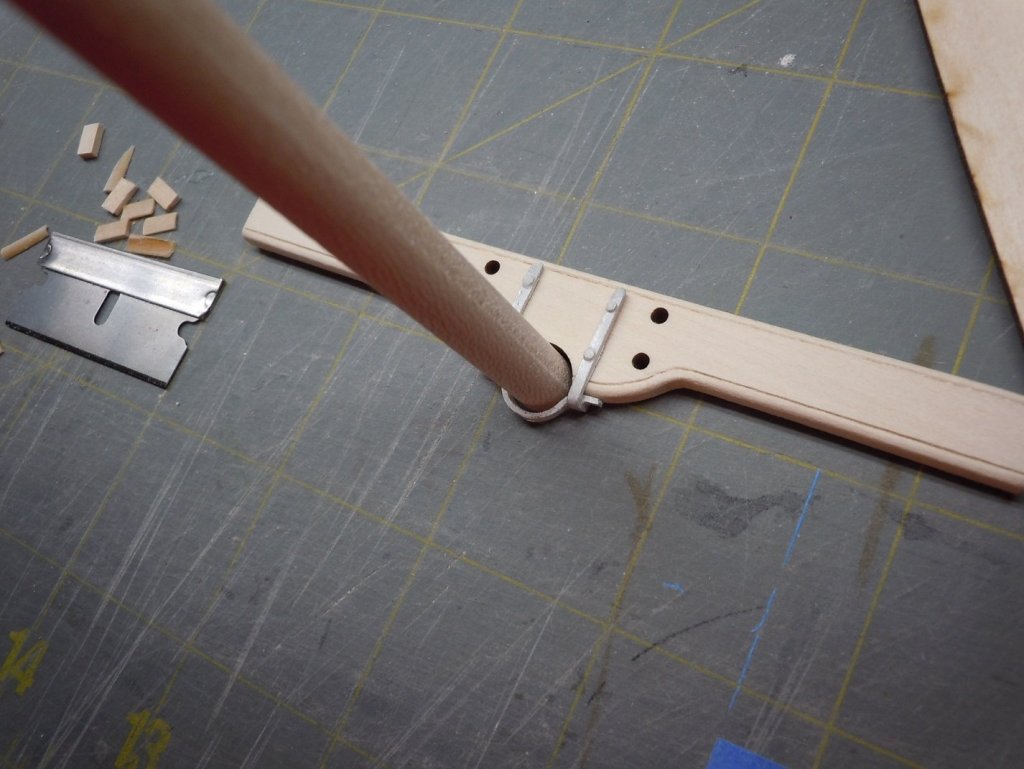
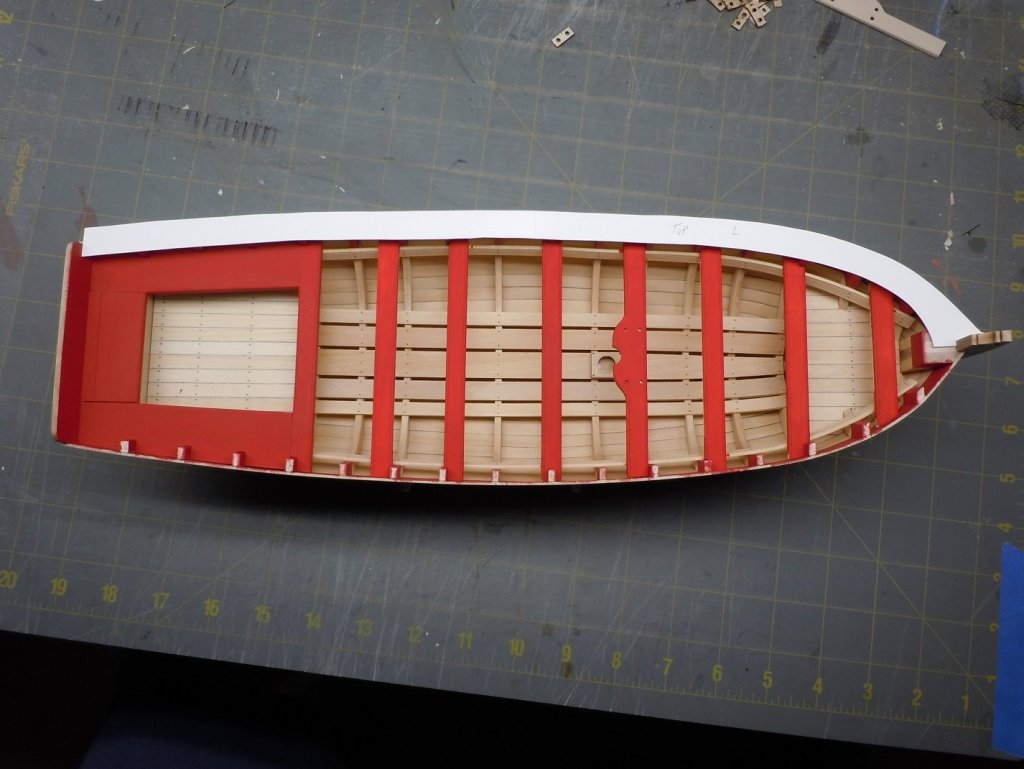
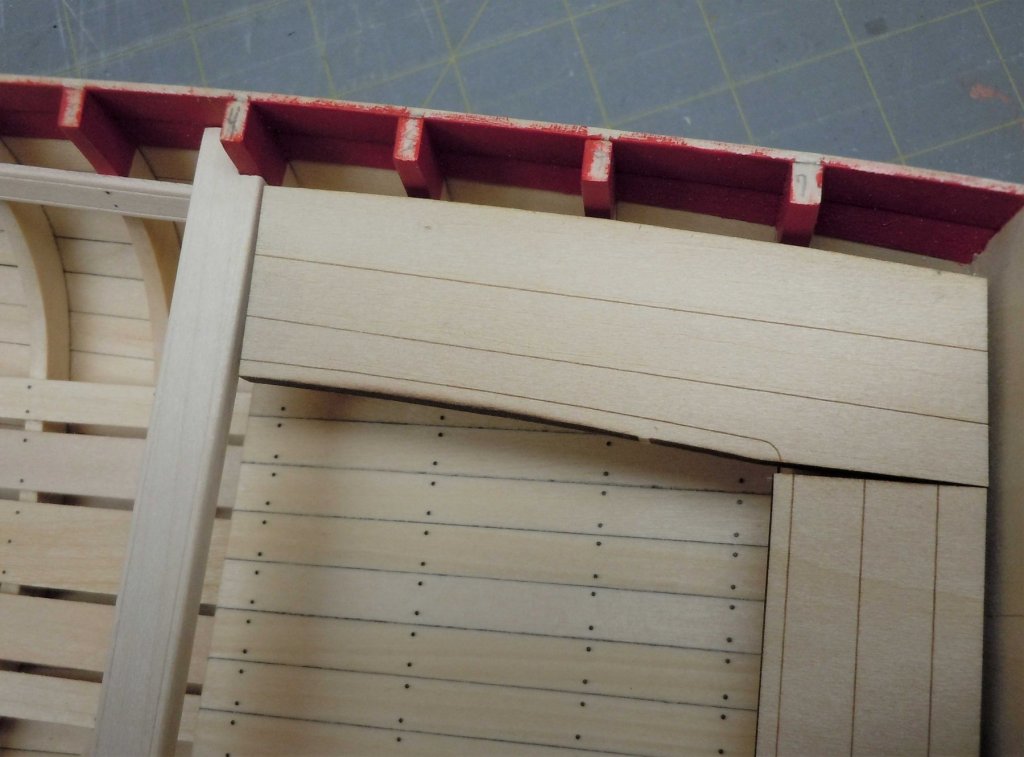
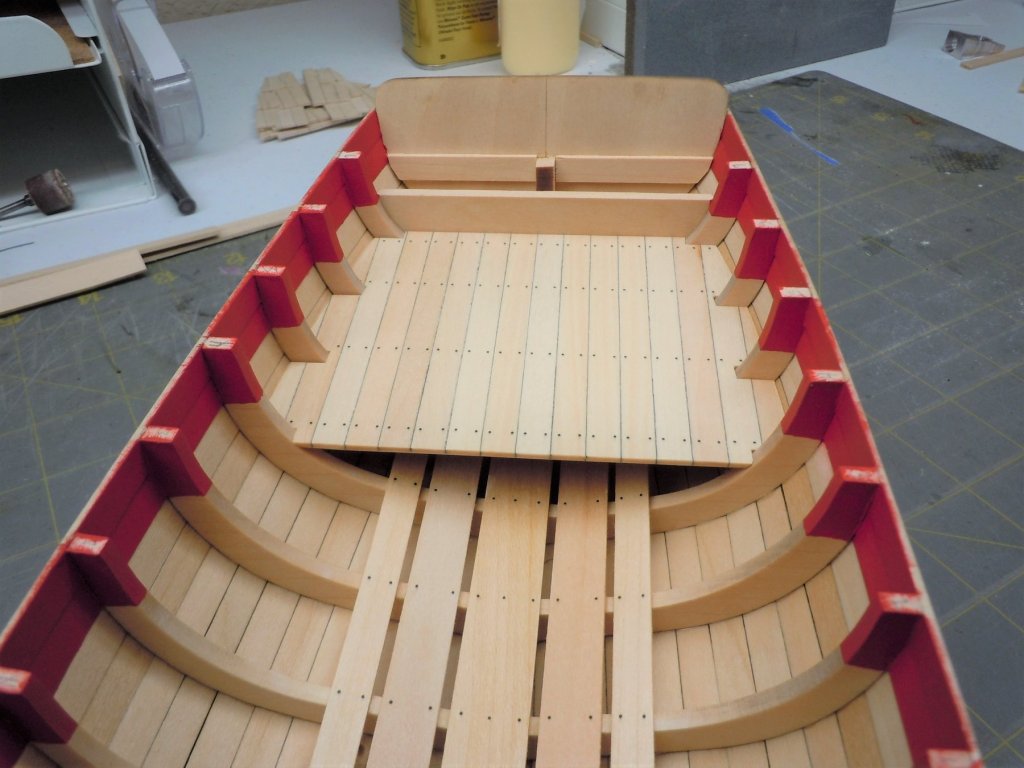
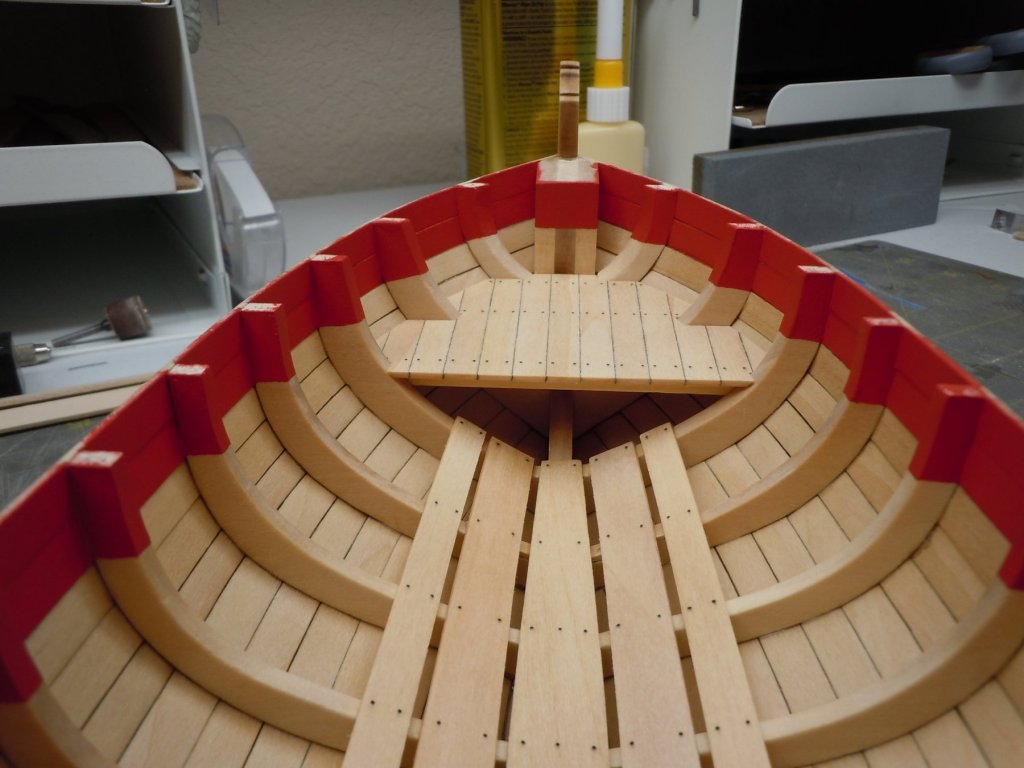
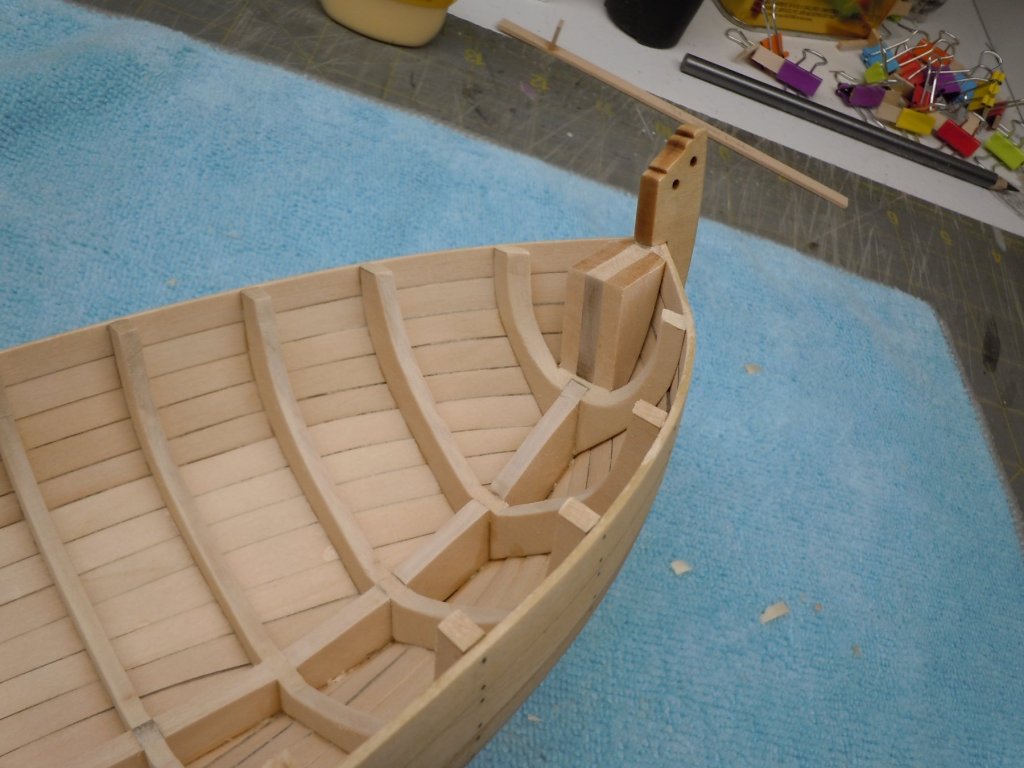
I've been slowly chipping away at this boat, can't say I'm in the home stretch yet because the Army has a way of surprising me with trips that aren't on the calendar. As previously posted, the supplied laser cut cockpit seat parts are undersized and unusable for me. I made replacements from basswood sheet. I think this boat is 50% MS wood and 50% Hobby Lobby basswood. I made a number of attempts to scribe the decorative line around the inner perimeter of the seats but basswood is not amendable to my methods. I elected for a simpler version for the sake of a decent finished piece. For comparison, this photo shows how the kit supplied part just wasn't going to fit. I'll be interested to see if anyone else encounters this same issue. I made the thwarts with the kit supplied wood and scribed the decorative line with my homemade scraper. The kit supplied laser cut thwart/mast brace didn't work for me. For starters the semi circle cutout for the mast is 1/16" diameter larger than the mast. Because of that, the supplied casting can't be shaped to follow the contour of the mast. I also think the 4 holes for the belaying pins are too large to be scale, and are definitely so large the supplied brass belaying pins slip right through. At this point I doubt anyone will be surprised I made a replacement which you can see in a later photo. With the thwarts installed my next step was the cap rail. This proved easier than I expected. I made templates from 80 pound card stock as detailed in the instructions. I made the cutout for the stem, and traced the outline of the top strake with the model flipped upside down. I then made certain to split the template down the center. I made the cap rail from a single piece for each side, versus 2 shorter pieces per side as show in the instructions. The kit part uses 2 pieces per side I suspect, so that they can keep all of the wood 12" in length or less to fit in the box. Anyway this was a pretty easy step. Once the cap rails were in place I added the cannon mounts and breast hook. The kit supplied breast hook was no usable for me, perhaps due to the way I shaped the cap rail in the stem area. I made a replacement easy enough. This photo shows the replacement thwart for the mast mount. You can also see the holes for the belaying pins were made a more scale diameter. Now the metal mast mount fits around the mast like a glove. I also added the thwart knees doing my best to make sure they were parallel with the nearest bulkhead. Painted the thwart knees multiple coats before gluing in place, in these photos are just friction fit. An oddity is the round cannon mount. There's not mention of the 4 laser cut holes in the instructions. I surmise someone at MS thought they were a good idea for some reason? Perhaps they are for simulated bolts, alas there are just enough nails in the kit for other uses and not even a spare. Eventually I filled these holes in with spots of wood putty. Another error with the laser cut parts via the thwart knees. If the cap rail was 1/8" thick they would work, but it's only 1/16" thick so these are cut 1/16" too deep. I used scrap 1/16" thick wood to bring the depth up to 1/16". This is pretty easy to do, but an odd mistake for the kit to have. Luckily these parts will be painted. Another deviation to the kit I decided to make was to paint the thwarts red. I noticed photos of the museum models Chuck has posted in his Medway Longboat kit post had red thwarts and liked the look. Since the majority of the interior is unpainted and the hull is unpainted I think the extra color is complimentary. In the photos I have only applied 2 light coats, I have since painted several more coats and I like the look.


- 95 replies
-
- 7
-
-
- Model Shipways
- 18th Century Armed Longboat
- (and 1 more)
-
That looks awesome! I haven't tried mixing alcohol with water, I'm definitely going to give a try on my next build.
-
Dr PS, For the top (actual top of the boat) 2 strakes I used the kit supplied 1/4" wide stock. The garboard plank was also kit supplied stock. The next 3 strakes going up from the garboard I only used kit supplied 1/4" wide planks for the aft half of the run, the forward half were spiled. I did mark each bulkhead where there was going to be strake joint so they were staggered in the locations identified in the plans. After that I don't think I used hardly any of the kit supplied planks, maybe a few for the aft half of the run but only a couple. In hind sight for me, I think the curve the instructions have you create on the forward end of the garboard is too tight of a radius. On page 12 it states to mark the plank 1-3/4" down from the end. I would recommend marking it at 2-1/4" instead. I also recommend trying your best to get the end (pointy bit) of each of the strakes to fall where they do in the top right photo on page 15. I freely admit I threw away a number of spiled planks but the cost of the wood sheets is so low I was only wasting my time. I wish I could have gotten these planks to bend for me but they just wouldn't and for those that did, it was near impossible to not have them dented beyond redemption by clamps. The difficulty in this kit for me has been that you have to worry about how the planks look on the inside as well as outside. Hope that helps, if not I feel free to let me know. By the way I'm just south of you at Fort Hood, hope the twister near Waco missed you up there.
- 95 replies
-
- 1
-
-
- Model Shipways
- 18th Century Armed Longboat
- (and 1 more)
-
Thanks for the compliments SandyBay and Dr PS! Dr PS feel free to ask any questions you may have at any time. I am definitely no expert and I'm sure some of my work arounds could be accomplished in a better way. All I'm hoping to achieve is to help others avoid some of the pitfalls I've run into.
- 95 replies
-
- 3
-
-
- Model Shipways
- 18th Century Armed Longboat
- (and 1 more)
-
Looks pretty darned good Tiger65! I found a couple unusual issues you will run into during the next few steps. The instructions tell you to use 1/16 x 1/4" plank scraps to make the bow and stern platforms, and the photos in the manual show this. The inventory sheet in the kit however identifies ten 1/16" x 3/8" strips for the bow and stern platforms. I used the 1/4" strips per the instructions, but I think the 3/8" wide strips look more correct compared to photos of other longboats. I only discovered this when I inventoried what I had left in the box and couldn't figure where all those 3/8" wide planks were supposed to go. I also found the laser cut cockpit seats are not long enough by at least 1/4". There's no way to bevel them to fit against the transom and but up against the last thwart.
-
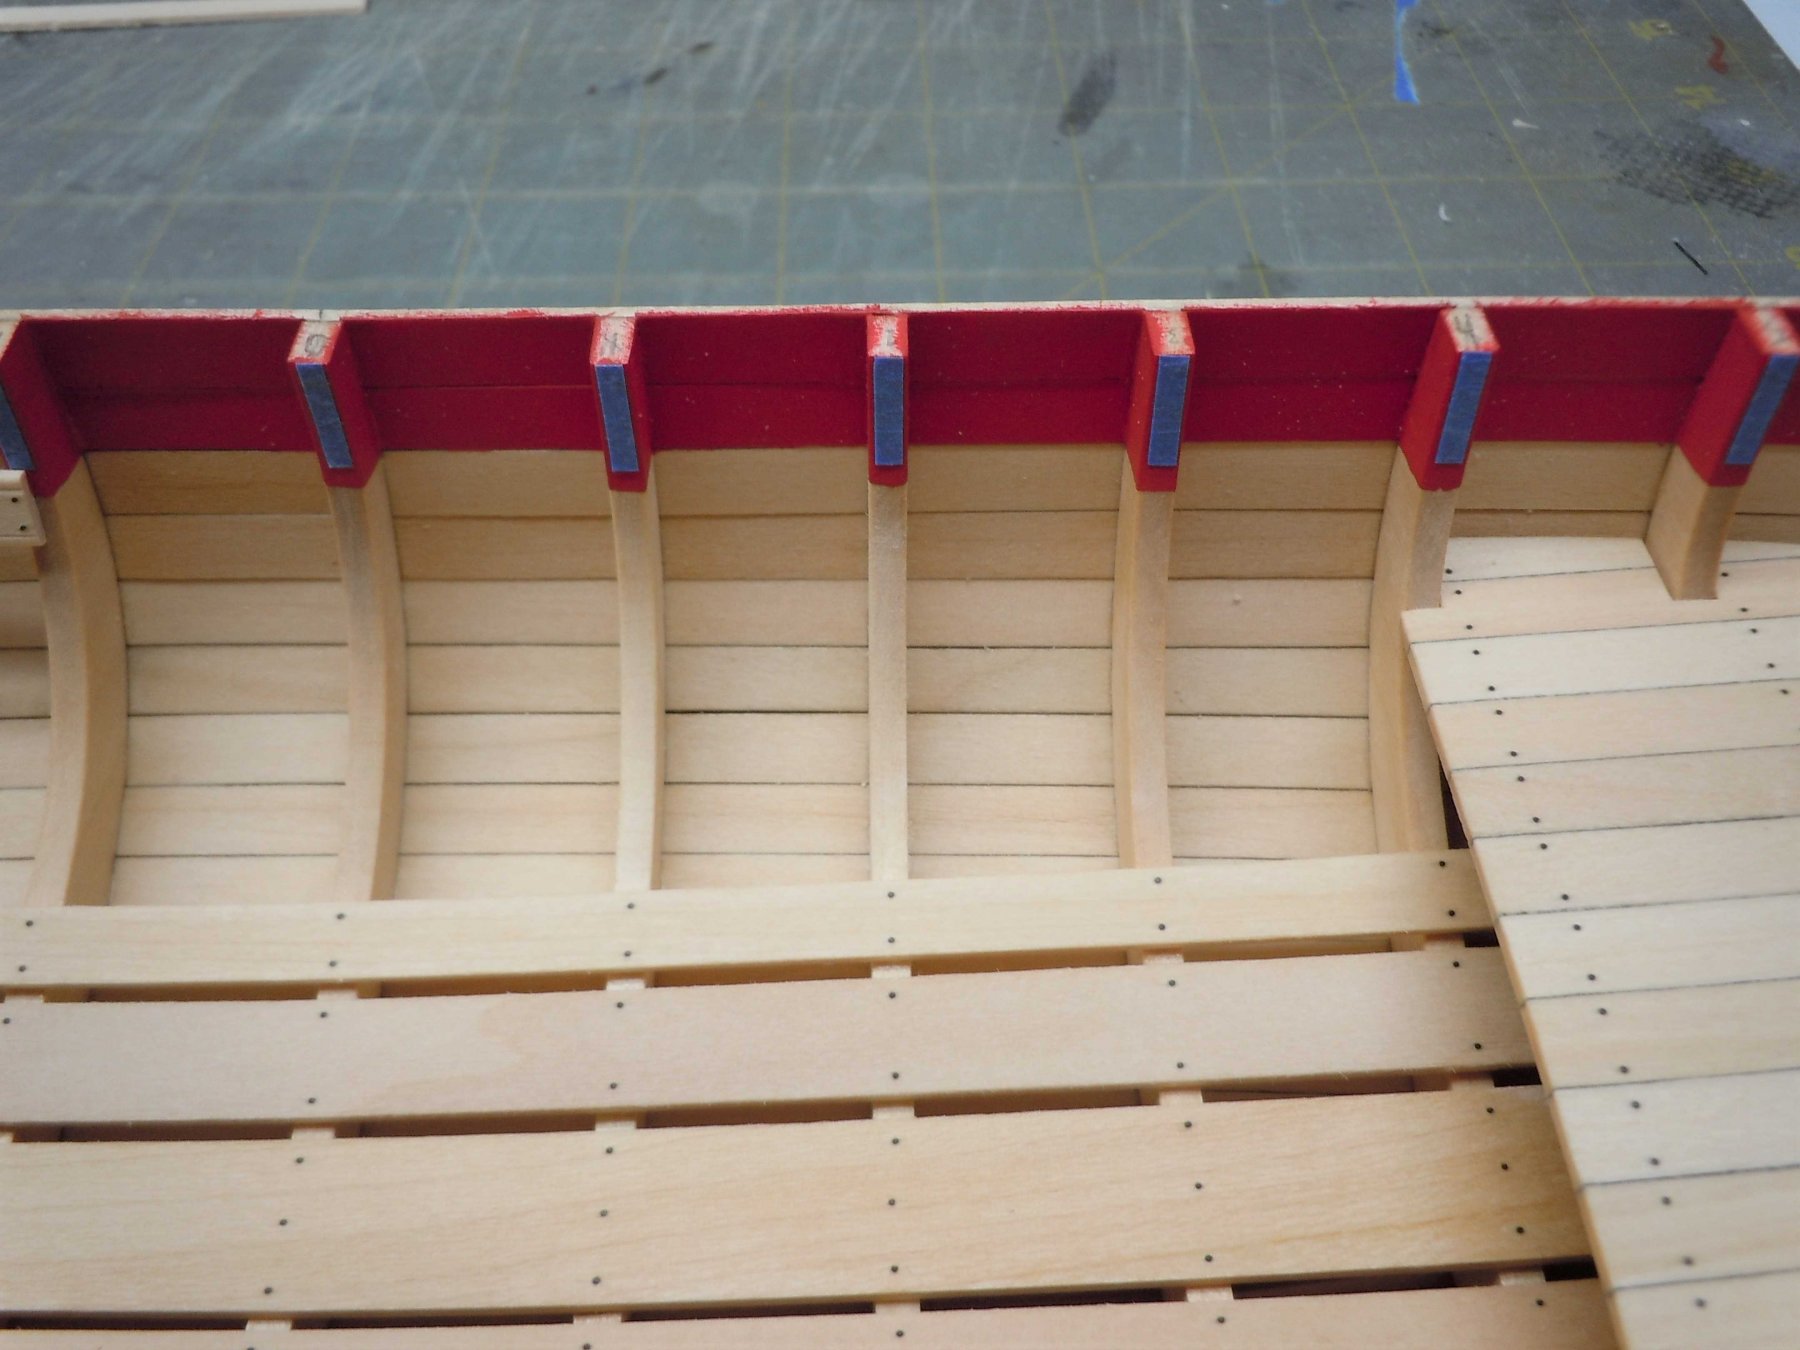
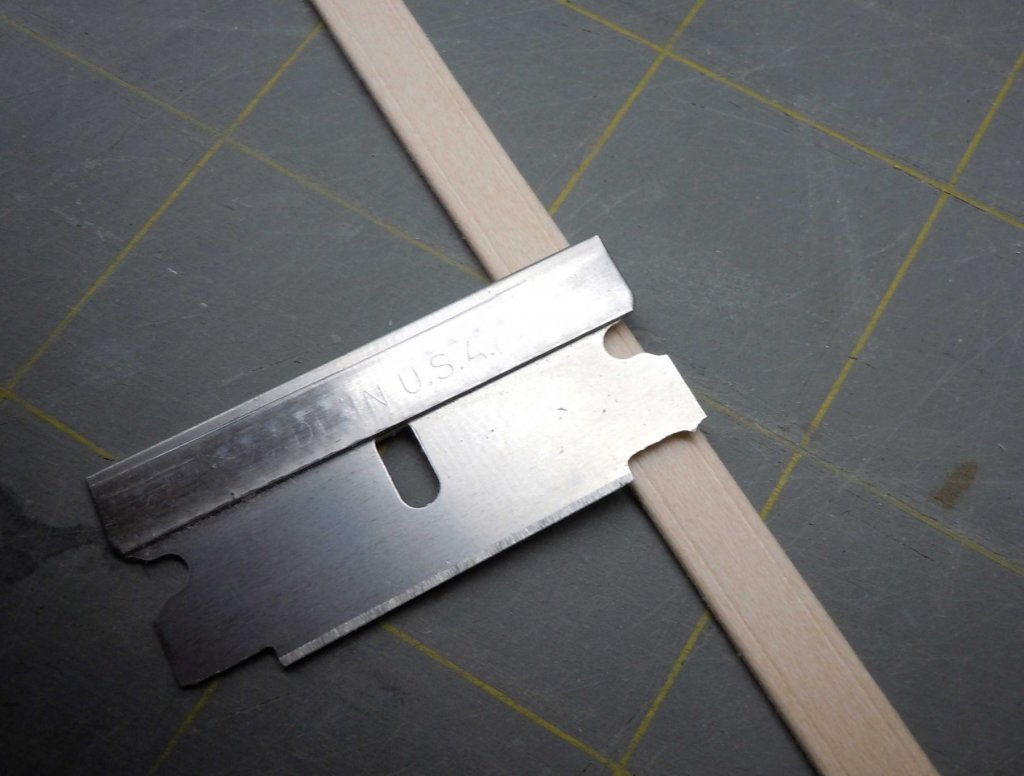
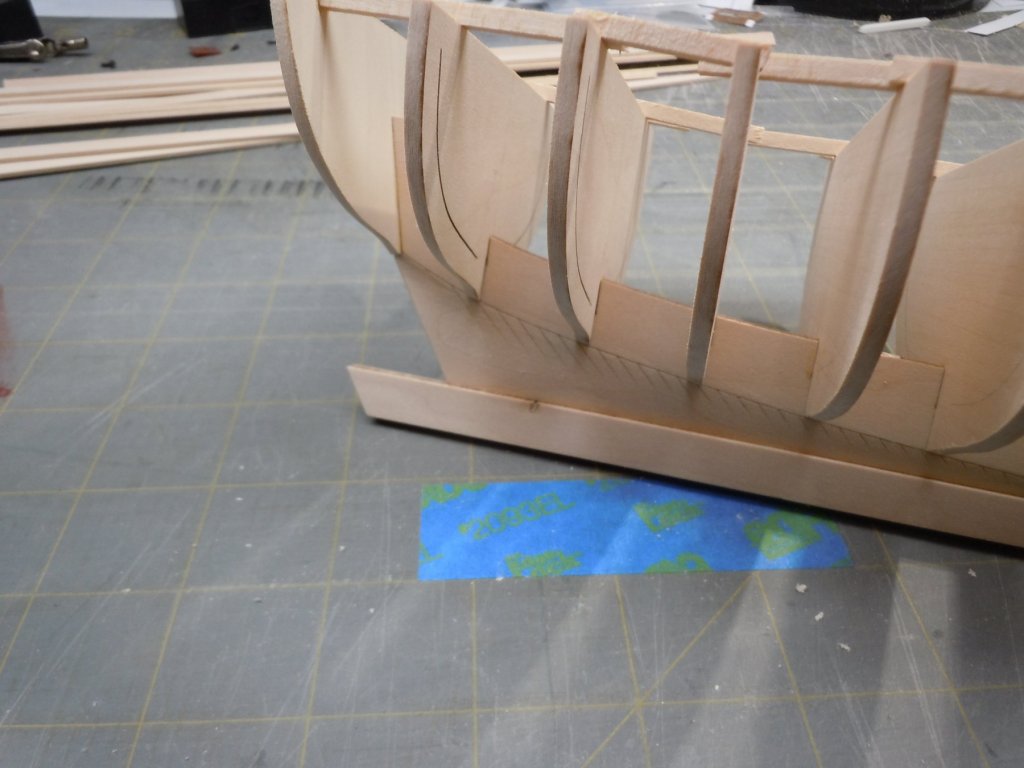
It's surprising how much time it's taken me to install the thwart risers! Most of that time was spent deciding how to best ensure they were spaced correctly in relation to the top edge of the top plank and bulkheads. I chose to use masking tape to mark where the top of the thwart would go, this worked like a charm for me. I also deviated from the instructions and rather than emboss the decorative line on the thwart risers I made a simple scraper from a razor blade. This worked pretty well however basswood is soft and splinters easy so I found light easy passes yielded the best results. With the thwart risers shaped, I added monofilament nails and then glued them in place with medium CA, working a few frames at a time. I also deviated from the instructions and chose to place the thwart riser joint at bulkhead A rather than bulkhead 5. The joint would be hidden by the thwart and in my view it would be easier to place and glue the shorter pieces rather than a 12" piece with a 2 1/2" (I think) extension. I'll brush on some wipe on poly after I get the thwarts done and the cockpit seats worked out. I made the thwarts but will get to those in my next post. In the mean time I discovered that the laser cut parts that make up the cockpit seating aren't going to work. As you can see from the photo, this part is short, by over a 1/4". The back edge needs to be beveled so that it buts up against the transom and this part isn't even close to long enough. Not the end of the world, I'll make a substitute but it is disappointing to have laser cut parts that don't work. I also figured out that I shouldn't have rounded off the thwart where it meets the cockpit seats since these parts would have been butt jointed, well at least I have a template to remake this thwart! Here are the cockpit seat parts together. With the decorative lines matched up the part that makes up the stern locker lid is, yet another 1/8" too short to match the other parts. This is just an odd mistake to see in a kit like this. Again not the end of the world, just a little frustrating. Also for anyone building this kit, in hindsight I would lower the floor in the cockpit/stern area (way too late now). I think the cockpit floor is way too high, the seat tops once complete will be barely 12" scale inches higher than the floor. I know people were shorter back then but they weren't short enough to sit on 12" high seats!

- 95 replies
-
- 7
-
-
- Model Shipways
- 18th Century Armed Longboat
- (and 1 more)
-
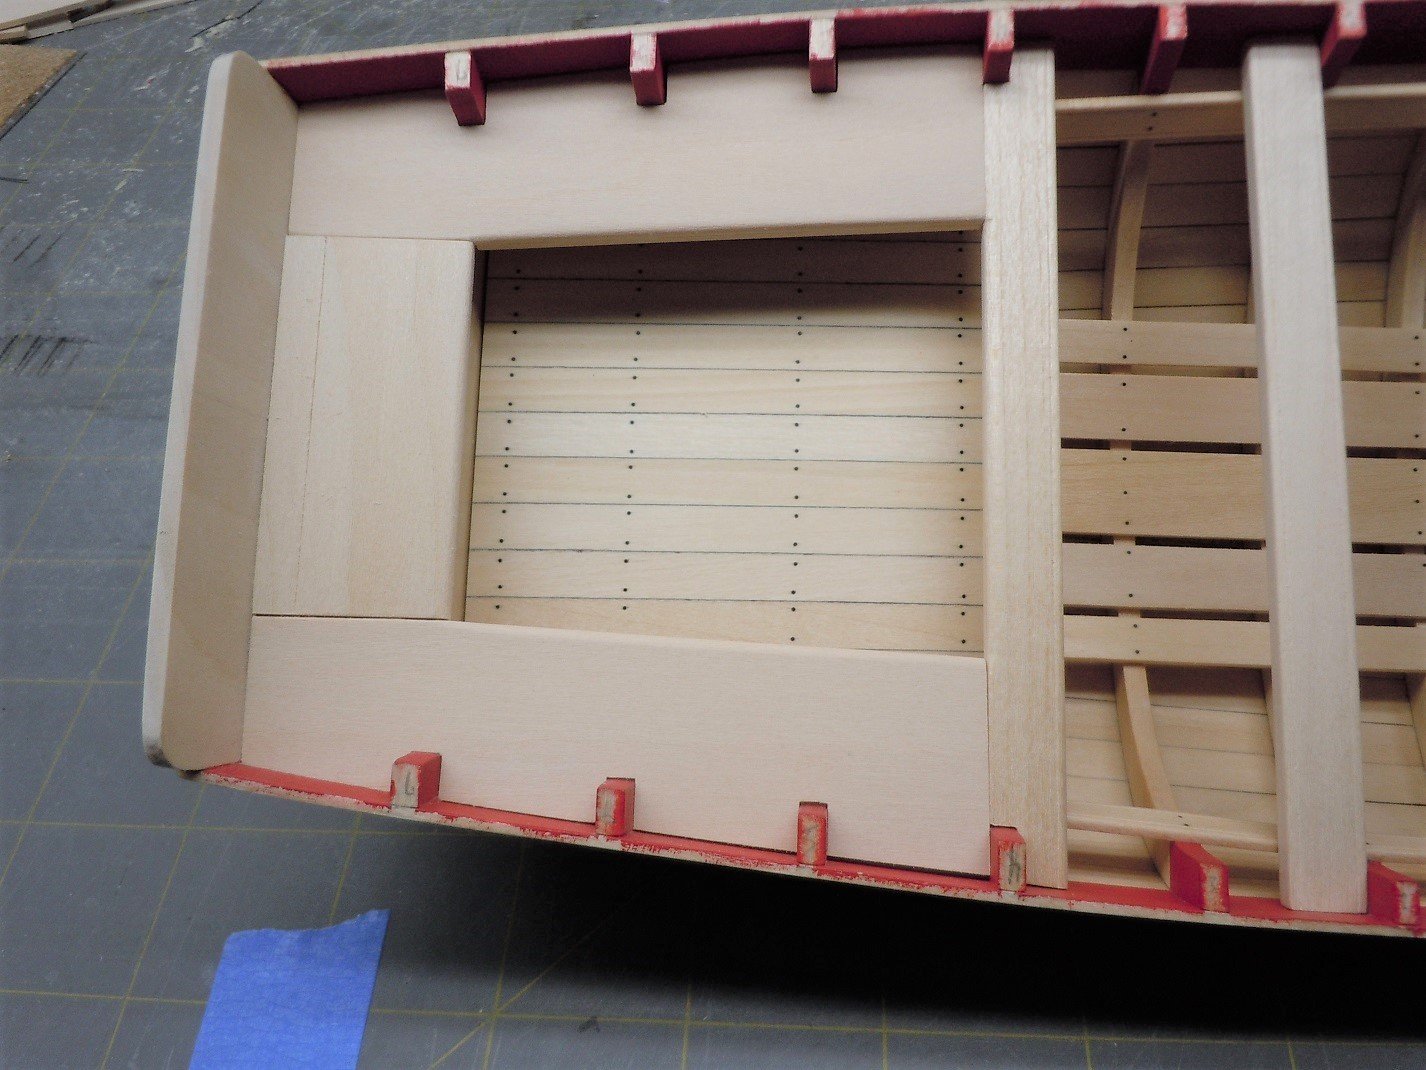
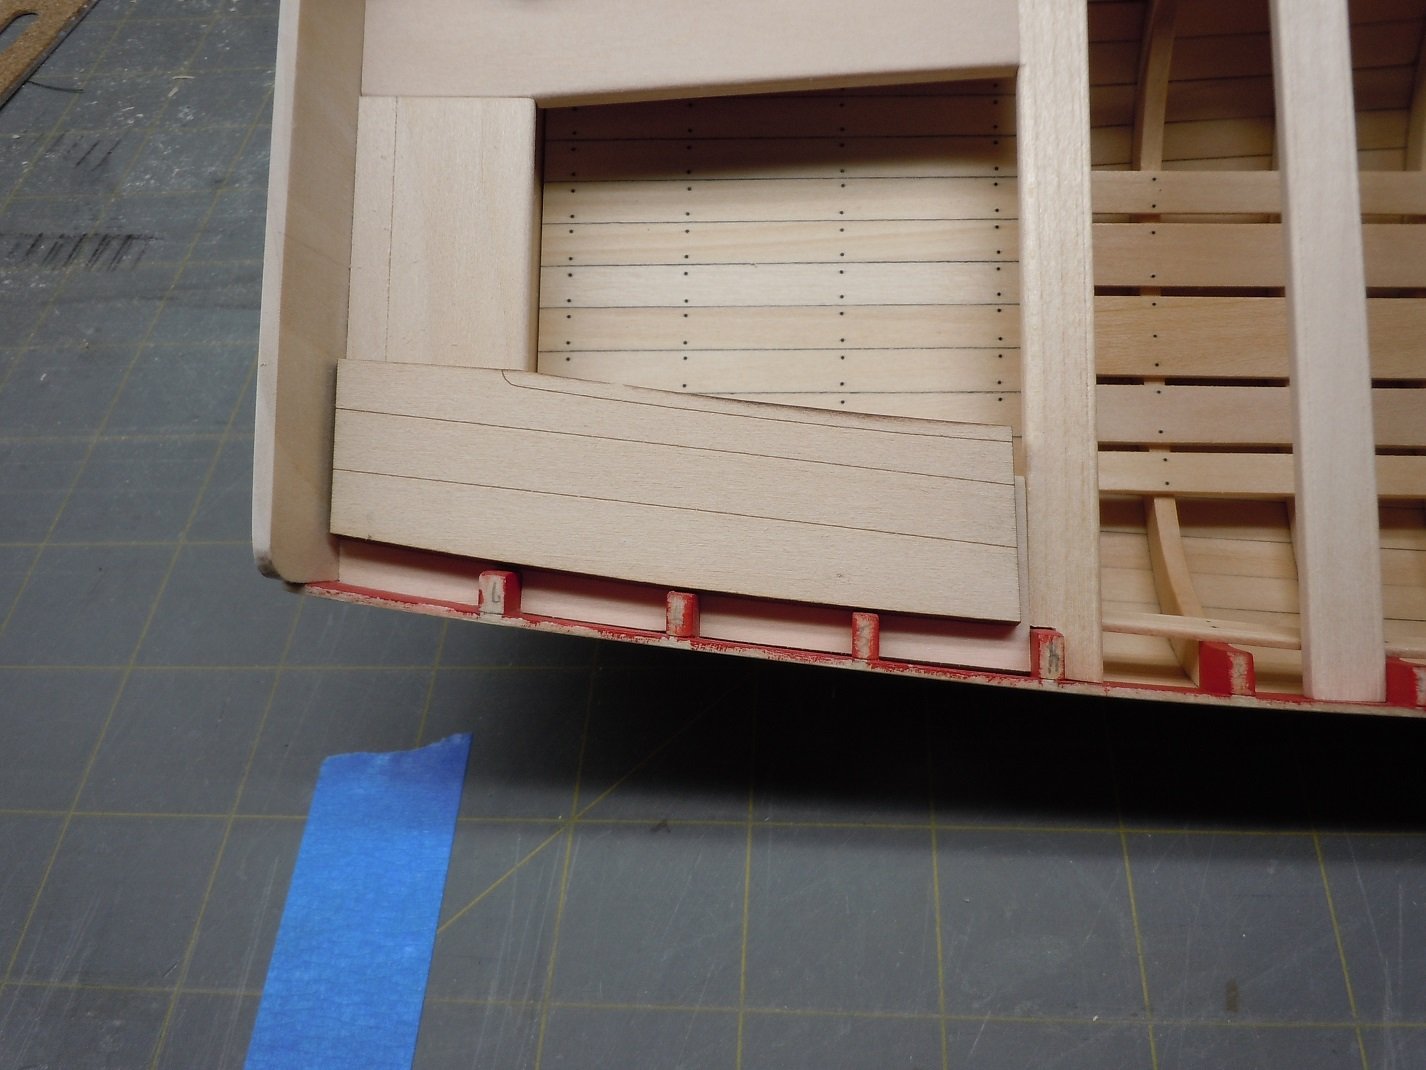
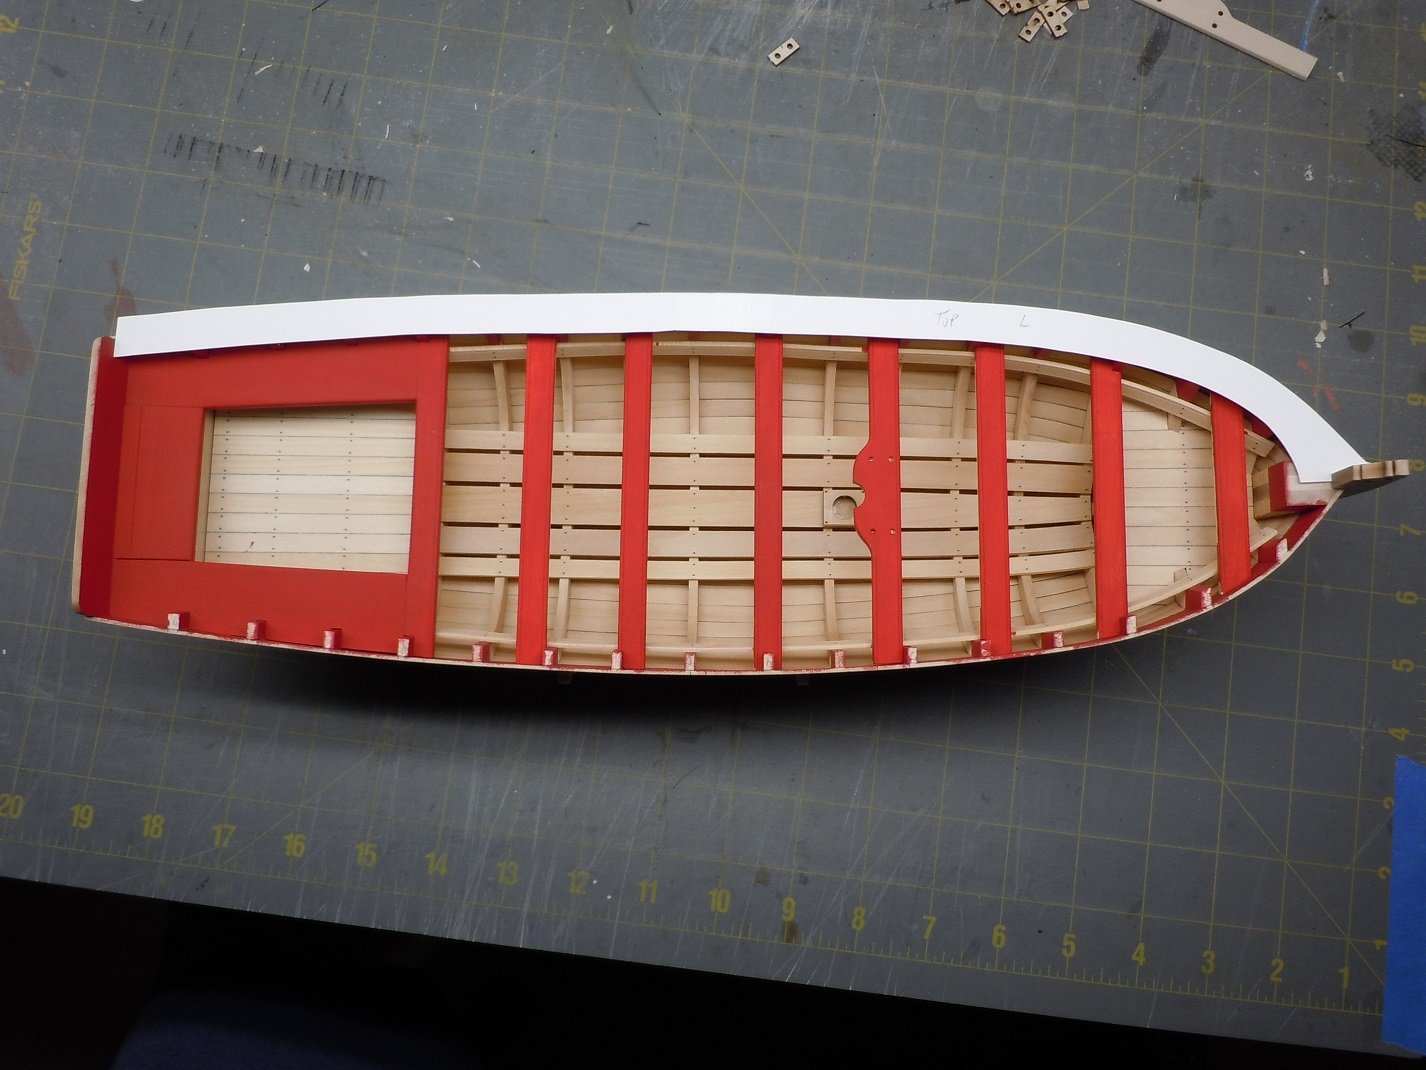
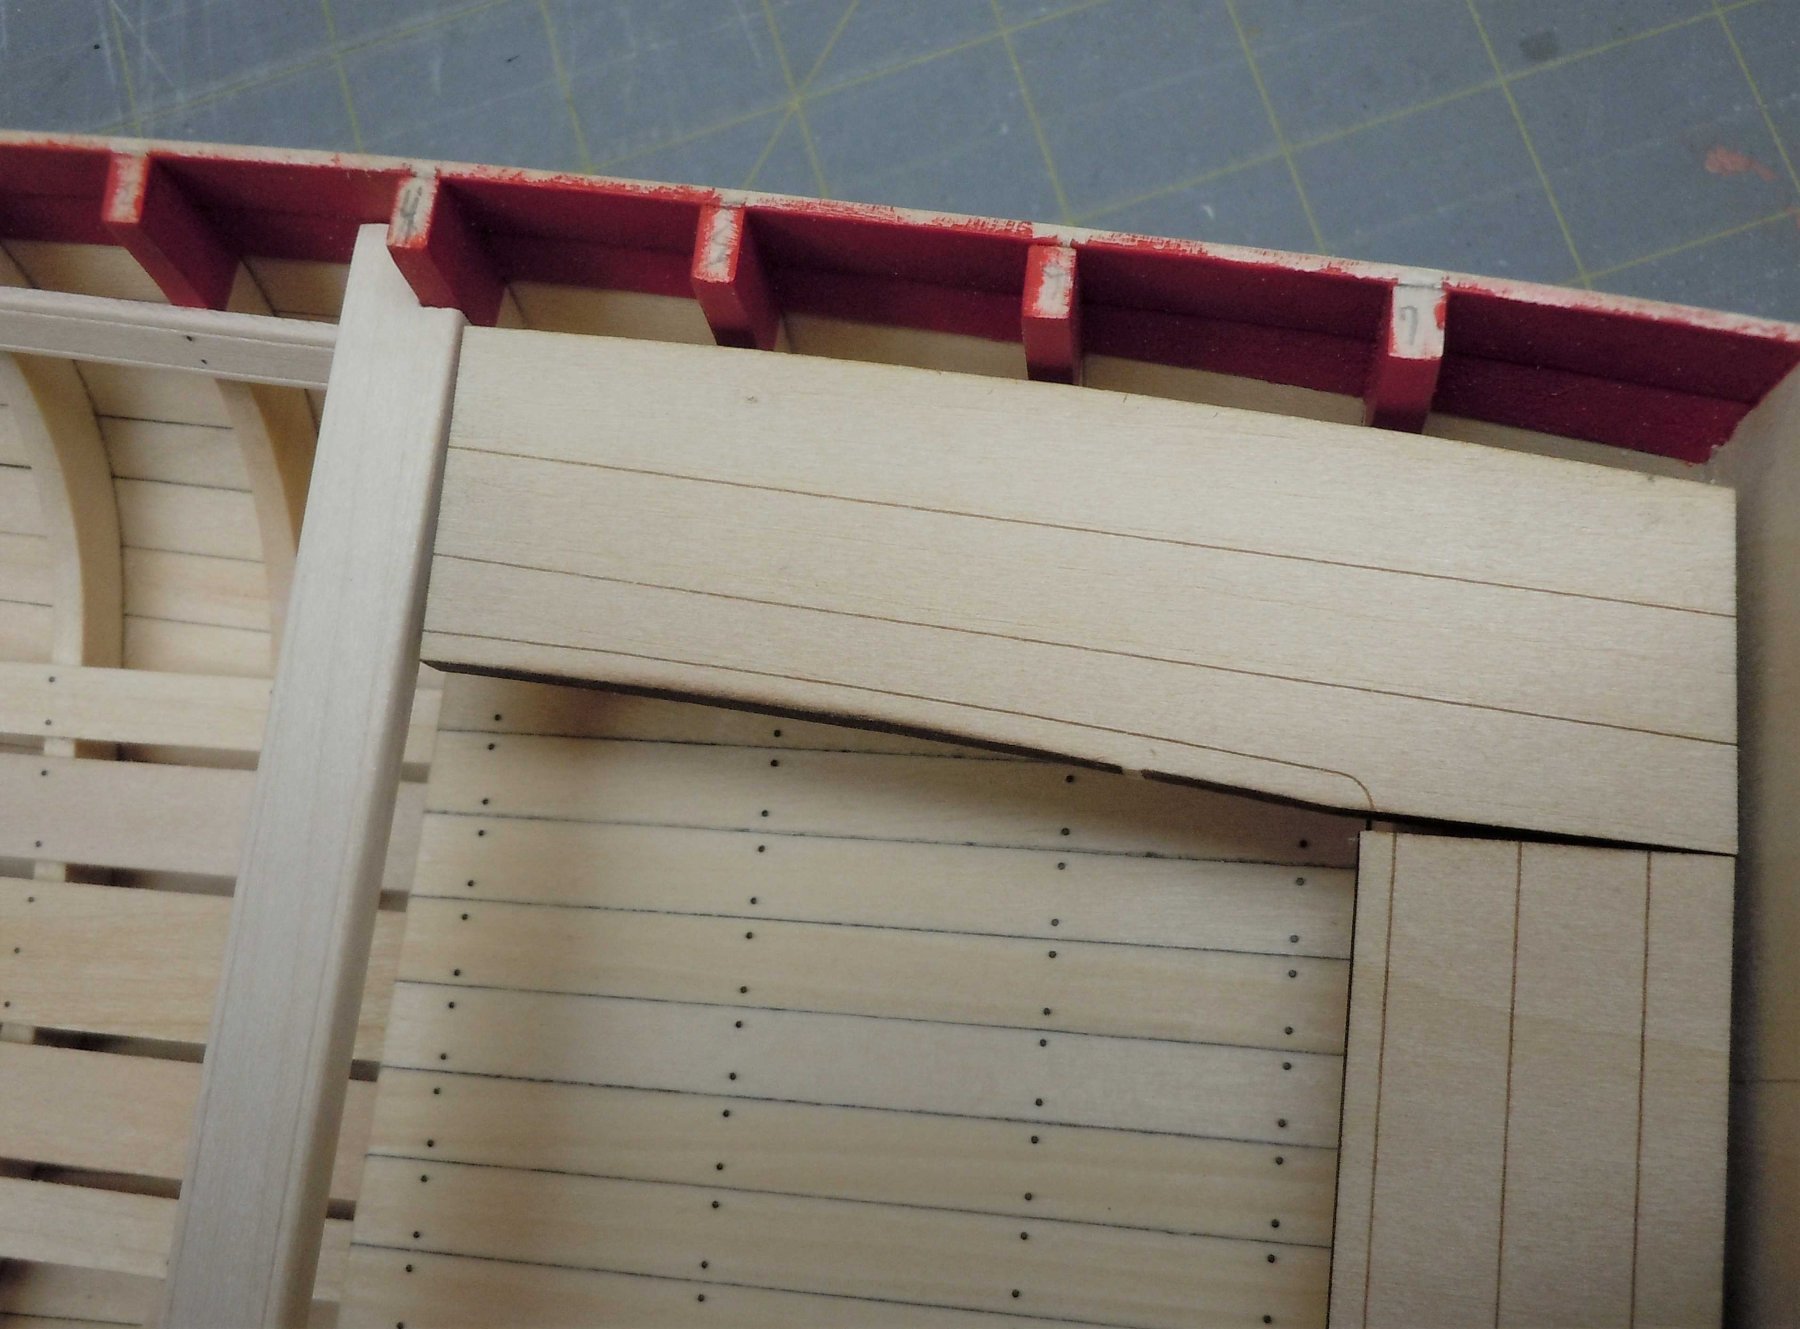
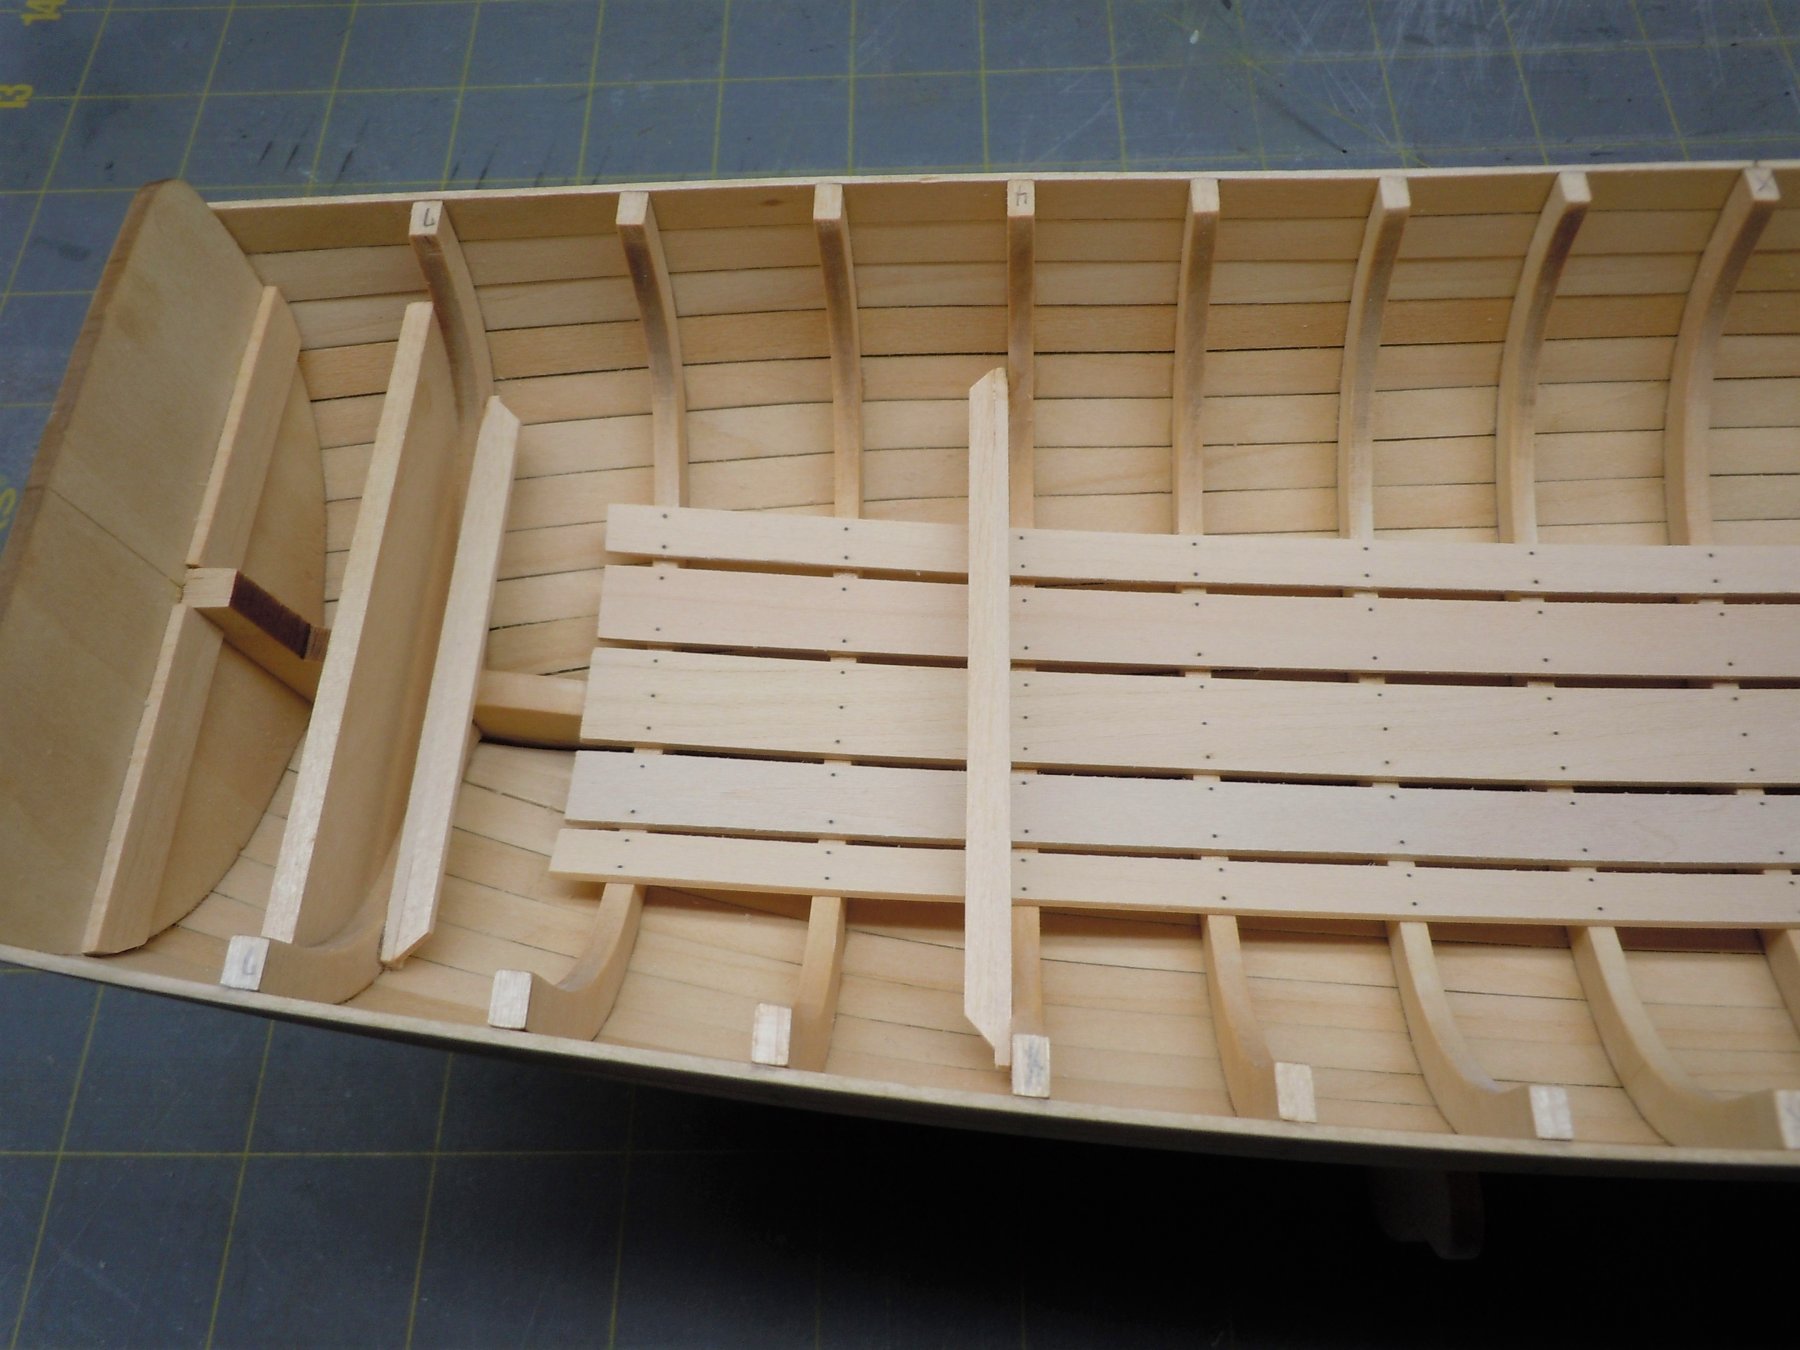
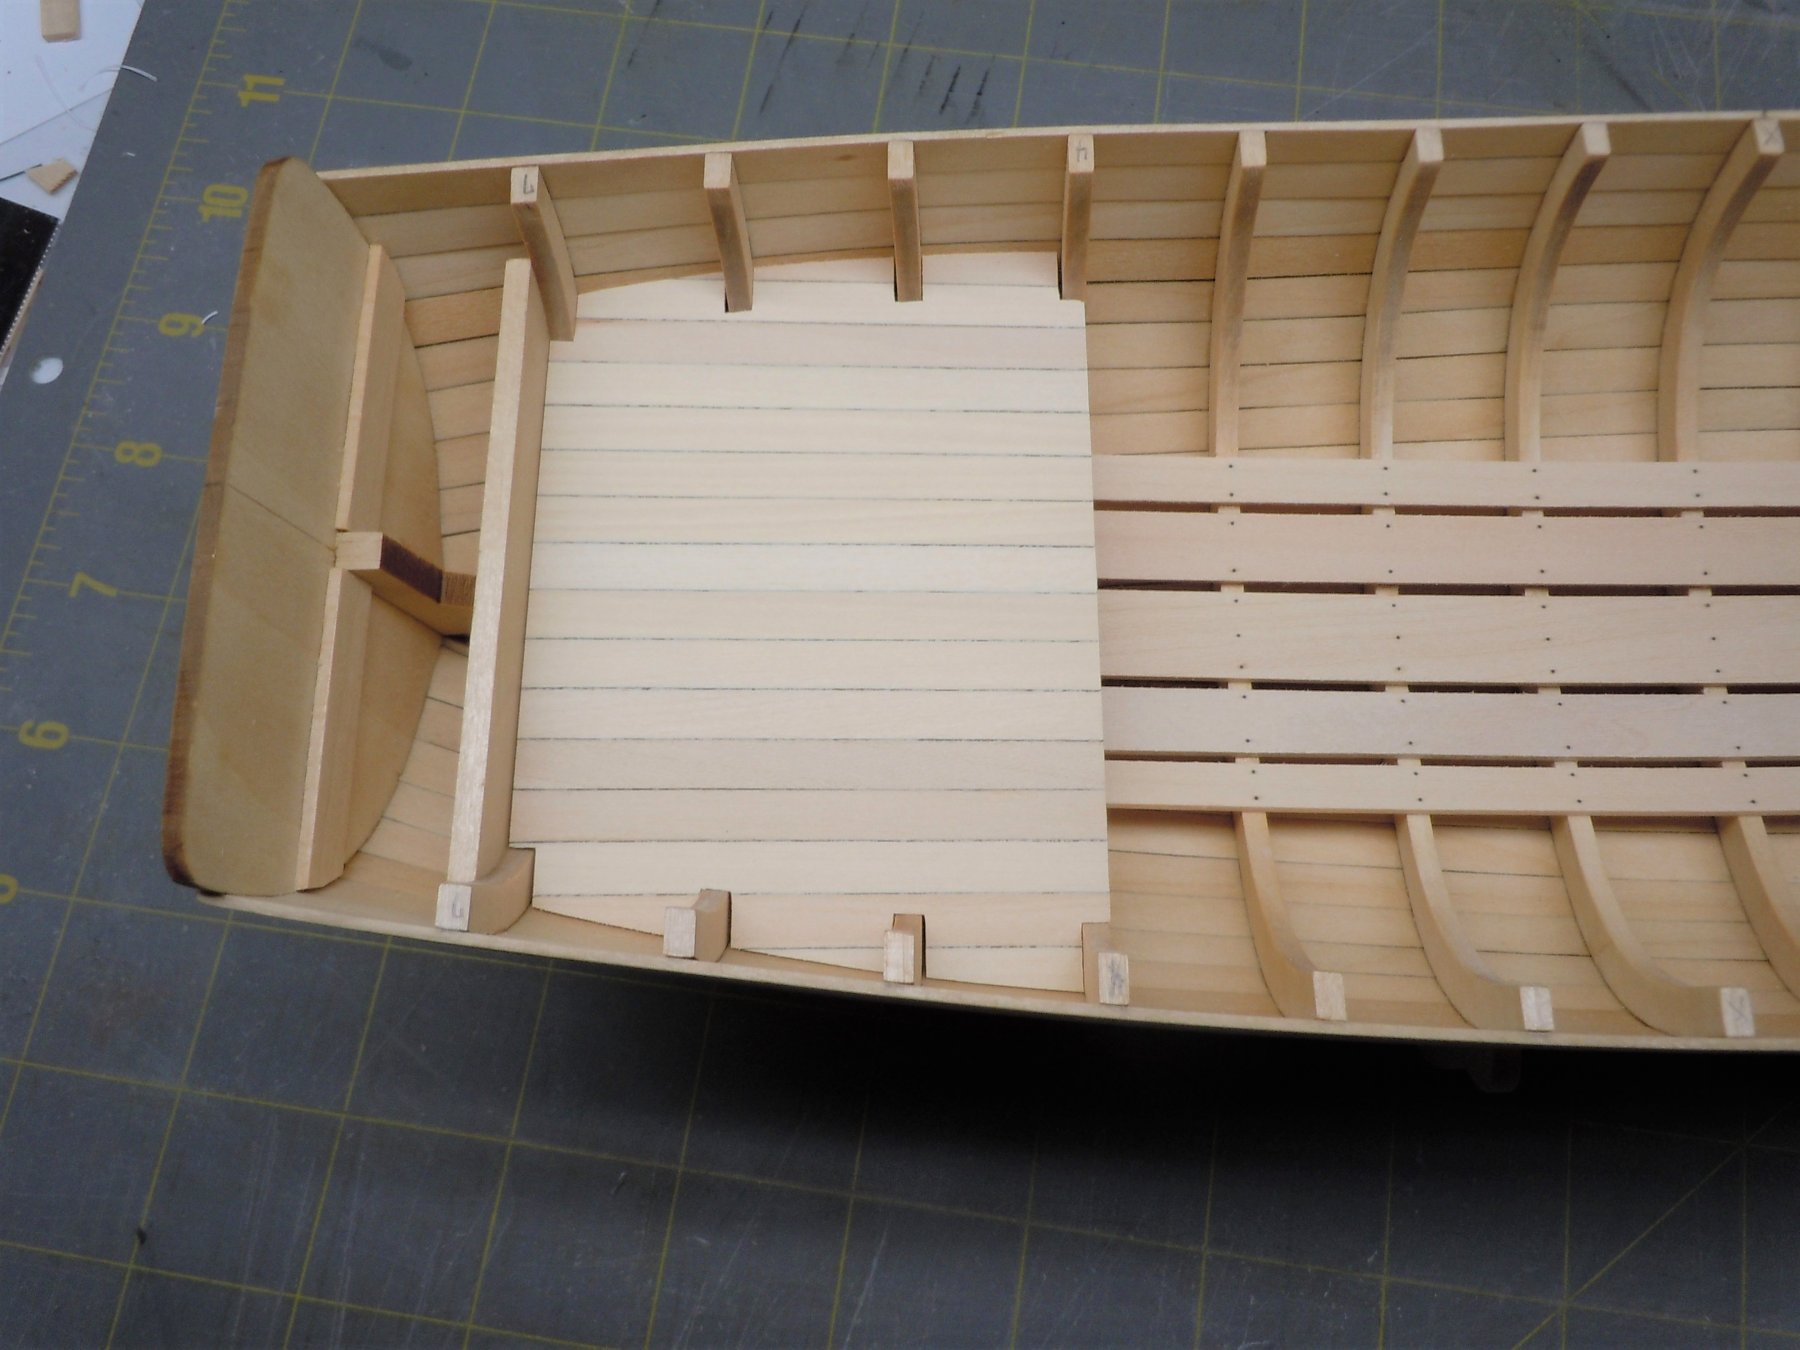
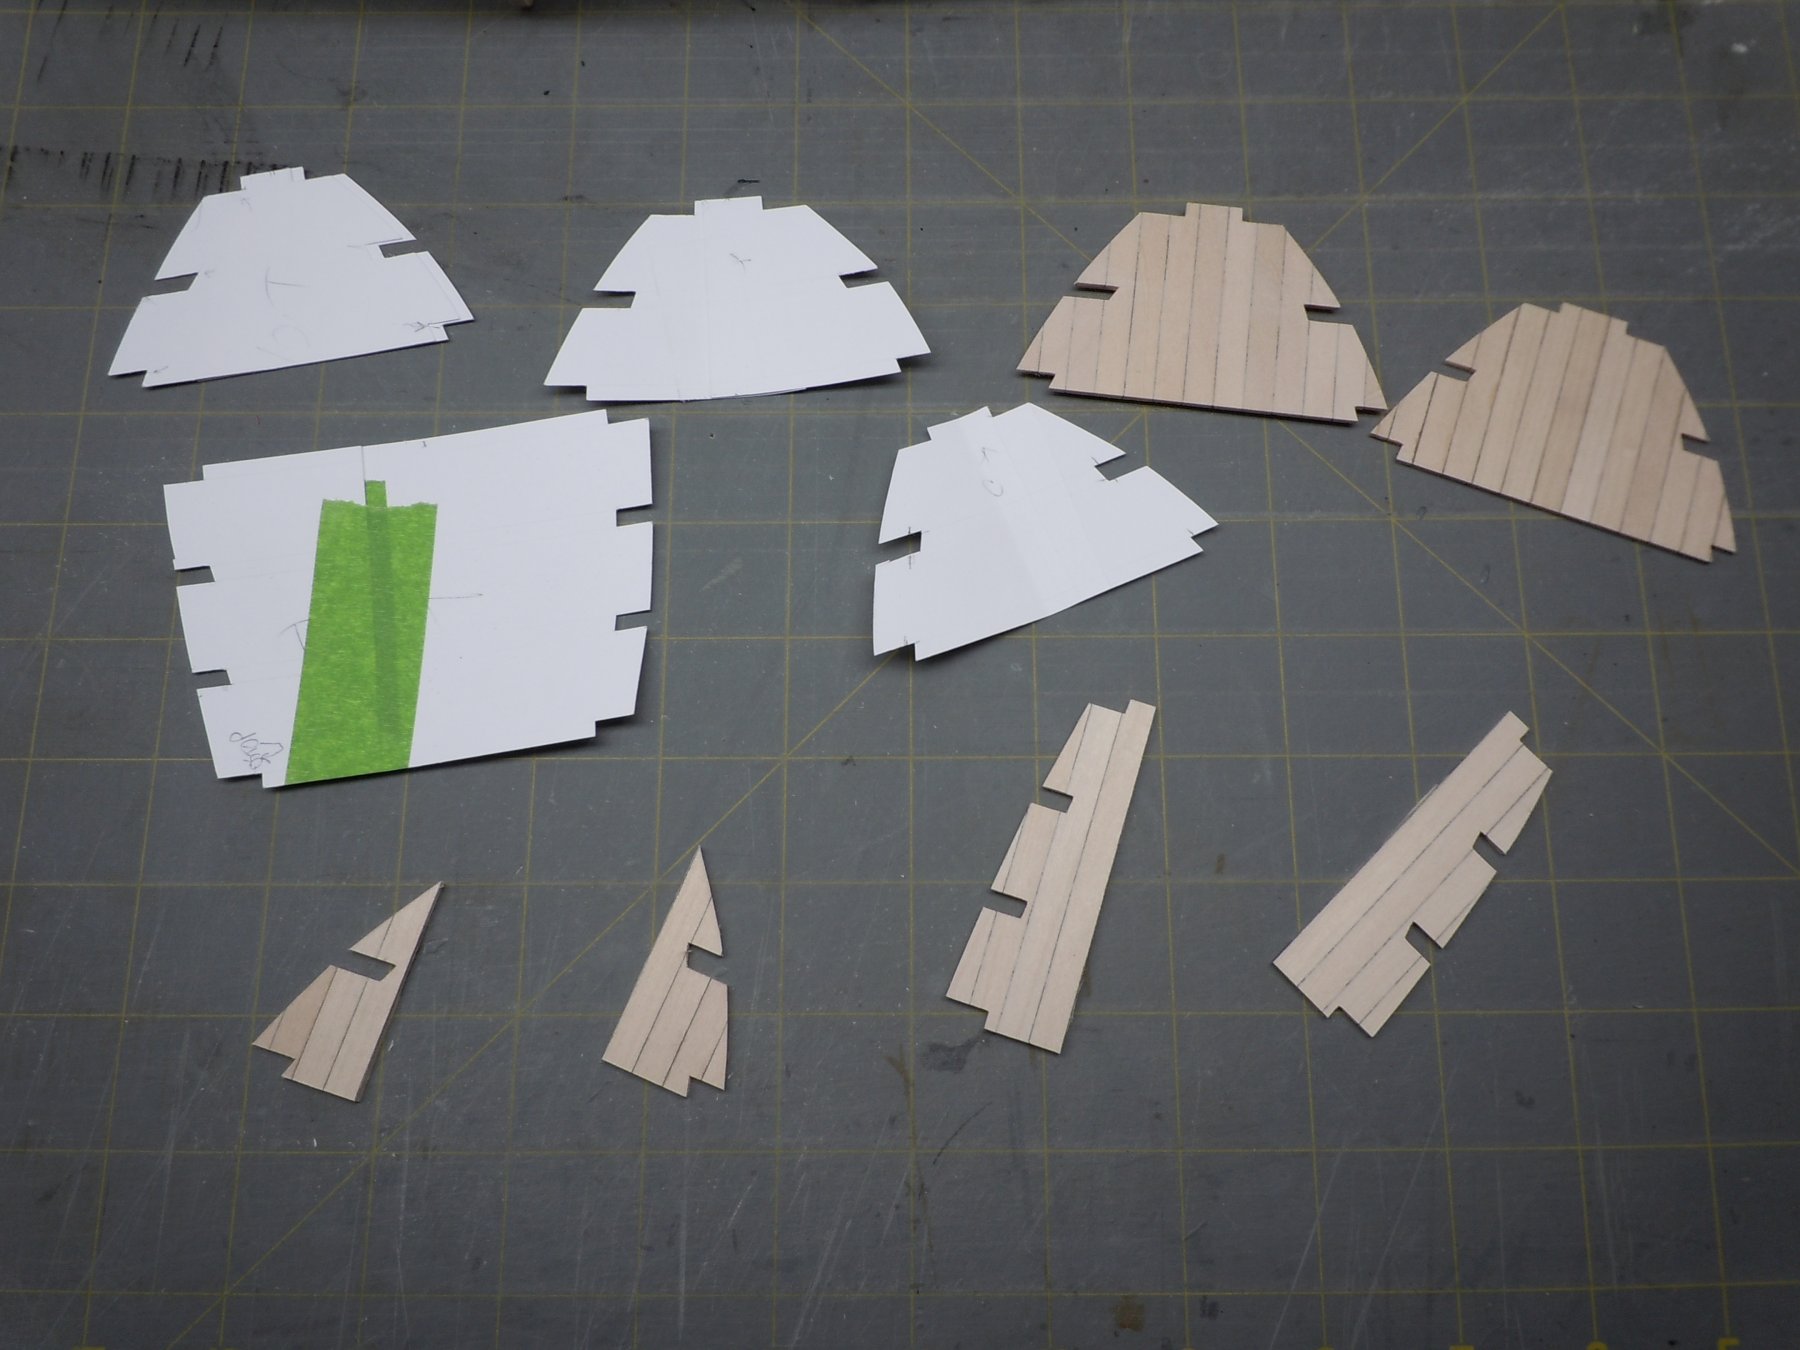
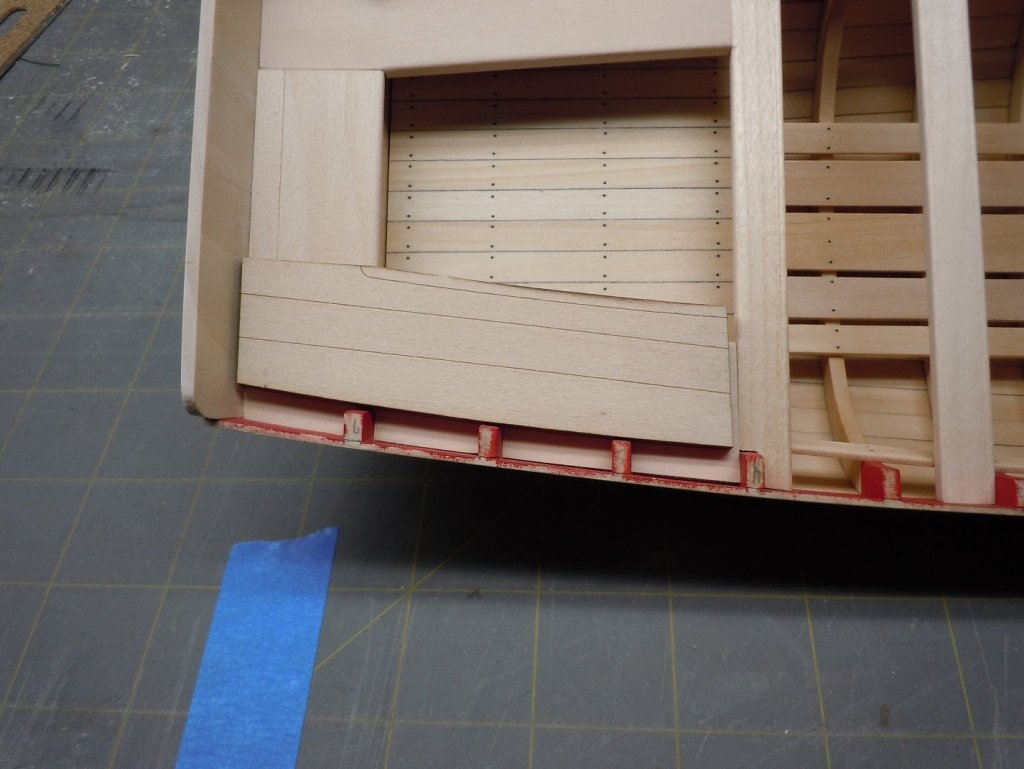
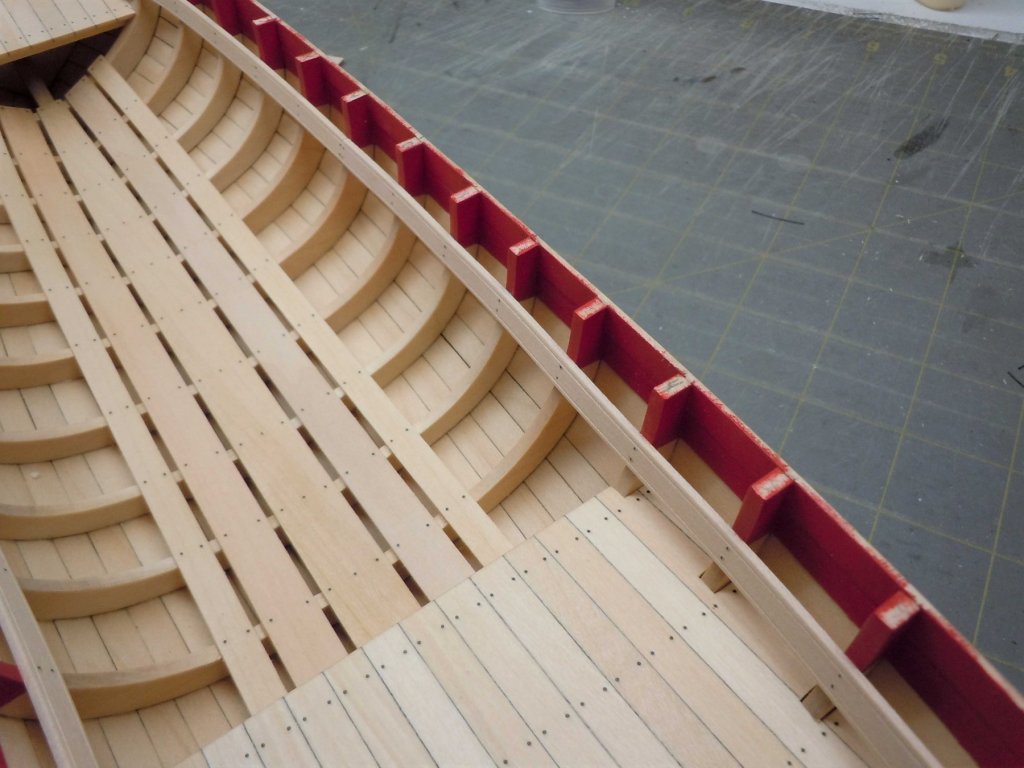
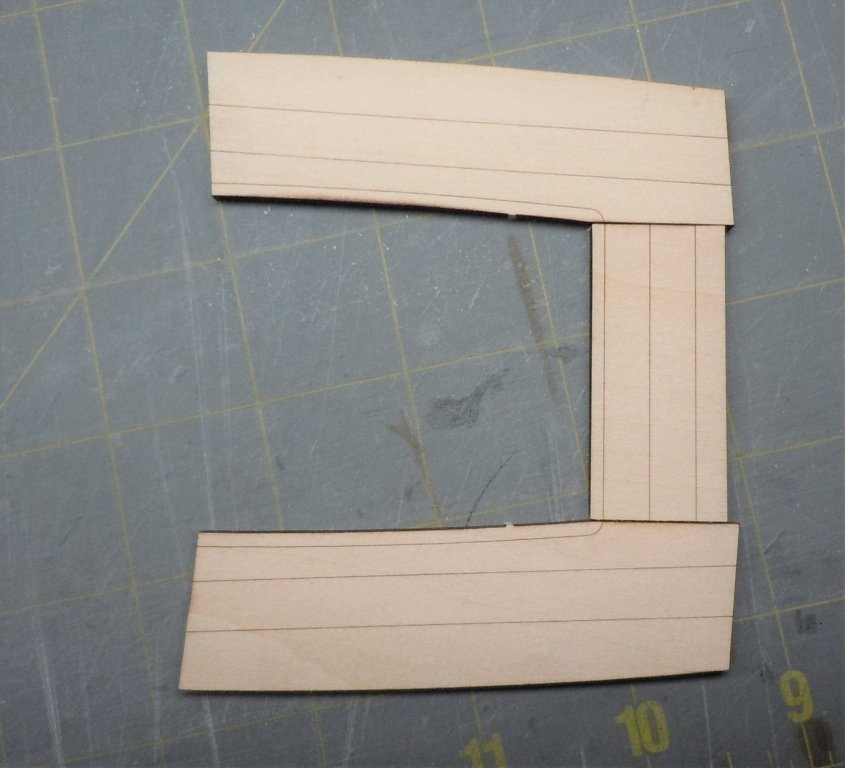
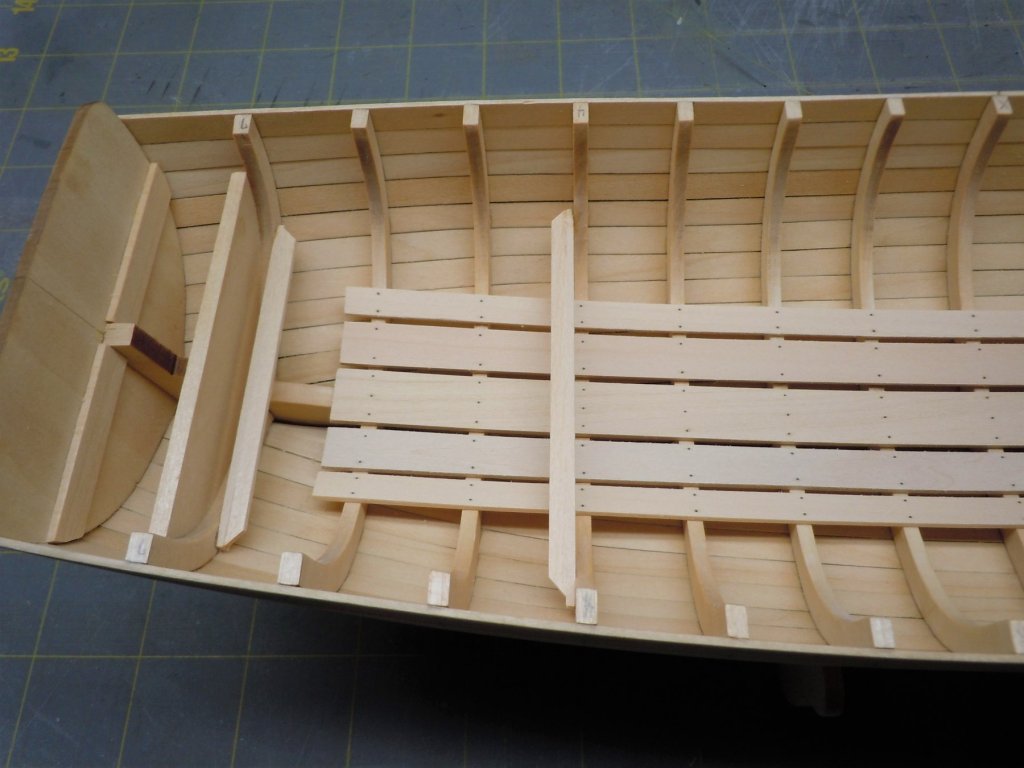
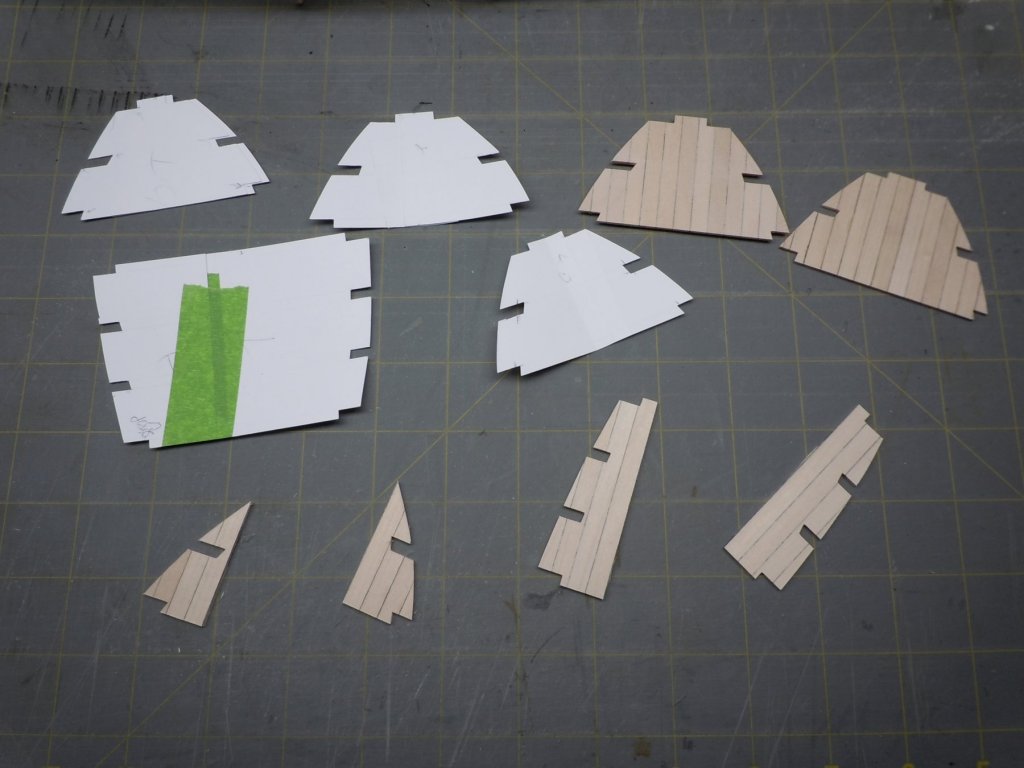
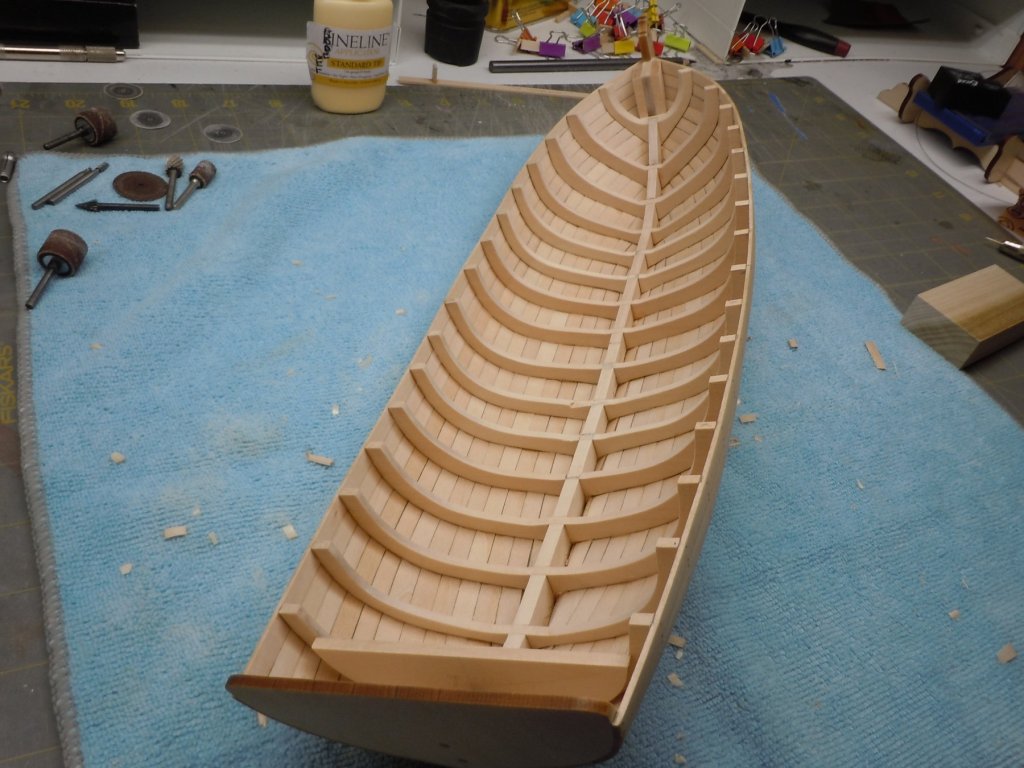
Work has been keeping me busy so my progress was slowed a bit. I added the floor boards which contrary to the instructions ended up not needing to be soaked in water for edge bending. The center board is tapered and due to the lay of the outer boards there's very little actual bend in the bow and stern areas. With the floorboards installed I added the supports for the cockpit and bow platforms. Essentially you create an L from the specified stock (I think it's 1/8" x 1/16") and then span the appropriate bulkheads. Next the cockpit and bow platforms are made up from 1/4" x 1/16" plank "scraps". Trust, I had plenty on hand! Like the hull planking I used a graphite pencil to simulate caulking and later black monofilament to simulate iron nails. No clue if this is accurate or not but I really like the look Chuck's Medway Longboat so I copy catted. These platforms were more work than I expected. My first attempts left too big of a gap between the platform and the hull sides and bulkheads. These are evolutionary rejects, and the templates I made. The rejects fitted in place allowed me to make a more accurate template. Since the edges of the platforms need to be chamfered to fit reasonably tight, the extra 1/16" height the scrap platforms provided made the difference needed. Also once the planks are glued together I recommend adding a couple of cross braces on the bottom. If they fit snug, you risk snapping them at the glue joint trying to remove them, ask me how I know. With the platforms built and nails installed, I was finally able to apply wipe on poly to the floorboards, platform supports and platforms. Once those were dry I then painted the top two courses of planks and bulkheads. I used Vallejo Red applied with a brush. 2 coats seemed to do the trick. All I have left is to glue the platform in now. In the mean time, I've experimented with making a scraper to shape the thwart risers, hopefully they will be a short easy project. Thanks for looking!


- 95 replies
-
- 12
-
-

-
- Model Shipways
- 18th Century Armed Longboat
- (and 1 more)
-
Looking good Tiger! If you're anything like me, you'll have the "spile your own plank" perfected with the last plank. LOL I'm pretty sure I spoiled more than I spiled!
- 43 replies
-
- 3
-
-
- 18th Century Armed Longboat
- Model Shipways
- (and 1 more)
-
Looking good Dwight! I just started working on the floor and it's more work than I imagined it would be, seems like the next step should be easier but ends up presenting it's own new challenge. What paint did you use for the top 2 planks?
-
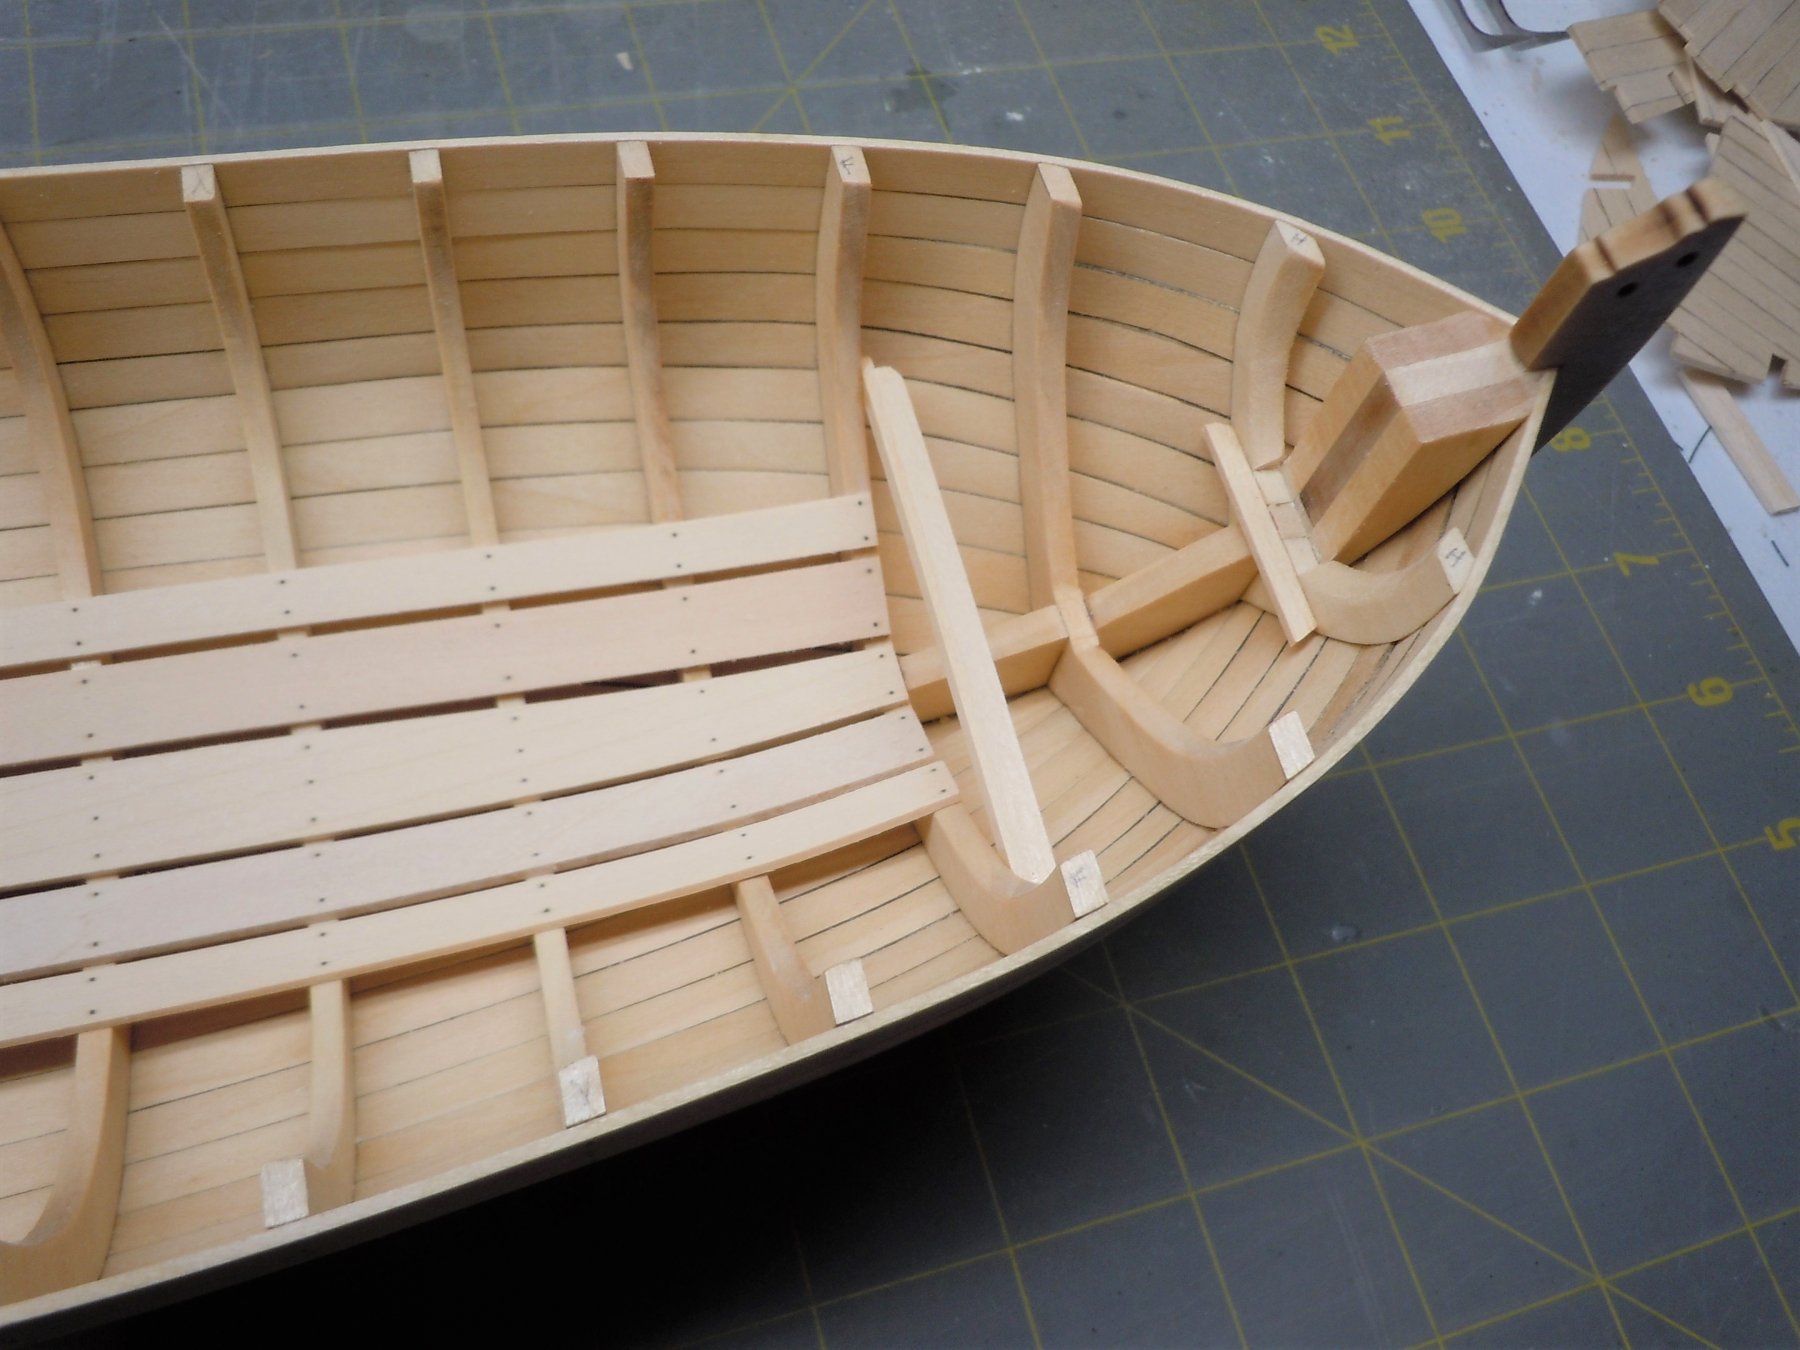
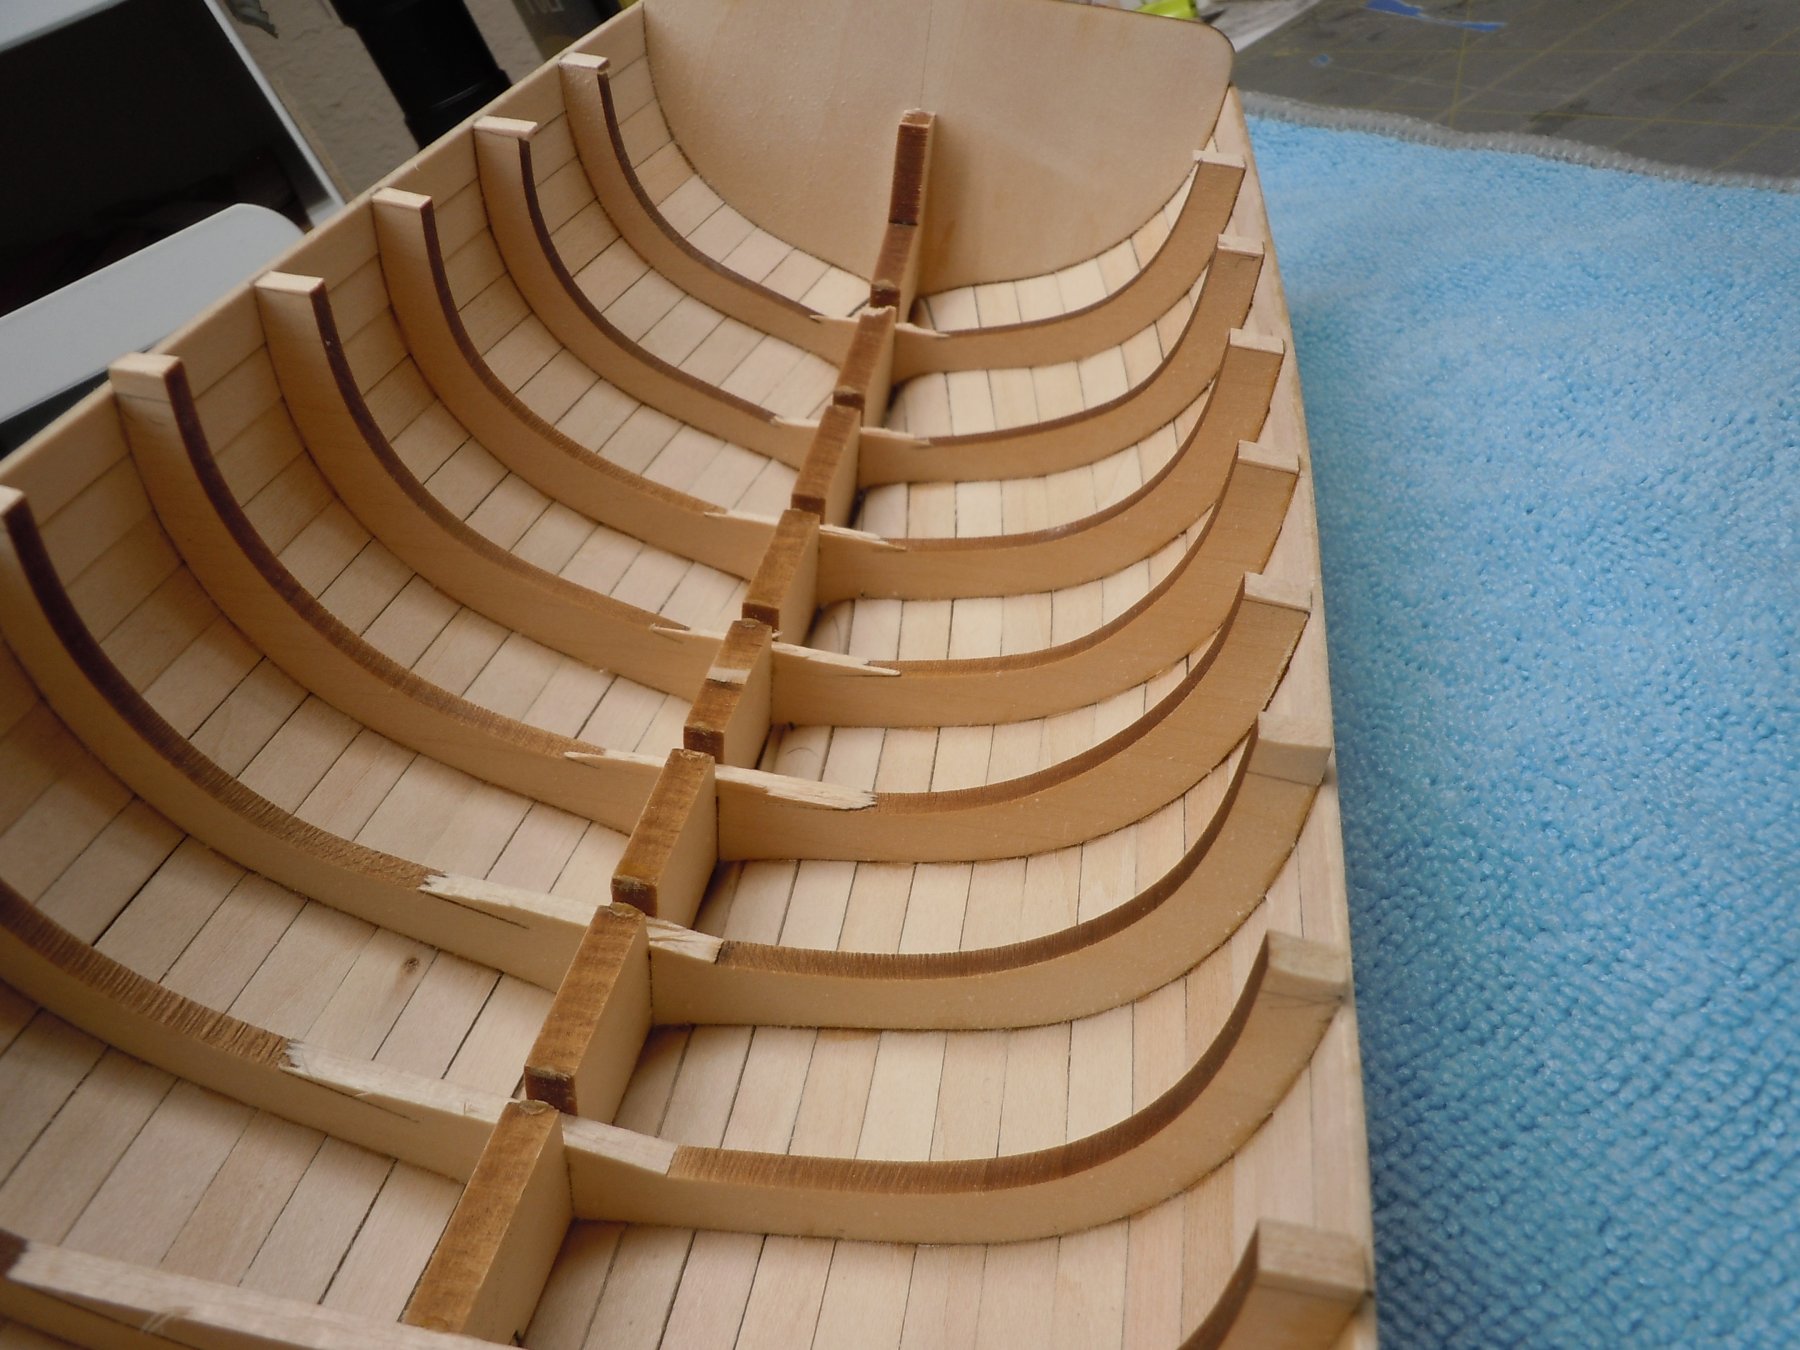
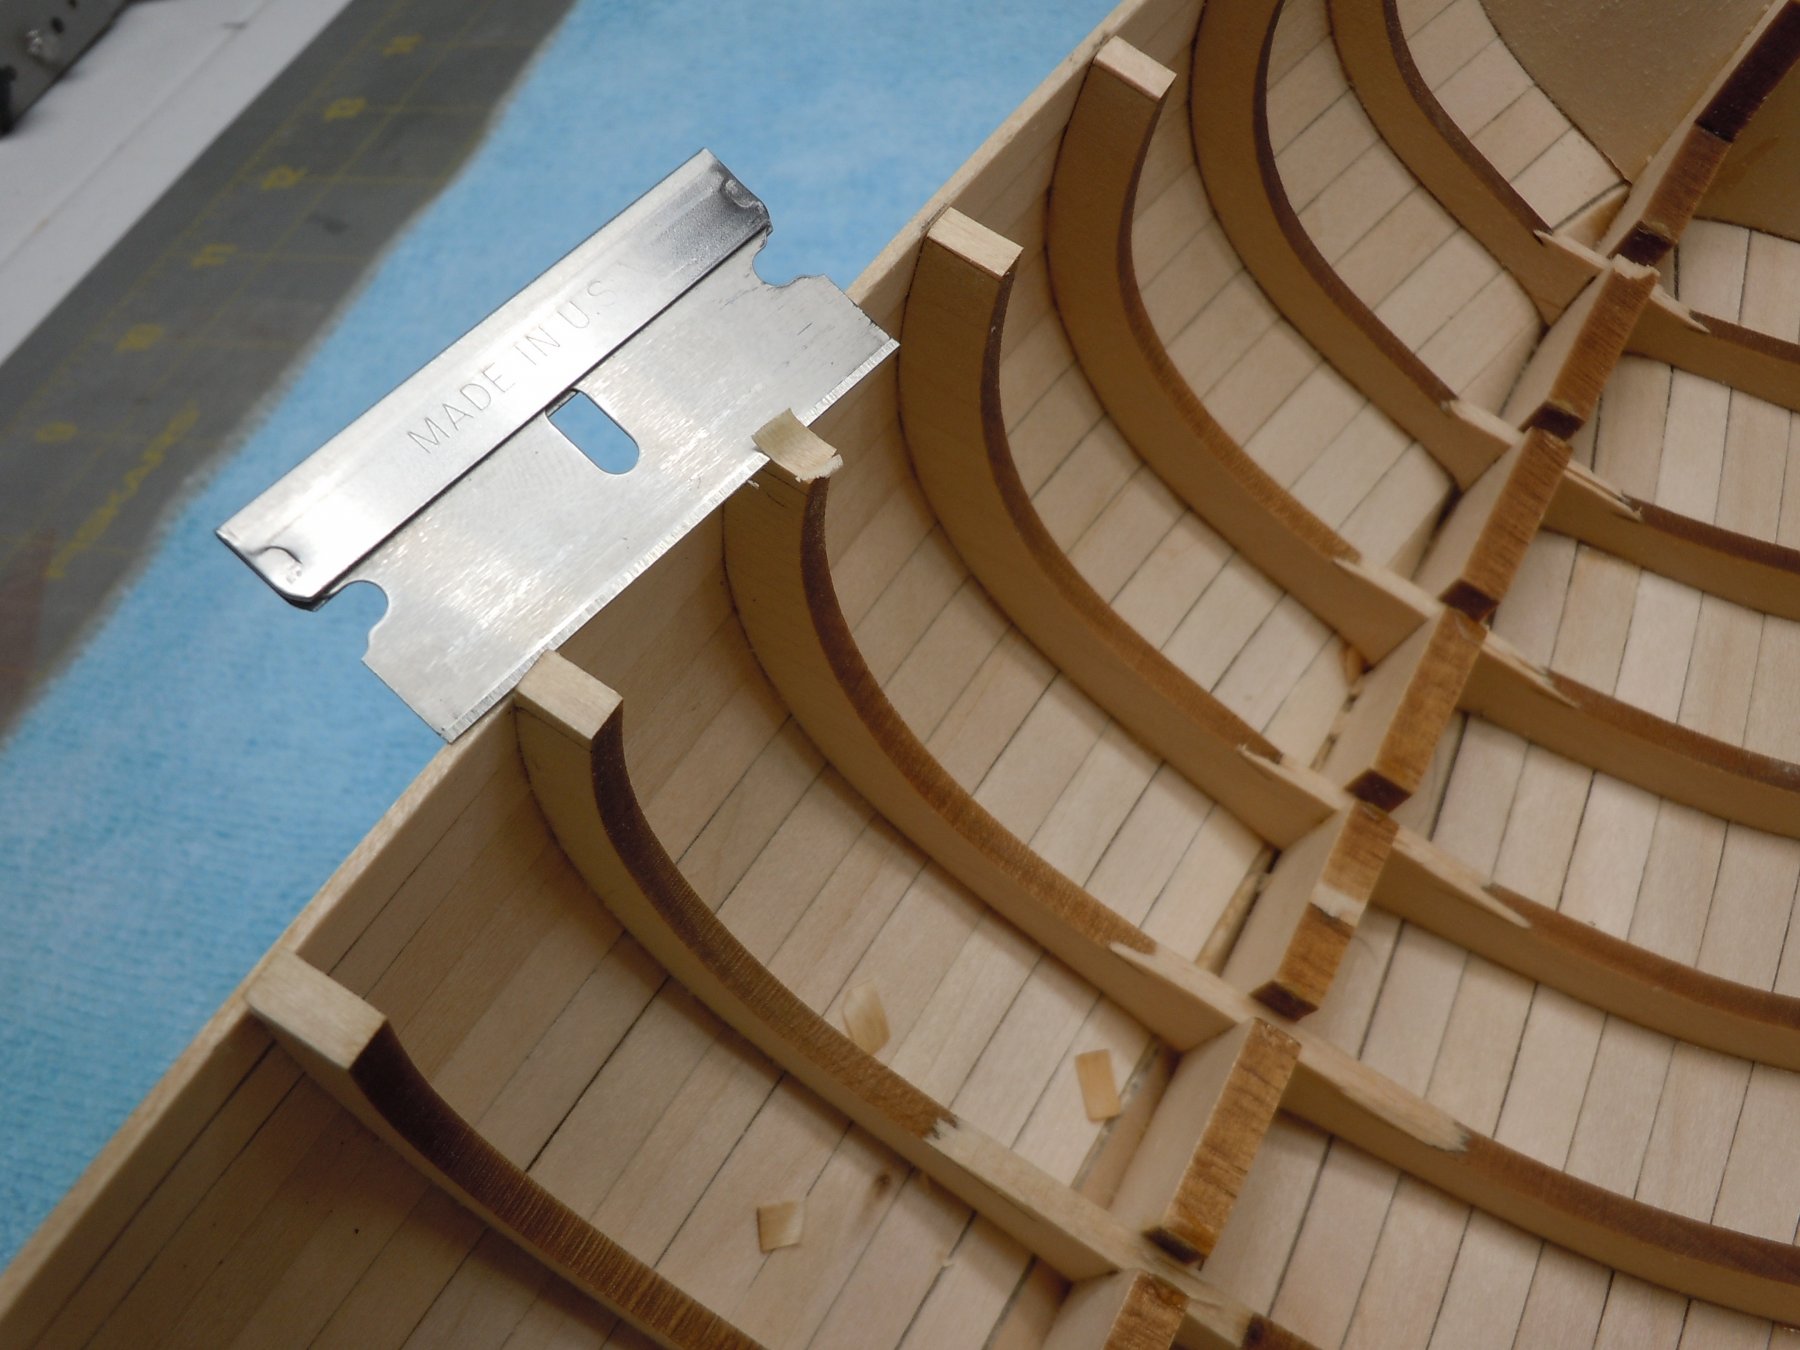
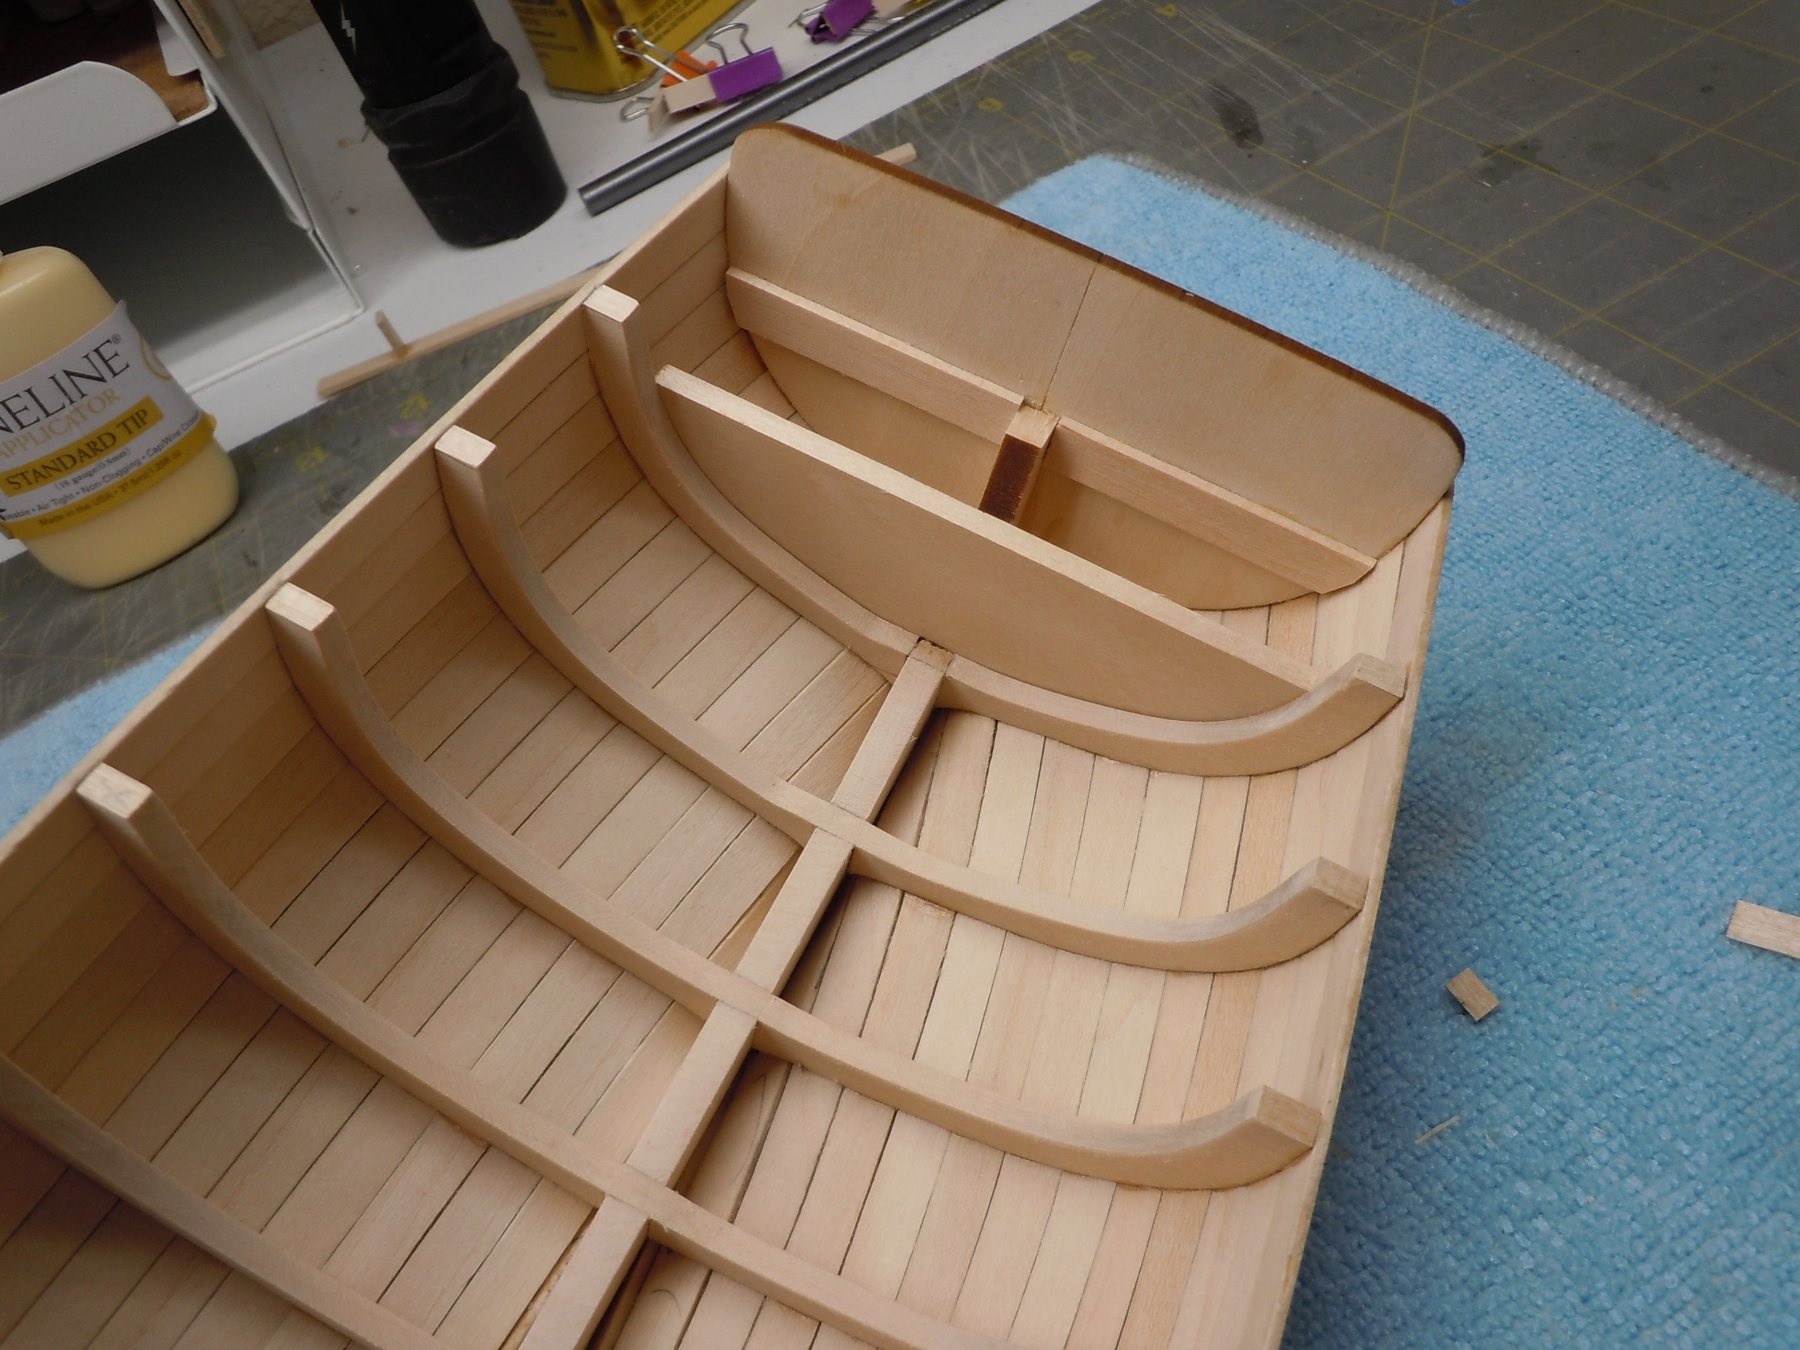
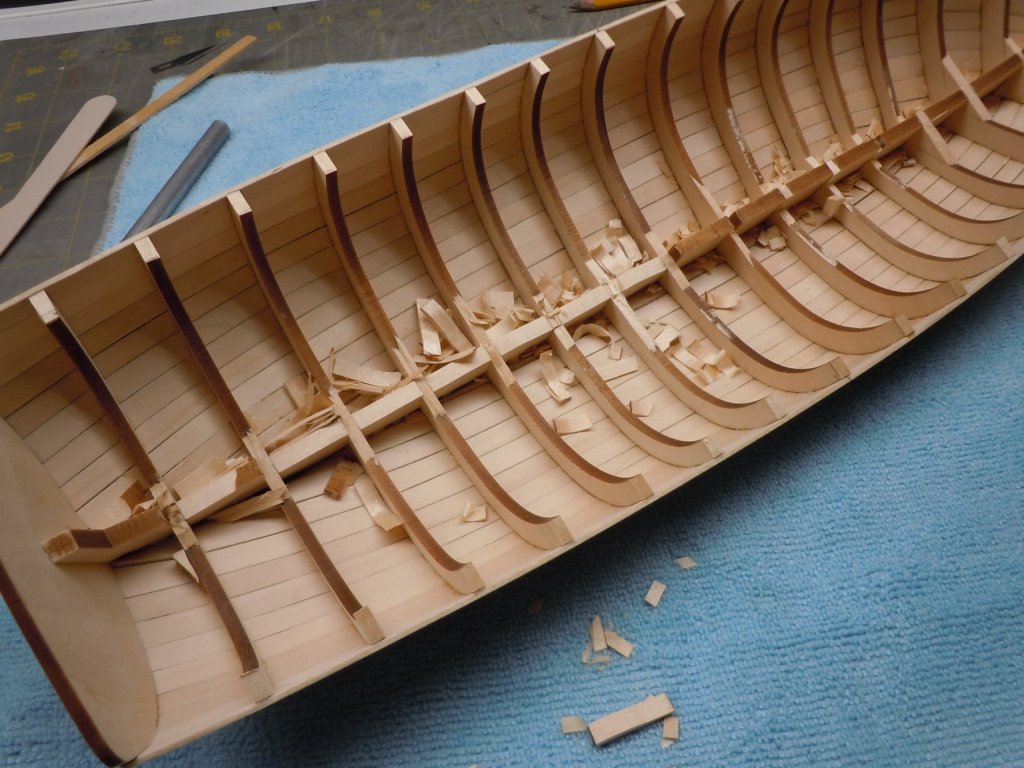
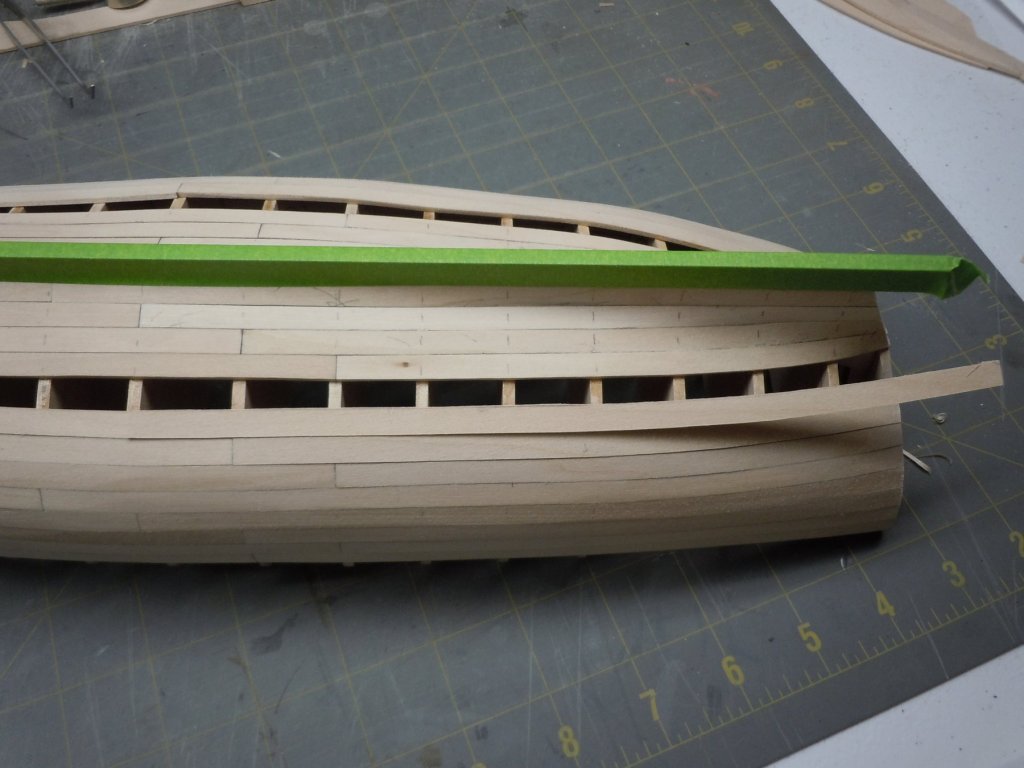
With the exterior complete I started on the interior of the hull. I was worried about breaking off bits of the bulkheads that sat proud of the sheer plank and trimming them down level with the sheer plank was the next step. I started by creating a witness line on the bulkhead. I used a small machinist rule to span the hull at each bulkhead set with the edge of the ruler on the sheer plank. I then drew a light pencil "witness" line from below the ruler on both sides of each bulkhead. This is not a "cut to" line, it's to get me close enough while keeping the bulkhead tops level. This is pretty much per the instructions. With all of the bulkheads marked I shaved them down with a single edge razor blade. I made thin slices, the grain of the bulkheads is horizontal and the wood wants to split if you try to take off too much at once. This was actually pretty quick and easy work. I left each bulkhead top just a smidgeon proud of the sheer plank and finished touching up with a manicure flexible file. The top sheer is curved so it is nearly impossible to shaved the bulkheads flush to the sheer without the razor blade digging into the sheer. In this photo you can get an idea at how thin of slices I was taking. With the bulkheads trimmed down I started chiseling out the false keel. This was quick and easy work using a chisel blade in the exacto knife. The grain of the false keel runs parallel with the false keel so some caution is needed to not split the wood. My advice, take thin slices at a time. With false keel whittled down it was time to start fairing the bulkheads. This is ALOT of sanding!! Hours and hours of sanding..... I used 120 grit to do the majority of the work, then went back over everything with succeeding finer grits to 400. I used a piece of the manicure nail file (the kind that are foam with sandpaper on each side) that I cut in half length wise and about 2" long wrapped in sandpaper. This worked really well, the nail file had just enough flex to get the correct angle on the bulkhead while stiff enough to not just round off the bulkhead. I also used a 1/4" x 1/16" scrap of plank as a batten where the thwart risers will go (3/8" below the top of the sheer plank) to ensure the bulkheads were sanded so that the thwart riser would lay flat against the bulkheads. Since the bulkheads needed to be adjusted vertically to the rabbit when they were glued to the keel, on my model at least this resulted in some bulkheads being higher or lower than they should have been resulting in, more sanding. Although the instructions do not address this, at the bow there is a block that is a lamination of the false keel and the bow block fillers. This sits proud in relation to the sheer plank and needs to be sanded down so that the cap rail will sit flush. Sanding against the end grain of a 1" square block of laminated wood is hard going!! I made witness marks on the back and sides of this component and used a tiny disc sander attachment in the Dremel to sand the majority down. I finished up with the chisel blade exacto and finally some light sanding with a sanding block. I don't think it needs to be perfectly sanded flat and flush, I don't think it will be visible in the finished model but I was just getting the hang of this sanding thing so I went for it! I will apply a coat of poly and paint the inside of the sheer planks before installing the floor boards so I skipped ahead a little and installed the stern locker braces and stern locker wall. I made a jig from a piece of scrap plank that was long enough to span from sheer to sheer and then glued a 3/8" long piece of scrap plank perpendicular to it to mark the transom and bulkhead interior used for the stern locker wall. You can see this simple jig in the photo above, its between the pencil and the bow of the boat. Oddly enough the instructions tell you to save the inner portion of bulkhead #7 when you remove it for later use. On page 20 of the instructions they tell you to use the center area of bulkhead 6. I will confirm 6 does not fit, it is in fact #7 that's used. I did have to make a notch for the false keel but that was pretty easy. Tomorrow I'll apply poly to the interior and then wait a few days to apply the paint and continue my build. Thanks for looking!


- 95 replies
-
- 16
-
-
- Model Shipways
- 18th Century Armed Longboat
- (and 1 more)
-
Thank you Nils! Tiger65 I was in the same exact boat, pardon the pun. So far I've made parts for 2 boats, one set you see, the other set is in the bin! For me spiling planks from a sheet saved a lot of time and frustration. Since the sheet bass wood is so cheap I wasn't shy about throwing away a plank if it didn't fit right. About halfway through I started getting repeatable acceptable results. Also I was able to sand the interior side of the planks before installing, since they would be visible later and impossible to sand smother once attached. I dreaded the last plank, I figured it would take many attempts but it fit so snug glue wasn't needed to hold it in place.
- 95 replies
-
- 2
-
-
- Model Shipways
- 18th Century Armed Longboat
- (and 1 more)
-
The nice thing about Model Shipways is that you can download the instruction manual for all their kits from their website. This helps in selecting a build you can enjoy. Some of their kits instruction manuals in my opinion, are geared towards more experienced modelers.
-
Thanks xken, and what a sharp eye!! I think missing those 2 nails is the model ship builder's version of being snow blind. LOL I just realized, aren't you the same Ken that built the prototype and did the instructions?
- 95 replies
-
- 1
-
-
- Model Shipways
- 18th Century Armed Longboat
- (and 1 more)
-
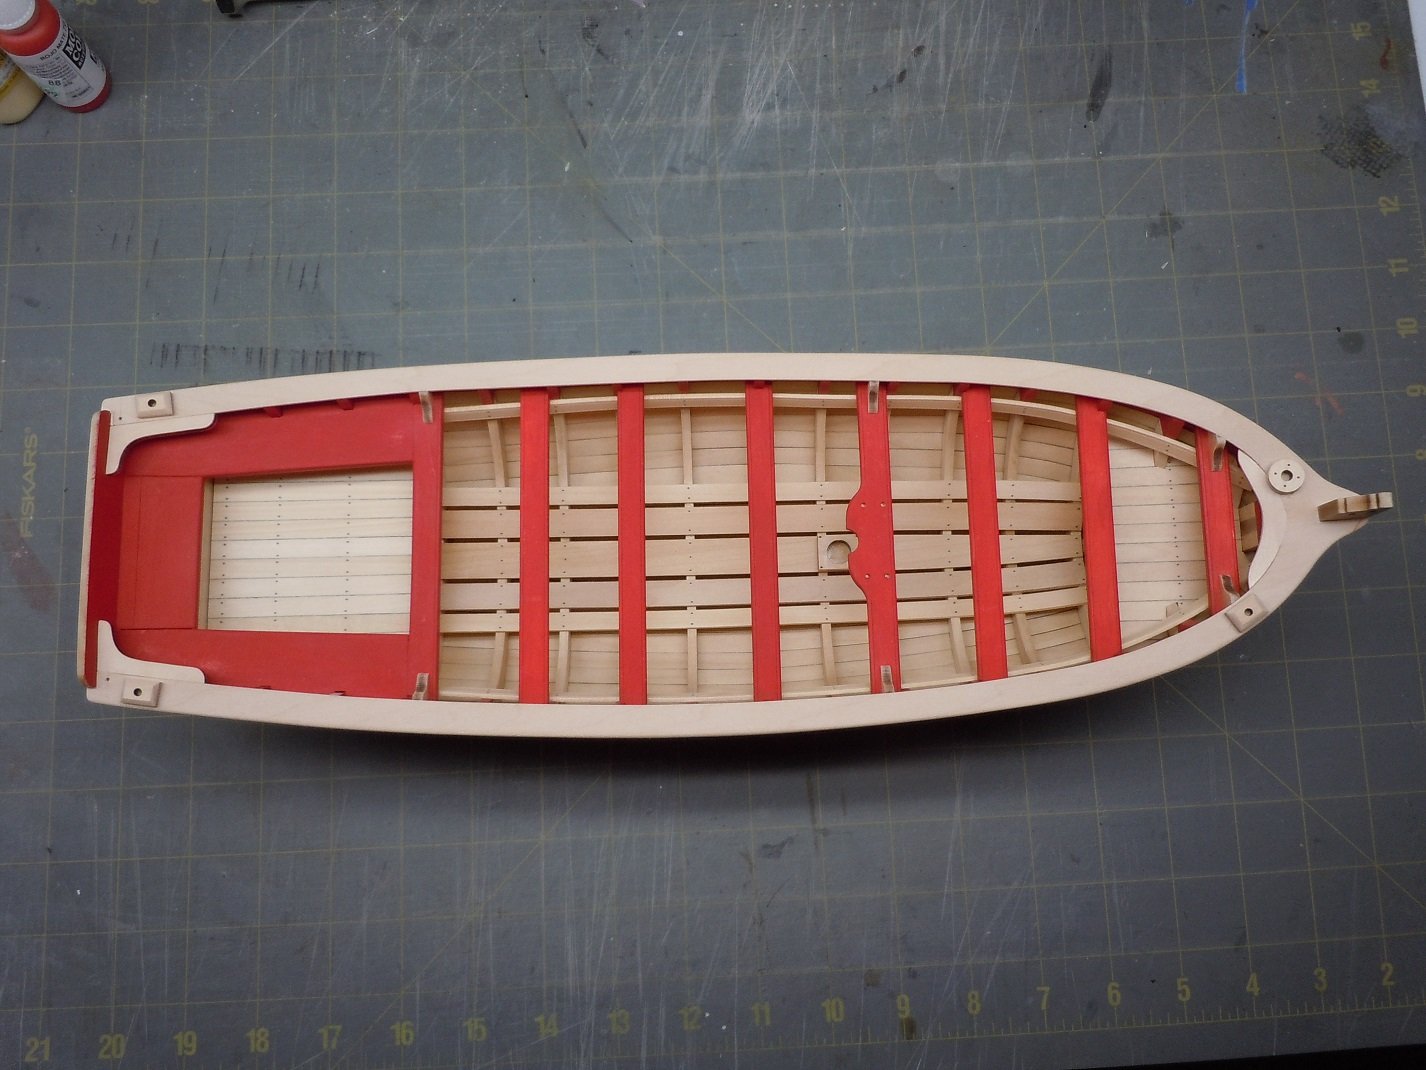
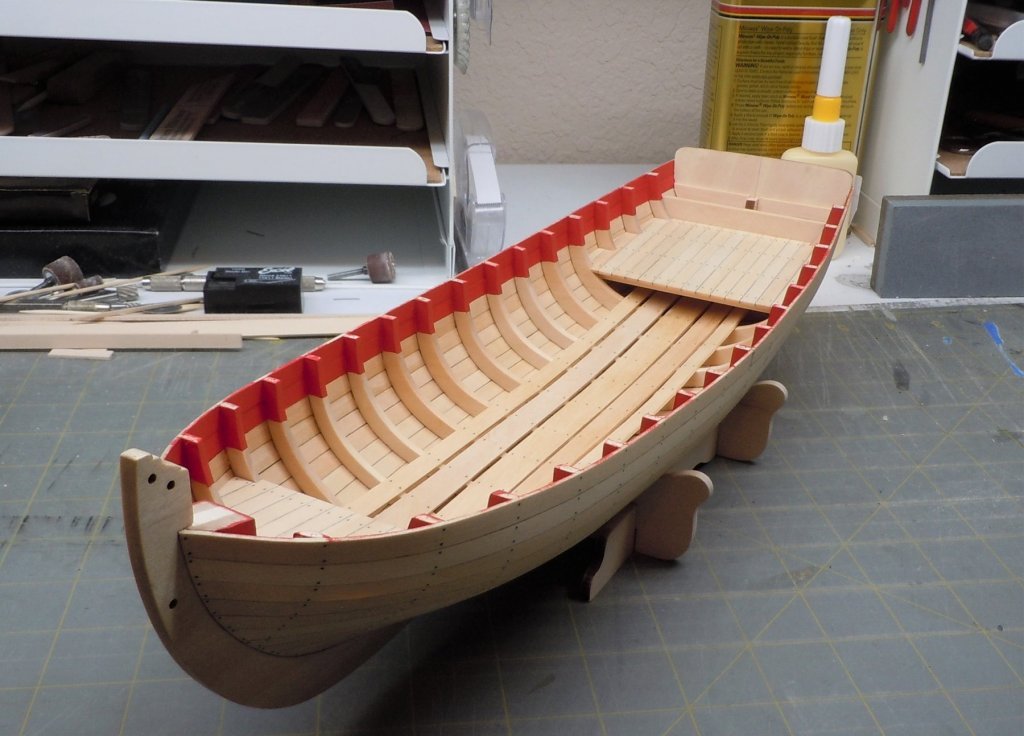
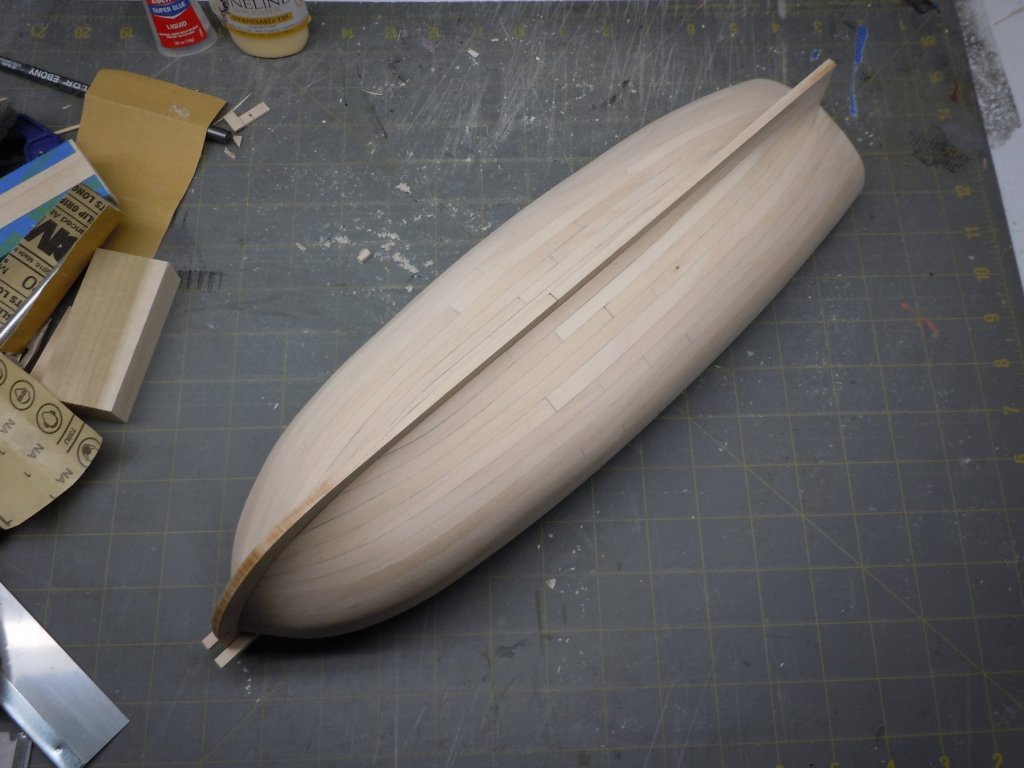
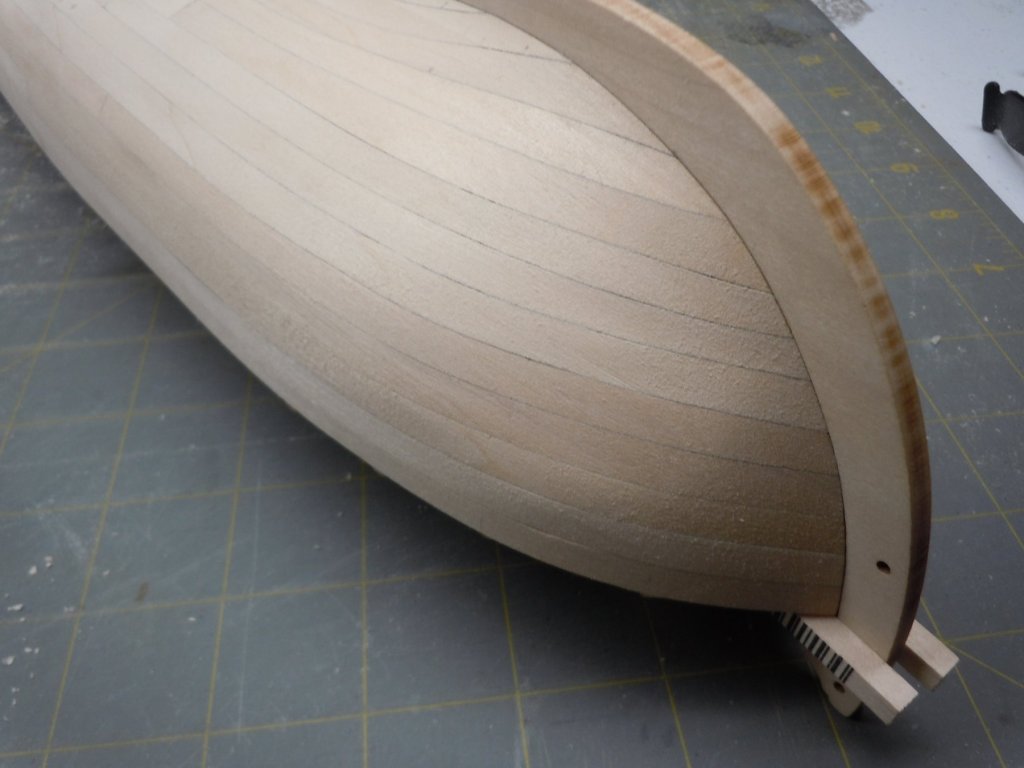
With the treenails installed I final sanded the hull, again down to 400 grit. Then I went on to remove the center section of the bulkheads and my temporary brace at the bow for the keel. Although not seen in this photo I also sanded the glue residue off the interior side of the transom, where my strong back bracing had been attached. Next I brushed on a coat of wipe on poly to the exterior. I planked a 6"x6" x 1/4" thick basswood to experiment with various stains and finishes. I settled on just brushing on a coat of clear satin wipe on poly. Sometimes the simplest solution really is the best! Basswood isn't the prettiest wood on the planet but the wipe on poly improved the appearance.

- 95 replies
-
- 14
-
-
-
- Model Shipways
- 18th Century Armed Longboat
- (and 1 more)
-
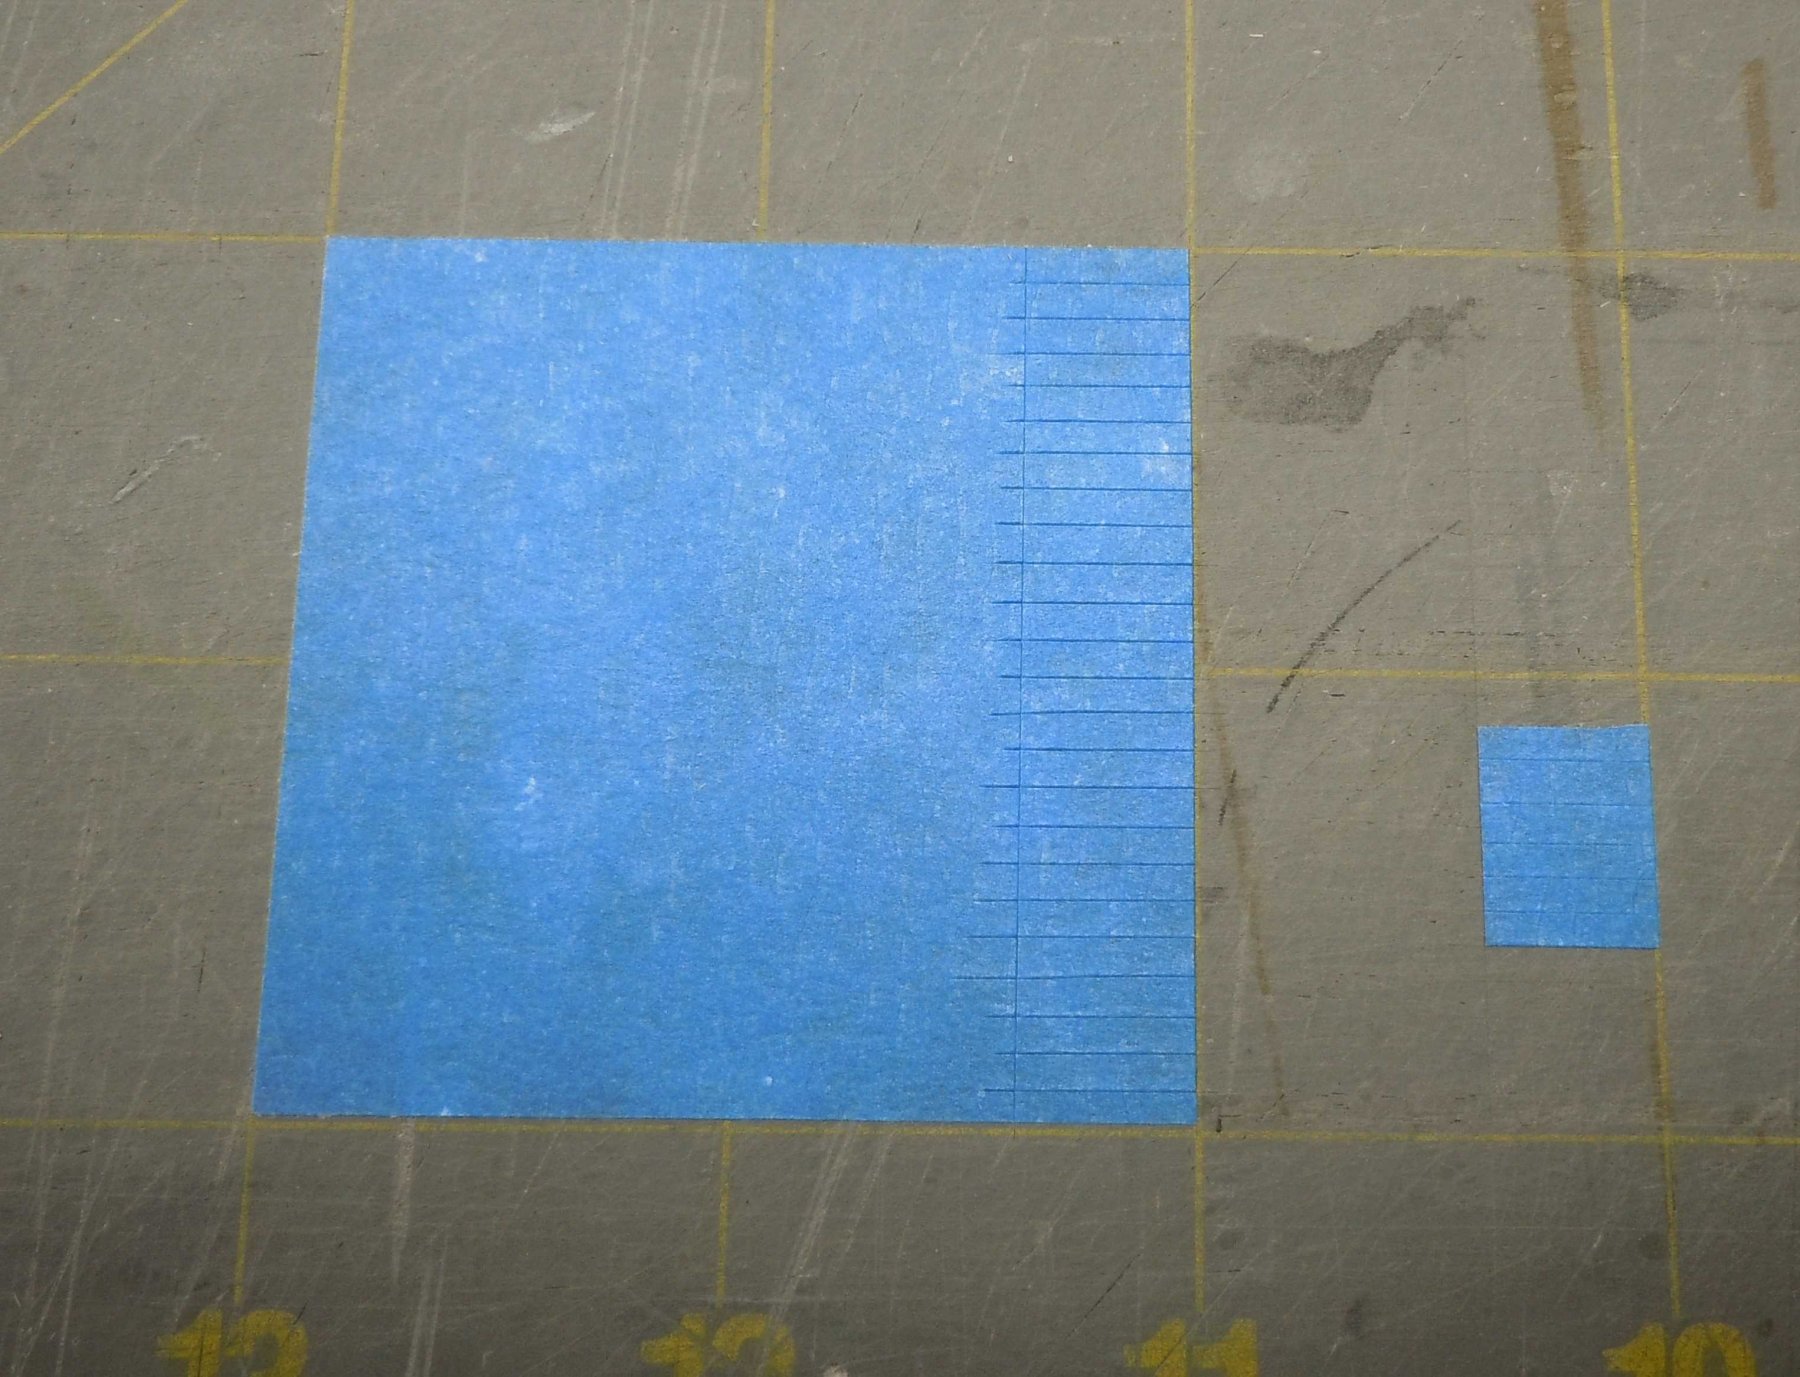
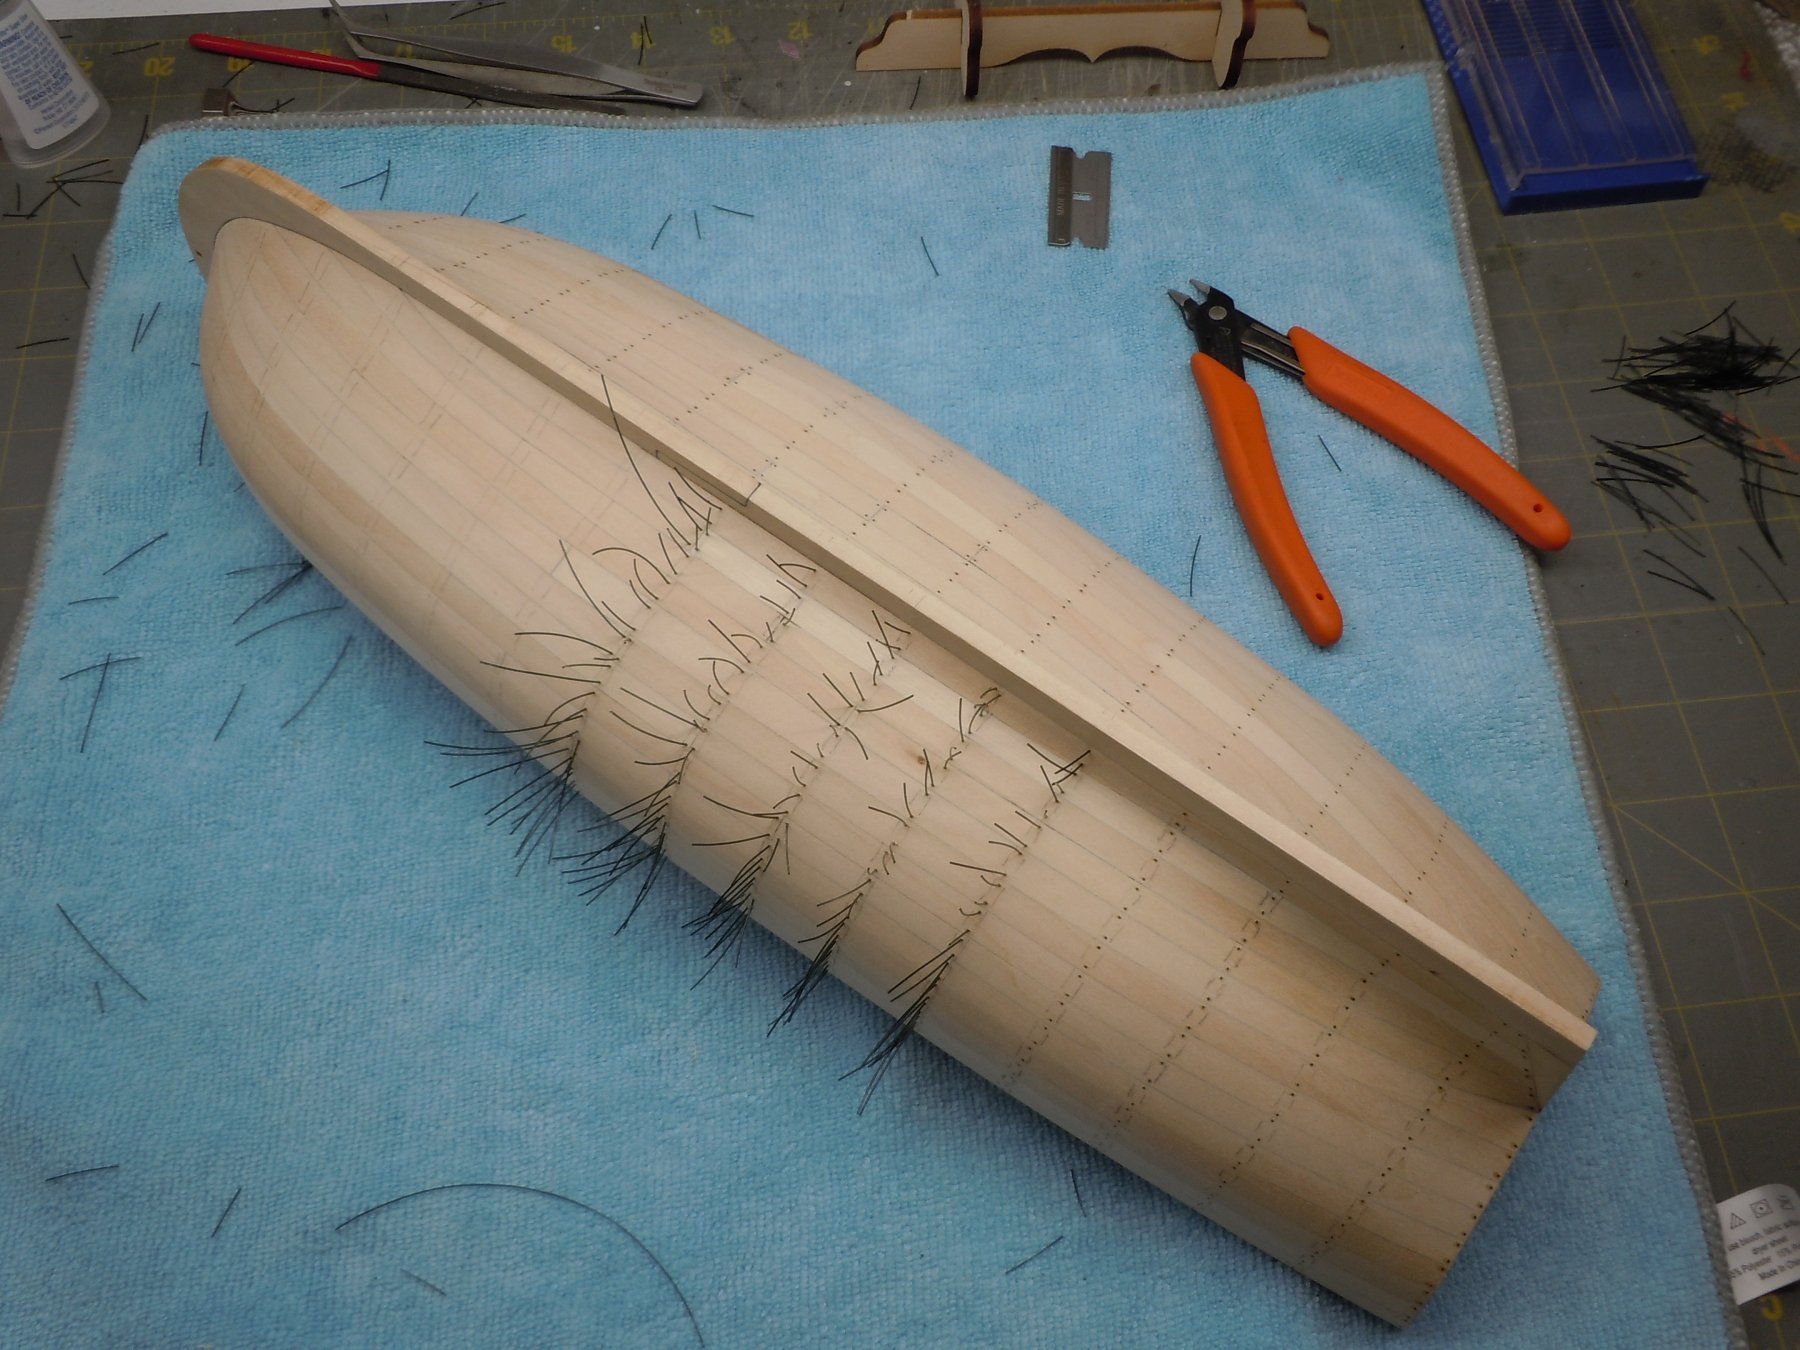
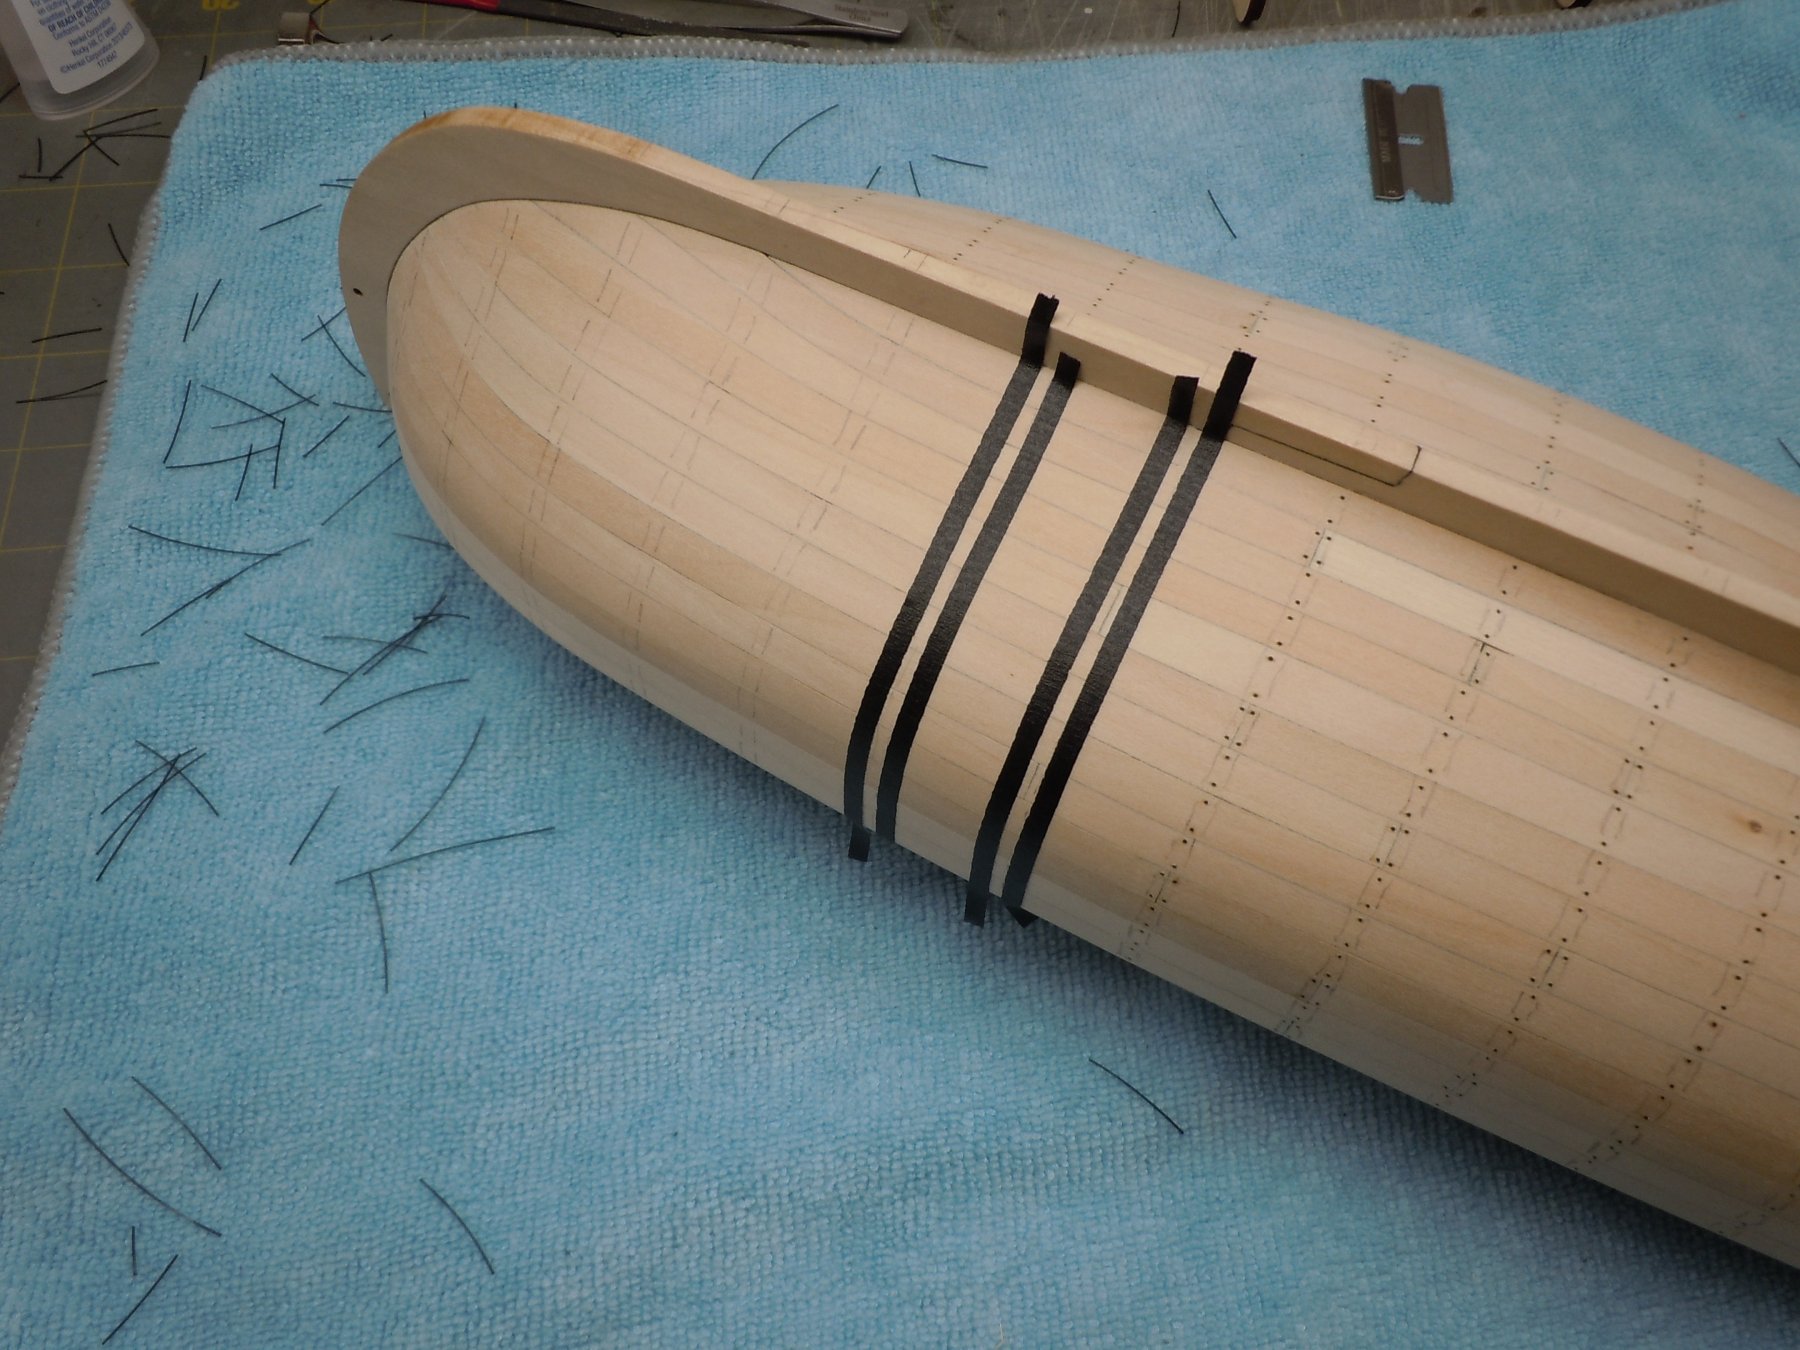
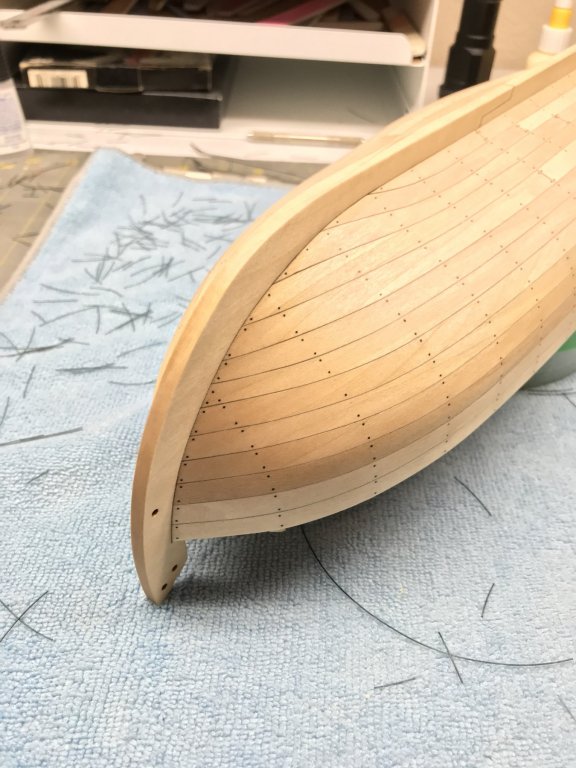
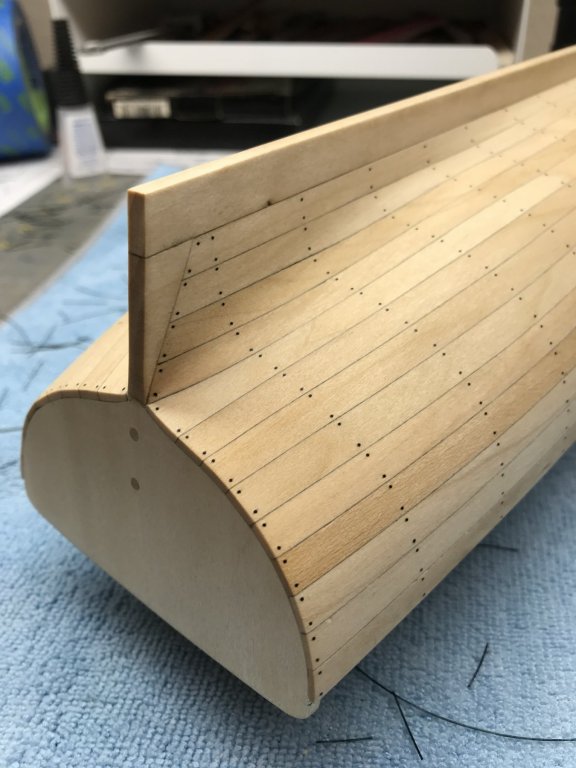
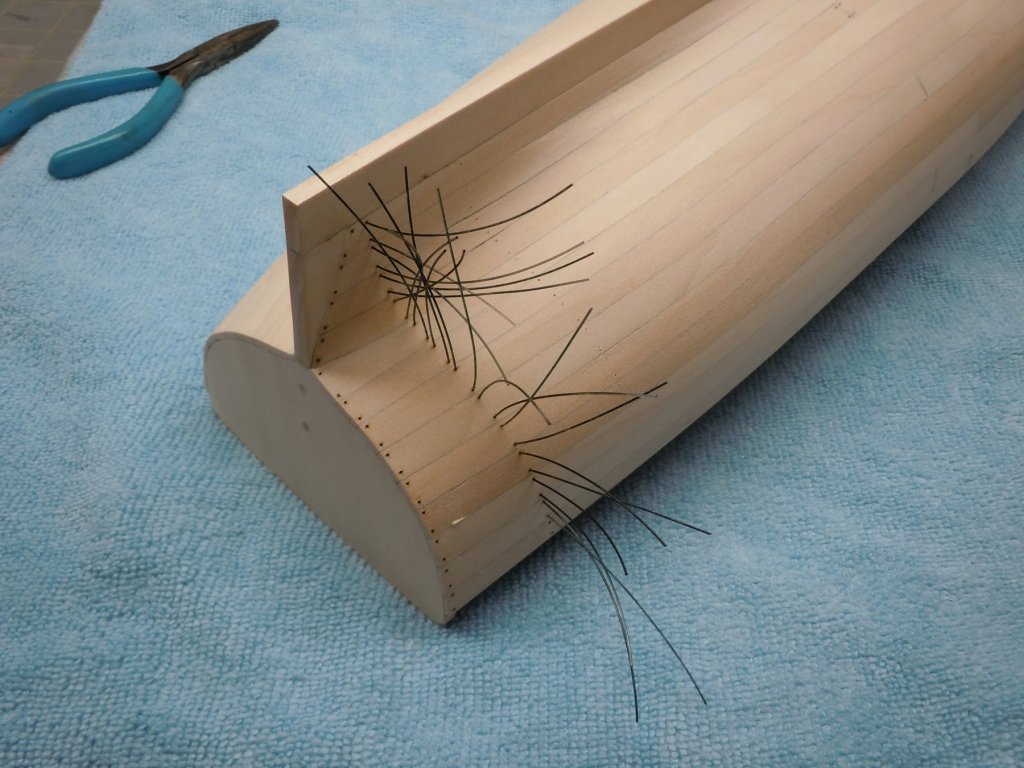
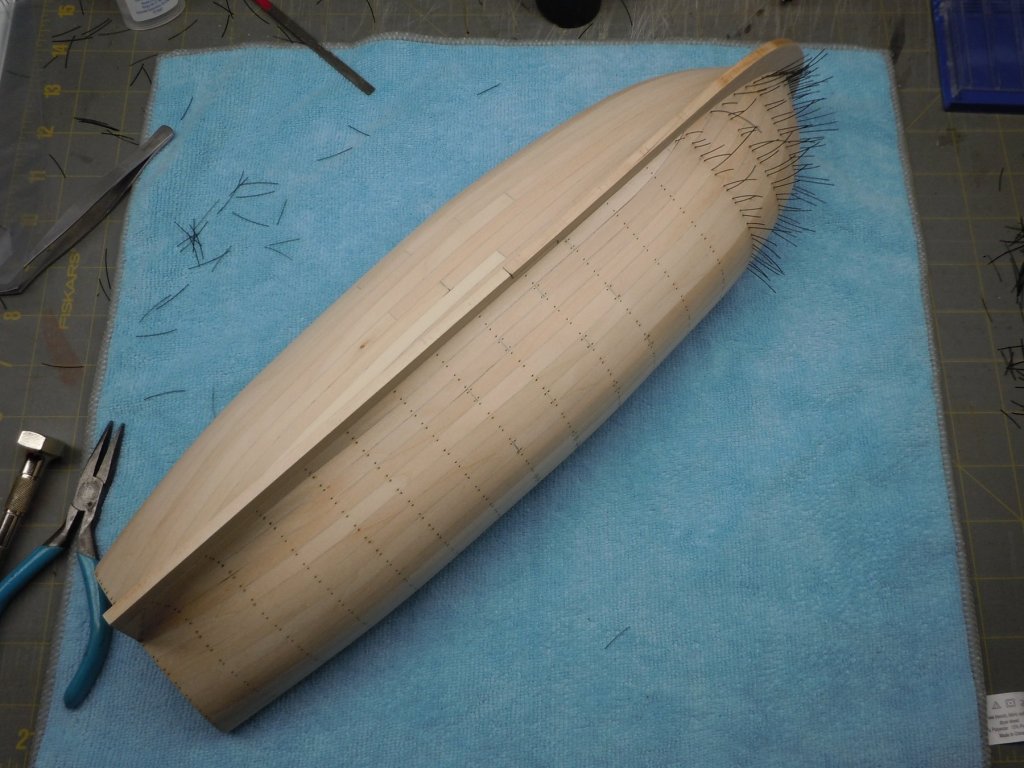
Prior to starting the tree nails I final sanded the hull down to 400 grit. Again copying Chuck Passaro I used black monofilament for nails. I bought 10 and 20 pound test, the 20 pound test is .4mm diameter and chose to go with this. I've never seen black monofilament, this stuff may be of dubious quality because it ran from black to a translucent smoke. I threw a lot of it out as I went, if it was translucent in went into the bin. I started out holding the hull up to the light and using chart tape to demark the left and right side of the bulkheads. When I started drilling I realized that with over 1,000 holes to drill it would be a miracle if I didn't miss a bulkhead and spoilt the planks on the interior with a hole. When I started on the port side, I chose to mark where the bulkhead was using a pencil on each plank. Then I ran the chart tape over the pencil lines erring on the side of caution. This worked out pretty well and I'm happy to say I didn't "hole" a single plank. Initially I was trying to slice the monofilament off flush with a brand new straight edge razor but this was tedious and didn't work that well for me. I switched over to sprue cutters and they worked great, I could lop those whiskers off on a whole run in the time it took to slice through 2 or 3 with a razor and it required less sanding to get them flush. I used medium CA dispensed on a plastic bag to glue the mono. Just a dip in the CA and insert. I also found flat jaw needle nose indispensable for inserting the mono in the tiny holes, tweezers of all makes and models were tried to no avail. It took a total of about 6 work hours to get all the nails in, working 15-30 minutes at a time. What a weird way to spend free time!!


- 95 replies
-
- 6
-
-
- Model Shipways
- 18th Century Armed Longboat
- (and 1 more)
-
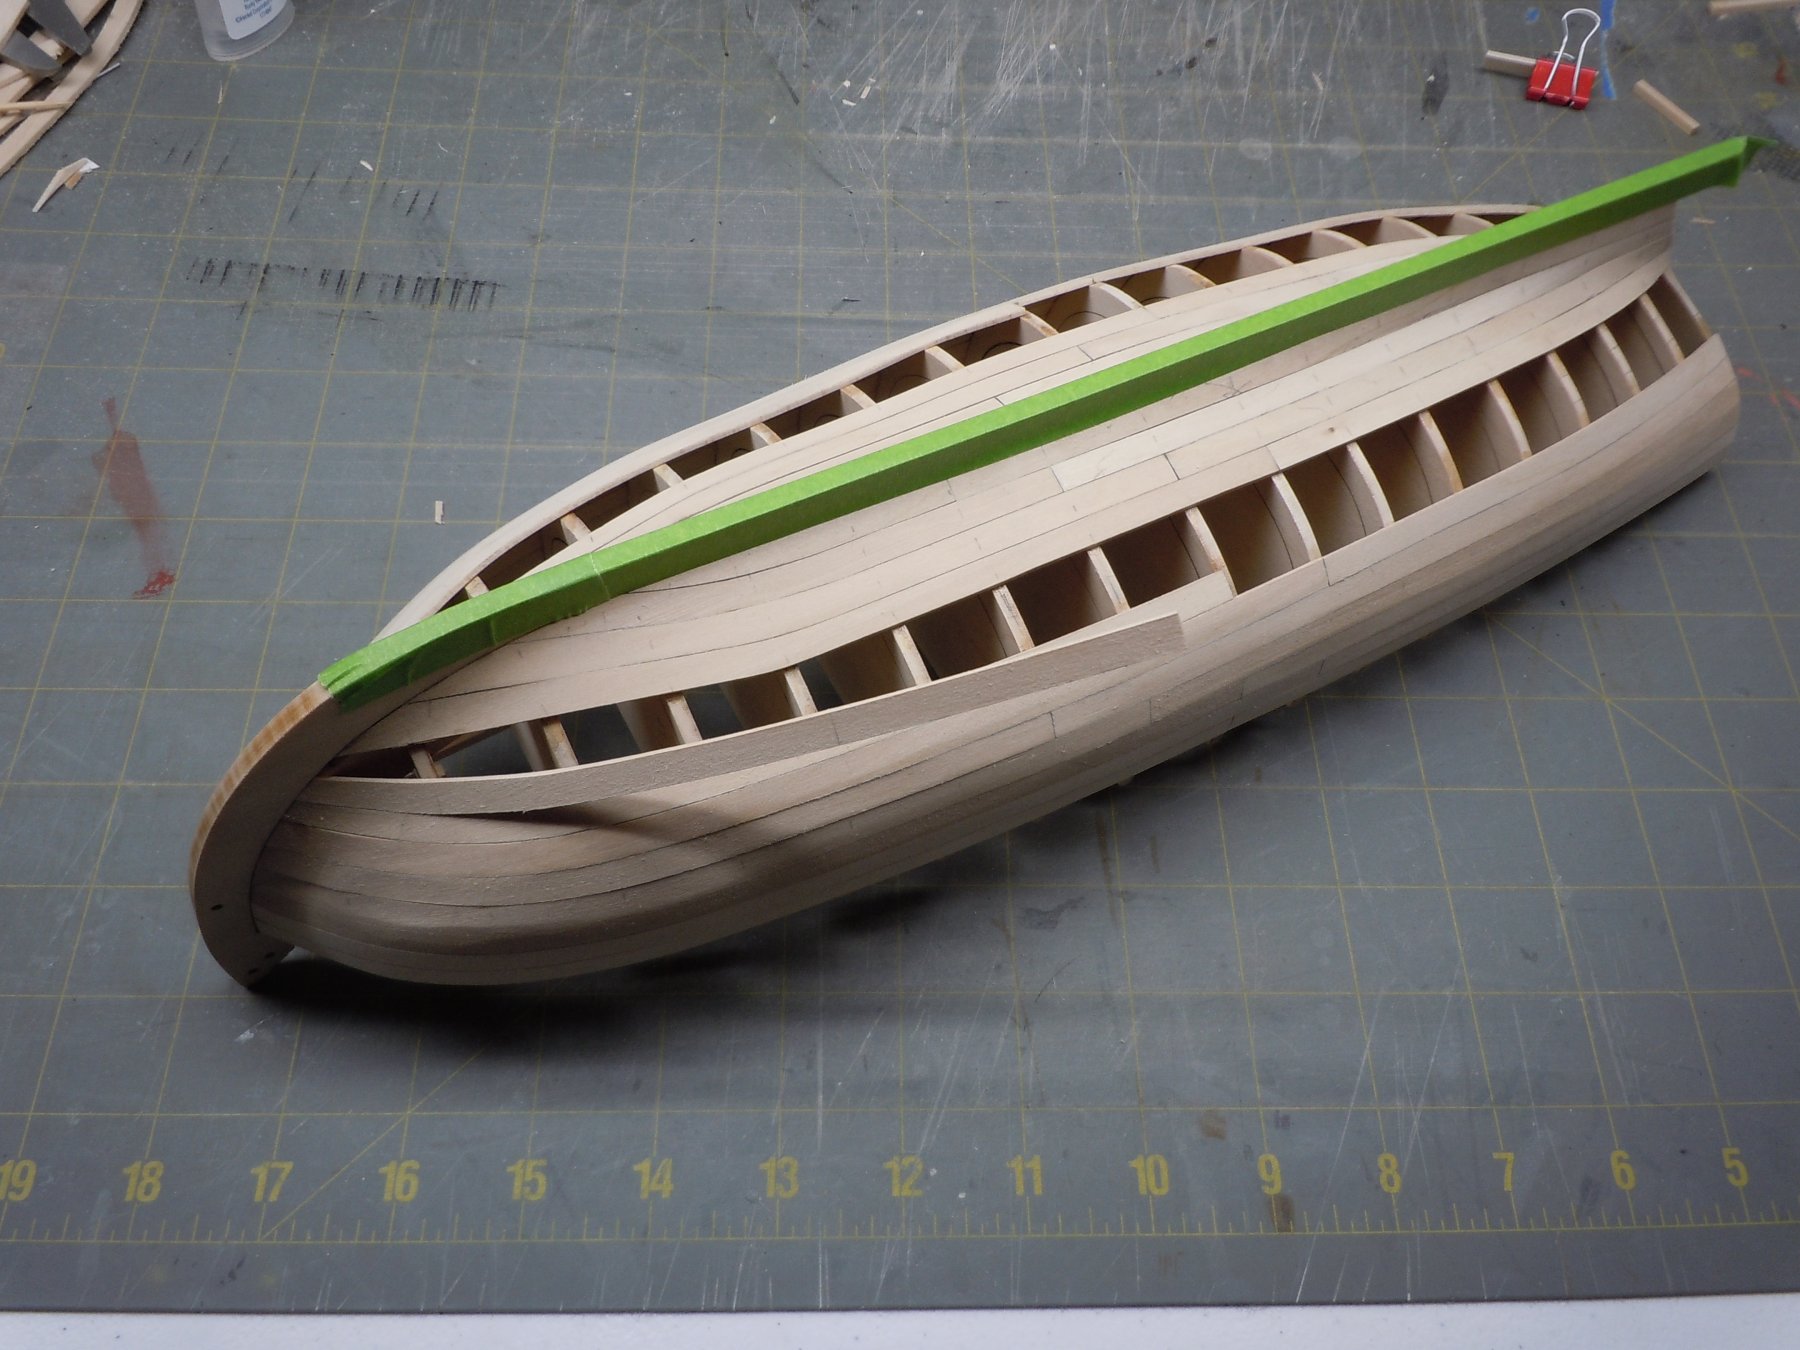
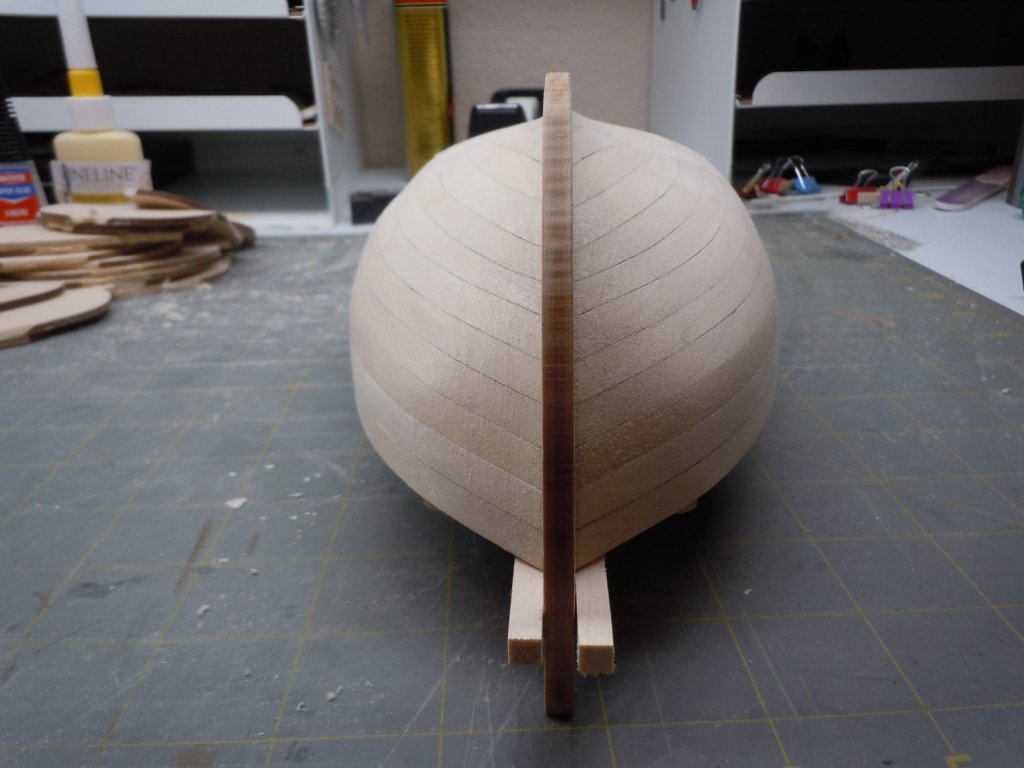
Thanks guys! xken, luckily the plans are for reference as far as I can see so the size issue isn't stopping the build. I only find it odd because I have built dozens of RC planes over the years and never ran into plans that weren't to the scale of the model. Anyway the show goes on! After the last plank went down I removed the keel and sanded the hull to close to where it needed to be. Once satisfied I reinstalled the keel. I've been using Titebond 2 for everything aside from the planks and that's what I used to permanently attach the keeI. I did add a couple of short lengths 1/8" x 1/8" stock to register the keel at the bow, those will be removed later. With the majority of the sanding done I decided not to paint the lower hull. I wasn't 100% confident that the planking in the stern area wouldn't require some filler, since it didn't I moved forward with tree nails on the entire hull. It was actually seeing all the models on this forum with tree nails that got me reinterested in building some boats.
- 95 replies
-
- 17
-
-
-
- Model Shipways
- 18th Century Armed Longboat
- (and 1 more)
-
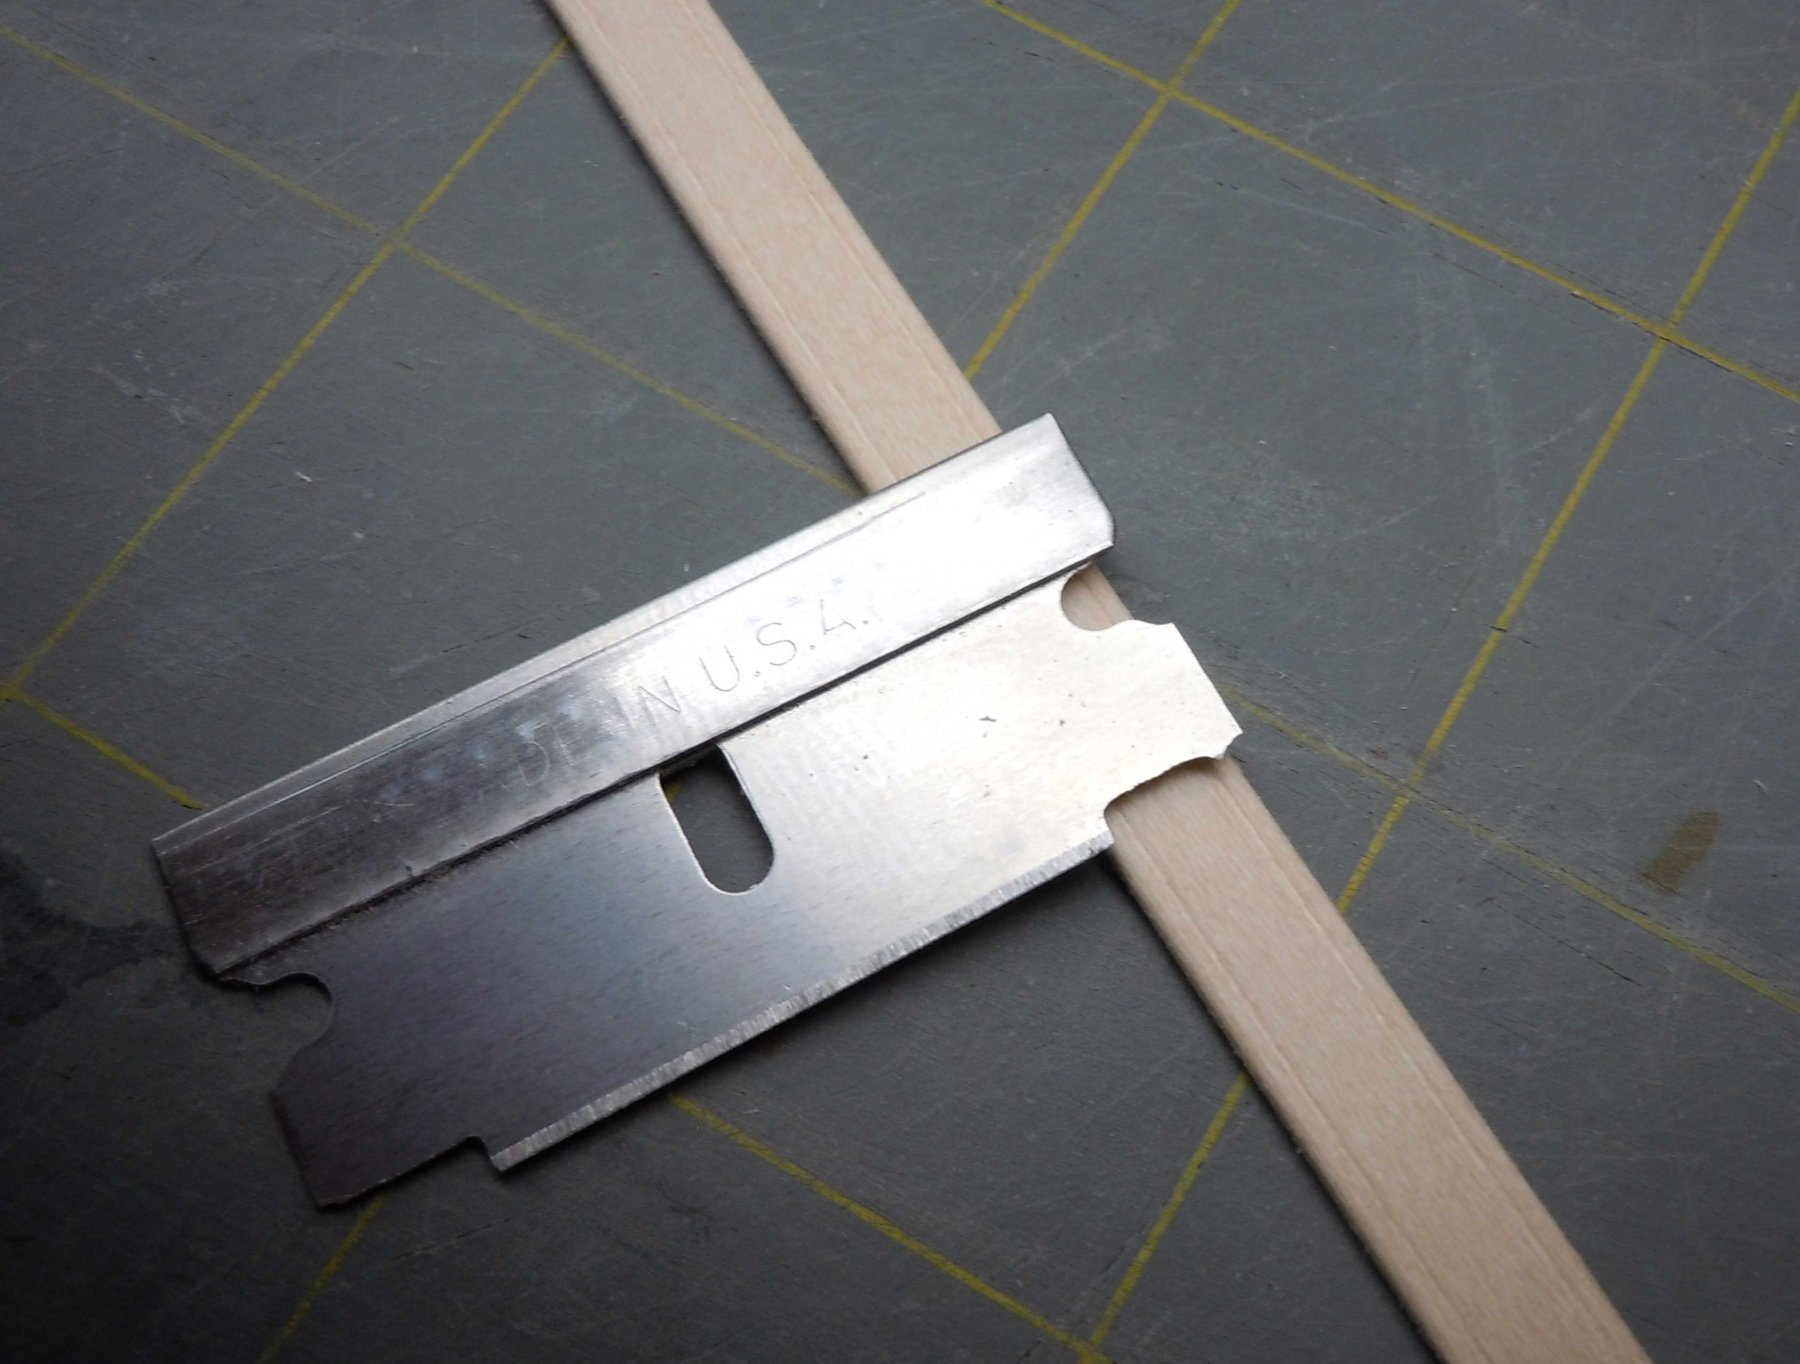
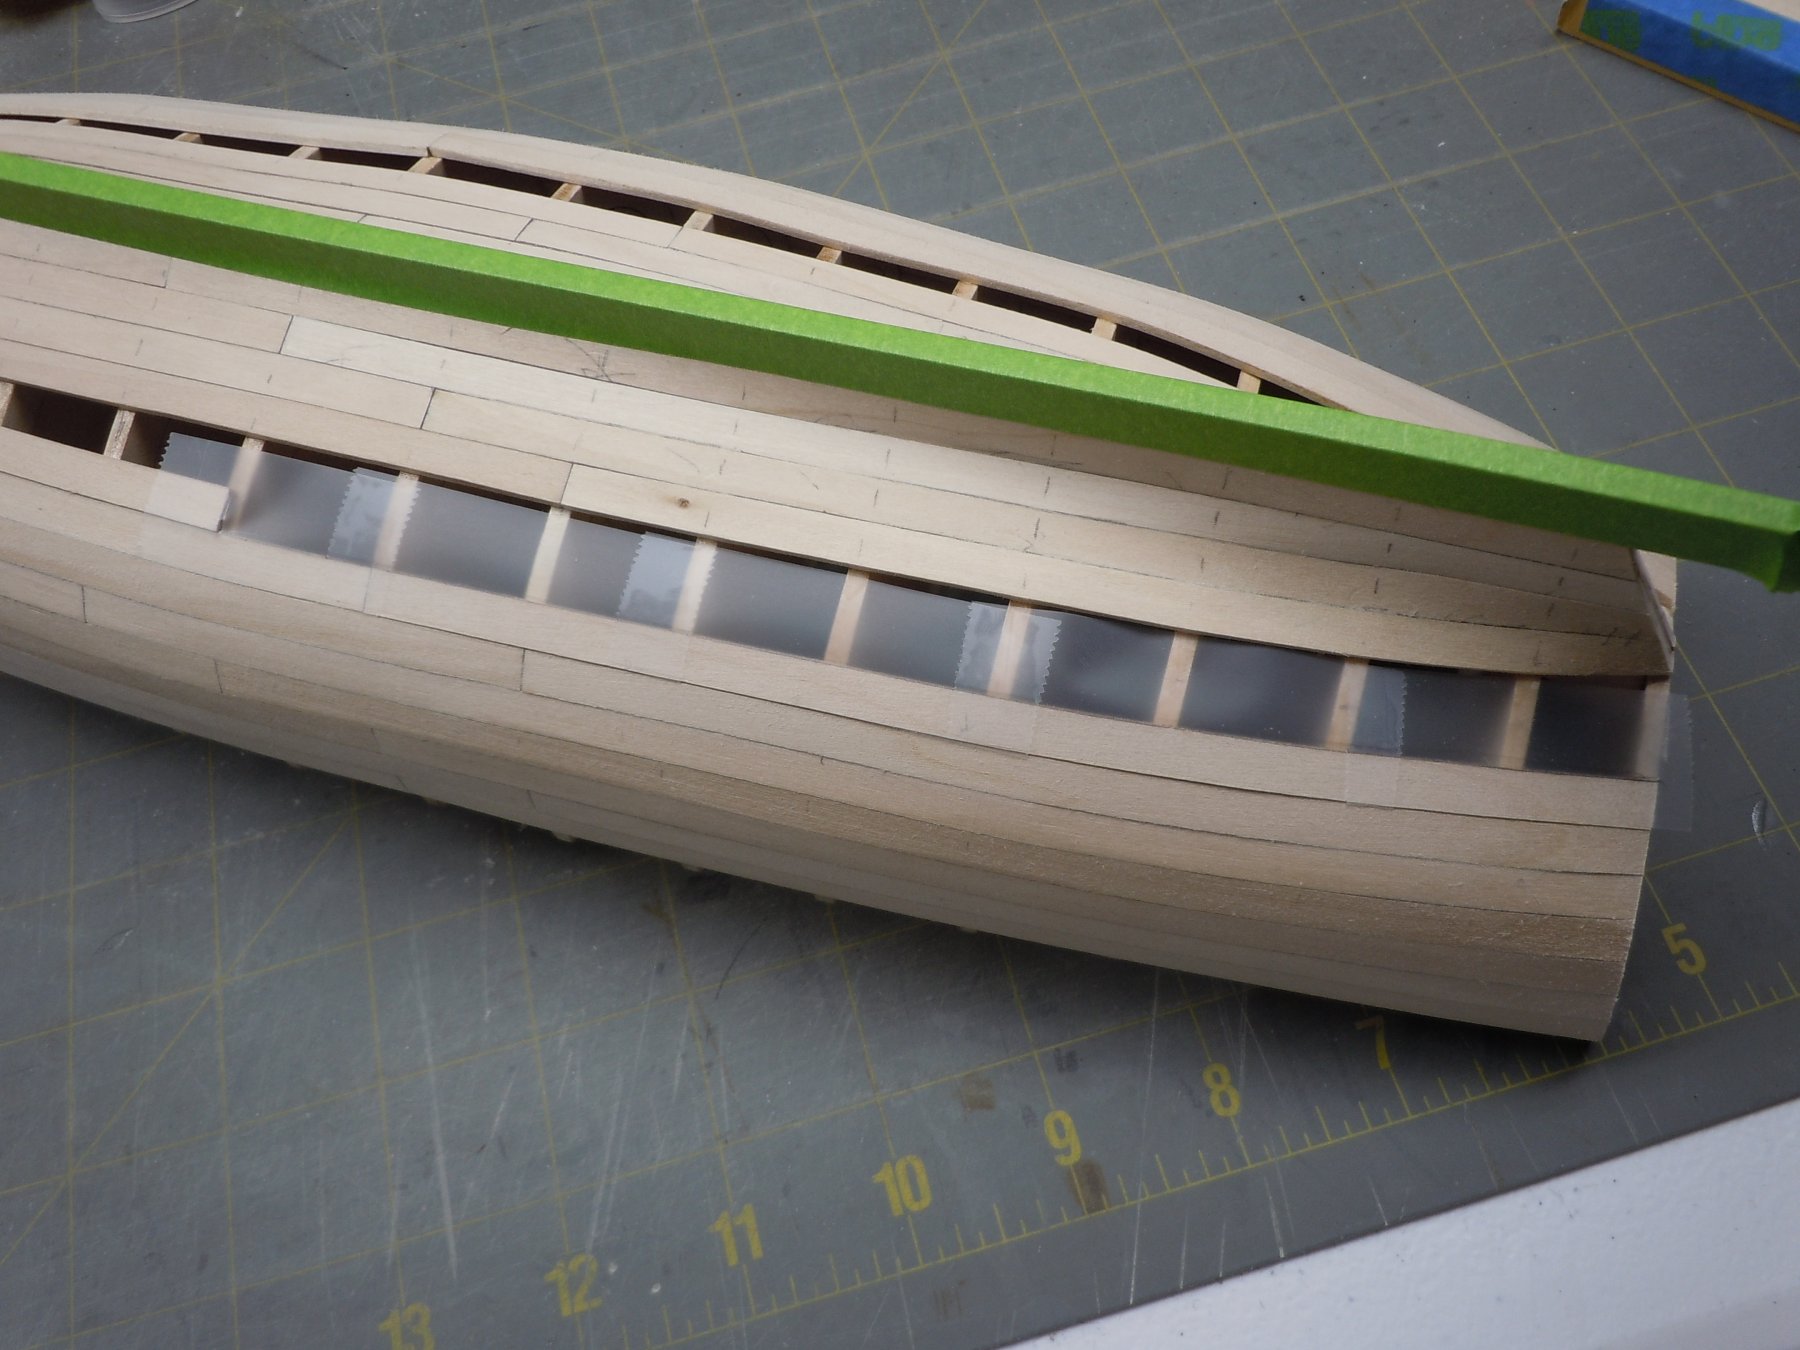
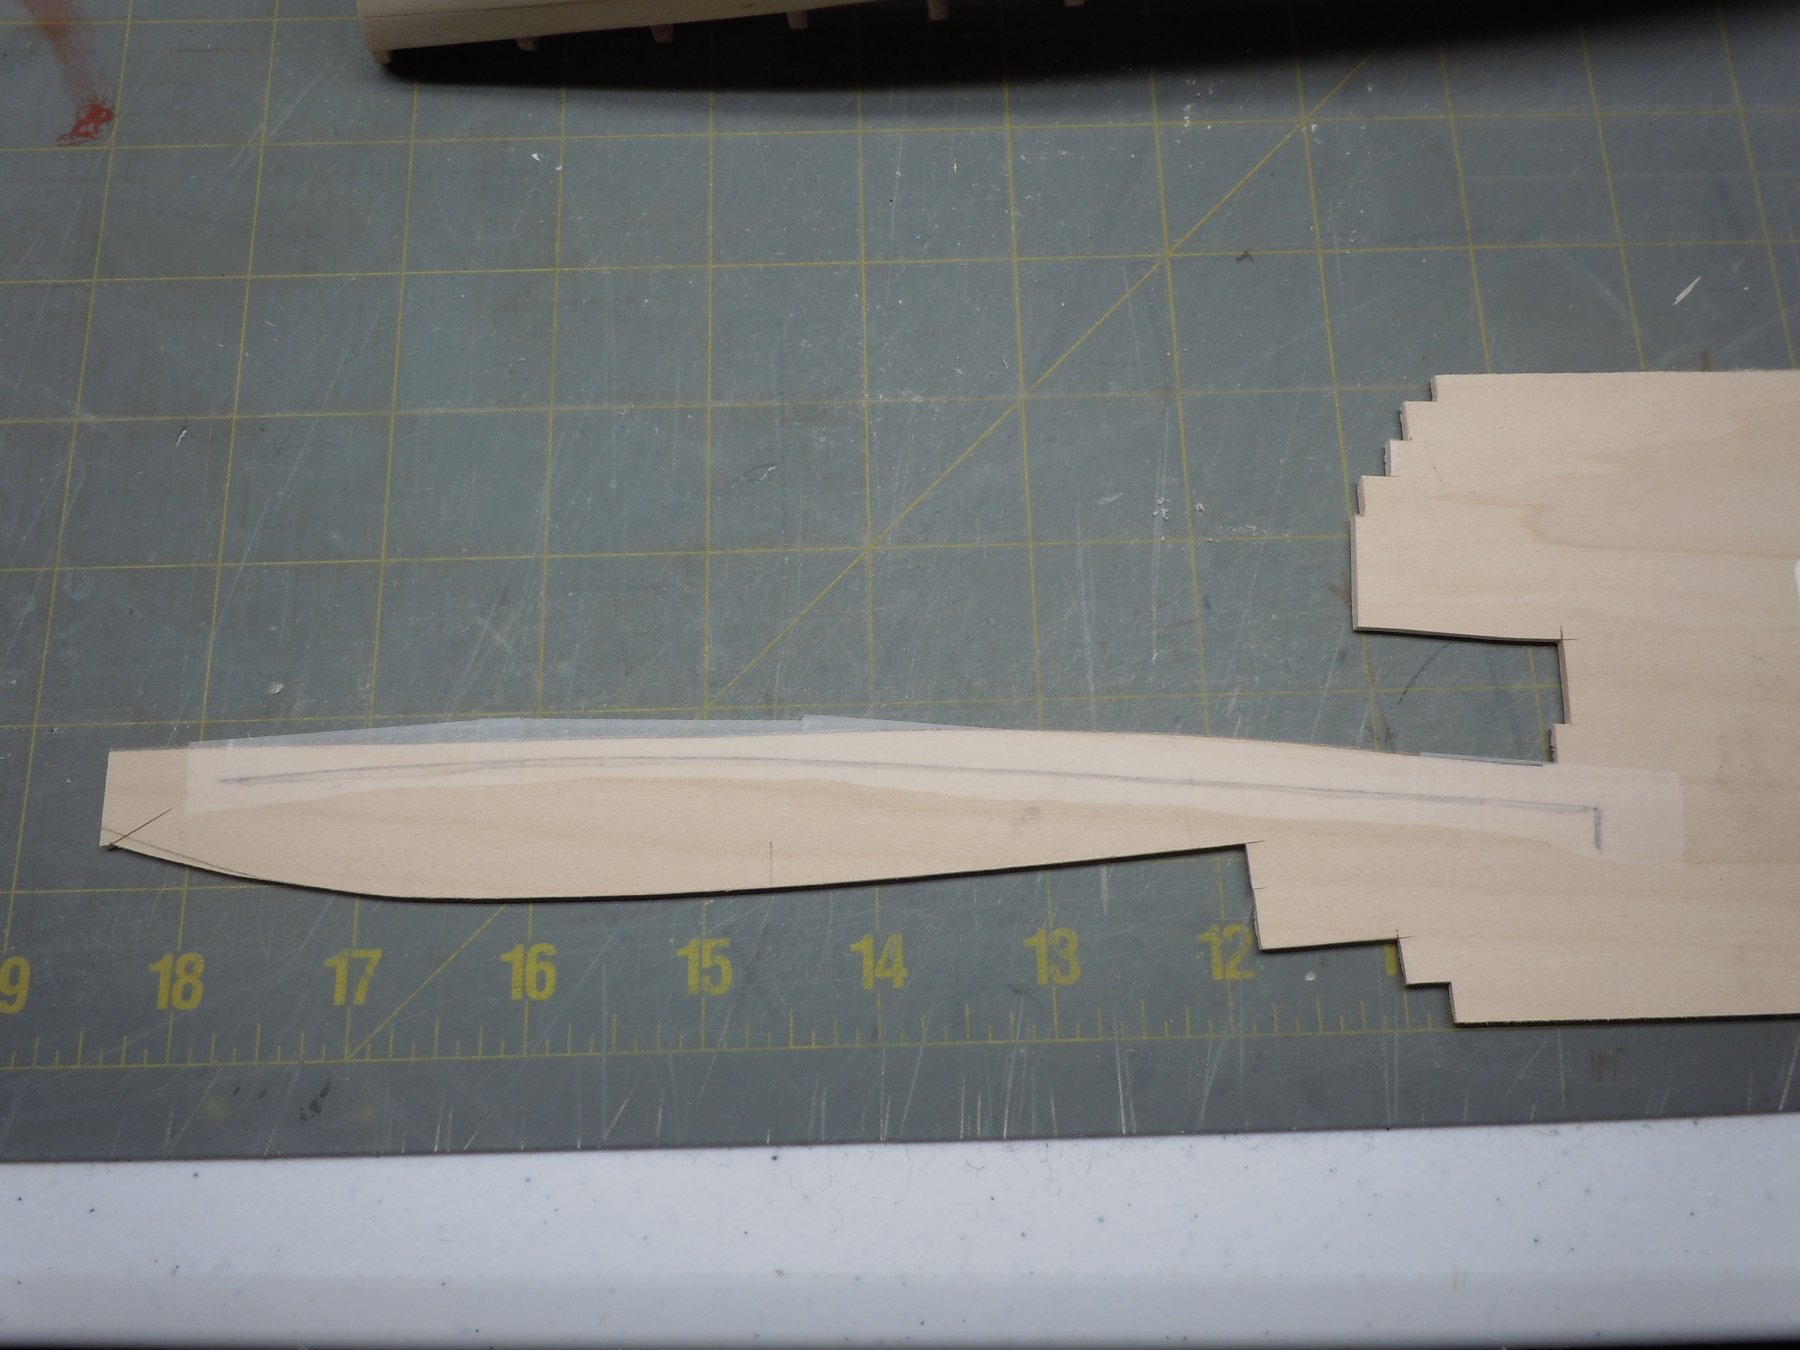
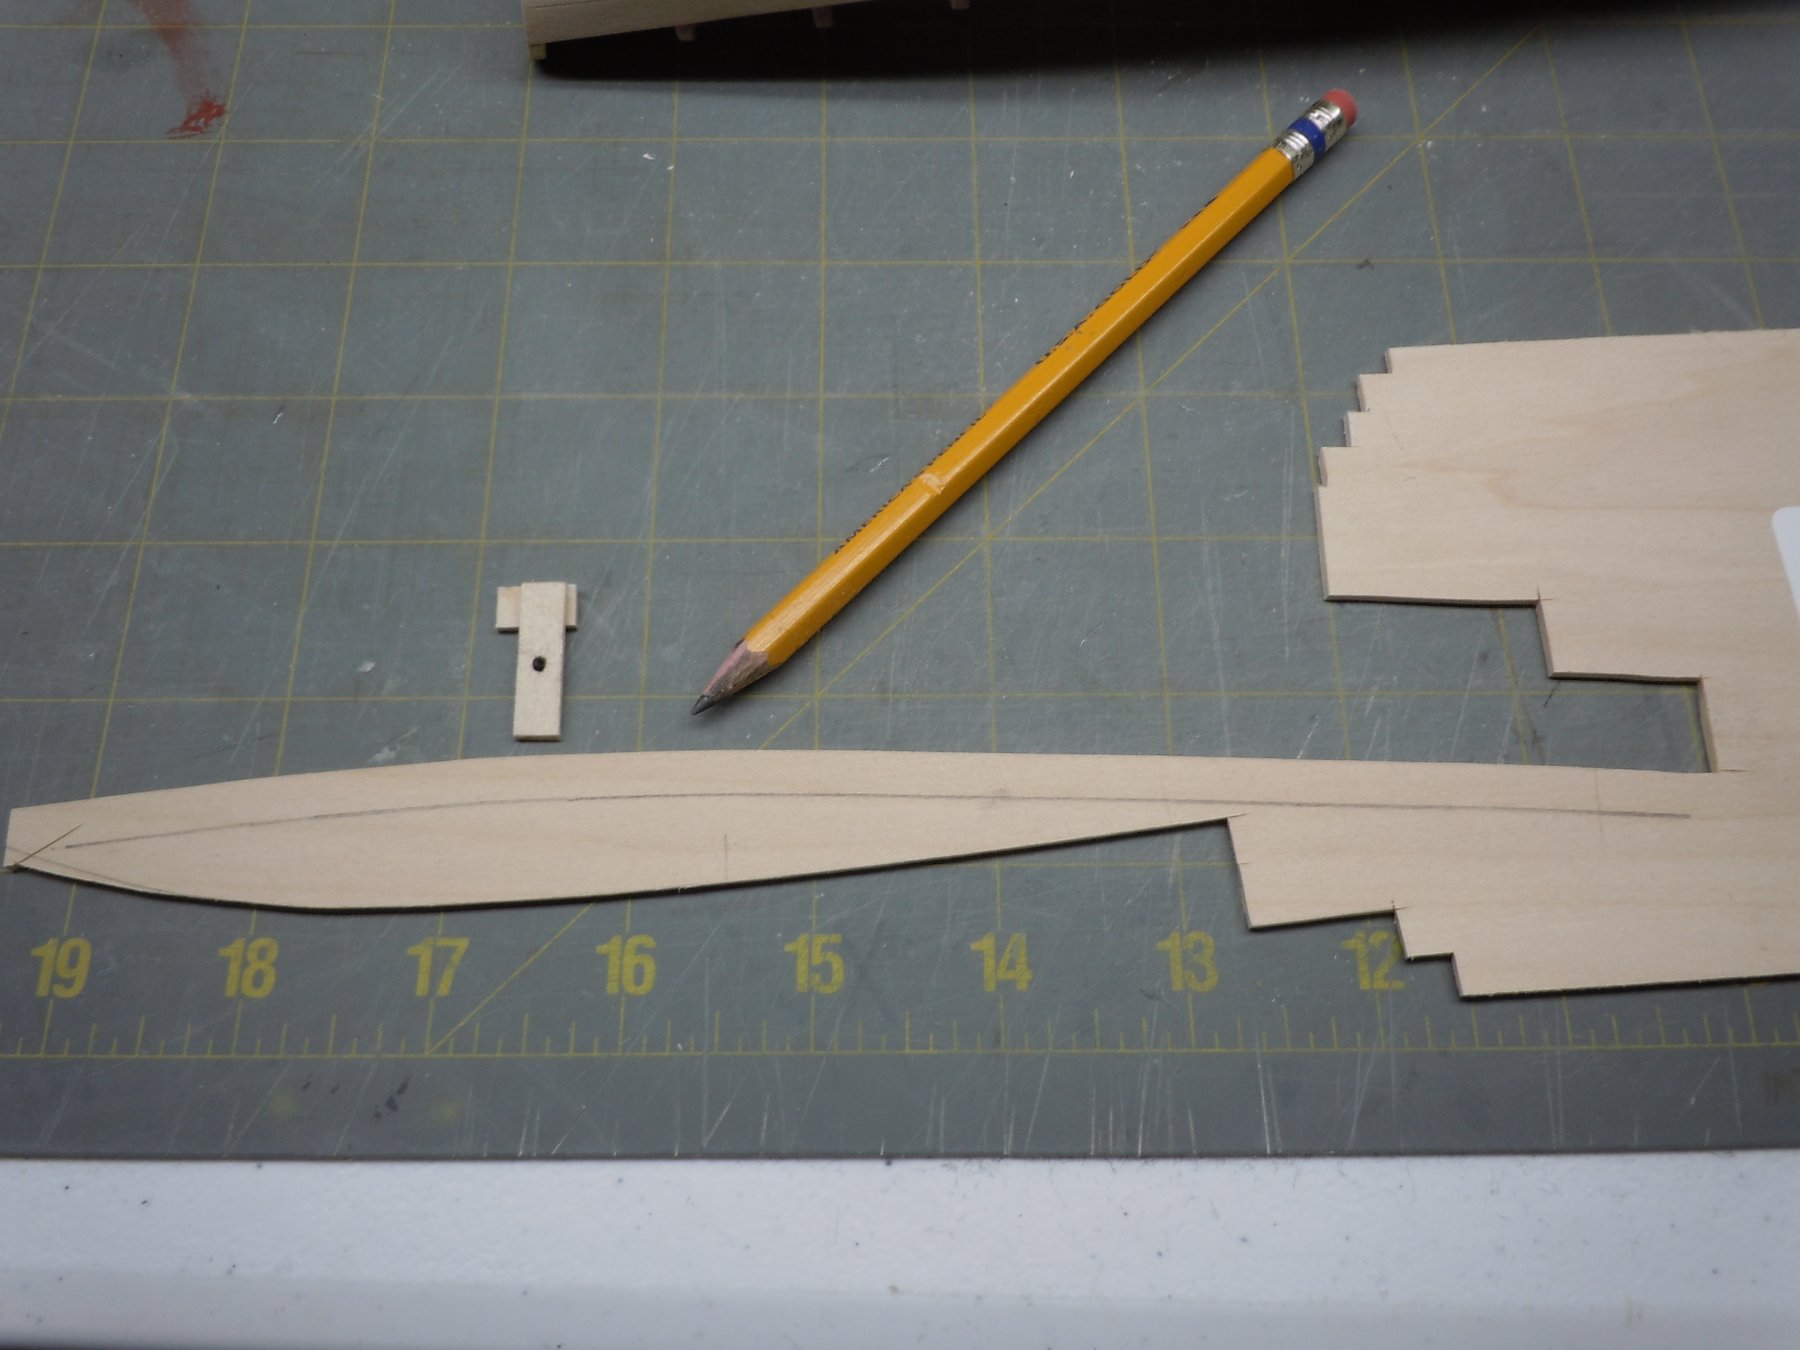
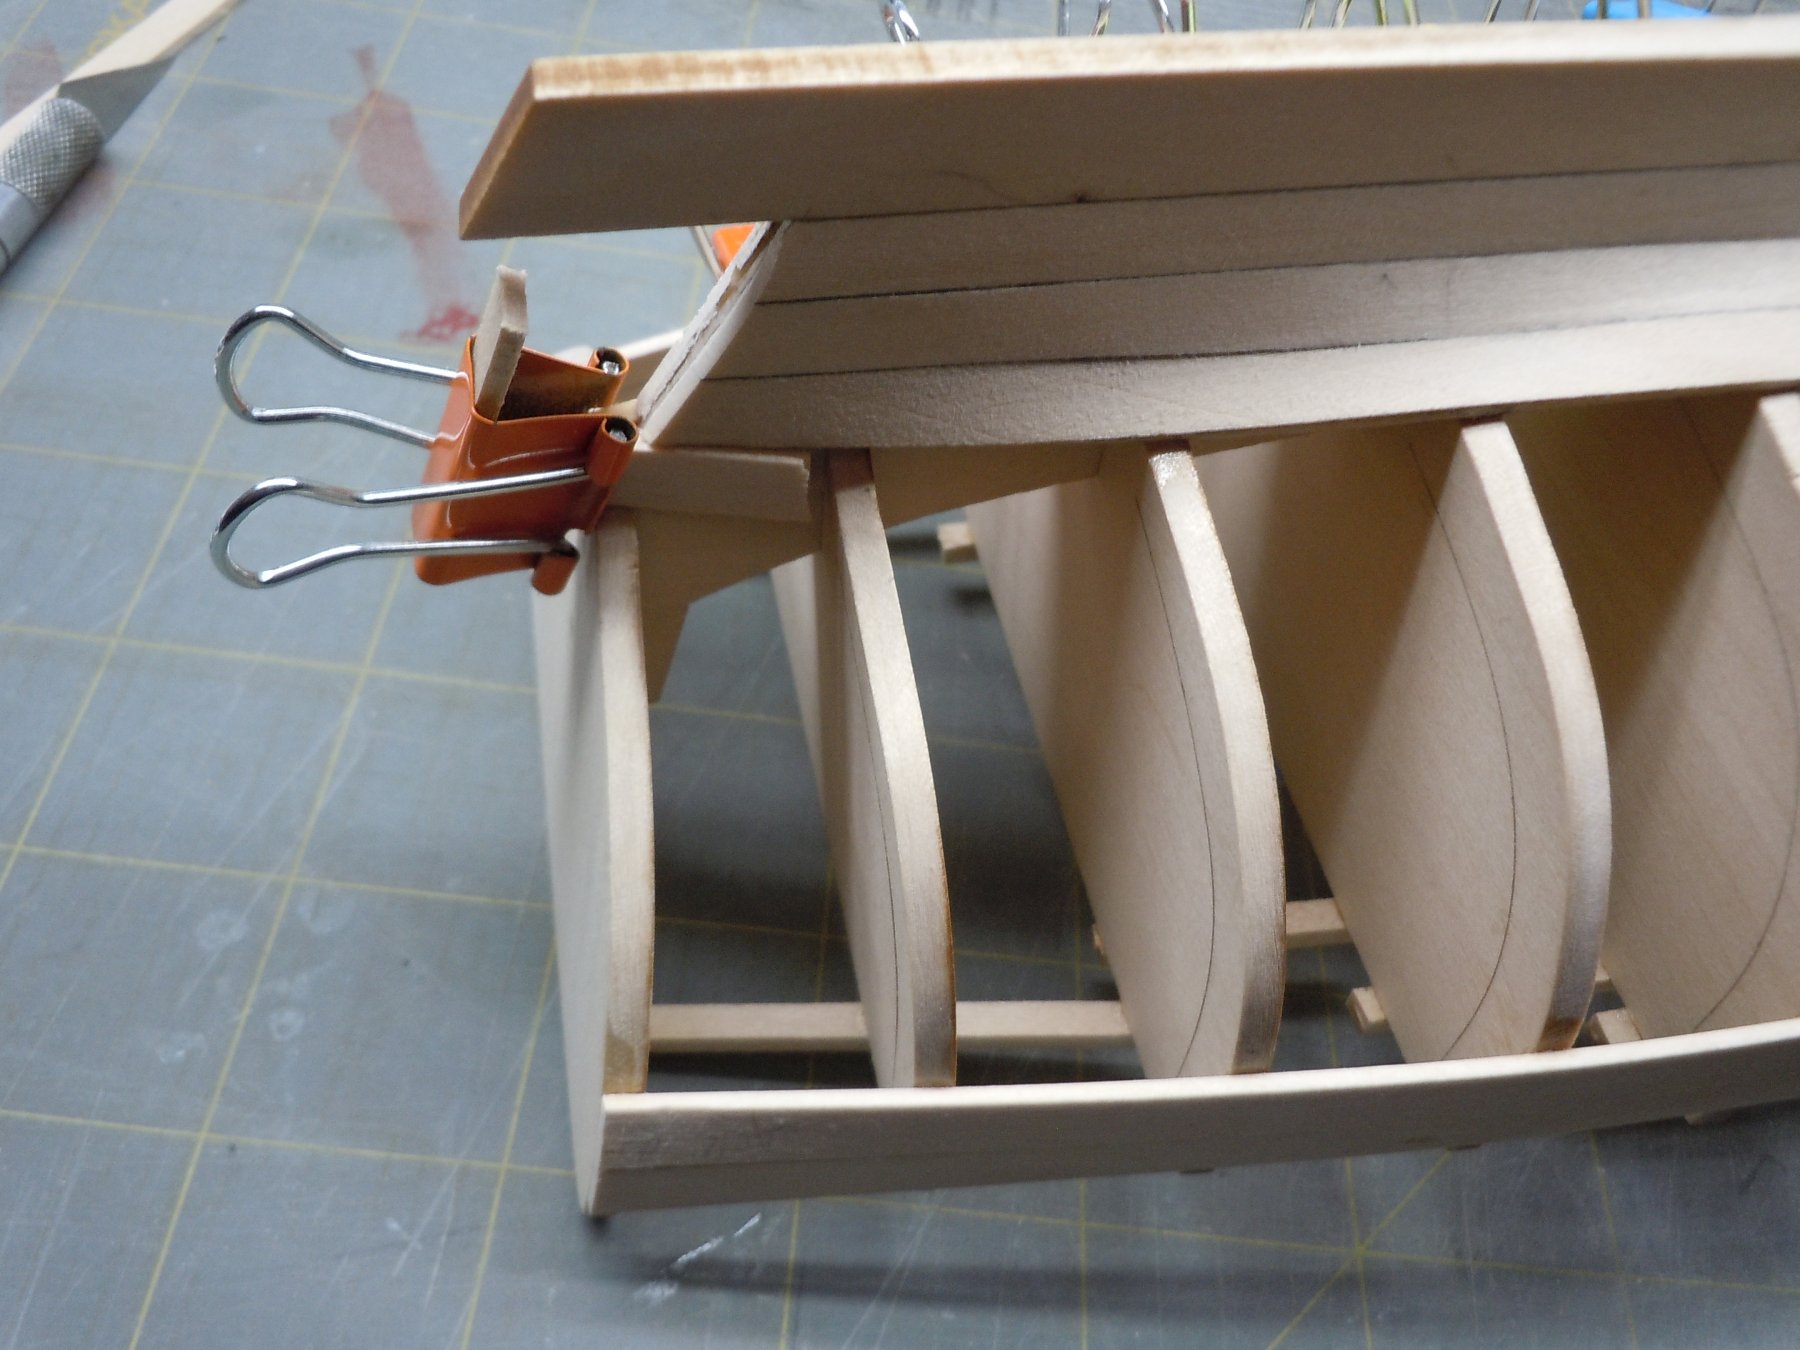
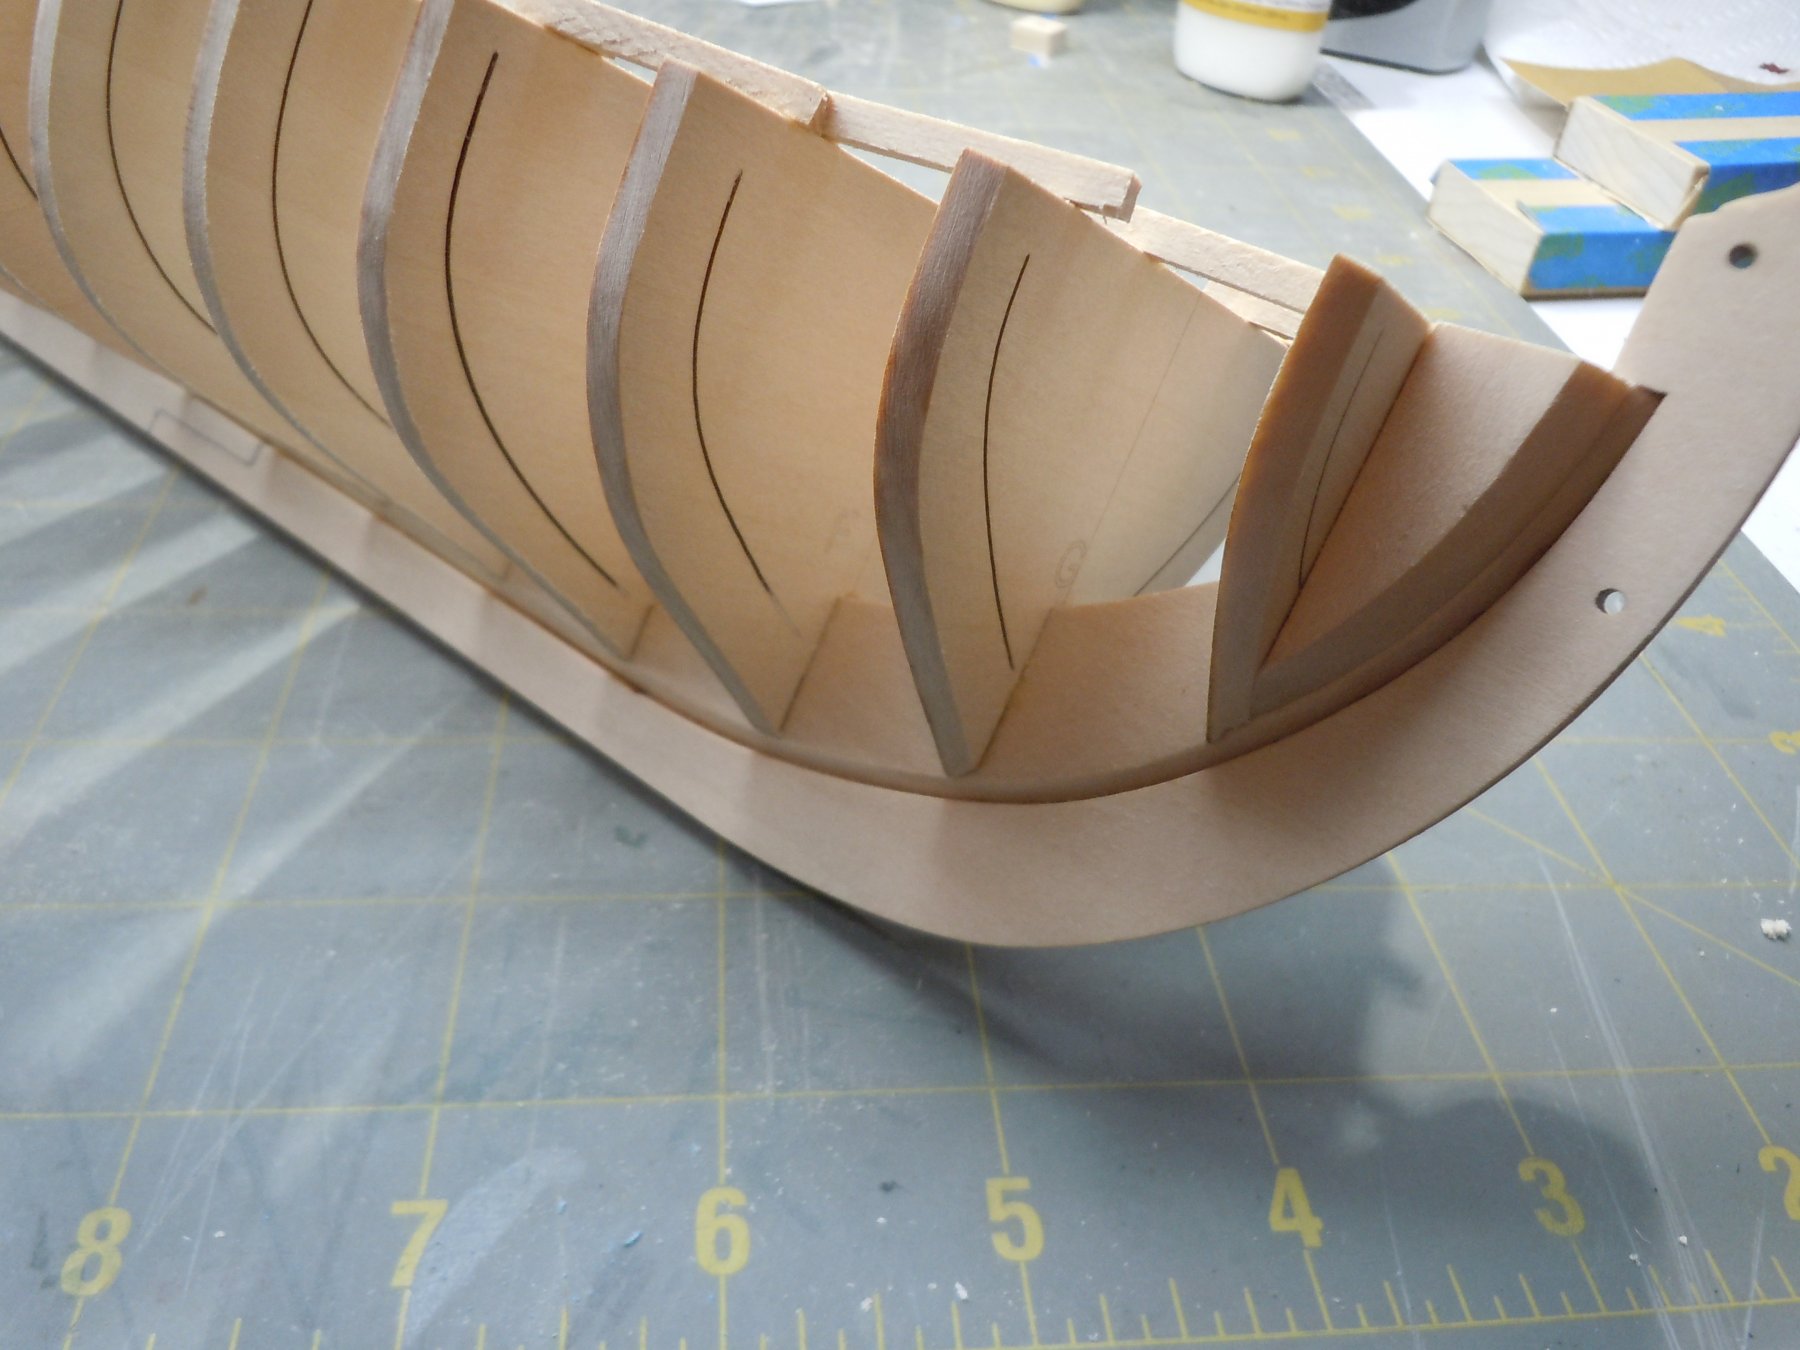
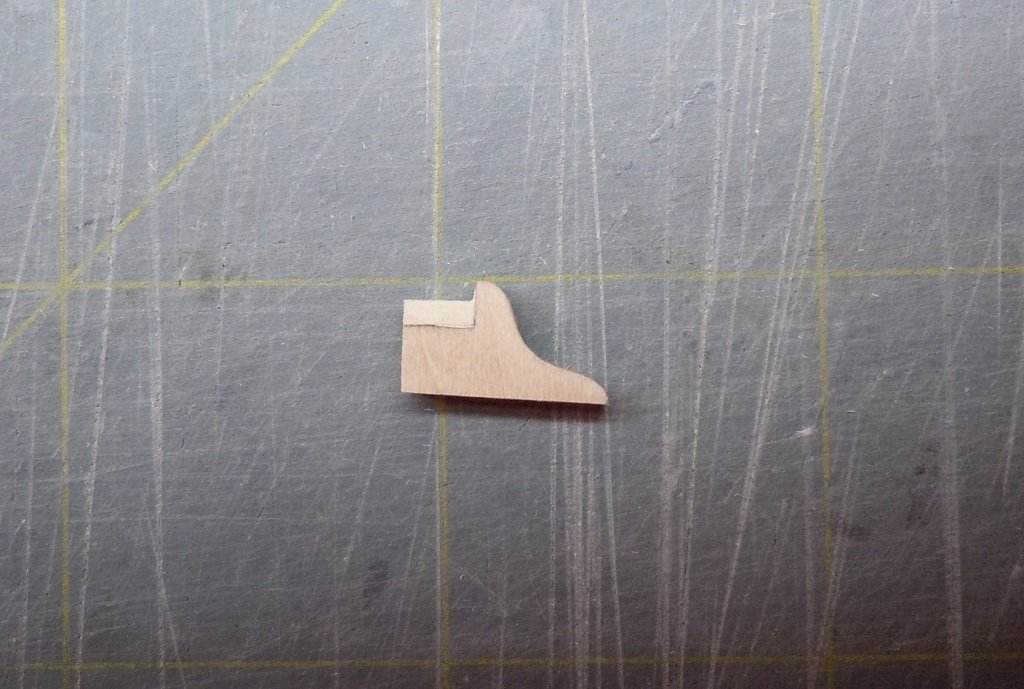
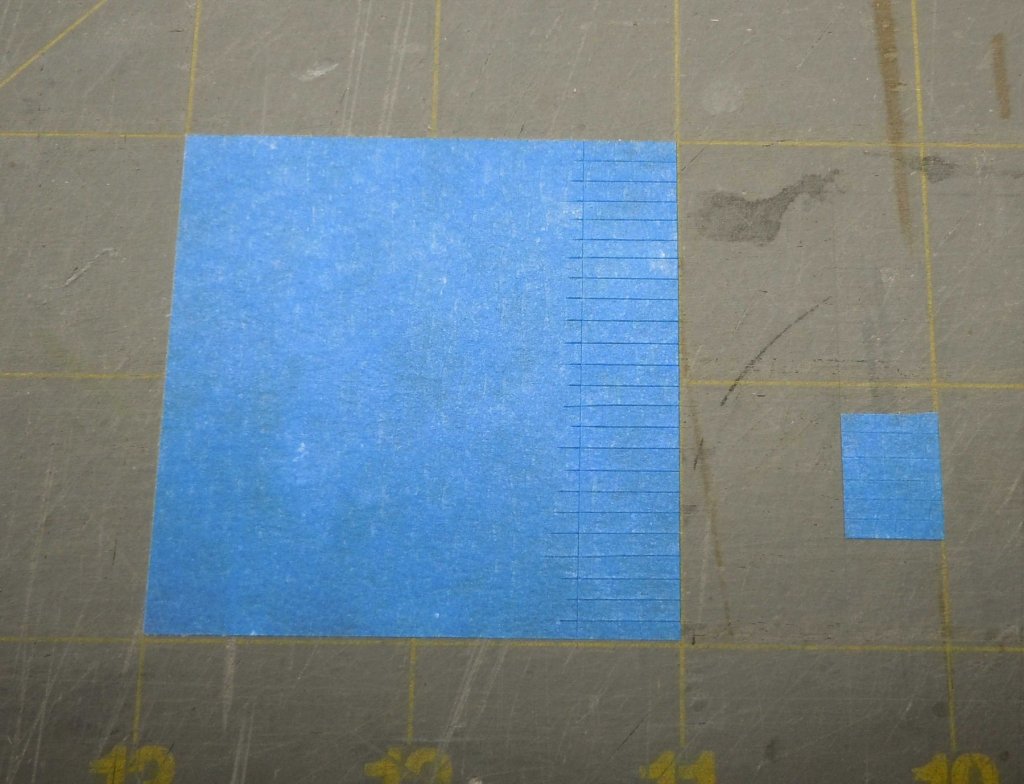
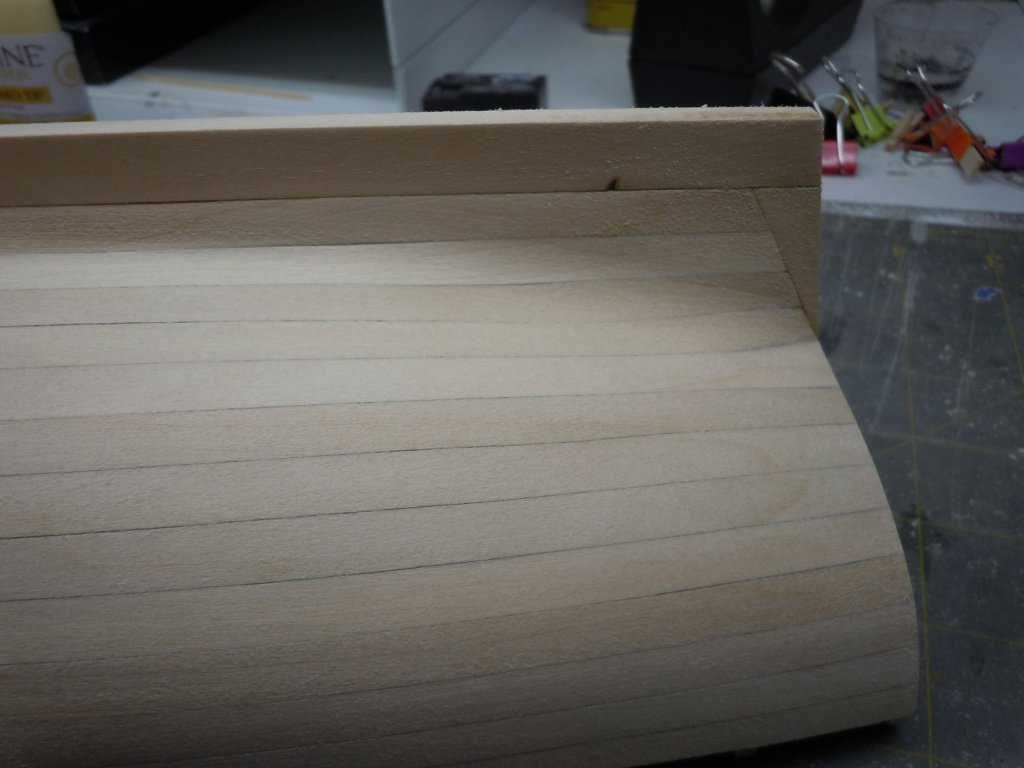
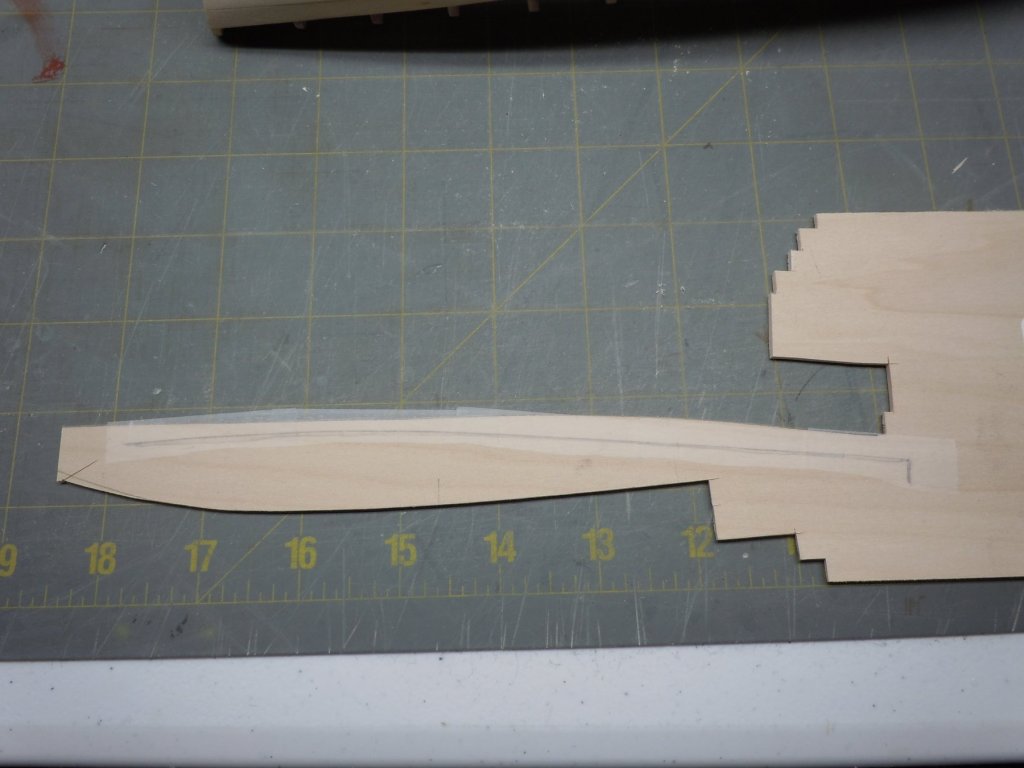
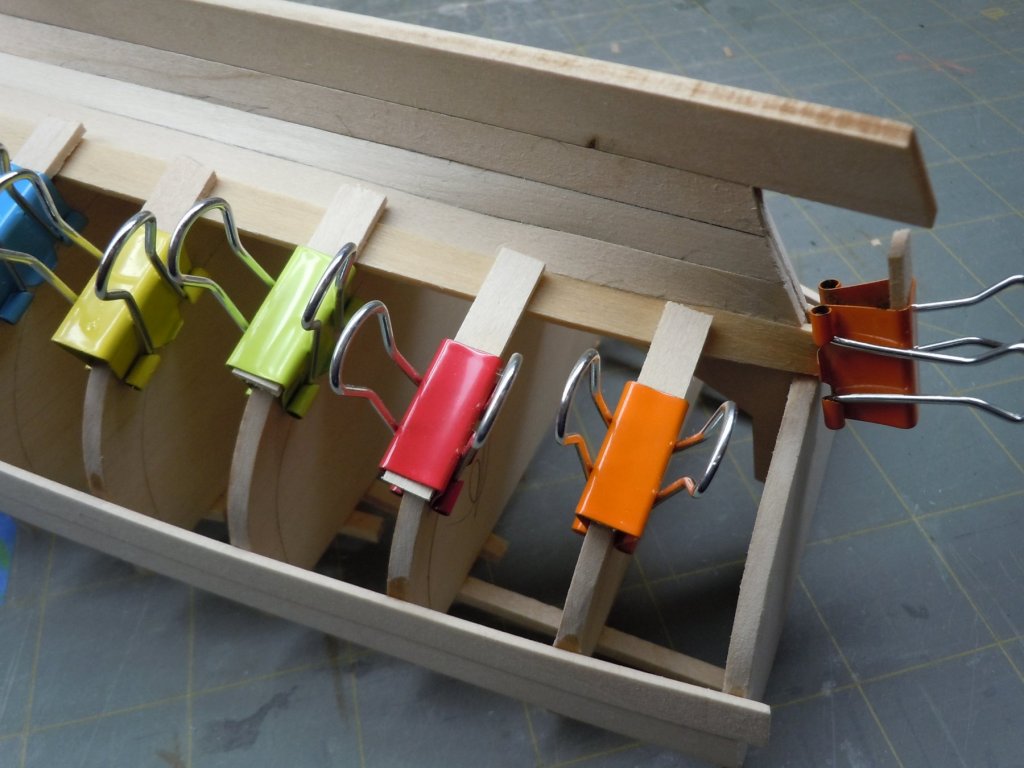
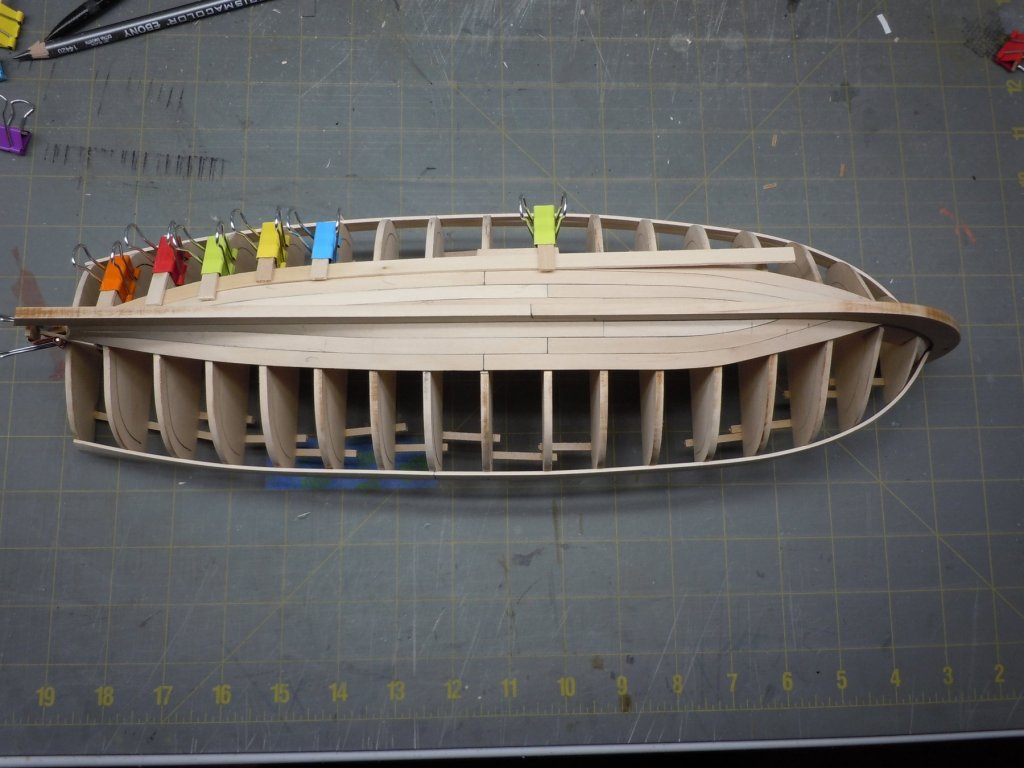
The instructions say that the 4th plank (from the keel) is the "hardest" to form and I dreaded how many attempts I would make. Turns out I learned enough from the first 3 that it wasn't so hard to form. I then started planking down from the top. I think I spiled all of the forward half of this boat's planks, I just can't get the wood to edge bend the way it needs to for this model. I ended up spiling about half of the aft half of the planks as well. For me, it's the path of least resistance. This spiled plank I hope demonstrates how much of an edge bend a straight plank would need, and then it needs to bend in a plane 45 degrees off axis from the edge. I borrowed Chuck Passaro's technique to spile planks using tape. For this model frosted scotch tape was laid on the mating plank as flat as possible in short pieces. Some planks required many short pieces of tape to ensure they laid flat while others could use longer pieces. The goal is for the tape to lay perfectly flat on the mating plank. Halfway through the build I realized I could put a few witness marks on the installed plank, and transpose those to the tape. This really helped when shaping the ends of the plank at the bow. I then ran a pencil on the edge of the mating plank. The tape was carefully pulled off the model and laid on sheet wood. My technique was to fix the end of the tape and then lower the tape so that it laid flat. I would then press the tape down being careful not to smudge the pencil line. With the top edge of the plank cut I used a simple compass I made from scrap wood so that I could draw a line 1/4" parallel with the cut edge. As you can see I waste a lot of wood, but 2 sheets is enough to plank this entire boat and they sell for $3.59 a sheet so for a few bucks I'm all for making my past time pleasant. Maybe I should build a miniature wood burning stove, I have enough scrap wood to heat a 1/24 scale house in Alaska all winter long! Finally this photo shows the spiled plank laying on the model with no glue. The slight bend needed at the stern requires minimal pressure to get it to lay flat on the bulkhead.


- 95 replies
-
- 12
-
-
- Model Shipways
- 18th Century Armed Longboat
- (and 1 more)
-
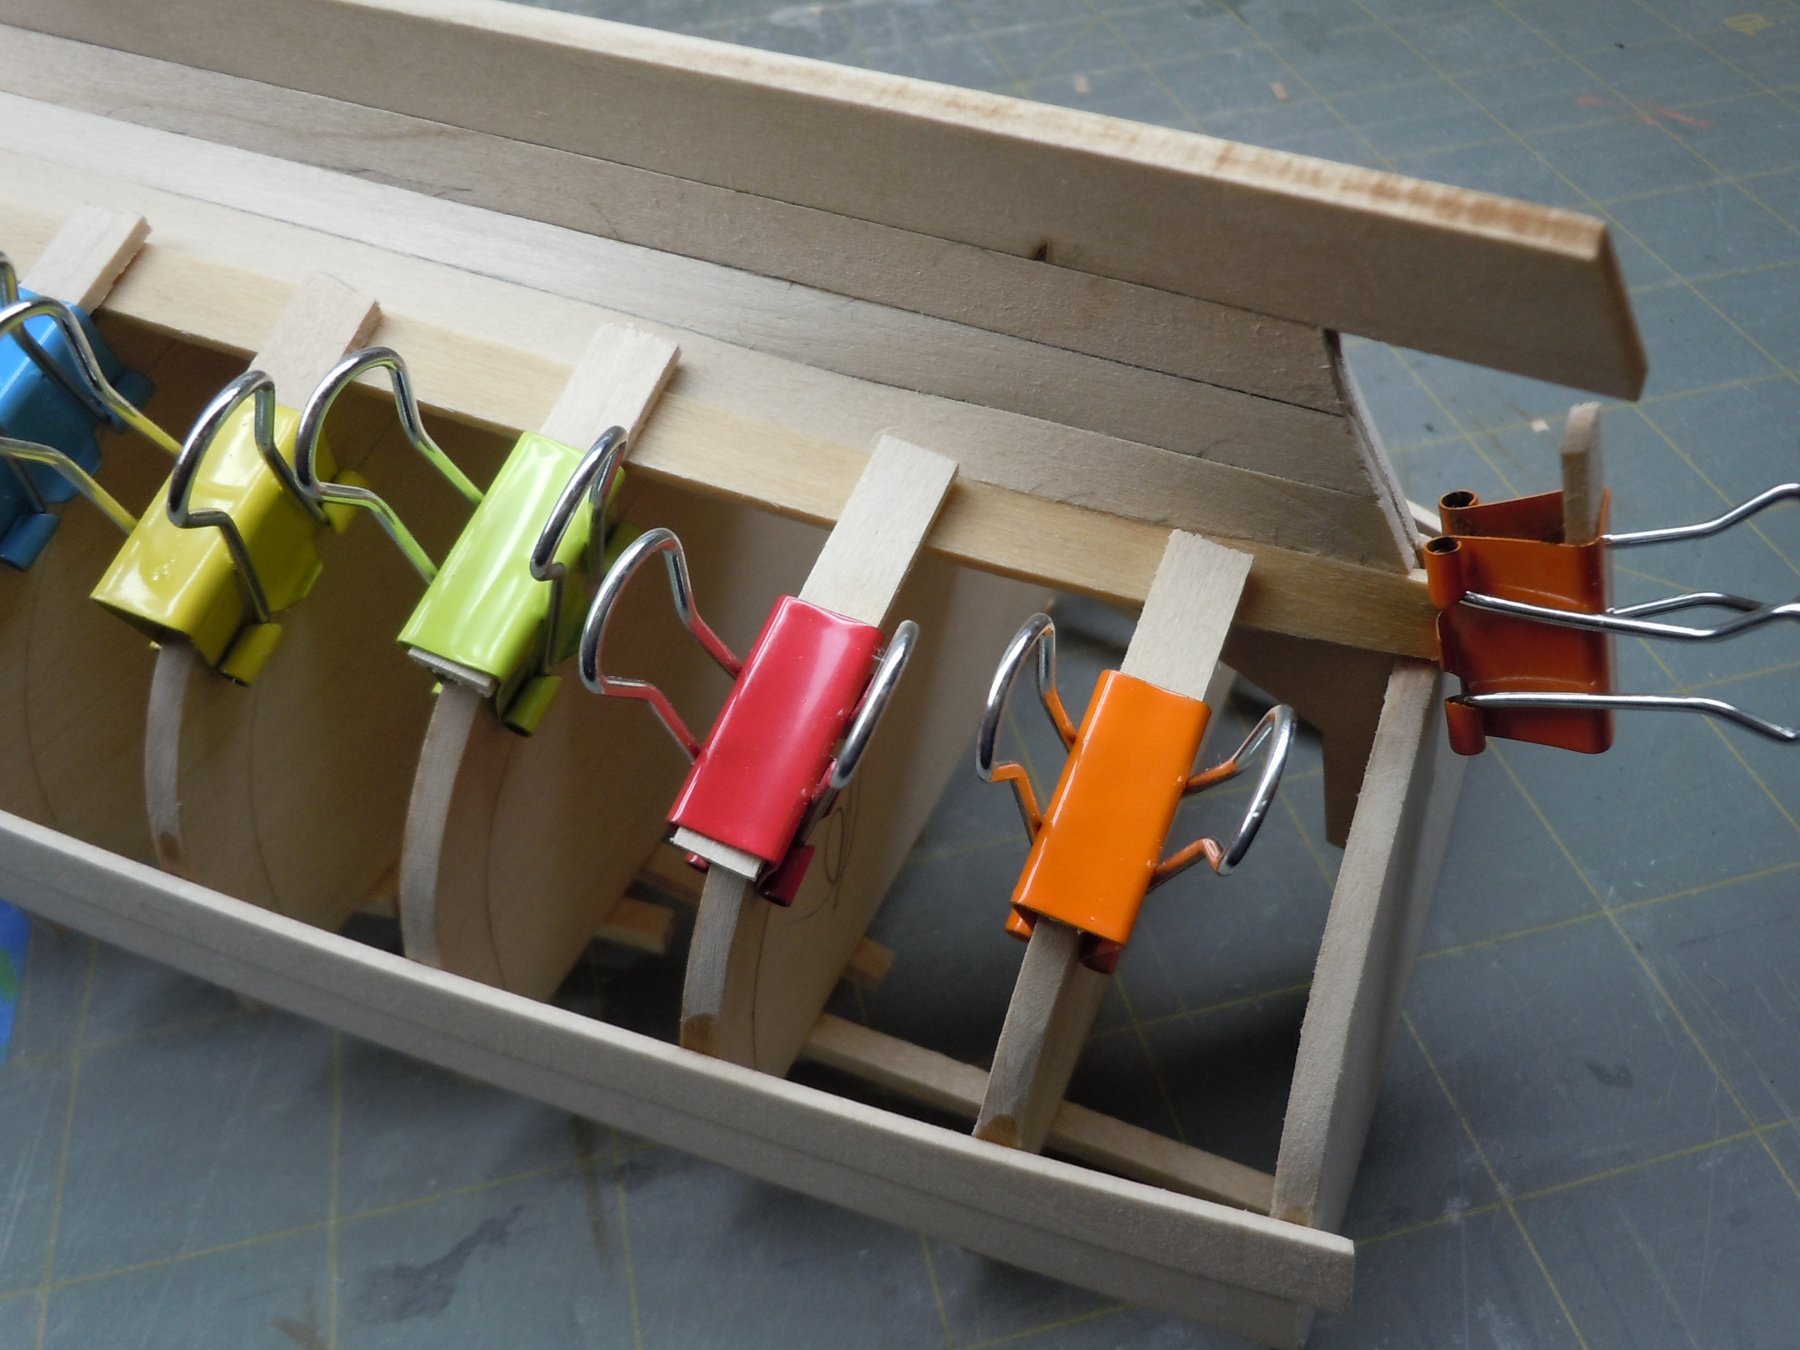
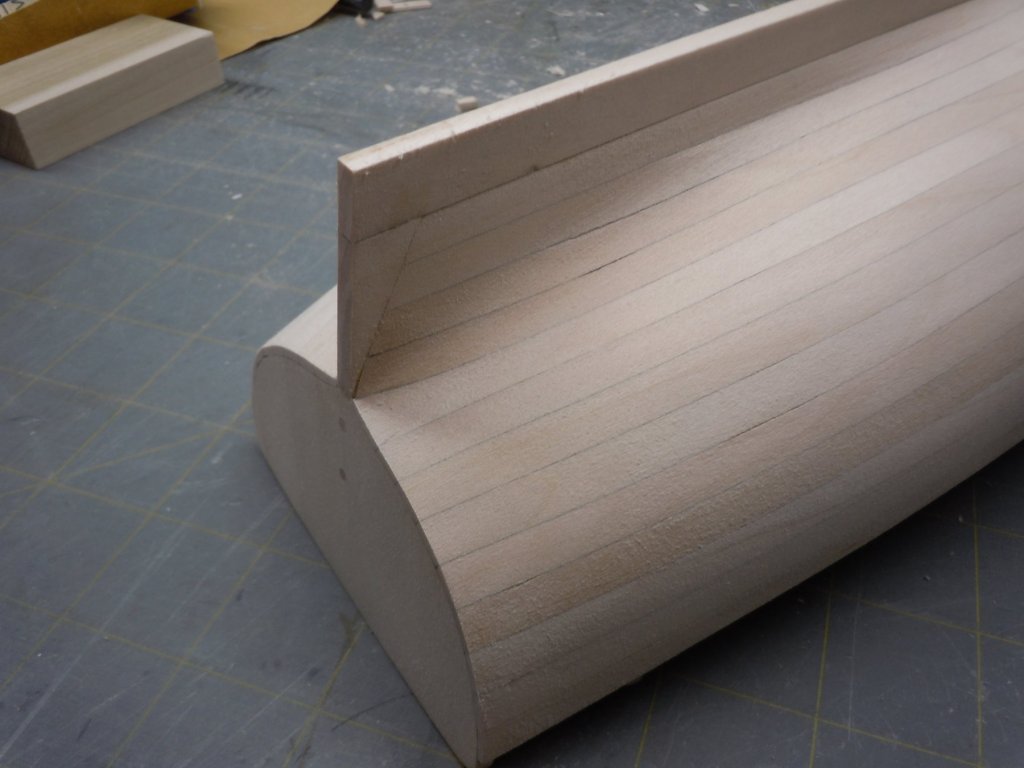
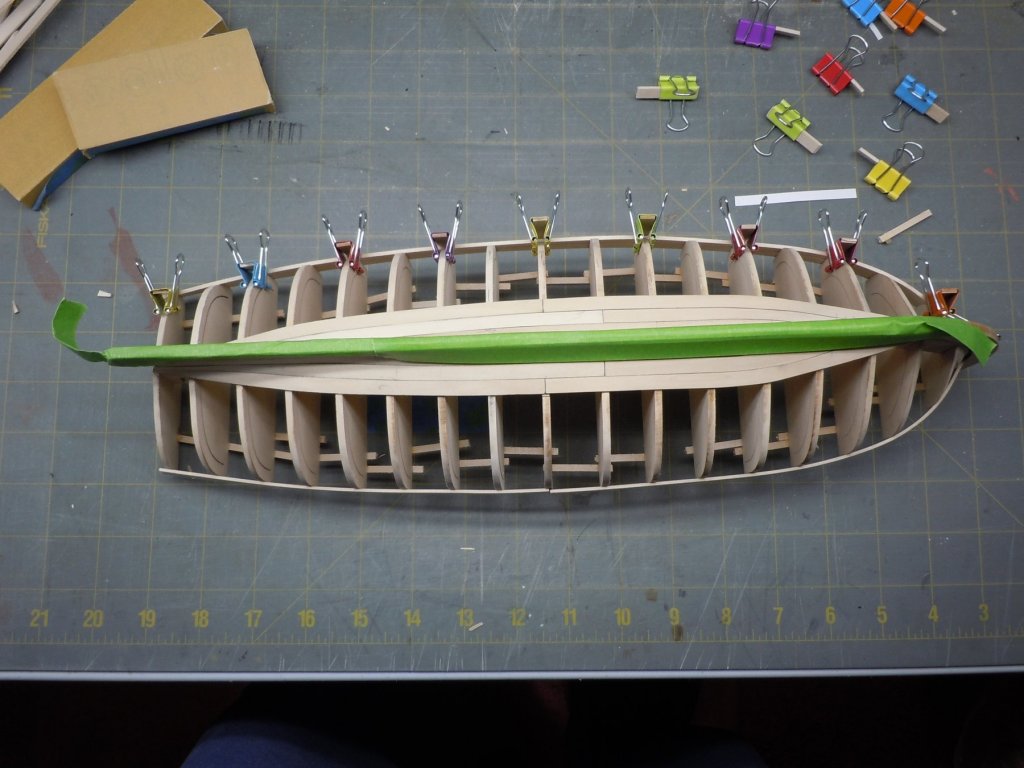
With the bulkheads faired I was ready to start planking. I used medium CA to glue all of the planks. I did find that I had to pretreat the bulkhead edge with a drop of CA because the wood soaks it up so fast the planks will not bond. I let the pretreated bulkhead edges cure for about 1 minute before gluing the planks on. The garboard plank was easy enough to form. The second plank not so much. The curve in the garboard per the instructions requires the next plank to be edge bent to the point basswood will not bend. I tried hot water, boiling water, steam, even an ammonia water mix but that much bend and the wood just collapses. To make life easy, I spiled the forward half of the second plank from a sheet of basswood I had on hand (I ended up buying 3 more sheets at Hobby Lobby). The aft half of the second plank was soaked in hot water, clamped in place and allowed to dry before gluing per the instructions. Also prior to gluing any planks on, I sanded the interior side of the plank with 220 then 400 grit sandpaper and chamfered the mating edge. I also colored the unchamfered edge of each plank with a pure graphite pencil. After the 3rd plank was on I installed the top 2 planks. The instructions would have you install 4 planks first but the 4th plank has a lot of bending at the stern and I wanted the frame to be a bit more rigid before trying to fit this plank. With the top 2 plank installed I added the 4 plank. I threw away my first attempt, clamps and wet wood equal dented wood. I realized that if I let the plank run long, I would use a scrap of plank and a binder clamp to hold the plank in place while it dried without denting the wood that will be on the model. I also spiled the forward half of this plank run from my sheet wood stash. I became very familiar with the forward half of the 3rd and 4th planks because later in the build I tore them out and remade them, a couple of times! LOL

- 95 replies
-
- 6
-
-
- Model Shipways
- 18th Century Armed Longboat
- (and 1 more)
-
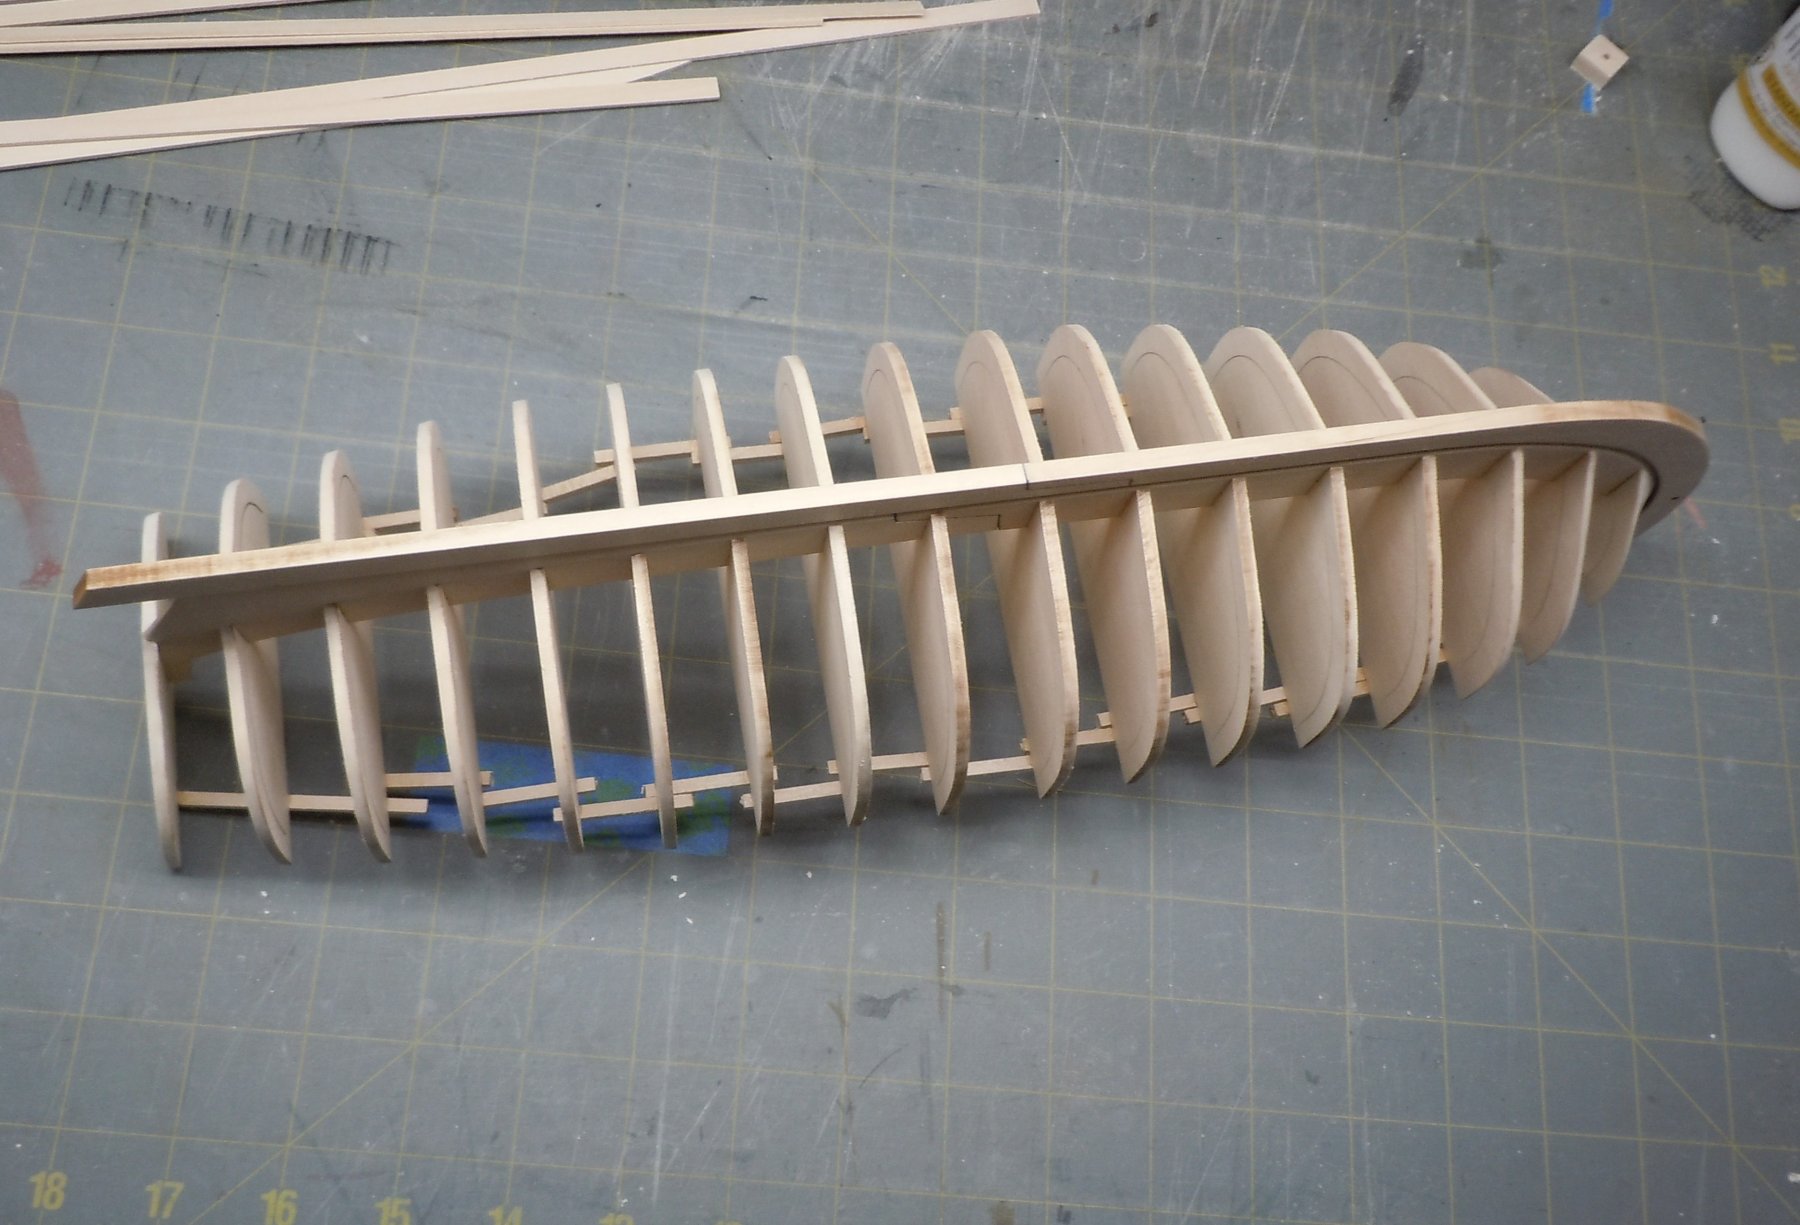
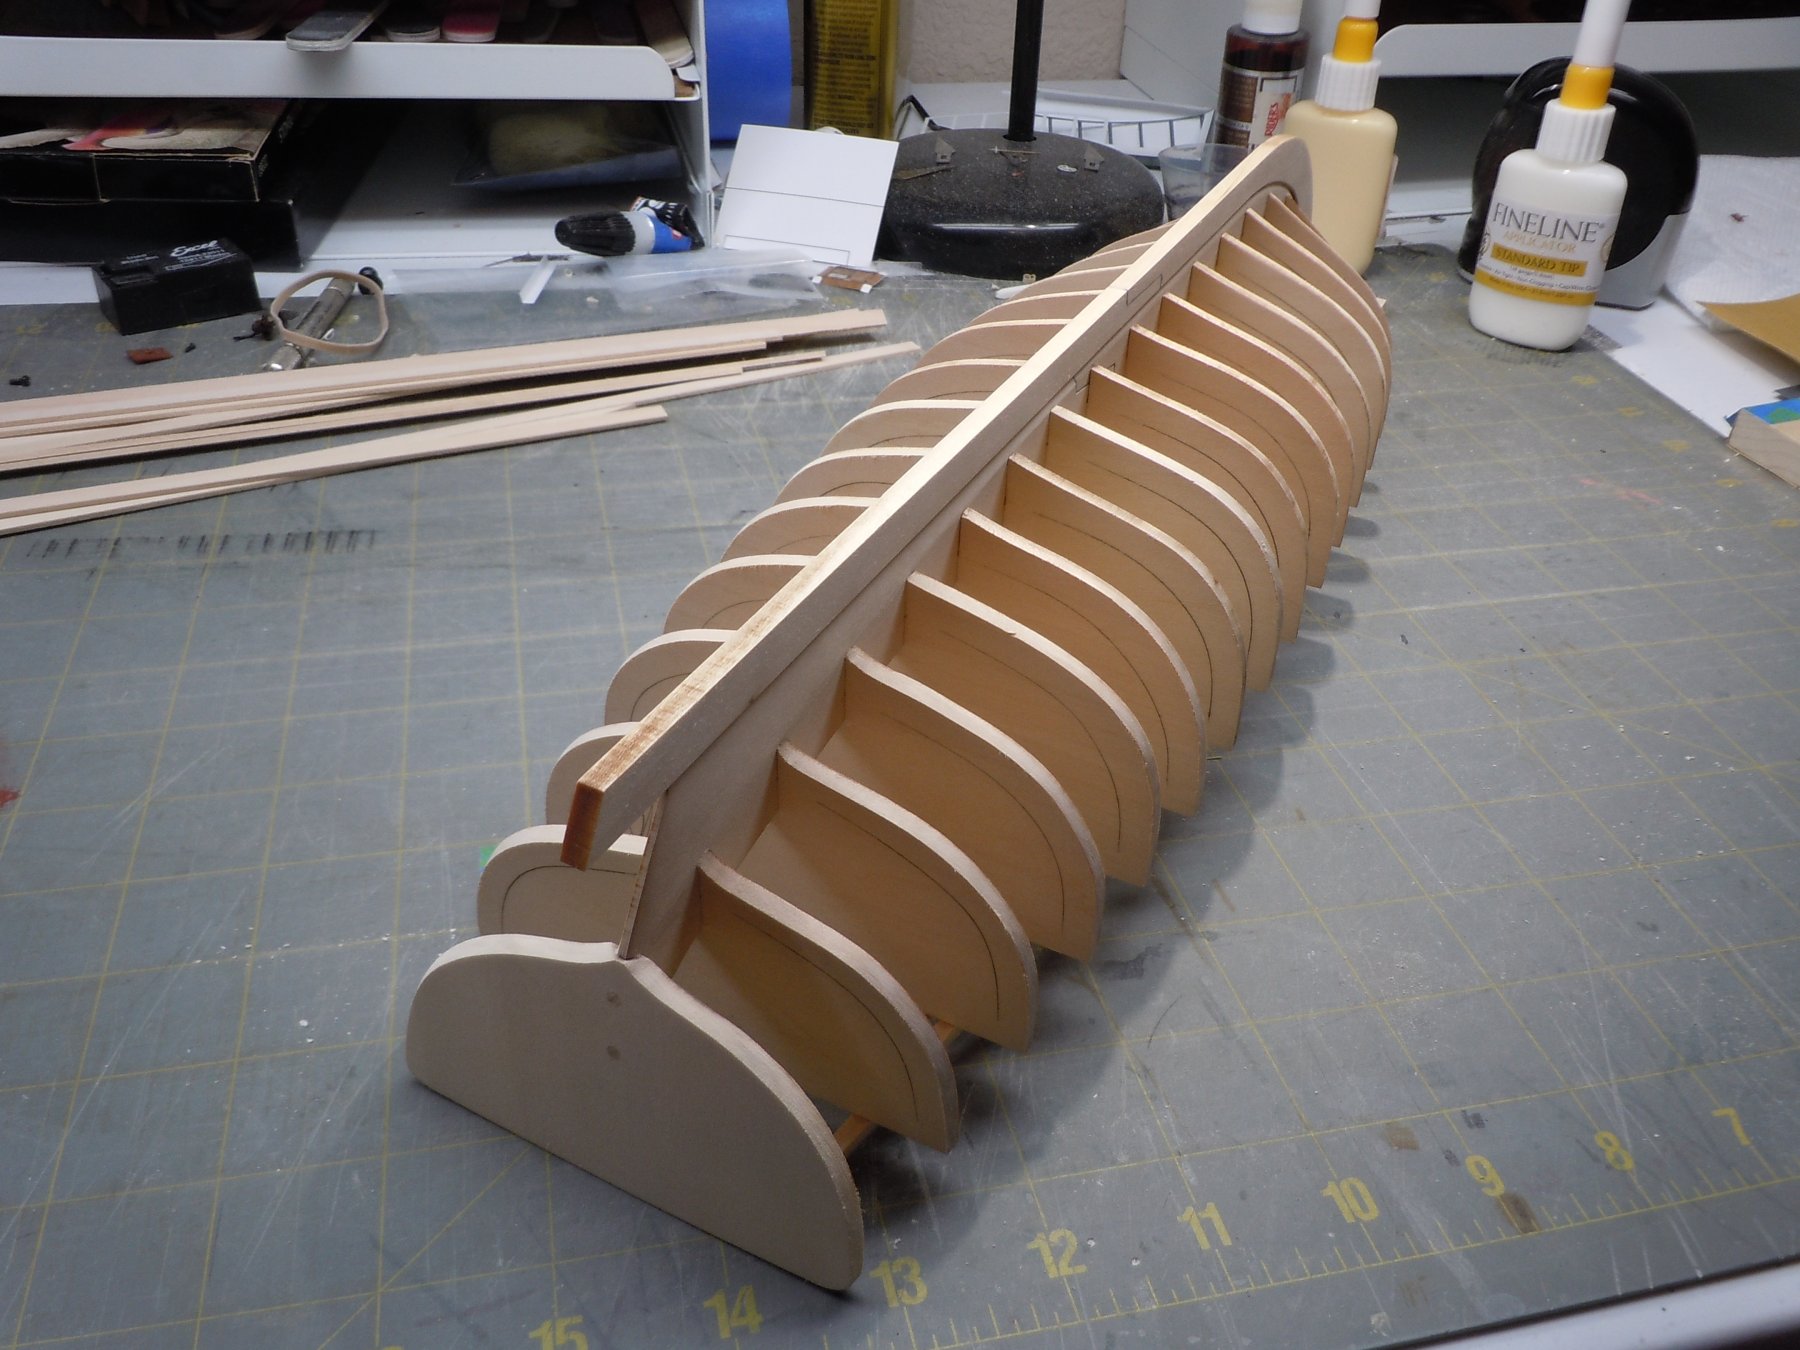
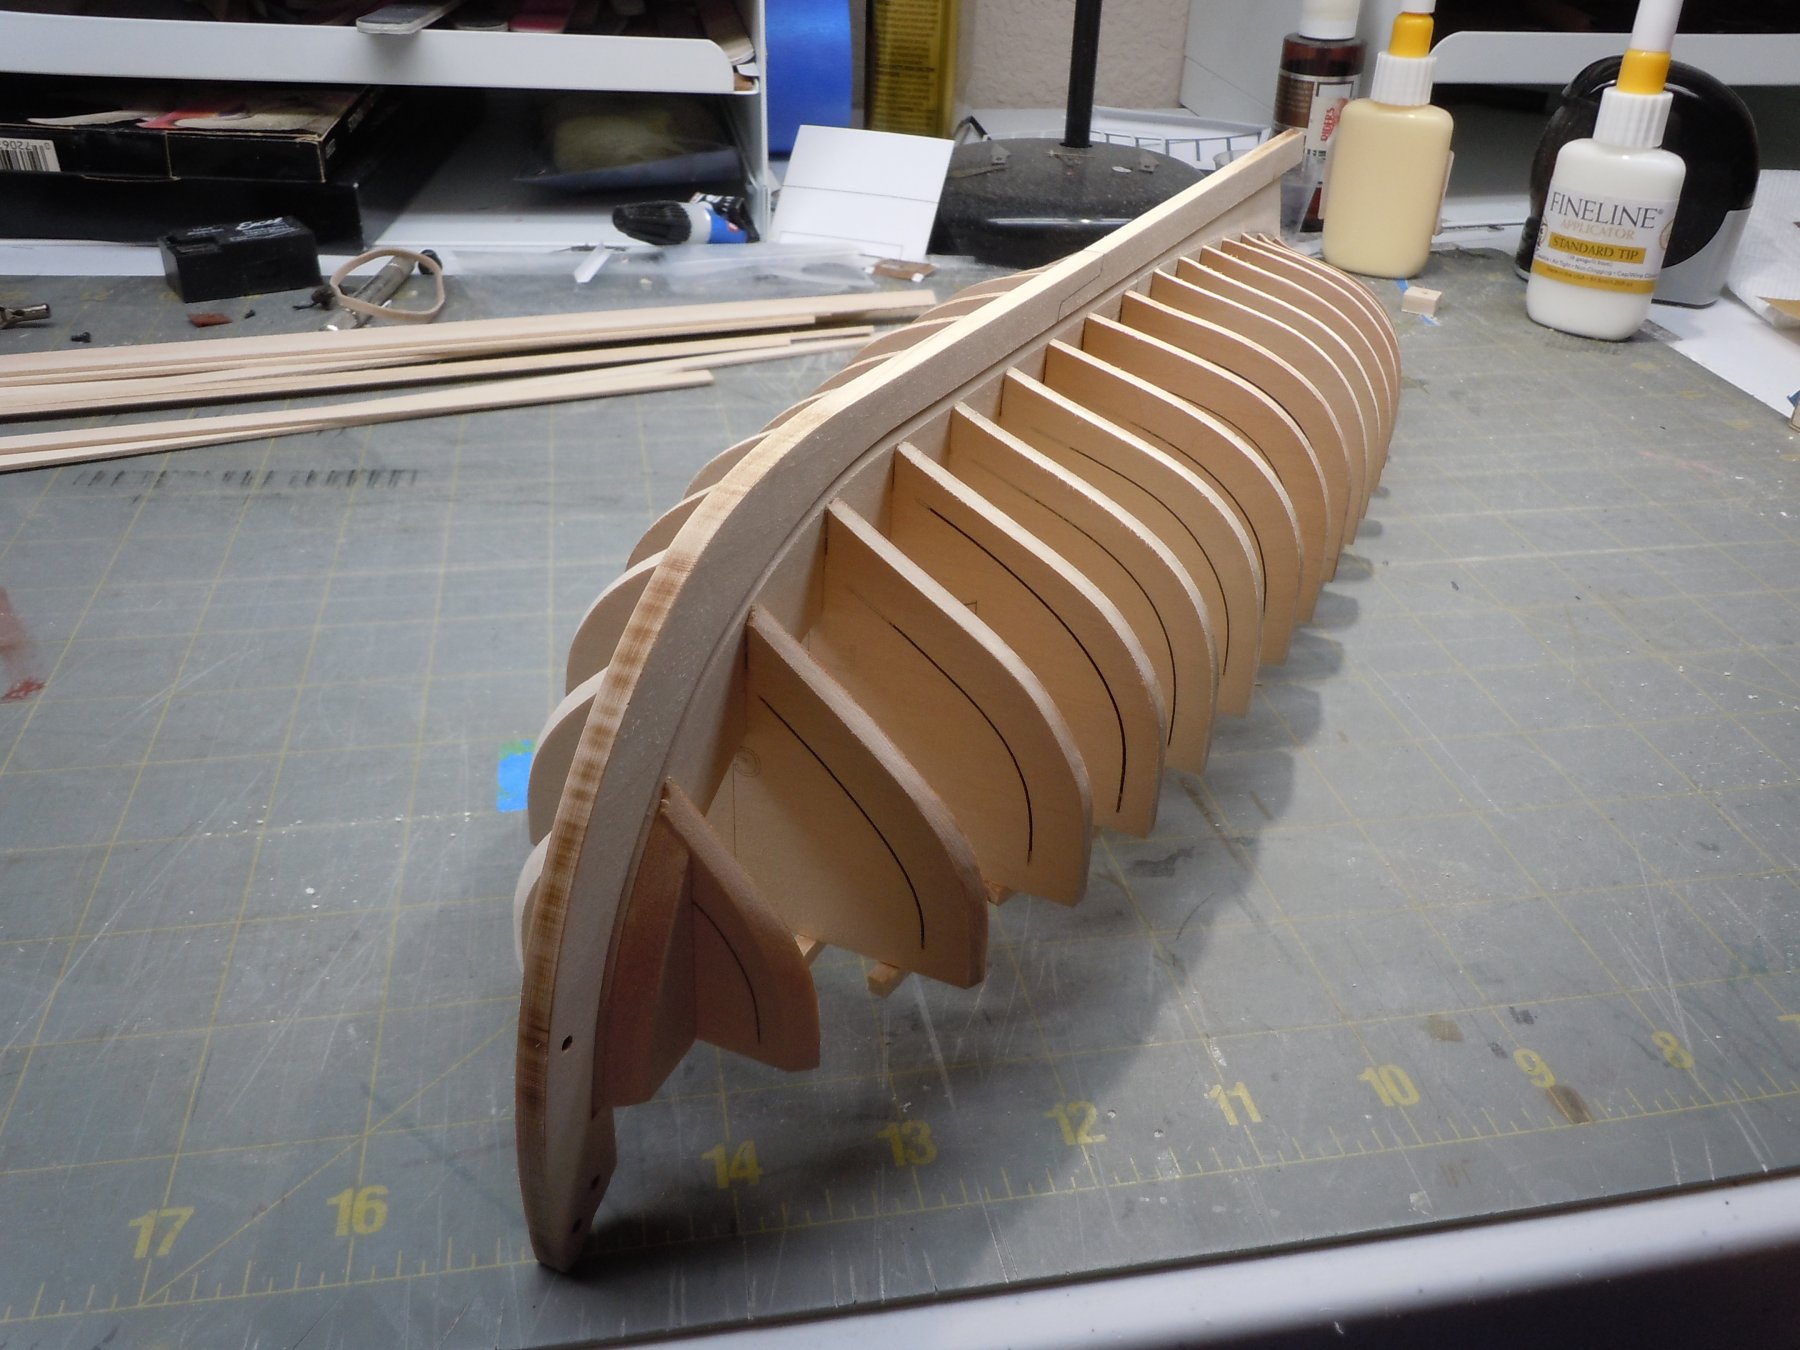
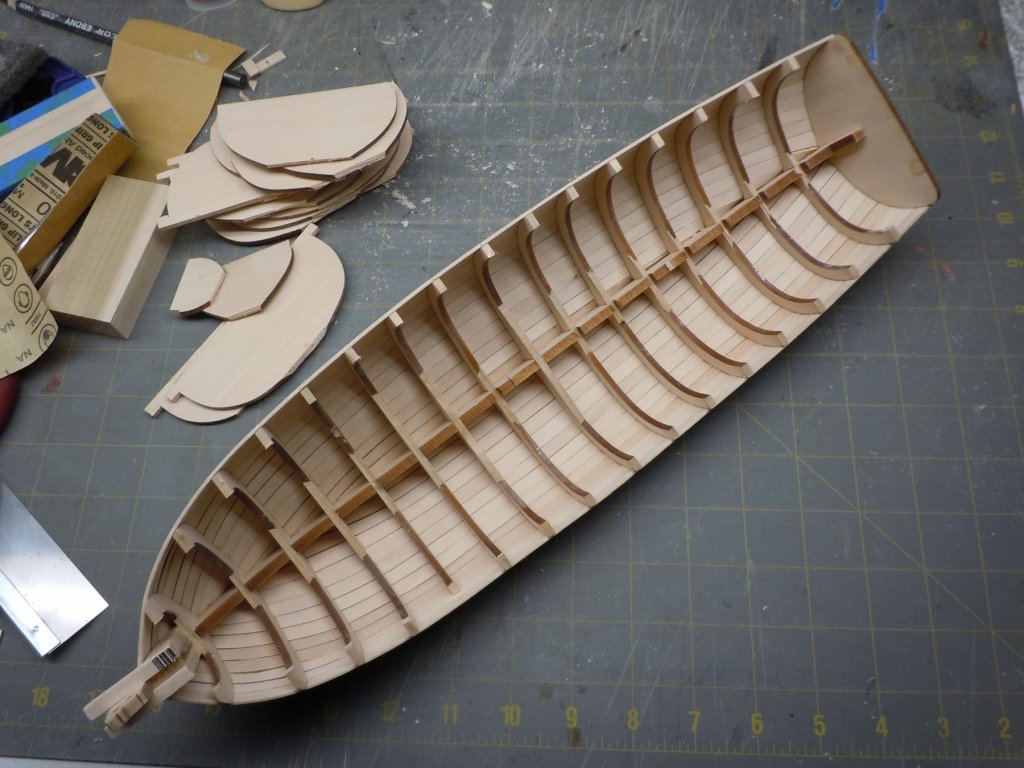
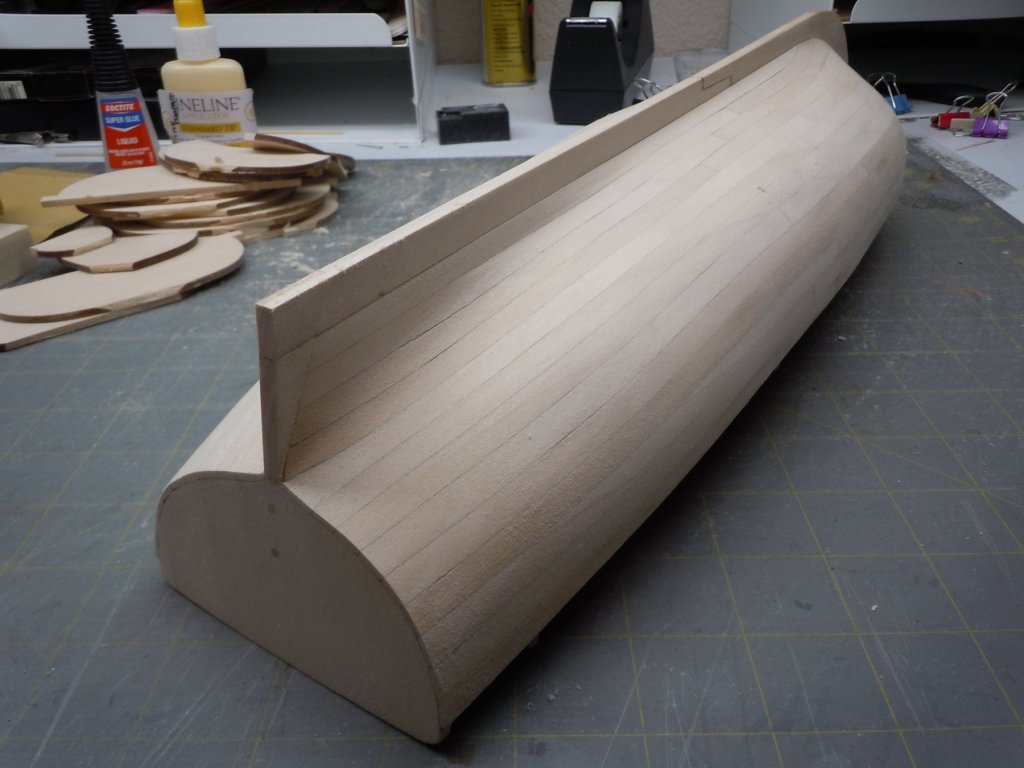
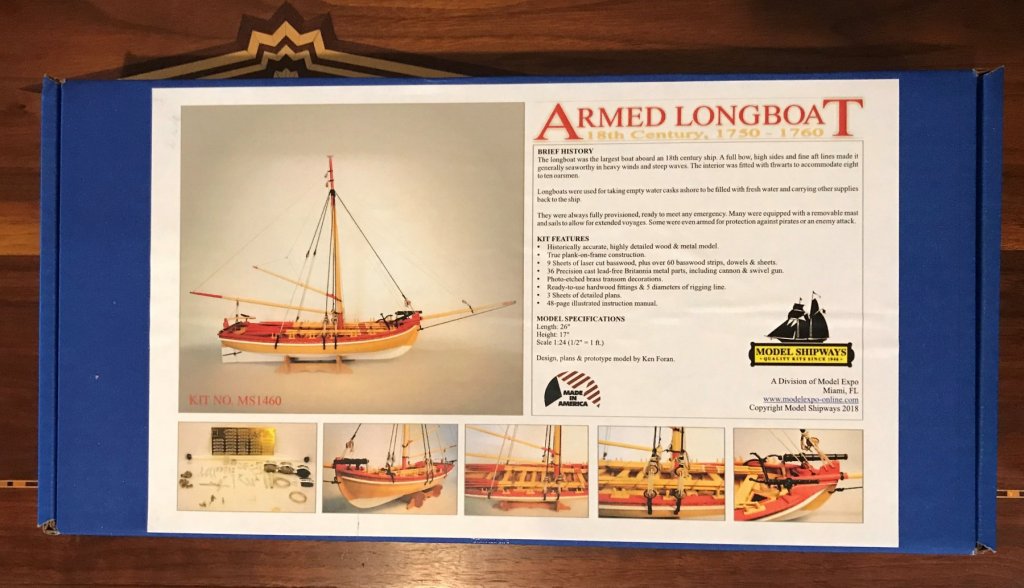
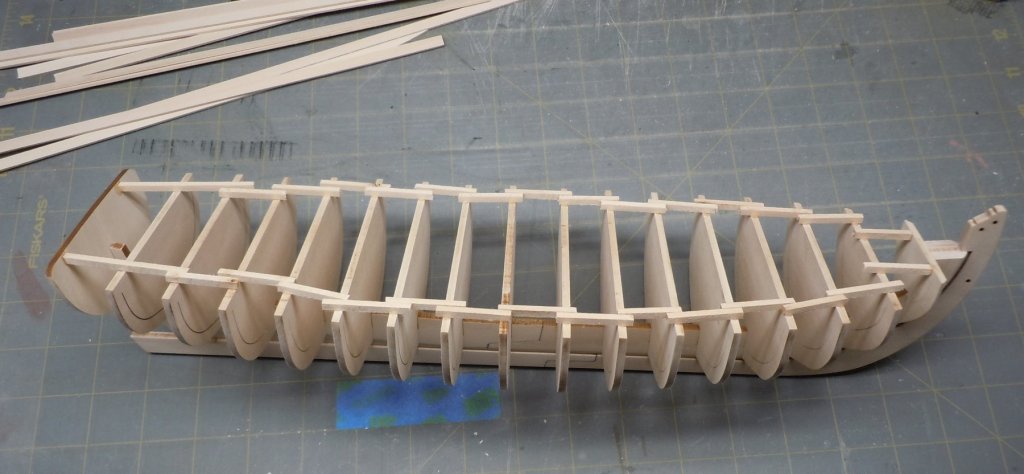
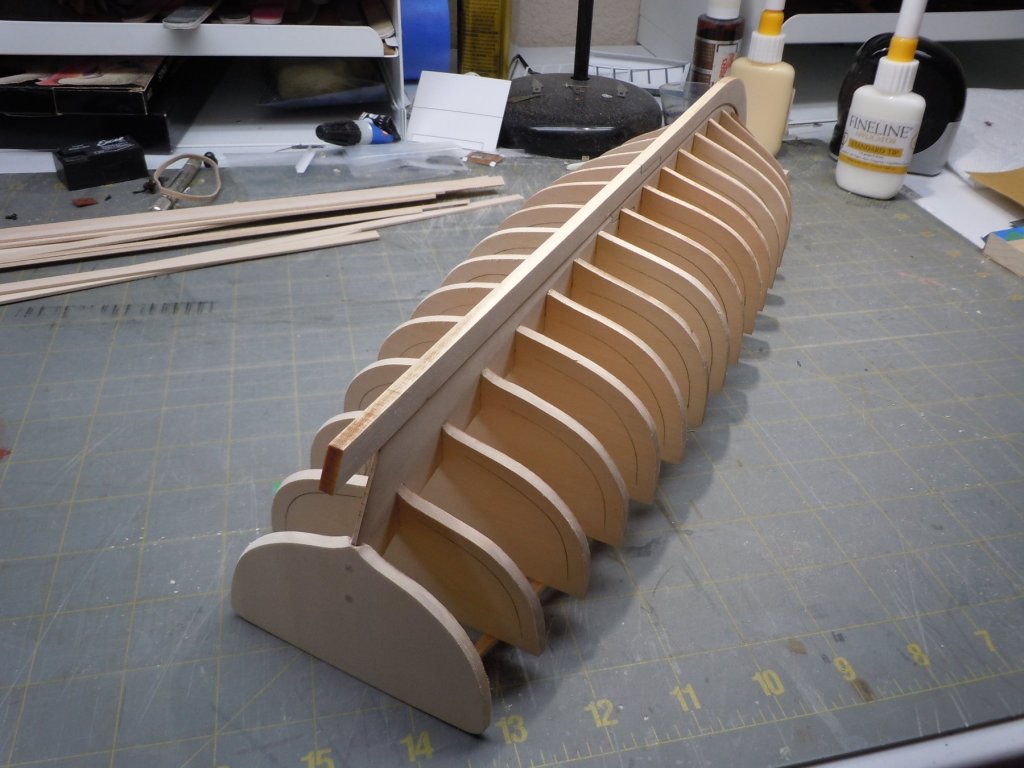
I've been working on this kit for a little over a month now. I delayed posting a build log until now, I wanted to make enough progress to be certain I wouldn't be creating yet another unfinished build log. I'm in the military and will be changing duty stations later this year so I'm hoping to complete this build before move day arrives. This is my second model ship (I guess this is technically a boat). My first kit was the Artesania Latina Bluenose 2, which I built back in the mid 90's. I got to the 90% finished stage however I used several coats of very glossy polyurethane on the hull and deck and then realized I hated how it looked. I ended up giving it away to a friend. I'll get my build log caught up in a number of posts. First the obligatory box photo of the kit: I read through the manual numerous times to ensure I understood each step of the build. The manual is somewhat lacking and a few extra photos of some critical areas would have been nice. Also there is some vague verbiage which I will cover in later posts. Unfortunately the plans are not to scale, they seem to be a 101-102% enlargement. So far from what I can see, they aren't actually needed for the build but I do find it odd that they aren't scaled to the kit. Aside from these issues, I think this a pretty good quality kit, neatly packed and nothing damaged or missing. After shaping the rabbit and beard line, I installed the bulkheads. I did have to adjust several that sat too high or low so that they would meet the rabbit. I deviated from the kit by omitting the supplied strong back which is glued down the center. I chose to use 1/8 square basswood in segments so as not to pull the bulkheads out of plum. This also prevented all but 1 of the bulkheads from splitting during the build and kept everything plum while it was planked. If I could go back and do this over, I would have drawn a light pencil line connecting the bottom of the bulkhead cutouts on the sides of the false keel, this material is removed after the hull is planked. A pencil line would have made a handy guide when cutting the false keel down. If you build this kit, make sure the joint between each former and the side of false keel is securely glued, when the inside of each bulkhead is removed and the false keel is cutdown the resulting bulkheads are just a butt joint against the false keel. Finally I did cheat and only tack glued the keel to the false keel with gel CA which is easy to break free without splintering the wood. This will allow the planking at the bow to be sanded easily giving a nice tight fit when the keel is glued back on. I faired the bulkheads with 180 grit finishing with 220 grit sanding blocks I made for this build. I also made various length blocks for up to 400 grit sandpaper. Despite my best efforts, bulkhead 4 still ended up sitting a bit too proud (with the hull upside down). There is a small knot in the keel near the stern. Since I originally planned to paint the lower hull it didn't concern me but now I have decided not to paint the lower hull so that knot is going bug me till the end of my days. I also dowel pinned the transom to the keel because it seemed a likely candidate to be knocked off. Since the transom will be painted the dowels will never be seen. It was cheap insurance, the transom stayed put all the way through planking.


- 95 replies
-
- 5
-
-
- Model Shipways
- 18th Century Armed Longboat
- (and 1 more)