TK1
-
Posts
61 -
Joined
-
Last visited


-
 Great instructions Chuck, thanks. Just found some of this dye available locally. Do you use it with timbers or any other material apart from resin in your builds? I noted it's a leather dye, but keen to see how it works on some wood for effects. My capstan is on the way too, looking forward to getting started. Darren
 -
 TK1 reacted to a post in a topic:
Double Capstan Project by shauer - Portland Scale Ship Co Kit
TK1 reacted to a post in a topic:
Double Capstan Project by shauer - Portland Scale Ship Co Kit
-
TK1 reacted to a post in a topic:
Double Capstan Project by shauer - Portland Scale Ship Co Kit
-
TK1 reacted to a post in a topic:
Double Capstan Project by shauer - Portland Scale Ship Co Kit
-
TK1 reacted to a post in a topic:
Double Capstan Project by shauer - Portland Scale Ship Co Kit
-
TK1 reacted to a post in a topic:
Best way to finish wood?
-
TK1 reacted to a post in a topic:
Best way to finish wood?
-
TK1 reacted to a post in a topic:
Best way to finish wood?
-
TK1 reacted to a post in a topic:
Best way to finish wood?
-
robert952 reacted to a post in a topic:
Best way to finish wood?
-
Ryland Craze reacted to a post in a topic:
Chucks Prototype Double Capstan (3D print and laser cutting group)
-
Jack12477 reacted to a post in a topic:
Chucks Prototype Double Capstan (3D print and laser cutting group)
-
scrubbyj427 reacted to a post in a topic:
Chucks Prototype Double Capstan (3D print and laser cutting group)
-
Hi, I'm getting more into scratchbuilding, and modifying kits. One thing I see in great builds here and elsewhere, is very precisely milled and finished woods - whether for planking, decking, or fittings. I know there's a difference in quality, and likely therefore finish, between typical mainstream kit woods, and top-end kits/scratch builders. Boxwood, Alaskan Cedar, etc will generally look better than walnut veneers. limewood, etc. But I see such polished and precise finishes, so keen to know if this is in the milling, and/or how it's finished. Are others using scrapers and planes vs sandpaper, or milling with planes and drum sanders or thicknessers rather than accepting what's bought from suppliers? Is it all in the wood, the milling, the finishing or the finish applied? Or a learned combination? Any insights appreciated! Thanks, Darren
-
Great instructions as always Chuck. I seem to have done this backwards, I bought the kit from Portland Scale Ships after following a banner link on MSW, and then found this group build! So worked out well in the end. The kit has been dispatched with lightning speed, once it arrives Down Under, I'll get into it and add a build log. One initial question from your build, what's the black you used for the base/pillars? Is it a stain or regular paint? Satin? Looks great so keen to do something similar. Thanks, Darren
-
TK1 reacted to a post in a topic:
Chucks Prototype Double Capstan (3D print and laser cutting group)
-
TK1 reacted to a post in a topic:
Chucks Prototype Double Capstan (3D print and laser cutting group)
-
Thanks Chris for the input. Seems ro reinforce what CJ suspected. Would have been early last year i place my last order and it was shipped promptly. Interestingly I've received a lot of promotion, specials, and "pre-order now!" emails in the last few months. Hopefully other's aren't in the same situation with silence after making payments.
-
Can't help with a definite answer, but I'll try to give them a call as I was about to place an order, and have a credit for something they couldn't supply. I'm still getting emails for specials, "something left in your cart", pre-orders, etc as of yesterday 14th January, and haven't seen anything untoward. But I did just click on their "About Us - Our Story" page and it gave me a 404 - Page Not Found error, so maybe something is up, a change of ownership or similar. Interestingly, Modelers Central and Modelers Shipyard are both still linked to the Model Ship Building College in Glenbrook, the entity that took over the business form the original owner in Nowra. But there's a more recent entry for Modelers Shipyard registered in WA. So maybe changed hands? Also it looks like just about everything is listed as "Pre Order" with only a handful of kits in stock. Interesting... Will have to wait and see I guess, but I'll certainly try to get in touch with them before placing an order (and report back if I learn anything). Darren
-
This looks great, and reminded me I need a whaleboat kit. I'm terrible with imperial conversions, so is 1' = 3" equal to 1/36 scale? Thanks, Darren
-
Canute reacted to a post in a topic:
Tool Organizer
-
mtaylor reacted to a post in a topic:
Tool Organizer
-
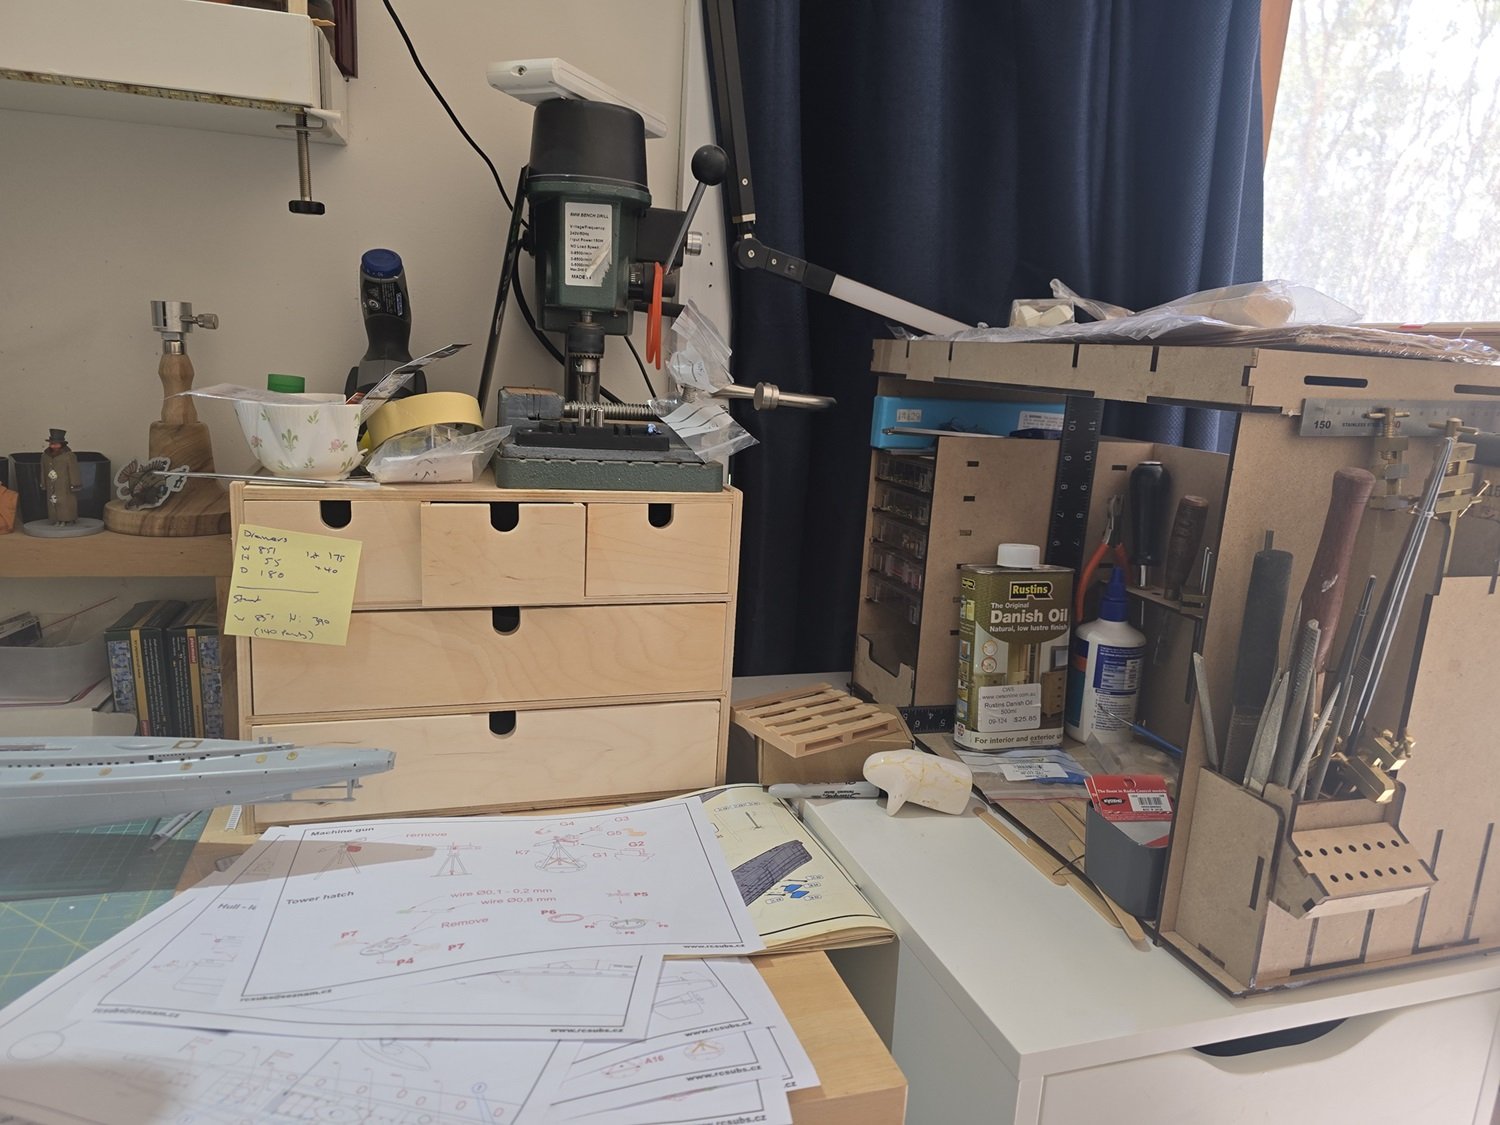
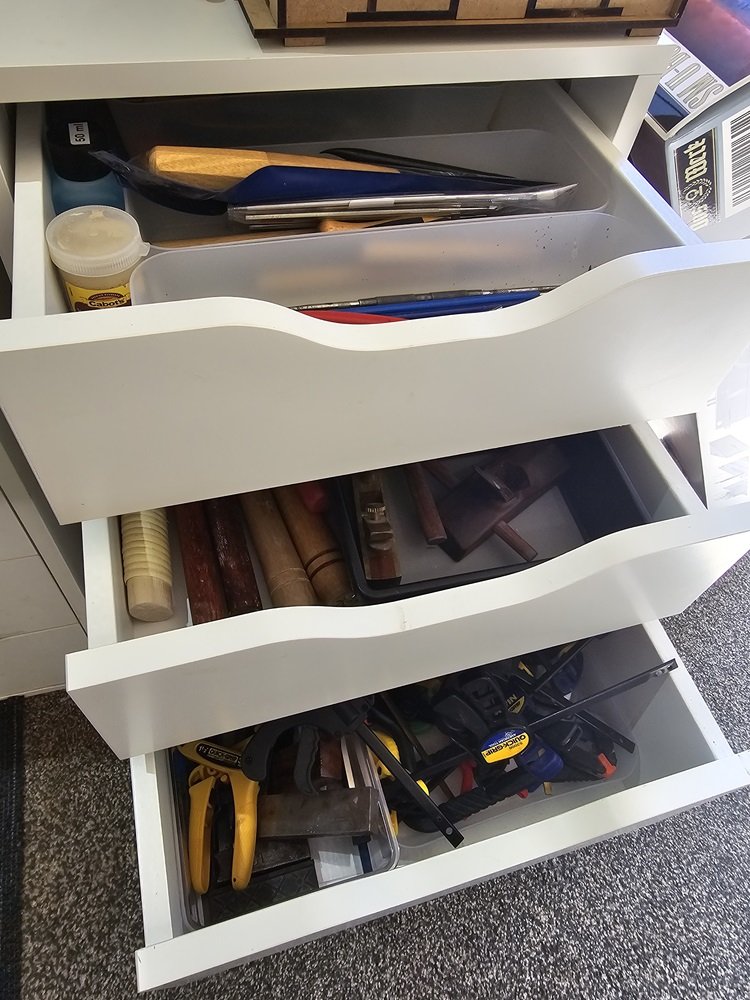
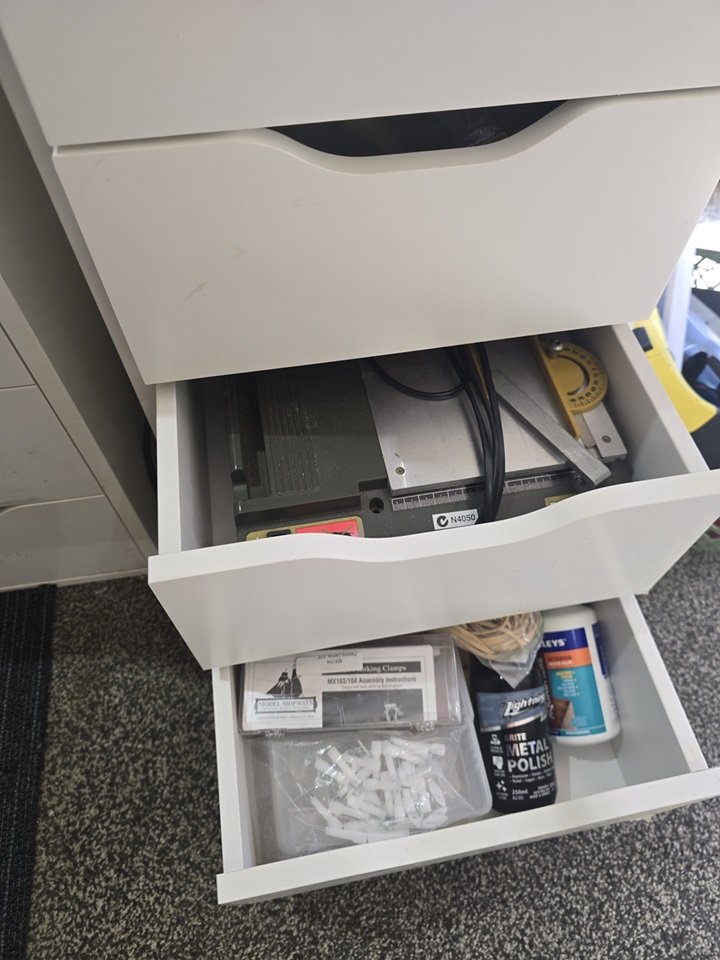
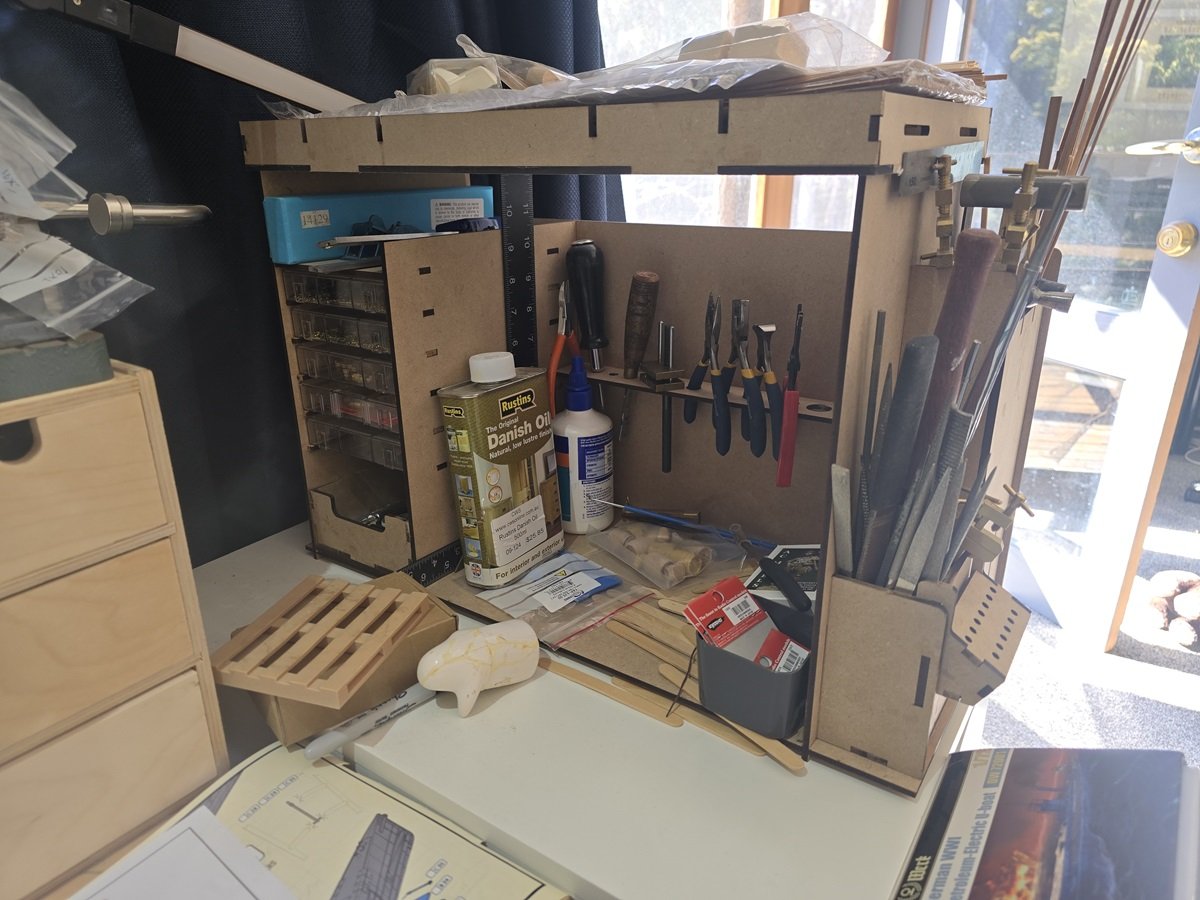
I have the Occre workstation from the original post. I find it works well for project storage - at present I'm doing kits, either cross-sections or workboats so the size works well. I have it to the side of my main indoor modelling desk (where I do plastic models, figures, etc) so it's a place to keep some often-used tools and WIP. It sits on top of a set of Ikea "Alex" drawers which then hold more tools and supplies. Certainly the Occre one isn't quite enough for everything I'd use regularly, but it's a good extension to the drawers to hold clamps, files, small fittings, etc. When I'm working on a wooden ship then it saves getting everything out or reconfiguring my main desk - although as per pics I still need ot set up Proxxon saw, drill press, etc, if using them. If I had more space (desk can't be longer due to a door), I'd definitely use other organisers. But it works for now. As for quality, the construction and instructions were good, once glued up it's really solid and does what it's supposed to. Darren

-
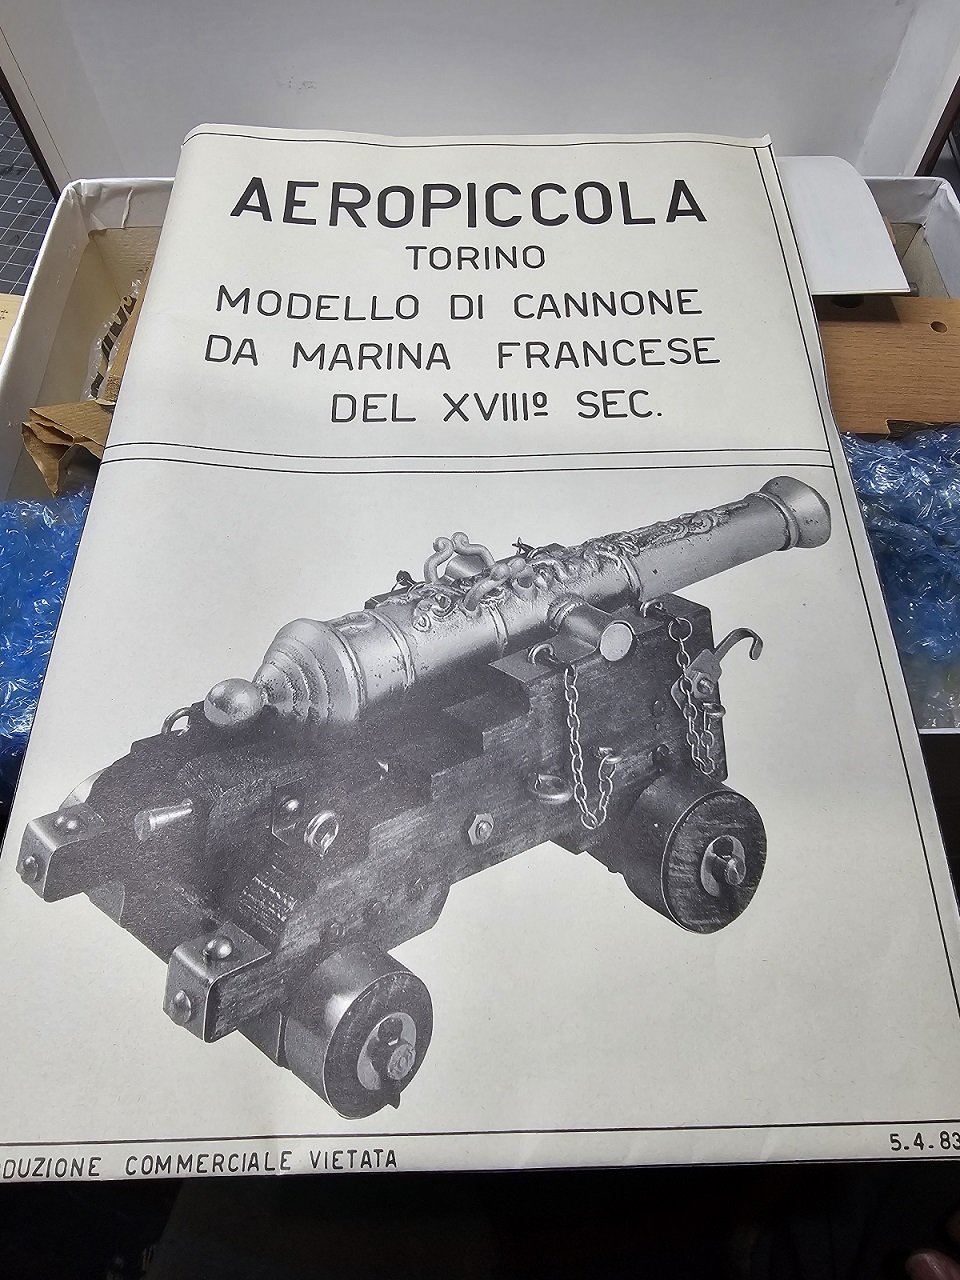
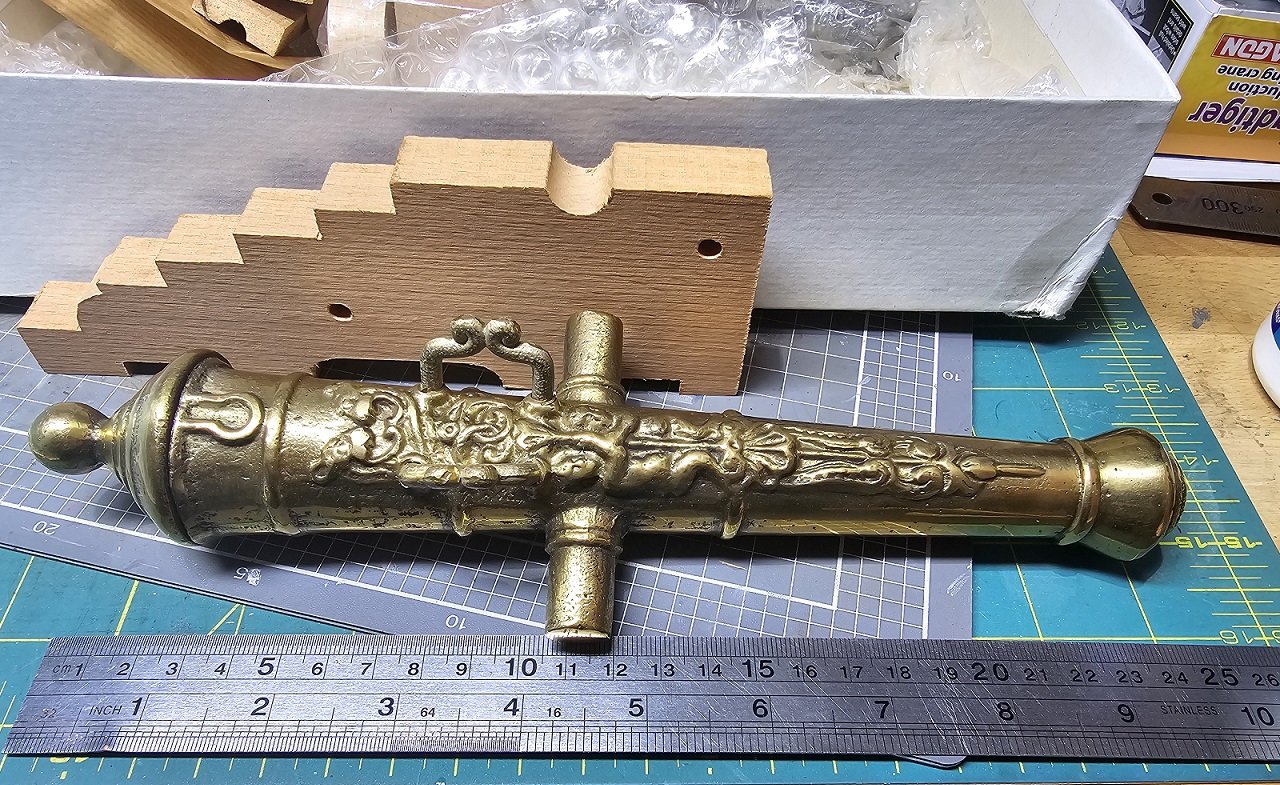
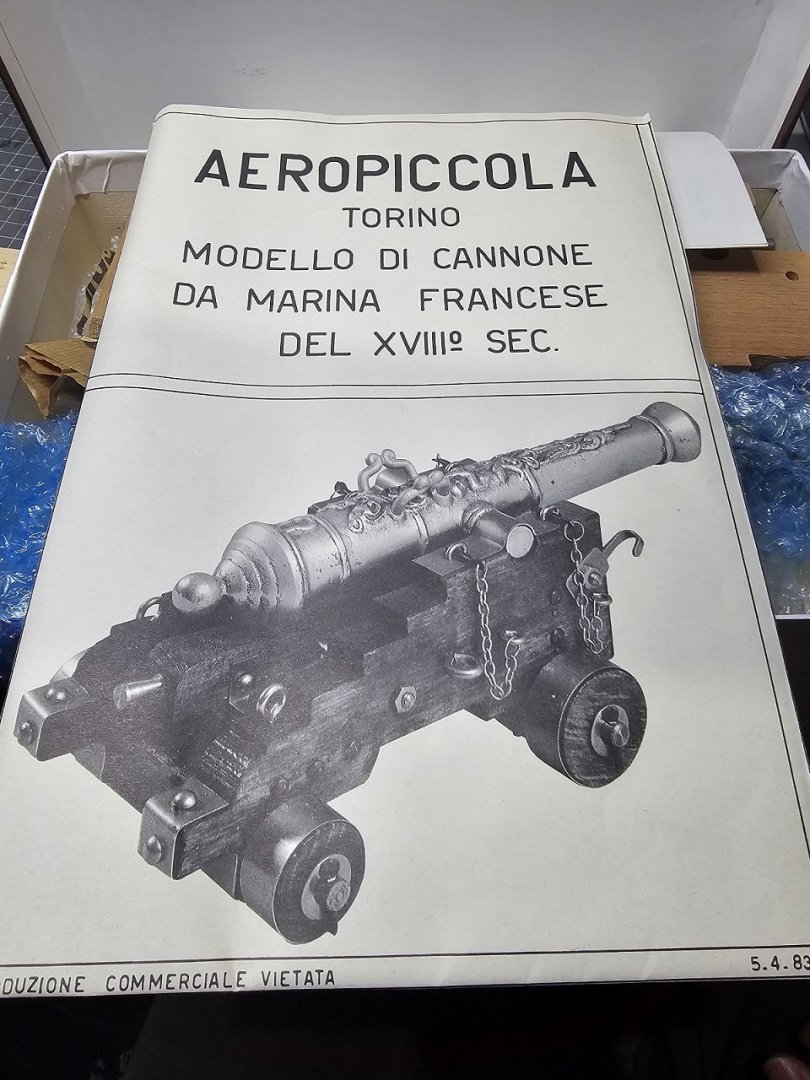
Hi all, I recently picked up this vintage Aeropiccola kit, of a French Naval Cannon, 18th Century. I've done a few searches, but can't find much about it. So before I spend $250 plus postage on Boudriot's French Naval Artillery book (over 5x the kit cost!), I'd like to know if anyone could help with info - scale, prototype, rigging, etc. The barrel is approximately 24.5 - 25cm / 9.5 - 10" long, so I'm assuming it's quite a large scale - but nothing in the plans or box indicate the scale, or more information about the type of gun it was based on. The carriage looks pretty typical of British (and I guess French) designs of the time. Apart from the brass barrel, all metalwork is steel, and the wood seems reasonable condition. I'll blacken the brass once cleaned up. Not sure if the French painted their carriages red like the British? Or just varnished? I can't seem to even find much on French cannons of the period online. Also interested if the decoration was commonplace, or does it represent one from perhaps a royal ship, or other decorative version. Given the size, I'd like to do it justice and not just follow the instructions, plus ideally add a base with basic gun tackle for display. Any help appreciated! Thanks, Darren
-
- 2
-
-

-
Funnily enough, I've decided to do cross-sections after doing full models. So I'm a bit backwards (or maybe upside-down, being from Australia) 🙃. But as others said, they are a great way to learn a lot of the techniques. I see a lot of new builders struggle with planking a full ship (especially a bluff bow), and getting it right (fairing, tapering, spacing, etc) can be daunting - and take a lot of time. With a cross-section, you get onto making fittings, doing masts, and rigging quicker - so a little bit of everything you may do in a full model. Plus not being retired yet, and doing other types of models, it takes me years to do a full ship. Also, my wife was sick of them being everywhere - they take up a fair bit of shelf space! So, cross-sections should be quicker, some of the kits out there are good, and they offer a great intro to scratch-building as said above. Plus I can display a few in the same space as a full ship. I'm working on the Modelers Shipyard HMS Sirius at present - here's the build log: Like any kit, it's not perfect and can do with some improvement - again a god way to get into modifying and scratch-building some components. I have the Hatchett (? part-series with books) sections for Victory and Endeavour, and a few scratch ones planned. I have the AL San Francisco but I'd avoid it, see the build logs on here - hull frames are weirdly thick, ladders don't fit, etc. So will be a lot of work to make it presentable. The OcCre ST looks good. I'll probably do the Model Shipways Constitution rather than the Mamoli one, as it's slightly larger. With the Anatomy of the Ship books you can do a good job of scratchbuilding the ships they cover. Dive in and give one a go - and do a build log 🙂. Darren
-
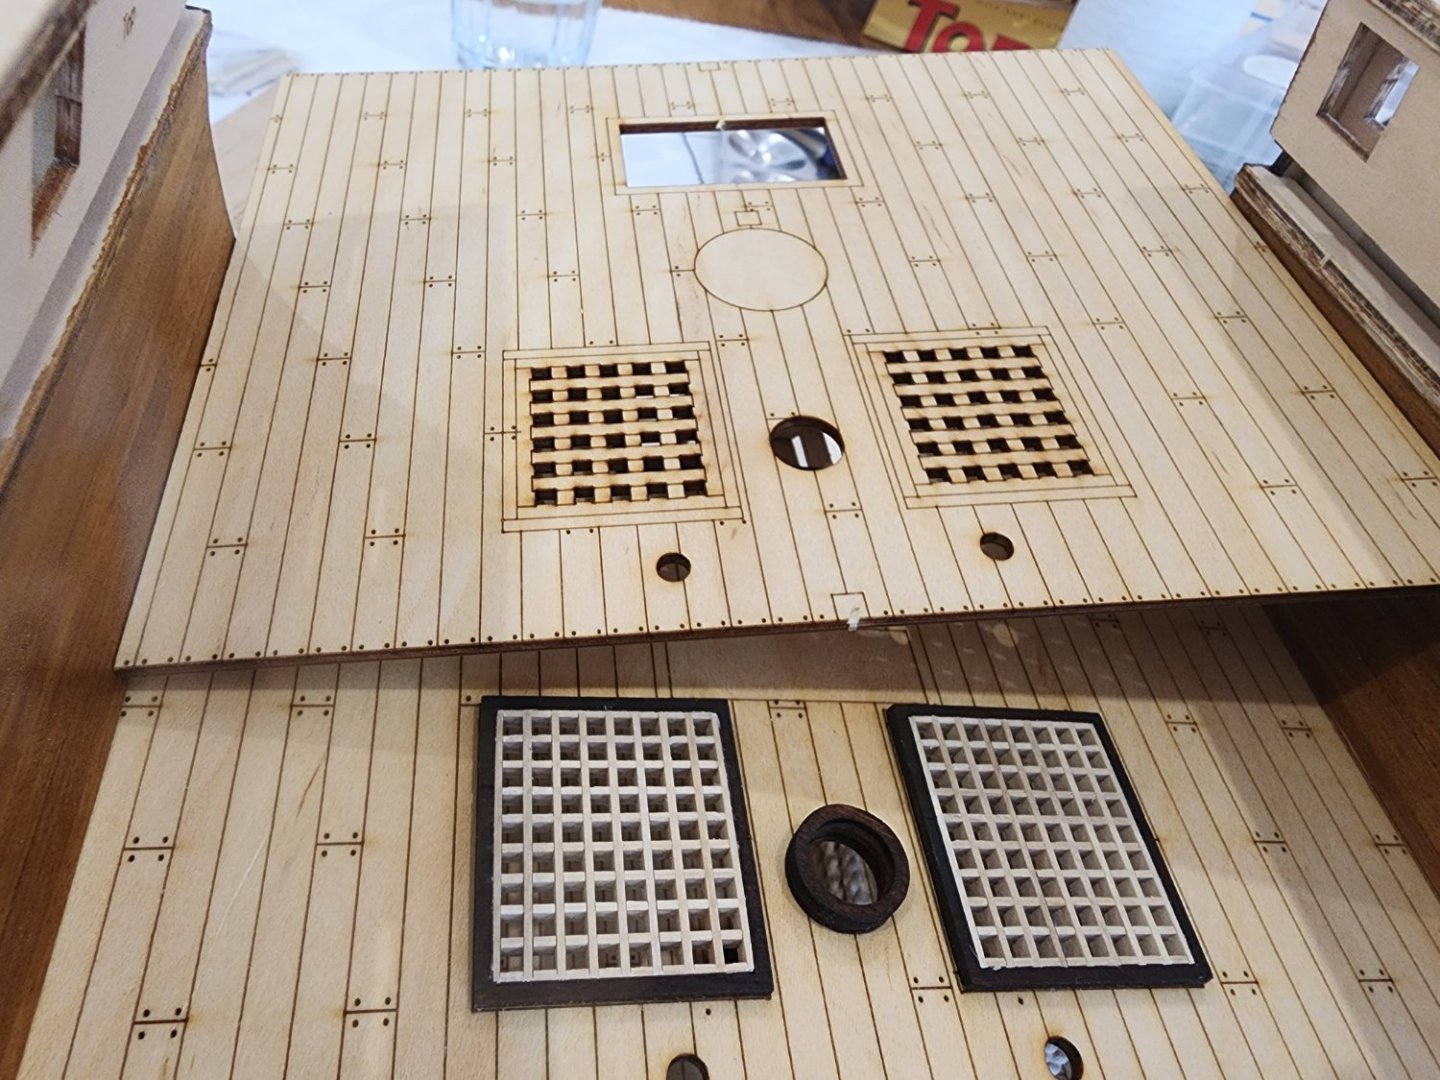
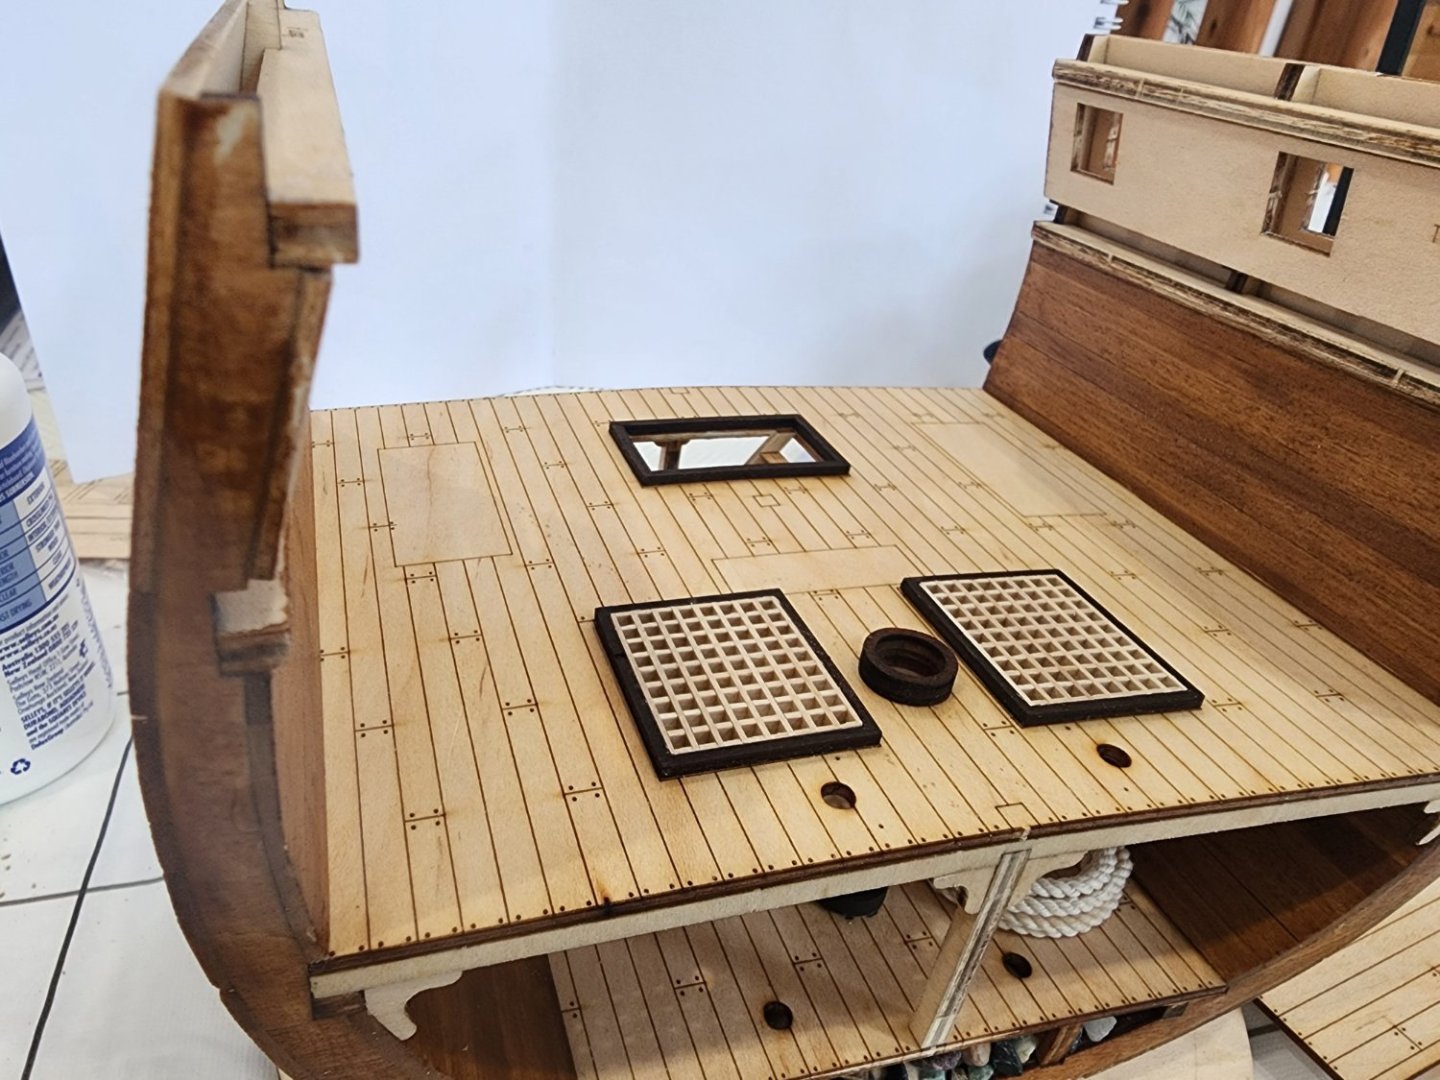
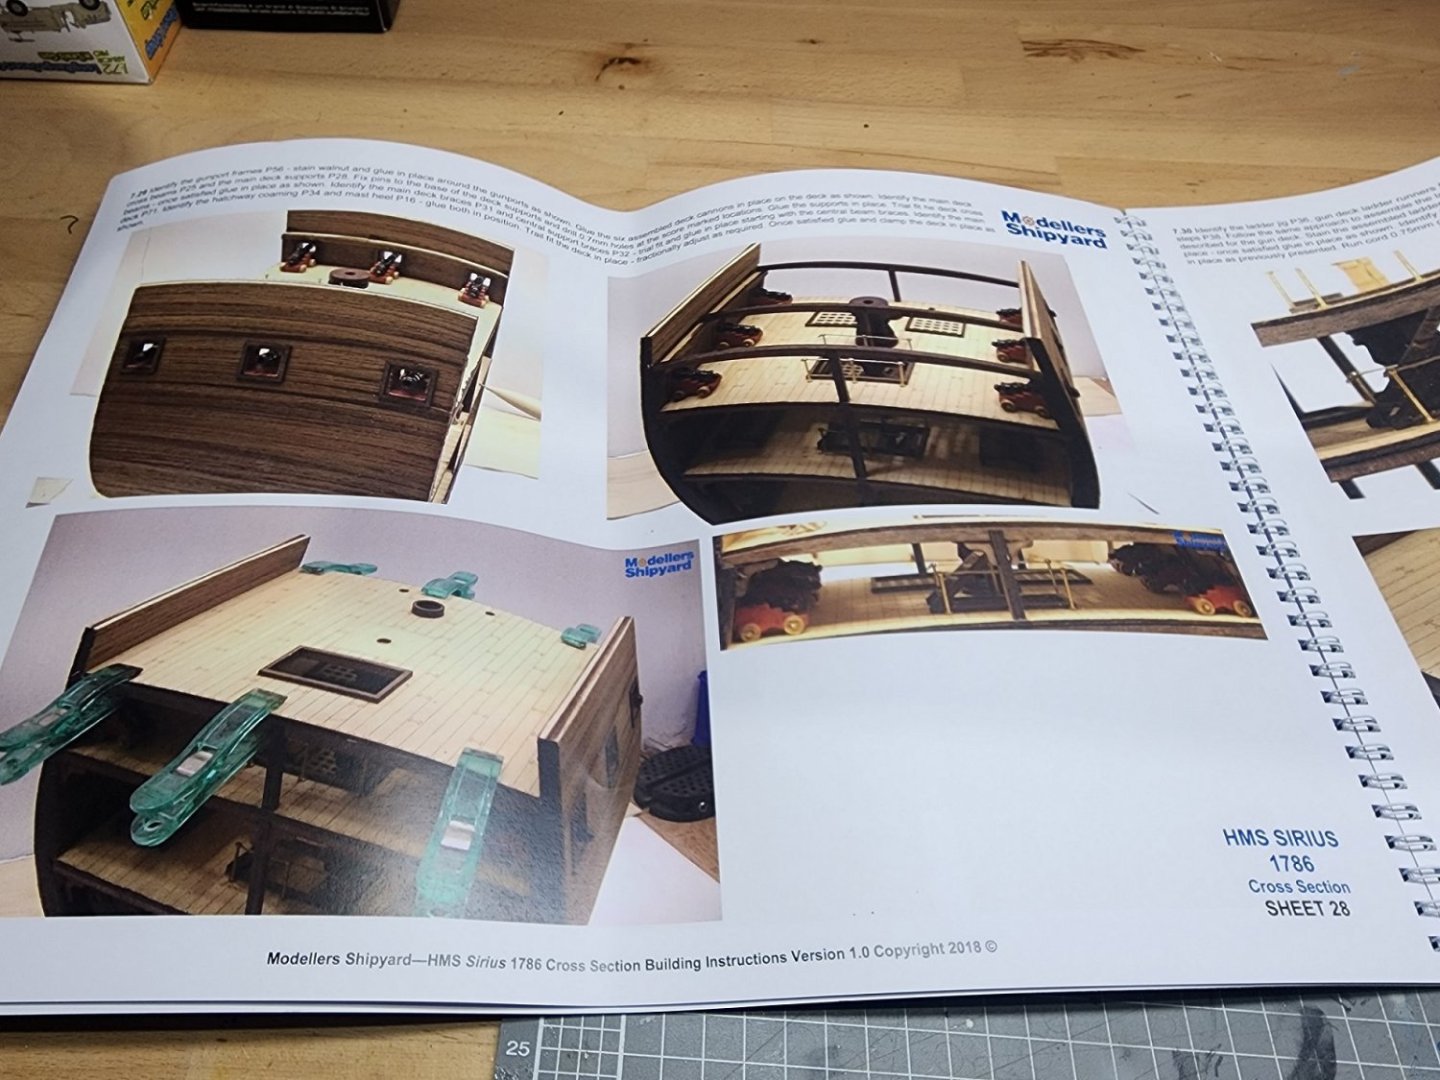
Progress continues....whilst it's summer here in Australia, more rain than sunshine combined with a broken foot allowed me to spend the day on the next steps. So, for now I've left the hold/lower deck with just a coil of rope. The only other items included were a few barrels. I'll modify them by sanding off the wooden turned bands, and replacing with black tape for a more scale-like appearance. I'll also add more barrels, plus some timbers and perhaps crates or sacks of supplies for the new colony. One item I'll add when I get home is an upright piano - according to records I found, the Sirius carried the new Governor's piano. So I should add this! Work then moved to the mess deck. I replaced the laser-etched kit gratings with new ones built up, whilst still a bit oversized, the photo shows the comparison and improvement. The hold ladder was built, and posts and knees added to the hold. These will be painted later after a bit of putty has been applied to gaps. Next step is the furniture and fittings for the mess deck - tables hammocks, lockers, etc. More updates soon hopefully! Thanks for watching, next updates should be more frequent. Darren

- 8 replies
-
- 6
-
-
- Sirius
- cross-section
- (and 1 more)
-
Hi Greg, Yes, good pick-up. Its definitely like aquarium gravel. I decided to go with it as I didn't bring an alternative. I do think I'll add some scale ballast when I get home. The gravel is just attached with white glue, so easy enough to remove some to replace it. Thanks, Darren
- 8 replies
-
- 2
-
-
- Sirius
- cross-section
- (and 1 more)
-
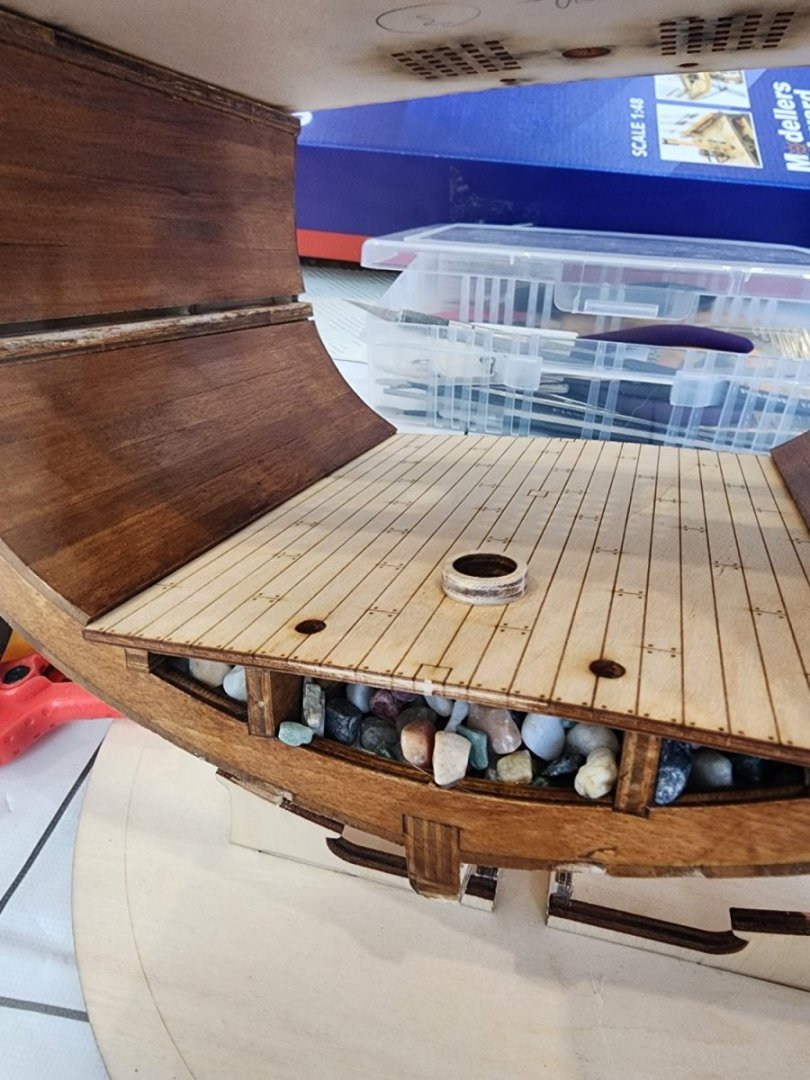
Finally an update! This was going to be a quick build, but life got in the way, as it often does. But I have a few weeks off work, and am house- and dog-sitting for a friend, so that gets me away from other demands, and leave time for some modelling at night. And why not build whilst watching Master and Commander? 🙂 So, initial progress made....the hull has been planked. First layer outside, and single layer inside. The instructions don't call for planking on the inner plywood bulwark, but I'll add that when I get the gun deck on. Interior stained with a light walnut, and I'll probably paint the frame ends to cover the ply parts. Stones (supplied with the kit) have been glued in for the ballast, and the orlop deck piece glued in place. Next step is some hold storage items including a hawse cable and barrels. I was going to add more, but bought limited supplies so may do more later. Next update won't be quite so far away! Darren

- 8 replies
-
- 5
-
-
- Sirius
- cross-section
- (and 1 more)
-
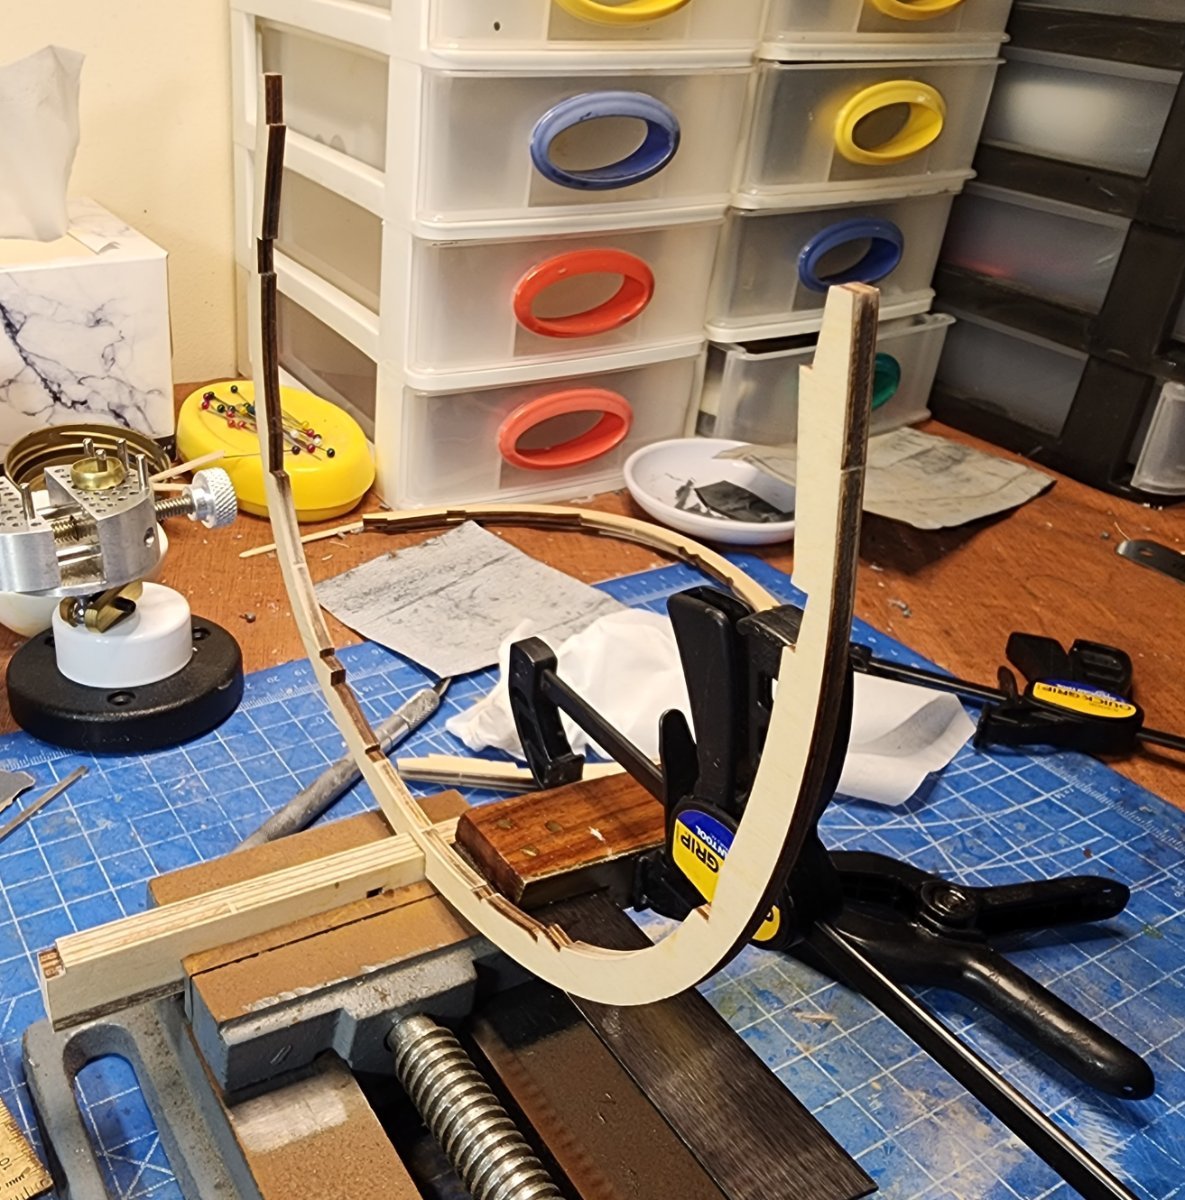
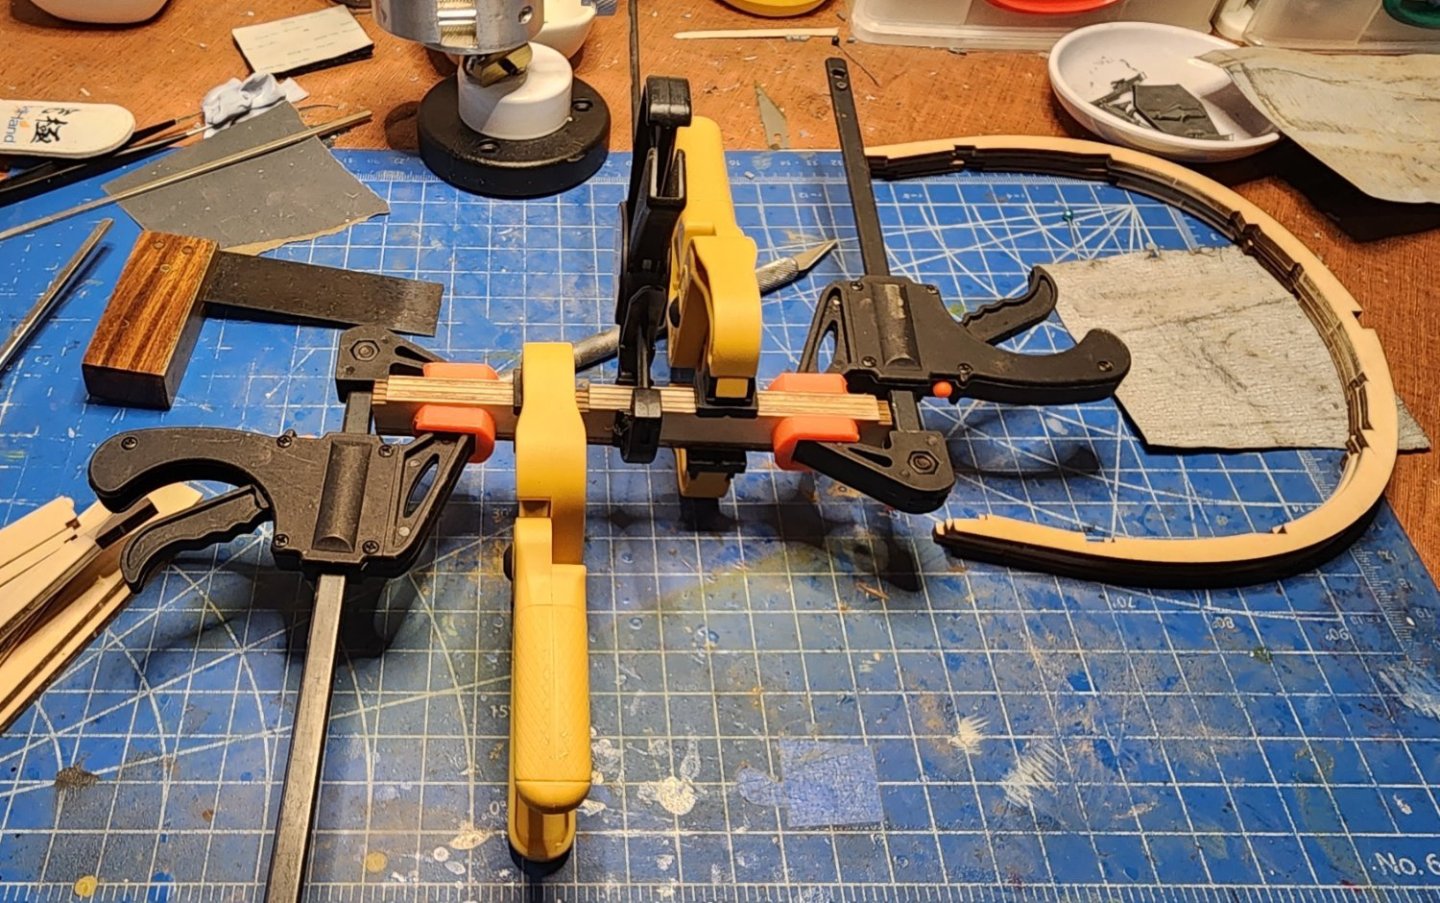
Made some minor but worthwhile process. All frames done and aligned, so I've started the first layer of planking - in limewood as is typical in kits. Cut them a bit oversize and will then trim. Still undecided on the amount of effort/detailing I'll do - depends if I'm at home or not during the build, and how long it takes. It's intended to be a practice/ease me back into it, so don't want to get bogged down in too much extra work vs focus on a neat finish. Will wait and see.... Anyway, here's the planking. You can never have too many clamps, of course.

- 8 replies
-
- 3
-
-
- Sirius
- cross-section
- (and 1 more)
-
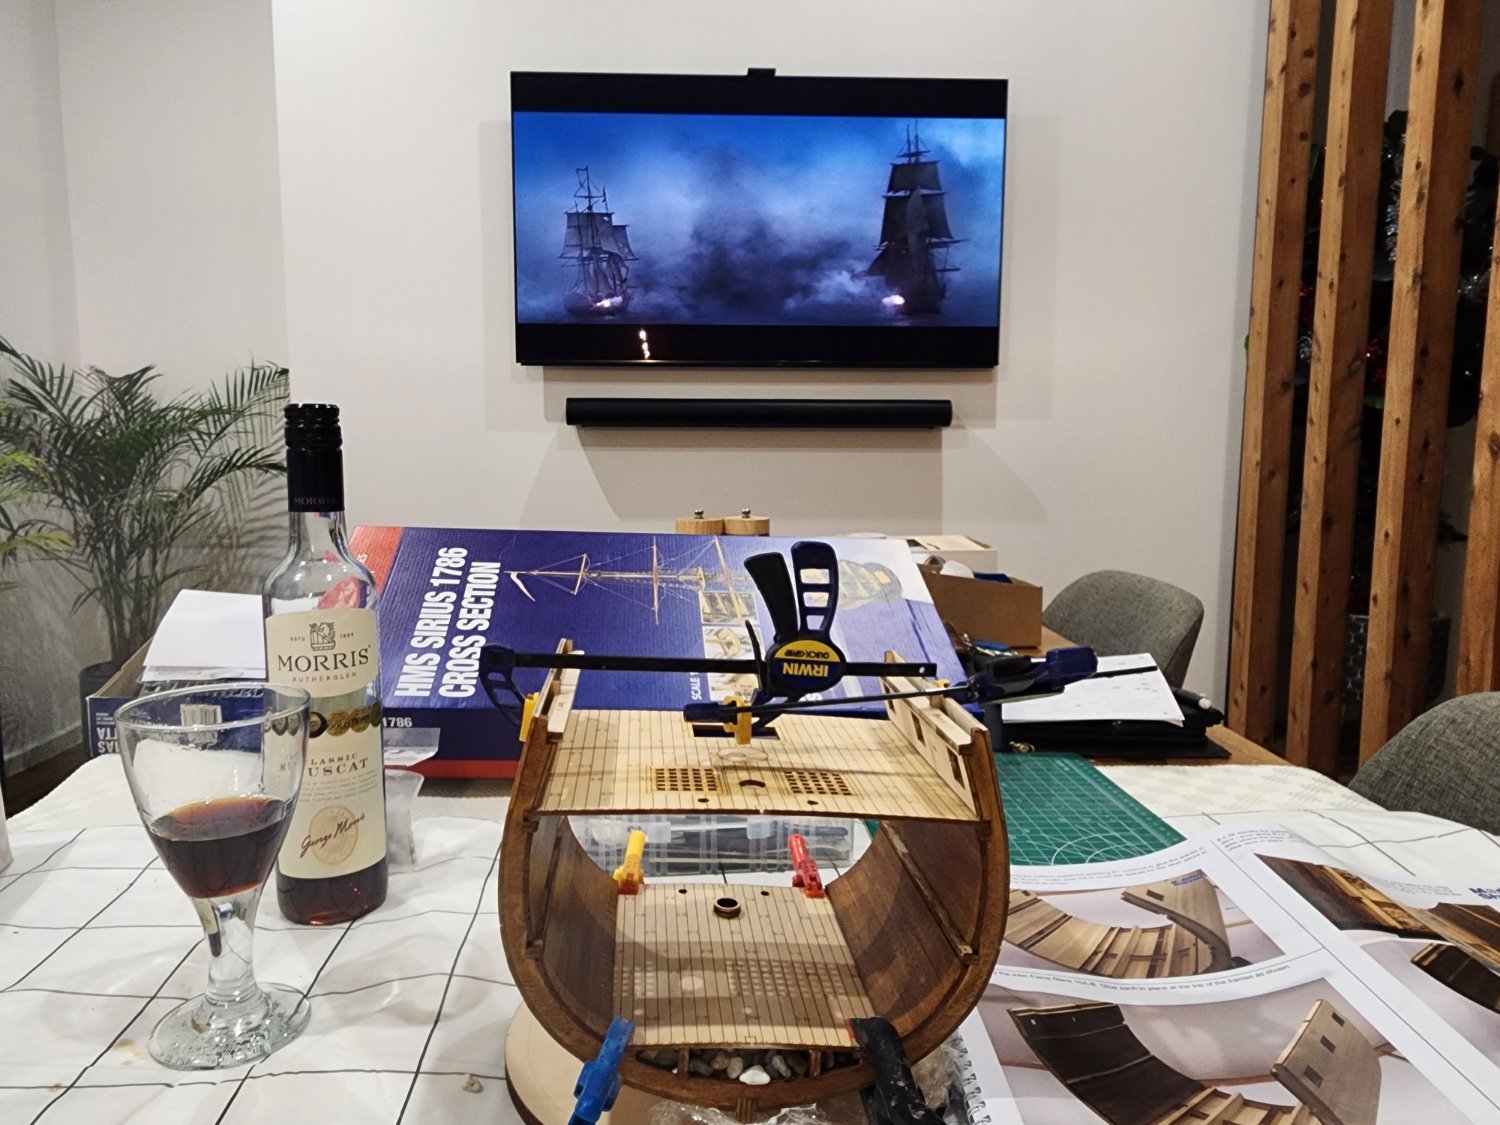
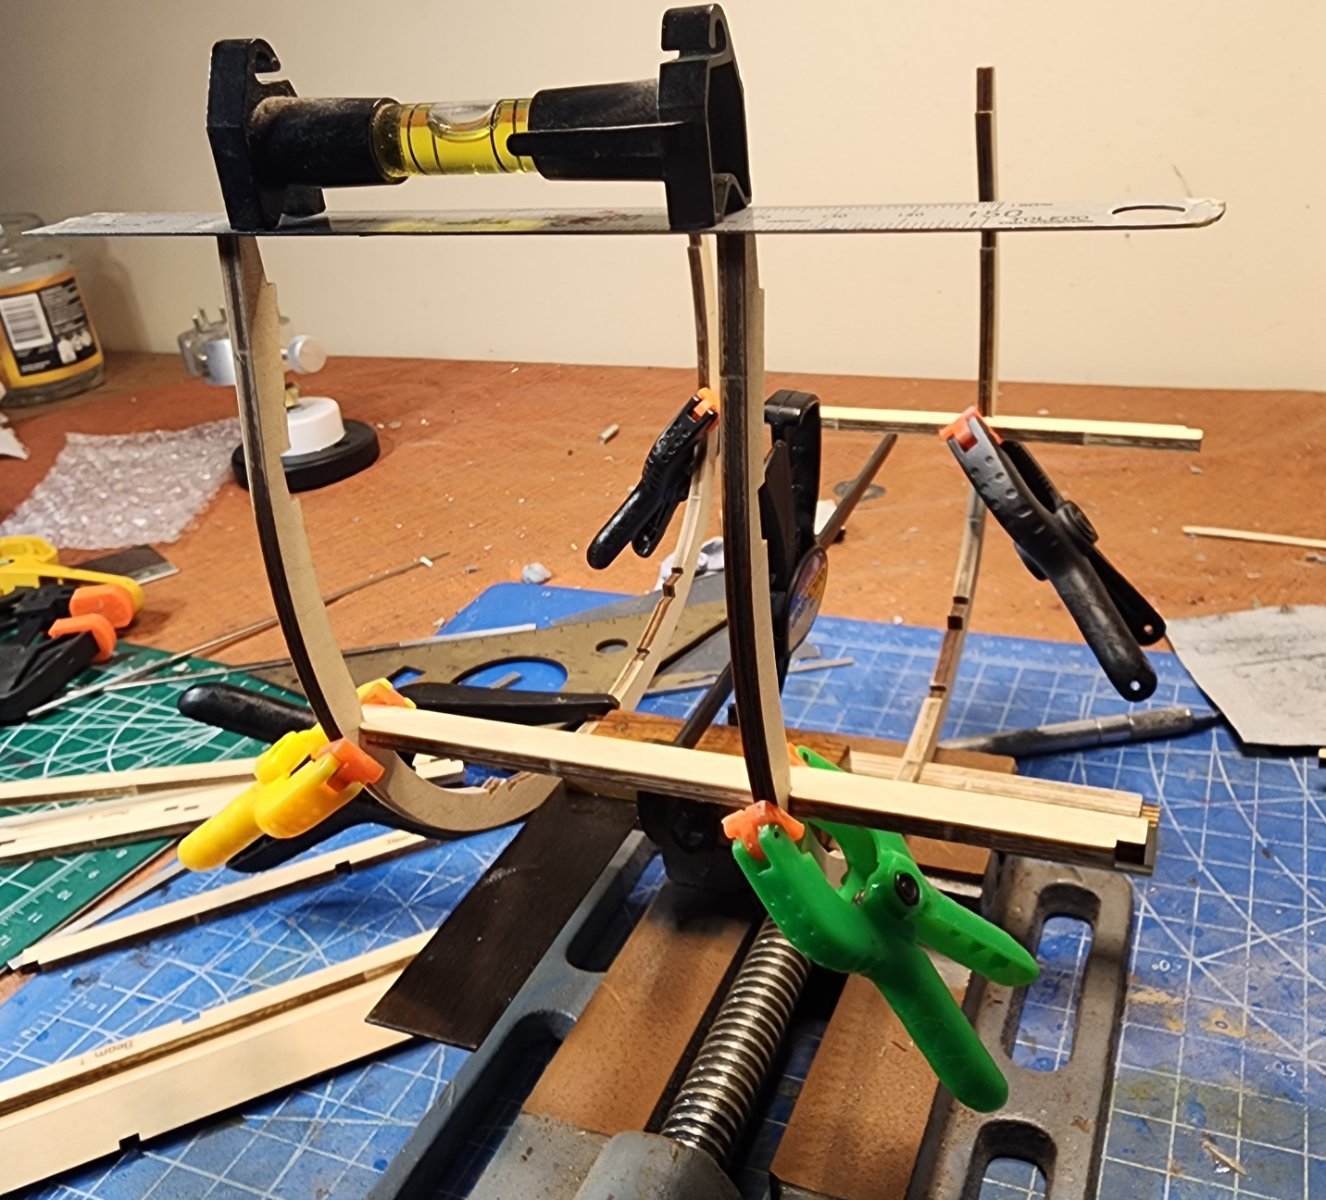
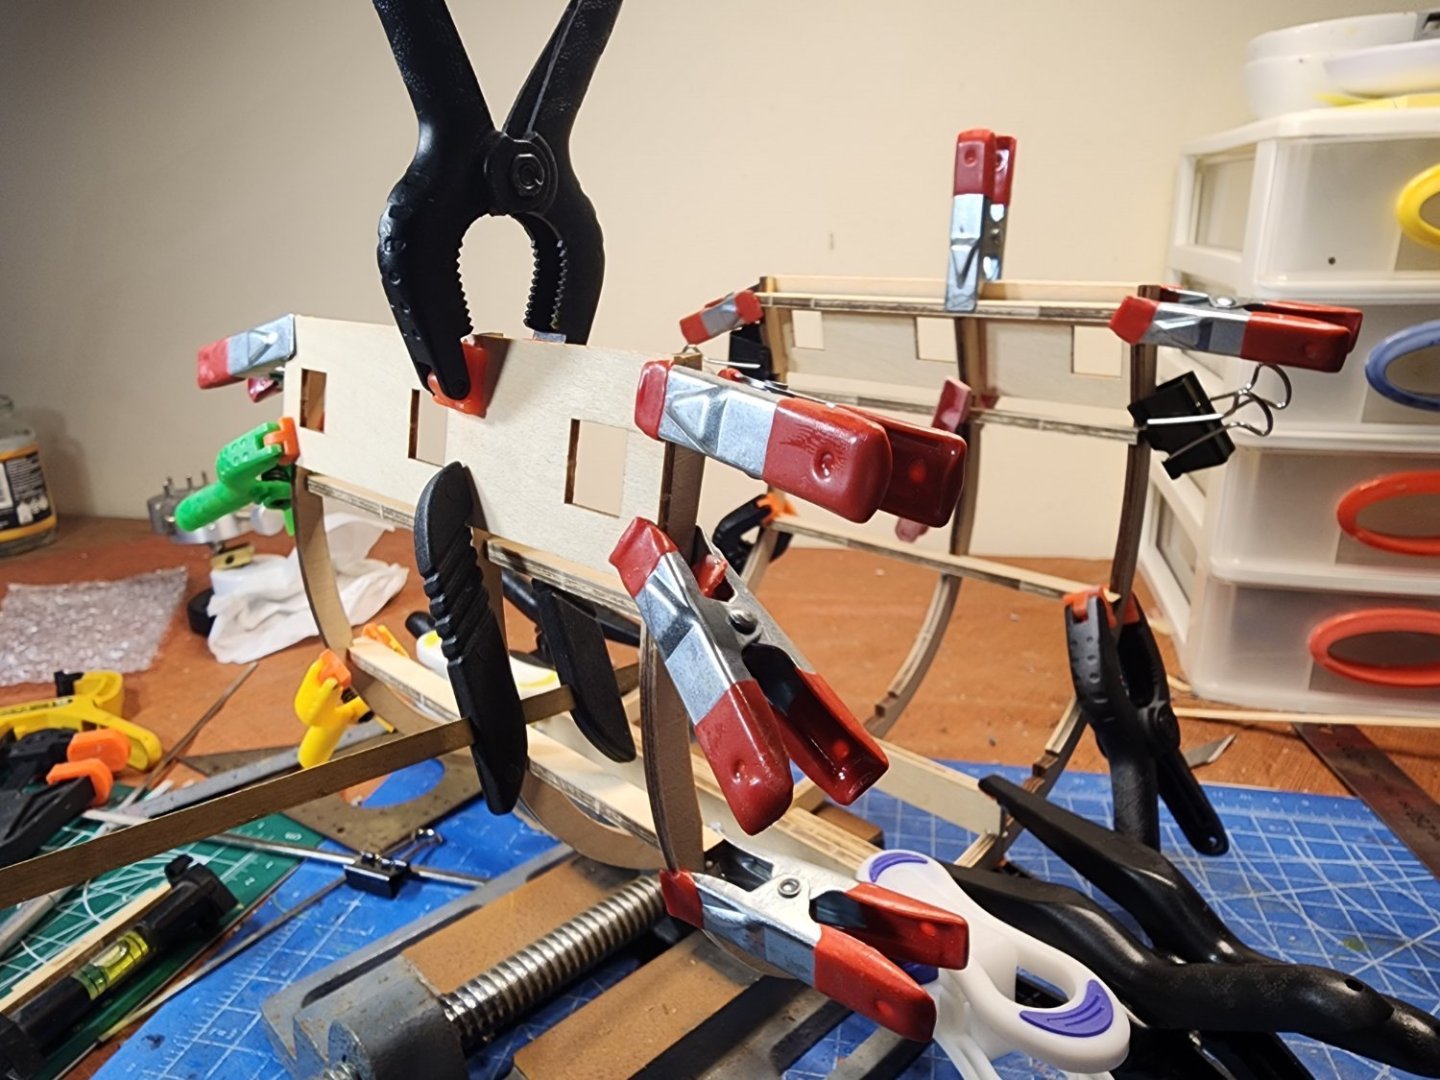
Right, finally on to the build! A delayed start, since I'm away from home caring for my parents, but got my wife to bring me a care package including the kit. And fitting as my father was a great wooden model ship builder, and this will be the last one built in his house and using some of his tools. But, I digress... The first few steps see you building up the keel from 3 pieces, then attaching the 3 frames and longitudinal beams. Finally, bulwarks with gunport cut-outs are attached to each side. All pretty simple so far, but without an alignment jig or proper baseboard, it was all a bit fiddly and required a couple of squares, a drill-press vise, a couple of levels, lots of measurements, and even more clamps. Here's the photos of the first few steps - apologies for the messy work area (he was recently doing plastic models so it's been a hunt for ship/wood tools but I'm making do!); and the large pics, I couldn't edit on his PC. Next up, the first layer of planking and on to the lower decks. Thanks for looking - early days but it'll get more interesting soon, I promise!


- 8 replies
-
- 7
-
-
- Sirius
- cross-section
- (and 1 more)
-
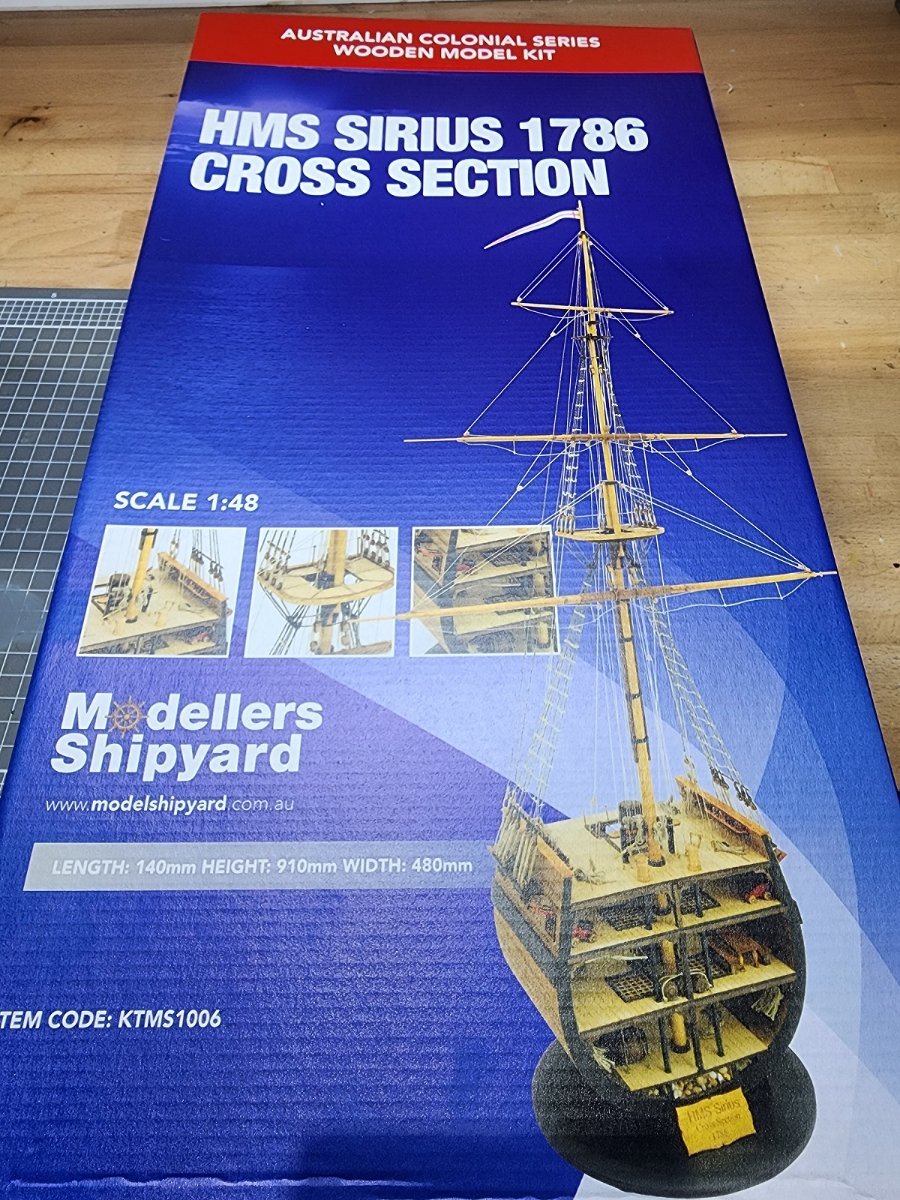
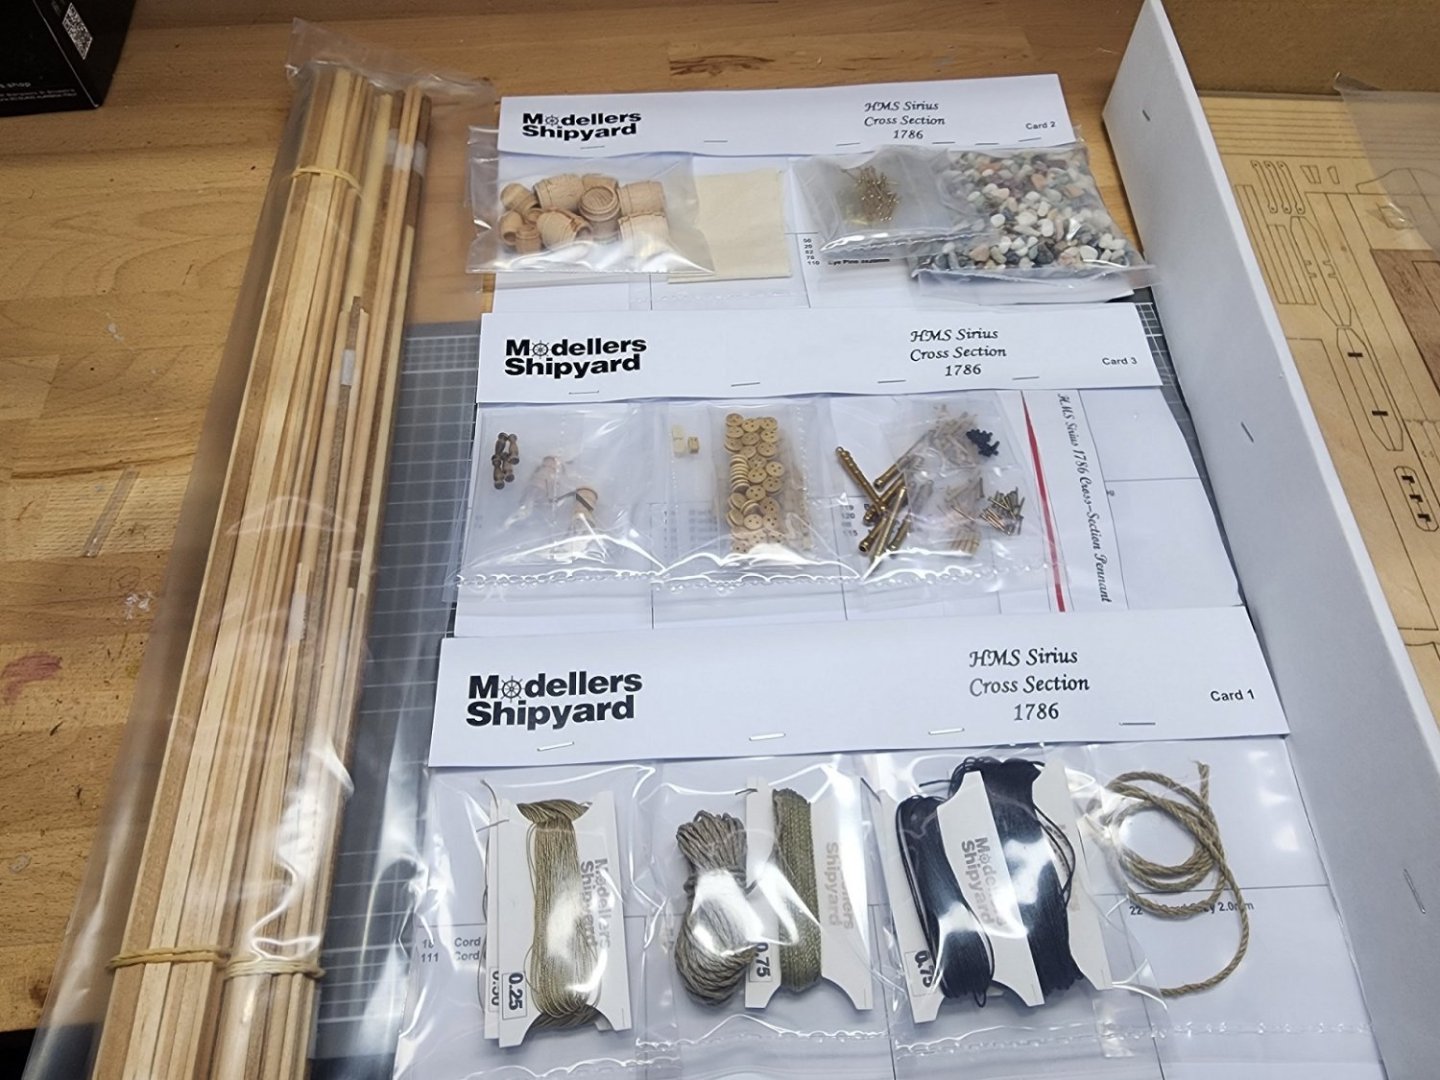
Hi all, I decided to finally venture back into wooden ship models, after a long break where I focused on plastic kits (ships and other subjects). But I have been getting into woodturning also, and love working with wood. Having built my fair share of full-hull (mostly POB) models both kit and scratch, this time I have decided to focus on cross-sections. This lets me focus on fittings, masting/rigging, and detailing a smaller model which is easier to display, won't (hopefully) take years, and less workspace to build. So I thought - where to start? I managed to pick up the cross-section kits from DeAgnosti of Victory (1/72) and Endeavour (1/48) off a builder who only did the main ship builds. And I have a HMS Vanguard (1/72) with a damaged hull which I'll use as a basis for a cross-section of that, and there's some other nice kits and pracitums out there now. But to start, I thought I'd go for something potentially simpler. Enter, the Modeller's Shipyard HMS Sirius. I won't go on too much about the ship itself, many are familiar with the flagship of the First Fleet which settled Australia. But in short it started life as Berwick, built in 1780 then bought by the Royal Navy in 1781, she had a few adventures before being renamed Sirius in 1796 as a 6th-rate and prepared for the journey to New South Wales. Wrecked in 1790 off Norfolk Island. As for the kit - some contents pics below before I get started. All timber and fittings appear nicely done, with the deck planking laser-engraved sheets rather than initial planks. I'm thinking of using these for simplicity this time around. Mine weren't engraved very well, so I'm waiting on replacements. Not as many parts as a proper kit, but all nicely packaged. I can't comment on accuracy at this point - I read some questioning of the full HMS Sirius kit by MS, but as I get the frames made I'll do a measure against drawings I have. Instructions appear very good, but no actual scale plans are included. In terms of improvements I plan, beyond individual planks TBC, I will aim to: - add copper plates, since multiple sources describe the ship as being coppered - add more items in the hold. It comes with a few barrels and an (anchor?) cable, but records state she was heavily laden for the voyage so I'll add more barrels, sacks, etc - maybe even the ship's surgeon's piano it reportedly carried! - replace engraved gratings with built-up wooden ones - improve mess deck details like the hammocks, tables, etc and add lanterns (lanthorns?), maybe some gear, etc - include additional cannon details and tools - try to make nicer barrels - and maybe other improvements like pumps, any identified missing rigging details, etc. So, thanks if you've read this far! I hope to make a start on it this weekend, along with setting up a space for "indoor" tools (any major surgery will be done in the shed). Really this intro is just to motivate me to start, and complete, a build log 🙂


- 8 replies
-
- 4
-
-
- Sirius
- cross-section
- (and 1 more)