DONATION DRIVE - SUPPORT MSW - DO YOUR PART TO KEEP THIS GREAT FORUM GOING!
×

Pat Lynch
-
Posts
103 -
Joined
-
Last visited
Content Type
Profiles
Forums
Gallery
Events
Everything posted by Pat Lynch
-
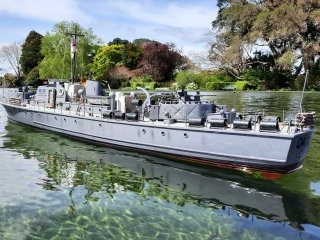
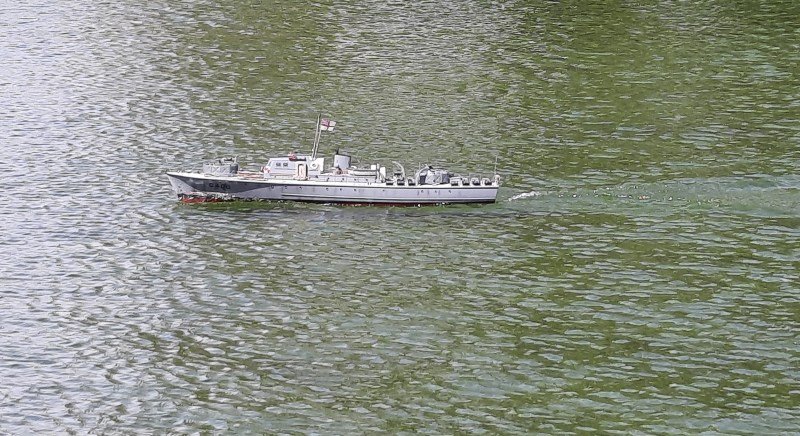
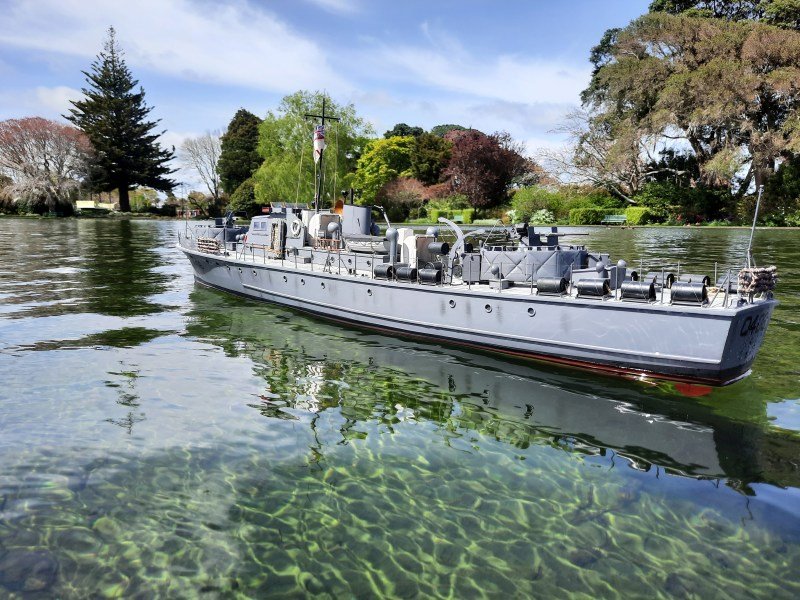
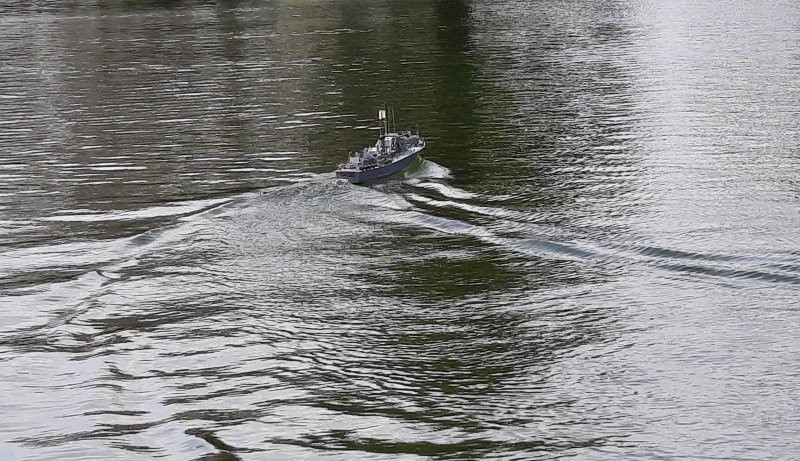
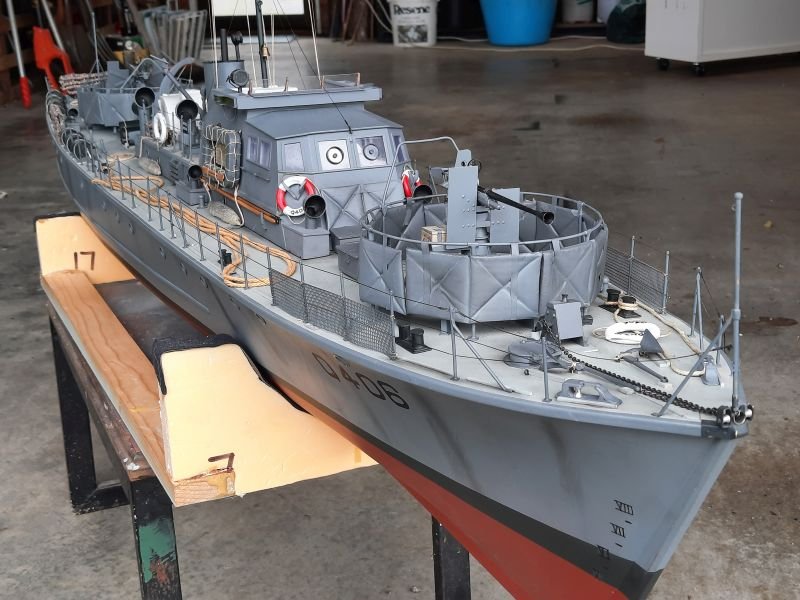
 I guess that just about finishes my nearly 2 years of building - a good COVID project! The maiden outing was totally successful - she needed about 2Kg of steel bars to get her sitting properly and a brass reinforcing strip added to the bow to protect her when running into the concrete at the local model pond. She's been out several times and after a few more minor details added after the maiden, Q406 was declared "finished". Young onlookers loved it - esp. when the loud fog-horn sound was played! There is video posted on a popular video-sharing site under my name and Fairmile! Thanks for the interest in my efforts. Pat Lynch
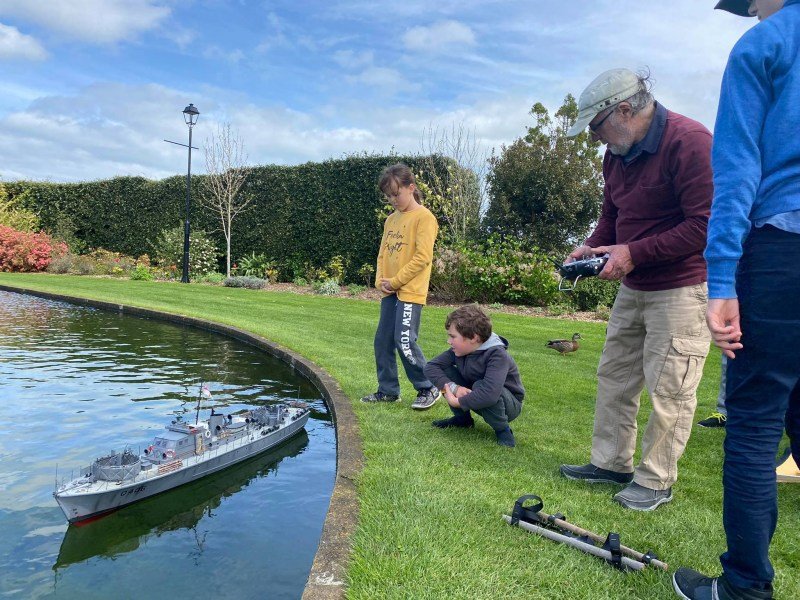

-
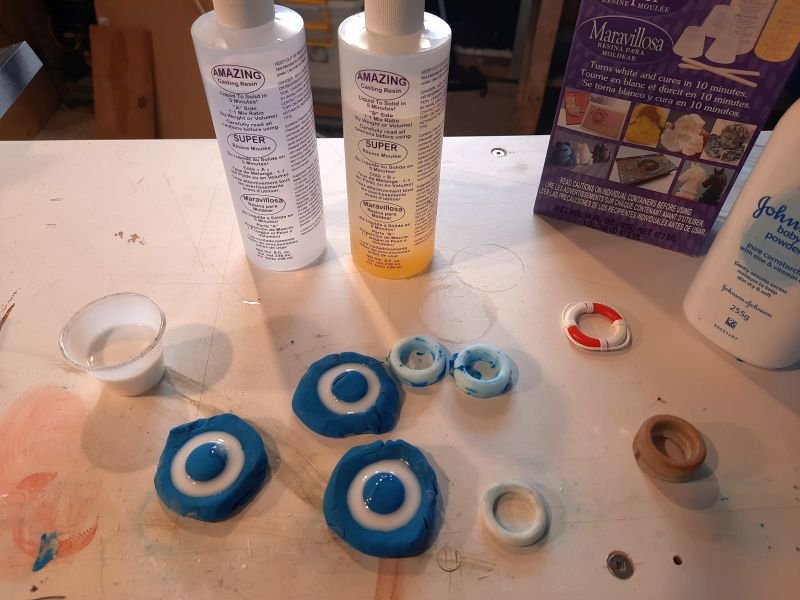
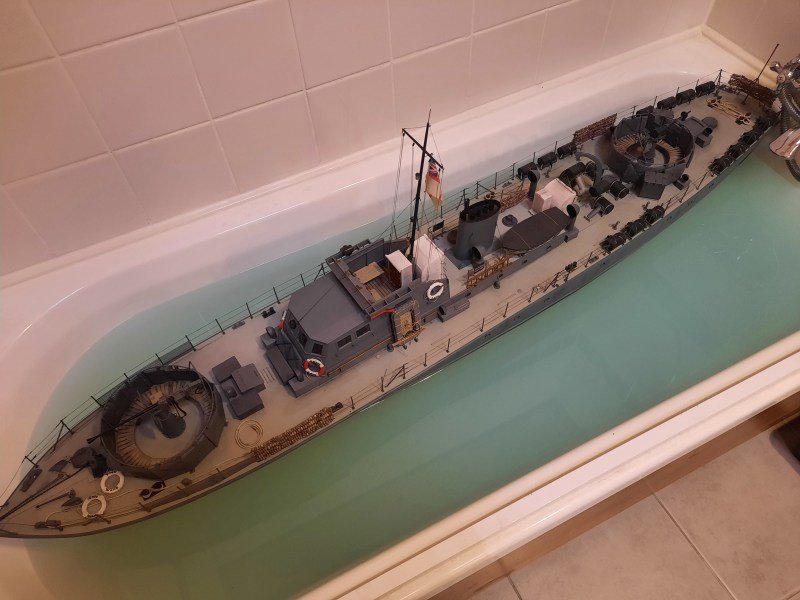
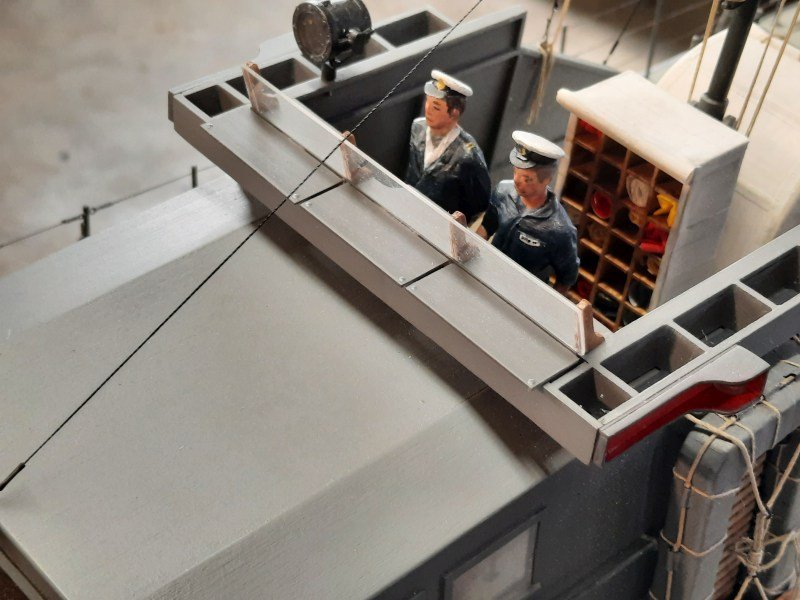
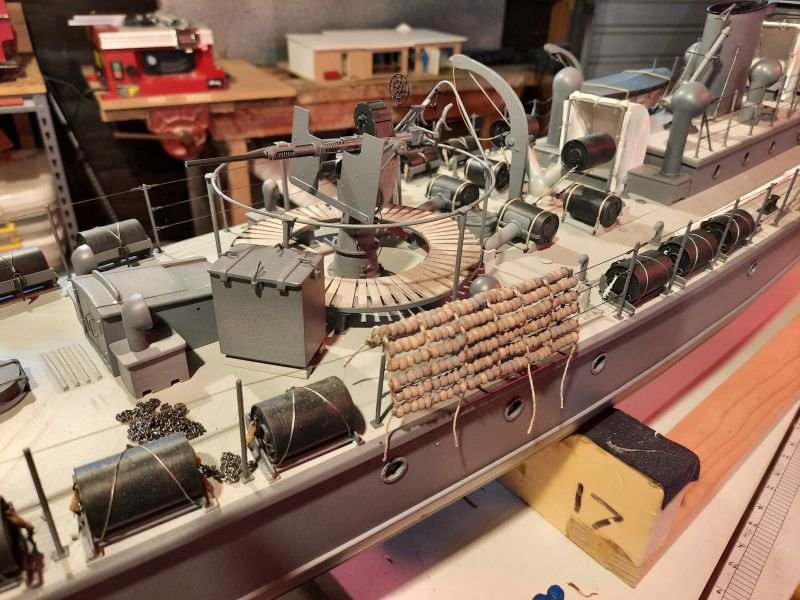
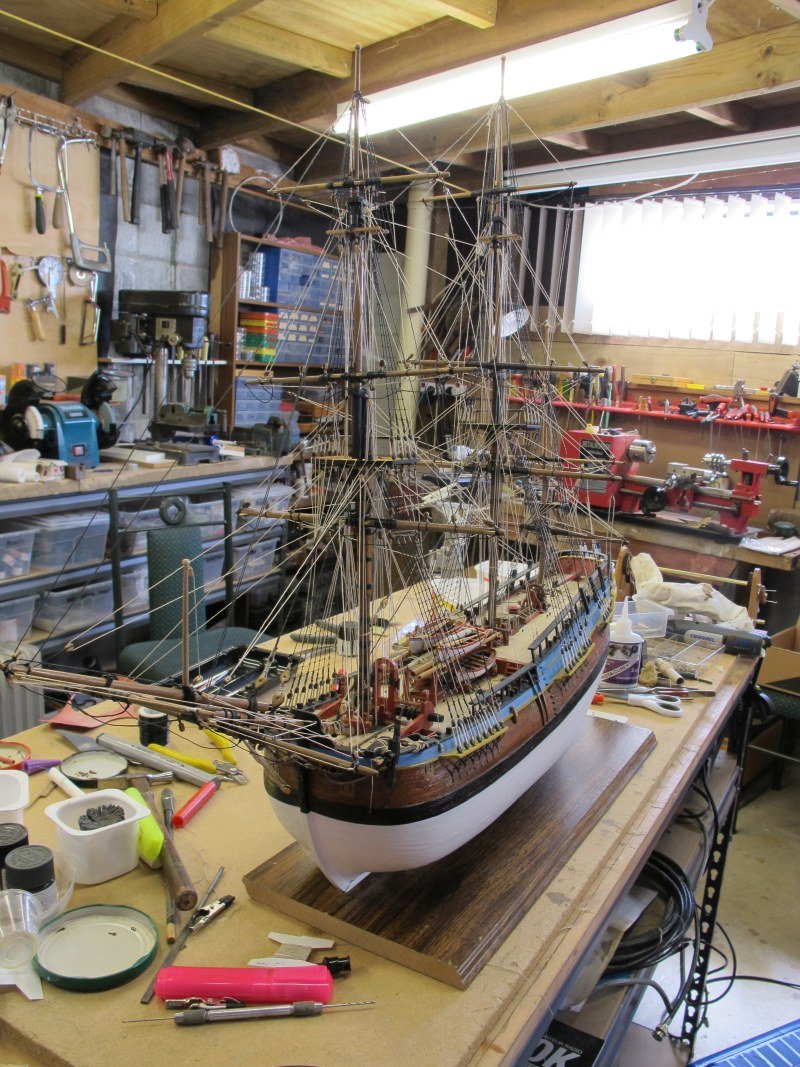
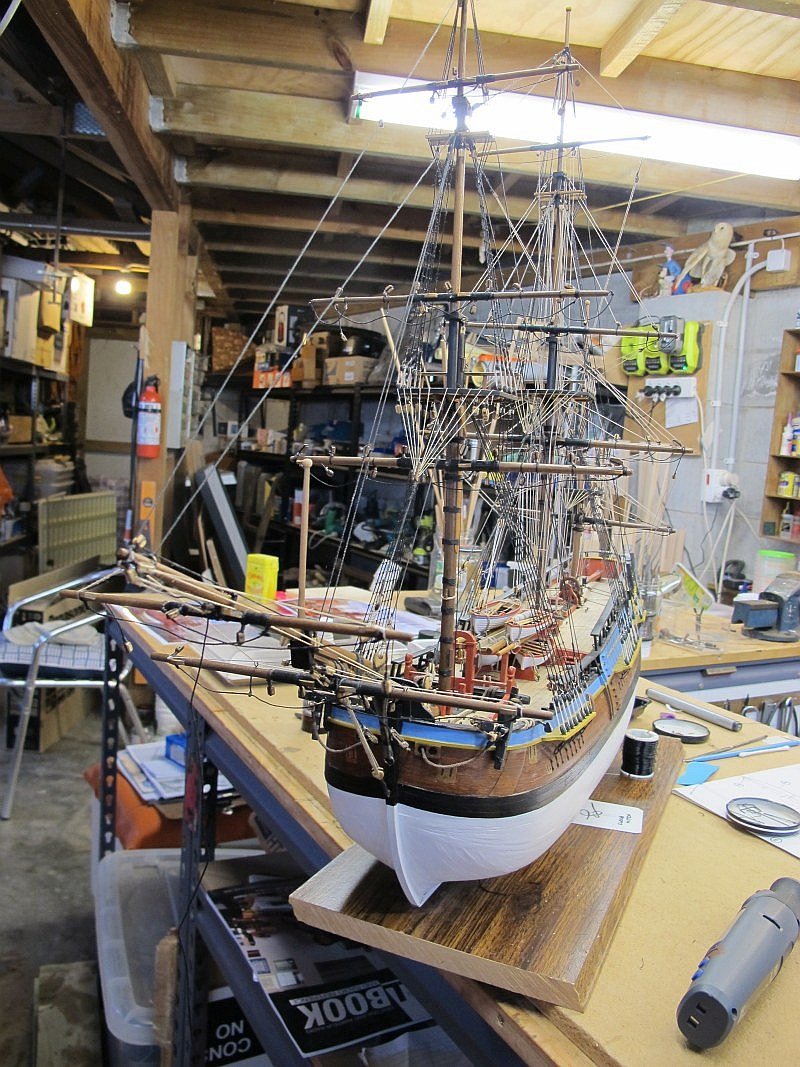
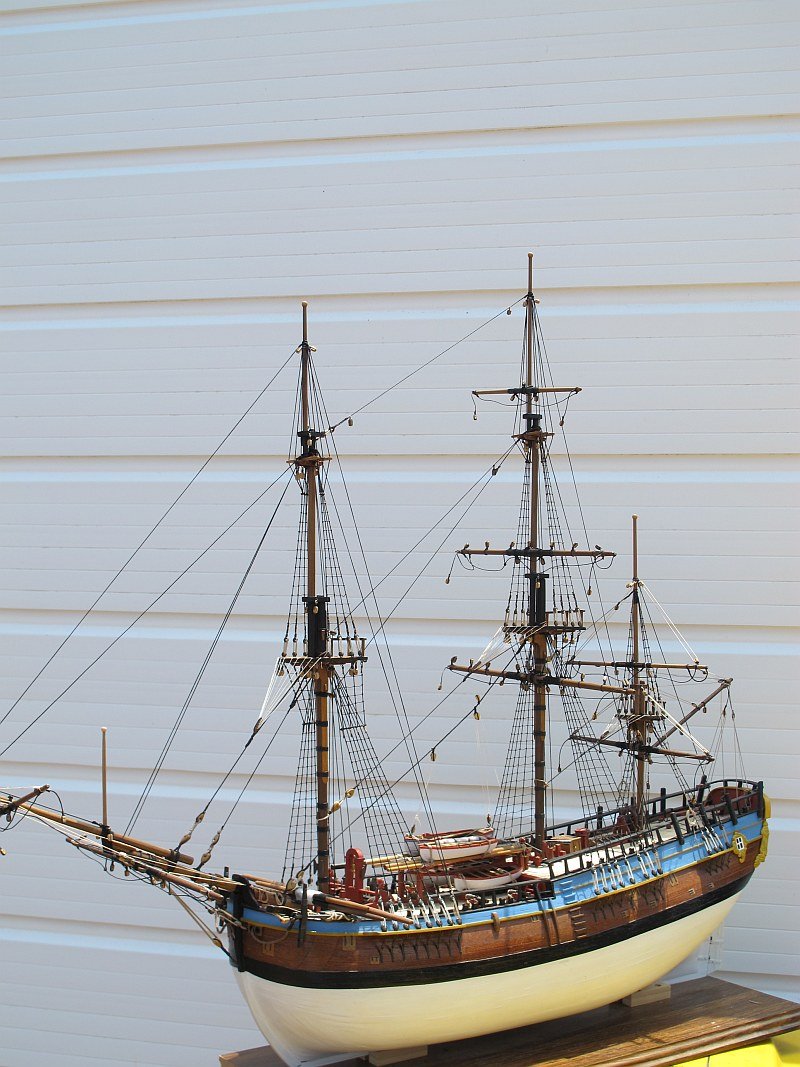
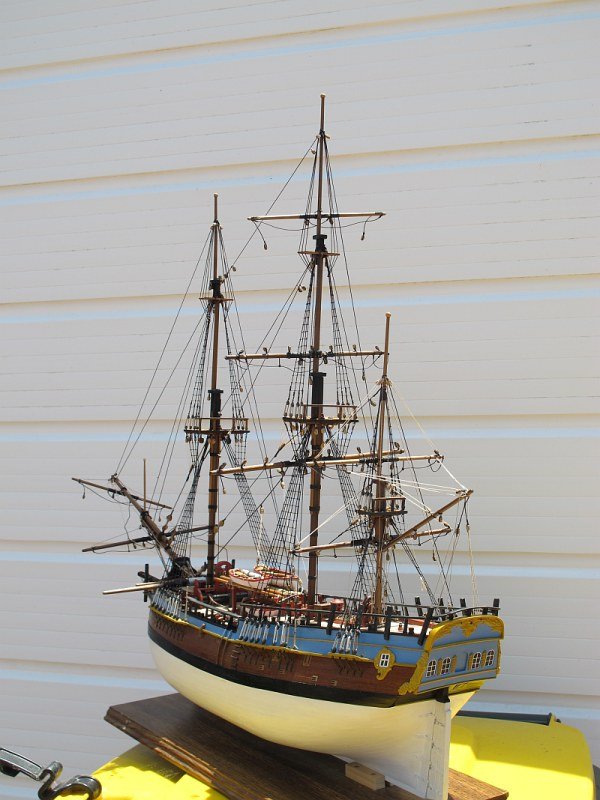
With the model now mostly complete, it became a classic example of the expression "..a scale model is never finished.." - you just stop adding detail - the Fairmile was a good example. I had already begun planning (in my head) my next project so it was time to call it quits!☺️ However lots of little things were still in progress - Life buoys, flotation matts, a bridge crew and flag locker etc etc.......here are a few pictures..... The life rings were cast with resin, the flag painted onto an old, very worn piece of handkerchief - it actually flutters when in motion. The shrapnel matts were made 'squishy' with thin kitchen sponge and model rc plane covering - 'Solartex'. The sound system installed - it has the actual Fairmile twin petrol engine startup and running sounds. Then the requisite bath tub test - it almost didnt fit! But no leaks - now we are ready for a proper sea trial! Pat

-
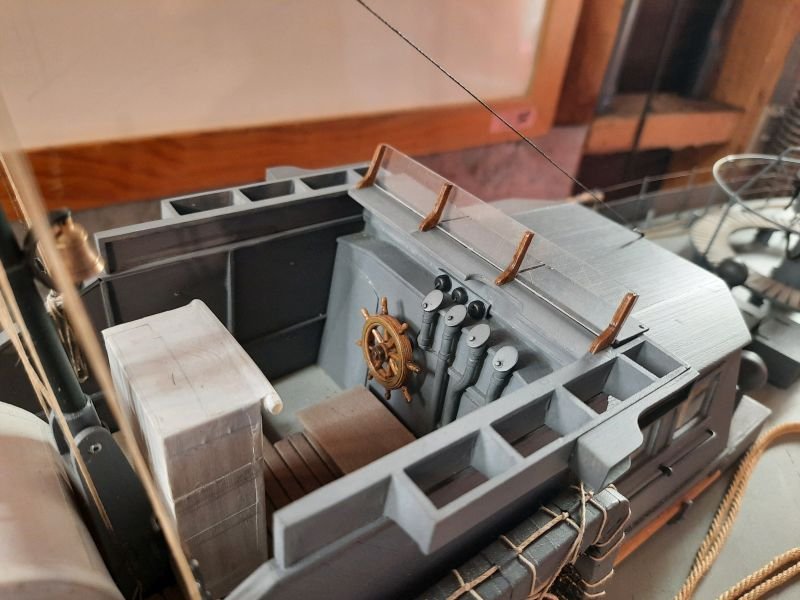
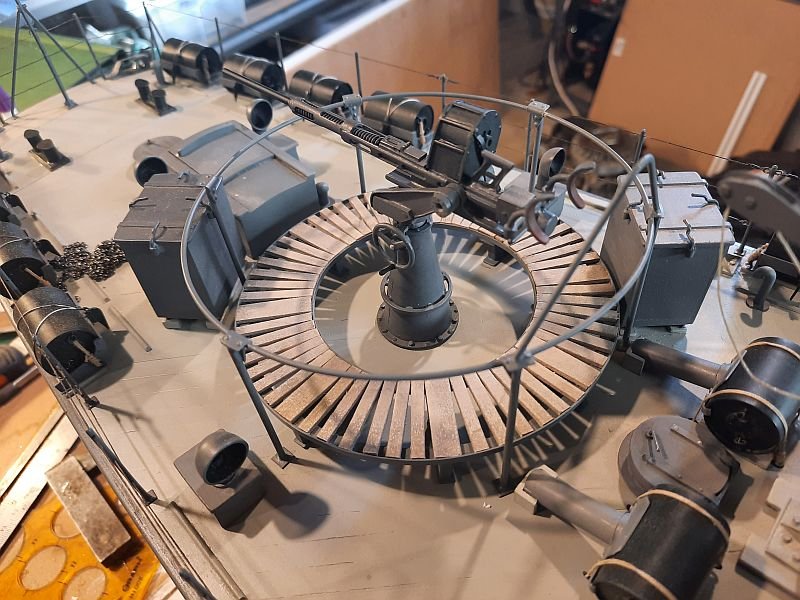
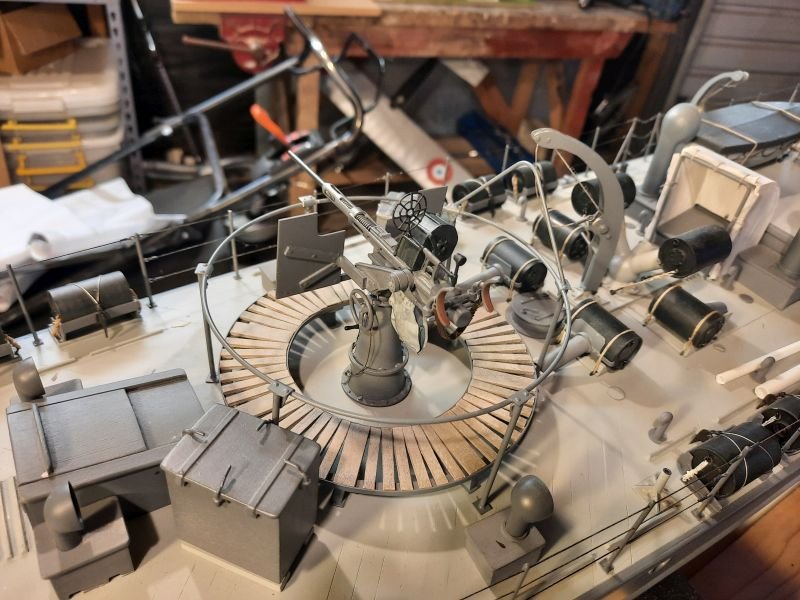
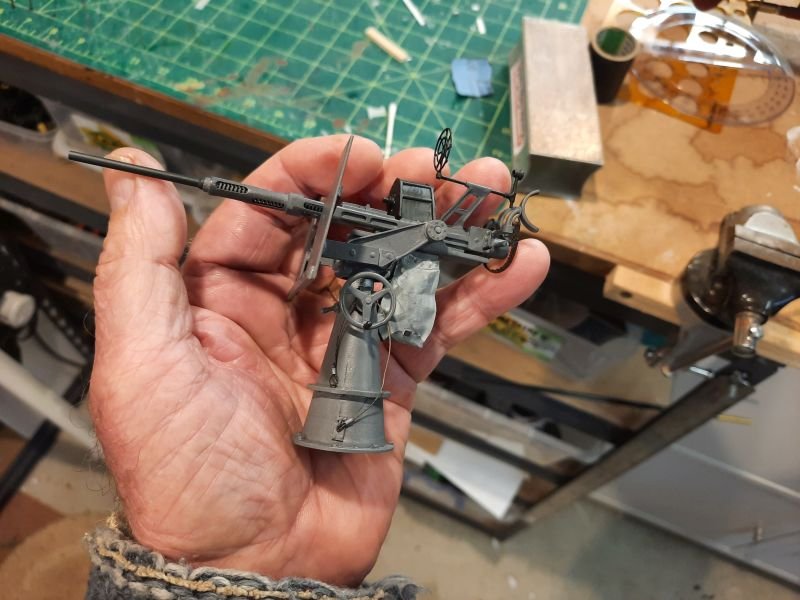
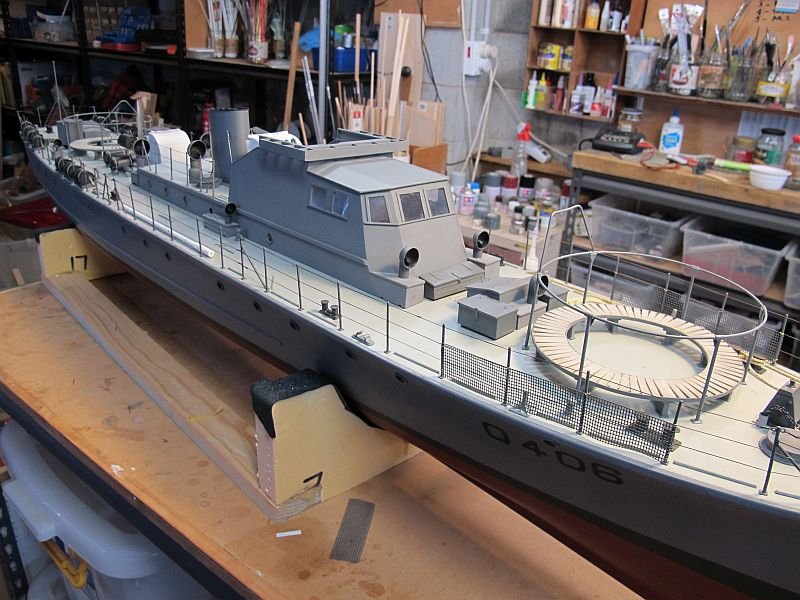
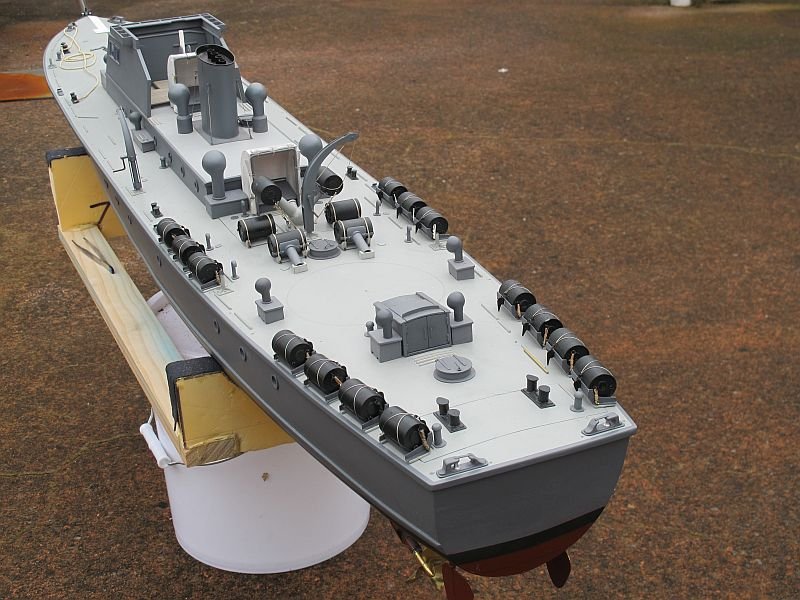
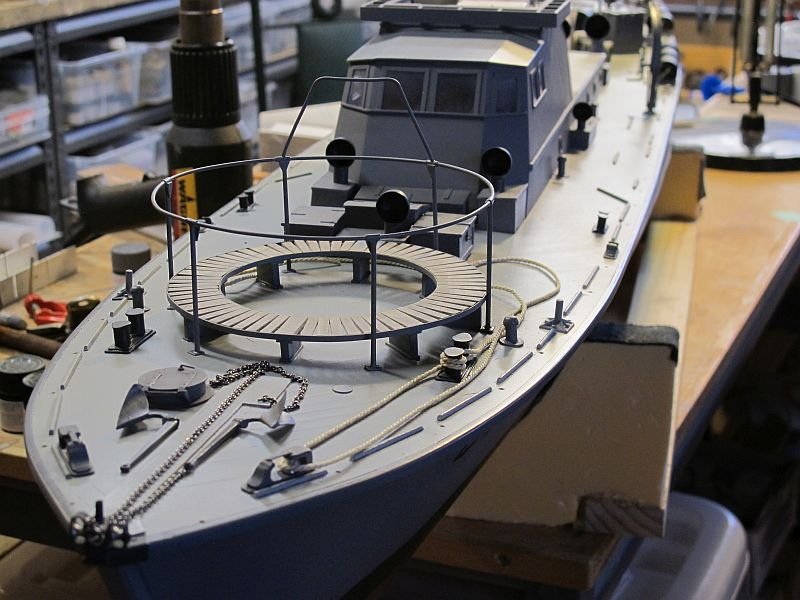
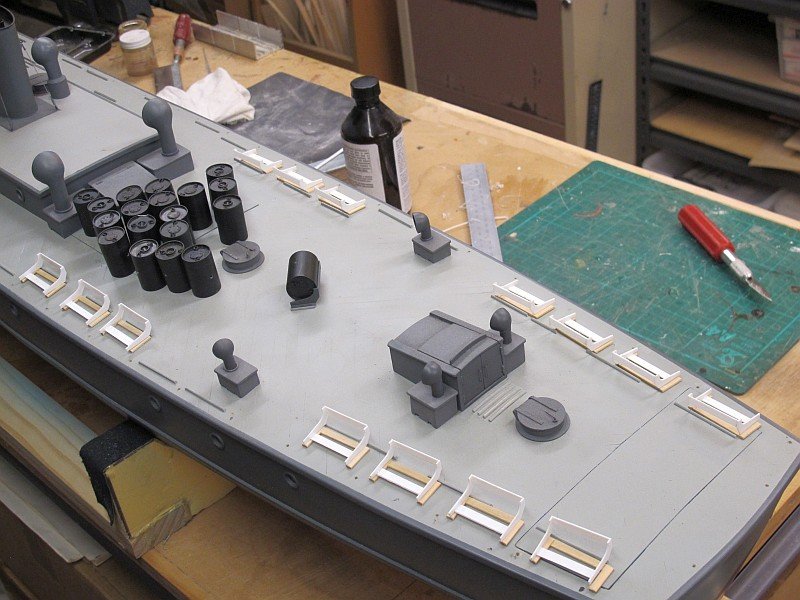
No, the compass doesn't work - I doubt anyone look that hard at a model regatta! A few more details and soon it'll be done. The forward gun is a Rolls Royce 40mm - I'm told it wasnt all that successful but I doubt the NZ boats even used it - except for practice. The deck is finally getting the look I was aiming for - a lot of clutter. A bit more work and we can get it under power! A did one picture in B/W to see if it looked realistic! Pat


-
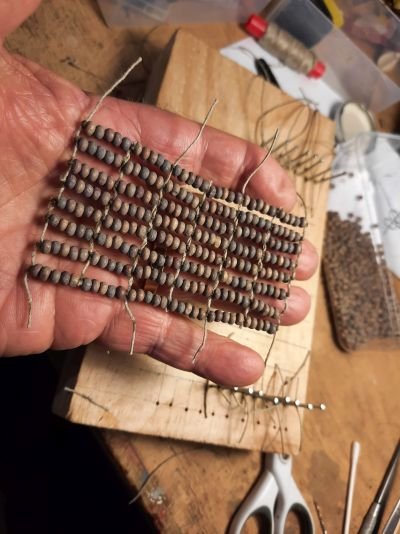
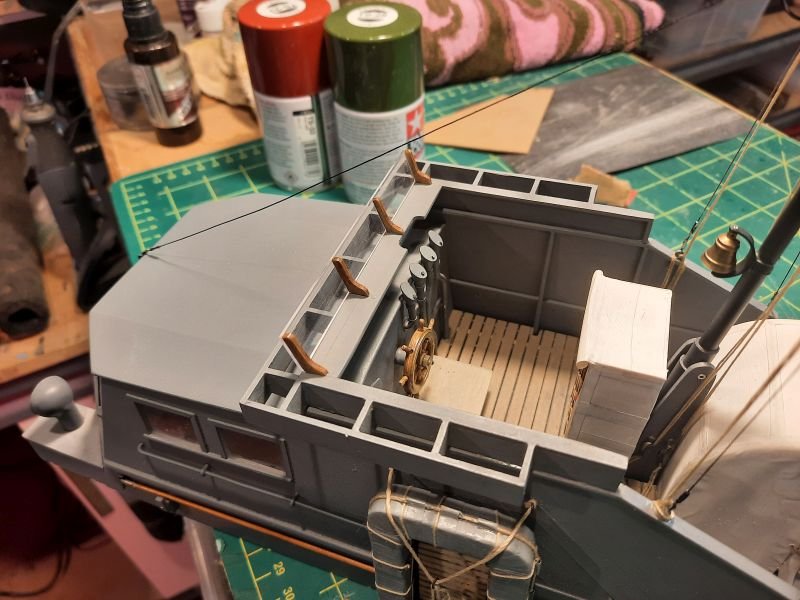
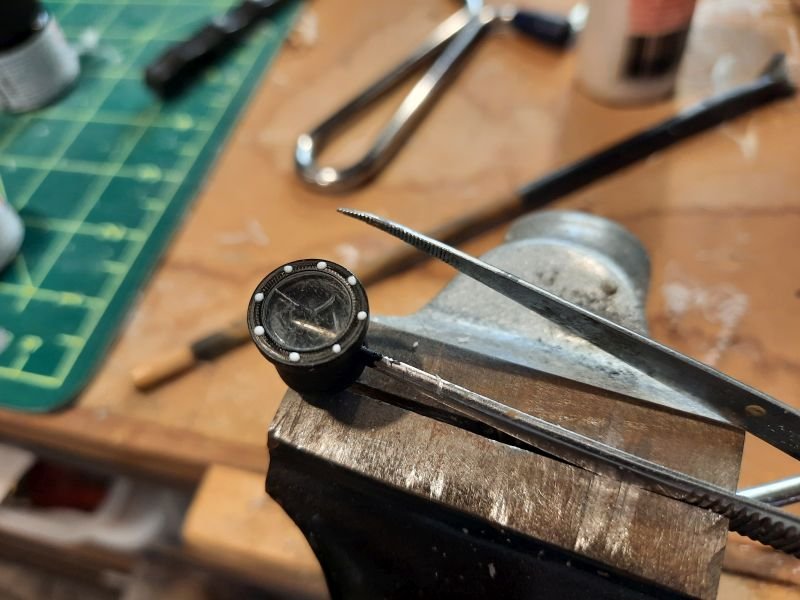
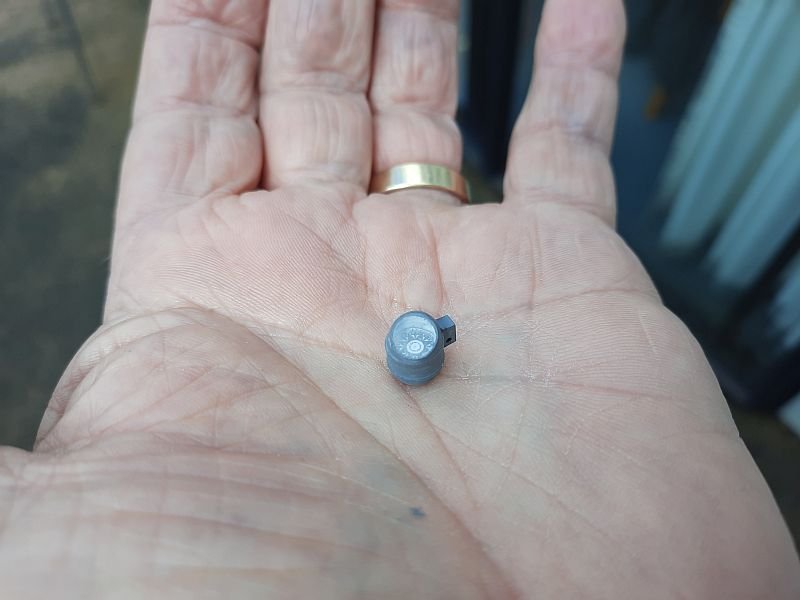
A few more details as the build progresses. As said before, I found this 1:24 scale good to fabricate details but still make a modest size ship. Searchlight, compass (with a dial inside), flotation matts from tiny coloured beads, and the beginnings of the bridge - more later. Pat
-
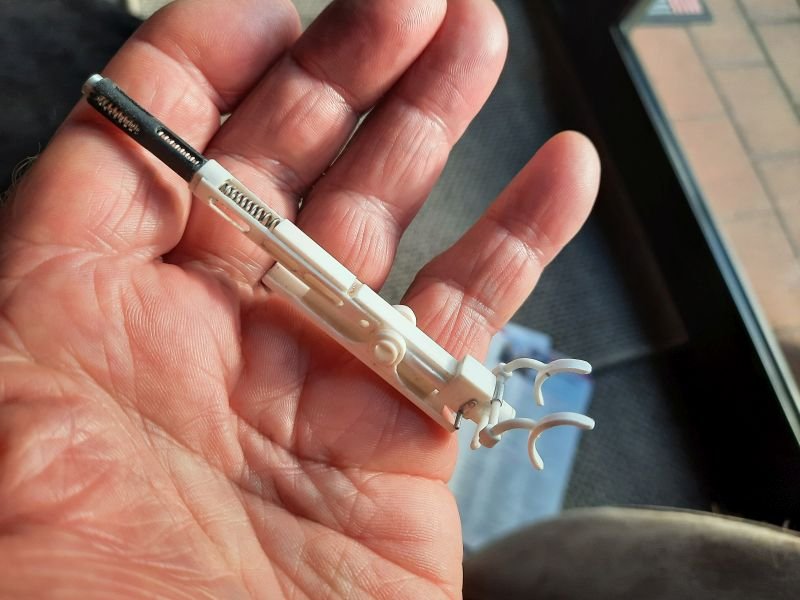
The armament was fun (despite its lethal purpose). An Oerlikon 20mm gun down the back was built from scrap tube, wire, old ballpoint pen springs and masses of plastic scraps. It was quite fun as there is only one to make - and there is plenty of accurate scale drawings available. Other detail can be seen around the deck as the model progressed. Pat
-
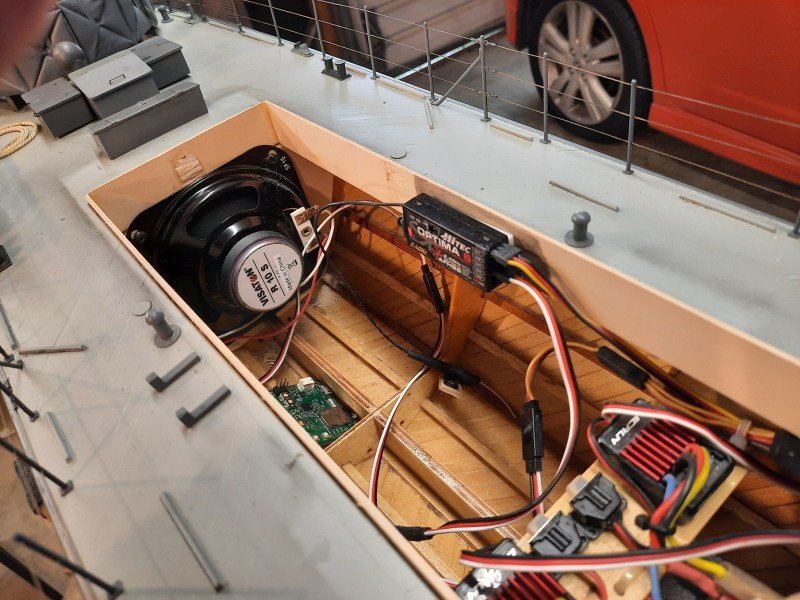
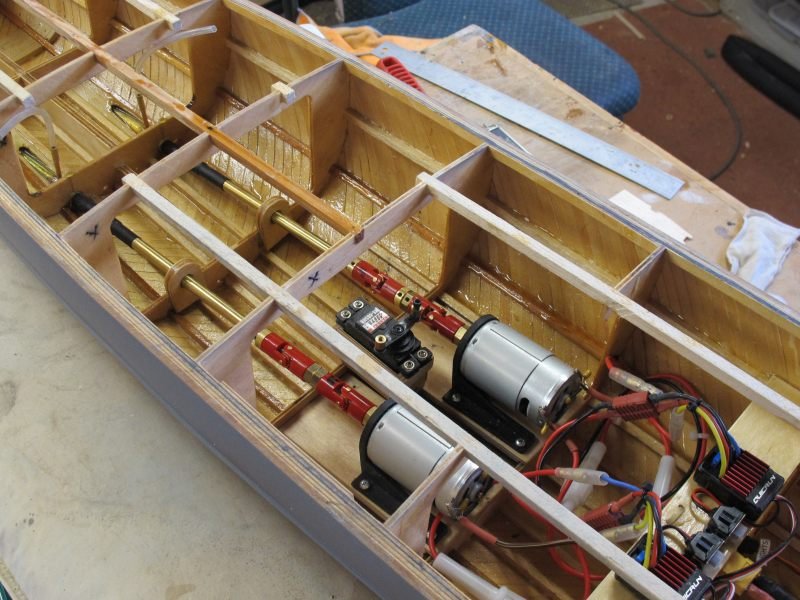
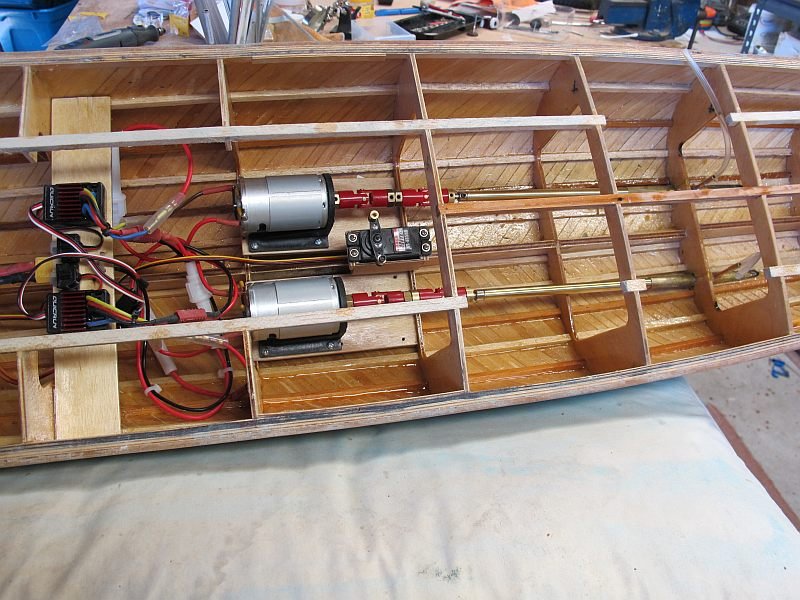
Thanks for the kind comments folks. Here are some photos of the basic internals. The rudder servo is in the 'engine room' with 2 steel pushrods in nylon tubes down to the stern. Each rudder has crank on the rudder shaft. Easy and it worked well. I had also intended to have the motors independently controlled to give each prop the chance of going in opposite directions for tight steering. Haven't done that yet. 😉 Also visible in the engine-room photo - the prop shafts each have an oil tube which can be re-oiled by removing a small cowl ventilator on the deck above! Pat
-
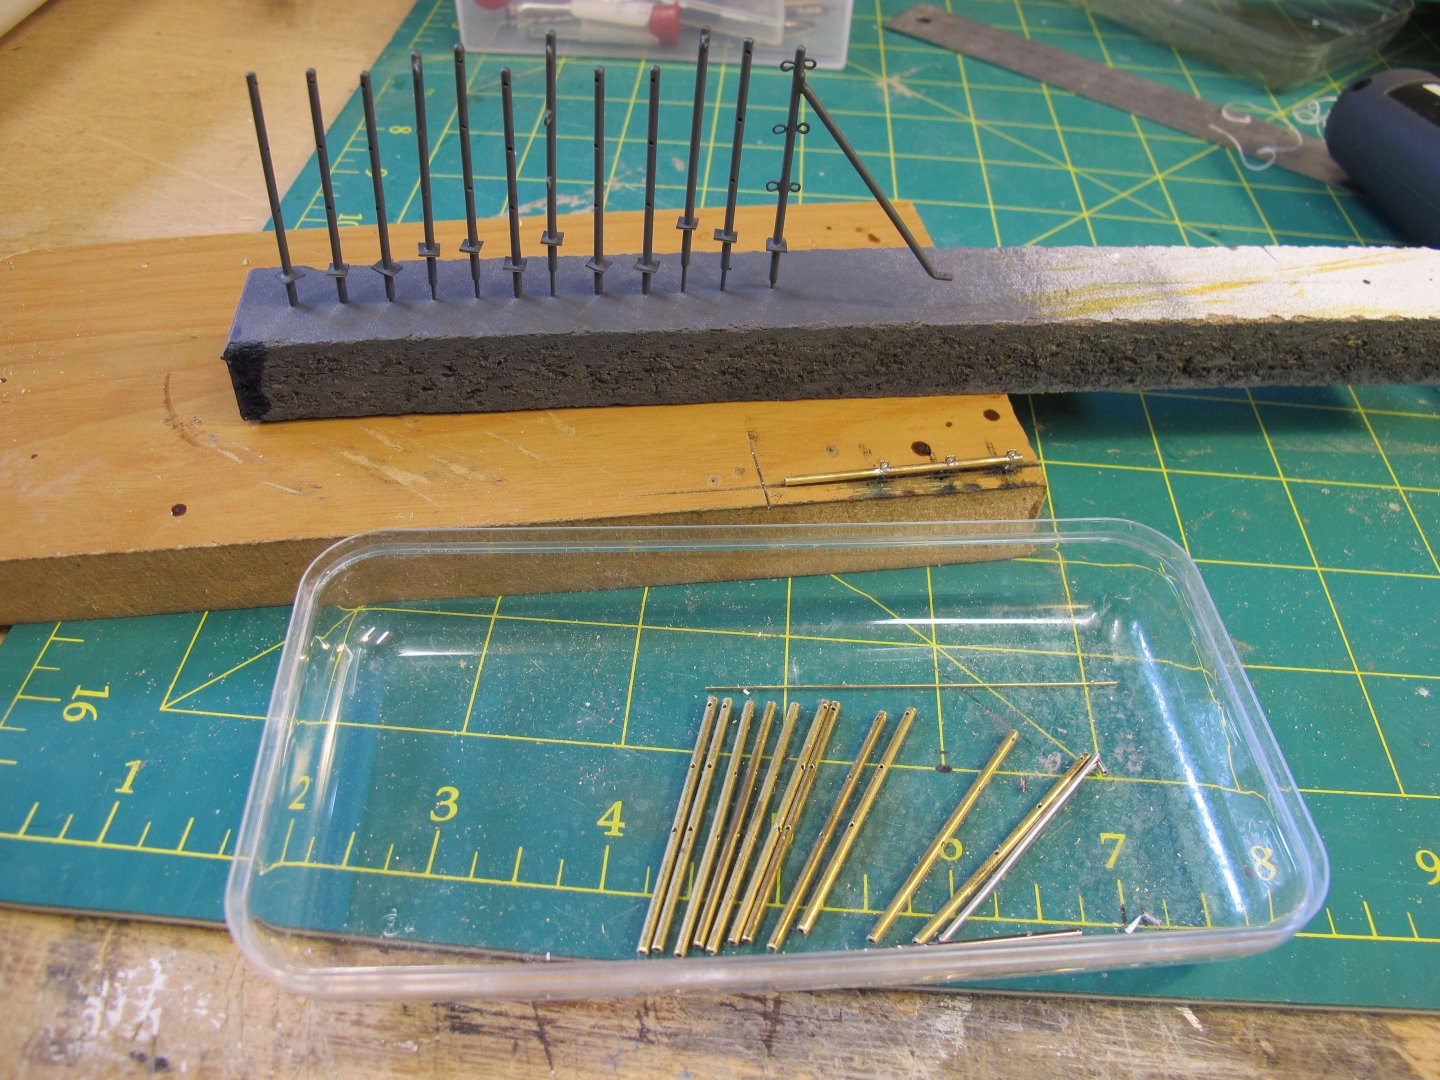
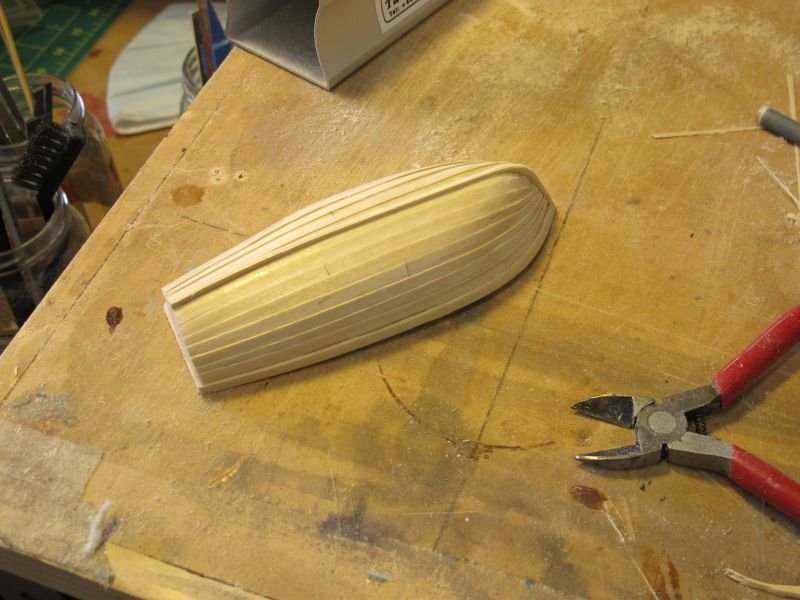
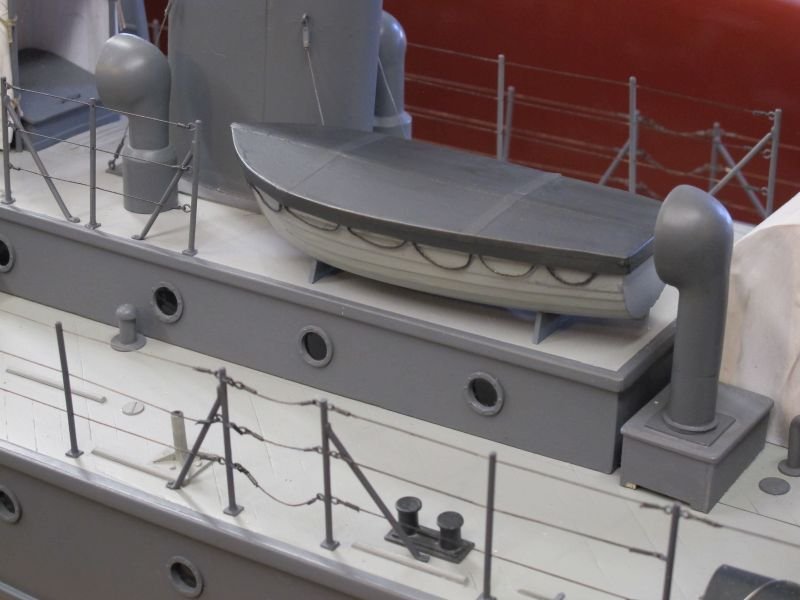
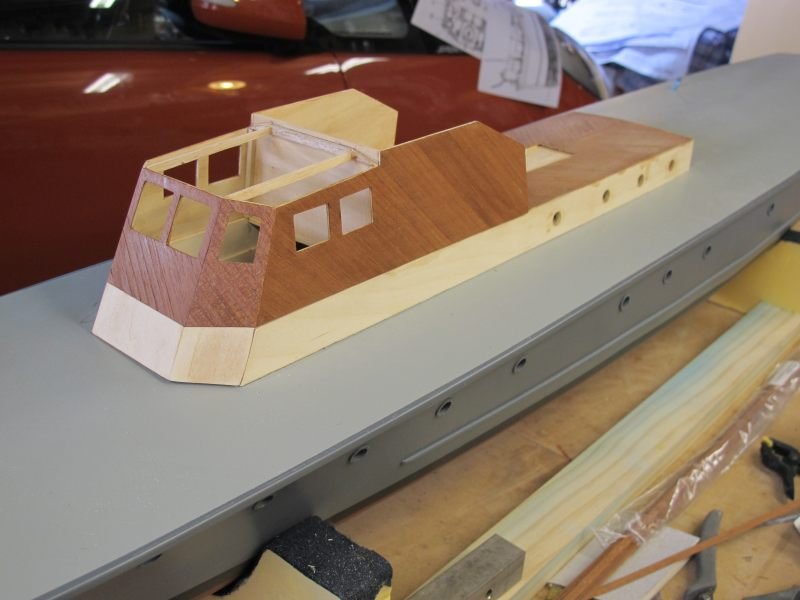
Continuing the model - 1:24 is a great scale for those who love detail! When to stop is a major problem - I guess when the next project was being considered, then this one needed to be finished. The railings were a learning curve and a few ways were tried and I eventually settled on 1.5mm brass tube stanchions, and stranded beading wire giving a realistic look. The little 'captains gig' dinghy is a shaped balsa block with Basswood planks. The cover is rc model plane textured covering material "Solartex". Pat
-
Thanks for the comments John. It was/is a great ship to model - the larger scale however, tends to beg some detail work that tests my ageing eyes 😉 Pat
-
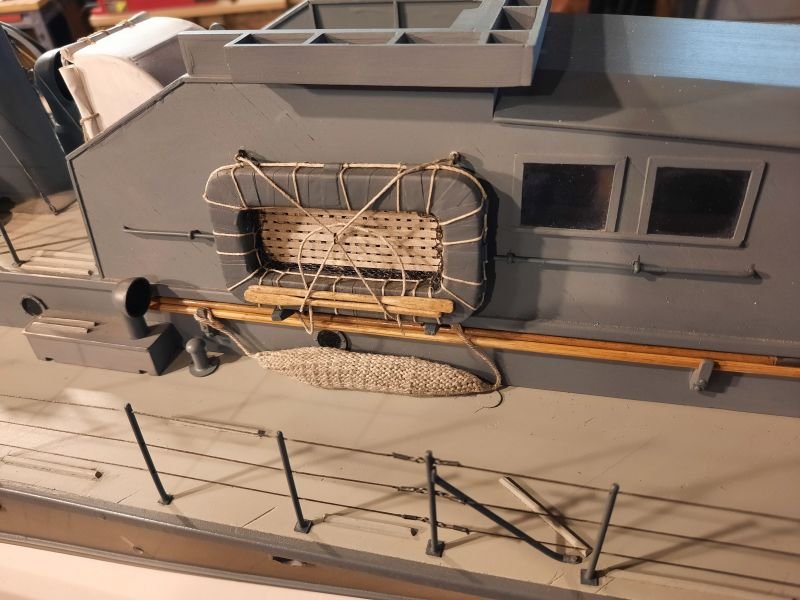
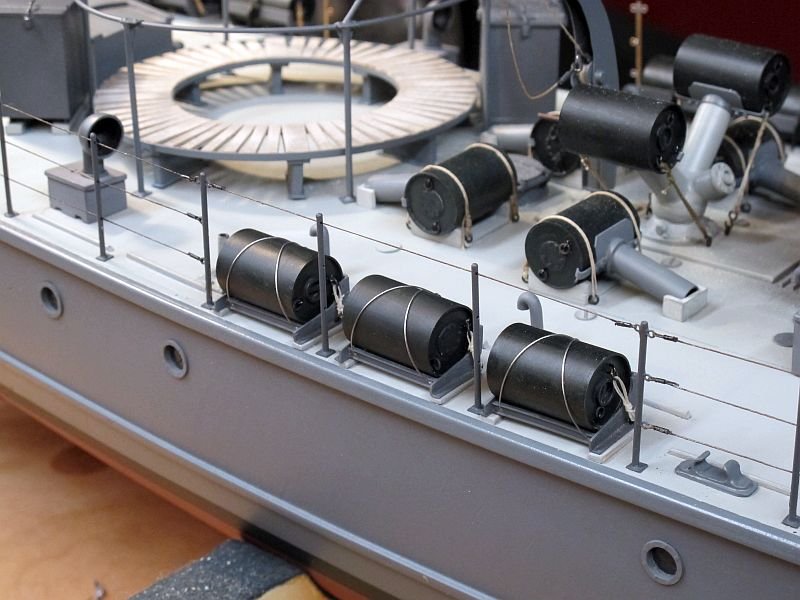
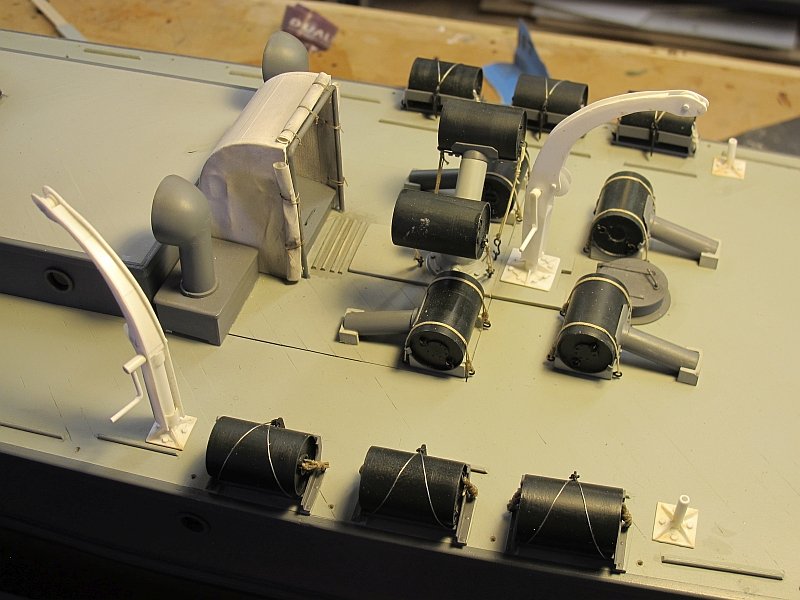
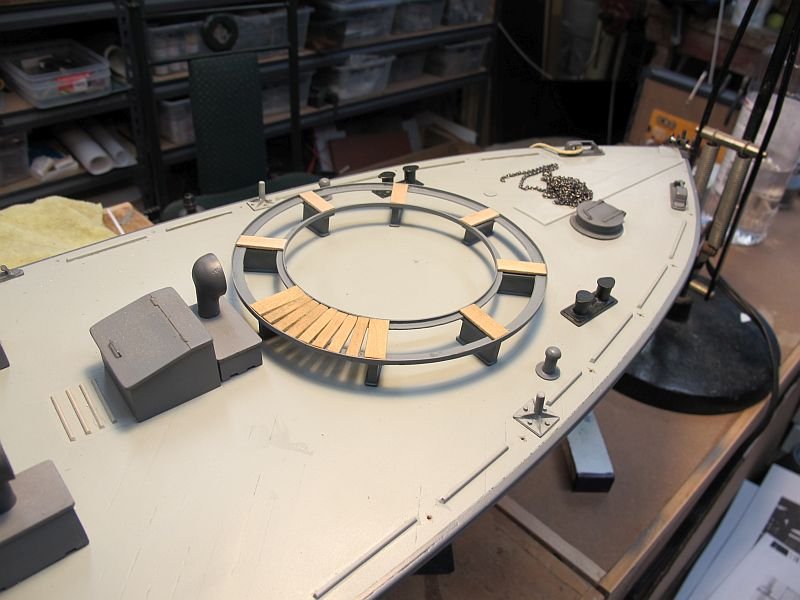
A few more details of the Fairmile as the build slowly progressed. Almost all the important stuff on the vessel is scattered around the deck - virtually covering it by the time the project is complete. At 1:24 scale, there is no excuse for leaving off visible details such as depth-charge securing cables and quick-release catches - I guess they were given a good boot over the edge! The forward gun platform has a raised wooden walkway and much of the foredeck clutter is complete. All parts have been scratch-built. This was my brief to myself when I started this project. I love the research and effort needed to work out ways of creating the odd-shaped bits on the model. ☺️ ps. I didn't make the chain or rope! Pat
-
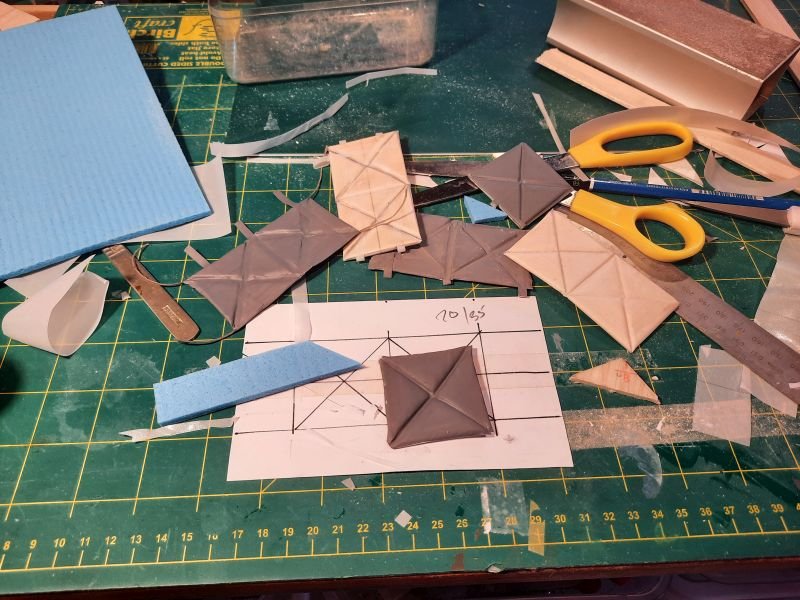
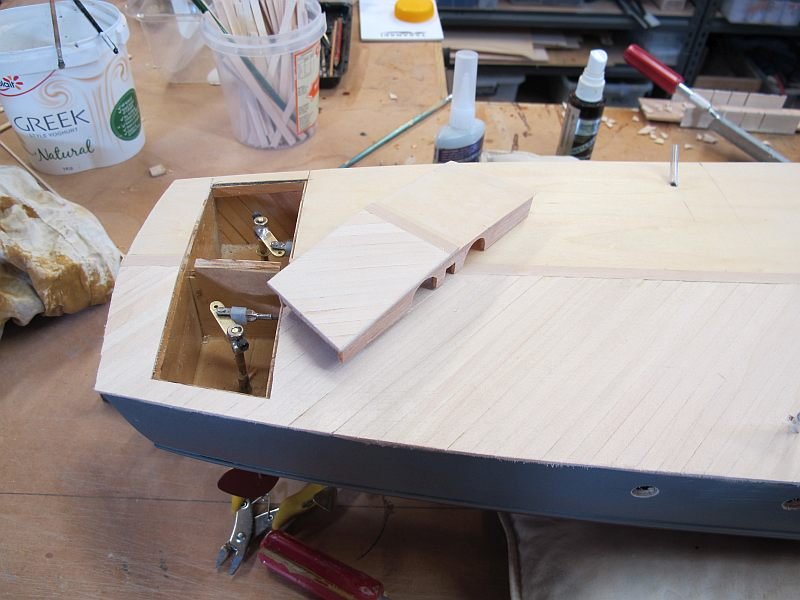
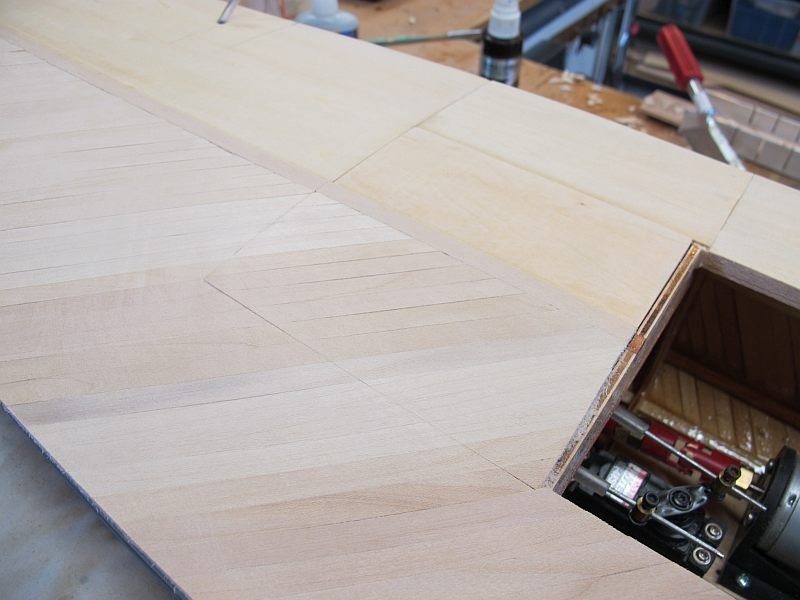
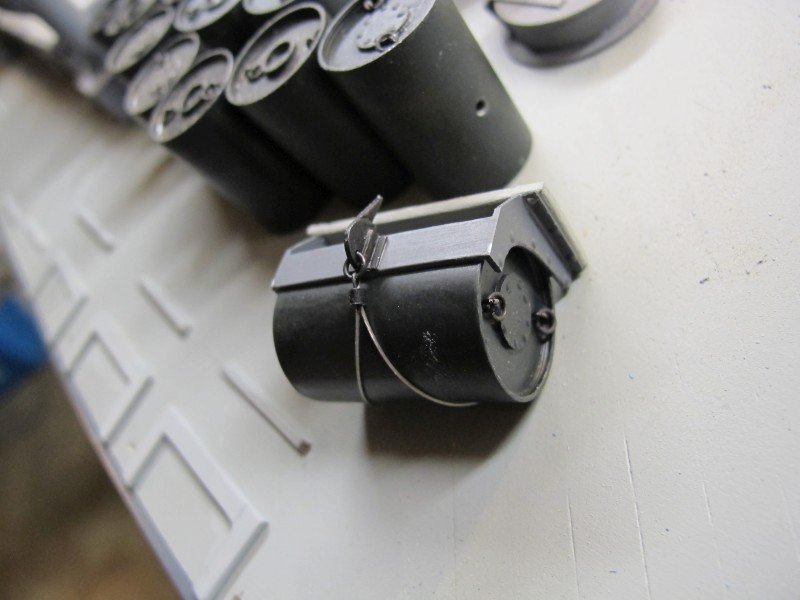
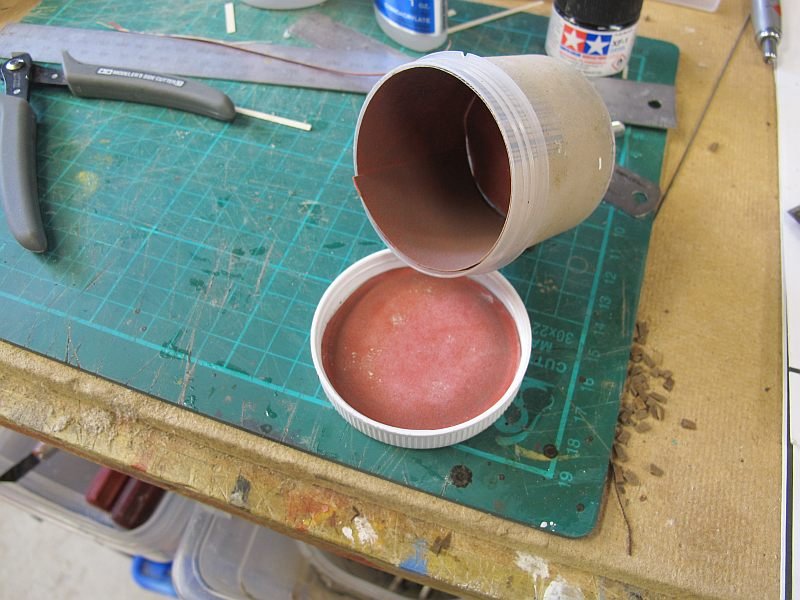
Moving along.....Next task was installing the power and control stuff - twin 600-size brushed motors (cheap) and controllers, radio and switches etc. Later, I also added a sound system with actual recording of the big petrol engines with start-up and linked to the throttle. With all the 'innards' fitted, The deck was framed and sheeted with 1.5mm ply. As per the prototype, the deck was planked diagonally as was the upper superstructure - a simple bit of work from 1.5mm ply. There are various hatches and companion way structures also added at this stage. The rows of depth charge racks around the rear deck were added to make sure they all looked ship-shape!🤔 A start was made on the many charges themselves - slices of a piece of correct diameter plastic tube. (old knitting needles actually). The vents, port-holes and other details shown are made from styrene sheet and tube. If anyone wants more detail, please ask! ps I mentioned earlier that this model was mostly built during the COVID epidemic some years ago - this is a speeded up description of the build because I like the nautical flavor of this forum 🙂 Pat

-
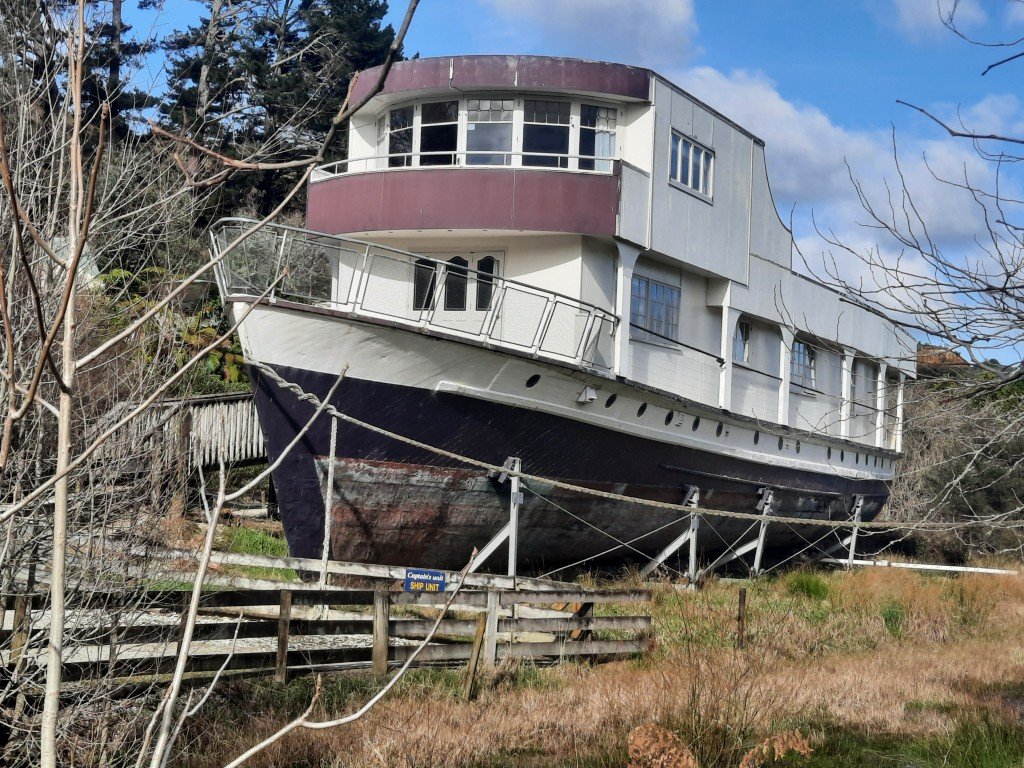
Yes Jim - it was a bit of a shock seeing her many miles inland near the Waitomo caves in NZ. Better than rotting away I suppose! Pat
-
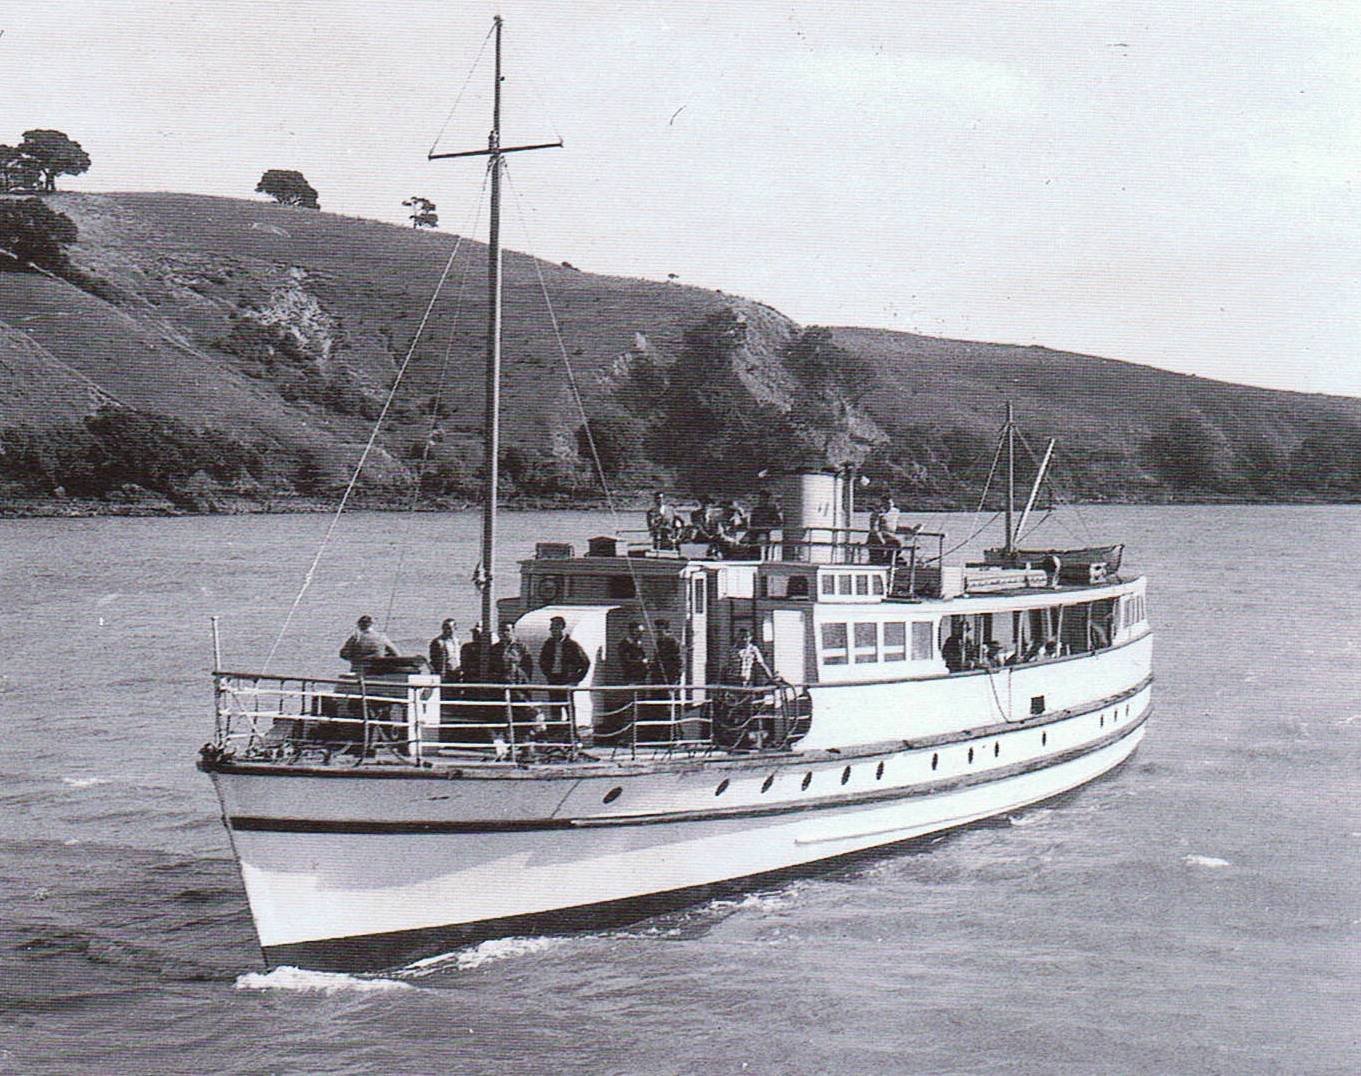
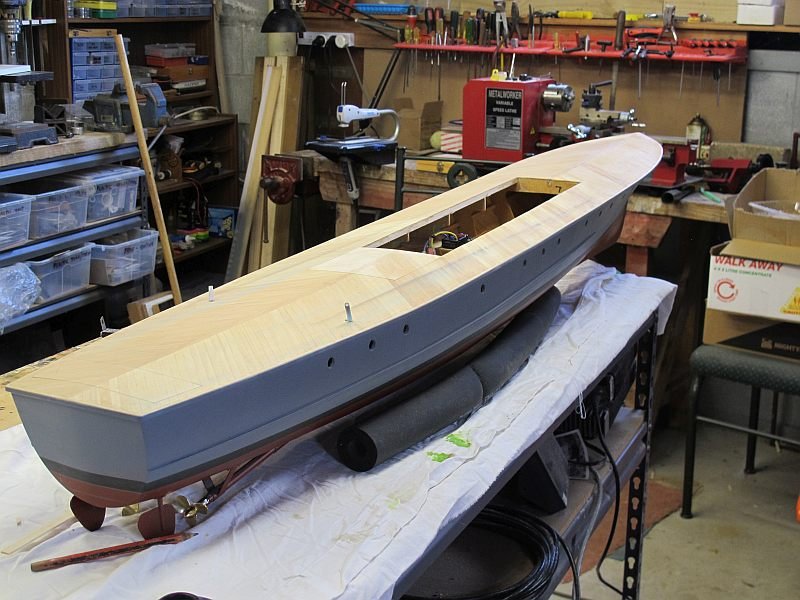
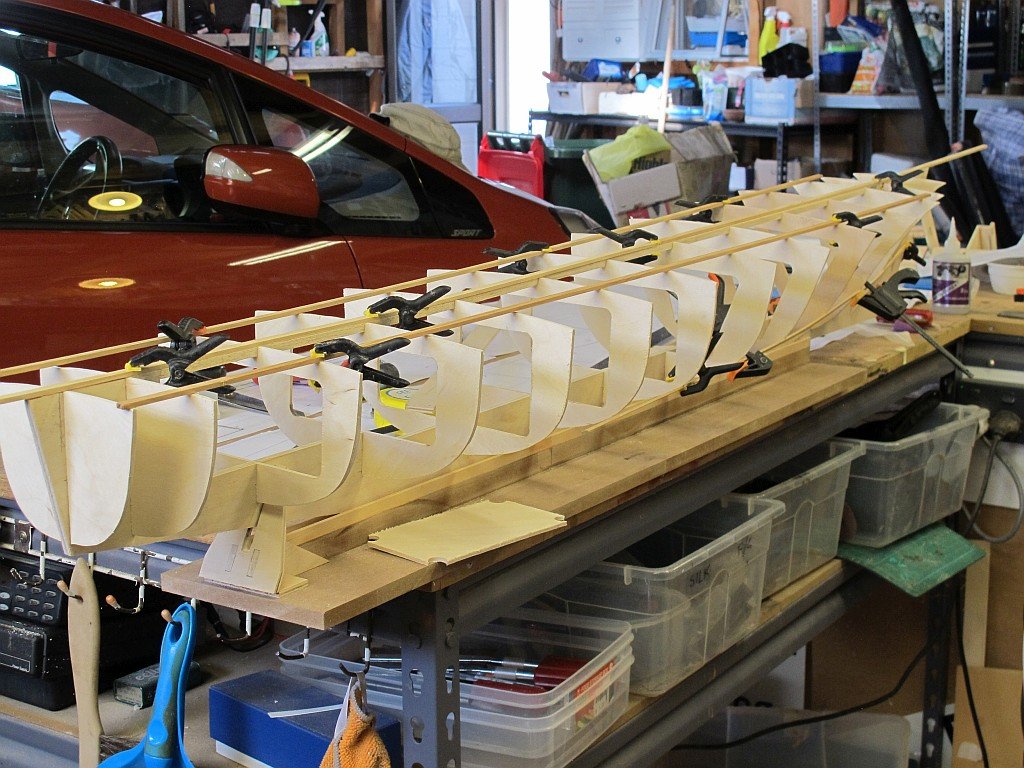
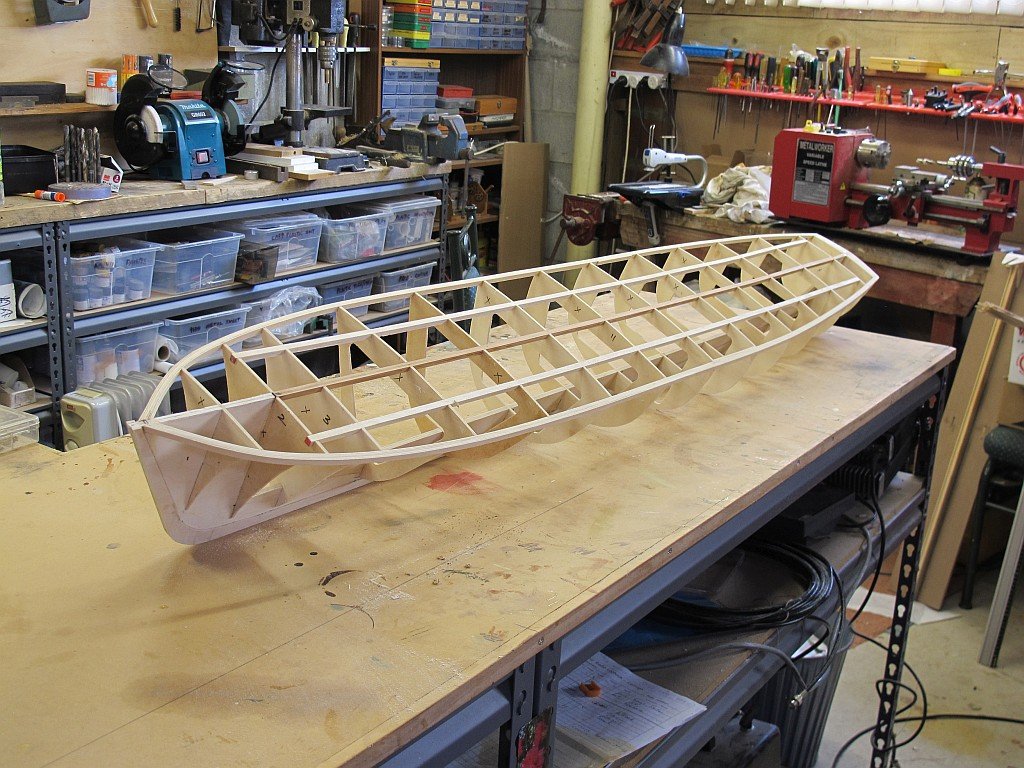
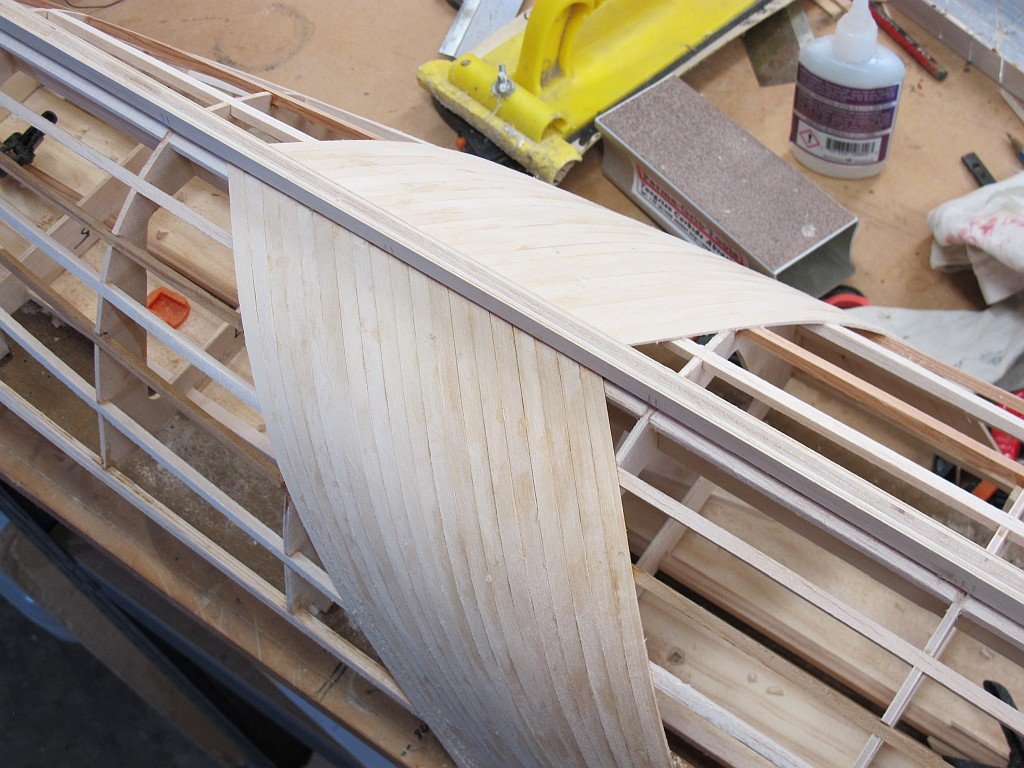
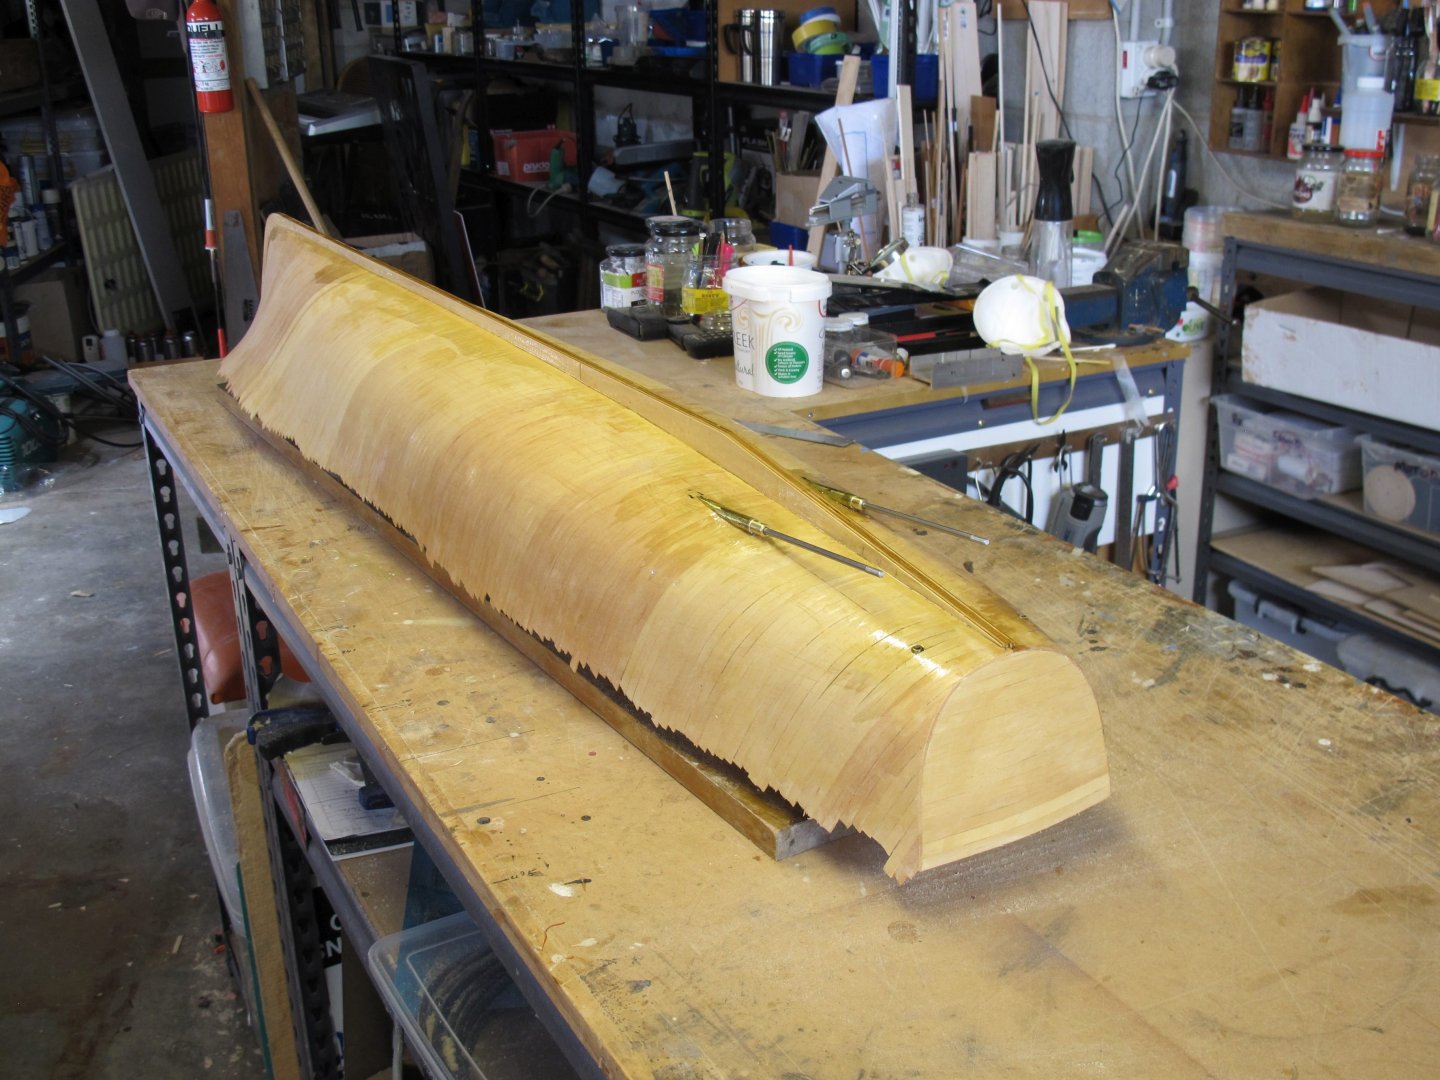
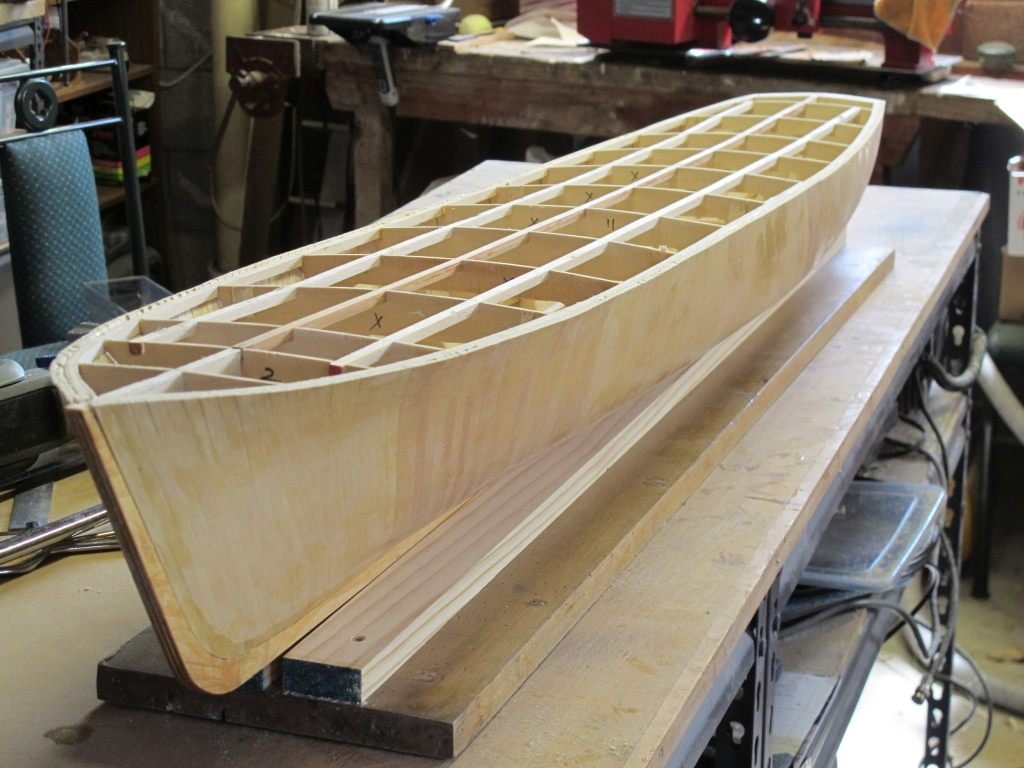
The real Fairmile C launch was constructed from plywood frames and clad with 2 diagonal layers of timber. This seemed an ideal way to build the model as well! A set of drawings of the real ship were obtained from the UK and although the detail and scales were of variable quality, they were a good start for a 1/24 scale model - a length of around 1500mm. This scale would give plenty of scope for detail and would still fit in my Nissan Dualis wagon. The basic side view was drawn out and the keel cut from 6mm 7 ply birch. The frames were also sketched out using an old version of AUTOCAD and cut from 3mm ply and the whole lot assembled on a jig and basic stringers notched into the frames. The construction looked almost exactly like the real thing. When all was checked and sanded, the frame was inverted and remaining stringers fitted. Two diagonal layers of 2mm Basswood were fixed using medium CA with a bead of waterproof Titebond along the edges. After sanding to a nice finish, a second layer of diagonal Basswood was applied at 90 degrees to the first layer. While still on the jig, the two prop shafts were fitted, carefully aligned and epoxied in place. Now it was looking like a proper boat 🙂
-
This model was conceived, researched and begun during COVID a few years ago and, wanting to share my experience, I'd like to post some photos and build notes for the benefit of others. The Fairmile launch was one of the first naval ships I had ever seen as a youngster when pointed out by my father during a visit to a celebration in New Zealand in the late 1940's. I'll post more details and photos as I dig them up from my "archives". Now to remember how to start a topic!
-
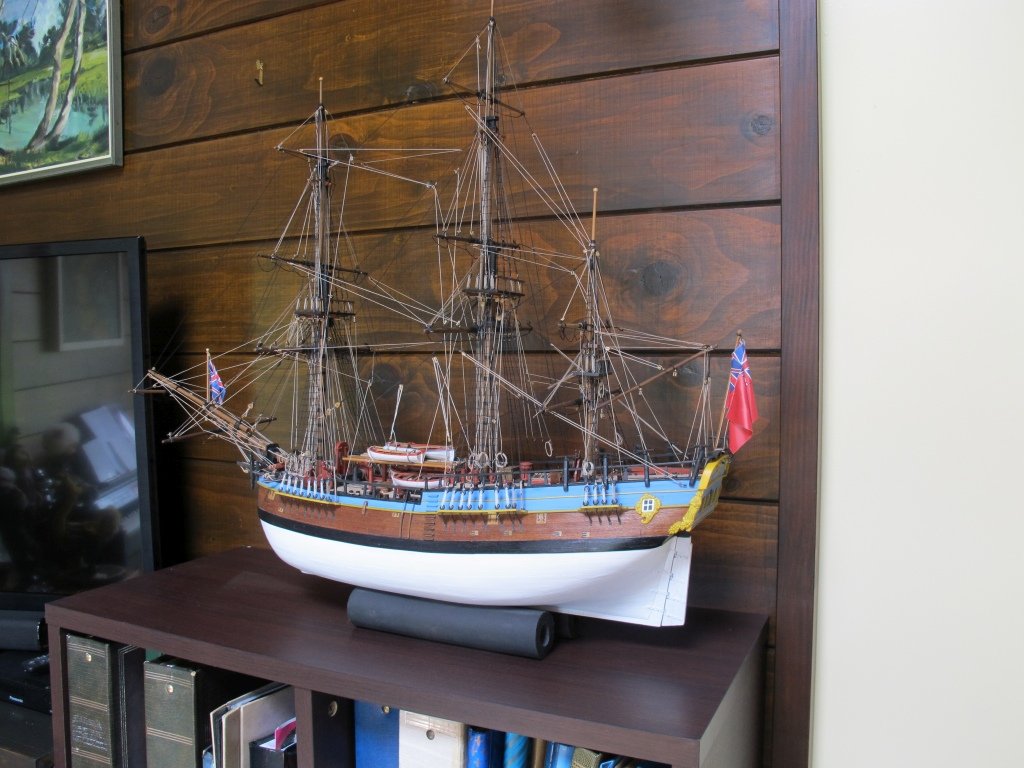
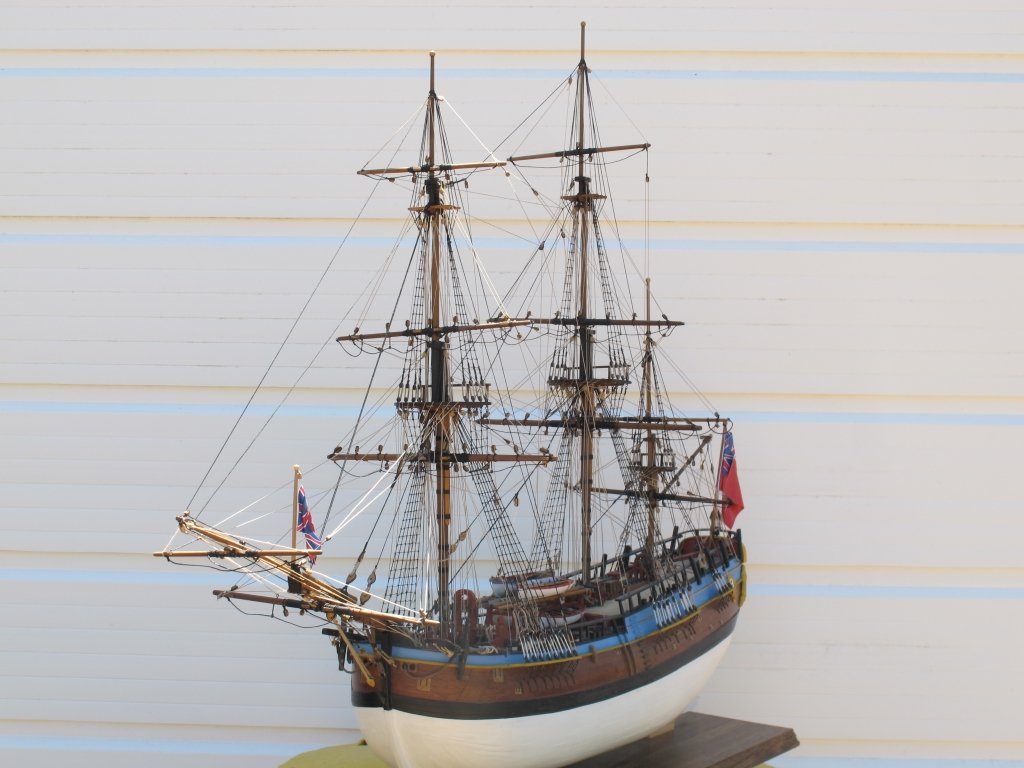
A temporary 'final' resting place in the music room. Now I can play my piano watched over by HMB Endeavour. She has been fitted with binnacles and swivel guns......now I need to make a less-rudimentary stand for her. Good to have completed a project 😎 Pat
- 111 replies
-
- 6
-

-
- artesania latina
- finished
- (and 1 more)
-
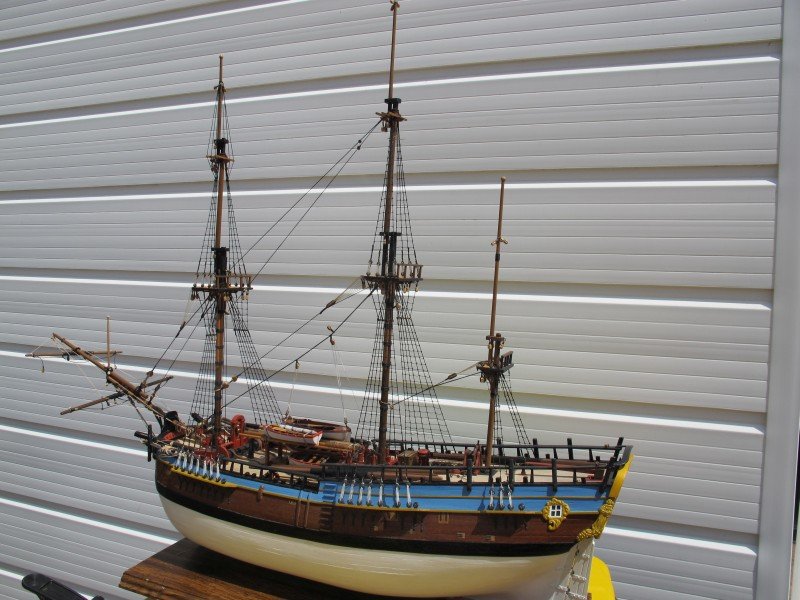
There's a saying in scale model aircraft circles that is just as applicable here ....."a scale model is never finished".....mostly, one just stops adding details. That is certainly the case with my Endeavour. There are still many small changes, additions, corrections etc that I can do but I'm declaring my model "finished". If I get an urge to update her over time, that may also happen but now she needs a simple stand so HMB Endeavour can grace a small space inside the house 😁 I spent some time pondering the flags as I didnt want a flag sticking out square of the staff. So the originals were used and carefully folded and glued to hang limp. Maybe not everybody's cup of tea but satisfies me on a static model Many of the more accomplished builders on this forum will see bits that are missing, but my enthusiasm is slowly waning in direct inverse proportion to my next, very different 'boat' model. Thanks for all the help and support on this project - while it is not the first time I've built a ship model kit, I t the first one I've finished. The first one I ever got to adding the yards and running rigging! Big job now is to clean up the shop and get all the Endeavour left-over bits sorted and stowed away. Next? A working RC power boat that I remember well as a youngster here in New Zealand. But I need to draw my own plans....... Pat p.s. I just remembered the binnacle/compass cabinet. Drat 😐

- 111 replies
-
- 7
-
-
- artesania latina
- finished
- (and 1 more)
-
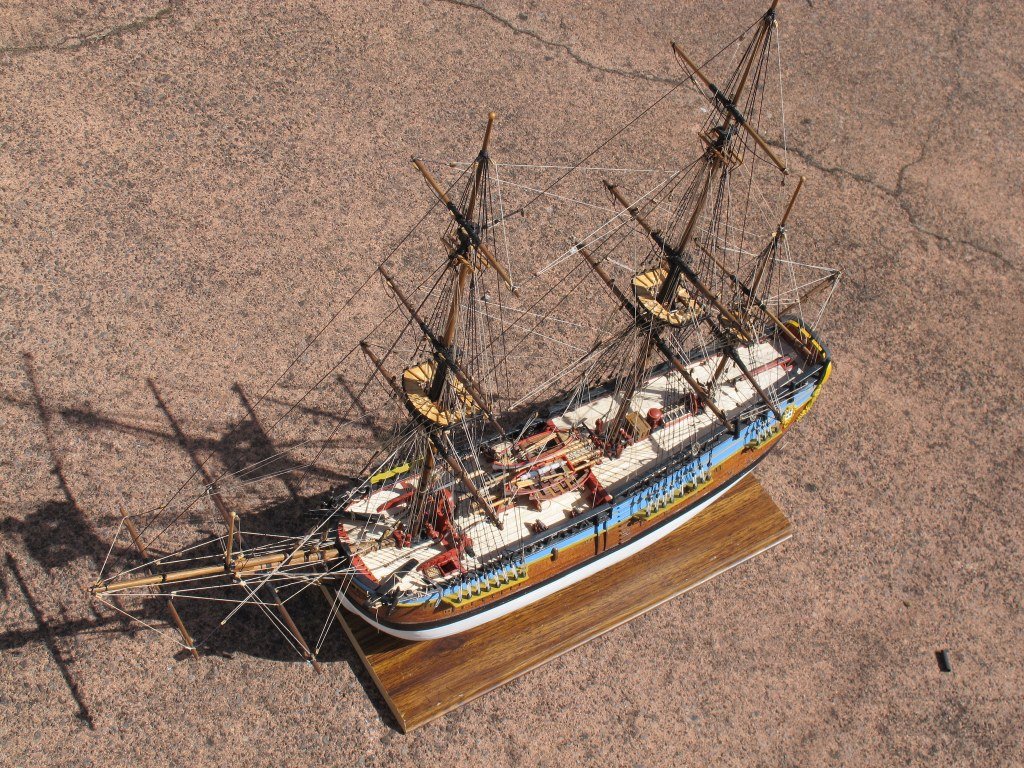
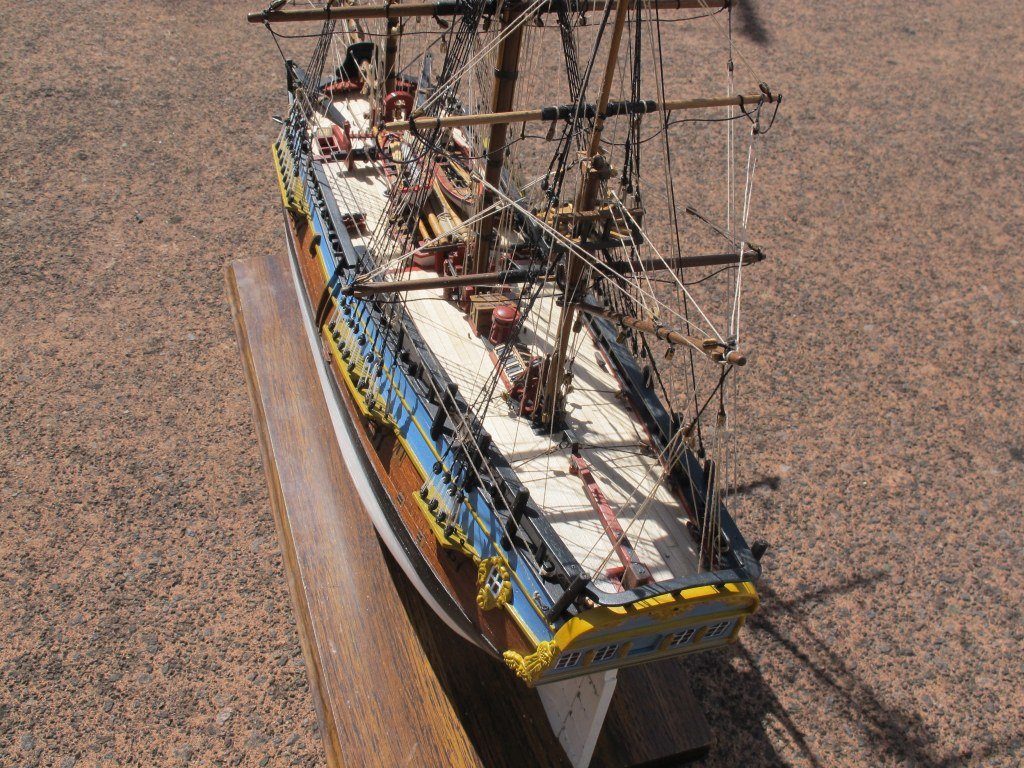
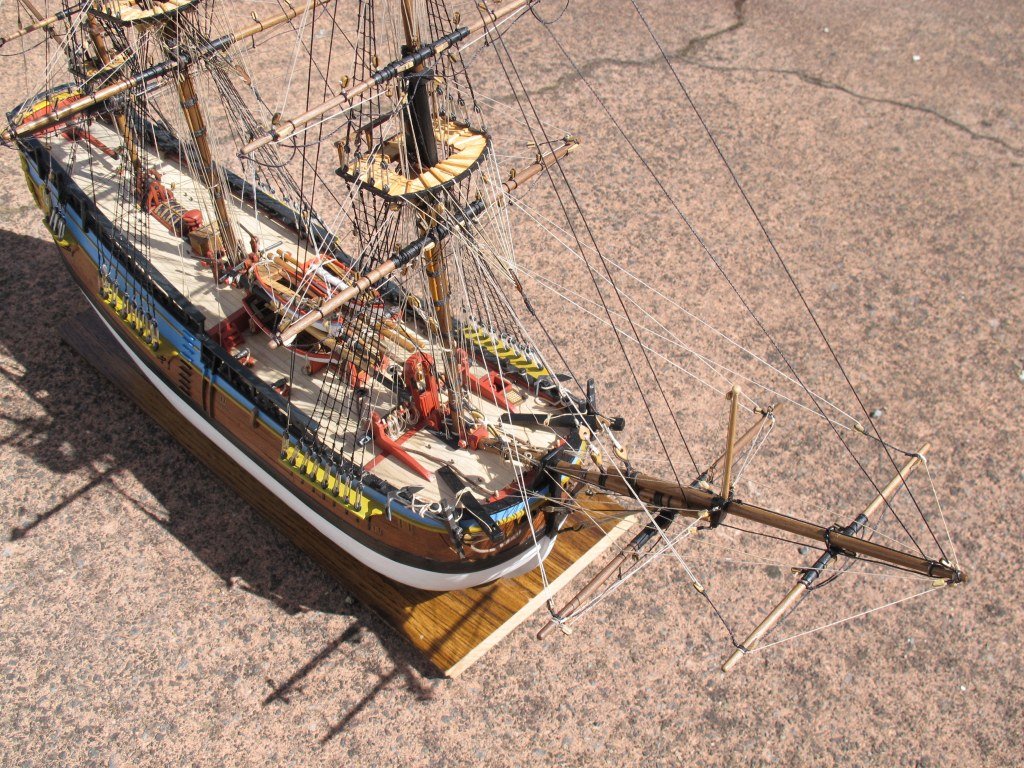
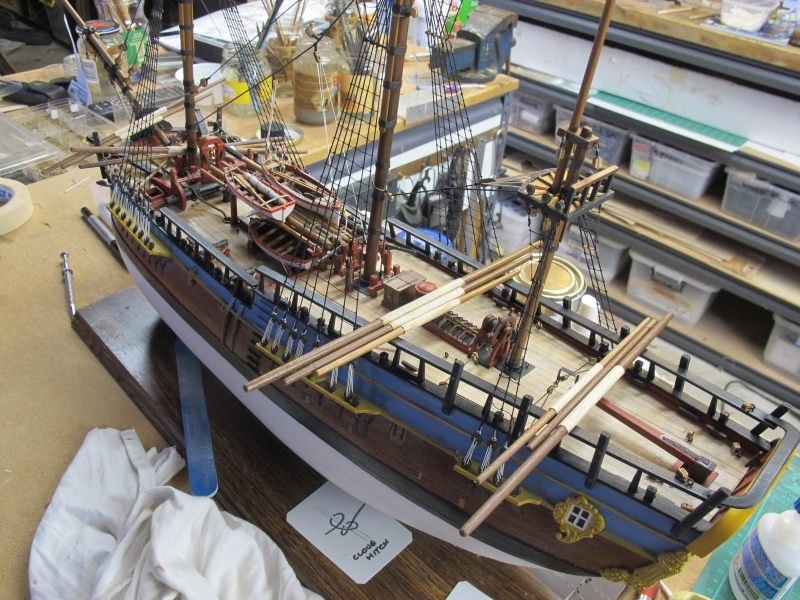
Yet more pictures with (I think) almost all the rigging done 😁 It is not a model to be used as a reference as I have relied heavily on A.L. documentation which is severely lacking in many areas but it allows a reasonable model to be built without too much kit-bashing. A lot of guesswork, much muttering and plenty of imagination were needed to get the running rigging "roughly" ship-shape. Ropes were going nowhere, the main deck airspace criss-crossed with yard stays (they'd never have got a boat lifted over the side) etc made me re-think a few steps. But Milton Roth, R.C. Anderson, Charles Davis plus all the great photos on this forum gave me a very basic idea of how these wonderful vessels were built. Extraordinary stuff. My model is so full of faults and errors that I dont dare do any close-up photos........ 😎 Still to go are a few deck details - barrels, the console near the wheel with navigation stuff in it, LOTS of dummy ropes stowed around the decks and of course the flags. These seem a bit rigid but maybe OK when made to look hanging in folds........I may even finish by Christmas 😎 Pat
- 111 replies
-
- 4
-
-
- artesania latina
- finished
- (and 1 more)
-
Just a progress report - no real exciting stuff. All the yards are now in place and the foremast remains to be fully rigged - mostly the running rigging. Then comes the major task of fabricating all the dummy looped ropes and fitting them over bitts and belaying pins etc.........still a way to go 😉 Pat

- 111 replies
-
- 5
-
-
- artesania latina
- finished
- (and 1 more)
-
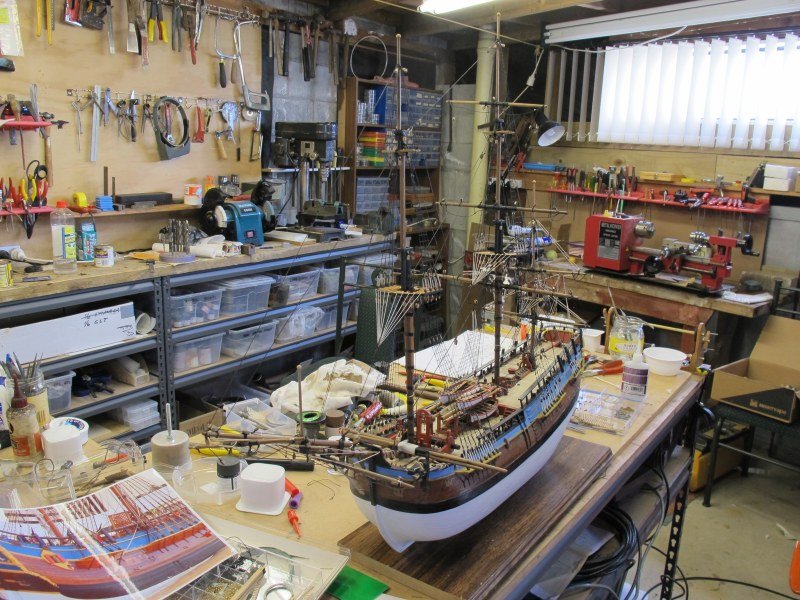
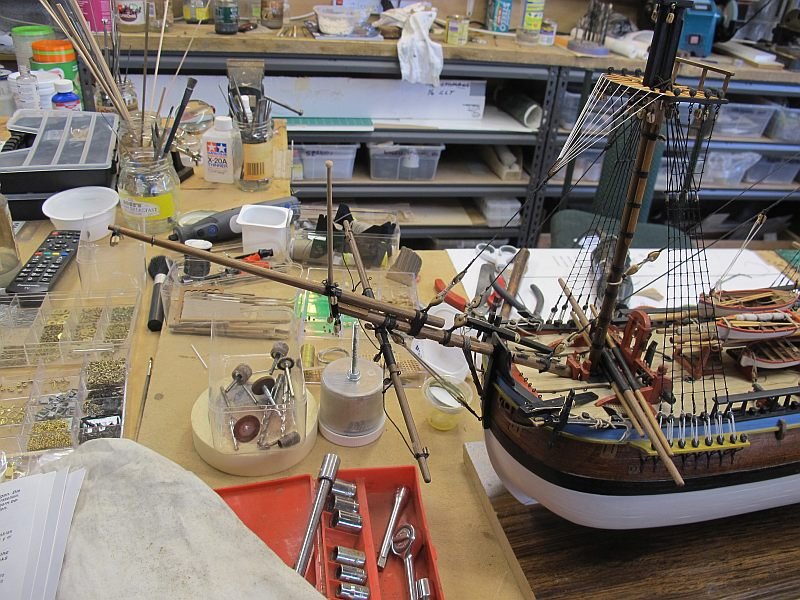
With Christmas fast approaching, I am reminding myself of my self - imposed target of a finish within 12 months of starting - still another two months to go but progress has been rapid! The speed of the build is dependent on a few factors, the biggest of which is my lack of understanding the rigging on an old ship. But I am learning! A.L. provides some "OK" drawings plus some not-that-useful photos. Helpful hints and instructions are almost non-existent. Thank goodness for Banyan, Dave Rowe, Cabbie and the others for their many photos which give me (usually) several variations to choose from! But once the spidery mass of shrouds and other 'stuff' starts to look complex, my heart gives a little joyous jump and I continue my task! What I've done is not always according to the book or the rules but the ship is looking like the real thing. As long as you don't look to hard 😉 I've just mounted the Mainmast yards including my first proper parrell. Now I get to sort the various lifts, hoists, stays and a myriad other mysterious nautical oddities. Then, only 3 yards to go........... A stinking hot day so Endeavour was moved outside for a few pictures..........Pat ps - not all model ship builders have tidy, organised work benches 😉
- 111 replies
-
- 7
-
-
- artesania latina
- finished
- (and 1 more)
-
Thanks for the comments folks - I haven't properly quit model flying but ship/boat building involves much less stress than when flying is an expected part of it 😐 QUESTION: When sails are not being fitted to a model, what happens to all the running rigging that normally attaches to the sails? This must also happen on a real ship when sails are removed. The main spars have several blocks each side which seem to guide ropes from the bottom/side edge of the sail and then through central blocks and down to the deck. Please excuse the non-nautical description 😏 I've barely a clue what a clew is (or bunts, bowlines, sheets etc...) Thanks in advance, Pat ps - I noticed after close inspection of other models, that some of these lines have been 'knotted' at the the blocks on the yards and then run as usual - was this full-size practice?
-
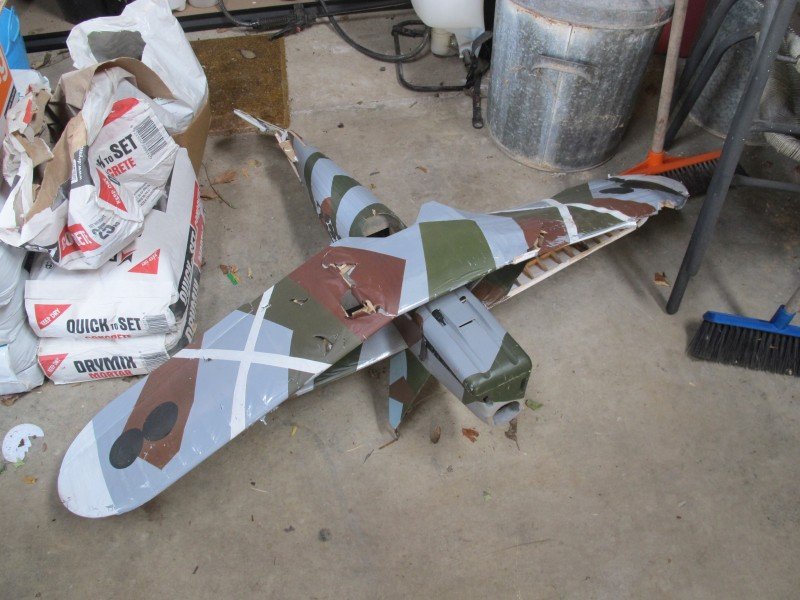
A couple of pictures showing the ups and downs of my modelling! The Endeavor is slowly progressing mostly in spite of A.L.'s rigging instructions. There are lots of drawings showing the basics of the standing rigging but often not enough information as to how or where some ropes are fastened to on the deck. I have taken many liberties and done a lot of head-scratching but it will at least resemble the original at a small distance. It doesn't help that I had left off some of the blocks to guide the various fore-stays down to the deck where I am assuming they are fastened to some eye-bolts around the masts. Looks about right! I'm trying to leave myself plenty of room for ageing fingers - after the various stays between the masts, I plan to fit the spars followed by the back-stays out to the channels. That's the plan anyway 😉 The second off-topic picture is from some months ago proving that a Heinkel 51 rc model will not tolerate attempting to pass though a large pine tree - modelship building is MUCH more relaxing......😎 Pat ps - see my profile picture 😏
- 111 replies
-
- 2
-
-
- artesania latina
- finished
- (and 1 more)
-
Great work Dashi - getting anywhere near the finishing line is a rare achievement on these ship model kits! (I know from bitter experience). Being able to follow your build, plus the work Pat, Dave and others, gives me hope that I'll overcome obstacles and finish mine too! Thanks for the many detail pictures and comments - it is all encouraging 😃 Many thanks for sharing! Pat
-
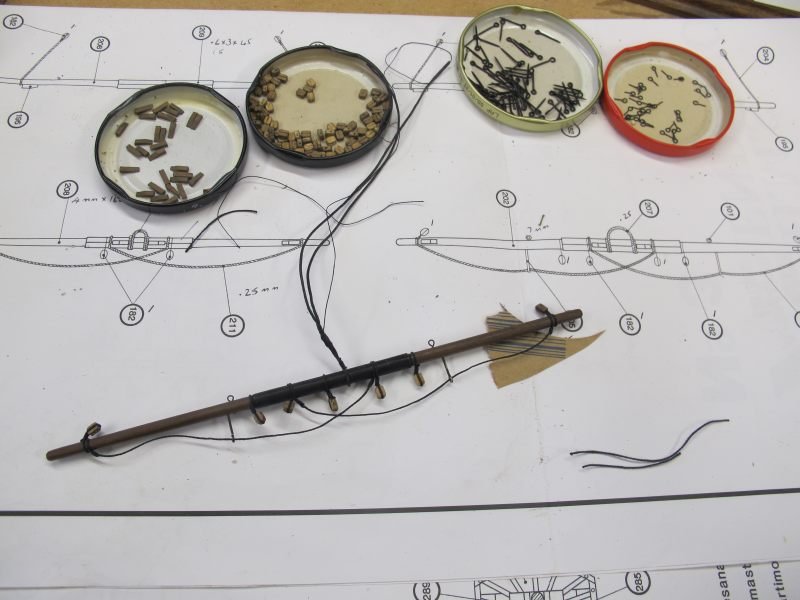
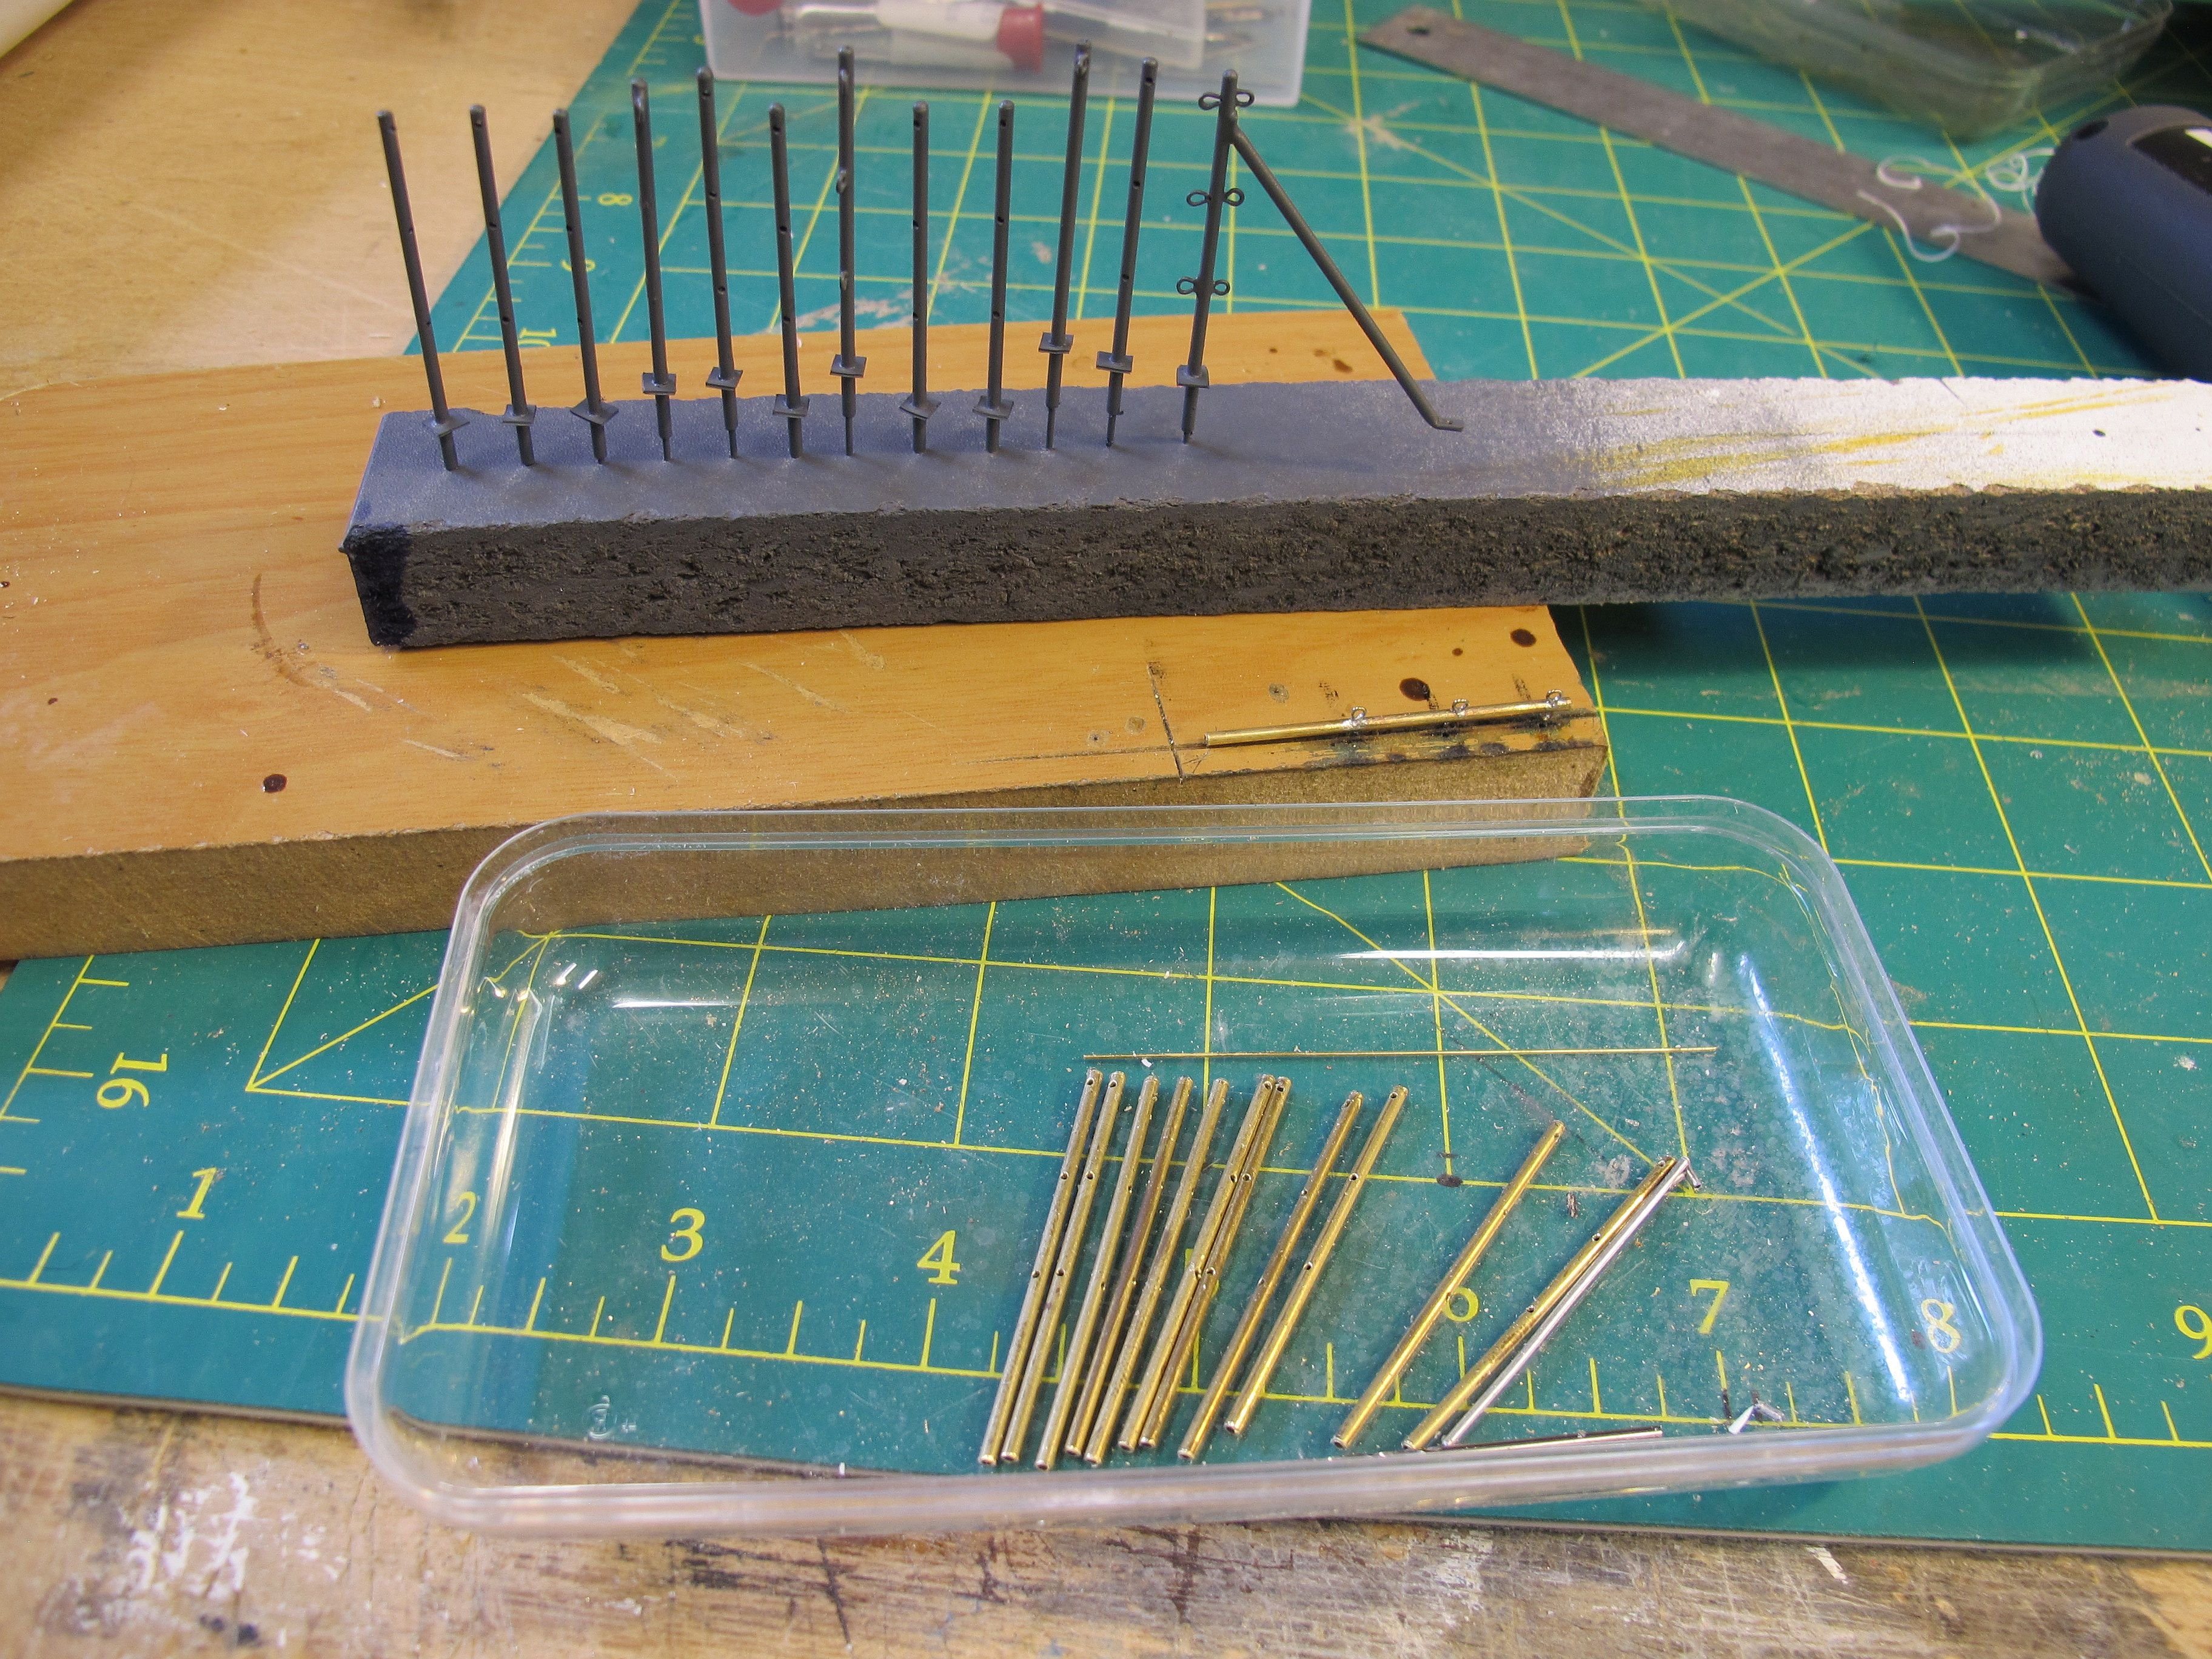
Thanks gents for the thumbs up 😎 Just another tiny step forward - I'd not realised just how much work there is on a yard spar! Also just how complex the running rigging is for the yards on the bow sprit. All part of the steep learning curve! I prepared all the bits that will be used making the yards - different sizes of 'eyes', lots of single blocks which I stained and tumbled in my very sophisticated machine. A plastic container with a lid, some 120 grit sand paper and a bolt through the pot to hold in the lathe chuck. I also tried throwing in a few steel nuts to help the cleaning up process. Worked a treat - even the fairly ordinary A.L. blocks look better! One of the spritsail yards was lashed in place just to give me the satisfaction - very important to feel happy with a complex project. I checked out all the running rigging to the sprit-sail's yards and right or wrong, they all have somewhere to go! Only 10 more yards to do............. Pat
- 111 replies
-
- 3
-
-
- artesania latina
- finished
- (and 1 more)
-
I think it's very daring of you to get up so 'close and personal' Phil. At this tiny scale, nothing looks perfect does it! But I'm sure a metre or so back she looks magnificent 😎. A very ambitious project and great to follow. Pat
-
A very minimal post to ensure the forum I am still at work on the Endeavour! I've been away on a wonderful NZ train trip which took more than two weeks with lots of marvelous side-trips including the Tranzs-alpine trip. Great stuff. Sadly, at 75+ years, it takes almost as long to recuperate 😉 But, I have made all the various remaining spars (yards) and am almost ready to detail them as per A.S. plans. So, the deck is littered with half-built yard-arms! Pat
- 111 replies
-
- 2
-
-
- artesania latina
- finished
- (and 1 more)


.jpg.4e99453ccfc779f31ff4f2478dbd2332.jpg)