.jpg.8f8939eb11584d346cdeb2a7ec4e1e42.jpg)
Kusawa2000
-
Posts
394 -
Joined
-
Last visited
Content Type
Profiles
Forums
Gallery
Events
Everything posted by Kusawa2000
-
are those the plans that i got from Parks Canada for you or did you get them separately? they look great hardcopied! Mike Draper
-

Hello from Perth, Ontario - On to Victory!
Kusawa2000 replied to Malcolm Brown's topic in New member Introductions
we will definitely have to connect. I will let you know what my schedule is once I bought my plane ticket and got plans figured out.. this is seriously cool MIKE- 31 replies
-
- 1
-

-
- Victory 1:100
- Heller
- (and 1 more)
-
Hello from Perth, Ontario - On to Victory!
Kusawa2000 replied to Malcolm Brown's topic in New member Introductions
Ian: My sister and I have a cottage at one of the two bays at the Perth end of the lake.. my mom and dad bought it in the late 1960s and have it ever since. While I havent bought my plane ticket I will probably be in Ottawa from July 4th to around the 19th..the first week I will be at the bluesfest but after that I will probably up at the cottage.. I will let you kids know when I have my dates.... i think that would be a blast! MIKE- 31 replies
-
- 2
-
-
- Victory 1:100
- Heller
- (and 1 more)
-
Hello from Perth, Ontario - On to Victory!
Kusawa2000 replied to Malcolm Brown's topic in New member Introductions
Malcolm: I will definitely will take you up on your offer. I plan to be down there in July so can connect then. Thanks for the pic. The view brings back great memories of the Ottawa valley Mike Draper- 31 replies
-
- 2
-
-
- Victory 1:100
- Heller
- (and 1 more)
-
Hello from Perth, Ontario - On to Victory!
Kusawa2000 replied to Malcolm Brown's topic in New member Introductions
Malcolm: I am originally from Ottawa and still have a family cottage at Pike Lake... just near Stanleyville.. miss that country alot. Enjoy the view out your window for me and welcome to MSW! Mike Draper- 31 replies
-
- 2
-
-
- Victory 1:100
- Heller
- (and 1 more)
-
Ian: Dont get me started on windshields.. I have a 2017 Jeep wrangler and Im on my 4th windshield. The one I have on my jeep has one big crack along the lower edge and 6 star chips and its only 7 months old... 😰 MIKE
-
if you want to have a tip in driving the dempster. they use shale as the aggregate on the lower end and if you keep your speed under 80km/hr it will help not getting a flat... I have done the dempster more times than I care to remember and taking your time is the ticket for no flats Mike
-
Ian: No problem in getting the pics. I guess Parks office was closed for XMAS but once they were open it was easy peasy.. they also indicated they will be doing renos on the upper deck and will be willing to take pics of any section of the ship. and we have warmed up here.. today it was a balmy -25c. Mike
-
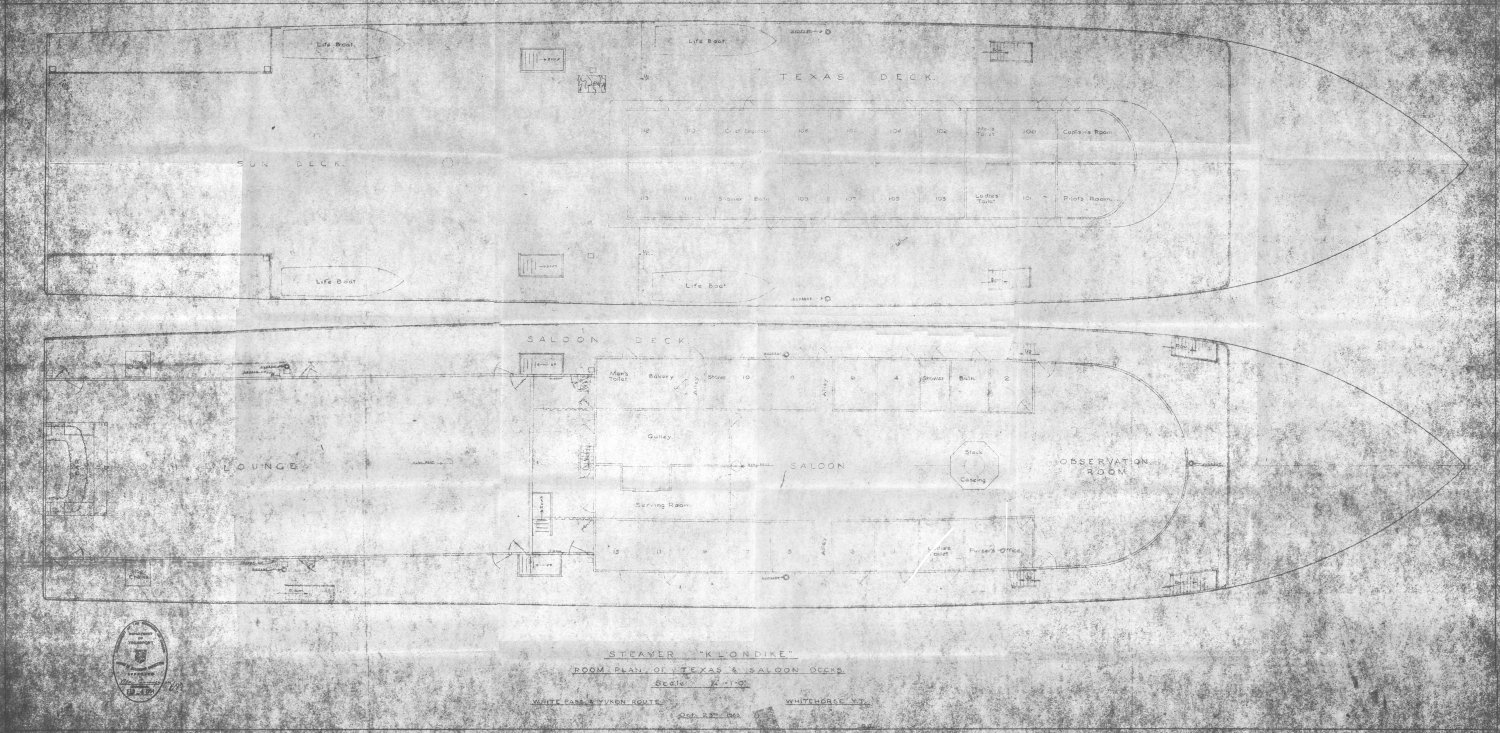
Everyone: just in case you missed it I have downloaded some PDF's of the SS Klondike last night... it gives more detail to the ship decks and stern. Hope that helps Mike Draper Whitehorse, Yukon (-38c)
-
some more pictures SS KLONDIKE MODEL DWG sht 7.PDF SS KLONDIKE MODEL DWG sht 8.PDF SS KLONDIKE MODEL DWG sht 9.PDF SUN DECK & SKYLIGHT DECK .pdf
-
here are a few more PDF files to enjoy SS KLONDIKE MODEL DWG sht 6.PDF
-
Here are more pics for your review. Open the PDF files into a separate window RESTORATION dwg 111.pdf SS KLONDIKE MODEL DWG sht 1.pdf SS KLONDIKE MODEL DWG sht 2.pdf SS KLONDIKE MODEL DWG sht 5.pdf
-
Met up with Richard Zaiden of Parks Canada today and was able to get some diagrams of the SS Klondike on a thumb drive. I will post those pics below. His phone number is 867-334-6837 (email Richard Zaidan richard.zaidan@pc.gc.ca). He made sure to mention that if anyone needs more detailed pics or diagrams of a certain section of the Klondike that email him and he will see what he can find on file. Apparently they have quite a few pictures and diagrams on file of all parts of the Klondike. Here are the pics he passed along to me. Open these files in a new window A-0A-01.TIF MAIN or CARGO DECK .pdf Paddlewheel assembly.pdf Dwg Proposed Steamer for WPYR.pdfDwg Proposed Steamer for WPYR.pdf

-
i will post whatever I get from RIchard on this thread. Glad to hear the communication link is starting to happen Mike Draper
-
Ian: Just got Richards Zaiden's email and he is at richard.zaidan@pc.gc.ca Hope that helps! Mike Draper Whitehorse, Yukon Canada
-
Ian: Just got off the phone with Richard Zaidan from Parks Canada (867) 334-6837. He is going to send me some pics and drawings of the Klondike's stern and bow as well as any deck drawings they have. I can forward them to anyone who is interested. If you have any specific questions he said feel free phone him. I will have his email address once he sends me the pics/drawing that he promised (in the next day or 2) . He also mentioned that they are doing a total restoration this summer on the Klondike so if anyone has any specific questions regarding any details of the ship, they could get some pictures your way (im going to see if I can get onboard as a volunteer to help! 🙂 ) So.. this is a good start to 2024! Mike Draper Whitehorse, Yukon
-
Everyone: Tried yesterday at the office.. the door was locked and gave Parks Canada a call today as well and left another voice mail.. I will keep trying. Its easier for me to keep bugging them Mike Draper
-
Greg: No argument from me on him being a amazing machinist and supporter of the hobby. Its my hope that a new owner can keep Jims products out there for purchase. His tools are invaluable for the hobby.. MIKE
-
Greg: My understanding there is still interest in selling the Byrnes business so I dont think the final decision has been made yet on what is to happen with the business. Lets see what happens and what is announced. Mike Draper
-
Tried again yesterday to visit the Parks Canada office and they were closed. I think they have the quick jump on the holidays. I will keep a eye out on the office and when they are open I will let everyone know what I find... Mike Draper
-
update.. I forgot to go to the Parks Canada office on Monday but was down there today and there office is all locked up, I left a voice mail with them on the posted number (867-667-3910) and I will go down on Wed and check again as well as give them another call if I dont get a return call.. I may got down there too late for today. I will keep everyone posted. Mike Draper
-
i will talk to them on Monday.. I suspect I will get a contact person that get you that material directly from. If they prefer to give it to me we can talk about getting the material into a envelope to you. I assume you want to have the original plans as I remember they had a set of plans for modelers that were modified from original plans If you need details on any aspect of the ship let me know... I can also go down to the SS Klondike and take pics as well. its a 2 block walk from my office. Also.. I would recommend a book to get the link on amazon is The Klondike Gold Rush Steamers: A History of Yukon River Steam Navigation: Turner, Robert D.: 9781550178876: Books - Amazon.ca And there was a good model of the Klondike in one of the hotels in town. I can check to see if its still there.. Mike Draper Whitehorse, Yukon Canada
-
Ian: What do you need? The Parks Canada office is one floor below my office in Whitehorse. I can easily knock on their door. Mike Draper Whitehorse, Yukon Canada
-
Go to the search engine at the very top of the MSW forum page and type in CAF models and you will get all the conversations about his models. His avatar name will be attached to one of those discussions and just click on his name and send him a personal message. He is good in responding Mike Draper
-
We lost one of the good ones.. he was good friend and a master when it came to taking a concept or a idea and making it a reality. He will be missed.