HOLIDAY DONATION DRIVE - SUPPORT MSW - DO YOUR PART TO KEEP THIS GREAT FORUM GOING! (Only 13 donations so far - C'mon guys!)
×
.jpg.8f8939eb11584d346cdeb2a7ec4e1e42.jpg)

Kusawa2000
-
Posts
381 -
Joined
-
Last visited
Content Type
Profiles
Forums
Gallery
Events
Everything posted by Kusawa2000
-
 Frank: Actually yes! I am nearly done the first planking of the wales as well as the planking below the Stern gallery windows. I have also milled the boxwood I will be using for the hull planking. I used the Alaskan cedar for the wales and below the windows as they will either be painted or covered in ornamentation. But I got access to some amazing boxwood and its colour and hardness was perfect for the Winnie. Also, as Chuck outlined in his chapter 2, that first wale is critical in getting it aligned. It was a real hassle getting it just right. I had a few false starts. But after all of that framing work it was a real pleasure to get some planks on her. I will post some pictures as soon as I can get the wales done and get that first plank using the boxwood.. Im stoked! Mike Draper
 -
Chuck: Cant wait to start planking but I have made sure I dont rush things. I see with how everything is designed, things need to be dead on accurate. Im thinking of using Boxwood for the hull planks... leave the stern planking and wales alaskan cedar as they are either painted or covered with a frieze but I have got a hold of some nice boxwood. I will see how it goes! 🙂 MIKE
-
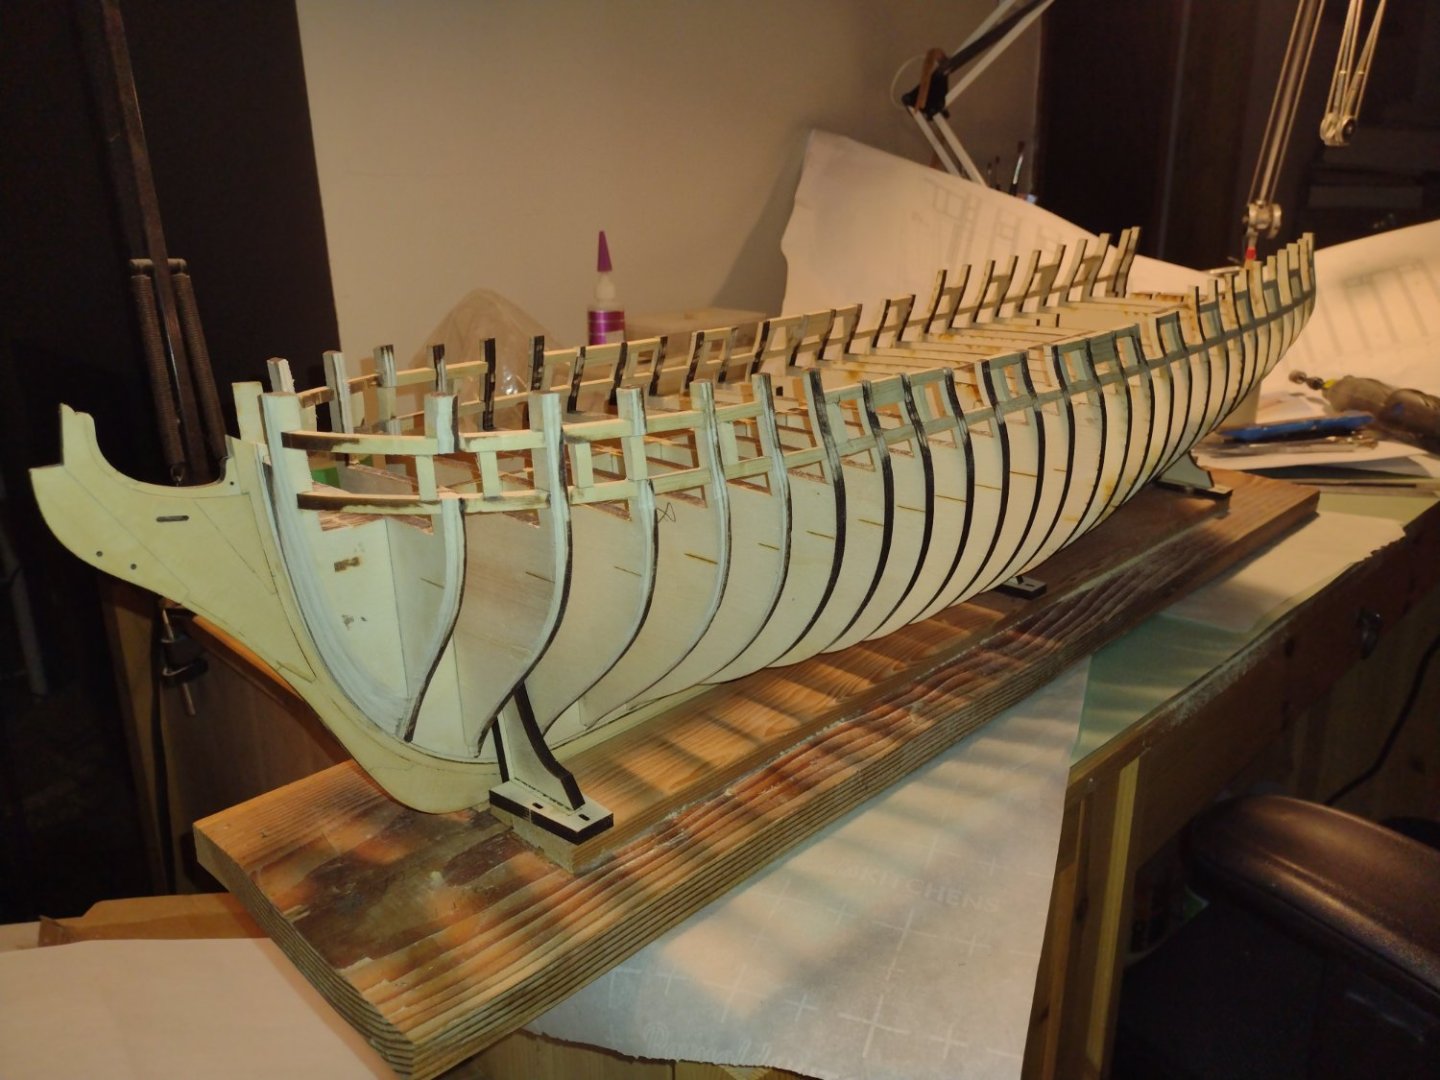
Everyone: Not the best pics but I have done the framing.. have marked the location of the wales but want to double check it. Figured I need to double check everything before the planking begins! Not a lot of room for error what I can gather and its a pleasure to work on a project where that is built into the kit. Enjoying every minute of it. Mike Draper
-
Can i live without a BYRNES TABLE SAW
Kusawa2000 replied to shihawk's topic in Modeling tools and Workshop Equipment
Also note they are just gearing back up from the holidays so there maybe a bit of a back log.. keep trying.. they will get back to you. Mike Draper -
Everyone: Just a quick (well not really quick as it took longer than planned to get it completed) progress picture of my Winchelsea. A lot of fiddling to get this right but as I have mentioned before, its good when you take the time to get it right.... Enjoy Mike Draper
-
Frank: how long it took to complete the Agamemnon was a bit of a surprise when I tallied up the time it took but life seems to have a way of snagging my free time.. Thanks for the compliment on the Agamemnon. Hope I can do a good job on the Winnie Mike Draper
-
Thanks! if that is the case I will be making some serious progress this winter while I look at my wood shed quickly empty... Mike Draper
-
Trust me.. you never get used to those cold temperatures. You make sure the wood shed is full and you have hobbies to keep you sane. Mike Draper
-
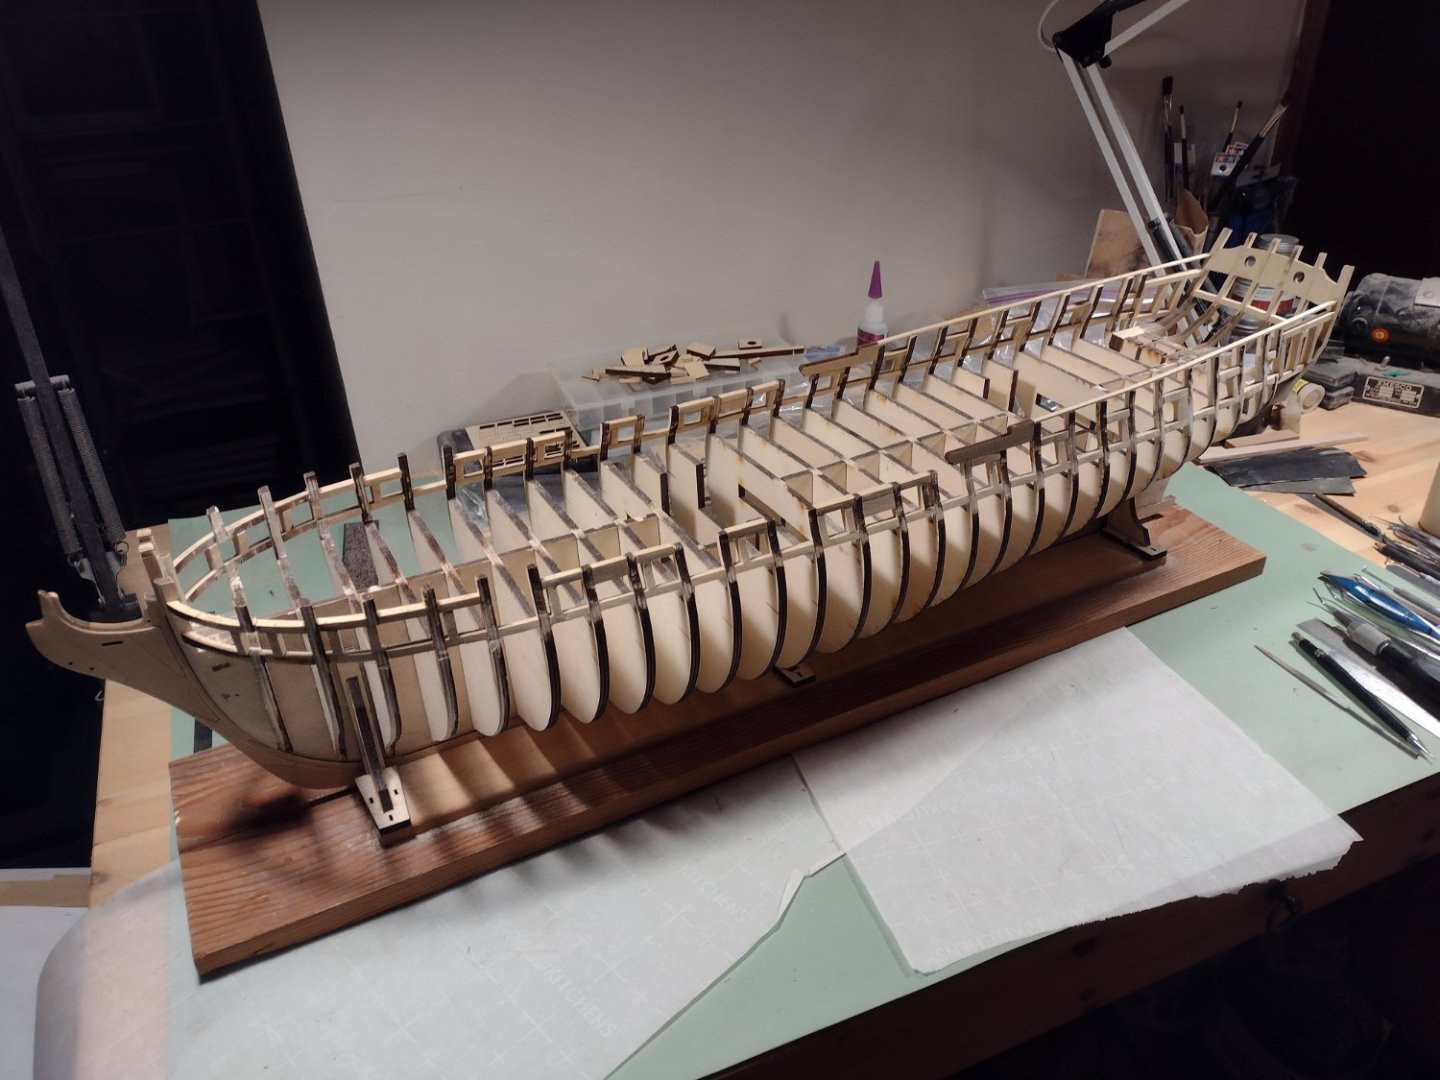
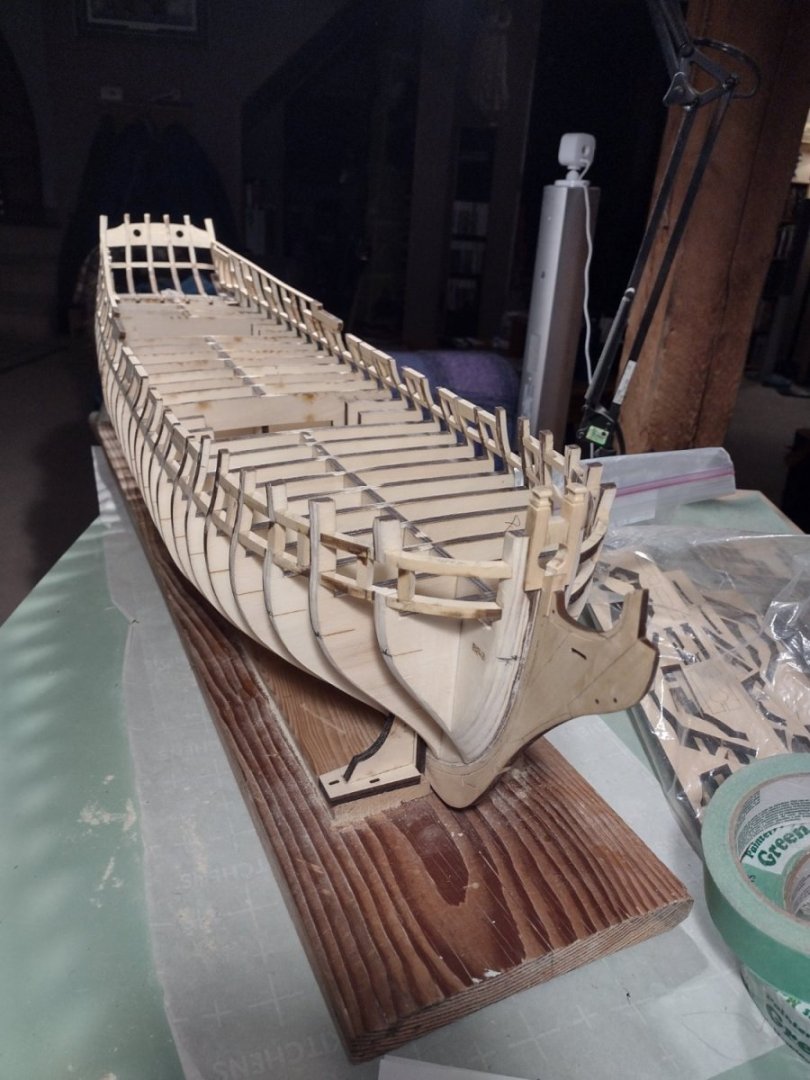
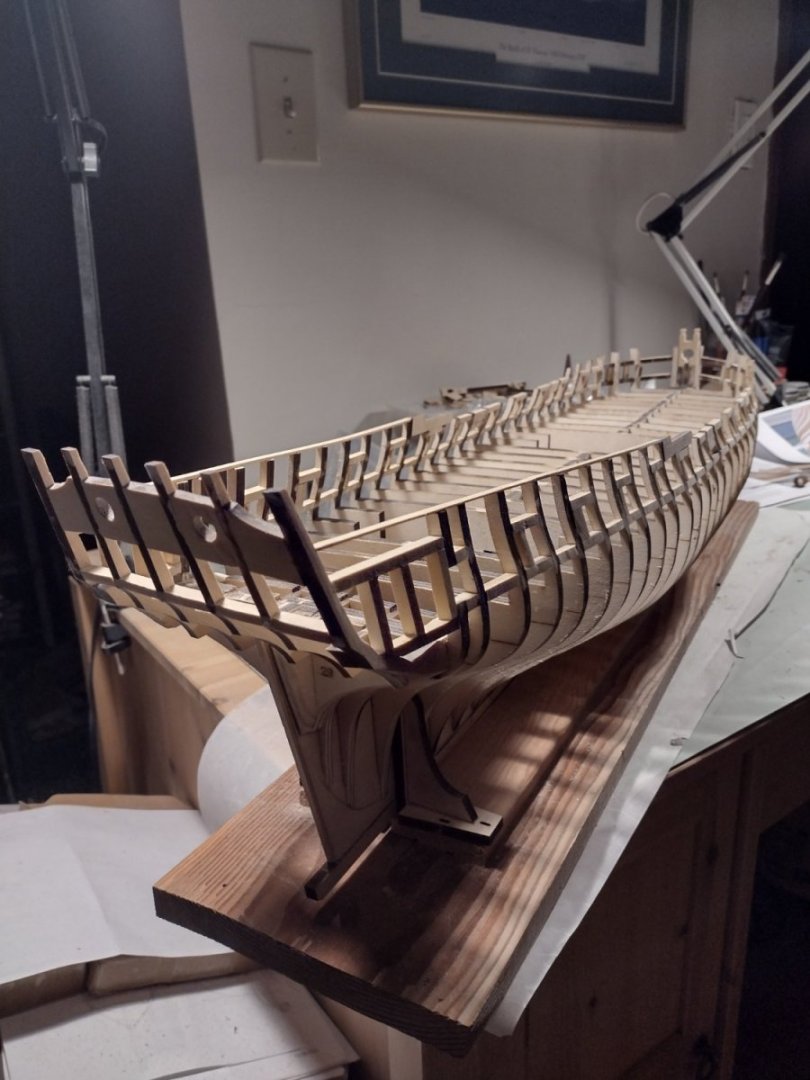
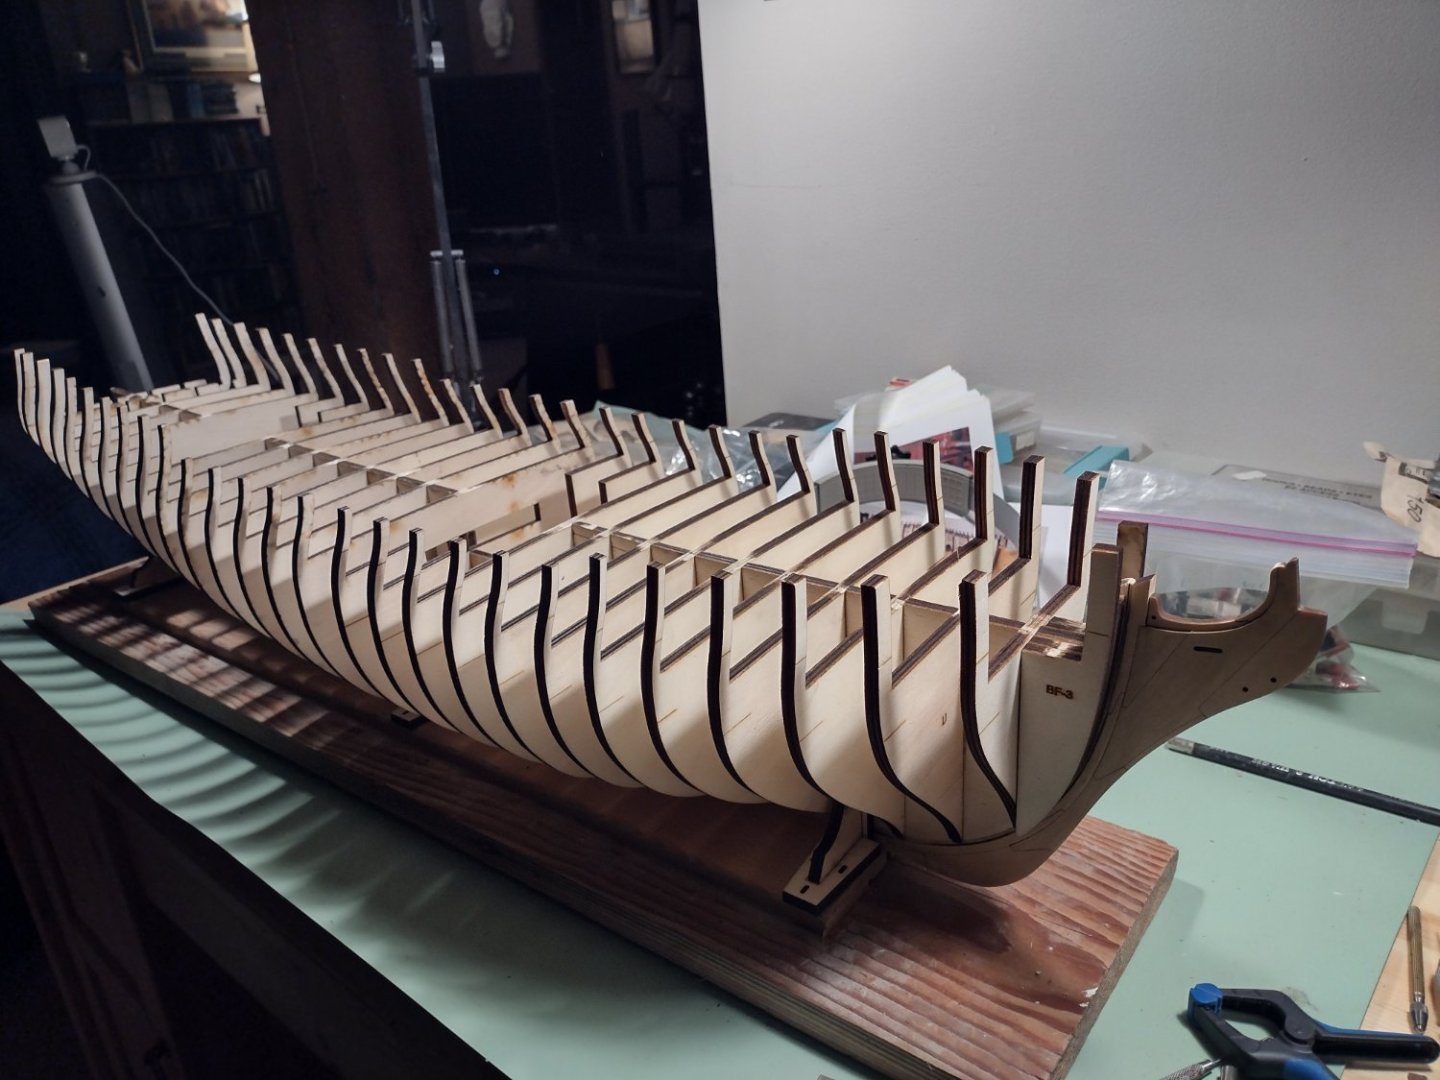
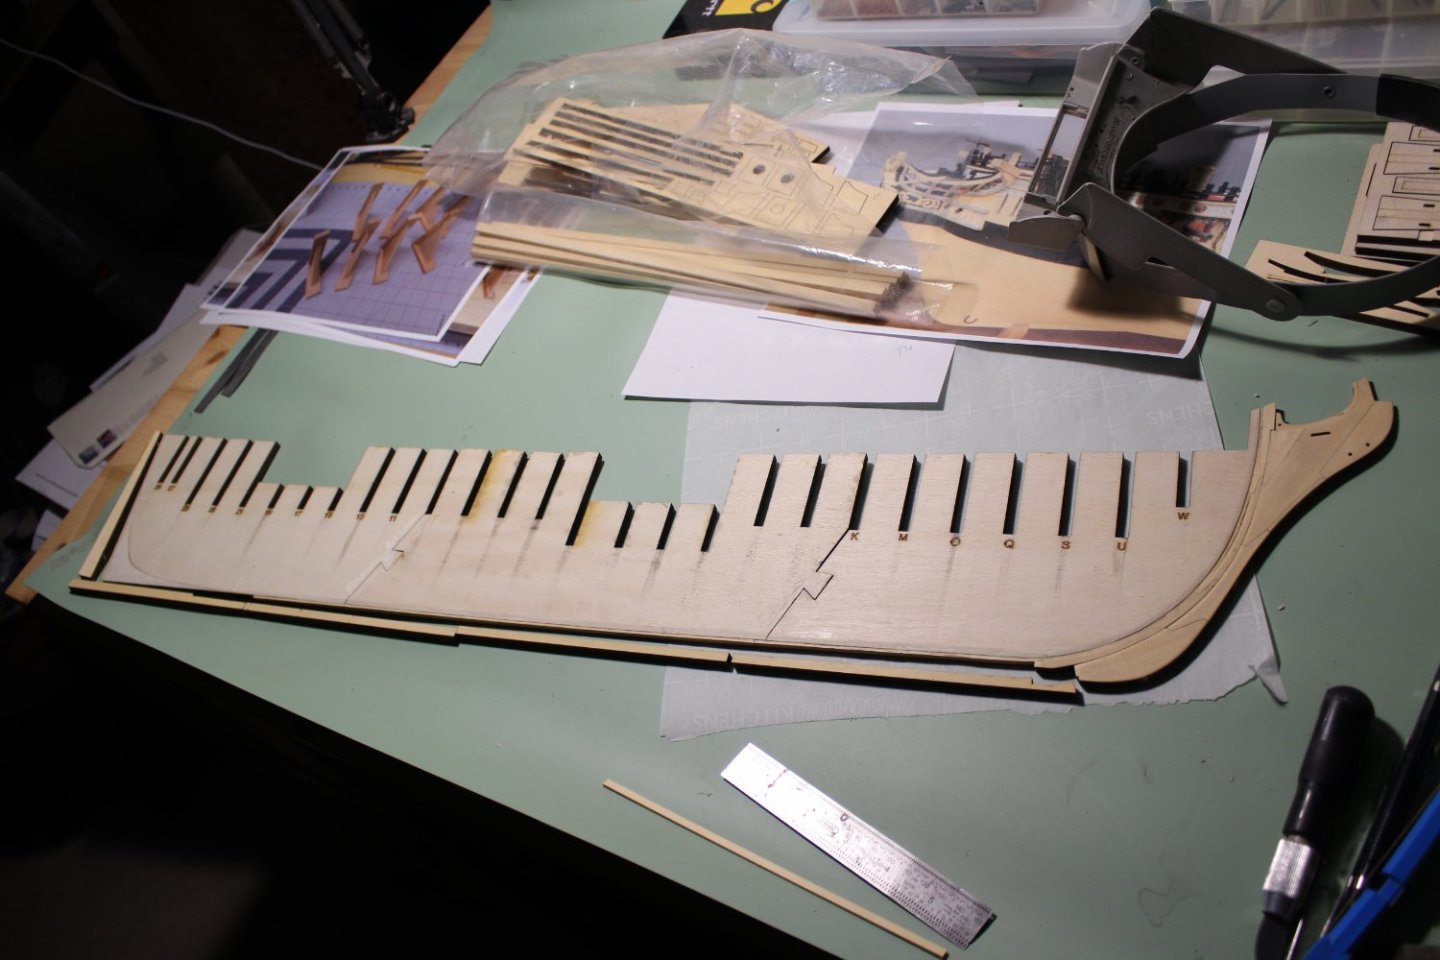
Everyone: Its been a while since I lasted posted any progress pics. I figure getting the gunport framing completed wouldnt take too long. Boy.. was I wrong. Between getting the framing all properly aligned and then getting all the frames faired correctly took a lot longer than I planned. It didnt take to long to figure out there is no point rushing this part.. and I have a few pieces of discarded framing pieces to show for it. In any case I suspect I will need to do a few more touch ups but I can say this part is done.... now the rear stern pieces. I did think about getting some detailed shots but there are some good reference pictures already out there.. I figure I can let ya know that the -40c weather we have been having has been a great incentive to make some progress on the Winnie. Mike Draper
- 37 replies
-
- 12
-

-
HMS Surprise? You have my vote Mike Draper
-
Chuck: Good point with comparing to what is on a dockyard model. Thanks for the reply. I will have to give it some thought on whether or not to add anchors. I may also add a flag on the stern.. may need to check into that a bit more. Mike Draper
- 1,784 replies
-
- 2
-
-
- winchelsea
- Syren Ship Model Company
- (and 1 more)
-
Hey Chuck: It is sure nice to see a finished product... and that there is a finish line somewhere out there. I do have one question.. is there any thought about anchors coming from Syren or is that a DIY project? Was just curious. I think it would be a great DIY project Thanks Mike Draper
- 1,784 replies
-
- 1
-
-
- winchelsea
- Syren Ship Model Company
- (and 1 more)
-
Glenn: Couldnt have said it better.. I have been working on the hull at a glacial speed. 🙂 MIKE
-
Chuck: Thanks! That is what I thought. When I was dry fitting the sills, it was the adjacent laser etched marks that got me wondering if the sills were to sit 90 degrees to the bulkheads or follow the laser etched marks of the adjacent bulkheads. Appreciate the quick response. I have learned in the past that its these small details that come back to haunt you. MIKE
-
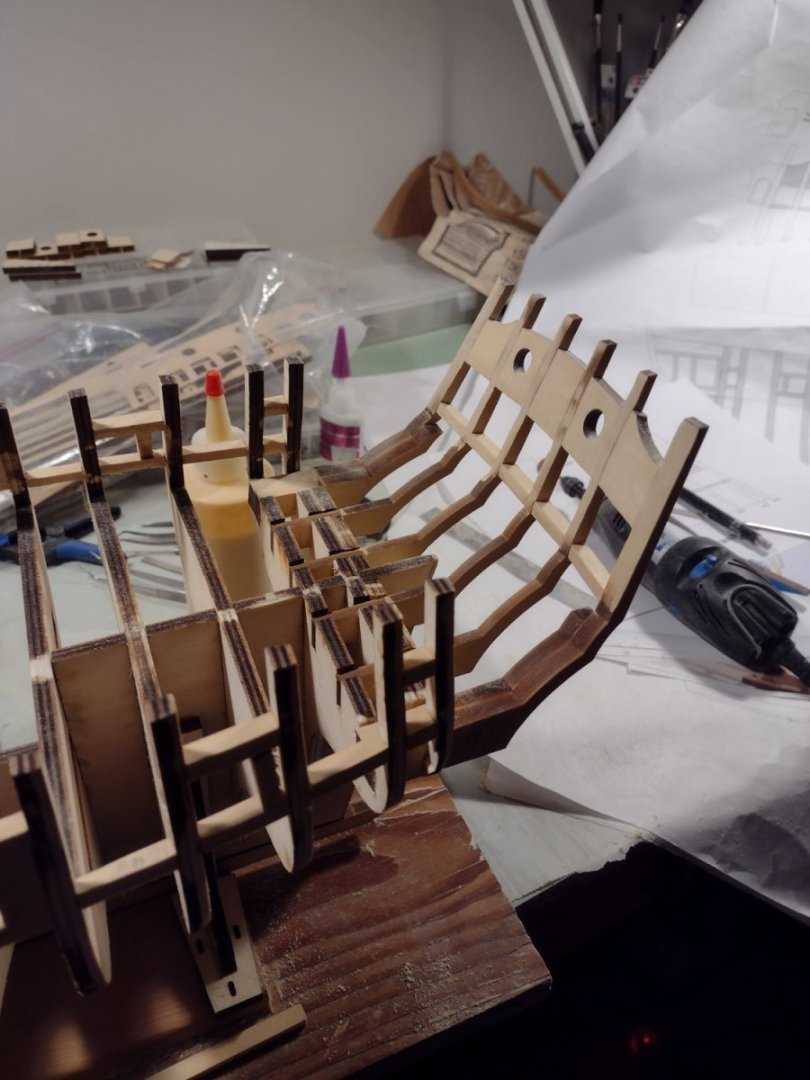
Question to the Winchelsea crew (or more a confirmation my approach is correct): Im cutting the cross pieces for the gun ports. While I understand to use the laser cut hash mark to locate where they are located on the bulkhead, my question is do you have the cross pieces run with the hull (thus have them align with the hash mark on the adjacent bulkhead) or have them sit 90 degrees to the bulkhead. I have checked pics from other builders and it appears that everyone is having them oriented to the run of the hull but I just want to confirm before I get to far along.. Thanks in advance.. MIKE
-
Everyone: Some progress. It was such an enjoyment being able to have bulkheads fit with a minimum of trouble. Now time to make some sawdust and fair the bulkheads. And with snow on the ground here in the Yukon, I look forward to a lot of time with the Winchelsea Mike Draper
- 37 replies
-
- 13
-
-
That is one large, beautifully insane kit! Simply wow! Mike Draper
-
1/200 Trumpeter IJN YAMATO - issued by MRC/Gallery Models
Kusawa2000 replied to yvesvidal's topic in REVIEWS: Model kits
Yves: I managed to get over to Kure in Japan and see the model. It is totally insane. Amazing level of detail and with the way its displayed you can check out every angle of the model. If you are thinking to build the Yamato it's the place to visit. The rest of the museum is interesting as well. They have the Zero airplane as well as flags and other memorabilia from the Yamato. They have also laid down a footprint of the actual size of the ship near the museum as well so you can appreciate the size of the battleship. Mike Draper- 104 replies
-
- 4
-
-
- MRC/Gallery
- Yamato
- (and 1 more)
-
I think that is what I may do as well. I do have some leftover pieces that can easily be milled. Thanks for the followup. MIKE
-
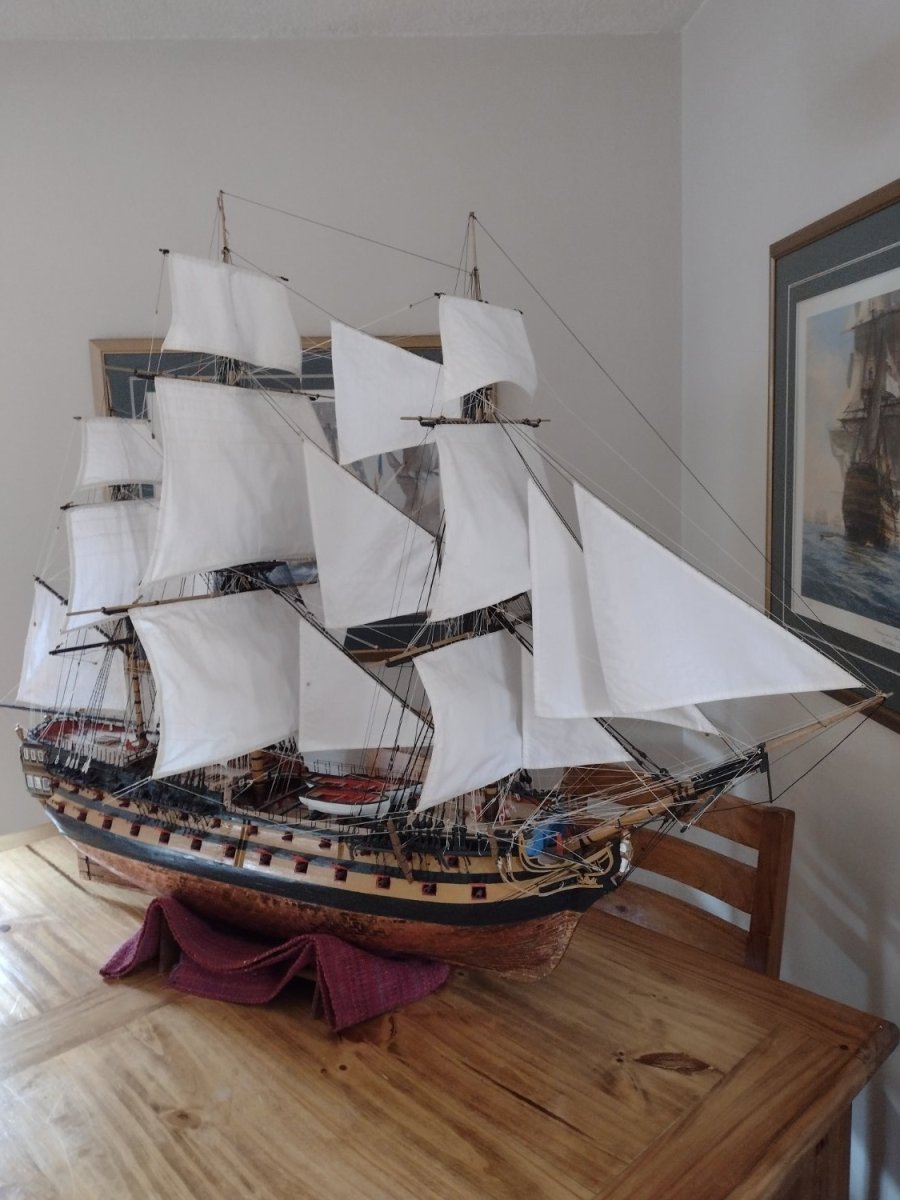
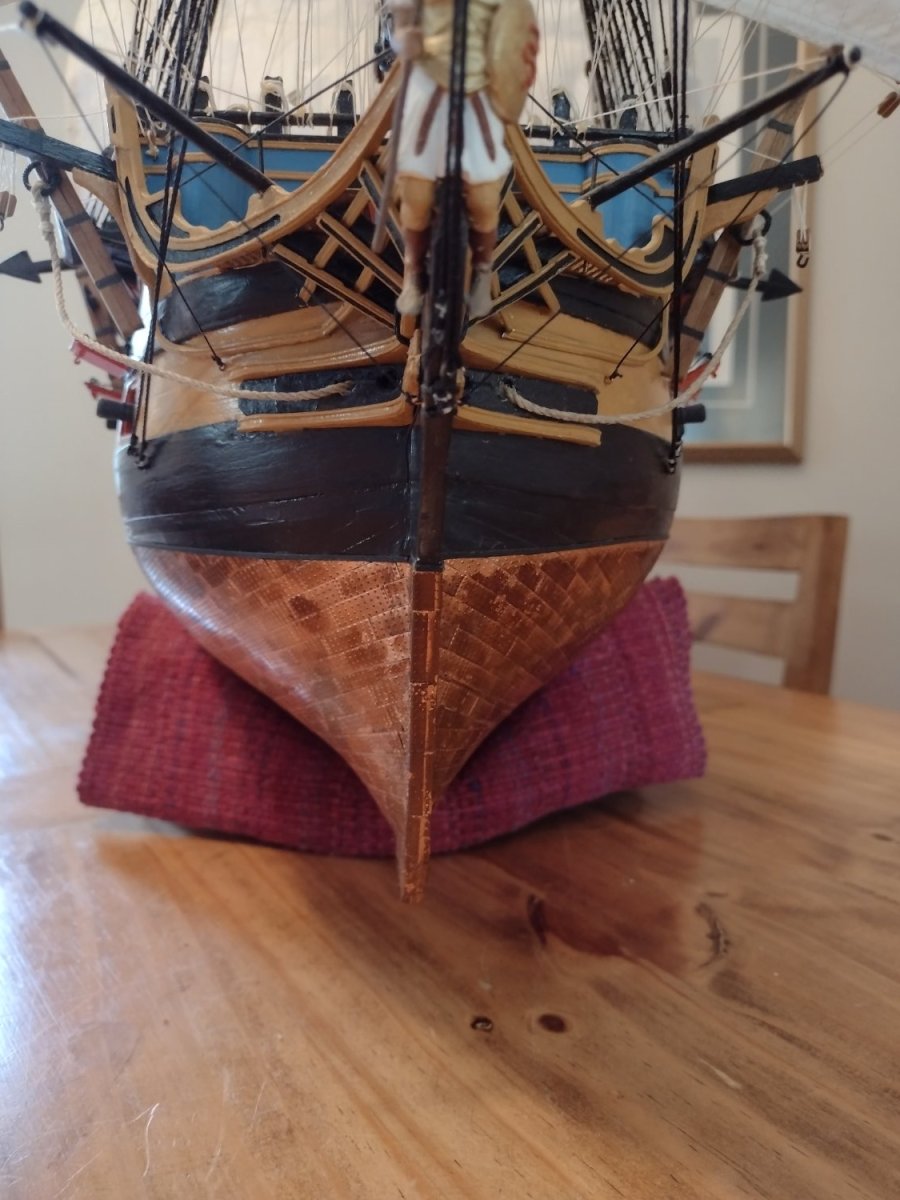
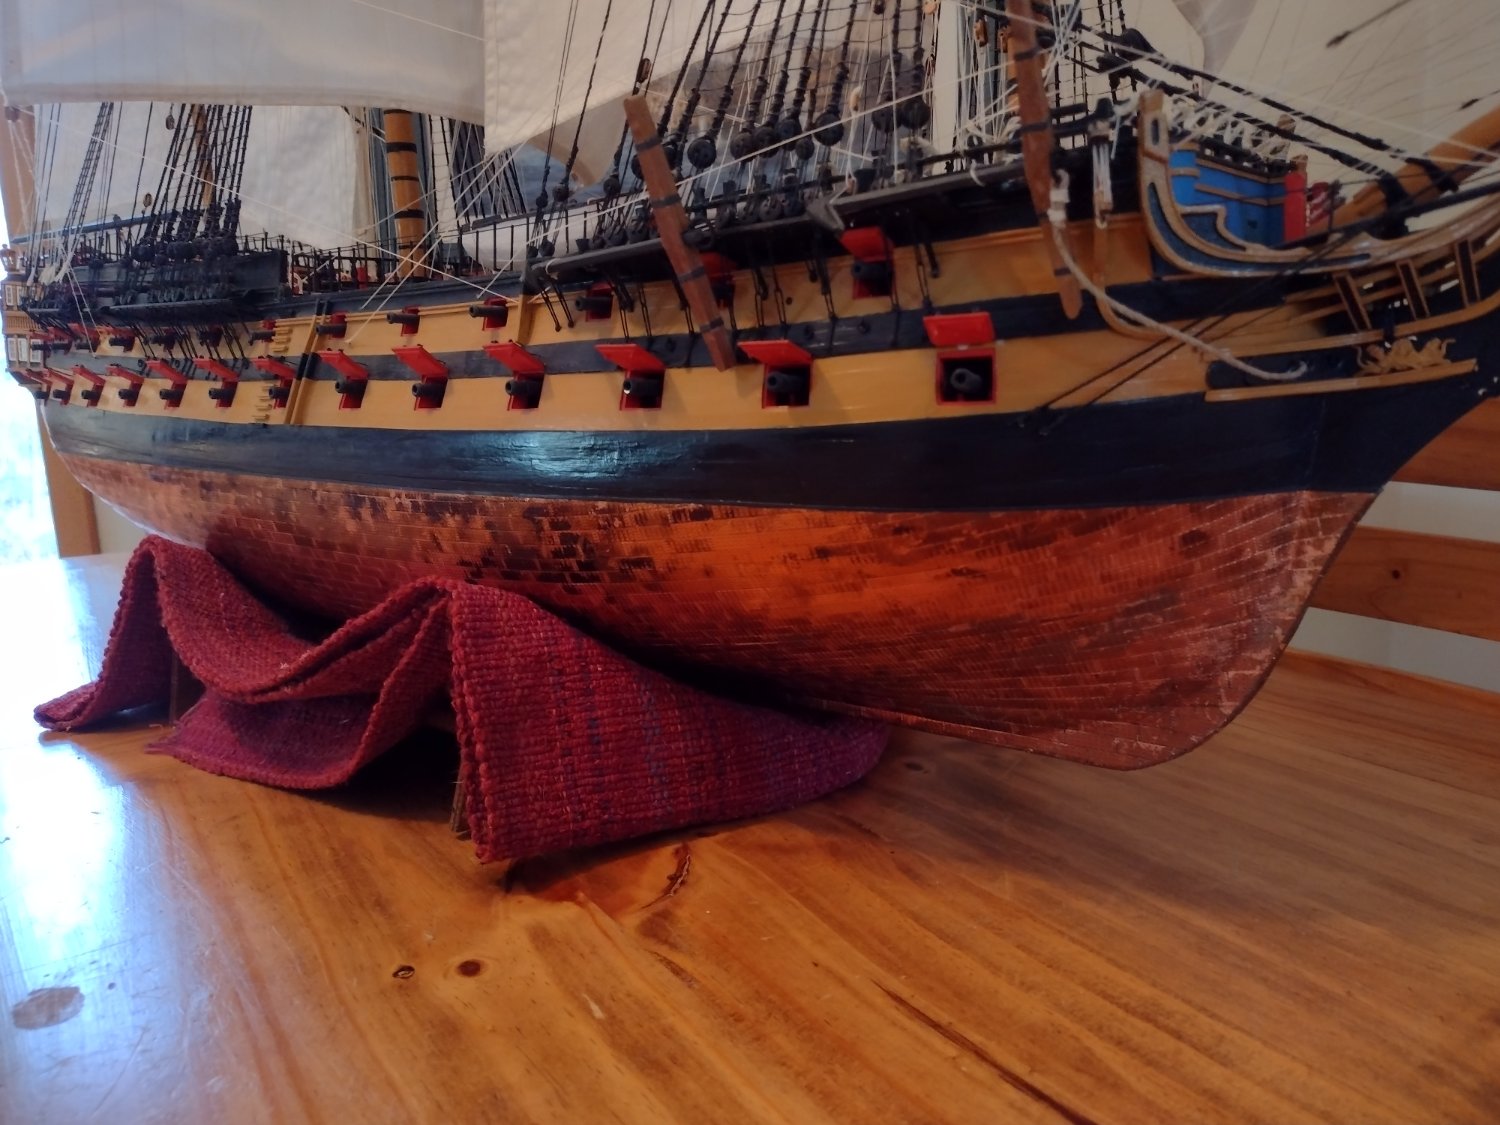
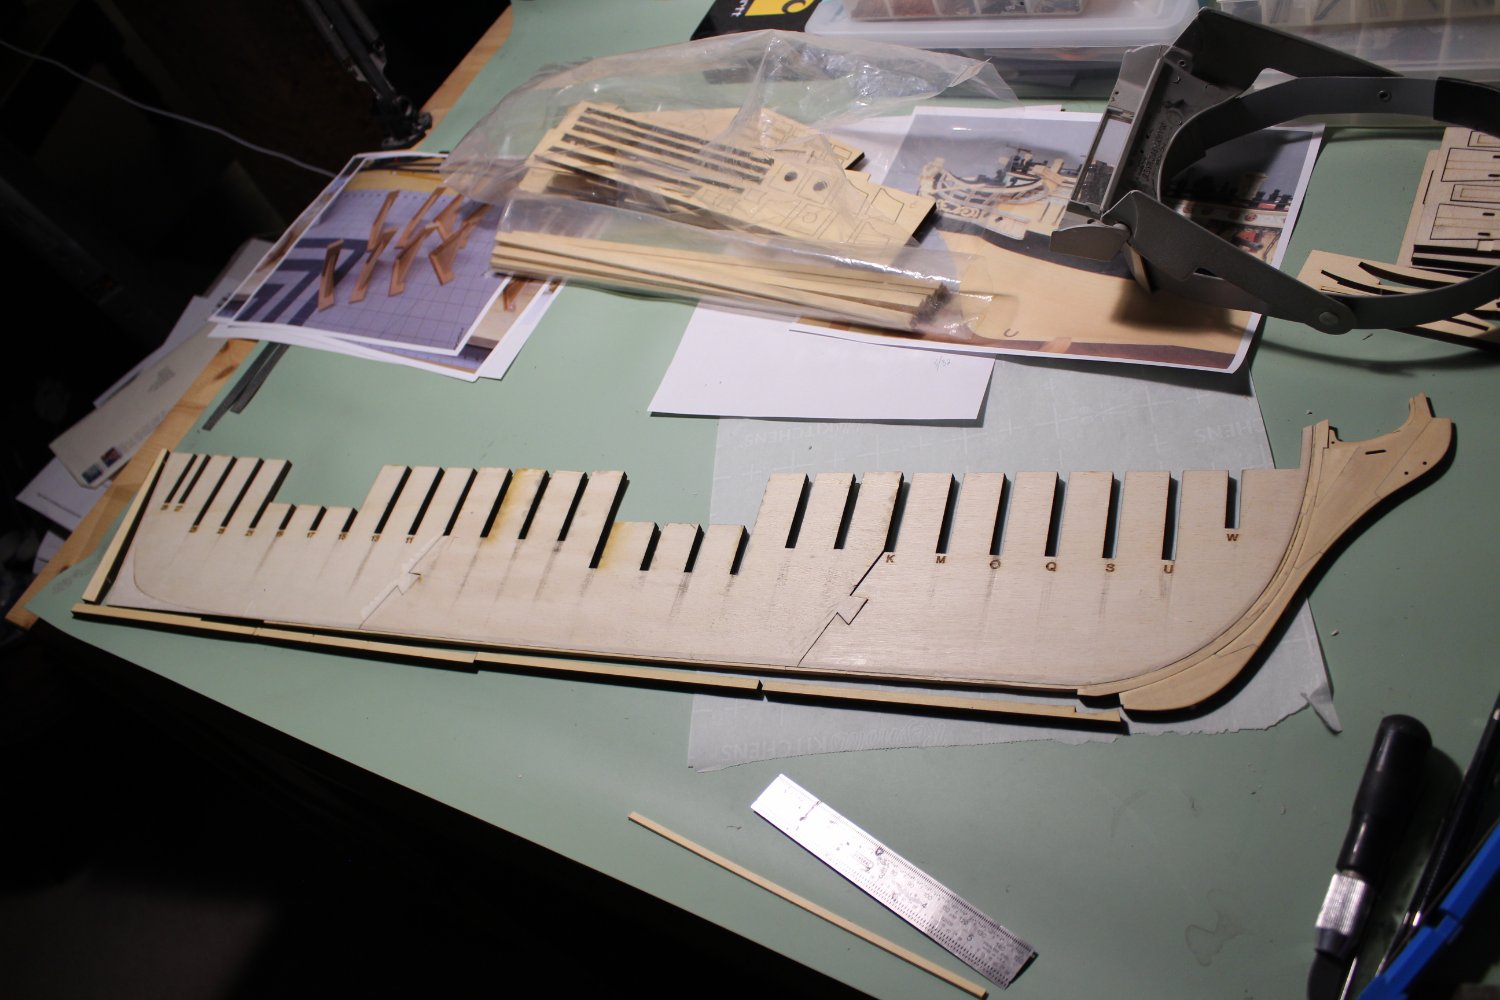
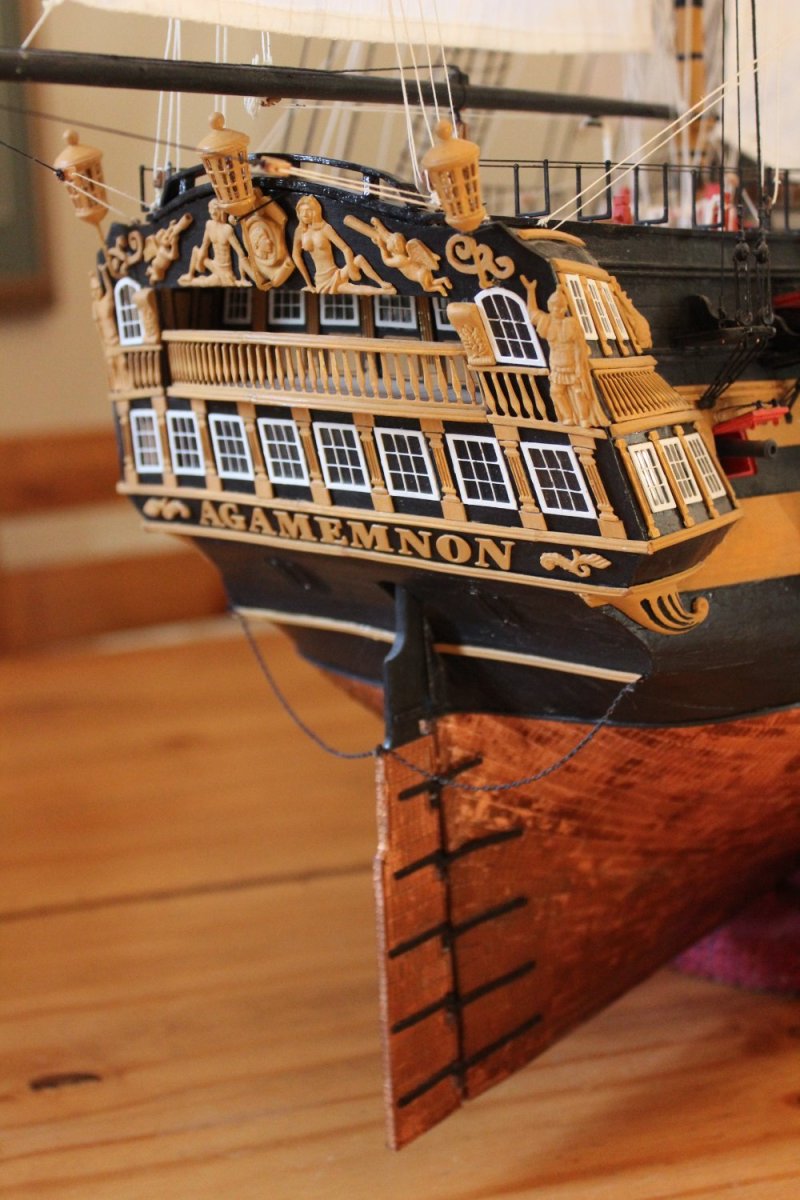
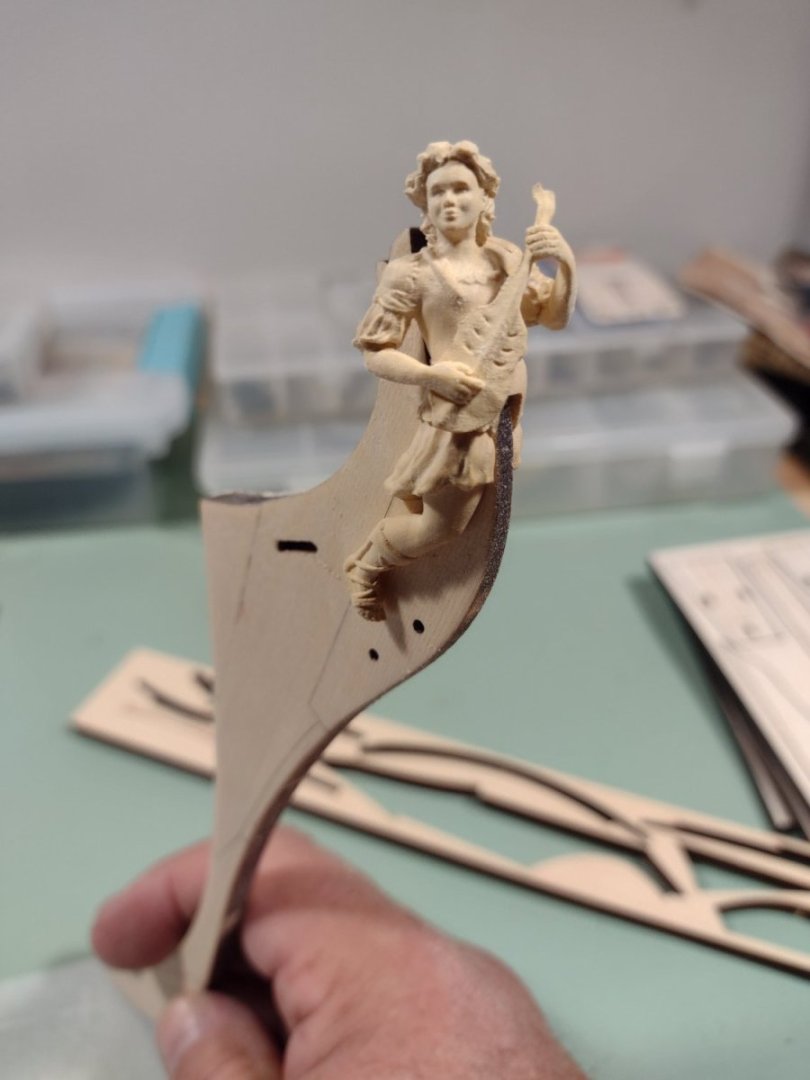
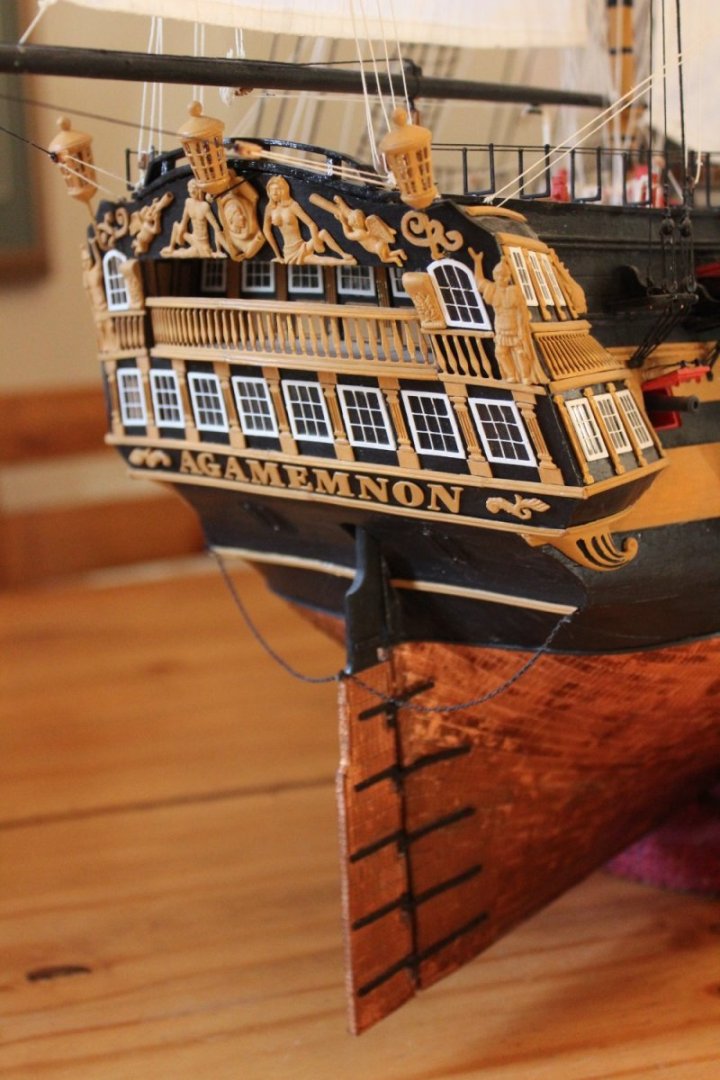
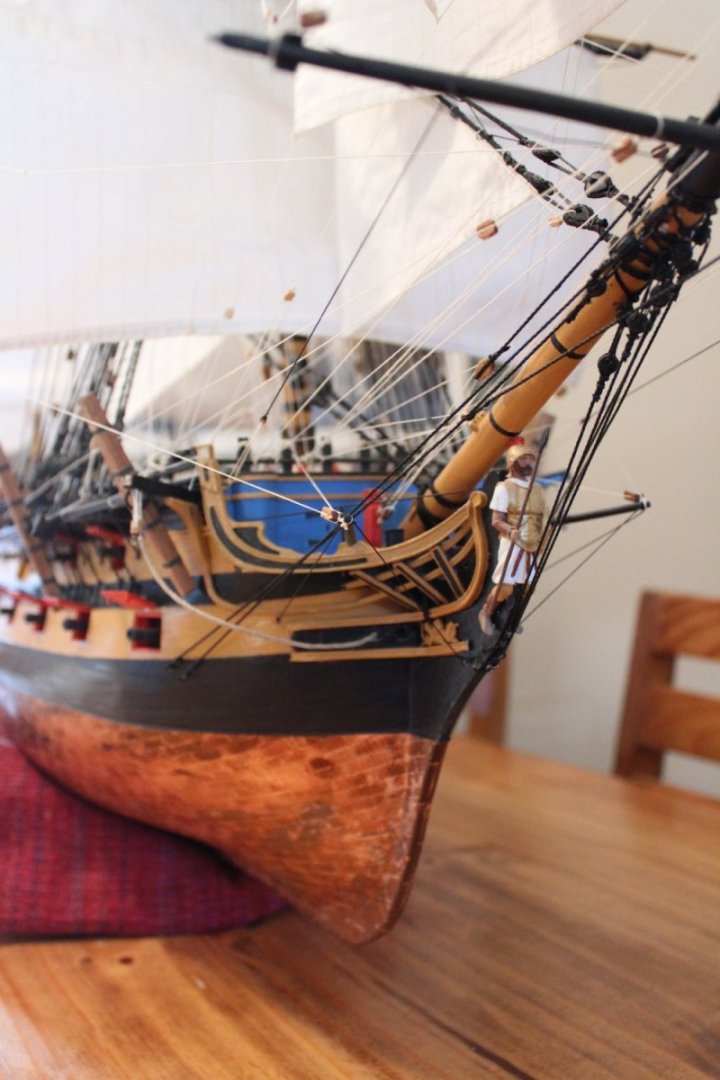
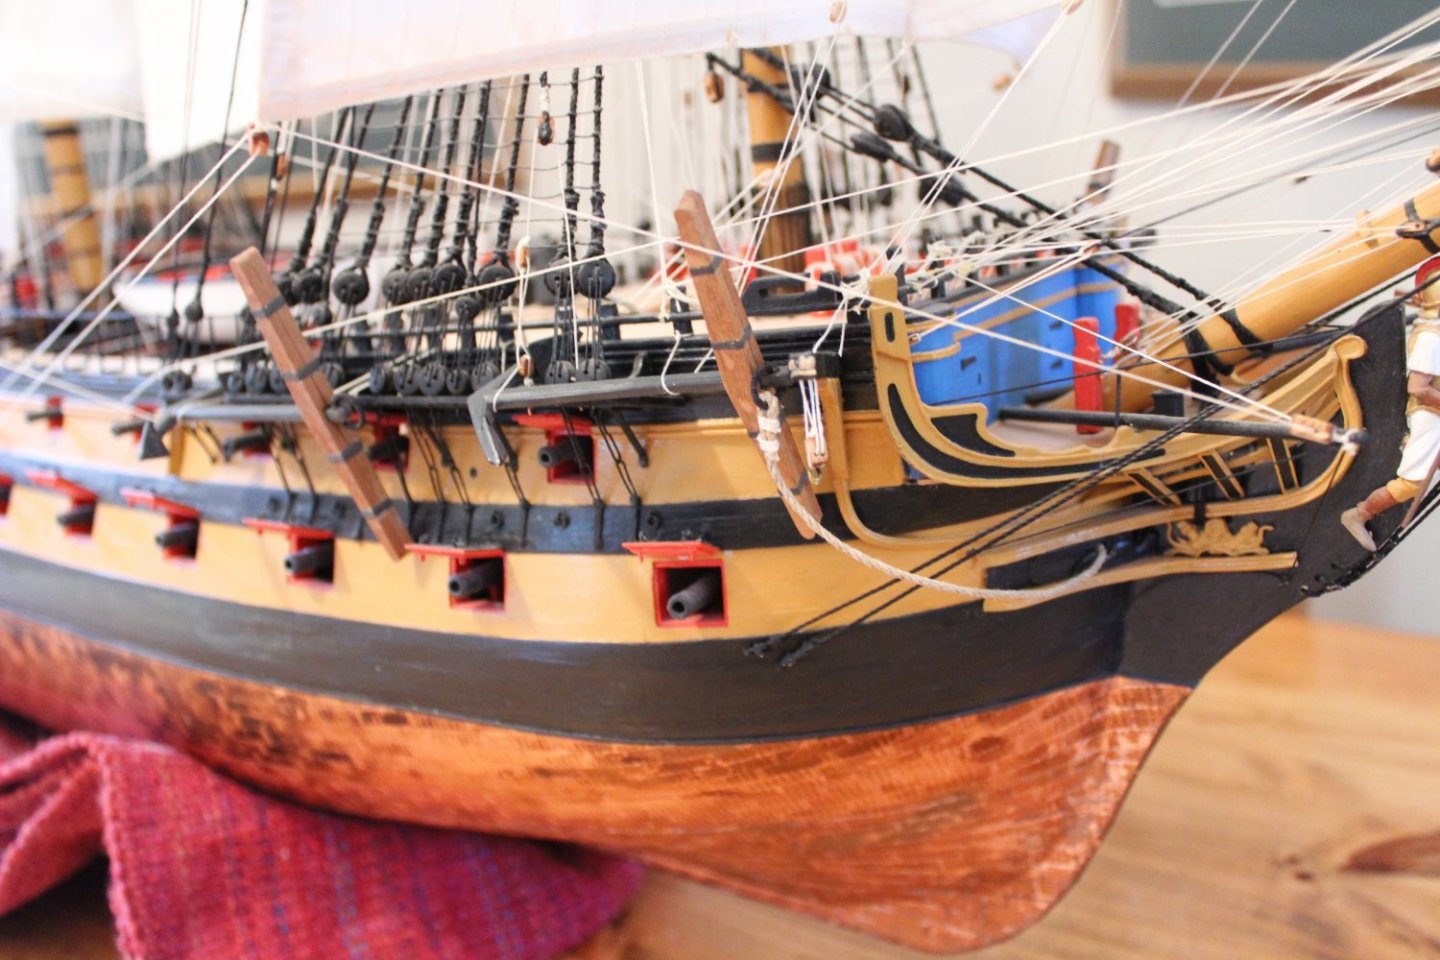
Hey Everyone: After a long haul (12 years) I have finally finished my Agamemnon. While I know this doesn't have much to do with building the Winnie, for me I just want to post a few pictures so I can put her on the "done" pile. Now I am keen on getting started with the Winnie after watching everyone work on her for the last year or so. In addition to the pictures of the Agamemnon I have included a few pictures of my progress so far. I have managed to get the stem assembled and tapered to fit the figurehead as well as get the bulkhead plate assembled and have the rabbet tapered and in place with the stem glued. But before I move ahead with working on the keel at the stern end of the hull, I do have one question for the "Winnie vets". The chapter talks of the false keel being a plank of wood 1/16" x 1/4". Now with the wood package I can only find one piece of wood that fits that description. Am i missing something? Everything I read indicates there is more than one plank but I can only find one. If I have to mill something I dont have a problem doing that I just wanted to see if I was overlooking something. Any information would be appreciated. Thanks Mike Draper

- 37 replies
-
- 10
-
-

-
Yves: Tempting.. but I have the Winchelsea next in the lineup... MIKE
- 150 replies
-
- 2
-
-
- agamemnon
- caldercraft
- (and 1 more)
-
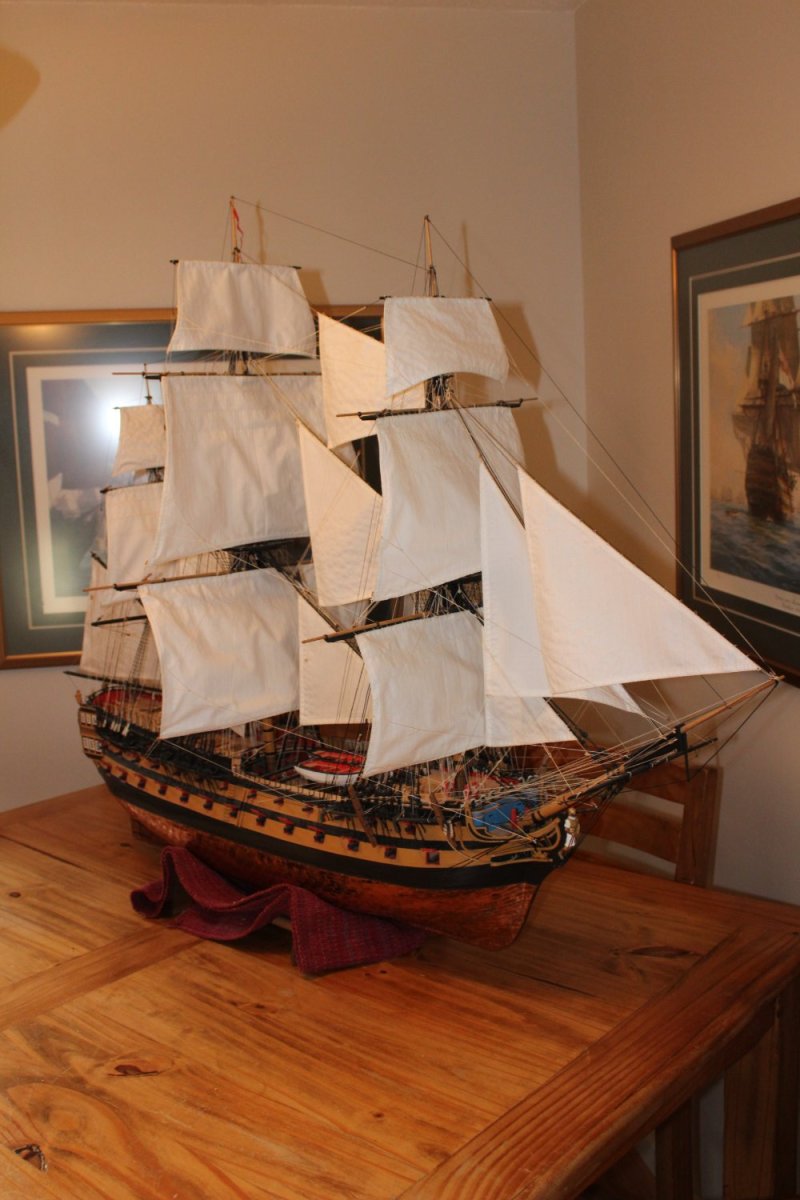
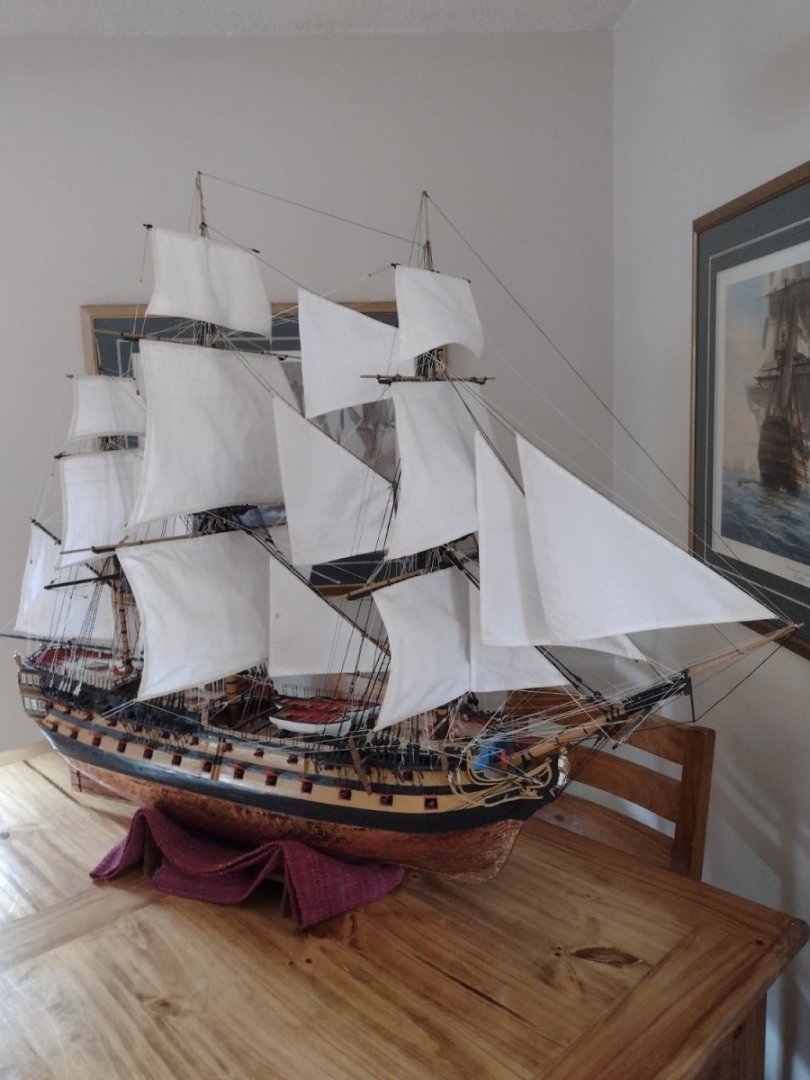
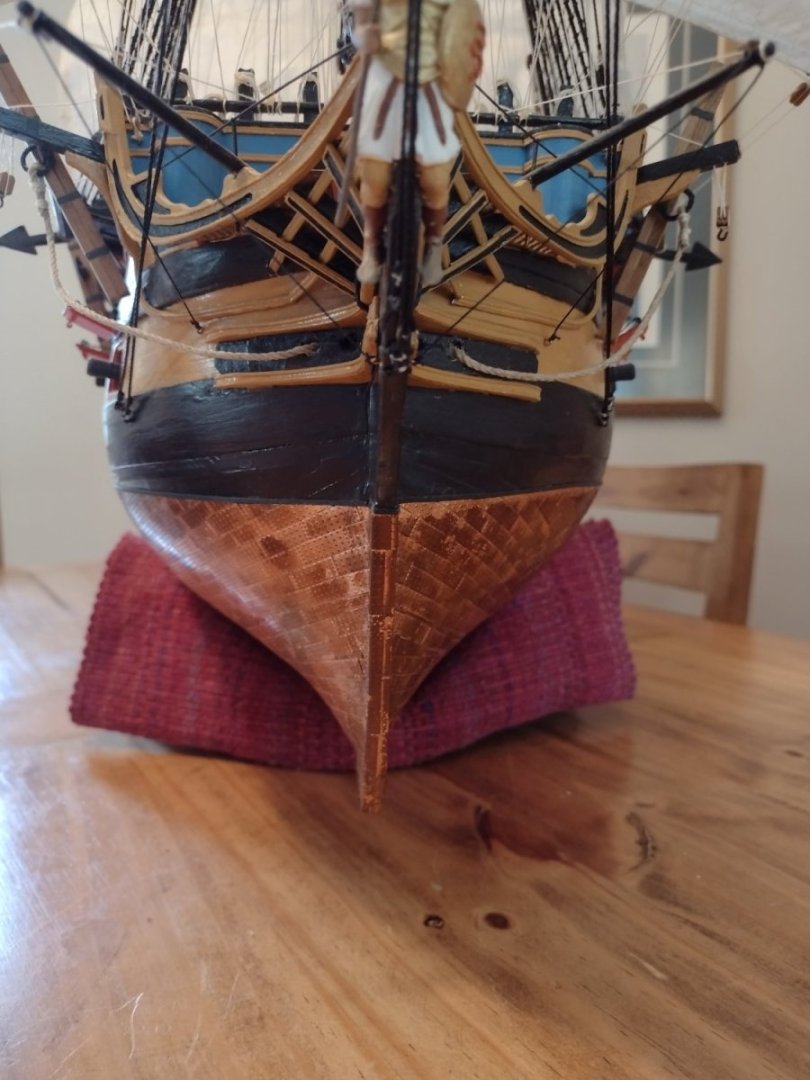
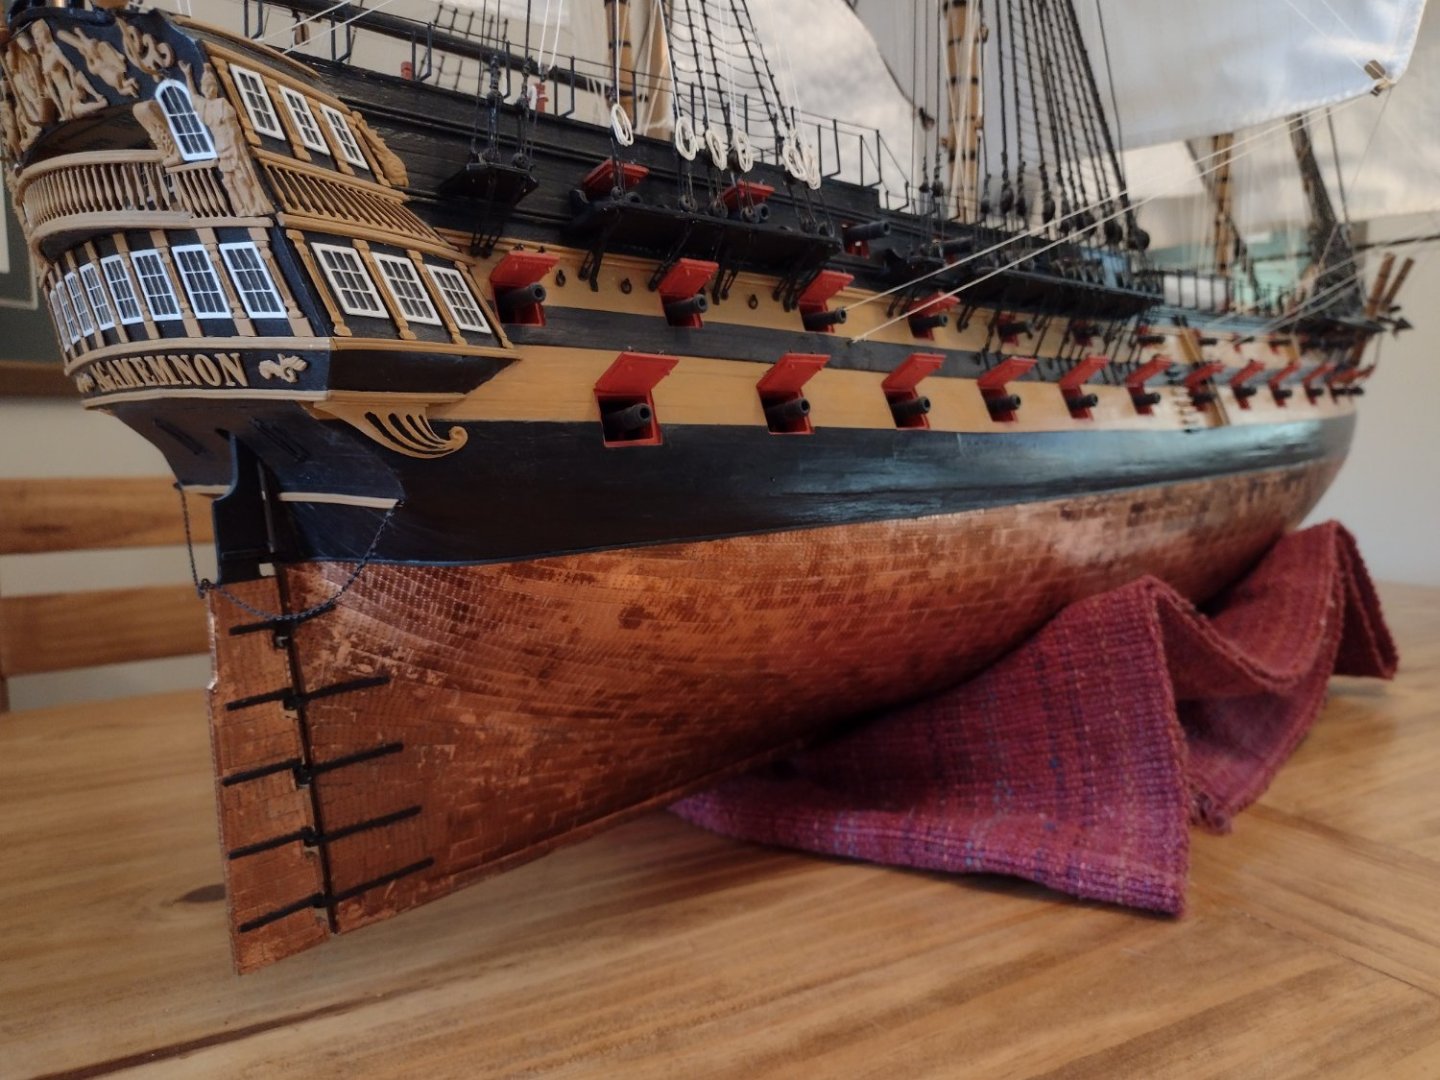
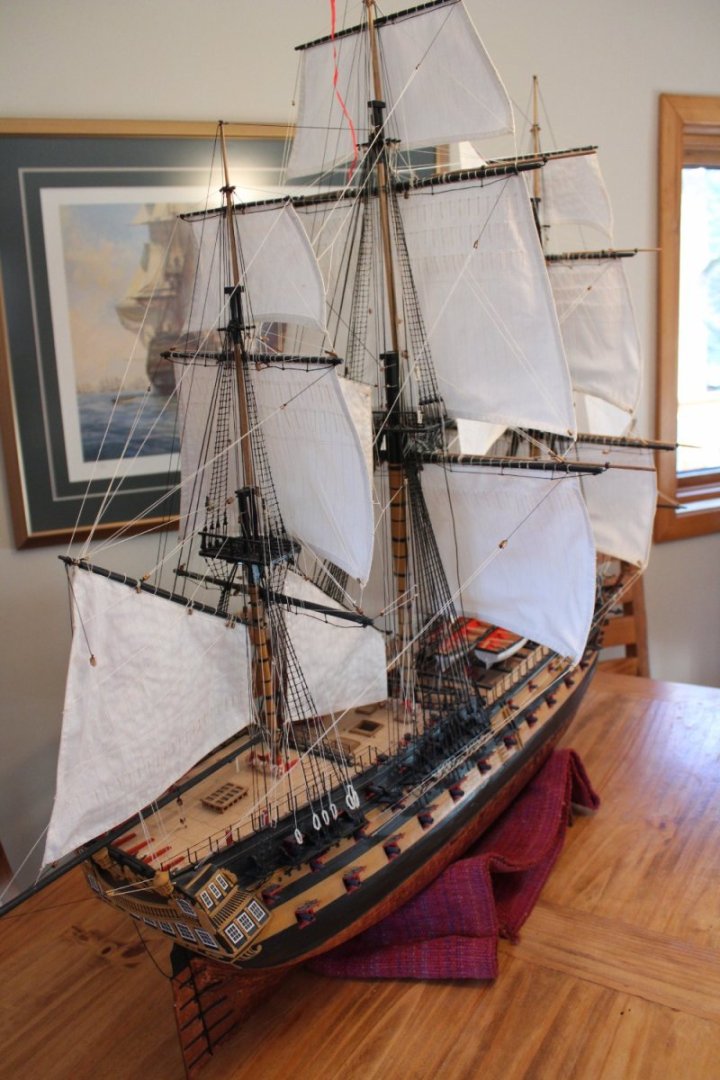
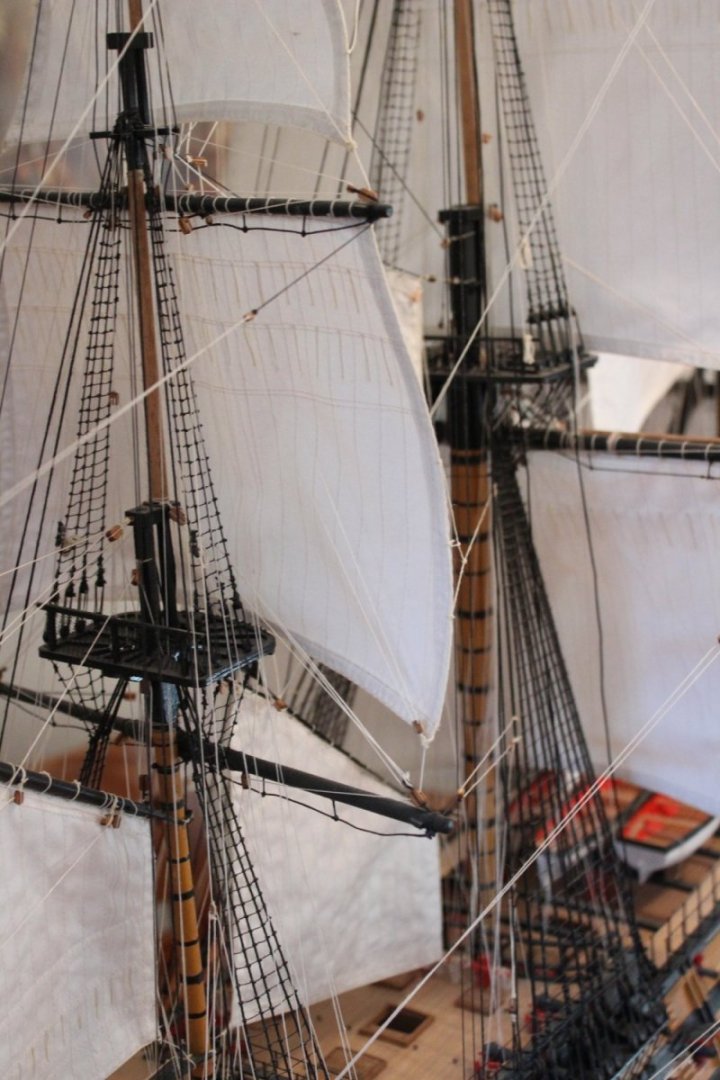
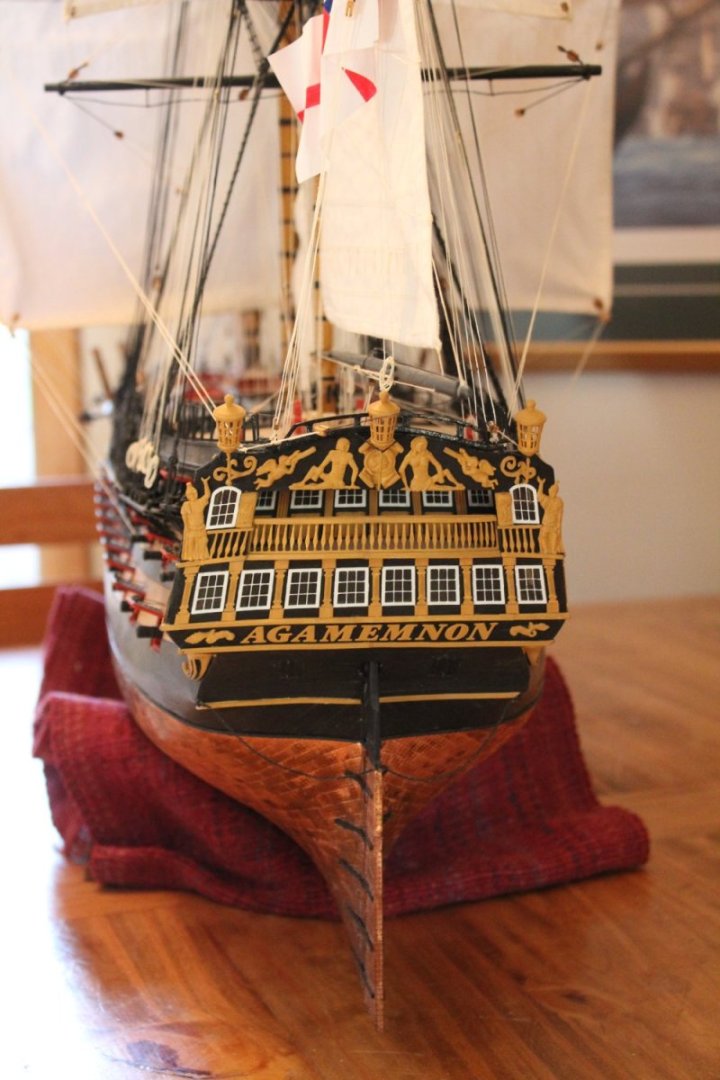
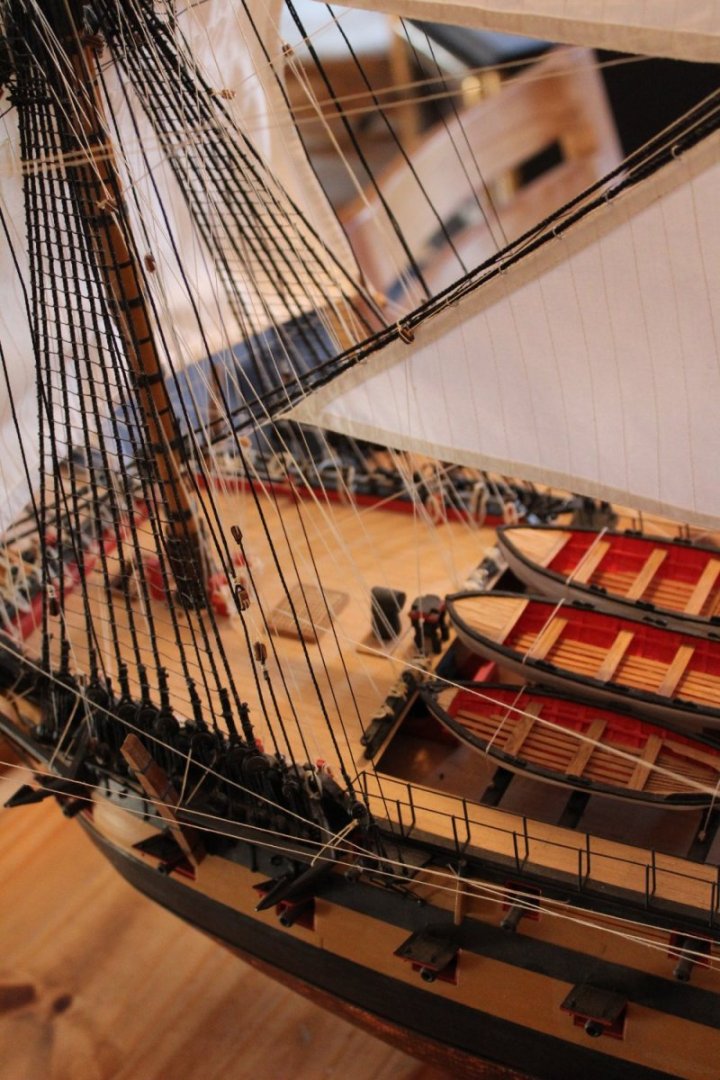
Everyone: Its done..... after 12 years of on again.. off again work, my HMS Agamemnon (Aggy) is finally completed. Im still waiting for a friend to make me a stand for it but the rigging is finally finished. Its bit surreal that I can say that but she no longer darken my shipyard but instead have a nice spot on a shelf in our living room. Did a lot of "kit bashing" with her.. milled maple planks for the deck and hull, treenailed the deck, have full guns and carriages on the gun deck either than the dummy guns supplied with the kit, rigged the guns, made my own flag, and added a "few" sails (made by friend Wendy!). It was a great project. took a littl longer than planned but glad its done and I can now move onto my next project the HMS Winchelsea through Chuck Passaro's practicum. Definitely ready for a new project. Enjoy the pics! MIKE


- 150 replies
-
- 15
-
-
-
- agamemnon
- caldercraft
- (and 1 more)
-
Chuck: All I can say.. is keep at it. Just delved into the first dozen pages of chapter 1 of the Winchelsea project and I can say I am definitely looking forward to this project! Mike Draper
- 1,784 replies
-
- 6
-
-
- winchelsea
- Syren Ship Model Company
- (and 1 more)
-
Chuck: Thanks for the "keep at it" approach. There are often so many promises out there for a final product and the completion date keeps getting pushed back. Its nice to see the follow through. MIKE
- 1,784 replies
-
- 5
-
-
- winchelsea
- Syren Ship Model Company
- (and 1 more)
-
If waiting for a new part is going to be lengthy why dont you use the broken part as a template and draw it on the remaining wood on the sheet. then using a table saw, or a hand saw, cut it out of the sheet and then sand it to the shape you need... there is nothing worse than waiting for replacement parts. I have had to do that a few times.. more for parts that went missing (wheels off a gun carriage that disappear into a carpet). Mike Draper