HOLIDAY DONATION DRIVE - SUPPORT MSW - DO YOUR PART TO KEEP THIS GREAT FORUM GOING! (Only 20 donations so far - C'mon guys!)
×


HakeZou
-
Posts
325 -
Joined
-
Last visited
Content Type
Profiles
Forums
Gallery
Events
Everything posted by HakeZou
-
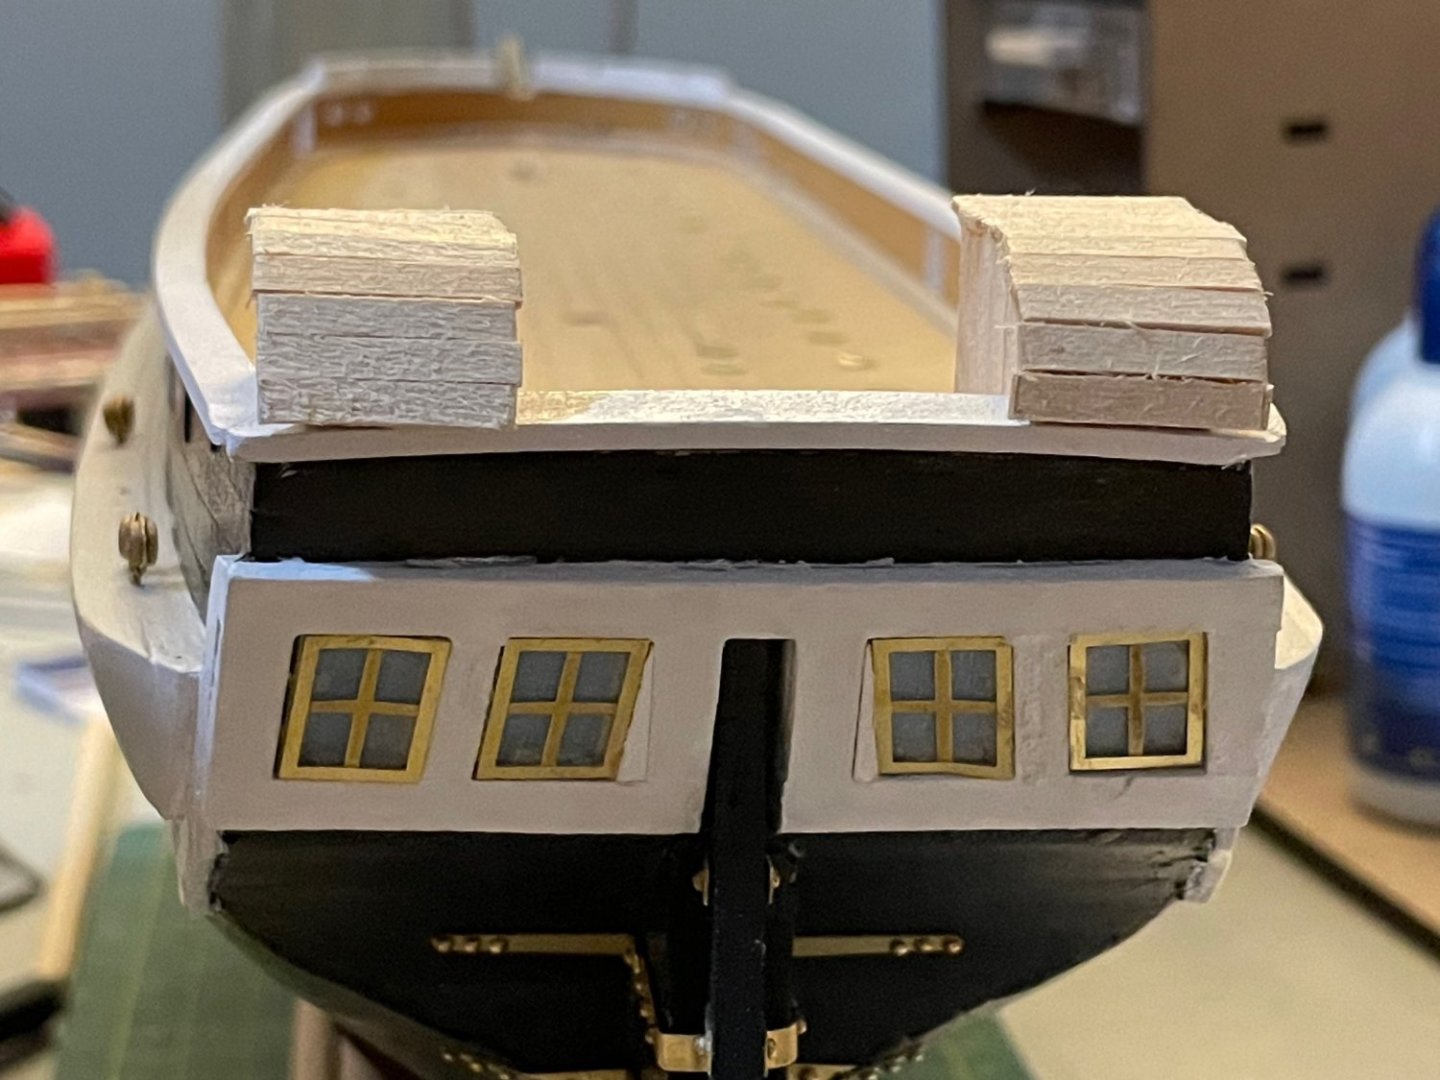
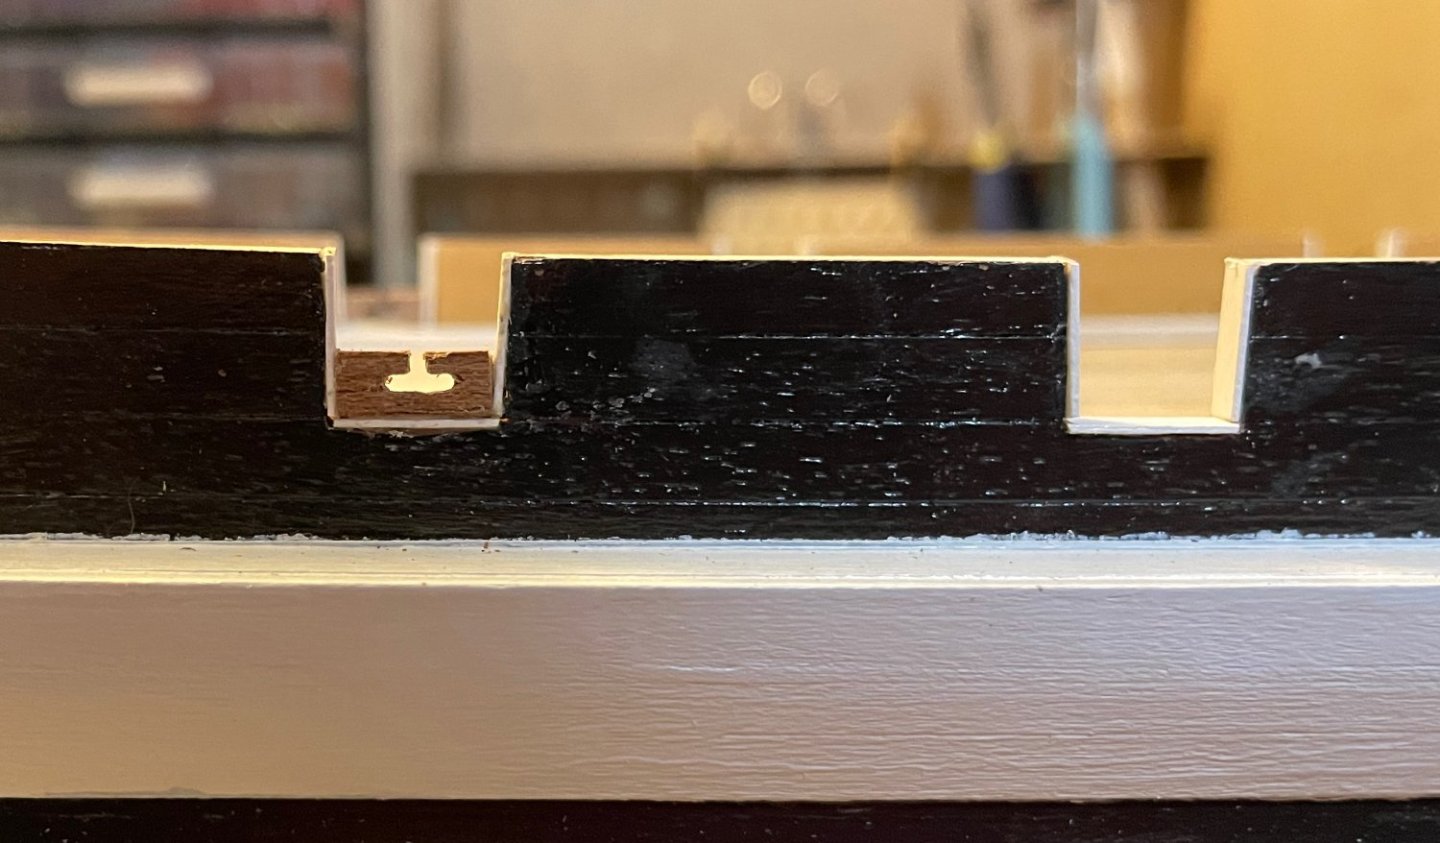
Got in the zone tonight and when I looked up, hours had passed! A while back, I made some wall panels in preparation for building the water closets. Tonight, I finally sat down to work on them. The good news is that the initial assembly is done! There's still quite a bit of clean-up work and finish work to do before painting them and calling them done. Once I sand them and clean them up, I'm going to add coamings (which will hide some of those gaps!) and doors. In other news, I'm having second thoughts about followingOccre's design of the lower deadeyes. I'm thinking about investing in the Amati chain plates that DanielD used for his Terror. My only hesitation on those chain plates is that Amati seems to design them for 7mm and 5mm deadeyes, but that seems too big here; I'm using 5mm and 3mm deadeyes. I'm still thinking about my options here...

-
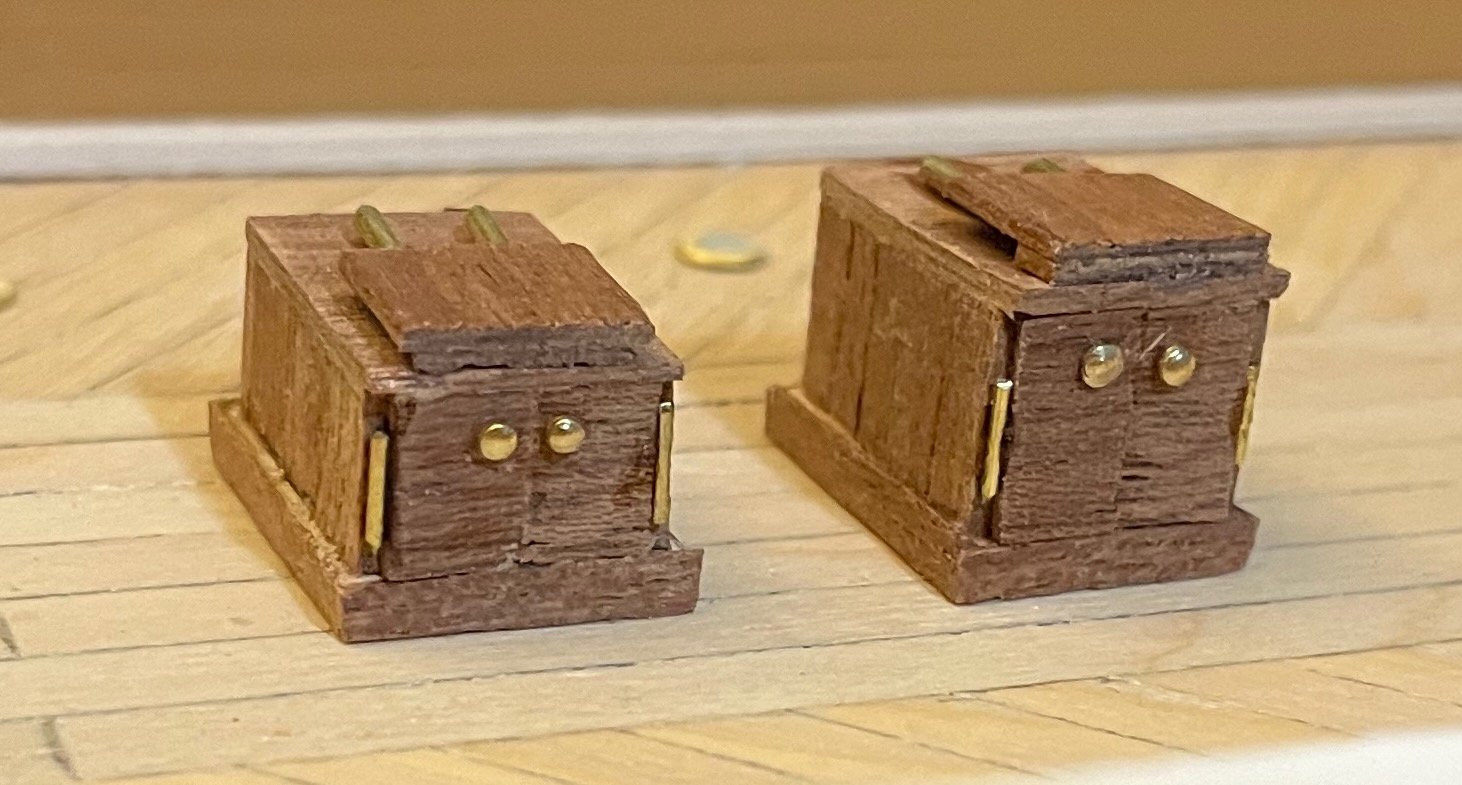
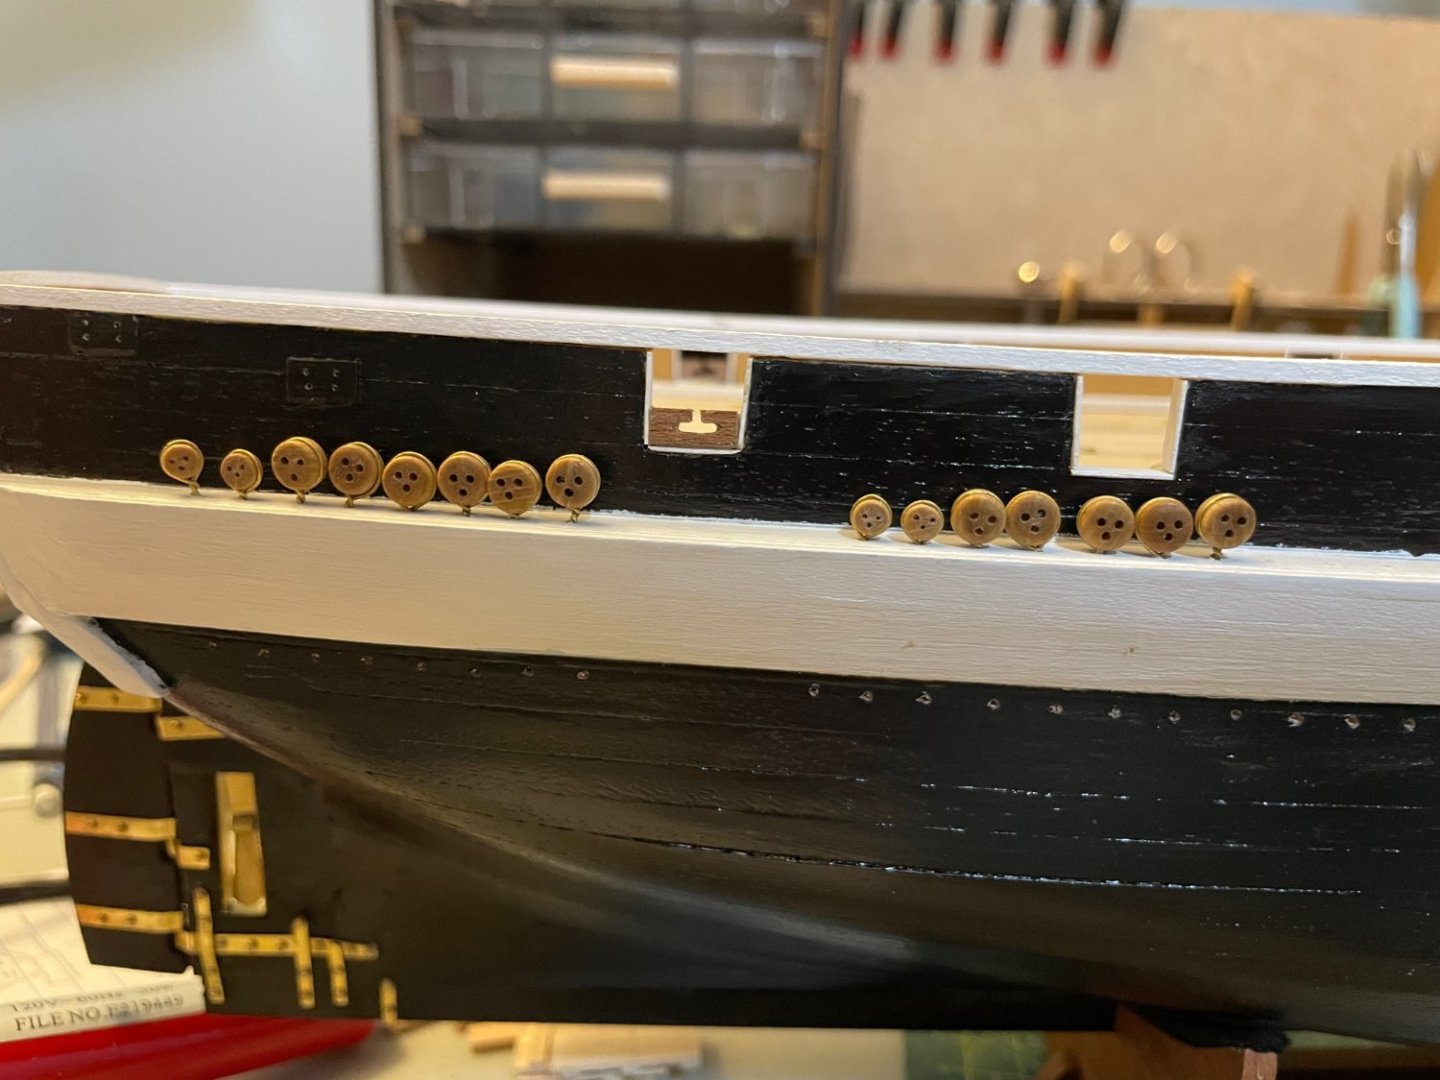
I've gotten a start on the lower deadeyes. For now, I'm just wrapping .5mm brass wire for the straps and setting them sit in the holes that I've drilled for them. Once I've finished this step, I'll start working on the chain plates. 15 down, 55 to go! I replaced the limewood deadeyes and blocks in the kit with walnut ones. I'm liking that look so far! I've also put together the forward and aft companionways. I departed a bit from Occre's plans, once again. First, I flipped them upside down, since that seemed to better match the design in Betts's plans. The overhang of the roof piece works well for the coamings, which Occre omitted in their simplifications. I had some 1x10 sapele strips laying around, so used that for the roof and the sliding hatch. I hang on to the shafts of pins when I could off the heads for rivets, so I also used some of those as hinges. I also noted that Betts gives the aft companionway as being somewhat shorter than the forward one, so I sanded it down until it was 2mm shorter. They still need a little bit of touch-up and some finish, but I'm mostly pleased with how they've turned out! Next steps: Continue working on the lower deadeyes and chain plates; install pin rails and cleats to the bulwarks; continue preparing the deck fittings.


-
Thanks for the encouragement, Keith! Yes, I knew about the illuminator that could be removed for the steam vent pipe (which I'm also planning to include). The missing illuminator is the forwardmost one on the starboard side. I just managed to miscount (repeatedly!) and so didn't prepare enough of them! At least that's an easy fix.
-
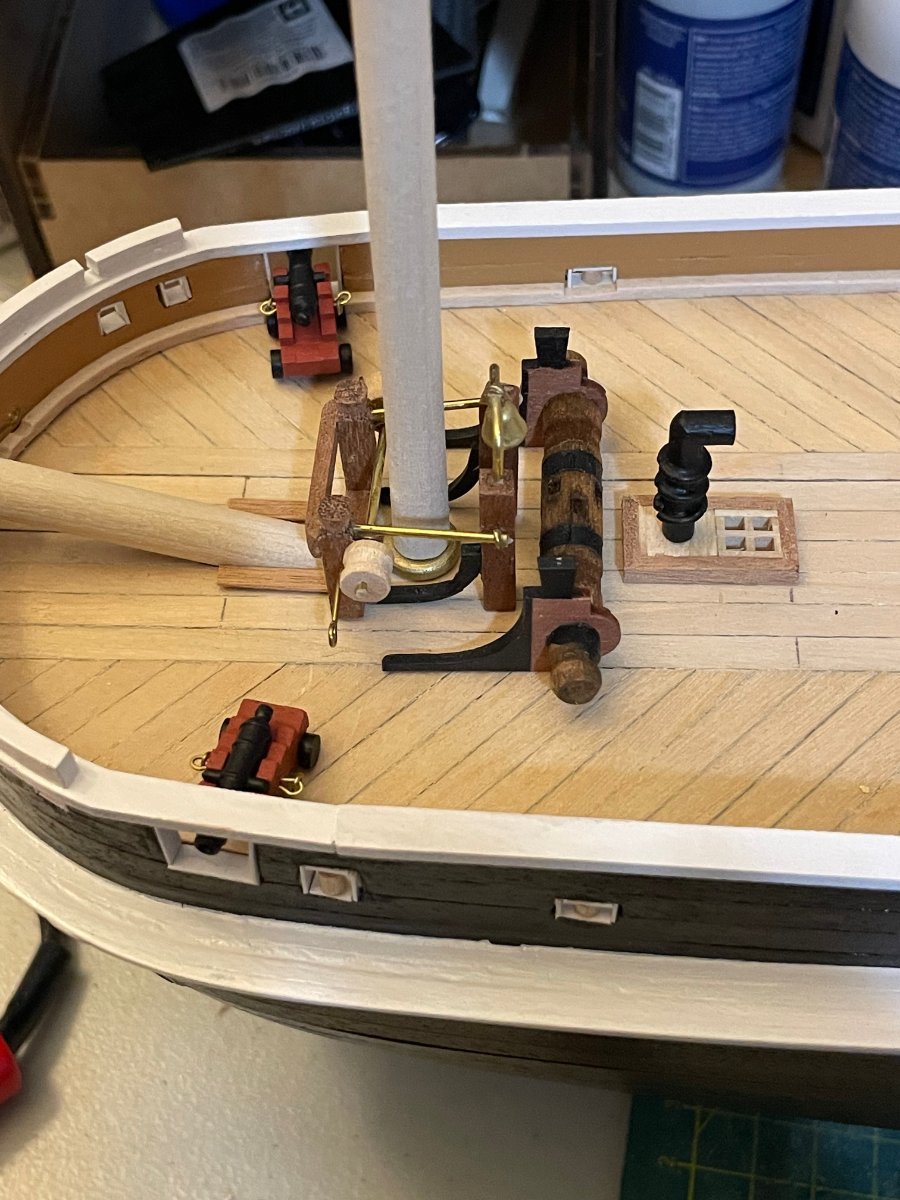
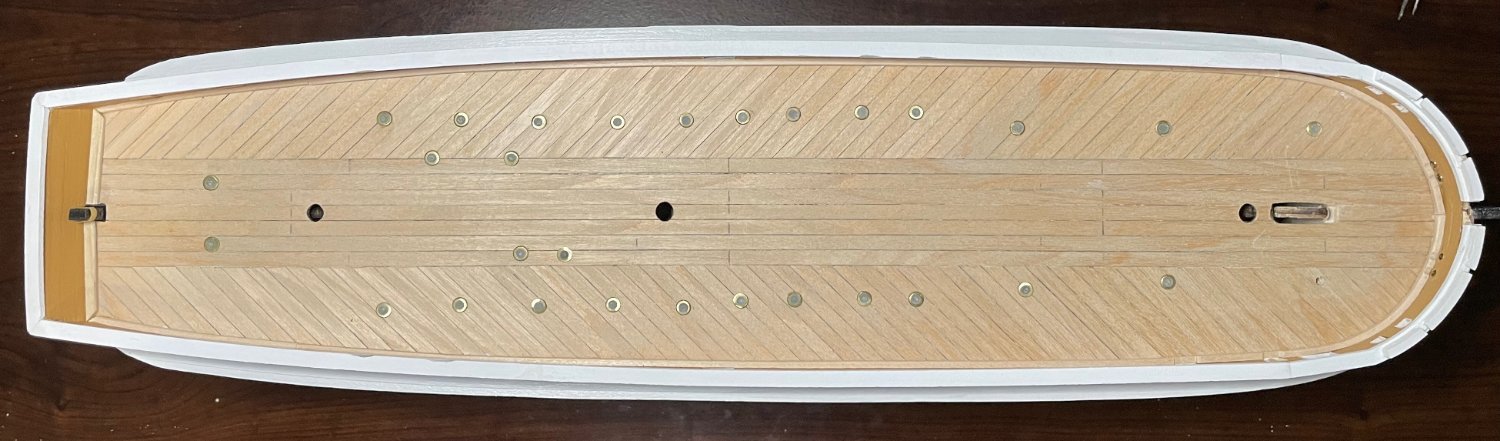
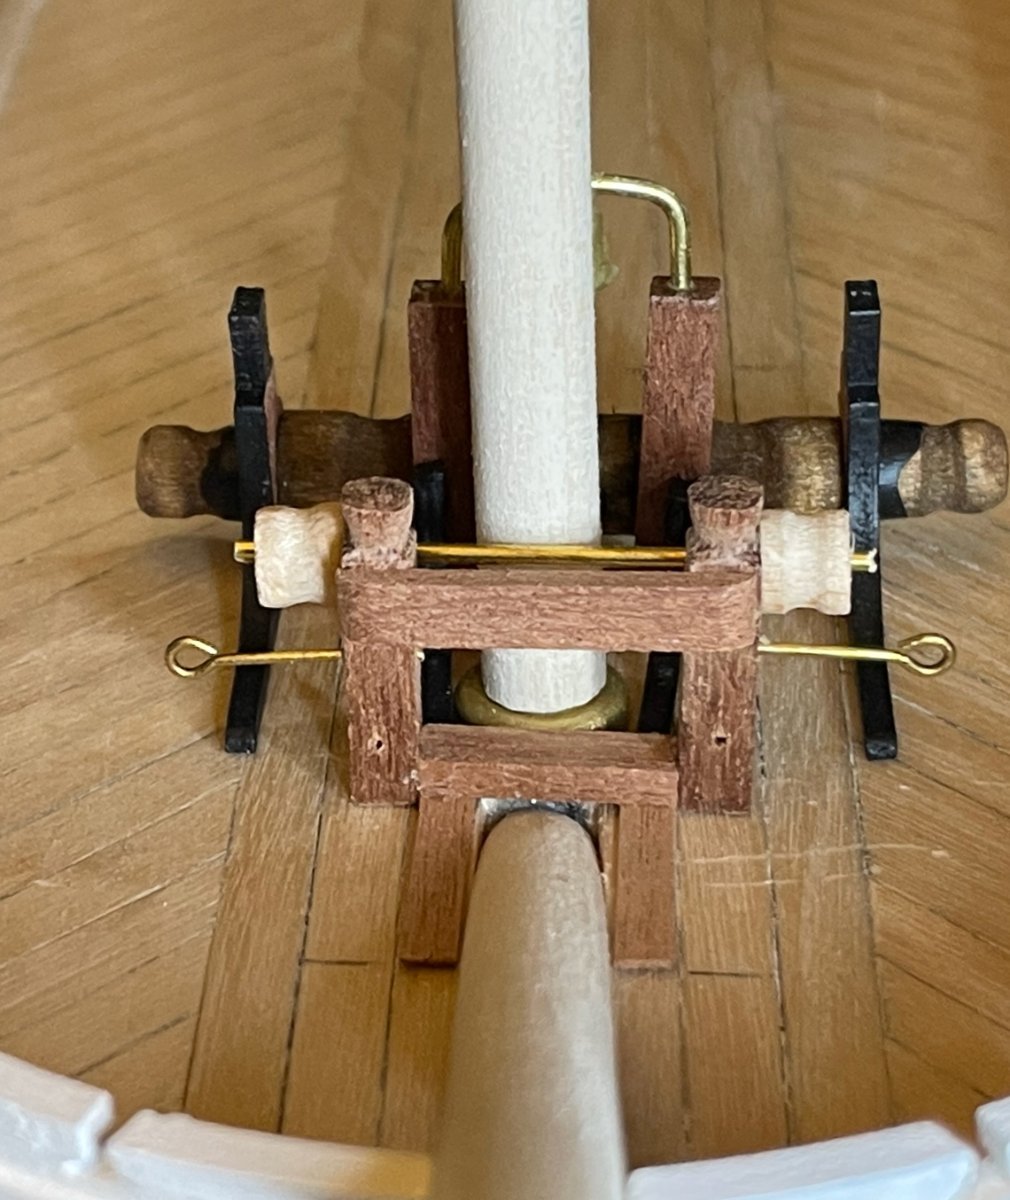
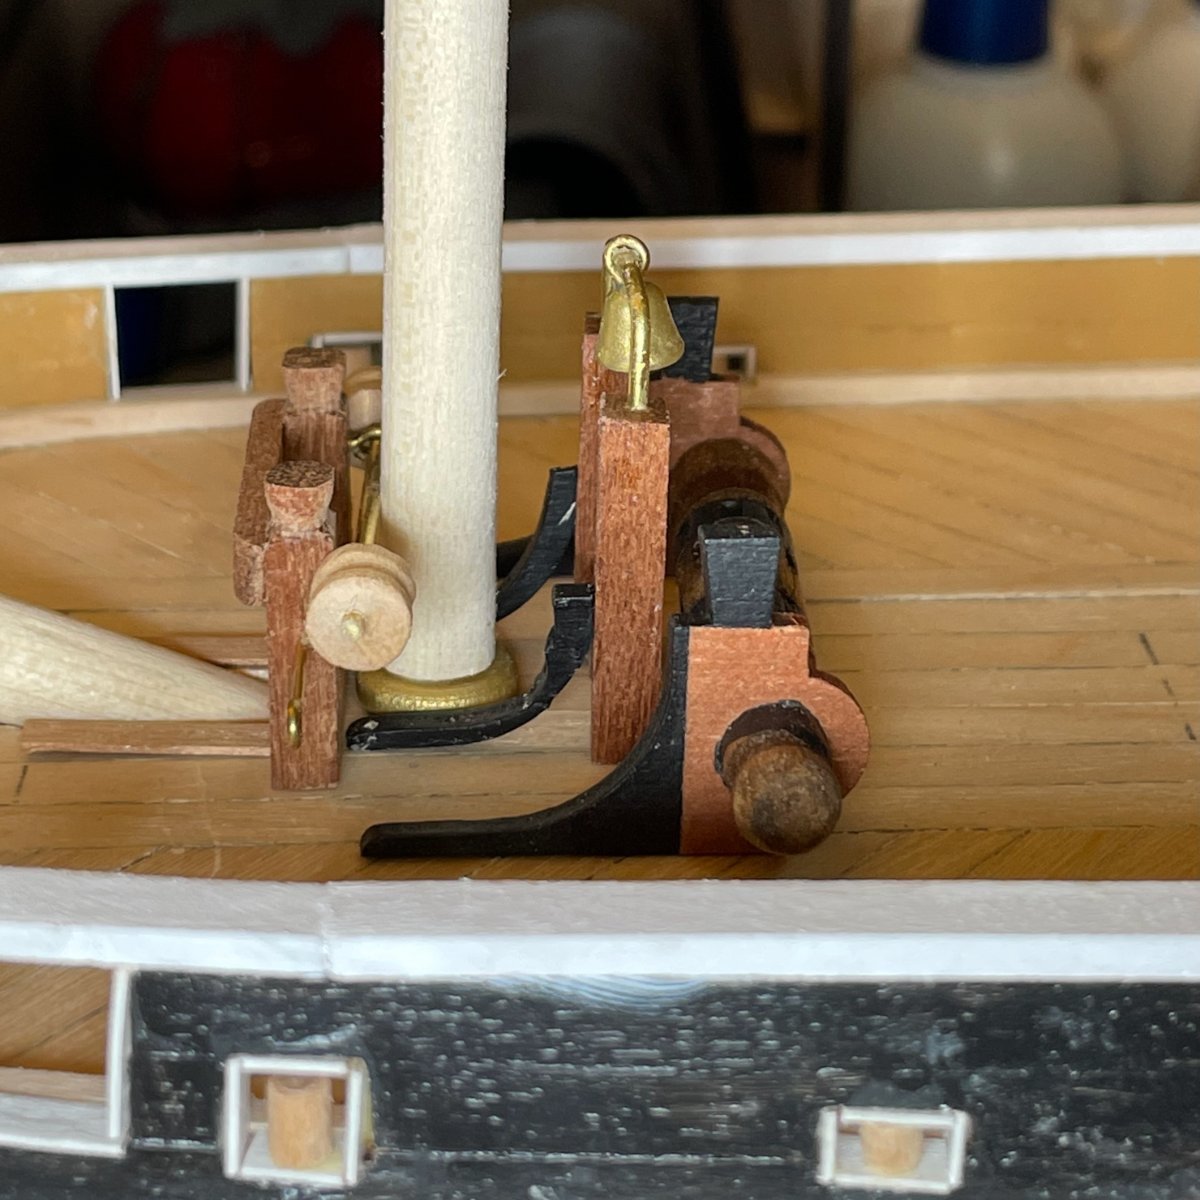
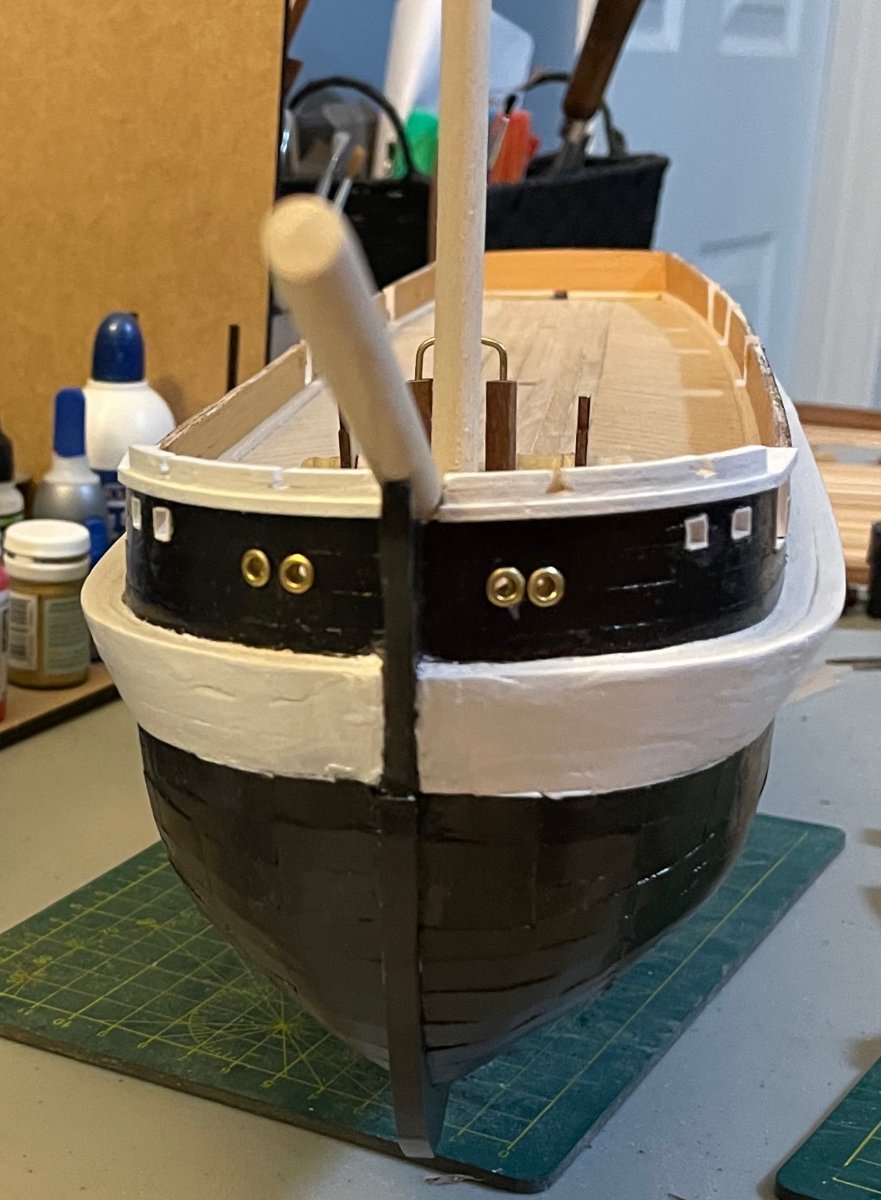
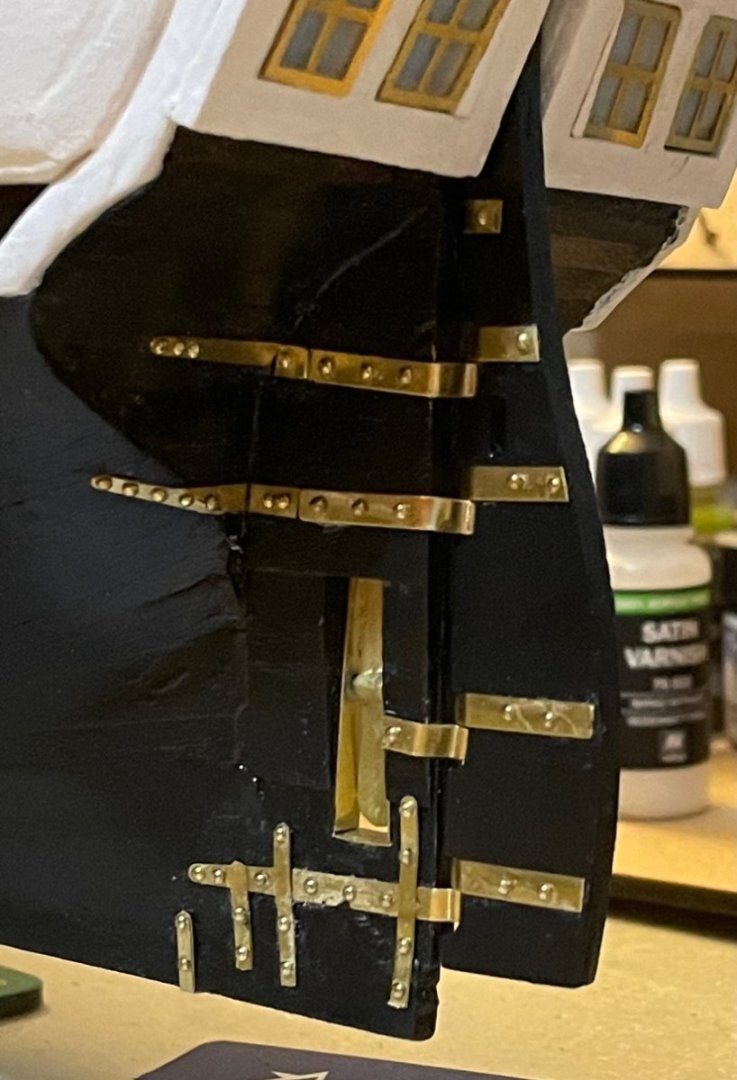
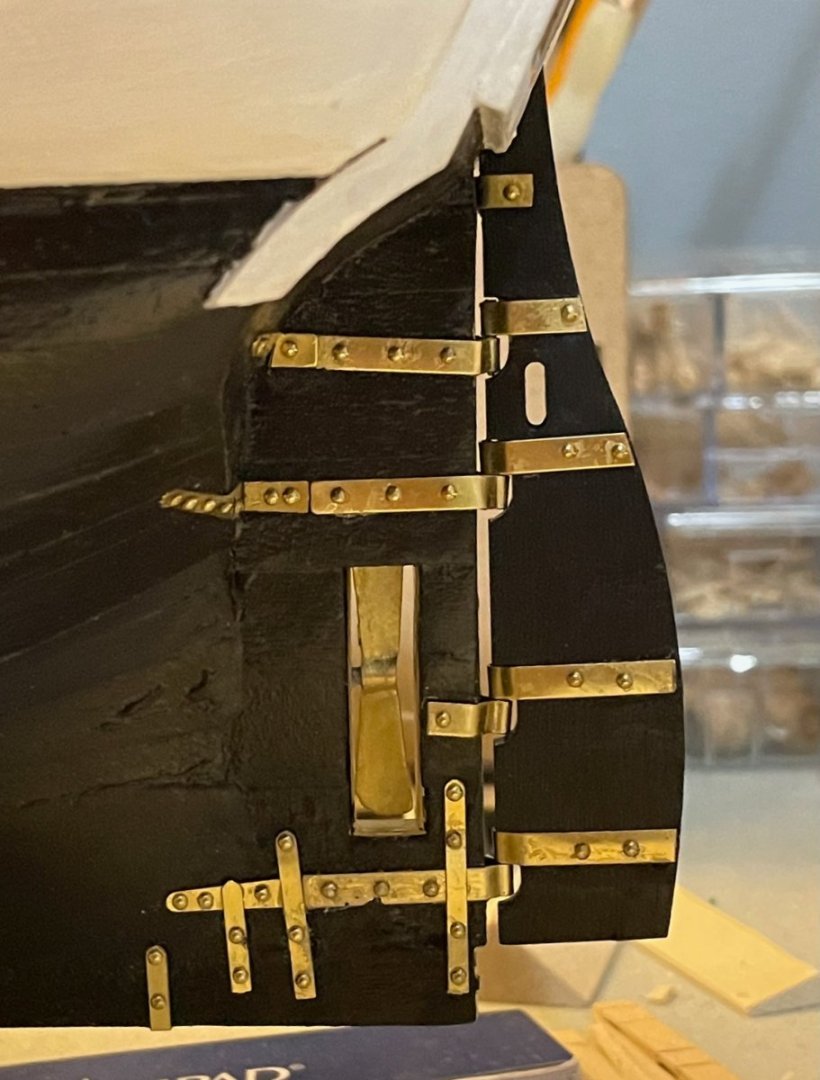
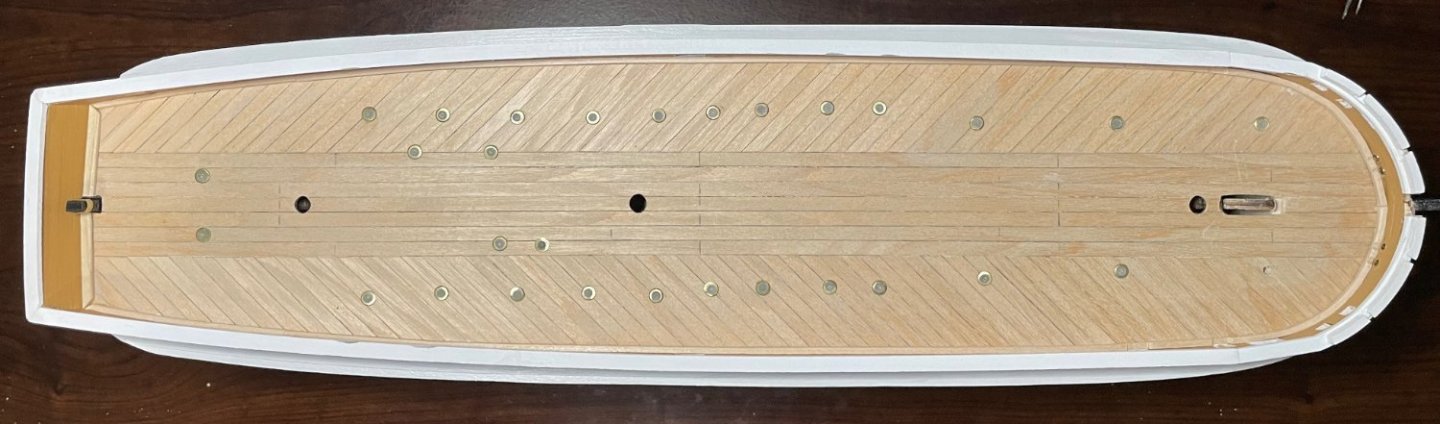
A few more bits of progress coming together in different parts of the ship. First, the deck fittings around the foremast are almost finished. The signal cannon are from a couple kits that I picked up from Model Expo—I think they're made by Corel? Once everything was painted, they were pretty straightforward to put together. The other significant new addition is the assembly of the ice scuttle and the flue for the Fraser's Patent Stove. The angle makes the flue look a bit short and a bit funny...I'll have to get a better photo later. Finally, I added metal rods running between the winch and the bitts supporting the bell. After a bit of experimentation, this seemed like a better solution for the pin rails here, though I'll have to be very careful installing the belaying pins. Next, I installed the rudder and all of the fortifying brackets around the deadwood. Metal work continues to be a big challenge for me. I feel mostly good about what I accomplished here, though the misalignments sure stand out in these close-up shots. Finally, the most nerve-wracking step yet—drilling holes in the deck for the illuminators. I wish I could have a couple of those holes back, but I'm not sure how to do that without tearing things apart. They're all close to the right spot at least and the misplaced ones should be less obvious once all of the deck fittings are installed. I filled Occre's porthole pieces with white glue to simulate the crystals in the illuminators. At their best, it gives them a nice frosted look similar to the sanded acetate in the windows on Crozier's cabin. Also, you'll notice one illuminator is missing. I can't tell you how many times I counted 29 illuminators in Betts's plans...but once I mapped them on the deck, there were 30. So, one more to prepare... With these caprails, rudder, and illuminators installed, I feel like I've hit a big milestone. Now I can shift fully to the next phase of the project. Next steps: install the lower deadeyes and chainplates (which will be easier to do when I can still flip the ship around on its side); install pin rails and cleats to the bulwarks; continue preparing the deck fittings. P.S., I'm also still trying to straighten out the 8mm dowel I'm using for my mainmast. Any recommendations on this? I spent a bit of time working on it with a clothes iron (after soaking the dowel for a couple of hours). It's better, but still noticeably warped. If the clothes iron is the best strategy, do I need to just keep working on it?

-
Finally getting caught up over here, too, Keith. I remember running into that discrepancy with the catheads, which you wrote about a month ago or so. I came to the same solution as you after studying that photo of Hurley's available through Getty. Also nice to see you correctly positioning the ventilators—that's probably my biggest regret from my build, that I didn't catch Occre's odd placement in time to more them. Your design of the steering gear looks fantastic!
-
It's been a while since I've gotten caught up on your log, Keith. You've been doing some beautiful work during that time! The end is definitely getting close for you now!
-
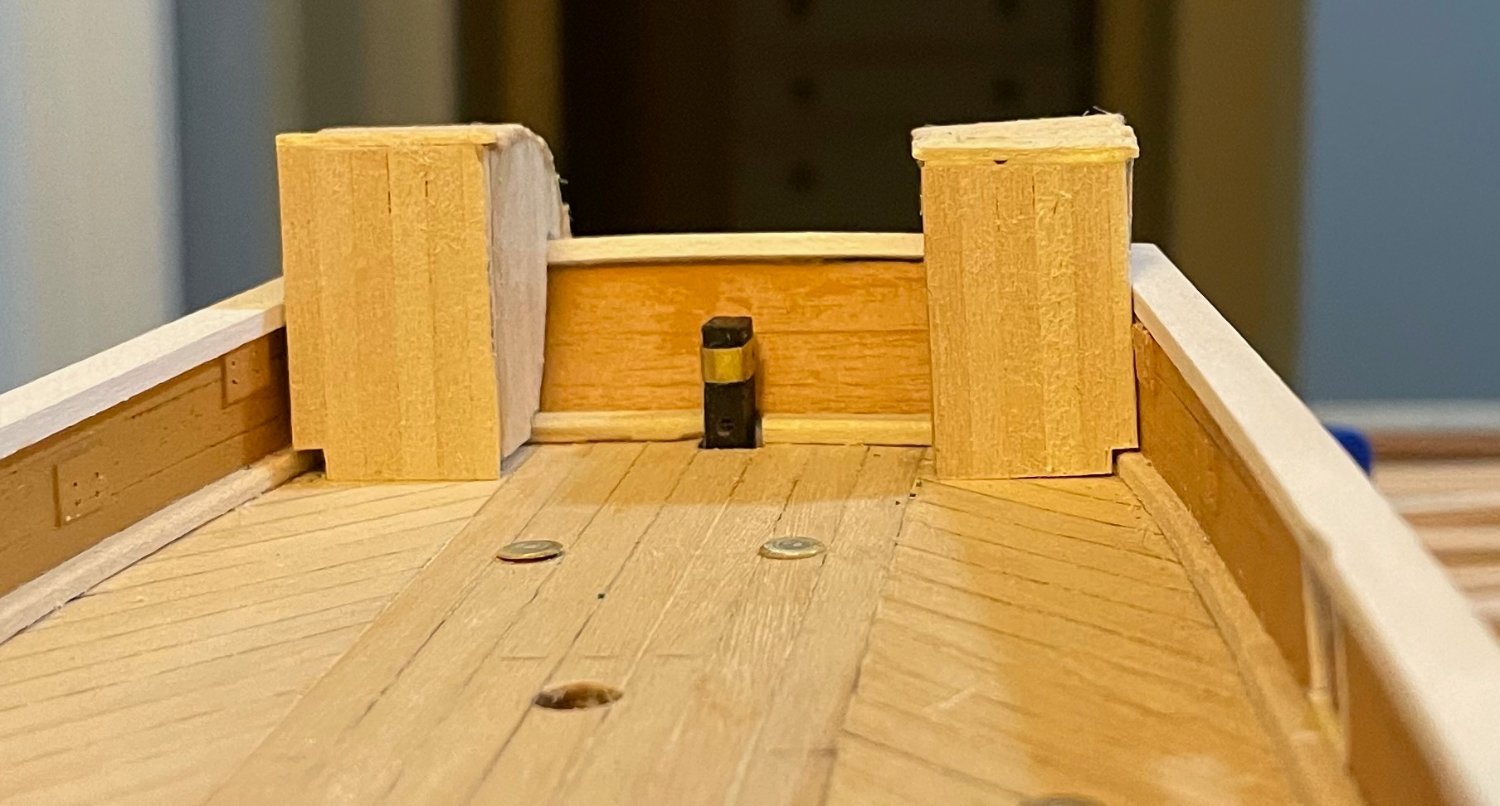
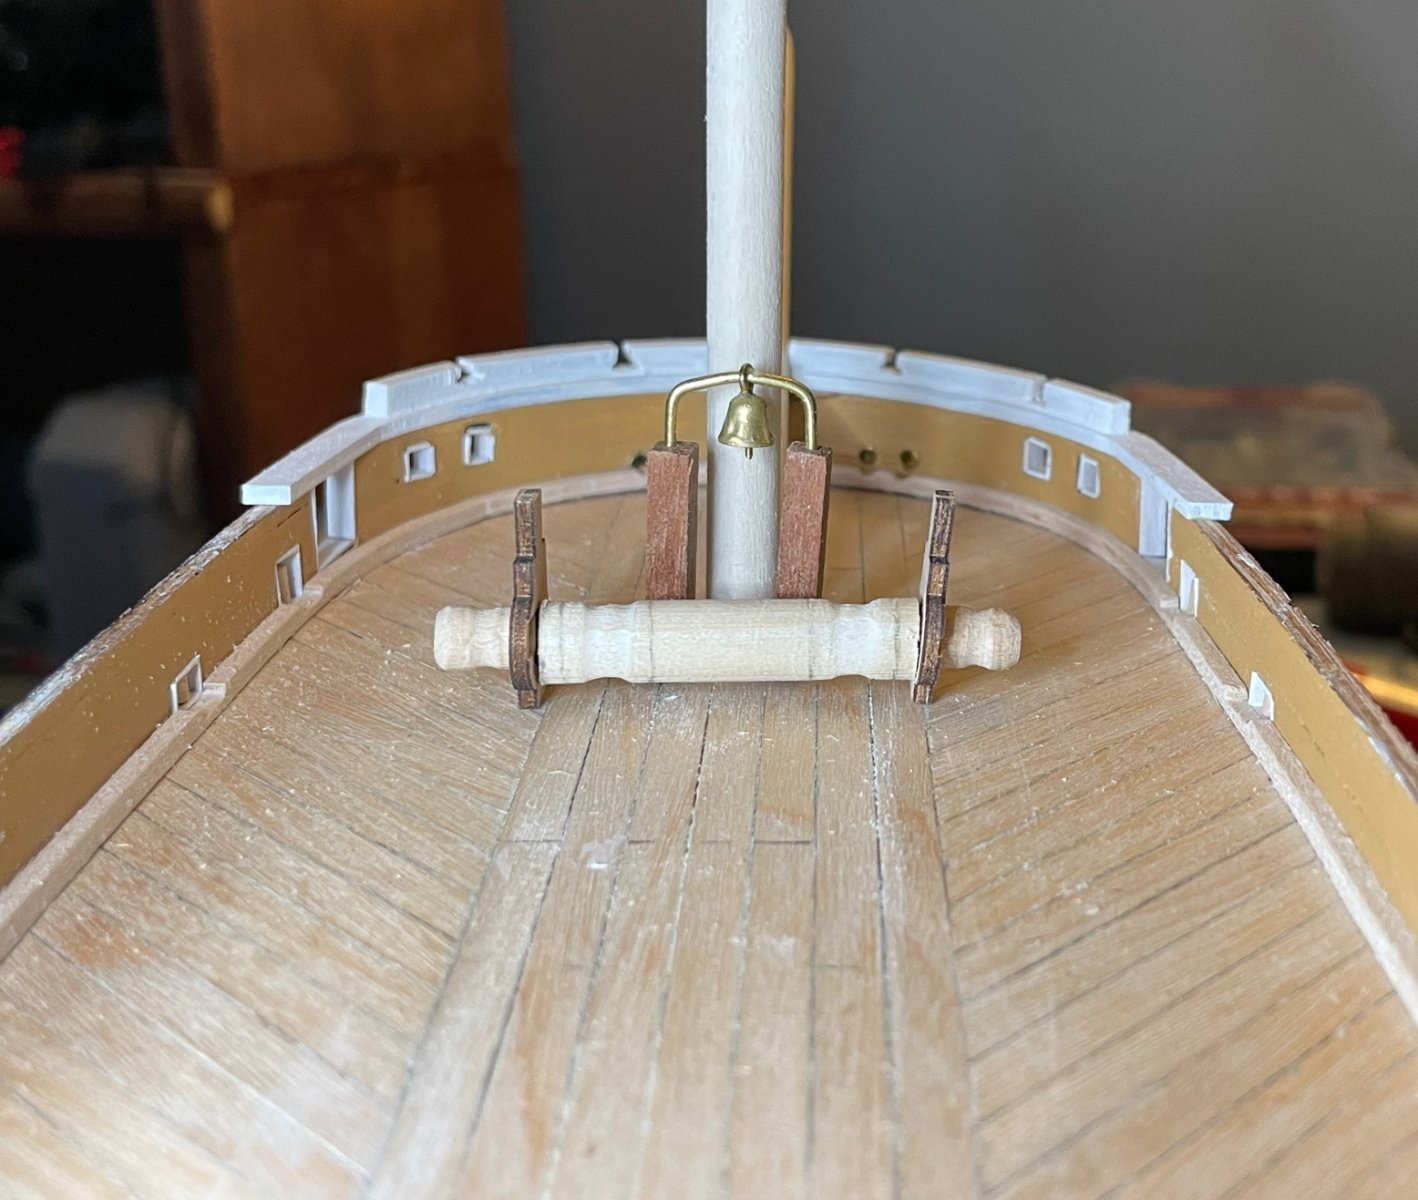
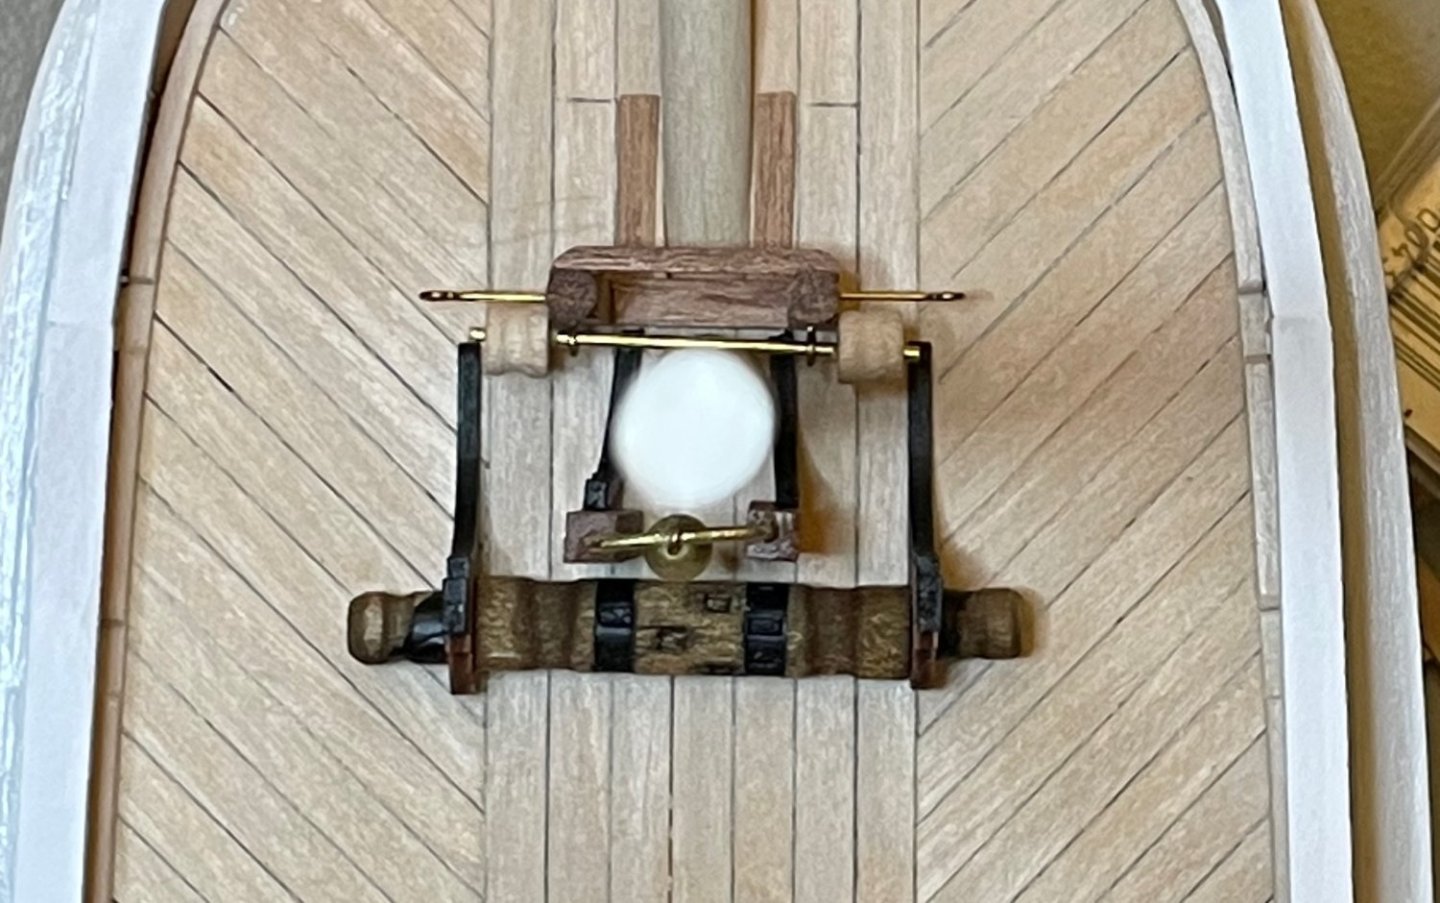
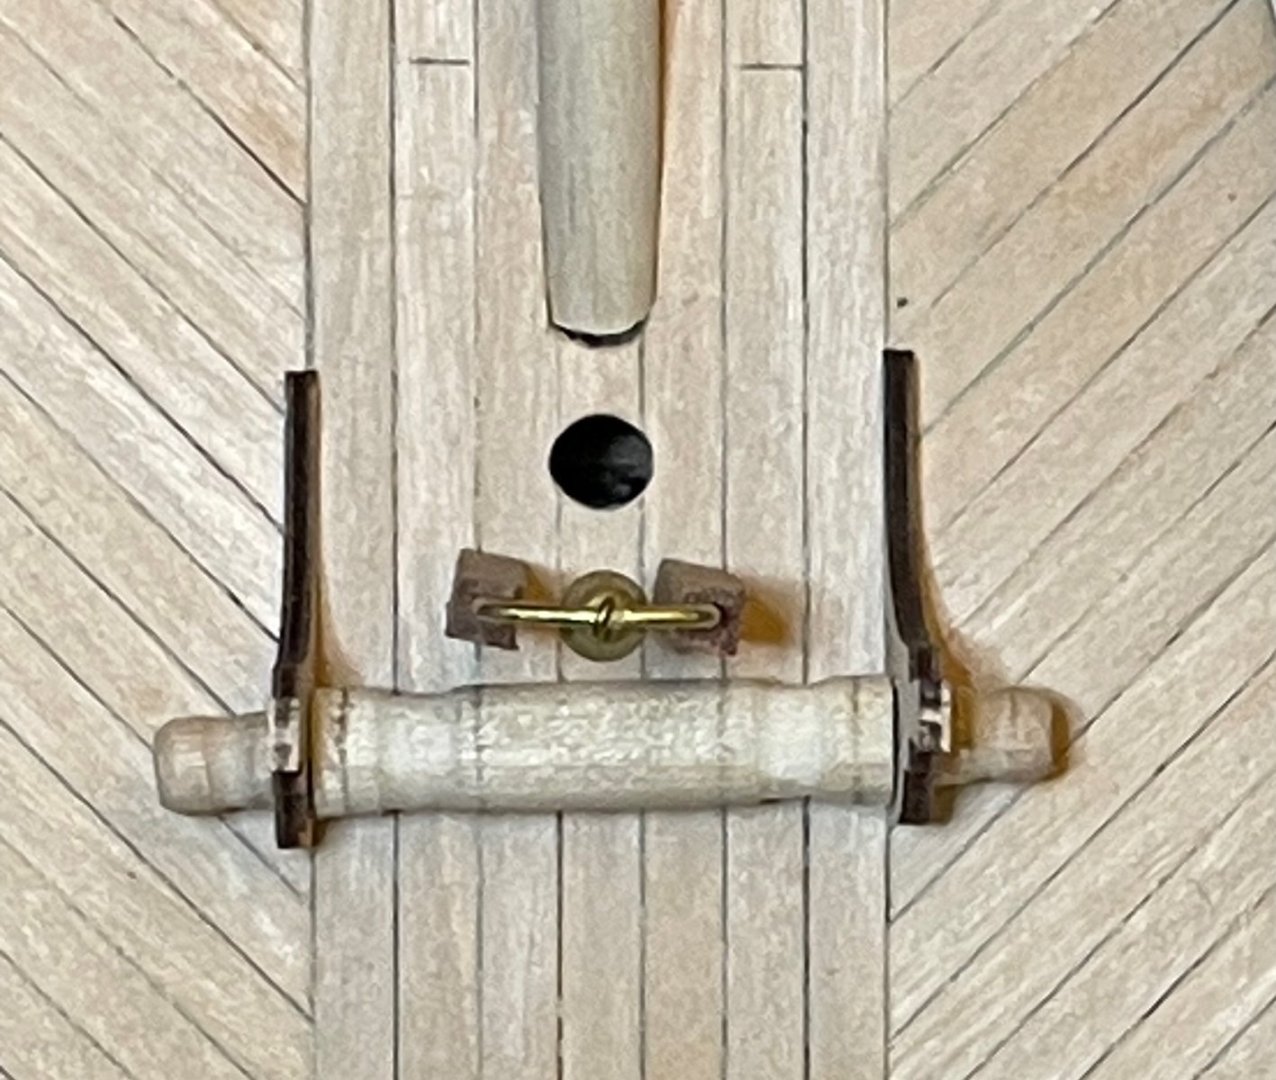
A bit more progress over the last couple of weeks! The cap rails are installed, which made for a nice milestone. The mizzen mast has been shaped and is sitting in place. I'm still working on the main mast, but my dowel is warped and I'm having a hard time getting it to straighten out. At 8mm thick, a hot water bath and my plank bending iron weren't enough. I'm going to try the Admiral's clothes iron next. I've also been working on the illuminators. After a few experiments, I found I liked the look of white glue in them. Unfortunately, I've had a frustrating time getting the set glue to stay in place while I'm sanding/polishing the top. I have six finished, but still have a long ways to go. While waiting on the illuminators, I've also been starting to work on the deck furniture, starting with the complex of things around the fore mast: the winch, the bell, and the windlass. These are almost finished. I still need to add pin rails between the winch and bell bitts, as well as some pawls. They aren't perfect, but this is the most intricate crafting I've done—I'm completely ignoring Occre's plans here and relying instead on the plans in Matthew Betts's book—so I'm generally feeling pretty good about them. Note that the winch doesn't balance well on its own, so what looks like a loose deck plank in the portside view is actually the coaming for the bowsprit, which I've built into the winch's base. The eyebolts sticking out from the sides of the winch bitts will eventually be connected to eyebolts on the deck, forming the guard to prevent the anchor chain from damaging the winch. The bitts and rod supporting the bell are pretty wild and will remain so until the pin rail is attached; for now, all of this is just sitting in approximately the right location and nothing has been installed. Next steps: Continue preparing the illuminators; continue preparing the main mast; add the pin rails to the winch and bell bitts.


-
It's been far too long since I've made an update about my progress. As I mentioned in the last post, this semester has been remarkably busy and I haven't spent much time in the shipyard. Because I've mostly had short periods of time to work on the Terror, I've been working on a few different small things on which I could really go one step at a time. A few photos of this incremental progress. First, a view of the prow. I've shaped the lower sections of the bowsprit and foremast. Those are dry-fit here, but the splash rails are assembled, painted, and installed. The rest of the cap rails are waiting until I have a longer work session. Second, two different views of the windlass. Again, everything is just dry-fit here, so things look a bit wonky. Like some of the other Terrorites, I wasn't satisfied with the metal windlass provided in the kit. I'm using the plywood frames, but the rest is my own solution to the problem, based on the drawings in the Betts book. The main drum of the windlass is made from a length of 8mm dowel. Using my drill as a lathe, I used round and half-round files to carve out the portion where the anchor chains will be wrapped. (Side note: This video has a really helpful demonstration showing the operation of a similar, though smaller, anchor chain windlass.) I still need to carve out the brake gears and the holes for the rods used to turn the barrel; those will all go into the center section. The warping heads were shaped in a similar fashion, though out of a 6mm dowel. The warping heads are mounted in the predrilled holes in the bitts, with pins anchoring them to the main drum. The bitts supporting the ship's bell are 4x4mm sapeli and will eventually house the pawls for the main drum. I plan to add some metal feet to support these bitts, but haven't had a chance to do that yet. The kit comes with an elaborate cross piece supporting the bell, but Betts's drawings show a simpler metal arch; I've opted for the latter. Anyhow, it's nice to have something to share again! Hopefully it won't be quite as long until my next update! Next steps: Finish the cap rails; finish the windlass; shape the lower sections of the main and mizzen masts.


-
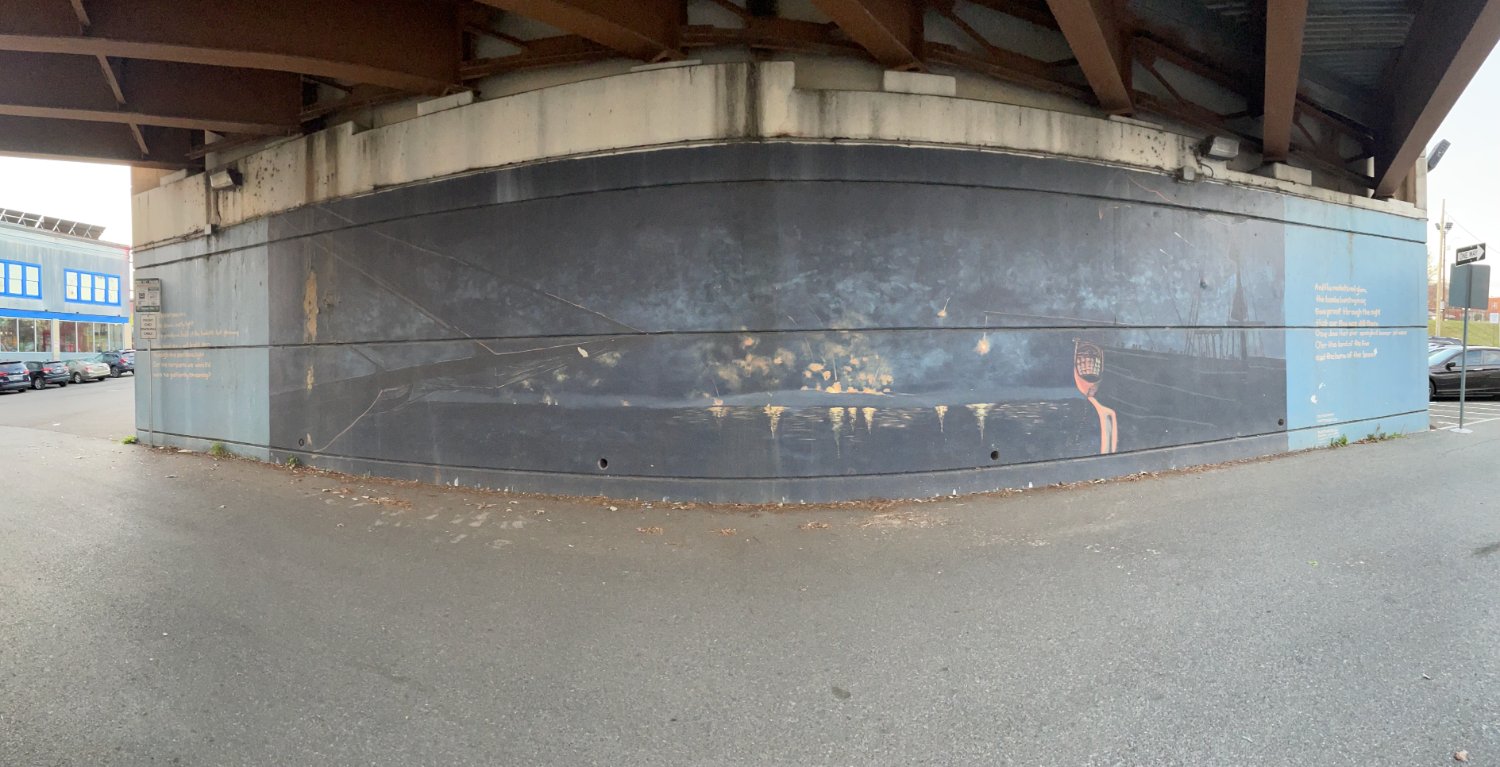
I haven't had much time to work on my Terror the last couple of months. Some small bits of progress, but I'm anxiously awaiting Spring Break, when I should be able to spend a bit more time on the project. But tonight's post is about one of those weird coincidences. I'm in the Washington, D.C. area on a research trip at the moment. Tonight, my friends and I had to walk under an overpass to get from where we parked to the restaurant we were eating at. I couldn't help stopping and taking a photo when I realized that we were walking past a mural of the Terror and Erebus bombing Fort McHenry! It's a panoramic photo, so a bit distorted and the ships aren't all that historically accurate, but still a fun piece of art to stumble on by pure chance!

-
Thanks, Keith! It was a quiet and very cold Christmas for us. We had frozen pipes for about 24 hours, but thankfully got everything flowing before any pipes burst. I hope you had a nice holiday, too! I ended up using my drill as a sort of lathe...that wasn't as stable as I had hoped, but I think it worked well. It was certainly quicker and did a more consistent job than the techniques that I used on my previous kits.
-
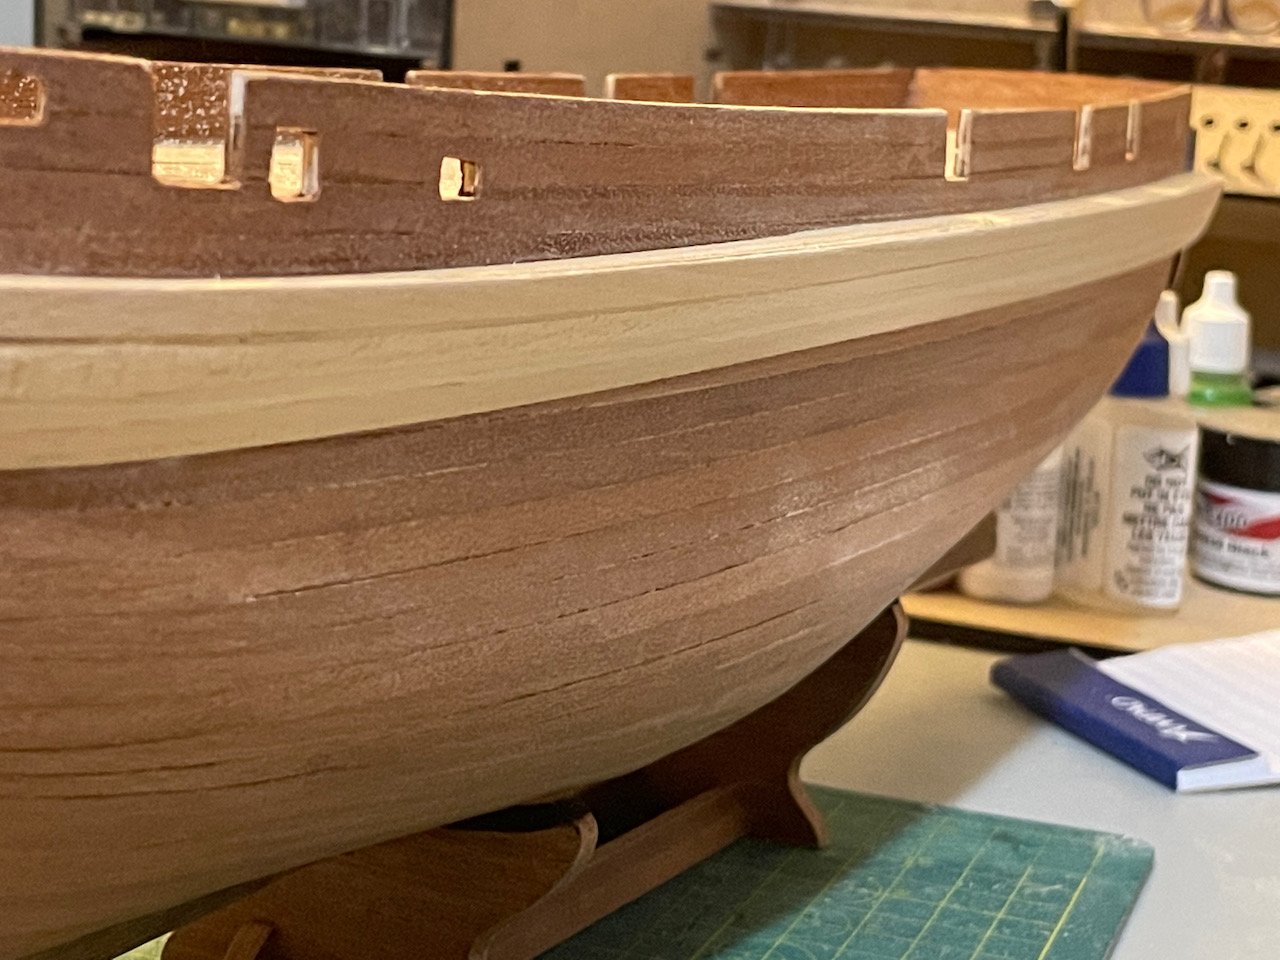
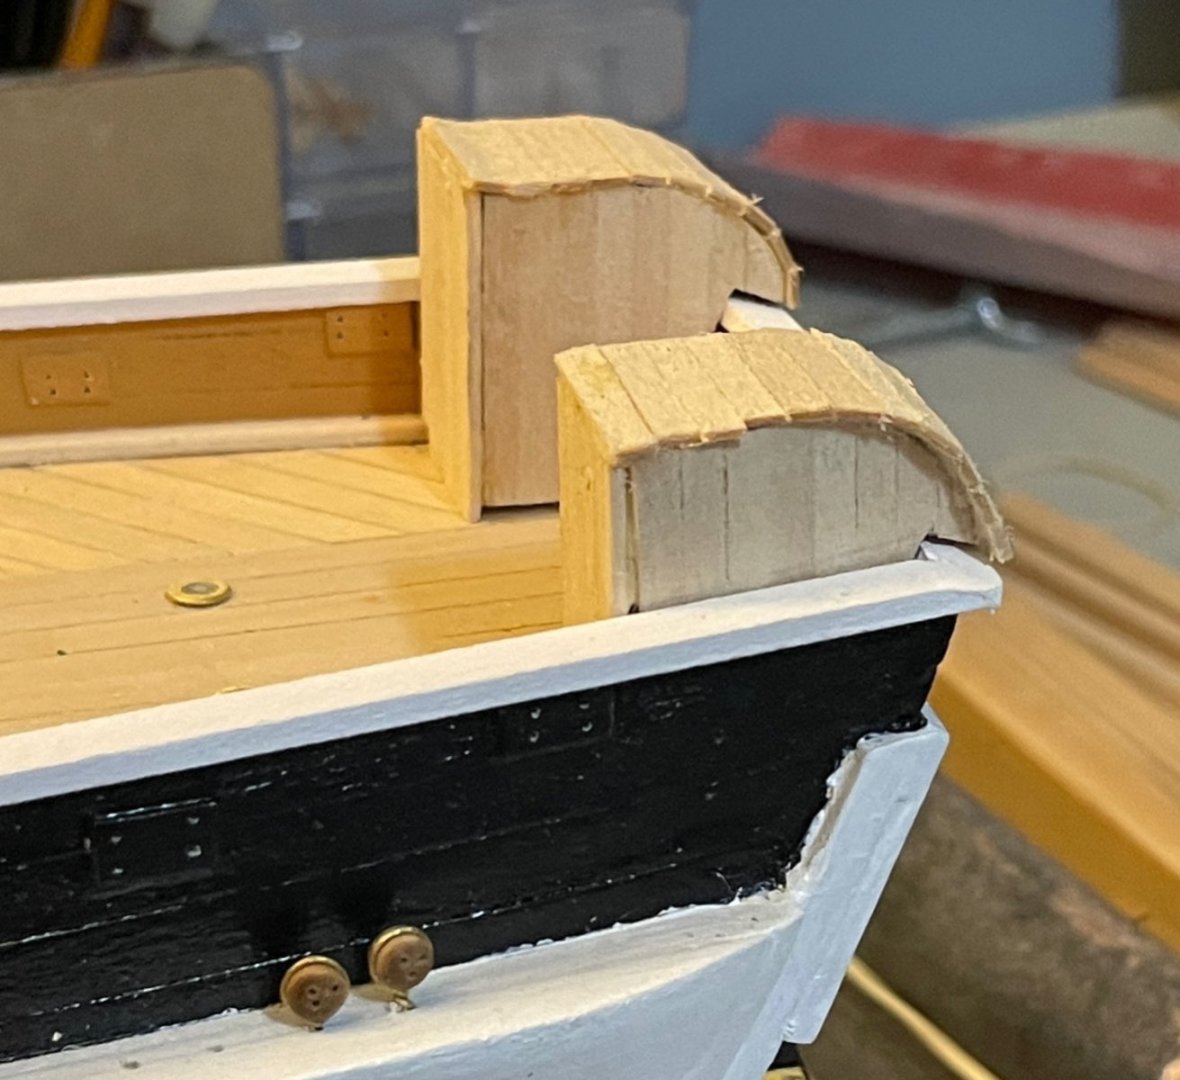
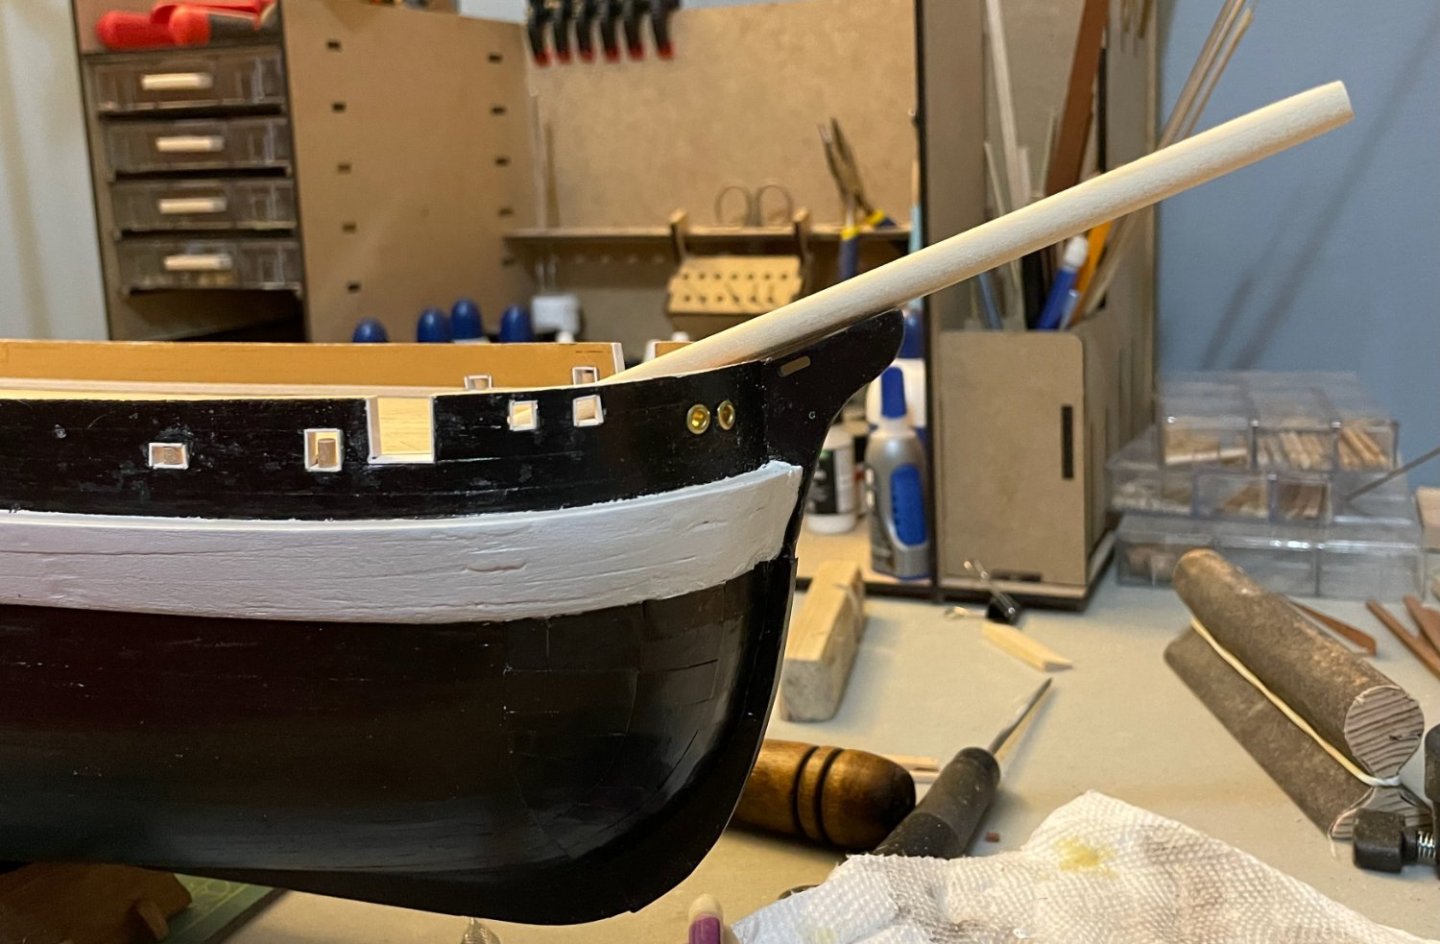
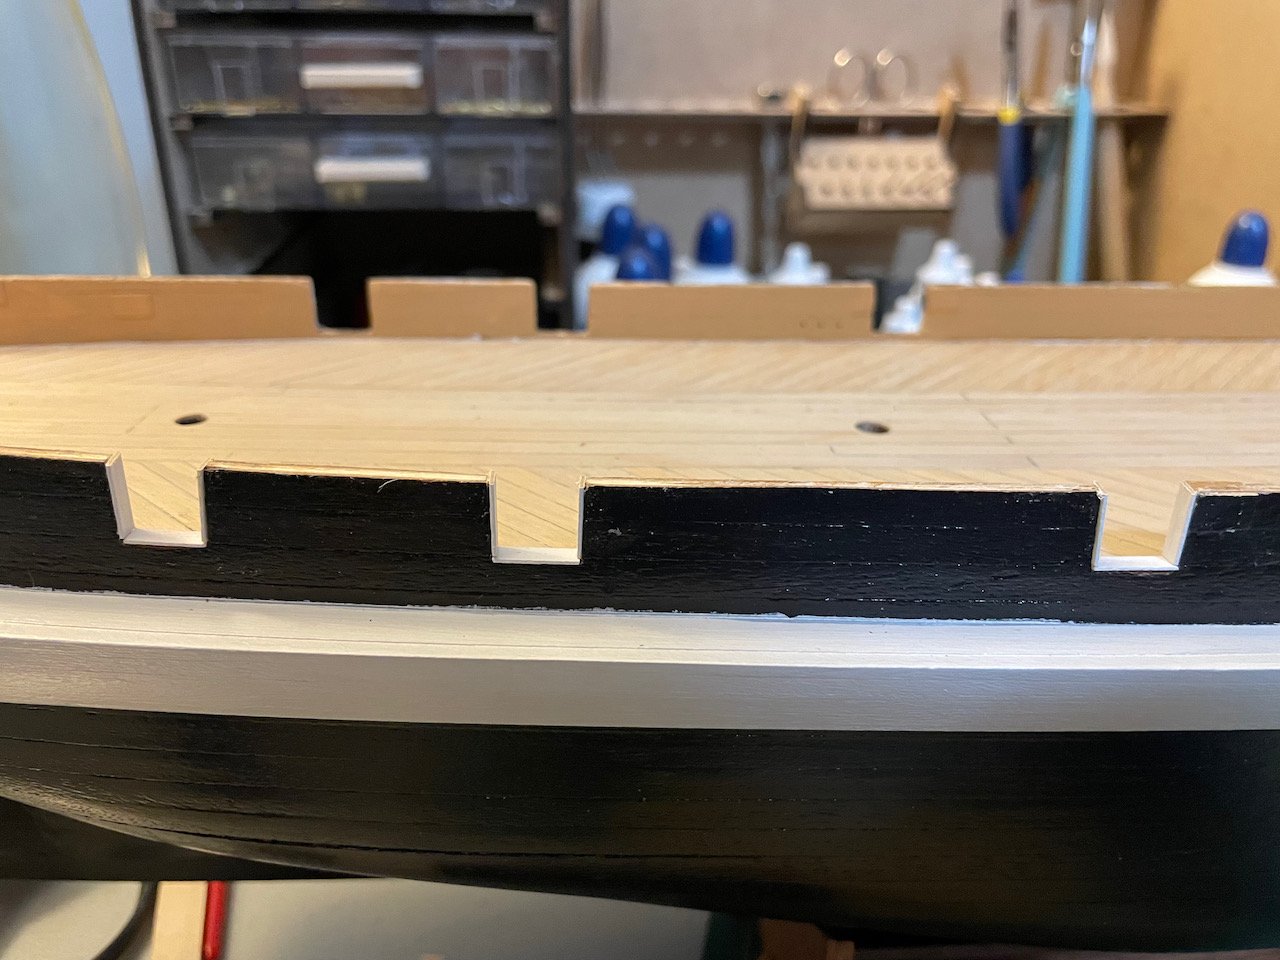
Another busy month, with the end of the semester and the holidays—but I finally have a bit of progress to report! I've finished the ports and the waterways. The lining of the ports went just okay, but I feel better about the heavy rope chocks and the posts for stowing the forward anchors. The chocks are fashioned from a spare piece of 2x4mm walnut from another kit and the posts from 3mm dowels. In preparation for installing the cap rails, I also fashioned the bowsprit. Like Keith (clearway), I opted to replace the dowel provided in the kit with a larger one—an 8mm dowel that I sanded down, tapering it from 7mm at the deck to 6mm at the tip. Next step: Install the cap rails and spray rails.
-
Hello everybody! What a busy month November ended up being. I thought I might finally get more work in on my Terror during the Thanksgiving holiday, but I was more pulled to the siren song of watching World Cup and college football games with my son—time well spent and no regrets at all! Today, just a quick note to confirm that the project is still moving forward at a snail's pace. I've finished lining the ports on the starboard side; still need to start the port side. This task has ended up being considerably more challenging than I anticipated, especially for the ports that needed lining on all four sides. The work is definitely not perfect, but hopefully having practiced on the starboard side will help me make the port side look better. In related news, a big order arrived in the mail the other day: a couple lifeboat kits, a couple cannon kits, a slew of nicer-looking blocks and deadeyes, and larger dowels for the foremast, mainmast, and bowsprit. Next steps remain: finish lining the ports, then install the cap rails, spray rails, and the waterways.
-
She continues to look better and better! I think that your decision to build the forechannels is well supported by the photographic evidence. I think that this photo is probably the clearest for seeing them. They do look pretty narrow, but they are definitely there below the capping rail.
-
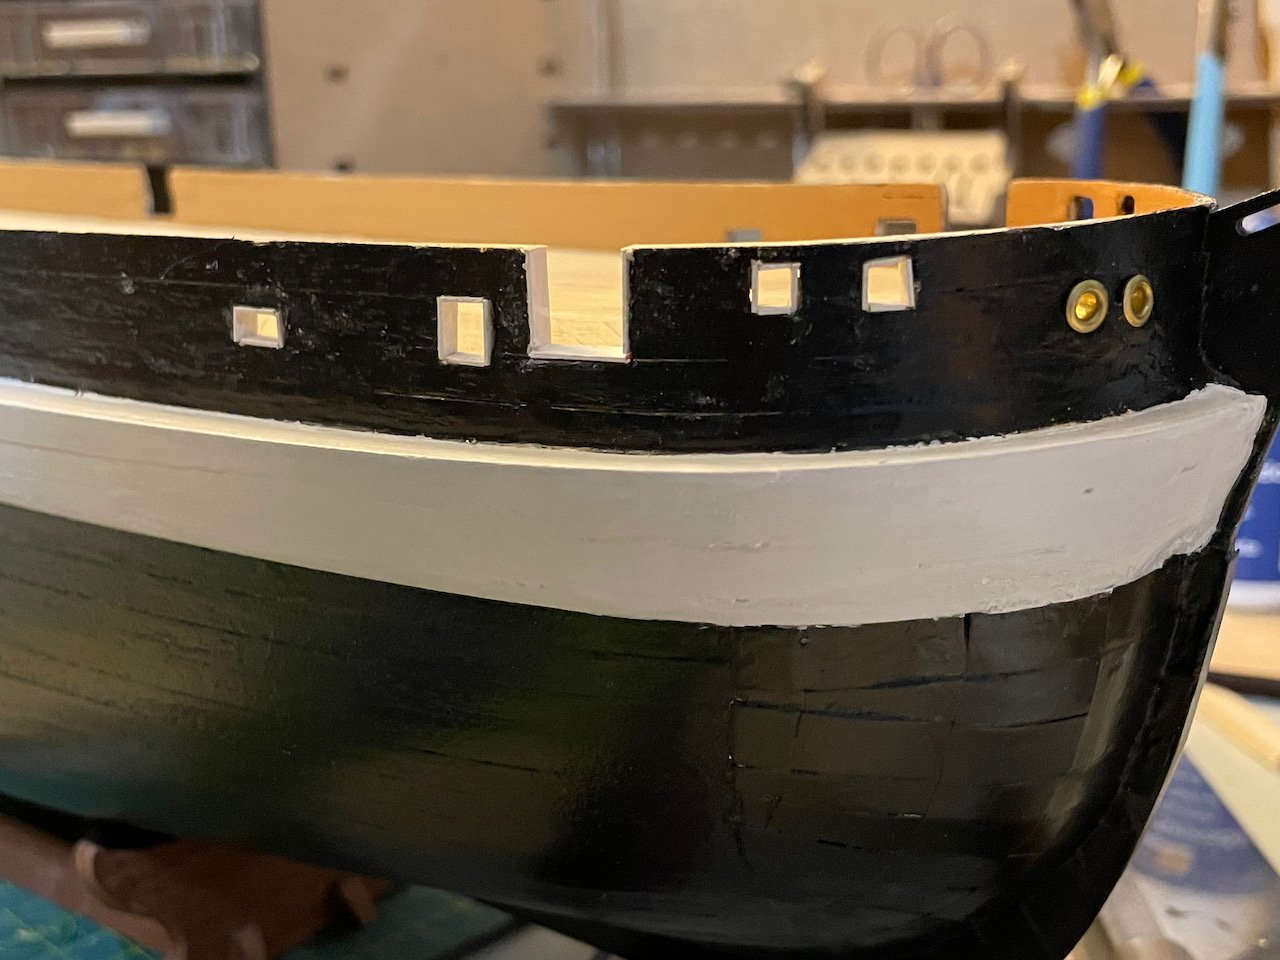
Some exciting progress—it's always a nice morale boost to see the paint go on the hull! My paint skills continue to be a work in progress, but I'm mostly happy with how this turned out. The hawse holes look a bit rough, but they will soon have some leftover brass port pieces installed in them. I opted for yellow ochre paint on the inner bulwarks. The windows on Crozier's cabin turned out okay. I think I need a bit of sanding and touch-up painting on the starboard side. Also...I'm going to need to order a replacement part for that last window. It didn't go in straight, so I tried to remove and reset it. But since the fit was so snug, it popped out and went flying...somewhere. Sure seems like I ought to be able to find it, but no luck yet. Next steps: Finishing the gun ports, then installing the cap rails, spray rails, and the waterways.
-
This is coming together so nicely, Daniel! Beautiful work! I'm curious about your plans for the other three lifeboats. Will you be hanging them from davits?
-
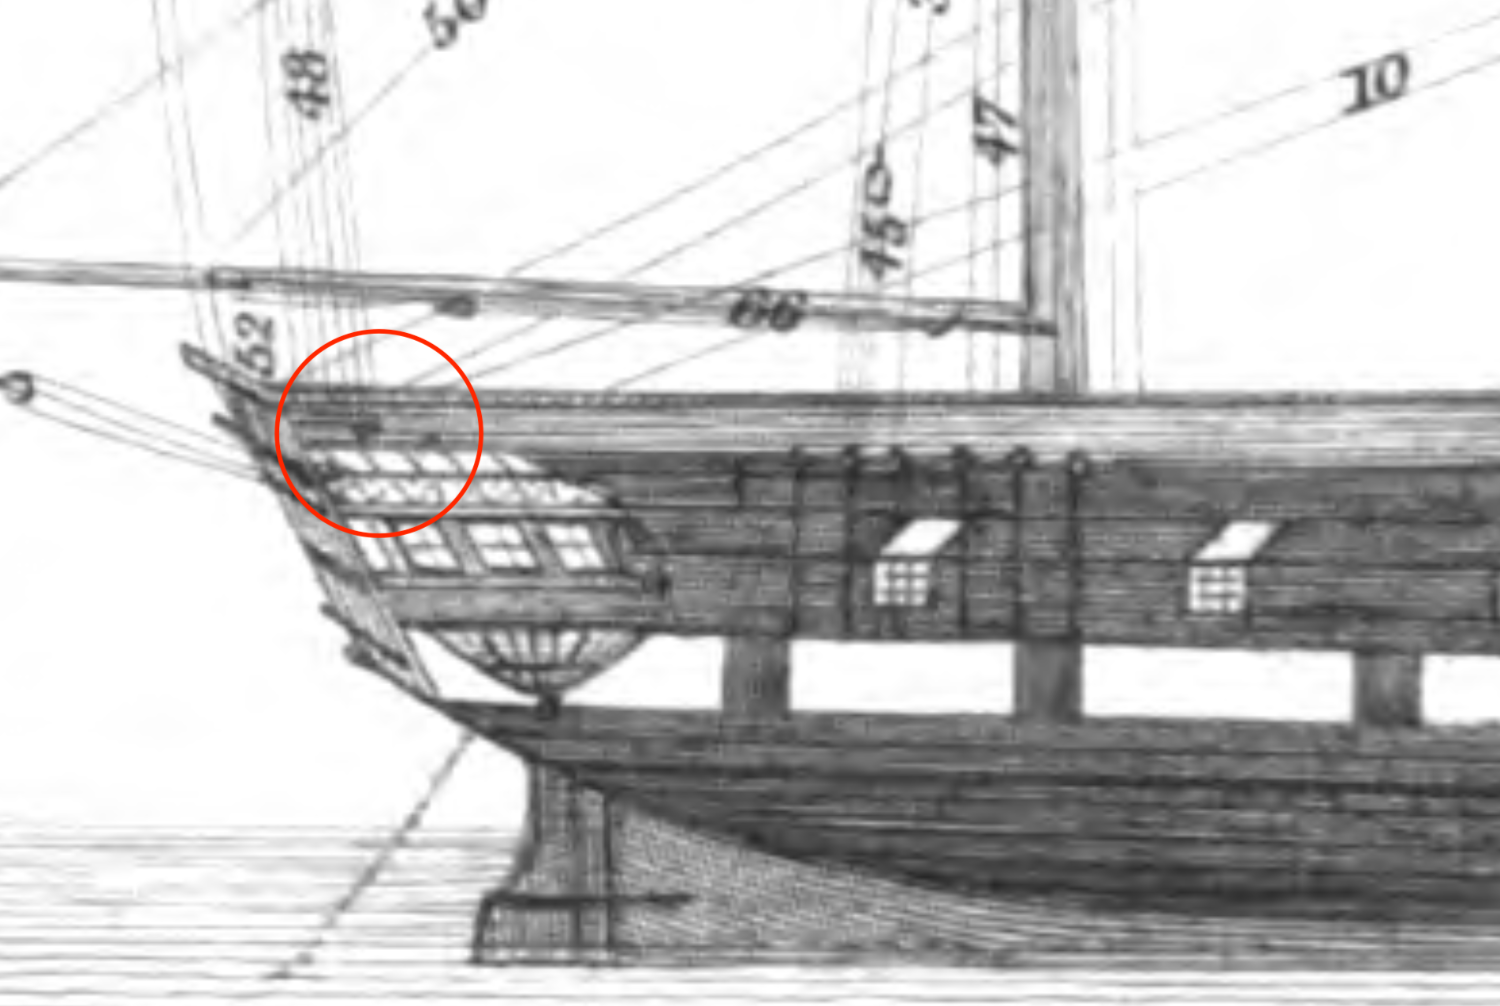
I've been spending a lot of time lately studying Biddlecombe's The Art of Rigging. He indicates that in this era there were bumpkins in the stern quarter that would serve this purpose: "Main Braces. The standing-part makes fast with a clinch round a bumpkin, projecting from each quarter; the leading-part reeves through the block at the yard-arm, and back through a block which is strapped to the bumpkin; then through the gunwale, and belays round a cleat inside" (83). The relevant portion of Plate X shows a hard-to-see bumpkin (which I've circled in red). The main braces are labeled #10, with the standing and running ends just above and below the number 10. Although Biddlecombe's description isn't specifically about the Terror, it is from the edition published in 1848, so I would assume has some relevance. (I hope so, since I plan to rely on this source pretty heavily once I start the rigging!)

-
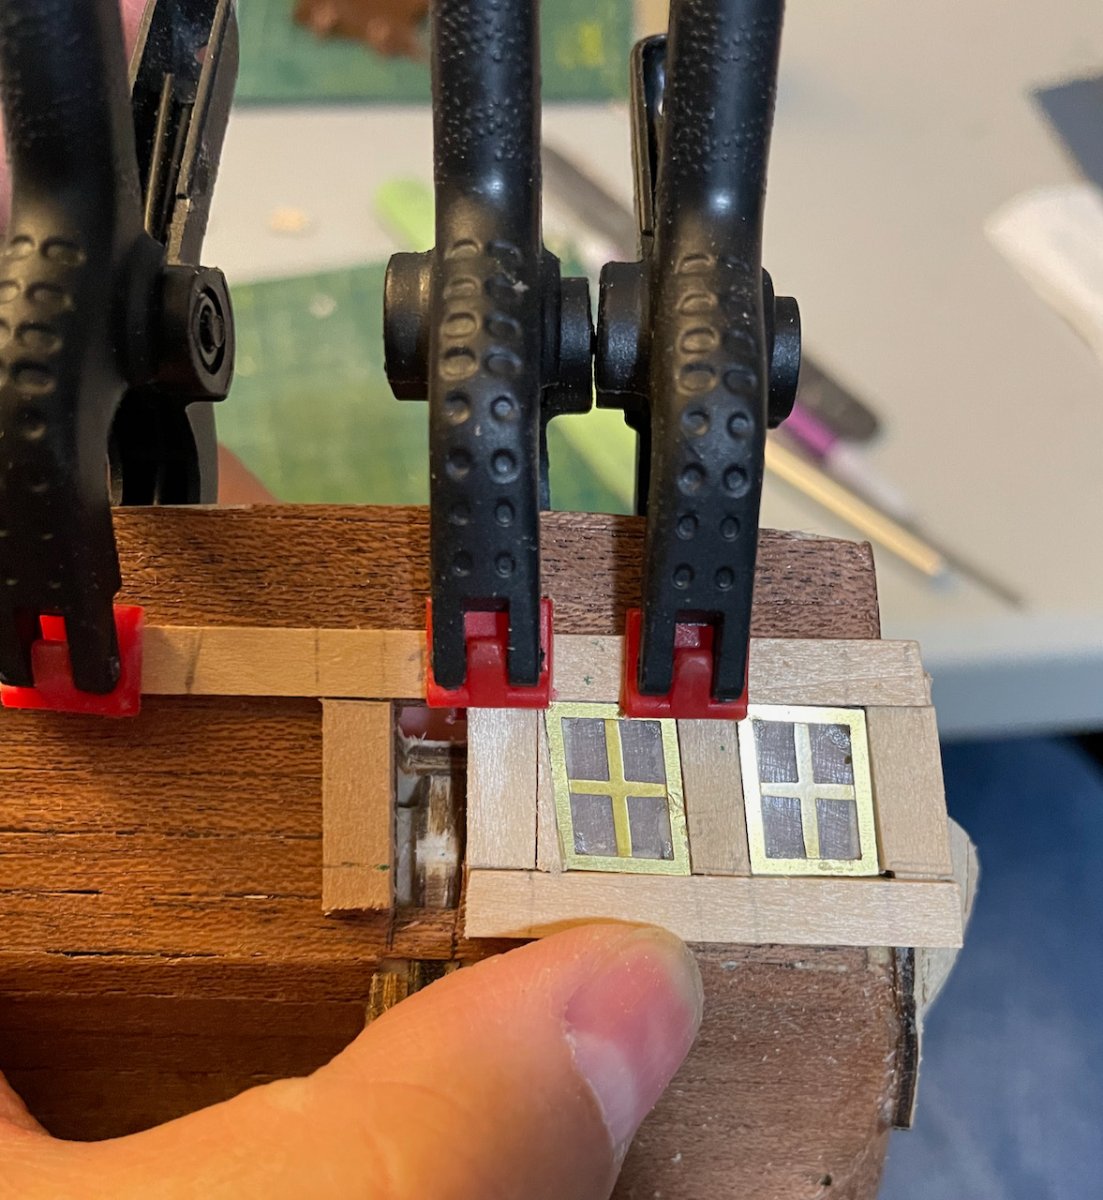
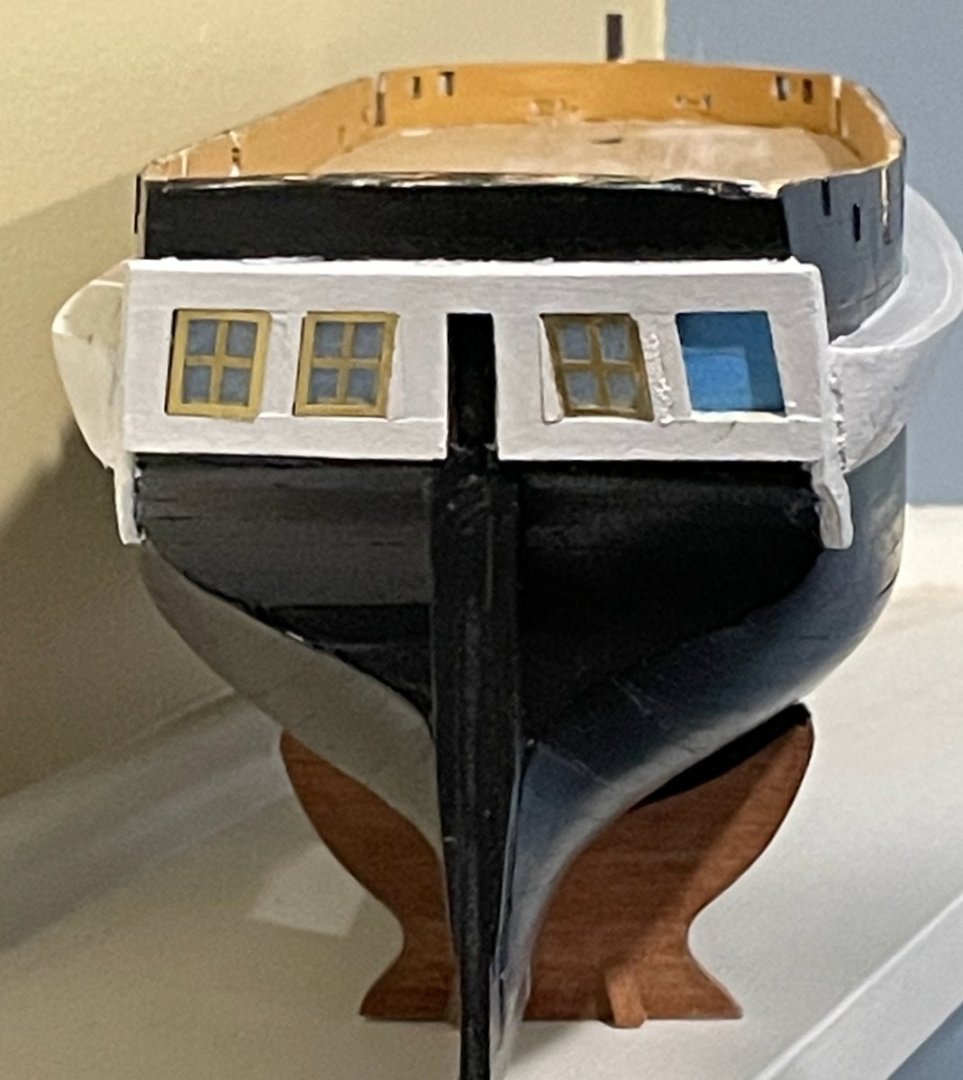
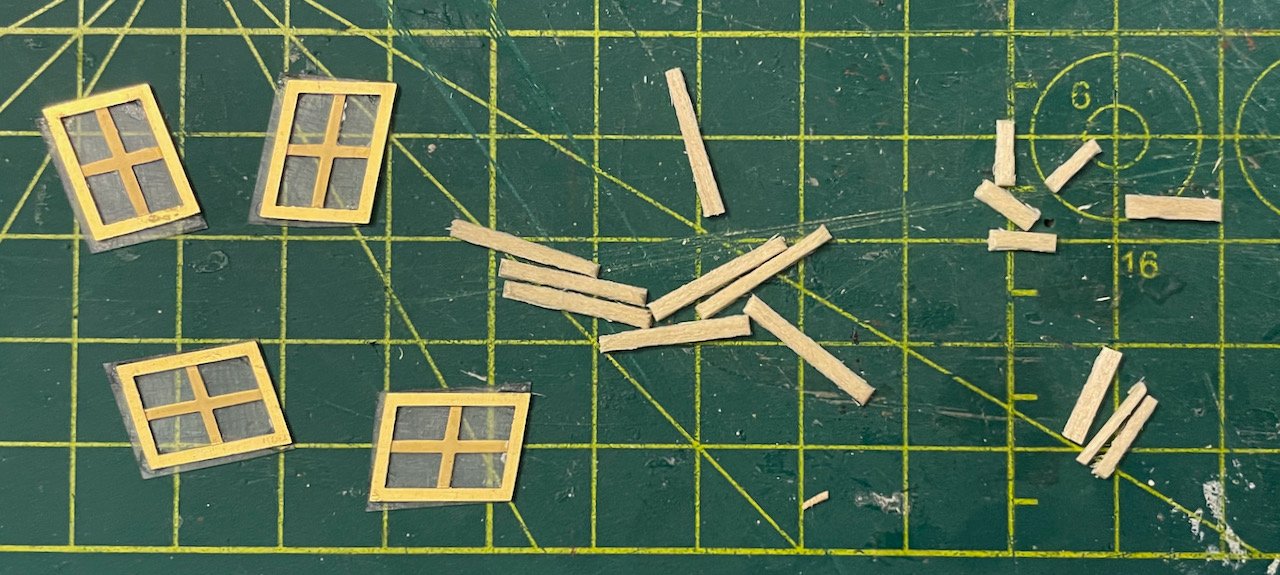
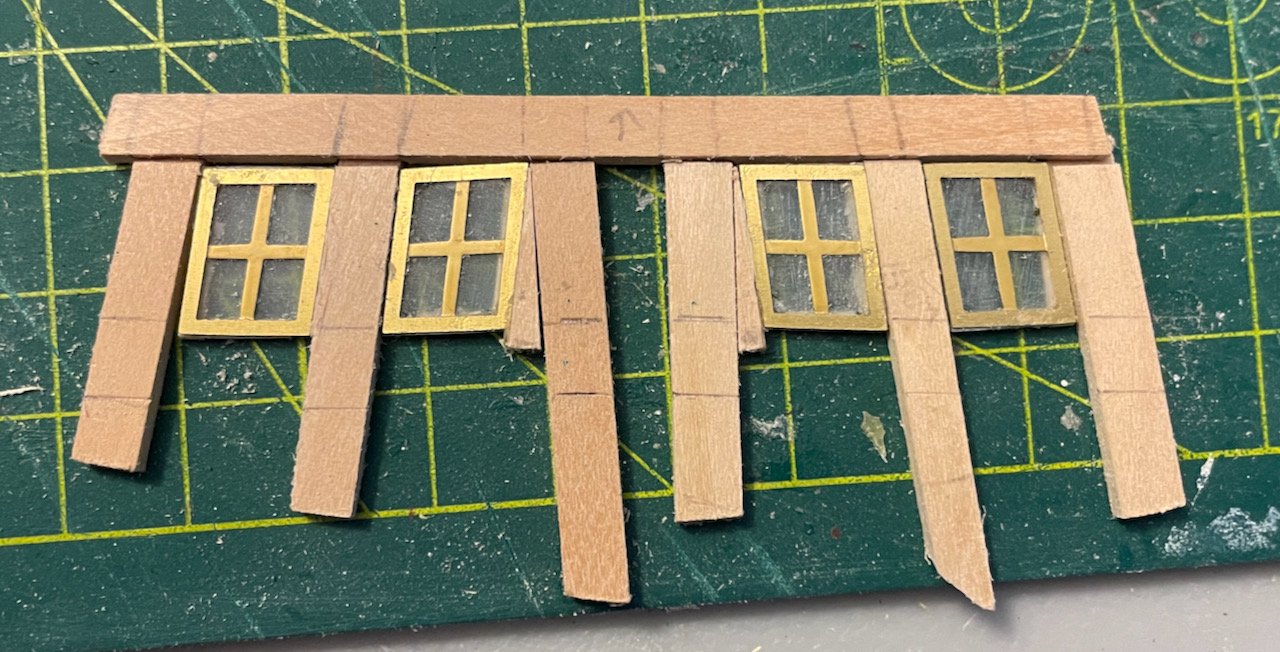
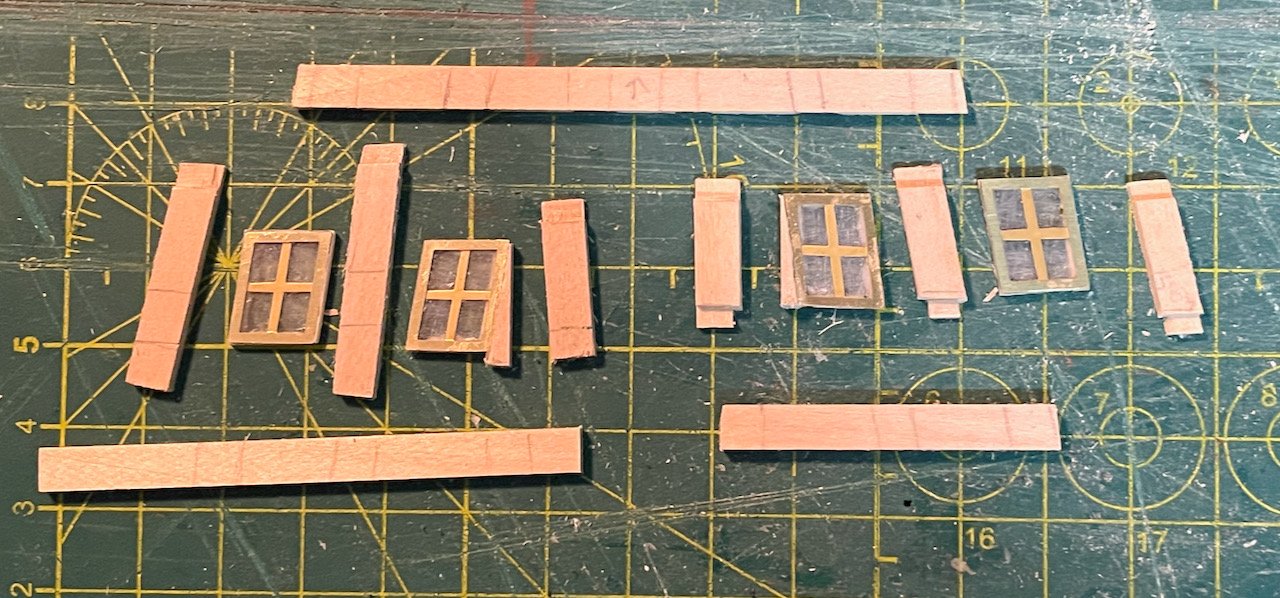
Today was one of those cool, lazy fall days. I was all caught up on yardwork, housework, and so on, so I put in a couple of good work sessions on my Terror. I focused all of my attention on working out the stern gallery. I started off with the windows. The kit calls for metal frames to be painted white and then placed over a portion of the transom painted blue. I'm not excited by that look, at all. So, I decided to use some pieces of acetate to simulate glass. I also don't like how deeply set the window panes are in OcCre's design, so I added a few 1x1mm pieces to lift them off of the transom. The photo shows them still in the assembly process, with the acetate still needing to be trimmed and the wood pieces needing to be glued on then sanded down. Next I began working on the frame pieces. Although this is similar to OcCre's design, I branched off and solved the problems by just focusing on the pieces of wood in front of me. After cutting out the top piece, I cut out the six vertical pieces. I thought the butt joints called for in the kit would be too prone to alignment errors, so instead fitted the pieces with lap joints; in the photo, you can see I still have a few more joints to prepare. I also added wedges against the interior windows, to ensure that they line up well with the center vertical pieces (the only ones that are truly vertical, since the other four match the angle of the windows). Sorry for the lighting in the photo... After preparing the top and vertical frame pieces, I dry fit everything to get a sense of the look. Finally, I started working on the bottom pieces, the crucial and challenging ones that would lock everything else into place. I managed to make good progress on the starboard side, but was starting to get mentally fuzzy, so left the port side for tomorrow. Things aren't quite perfect yet—the center vertical pieces on each side are a bit too wide and I may need to redo a couple pieces to better align the joints. But overall, I'm pretty pleased with how the galleries are coming together!

-
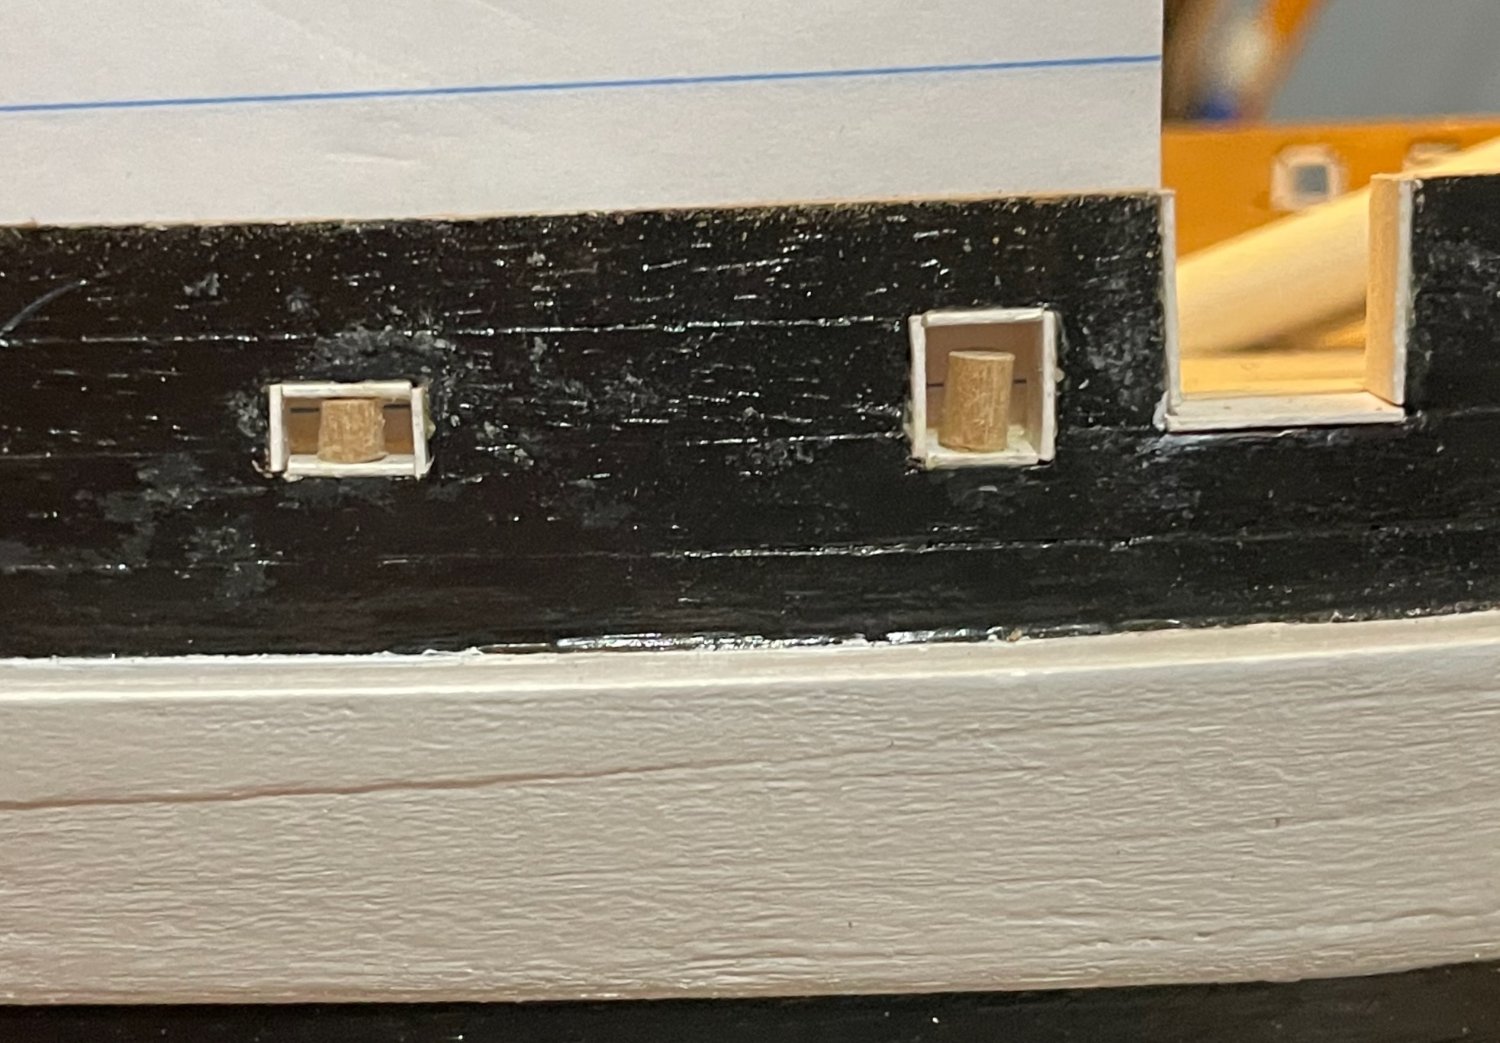
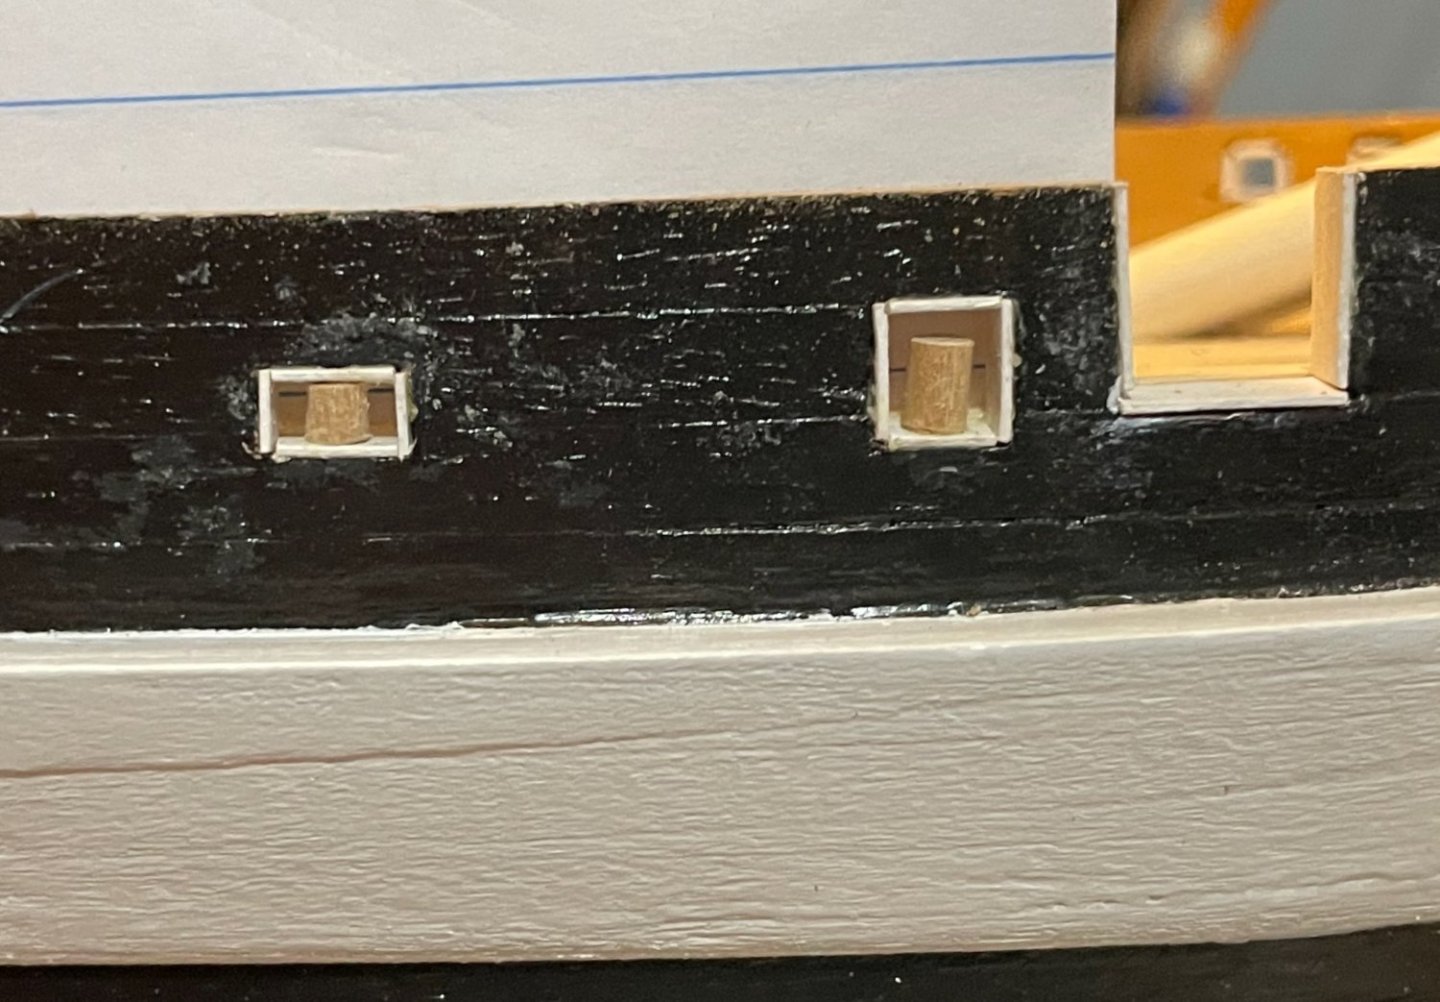
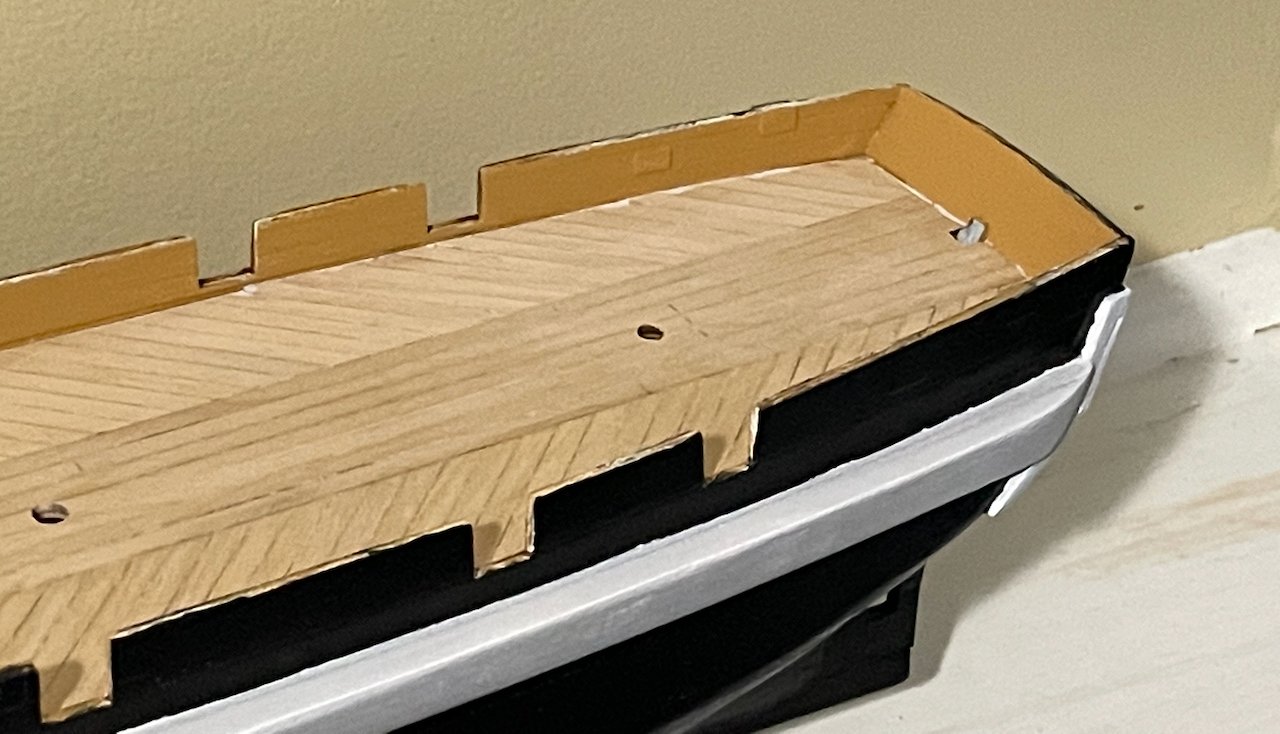
I've been able to devote a fair amount of time to my Terror over the past couple days...probably more than I should have, but I consider it time well spent. I think I'm almost ready to paint the hull now! I finished up the bow plating, added the sheave-holes and faux blocks to the hull, drilled out scuppers, and drilled out the five holes on each side of the midships bulwarks (not quite sure what those are, but they're located just behind the gunport...). I also fixed the hawse holes, which I had really mangled earlier. I'm going to add 3mm airports to those to replicate the rings that are shown in the 1839 plans and in Betts's book. At the moment these are just sitting in place; I won't glue them in until after I've painted. (Note: In the second photo, you'll also notice several pen markings that were mis-measured and you'll notice that the scuppers need to be cleaned up.) Before starting to paint, I'm going to need a final round of sanding to clean things up and I will need to finalize things for the stern gallery.
-
Thanks for the tip on working with aluminum, Keith! I've spent a bit of time reading up on aluminum oxidation—which begins within the first second of exposure to oxygen! Looks like it'll be fine if I sand off the oxidizing layer right before applying primer and paint.
-
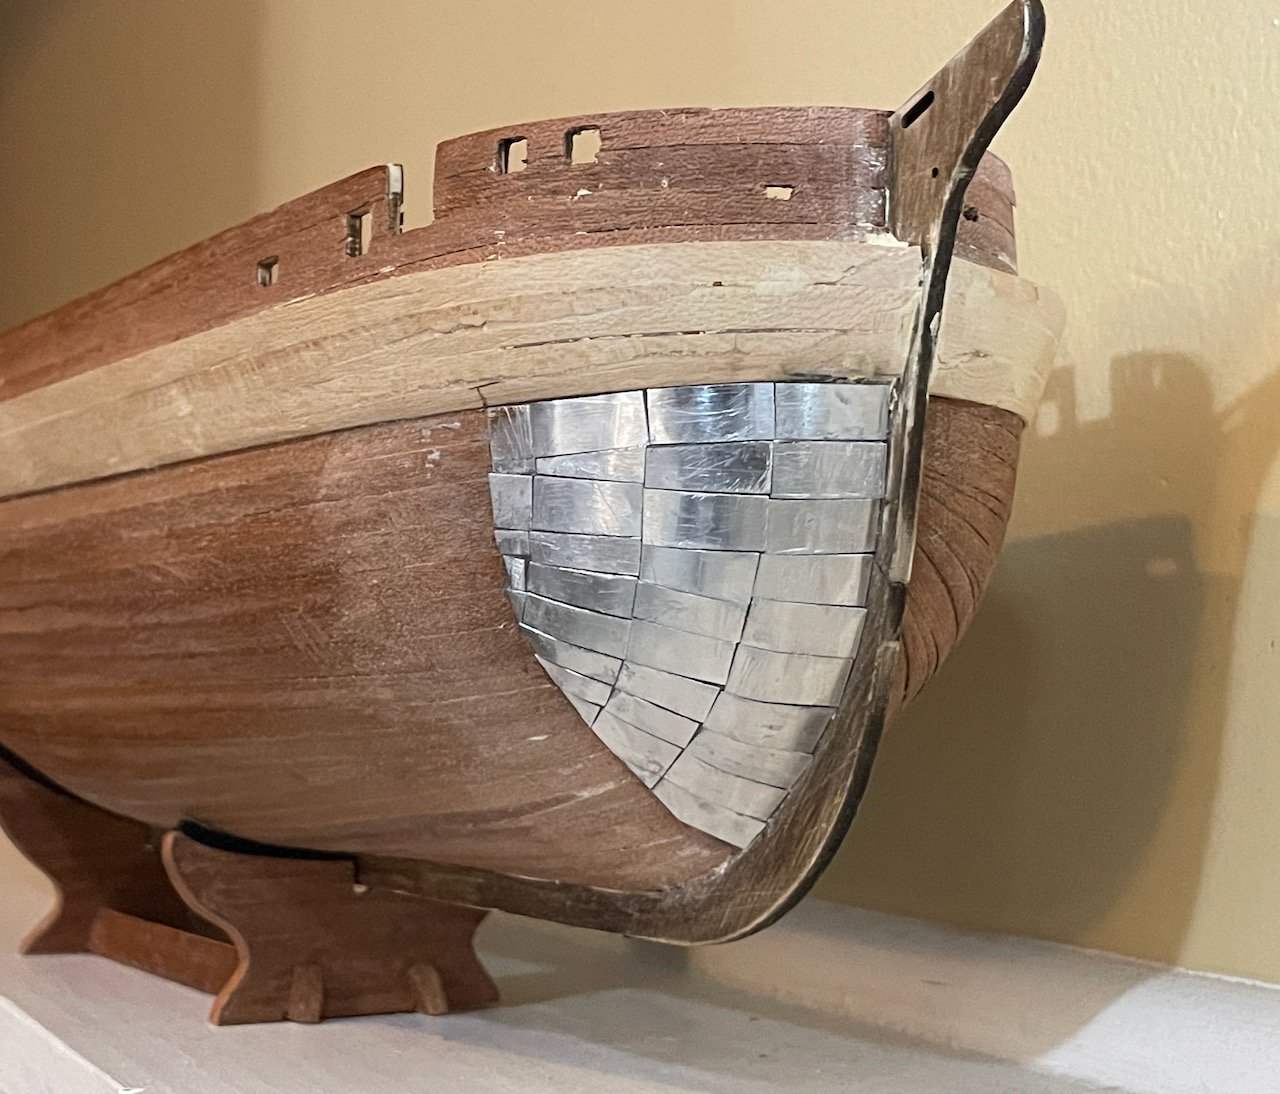
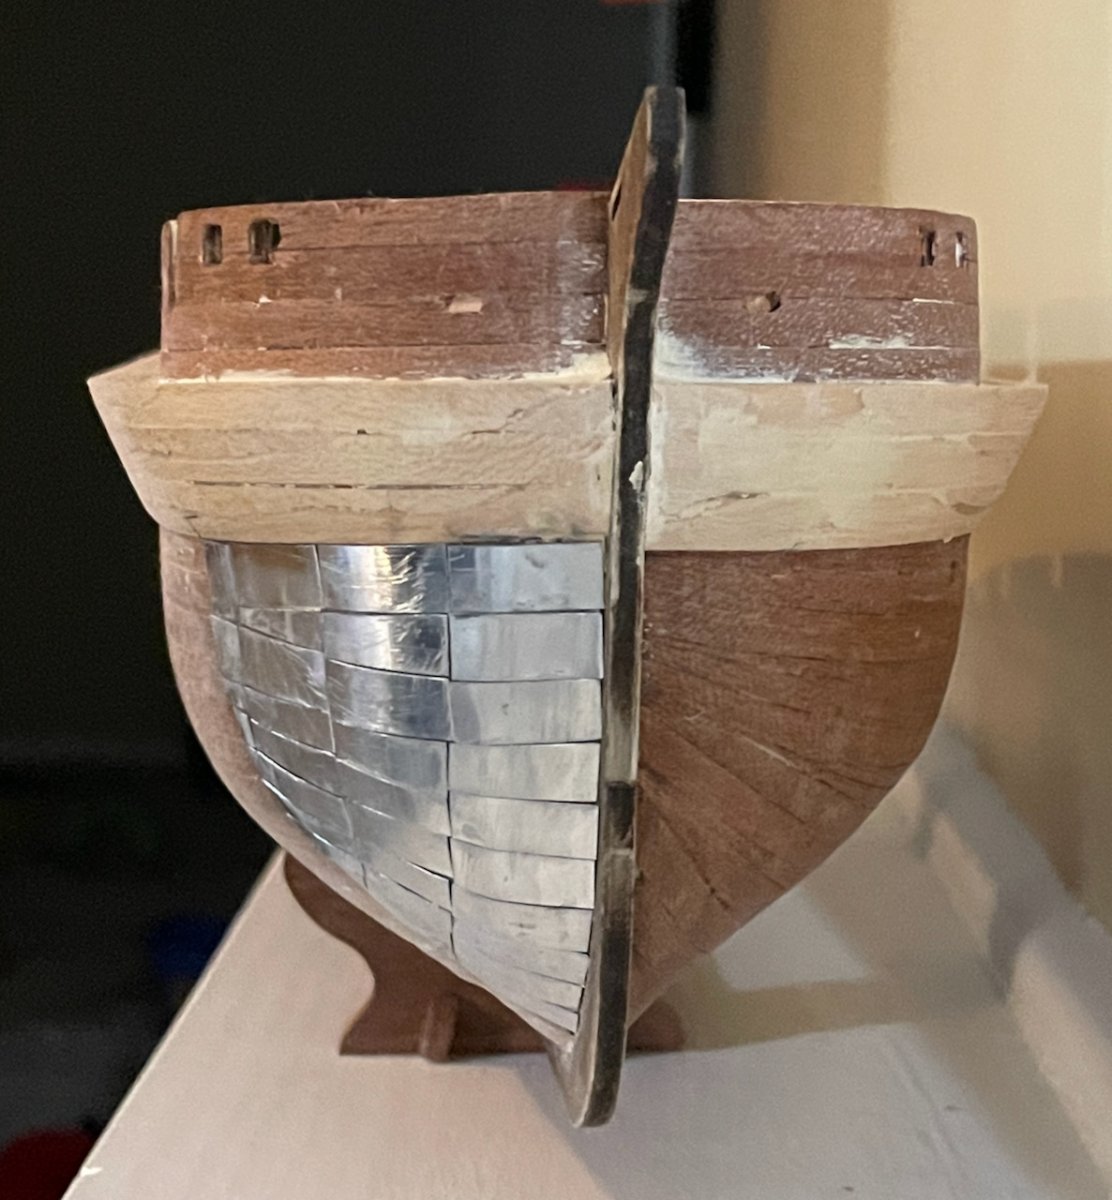
As I mentioned a few days ago, I wasn't satisfied with the paper pieces I had used for an initial draft of the bow plating. I used a hair dryer to soften the glue, tweezers to pull of the paper pieces, and then had some sanding to do to finish the cleanup. I ended up using the aluminum plates that came with the kit, which were easier to work with than I had anticipated. I've installed the bow plating on the starboard side, except for the portions that cover the bottom edge of the ice bumper and stem. Since this is my first time plating a hull, it's safe to say that it isn't perfect, but I'm pretty pleased with how it's turning out so far! I found that the rounded end of one of my sanding blocks was perfect for bending the plates to fit the curve of the hull. I initially tried attaching the plates with PVA glue, but got frustrated with that very quickly, so switched to CA glue. That worked much better, though it made a bit of a mess, which I cleaned up using a cleaning/polishing attachment on my Dremel tool. Now, if I could just figure out where my wife is hiding her nail polish remover, I could clean my fingertips! Apart from this, I've spent the last couple of weeks doing some long range planning for the deck fittings. I've identified several upgrade items that I'm going to need to purchase, so am starting to shop around for them. Top of the list are brass belaying pins, 8mm dowels for the mainmast, foremast, and bowsprit (the latter two will have to be sanded down a bit), and lifeboats. I'm planning to include the cannon that have been found on the wrecks and am trying to find a US-based source for the 10-spoke ship's wheel from Caldercraft. Next steps: Continuing installing the bow plating.


-
Thanks again, Keith! Your comments and the Lees book ultimately led me to Sir George Biddlecombe's 1848 treatise, The Art of Rigging. He refers to the sheaves in the sides (and masts and yards) as sheave-holes. He describes their use very clearly in several places, for example in the section on "Reeving the Gear and Bending the Fore-Sail," he writes: "The leading-part [of the Sheet] leads through a sheave-hole a little before the gangway; then leads forward, and belays round a large cleat in the side" (page 91). This will be very useful later on! I've decided that the paper solution for the iron plates won't be satisfactory enough for me. I'll play around a bit with the aluminum plates that come in the kit, but have also picked out some self-adhesive copper tape that may be easier to work with. Time to start removing the paper plates...
-
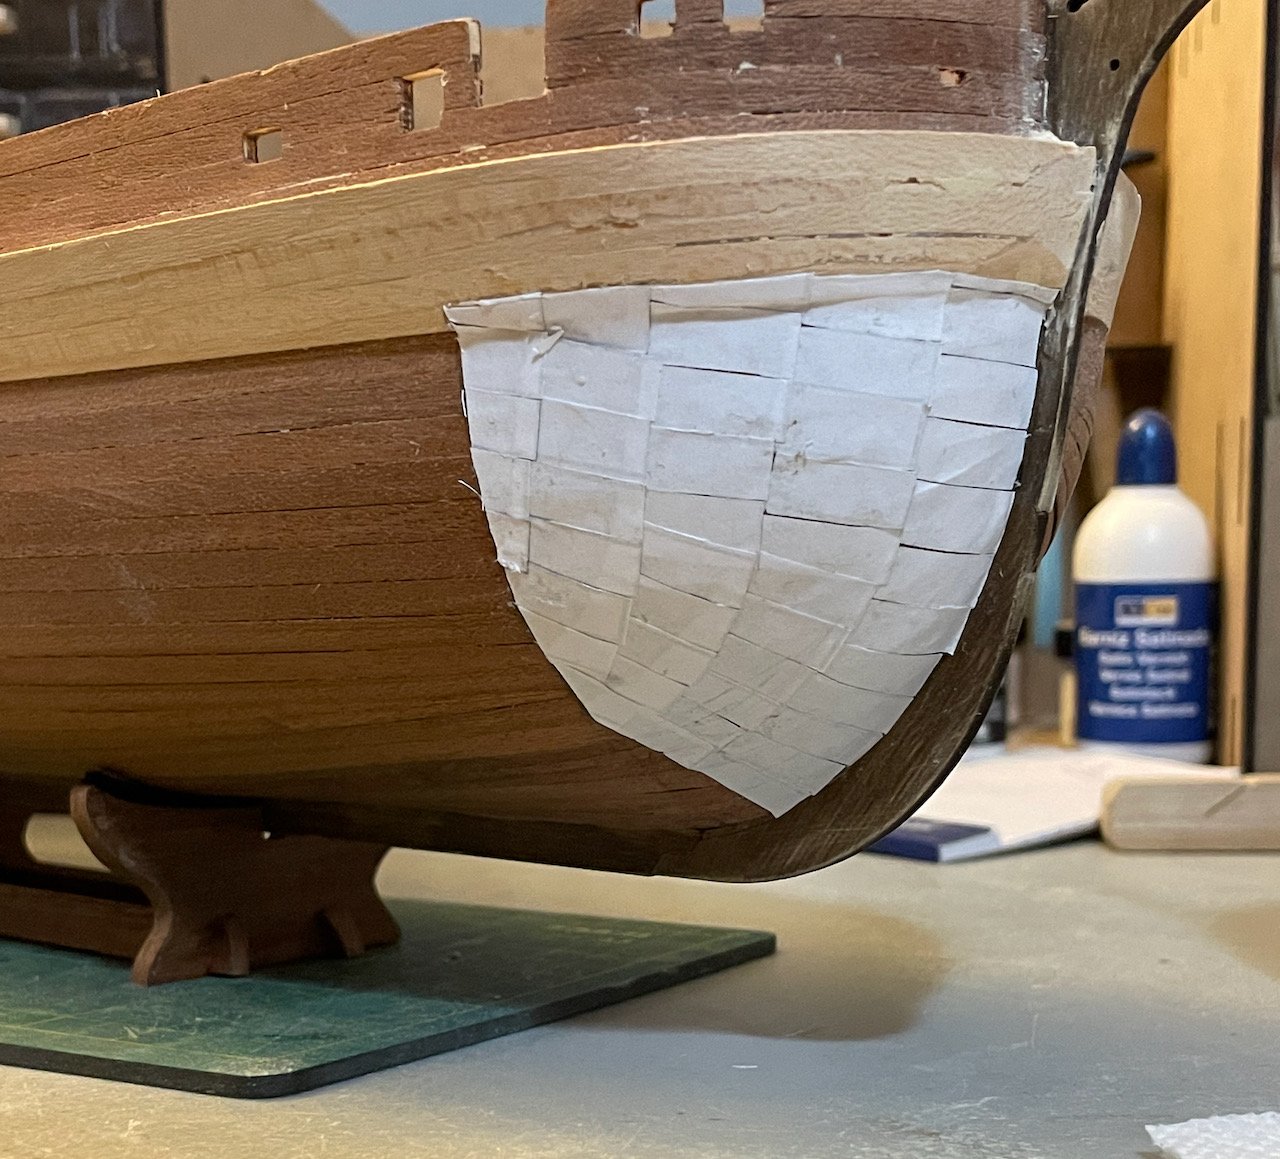
Thanks for identifying the sheaves in the hull, Keith! Can you recommend any sources where I can learn how the rigging runs through them? I've been poking around online a bit to no avail (except for an excerpt from the instructions for the Model Shipways Syren, in which the sheets are glued into the sheaves). After staying up for a while last night, I had a plan for the next few steps. First up, the bow plating. I'm not excited about the aluminum plates that came with the kit. They'll require a bit of work to cut and shape and I'm not convinced that I can do that satisfactorily, especially since this will be my first time plating a hull. After reviewing Betts's book, though, I had a thought. The original plates on the ship in 1845 were roughly 5/16 in. thick. At 1:75 scale, then, the plates should be just over a tenth of a millimeter...almost exactly the thickness of 20-pound paper. After a few more calculations, I printed a sheet of paper with a bunch of "iron plates" that were 29x67 mm in size (scaling up to approximately 20x50 inch on the real ship, which seems to match Betts's plans). As a test, I laid these paper plates on the starboard bow. I need to live with this a bit to decide if I'll be satisfied once they're painted. They're attached with white PVA glue, so I think I should be able to remove them if I'm not happy. Hmmmm....

-
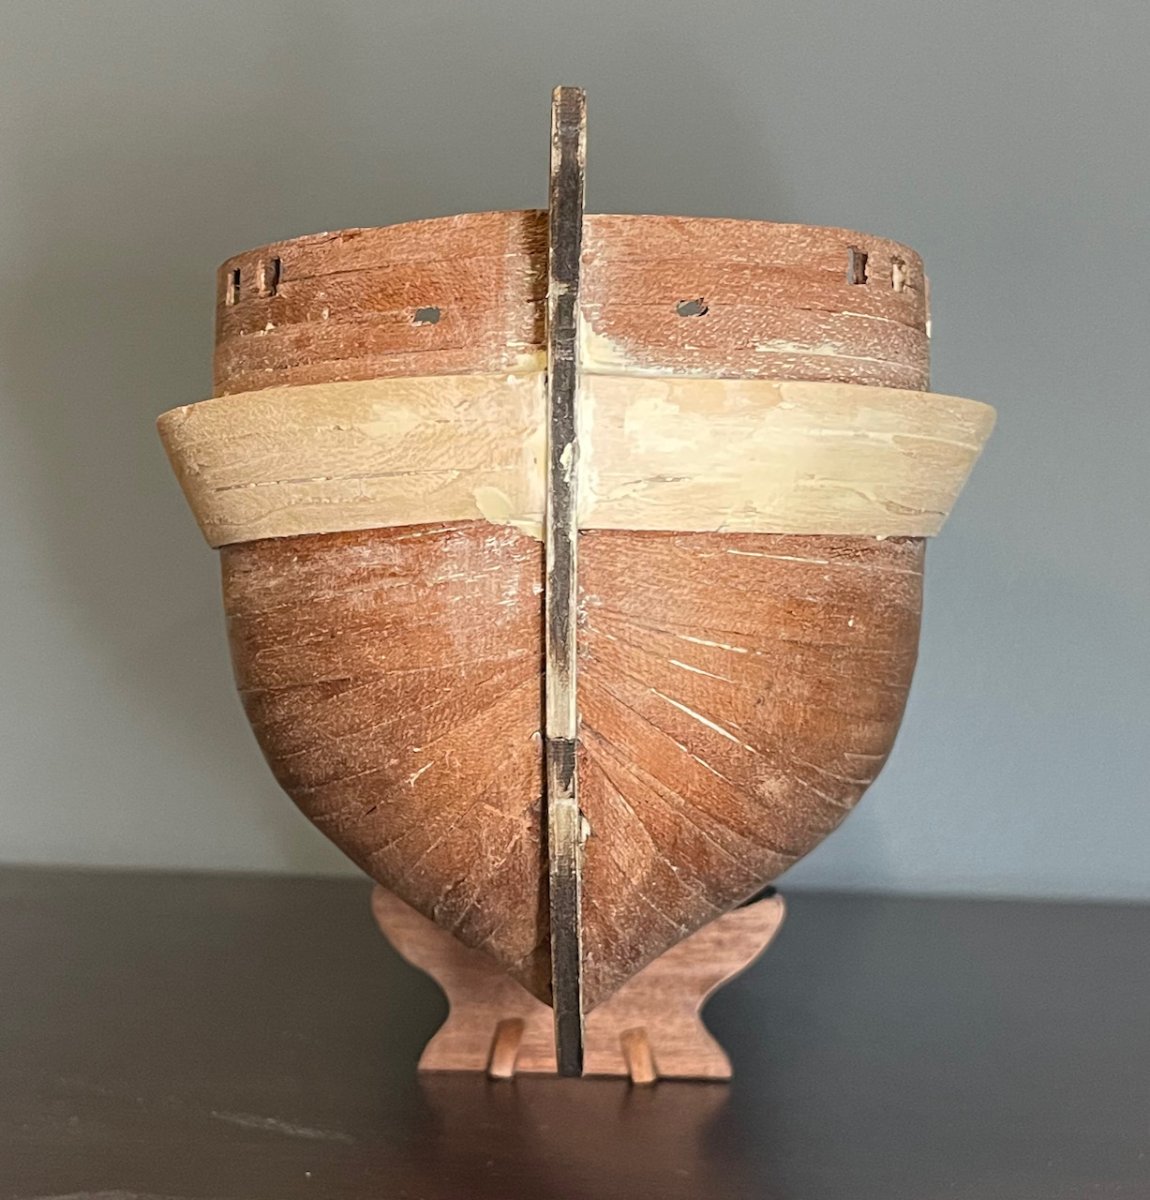
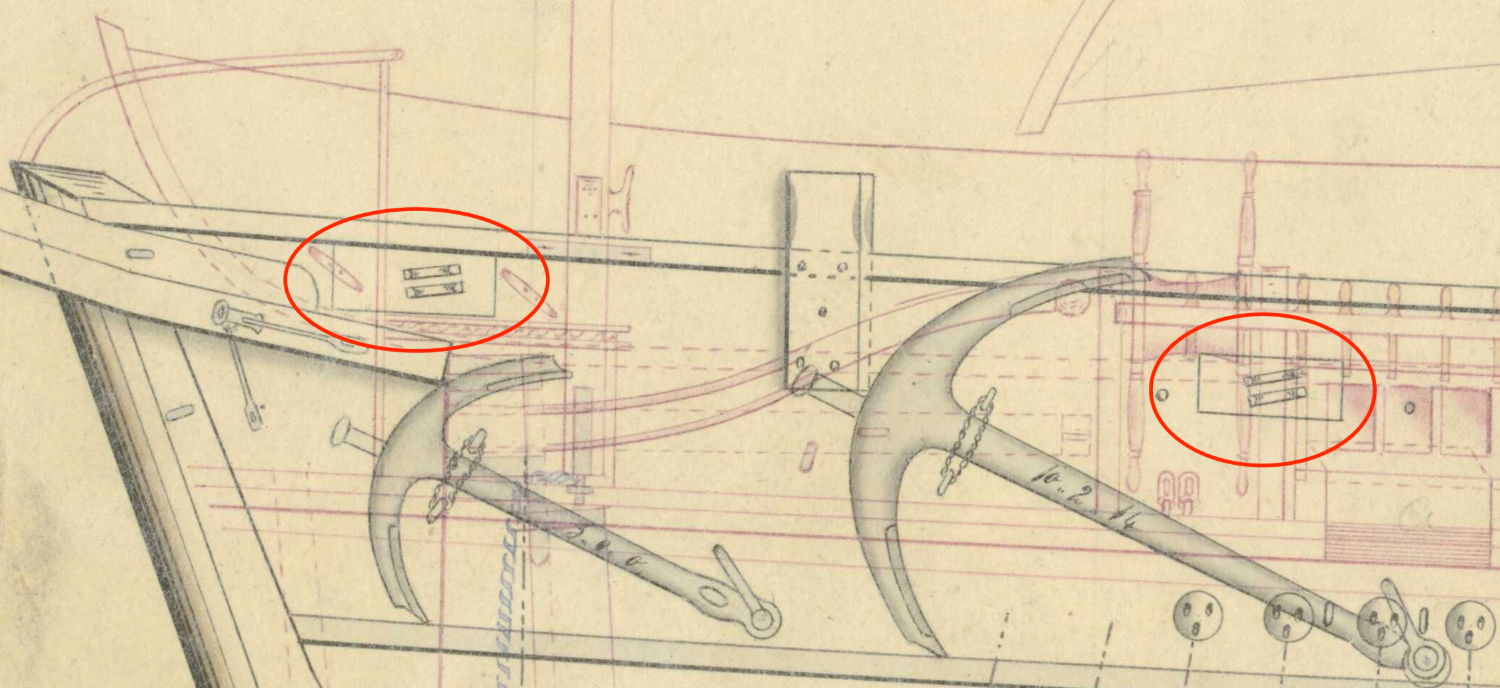
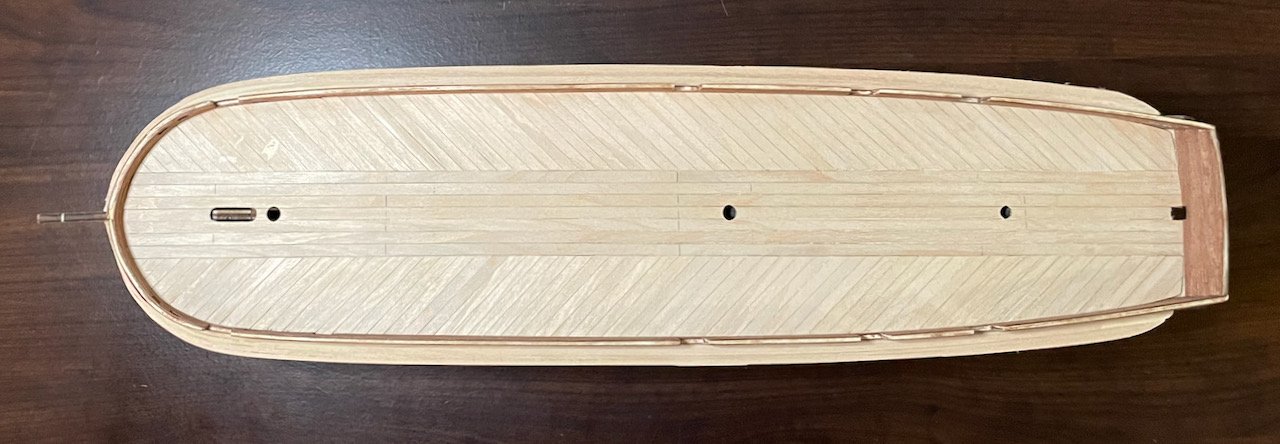
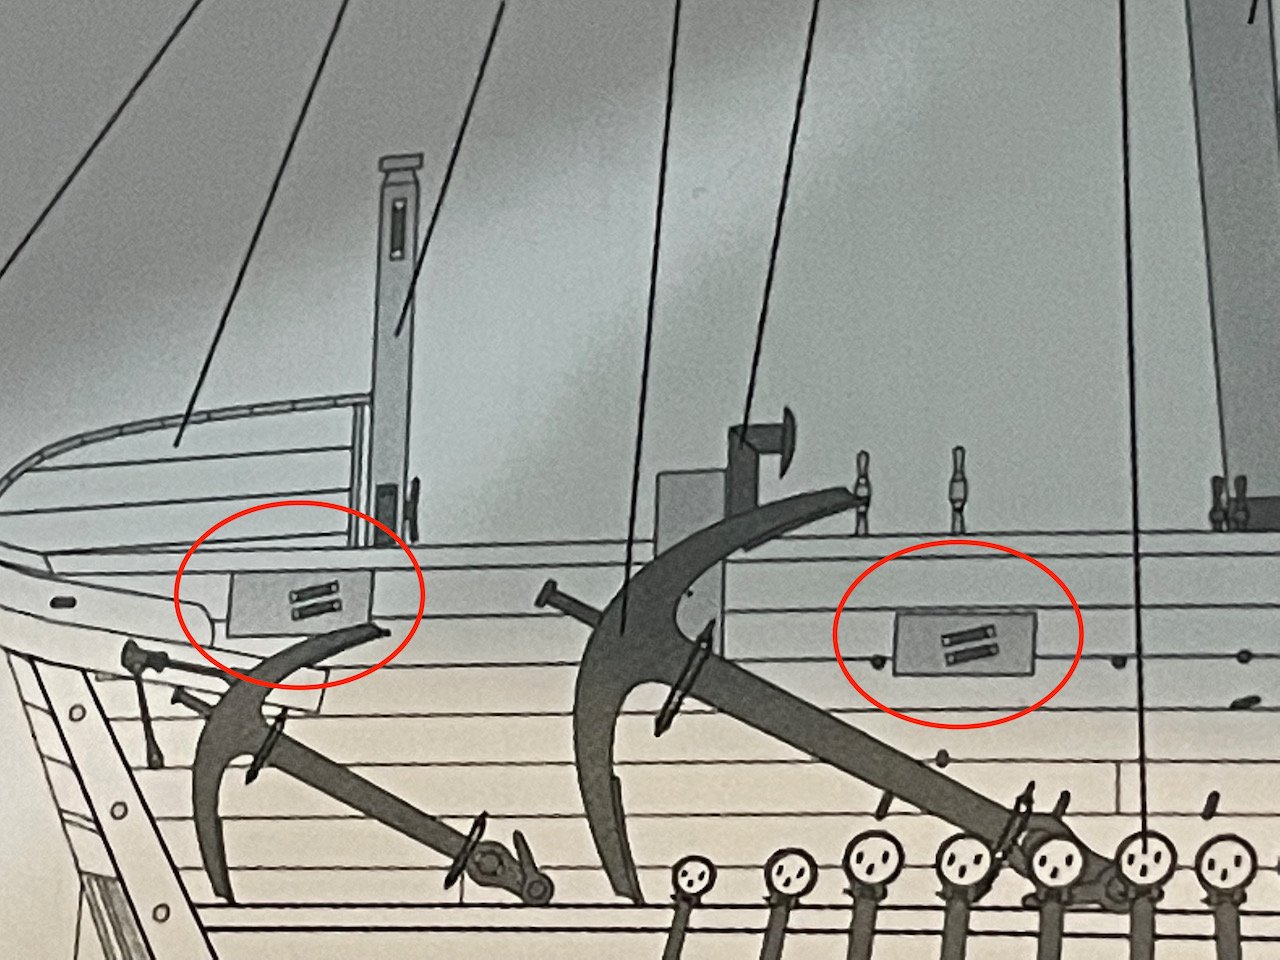
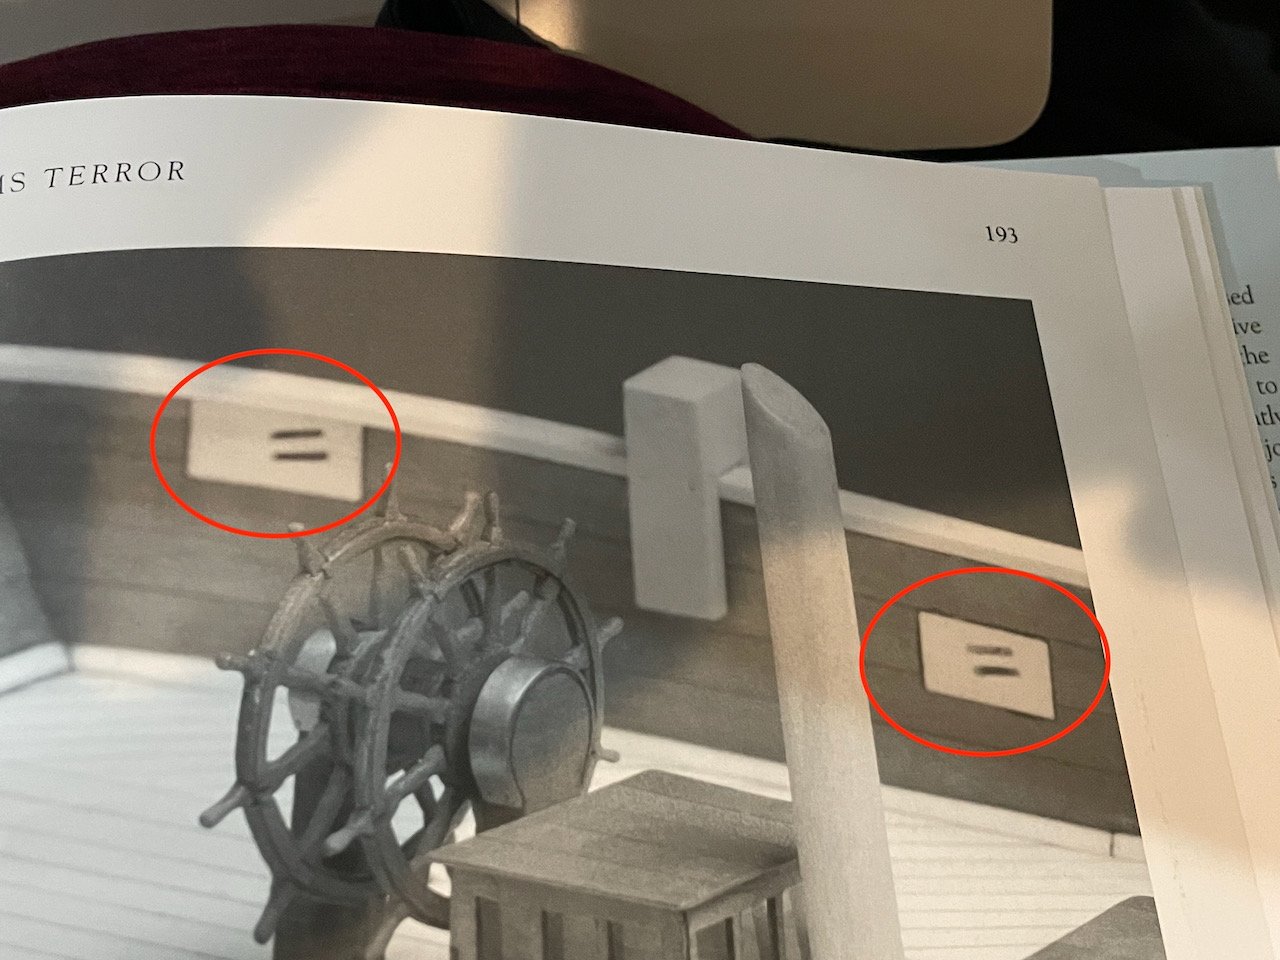
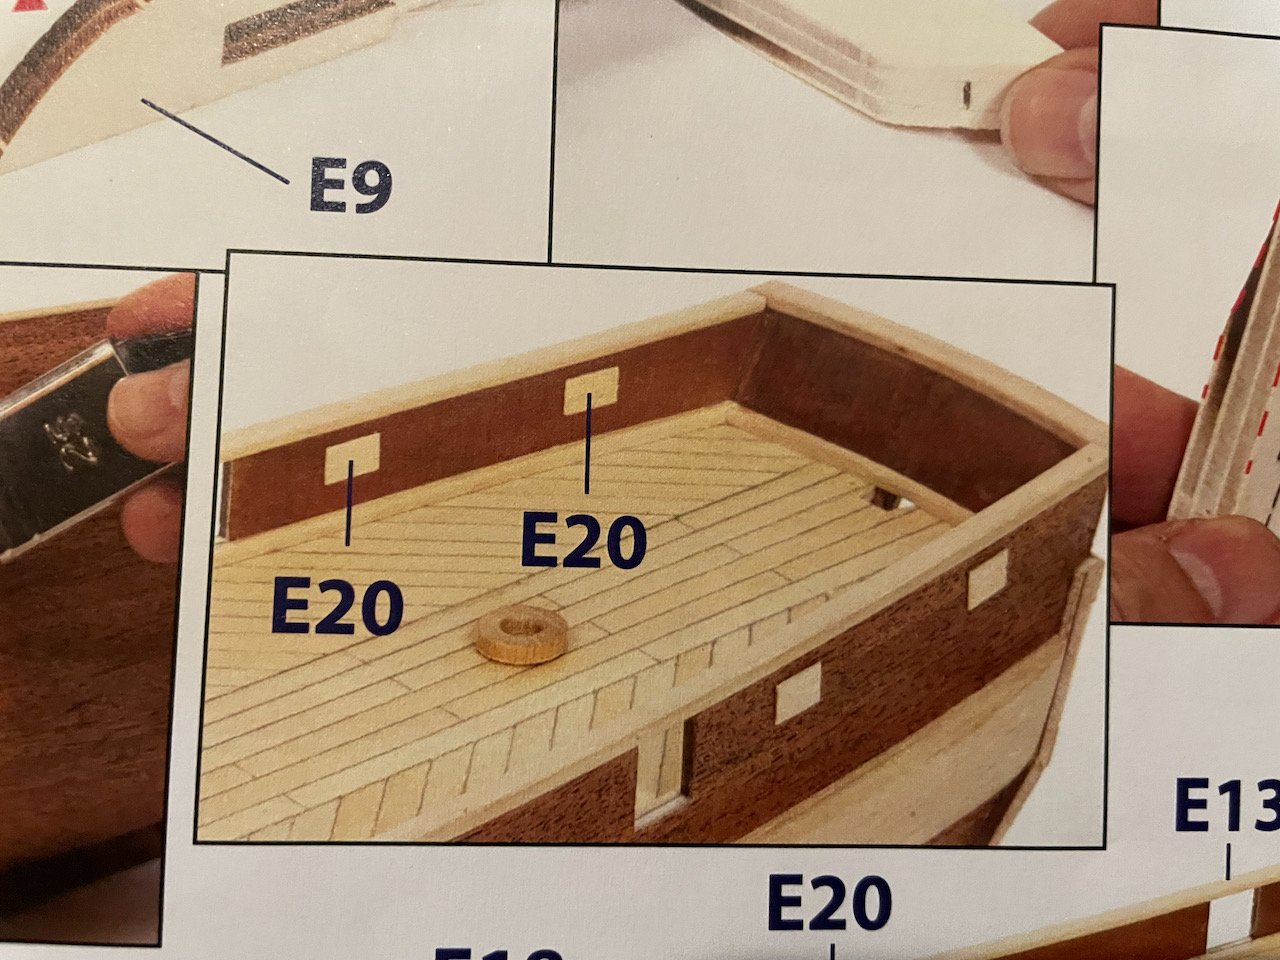
I've had a chance to smooth out the wood filler, so I think that the ice bumpers are essentially done. I need to take a closer look at the curves around the bow to ensure that they match...they don't appear to be symmetrical in the overhead shot below. Although I've sanded the wood filler down so that it's even, it left a bit more of a mess than I was hoping it would. Not a big worry since I'll be painting, but I'm going to have to revisit that, too. In the meantime, a few photos of how they're looking right now: Having reached this point, I'm struggling a bit with where to go next. As Keith mentioned above, OcCre's plans leave a bit to be desired and I'm entirely sure why they recommend doing things in the order that they do. I've started a spreadsheet to organize my thoughts, but for right now, I figure that I'll be taking my sweet time getting through the next steps that I list below. I also have a question for those who've built and studied the Terror. In the OcCre plans, part E20 includes several pieces of .6x5x10 pieces that are mounted inboard and outboard in the quarterdeck. These pieces appear in the 1839 plans, in Betts's plans, and in his final model. In OcCre's plans, they are just simple panels with no elaboration, but in the other places there's...something...on them. There must have been some kind of functional purpose for these, but I can't imagine what. They're a rare part that Betts never identifies by name (unless I've missed something in his book). Can anybody shed light on these? Next steps, order yet to be determined: waterways, cap rails, lining the gun ports, stern gallery, scuppers, hawse holes (I'm planning to add some brass rings for these). Also the rings around the bases of the masts (I really should know the name of those parts!); this means I will probably also need to start thinking about shaping the masts, for which I'm planning to follow the measurements Keith shared in post #94 of his buildlog.


-
Hi Keith! Thanks for the recommendations. I started feeling more confident with my Dremel tool, so made quicker work of the starboard side than the port. (It wouldn't have taken much to be quicker!) I have some wood filler setting on both bumpers, so will post new photos once I have a chance to clean that up. The OcCre kit does not include the stern deckhouses, so those will be a scratchbuild for me, too.
-
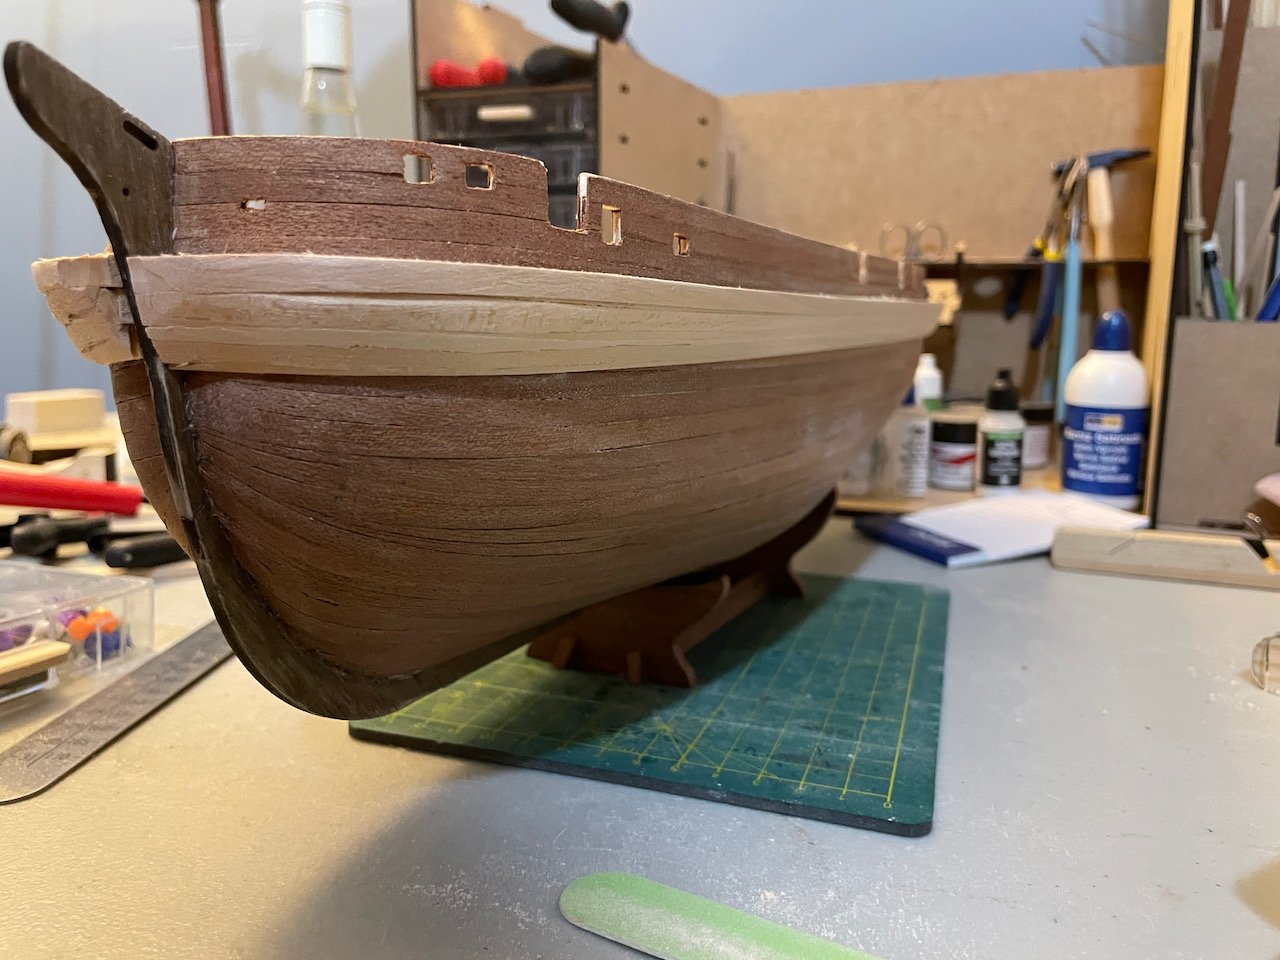
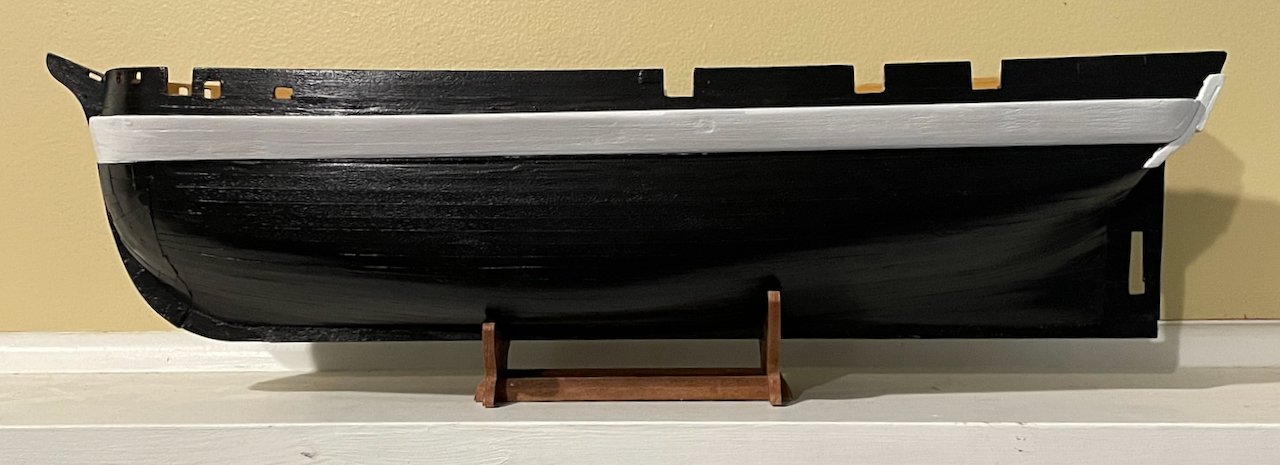
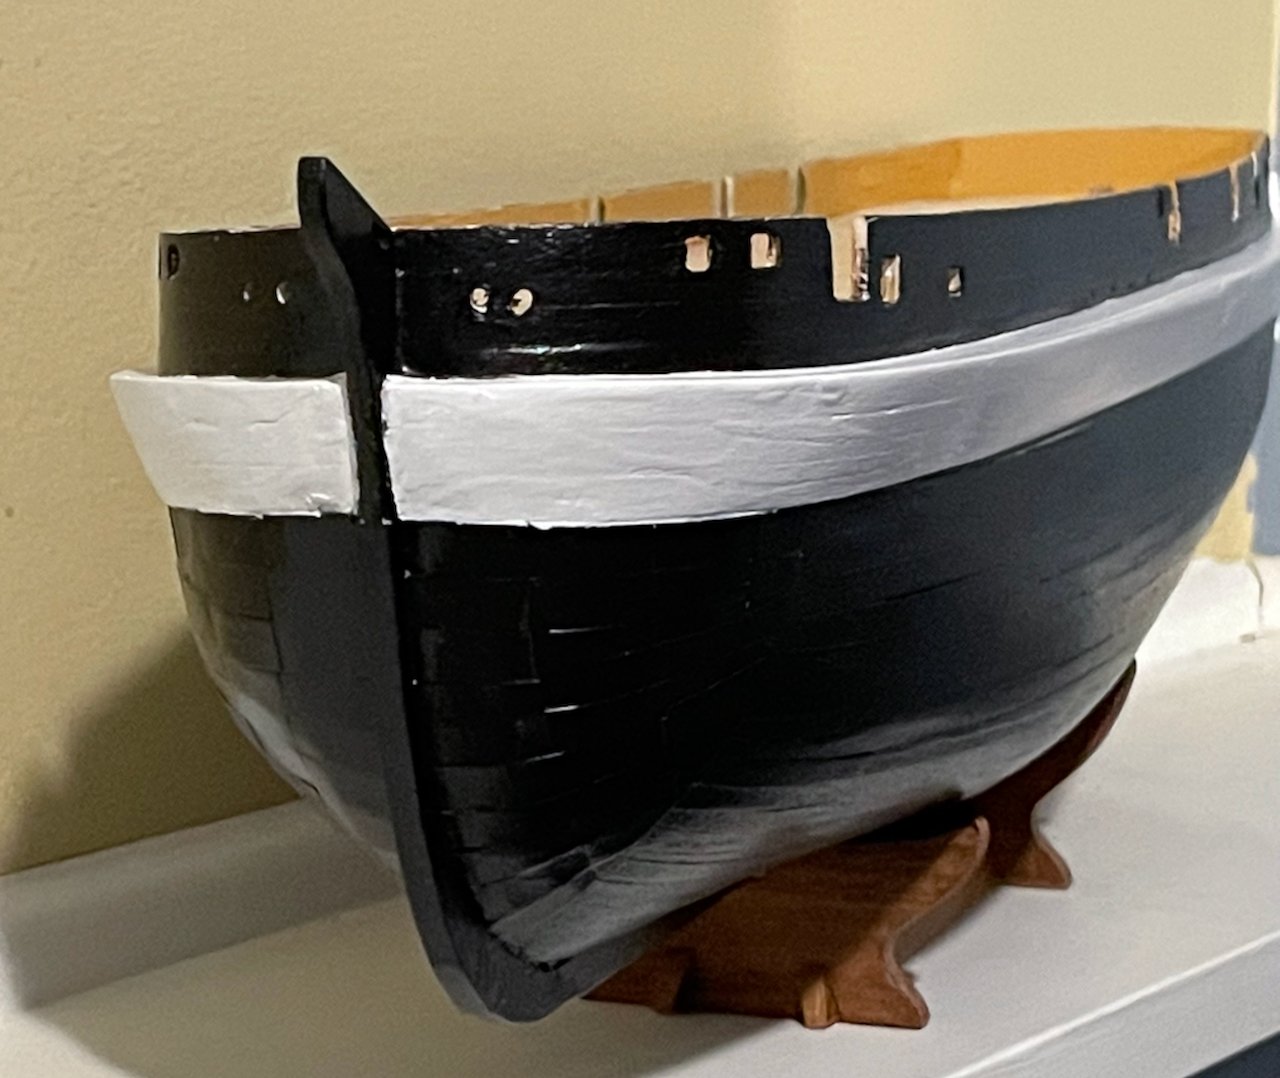
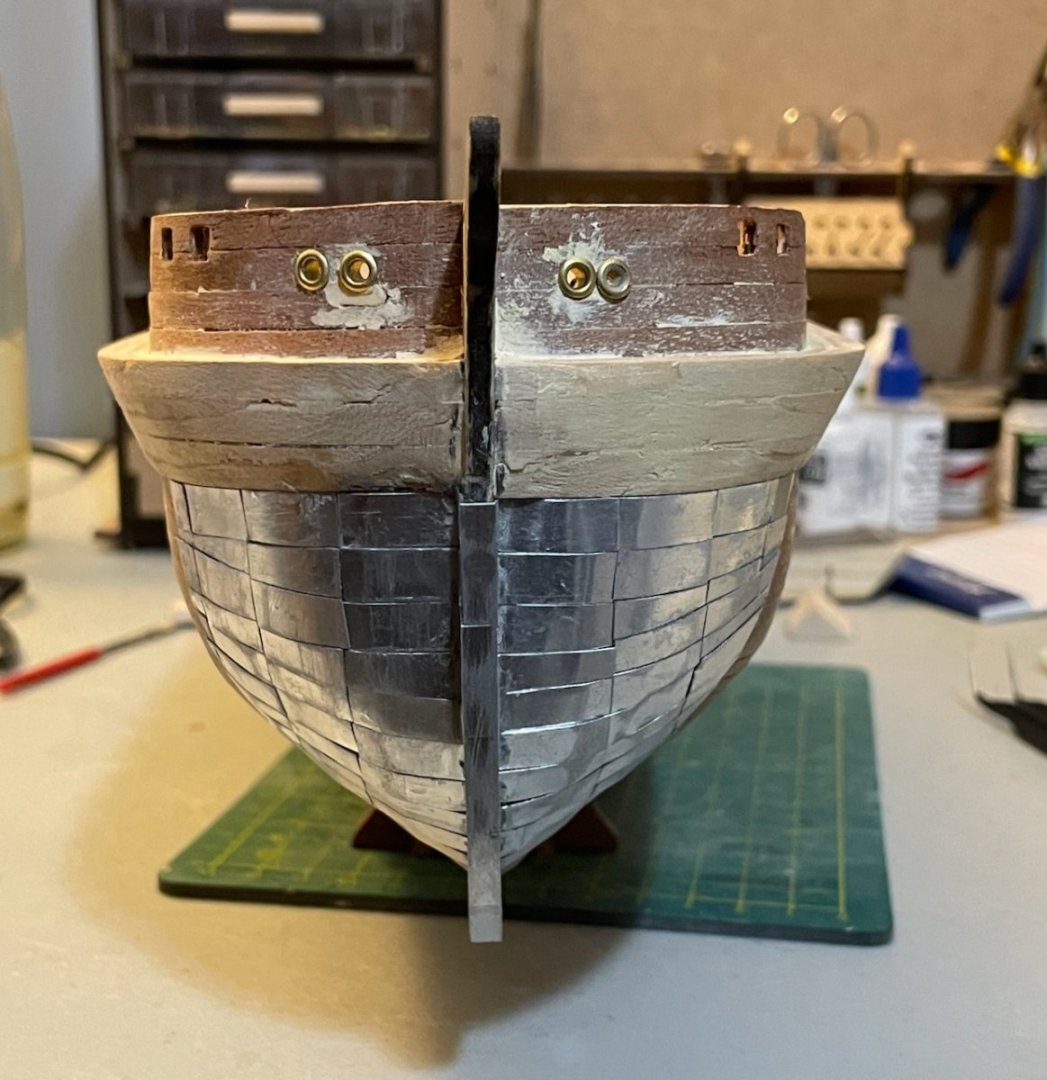
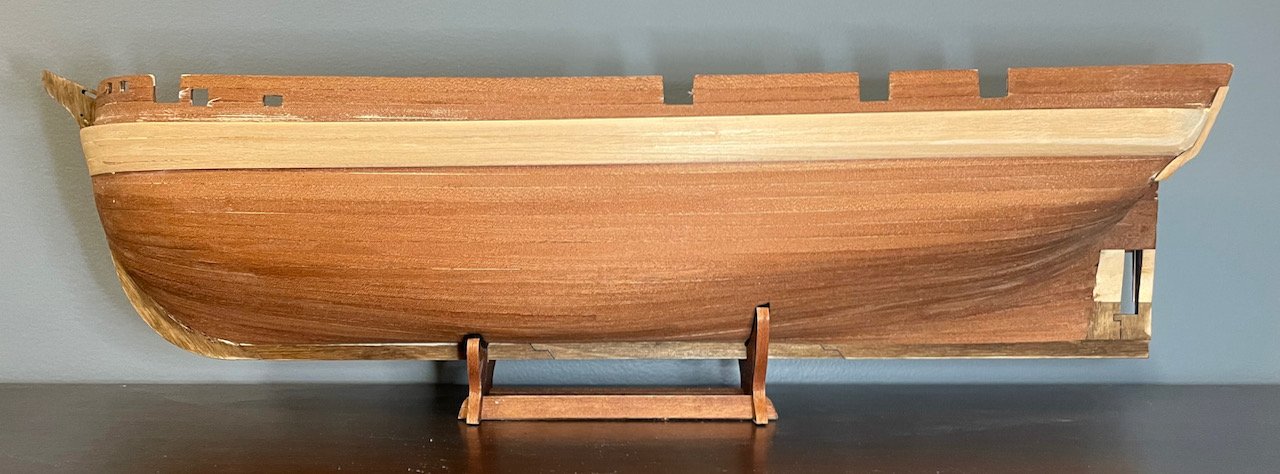
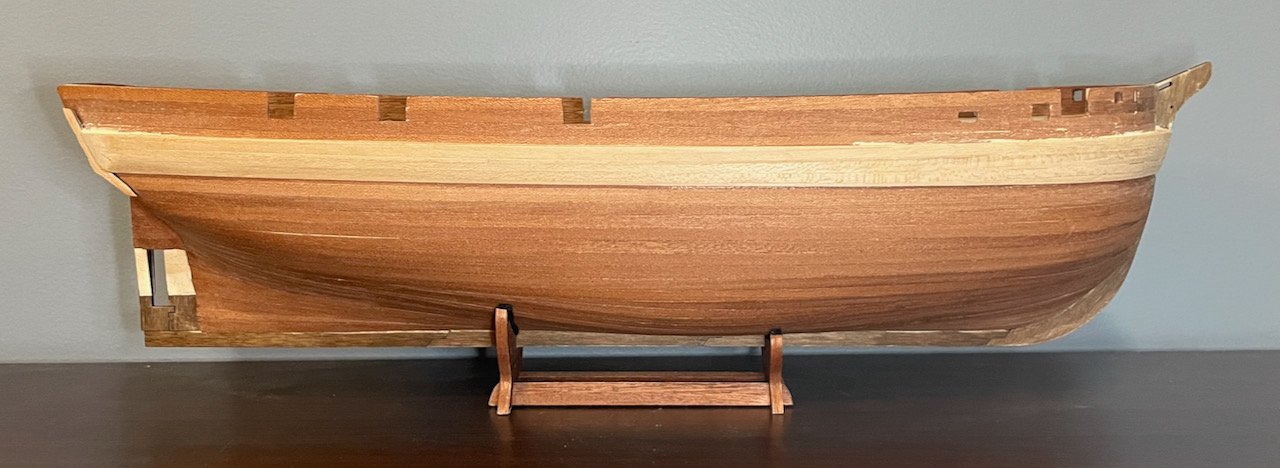
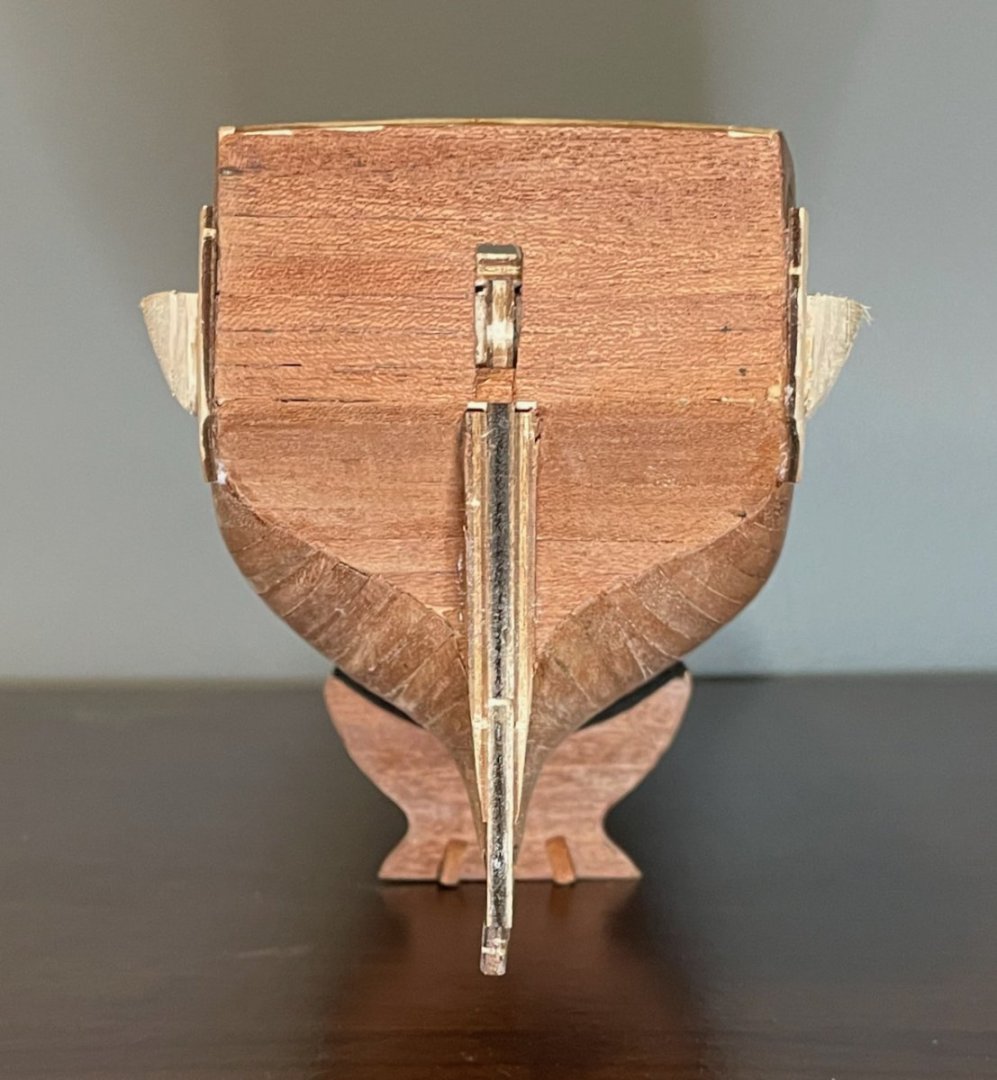
So. Much. Sanding! I'm making progress on the ice bumpers, but still have a long way to go. At this point, the port side feels like it's getting significantly closer, while the starboard has gotten less attention. The bottom of the port bumper has been sanded almost flat to the hull, but the tops are still about 1.5mm too wide; using those measurements as a guide, I'm working on the angle of the outboard side. I've done a bit of shaping at the stempost and the transom, but there's still a lot of work to do in both places. I got things started with the sanding barrels on my Dremel tool, but have found sanding sticks to be the most useful tool for this job. I'm almost out of both sanding barrels and sticks, so I need to restock, which made this a good time to reflect on progress again. After this evening's work session, I snapped a couple of photos. I'm not sure they're all that great, but compared with the photo in post #18, you can see that things are coming along slowly. Apart from this, I've also been starting to look ahead at some of the deck fittings and pondering what upgrades I want to attempt I still need to study some of the other buildlogs for this, but here are my thoughts for the moment—feedback definitely welcome! As I study the 1839 plans, I notice that there are five (or maybe 6?) ship's boats indicated. In his book, Betts notes that records show 8 boats of various sizes and styles were taken on the 1839 expedition, then he goes on to speculate that there were four of various sizes and styles taken on the 1845 expedition (104–6). I've been playing around a little bit with the three boats in the kit; I think I've made them look okay, but I'm not sold on using them yet. Mantua has some lifeboat kits that look like they could work well for the job, but I haven't found any other comparable options yet. I've been taking note of the Preston's patent illuminators, which OcCre represents with their standard hollow portholes. (Side note: Here's an interesting link of the history of Preston's illuminators, including some of the drawings included in his patent paperwork and the Parks Canada photo of one that they recovered.) I'd like to fill OcCre's portholes with something to simulate the glass in the actual illuminators. I haven't started experimenting yet, but would love some ideas of what might work. I'm thinking a drop of wood glue, maybe? The closets at the stern (marked as "Hen coops" in the 1839 plans) seem like a big oversimplification on OcCre's part. I'll definitely be doing something with these. Beyond this, I'm pondering my options. However, Keith Shergold's realization of the OcCre kit, shown in Betts's book, lists a number of possibilities that I think are mostly possible given my skill set. Next steps? You guessed it. Continue shaping the ice bumpers.