ortho85
-
Posts
148 -
Joined
-
Last visited
Content Type
Profiles
Forums
Gallery
Events
Everything posted by ortho85
-

Edge bending planks
ortho85 replied to ortho85's topic in Building, Framing, Planking and plating a ships hull and deck
Thanks for all the responses. A couple of follow up questions: If I surrender and cut the curved planks out of larger pieces, is there anywhere in Australia to buy these from? Would real ships have been made using such a difficult technique as edge bending? Cheers, Brett -
So, I've prowled the forum, and the Googlesphere, but can't find a genuine answer. How can you bend planks on their edge? I've got the normal bending down OK, using my daughter's old hair curler. However the model I'm doing now (AVS) wants me to bend edge-wise. Here's a pic from the practicum: So far I've tried ammonia and long time soaking. I've even tried to invent jigs to effect the curve, but it's hit and miss. I don't want to take the easy way of using wider planks and carving to shape. It will be even trickier for the top, walnut planks! So, any solution out there? Thanks, Brett
-
Hi Rick, I'm only on my second model so don't take my opinion for much. On my first model, precise cut parts would have been wonderful. However, now I look on the discrepancies as part of the fun of model making - after I realised you can unglue, sand down, or shim. Given that many models take a year or more, I don't think speed is a concern. Maybe for the first-timer or modellers in a hurry this would be attractive? Cheers, Brett
-
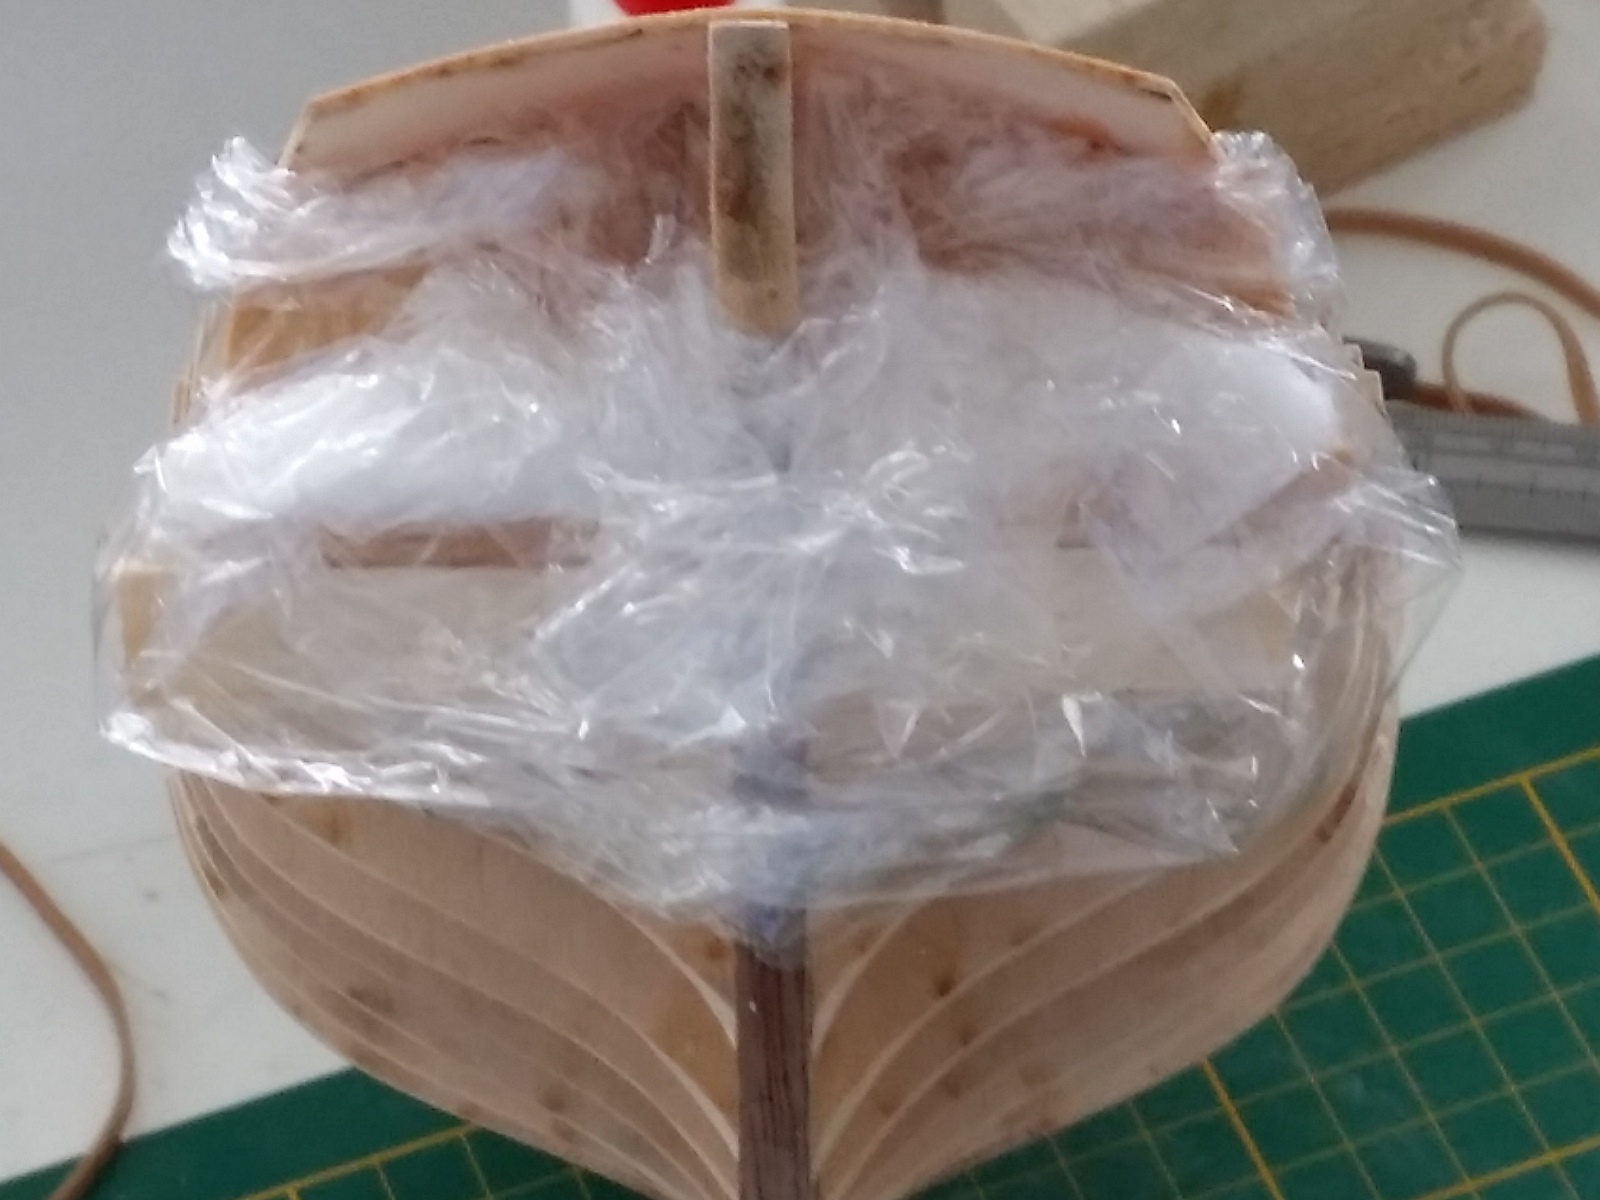
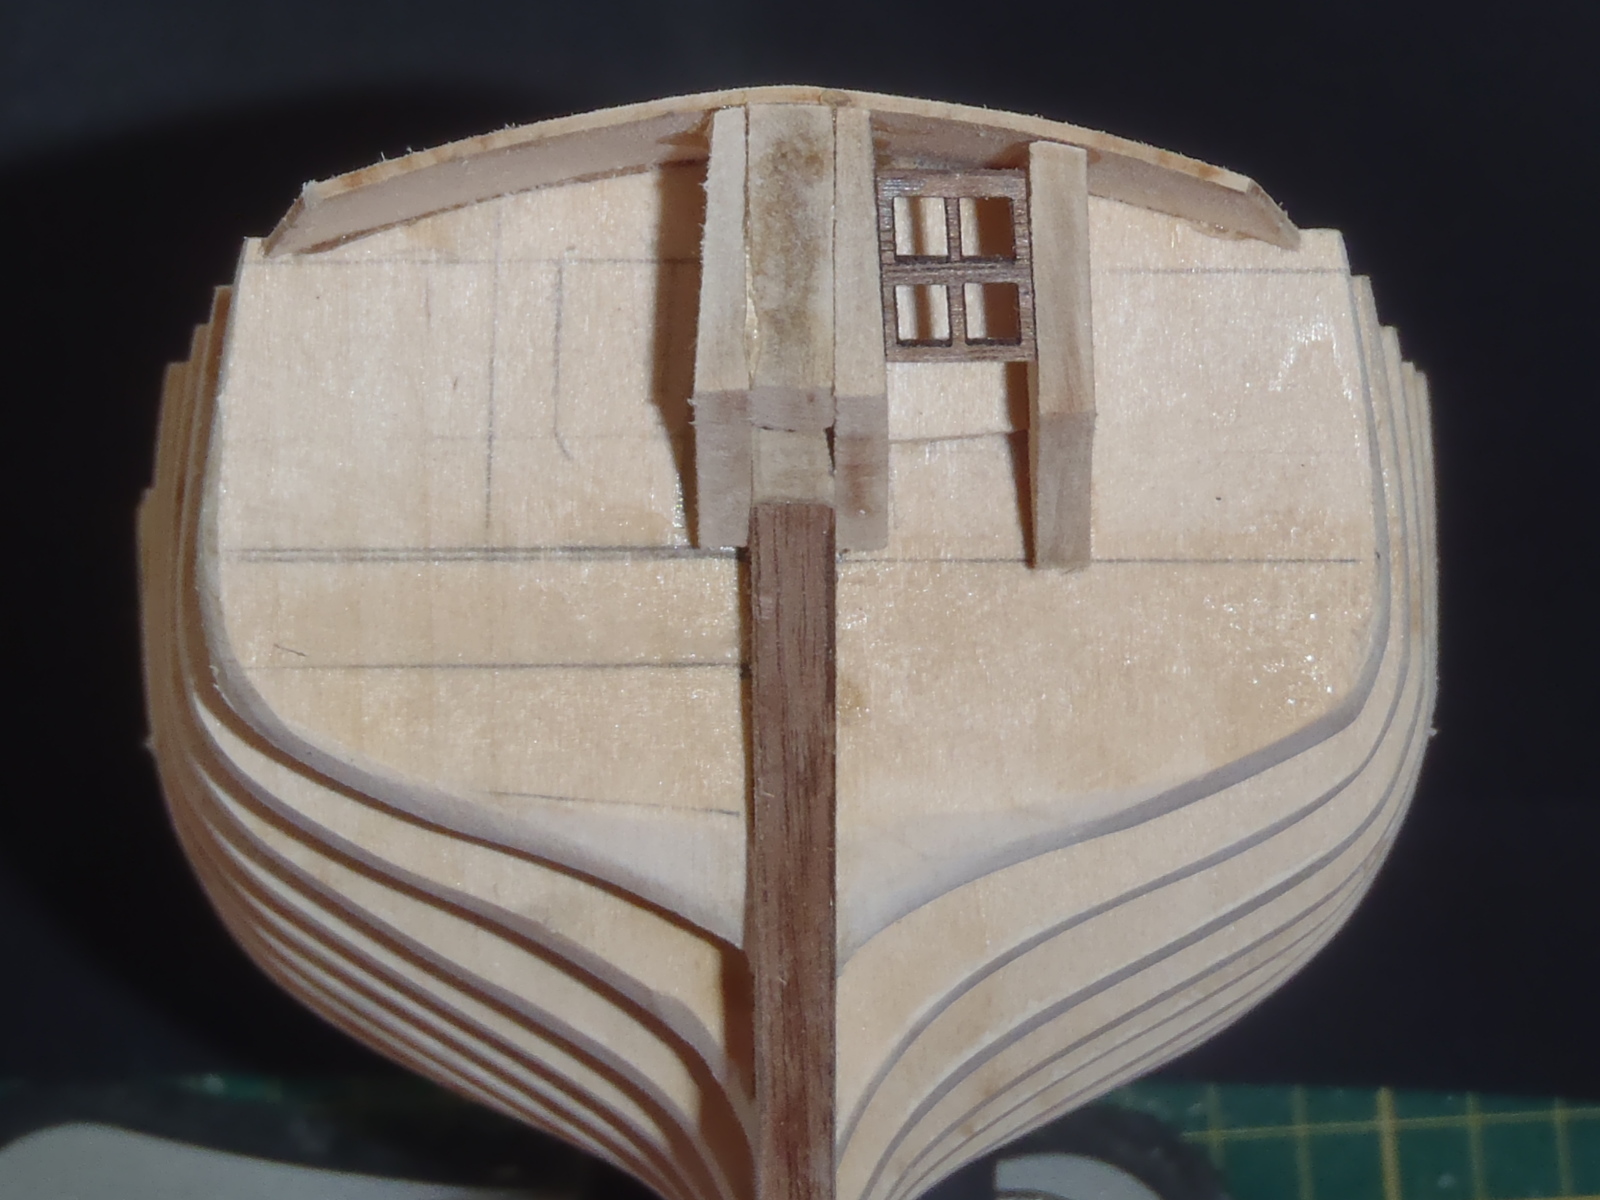
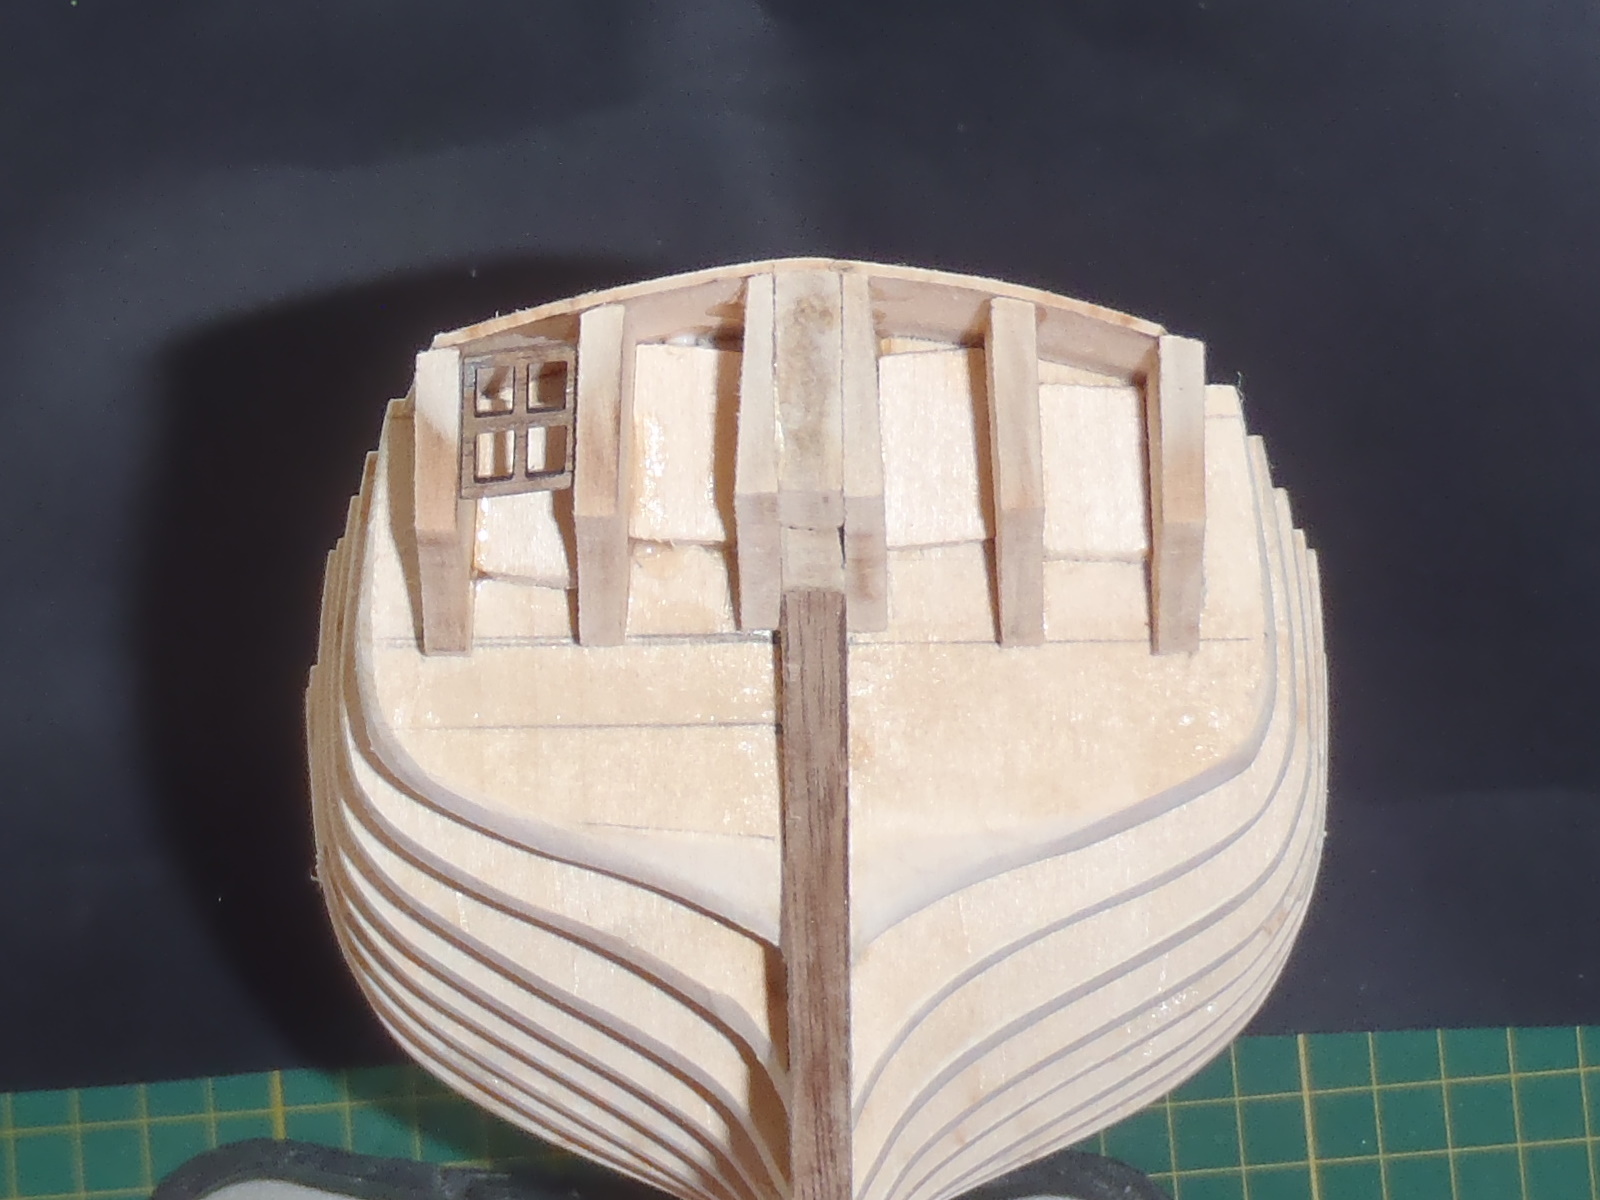
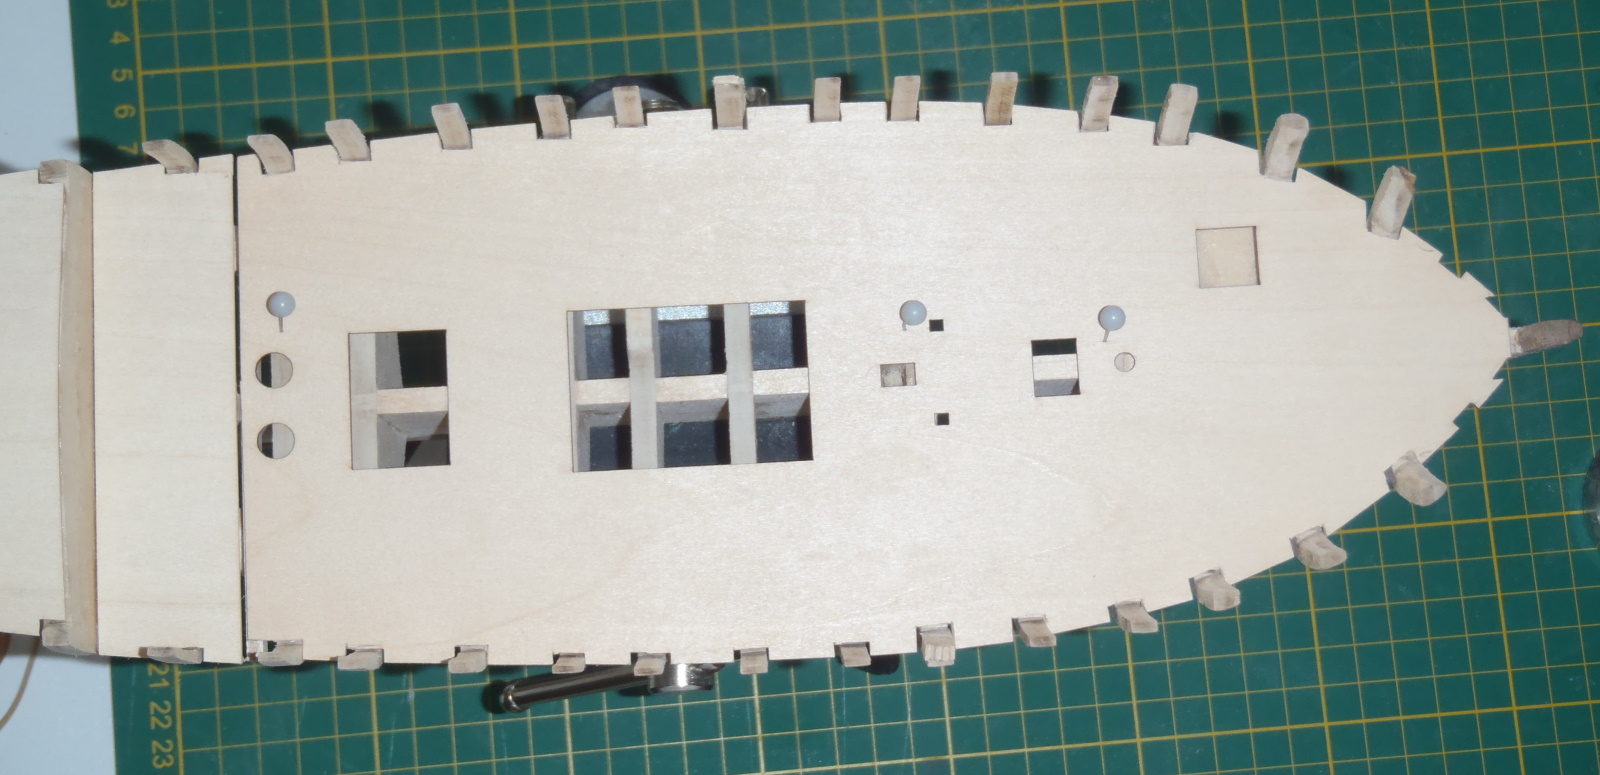
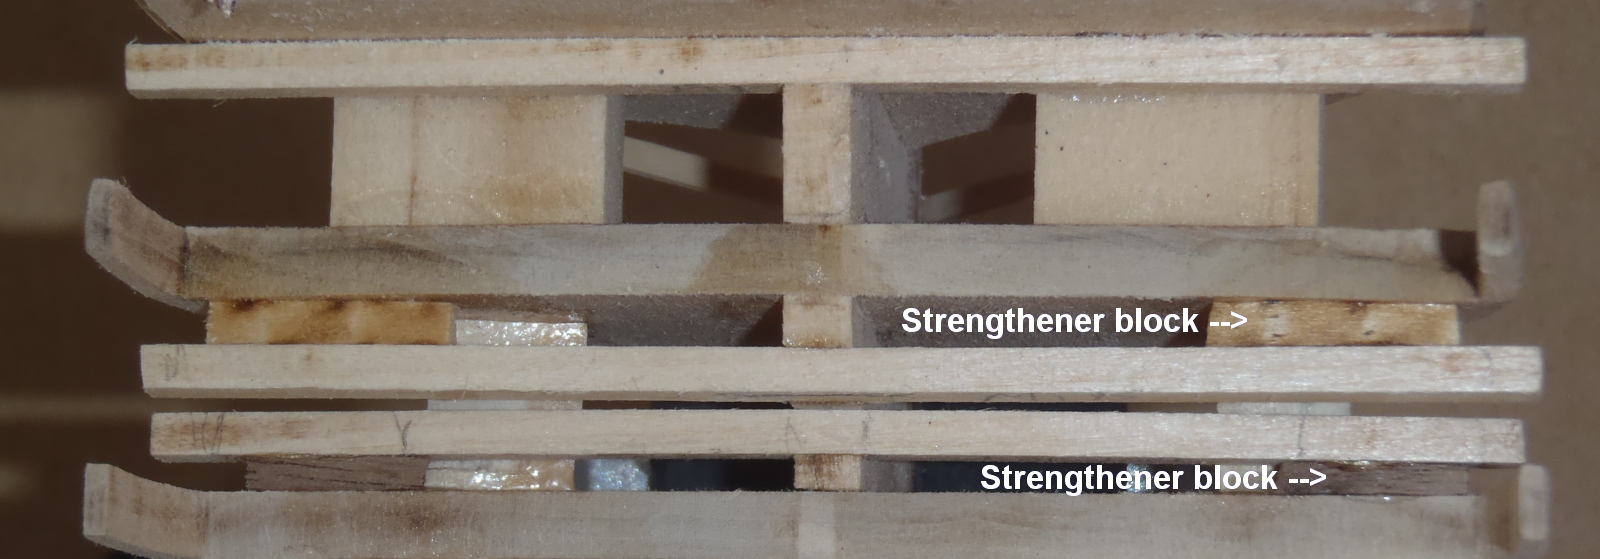
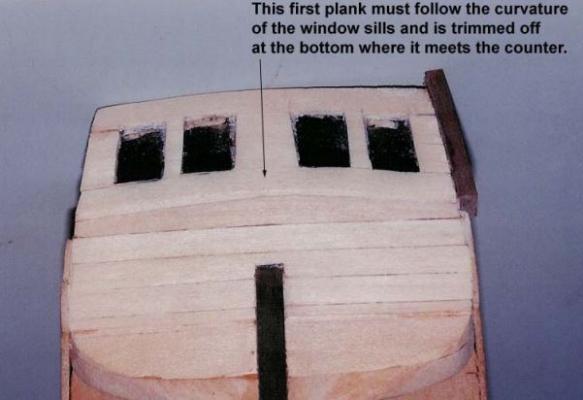
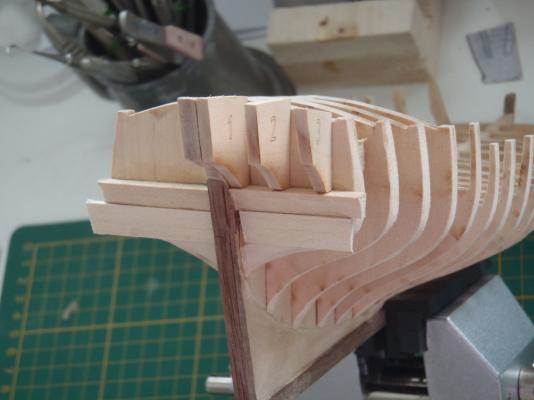
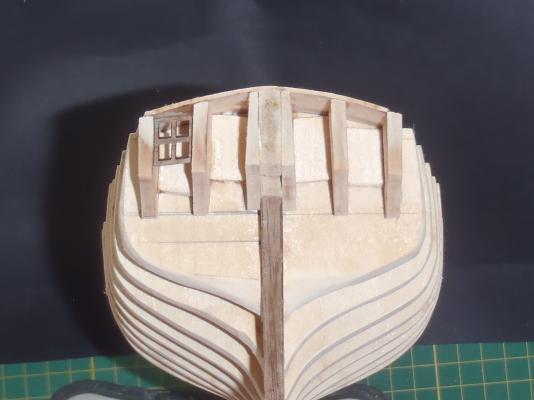
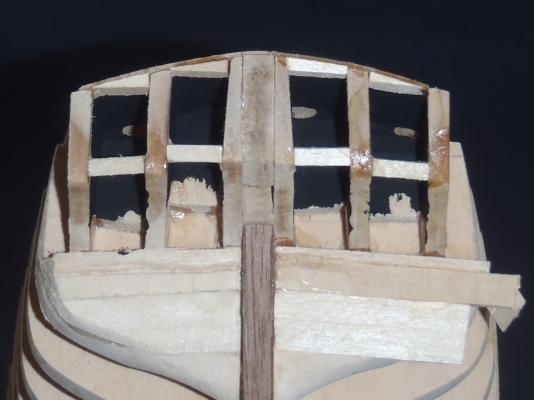
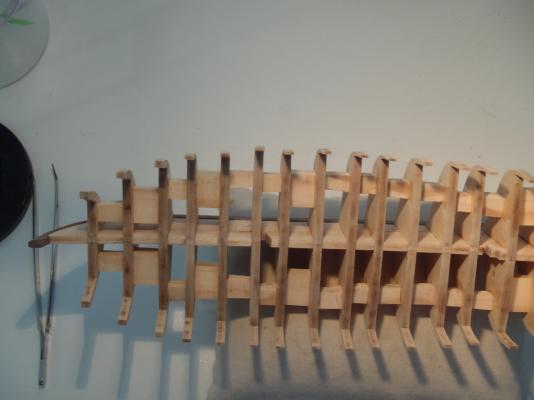
Thanks, again! Because I believe you should always listen to advice, I decided to follow Bob Hunt's practicum (cheers, Alistair). He has you place the stern framing BEFORE the wing transom and filler blocks. When I looked at the positions of the wing transoms I had placed, I realised they were wrong - flat across instead of angled downwards towards the sides. Another misdirection from the official plans. This shows the stern frames resting on the glued-on wing transom: When I fixed the poop deck it looked even more wrong. So, using Dan's advice, I unglued the wing transoms and fillers. Isopropyl alcohol and GladWrap: Then used the inboard windows to shape and position the stern frames. Being belt-and-braces, I placed strengthening blocks between each frame, glued to the bulkhead: Rinse, and repeat: Having read that windows get mixed up, I replaced them in their original block as I went: Again, using the windows as guides, I trimmed and fitted the headers and sills - not really happy with these, couldn't find a way to make them fit in all directions. I'm hoping sanding will fix that: Painted the insides black as suggested. Also, as you can see, at that stage I refitted the wing transoms and filler blocks. Enough writing - time for some sanding! Cheers, Brett


- 129 replies
-
- 4
-

-
- armed virginia sloop
- model shipways
- (and 1 more)
-
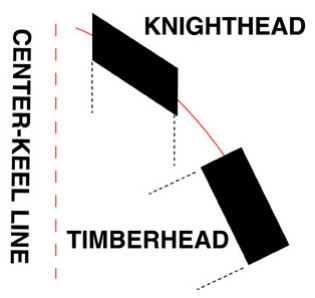
And another question. The instructions and the practicum show the Knighthead carved as a rhomboid in cross section: I can't see any reason for this shape. Surely a simple rectangular shape mirroring the Timberhead would work the same? Or am I missing something? Thanks, Brett
-
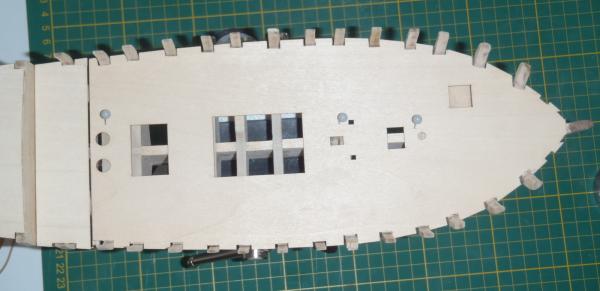
Thanks, Ken. My Practicums from Bob Hunt arrived today, so I will follow them from here on. But there are always puzzles! So, another question to all. I'm ready to glue the main sub-deck on, but want to be sure I haven't missed anything else (like the mast mortices!). Here's a photo of the sub-deck pinned in place. Where there are holes punched out should I cut away any of the bulwarks for future attachment of pumps etc? Also, should I be concerned that the sub-deck cutout for the mast (near the middle of the 3 pins) doesn't exactly match up with the centre keel Mast recess? Or am I overthinking again? Thanks, Brett
- 129 replies
-
- 1
-
-
- armed virginia sloop
- model shipways
- (and 1 more)
-
Yup, that's the one Alistair's referring to. However, it's short on detail, and really just an add-on to the manual that comes with the kit. The free chapter of Bob Hunt's practicum (http://lauckstreetshipyard.com/PDF/avs_sample.pdf) is much more detailed - I'm hoping for great things from the rest, when it arrives! Cheers, Brett
-
Thanks, Alistair. I have that PDF, and now see what you and Ken mean. Cheers, Brett
-
Thanks, Ken. I had not noticed the "mast mortice" until you mentioned it. I haven't glued the sub-main deck on yet - trying to mark time until the practicum arrives. Are there any other traps before I go any further? I haven't shaped the bow filler blocks yet - that's today's project. I'm sorry, what do you mean "You also need to add an extension piece on each side of the cabin face bulkhead to provide a support surface for the planking where the rail steps down to the main rail."? I've looked at plans and other builds, but can't figure it out. Cheers, Brett
-
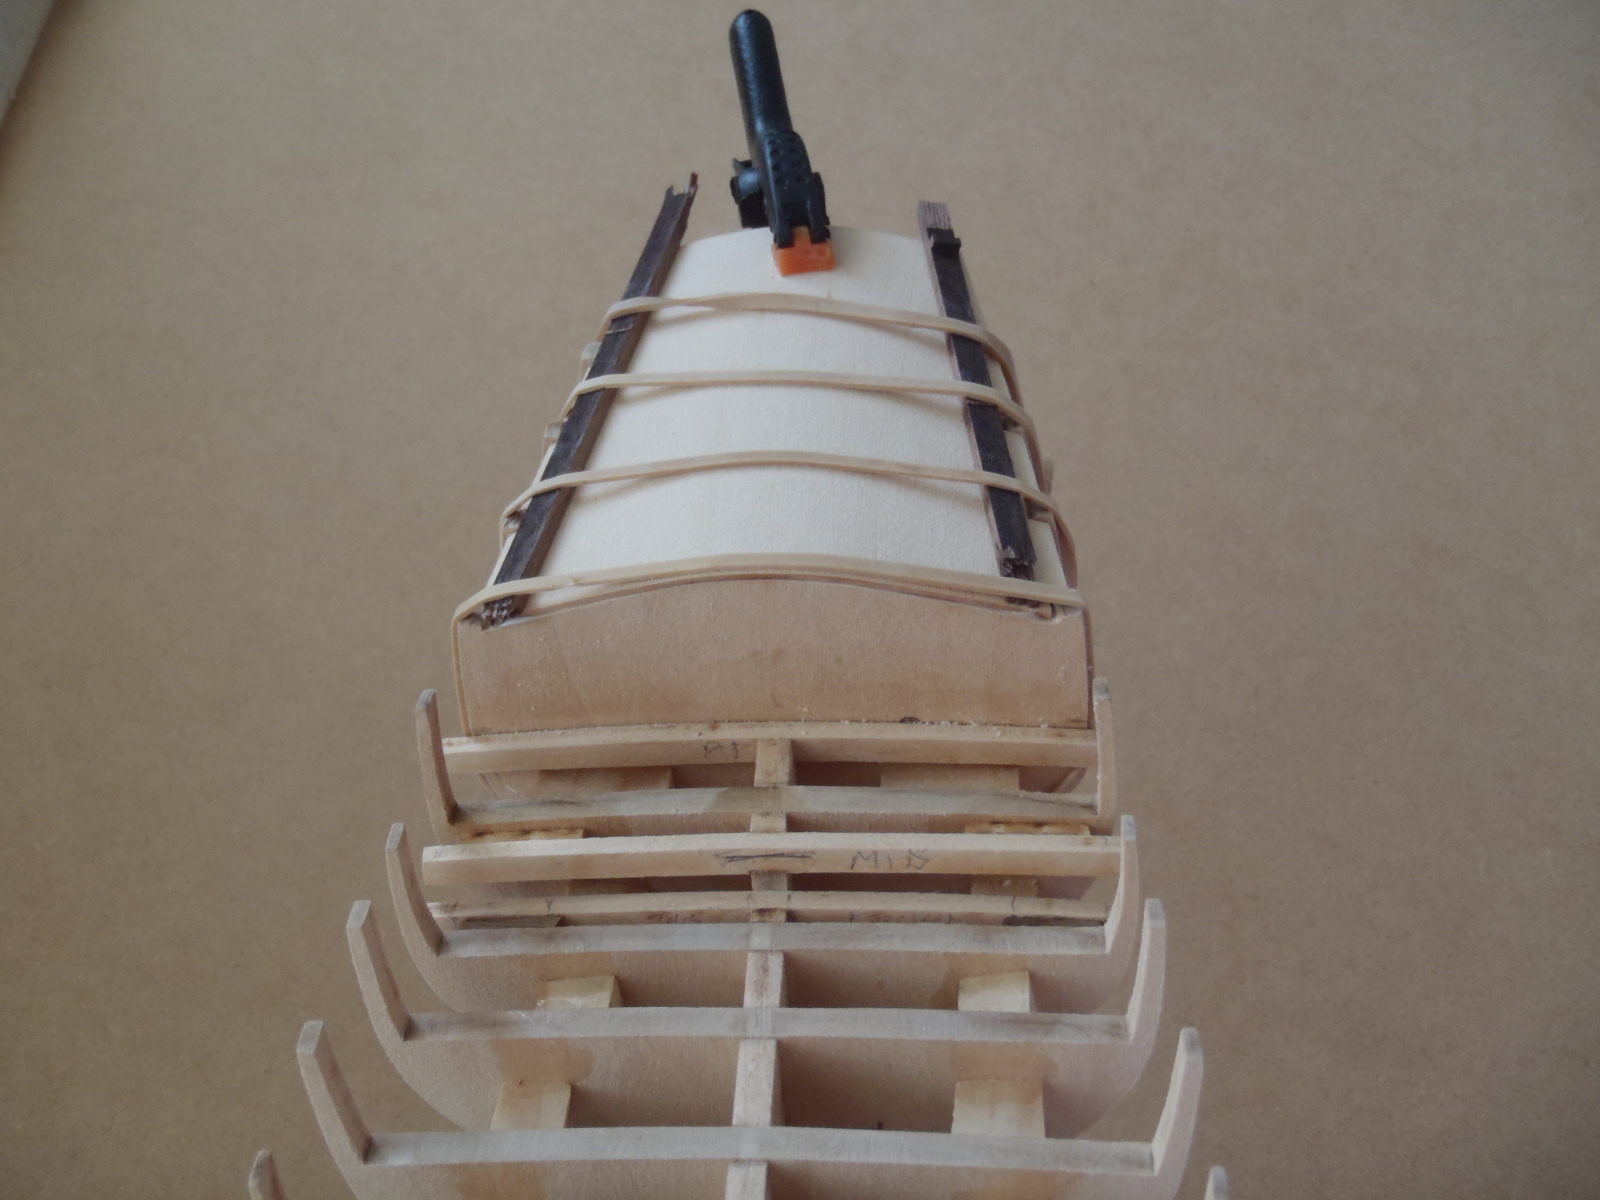
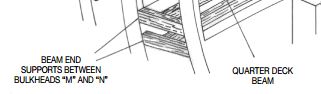
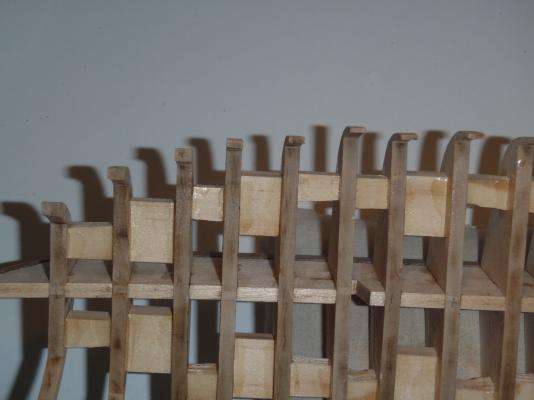
I'm still waiting for the Practicum, but I have the free first chapter, so I thought it would be safe to press on - slowly! The next step is the sub-decks, and, for the quarterdeck I agonised over the best way to strengthen the deck beams. The manual suggests beam end supports like so: Bob Hunt's doesn't show any supports, which I thought was faulty. Then I found the answer in Alistair's build log, and added supporting blocks between the beams and bulkheads M & N. I used scraps of offcuts, so they are functional, but ugly: After considerable fairing of the bulkhead tops, I shaped the dampened poop deck in situ for an hour or so, then I glued it on, lightly held with elastic bands. The scraps on the sides are just to hold the deck down evenly: And now, again, it's time to sit back and wait for the glue to dry, and the practicum to arrive. With the occasional drive-by fairing as I pass the model! Cheers, Brett


- 129 replies
-
- 1
-
-
- armed virginia sloop
- model shipways
- (and 1 more)
-
Many thanks, Alistair. I expect to get delivery of Bob's practicums any day now, so I will hold off any further gluing! I have started fairing and shimming. A couple of questions to one and all - what plank size is best as a test for fairness (the manual says 1/8" square - obviously bulldust!)? And is a sanding pad the best tool for fairing? Cheers, Brett
-
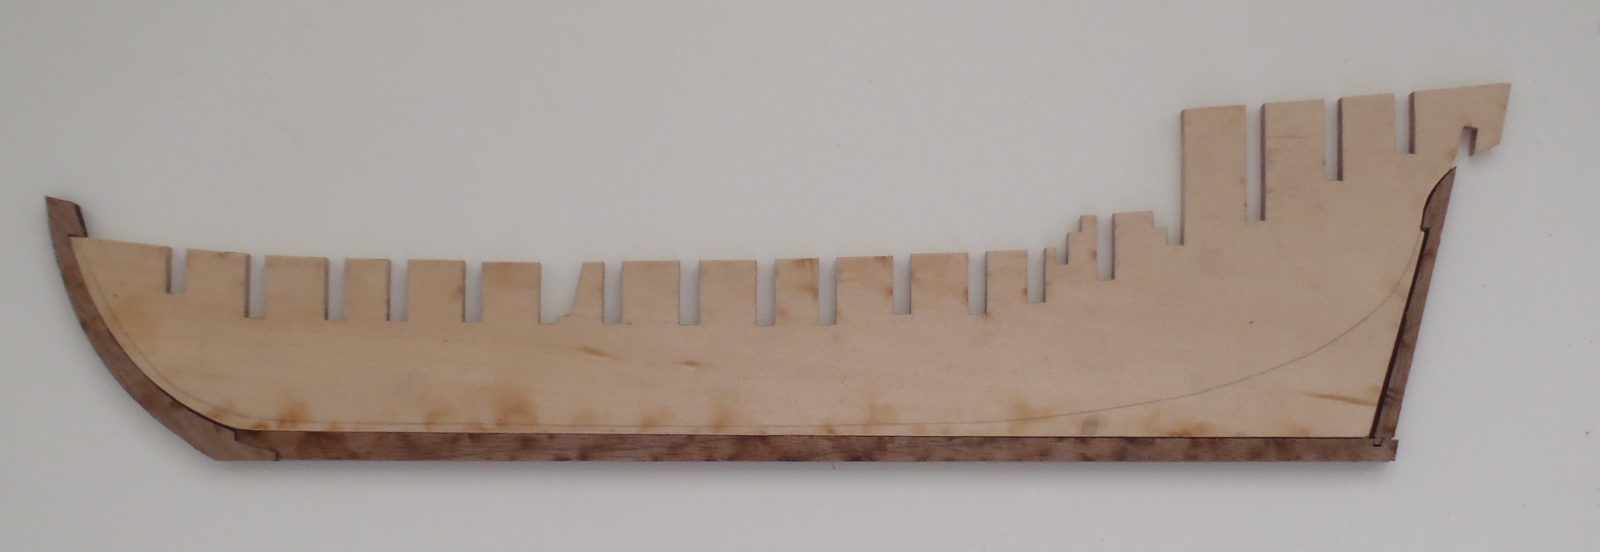
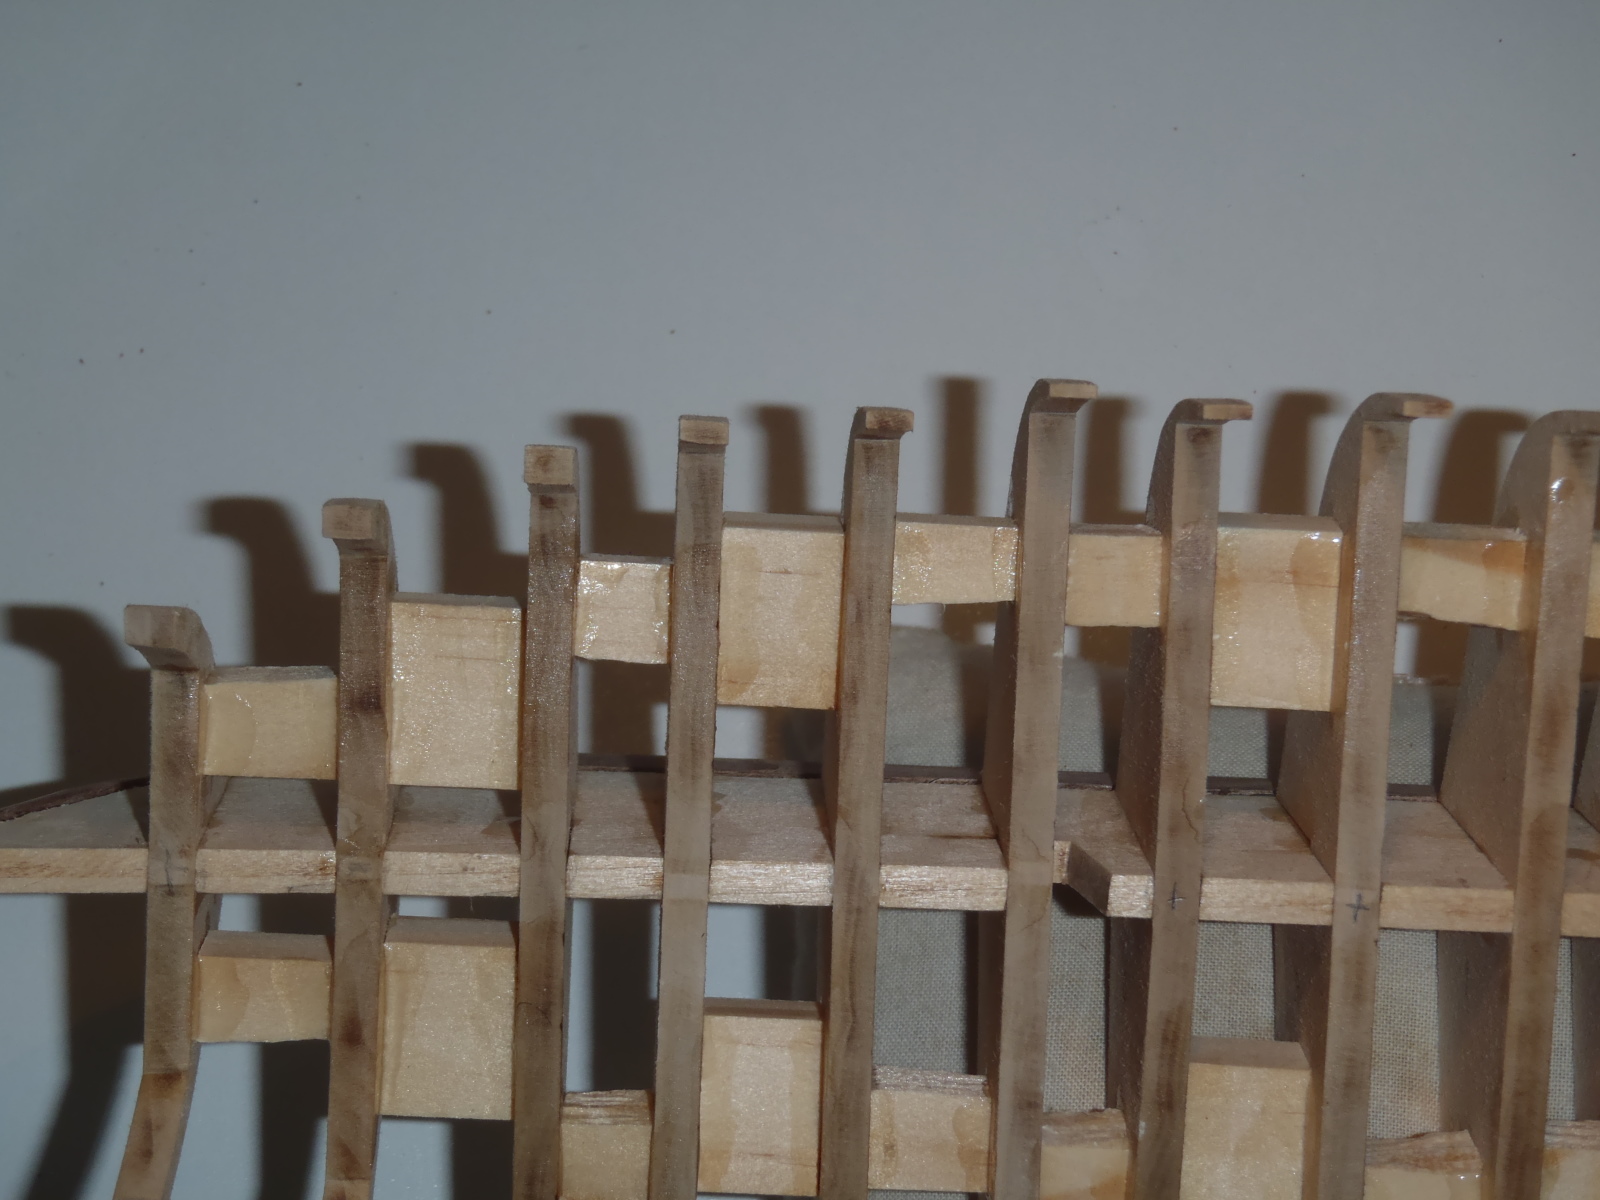
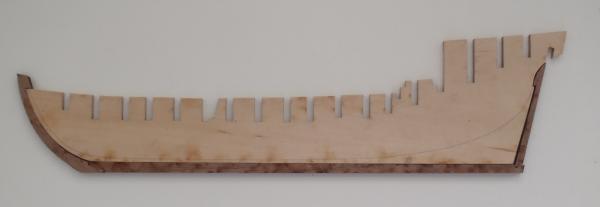
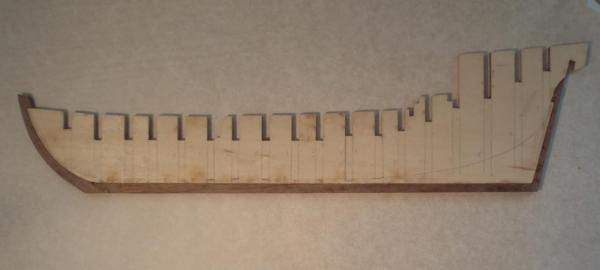
I took heart from the replies and pressed on with cutting the rabbet to an estimated 1/16" deep, expecting to need to deepen and reshape it before planking. I then attached the bulkheads, and reinforced them with random bits of scrap wood. I had problems with the 3D positioning of a couple of bulkheads, so I started a discussion here. Finally I had them to an acceptable state - not perfect, though - and did some fairing and shimming. Like a fool, I then followed the instruction manual, and approximately shaped and glued on the wing transom and filler pieces. It was only when I tried on the stern frames that I realised I should have put those (the stern frames) in position first. Here you can see the wing transoms and fillers glued in place, with the stern frames just resting on them. You will see that the stern frames 2 and 3 stick up a little above bulkhead R. I'm hoping I can trim the wing transoms down to shape! I must say, I'm a bit disappointed with the manual and plans for this model. And it's not easy finding info from other logs, since many of them are now just the reloaded photos. I'm sure experienced builders would have no problems, but for us novices, a bit more spoonfeeding in the manual would be helpful. The plans looked great at first view, but need a more logical arrangement and relationship to the manual. End whinge!


-
Where to buy wood ship models on Internet?
ortho85 replied to warship's topic in Wood ship model kits
Hi Tony, and welcome! I recently bought on Ebay from this seller http://stores.ebay.com.au/R-K-Hobby-Wood-Model-Ship-Tools Excellent product and service, but postage is costly. It depends on the model or supplies you want. Cheers, Brett -
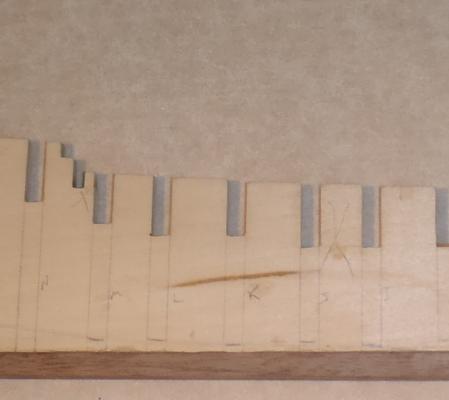
Well, as I said, I tried un-gluing. Both the water and the isopropyl alcohol allowed me to remove the stiffening blocks, but with difficulty. The water tended to swell and warp the basswood. Before I jumped in, I tested this on some scraps. After 1 hour soaking, the samples pieces swelled by approx 8-9%. However, after 2 days air drying they were back to within 1-2% of their original size. The alcohol is hard to use - I tried to keep the joints soaking for an hour, but it evaporates quickly in our 30-33C weather! With both methods I had to apply more force to remove the blocks than I liked, but they came loose. Adjusting the bulkhead, well that was scary, and near impossible. I could not (dared not) free the bulkhead, so I twisted it a little in situ. The water soaking allowed this for the first one I tried, but alcohol on the second one was less successful. End result - a lot of time and stress for little result. I should have listened to the folk who said shim & sand! BTW when you look down the deck it is easy to see where my initial positioning was wrong. In this photo I have already worked on the 8th bulkhead - the one with the faint blue mark on the right (sorry - port in this view!). The darker blue marked bulkhead (6th from the near view) cants up on the right, and was next to be adjusted: Here is the view after removal of the first blocks: Fortunately through all this I had one of my trusty assistants protecting my chair wheels: Thanks for all the help - I will now continue in the build log. Cheers, Brett


-
Hi Eamonn, My first disaster (Swift) had no rabbet, and no thickness of keel really to allow for it - so I can't help. However, as I did with this my second build, I think you should start your log and ask the experts. Twice the exposure! And, not to rub it in, but how does a man with the surname Morgan, get to play cricket for England, and be Irish? BTW, I thought his first name was Owen - making it sound even worse! I really struggled with my first build, and bodged it. Hope we both have better joy this time. Sláinte, Brett
- 129 replies
-
- 1
-
-
- armed virginia sloop
- model shipways
- (and 1 more)
-
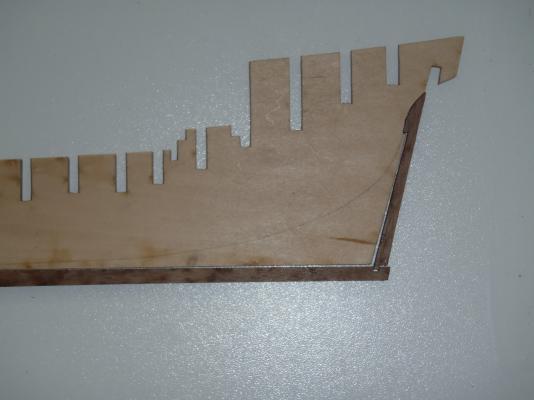
So, I traced the rabbet line on the keel, and drew the extensions to position the bulkheads. There's not much to see here: Then I tried to understand the instructions for cutting the rabbet. Talk about confusing! Here I struck another problem. The manual and other practicums refer to the first layer planks as 3/64" covered by second layer of 0.020". Being simple minded, I will talk in metric, to try to explain the problem! WARNING - maths following! Theoretical thicknesses: First layer 3/64" equals 0.047" Second layer 0.020" Total theoretical thickness 0.067" In reality the second layer planks supplied and listed are actually 0.030". That gives a thickness of 0.077" for two planks on a side, and a total actual thickness of 0.154" for both sides. Now the centre keel is 3/16" which equals 0.187". If you cut a rabbet on each side to the true double plank thickness you will leave the centre keel only 0.033" (about 1/32") thick in parts - surely too weak? Here's a graphic to try to illustrate my maths: And here's the question - am I overthinking this, and it will be strong enough after the planks are glued on? OR Should I keep the rabbet to 1/16" depth, and thin down the first layer garboard strake to compensate, like this: Apologies if confusing!


- 129 replies
-
- 1
-
-
- armed virginia sloop
- model shipways
- (and 1 more)
-
The next step was to try to figure out whether to cut the rabbet before or after gluing on the stem, keel and sternpost. The manual says glue first, rabbet later; Bob Hunt’s practicum says the reverse. It would obviously be much easier (better access) to cut the rabbet first, but I was worried about trying to accurately glue a 3/16” piece to a 1/16” edge after thinning the centre keel. In theory this would be the cross-section: I wish these kits were metric, it would make calculations and measurements so much easier! So, I trial fitted the stem, keel and sternpost to the keel, and found small errors. After a bit of careful sanding I got a reasonable fit, and glued them in place: Before I finish this post, a word of warning to other beginners - don't force the bulkheads on to the keel if they are a tight fit. Sand them looser first. The two areas marked with pencil Xs in this pic snapped off, and had to be glued! Cheers, Brett


- 129 replies
-
- 1
-
-
- armed virginia sloop
- model shipways
- (and 1 more)
-
Hi Brian, The thread on preferred glues mentions PVA often - from members in several countries. I reckon we've learned 'em to speak proper! My personal difficulty was seeing "CA" in threads, and interpreting it as "Contact Adhesive"!!! Whoops. I've decided to have a shot at un-gluing my errors. I'll try softening some with water, and some with IPA (isopropyl alcohol) - love those TLAs (three letter acronyms)! I will report back, unless I wreck the model. Cheers, Brett
-
Thanks, guys. I forget that these constructions get stronger as you add bits. I persist in thinking of each part as a stand-alone! Demonborger, I use several - WeldBond, Selleys, Parfix - depends which one I grab. They seem chemically similar, and, once set, don't soften in water quickly. And, of course, I don't want to soak the whole thing. Mark, I tried the isopropyl alcohol on my first model, but it did not release the PVA I was using. Maybe there are different formulations. I've seen references to yellow coloured PVA from the USA, but here in Australia they are all white. Thanks all - I'm happer now than I was an hour ago! Cheers, Brett
-
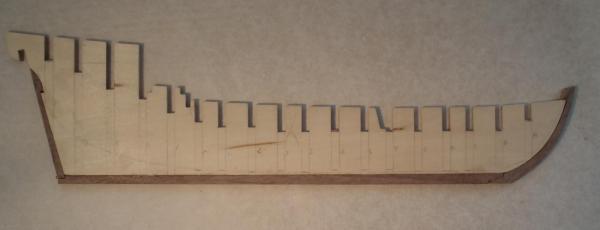
Help, please. I've started a log on my Armed Virginia Sloop, but it's taking time to write up and so I'm ahead of my log. I've glued in (PVA) all the bulkheads, and added reinforcing blocks between them. I thought I was being so careful, but managed to get a couple of them wrong. I hope these pics will show that bulkheads 5 and 7 (counting from the bow) have obviously been fitted with a tip from starboard to port, leaving them in on the starboard, and out on the port. As you can see, the "timberheads" are very thin where I've made these errors. I realise I can shim them, but, when I trim them back on the other edge the shim will be unsupported. Is there some way to recover from this, or must I try to remove those two bulkheads somehow? Thanks, Brett
-
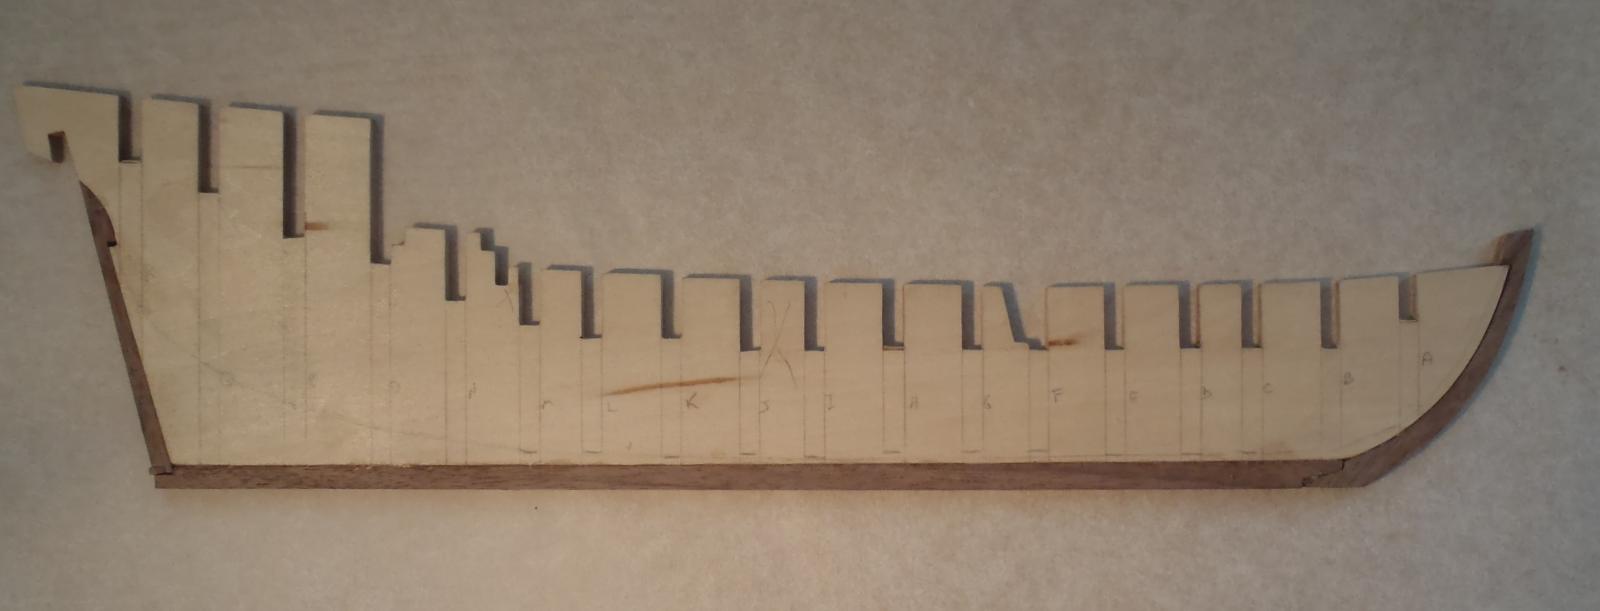
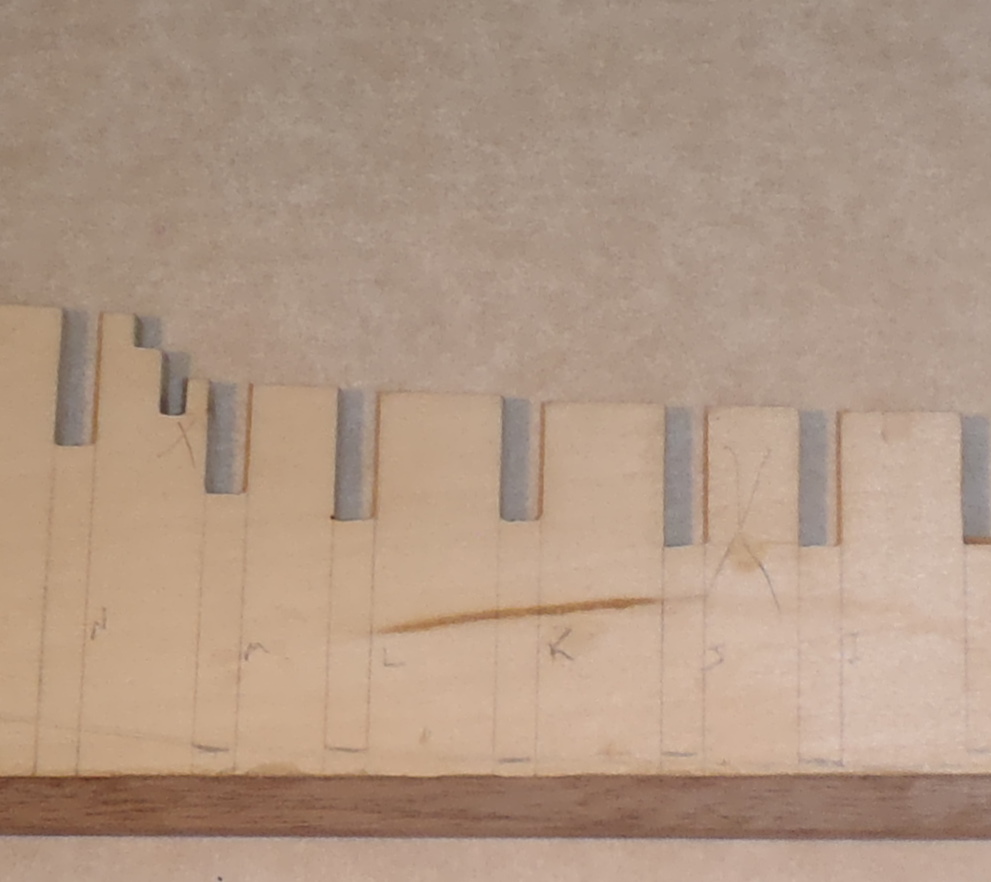
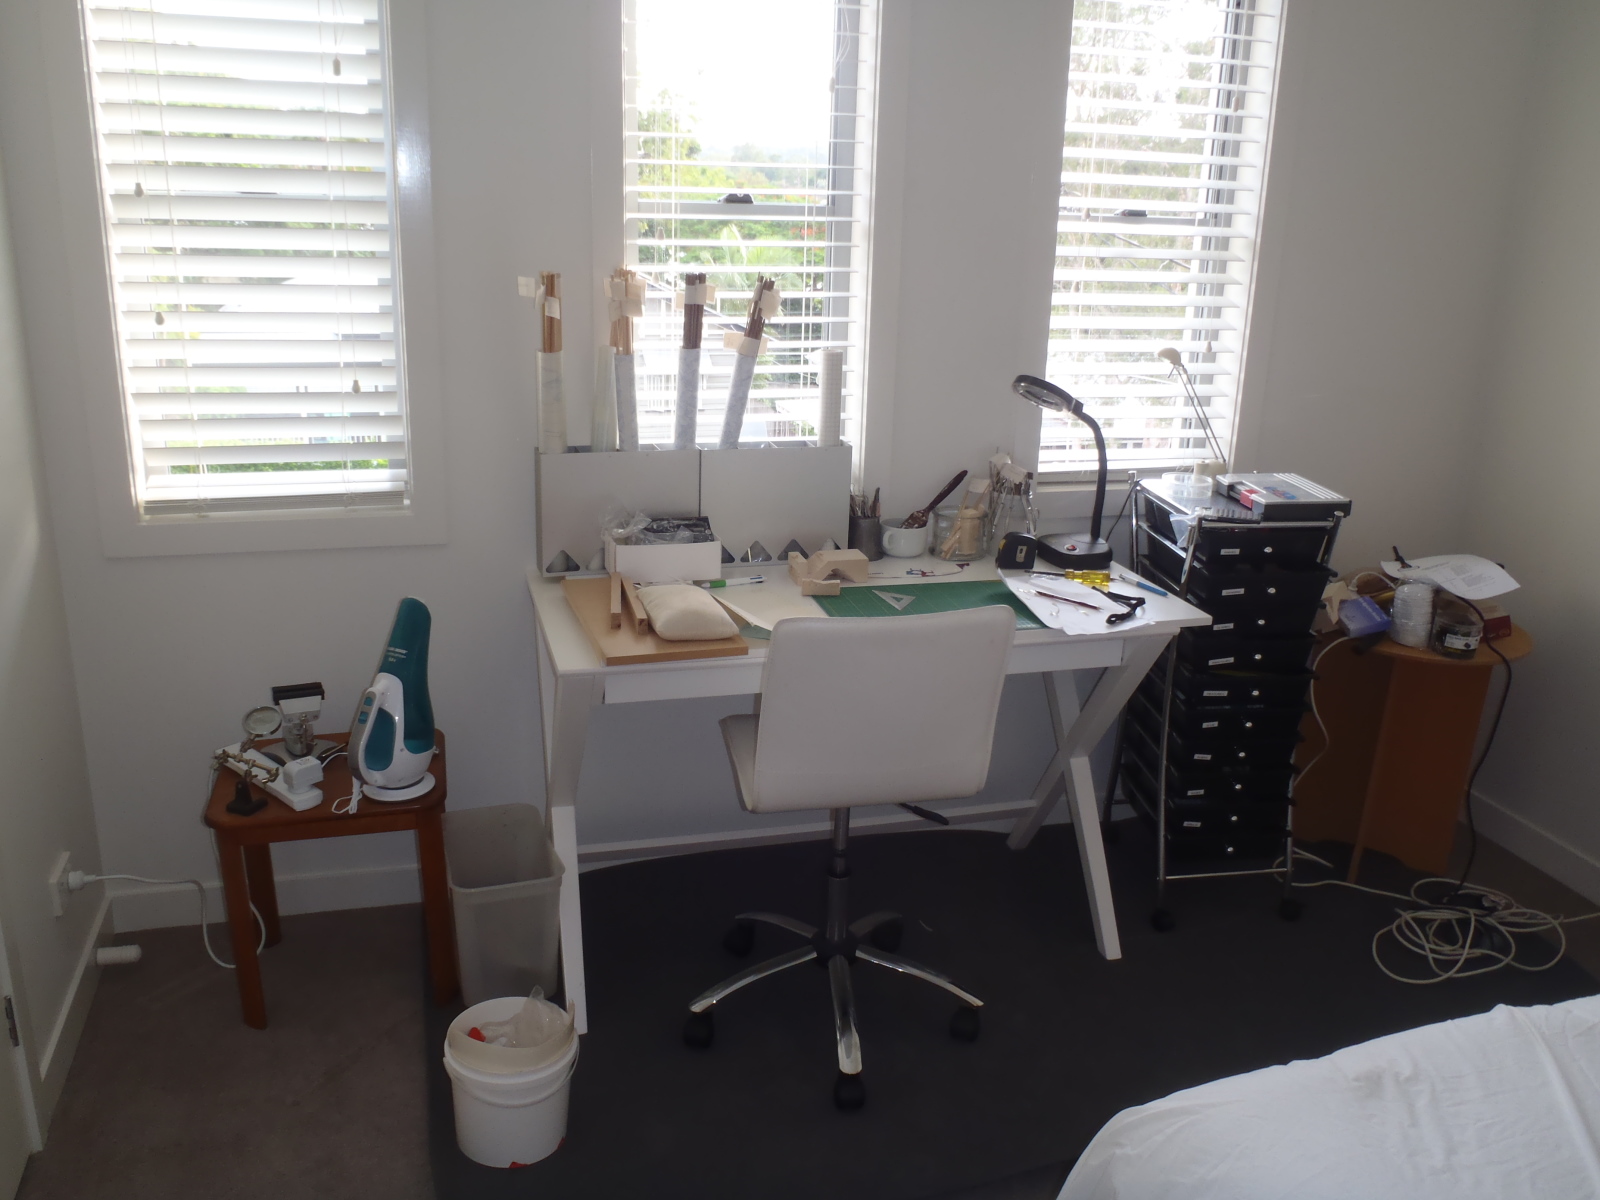
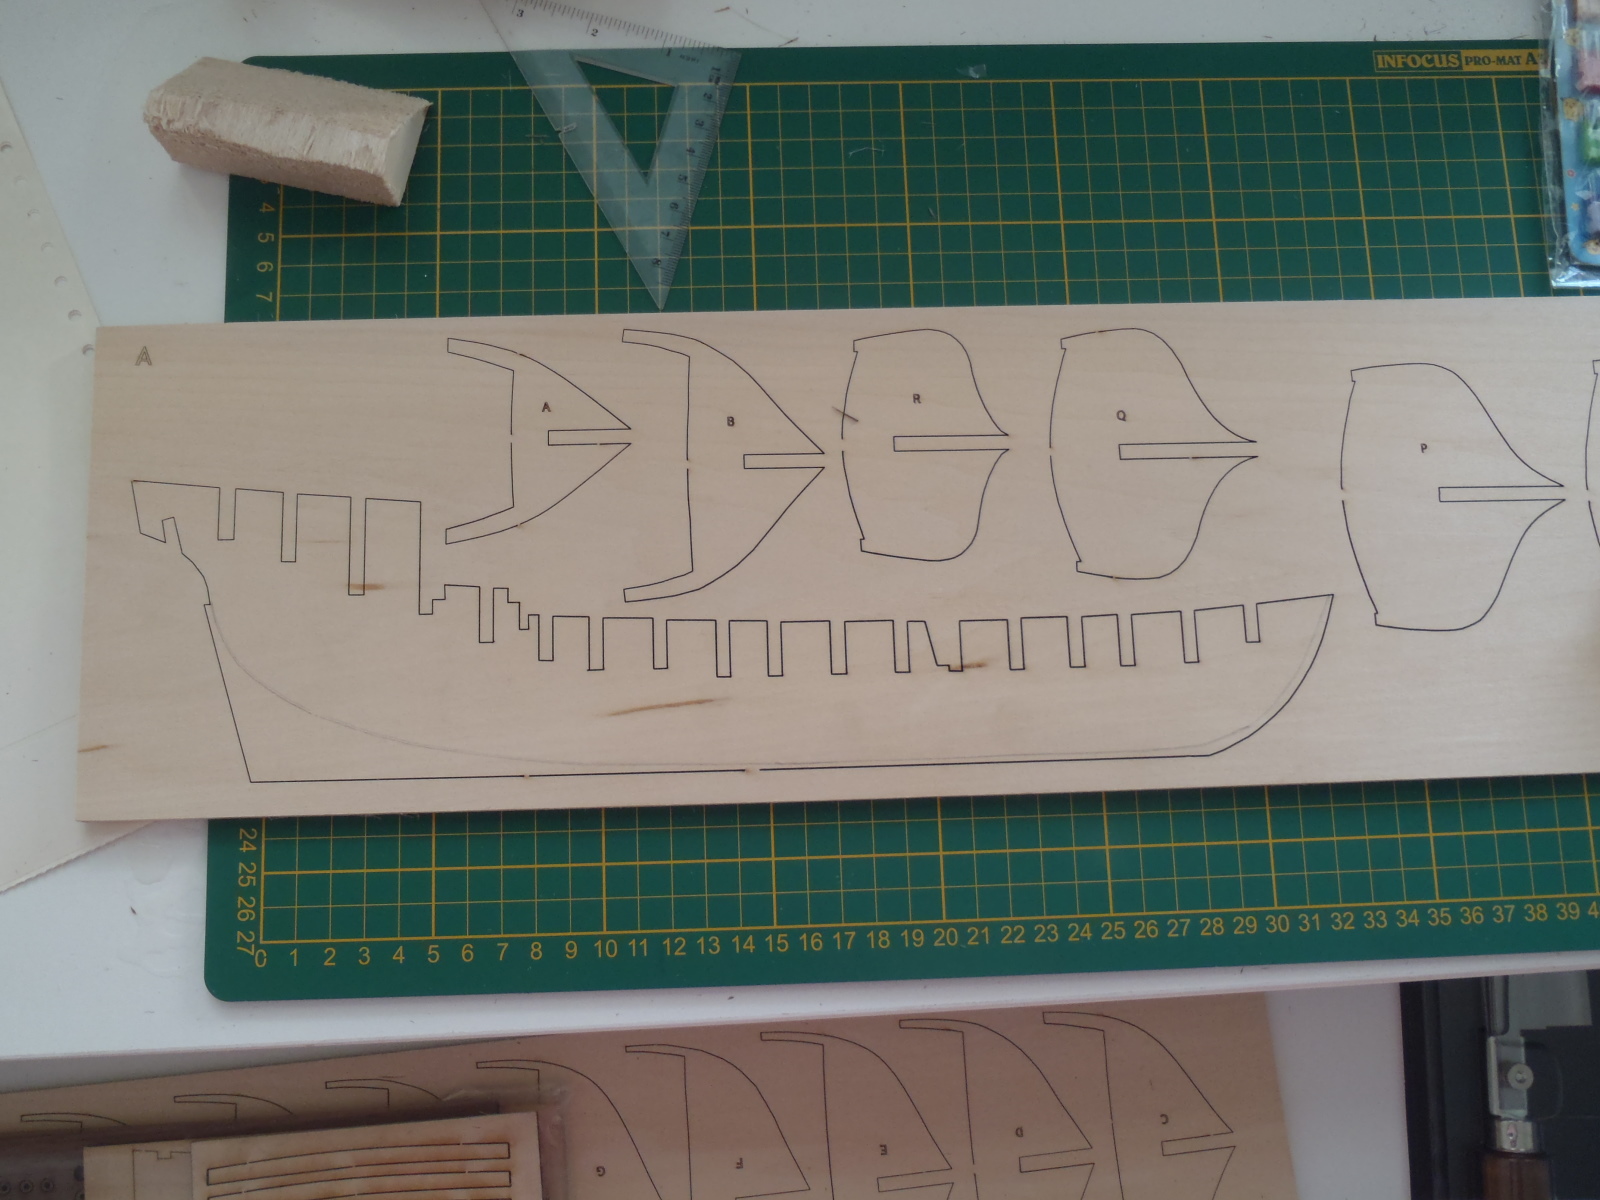
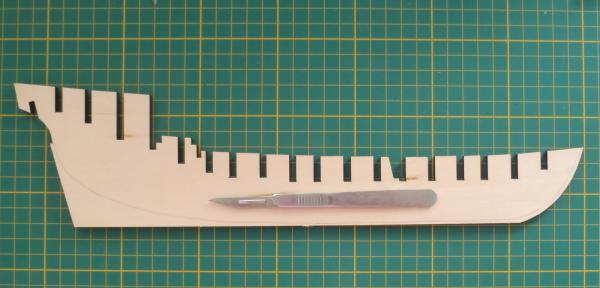
To start at the start. I bought this version of the Armed Virginia Sloop on Ebay. Ordered on 10th December, delivered 23rd December – not bad from USA to Australia at Xmas time! All arrived safely. Impressive looking plans and kit. As far as possible, I checked the inventory, and labelled and stashed the timber. For my first build I was unprepared, but this time I knew the most important rule – buy lots of tools. I commandeered a spare bedroom, putting protective covers on the floor, desk and bed. The bed is invaluable for dumping the plans on. The next step was to re-read the manual, and search for any information on this site or the rest of the net. As I said before, I was a bit surprised how few build logs survived, making it more daunting than I had expected. I found the free chapter of Bob Hunt’s practicum, and the notes from the Model Boatyard site, but when you’re a novice you need highly detailed step-by-step assistance. Hence my query about cutting the rabbet – thanks, Ken, for your reply. With my head spinning from too much information, I decided I needed to get into it. The first step is to separate the laser-cut centre keel. This was the first glitch. On one side the laser cut was clean, and the tags left to hold the piece in were clear: However, on the other side the laser had not quite cut through in several random spots: Not a big problem, but I was scared of damaging the keel, either by missing some tags, or by being too enthusiastic in cutting them. BTW, many of the basswood and walnut pieces have this minor fault. With a little patience, and a #11 scalpel, I managed to remove the keel mostly unscathed! Enough typing for today - I only use one finger, and it gets sore! Cheers, Brett


- 129 replies
-
- 4
-
-
- armed virginia sloop
- model shipways
- (and 1 more)
-
Thanks, Ken - that's what I decided to do. There is one small problem, but I'm going to mention it in context later, and begin my log now. Should we call them "Slogs", since a blog is a weblog, and these are Shiplogs? Cheers, Brett
-
Hi, Can I get a copy of these if they are still available, please? Cheers, Brett
-
Hi Alistair, Thanks for the info. Your log was one that I wish had the original text! I don't have the full practicum, just the free first chapter. I also have the PDFs from The Model Boatyard. So I have 3 guides, but prefer first hand advice. As you say, it looks logical to me to glue on the keel etc first, as it will be a stronger, more accurate fit. However it would be much easier to cut the rabbett as a simple chamfer, as show in the practicum: Any other comments from members who have done this? Thanks, Brett

-
Thanks for all the answers. I like the "bean bag" type. We have a wheat filled heat pack that will be perfect. The foam looks good, but shipping to Australia?? I have found the Panavise at Hobby Tools Australia - so I may have to buy (yet) another tool! Cheers, Brett