

Rik Thistle
-
Posts
876 -
Joined
-
Last visited
Content Type
Profiles
Forums
Gallery
Events
Everything posted by Rik Thistle
-
 Yes, that sounds good. Clydesdale horses pulling ploughs etc were still used in Scotland well in to the 1930s. Very powerful and gentle animals. Richard
 -
Eric, Threshing Time | Farmington Historical Society - https://farmingtonhistorical.org/stories-threshing.html and Machinery’s profound impact on farming never seems to slow - https://historyonthefox.wordpress.com/tag/reaper/ Some pics and info from around 1900. Note: adding a Thresher would tie down the season your layout depicts ie when the crops come in. Richard Edit: Adding a thresher etc would fit in nicely with the grain barns mentioned in earlier posts. This could be a whole project in itself, assuming there were crops grown nearby...maybe it's a side-project for now or for later when the railway layout is up and running. Either way another interesting subject for us readers 😉
-
Threshers are fascinating machines, especially to a young lad - I was raised on a farm. Fascinating, but potentially very dangerous....lots of exposed moving parts, but since the hands understood the risks they didn't get injured.. Different times. Richard
-
Eric, Richard I think original small villages would have a bit more space to play with. If the village quickly grew in to a town/citiy then the original buildings were likely knocked down and Gen 2 built. But again very dependant on whether the village/town was built in a restrictive valley or a flatter area. Town planning, if there actually was any in the early days, would have been minimal, I guess. Yes, there are quite beautiful and compact high streets in Europe which have been deliberately preserved. Which is the right thing to do, - it's good for culture and tourism I skied in Breckenridge many years ago....beautiful location and town. And I agree, the streets were wide and plenty space between the buildings. Sorry for sidetracking your very good build thread in to a town planning discussion.... onwards with McBaine 😉 Richard
-
Eric, As Keith says, not bored at all. I'm learning a lot. Very good imagery included in your reply....it makes understanding easier. Certainly in the modern UK, as building land has become rarer and hence more expensive, construction companies are now creating housing estates with very little space (72 feet) between dwellings and making the gardens the size of postage stamps. As I drive past these new estates it sure doesn't look like 72 feet, but I guess it must be. But going back a few centuries urban UK houses (and commmercial buildings) were packed much closer in the busier areas eg London. Rural areas, eg small farms and villages, had more land to spare so spacing was a bit more generous. Houses/buildings tended to be stone built so there may have been a need to keep a sizeable construction zone between them. I had imagined with the USA having much more land than the UK, buildings would have been spaced out more but , as I am learning, town planning is mostly determined by the lie of the land and keeping the main commercial areas compact and close to where the action is. As usual, this continues to be a fascinating build. I look forward to seeing McBaine take shape and the railway extension that goes with it. Happy building. Richard
-
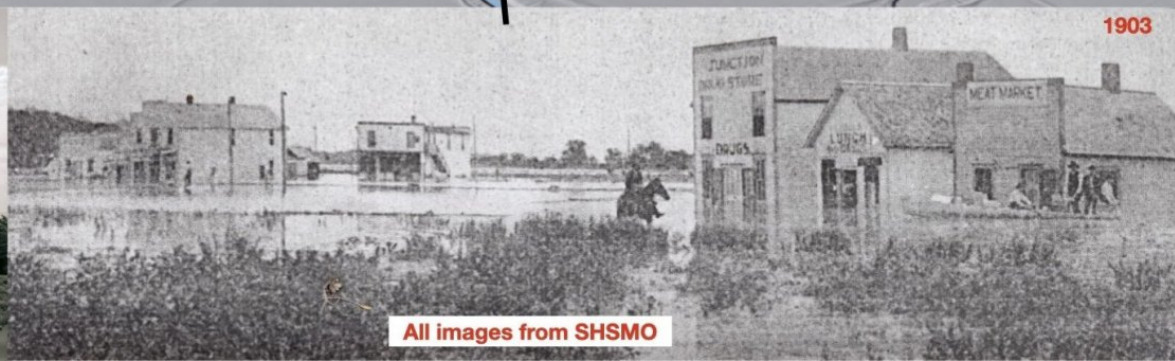
Eric, A very welcome sidetrack to the main theme, which is already more than we deserve 🙂. That 1903 pic is interesting.... I had wondered why the buildings were built so close together in your earlier posts, but that is what they did, for some reason. I also notice (in the 1903 pic) they seem to be built in distinct and quite far apart groups - I wonder why?....either side of a river, track, stable patches of ground suitable for bearing the weight of buildings etc? And, yes, the signage is brief but to the point....Marketing 101. All very interesting, thank you. Richard
-
Eric, That is a great pic.... it has scale, detail, good focus, clearly shows all the additions inside the room and a clean background. Good stuff. Richard
-
Donation made. Thank you MSW for what you do. All the best to everyone for 2026. Richard
-
Eric, A nice looking building and well finished and furnished by you. UK pricing on the their website says £47 so I guess they set a price target and designed it to suit, hence no 2nd floor etc. I agree, that no one will notice that floor is missing. I can't understand either why they designed it so one couldn't work on the insides of the 'box'...strange. It is interesting what buildings/establishments appear in a new town during the first round of building works, and then what buildings follow in the 2nd and 3rd rounds etc as a town grows. I re-watched the TV series Deadwood (...gritty and not family viewing!) recently and it was a good insight in to how political power and money drives what buildings come first and which buinesses survive in the longer term. Have a good Christmas and New Year. Richard
-
Just for interest.... Moving a Churchill Mk 7 (flamethrower) tank and an explanation of the work shedule to get it running again..... Recovering a WWII Churchill Tank That Hasn’t Moved in 30 Years (45 mins) ... " What started as a “simple” recovery of a World War II Churchill Crocodile from a museum quickly turned into controlled chaos when our recovery gear bent straight away. In this video, we attempt to extract a 40-ton WWII flamethrower tank that’s been quietly ageing indoors for decades, load it onto Crouch Recovery’s lorry, haul it back to our workshop in Leicestershire, and finally take a look inside — including a rare Bedford Twin Six spare engine that came with it. Nothing goes exactly to plan… but that’s half the fun." Lots of 'creative' methods used for shifting the tank out of it's museum building onto the truck, and then off the truck in to the repair facility. But those chaps obvioulsy enjoy what they do....I wish them well. Richard
-
Eric, As Keith said ....Whatever the barn's history, it's a neat structure and you've done a fantastic job modeling the barn. It's very well done. The project continues to fascinate. Richard
-
Eric, Keith suggestion of horses being kept in the barn piqued my interest. There is what looks like a corral attached to the right side of the building. That maybe means there was livestock of some sort kept inside, and that they needed daily fresh air ... or perhaps for auctioning? Does the spacing on the corral rails give any clue to the livestock type....the wooden rails look quite close together....were sheep a thing at those times? Richard Edit: Also the soil within the corral looks churned up.
-
Good 'Hobby Quality' Metal Lathes
Rik Thistle replied to tmj's topic in Modeling tools and Workshop Equipment
tmj, Everything that has been said before, plus... Since you are based in Texas, USA you might want to consider a local company like Grizzly ..... https://www.grizzly.com/metal-lathes ....showrooms in Missouri and Washington..... they also deliver to your home. From their website.... Our products are manufactured in several countries, including locations in Asia, Europe, and the U.S. Many of our products are made in China and Taiwan, while others are produced in the U.S. and Europe. I suspect most of their sub-$3k lathes are made in China, and maybe Taiwan. Those designs look very similar many other sellers of Chinese lathes, so they possibly come out of the same factory but with differing quality control standards. Chinese made lathes are no longer 'bad'.... they have upped their game, but rejects plus poorer quality control units can end up in the direct sales route. I would buy from a USA supplier (eg 'Grizzly' or The Little Machine Shop) since they will have already taken care of import admin etc. They can also deliver quicker from USA based stock, provide local Support (...most definitely not to be underestimated) and a wide range of accessories, again usually from stock. I'd avoid Amazon/eBay kit. You mentioned $3k as being a bit too high but if you buy a $1.5k lathe, say, you can expect to eventually spend at least that same amount on tooling and accessories....it's one of the laws of nature I'm afraid 😉 I have a lathe similar to the Grizzly G0765 - https://www.grizzly.com/products/grizzly-7-x-14-variable-speed-benchtop-metal-lathe/g0765 Mine's runs a 3" 3 jaw chuck (and collets, as Wefalck recommends) , has a 3.5" swing, 0.5HP brushless motor and quick release tailstock. I make metal model engines on it. You'll need a little space either end of the lathe for gearing access and tailstock wheel handling, plus a few inches behind it. Oh, and don't forget to get a light...I use a flexible Ikea clip-on one. Good hunting. Richard -
Eric, As Paul and Keith have said, those are two very well done additions to your layout. Good stuff! The more I read of your build, the more I understand why folks build model railway scenes....there are so many different and interesting aspects to it. Richard
-
Eric, I should have looked back at your tunnel pics in post #78.... the smoke staining is obvious. Yes, agreed, an open countryside, rural town is much less likely to suffer from smoke staining. Richard
-
Eric, Good new building and gravel innovation. Keep 'em coming. I was wondering if the smoke stacks would cause any discolouration of the wooden buildings and tunnel entrance. In the UK, due to coal fires to heat homes, power industry and railway lines/junctions, many UK cities with stone buildings were almost black in colour...it was very bad. In the 1960s or so steps began to clean up those buildings. Lungs were a different matter ;-( Richard
-
Valeriy, Good ideas. Richard
-
Richard, Those steam engines and settings are superb. Thank you for the link to the video of the working models and of David's methods.. Richard
-
Giorgio, What a great project. I'll follow from now on. Commander Piedrabuena had a very full life and seemed to want to help his fellow humans at every opportunity. Is this novel based on his adventures?.... Piedra Buena: Un Capitan Respetable, Historical Novel - https://www.amazon.com/Piedra-Buena-Respetable-Historical-Mastroscello/dp/9871468318 Thanks, Richard
-
Eric, The Inman & Sons building looks great. Your comment about the Sign's lettering size got me wondering if American 'shop fronts' also included the products sold (eg furniture) on the front signage, as well as the proprietor's name? Googling that thought for some imagery .... https://www.google.co.uk/search?lr=&sca_esv=b4f5d26490e949a3&as_qdr=all&udm=2&fbs=AIIjpHxU7SXXniUZfeShr2fp4giZ1Y6MJ25_tmWITc7uy4KIeioyp3OhN11EY0n5qfq-zENwnGygERInUV_0g0XKeHGJRAdFPaX_SSIJt7xYUfpm-75lA8Uar42yNWdqGuJlUAnl4VoyIc9TvIZo00AnzLuo73CKalUXQ8cWgmottQs4BXh0bU9aRqLPpzWejdabGFvk-MuP83mUuK41Ro6dMLX7Czip9A&q=19th+century+shop+front+american&sa=X&ved=2ahUKEwj99Mupl-qPAxXPQkEAHbyIPHwQtKgLegQIFxAB&biw=1376&bih=731&dpr=1.4 ...seems to produce a 50:50 split....some did, some didn't. That might possibly be related to whether or not the business was public facing or 'business to business' ... or both eg public facing needs to suck in passing trade so giving as much useful info as possible in the sign is a big help. Whereas B2B doesn't need that. Richard
-
Eric, Thanks for the very detailed explanations of the logistics behind the both the actual and model railways. I can see why it grabs folks as a hobby. Richard
-
Eric, Thank you for all that info....there is a lot going on. I imagine the person (or office) that collected all the data to produce the Waybills was very important and crucial to smooth, efficient running of the railway. Some questions - How did that office communicate with other remote regional offices to know what deliveries to expect etc? Or was there one central 'waybill office' per region? Did Telegraph enable the first Waybill usage or were Waybills initially carried on the trains? I think that a casual bystander like me only ever sees the tip of the iceberg regarding 'railways workings' - the same can be said of all professions I imagine. So thank you for giving a very insightful look at what is happening below the surface. Richard
-
Eric, Not being a model railway enthusiast this is all new to me but nonetheless fascinating and a bit complex. I'll re-read these posts to let it properly sink in. The diagrams and pink cards add a whole new dimension to it all. The last pic of the train passing through the bridge is quite picturesque. A very interesting build log....keep it coming 😉 Richard
-
Wefalk, Yes, a lot of the bigger flywheel'ed engines did run in a pit. And some modellers have built their Stuart Beams in to 'pit scenarios' with brickwork, railings, proper flooring etc. But my simplistic layout took the easy route 😉 Richard


