Rik Thistle
-
Posts
876 -
Joined
-
Last visited
Content Type
Profiles
Forums
Gallery
Events
Everything posted by Rik Thistle
-

Scrappee Liaison by chadwijm6 - Microaces - RADIO
Rik Thistle replied to chadwijm6's topic in Non-ship/categorised builds
James, That's a really good insight in to the product. I'm also looking forward to how you wire in the electrics, battery choice etc. Any RC stuff I've done in the past was off-the-shelf, so need to learn the construction side. Richard -
The African Queen. My First Listing and First build here.
Rik Thistle replied to a49kid's topic in New member Introductions
Welcome Wayne, Following your build with interest. Richard -
Scrappee Liaison by chadwijm6 - Microaces - RADIO
Rik Thistle replied to chadwijm6's topic in Non-ship/categorised builds
It's made from Depron which is an extruded polystyrene foam. Thanks James....will have a read up on the products. I'll follow your build with interest. Richard -
Scrappee Liaison by chadwijm6 - Microaces - RADIO
Rik Thistle replied to chadwijm6's topic in Non-ship/categorised builds
James, As OC says, that looks very interesting. Am I right in thinking the fuselage etc is plastic card rather than paper? I do have an RC Tx/Rx stashed away from when I had a go at flying RC helicopters (...not terribly well), so Scrappee could be one for the future 🙂 Thanks for sharing. Richard -
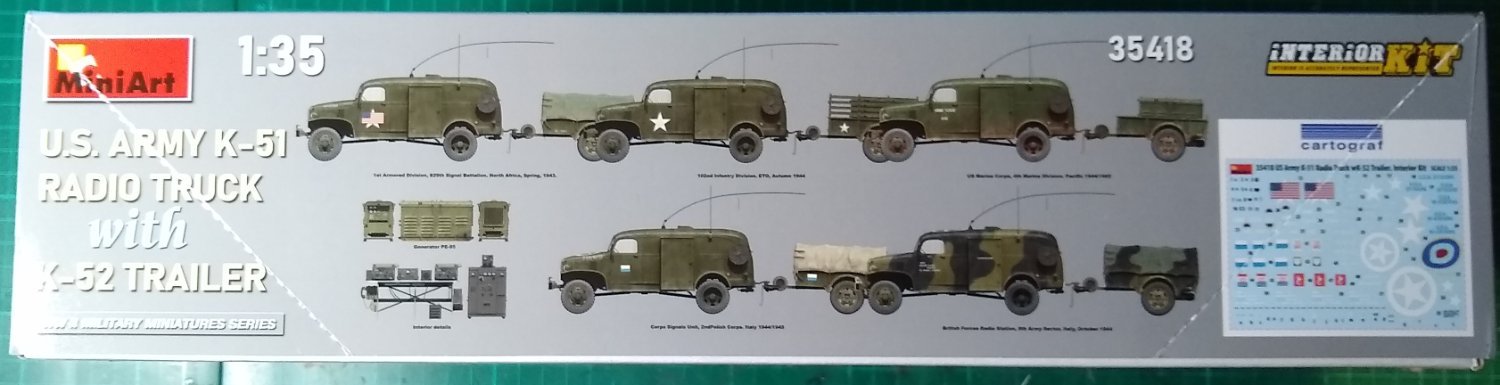
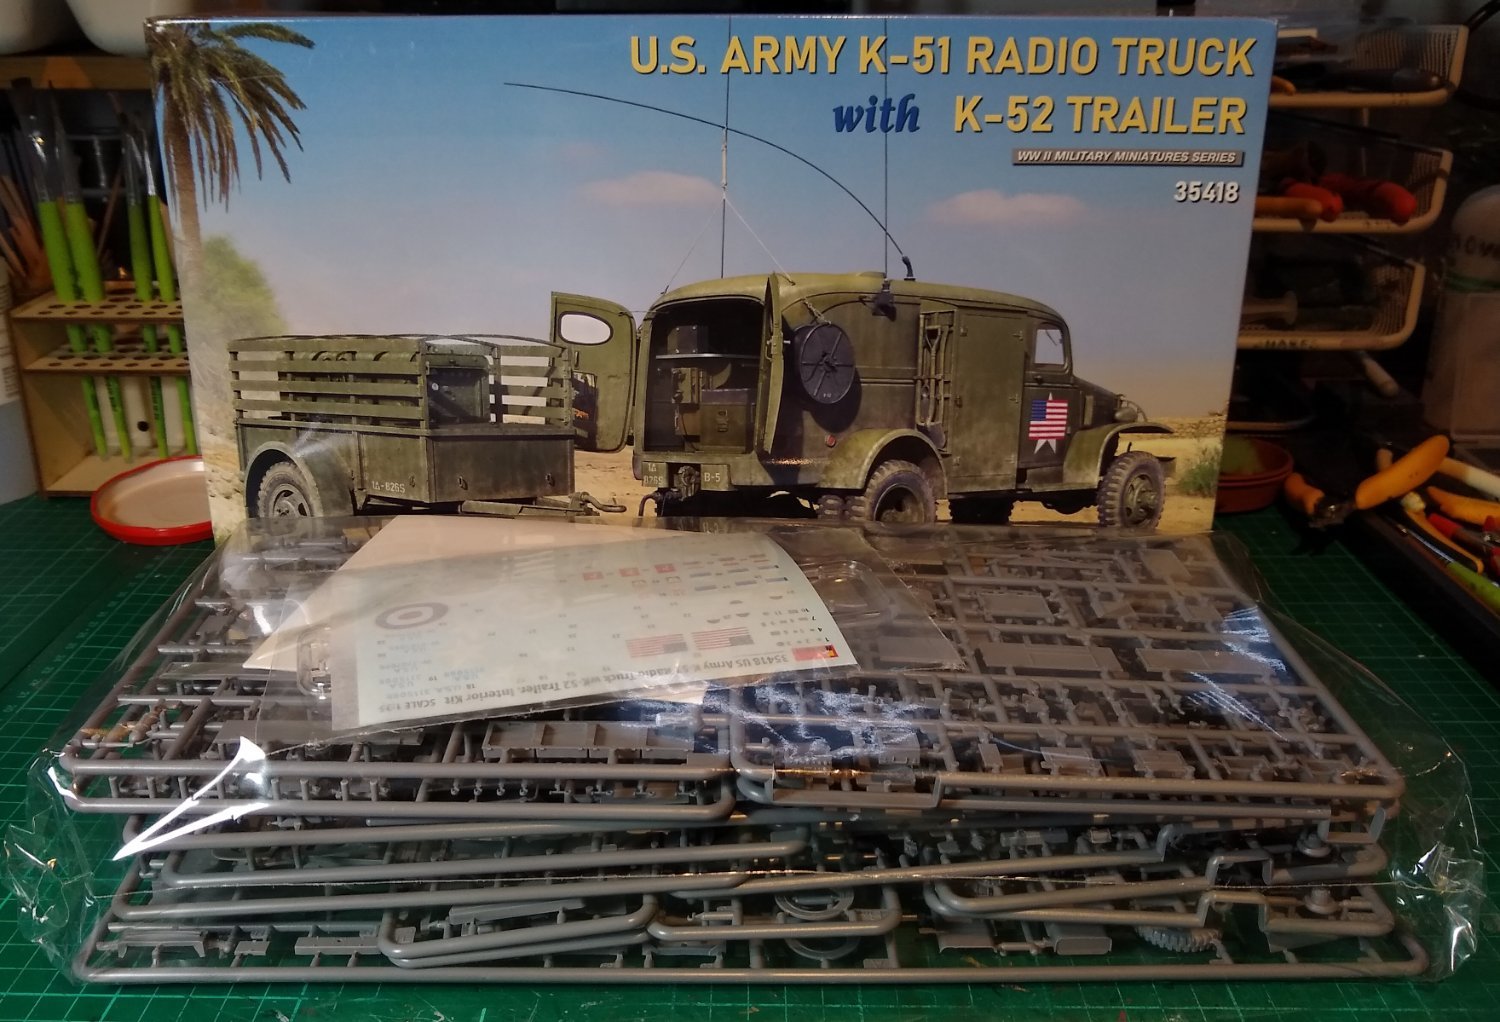
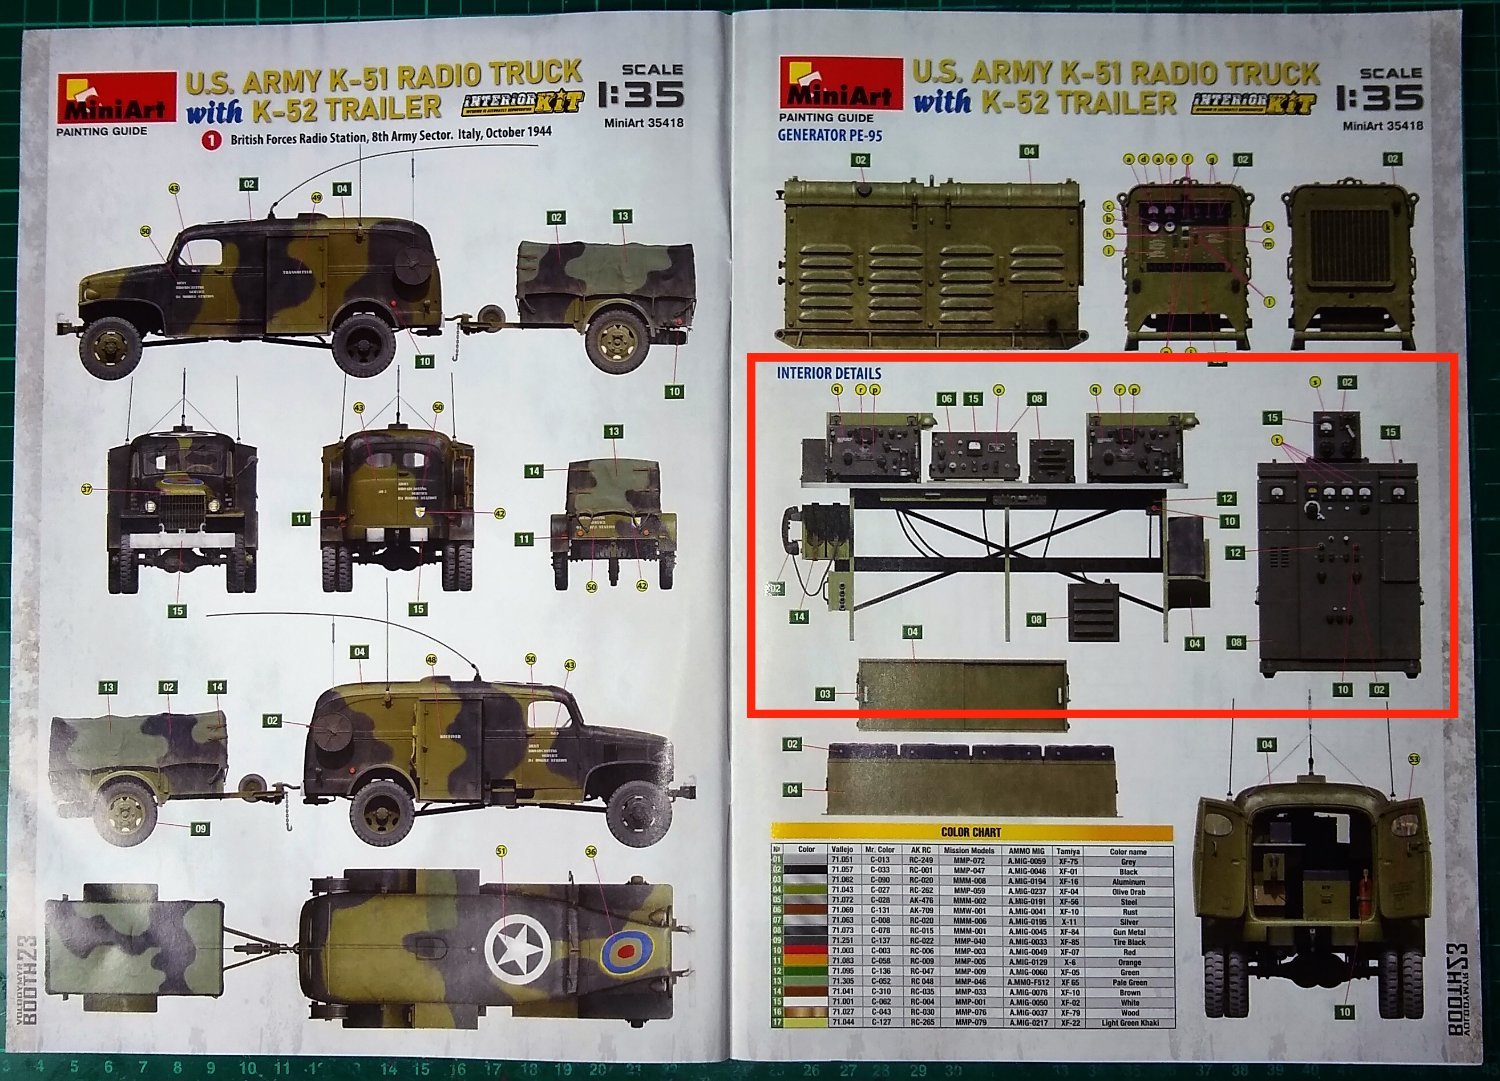
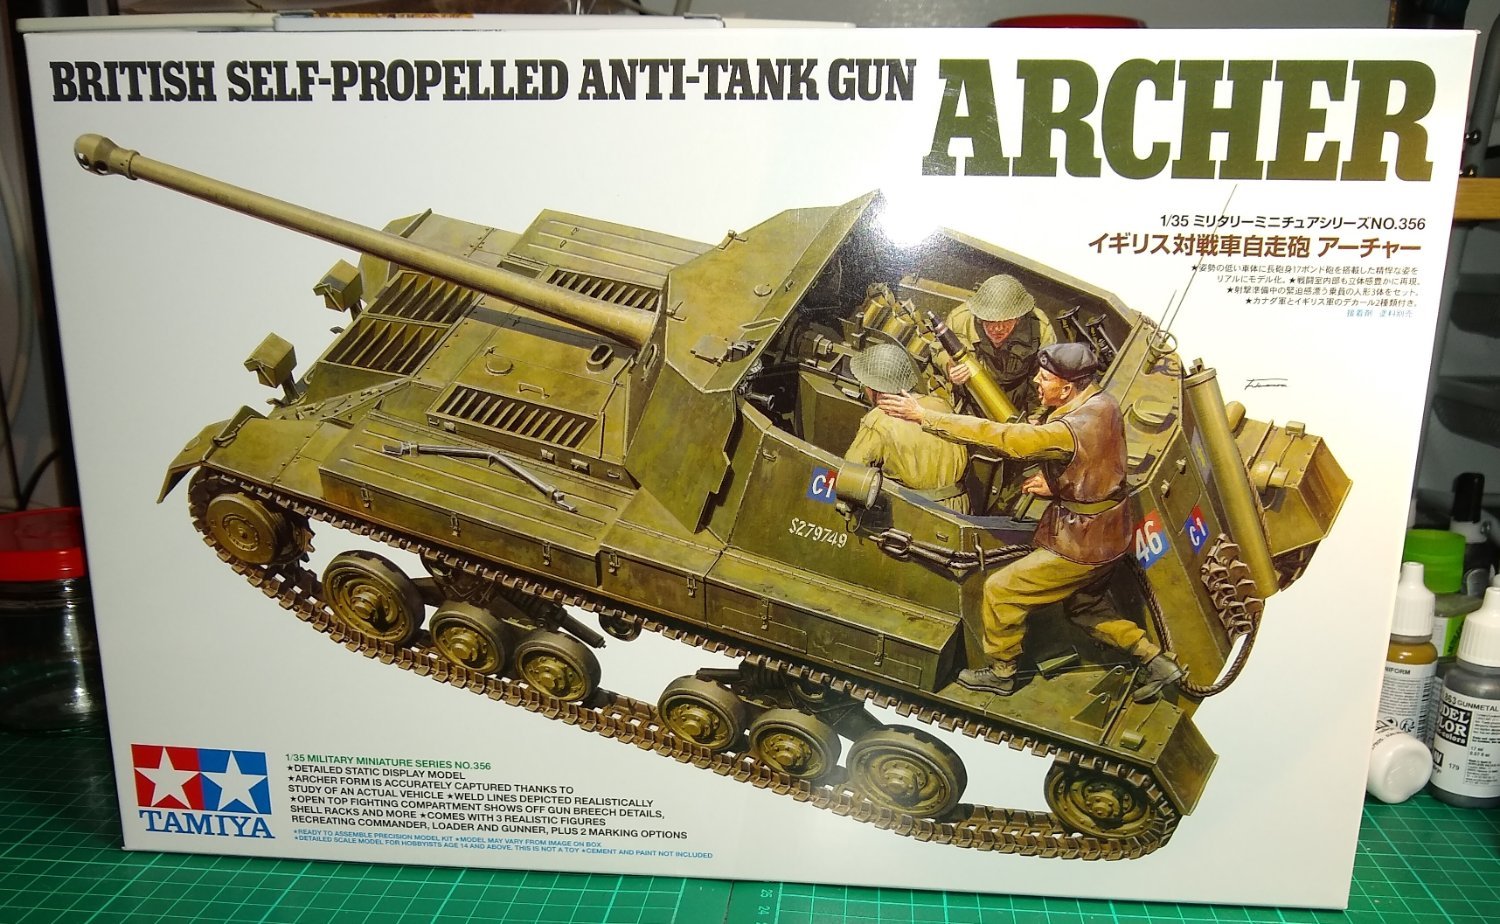
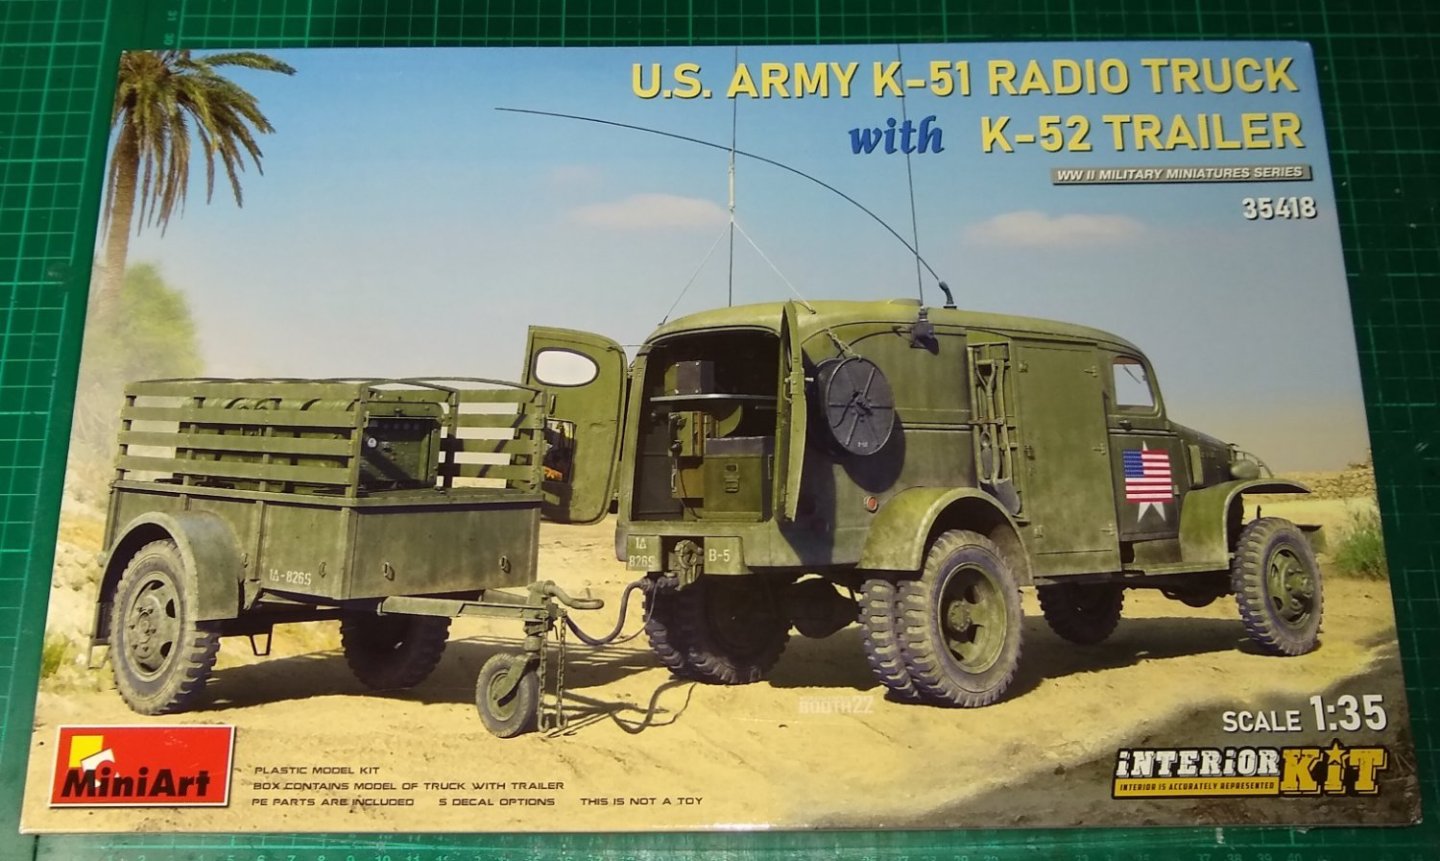
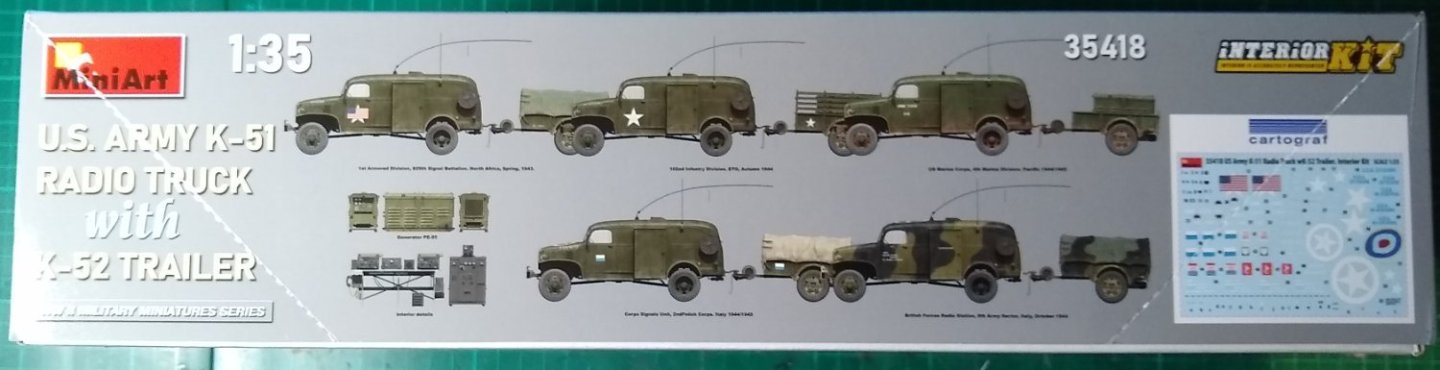
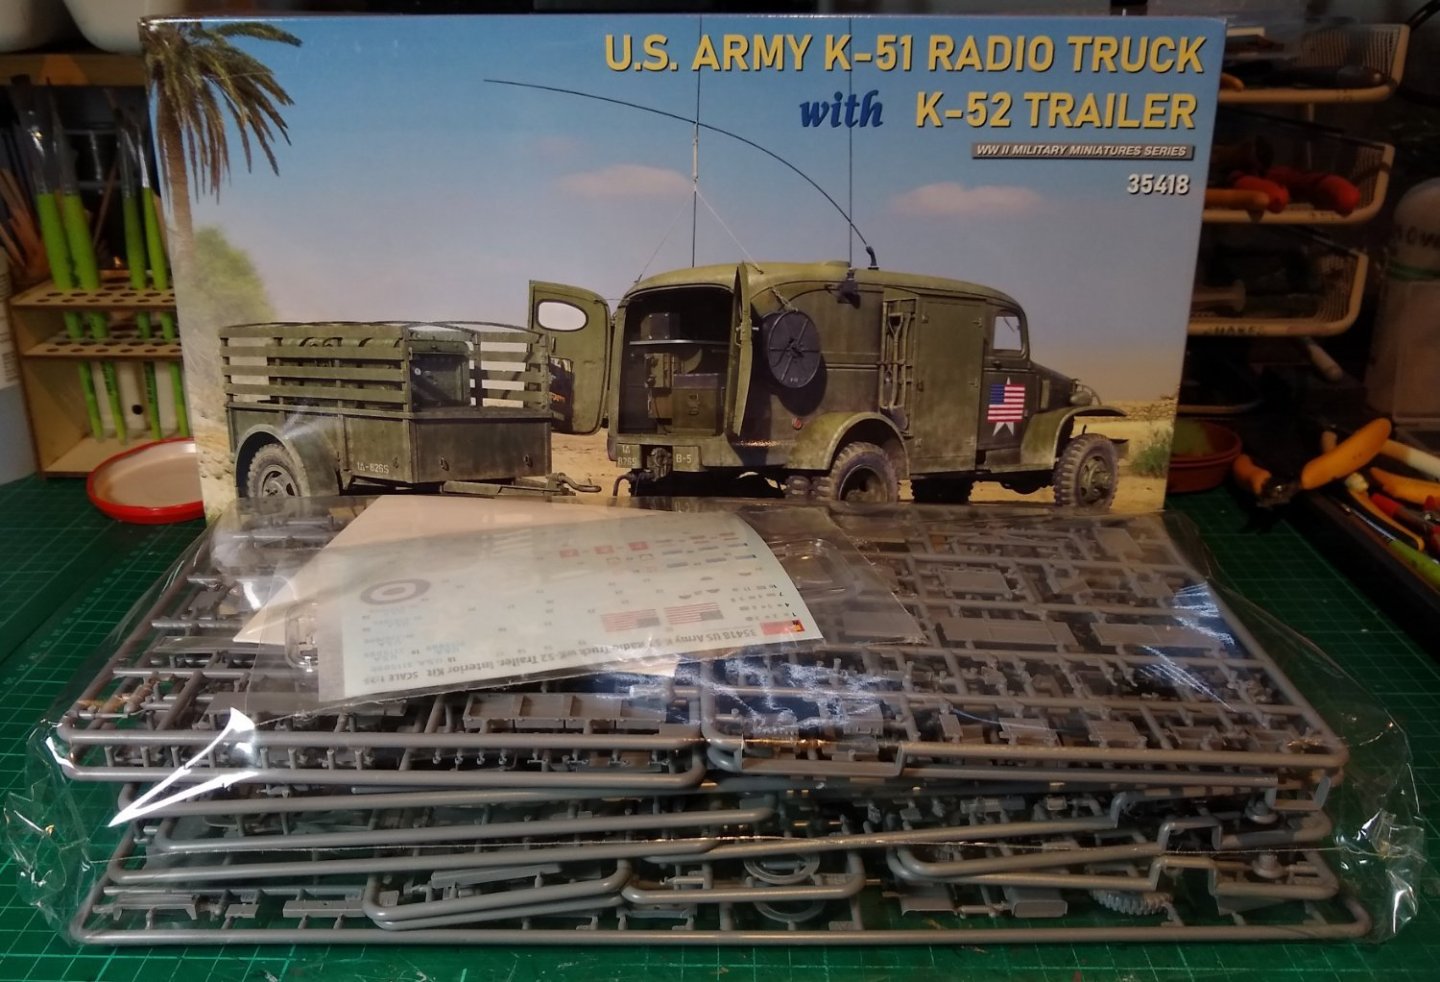
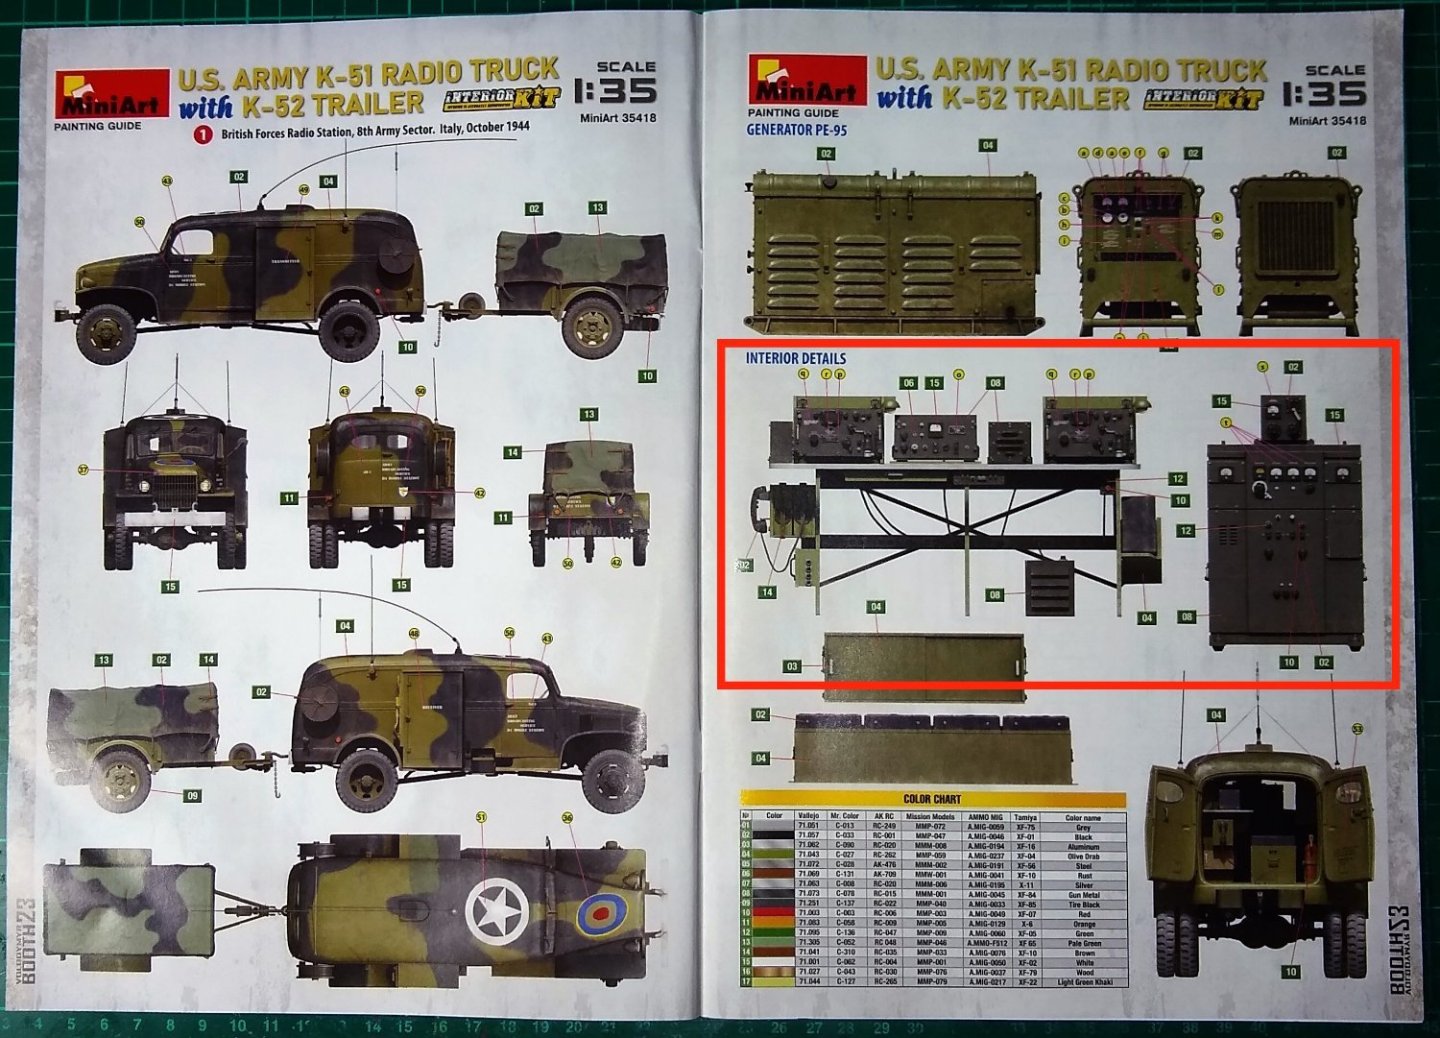
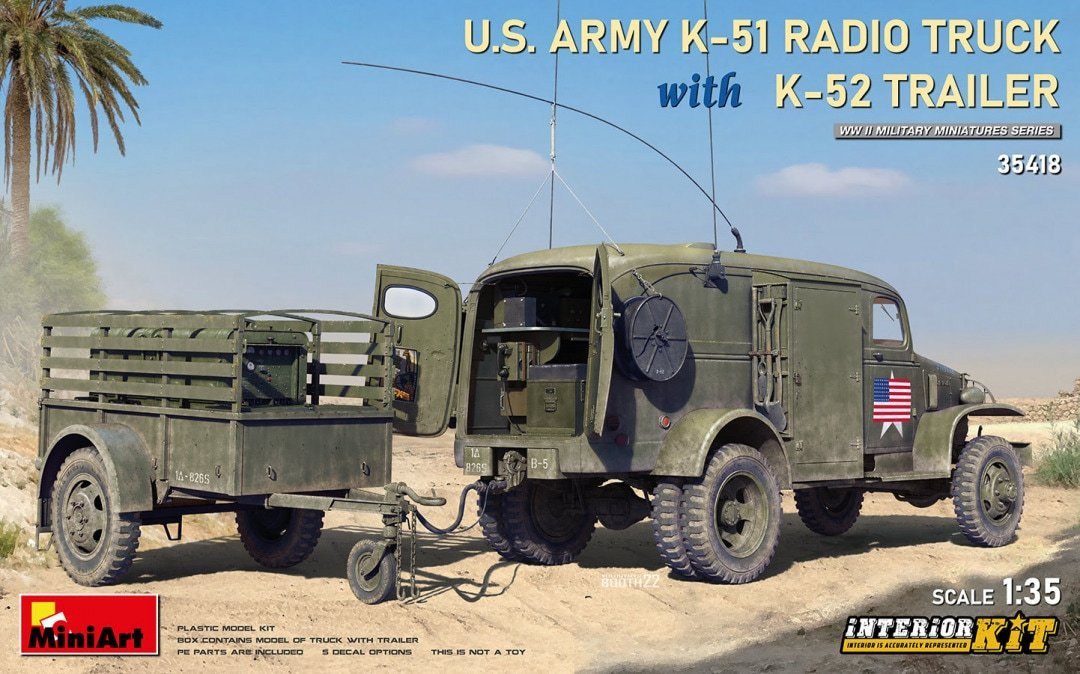
Hi all, This is my build of the Chevrolet based K51 radio truck model made by MiniArt .... https://miniart-models.com/product/35418-us-army-k-51-radio-truck-with-k-52-trailer-interior-kit/ The blurb on the MiniArt radio truck page says... "HIGHLY DETAILED PLASTIC MODEL KIT, PHOTO-ETCHED PARTS INCLUDED, CLEAR PLASTIC PARTS INCLUDED,DECAL SHEET FOR 5 OPTIONS, K-52 TRAILER WITH POWER UNIT PE-95 ARE INCLUDED,RADIO SET SCR-299 INCLUDED, DOORS CAN BE ASSEMBLED IN OPEN OR CLOSED POSITION, HIGHLY DETAILED ENGINE COMPARTMENT, TRANSMISSION, BRAKE, STEERING SYSTEMS ,HIGHLY DETAILED PLASTIC MODEL KIT"... OK, fine 😉 Reliable radio communication was arguably the most important technology used in WWII. And, as usual with war technologies, the science was forced to move forwards quickly. First a couple of pics of the box art. Below is the truck plus it's generator trailer. There were a number of countries using the radio truck. Those countries were.... British Forces Radio Station, 8th army sector, Italy, October 1944, Corps Signals Unit, 2nd Polish Corps, Italy 1944/1945, 1st Armored Division, 829th Signal Battalion, North Africa, Spring, 1943, 102nd Infantry Division, ETO, Autumn 1944, US Marine Corps, 4th Marine Division, Pacific, 1944/1945. Below, the large stack of parts that make up the model. Finally, a couple of pages from the rather thick manual. The red box on the second page indicates the meaningful part of the mobile unit, the radio equipments. I'm off now to do a lot more reading up on war comms and how and where the K51 was used. Back soon'ish. Richard
- 43 replies
-
- 15
-

-
James, An interesting and capable aircraft with a long pedigree. Looking forward to your build. Richard
-
James, That Spit looks ready to fly! Wonderful job. Richard
-
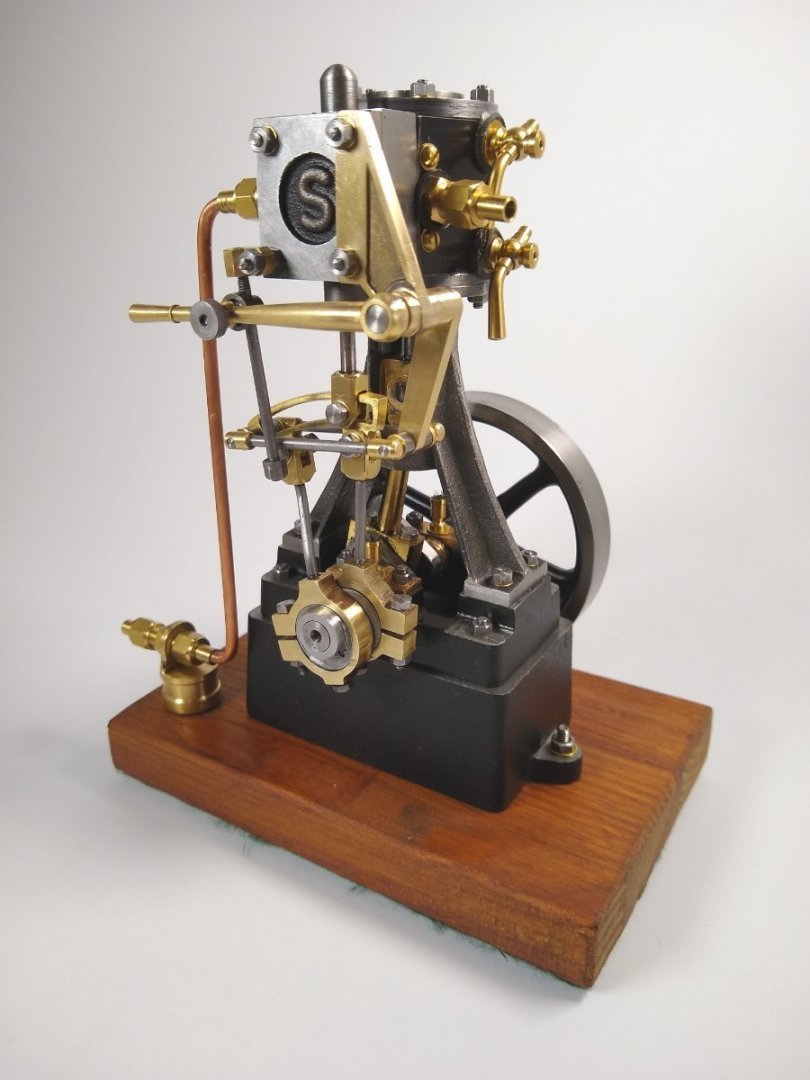
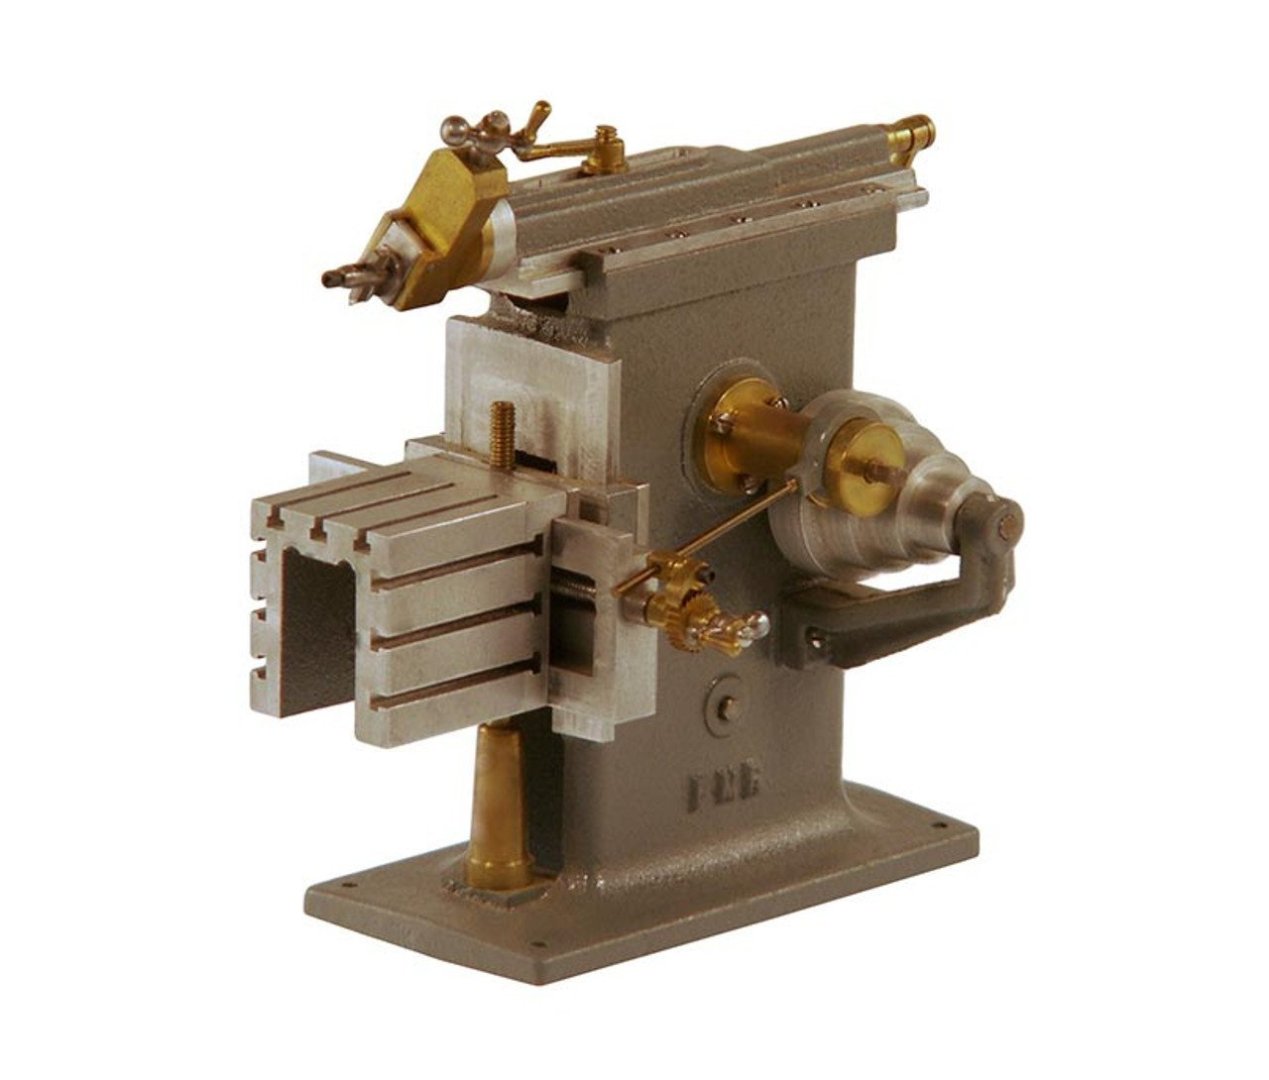
I've ordered the Comms truck ... U.S. Army K51 Radio Truck with K52 Trailer - https://www.scalemates.com/kits/miniart-35418-k51-radio-truck-with-k52-trailer--1459015 ...for indoors .... ...and will probably also order the PMR Shaper ...for the shed. (Edit: Now ordered). I'd have liked to get the Stuart oil pump but it is over £500 ($636) so it just a bit too rich for me at the moment. Richard
-
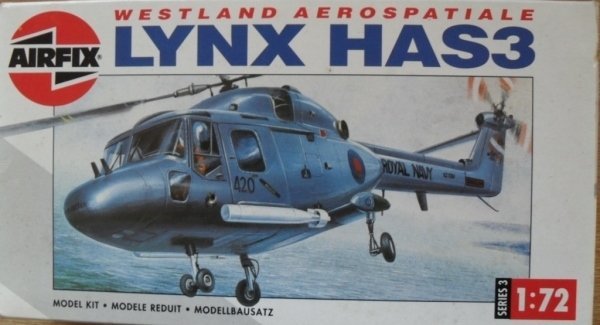
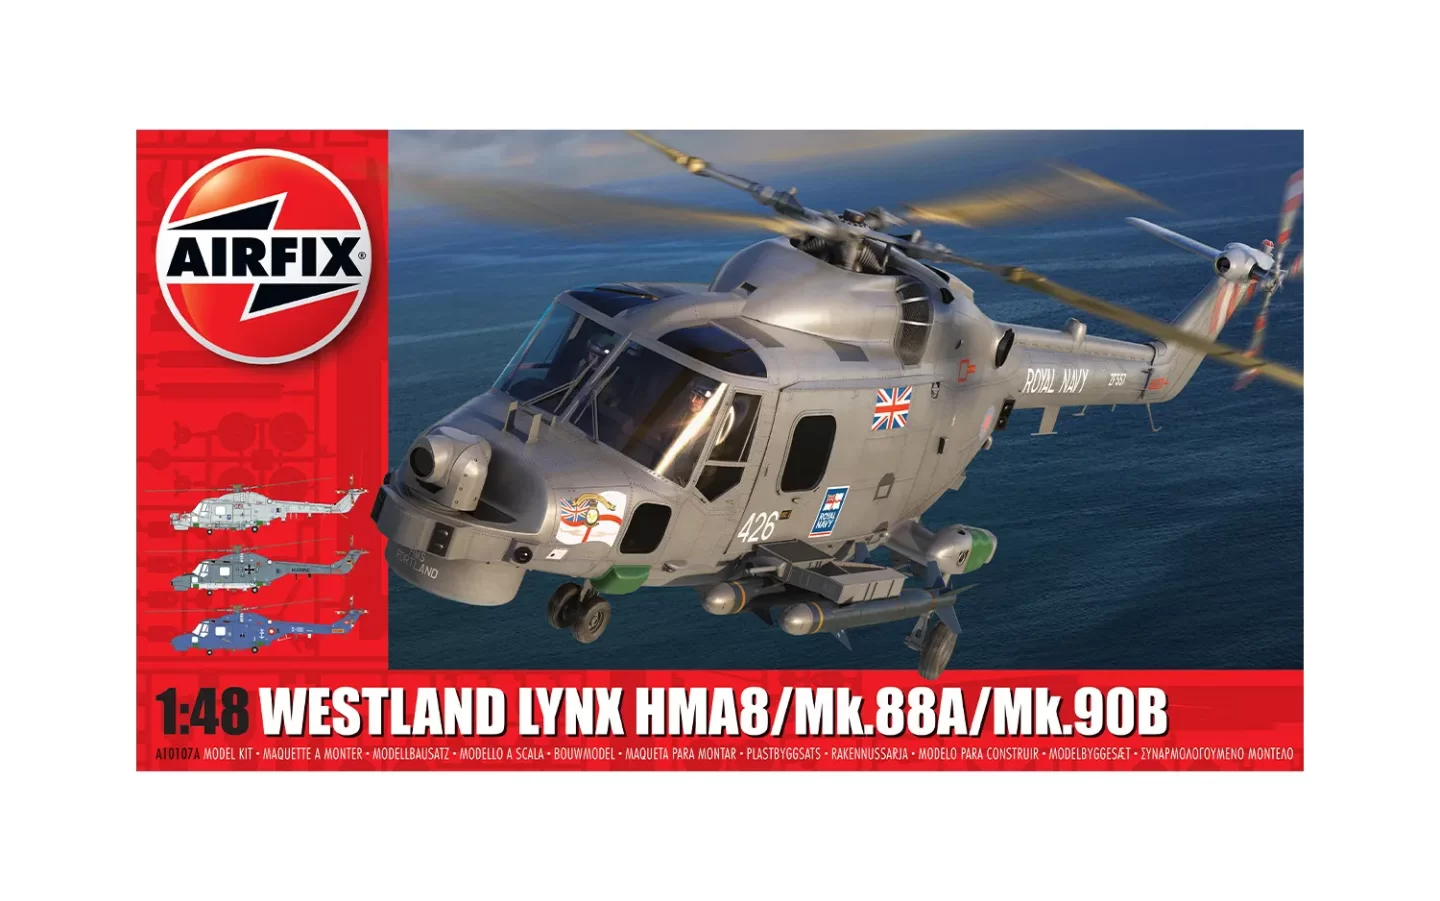
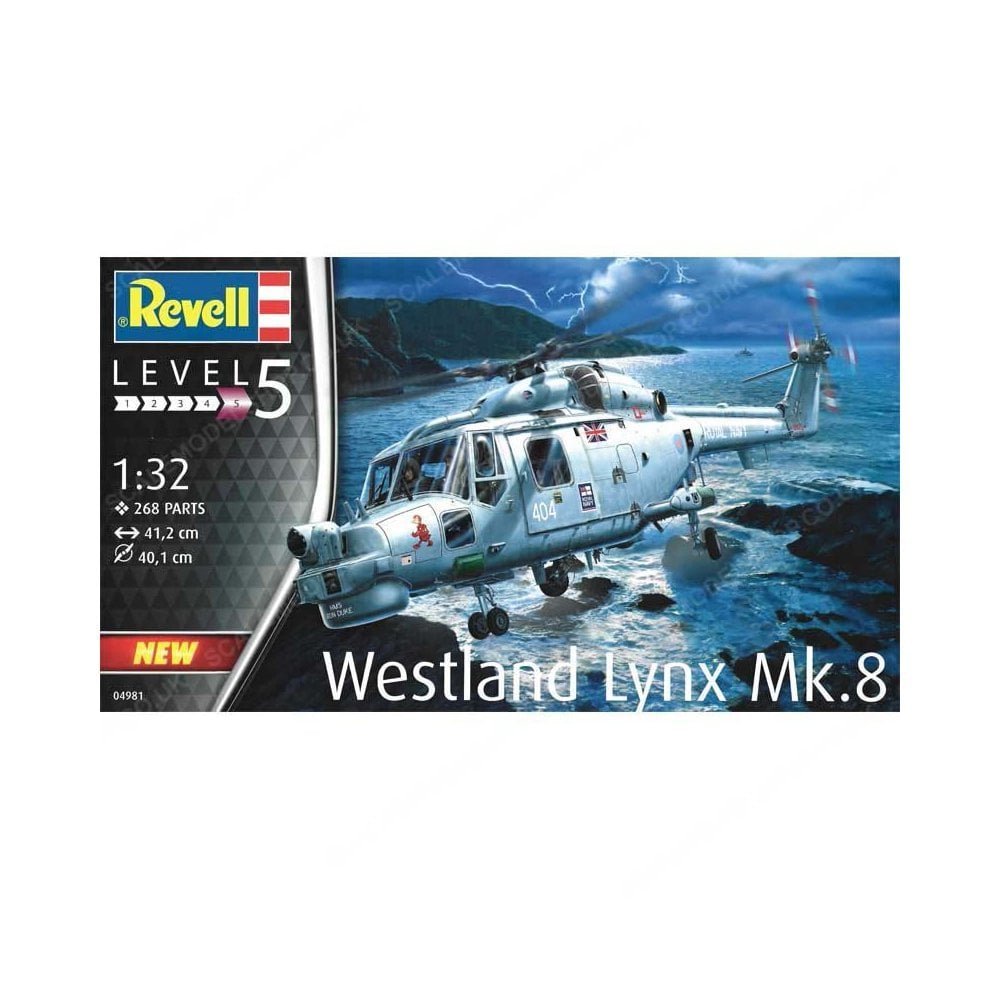
Will the pump be automated or static I do have a Stuart V10 steam engine that would be used to power it, even if only temporarily on the bench just to see it pumping. If I were to build a combined power source + pump scenario it would be quite a large size. Also, to be period correct, I believe the steam engine would be a horizontal one. Anyway, still thinking about the pump 😉 Yes, the Lynx is an interesting platform. It is used both by Armies and Navies.... Westland Lynx - https://en.wikipedia.org/wiki/Westland_Lynx I'd go for the Naval variant with a full sensor suite, and maybe with the Sea Skua missile (which used the nose radar for target illumination). There are a few makers of Lynx kits eg Airfix (1:72 scale) .... but I haven't researched which is best. I'll have my thinking cap on over the weekend....it's a fun part of the hobby deciding what to do next. Richard Edit: This Lynx with the 360 deg radar and at 1:48 scale may be a better bet.... https://uk.airfix.com/products/westland-navy-lynx-mk88ahma8mk90b-a10107a? 2nd Edit: The latest version of the Lynx is the AW159 Wildcat.... https://en.wikipedia.org/wiki/AgustaWestland_AW159_Wildcat It went in to service Aug 2014. It does look good. But there isn't yet a kit supplier for it - however there is a conversion kit available that upgrades earlier Lynx kits. If I did go for the Wildcat in the future I'd plan to do a scenario of it sitting on a flight deck. But all that is for sometime in the future, maybe 😉
-
Egilman, Alan, OC, Thanks for the comments and kind words. fastest way to permanently learn not to stand behind the cow. Ah, right...THAT danger 😉 But it did quickly become just part of everyday life - even the smell 'disappeared'. the Archer blends into the scene That was my intention....glad you like it. Like most things in life, nothing happens in isolation. This is a Great finish - really nice. As usual, when a build is finished the builder knows where all the skeletons are buried and what things should have been done differently. But it's a learning game 😉 I'm not sure what to do next.....scenarios do take up quite a bit of shelf space, and I need to get back to 'metalworking' in the shed....some random thoughts.... Oil Field pump (...I always found the American movies on the early oil business fascinating), Shaper (another one for the shed), Westland Lynx (been close to them a few times and worked on some of their contents), Comms truck (a vital part of the organisation). Maybe one for the shed (during the day), and one for the Study (in the evening). Thinking... Richard

-
learned not to stand around the back end Yes, first rule of farm life... the cow/horse/donkey can't afford the time to decide if you are a human or a mountain lion....kick first, ask questions later. I read somewhere recently, if a mule kicks at you and misses it was because he intended to miss. We used to build forts in the hayloft from the bales Yup, we were spoiled 😉 Not sure Dad appreciated his bales going out of shape, but he gave us enough slack to keep us happy. Richard
-
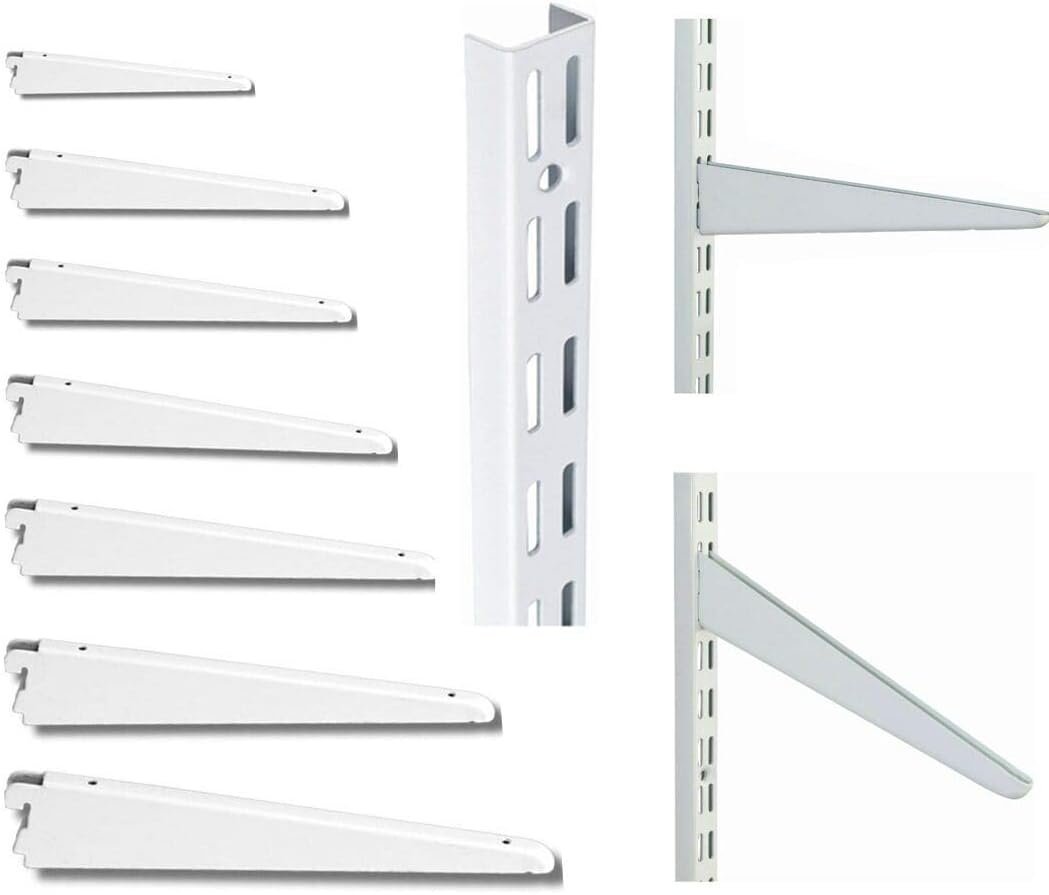
Andy, Egilman, Thanks for the feedback....much appreciated. A bigger shelf is a better idea I've got the type of adjustable shelving shown above...so there is still space for a couple of more shelves 😉 And Yes, the livestock frequently got in the way.... As kids on our farm we always found the cows as friendly, inquisitive animals. The Bull was a different story! Richard
-
Thanks Ken. It's now happily sitting on the Study shelf next to the Churchill tank. But shelf space is disappearing quickly....I might need to scale down! Richard
-
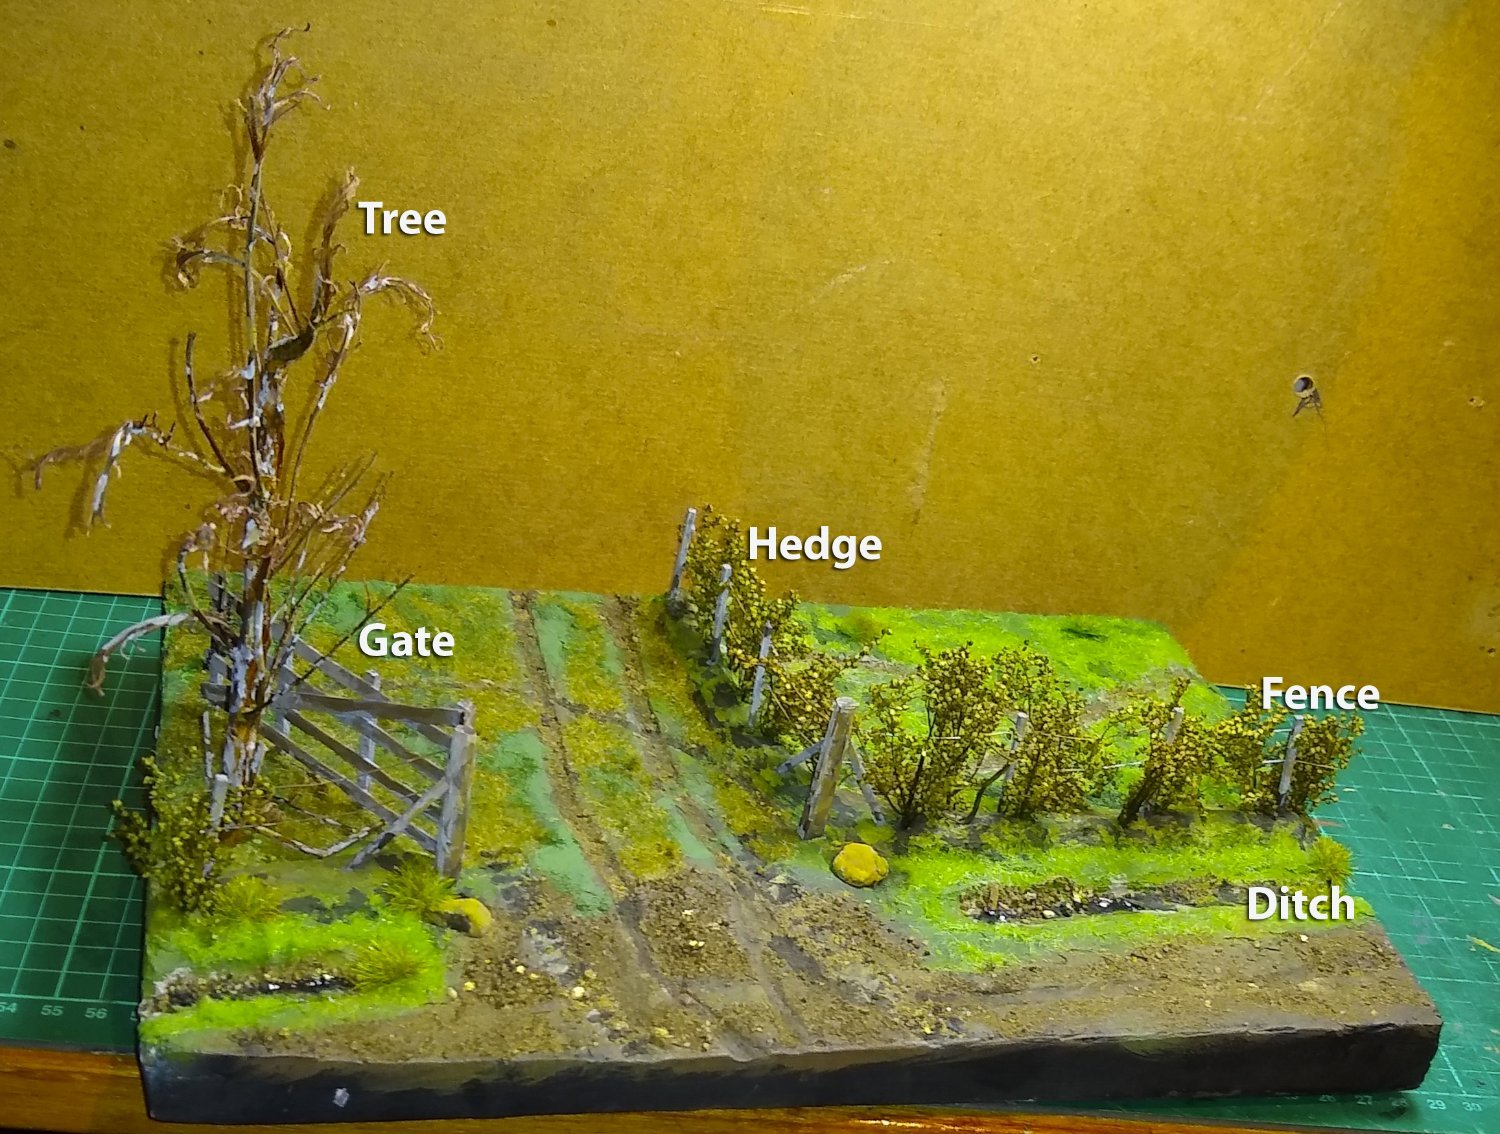
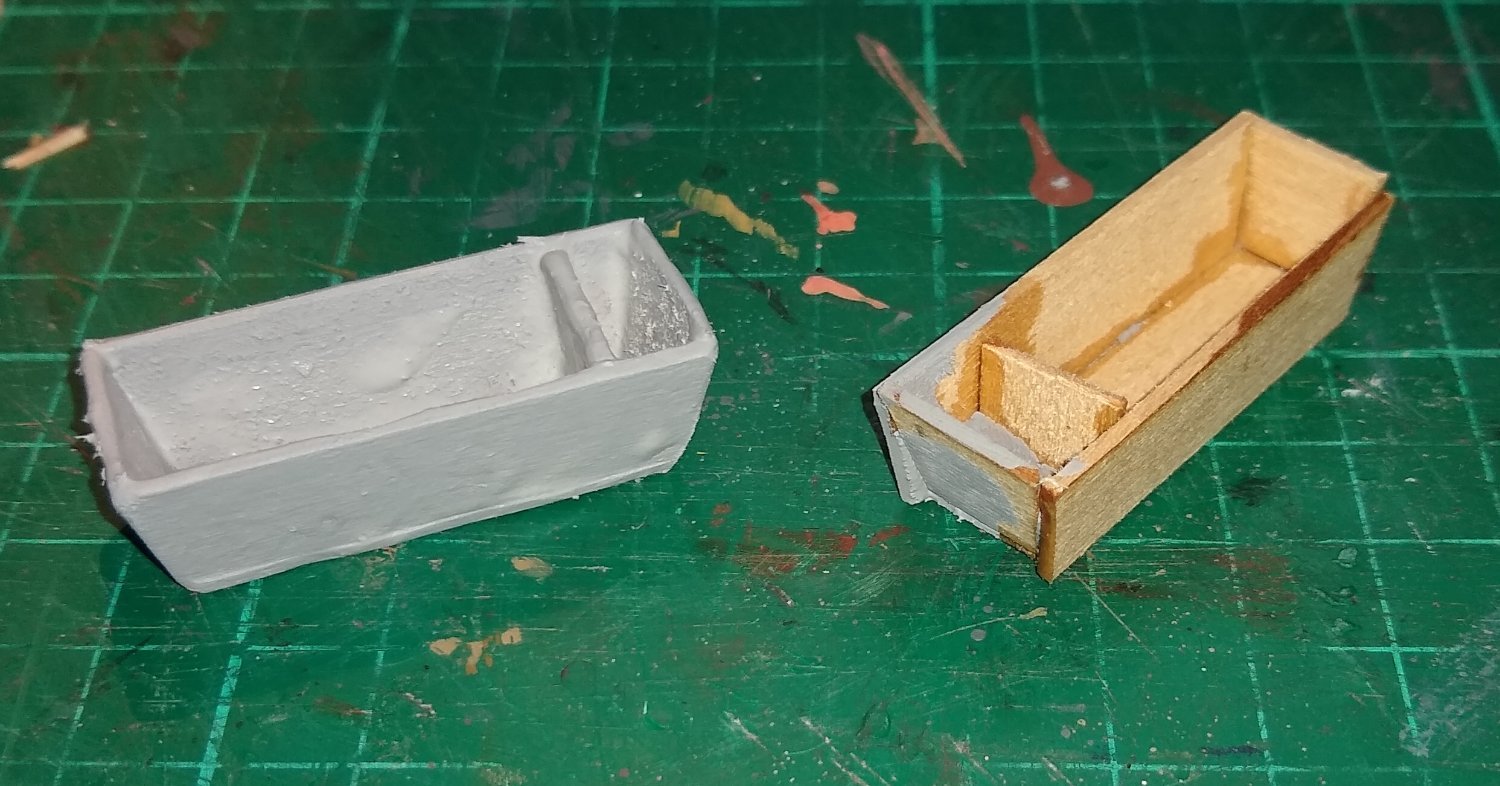
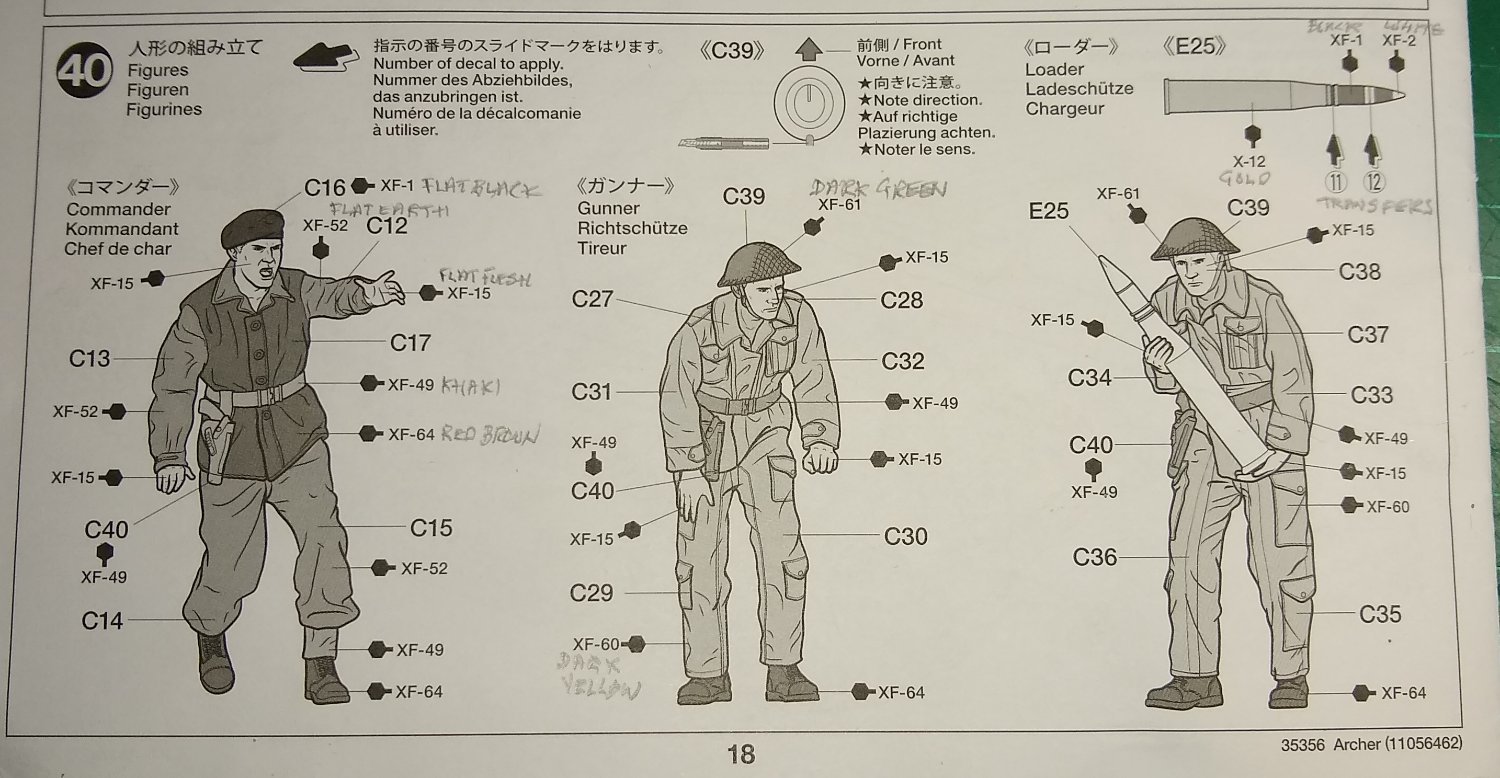
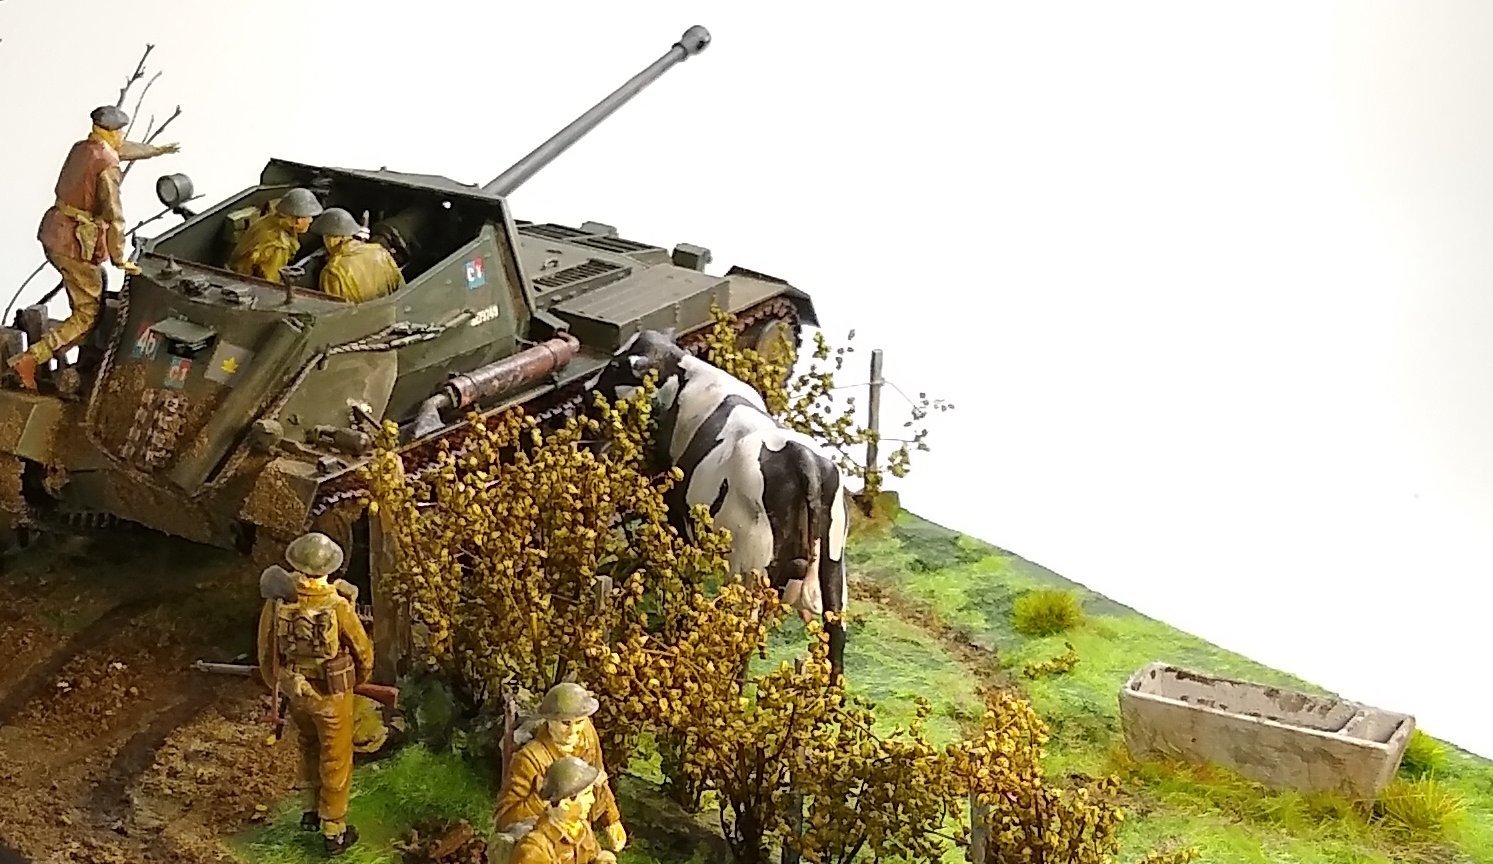
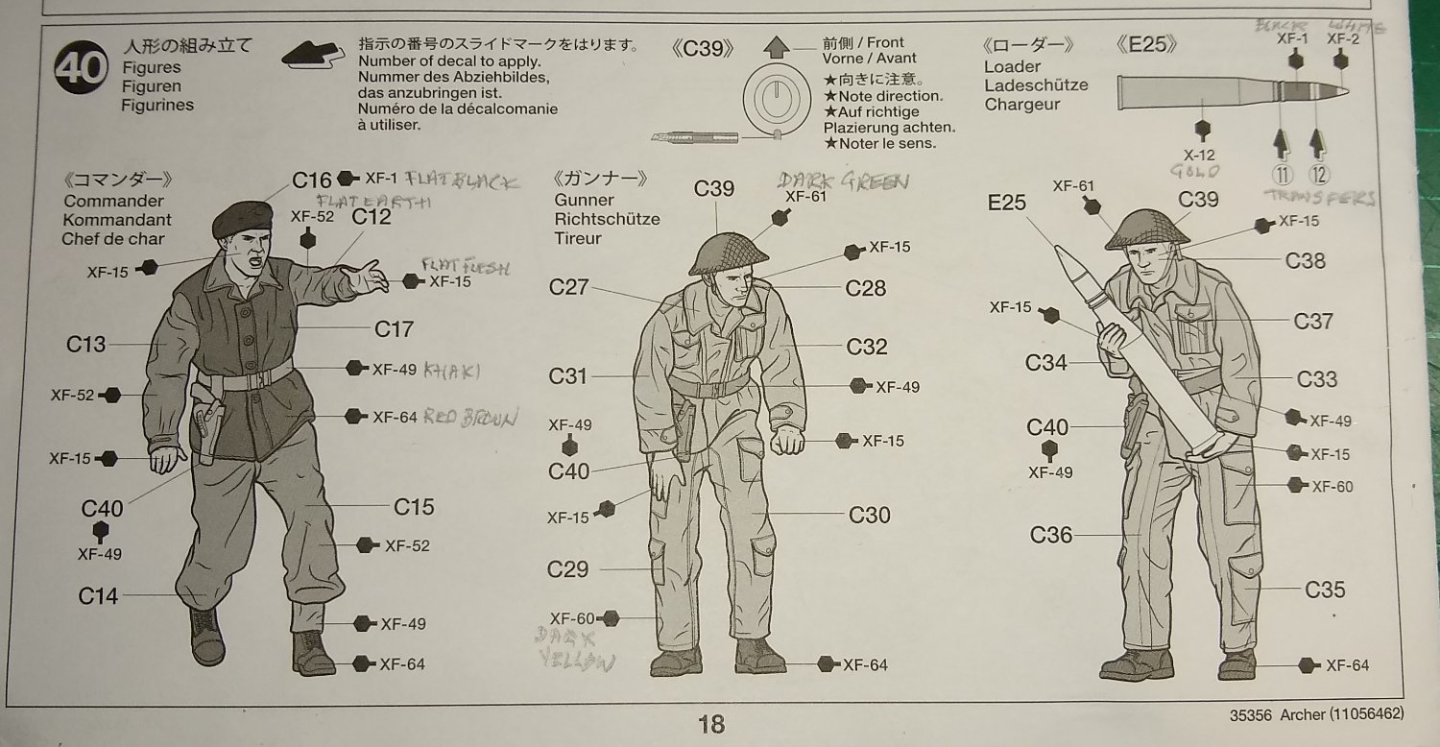
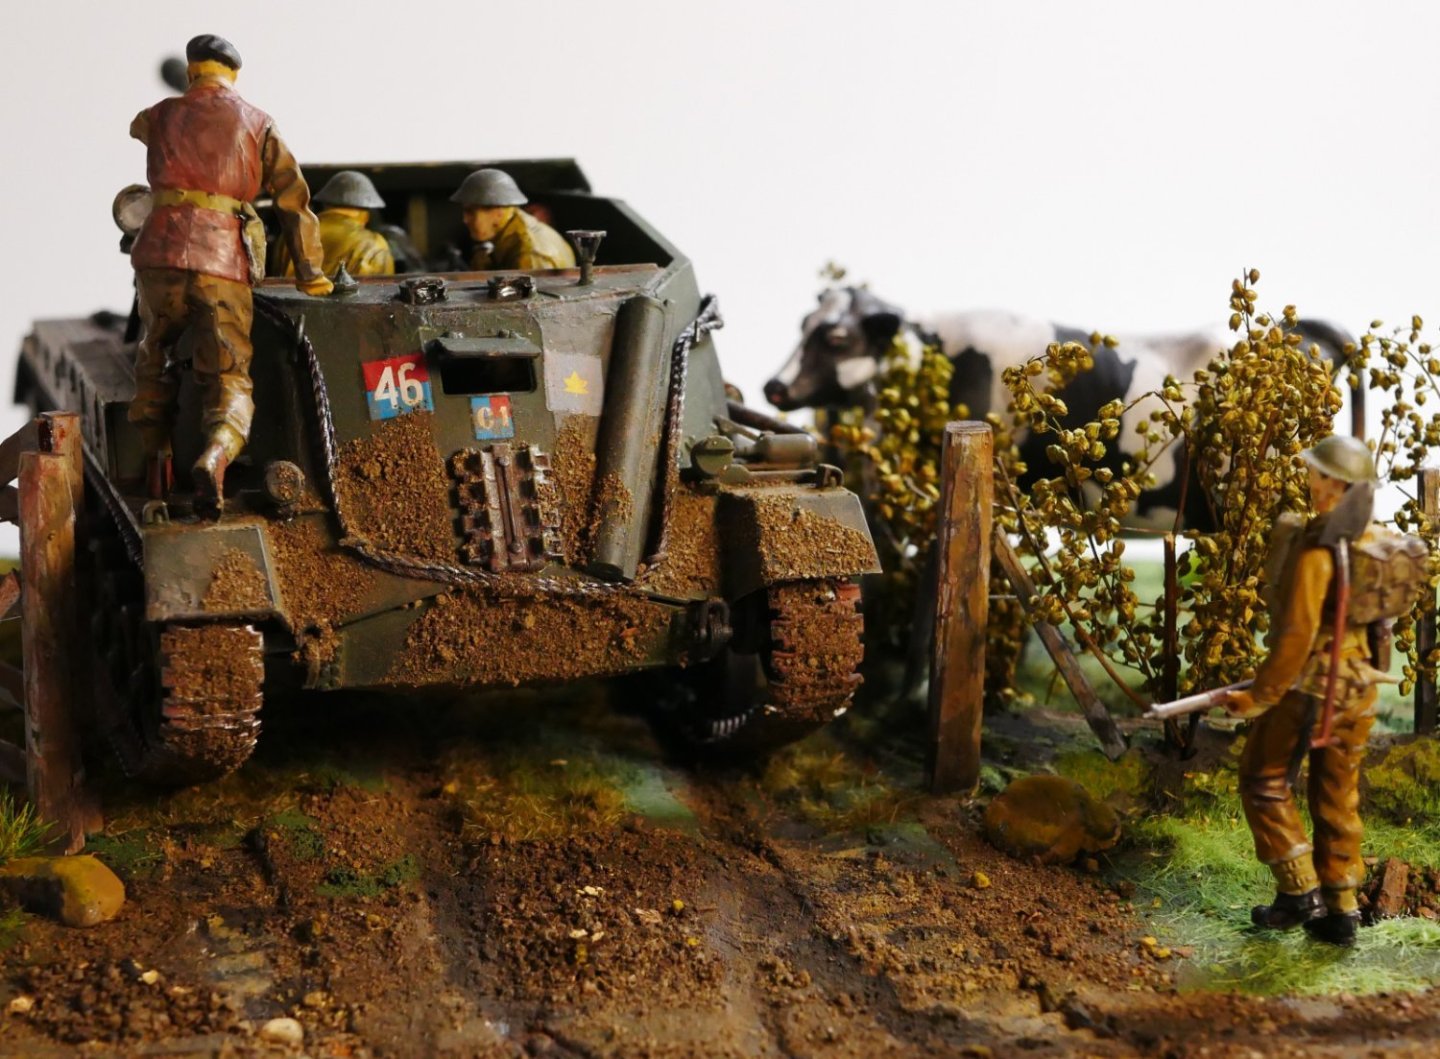
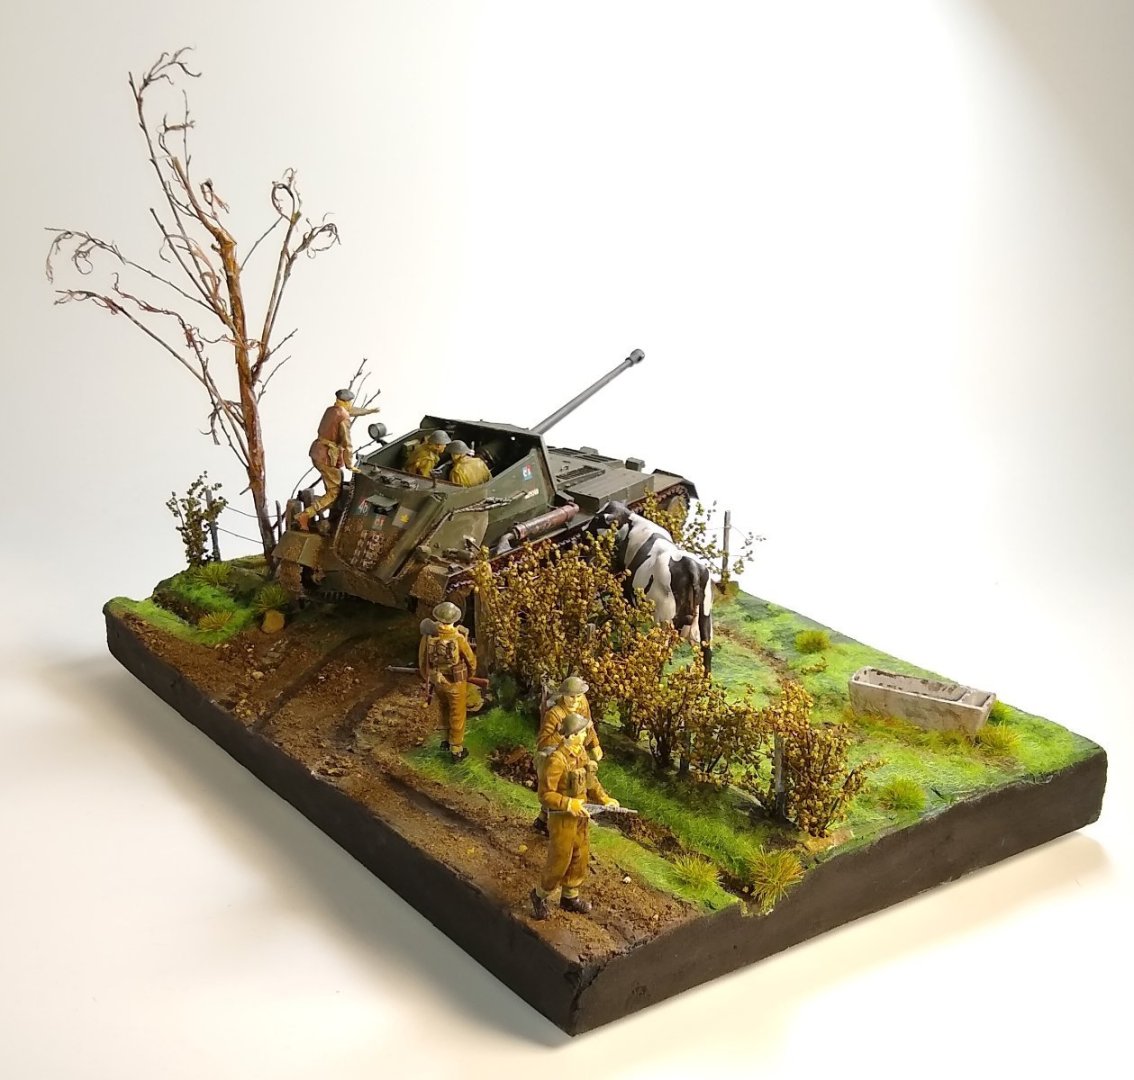
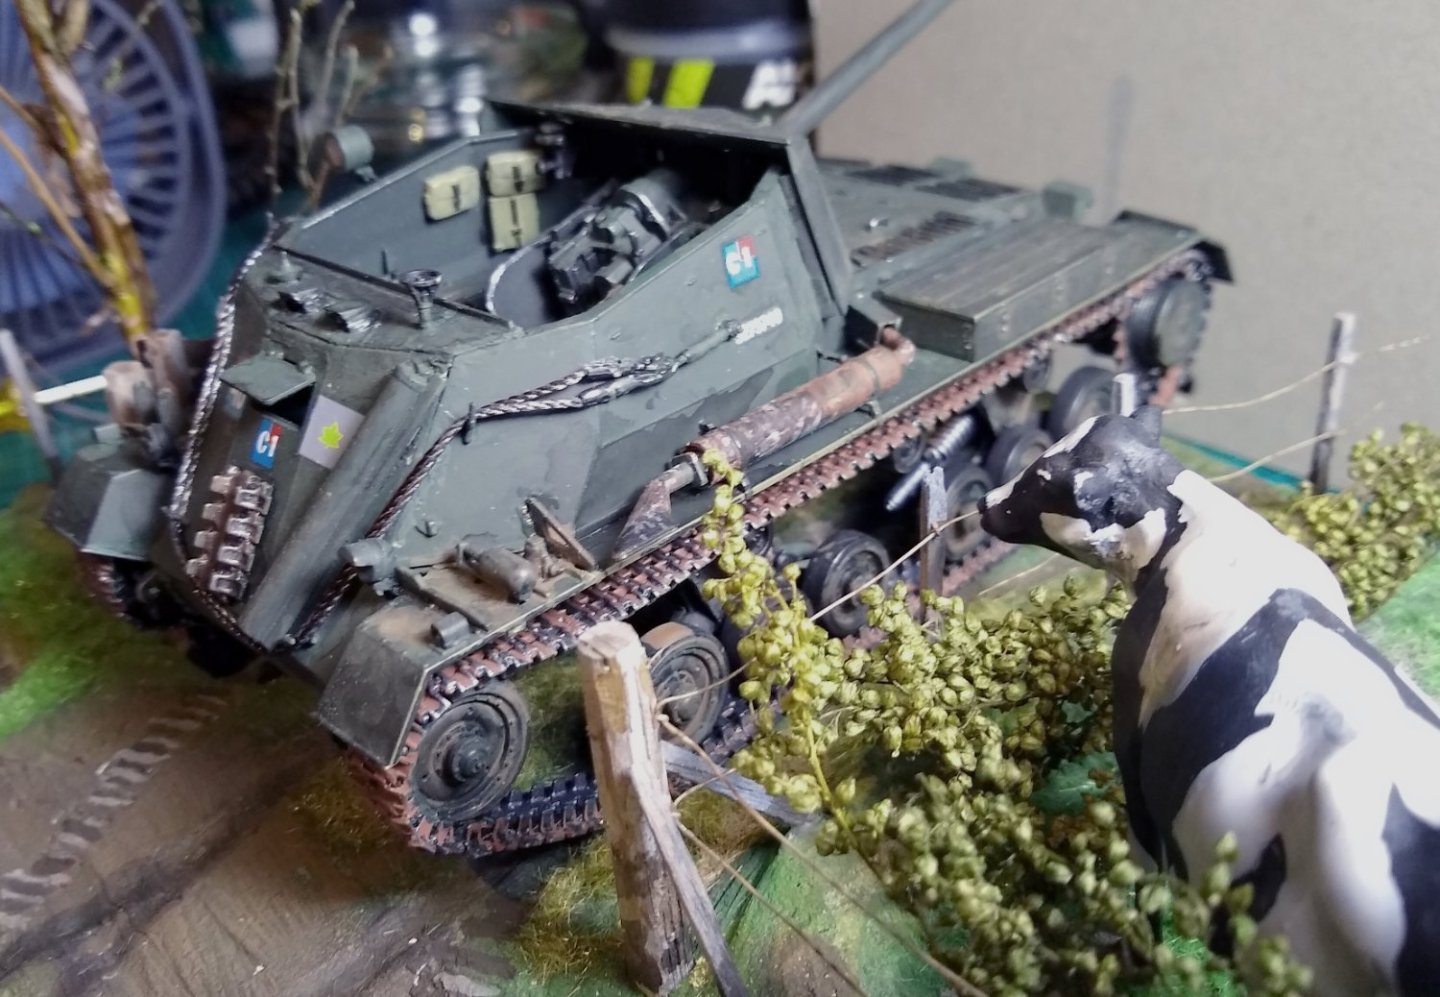
Hi all, This is my final update on the Archer scenario build. Firstly, another look at the Tamiya box art. For the scenario, I created a farm location somewhere in Normandy. A particular feature of that countryside is the thick hedges planted on raised banks, and ditches bordering most fields. The top right of the scenario was a bit bare so I made a concrete water trough for the cattle. Early prototype on the right, and a finished one on the left coated in slightly diluted AK Grey putty. A would later add some weathering to it. Below, the Archer crew painting details. I've just noticed that the box art shows black leather boots but the instructions call for Red Brown XF-64 paint.... ah well, too late now....the Commander has shiny red leather boots! Plenty (sieved and microwaved) garden dirt added to the rear (and front) of the Archer. Marguerite waits patiently for the 'tractor' to throw over some hay. Unfortunately for her, and some others about 1 mile away, it is not hay being delivered today! Cattle are generally curious animals and had a habit off staring at soldiers hiding in the hedgerows, and even wandering over to get a better look. The enemy found this a bit of a nuisance, to say the least. Below, the final overall scenario - the Archer has pulled in to the field to target the enemy, whilst not blocking the farm path. A passing infantry patrol has had a chat with the Canadians and are now departing. One infantryman wants to watch the first shell being delivered. This was an interesting build. Some of the Tamiya Archer parts were a bit more delicate than the Churchill tank parts, and it was a slightly more complex build. I think I prefer to see the 'machinery' in use in a typical setting - it gives context to purpose and effect on the local communities. I'm not sure what my next build will be...possibly back to the machine shop for another metal model as the warmer weather is showing signs of moving in 🙂 Finally, thank you all again for the Likes, Comments and perspectives (on what was a very difficult time for the world). I don't think a Build really works unless opinions and advice are shared. Take care, Richard


- 47 replies
-
- 14
-
-

-
Informative video about 18th Century Sailing Battleships
Rik Thistle replied to Peanut6's topic in Nautical/Naval History
Kev, That is a very informative video - thanks. There were so many different systems onboard that all needed to work together perfectly for those ships to operate the way intended. Quite an achievement. Richard -
What kind of Cutting Mat choose
Rik Thistle replied to Olaf's topic in Modeling tools and Workshop Equipment
I use a mixture of A3 and A4 matts fitted around my L-shaped desk.... something like this https://www.amazon.co.uk/gp/product/B001IOZUHK/ref=ppx_yo_dt_b_search_asin_title?ie=UTF8&th=1 ...but with a 3mm thickness. They last for years, although solvents and scraping can remove some of the 1cm guidlines over time. So I just rotate the matt by 180 deg to get a fresh working area. I don't recall ever cutting through one, but may have managed (when not concentrating) to drill some small holes through them. Richard -
top of the bales into the loose straw. Yes. And that was one of the safer activities 🙂 When I think about all the open machinery in those days (belts, gears), riding on the back of trailers, climbing farm buildings/trees etc.... I'm surprised we are are still here. But it did build up a strong 'risk assessment' instinct. The childhood was maybe not that different from being brought up in a town...it was just more easily accessible? Richard
-
Alan, Yes, run-ins with nettles was part of growing up ... Docken Leaves helped reduce the sting a bit. And barbed wire was just one of the many challenges we learned to navigate ...wish I could turn the clock back 😉 Just Googled it, and it seems you have nettles in Florida...I guess they grow just about everywhere. Richard
-
Thanks Alan, I was brought up on a farm - dairy, beef and crops....therefore have climbed over many gates and wiggled through many fences as a child. So have some vague recollection of how they looked. But most recent info has come from the web. As with many things, close examination soon reveals the flaws but from a distance it looks OK...and Marguerite and her herd seem to cope with it. But once the shells start going off, I hope she scarpers away from the fence rather than through it! Richard
-
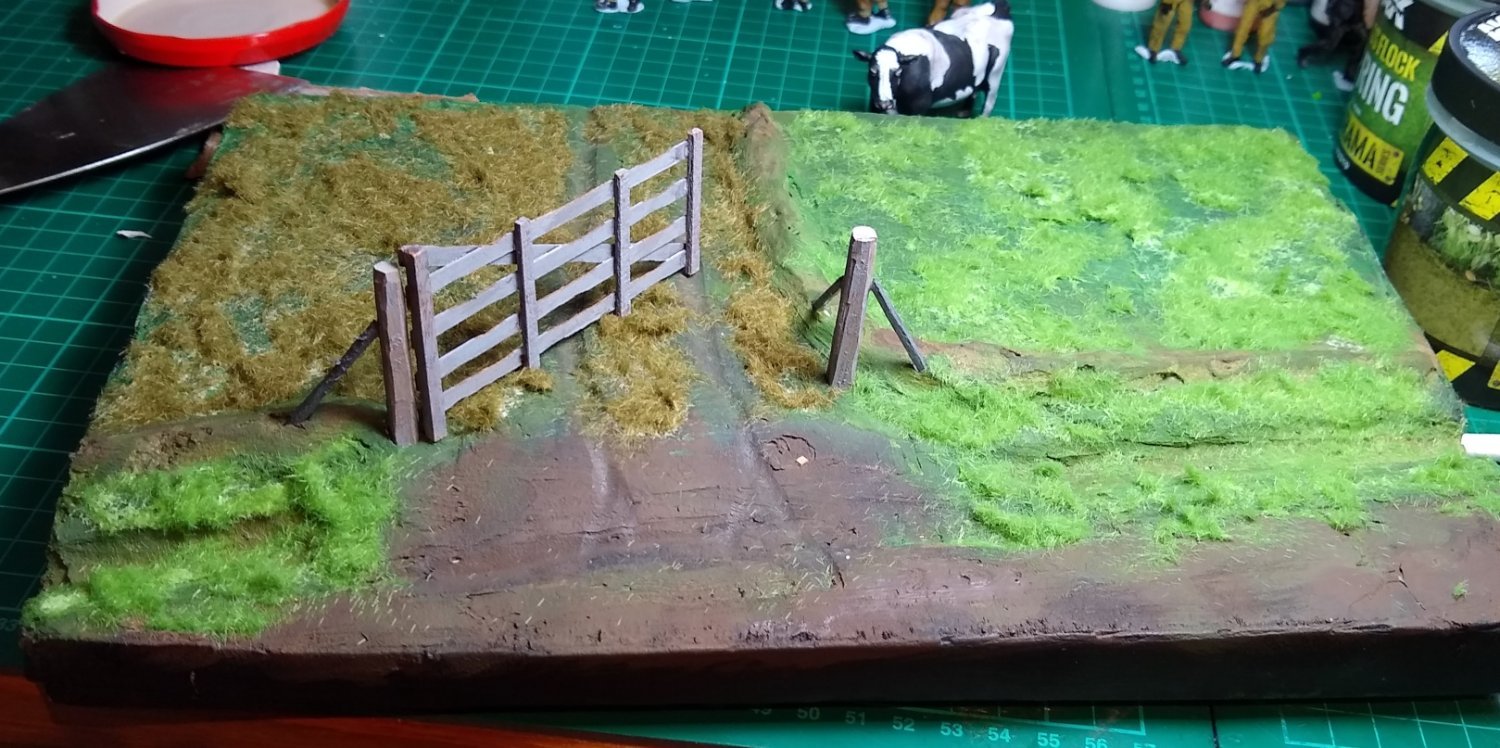
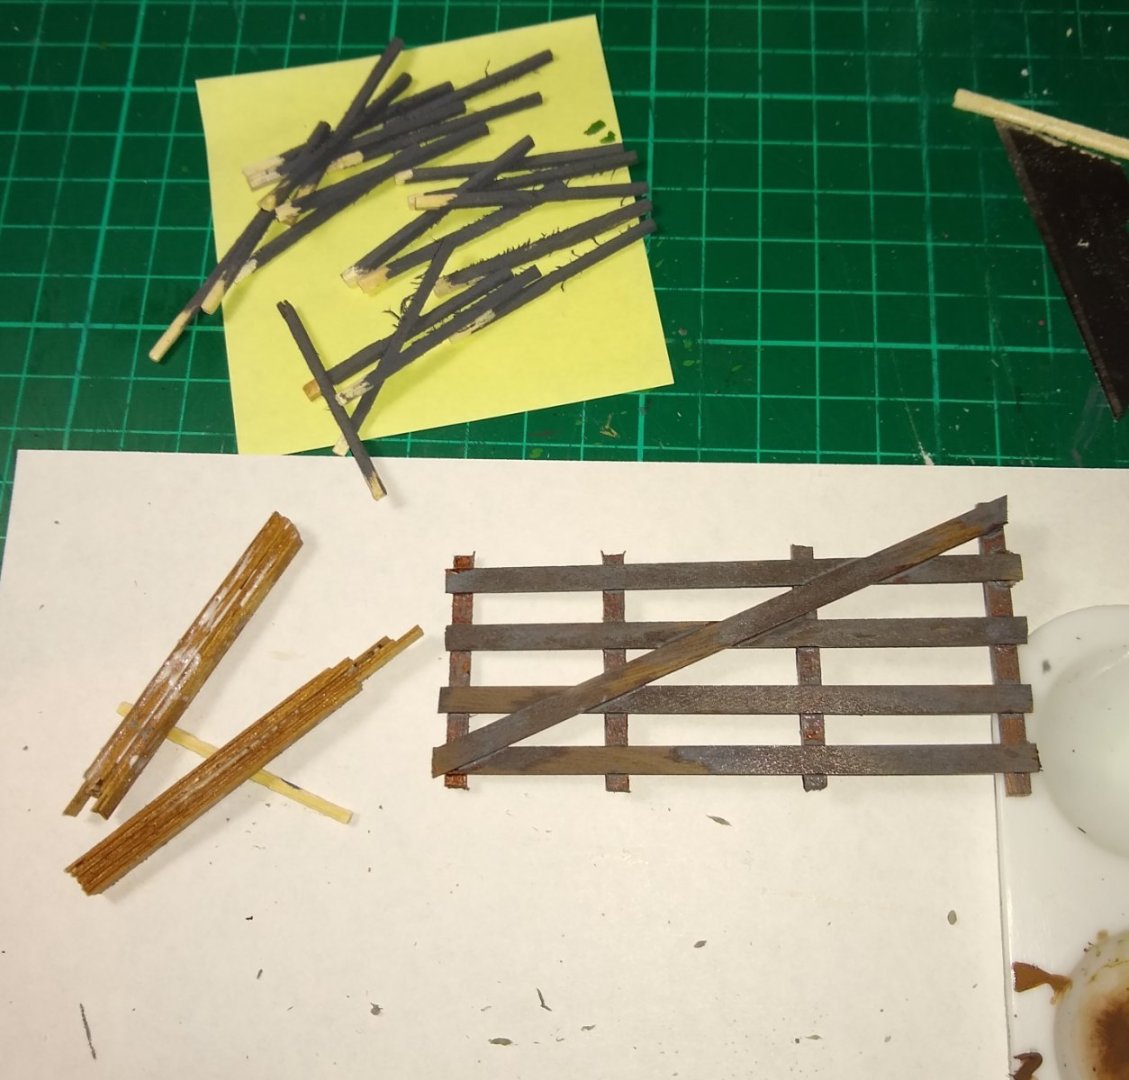
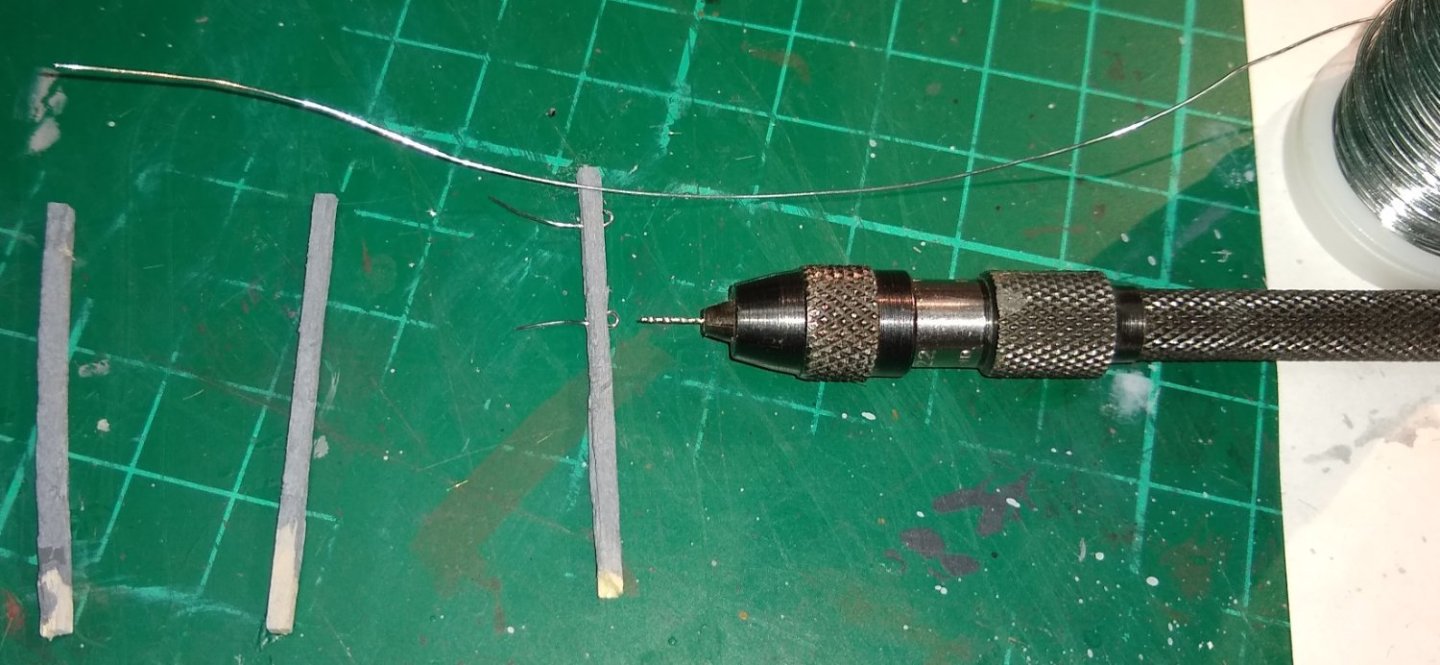
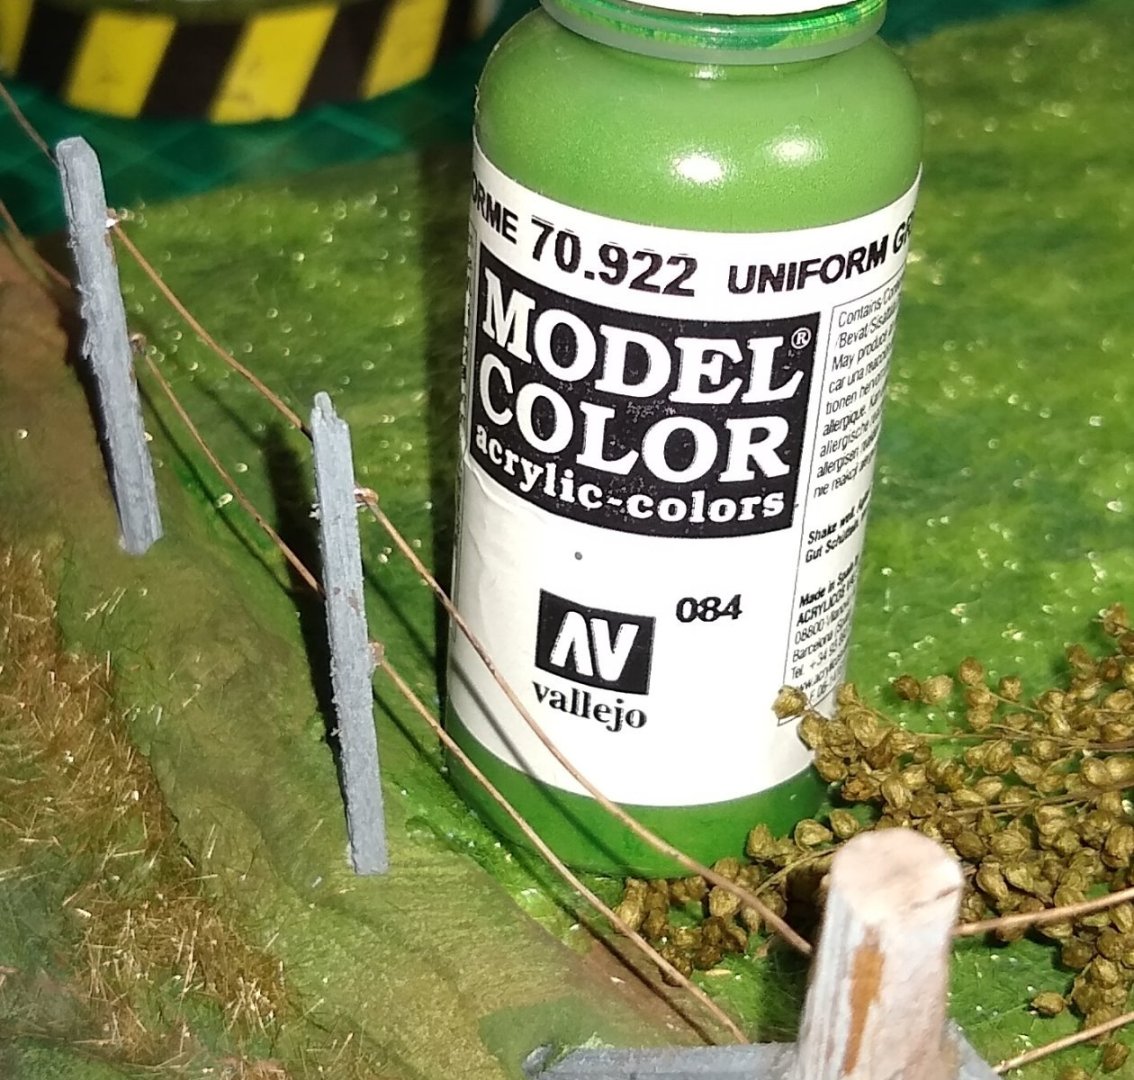
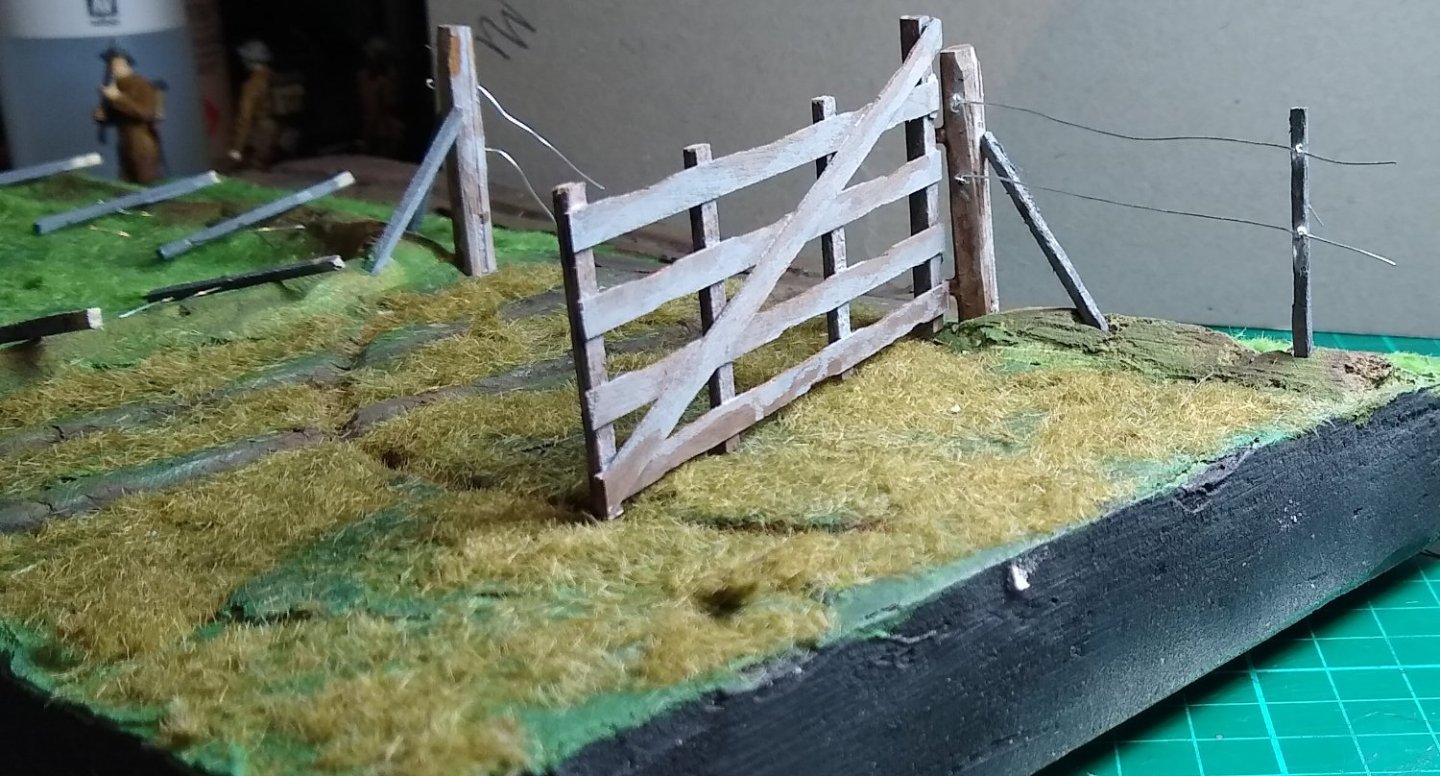
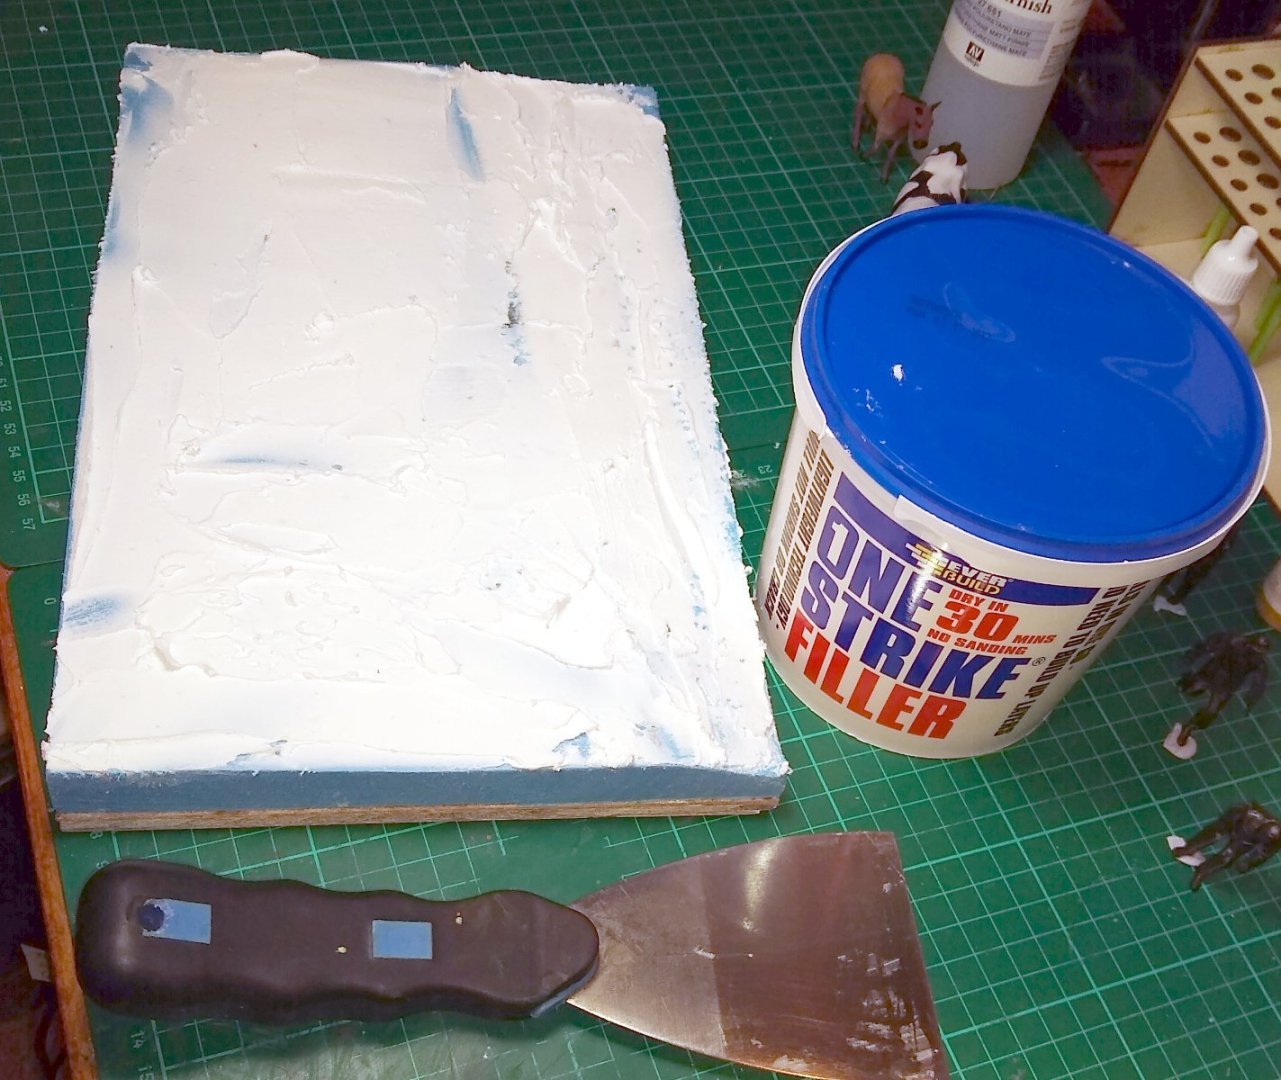
Hi all, Thank you all for the Likes and advice. Now, an update on my 'fencing' construction etc. Below, fence posts, hinge/latch posts and the field gate. Above - I bought some matchstick blanks to use as fence posts, and gave them a grey undercoat. During the WWII era I suspect many fence posts were made using tree branches, but I think some probably used sawn timber. On the left are wooden strips wood-glued together to form the end supports for the gate. And finally the gate, based on images from the period. Below - Fixing the fencing wire to the posts caused a bit of head scratching....normally staples would be used but at 1/32" (0.75mm) across I couldn't see how I could make them that small yet strong enough to press in to the wood. So 0.35 mm wire (...same as the fencing wire) was used to form a 'hook' that had the long leg glued in to a drilled hole in the post. That worked as well as I could hoped. Laying out the posts on the raised banks to check I had the right number to look right. I also added braces to the two support posts. The posts were slightly tapered to give the impression of being made from actual tree trunks or large branches. The semi-circular groove on the right is caused by the sweep of the gate dragging on the ground. I also added some farm tractor tyre ruts. Finally I added two shades of AK grass. I don't have a Static Grass Applicator, but grass in farm fields, that hold livestock, tends to be flattened and bumpy anyway. Trying to catch a 'staple' in focus....the paint bottle was positioned to assist the camera find focus. Gate mounted in position. I suppose I could have made miniature metal hinges for the gate, but made do with tiny blocks of wood to simulate the hinges. Another view of the gate. And finally, Marguerite still patiently waits for the hay to be thrown over. Next is probably painting the Archer crew, finding the makings of a suitable tree for the left side of the scenario, and adding the hedge rows, There's also dirt to be added on the road, small rocks in the ditches and more weathering of the vehicle and landscape. That's it for this week, all the best, Richard


-
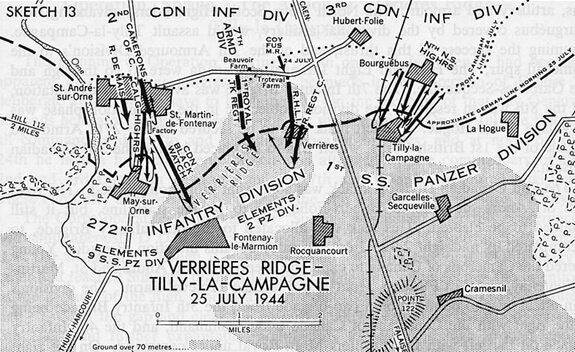
Thanks Andy. I am assuming that on the way to Verrieres (before the fighting started) the Archer did pass some farms. The 17Lb gun may have been accurate up to about 1 mile range (?), so perhaps was used to slow down German tanks headed towards reinforcing the ridge? The Verrieres Ridge itself does, as you note, look out over some open countryside, from what I see on that video. I can find Operation Spring maps on the web eg .... https://valourcanada.ca/military-history-library/operation-spring-1944/ If I need more I'll drop you a PM. Thanks again, Richard
-
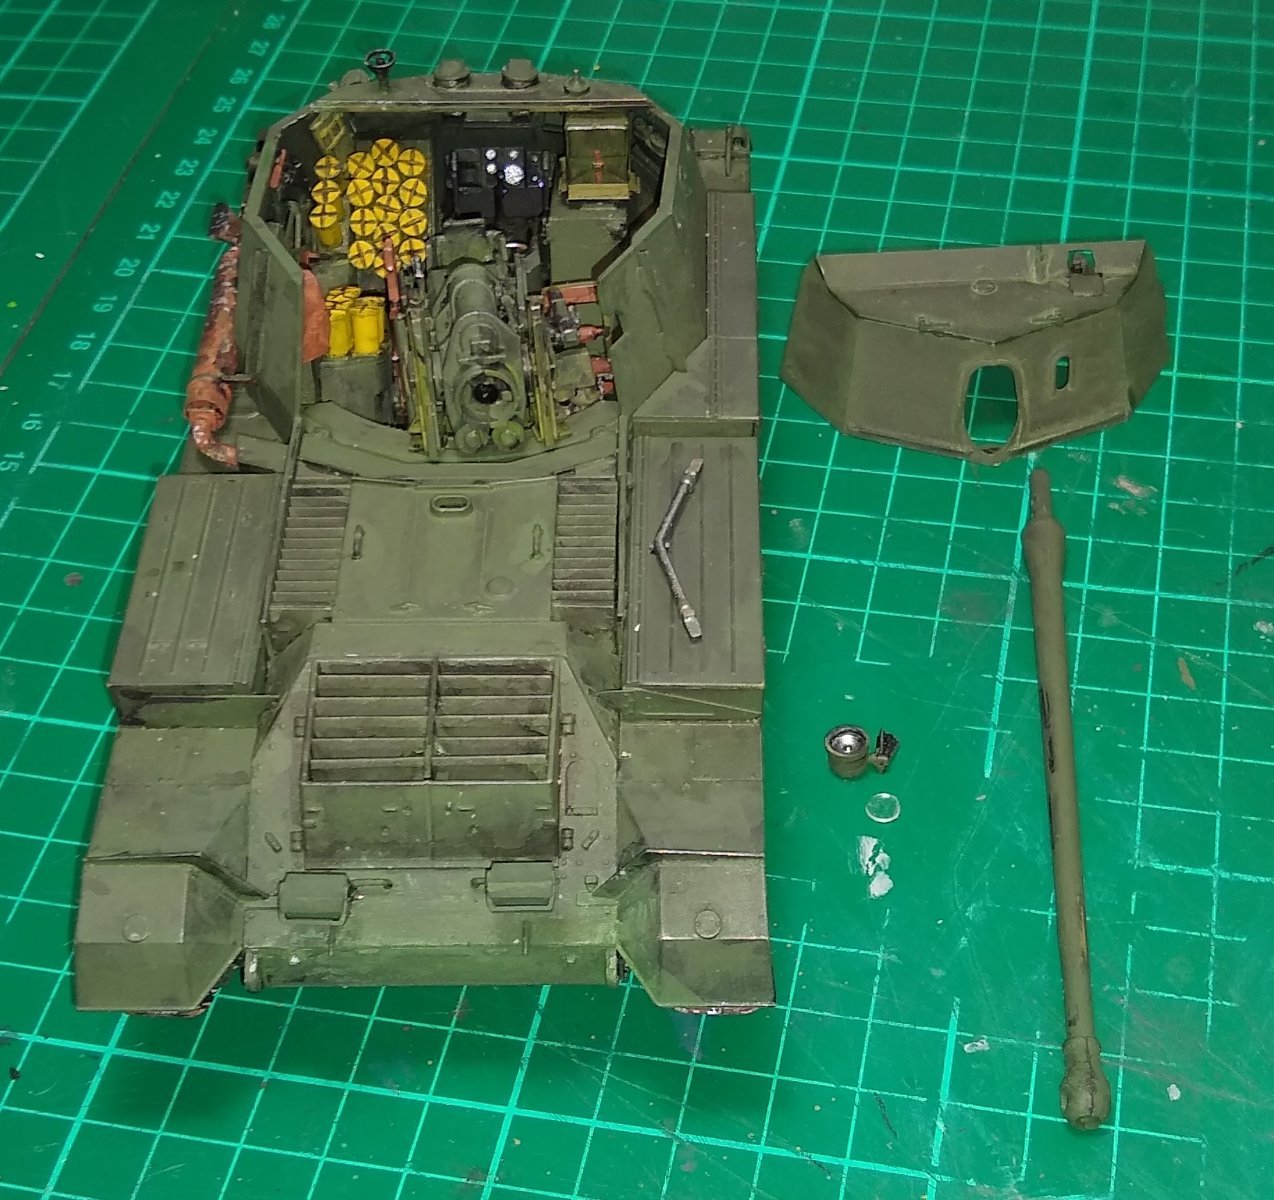
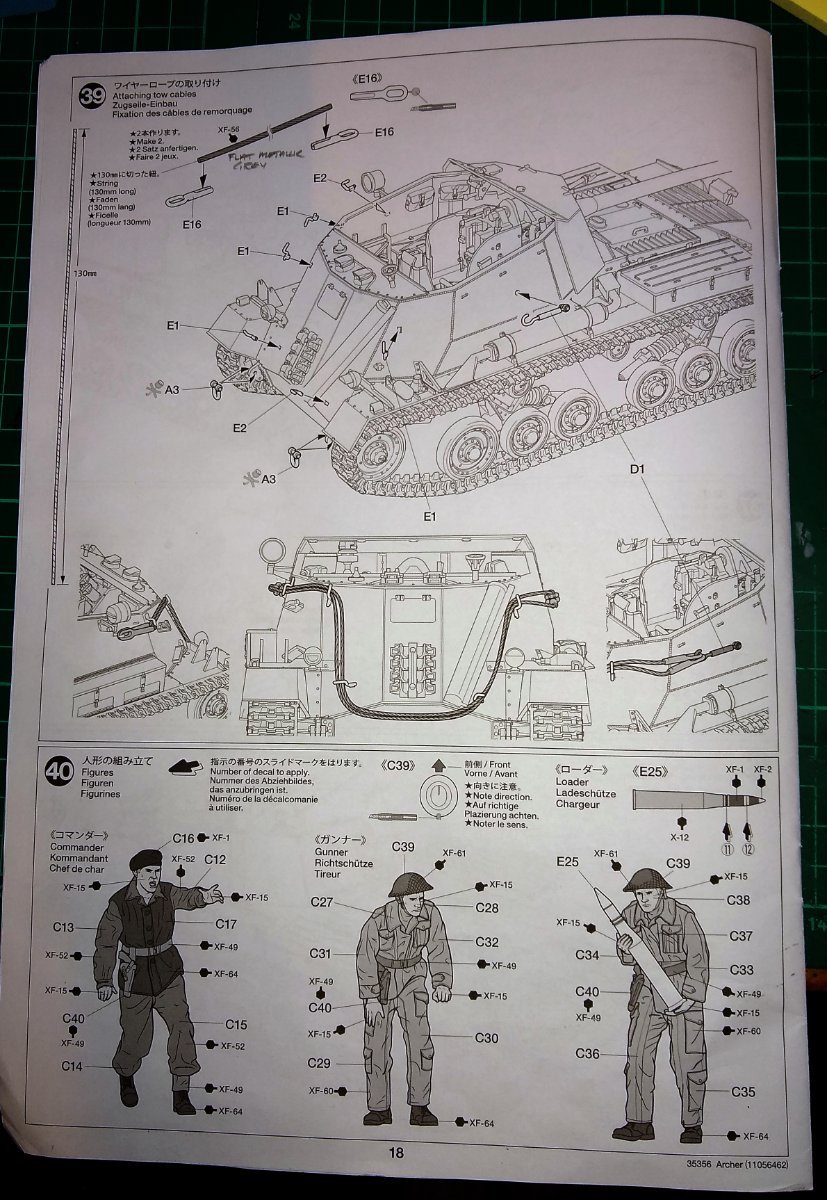
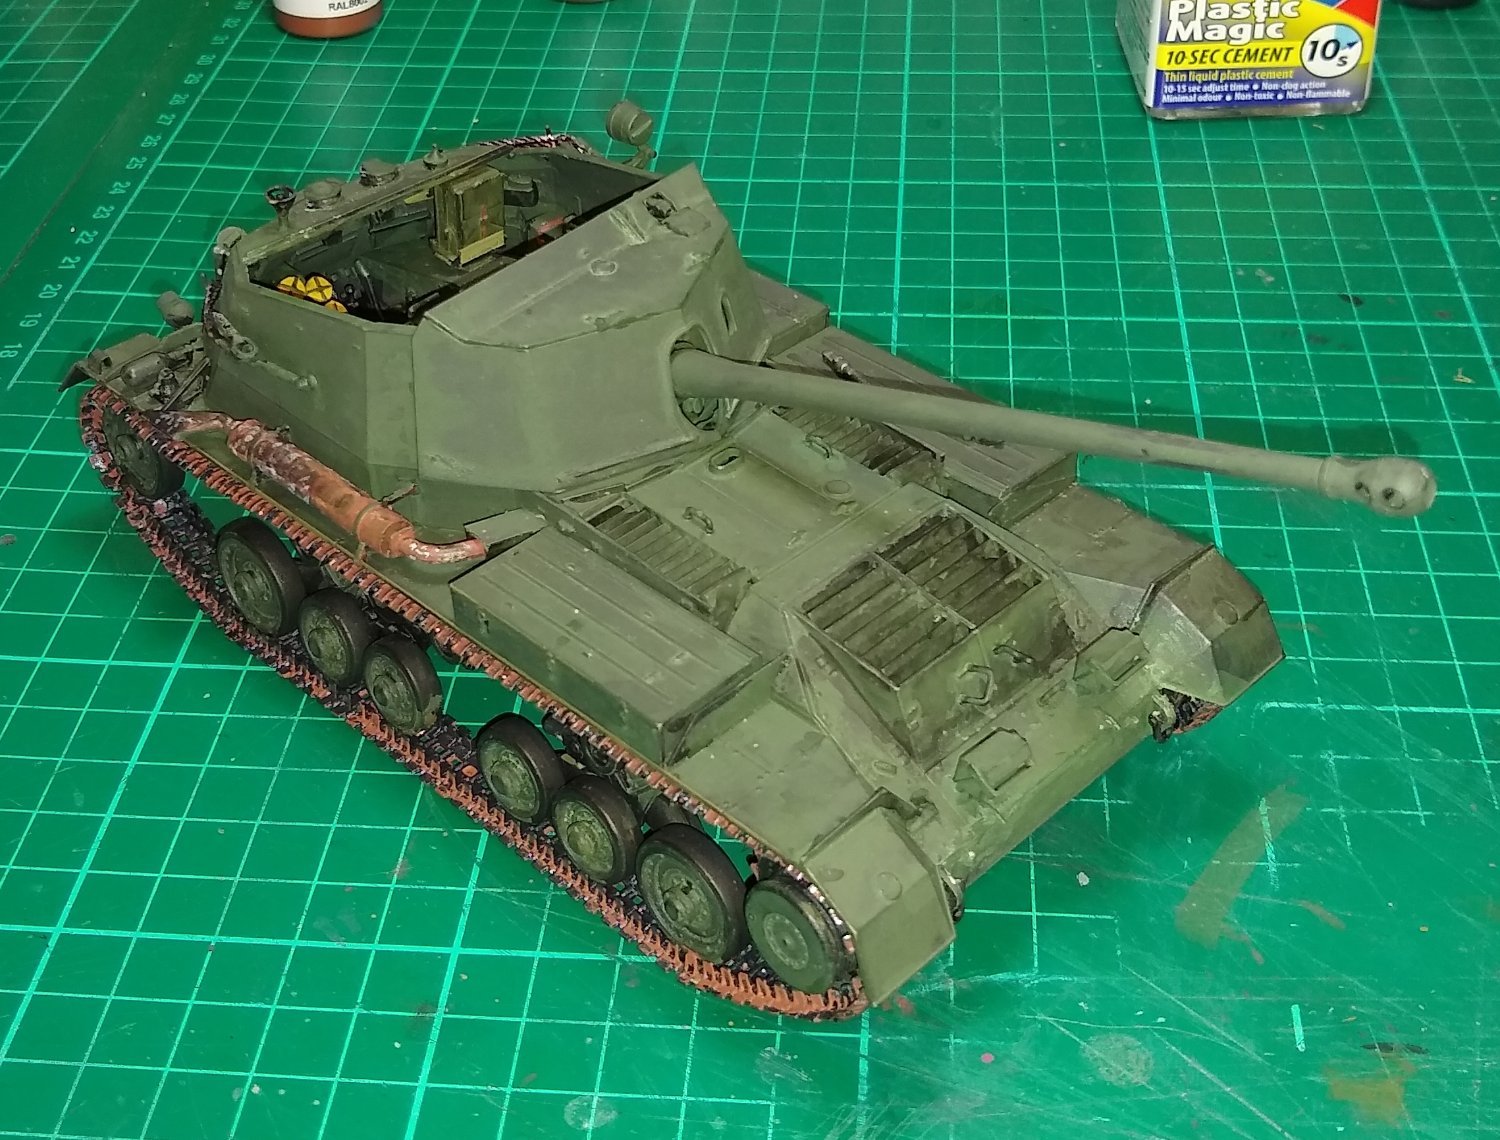
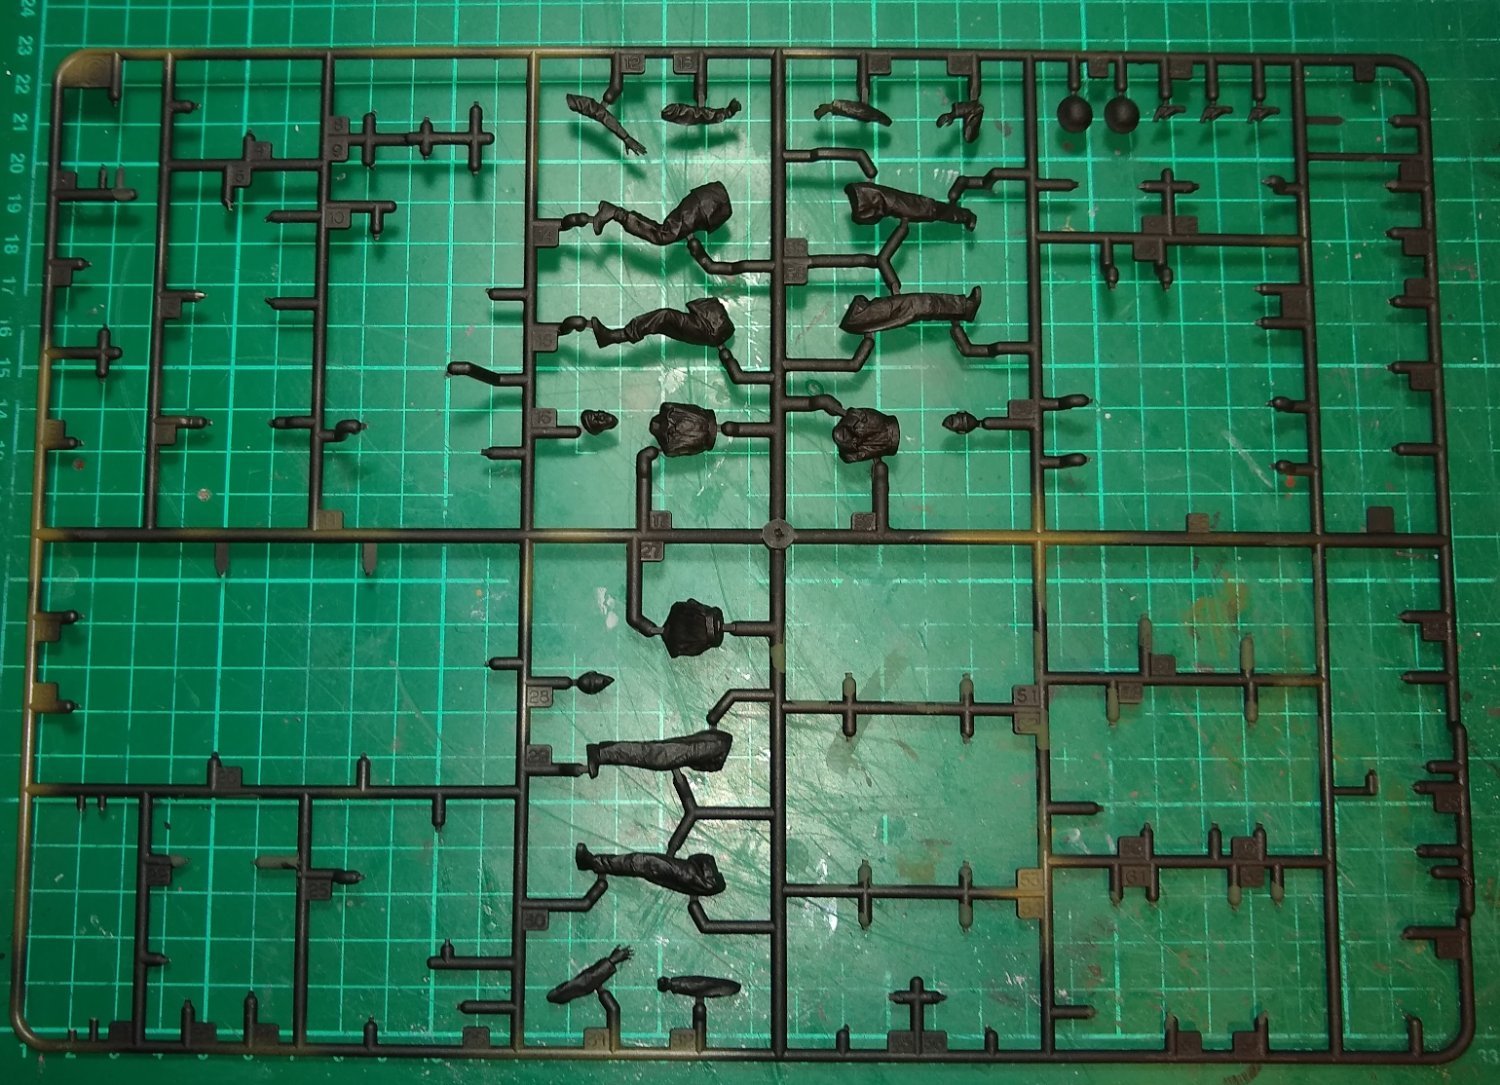
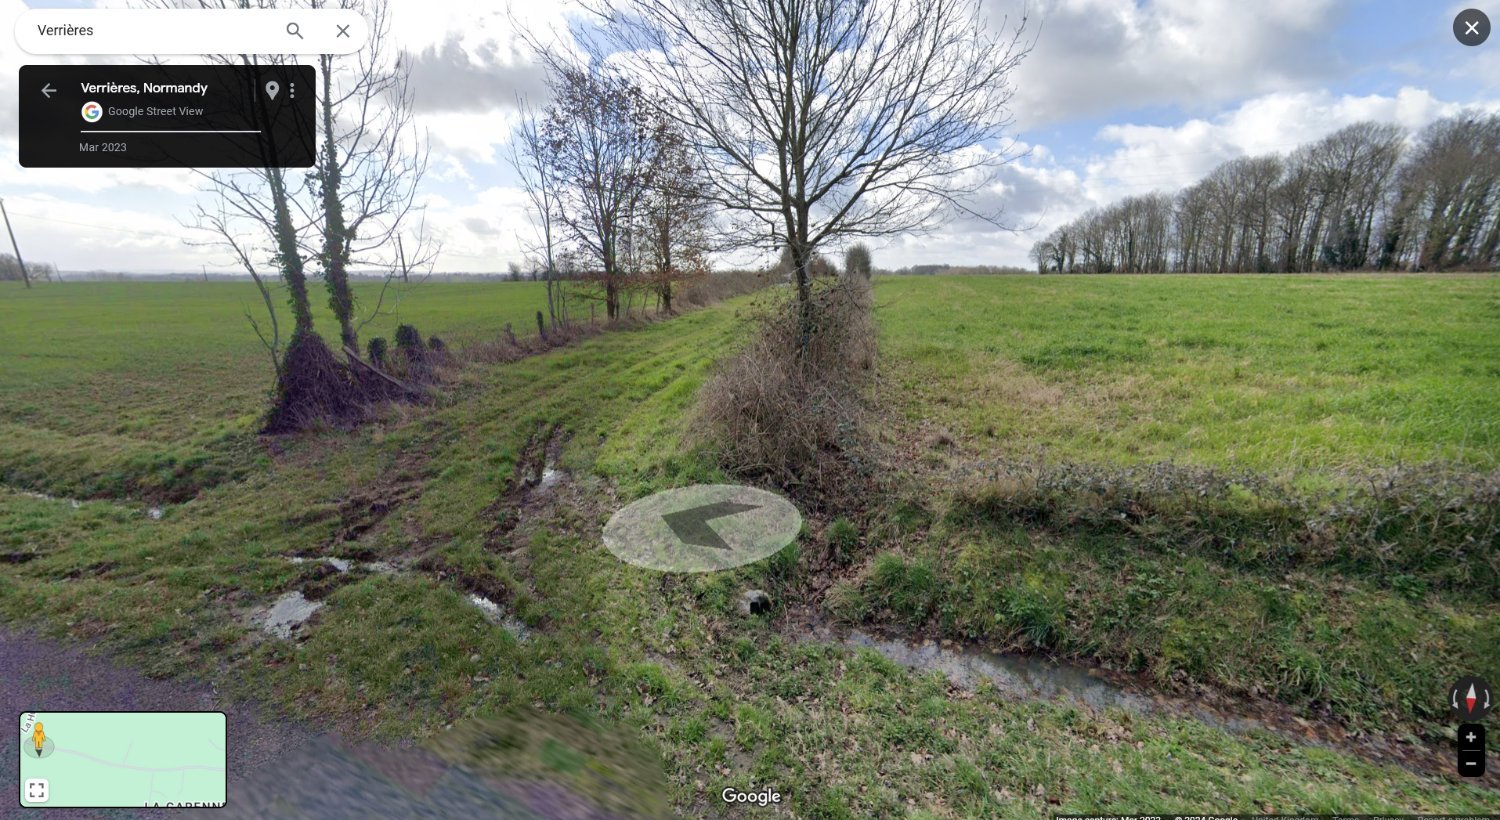
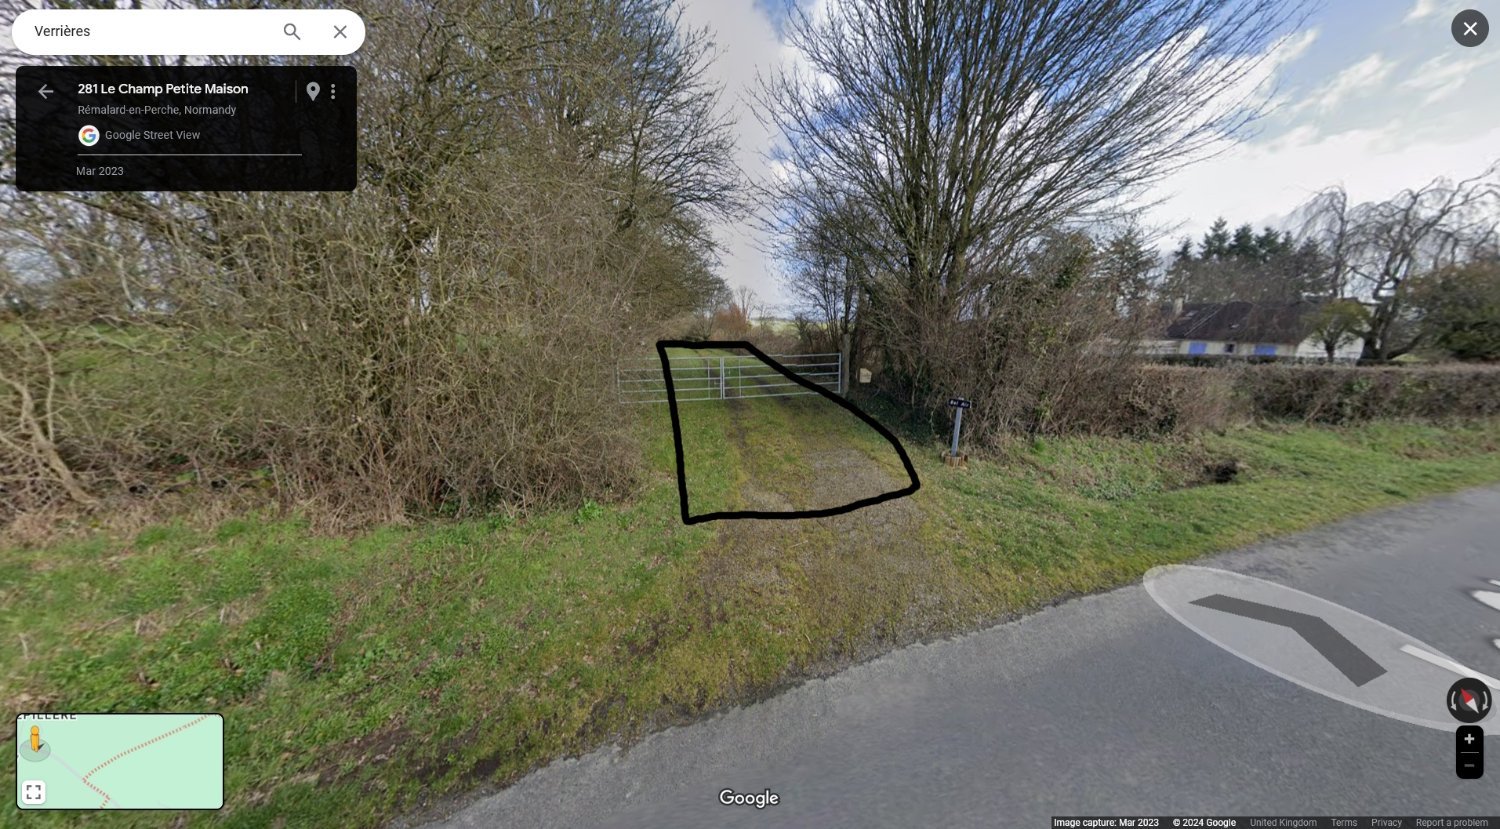
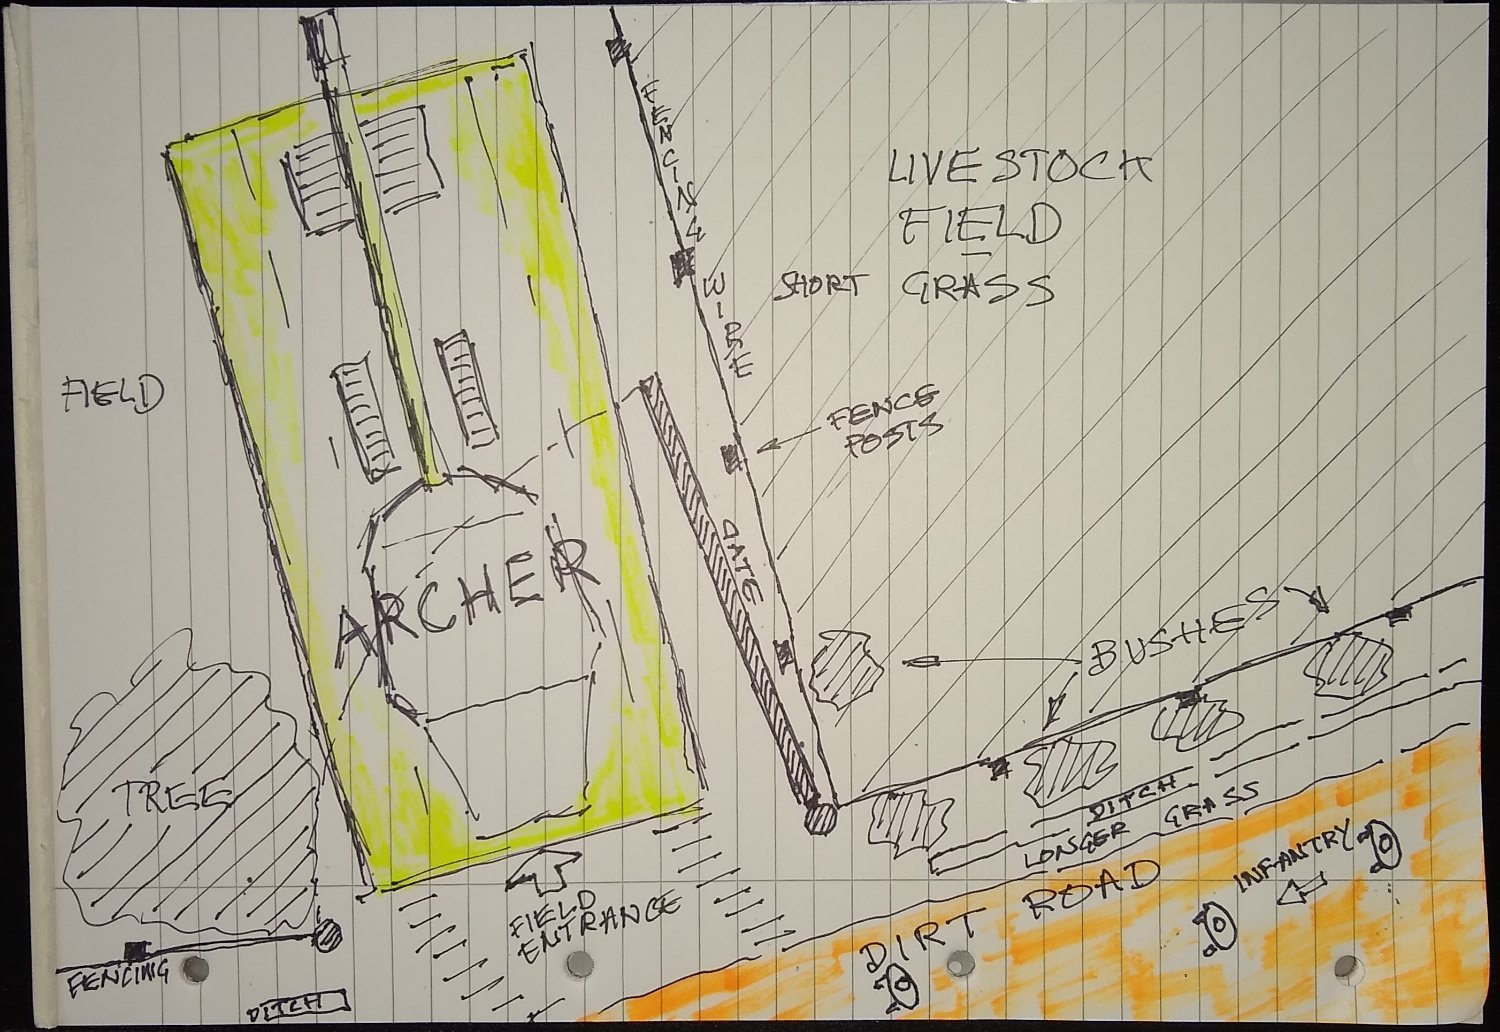
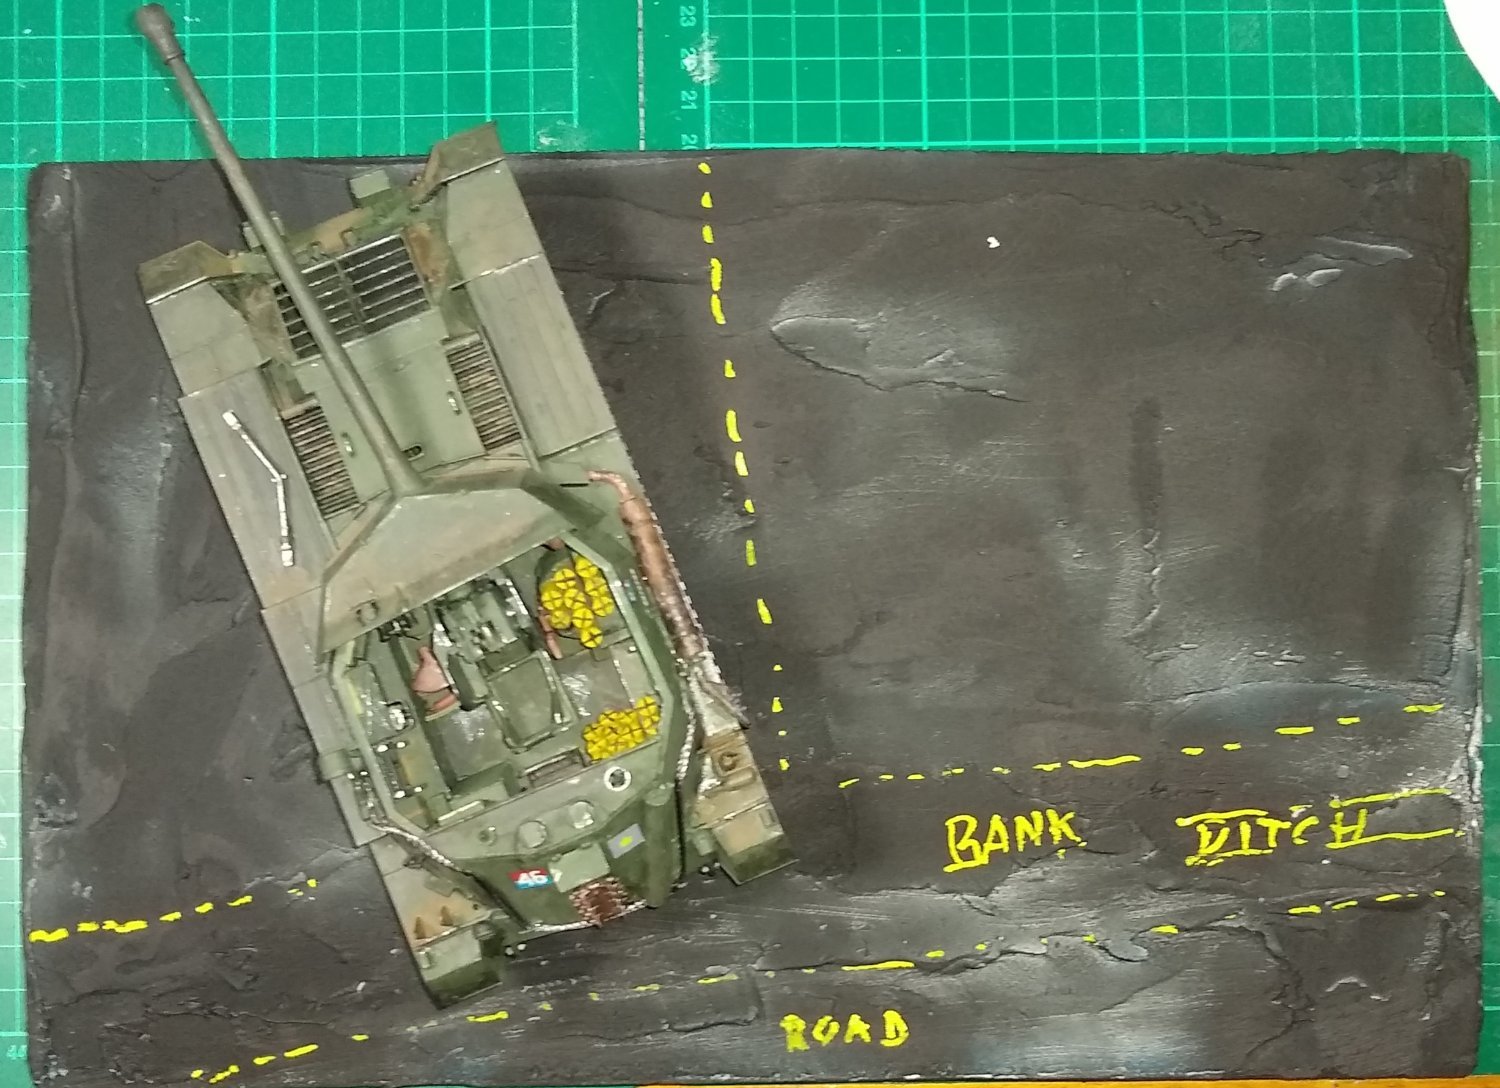
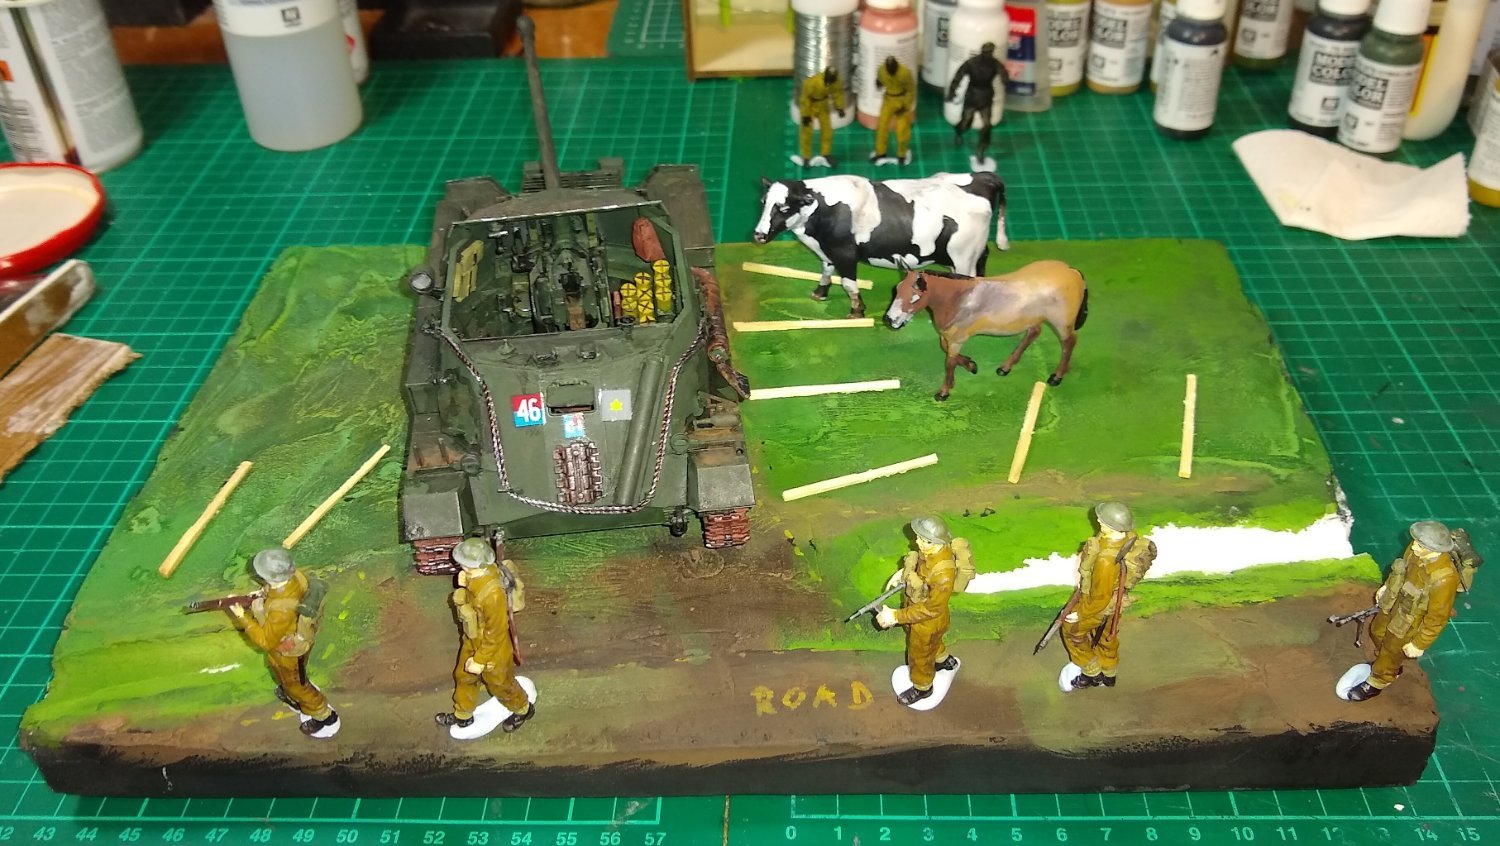
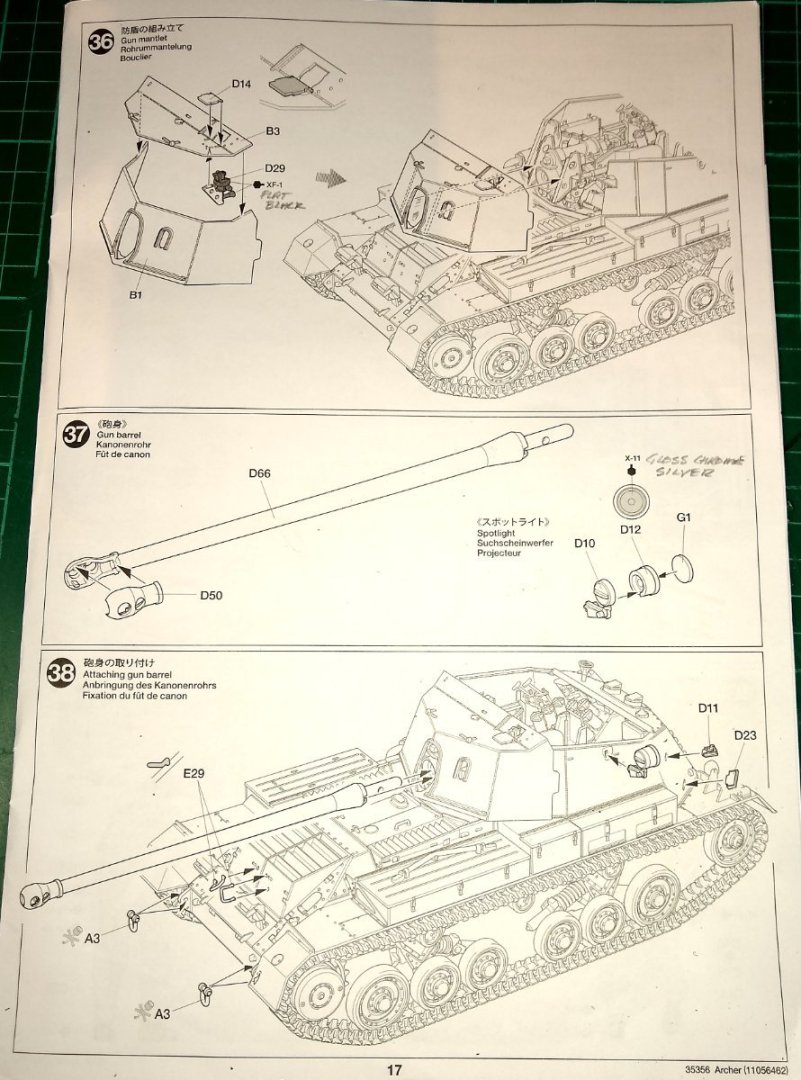
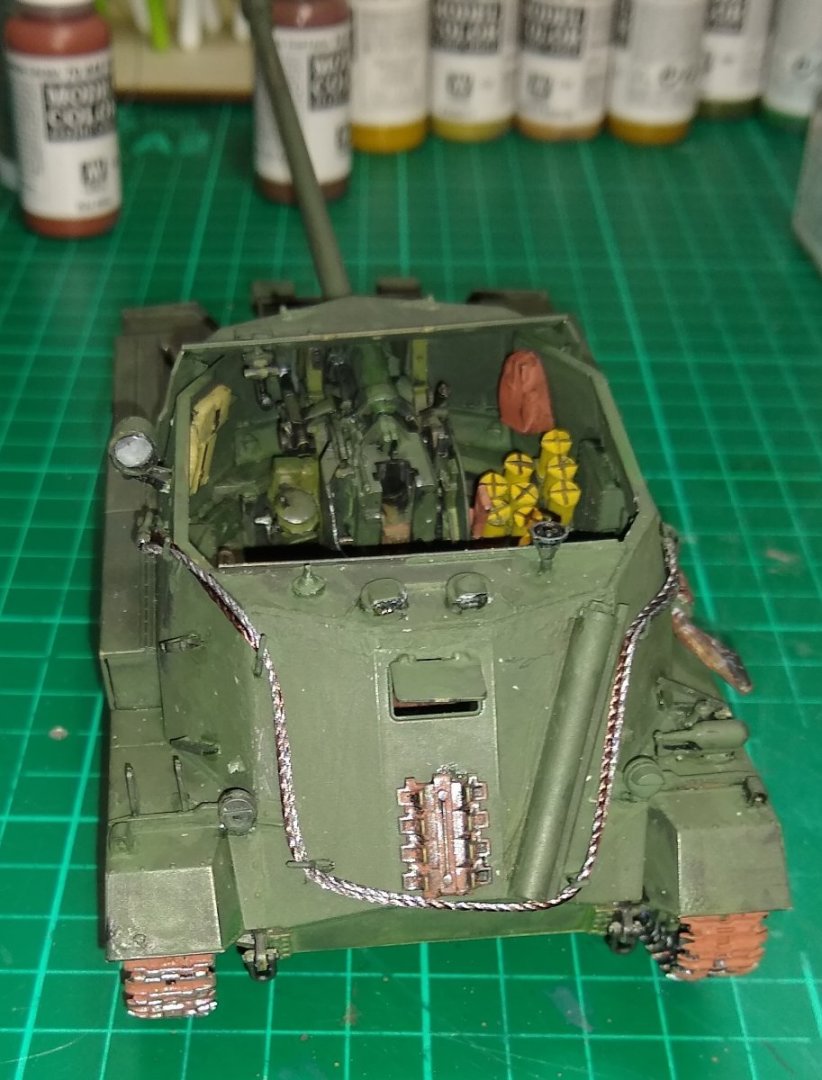
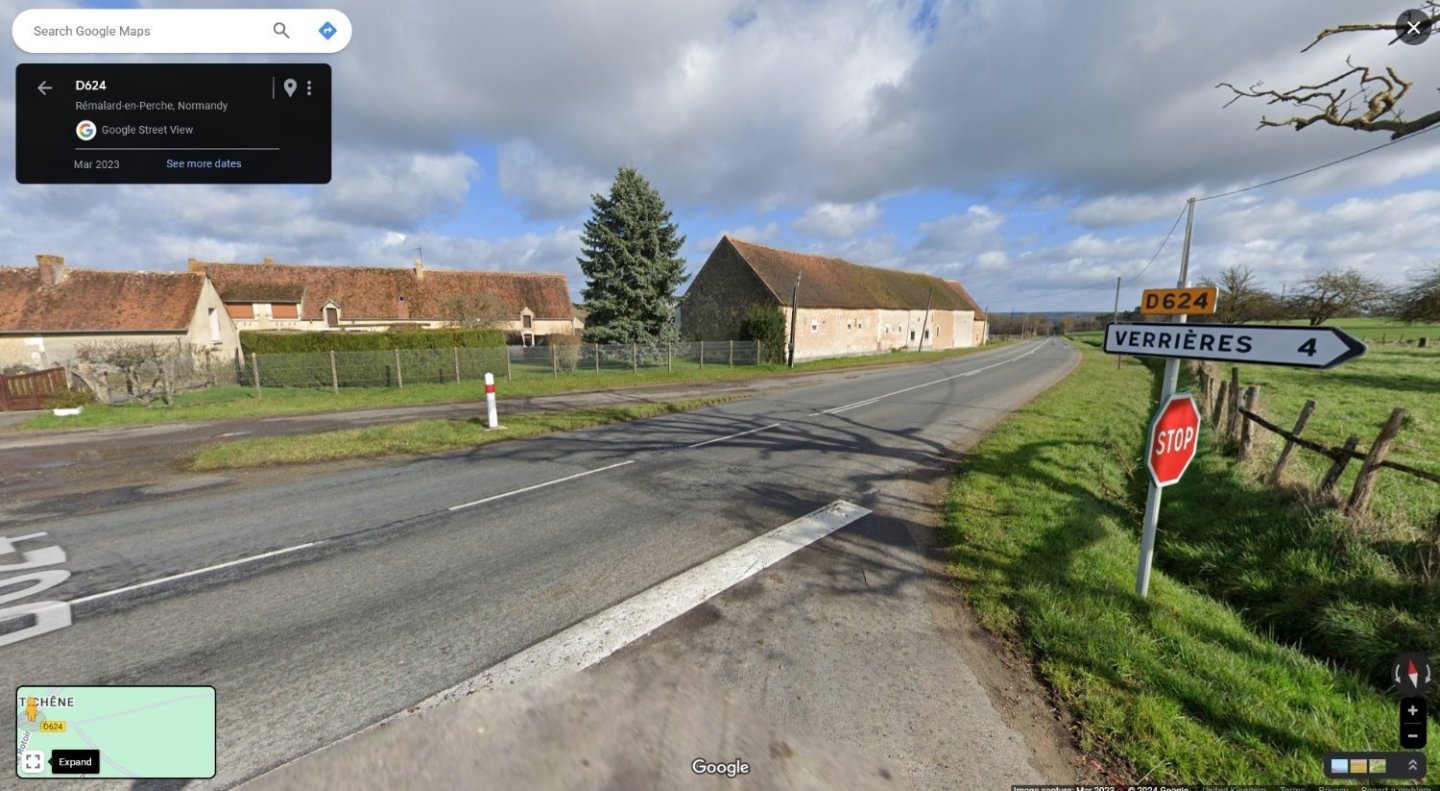
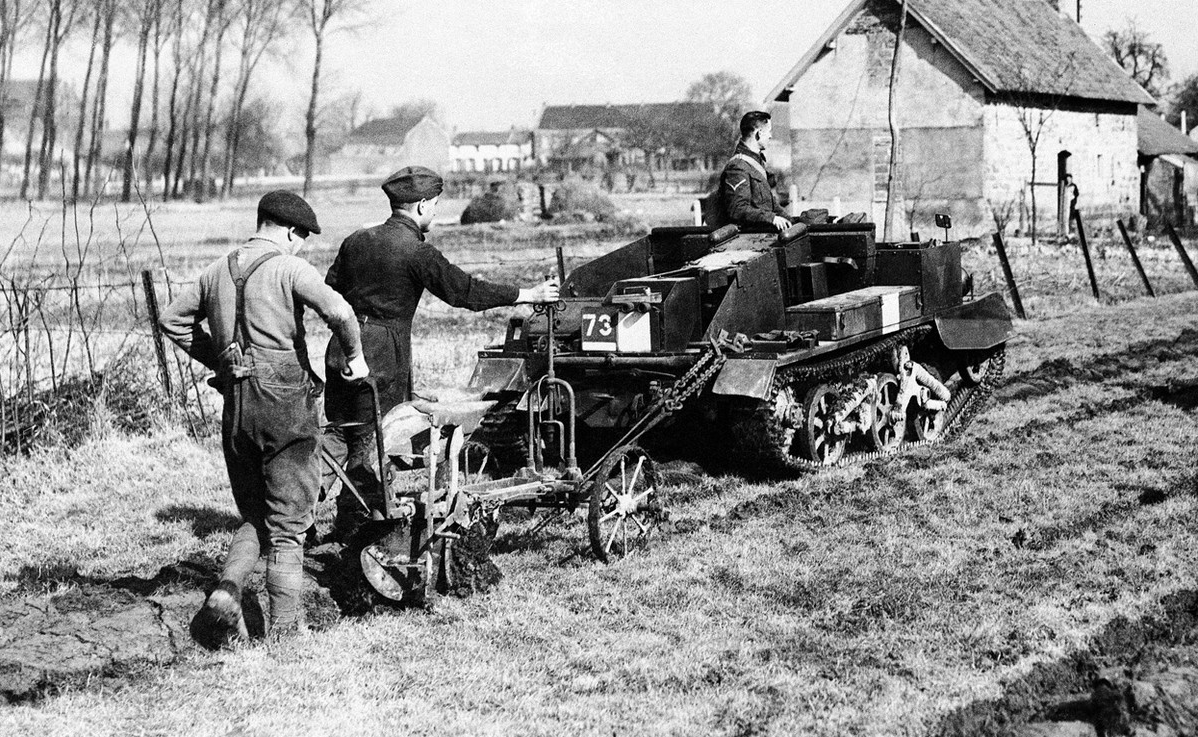
Hi all, Another update on progress on the Archer, and where I've sited it. Firstly, adding the final parts to the Archer. The gun mantle was slightly difficult for me to locate on the fighting compartment...there are a couple of alignment slots on the compartment/breech and I eventually got the mantle settled in the correct position. The two tow cables wind their way round the front of the vehicle, held in position by some very tiny hooks. A couple of them did fly out of the tweezers but were found. Below, the tow cables in position. Judging the cut length had to be done carefully. Below, the Archer pretty much assembled. The Canadian marking transfers still to be added plus some more weathering. A quick look at the crew, awaiting assembly . I've decided to locate the Archer on the way to the Verrieres Ridge, as mentioned by Andy (realworkingsailor) in post #5. I wandered through Google Maps to find a suitable location that matched how I already envisioned the scenario. Whilst doing that, this came to my attention. During WWII the Germans made an art out of 'hedgerow warfare'. A great read on that subject is here 'Combat in Normandy’s Hedgerows' -https://warfarehistorynetwork.com/article/combat-in-normandys-hedgerows/ A couple of extracts follow.. "Pushing inland, the 26th primarily encountered open fields, and from June 7 to 12 they marched 20 miles, plowed through moderate resistance, and bagged POWs. But deeper inland enemy-occupied hedgerows abounded, freezing the American momentum on June 13 at Caumont le Repas. Locked in a 30-day stalemate, the GIs soon discovered that the terrain fostered a glaring paradox. They could not see the Germans, but the Germans could see them. The hedgerows reduced visibility and precluded mobility, forcing both sides to exchange mortar fire and conduct reconnaissance patrols. -------- Cattle, living and dead, were abundant across Normandy and delivered vital information in their own right. A dead cow cautioned that a field or trail might contain mines and acted as a landmark, giving GIs a sense of direction in the confusing twists and turns. Grazing cows were often a sign that an area was free of mines. American and German soldiers monitored the behavior of cattle. Those that stared at a hedge might be indicating that an enemy soldier was hiding in or near it." It would seem that French farmers divided land in to fields by using very thick hedgerows planted on raised banks. The Brits were probably a bit more used to hedgerows (and dry stone dykes) but even then the French ones would still be quite a challenge to navigate. Below, a picture of a typical modern French hedgerow in the Verrieres region. I'm not sure if back in WWII days the farmers had got round to using fence posts and wire to keep animals confined. More later. Also ditches seems to be a very common feature at the edges of these French fields. The pic below is close to the scenario I had imagined, and is in the Verrieres locality. The black box outlines the Archer position. The metal gate is modern - a wooden one will replace it. The raised hedges are still apparent but now, I suspect, reinforced by wire fencing. The road would not be Tarmacadam back in the day....it would likely still be dirt. A sketch of my scenario. I'm now thinking about whether or not I need to replace the fencing with banks and hedges. Preparing the scenario base. A quick check to see if the Archer fits and the layout makes sense. Not sure about the gun sticking out though :-# ? A quick layout check with some of the main players. Lots more still to do. But I was glad to have found 'Combat in Normandy’s Hedgerows' - https://warfarehistorynetwork.com/article/combat-in-normandys-hedgerows/ ... it has opened my eyes and added new dimensions to the scenario. All for now , Richard Edit: Fencing wire was invented long before WWII, and with barbed wire being used in WWI and WWII prisons. Whether it was yet cost effective for French farm widespread usage around WWII time I'm not 100% sure, especially since they already had quite effective hedges (for containing livestock). However there are images on the web showing some fenced French fields during WWII eg https://www.theatlantic.com/photo/2011/07/world-war-ii-axis-invasions-and-the-fall-of-france/100098/ 10. The Royal Irish Fusiliers of the British expeditionary forces come to the aid of French farmers whose horses have been commandeered by the French Army. A tank is hitched to a plow to help with the spring tilling of the soil on March 27, 1940. #


-
Yes, I also would like to see where you take this one OC. Looking forward to the rest of the journey 🙂 Richard
-
OC, Great build! I've seen the Harriers do their stuff at many airshows...nothing beats seeing a fighter jet flying backwards! I imagine you have read it, but just in case, 'Sea Harrier Over The Falklands' - https://www.amazon.co.uk/Sea-Harrier-Over-Falklands-PAPERBACKS/dp/0304355429 is a no-punches-pulled account of what 'possibly' happened in the Falklands. "Sharkey Ward commanded 801 Naval Air Squadron, HMS Invincible, was senior Sea Harrier adviser to the Command, flew over sixty missions and was awarded DSC. Yet had he followed all his instructions to the letter, Britain might well have lost the Falklands War." Richard
-
Thanks Alan, Since posting I've decided the Archer position is inside another field accessed via a field gate. The Archer is approximately 9 feet wide, so should fit within a typical French field gate (TBC). This is a developing story, so don't touch that dial 😉 Richard