

yamsterman
-
Posts
549 -
Joined
-
Last visited
Reputation Activity
-

 yamsterman got a reaction from Saburo in WASHINGTON GALLEY by yamsterman - 1/48 scale - POF
Hi Kurt
Thanks to your supreme efforts,along with Jeff staudt and Mary's prompt dispatch of the plans I have my first full hull p.o.f on the building board.....a great introductory model....not too complicated but more than enough to present some interesting challenges! So thank you!!! It's a shame to can't have a go yourself but then there's only so manyhours in one day!
Before I tackle the rest of the stern area I'm planning on getting all the half frames and cants done fore and aft.
Midships frames are,hopefully , more straightforward.
She's quite broad and uniform in the beam so I suspect that this was an established design for cargo carrying utilised as an ad hoc gunboat at short notice?
The alternative rig would have required less manpower to operate?
Hopefully it will provide a nice contrast to the previously built sloop.....one for the Brits and one for the colonials!!
Cheers....mick
-
yamsterman got a reaction from Saburo in WASHINGTON GALLEY by yamsterman - 1/48 scale - POF
Hi Carl
Half frames are cut from multiple pieces...there's a fore and aft side both sides made from 1\8 inchstock giving a frame thickness of 12 inchs full size. Once fore and aft side are glued the respective bevels are worked in and then the frame bolts are simulatedwith copper wire.
The main sqaure frames are made exactly the same way except that now there's a floor timber and rebate for the keel to contend with.
I try and avoid going to the docs....they keep finding reasons to send me away and slice me up!!!!
Been falling apart ever since I reached 40!!!!
Cheers....mick
-
 yamsterman got a reaction from Canute in WASHINGTON GALLEY by yamsterman - 1/48 scale - POF
Hi druxey
Thanks for stopping by......I'm managing one frame a day at the moment. No rush.....should keep me out of trouble for a while!
Cheers....mick
-
yamsterman got a reaction from Saburo in WASHINGTON GALLEY by yamsterman - 1/48 scale - POF
Hi Chuck
The counter fashion piece's? Yep I had a trial run at those to try and work out a method......must have got the wrong end of the stick with which bit you were interested in...oops!
Ideally those pieces need to be cut from a single piece approx 1 1\2 inchs wide by 4 inchs long by 1\2 inch thick.....with the test piece I laminated two1\4 inch pieces together.
The first profile I shaped was the stern view. I then superimposed the longitudinal plan on top of the previously shaped piece....trying to ensure the bottom and knuckle line corresponded with the previous piece. I did post some pictures in the previous post......if you would like I can rearrange those into a seperate post....pictures tend to be clearer than a thousand words.....these were only practise pieces and may not be good enough to include on the model....I need to get the stern framing up first and test fit them.
Hope this helps.
Cheers...mick
-
yamsterman got a reaction from Canute in WASHINGTON GALLEY by yamsterman - 1/48 scale - POF
Hi Kurt
Glad to be of any help.....good luck with your build
Cheers....mick
-
yamsterman got a reaction from Canute in WASHINGTON GALLEY by yamsterman - 1/48 scale - POF
Hi Carl
Half frames are cut from multiple pieces...there's a fore and aft side both sides made from 1\8 inchstock giving a frame thickness of 12 inchs full size. Once fore and aft side are glued the respective bevels are worked in and then the frame bolts are simulatedwith copper wire.
The main sqaure frames are made exactly the same way except that now there's a floor timber and rebate for the keel to contend with.
I try and avoid going to the docs....they keep finding reasons to send me away and slice me up!!!!
Been falling apart ever since I reached 40!!!!
Cheers....mick
-
 yamsterman got a reaction from mtaylor in WASHINGTON GALLEY by yamsterman - 1/48 scale - POF
Hi druxey
Thanks for stopping by......I'm managing one frame a day at the moment. No rush.....should keep me out of trouble for a while!
Cheers....mick
-
yamsterman got a reaction from Canute in WASHINGTON GALLEY by yamsterman - 1/48 scale - POF
Hi Chuck
The counter fashion piece's? Yep I had a trial run at those to try and work out a method......must have got the wrong end of the stick with which bit you were interested in...oops!
Ideally those pieces need to be cut from a single piece approx 1 1\2 inchs wide by 4 inchs long by 1\2 inch thick.....with the test piece I laminated two1\4 inch pieces together.
The first profile I shaped was the stern view. I then superimposed the longitudinal plan on top of the previously shaped piece....trying to ensure the bottom and knuckle line corresponded with the previous piece. I did post some pictures in the previous post......if you would like I can rearrange those into a seperate post....pictures tend to be clearer than a thousand words.....these were only practise pieces and may not be good enough to include on the model....I need to get the stern framing up first and test fit them.
Hope this helps.
Cheers...mick
-
yamsterman got a reaction from mtaylor in WASHINGTON GALLEY by yamsterman - 1/48 scale - POF
Hi Kurt
Glad to be of any help.....good luck with your build
Cheers....mick
-
yamsterman got a reaction from mtaylor in WASHINGTON GALLEY by yamsterman - 1/48 scale - POF
hi ken and christian
thanks for looking in.........happy with the first frame to go in.....the aft cant frame may need some more work,need to study the plans a bit more!
looking forward to more frames and a ship slowly emerging!
cheers....mick
-
yamsterman got a reaction from Saburo in WASHINGTON GALLEY by yamsterman - 1/48 scale - POF
hi chuck
i had to look twice myself at the wing transoms.....and the rest of em!!!
the wing transom starts off as a sqaure block of timber,slightly thicker than is required but wide enough to paste the plan view on top.
i had a play around this morning and remade the piece in 1/24 scale,primarily because its easier to photograph and secondly it shows the round up better.
i havnt gone to any great lengths to finish the piece,made from a bit of ramin i had lying around,but the photographs should show the construction sequence in the order i did it.
the rear face of the wing transom need to have its face angled in order to be in the same plane as the rabbet of the stern post......not shown on the plans.
the ends of the transoms may need to have an angle planed on them in order to fit flush against the rear face of frame 22.......the bottom of the wing transom will fit against the top of the rear part of frame 22.
hope this makes sense.
the following photos should be in the right order for the construction sequence.
-
yamsterman got a reaction from mtaylor in WASHINGTON GALLEY by yamsterman - 1/48 scale - POF
Hi Carl
Half frames are cut from multiple pieces...there's a fore and aft side both sides made from 1\8 inchstock giving a frame thickness of 12 inchs full size. Once fore and aft side are glued the respective bevels are worked in and then the frame bolts are simulatedwith copper wire.
The main sqaure frames are made exactly the same way except that now there's a floor timber and rebate for the keel to contend with.
I try and avoid going to the docs....they keep finding reasons to send me away and slice me up!!!!
Been falling apart ever since I reached 40!!!!
Cheers....mick
-
yamsterman got a reaction from Saburo in WASHINGTON GALLEY by yamsterman - 1/48 scale - POF
WASHINGTON GALLEY PART 1
HI ALL
WOOD HAS FINALLY BEEN CUT.
STARTED WITH BASIC KEEL COMPONENTS.
MAIN KEEL CUT 3/16 WIDE BY 7/32 DEEP. FALSE KEEL 3/16 X 1/16. HOG 3/16 BY 3/32.
ALL CUT FROM SHEET MATERIAL ON THE BYRNES SAW.
I DECIDED TO DO THIS IN THREE SEPERATE PIECES AS IT WOULD BE EASIER TO PROFILE THE REBATE.
THE HOG(?) HAS PROVED TO BE QUITE A TASKING PIECE TO MAKE ACCURATELY. THE PIECES IN THE PHOTOS ARE THE FOURTH ATTEMPT!!!!
I ORIGINALLY ASSUMED THAT THE SPACE BETWEEN THE DOUBLE FRAMES,WHICH ARE 1FT THICK(SIDED) OR 1/4 INCH ON THE MODEL WOULD BE EQUAL TO 0NE FRAME THICKNESS OR 6INCHES IN REAL LIFE (1/8inch) ON THE MODEL.A QUICK MEASUREMENT LATE A NIGHT SEEMED TO CONFIRM THIS.
WRONG!WRONG!WRONG!............MEASURE TWICE OR EVEN THRICE.......CUT ONCE!
THE ACTUAL MEASUEMENT IS 9/16 ON AN INCH.
IN ORDER TO CUT THIS ACCURATELY I HAD TO DEVISE A JIG FOR THE MILLING MACHINE
( SEE PHOTOS)
BUILDING BOARD AND FRAME PLAN PREPARED AND ALMOST READY FOR USE.
A FEW JIGS HAVE ALSO BEEN MADE FOR HELP IN FRAME ALIGNMENT....BUT THESE MAY HAVE TO BE REDONE AS THEY MAY BE ON THE CLUNKY SIDE.
THATS ABOUT ALL FOR THE MOMENT.....BACK TO WORK WE GO
CHEERS....MICK
-
yamsterman reacted to druxey in WASHINGTON GALLEY by yamsterman - 1/48 scale - POF
Nice, clean work there, Mick. Those other 40 frames? Slow and steady does it. You'll get there.
-
 yamsterman got a reaction from cog in WASHINGTON GALLEY by yamsterman - 1/48 scale - POF
Hi druxey
Thanks for stopping by......I'm managing one frame a day at the moment. No rush.....should keep me out of trouble for a while!
Cheers....mick
-
yamsterman got a reaction from mtaylor in WASHINGTON GALLEY by yamsterman - 1/48 scale - POF
Hi Chuck
The counter fashion piece's? Yep I had a trial run at those to try and work out a method......must have got the wrong end of the stick with which bit you were interested in...oops!
Ideally those pieces need to be cut from a single piece approx 1 1\2 inchs wide by 4 inchs long by 1\2 inch thick.....with the test piece I laminated two1\4 inch pieces together.
The first profile I shaped was the stern view. I then superimposed the longitudinal plan on top of the previously shaped piece....trying to ensure the bottom and knuckle line corresponded with the previous piece. I did post some pictures in the previous post......if you would like I can rearrange those into a seperate post....pictures tend to be clearer than a thousand words.....these were only practise pieces and may not be good enough to include on the model....I need to get the stern framing up first and test fit them.
Hope this helps.
Cheers...mick
-
 yamsterman got a reaction from Wishmaster in WASHINGTON GALLEY by yamsterman - 1/48 scale - POF
hi chuck
i had to look twice myself at the wing transoms.....and the rest of em!!!
the wing transom starts off as a sqaure block of timber,slightly thicker than is required but wide enough to paste the plan view on top.
i had a play around this morning and remade the piece in 1/24 scale,primarily because its easier to photograph and secondly it shows the round up better.
i havnt gone to any great lengths to finish the piece,made from a bit of ramin i had lying around,but the photographs should show the construction sequence in the order i did it.
the rear face of the wing transom need to have its face angled in order to be in the same plane as the rabbet of the stern post......not shown on the plans.
the ends of the transoms may need to have an angle planed on them in order to fit flush against the rear face of frame 22.......the bottom of the wing transom will fit against the top of the rear part of frame 22.
hope this makes sense.
the following photos should be in the right order for the construction sequence.
-
 yamsterman got a reaction from WackoWolf in WASHINGTON GALLEY by yamsterman - 1/48 scale - POF
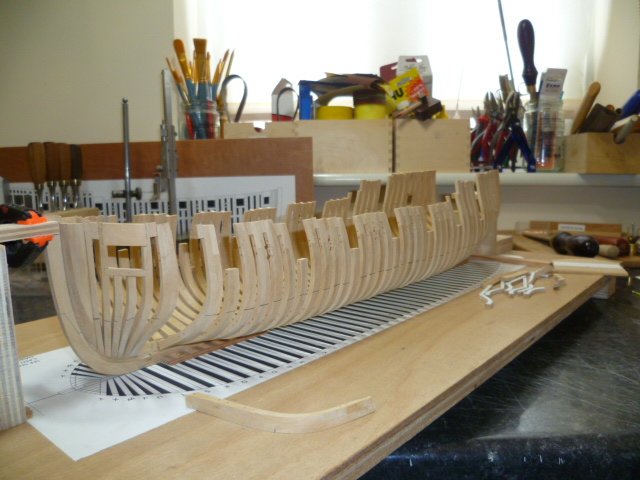
WASHINGTON GALLEY PART 6........FIRST FRAME IS RAISED!!!!
HI ALL
HAVING MADE THE LAST HALF FRAME AFT I DECIDED IT WAS PERHAPS WISE TO RAISE THIS FRAME FIRST
THE SINGLE AFT CANT FRAMES LEADING EDGE BUTTS UP AGAINST THE REAR FACE OF THIS FRAME SO IT MAKES SENSE.
I CAN THE WORK TOWARDS MIDSHIPS WITH THE REST OF THE AFT HALF FRAMES. I MAY THEN SWITCH MY ATTENTION TO THE FORWARD CANT AND HALF FRAMES AND THE DREADED HAWSE PIECES.
MIDSHIPS FRAMES ARE FROM ( 6 FRAMES FORWARD OF DEADFLAT AND 6 FRAMES AFT OF DEADFLAT) ALL THE SAME BASIC SHAPE WITH NO BEVEL. THE HEIGHTS ARE SLIGHTLY DIFFERENT,TO ACCOUNT FOR THE SHEER,AND SOME HAVE RECESSES FOR THE GUNPORT SILLS AND SWEEP PORTS.......BATCH PRODUCTION TIME!
SO THATS WHERE I AM AT THE MOMENT.....TIME FOR A CELEBRATORY SNIFTER
PHOTOS OF THE FRAME RAISING FOR YOUR DELICTATION
CHEERS........MICK
-
 yamsterman got a reaction from GuntherMT in WASHINGTON GALLEY by yamsterman - 1/48 scale - POF
hi chuck
i had to look twice myself at the wing transoms.....and the rest of em!!!
the wing transom starts off as a sqaure block of timber,slightly thicker than is required but wide enough to paste the plan view on top.
i had a play around this morning and remade the piece in 1/24 scale,primarily because its easier to photograph and secondly it shows the round up better.
i havnt gone to any great lengths to finish the piece,made from a bit of ramin i had lying around,but the photographs should show the construction sequence in the order i did it.
the rear face of the wing transom need to have its face angled in order to be in the same plane as the rabbet of the stern post......not shown on the plans.
the ends of the transoms may need to have an angle planed on them in order to fit flush against the rear face of frame 22.......the bottom of the wing transom will fit against the top of the rear part of frame 22.
hope this makes sense.
the following photos should be in the right order for the construction sequence.
-
yamsterman got a reaction from mtaylor in WASHINGTON GALLEY by yamsterman - 1/48 scale - POF
hi chuck
i had to look twice myself at the wing transoms.....and the rest of em!!!
the wing transom starts off as a sqaure block of timber,slightly thicker than is required but wide enough to paste the plan view on top.
i had a play around this morning and remade the piece in 1/24 scale,primarily because its easier to photograph and secondly it shows the round up better.
i havnt gone to any great lengths to finish the piece,made from a bit of ramin i had lying around,but the photographs should show the construction sequence in the order i did it.
the rear face of the wing transom need to have its face angled in order to be in the same plane as the rabbet of the stern post......not shown on the plans.
the ends of the transoms may need to have an angle planed on them in order to fit flush against the rear face of frame 22.......the bottom of the wing transom will fit against the top of the rear part of frame 22.
hope this makes sense.
the following photos should be in the right order for the construction sequence.
-
yamsterman got a reaction from Saburo in WASHINGTON GALLEY by yamsterman - 1/48 scale - POF
WASHINGTON GALLEY PART 2
HI ALL
WORK HAS CONTINUED ON THE KEEL.SCARF JOINTS HAVE BEEN CUT AND TARRED AND FALSE KEEL ADDED.
KEEL IS SLIGHTLY OVERLENGTH AT THE MOMENT TO ALLOW FOR FINAL ADJUSTMENT.
STERNPOST CUT AND TAPERED ,INNER STERNPOST SIZED AND READY FOR JOINT FOR TRANSOM TO BE CUT.
AFT DEADWOOD ASSEMBLED AND REBATES CUT FOR FRAMES.
STEMPOST CUT AND INNER SURFACE FINISHED, OUTER SURFACE AND GRIPE YET TO BE FULLY FETTLED. THE SAME APPLIES TO THE FORE DEADWOOD.
THE AFT DEADWOOD REBATES WERE CUT ON THE BYRNES SAW AS PER GREGS METHOD.
THATS THE STATE OF PLAY AT THE MOMENT.....GETTING READY TO CUT THE RABBETS!!!!
CHEERS.....MICK
-
 yamsterman got a reaction from druxey in WASHINGTON GALLEY by yamsterman - 1/48 scale - POF
hi chuck
i had to look twice myself at the wing transoms.....and the rest of em!!!
the wing transom starts off as a sqaure block of timber,slightly thicker than is required but wide enough to paste the plan view on top.
i had a play around this morning and remade the piece in 1/24 scale,primarily because its easier to photograph and secondly it shows the round up better.
i havnt gone to any great lengths to finish the piece,made from a bit of ramin i had lying around,but the photographs should show the construction sequence in the order i did it.
the rear face of the wing transom need to have its face angled in order to be in the same plane as the rabbet of the stern post......not shown on the plans.
the ends of the transoms may need to have an angle planed on them in order to fit flush against the rear face of frame 22.......the bottom of the wing transom will fit against the top of the rear part of frame 22.
hope this makes sense.
the following photos should be in the right order for the construction sequence.
-
yamsterman got a reaction from Canute in WASHINGTON GALLEY by yamsterman - 1/48 scale - POF
hi ken and christian
thanks for looking in.........happy with the first frame to go in.....the aft cant frame may need some more work,need to study the plans a bit more!
looking forward to more frames and a ship slowly emerging!
cheers....mick
-
 yamsterman got a reaction from Chuck Seiler in WASHINGTON GALLEY by yamsterman - 1/48 scale - POF
hi chuck
i had to look twice myself at the wing transoms.....and the rest of em!!!
the wing transom starts off as a sqaure block of timber,slightly thicker than is required but wide enough to paste the plan view on top.
i had a play around this morning and remade the piece in 1/24 scale,primarily because its easier to photograph and secondly it shows the round up better.
i havnt gone to any great lengths to finish the piece,made from a bit of ramin i had lying around,but the photographs should show the construction sequence in the order i did it.
the rear face of the wing transom need to have its face angled in order to be in the same plane as the rabbet of the stern post......not shown on the plans.
the ends of the transoms may need to have an angle planed on them in order to fit flush against the rear face of frame 22.......the bottom of the wing transom will fit against the top of the rear part of frame 22.
hope this makes sense.
the following photos should be in the right order for the construction sequence.
-
 yamsterman got a reaction from sfotinos in WASHINGTON GALLEY by yamsterman - 1/48 scale - POF
hi chuck
i had to look twice myself at the wing transoms.....and the rest of em!!!
the wing transom starts off as a sqaure block of timber,slightly thicker than is required but wide enough to paste the plan view on top.
i had a play around this morning and remade the piece in 1/24 scale,primarily because its easier to photograph and secondly it shows the round up better.
i havnt gone to any great lengths to finish the piece,made from a bit of ramin i had lying around,but the photographs should show the construction sequence in the order i did it.
the rear face of the wing transom need to have its face angled in order to be in the same plane as the rabbet of the stern post......not shown on the plans.
the ends of the transoms may need to have an angle planed on them in order to fit flush against the rear face of frame 22.......the bottom of the wing transom will fit against the top of the rear part of frame 22.
hope this makes sense.
the following photos should be in the right order for the construction sequence.