DaveBaxt
-
Posts
1,324 -
Joined
-
Last visited
Content Type
Profiles
Forums
Gallery
Events
Everything posted by DaveBaxt
-
Period Scale Model Masting and Rigging Tables
DaveBaxt replied to DaveBaxt's topic in Masting, rigging and sails
Bob thank you for finding that spread sheet. Now that I have borrowed a PC with windows 11 and excel on I can have a proper look at it. I have managed to down load Danny's spreadsheet and the one I downloaded origonally onto a Chromebook , I was able access the calculations page but as it is many years since I did any spreadsheet work and only fairly small ones, I got lost off a bit and could not make any sense and some of the commands were lost on me, such as the 'If.............. ' command.. It made me a bit dizzy if I am honest. I will take another look at your link, but I think jumping into a spread sheet of someone else work and this large is probabaly beyond my apprehension. I must thank you again Bob for sticking with me on this one. Your patience holds no bound. -
Period Scale Model Masting and Rigging Tables
DaveBaxt replied to DaveBaxt's topic in Masting, rigging and sails
May I be so bold as to ask one more question regarding mast dimensions if I may. I see from the AOTS Diana was launched on march the 3 1794. I also notice that 1794 is a fairly important year for the subsequent change in mast dimensions and how to work them out. I f there is a change of dimensions in this year I am assuming if the ship is launched without masts and perhaps not made yet. In this case would we take the formula given for before 1794 or for after that year and after. Once again I am not sure if this would be much different other than a slight difference in the diameters. So really just a matter of interest and perhaps the diameters increased due to the increase in the amount of sail carried as time progressed. Just a thought so could be wrong. Best regards Dave -
Period Scale Model Masting and Rigging Tables
DaveBaxt replied to DaveBaxt's topic in Masting, rigging and sails
Phew I am glad I got that one sorted. So for my masting and spars I think I am pretty well sorted then. However apart from the breeching rope and the gun tackle I think I will leave the rest of the rigging for another day. But a huge thanks for walking me through this. Best regards Dave -
Period Scale Model Masting and Rigging Tables
DaveBaxt replied to DaveBaxt's topic in Masting, rigging and sails
My working out is different than the spread sheet. for a main mast length of 92.5 ft . According to Steel the diameter is 9/10 th an inch for every 3 ft for 1794 gives me 30.8x9/10=27.75" change to metric x 25.4 and divide by 64 =11.01mm Fore mast is 0.9 the length of the main mast after 1773= 83.25 ft /3ft = 27.25 x 9/10 = 24.975" x 25.4 then divide by 64 = 9.91mm. According to the book AOTS Diana they also have the main mast at 11.01mm but the fore mast diameter at 9.77mm . So another discrepancy. Any idea where I am going wrong??? -
Period Scale Model Masting and Rigging Tables
DaveBaxt replied to DaveBaxt's topic in Masting, rigging and sails
Having looked more closely at the results of the masting sizes on Danny's masting sheet and looking at the diameter of both the main mast and the fore mast as the same 11.2mm on the model. I believe this to be incorrect but I could be wrong. I have taken my calculations from Lees book'The masting and rigging of English ships of War ' and as the lower fore mast is shorter than the main mast by 0.9 x the main mast = the fore mast then I assumed that as the diameter of the mast is calculated for 1" for every 3 ft of masting , then if the fore mast is shorter than the main mast then the diameter must be smaller. There is some ambiguity concerning Lees wording on this which perhaps I may have got wrong . In the Proportionate Diameters of the Mast section in Lees book FORE equates to 'The same proportions as given for the Main' My take on this would be for the same proportions as to the length of the fore mast and not main mast. I Hope I am making sense and wonder if it is possible to change the formulae in the spread sheet without too much trouble but beginning to think Allan is correct and we are just better off just working all this out for ourselves. There is however the possibility that it might be another incompatibility issue. However it is my hope to borrow a windows office 123 lap top installed and try this out for my own curiosity.Thanks again for all your help and patience. Best regards Dave -
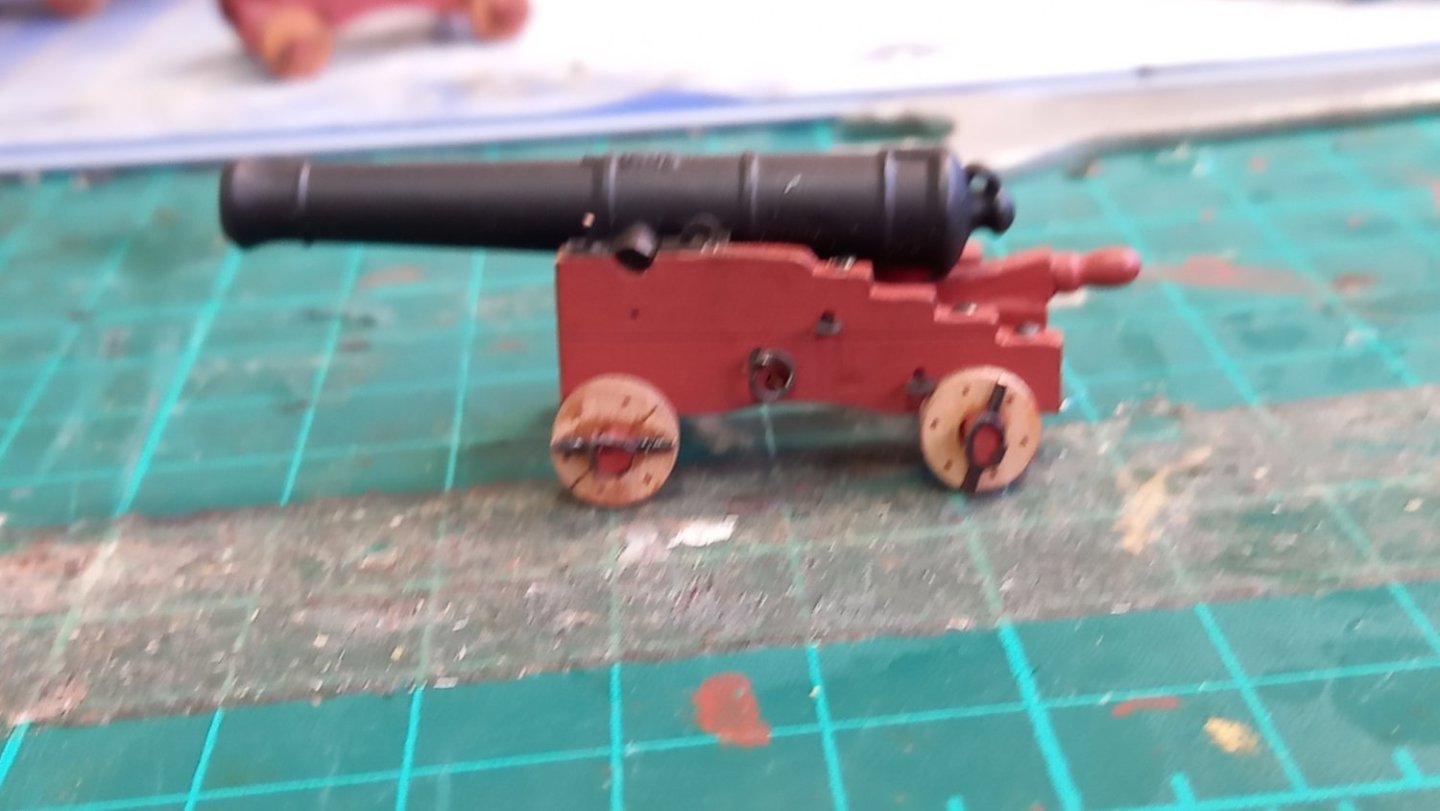
Thank you Andrew for kind words. Hopefully the heights should be fine. If not I might have to add a shim or remove a sliver of material from quoins but that could be tricky. Perhaps I could take a bit off the front or the back of the trucks but that might look a bit odd with a flat tyre. I have a couple of spare trucks if there is only an odd one or two. So could make another if all else fails but really hoping it works out OK.
-
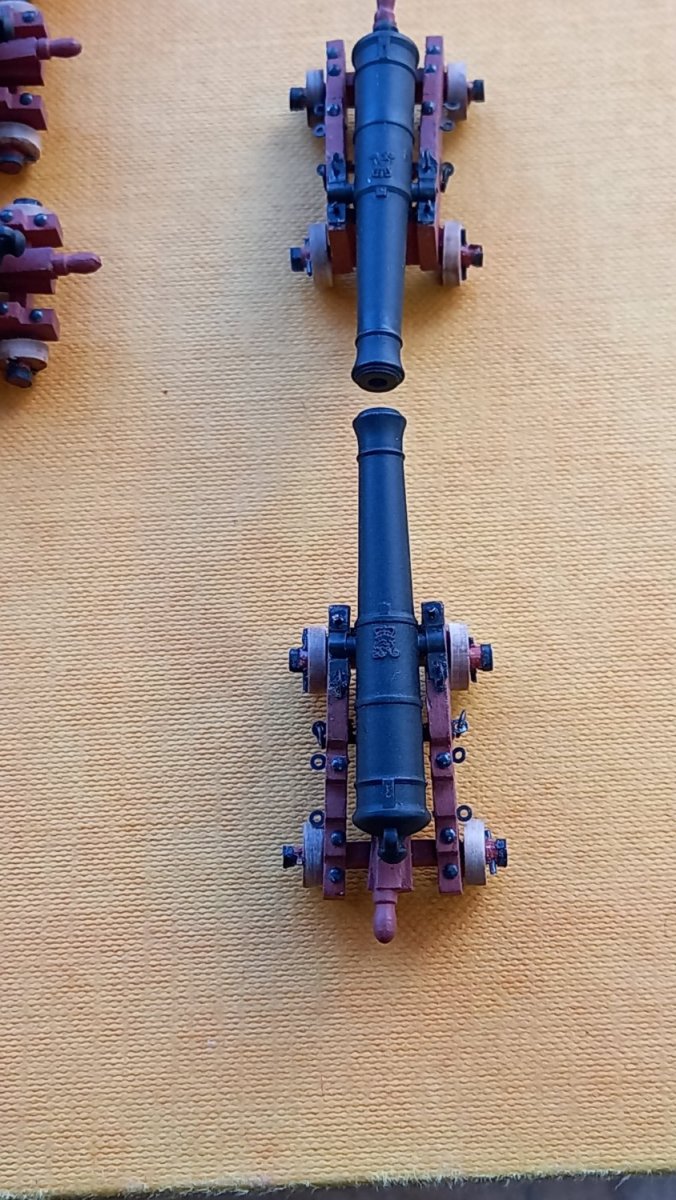
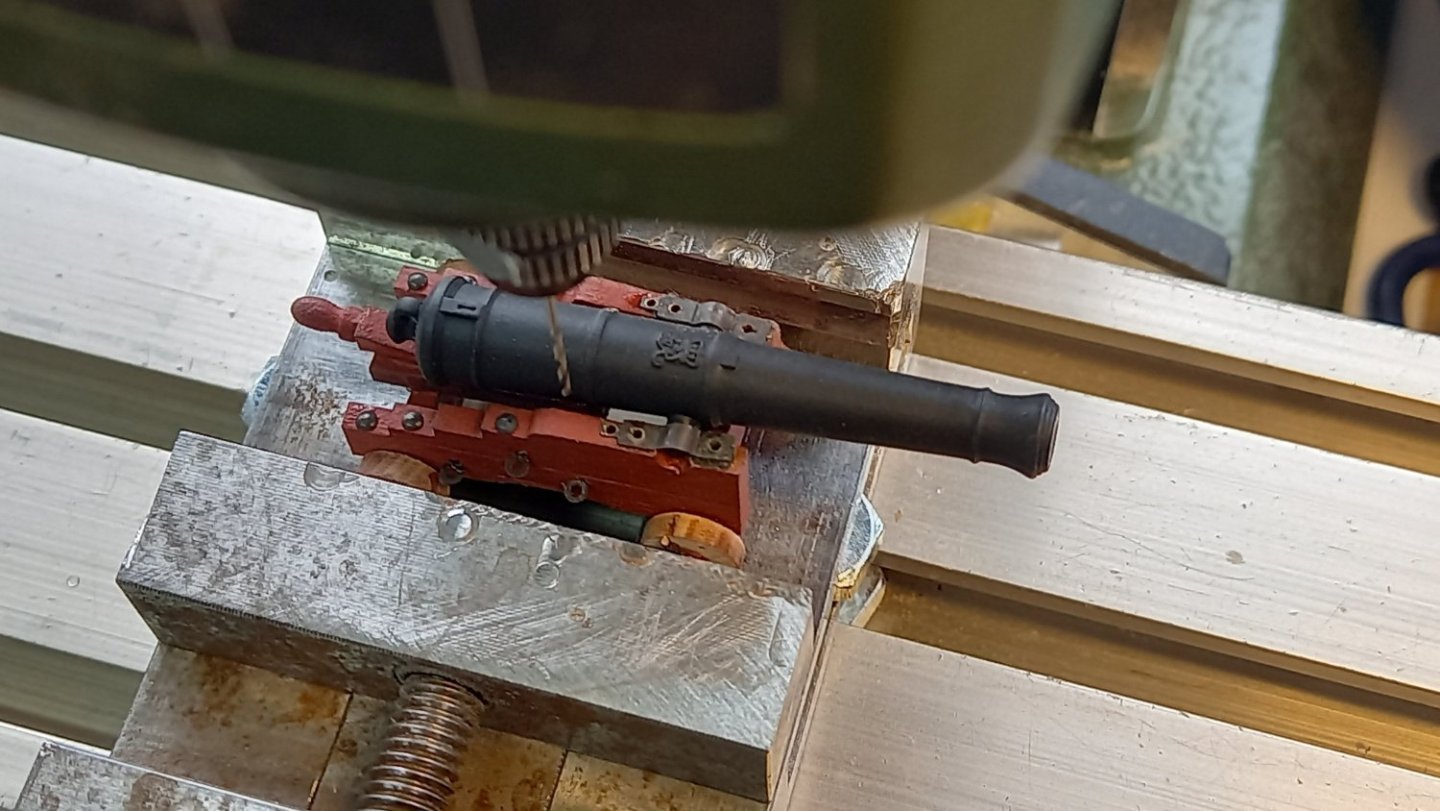
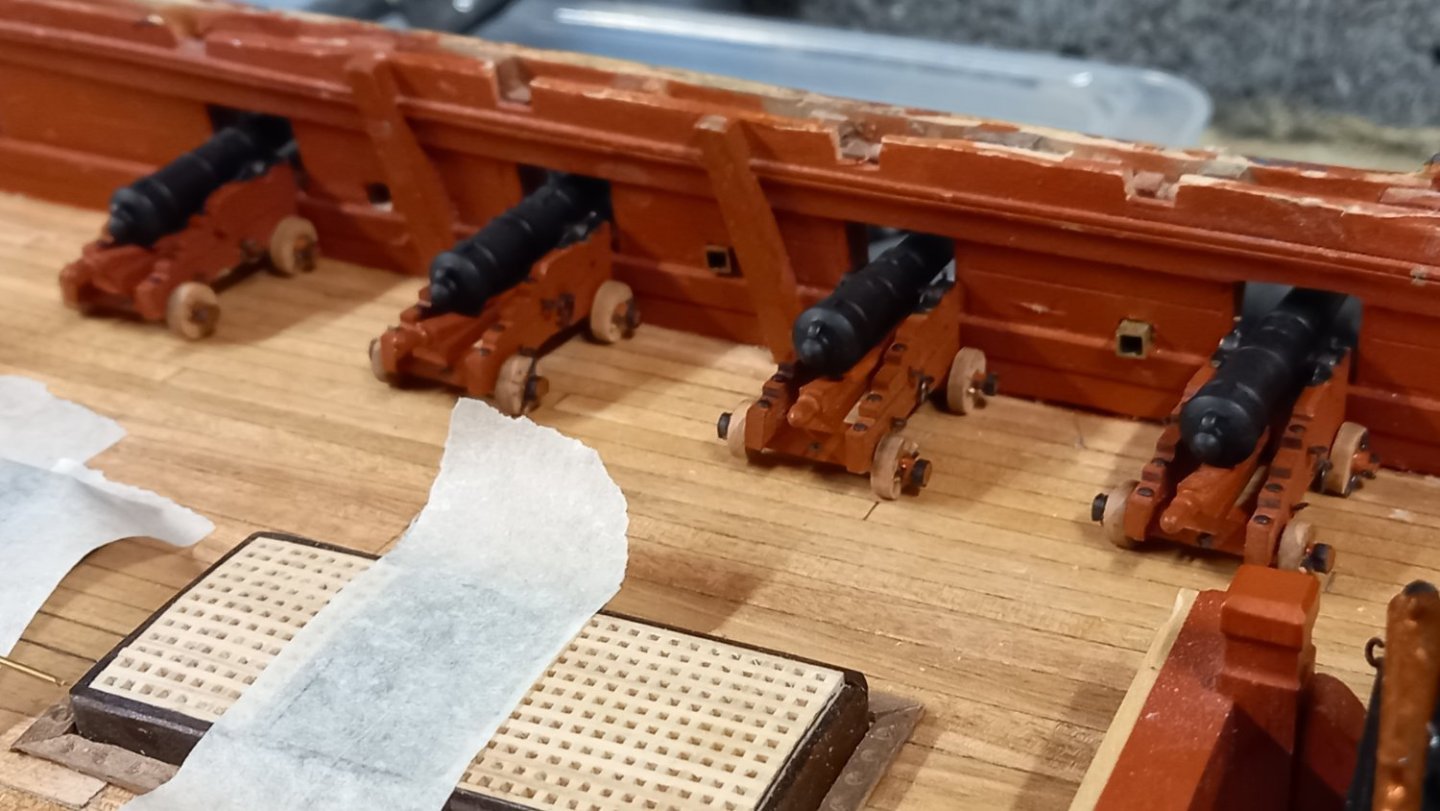
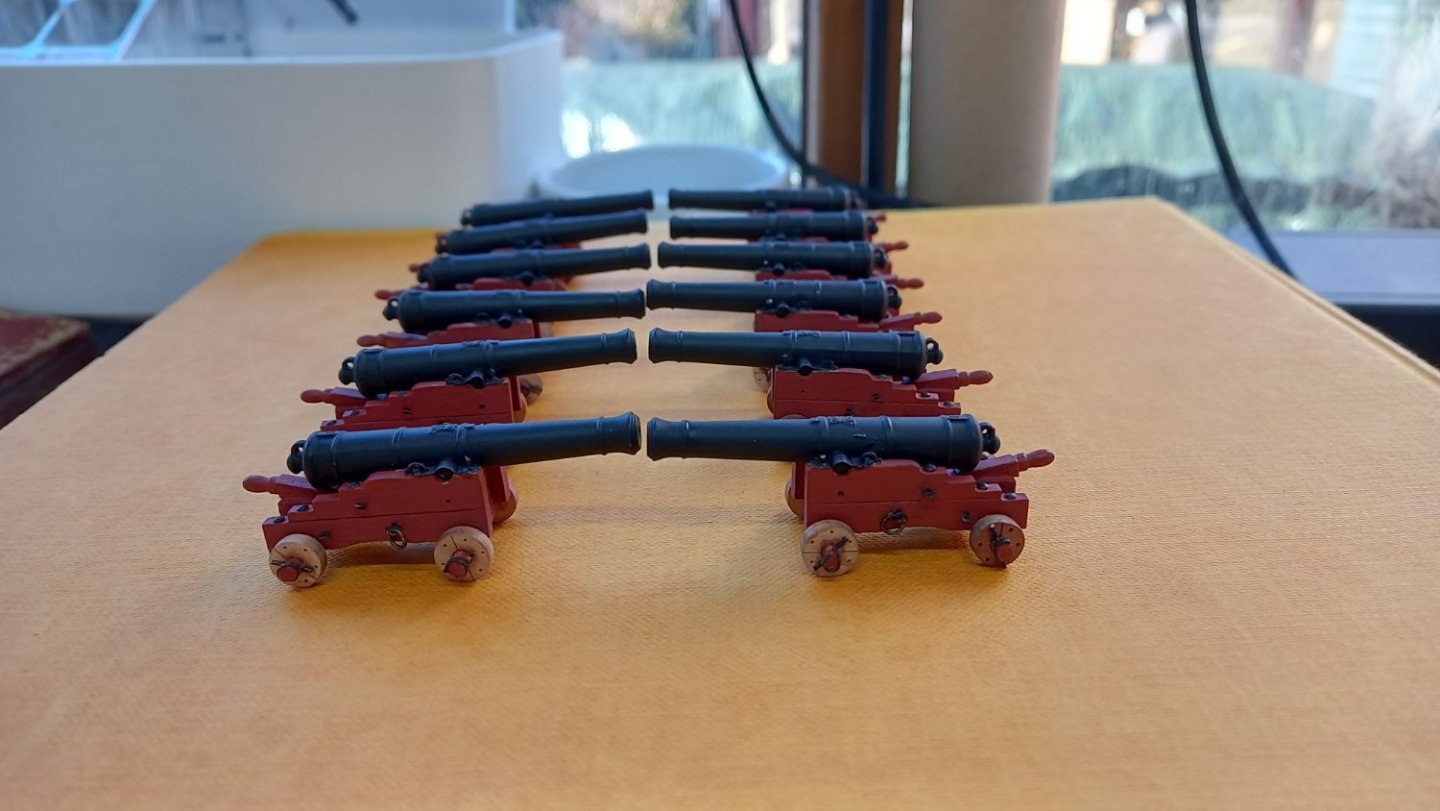
Few! Almost completed adding the brass fitting to the cannon but cannot make up the rigging for the cannon as I am still waiting for the breeching rope from 'Ropes of scale' I had some difficulty fitting the capsquare bolt to the 18lb gun carriages as these were tiny, so ended up drilling out the capsquare on my Proxxon milling m/c and using blackened brass wire. I also ended up removing one of the eye bolts on each side as I realised that it was easier to attach the 3mm brass rings to the eye bolt before attaching to the carriage. Whilst waiting for the breeching ropes I have a few small jobs which need attending to mainly adding the Cavel blocks and securing the brass lings to the or ports. I can also drill the holes for the breeching rope gun tackle eye bolts . This should be enough to be getting on with but will be taking a little break during the Easter period. Another mistake . I should not of glued the Quoins into position until I checked the hieght of the gun barrels in the ports but hopefully they are fairly central . The of the gun barrels look to be all a similar height so fingers crossed they look ok I also forgot to mention that I ended up fitting the Bloomfield cannon , although I am still uncerain if these were actually fitted to the Diana. I quite like the look of them, although I did not attempt to fit the very tiny gun lock or the chain for the cap ssquare key.

-
Wreck of Bonhomme Richard found off Yorkshire coast.
DaveBaxt replied to uss frolick's topic in Nautical/Naval History
Lovely area and coastline. It's a long time since I was up that way but never noticed the plaque. Hope you get some decent weather. Enjoy your Easter Break Andrew. You deserve it. -
Thank you Thukydides for another table /list . I think thats what I was trying to say that the carriages would move further back and causes problems for them when first fitted.Perhaps thats why there design of the carriages were different too. Am correct in thinking the different amounts of powder were for Proof (testing) In battle ( service) Saluting someone of another vessel perhaps but could not work out what sealing is? Thank you again for sharing your valued research , you definitely like to get an understanding of what really might be going on all that time ago. Thanks for your likes on my Diana log too.
-
Would a lighter gun and possibly carriage not move further back for the same size weight of shot and the the same amount of charge. Just wonder why they had a few problems when first used. The length of ropes do seem a bit shorter than for the same calibre ordI inary cannon but could be wrong. Thukydides thank you for the rope sizes much appreciated . It was my plan to use the 5.5" for the cannonade guns as ell as for the 18lbs as give in Allan's suppled data and see how it looks . Best regards Dave
-
Thank you for your thoughts which are much appreciated. I take my hat off to you sir for your thirst for knowledge and look forward to hearing if you come up with anything that might give a better indications . Best regards Dave
-
This is turning out to be a very indepth and interesting discussion and although I am having difficulty understanding the tables( probably due to the writing and mpoor eye sight) I however thank you greatly for posting them and for your time and patience in helping me.Due to yet not being able to determine the exact dimenions of the breeching ropes for cannonades and, interestingly I see on Allans supplied 'Instruction of gunnery' table it states on the bottom of the table ' That the length of the cable is left to the the discression of the gunner. It will be interesting where this discussion leads and I have some time before I will need to make the choice but have orderd up rope for 32lb guns and compair this with the 18lb guns and see what the differnce looks like at a scale of 1:64. Thank you all for the input on this thread and I am looking forwaed to see how far it goes and if it is ever actually resolved or infact what other people have done with their cannonade breeching ropes.
-
Period Scale Model Masting and Rigging Tables
DaveBaxt replied to DaveBaxt's topic in Masting, rigging and sails
Thank you Bob and Allan for your valued replies Bob, I was beginning to think that would be the case but it at lease I got the mast sizes from the program which seem to ceheck out ok. Looks like I will have to dig out an old windows lap top and see if I can get it going. It worked fine as long as it was still plugged into the mains electrical supply. Unfortunatetly it is quite old and probably wont run any programs these days but who knows. Allan thank you for letting me know the data is incorrect for between the dates you have mentioned. For the record I have a copy of James Lees book so will be able to work out the mast and rigging sizes from Lees instruction and least I will know I am correct for the date of the Diana was built.1794. Best regards Dave -
Allan thank you again for the above fore mentioned rope sizes. I am currently combining a list of different size ropes which I will need in the near future and require them to be ordered, thanks to you I am almost there. When ordering Breeching rope for Cannonade the dificulty is whe using bore of caliber . I am not sure if when firing the Cannonade whether of not the recoil would be less or more as the canonade is lighter but the shiot is heavier. I would like to know your thoughts or any one elses thoughts for that matter . Also Allan if I could ask you another favour, perhaps you know of another chart listing the size of breeching ropes. I am assuming the tackle would be similar to a normal 32lb cannon but I could be wrong. i must thank you again Allan for your time and patience.Best regards Dave
-
Period Scale Model Masting and Rigging Tables
DaveBaxt replied to DaveBaxt's topic in Masting, rigging and sails
Thank you for your valued imput and for the great spreadsheet by Danny Vadas, which at first had apeared to work fine. There was no warning message but I did have to transfer it over to google speadsheet called sheets. Anyway all seemedto be fine and the data for the mast came up ok but I was unable to use the buttons on the front of the sheet and had to use the tabs along the bottom. All great and the main mast diameter calc came up 11.2mm . So all good. I then went to the standing rigging using the tab along the bottom marked standing. Again all calcs came up for the Bowsprit and I assumed these would be correct, why wouldn,t they be as the mast dimenstions were fine.I have tried the button on the front marked 'Next Yard' and nothing happens as non of the buttons on the front apear to work. I am ony able to navgate the spreadsheet using the tabs along the bottom, even when I click on the tab list (the arrow at the side of the tab)I can,t see anything to move me to another mast or yard.It is the same with the running tigging tab too. Once again I think there are issues running this type of spreadsheets on google sheets and I might need to use a Windows excel spereadsheet to work. I hope I am wrong, as my eyes lit up when I saw the mast sizes for the model in metric are correct. I apologise for giving you the incorrect file .I have now attached the correct file but unsre if you can see it.I do like That Danny Vadas spread sheet as it looks a very profession job. I am prepaired to use the Microsoft excel spreadsheet if it will run on a Chromebook and I am prepared to pay a fee if this is the only way forward. I appreciate your help and for your time and patience but I could be wrong ( hopefully I am not) but I am beginning to think there are compatibility issues at play. Period Ship Scale Tables (1).xlsx -
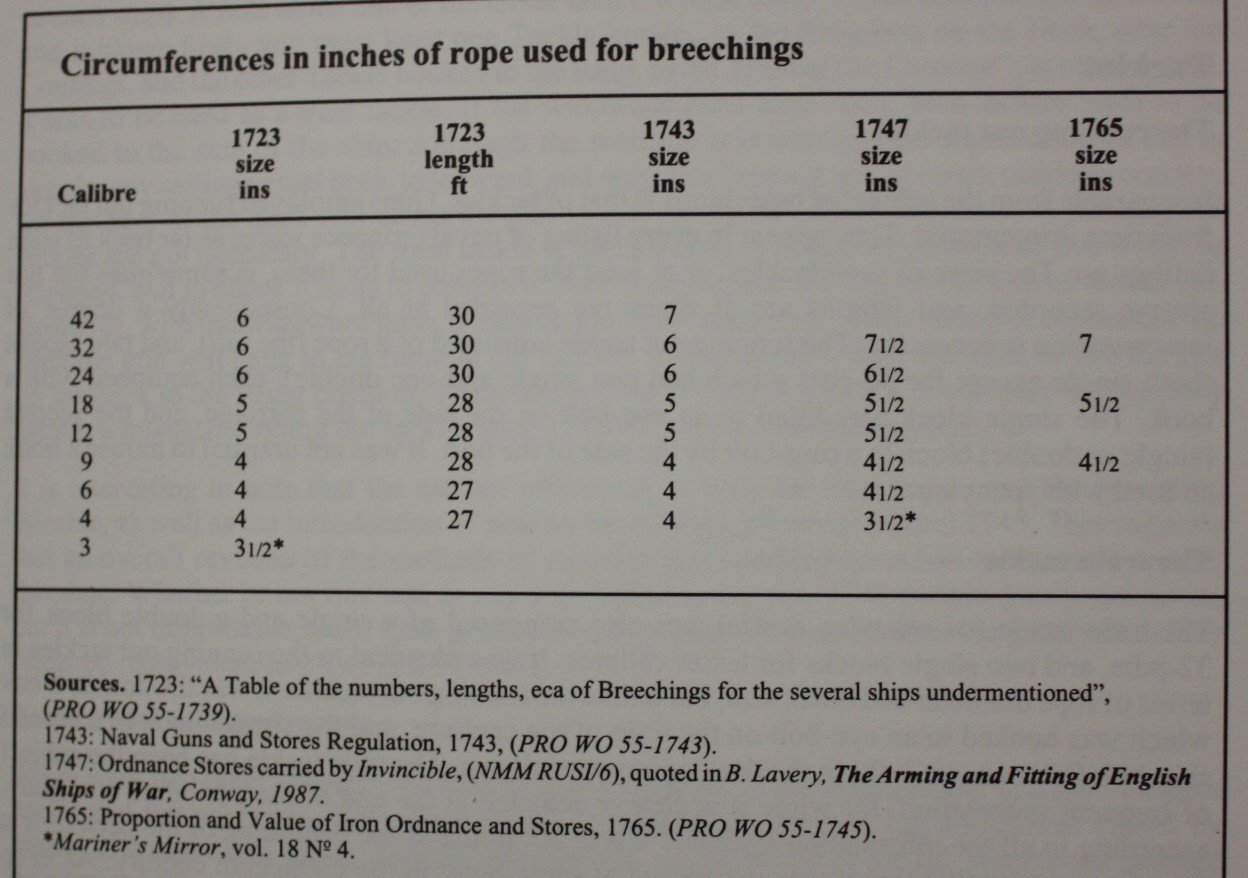
I have now started to consider the rigging to use for the guns and their aopropriate diameters. The popular choices used include the synthetic ropes made by Ropes of scale. The diameters of the ropes were supplied by Allen . Here is the link for the circumference of the Breeching ropes and for our 18lb guns is 5.5 " = 0.7mm. and according to Lees book gun tackles for 5th and 6th rates is generally 2" which equals 0.25mm There is also the length of the breeching rope to consider and again another great chart from Allan We can see from the above chart for a 4th rate ship with 18lb guns the Breeching rope would be 27 ft which equates to 129mm . As discussed with Allan the difficulty is this ring to ring or does it include the half hitch knots and seizing at the ends. But this will give me a good idea as to how much rope I will require for the Breech ropes and have decided to use the synthetic rope supplied by 'Ropes of Scale'. I would also like to thank Andrew Johnson for a very good link which I found very interesting regarding the position of the breeching ropes and their eyebolts on the inside of the bulwarks. It is shown in here ,there are in fact two eye bolts on each side .2 of the eye bolts I think are for running out the gun and 2 are swinging the barrel fore and aft. There are also two rings attached to eyebolts for the Breech ropes .All good stuff. I have also been looking into ordering some of the ropes I would need for the 9Lbs guns and the Canonades to try and save on the postage costs, so once again I will use the combination of the above charts together with Lees book ' The masting and rigging of English ships of war' The Breechings for the 9Lb cannon from the above charts have a diameter of 4.5" and a length f 25ft which is 0.568mm and 119 mm respectively. Looks like a lot of rope for the Cannon alone. Length chart (1).xlsx
-
Period Scale Model Masting and Rigging Tables
DaveBaxt replied to DaveBaxt's topic in Masting, rigging and sails
Thak you guys for your help and quick response. I would give you a link if I could . I am trying to copy and paste the file but isn,t happening for me. Neither is using the choose files option either. As you can tell I am no tech wizzard. For the record according to the AOTS Diana the main mast should have a diameter of 27.75 " the model main mast should therfore be 27.75 x 25.4 divided by 64 = 11.01mm on the model and I am assuming this will be the largest diameter. When inputting a 4th rate vessel in 1794 with a beam of 39.29ft and the length of 146.25ft the model mast diameter in metric is coming up as 2.6mm.? I am only trying to then work out the diameter of the stays and other rigging so I can order up what I need for the rigging etc.I had this problem last time and gave up in the end and just worked it out using Lees book as reference, but its a lot of hard work. Length chart.xlsx -
Hoping this is the correct place to post this question I tried to use this excel spread sheet a few years ago but unfortunately I was unable to get this to work on my chrome book at all. In the hope that things had moved on a bit, I decided to give this another go. When opening up the spreadsheet, unlike before everything looked to be in its correct place. After adding the scale 1:64 in the appropriate box I moved onto the dimension input boxes required, Trying both imperial and metric tabs for the inputs. On both occations the data for the main masts look to be way out. Being the proud owner of lees book' the Masting and Rigging of English ships of war' I was able to carry out the same calculations as the spread sheet and compare the Main mast using Lees formulae of the length of the lower deck plus the extreme breadth divided by two. This is given for calculating the main mast for 1794 . I also own the book AOTS Diana a 38 gun Frigate but unsure if this is a Class 4 or 5 ship.but tried both boxes isn the spread sheet . The measurements for the ship are given in ft and are as built are follows. length of lower deck 146 .25ft and Breadth extreme 39.29ft . My calculations work the main mast length to be 92.77ft. and the the diameter 1" for every 3 ft = 30.9 " . At a scale of 1:64 =0.4828" metric this equals 12.24mm. The Caldercraft kit has supplied 10mm dowel but do not intend to use this but have some 13mm square boxwood stock to make the lower masts .When adding the appropriate dimensions into the spread sheets I am getting ridiculous numbers for both the actual and model size masts. Where am I going wrong, Is it my calculations or is the excel spreadsheet still not compatable with my chrome book. Sorry for asking such an awkward question, but if I can resolve this issue it would save me a lot of time and I would therefore be very grateful for any input.Best regards Dave
-
Thank you Allan for those charts and information. Your diameters of breeching rope for the 18lb and 9lb Cannnon also tie in with lees book 'The Masting and rigging of English ships of war' So good to know I am on the right track Its a tricky one regarding the length of the breeching rope as to whether or not just its just from ring ro ring or the total length. I have also read somewhere, (probably Laverys book) that the breeching rope is normally 3 x the length of the carriage and if there is any difference to your attached chart would be interesting and if this is the total length of rope or not. I also wonder as I am using Bloomfield cannon and does not need to be wrapped around the cascable would this also make a difference. According to Laverys book, all cannon are tested and would not be allowed to recoil enough, so that the cannon could touch the hatch coamings unaided but does not allow for stretching over time . Perhaps they would need to be adjusted from time to time.( My thoughts) All interesting stuff ! Allan thank you again for your help. Best regards Dave
-
Thank you again Allan your input is always welcome . The chart is of great help and which makes the breeching fope slightly larger than Lavery but the same sizes as quoted in Lees book for 5th and 6th rated ships. I just wonder at 1/64 scale would the difference of 1/2" make any difference but then again may as well get it spot on. I have two Cannon for the 18Lb one which was supplied by Caldercraft and the other Bloomfield supplied by Vanguard models. The Bloomfield being the smaller bore. Unfortunately measuring the bore would probably not be very accurate, so where could I find the Calibar of the gun to work out the circumference/ diameter of the rope.
-
Thank you for the kind comments and building such a fine Diana which I have used your log on many occasions.
-
For the colours beige and Tan which seems to be the most popular for running rigging. Great thread by the way and excellent quality for the black I have received.Thank you
-
Cheers For the excellent link. I have had a quick look and think it's just what I need. I liked the bit about swinging the cannon and would need careful positioning of the eyebolts . This is different to what I initially thought and what is depicted in AOTS Diana.I will give it another study later as I need to go out but thanks again for your quick response. I can always rely on you to help me out. I also need to get some confirmation of the size of ropes as I am thinking of ordering some from ' Ropes of Scale' Think I am right and the size depicted in both Lees and Lavery are similar, but given as circumference rather than diameter but just need confirmation. I need to have another look at your build again and see which we you have decided to show off your cannon.Best regards Dave
-
It is my intention to show my model with the guns run out.According to Brian Laveries book the 'The Arming and Fitting of English ships of War 1600 to 1815) the breeching rope should be 51/2" in circumference and the tackle 2" for an 18lb gun in the late 1700s ( 38 gun frigate) He also shows diagrams with both breaching rope and both tackles attached and all 3 are slack. I am assuming this would be for show purposes only. I see many modellers prefer this situation but leave the setup without the training tackle. I am assuming the training tackle would only be used during battle and once the cannon is stowed away, would be removed. Livery also shows this when the cannon is stowed with the cannon barrel up against the side of the ship just above the gun port and both breaching rope and tackle would be taught.I am therefore wondering what people's thoughts are on the above and what are the merits of which way to show of their models with or without training tackle and size of ropes etc. I calculate this to be 0.7mm diameter for the breeching and 0.2 mm diameter for the other tackle.This seems a bit on the small size for the breeching at a scale of 1/64 I apologise in advance as I am sure this has been discussed many times before
-
Thank you Andrew for your kkind remarks. I still need to do a fair bit yet but you are correct I have spent alot of time on the gun carrages but hopefully it will be worth it in the end.