


Dan Vadas
-
Posts
3,261 -
Joined
-
Last visited
Content Type
Profiles
Forums
Gallery
Events
Everything posted by Dan Vadas
-
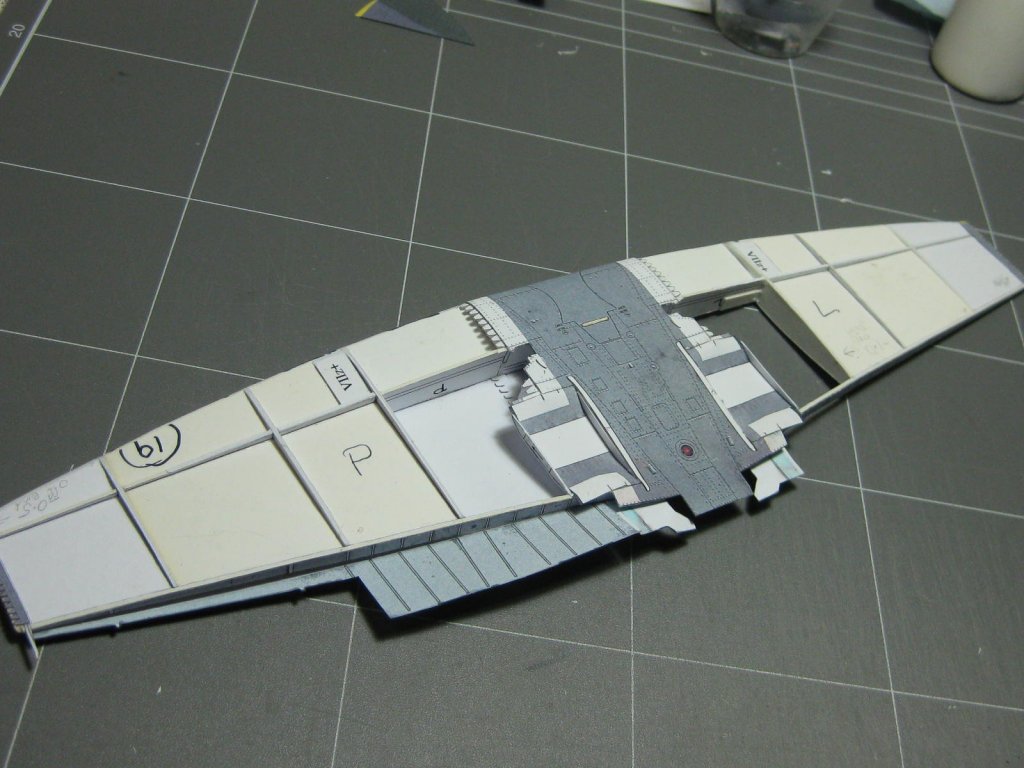
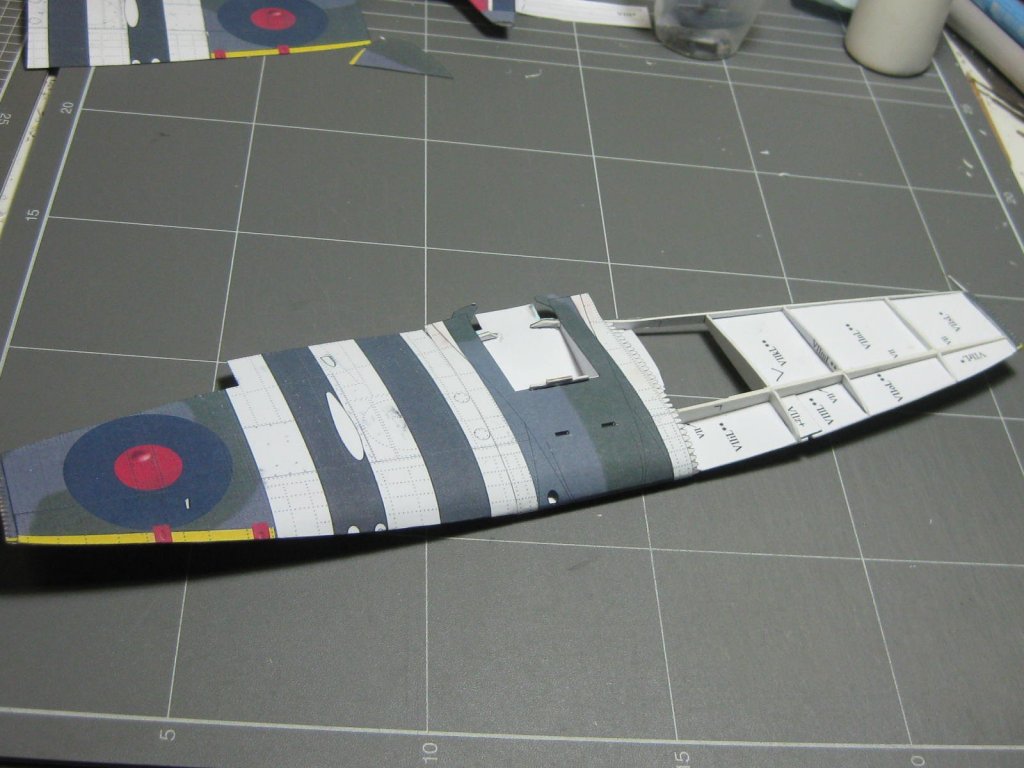
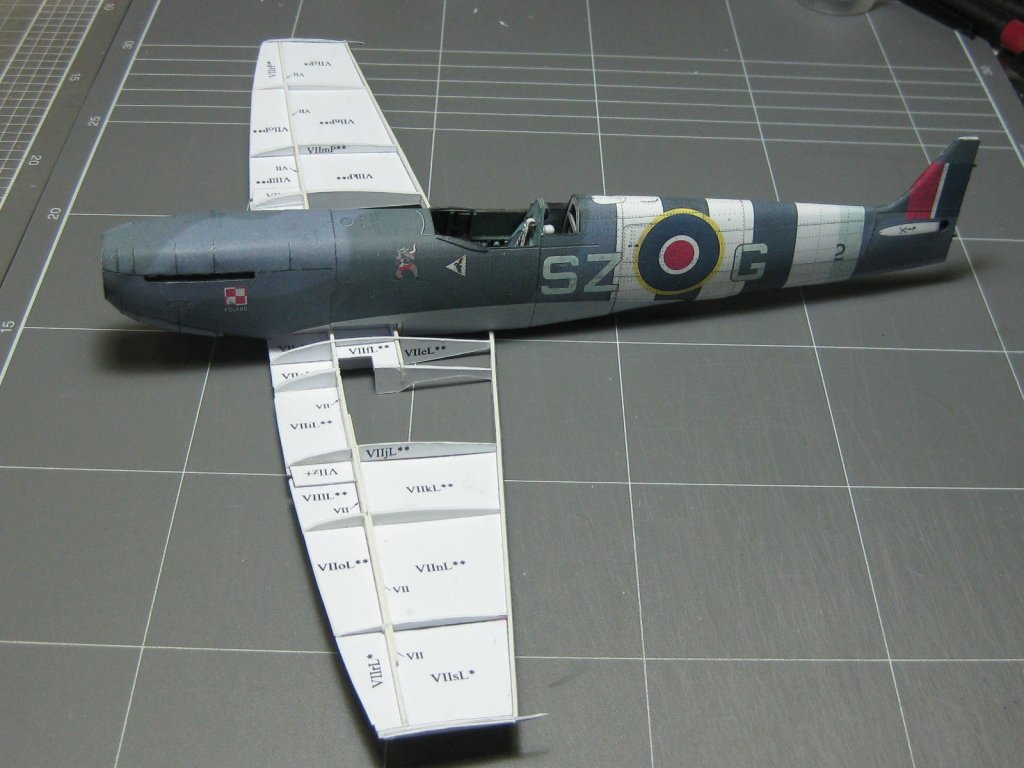
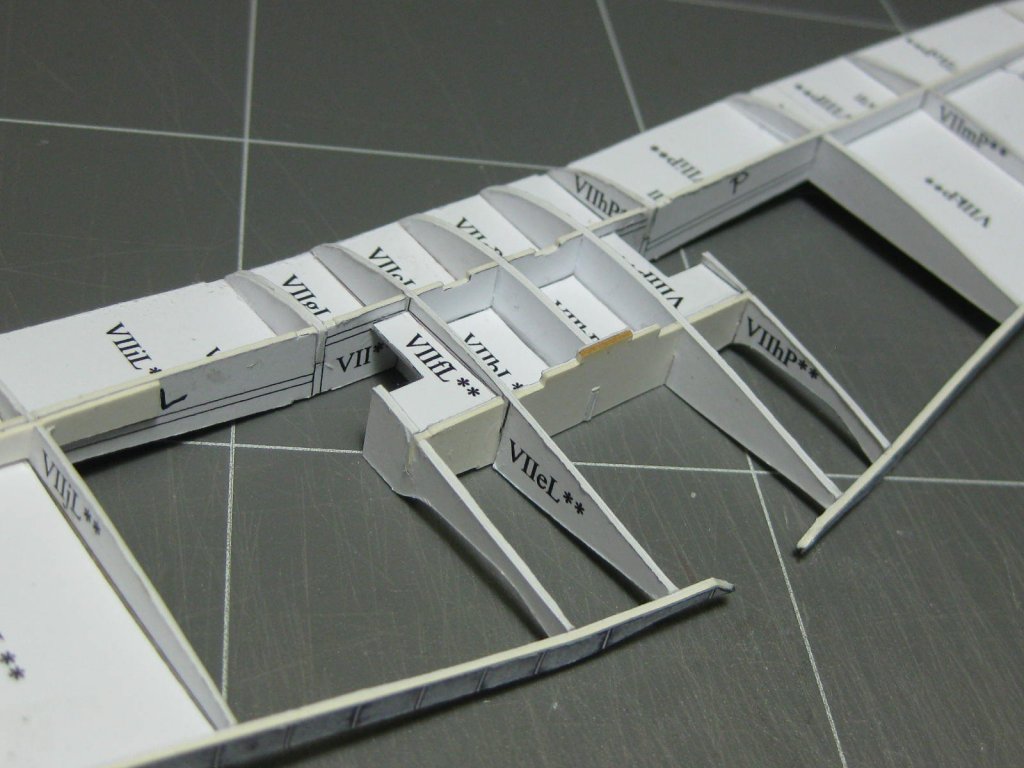
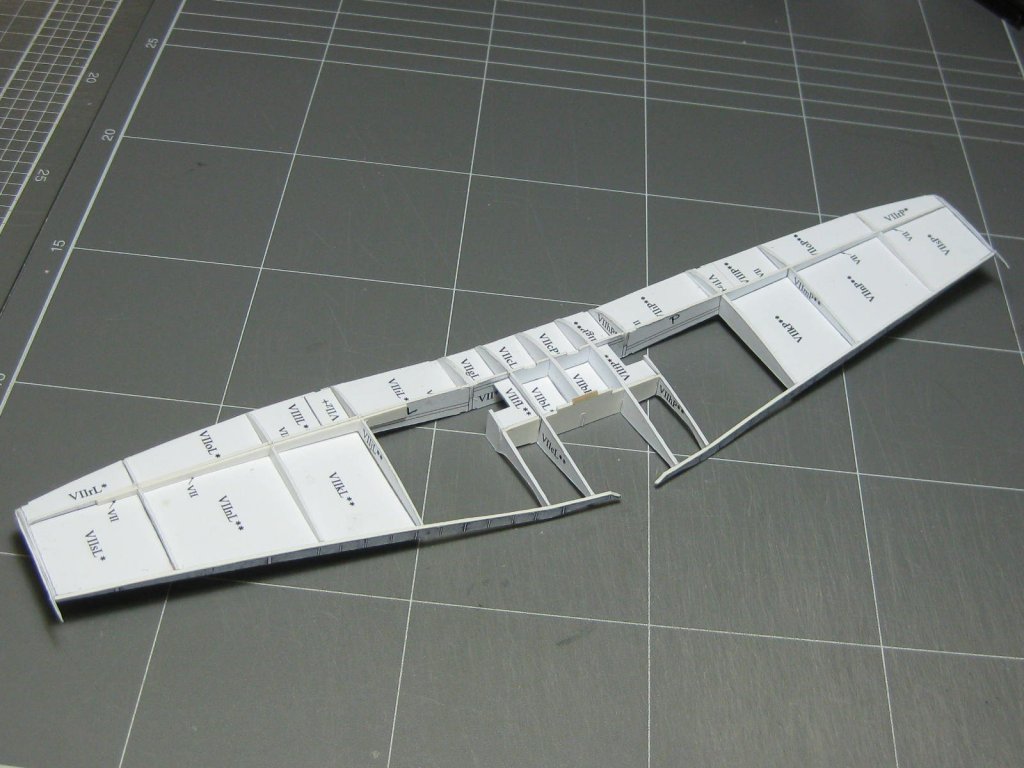
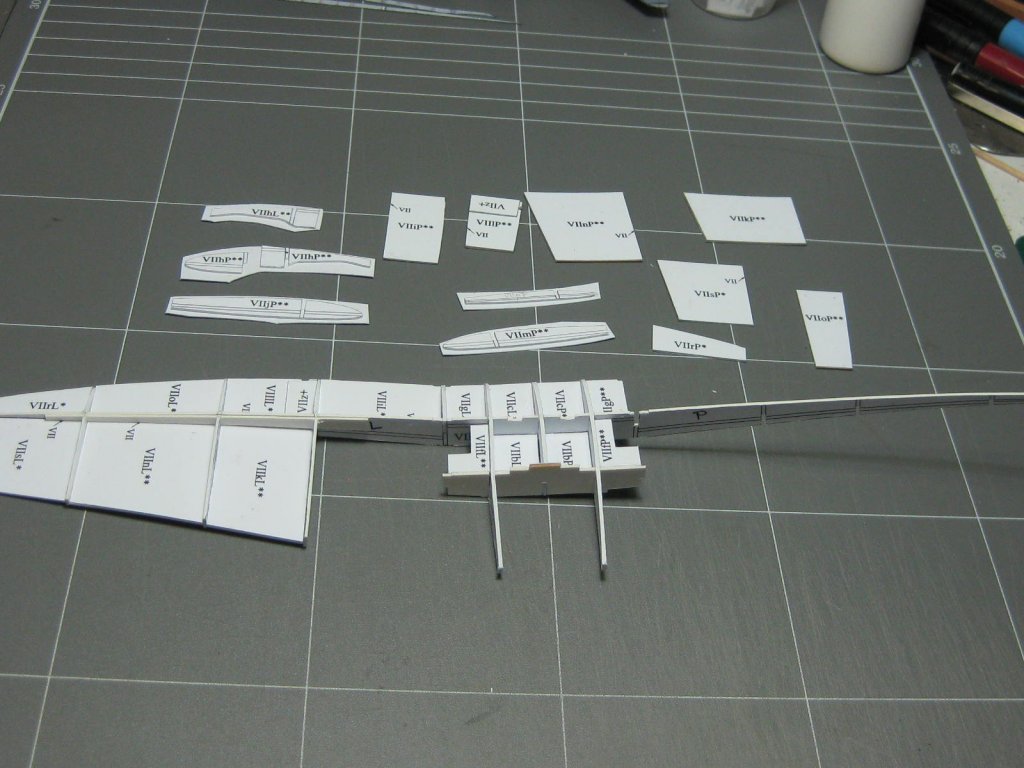
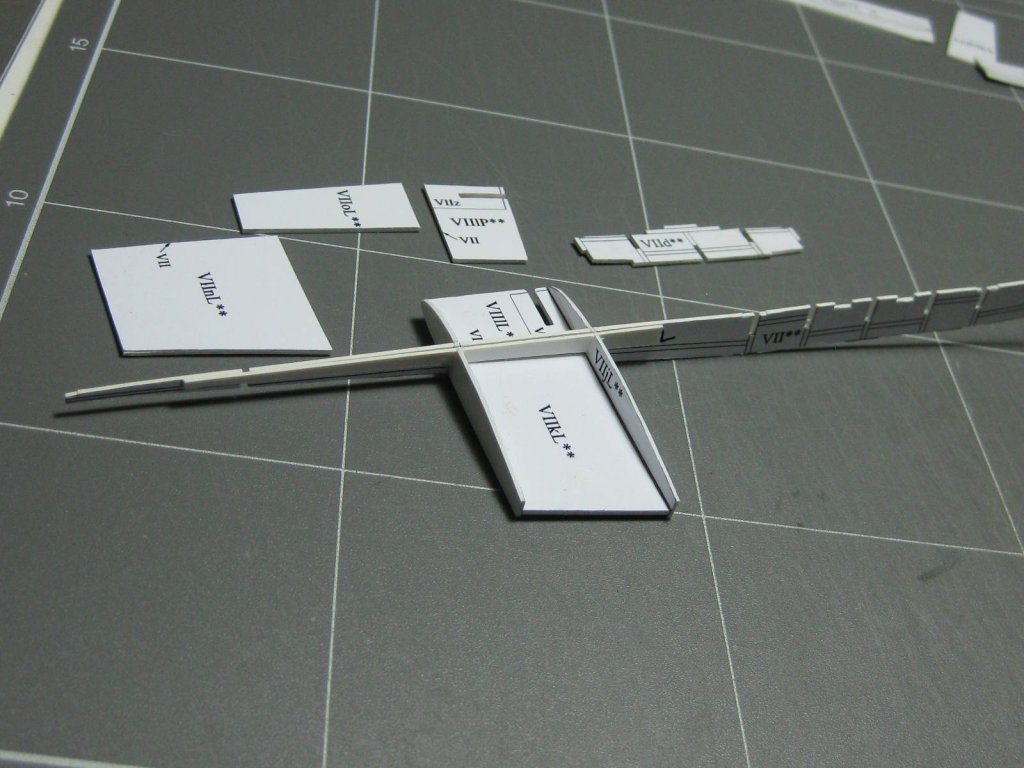
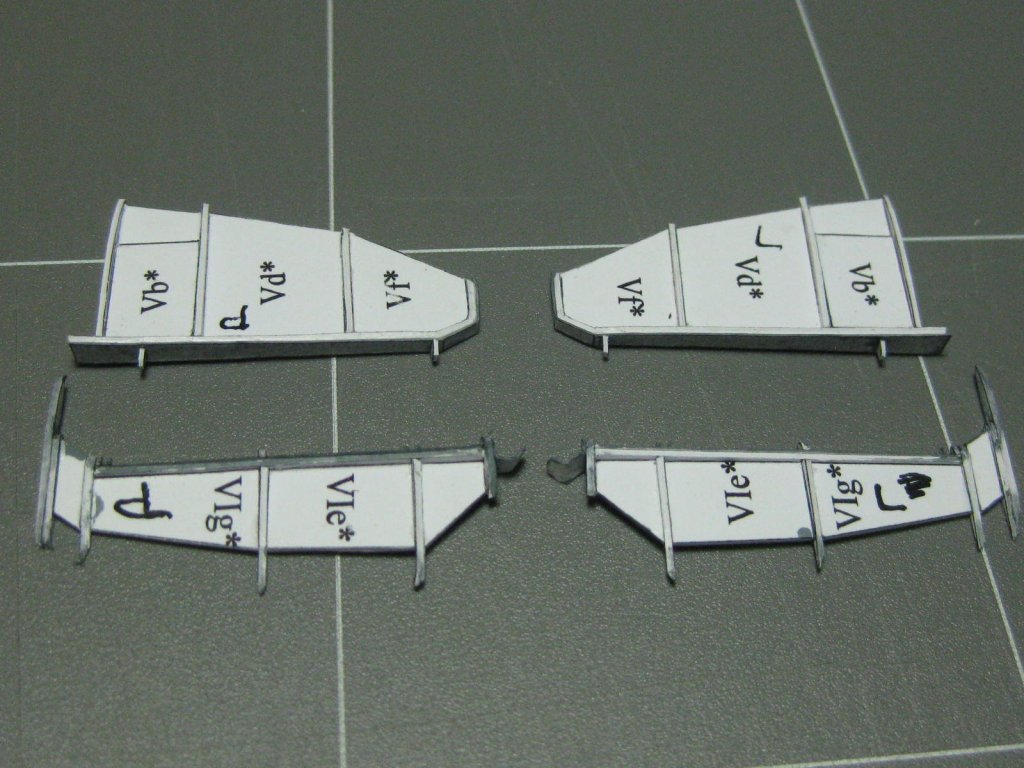
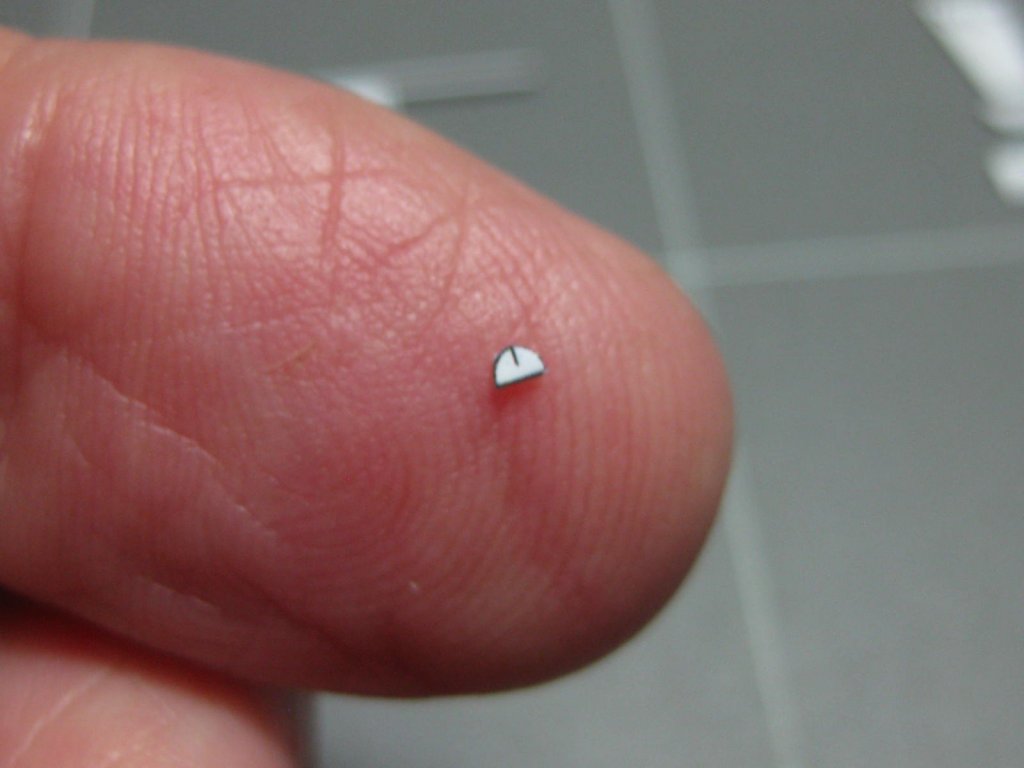
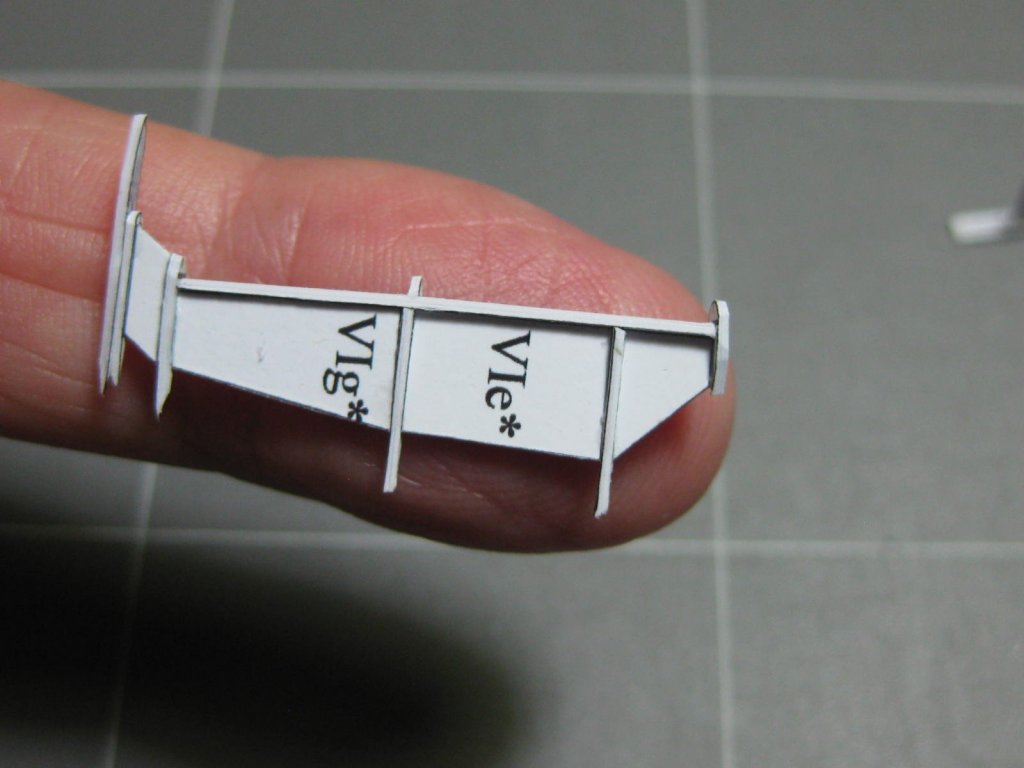
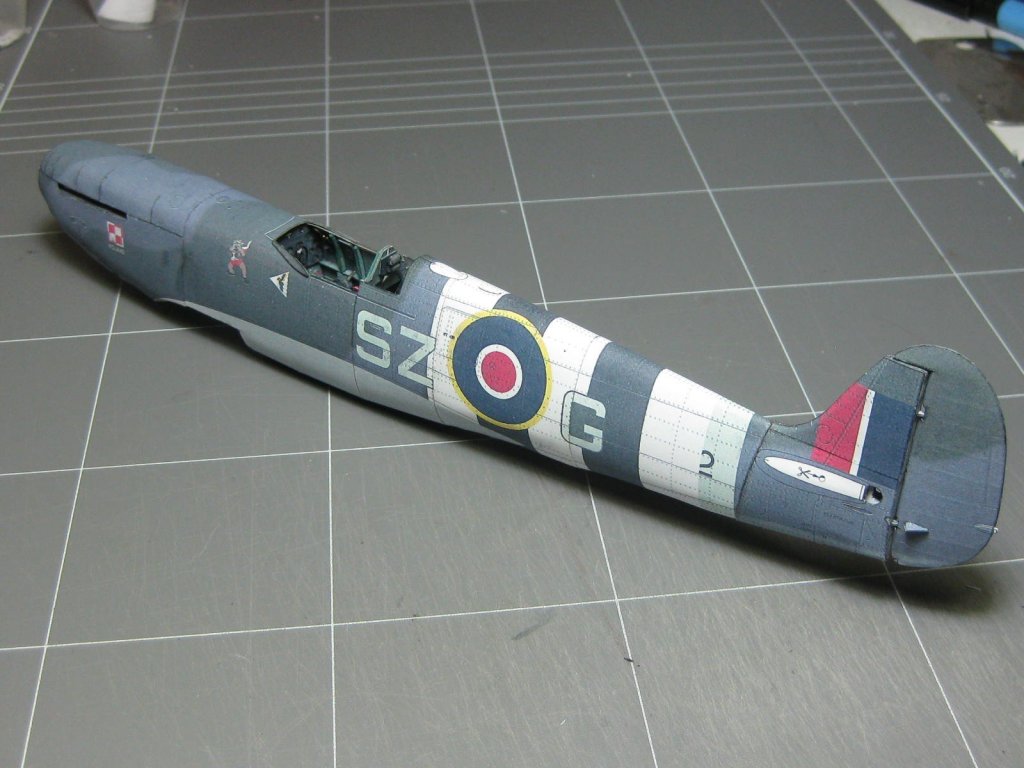
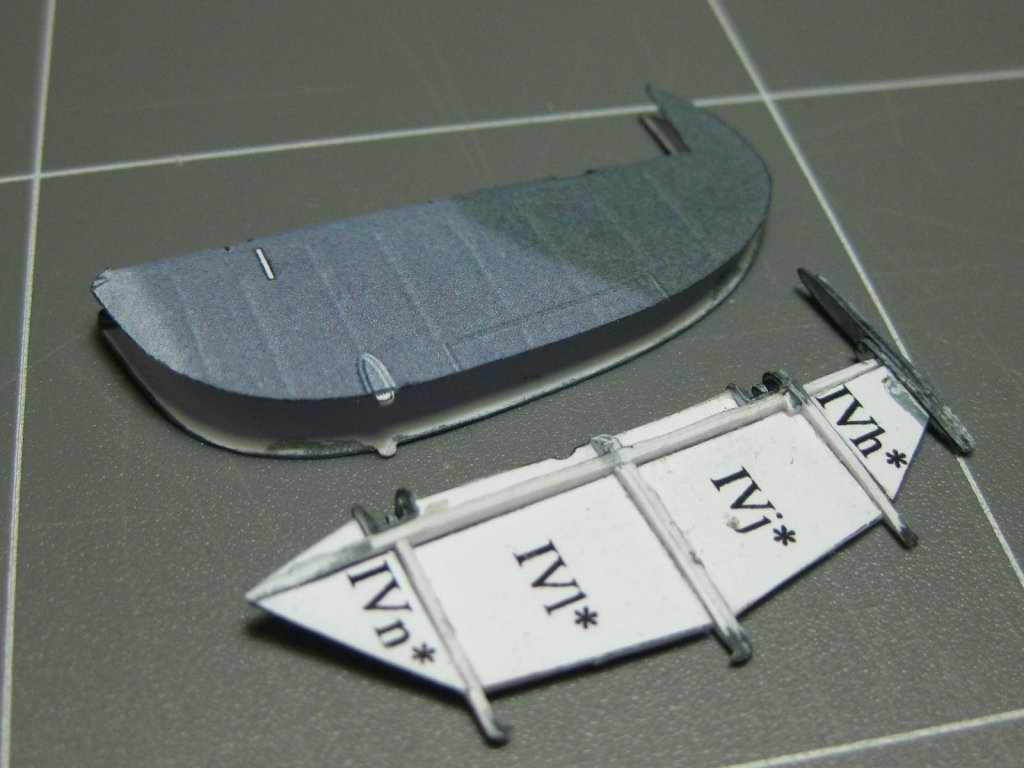
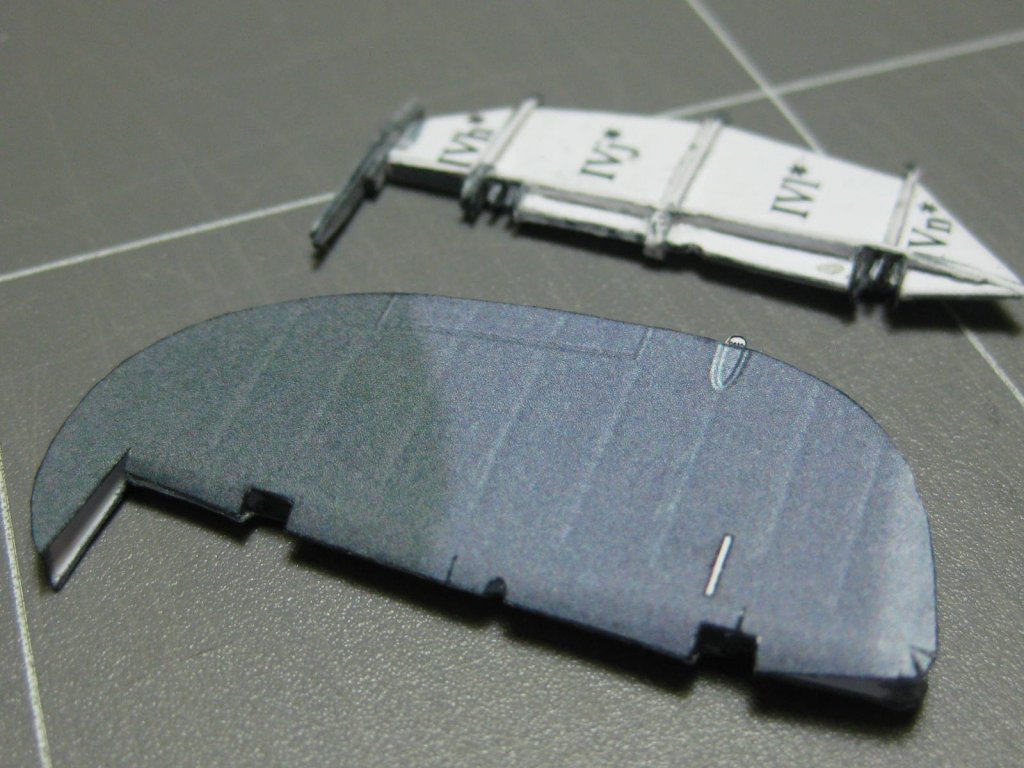
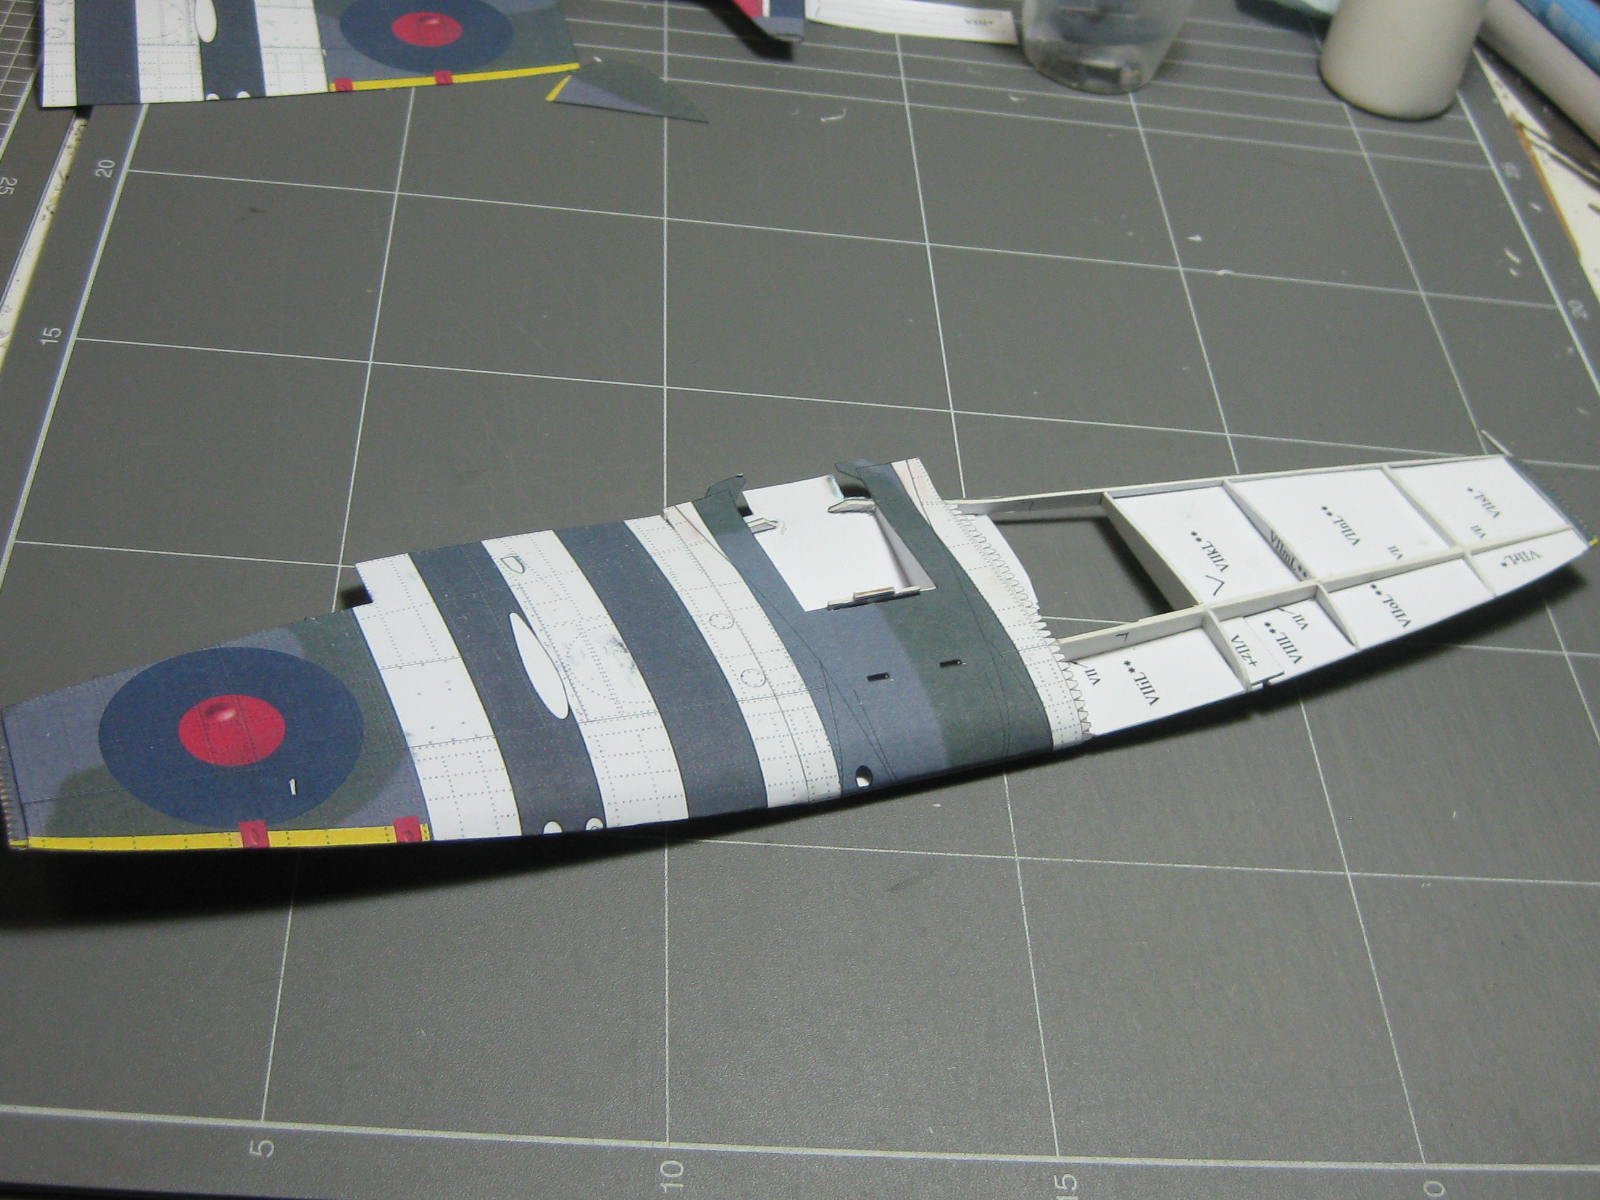
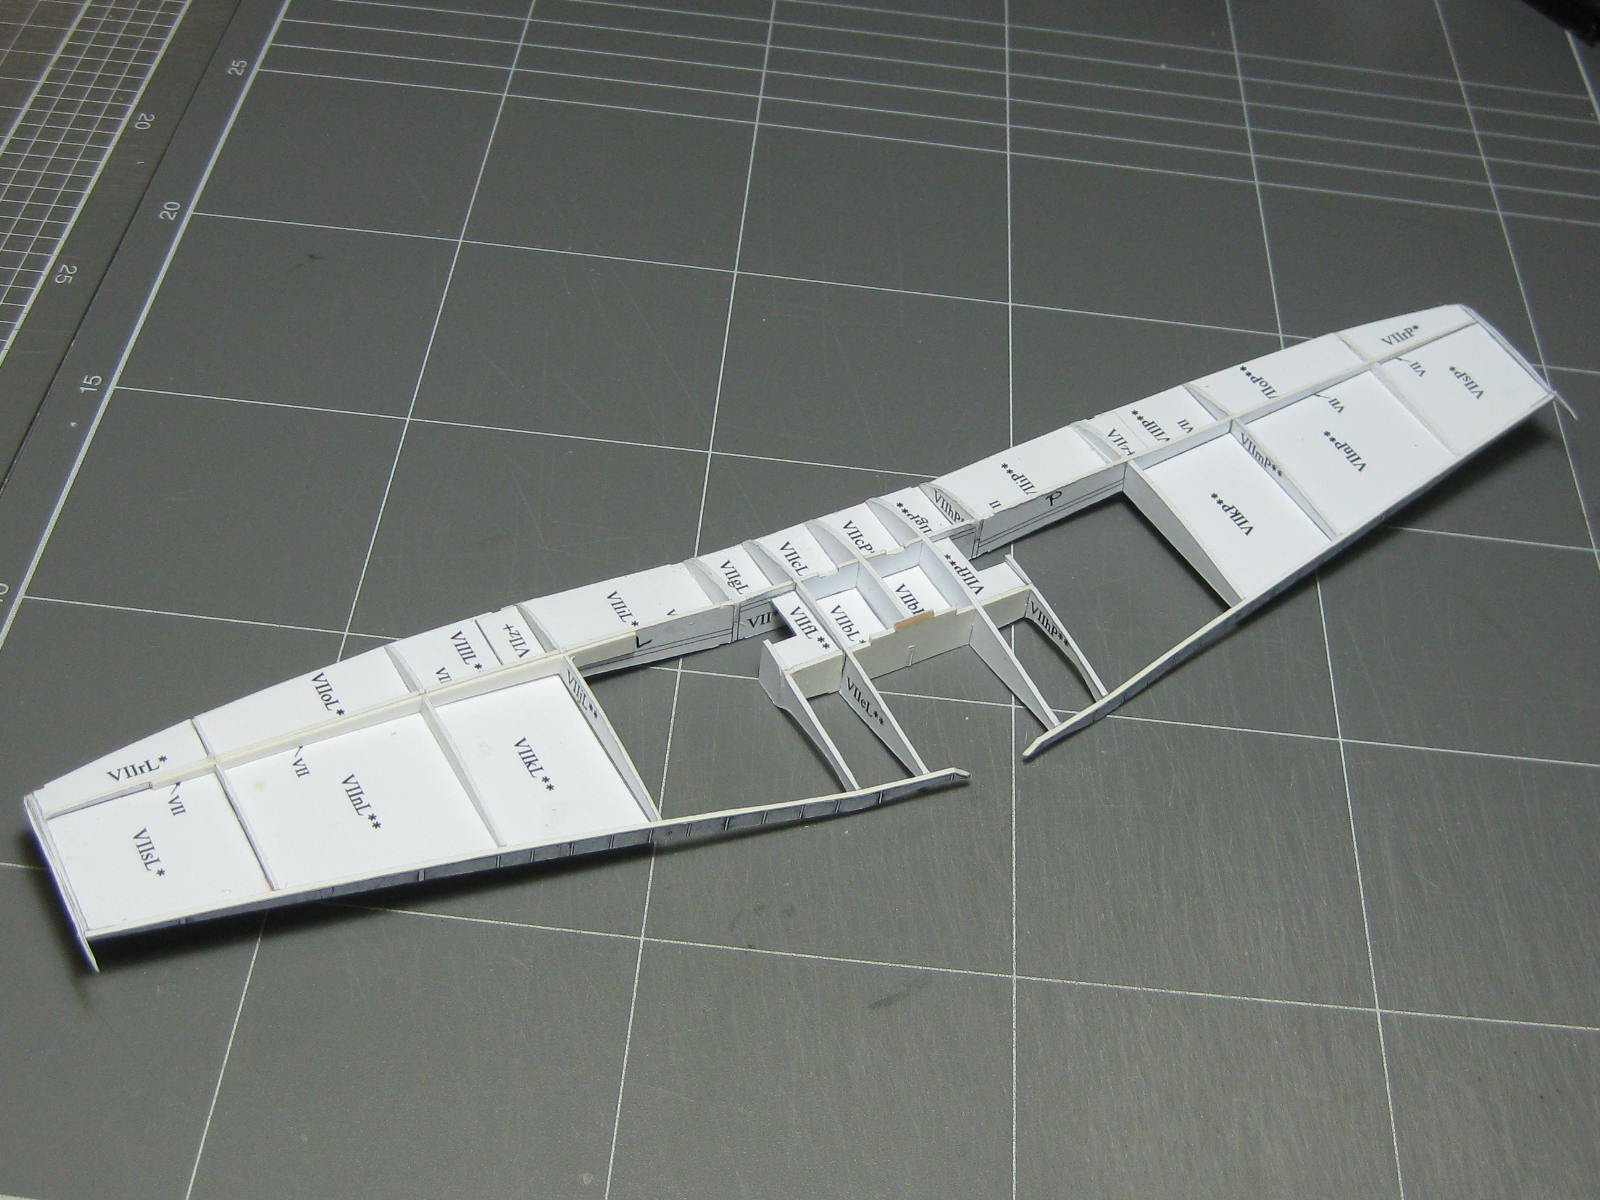
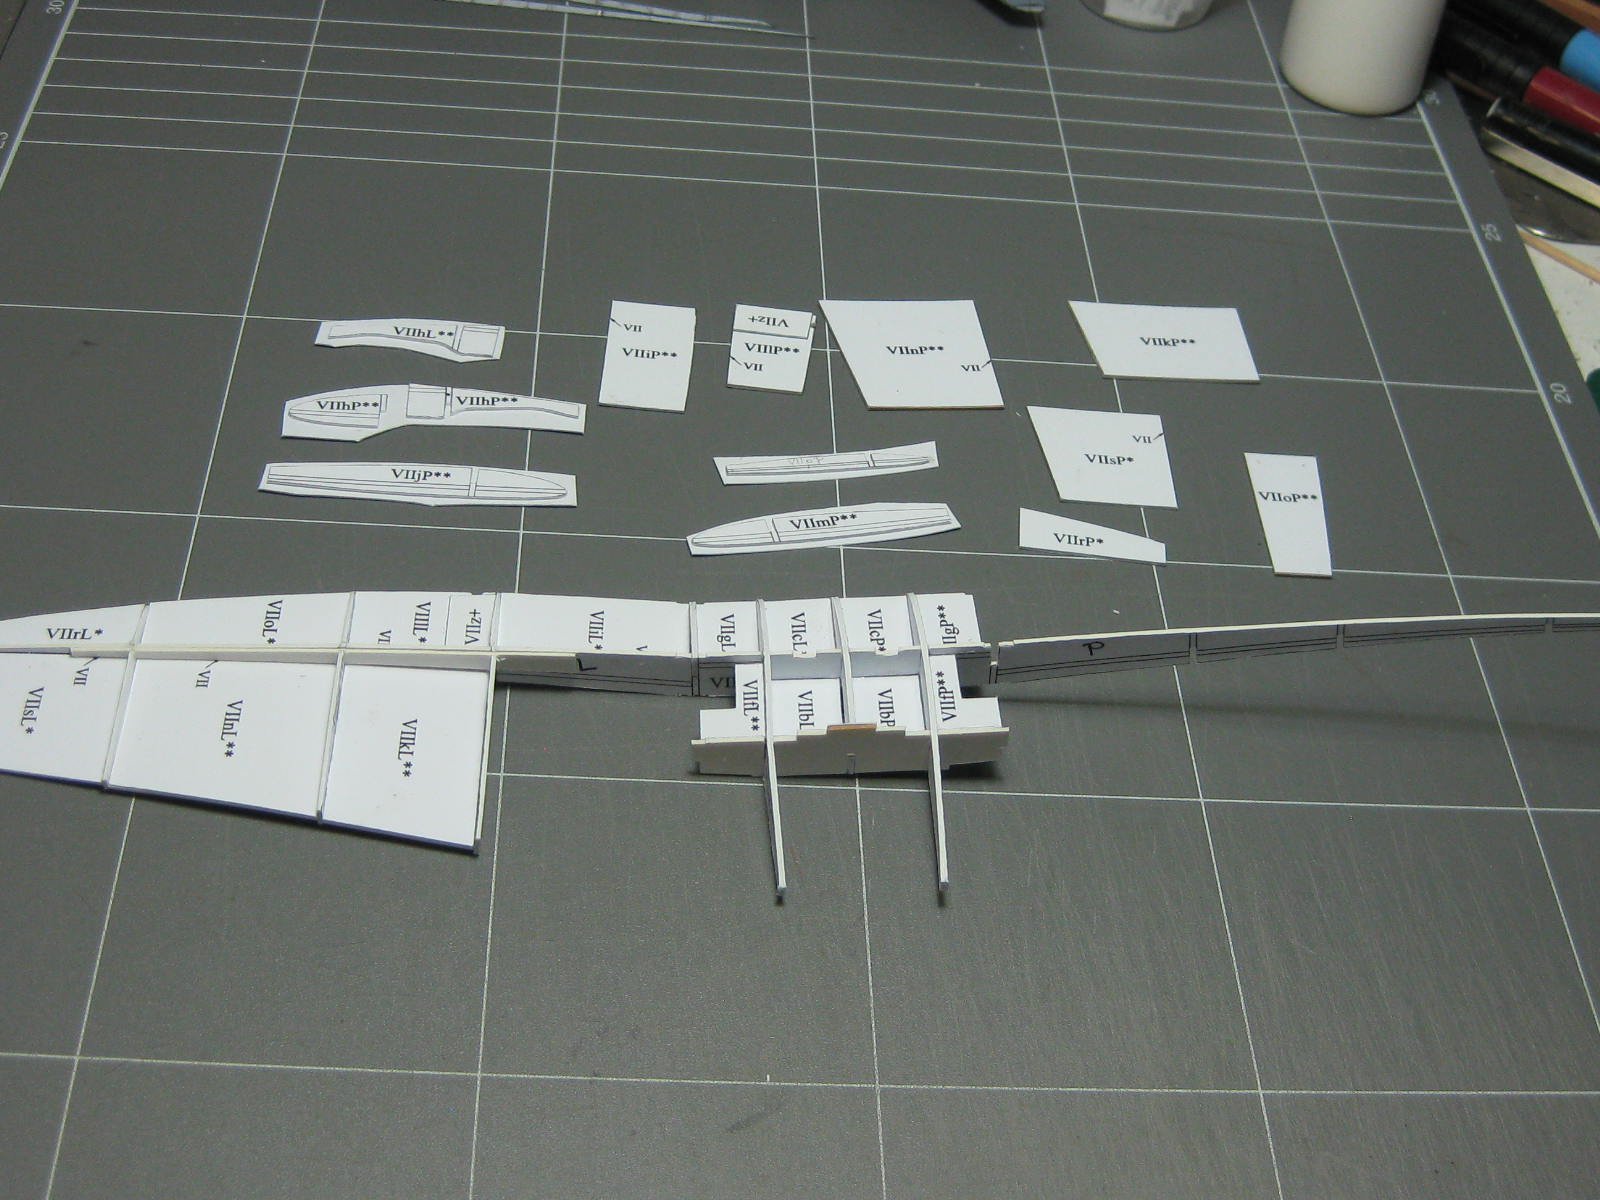
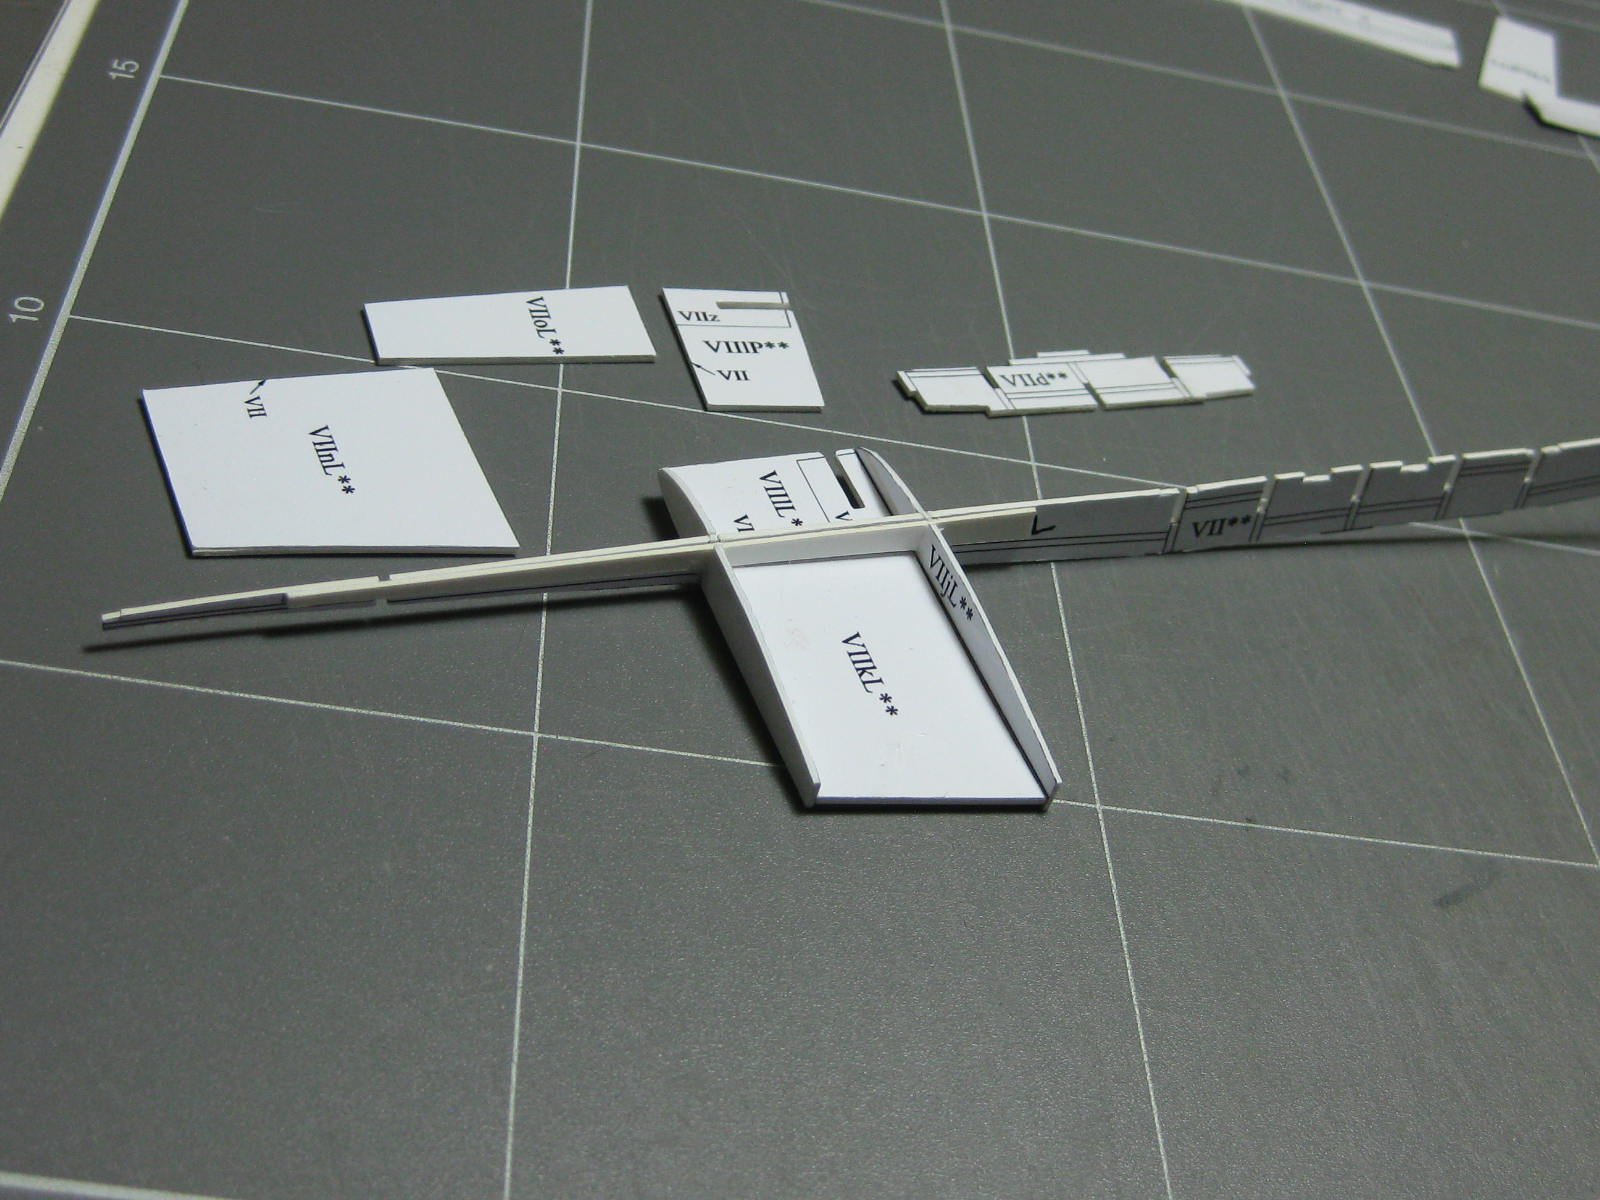
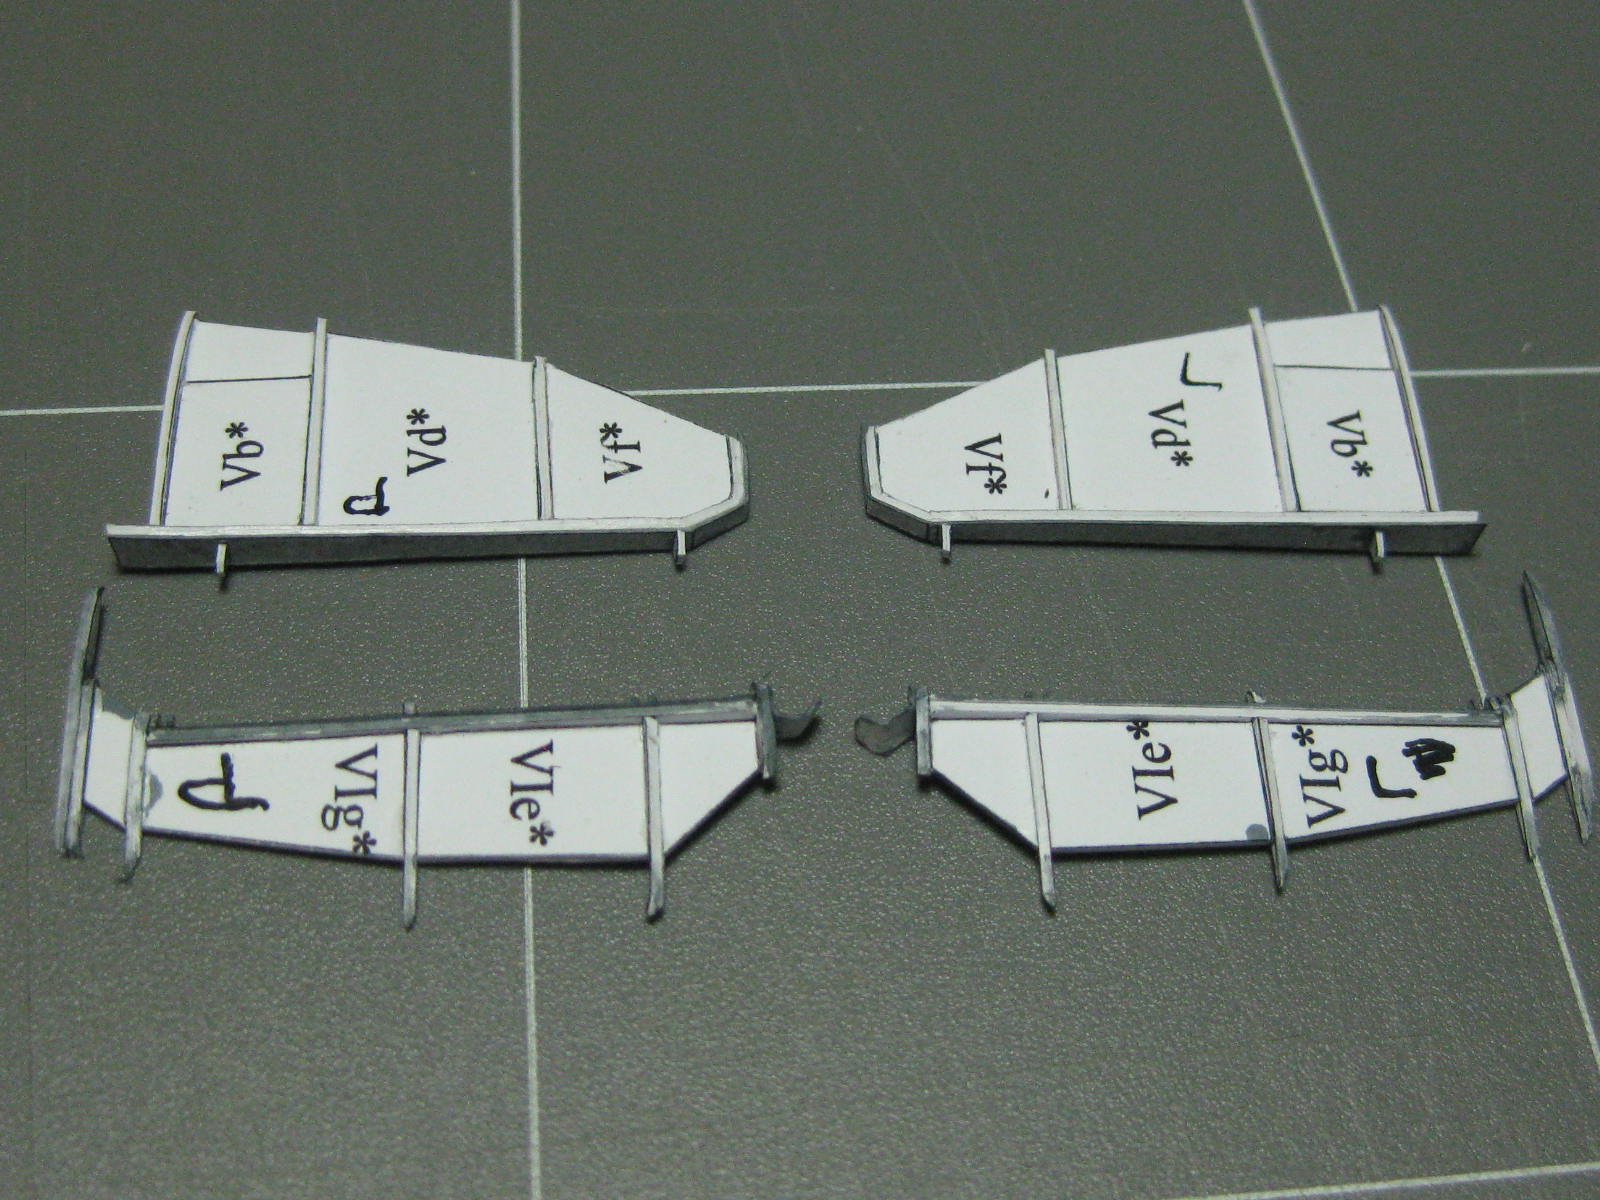
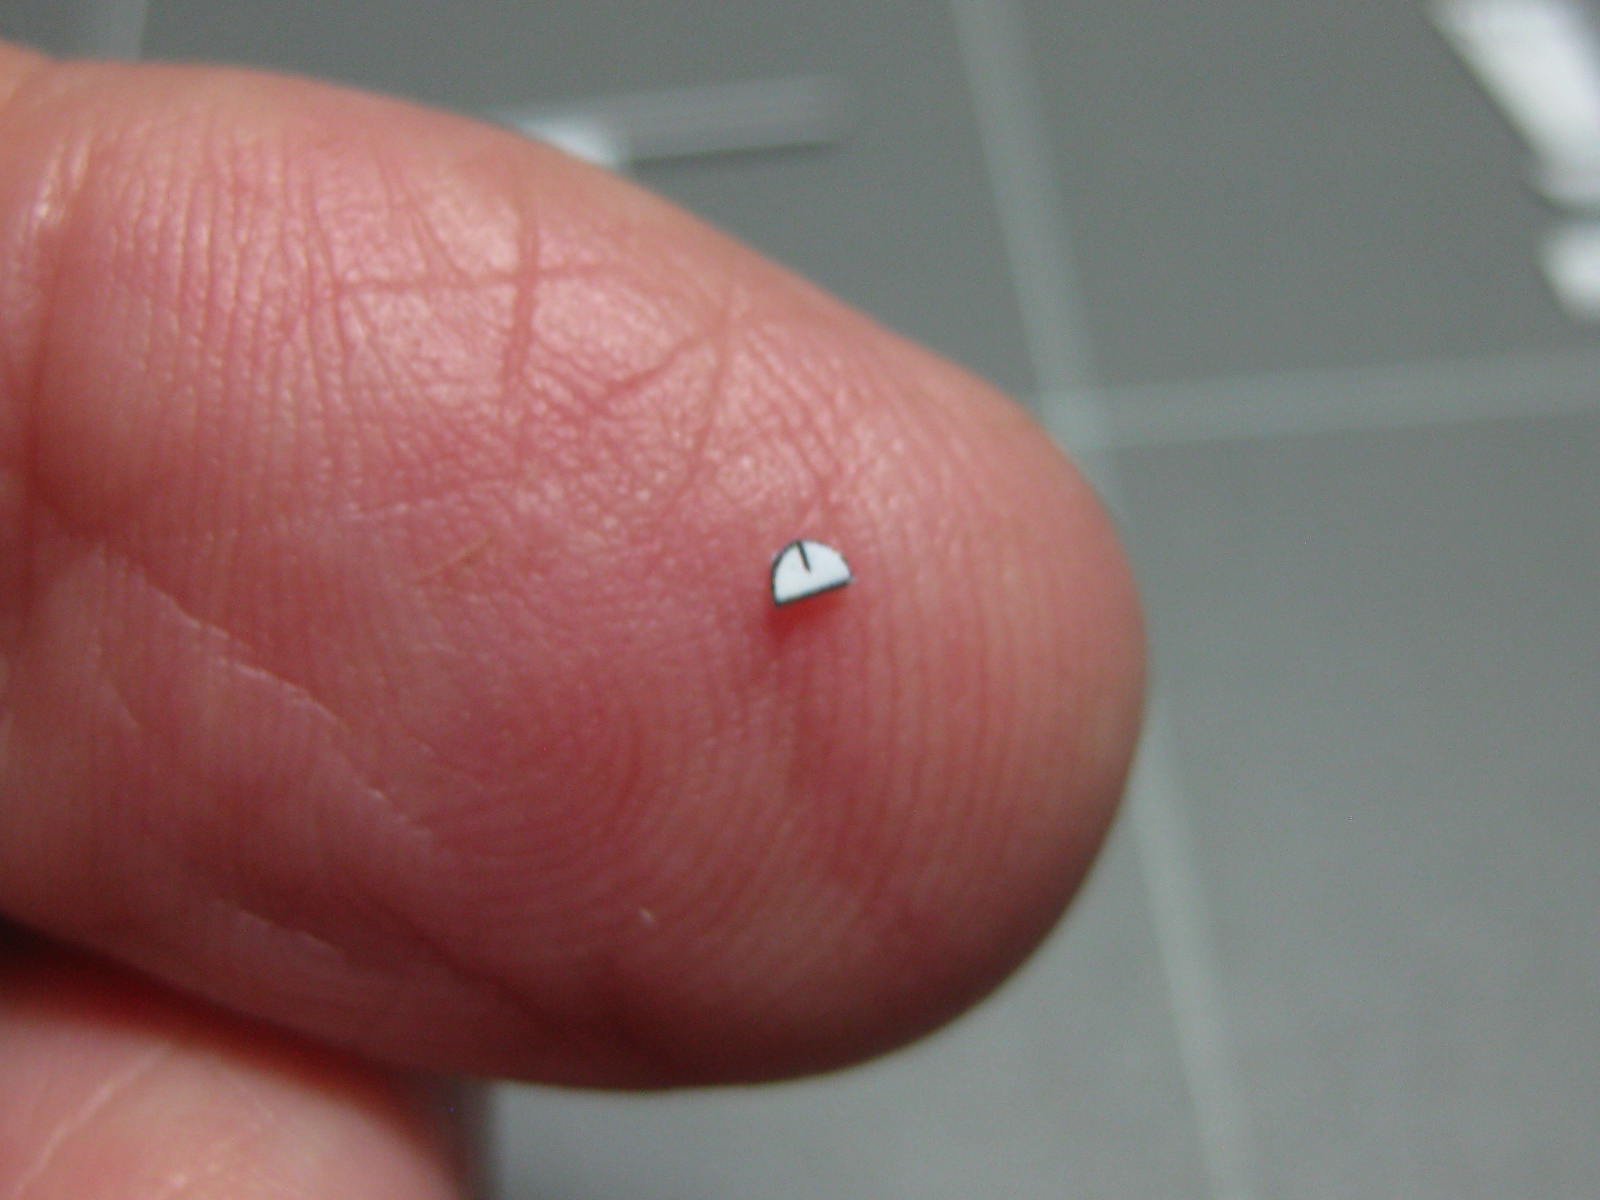
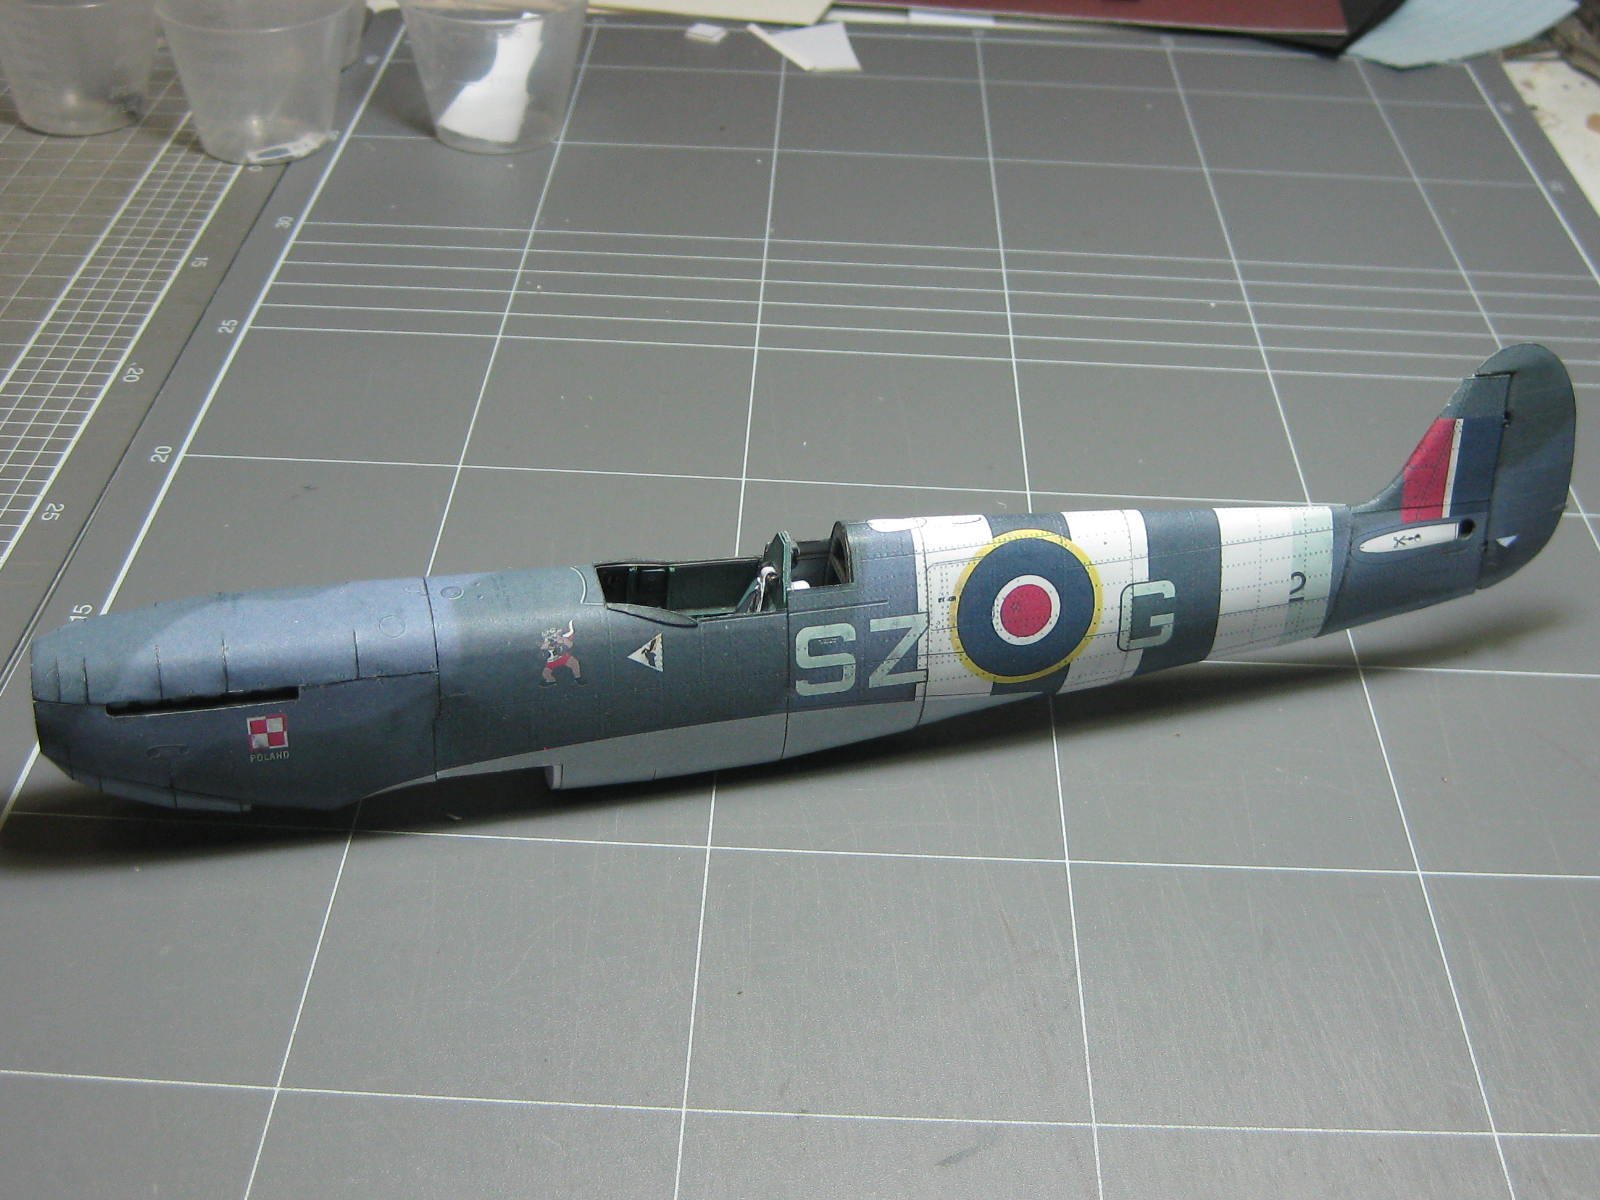
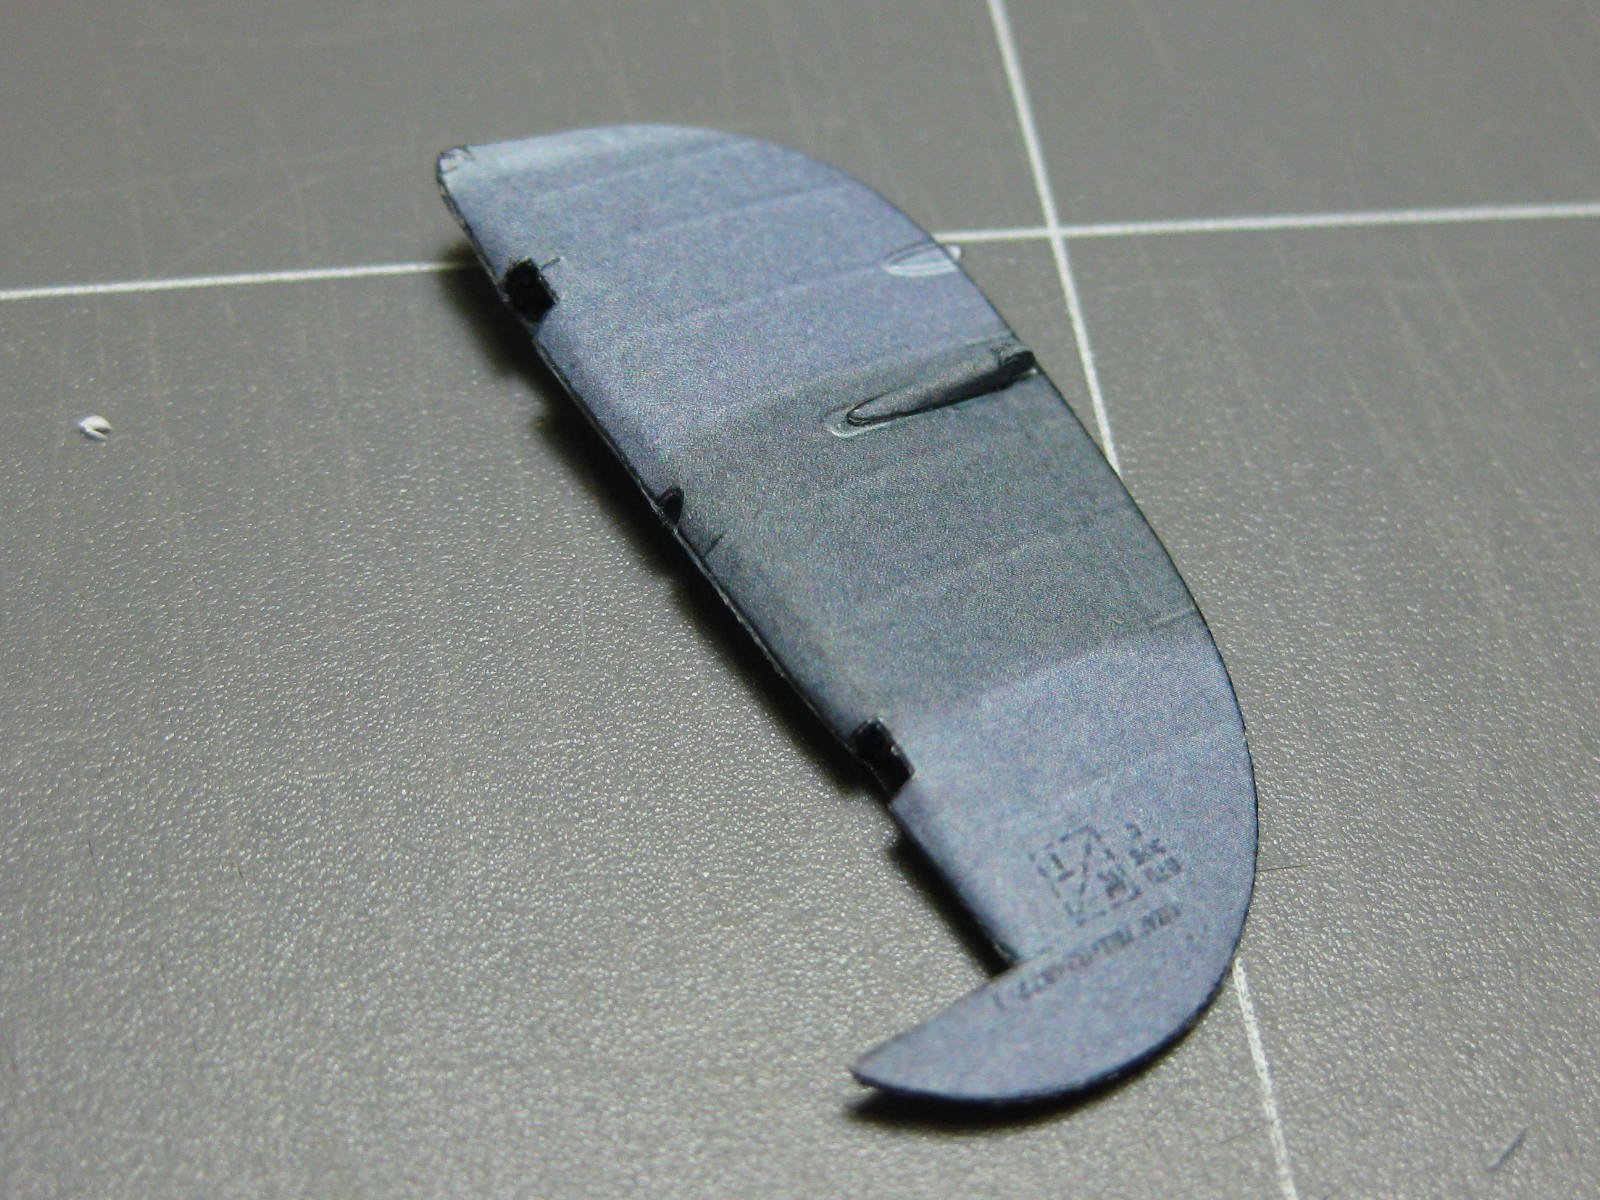
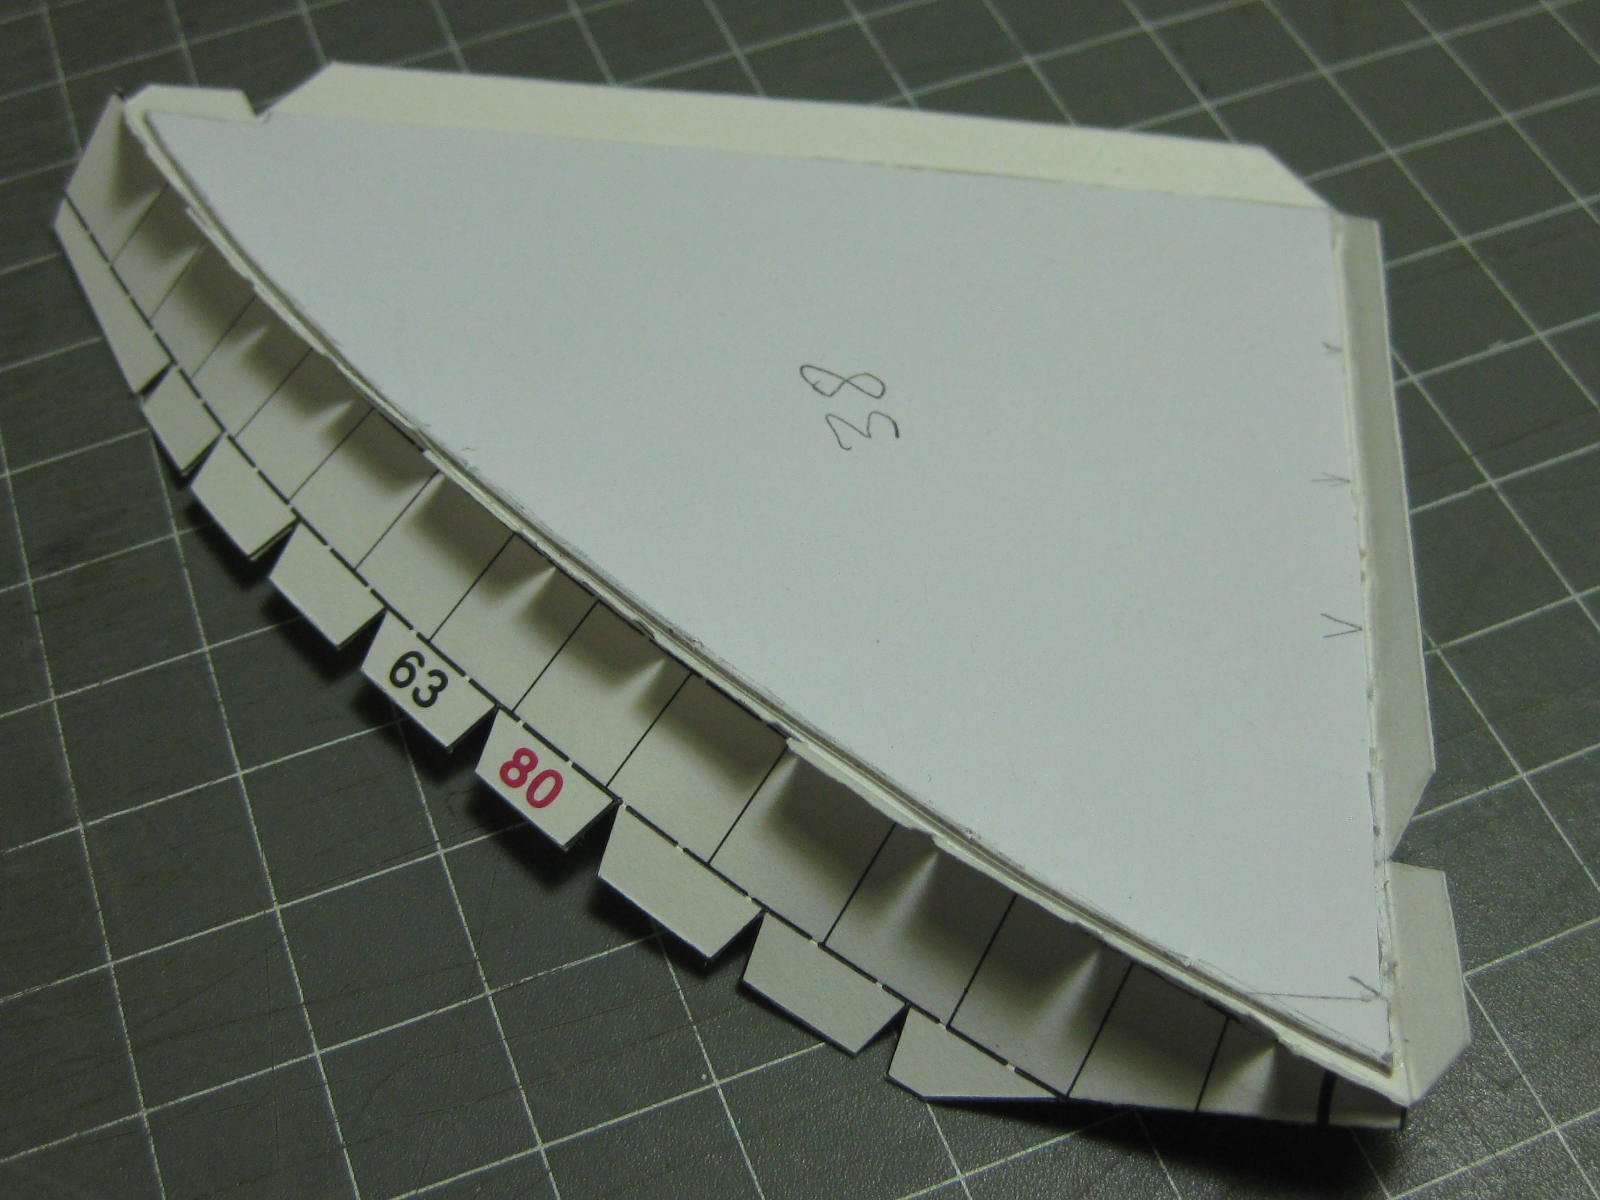
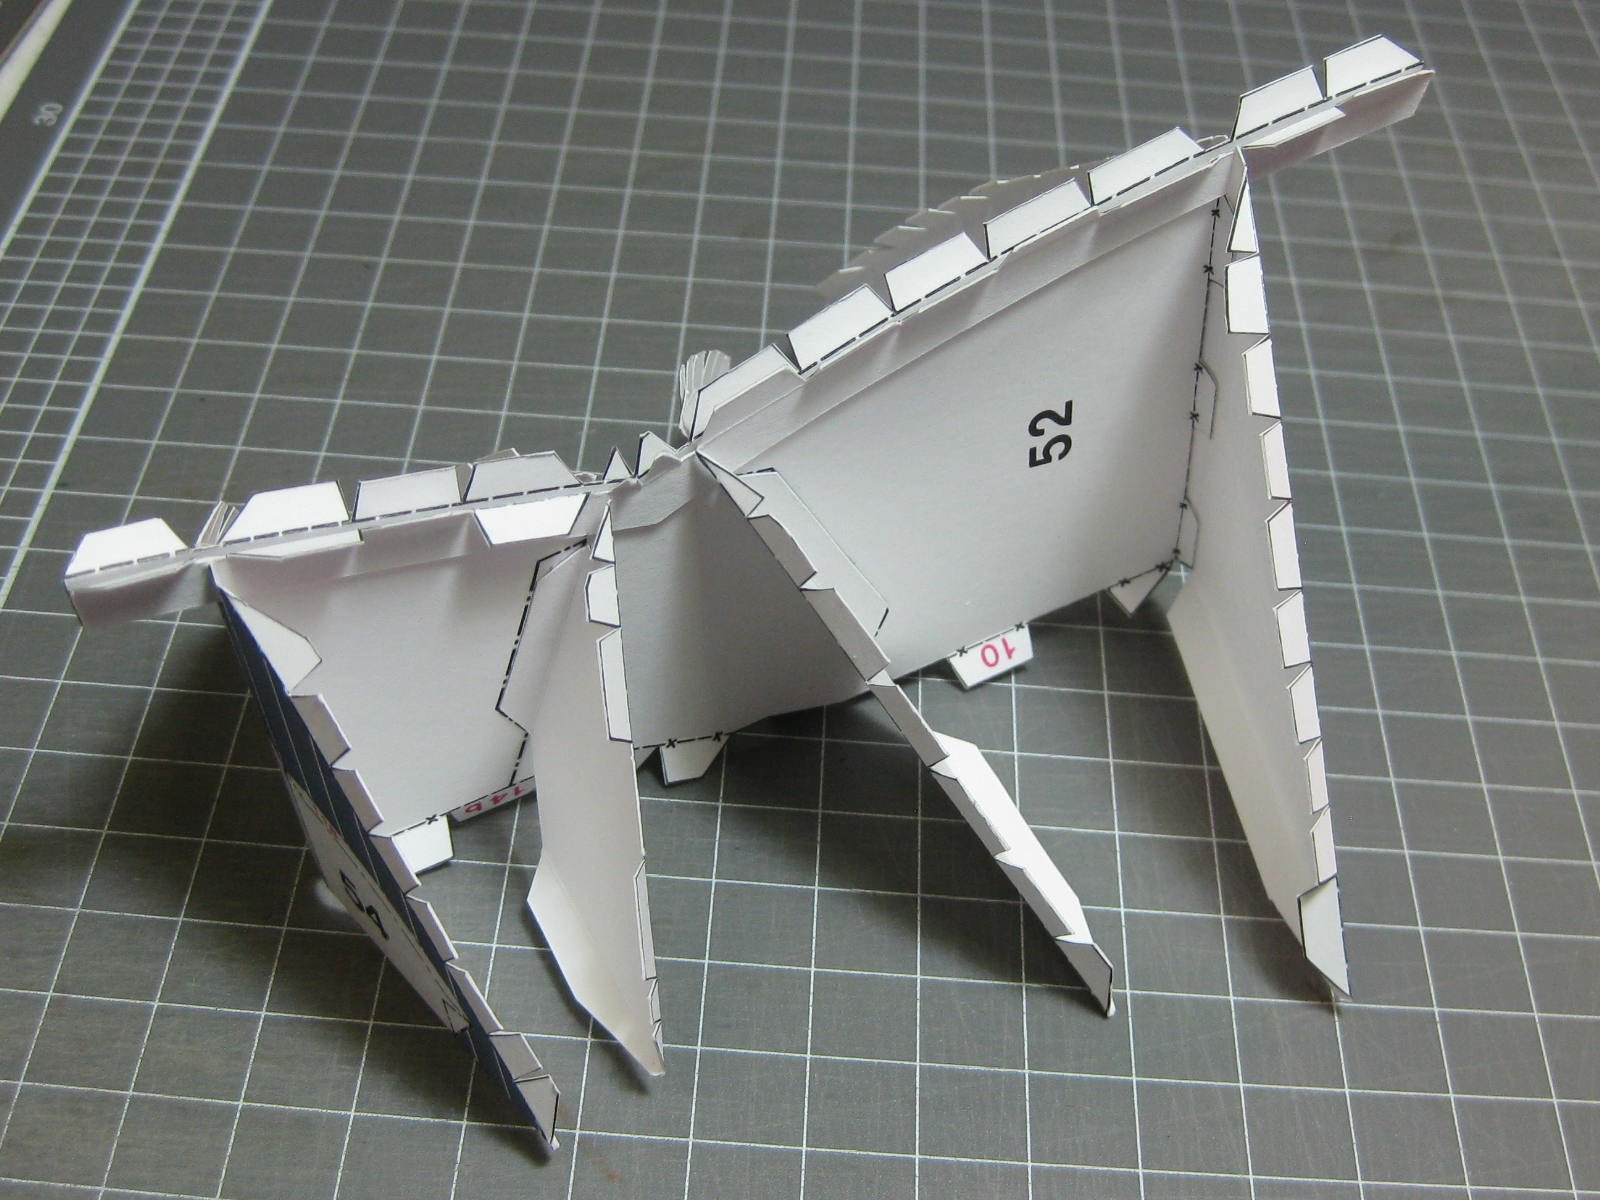
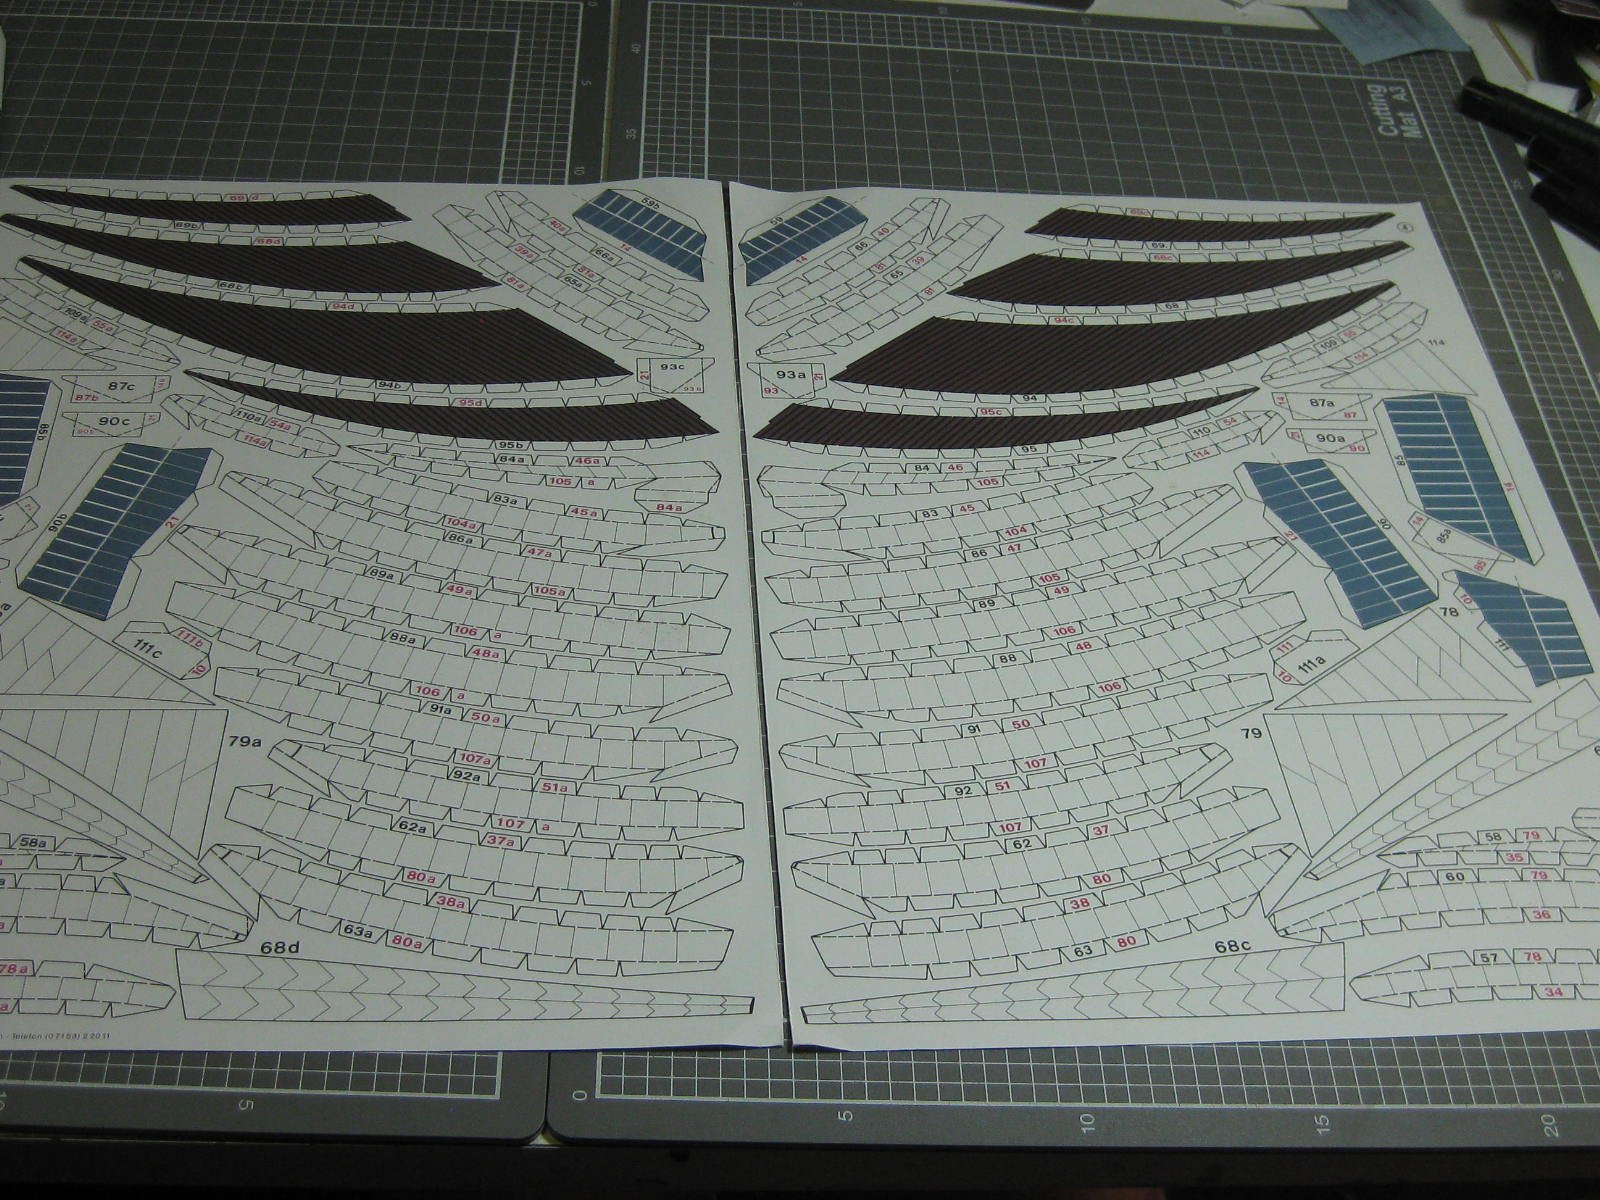
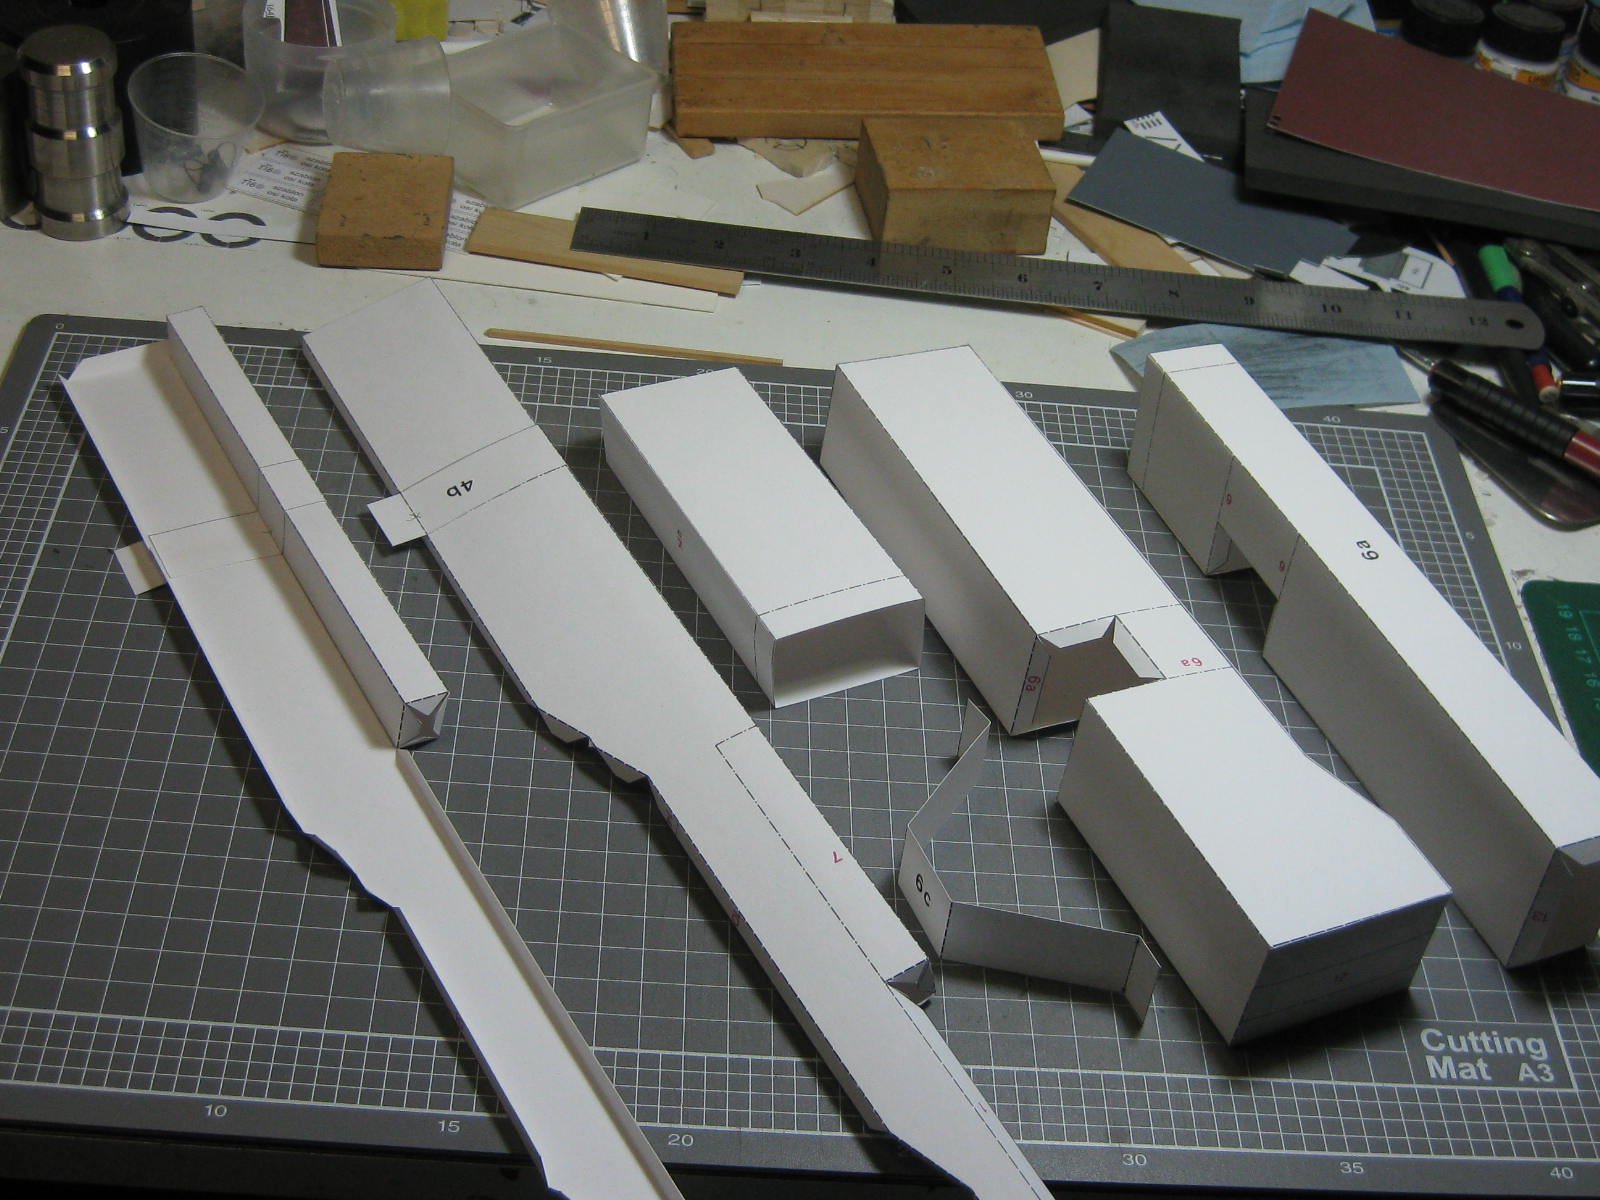
I made the horizontal fins and elevators next so I could fit them together. I'm leaving them off the fuselage until I have finished with the wings : Some of the parts are tiny, but there are smaller ones coming up later : I started the wings by gluing the widest pieces to the central brace : More pics of the wing framing : Skinning the wings starts with the middle piece : Followed by the upper skins : The fuselage with the wings temporarily in place. They aren't glued together yet : Danny
-
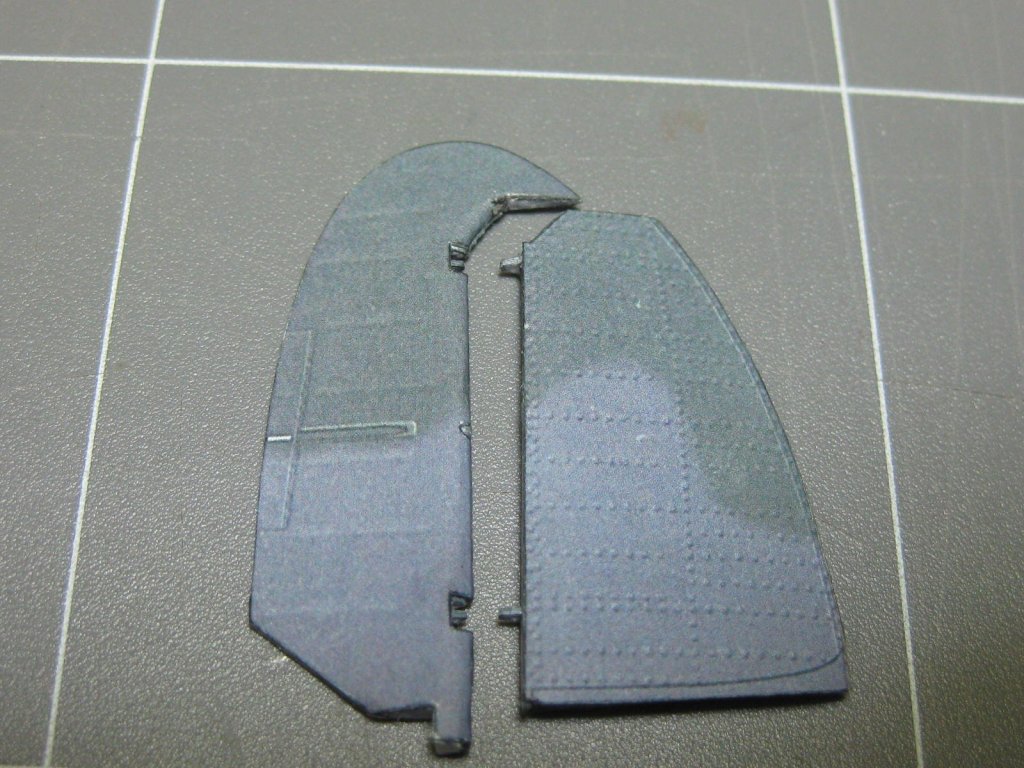
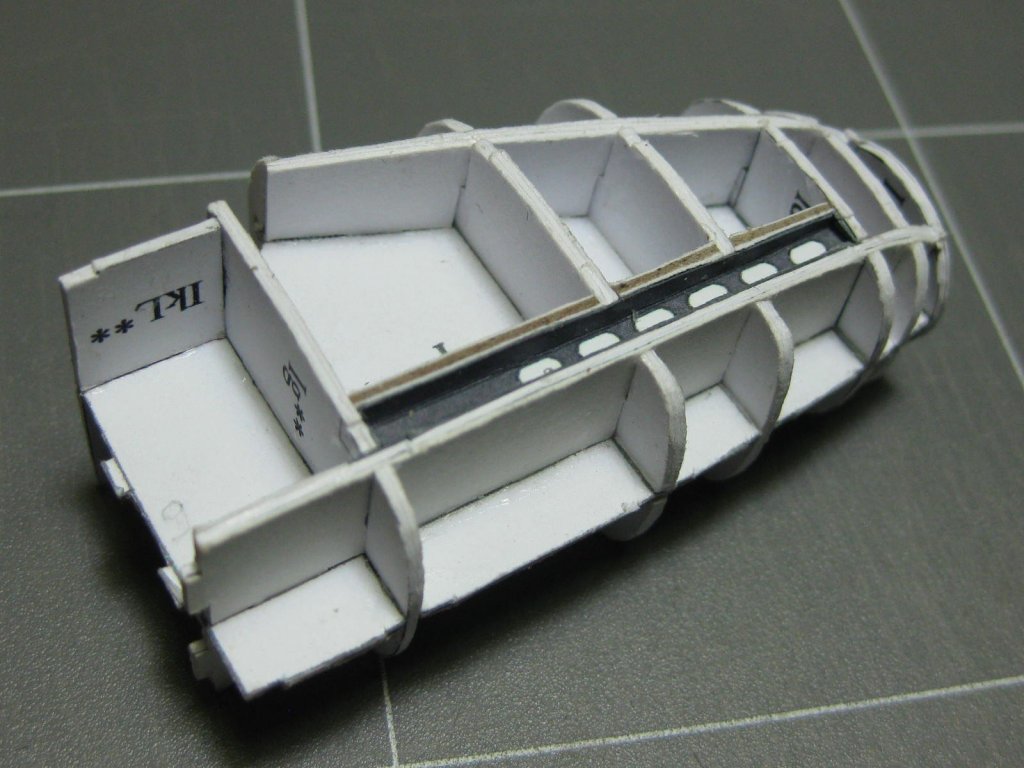
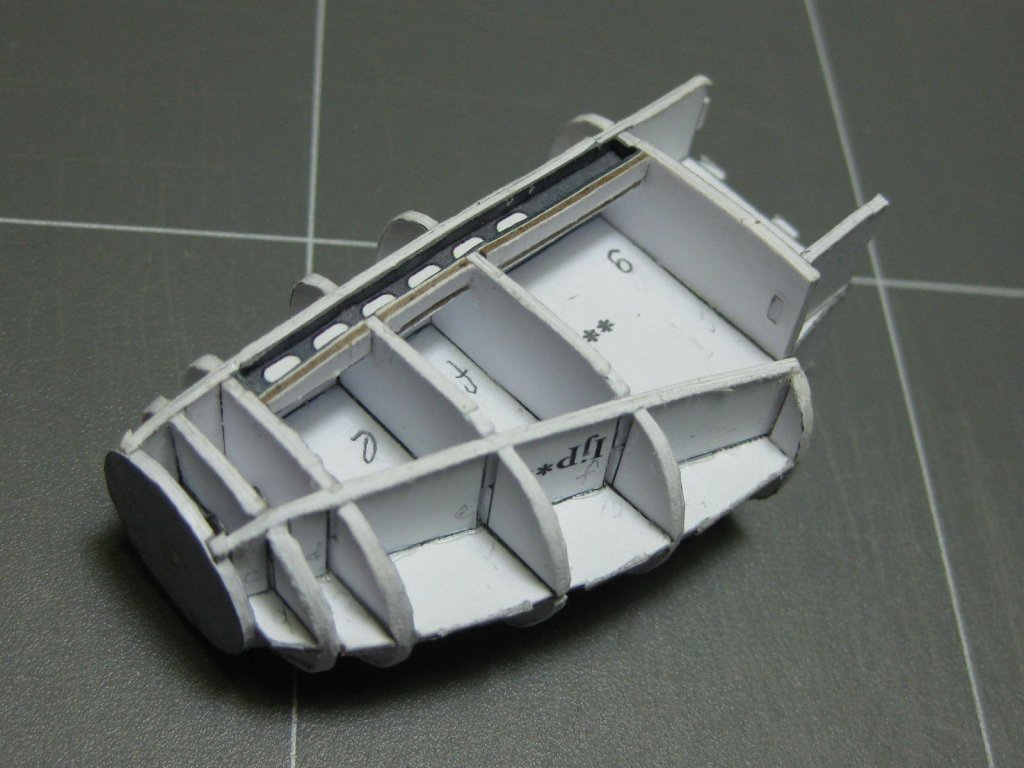
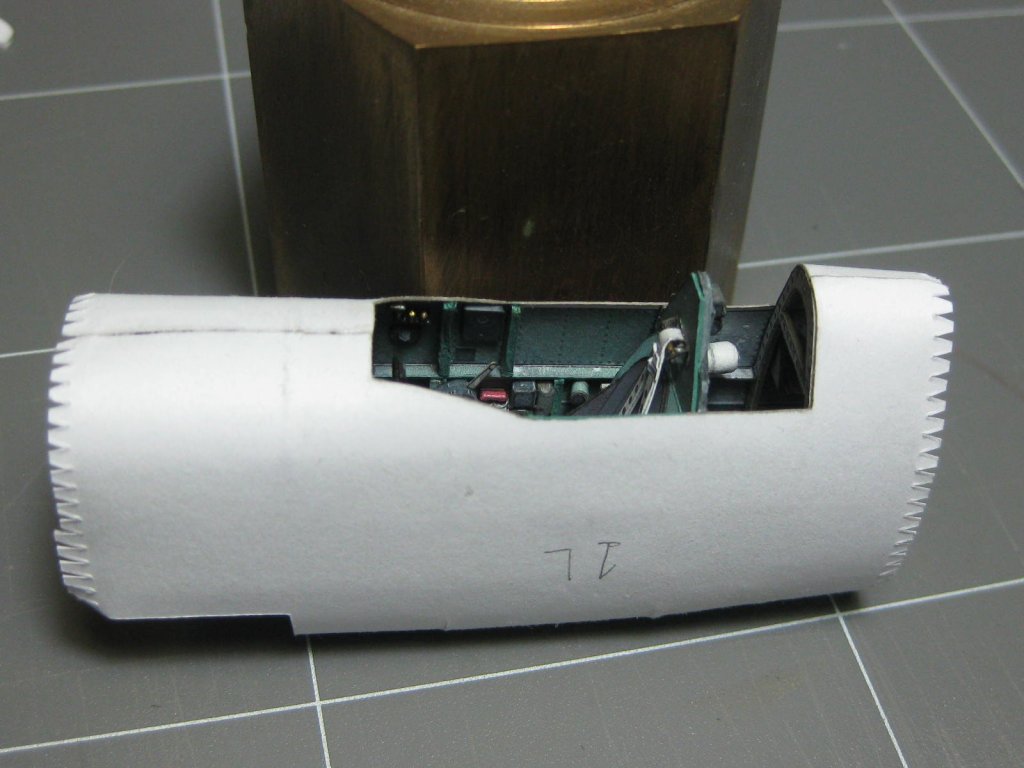
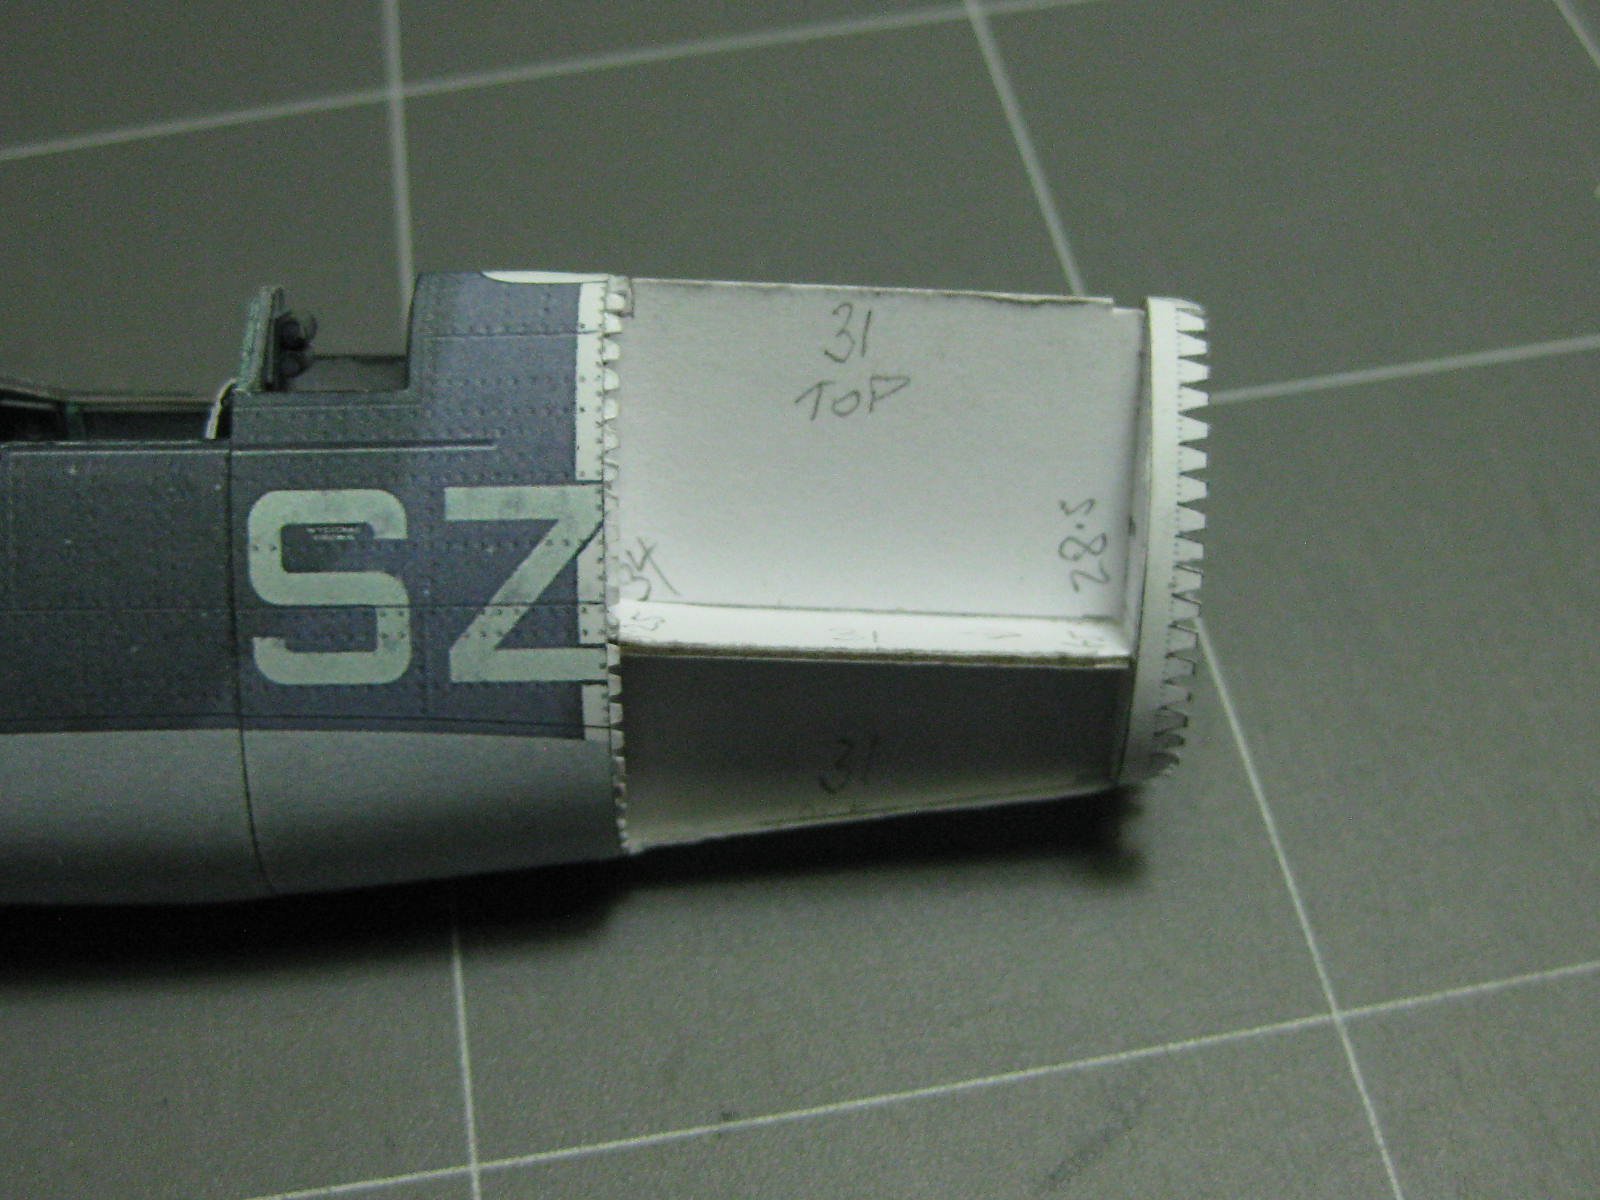
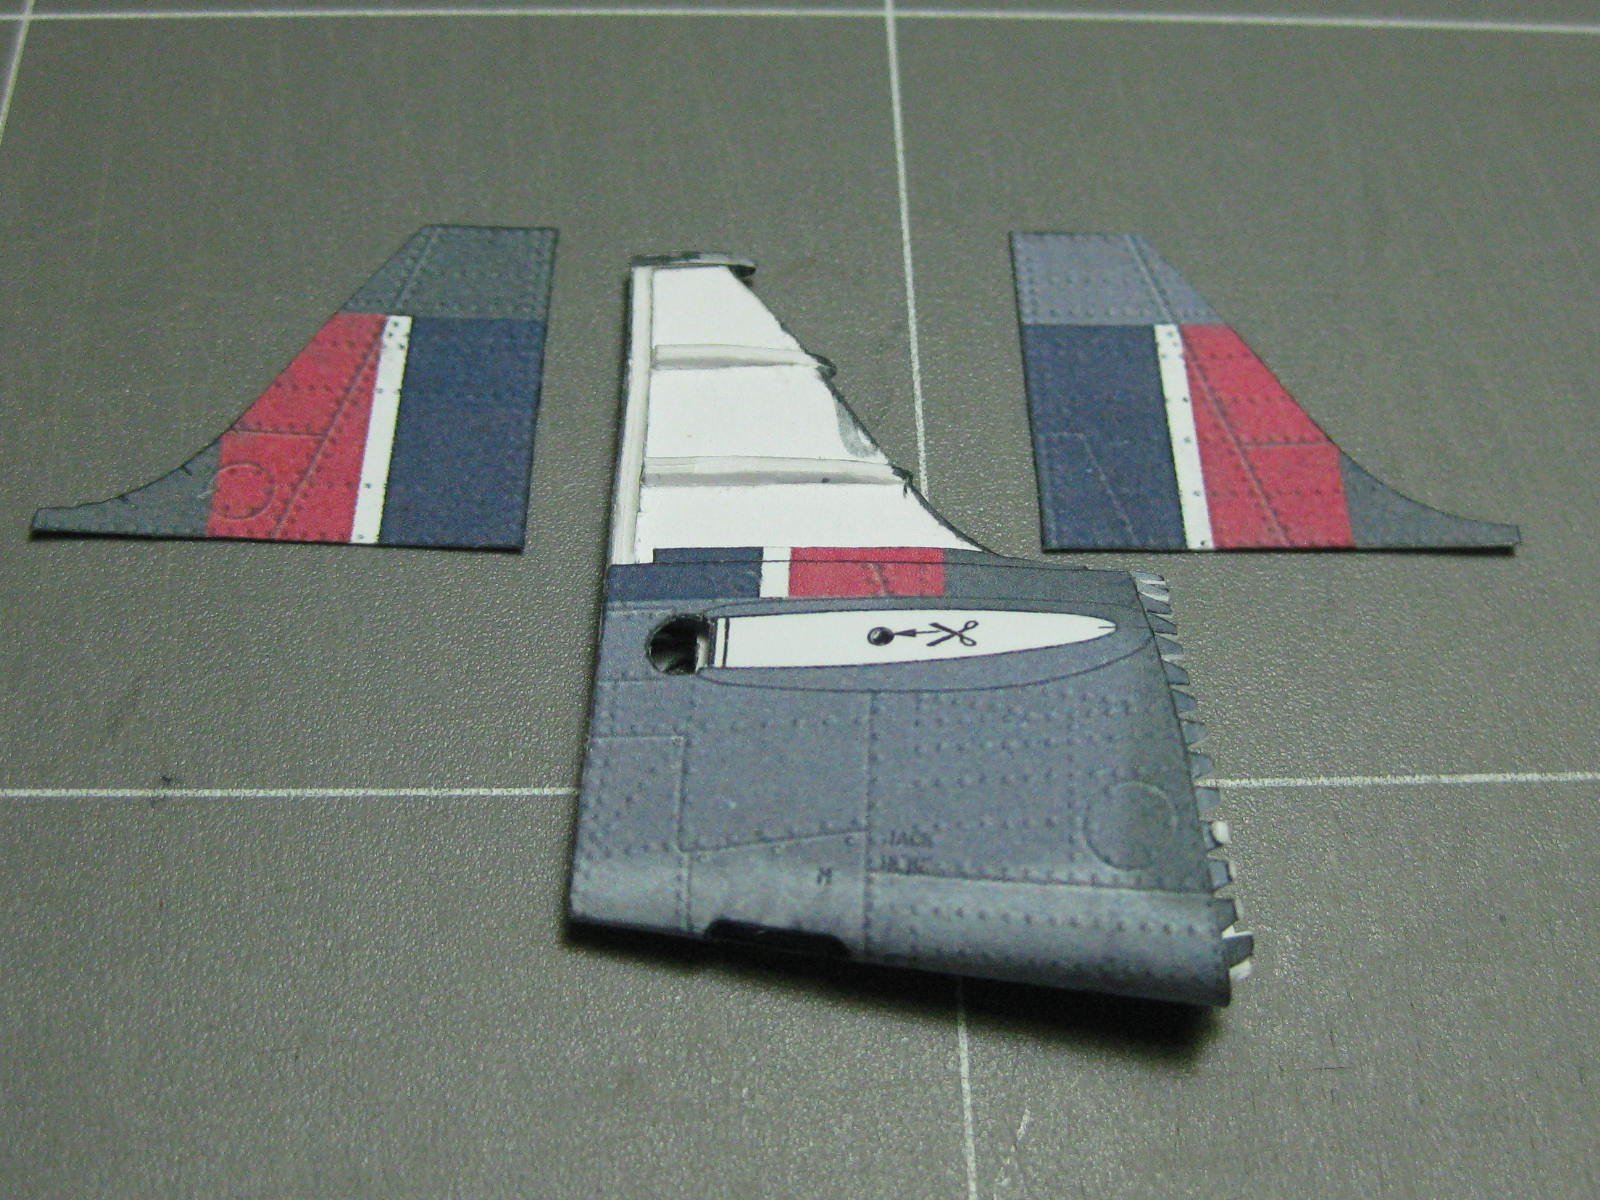
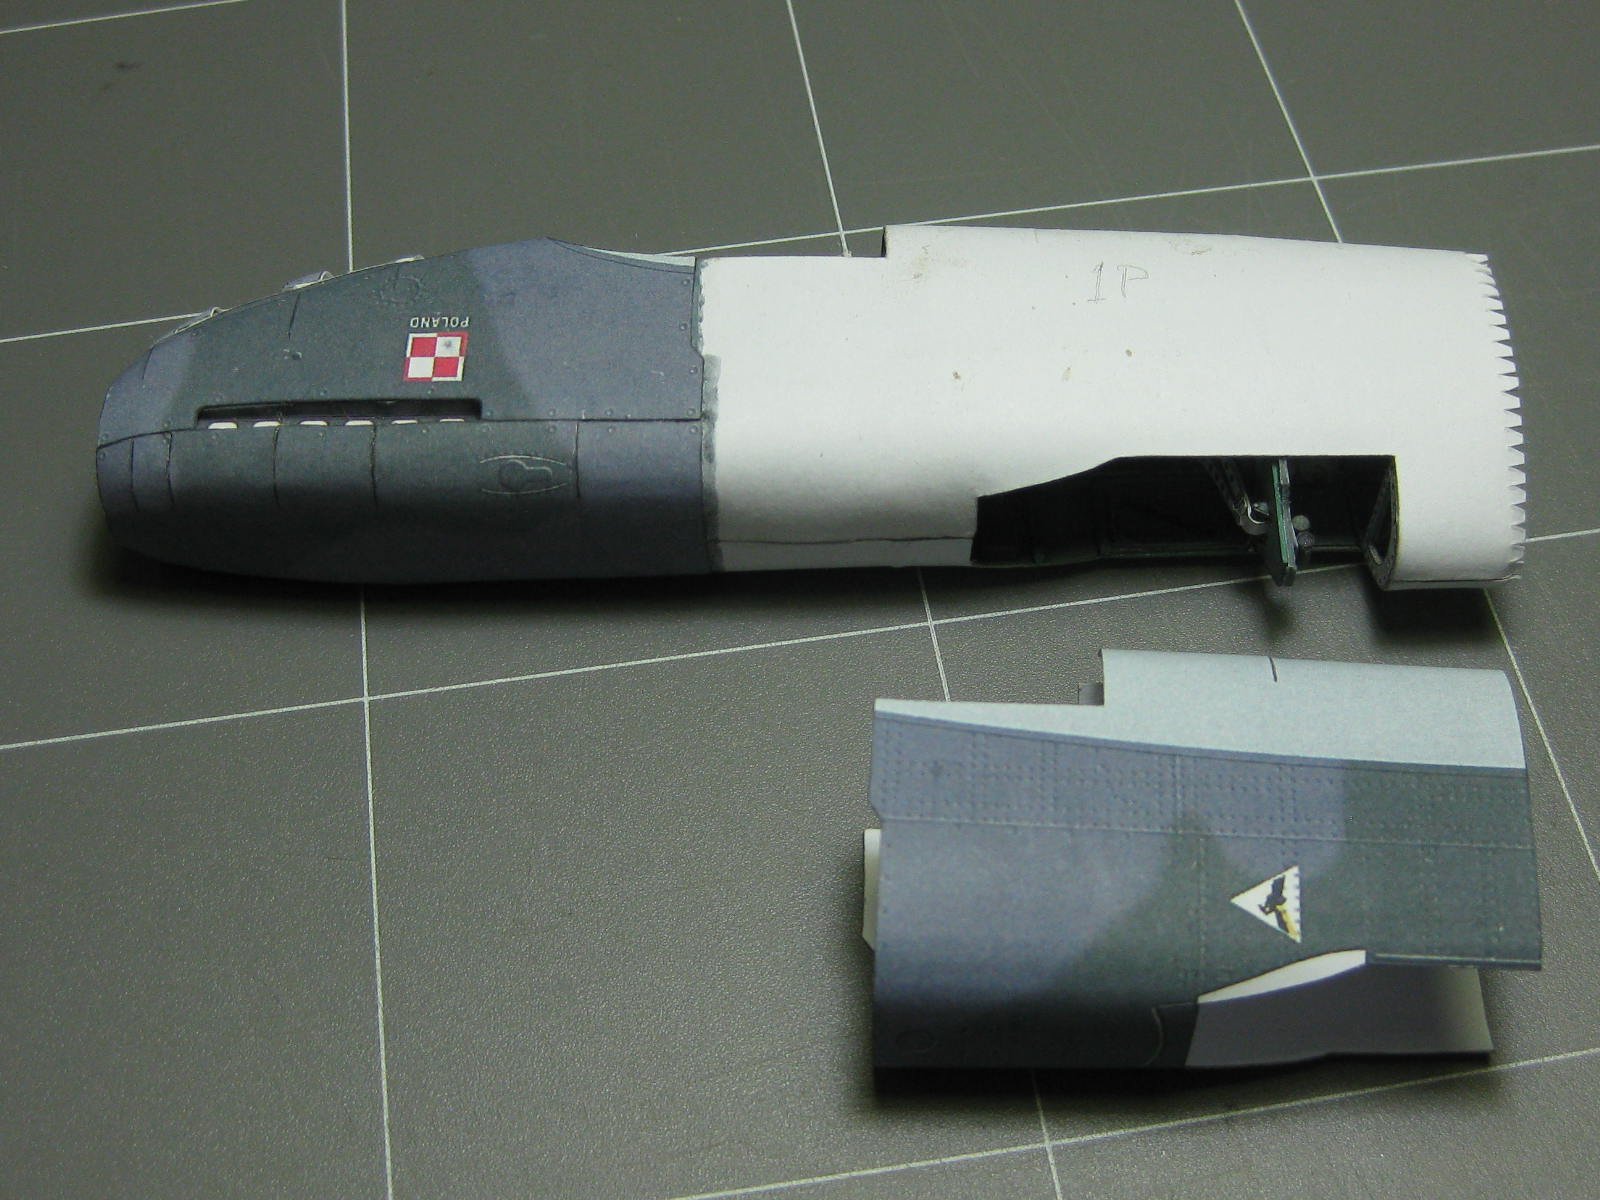
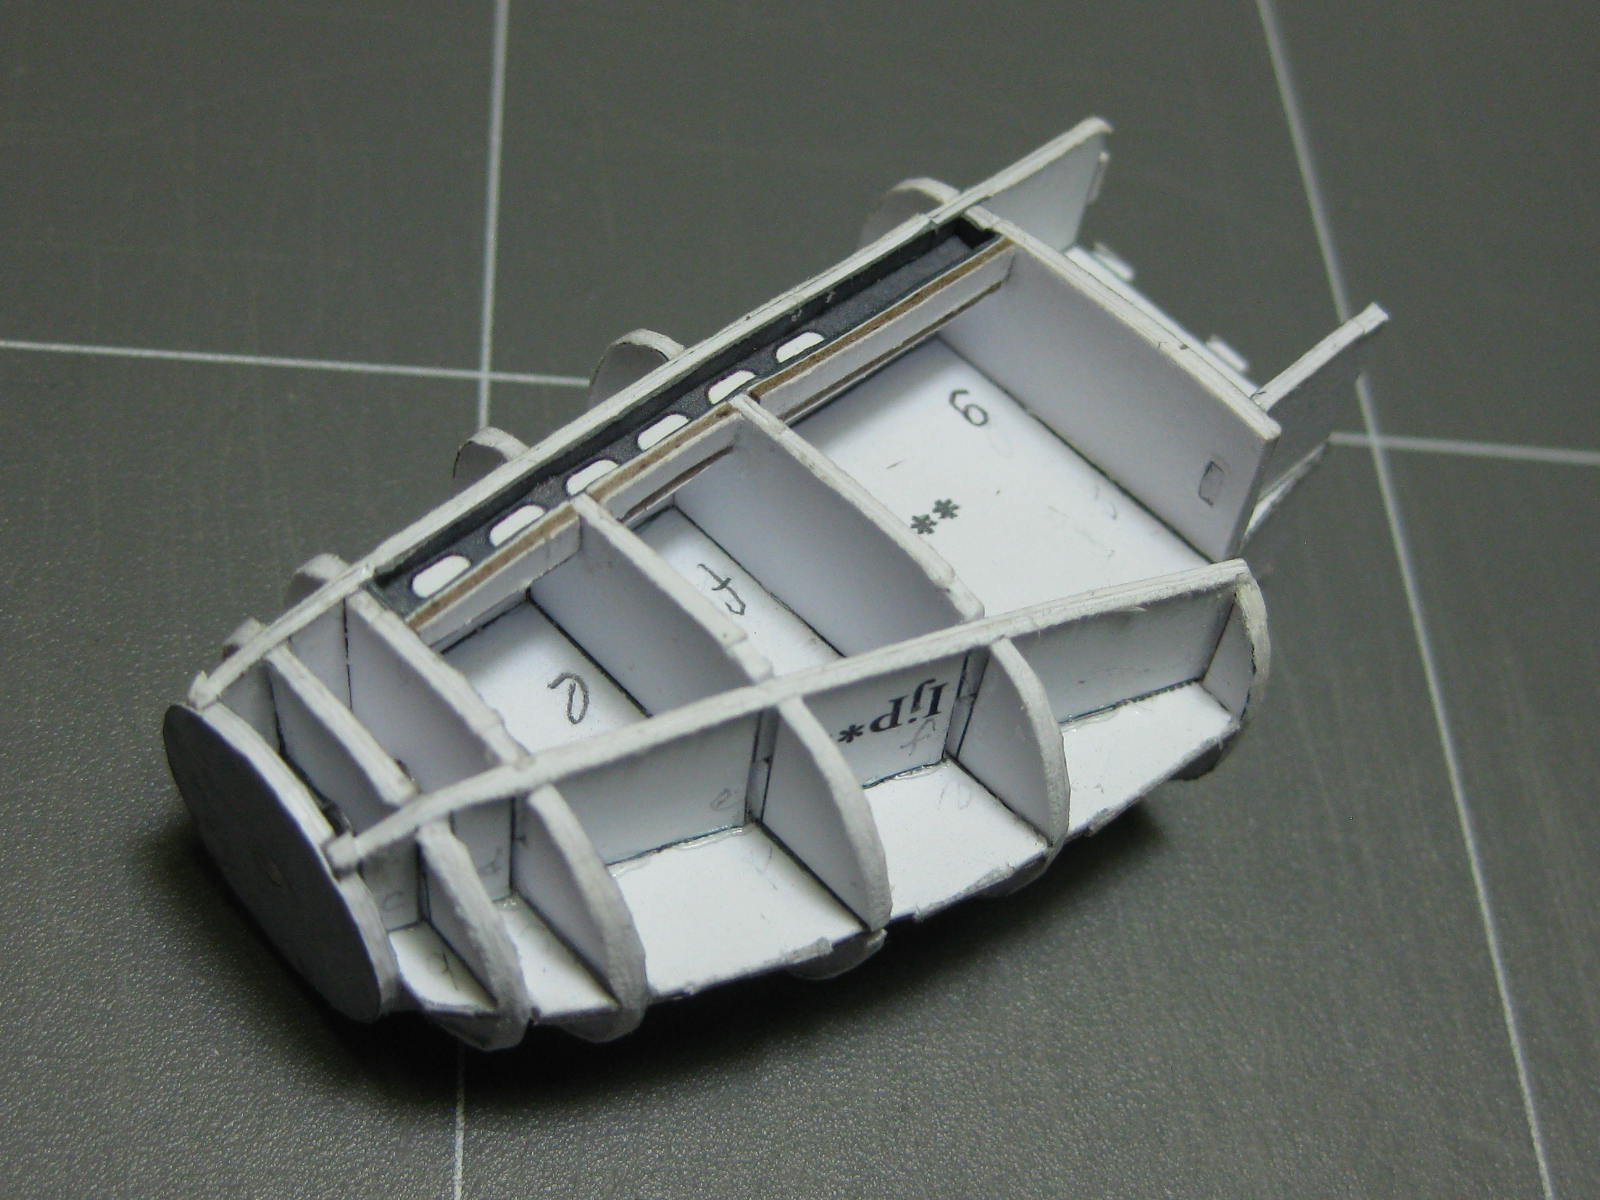
I wouldn't have room to fit it Pav, but it would make a nice "stand alone" model to display alongside this one . Thanks for the offer. And these pics show what I mean - here's the engine compartment sub-assembly : Start of the outer covering of the fuselage : The tail fin is the next stage : I'm building my kit a bit differently to Halinski's method, I don't know yet whether that is a good idea or not . The kit says to glue all the fuselage sections together as a unit before attaching to the cabin section. Due to the use of the tiny tabs on the joining strips I thought it might be a better idea to build a couple of sections of inner framing for support instead, as this would strengthen the model significantly and help prevent any possibility of accidental crushing. This method is not without it's own problems - accuracy is vital : The Rudder is probably easier to fit to the tail fin before attaching to the rest of the model : The skinned fuselage : Danny


-
QUICK-FIND INDEXES to BUILD LOGS FOR KITS
Dan Vadas replied to Dan Vadas's topic in - Index of all kits by brand and subject
No, that was all me. I must have uploaded the wrong file by mistake. I'll fix it. Danny -
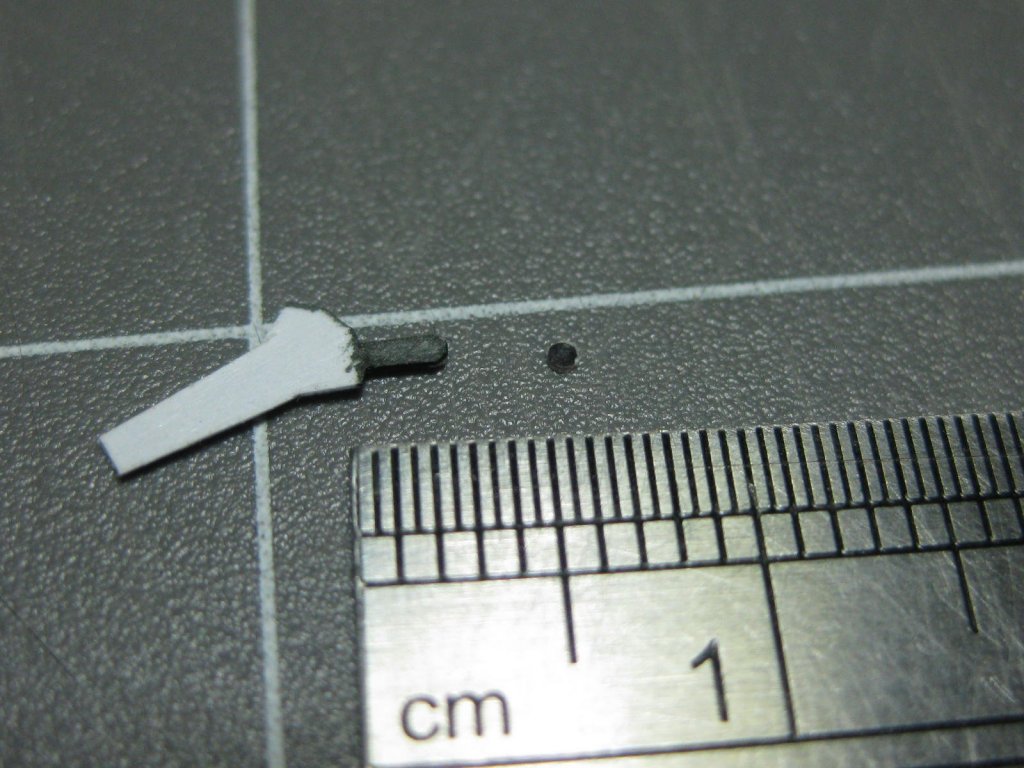
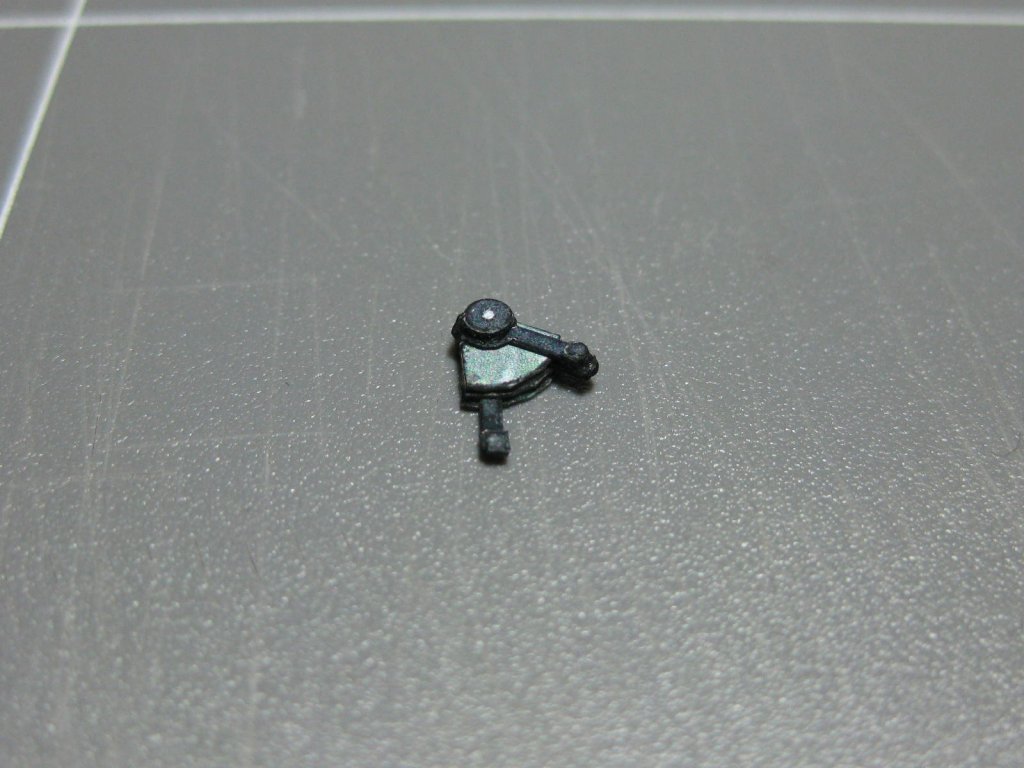
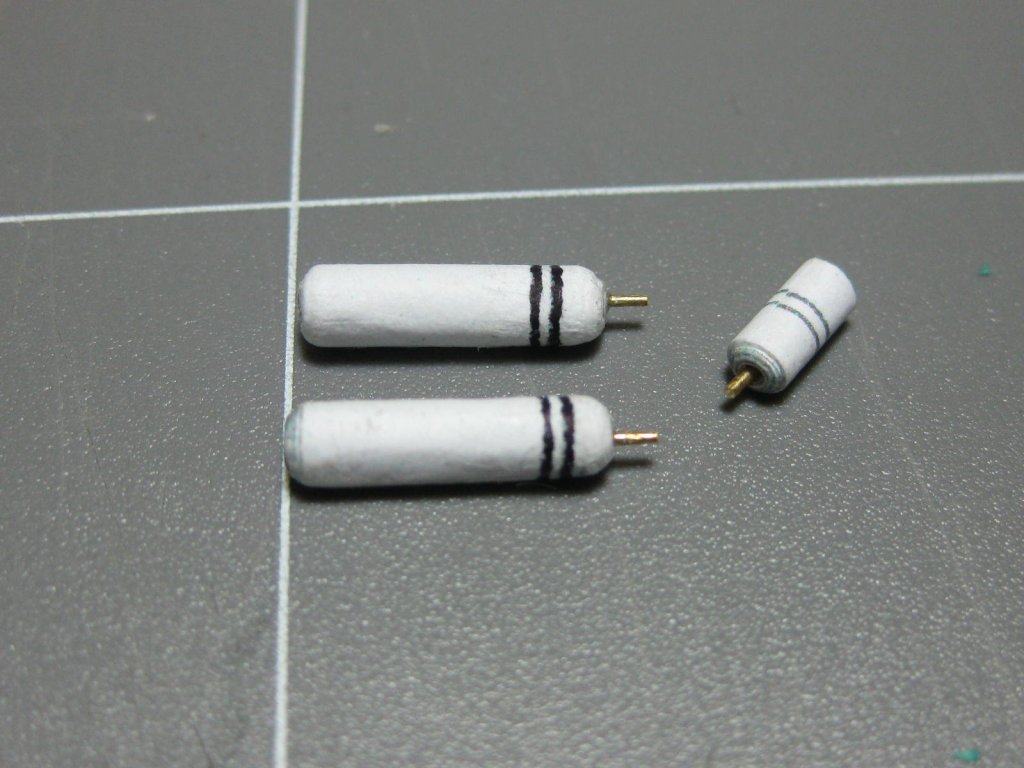
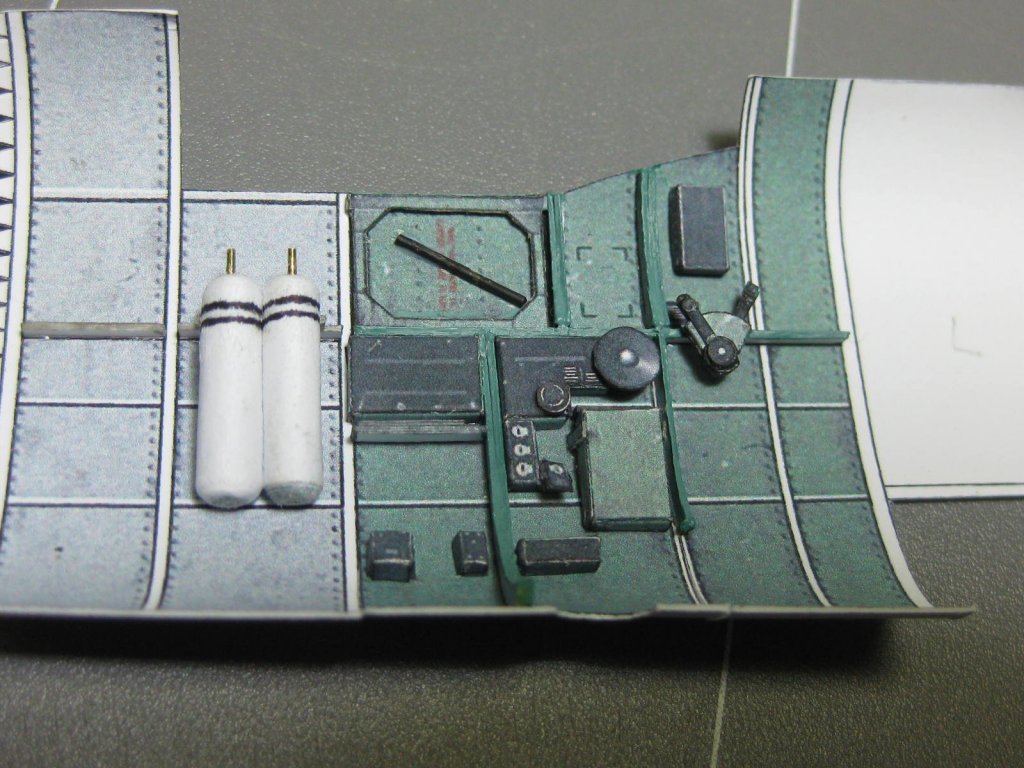
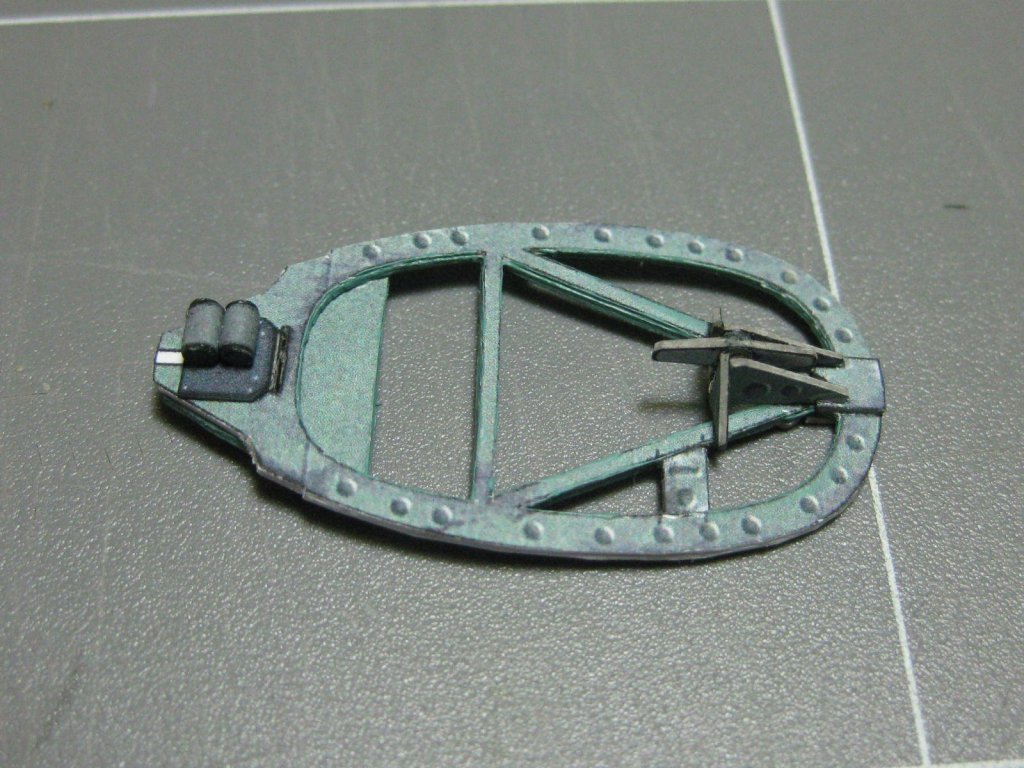
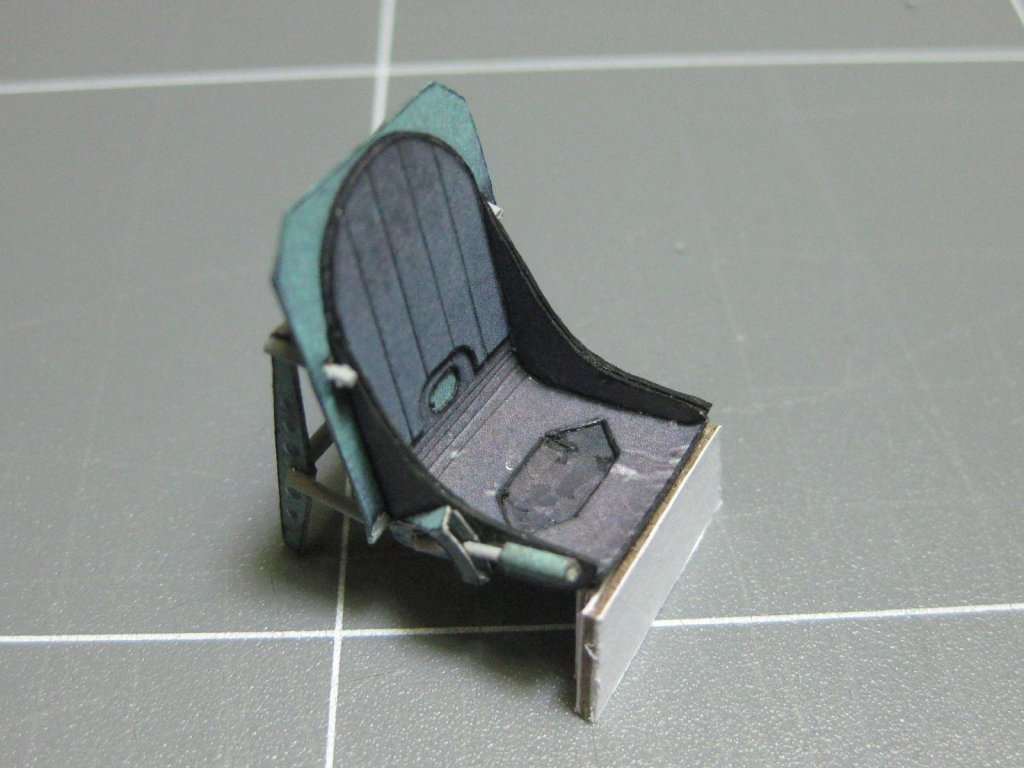
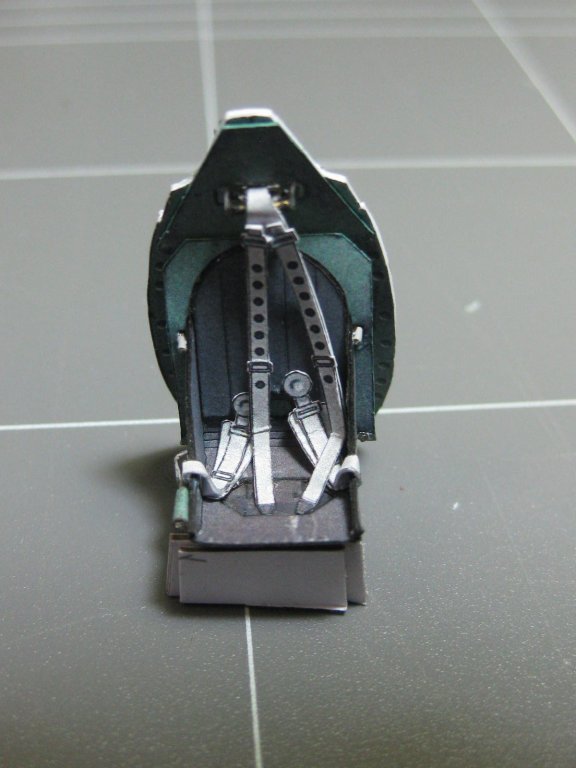
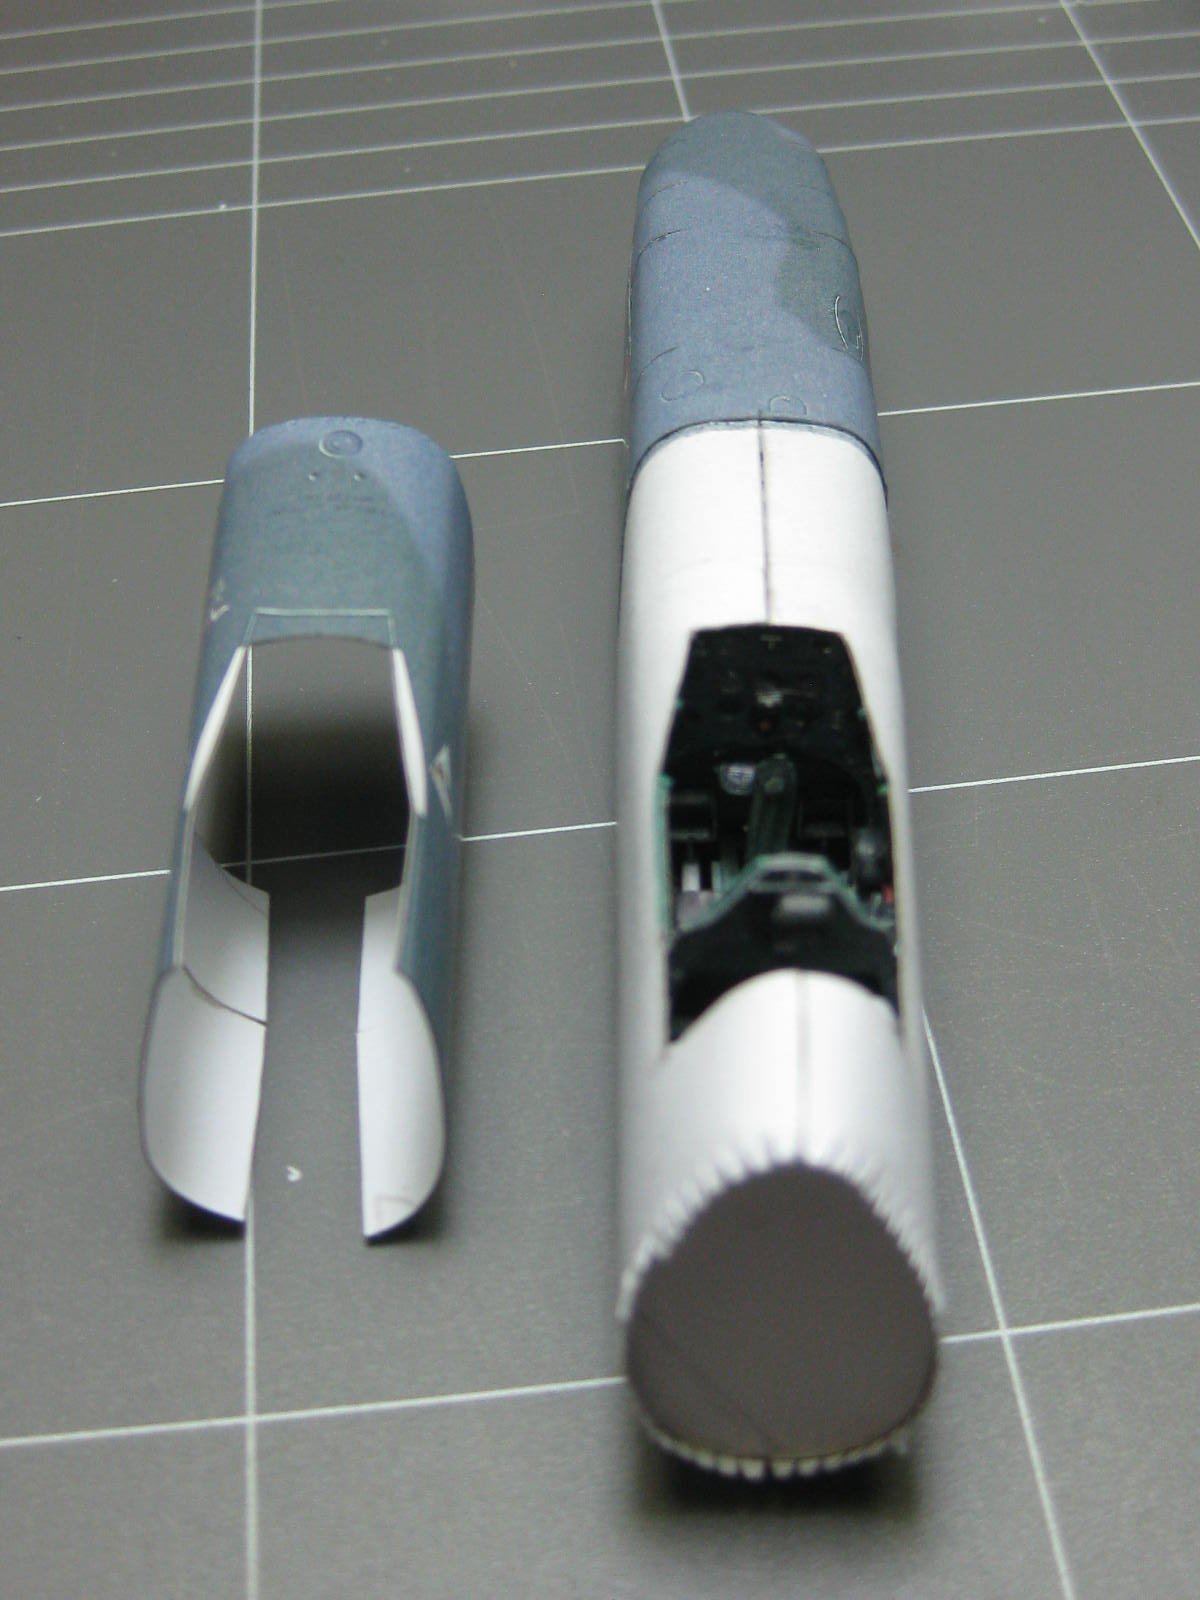
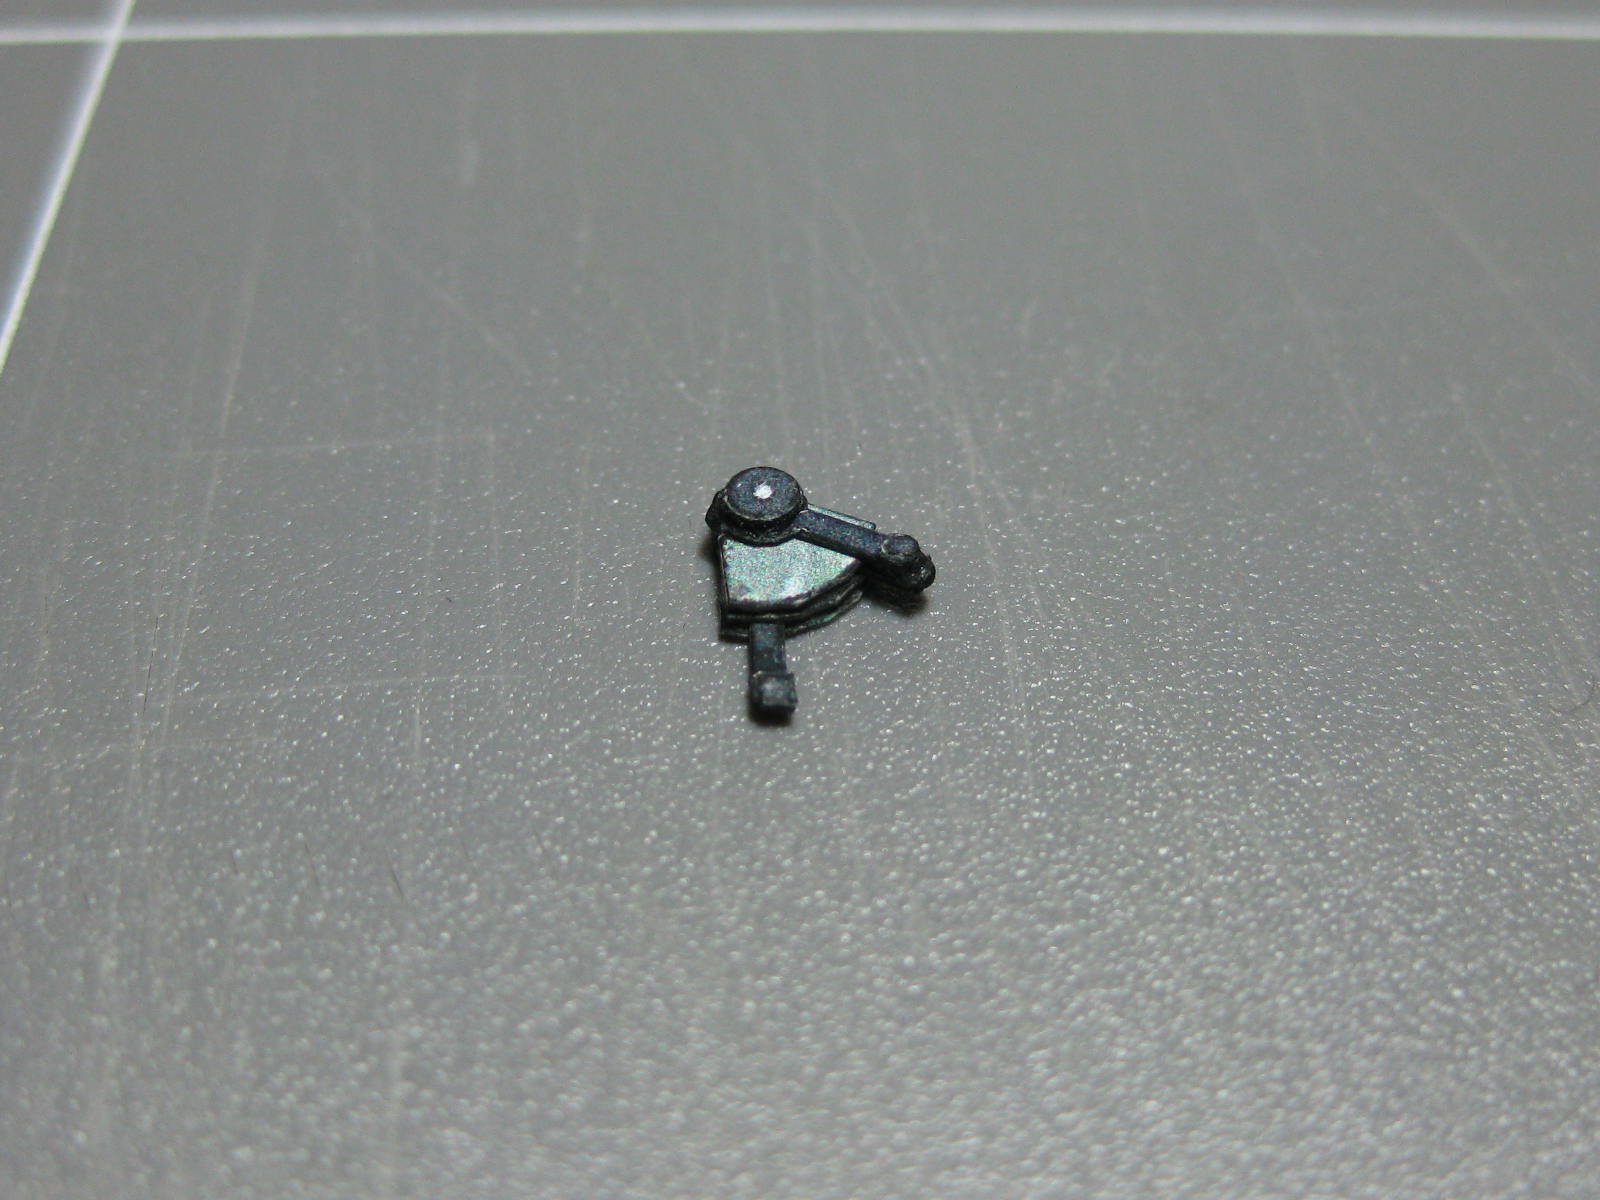
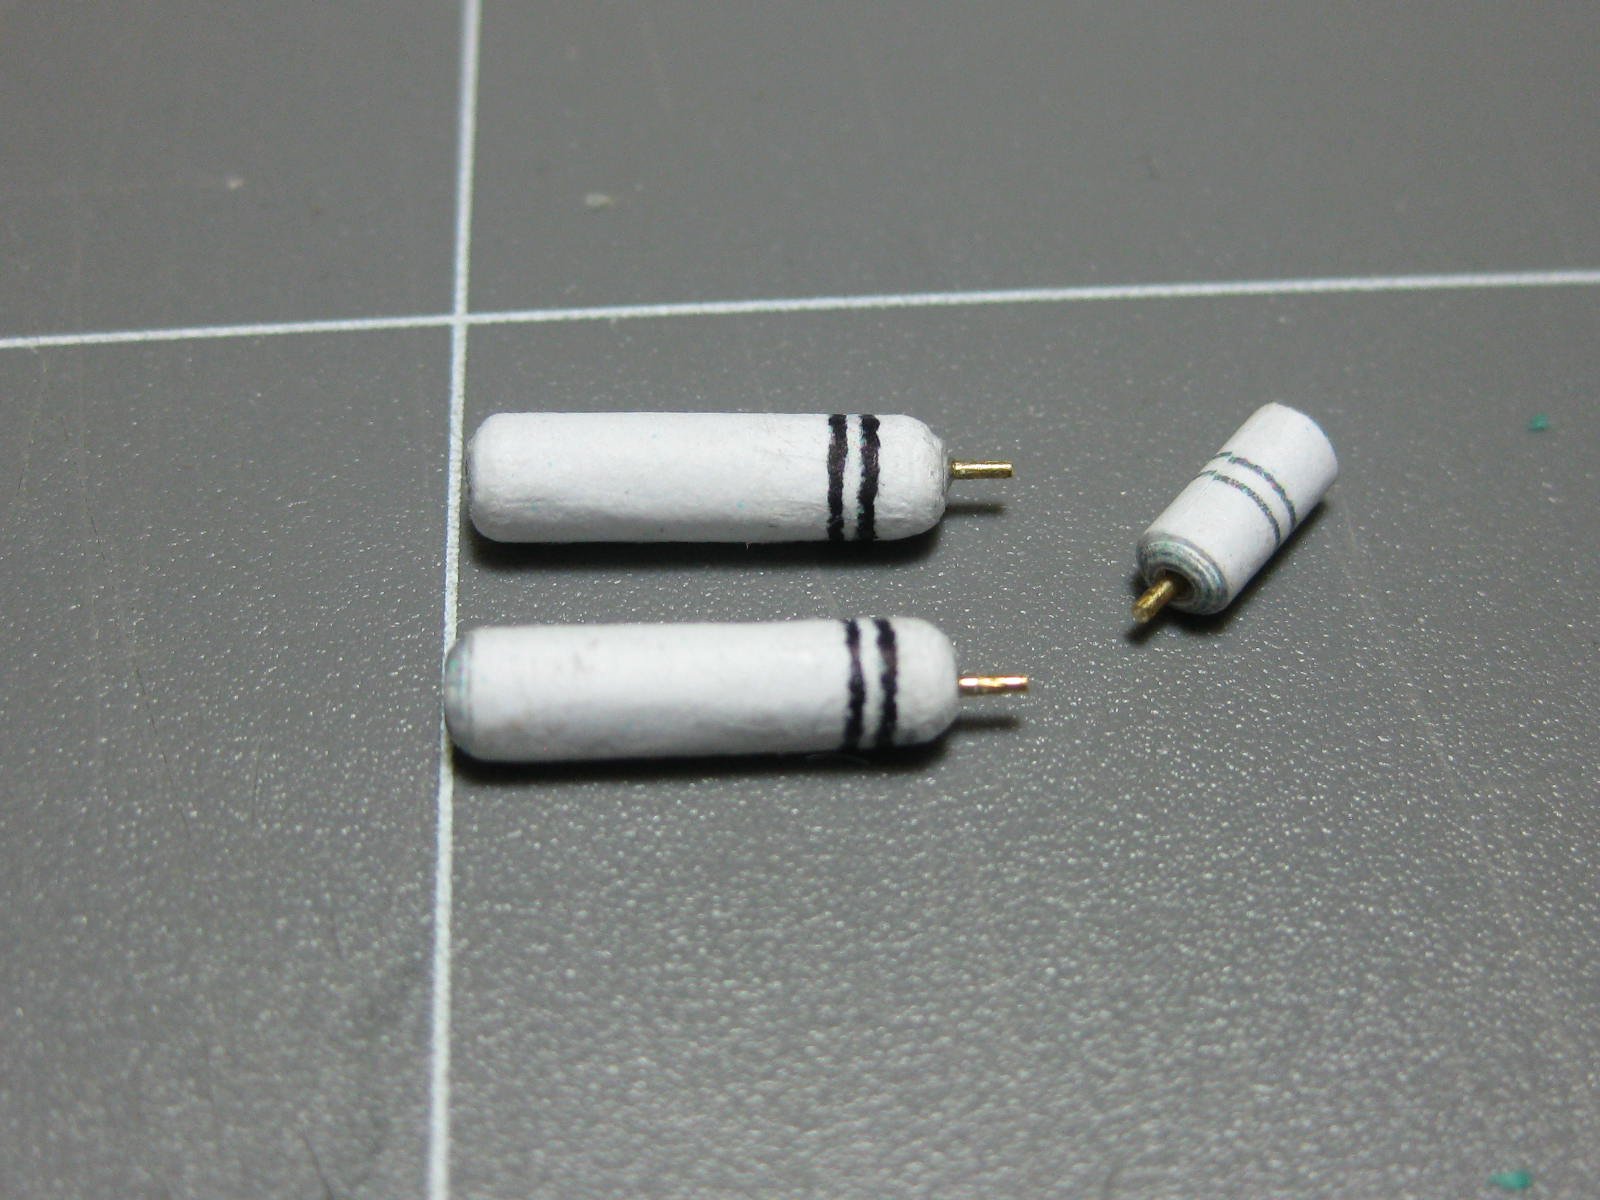
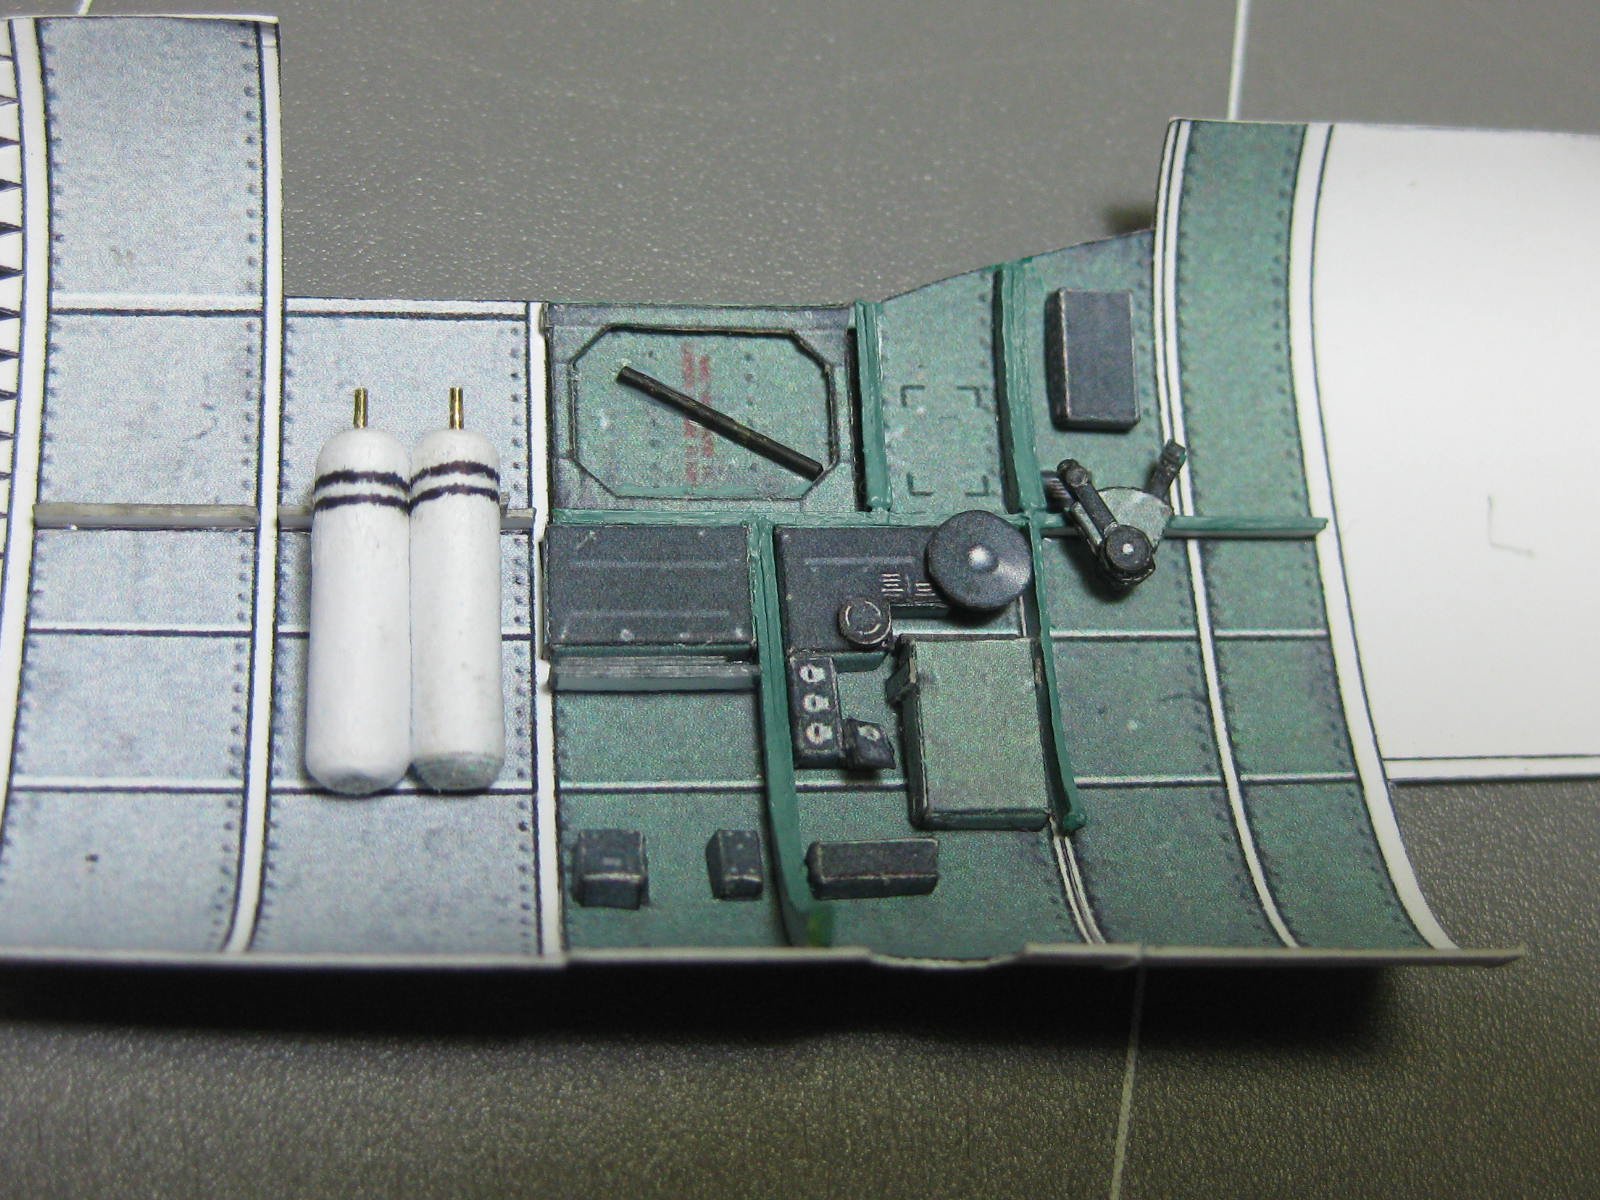
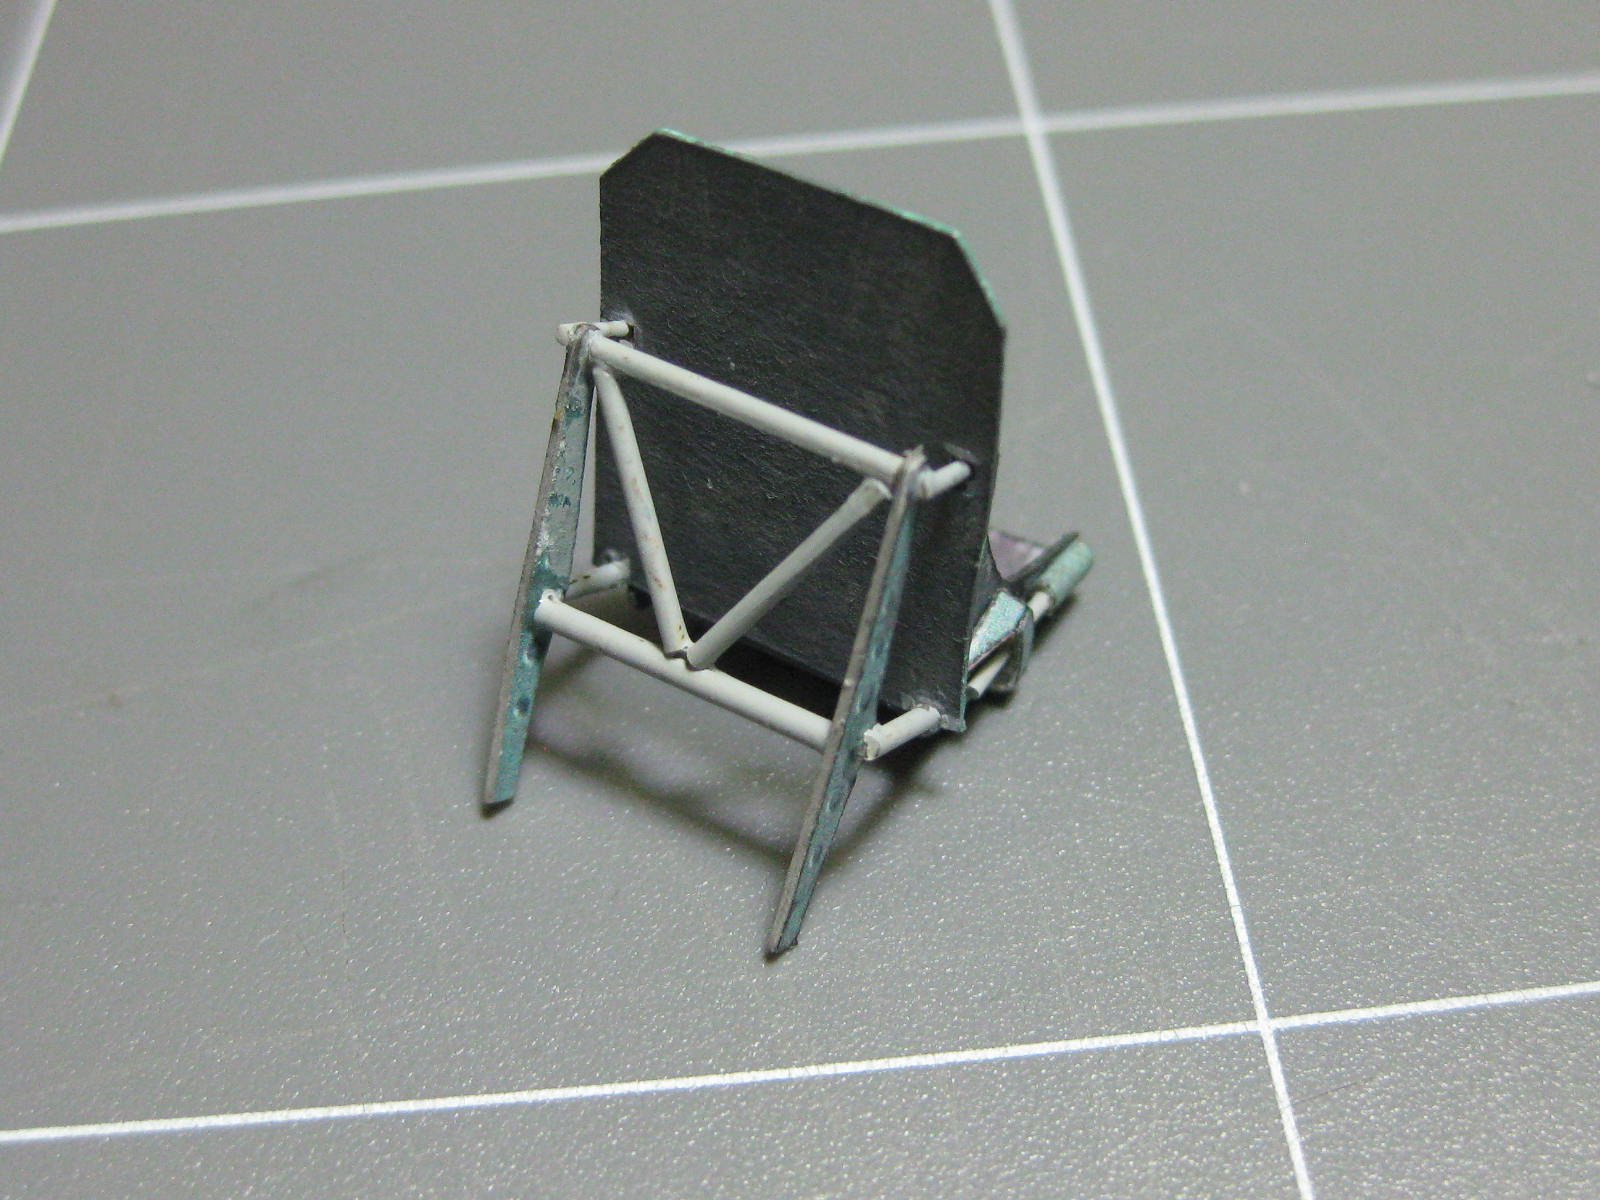
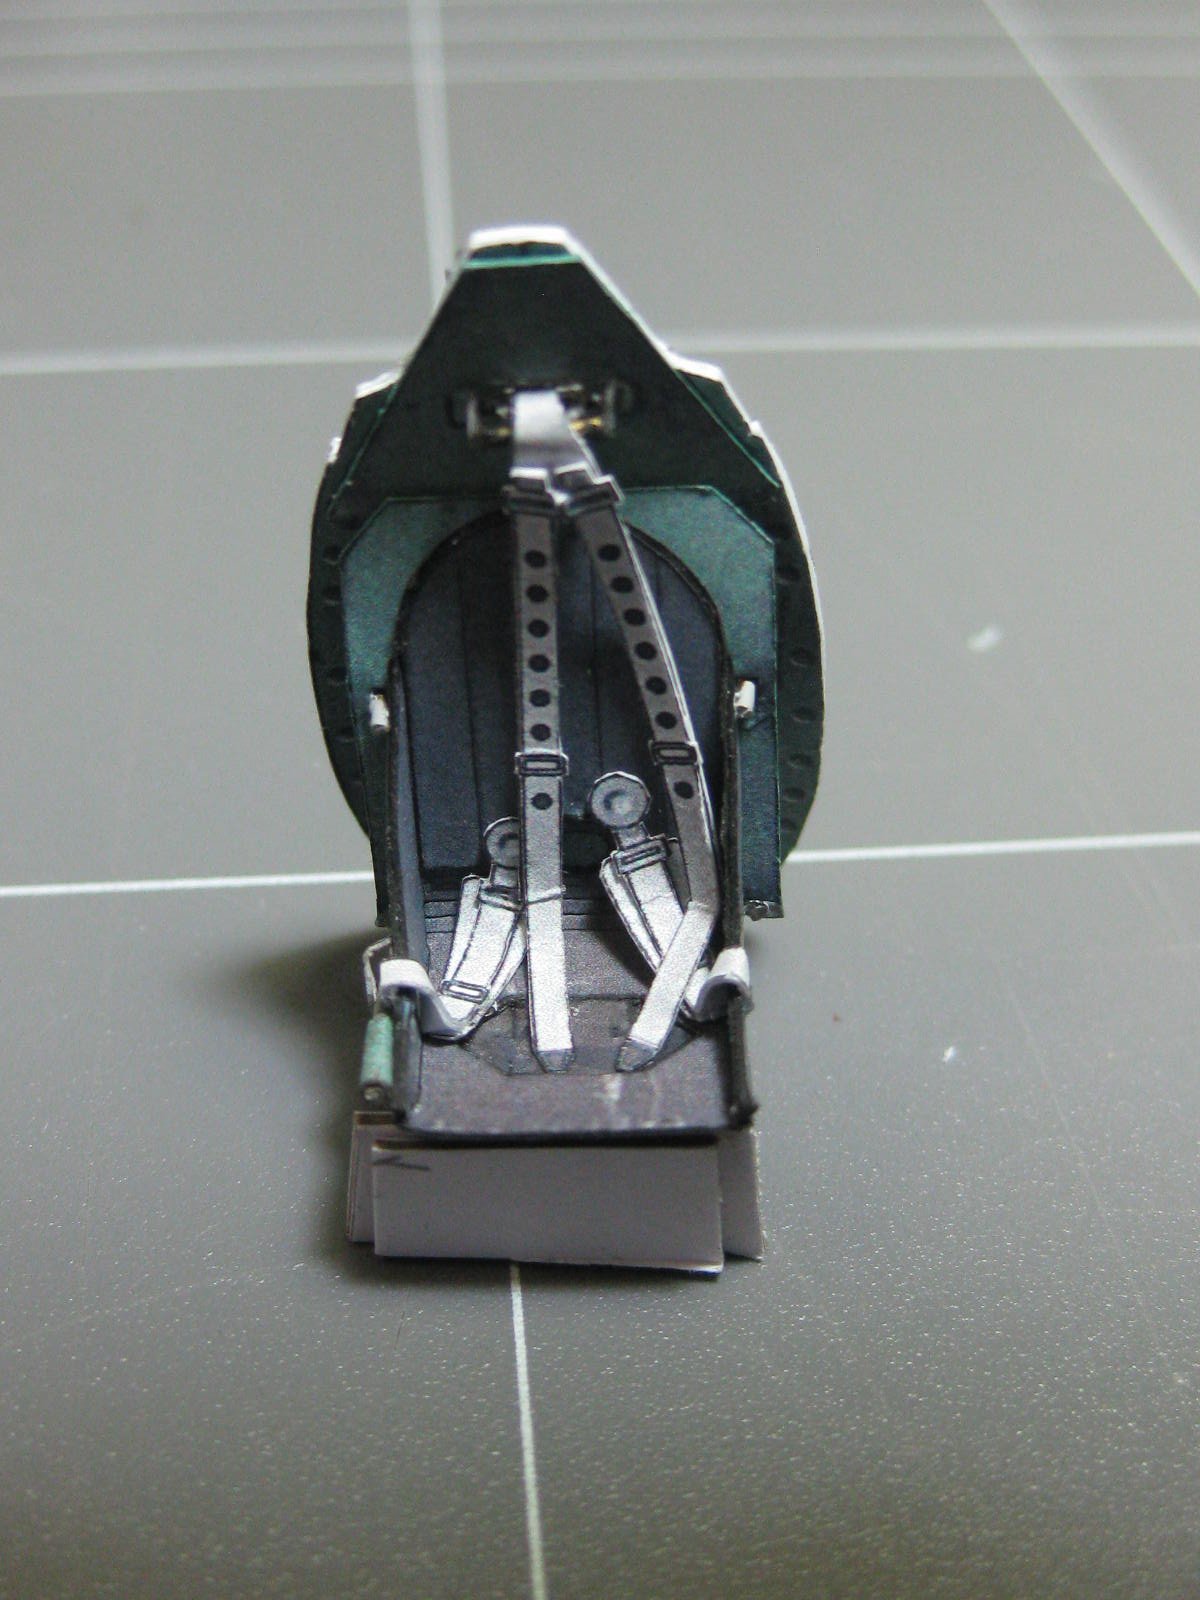
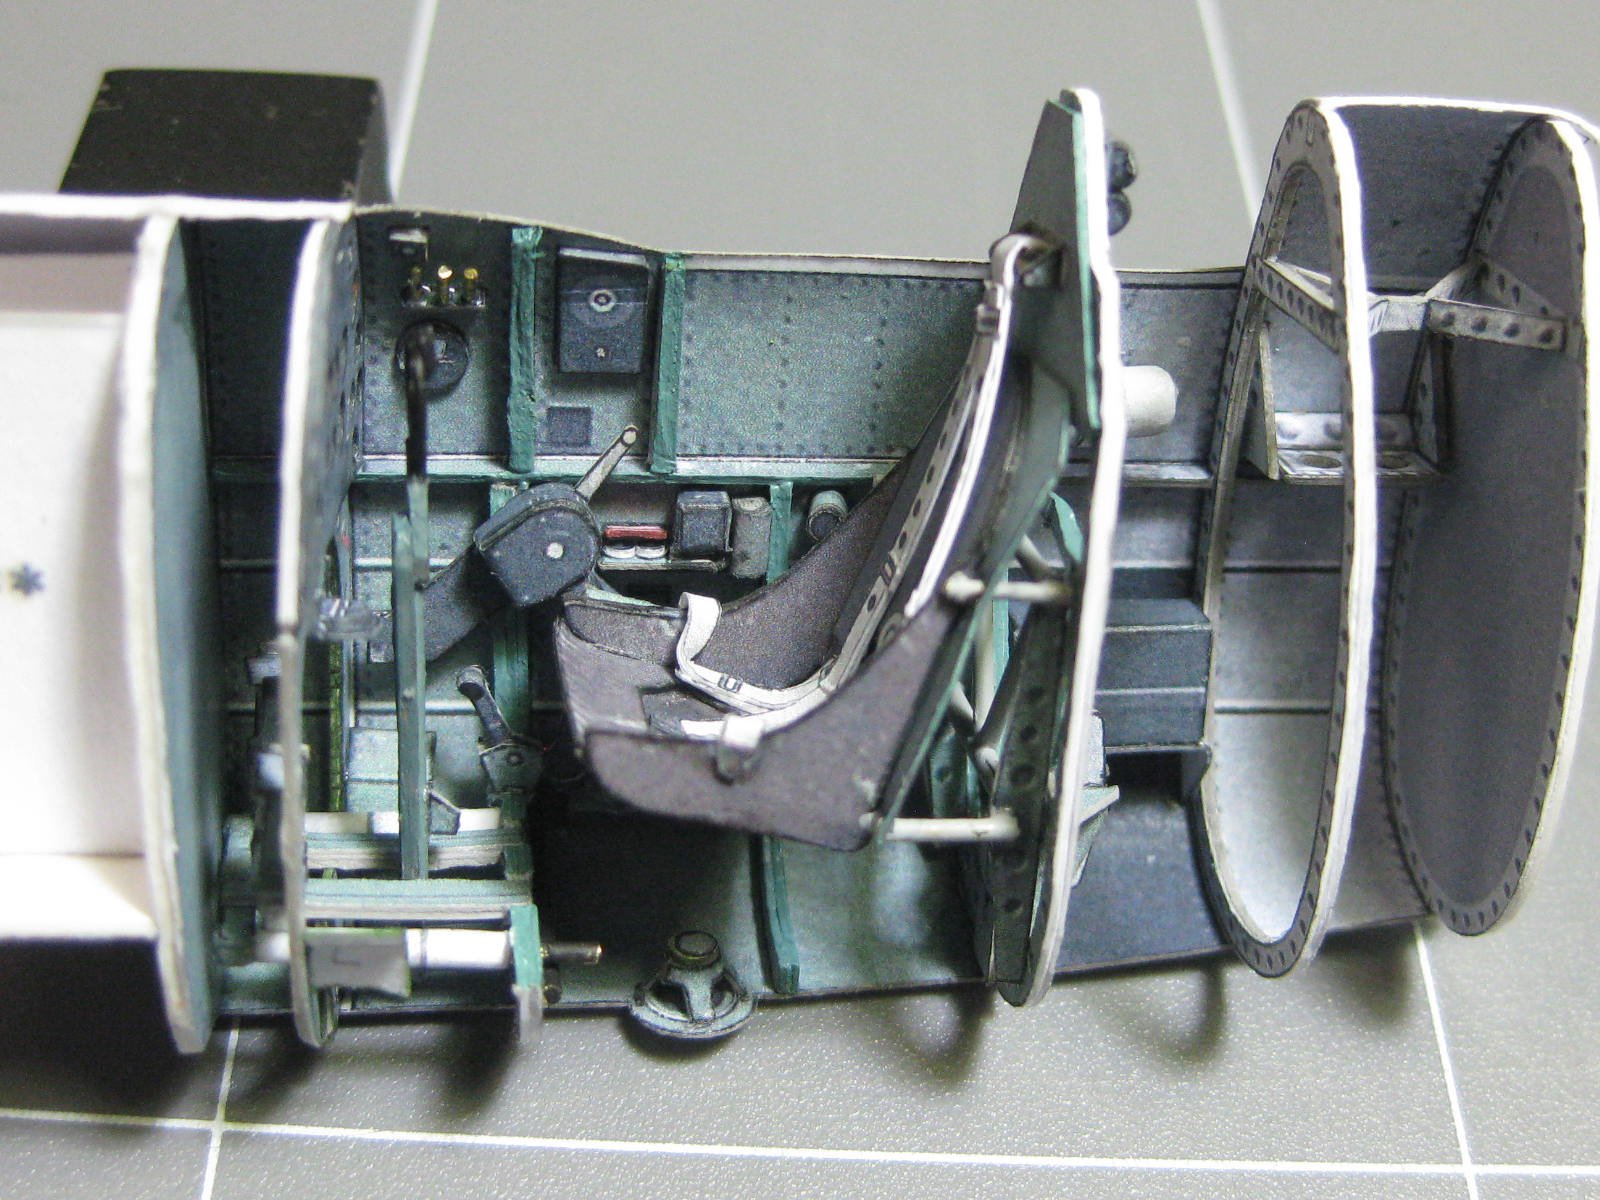
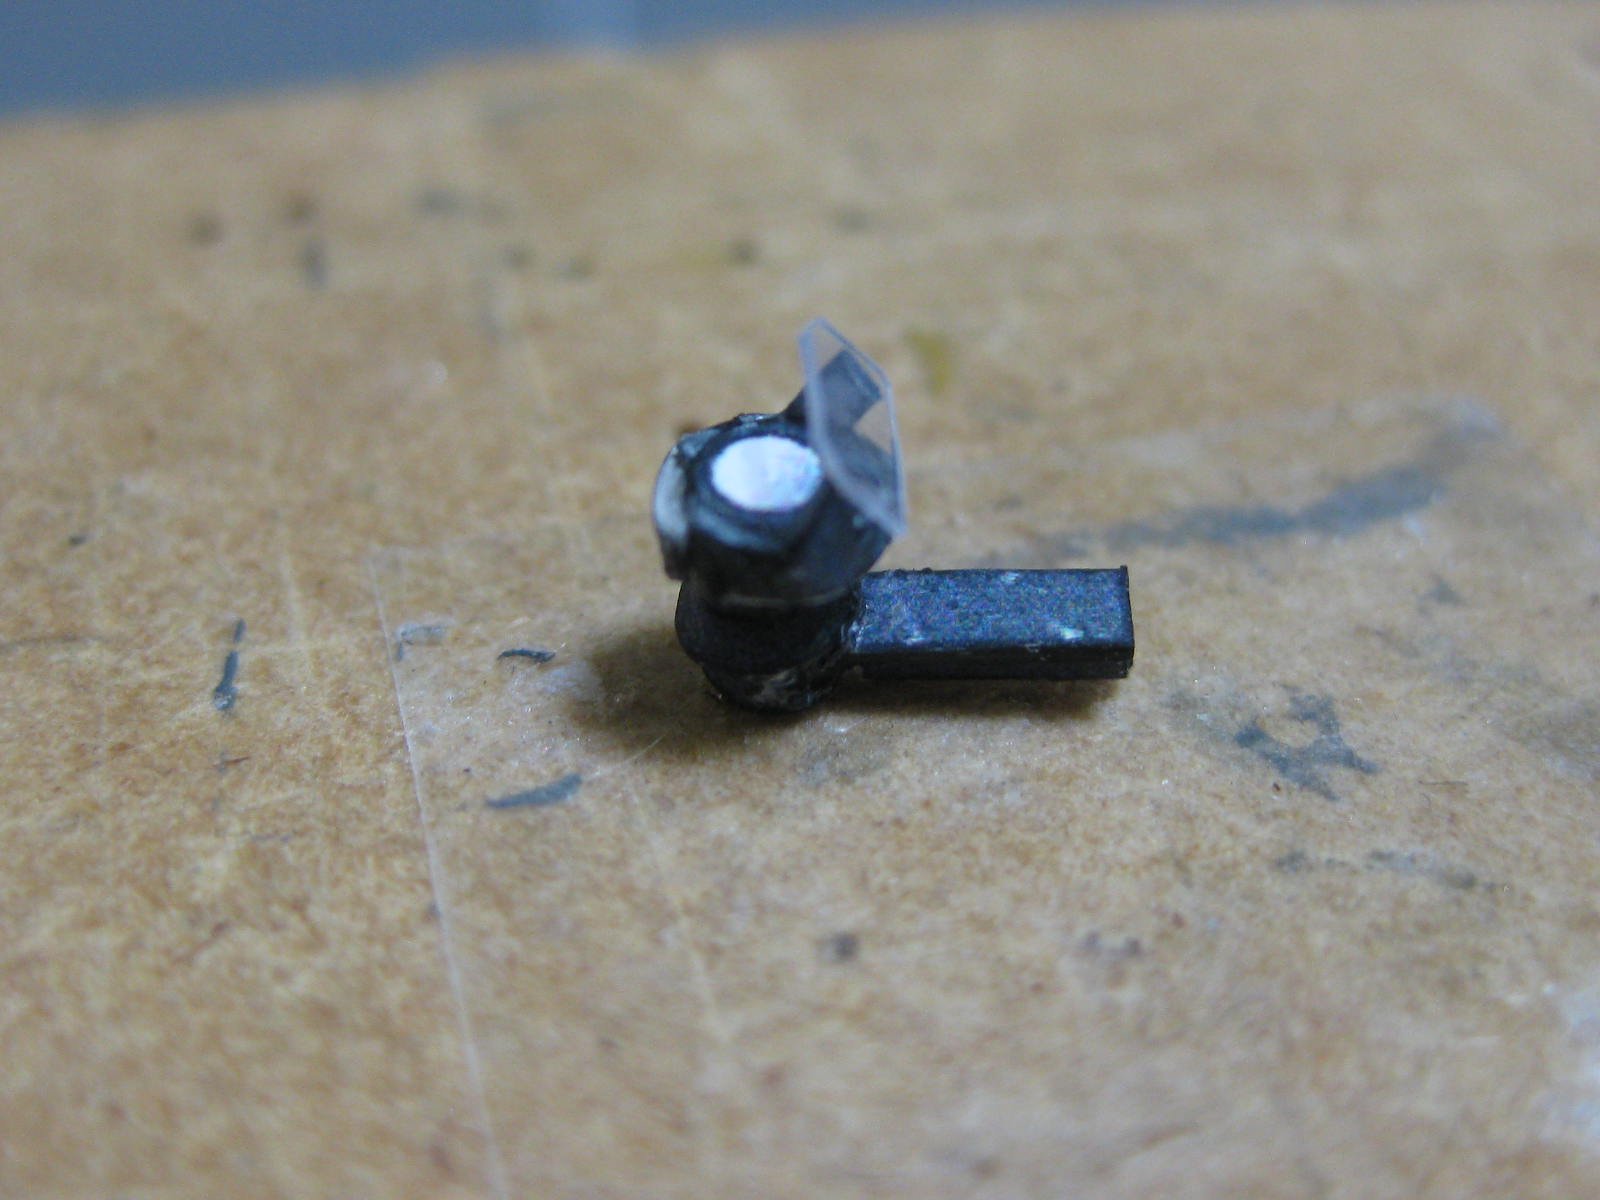
It's very detailed Popeye, but no engine unfortunately. The cockpit more than makes up for that however, the thinking behind this kit is that all actually VISIBLE details (without removing covers) are included. Here are pics of the first section to build, the cockpit, under construction. Halinski's method of building this kit is really great - there would be no way of including this amount of detail if the outside of the plane was built first : The Oxygen cylinders were tightly rolled from thin paper and the ends sanded round. The smaller one hasn't been sanded yet : Some of the ridiculously small pieces. This lever assembly is only 4mm across and consists of 10 pieces. The knob is 0.6mm diameter : The Gunsight has 15 parts and took me 4 hours to make. It is 2mm at it's widest measurement : The seat was quite a lot of fun to build. Here's another 1 1/2 day's work : The scrap of white card under the seat is purely a support for the pic, not part of the seat . As I've come to expect from Halinski the parts fit is excellent. The two halves of the cockpit were very complex, with a lot of areas of possible problems, but they virtually snapped together seamlessly when it came to gluing them together : Danny


- 62 replies
-
- 15
-

-
Thank you for the very interesting info Vossy . I changed the title - it was actually a typo on my part .
-
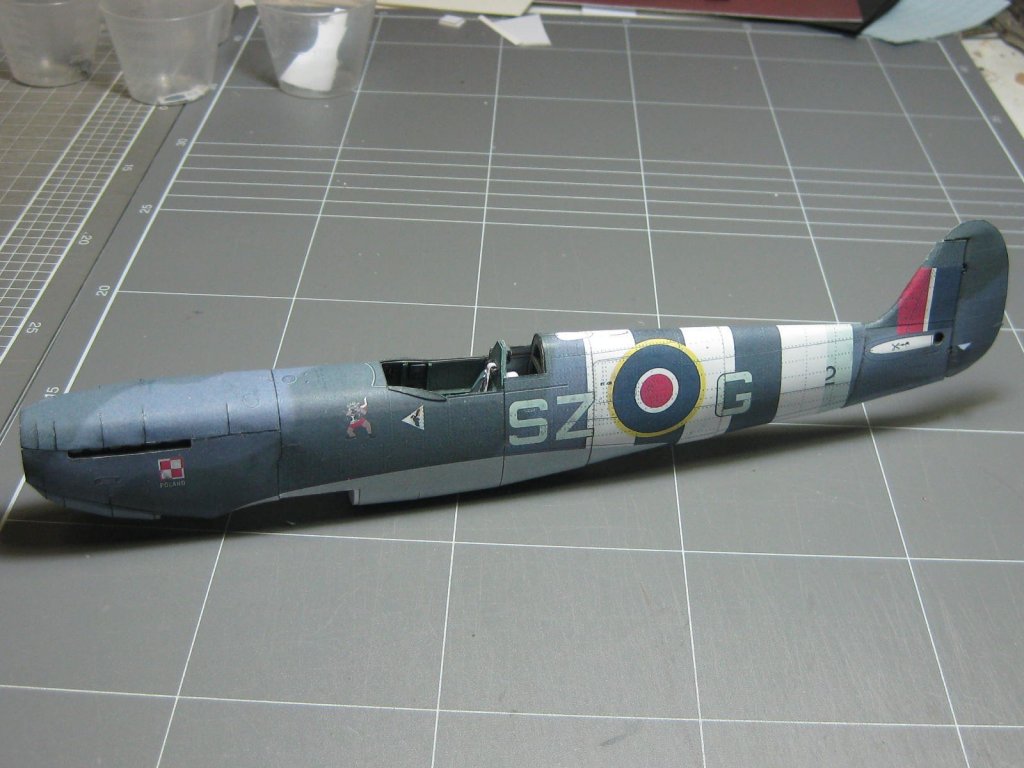
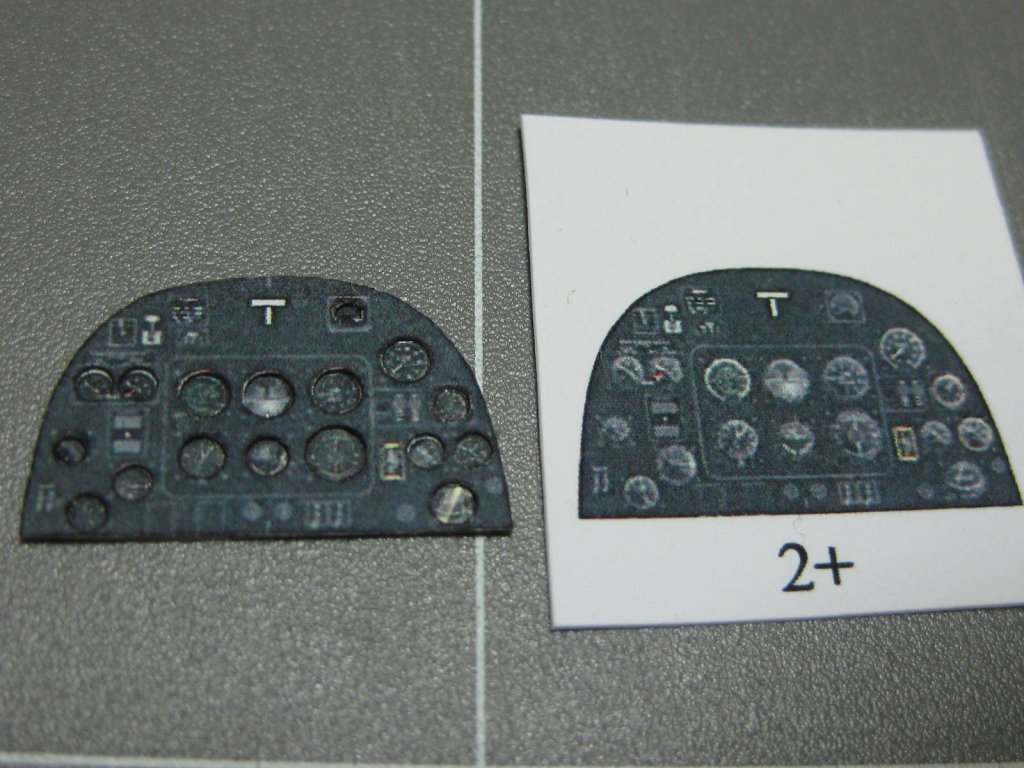
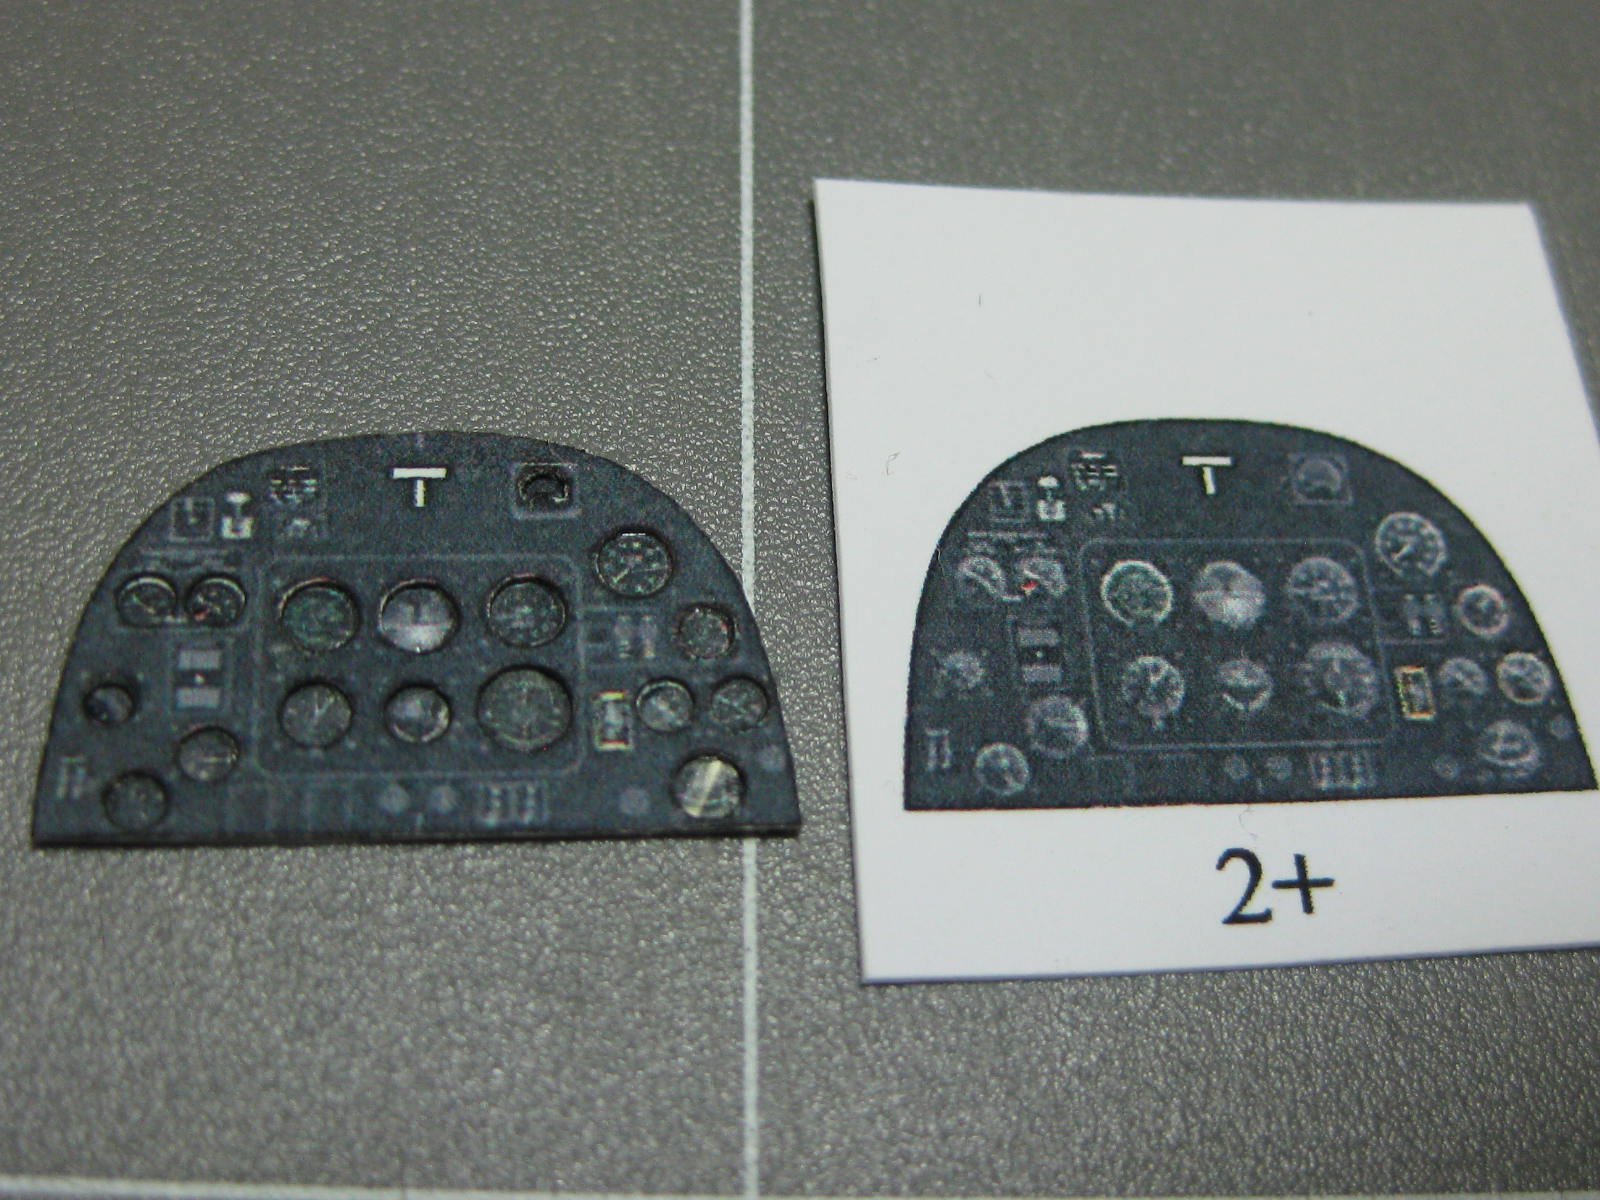
Hi all, Here's my next Card project, once again "off-topic" in a Model Ship Forum . It's a WWII Mk. IV Spitfire, or should I say TWO Spitfires. Halinski supply two aircraft in this kit - a green/grey version and and all-grey one. I didn't realise that until I was doing my Parts Spreadsheet and found a couple of identical pages which got me wondering . At this stage I'm only going to do the green/grey Post D-Day version, but I may change my mind later. Here's a pic of the Cover Art : Here's a pic of the first thing built, the Dashboard. There are 2 versions in the kit - a simplified one-piece dash and a 3-piece one that needs the holes for the gauges punched out and a thin sheet of cellophane (from a cigarette packet) inserted between them to simulate glass. No prizes for guessing which way I chose : Danny

- 62 replies
-
- 10
-
-
Thanks all for the kind words . No Grant, not until I can build myself a new workshop. The main reason I started with Card in the first place is that I'm currently working in my bedroom - too much sawdust for wood and the power tools disturb the neighbours in the next room . Pav, it's in whatever scale my printer spat out. I'll be able to work out what the actual scale is after I glue together the fuselage - I know what the original wingspan is. Danny
-
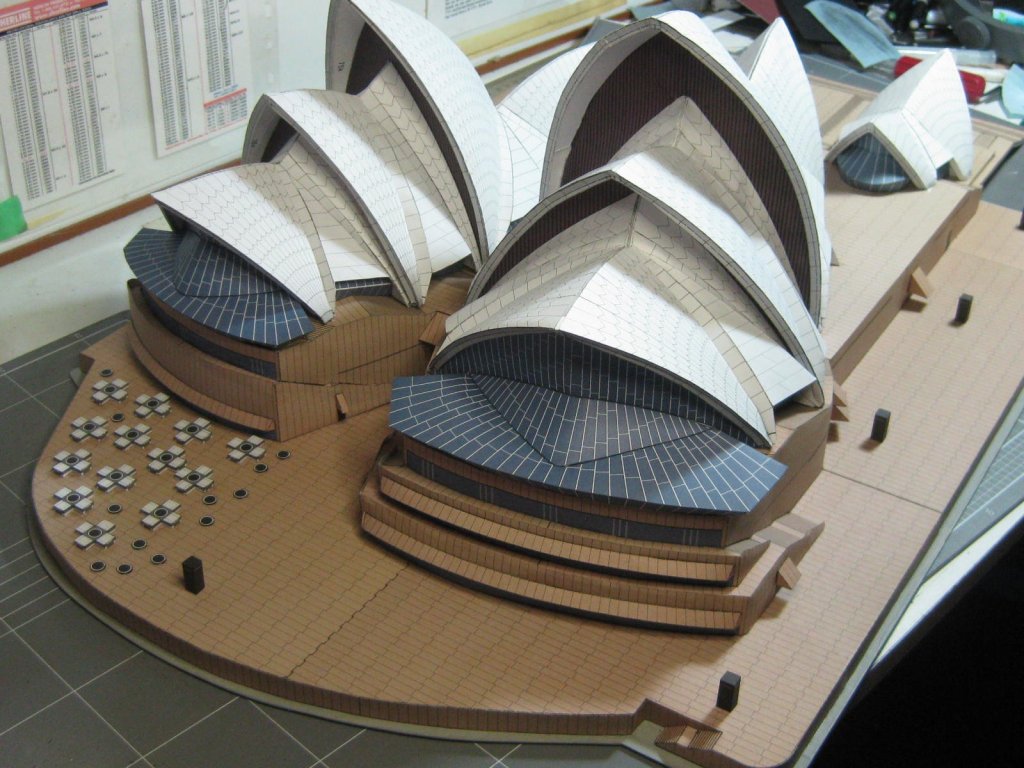
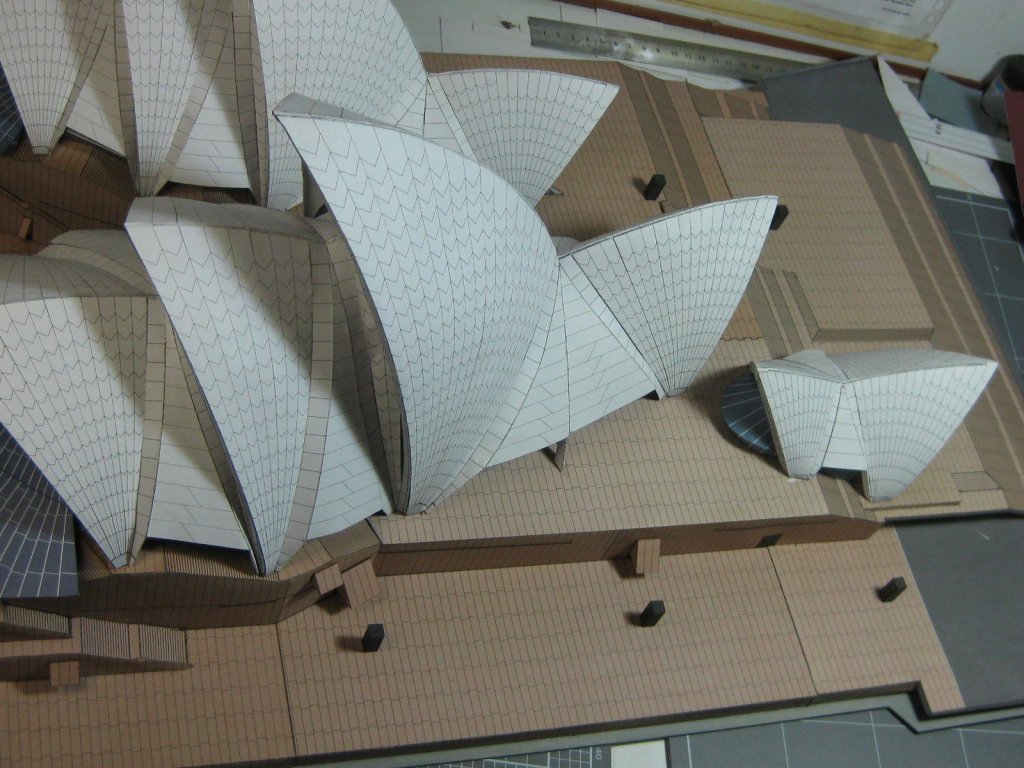
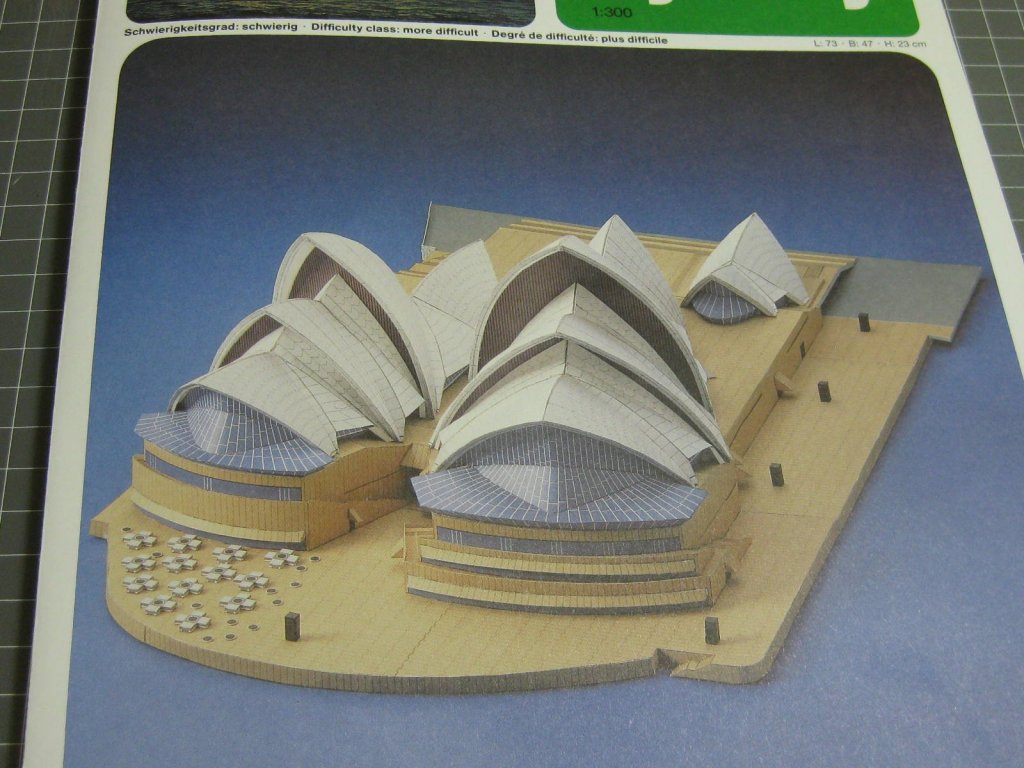
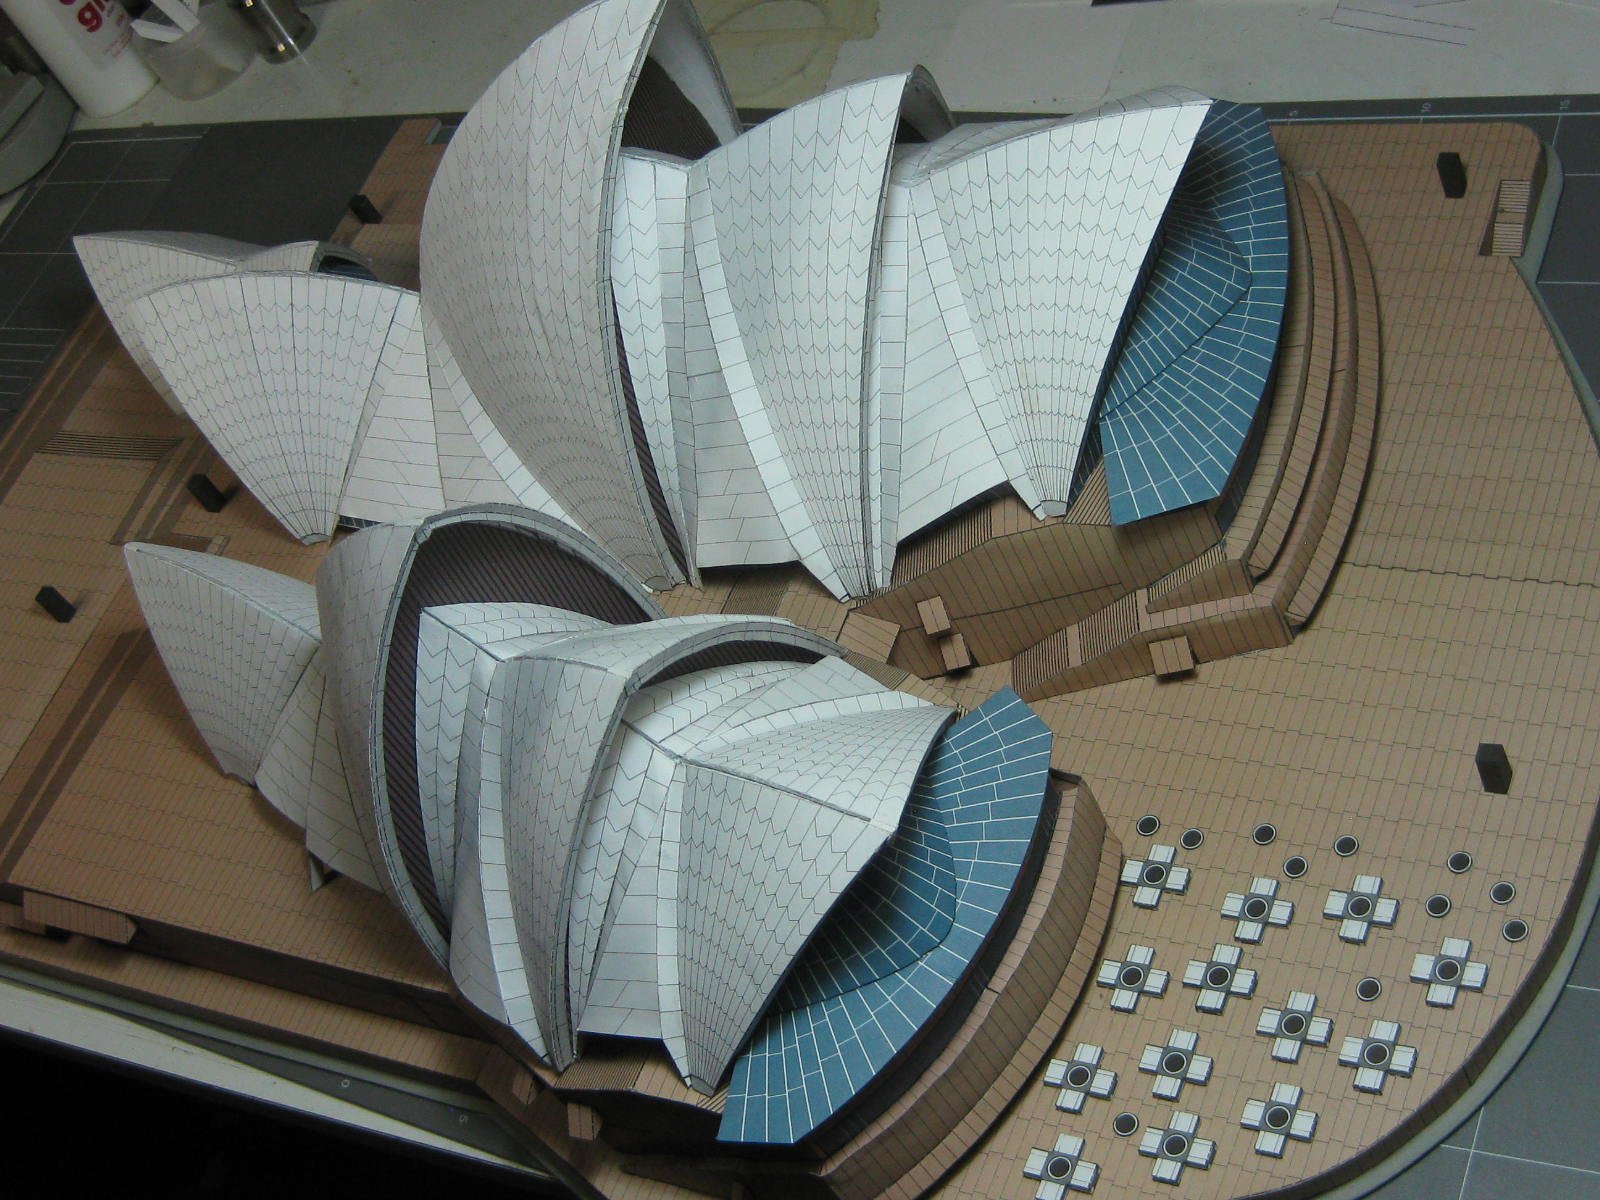
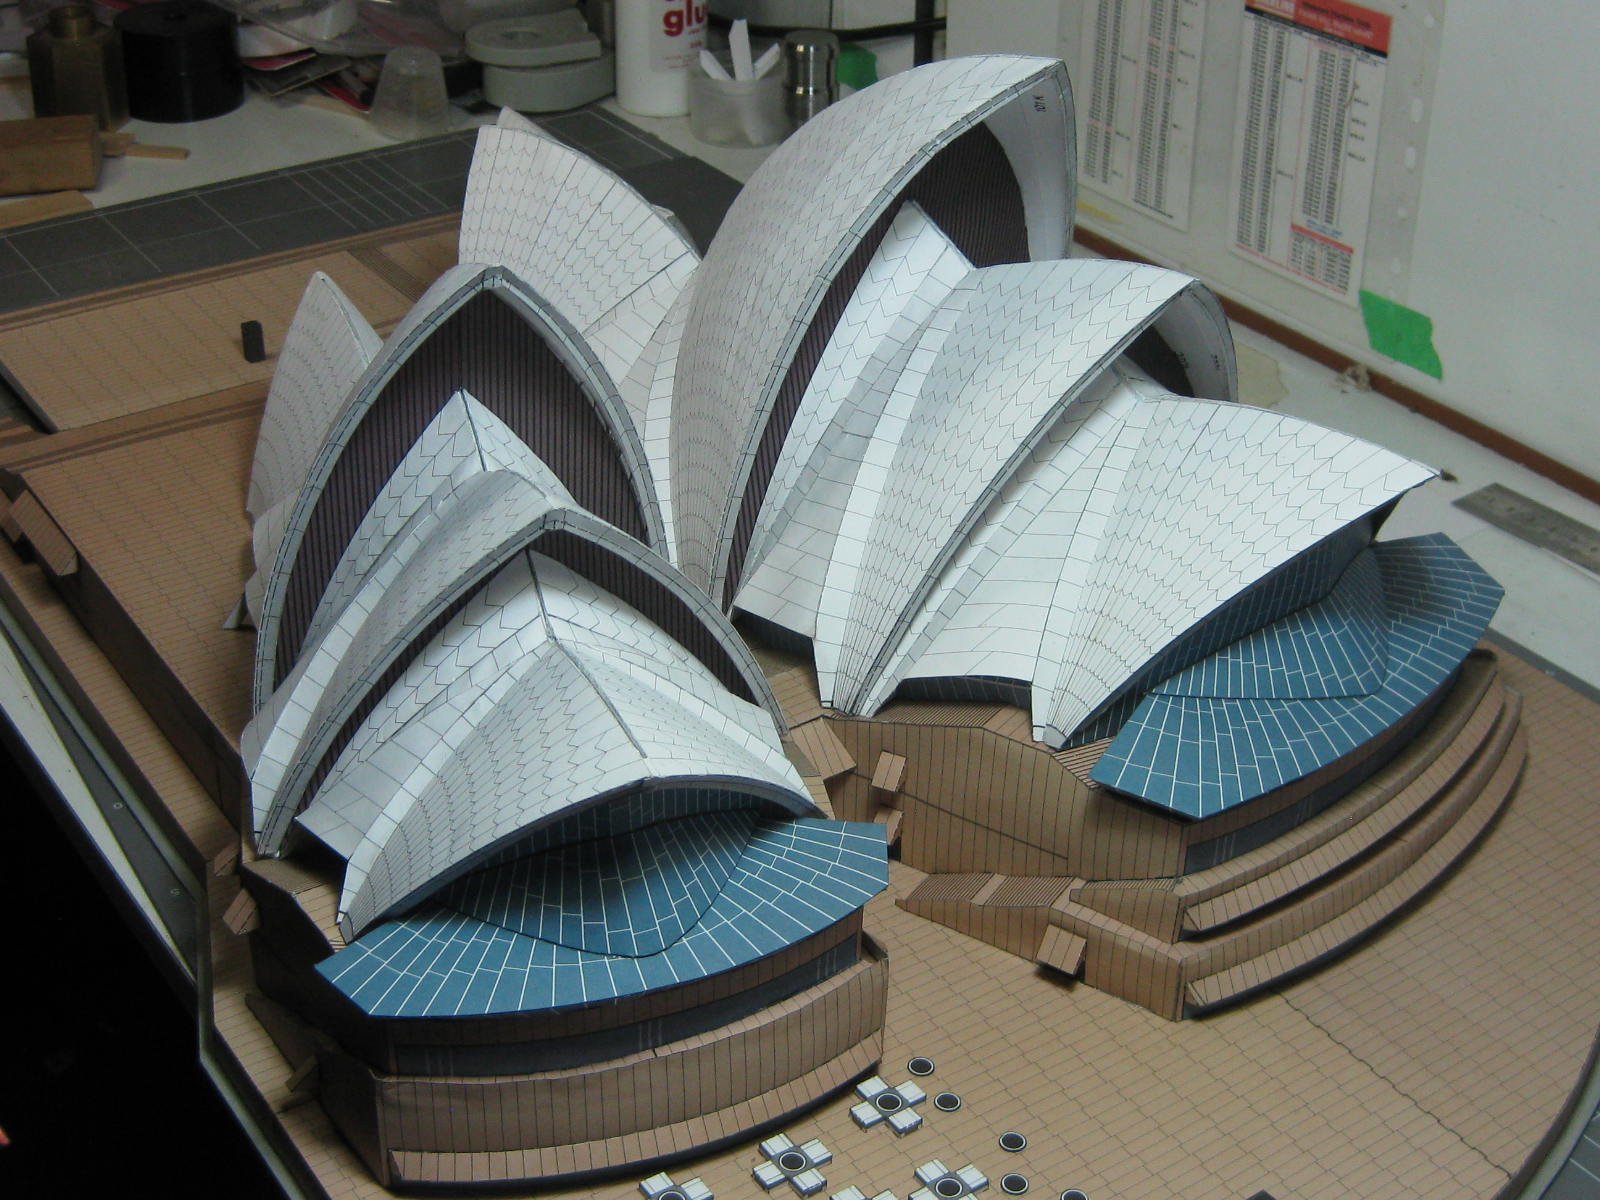
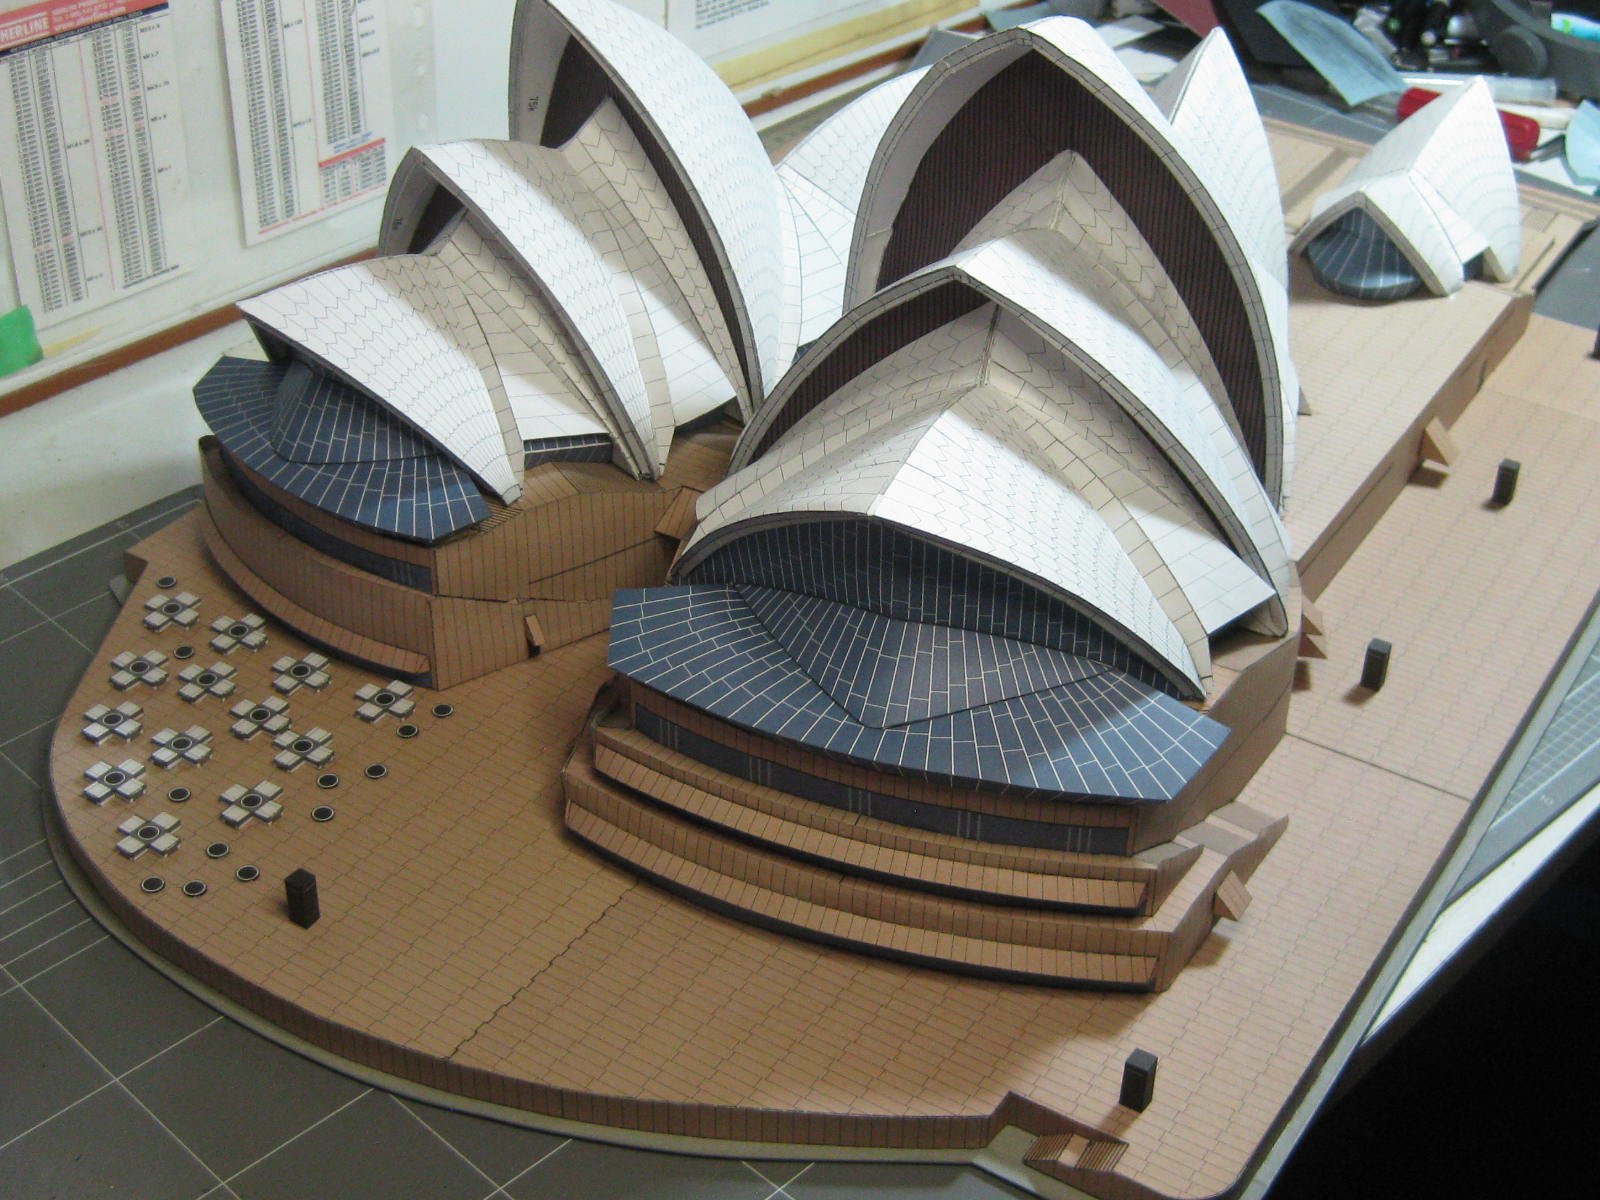
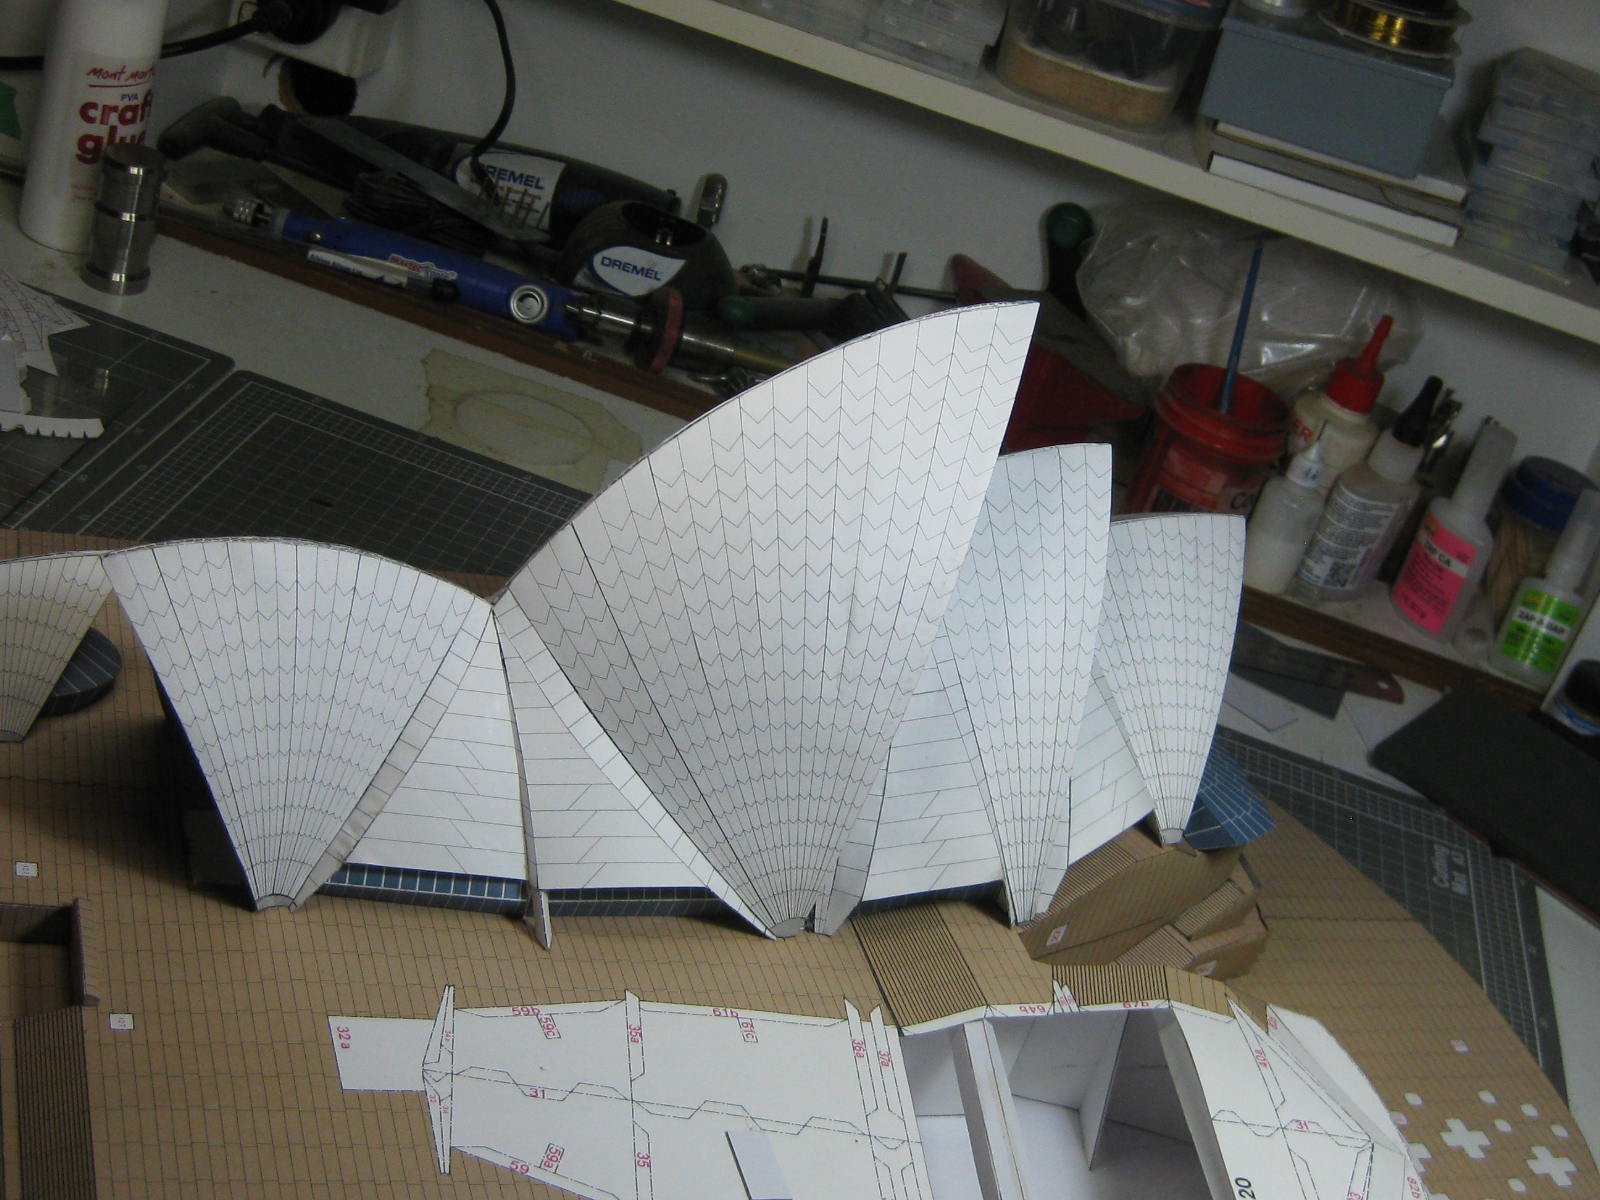
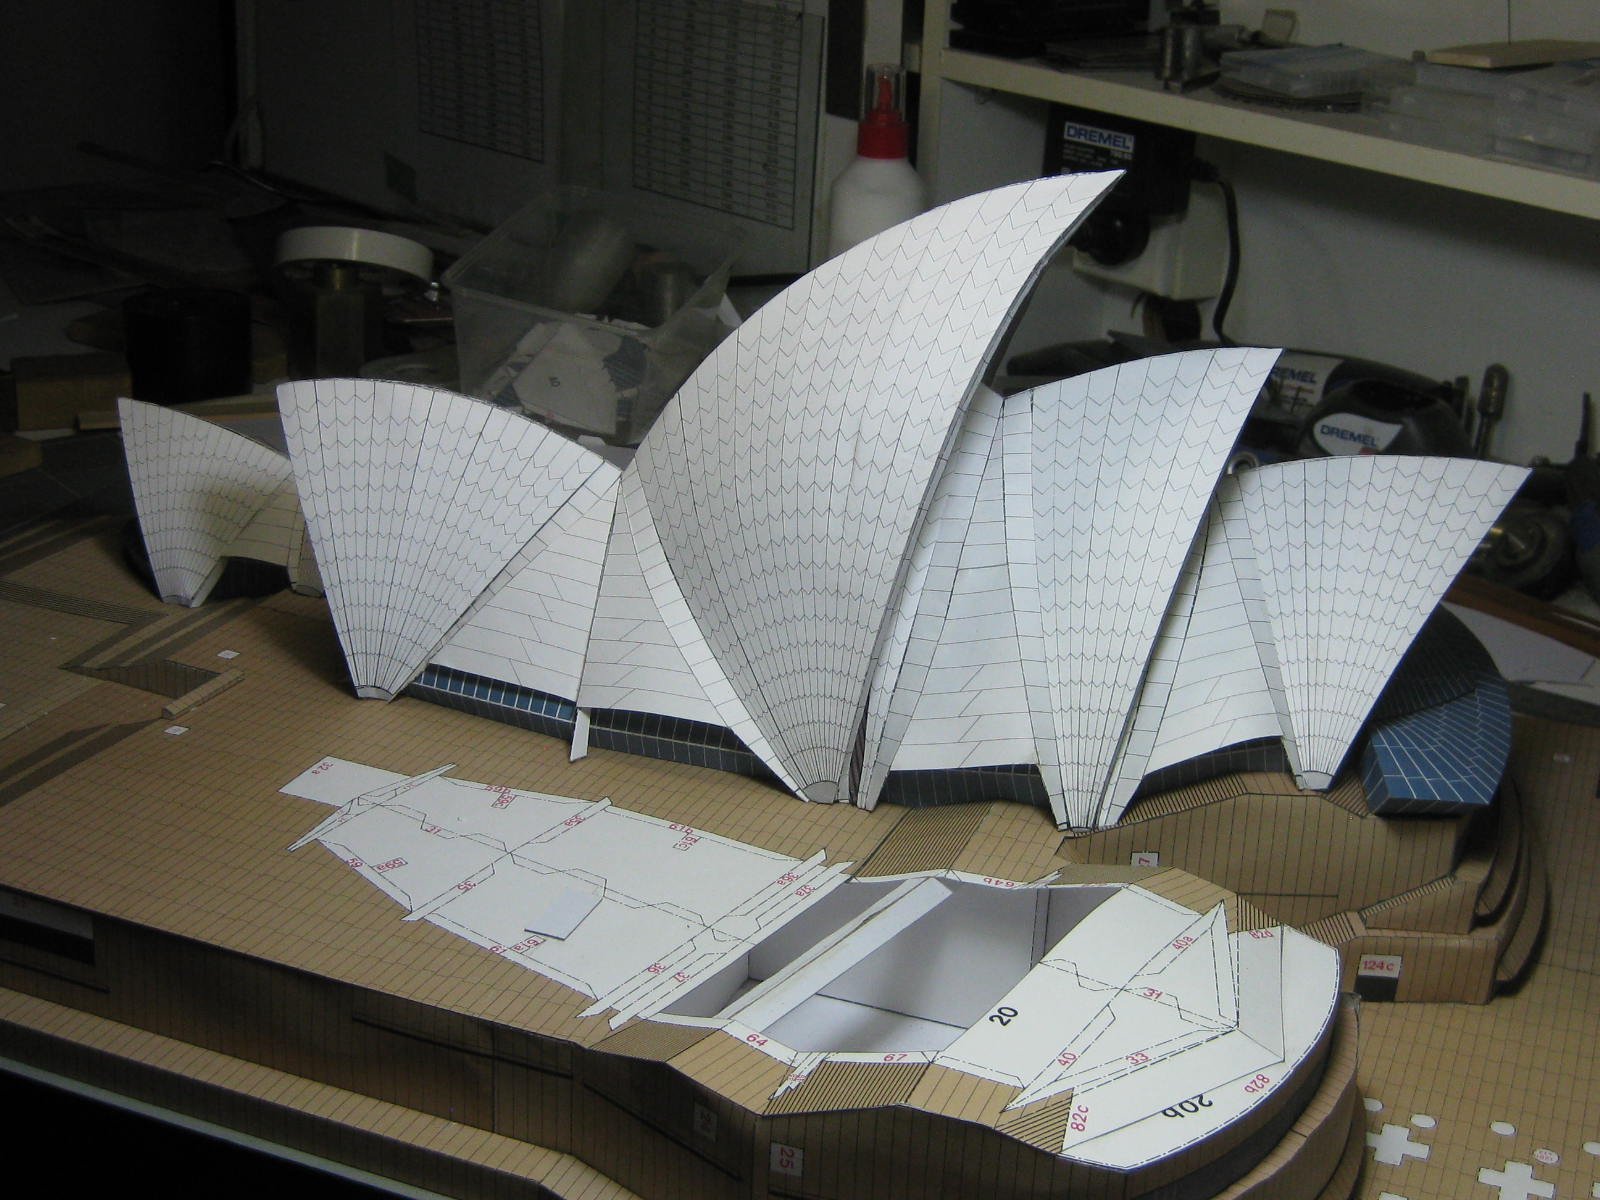
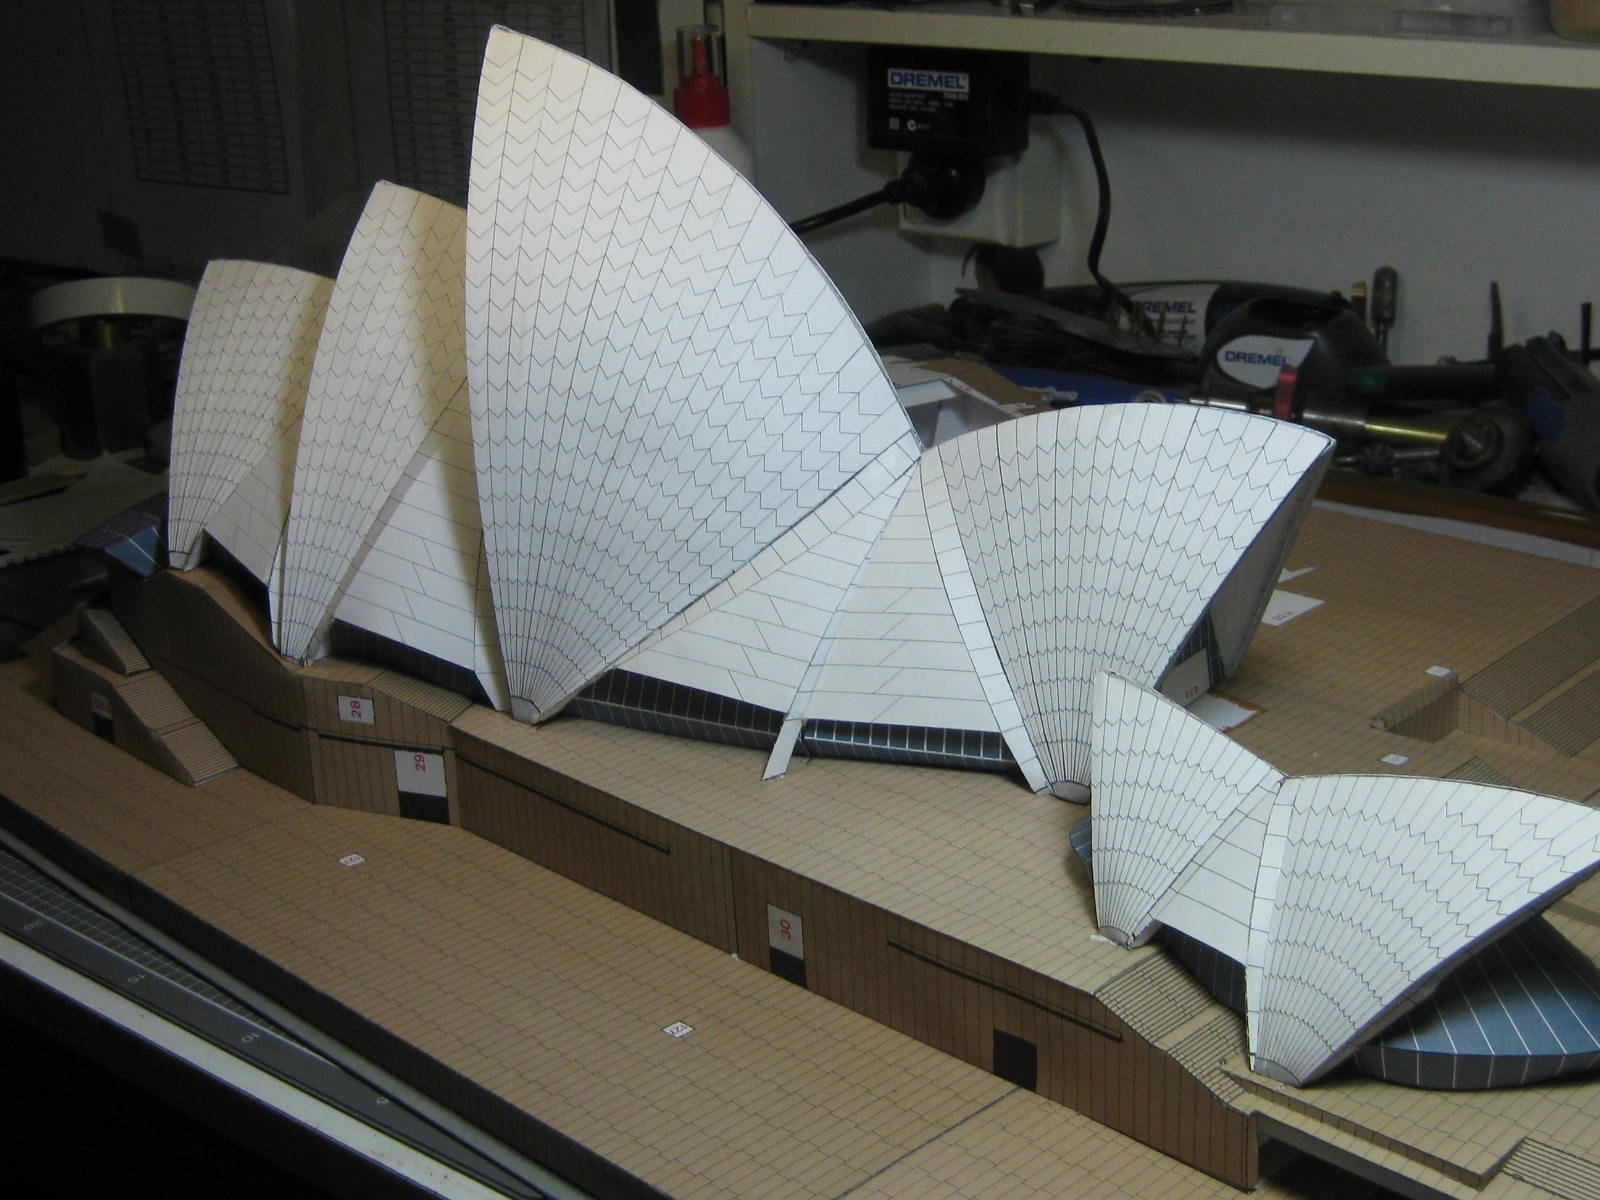
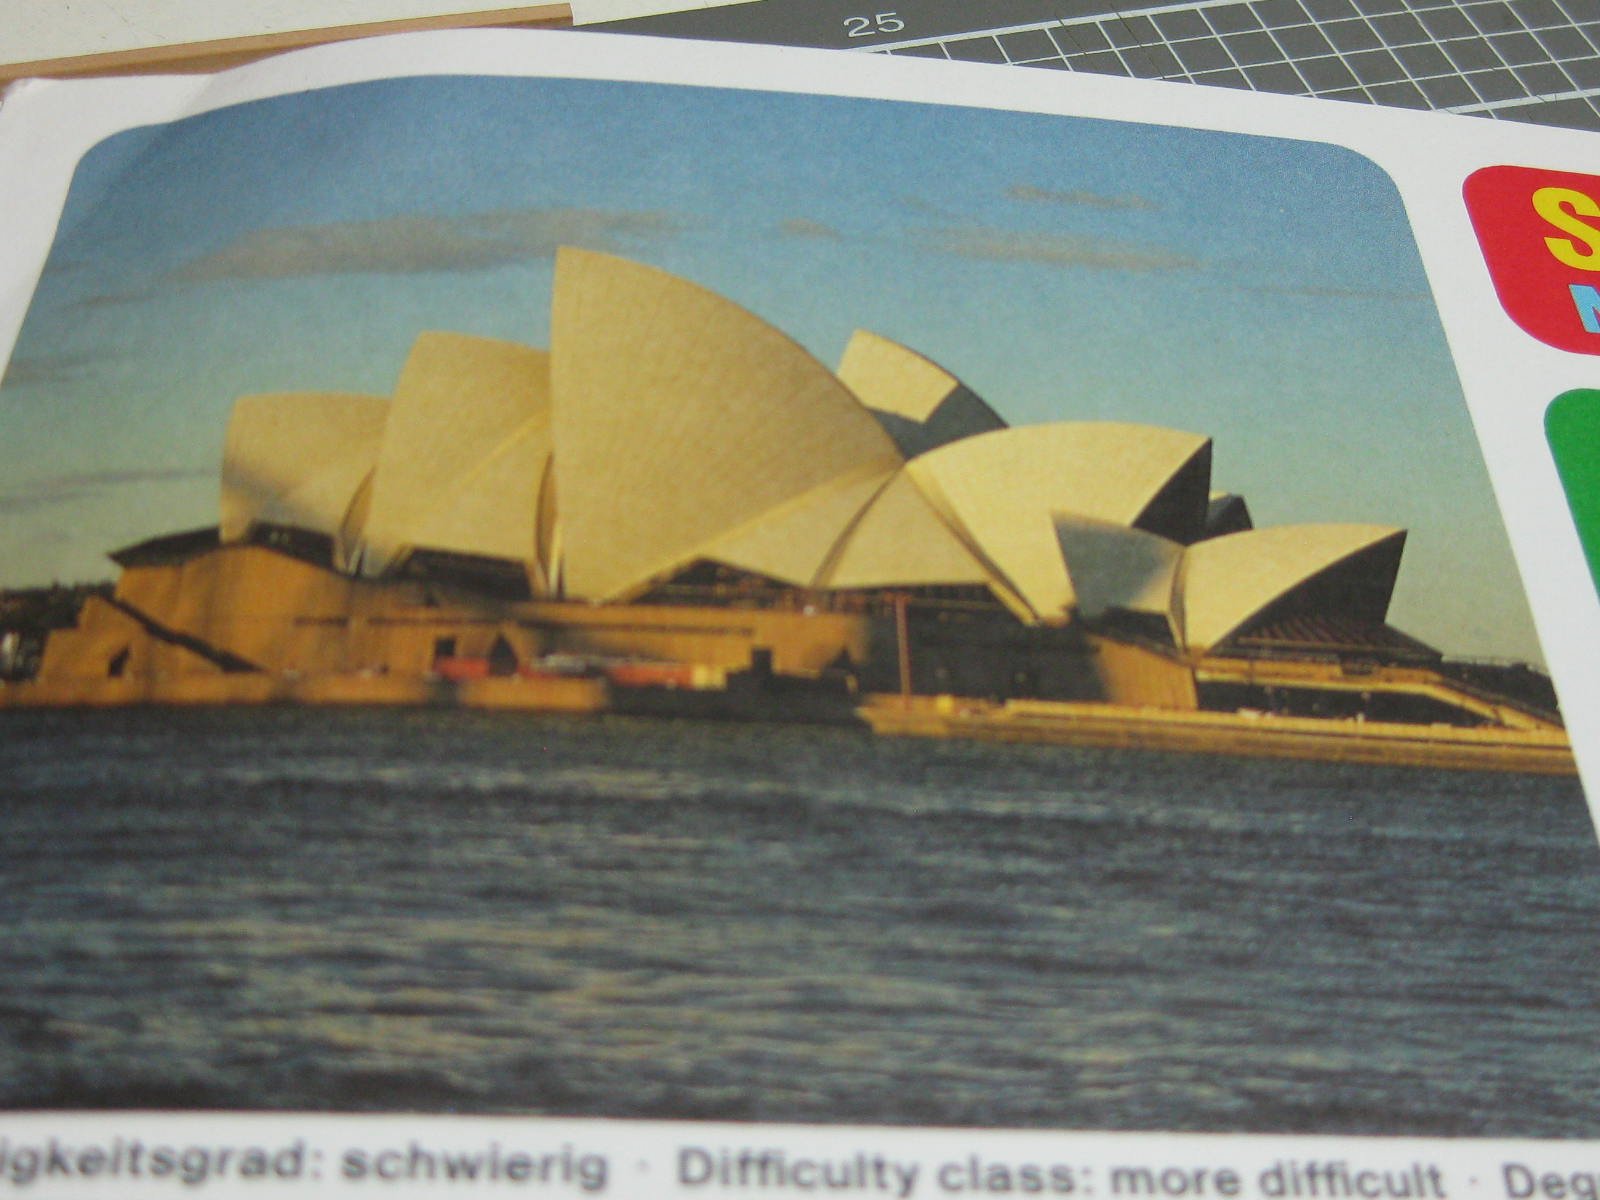
Thanks Popeye . I've finally finished the Opera House. I must say it wasn't the most enjoyable model I've ever built, and I'm not particularly happy with the way it turned out. Here are the final pics : My next model will be a (Card) Halinski MkIX Spitfire in about 1:50 scale. I'll do a build log for it in this forum. Danny


- 36 replies
-
- 13
-
-
Hi Kirk, and welcome to the wonderful world of Card Modelling . You're off to a pretty good start and I hope you won't find too many difficulties along the way. Yeah, I don't like Tabs but some models just won't go together without them - my Sydney Opera House for example. If you want to dispense with them (and even on a Tabbed model you can do that for some parts) you need to virtually re-design the support structure of the kit. Laminating using heavier card is a good option, as is adding extra card where you think it may be needed for keeping things square (or not). As far as "instructions" go in Card Kits - no publisher has the perfect examples. Some are just worse than others . You'll tend to pick up the gist of it with experience. Planning a step or three ahead is a pretty good idea. So is "dry-fitting" parts before applying any glue. BTW - a proper Swann-Morton Scalpel with replaceable blades works far better than an Xacto blade. They are cheap enough, and you can buy blades in boxes of 100 which is a lot cheaper than buying 5 or 10 at a time (see HERE) - believe me, you'll need LOTS of blades . Have fun, and I'll be following your Log. Danny
- 10 replies
-
- 2
-
-
- atlantic conveyor
- jsc
- (and 1 more)
-
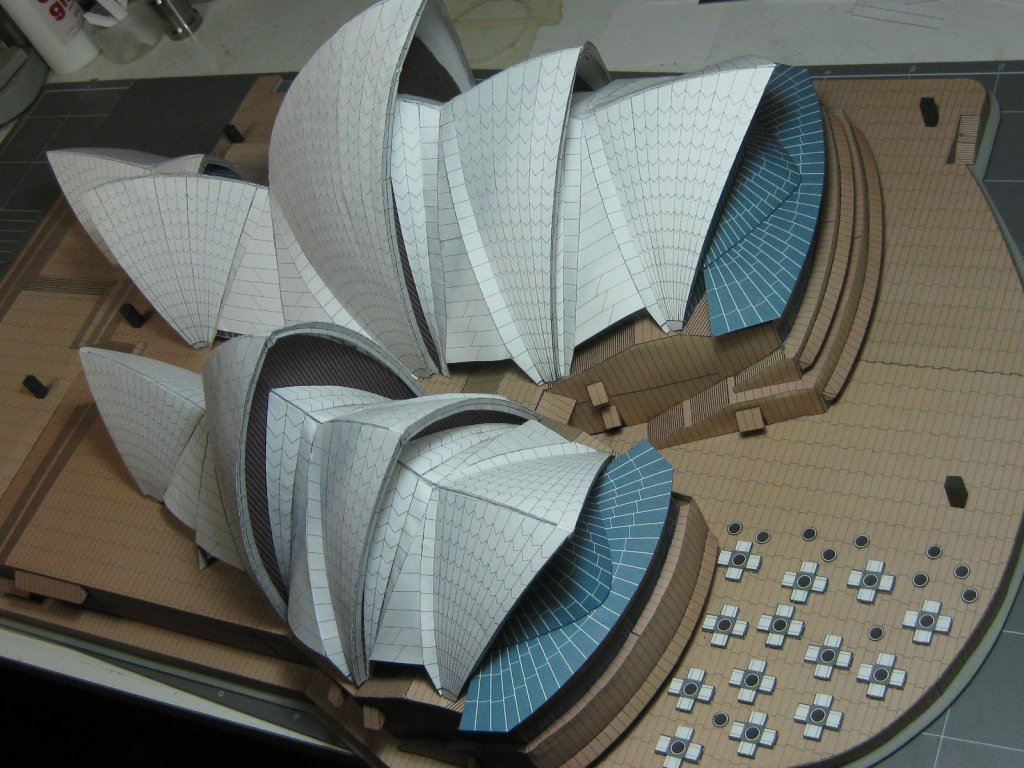
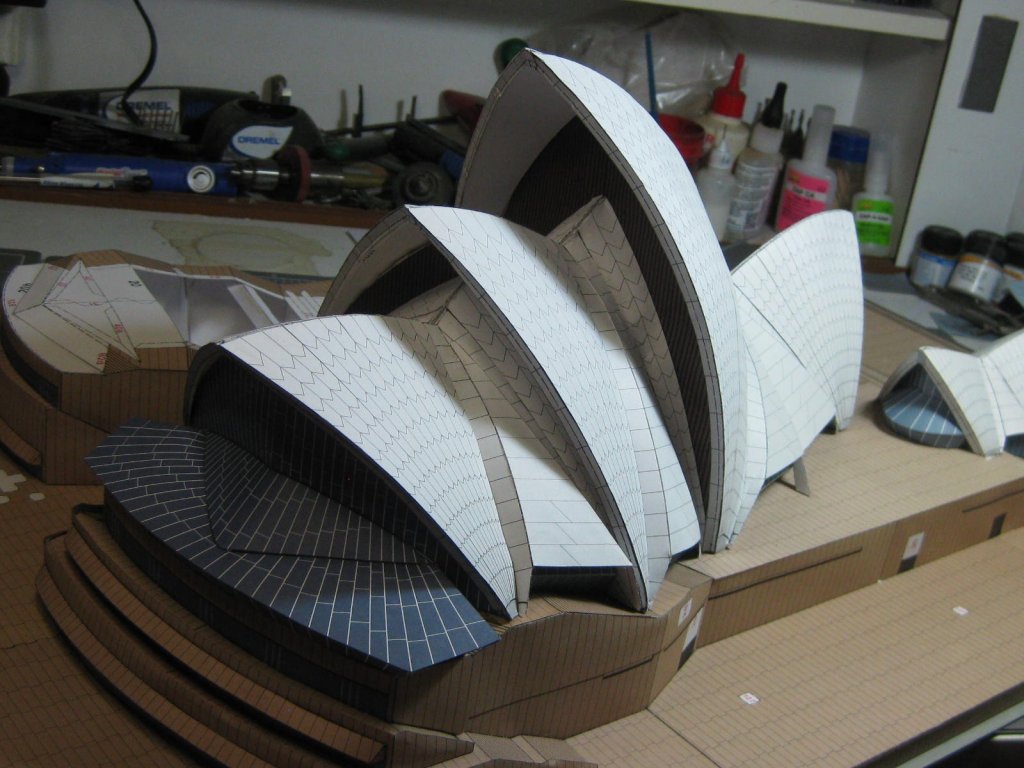
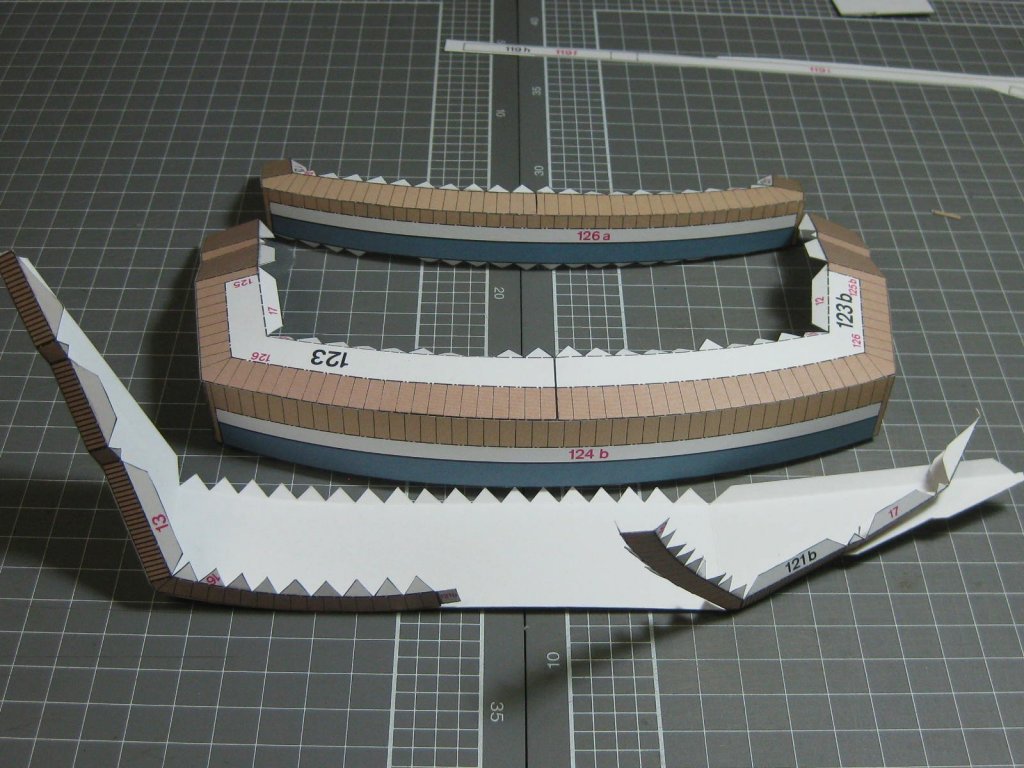
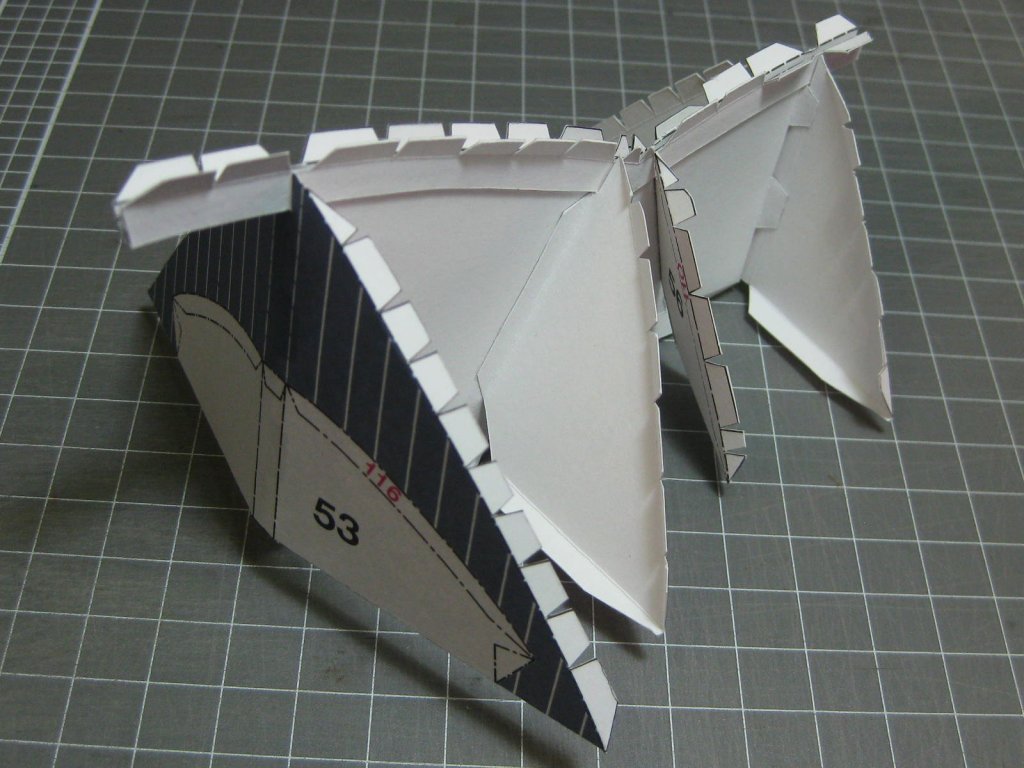
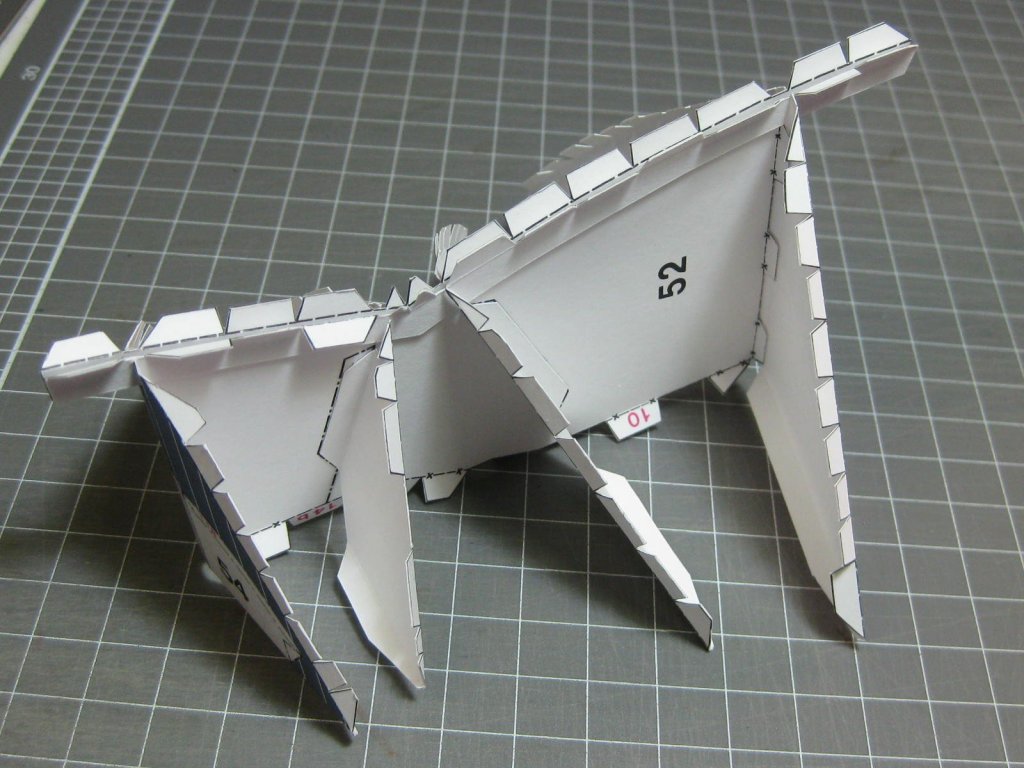
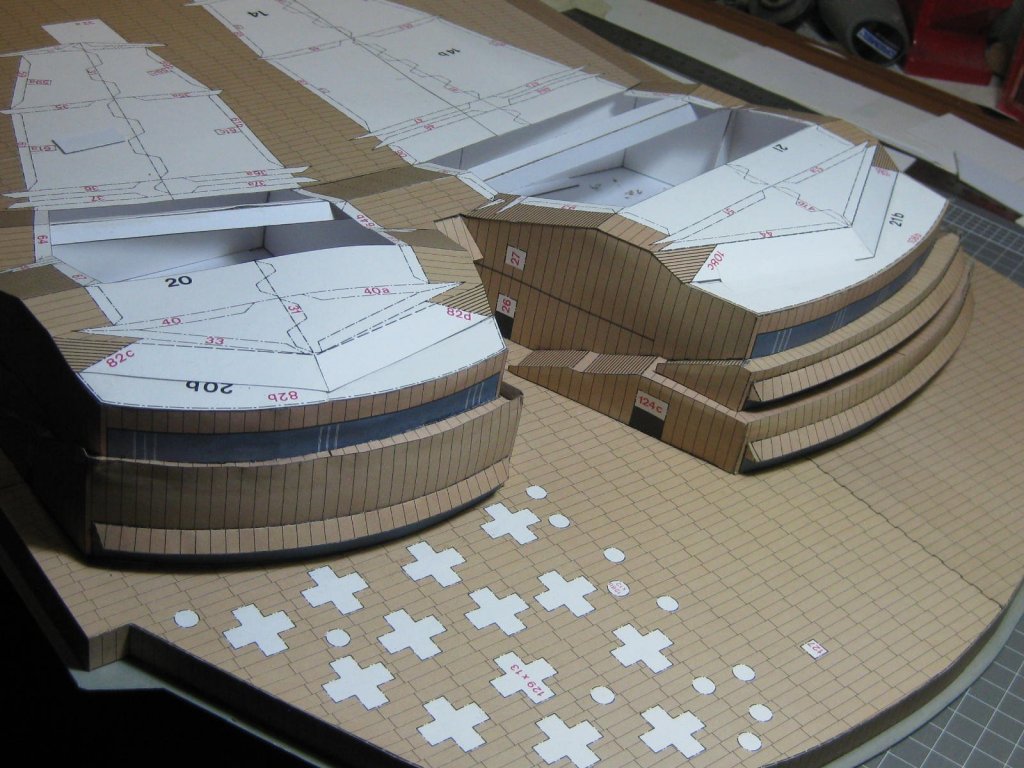
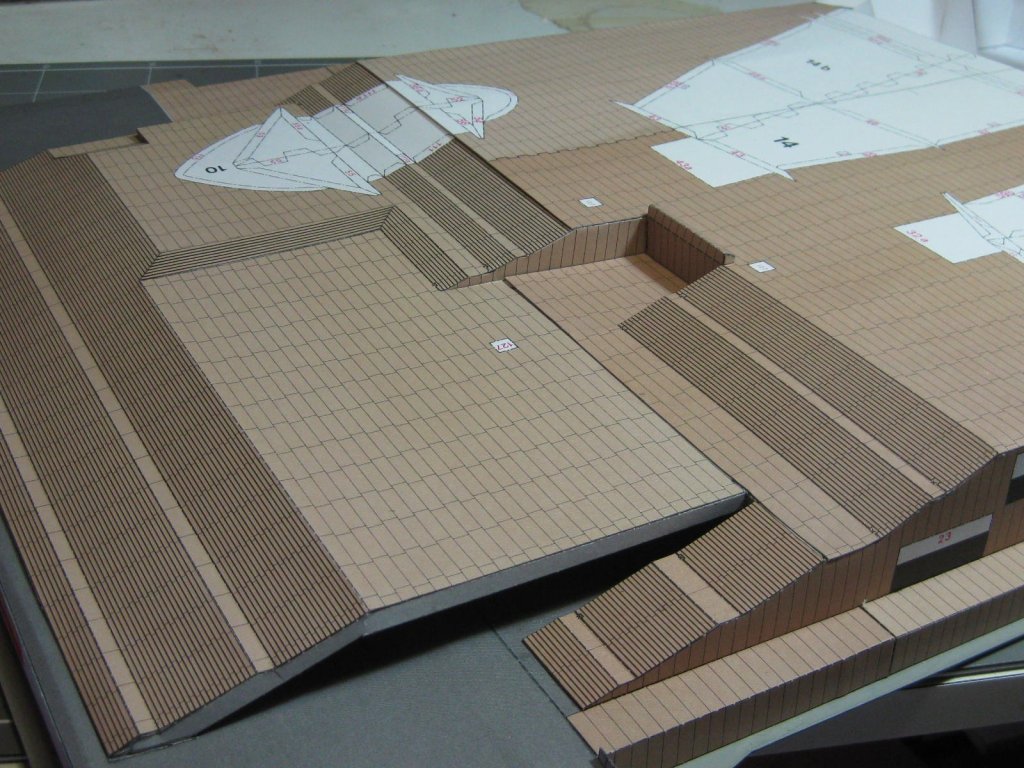
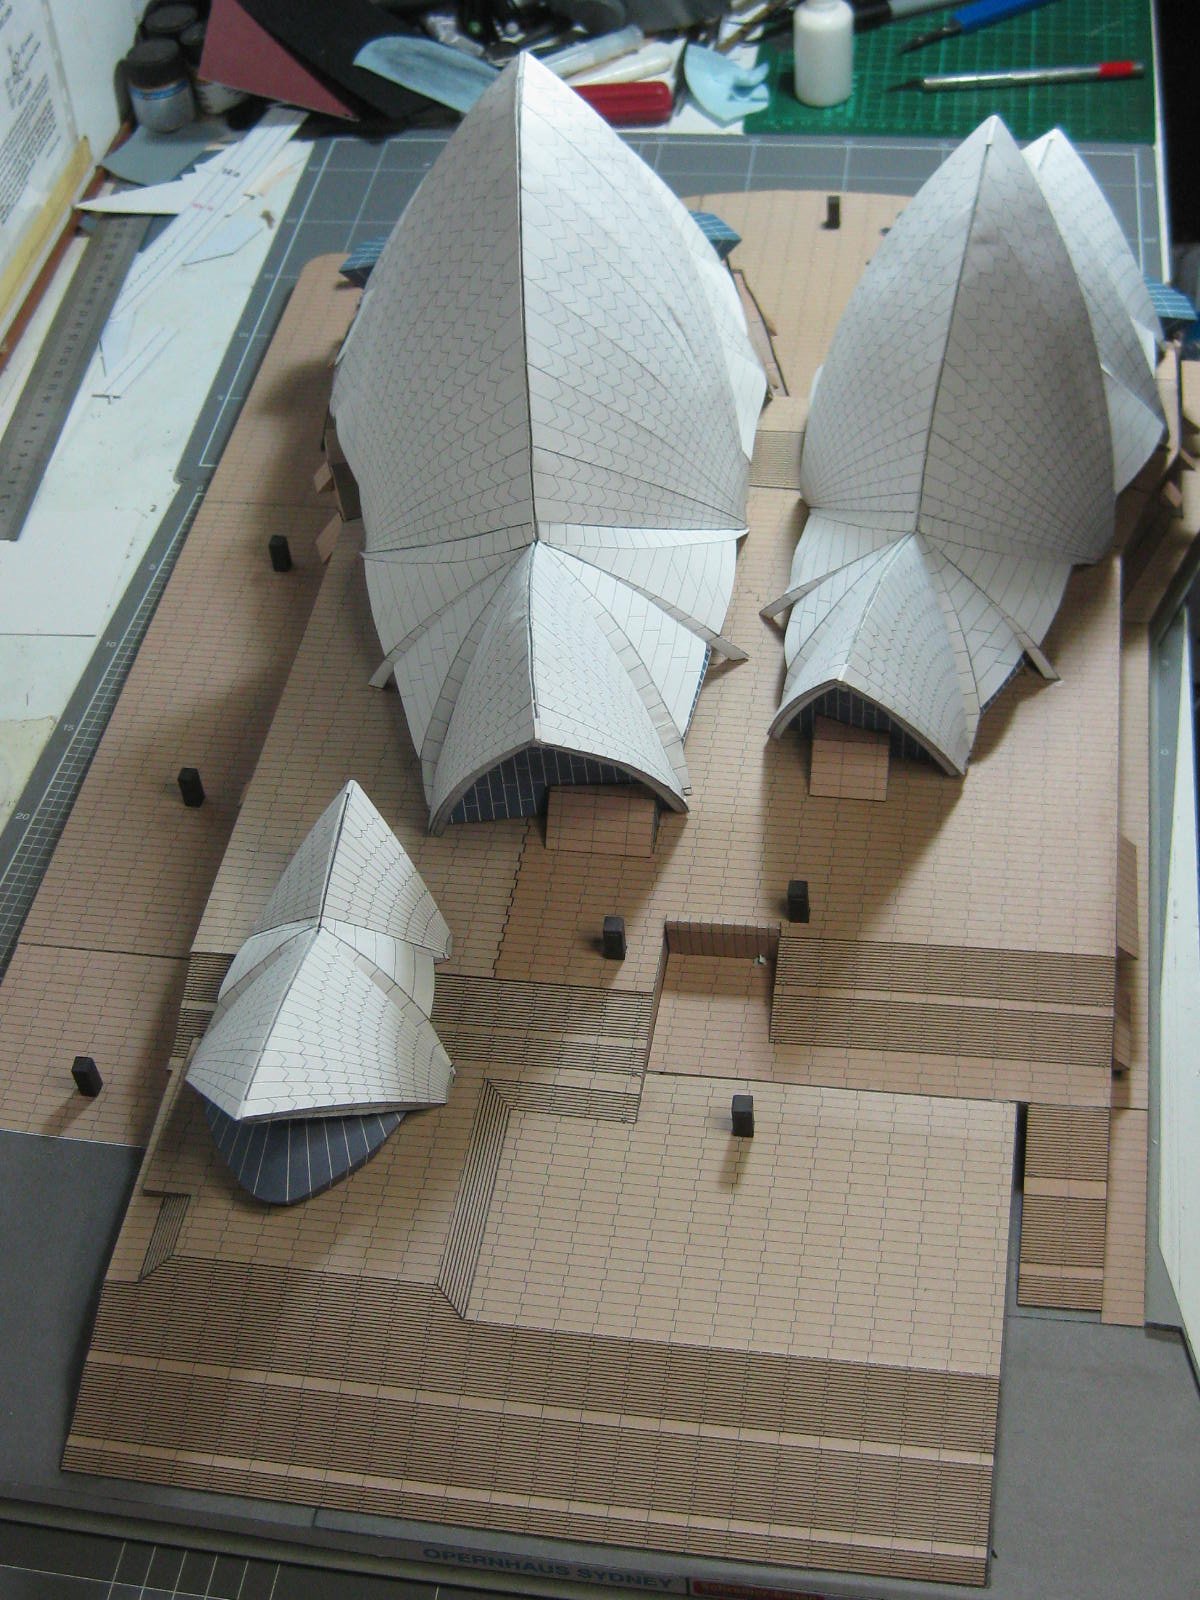
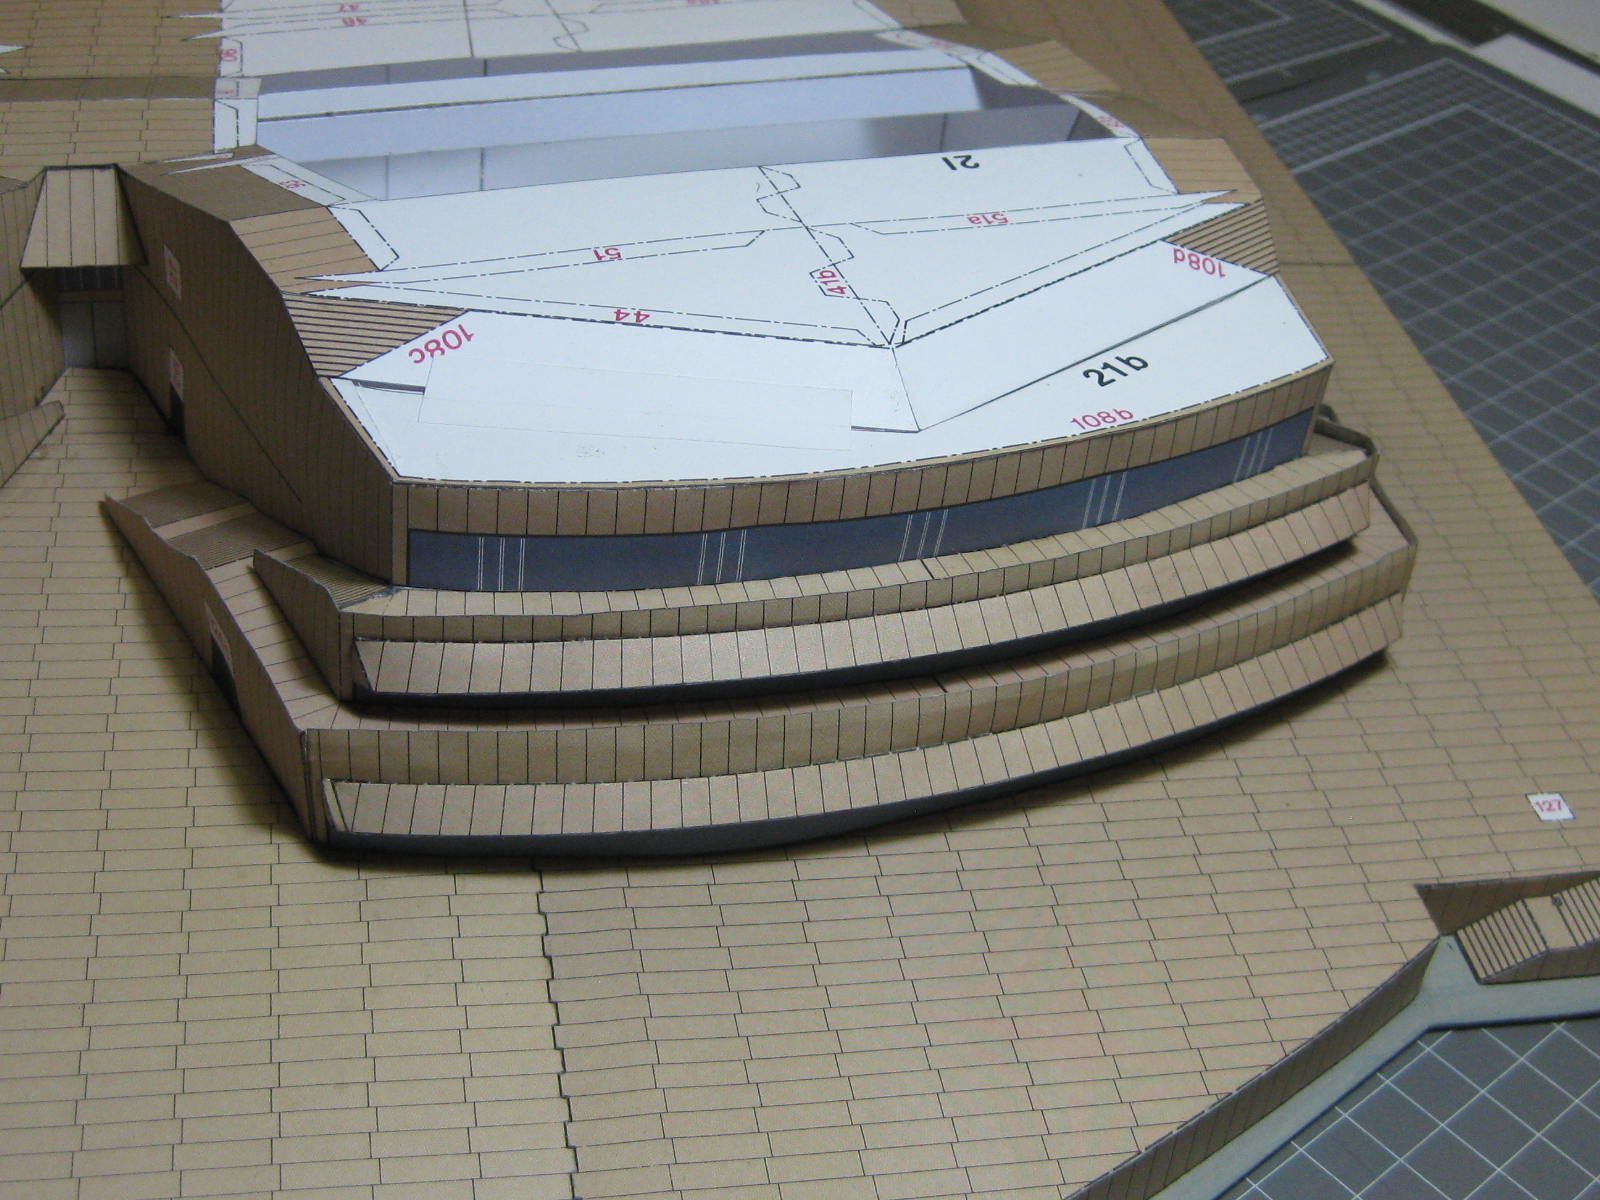
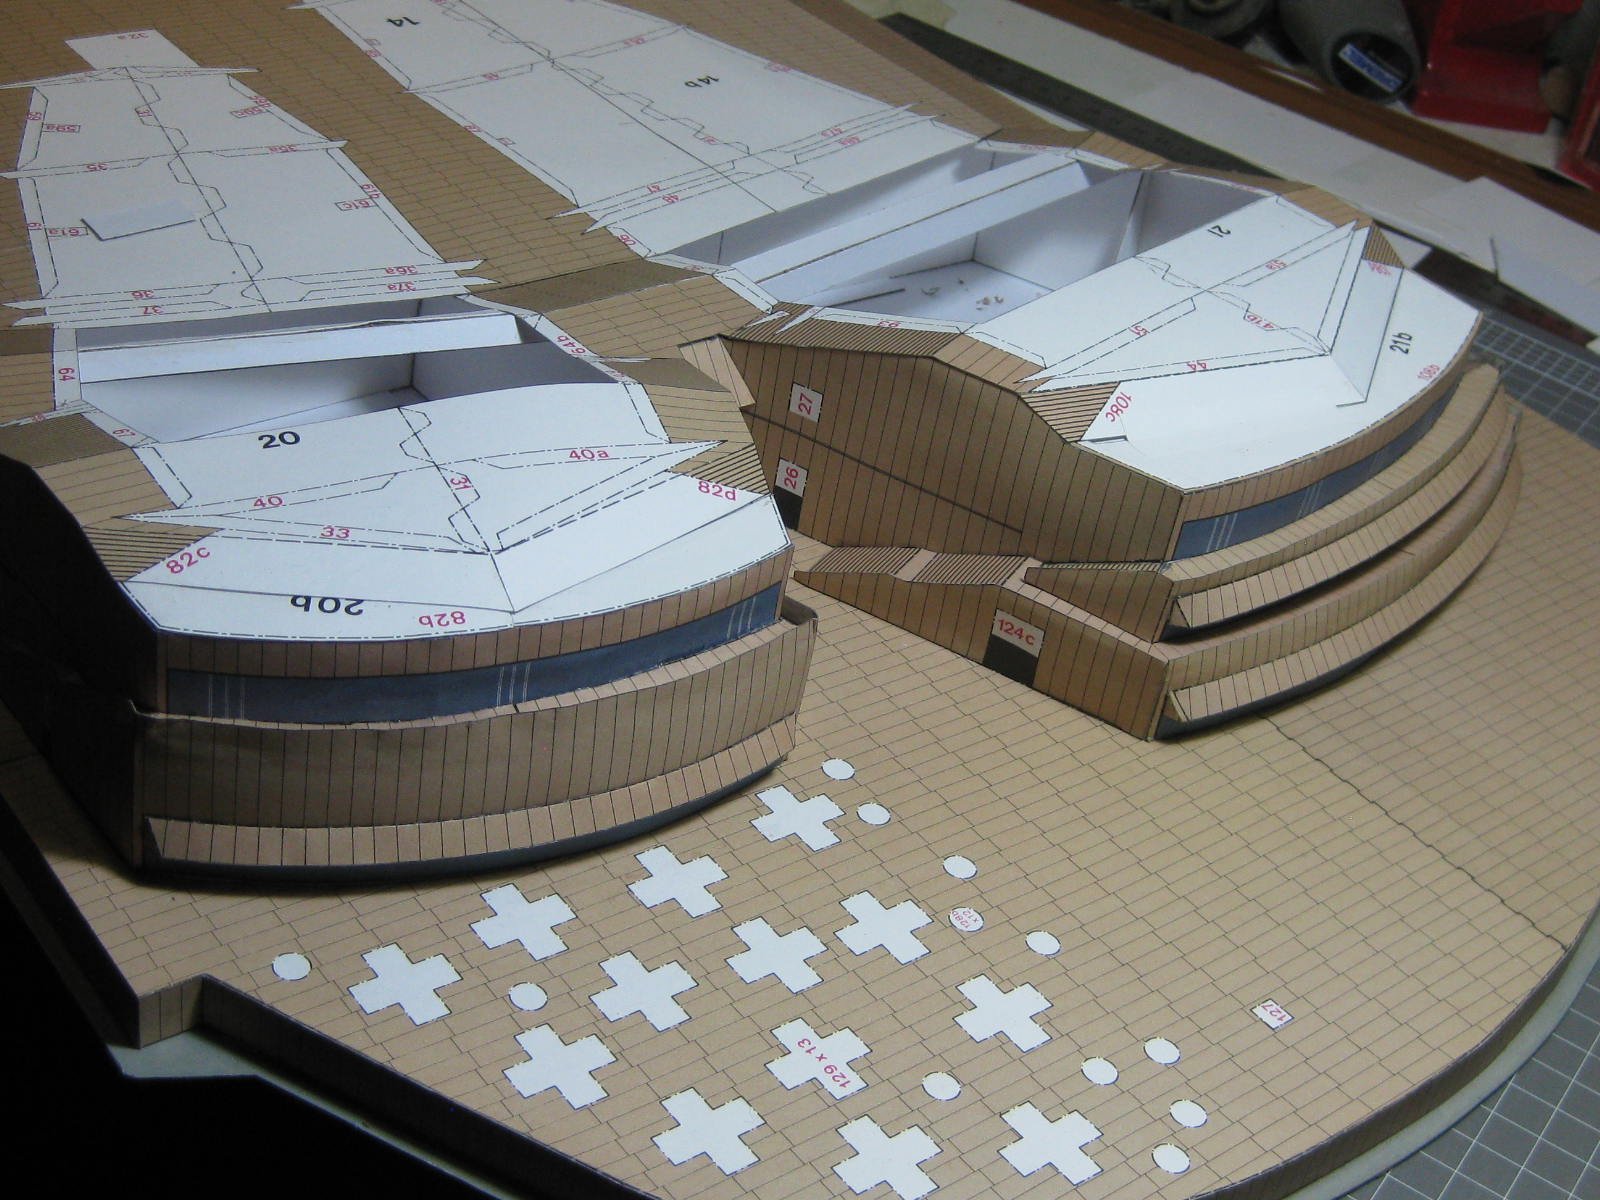
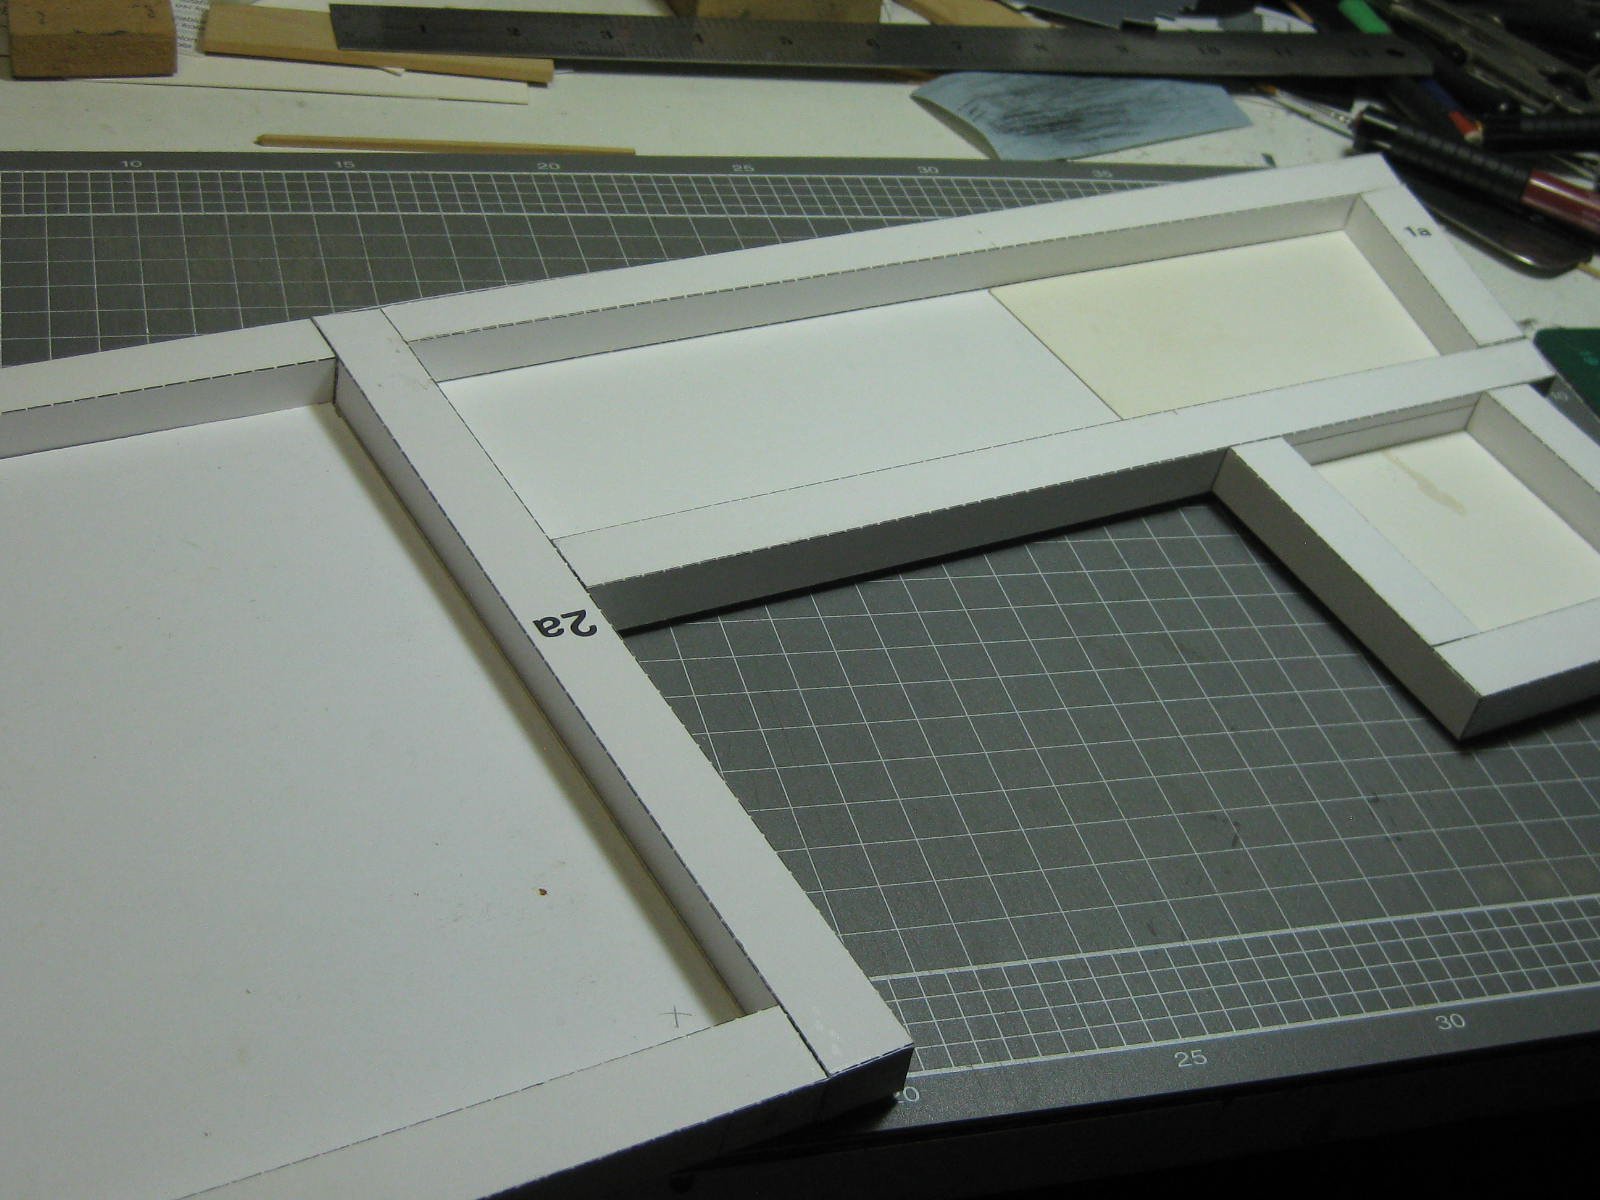
I see I've been real slack on updating this log . Here we go again then . I've completed the largest of the three buildings and fitted it to the base. It wasn't without numerous problems, mostly due to a lack of laminating extra card where needed. This resulted in quite a lot of wrinkles, most of which I managed to fix to a certain degree. Nowhere near perfect however . Here are some pics of the building fitted : Laminating 1mm card to the support pieces helped a LOT in keeping the last building's structures straight. Here's one piece ready to glue to the central support : The building under way. It's turning out quite well so far, and I think it will be acceptable without any drastic modifications when it comes to fitting it to the base : Danny


-
Sure, all those parts that I could actually laminate. It's not really possible on some of them due to the tabs getting in the way and of course they are the parts that are virtually impossible to reach the back of to put pressure on once other pieces are glued up. It's only 0.25mm, the same as photo paper. This is too thin for large pieces, it should have been at least 0.35mm or heavier, at least for about half the kit. Way too late for that I'm afraid, I'm getting close to completion. Danny
-
I sure have Pav and it's more than just that bit. It comes down to the card used (a bit too thin) and the way the kit is designed, which are both rather poor. I'm nearly at the stage of abandoning this model if I have any more problems with it. Danny
-
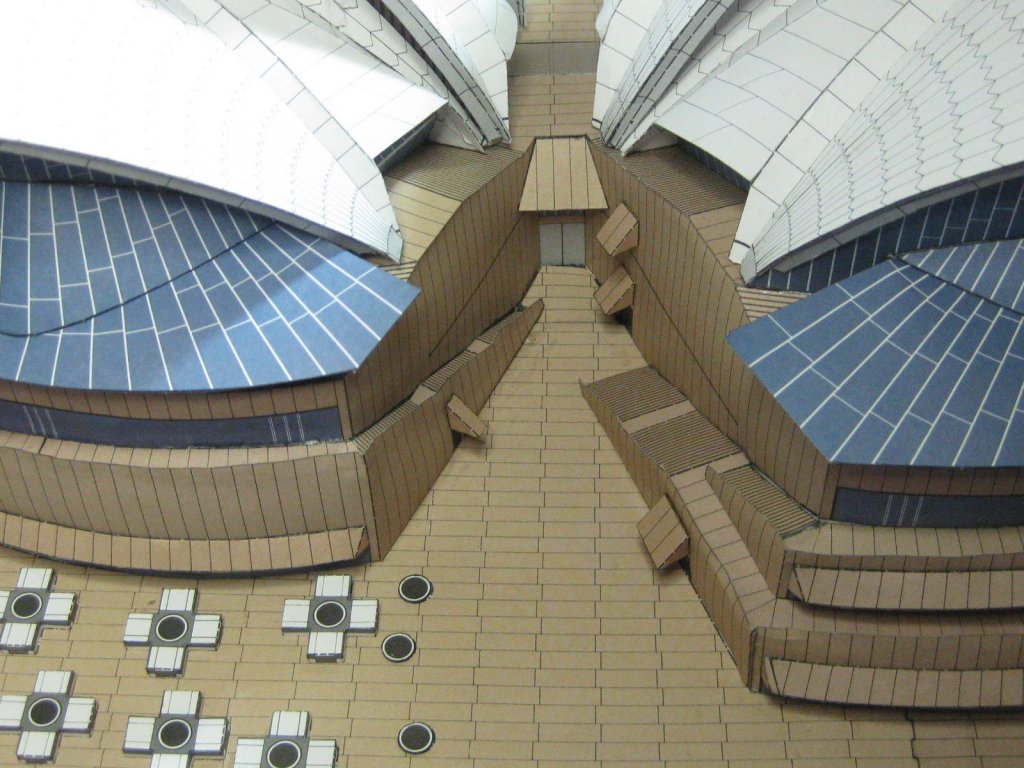
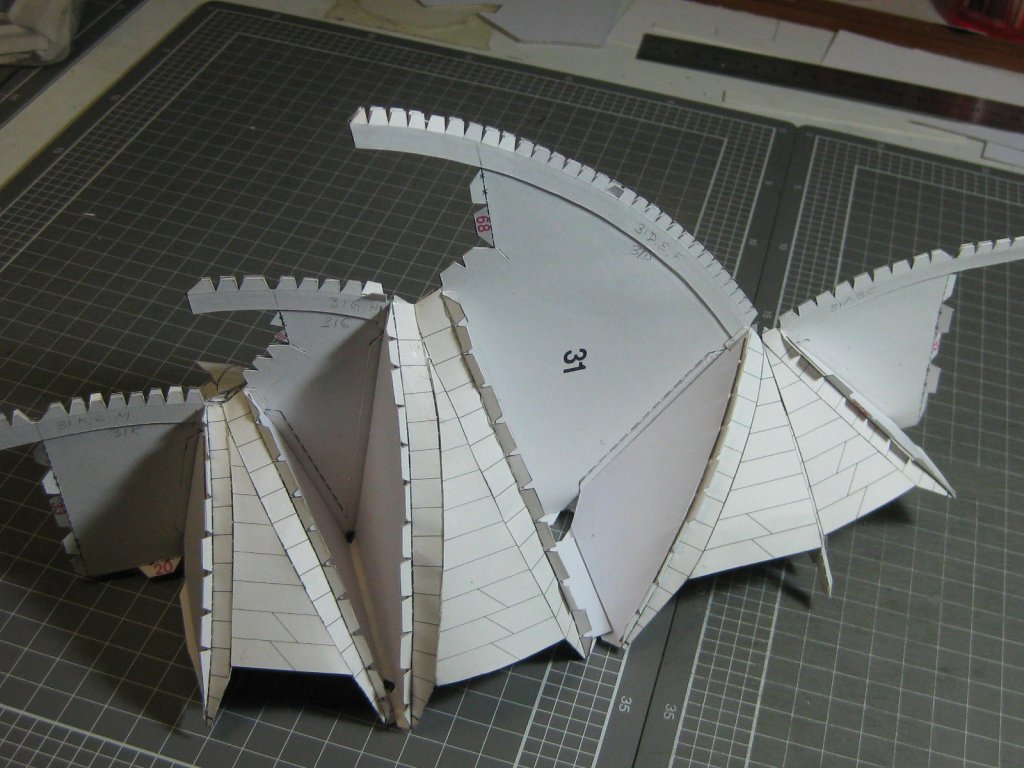
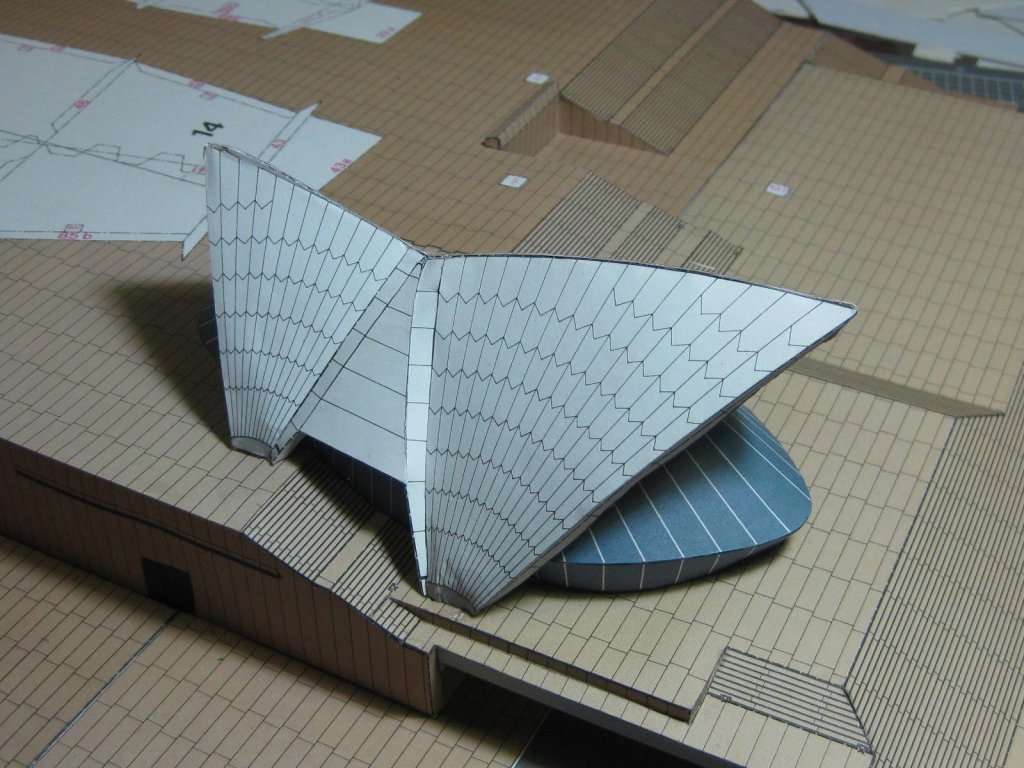
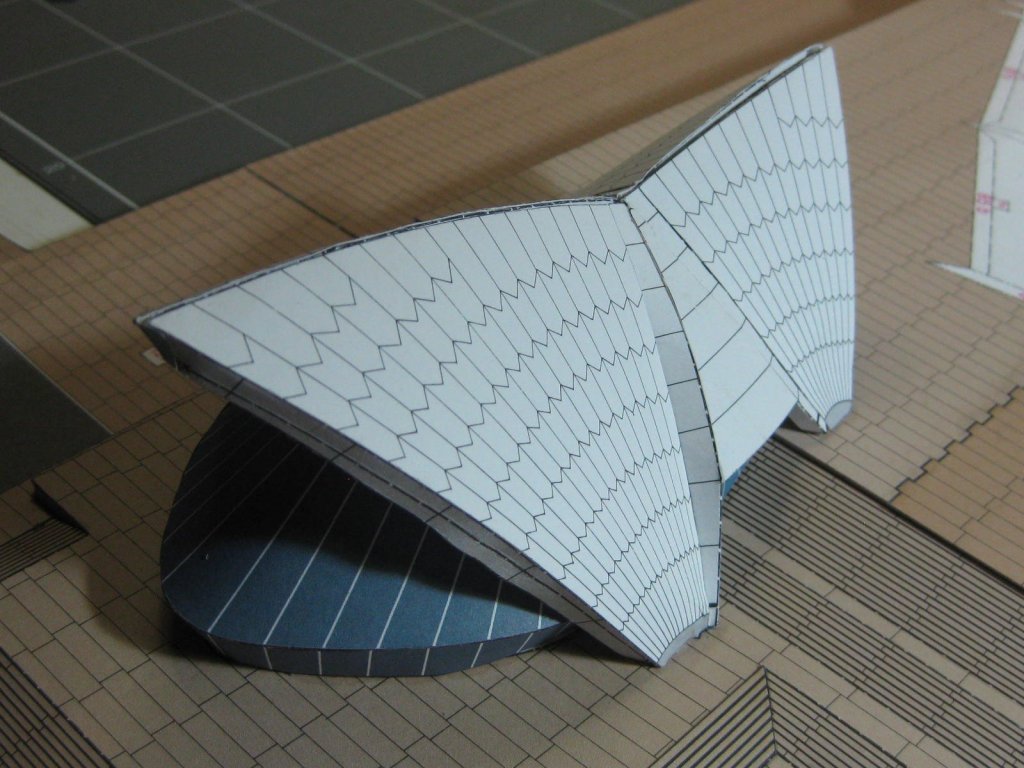
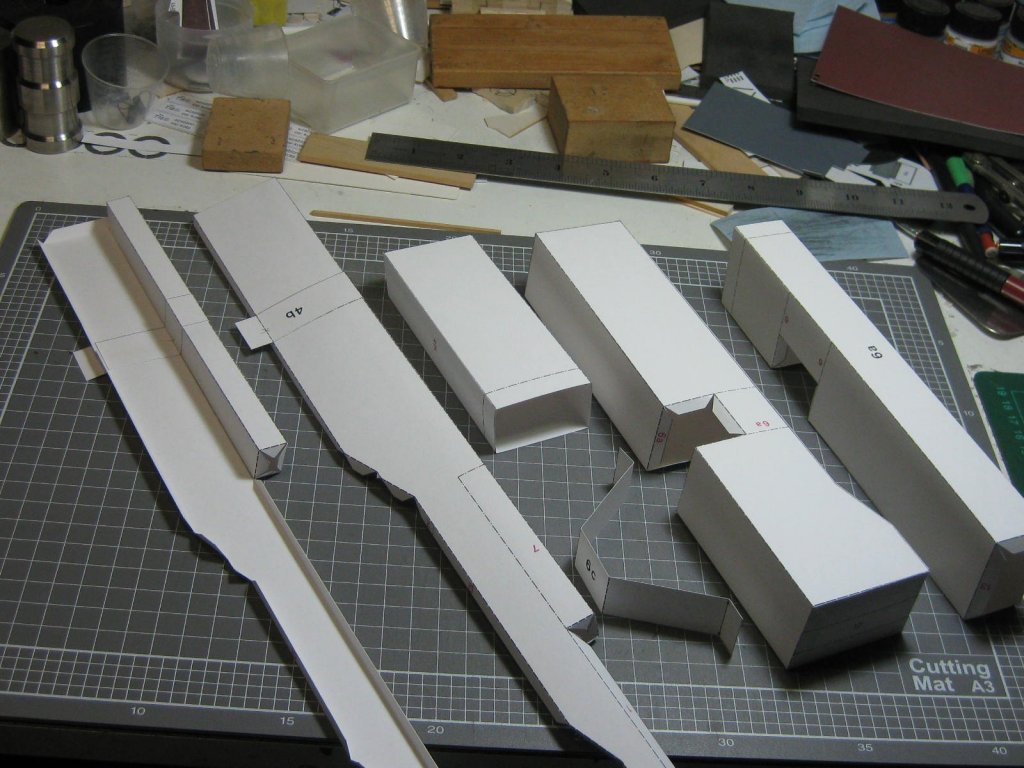
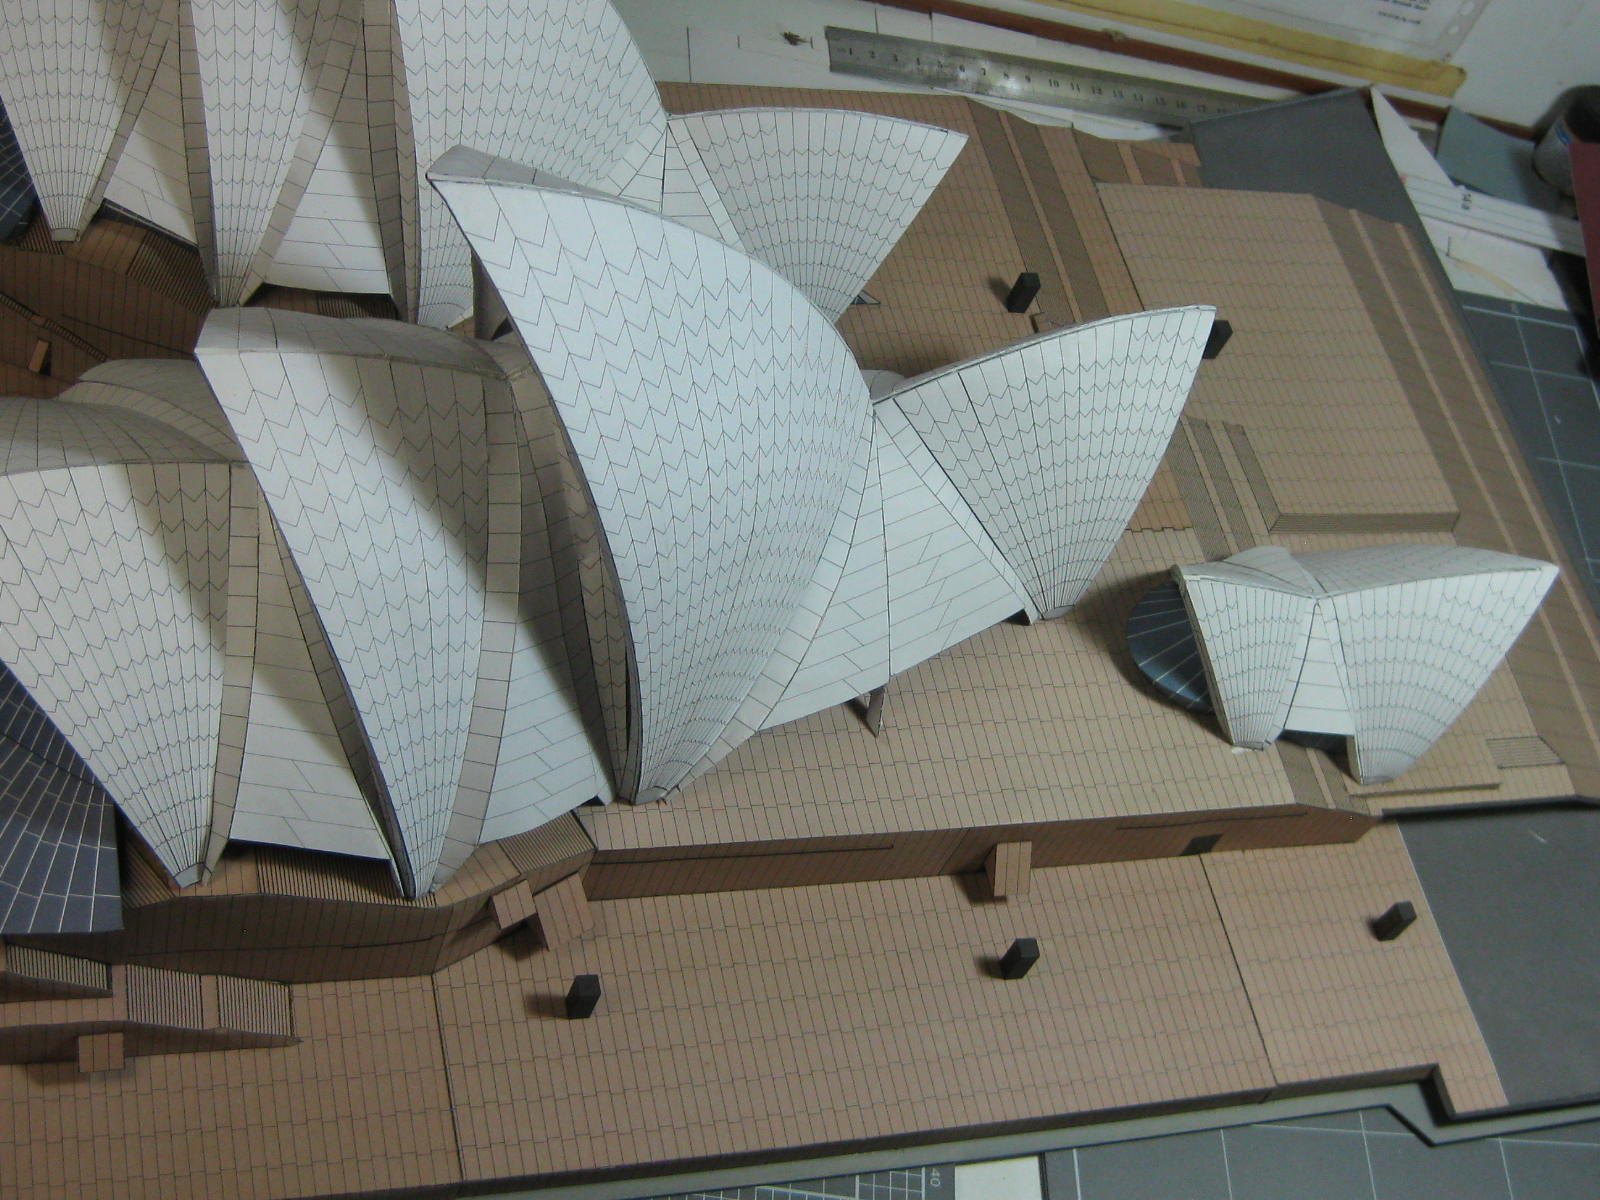
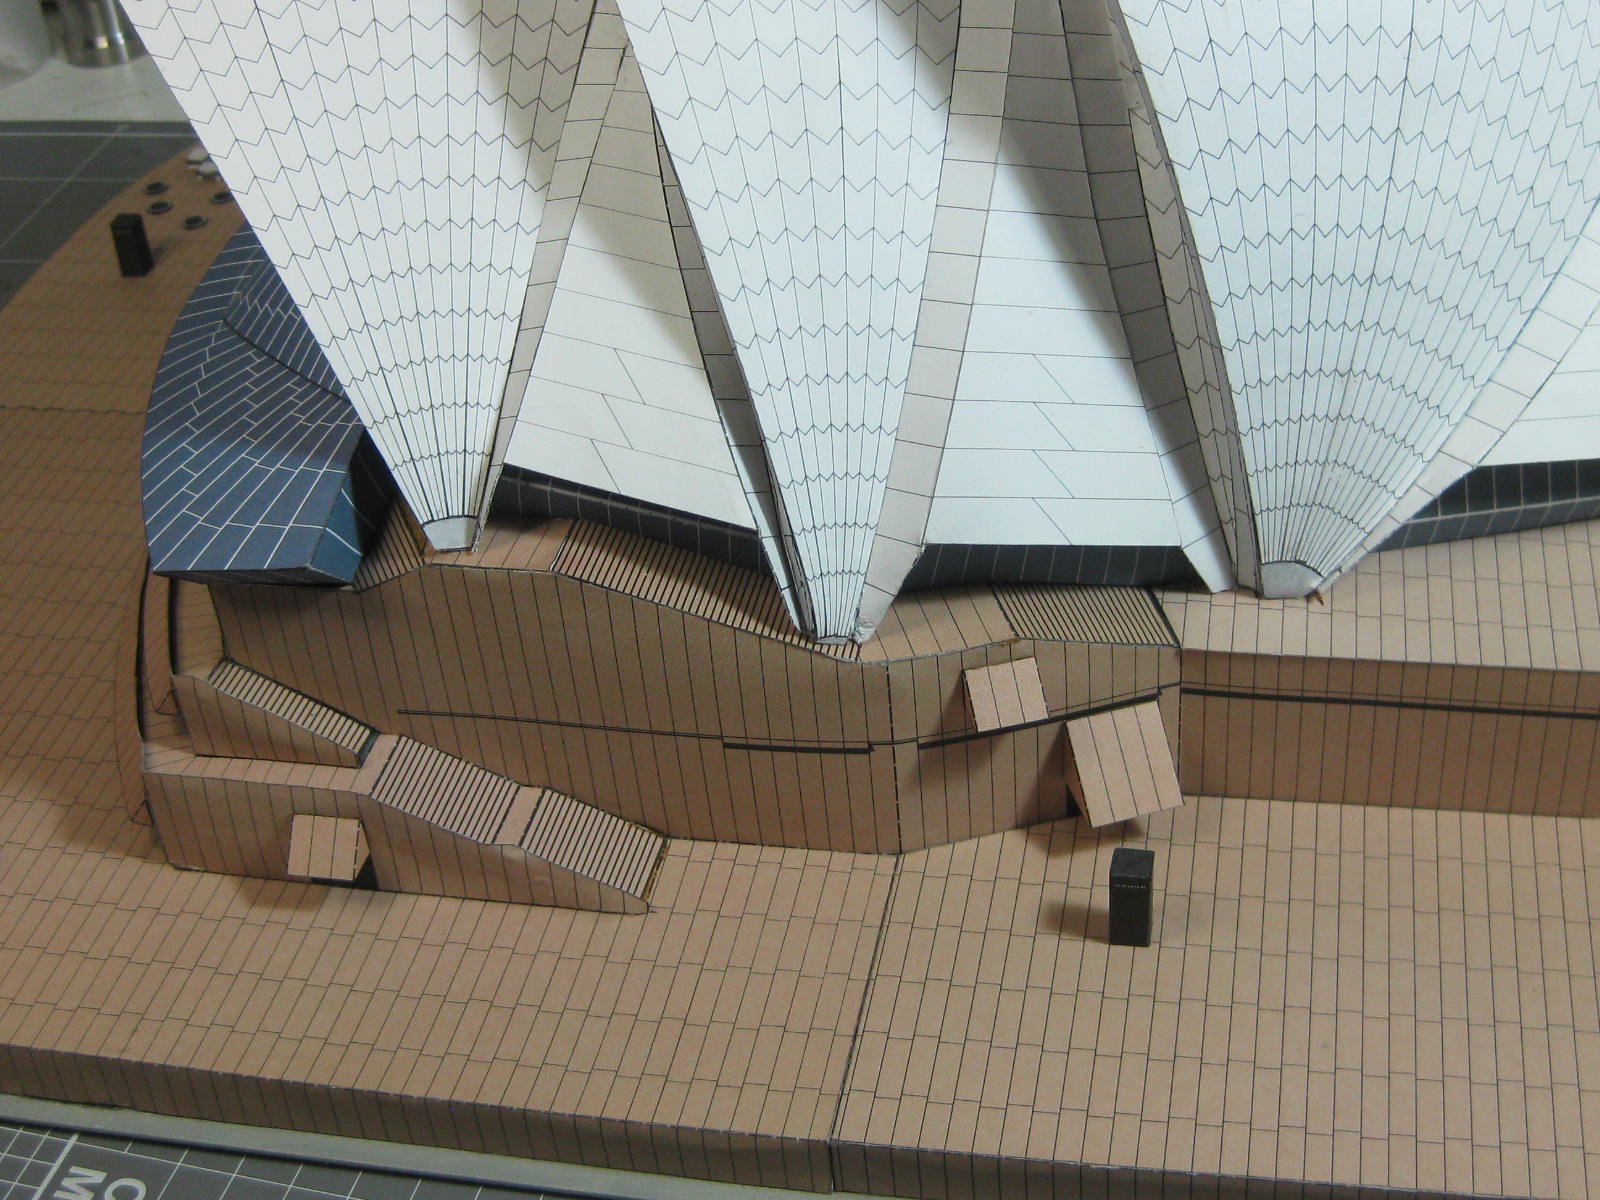
It's been a while since I last posted to this log. Life got in the way a bit, but I've still managed to do some more work on the "House". These pics are of the staircases and windows on the seaboard side : Next step was to make the smallest of the three buildings. Here are some of the parts needed : Some assembly pics. The instructions are a bit sparse in some areas, a fair bit of guesswork was involved but it all came together in the end : The building fitted to the base. I'll straighten out the wrinkles at a later stage : Danny


- 36 replies
-
- 14
-
-
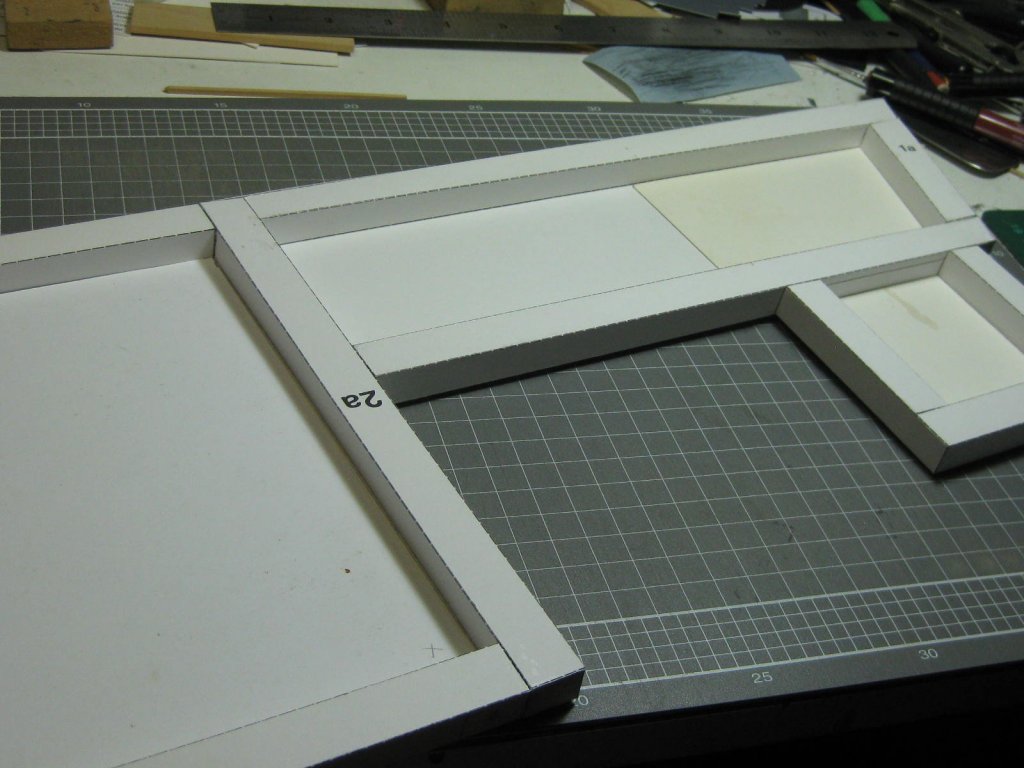
The main base is almost finished. I had to add a LOT of extra bracing : I'm fairly happy with the way all the steps turned out : Danny

- 36 replies
-
- 10
-
-
QUICK-FIND INDEXES to BUILD LOGS FOR KITS
Dan Vadas replied to Dan Vadas's topic in - Index of all kits by brand and subject
When editing your Signature - type the Text you want (e.g. Ship's Name), highlight it with the mouse and use the Link button in the Edit Box (it looks like 3 chain links). You need to copy/paste the URL from the Address Bar (top of screen) of the page you want to use as the Link. You can Format the text in your Signature (text size, colour etc). BTW - I did it for you . Danny -
QUICK-FIND INDEXES to BUILD LOGS FOR KITS
Dan Vadas replied to Dan Vadas's topic in - Index of all kits by brand and subject
John, read the post at the top of the Build Logs for Kits page titled "Starting and Naming your Build Log" for more information. Danny -
QUICK-FIND INDEXES to BUILD LOGS FOR KITS
Dan Vadas replied to Dan Vadas's topic in - Index of all kits by brand and subject
Problem fixed. Danny -
QUICK-FIND INDEXES to BUILD LOGS FOR KITS
Dan Vadas replied to Dan Vadas's topic in - Index of all kits by brand and subject
John, your build log has been in the "Small Craft" Index for some time now. I'm guessing you were looking in the Wooden Ships Index? Danny -
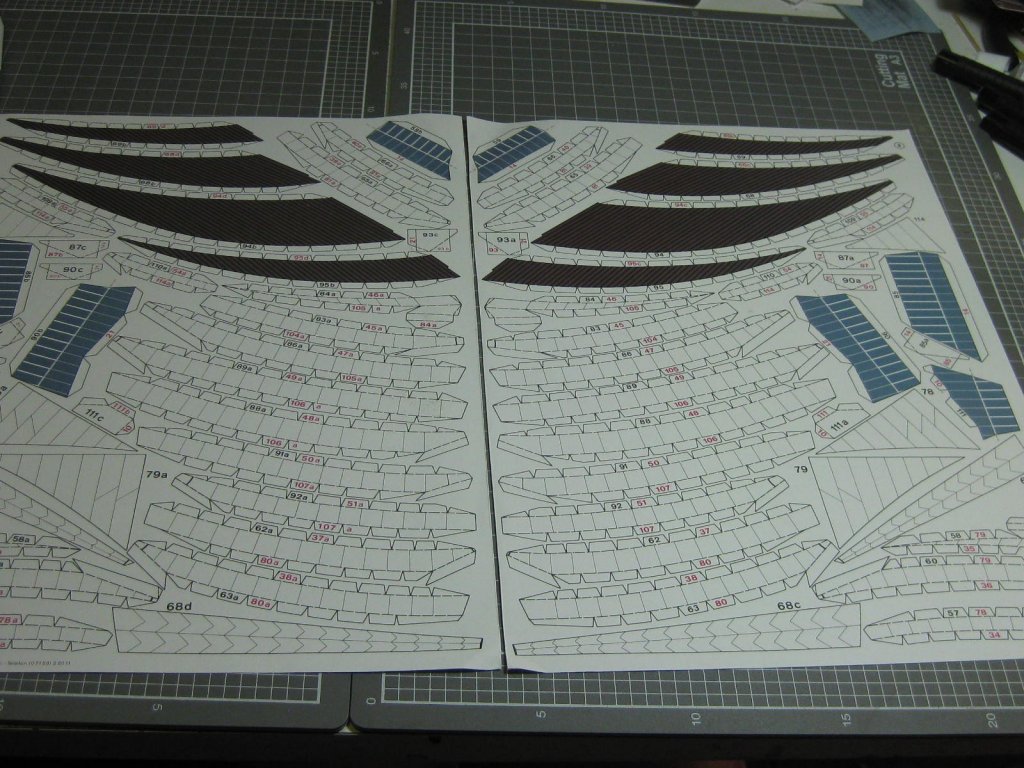
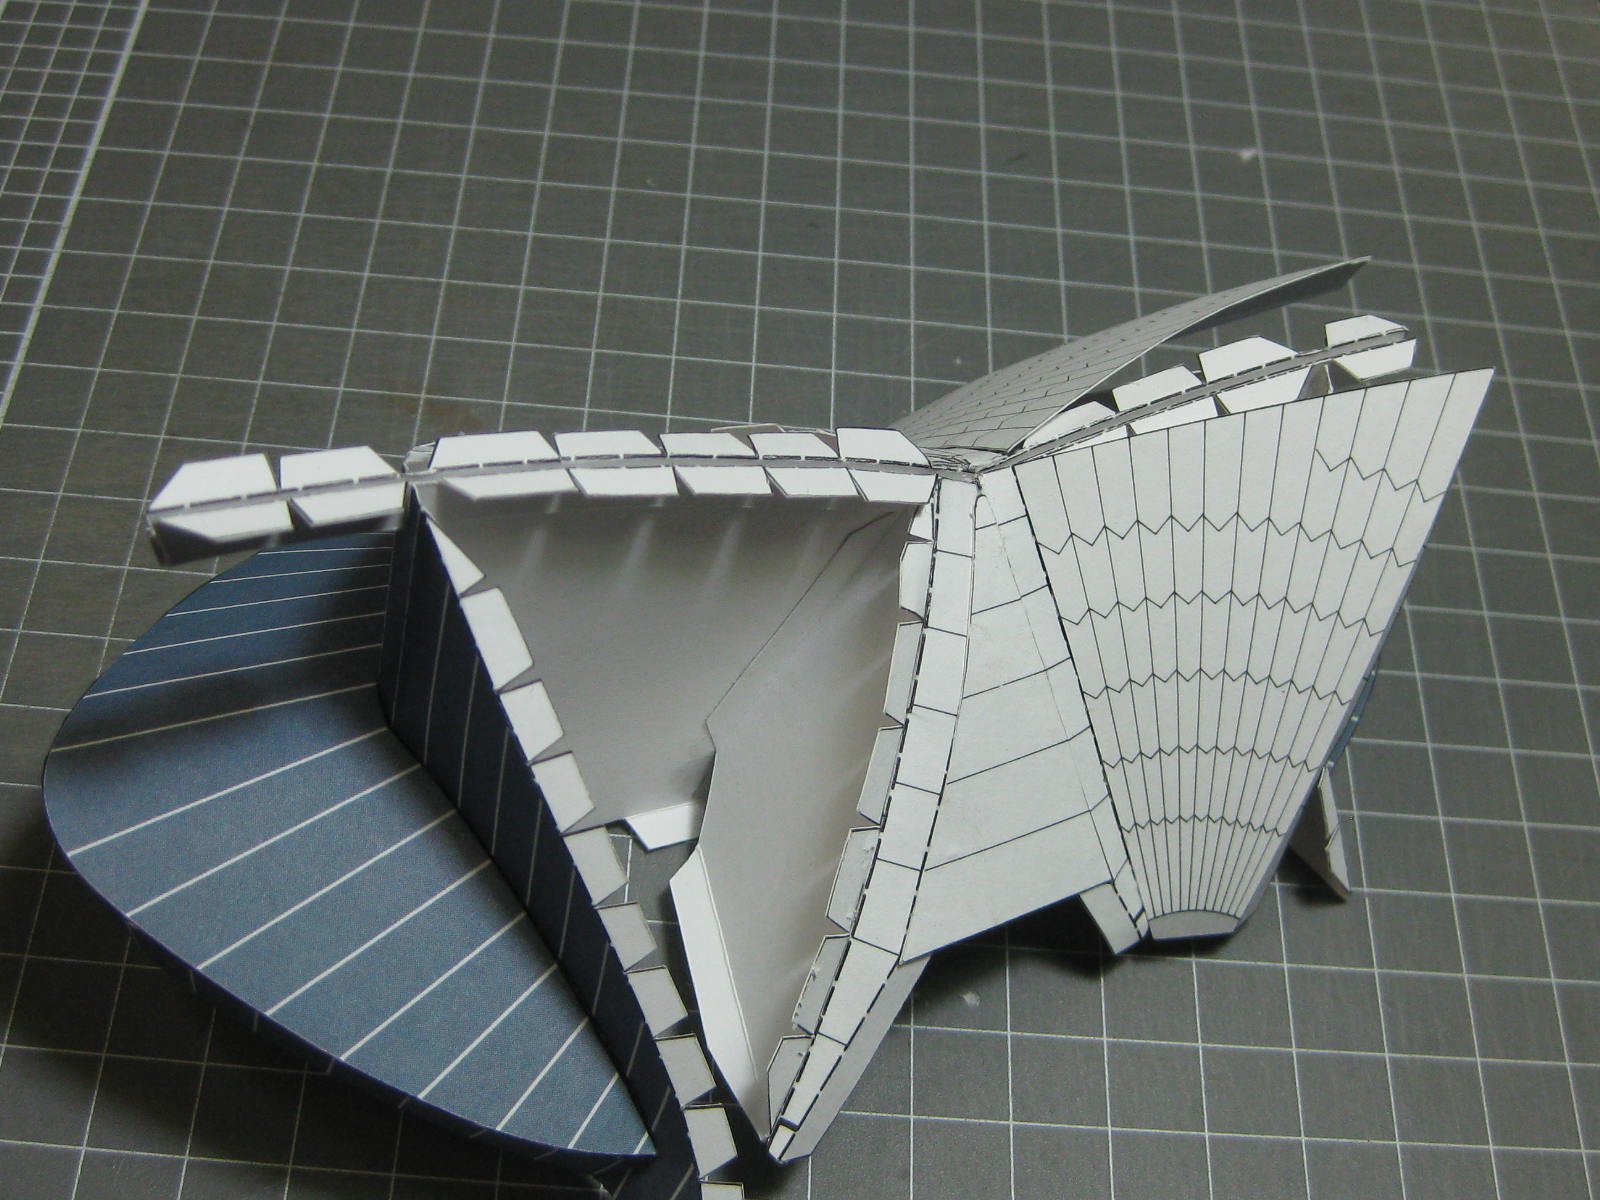
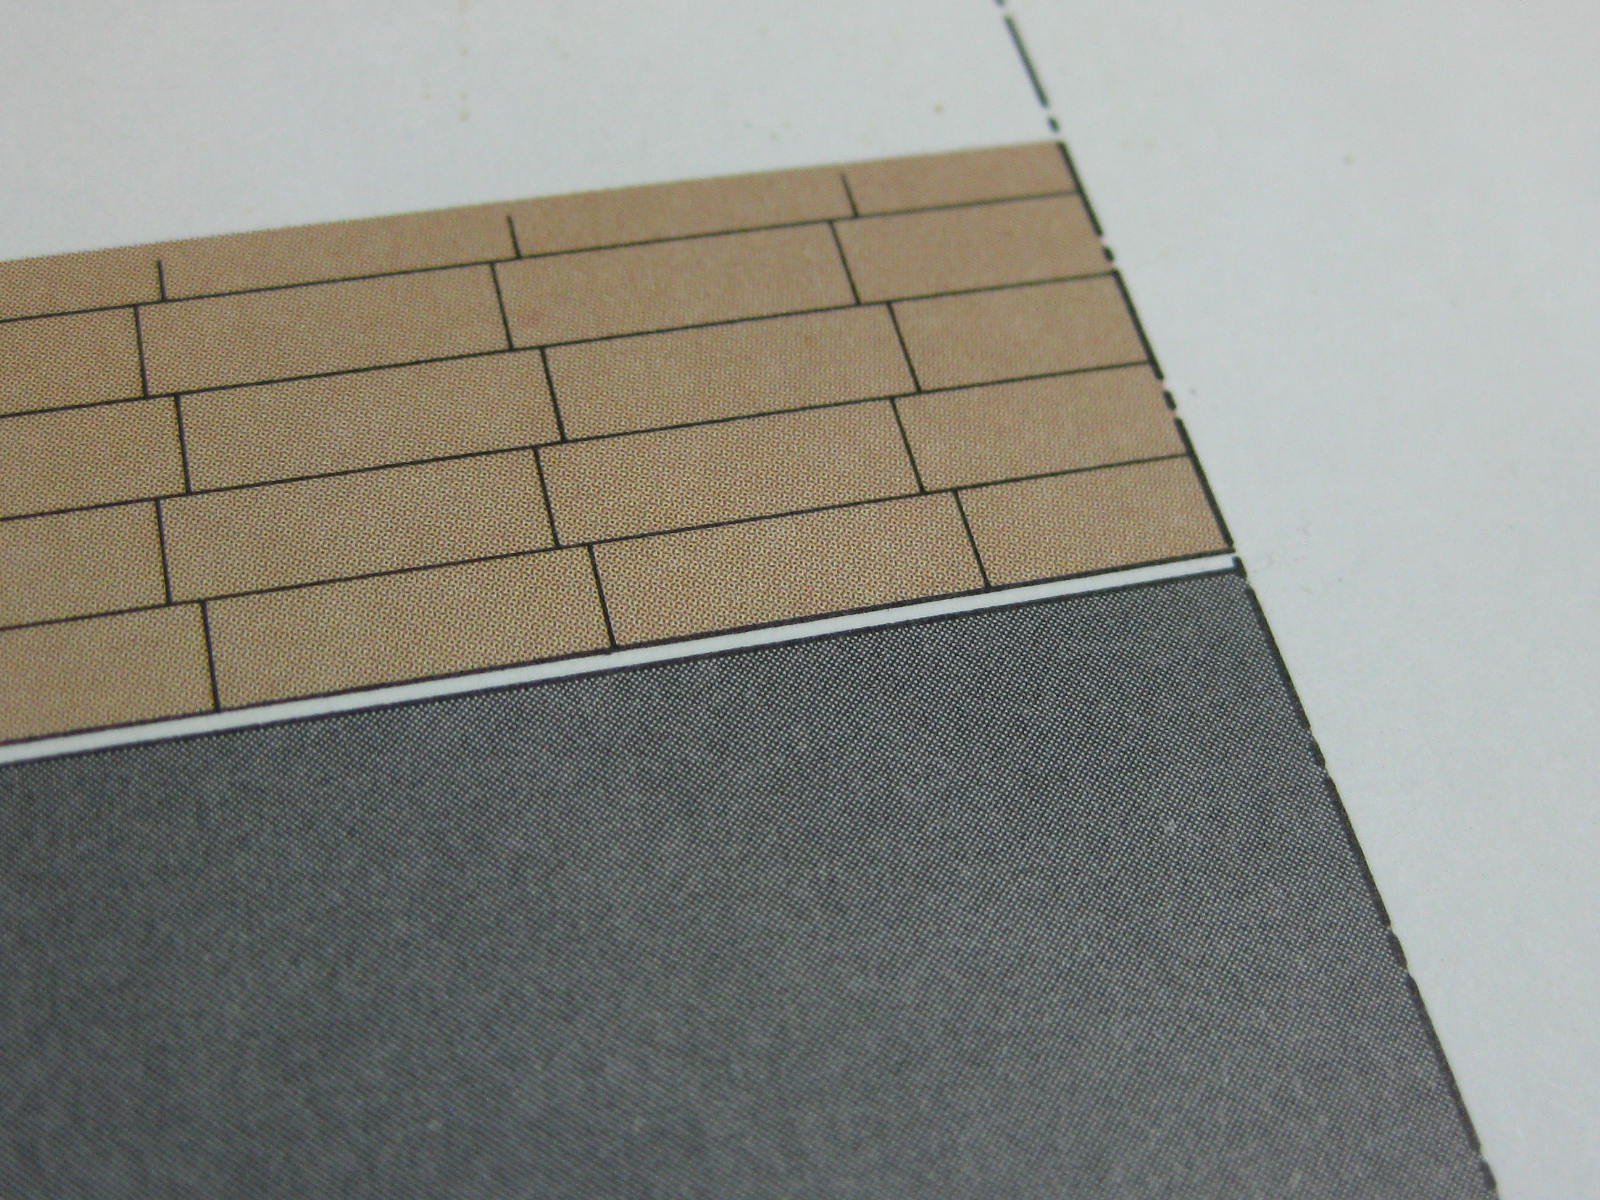
I believe that the idea behind the design was to imitate the sails of yachts on Sydney Harbour. Yeah I get that, but I was hoping they might have drawn in some texture. Like on the edges of the tiles for example. Danny
-
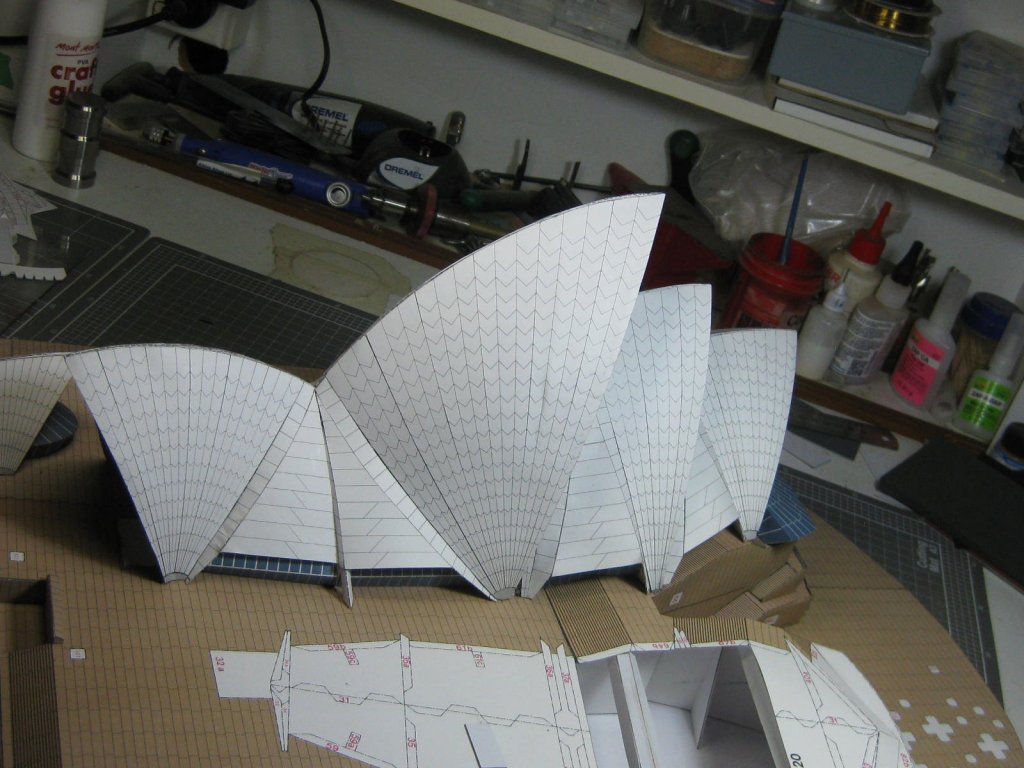
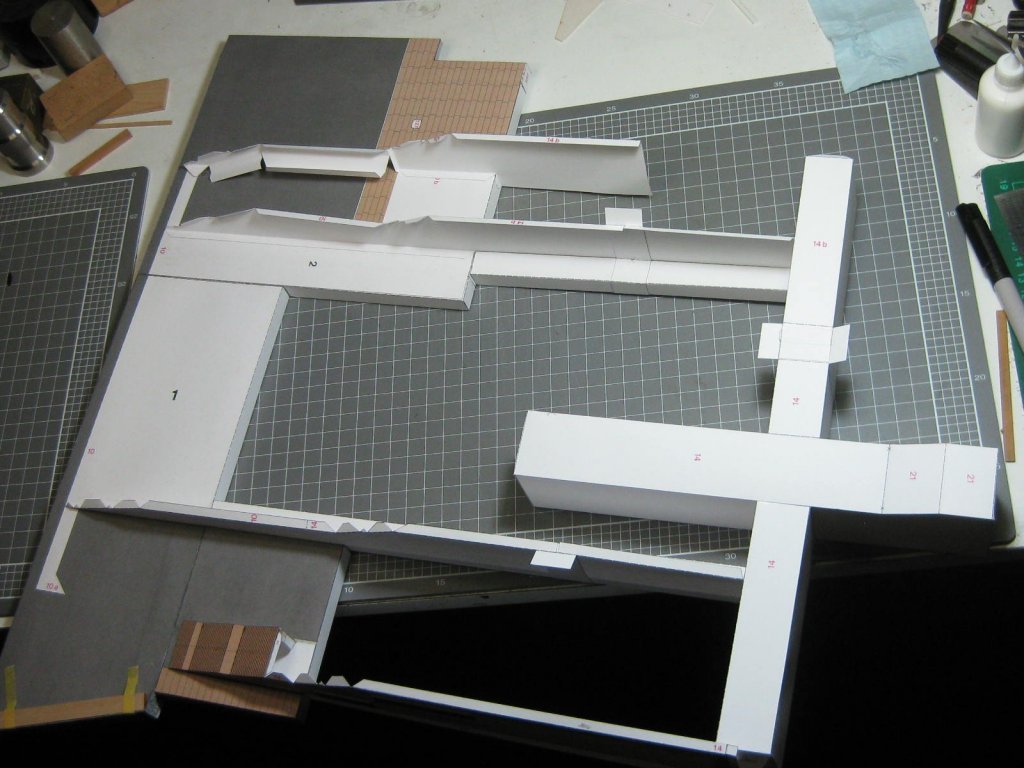
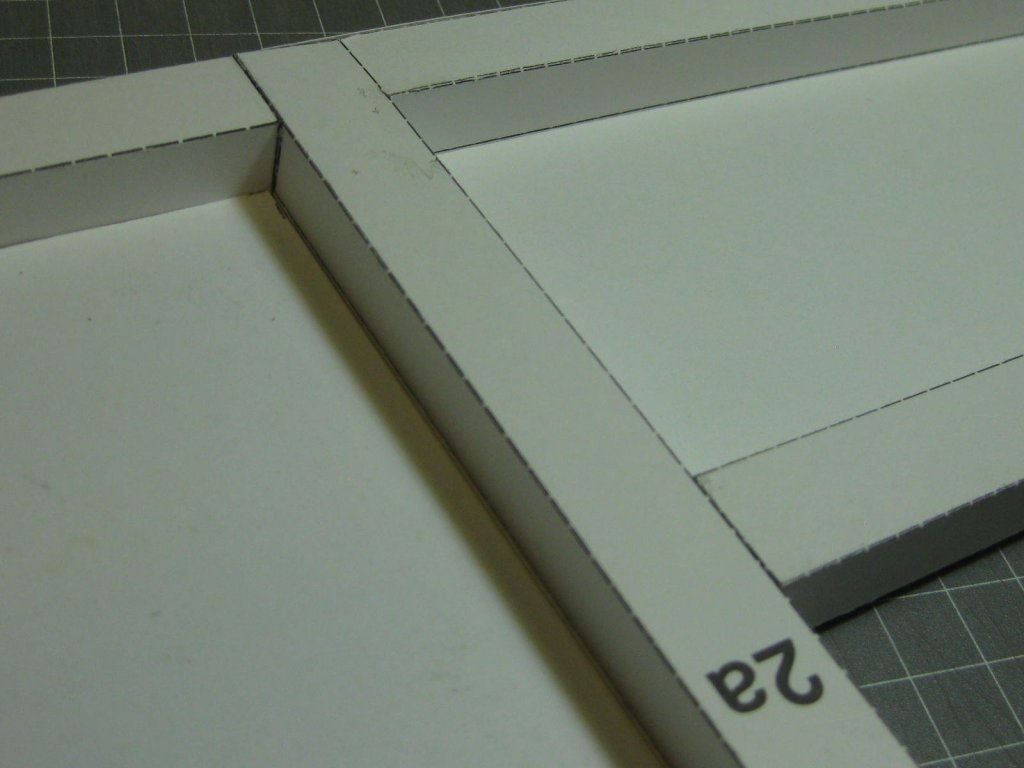
This model is of the iconic Sydney Opera House. The kit is from Schreiber-Bogen, a German kit publisher. When finished it will measure 730mm x 470mm x 230mm : My thoughts on the kit are that it is not printed as well as I'd hoped, with no "weathering" at all and fairly simplistic colouring. The card is of reasonable quality without being exceptional, and the instructions are fairly basic line drawings which are easy enough to follow. The design of construction could have been better, but it's workable. On with it. I started the model 3 days ago, and have completed the base to the stage of adding the vertical sections. For bracing beneath the base a number of square sections are used, some of which are integral with the upper surface and others are free sections : These pieces are ready for fitting to the main section : Danny


- 36 replies
-
- 13
-
-
QUICK-FIND INDEXES to BUILD LOGS FOR KITS
Dan Vadas replied to Dan Vadas's topic in - Index of all kits by brand and subject
That's my job. I'll get onto it shortly . By editing your Signature. Click on your Username at the top of the page, click on Account Settings, then Signature and go from there. To mark the build log as Finished - edit the FIRST post of the log. There is a box in the edit function that allows you to edit the Title of the log. Danny -
Thank you all for the replies . The tracks took a lot of the time, very fiddly. Also my health hasn't been too good lately, so I can't work at my usual pace . Some of you asked "What's next?" I've ordered a card model of the Sydney Opera House, which I'm building for my partner as a special request. I have no idea how long this will take, but I'll post some pics in the "Non-ship Build Logs" section in Shore Leave. After that one I'll get back to a ship (If I'm still able to model at all) - some kind of early 1900's Russian Dreadnought for something a bit different. This will once again be a Card model. Danny


.JPG.edb8073a6774596be12ad653c1a74459.JPG)
.JPG.c4b15fe1004ba03008242673afa40506.JPG)
.JPG.6b53d32089db684630d31b403631181a.JPG)
.JPG.29da755bb9c6c7d521b9be59ce11d69c.JPG)