
HOLIDAY DONATION DRIVE - SUPPORT MSW - DO YOUR PART TO KEEP THIS GREAT FORUM GOING! (Only 13 donations so far - C'mon guys!)
×


Dan Vadas
-
Posts
3,261 -
Joined
-
Last visited
Content Type
Profiles
Forums
Gallery
Events
Everything posted by Dan Vadas
-
YA-1 Yamaha Motorcycle by Dan Vadas - FINISHED - CARD
Dan Vadas replied to Dan Vadas's topic in Non-ship/categorised builds
That might still happen Jan . Danny -
YA-1 Yamaha Motorcycle by Dan Vadas - FINISHED - CARD
Dan Vadas replied to Dan Vadas's topic in Non-ship/categorised builds
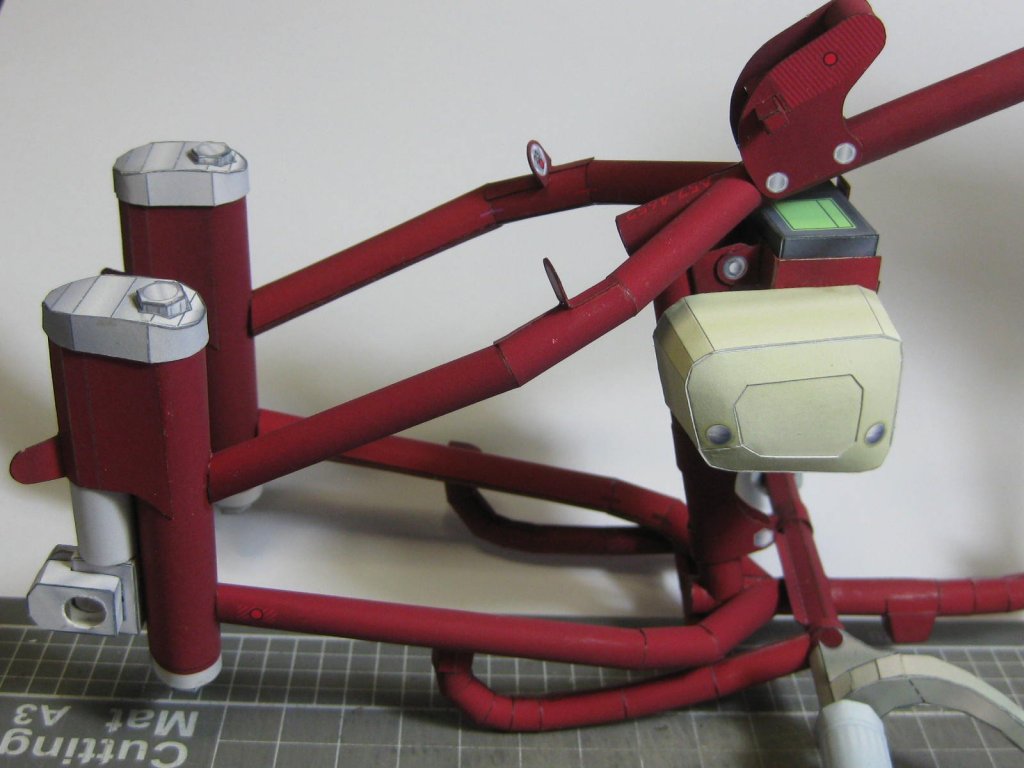
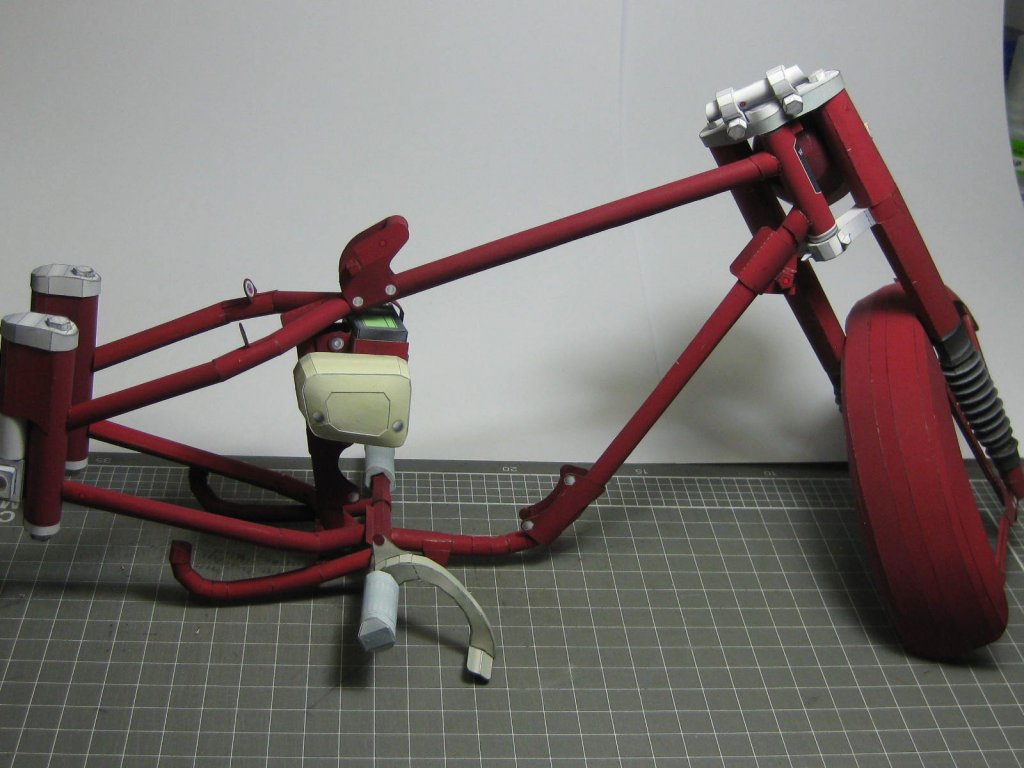
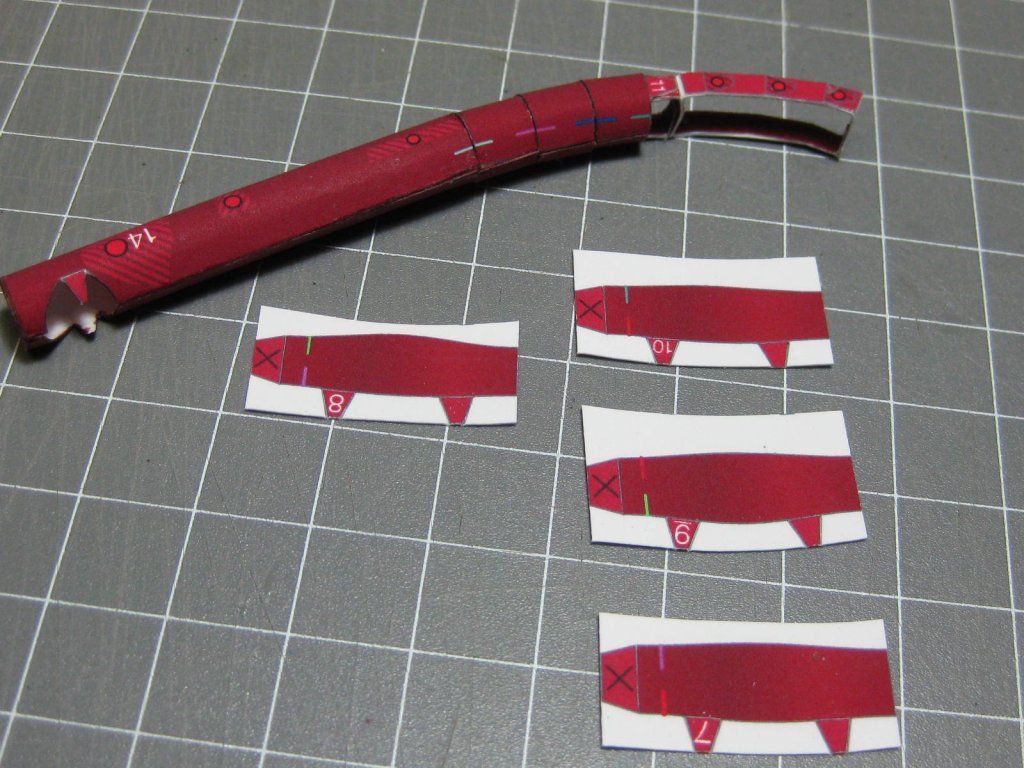
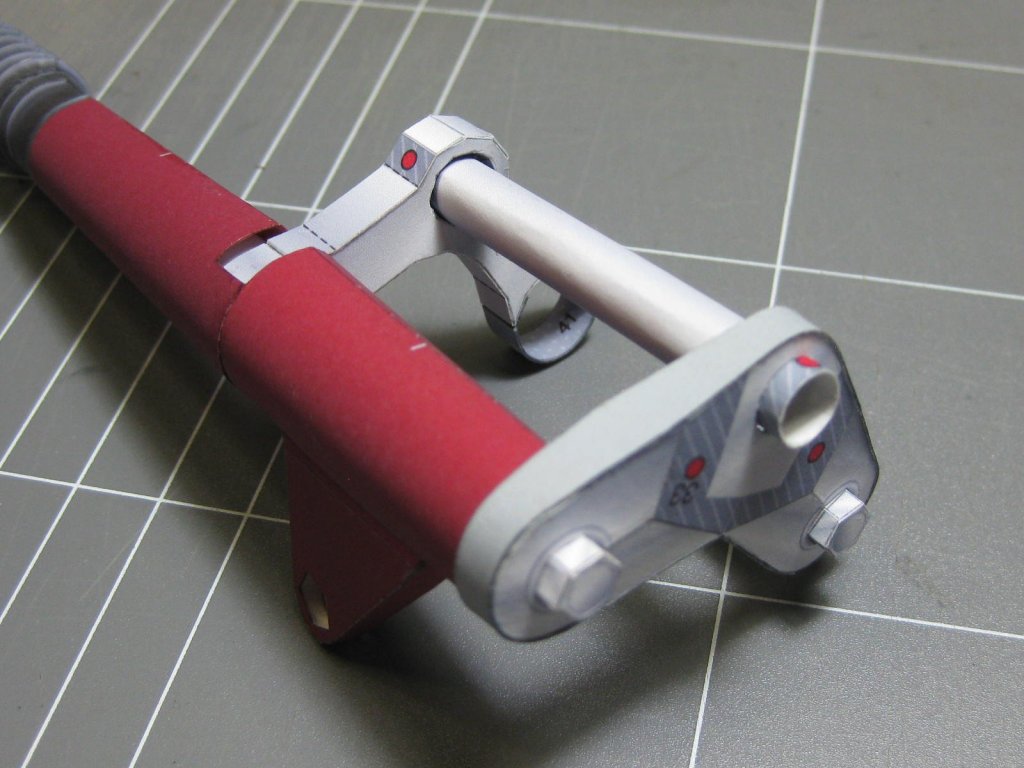
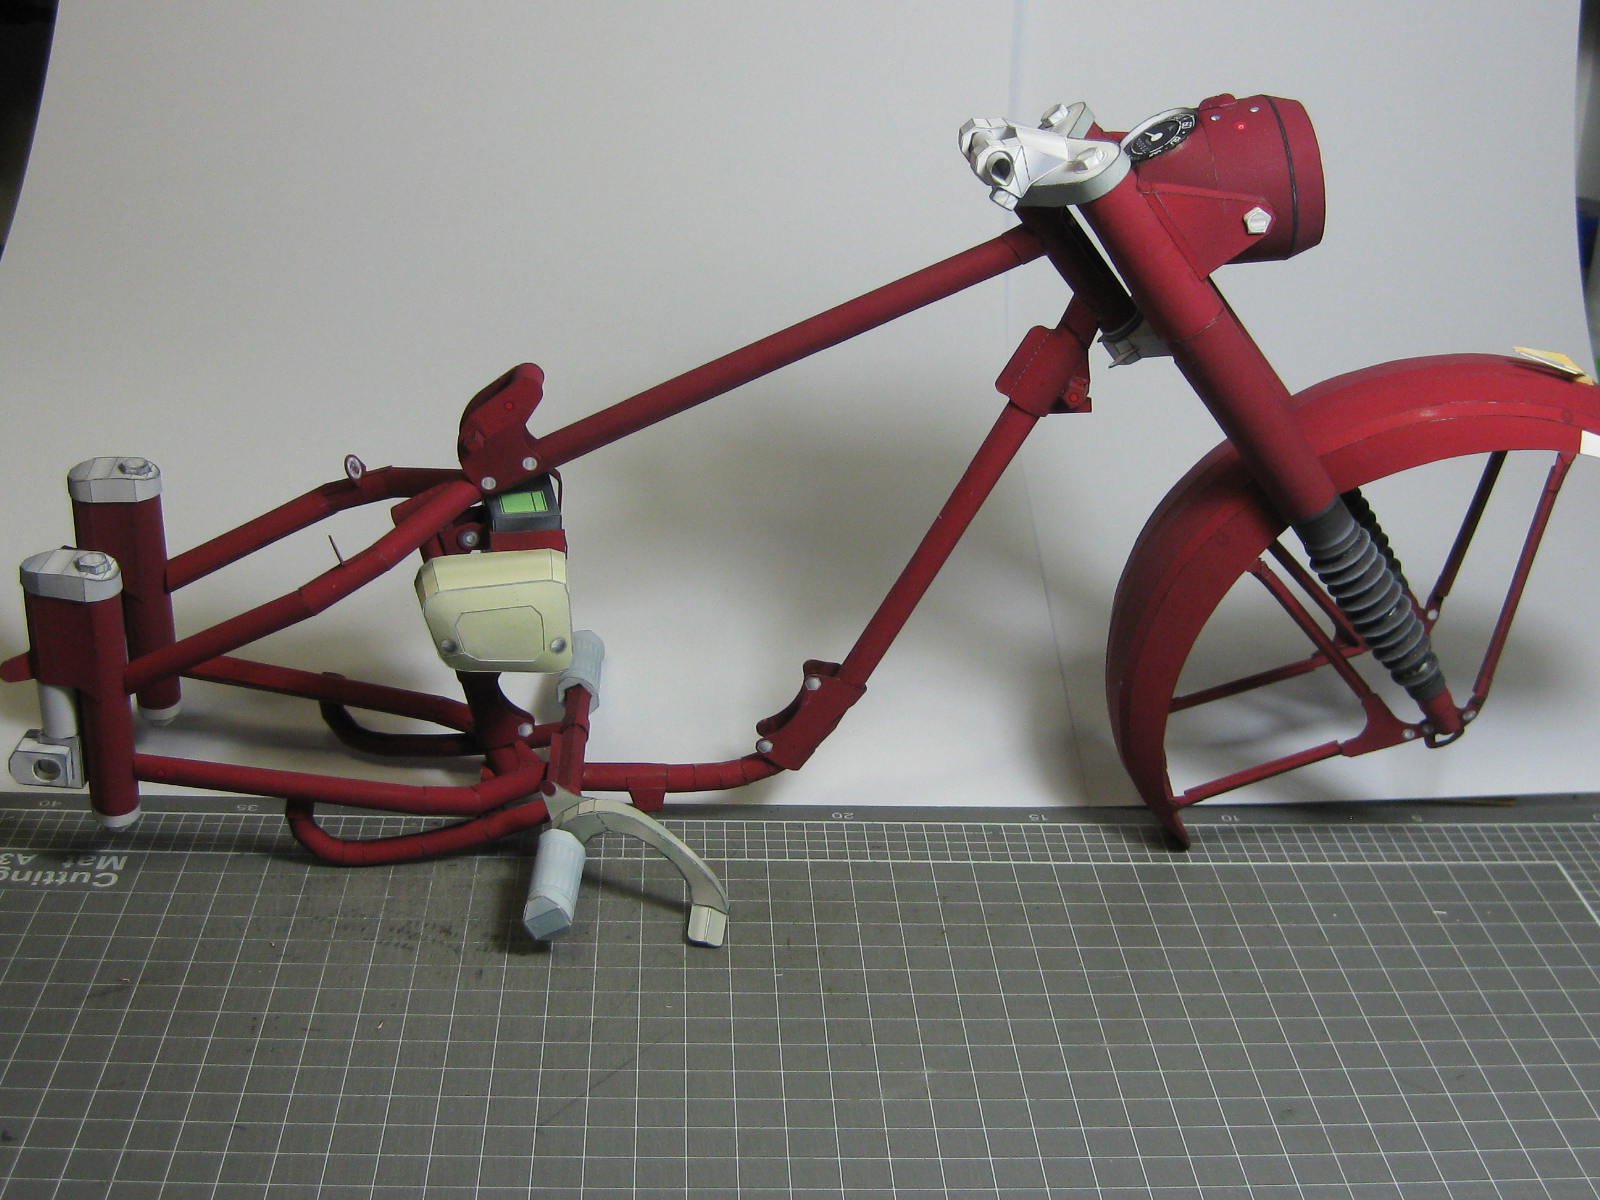
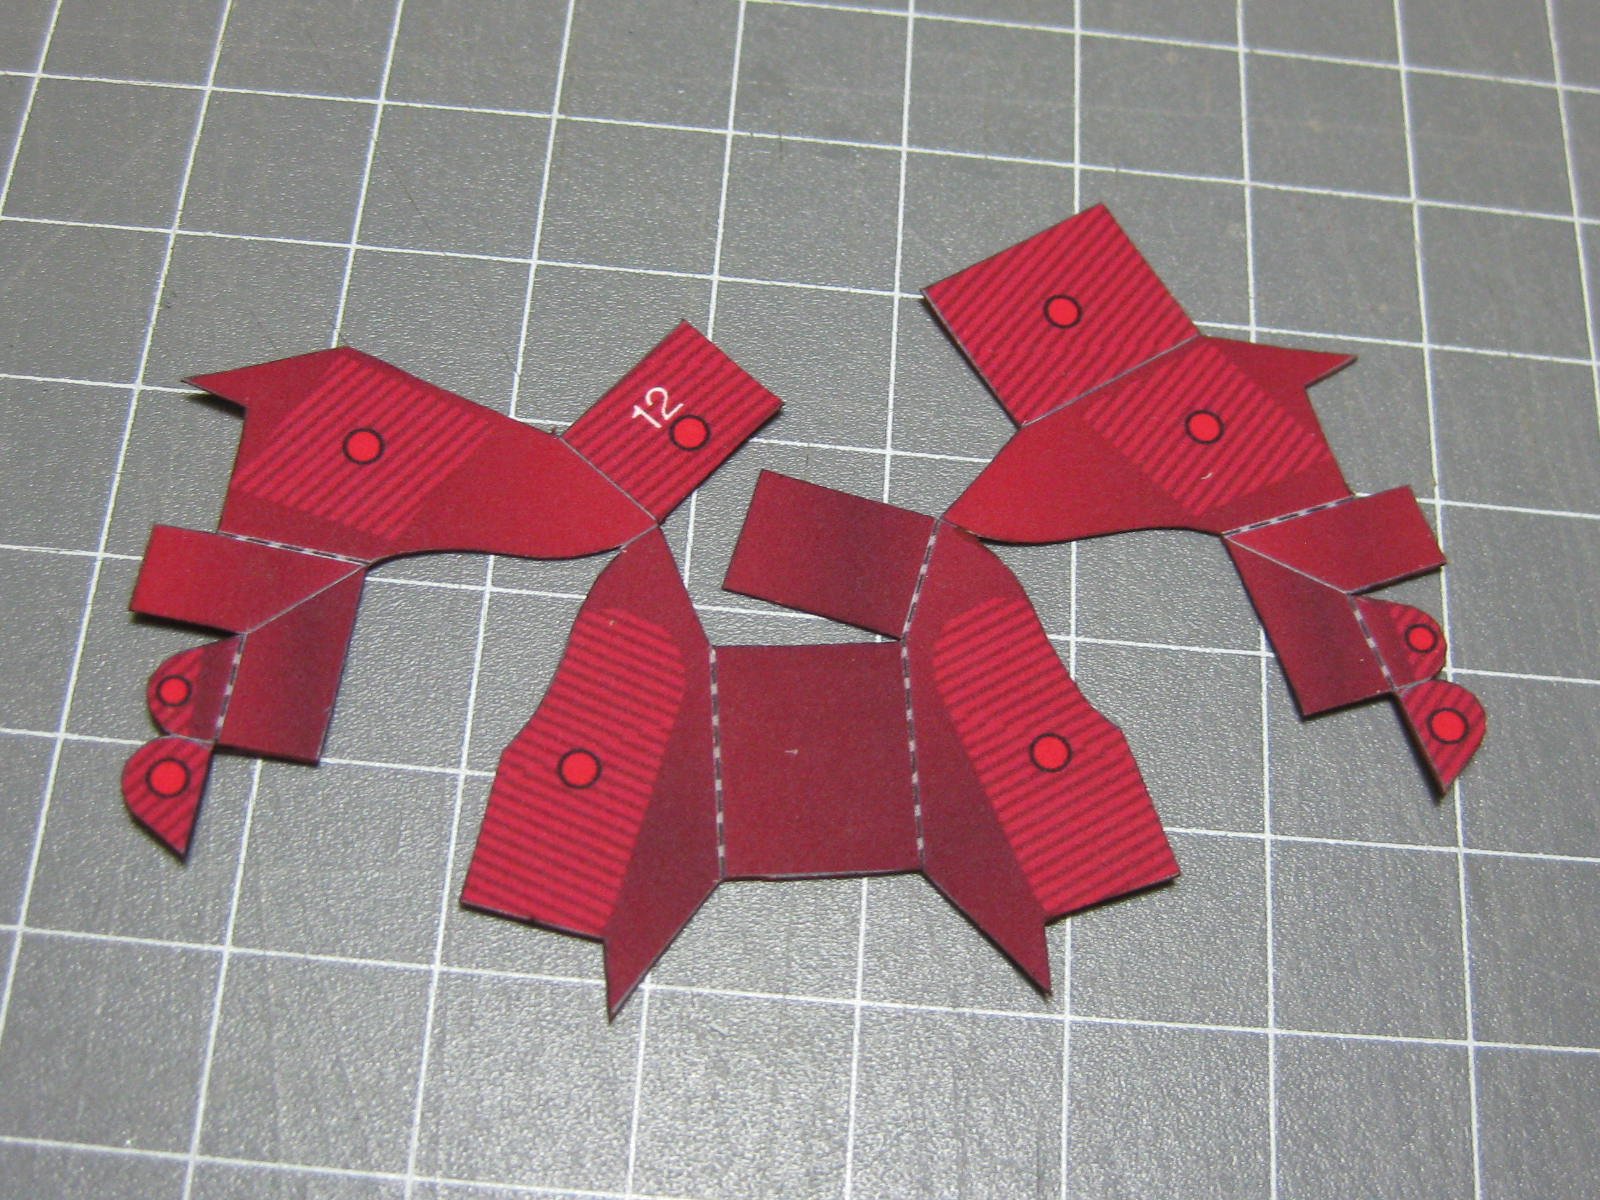
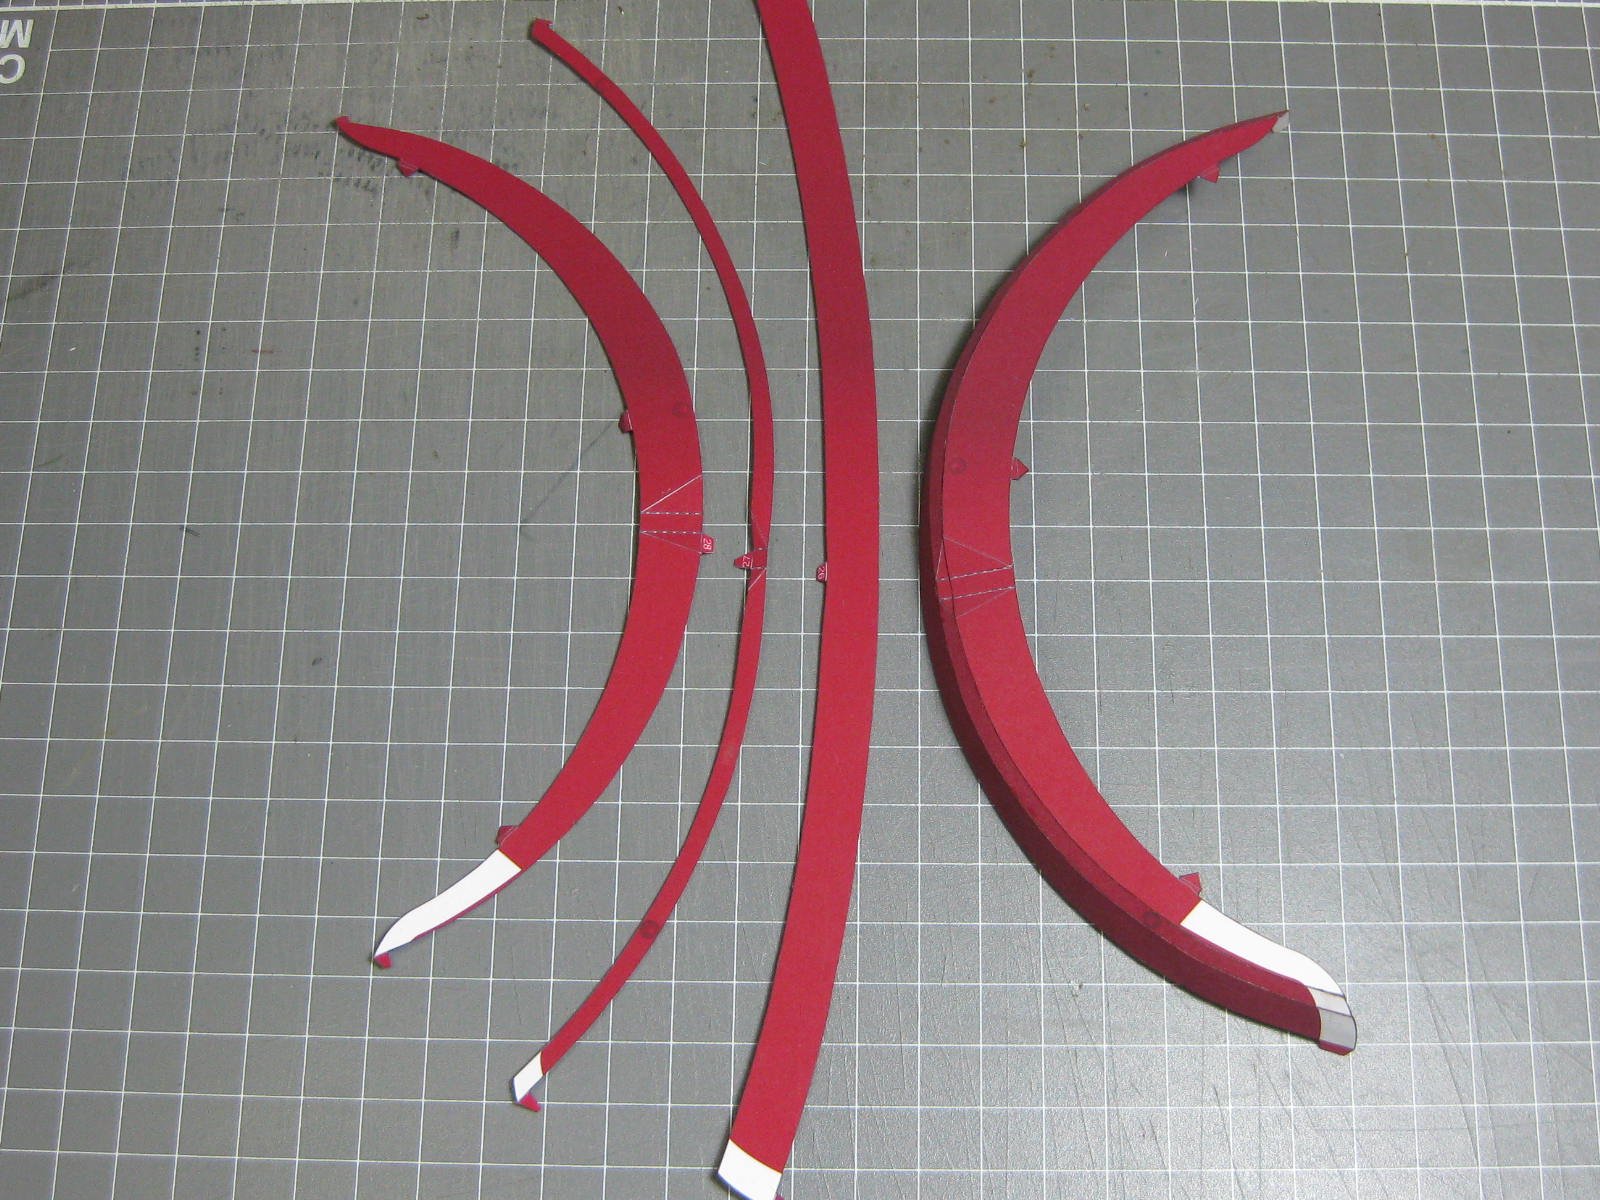
Denis, the MT-01 or the MT-10 will be my next card model bike . Edge gluing isn't easy - you generally have only a 0.25mm edge to glue. Sometimes I might laminate an extra piece inside the join to make it a bit easier. This kit has three stages. The first one is now finished. Here's a particularly tricky piece to cut and fold : The seat is one of the most difficult pieces I've found so far, owing to the multiple curves. It hasn't turned out quite as well as I hoped, so it's going to get sanded and painted. I used sanding sealer to fill in all the joins : The frame has a lot of tube rolling involved. Where it needs extra strength there's an internal support : Stage one finished. I haven't permanently attached the steering/front guard assembly yet, as it's rather difficult to hold the frame with it in place while I'm fitting the engine, seat etc : Danny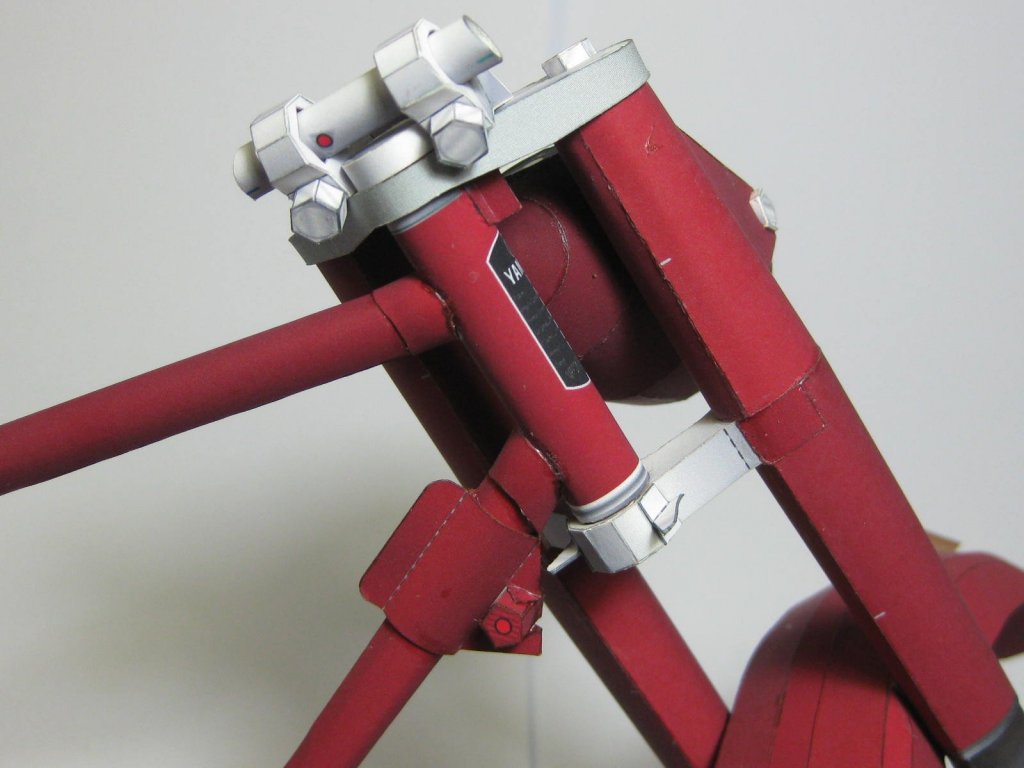


- 26 replies
-
- 16
-

-
Believe it or not - the small parts are actually easier than the big ones. Well, most of the time anyway . Danny
- 64 replies
-
- 4
-
-
- v108
- digital navy
- (and 2 more)
-
Hi Richmond, Welcome to the wonderful world of Card Modelling. I'm pretty well a total convert from the other media (for the time being at least ). Oh dear - MISTAKE. You'll find it very difficult to get PVA glue to adhere properly without removing the Clear coat from those areas that need gluing. I use a Nitrocellulose Clear Lacquer for the initial coating, as it appears to be made from something close to the make-up of paper (don't ask me the chemical formula, I just know it works ). The stuff isn't cheap - around $35 to $40 per can - but it works brilliantly. It's available on Ebay from THIS SITE among others. I'd suggest buying two cans of it - cheaper in the long run. Don't stress about keeping the centre bulkhead square at this stage. Everything will line up when the outer bracing is added, if there is any. If not then feel free to add as much extra card as you like to get things squared up before skinning the hull. Gluing some graph paper underneath the deck pieces would assist greatly in aligning the bulkheads later. (I just thought of that idea when reading this log, so thanks for the inspiration ). Good luck with the build (and your other one). I'll drop in from time to time. Danny
-
Trust me Richmond - 0.1mm is critical when it comes to Card Modelling, let alone a whole 1mm . Danny
- 14 replies
-
- 5
-
-
- digital navy
- V108
- (and 1 more)
-
YA-1 Yamaha Motorcycle by Dan Vadas - FINISHED - CARD
Dan Vadas replied to Dan Vadas's topic in Non-ship/categorised builds
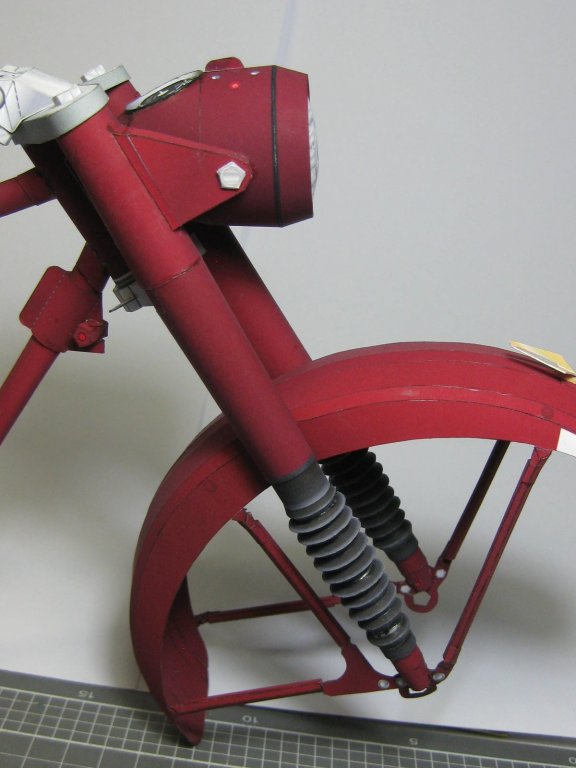
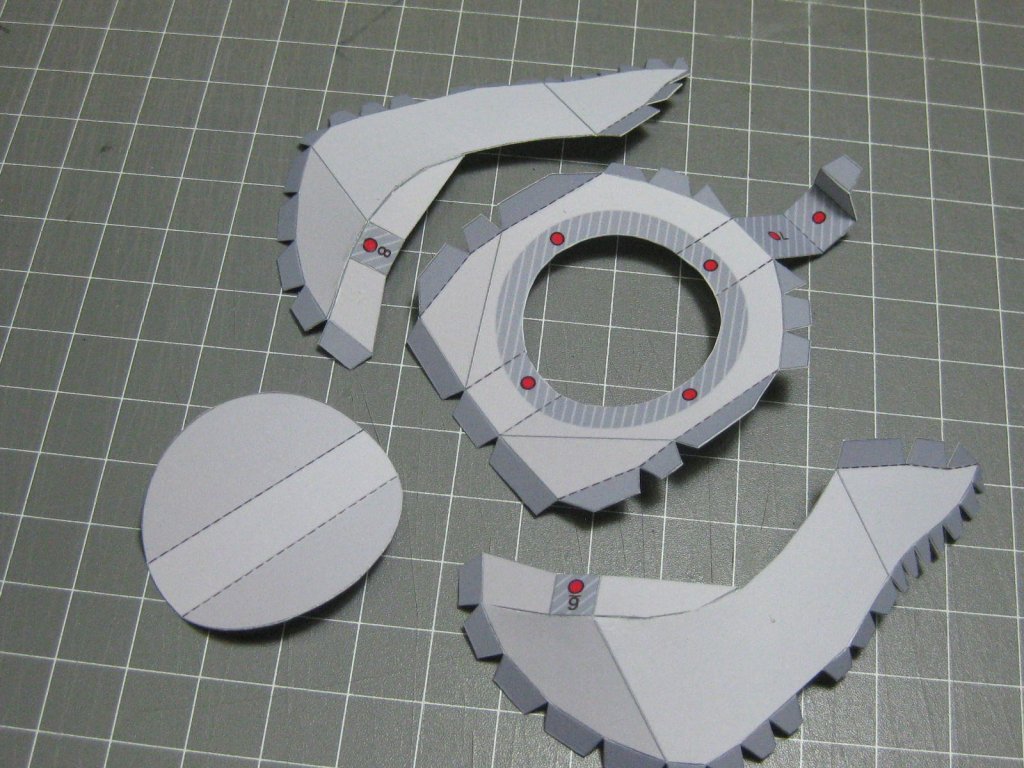
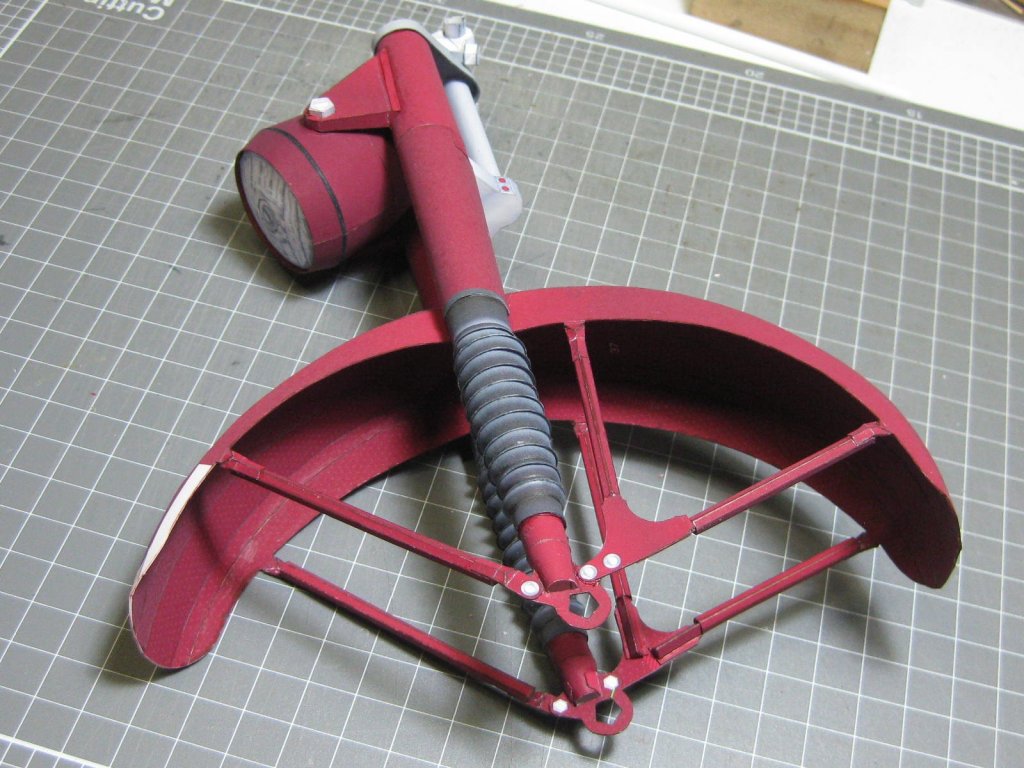
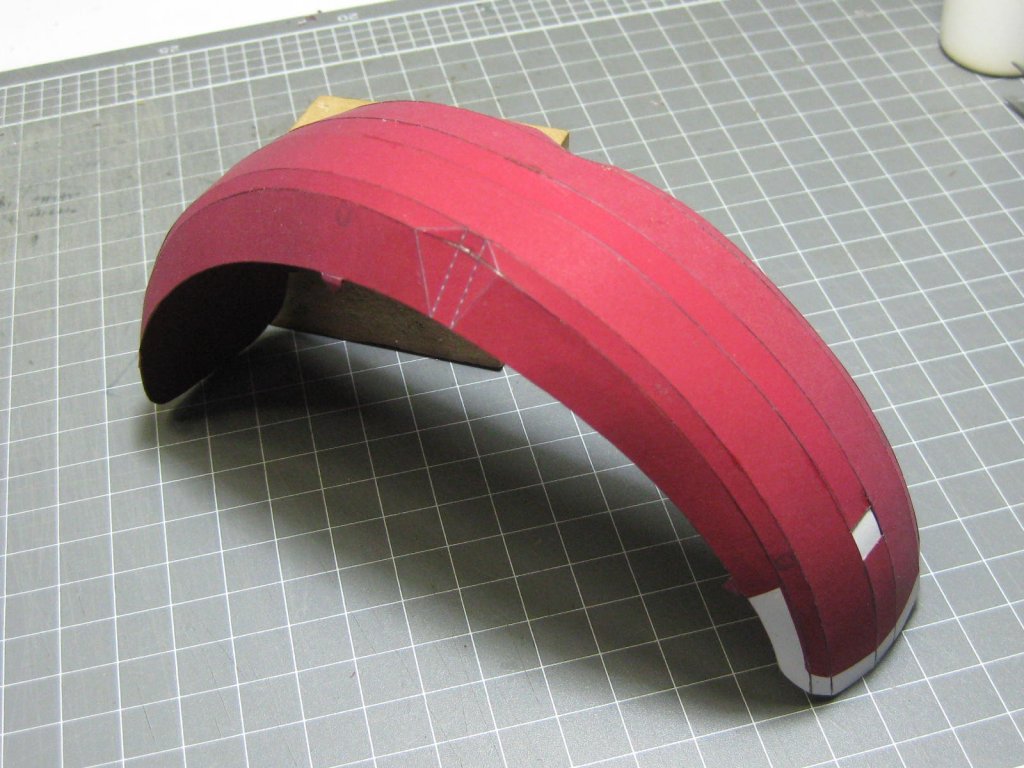
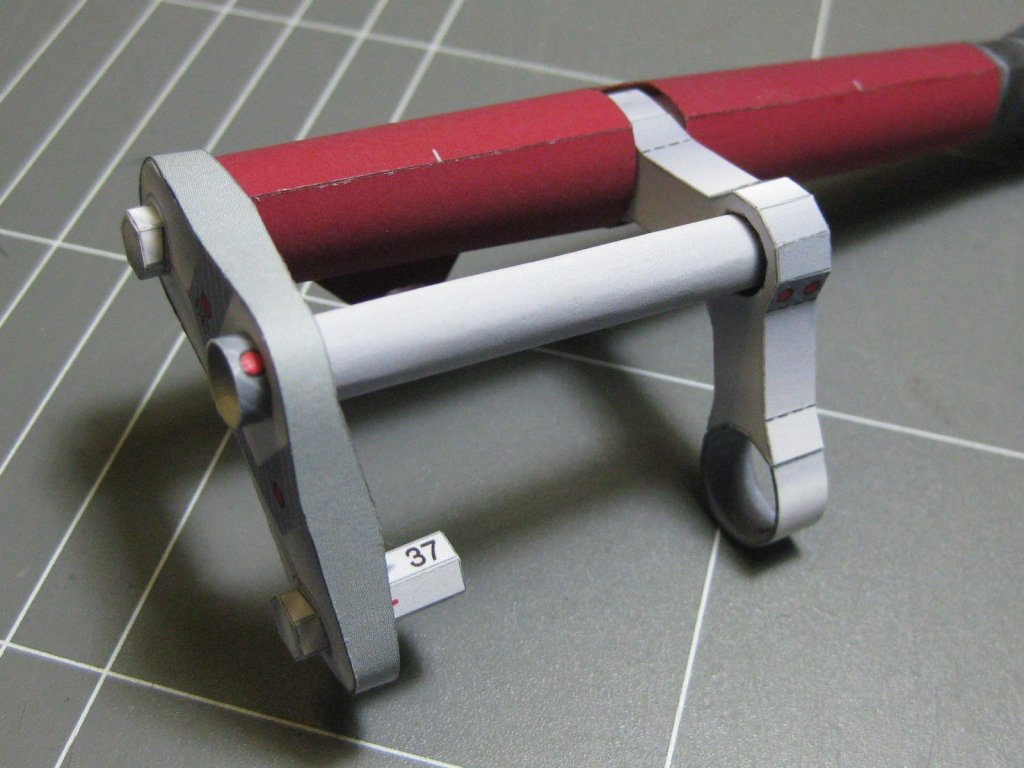
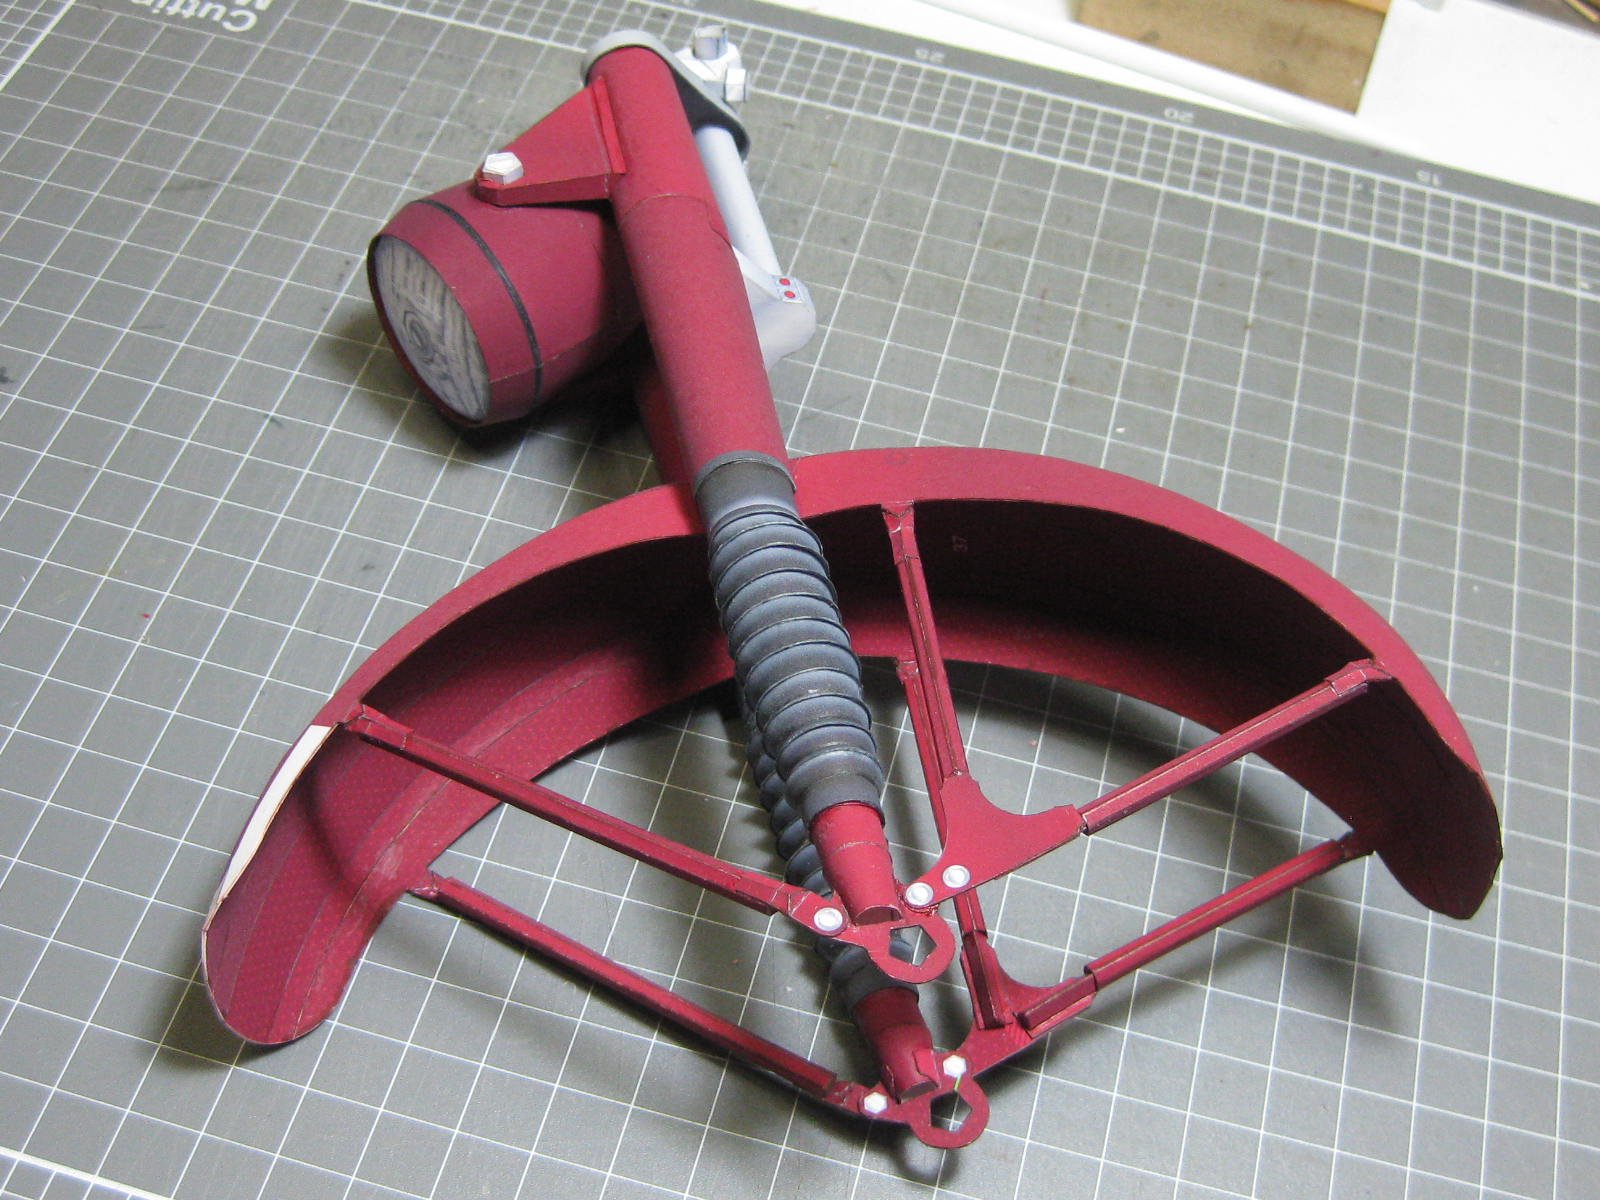
Thanks for the "heads-up" Jan. I've downloaded all the remaining five motorbikes, I'll decide later if I make another (or all of them ). The front fender took a fair bit of work, some delicate cutting and edge-gluing : A few hours work in the fender braces : This sub-assembly is finished for now : Danny


- 26 replies
-
- 12
-
-
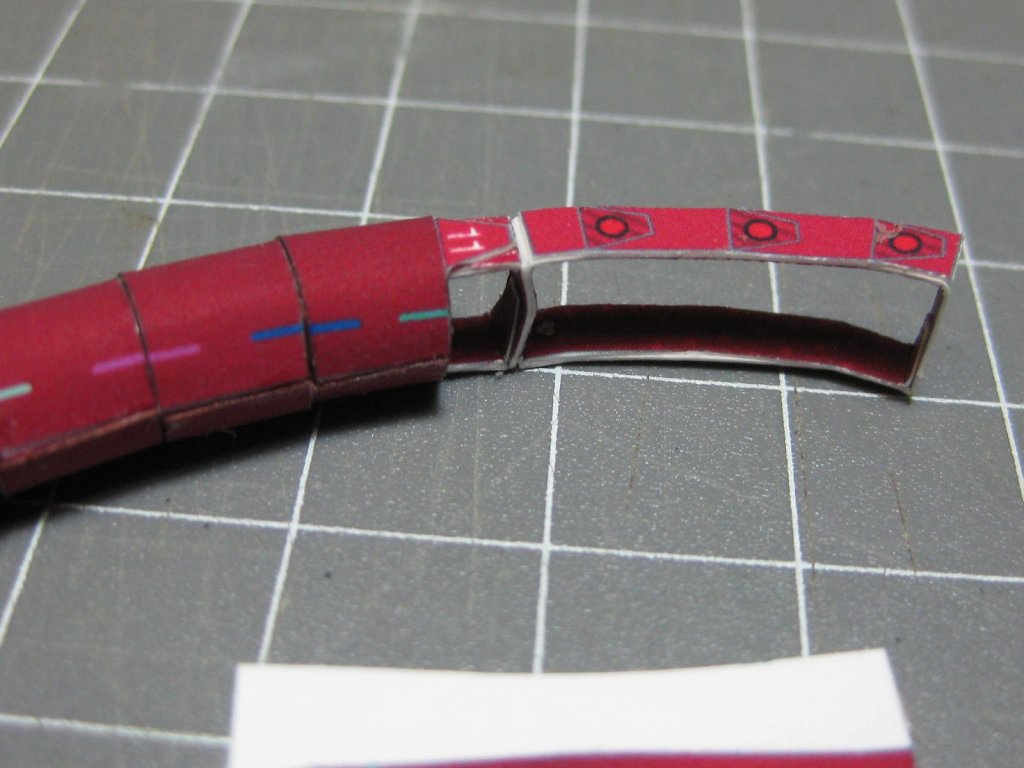
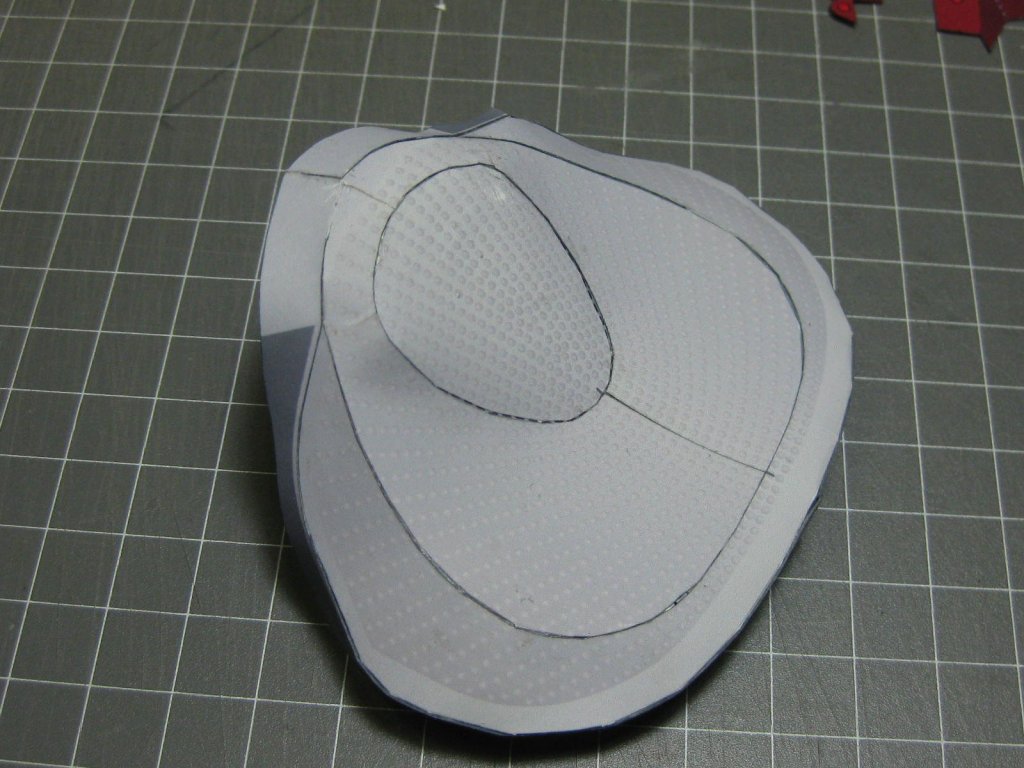
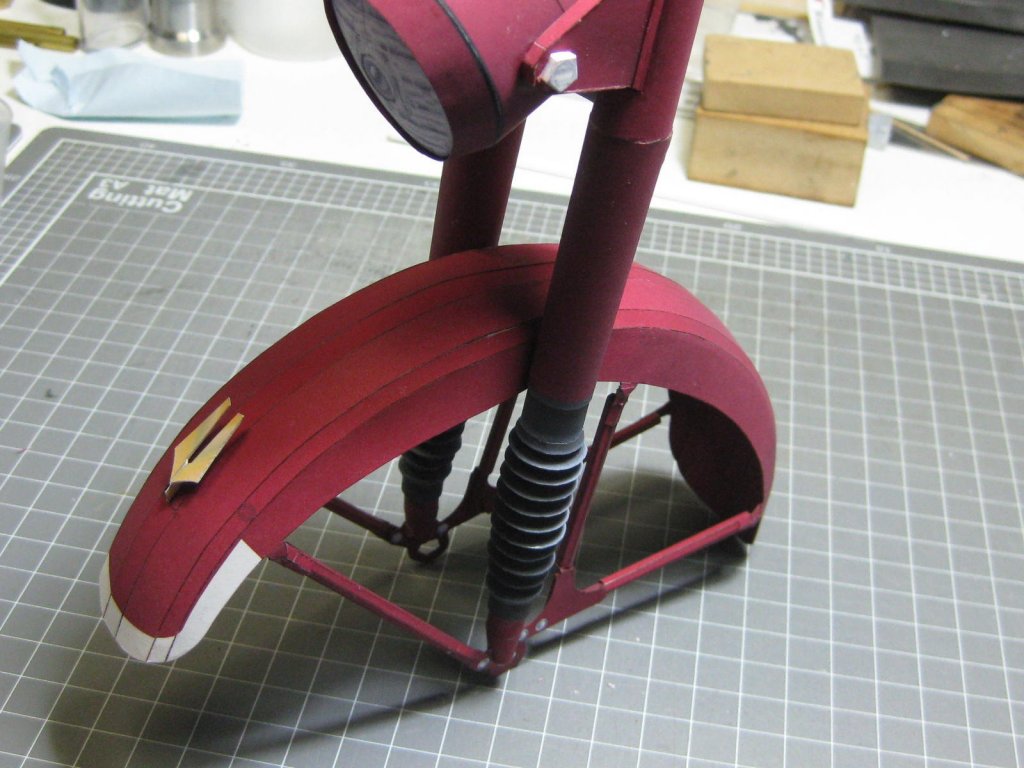
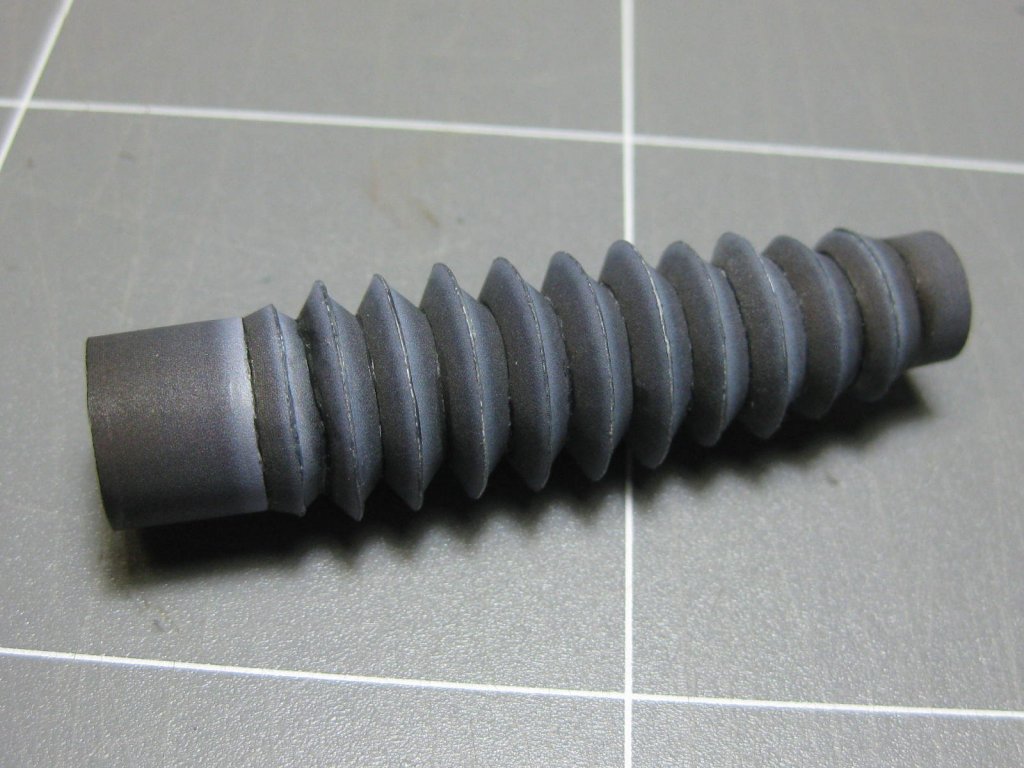
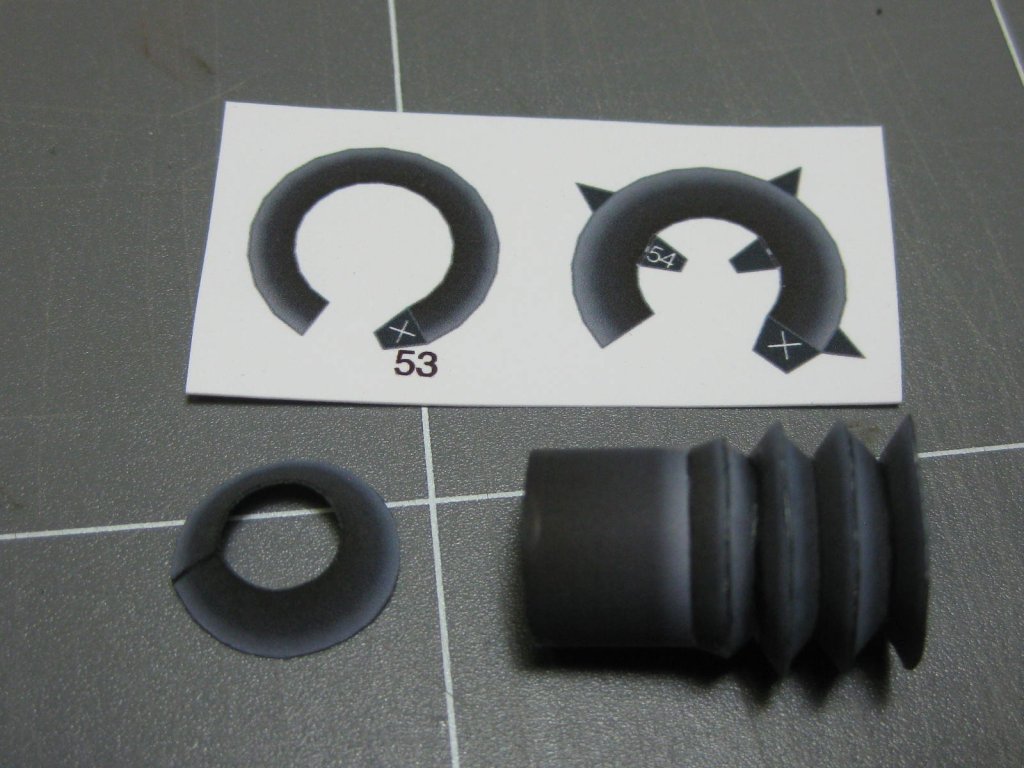
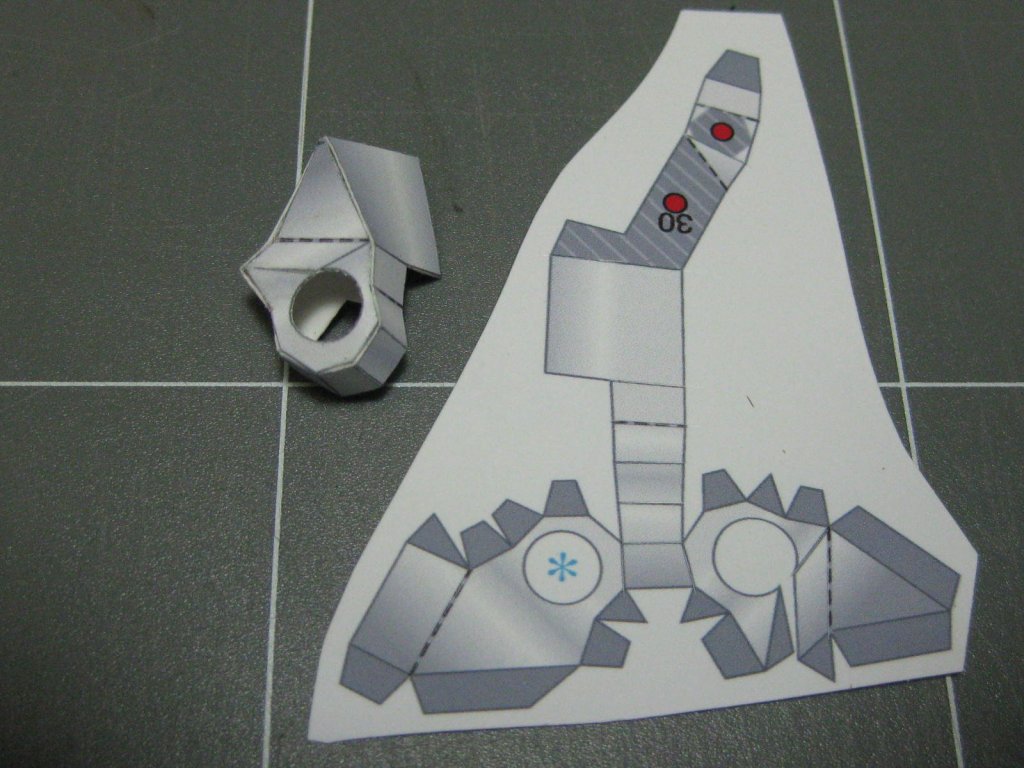
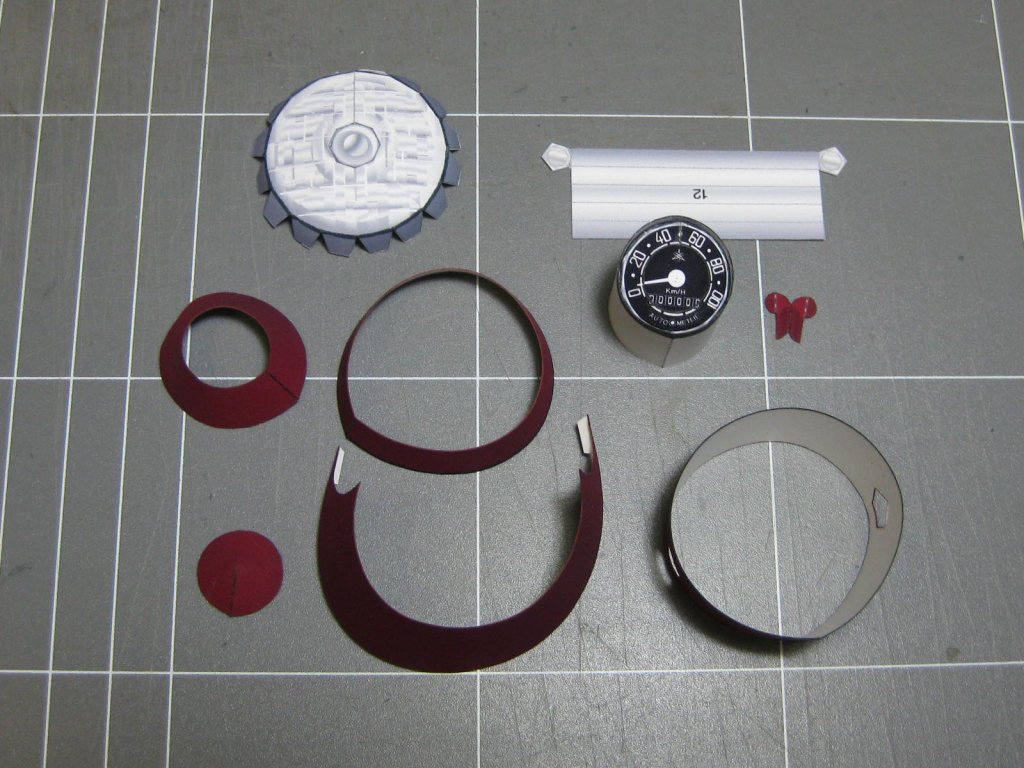
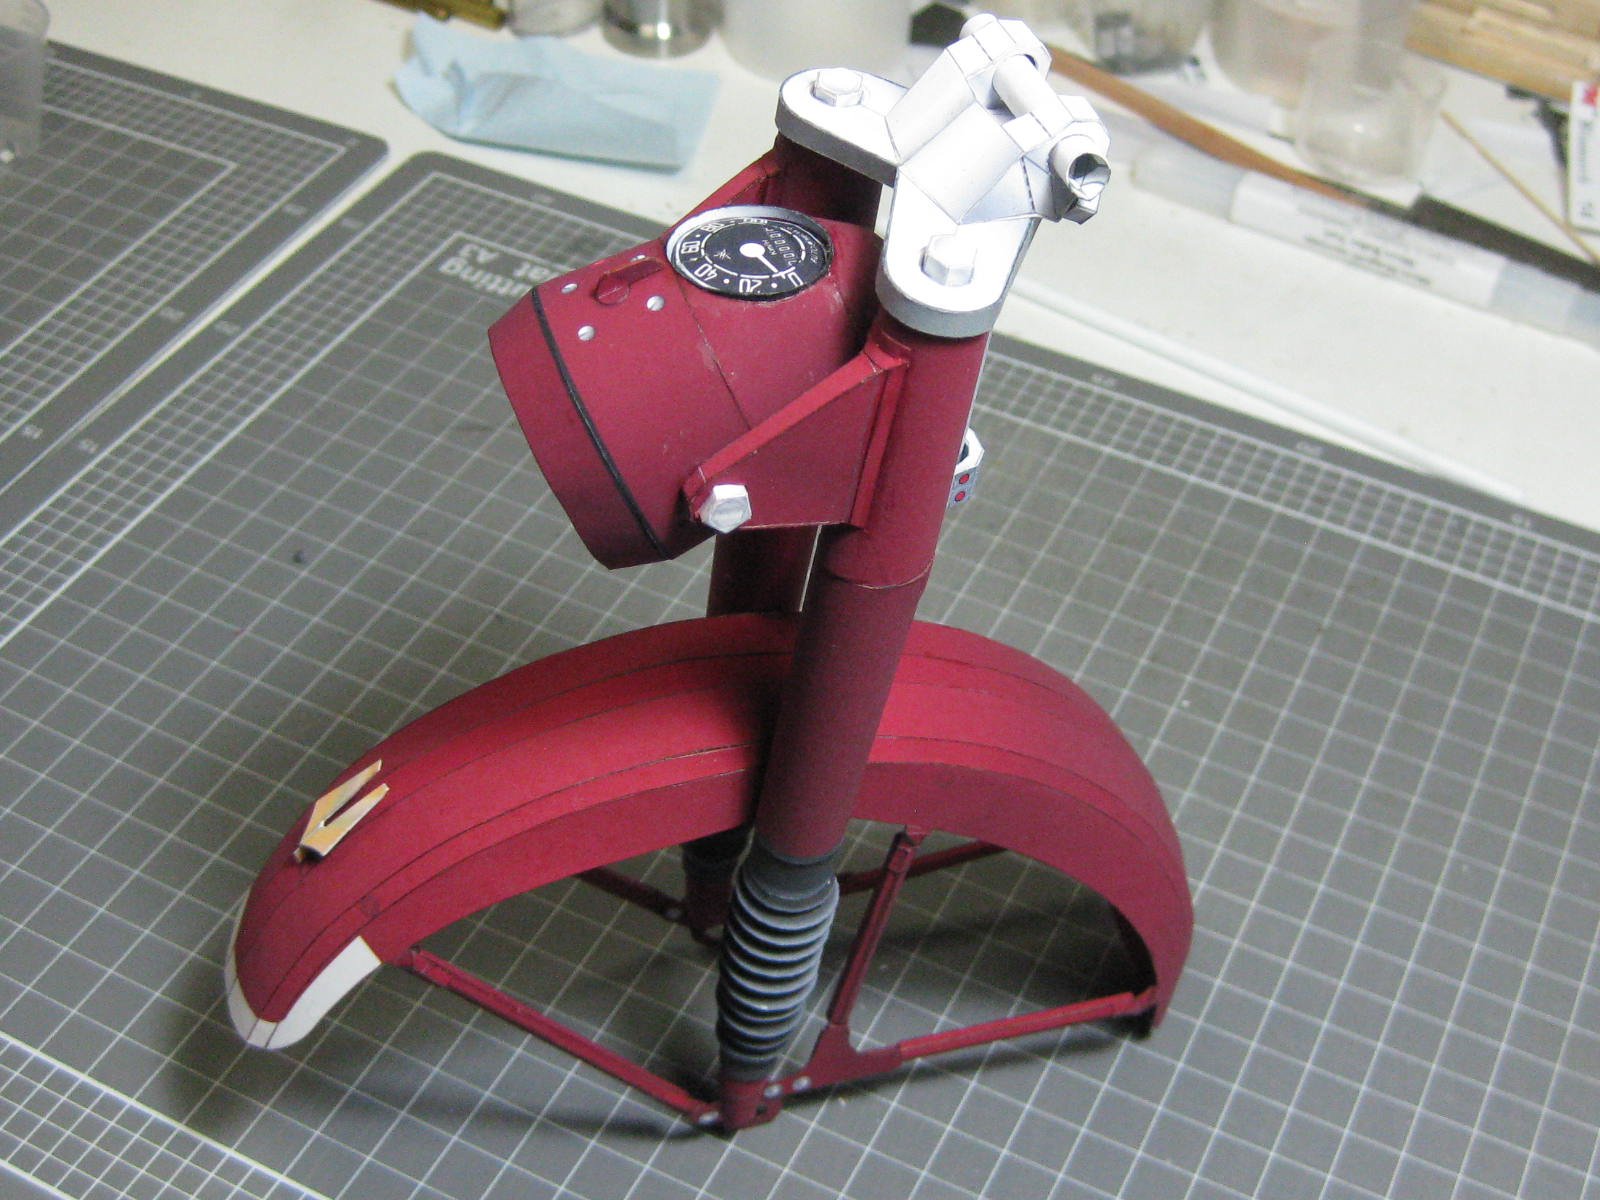
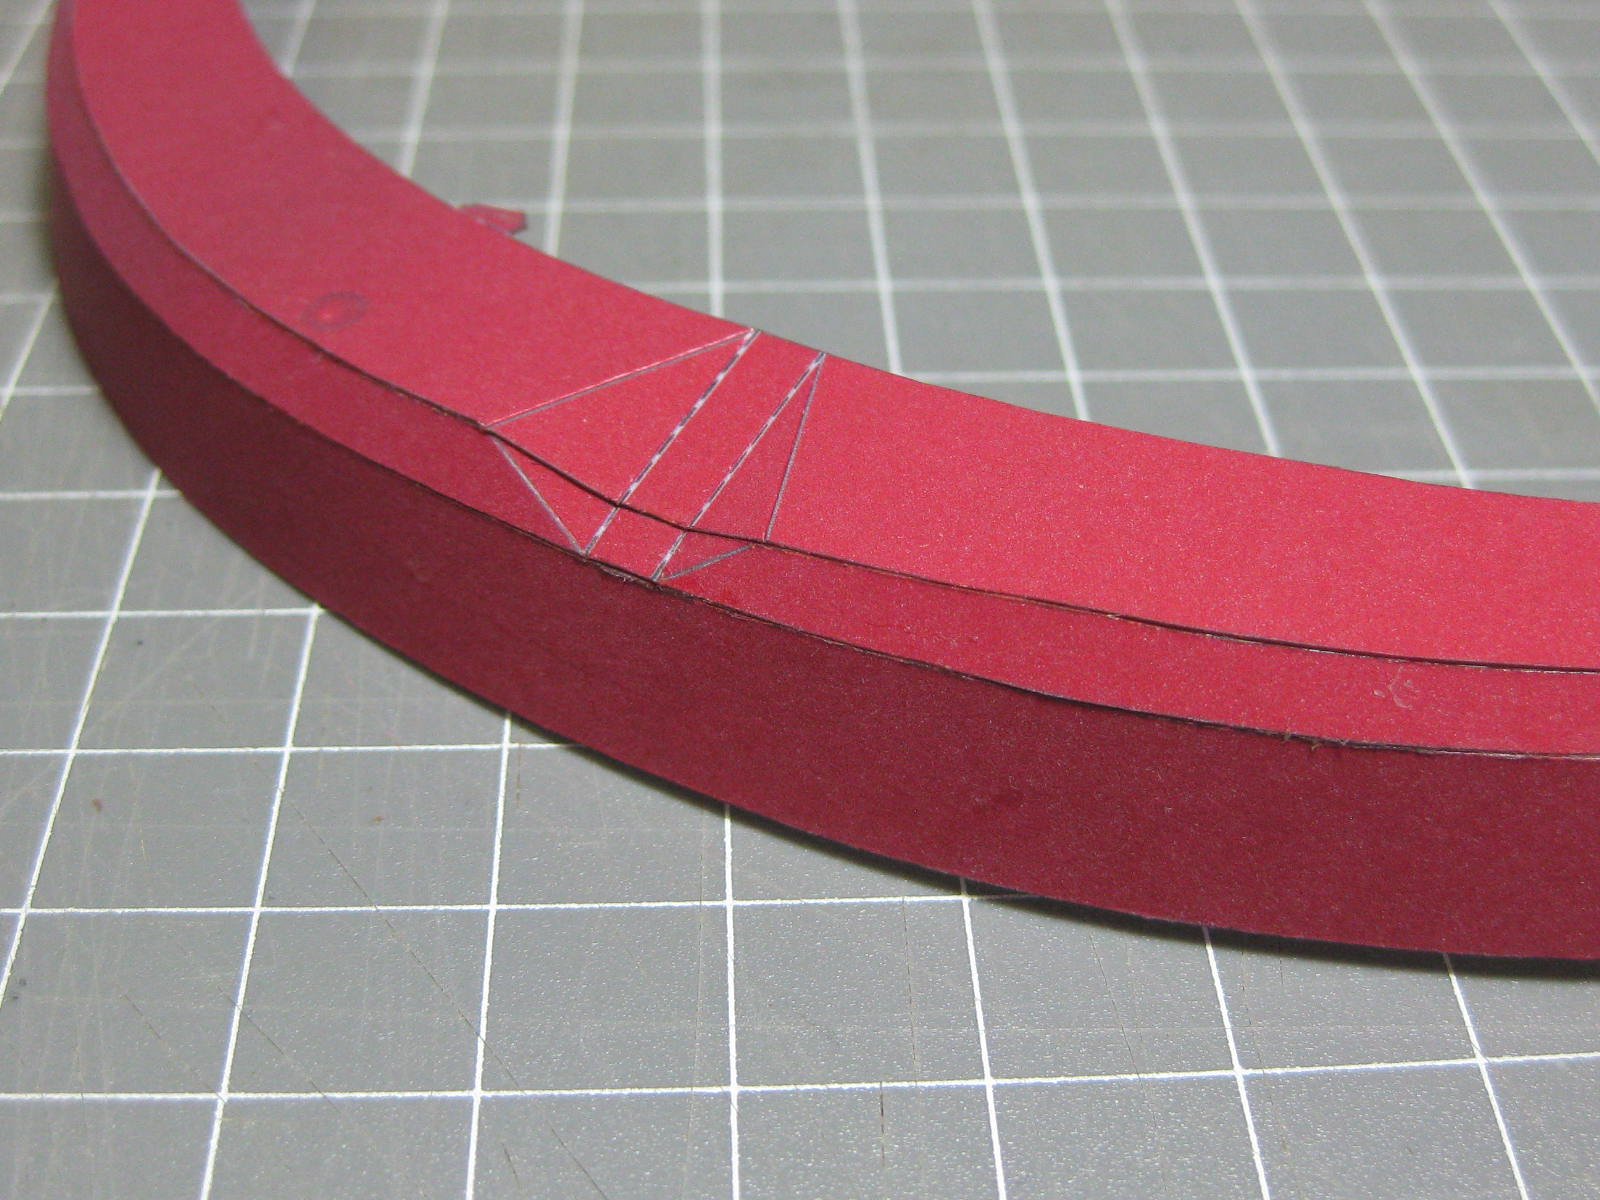
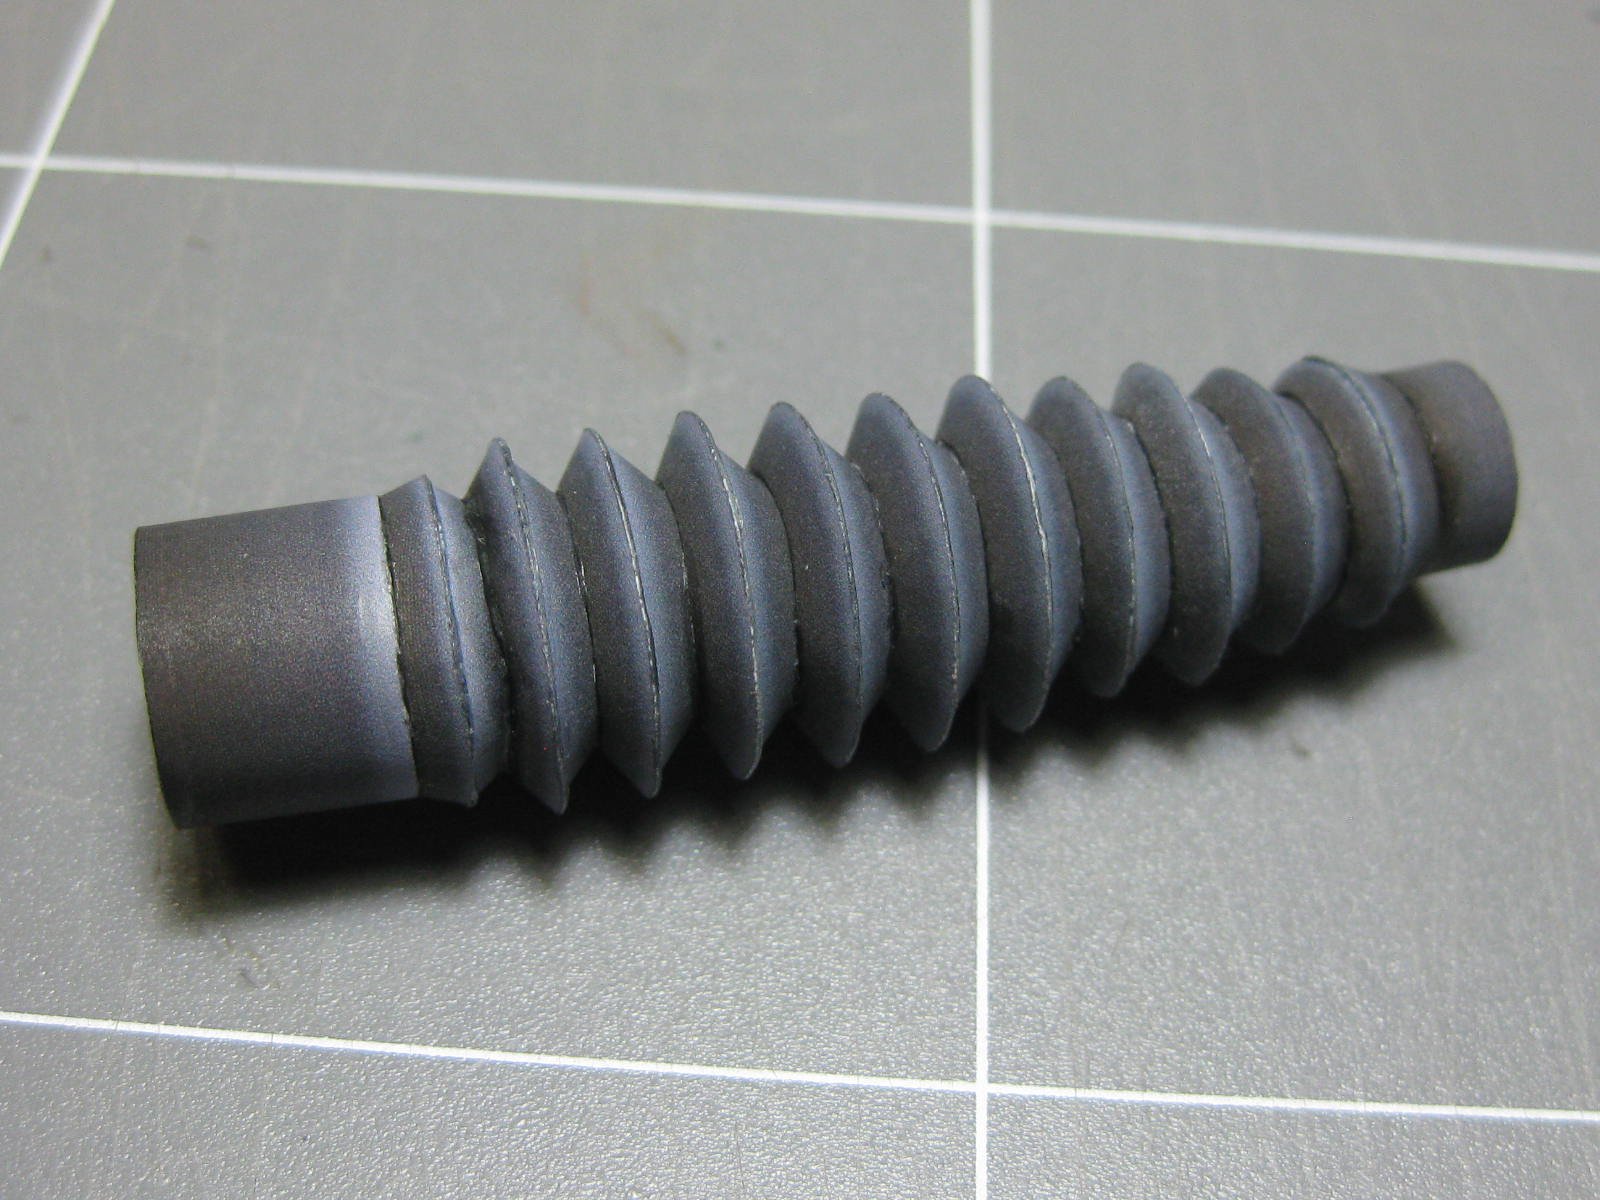
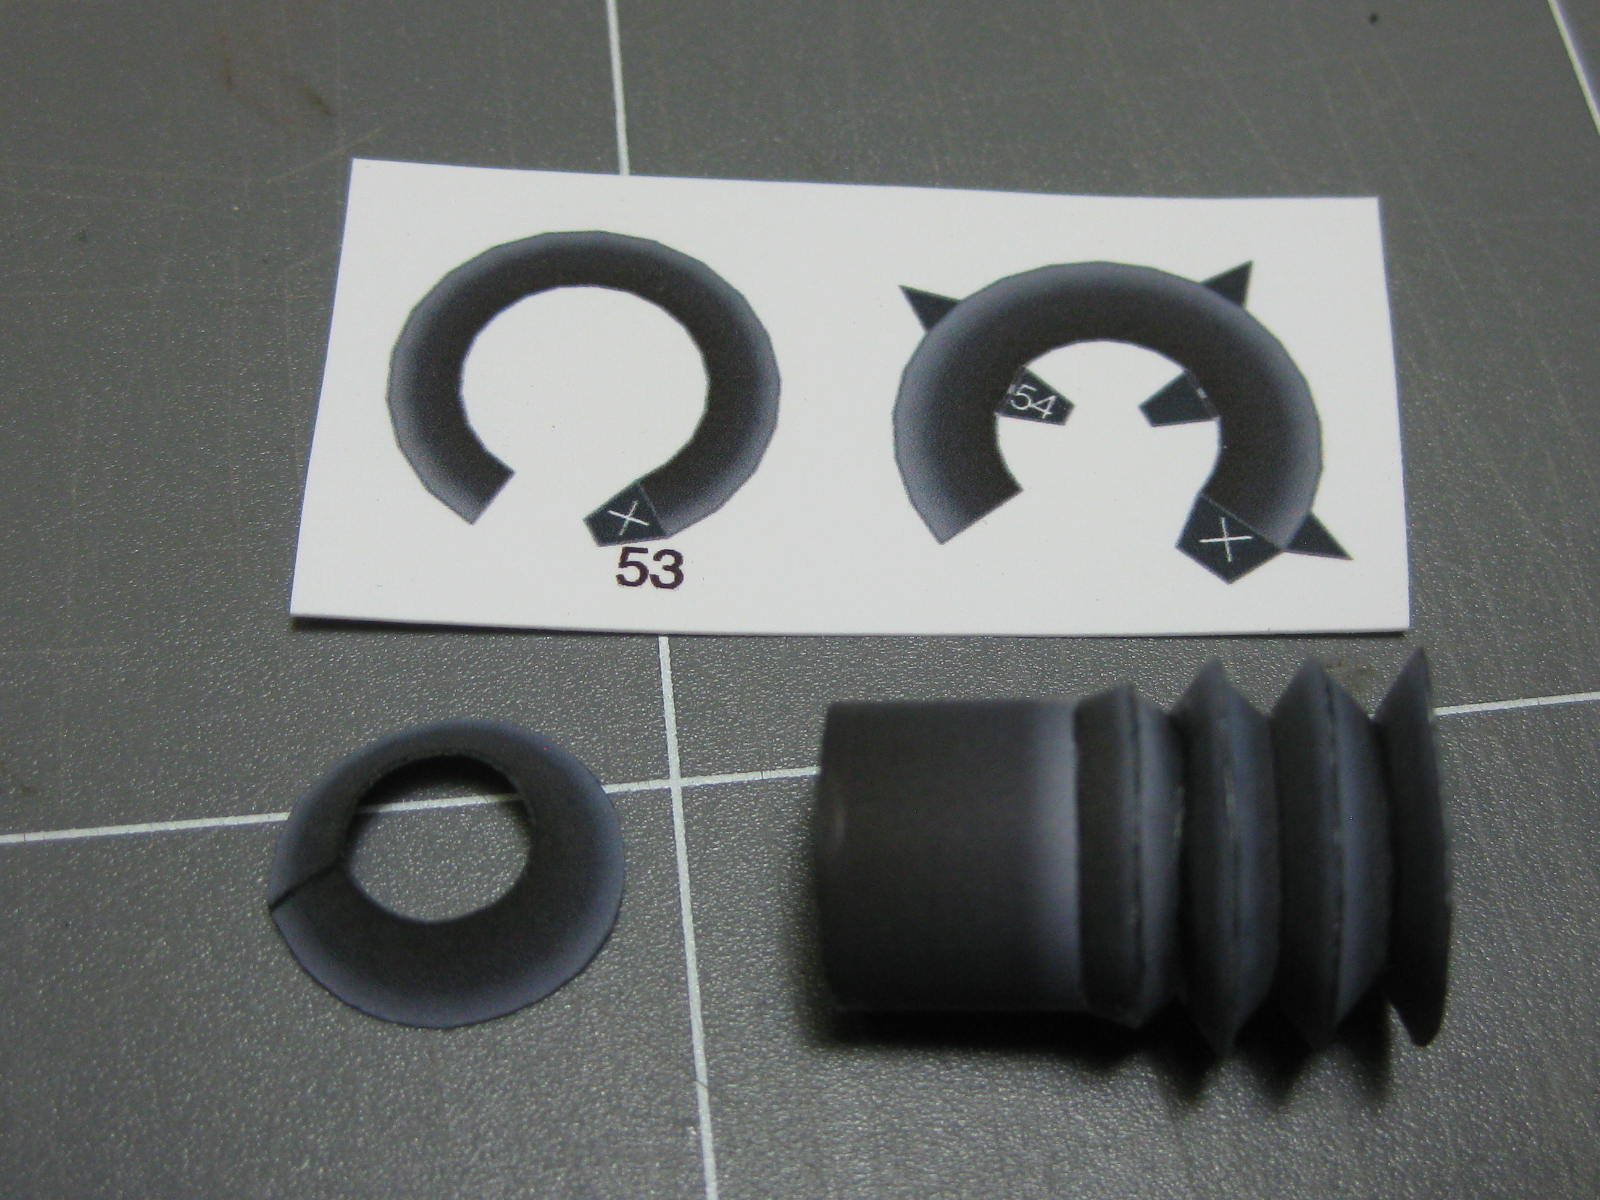
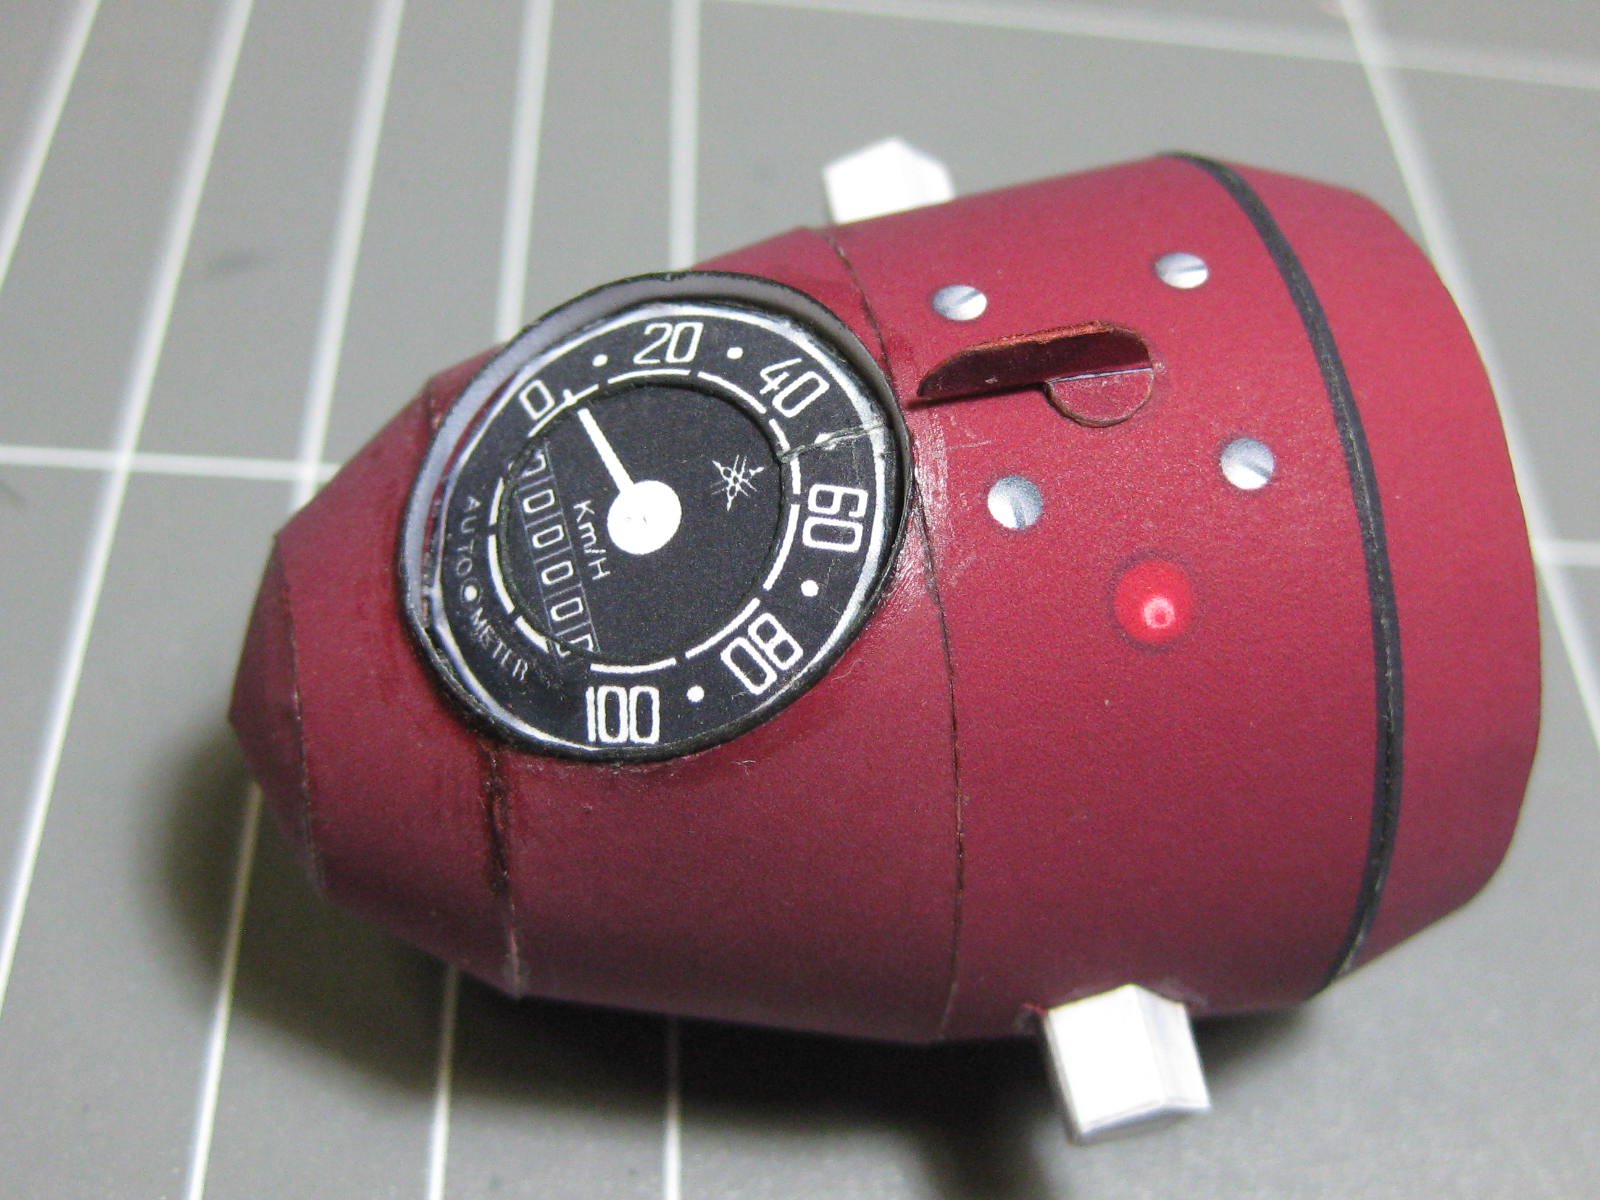
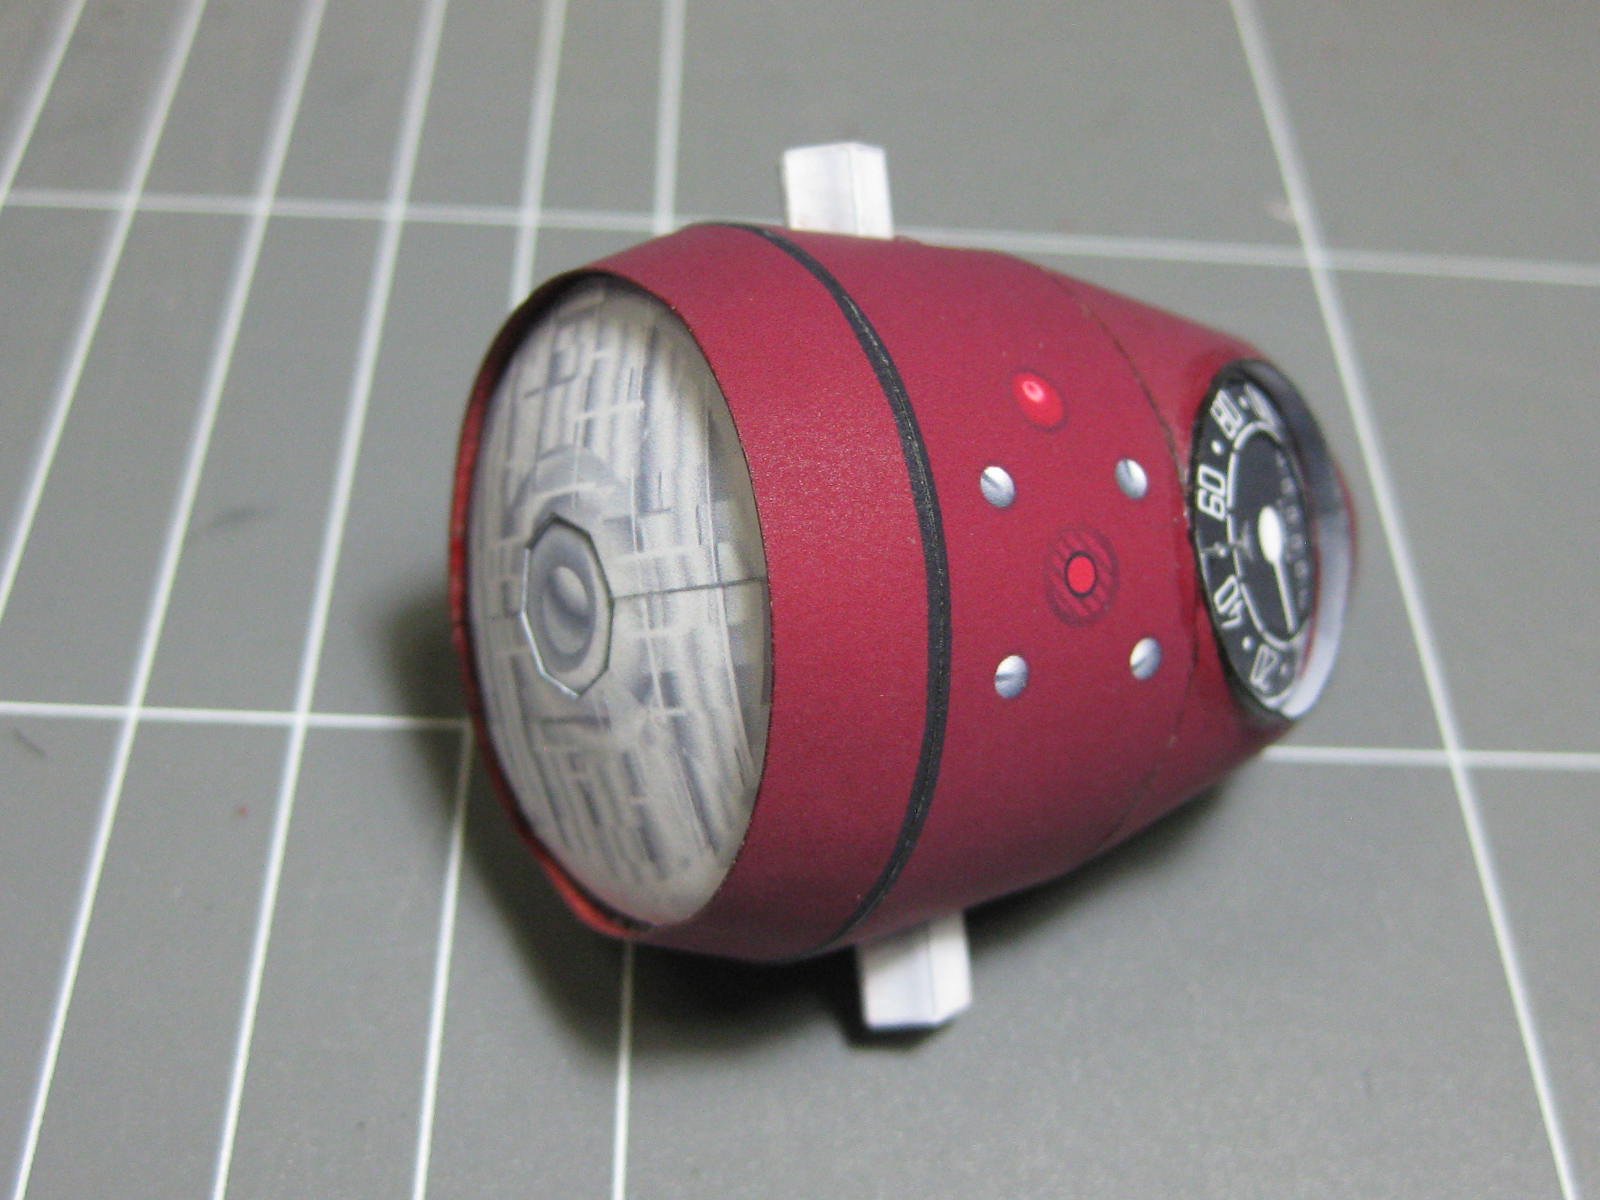
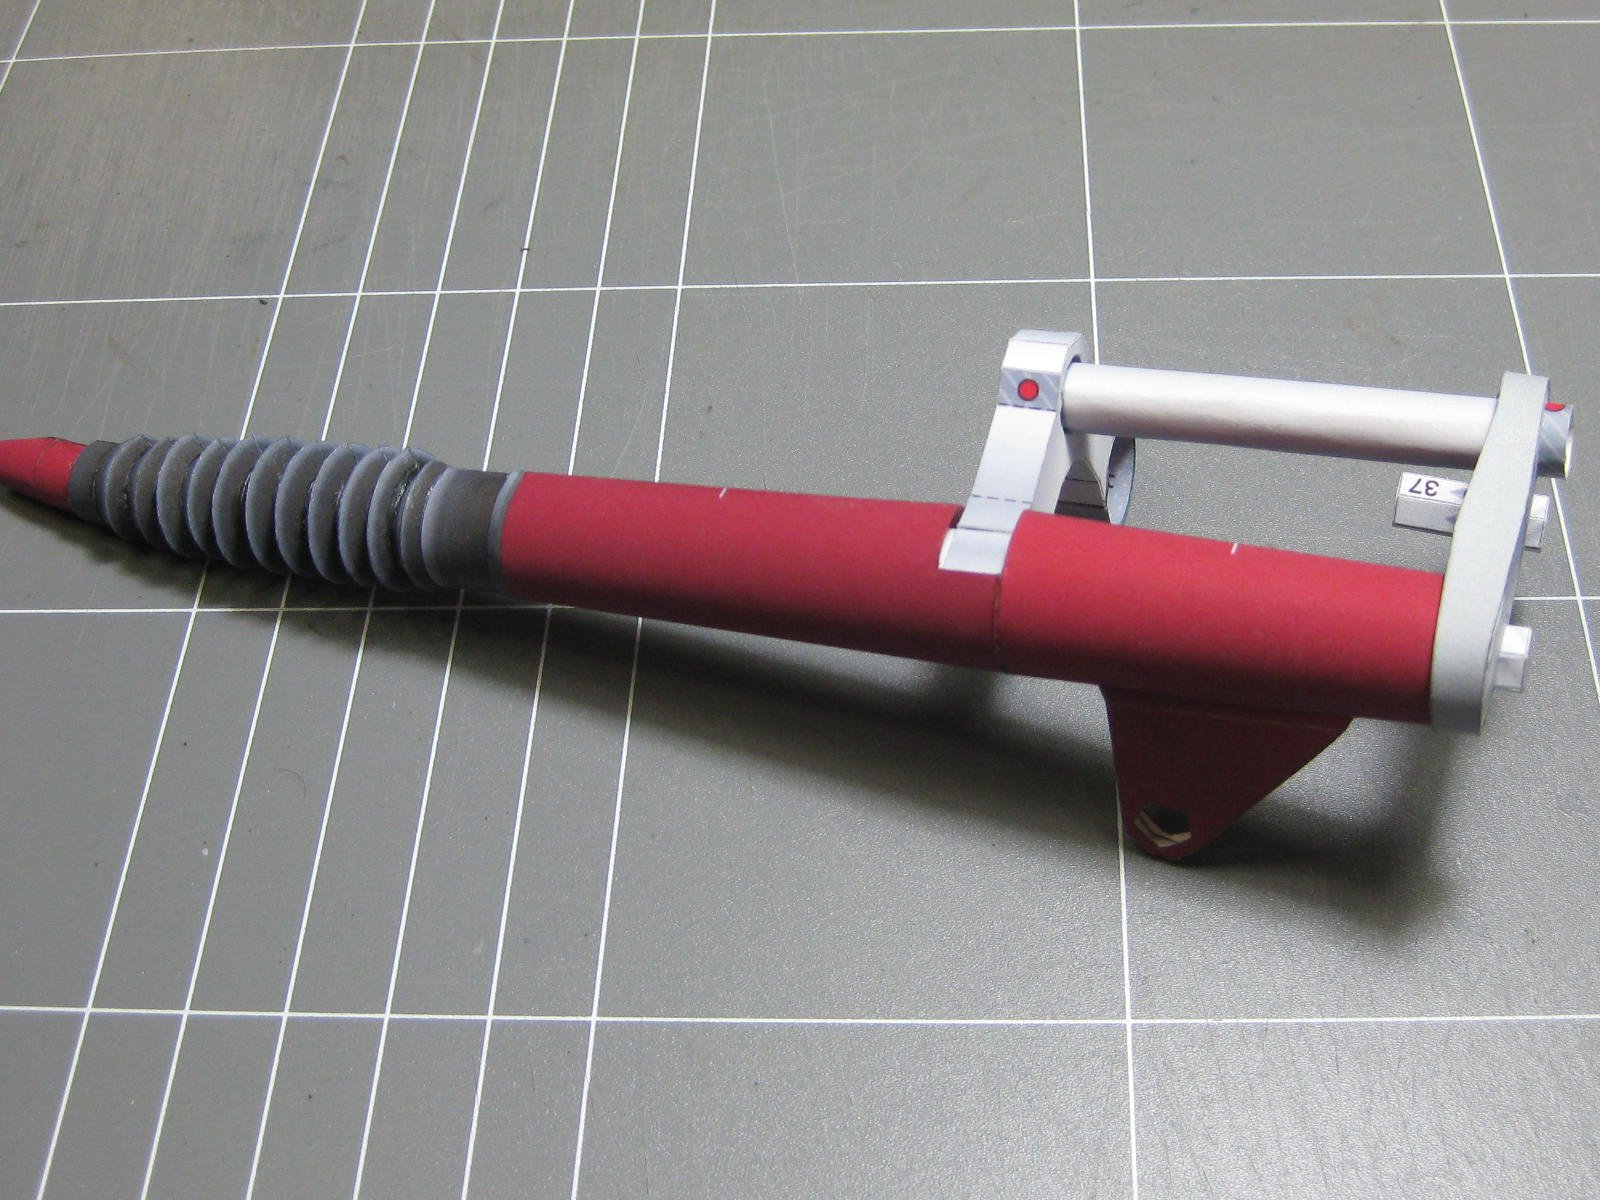
Hi all, After finishing HMS Hood I've decided to do something a bit different this time. A change is as good as a holiday, as they say . This is a free download of a Card model - a vintage Yamahe YA-1, the first bike that Yamaha made. This won't be a comprehensive Build Log, but I'll post pics as I complete certain significant sub-assemblies. The kit is not particularly good (different to what I'm used to might be more appropriate), as they would have you use Tabs throughout the build. I'm cutting them off and edge-gluing instead. The instructions are VERY good for a card model, every step is highly detailed. First thing (and I'm following the instructions with this one ) is the Headlight : No clear lacquer has been applied yet. It will "hide" the unsightly excess glue marks when it's on. Next things are the front shock absorbers. The "rubber" boots took a while to make : The Headstock comes next. Some of these parts are a bit tricky to work out how they fold at first, but I'm quickly getting used to it : Updates will follow when I have something substantial to show. Danny


- 26 replies
-
- 15
-
-
Here are the pics of the finished model : I'm taking a break from building ships for a while. My next project is a free download of a Card model - a vintage Yamaha YA-1 motorbike. I'll put up some pics of my progress in Shore Leave. Danny
.thumb.JPG.750f804a93dc6cc60b5d5e0a304d73ed.JPG)
.thumb.JPG.bab280a7ee1c184f7261e567b8688714.JPG)
.thumb.JPG.2374612715f5dd1f77ece5a25af94a05.JPG)
.thumb.JPG.9123e723eae77acad75be5685cb139e8.JPG)
.thumb.JPG.a77843d365b3af57228c31eb8c09ceab.JPG)
.thumb.JPG.9190ffe71b55f95d602478c5e8e05161.JPG)
.thumb.JPG.d8b7dc51969b5d8c6a0030da65dcfaa4.JPG)
- 244 replies
-
- 28
-
-
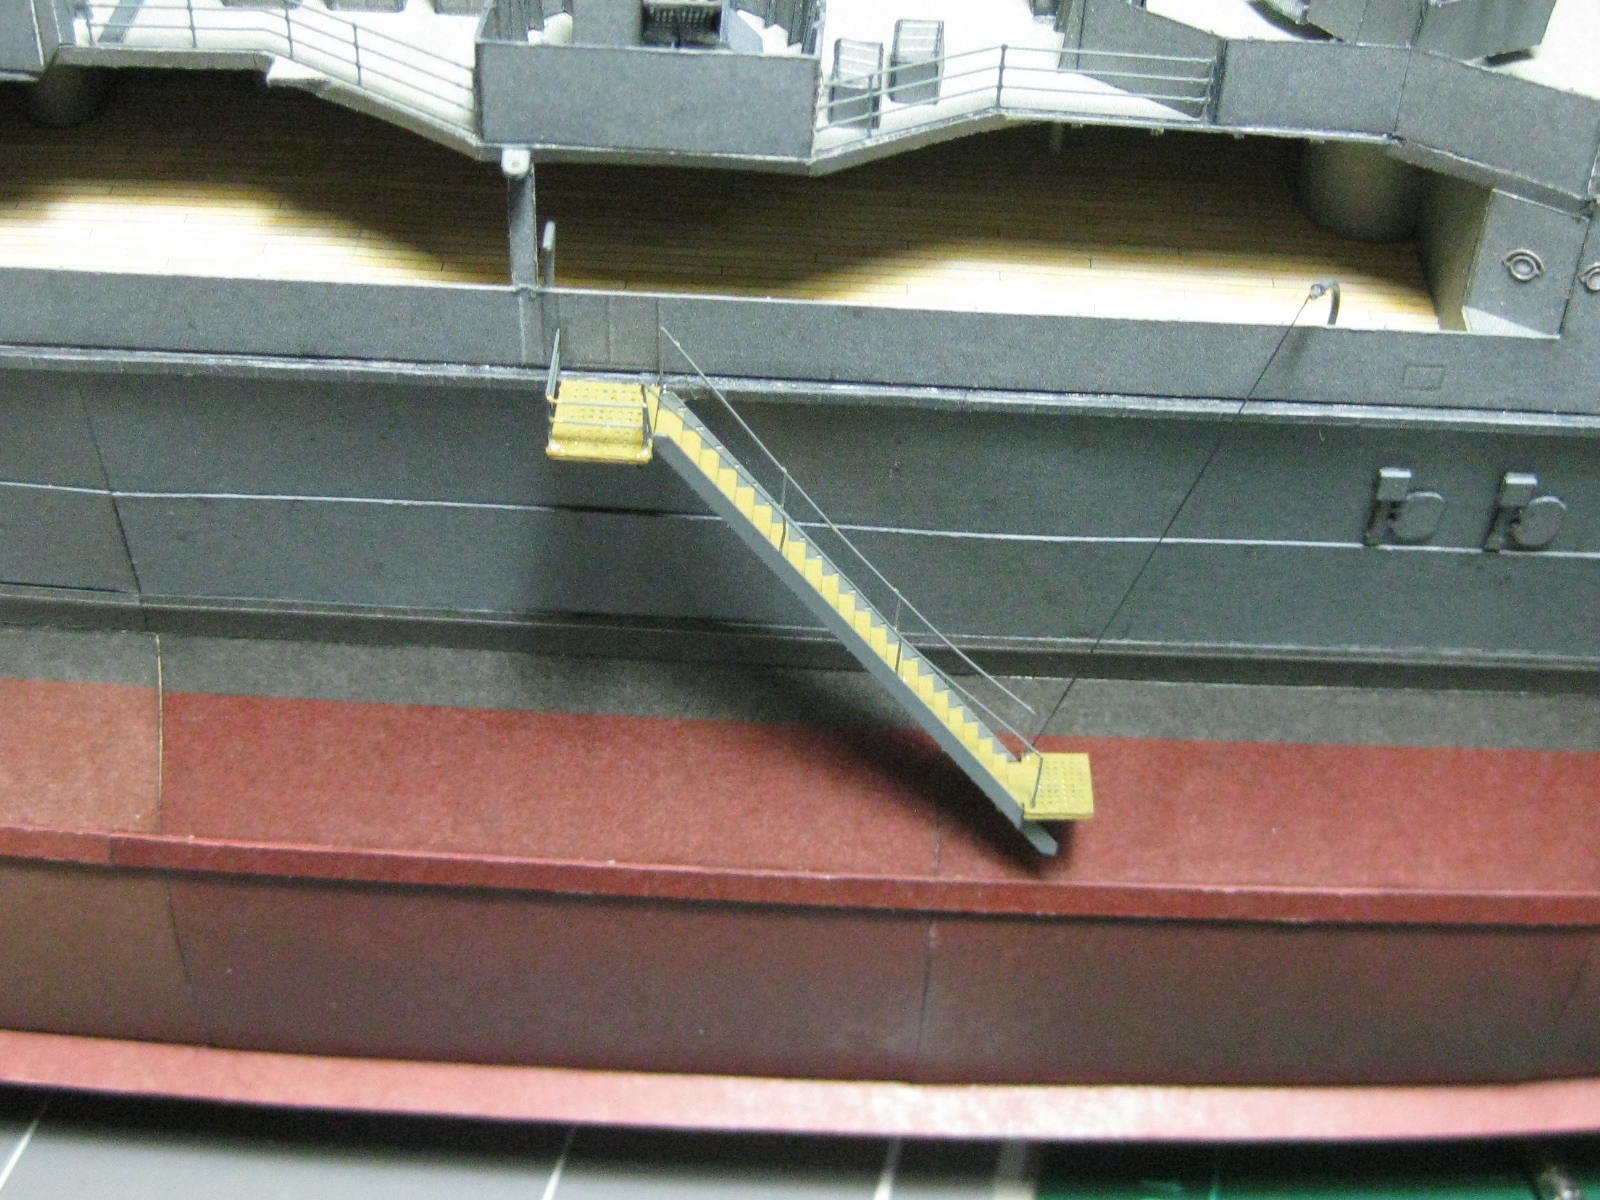
Thanks Pat and Popeye. I've fitted the Port side Accommodation Ladders : The Anchor Chains are all done as well : Final thing (as usual ) is the Ensign : Danny
.thumb.JPG.80e1df046df0aee71e99618c52dc3d9c.JPG)
.thumb.JPG.6de2c95ffa59cc017f675987d7dca7ef.JPG)
.thumb.JPG.4bcb4bd46ae3df331646a4b9ead0ce29.JPG)
.thumb.JPG.b0c637dd18e6d9ecf26226b633a4c82e.JPG)
.thumb.JPG.aa9926d1193d0f34b828742cf52968c4.JPG)
.thumb.JPG.bf91dc769a8bbe970583548c77dd7450.JPG)
- 244 replies
-
- 15
-
-
I think they are permanently mounted, but get raised to deck level when needed. They could probably be removed altogether if needed, for instance if they had the time before battle. Danny
-
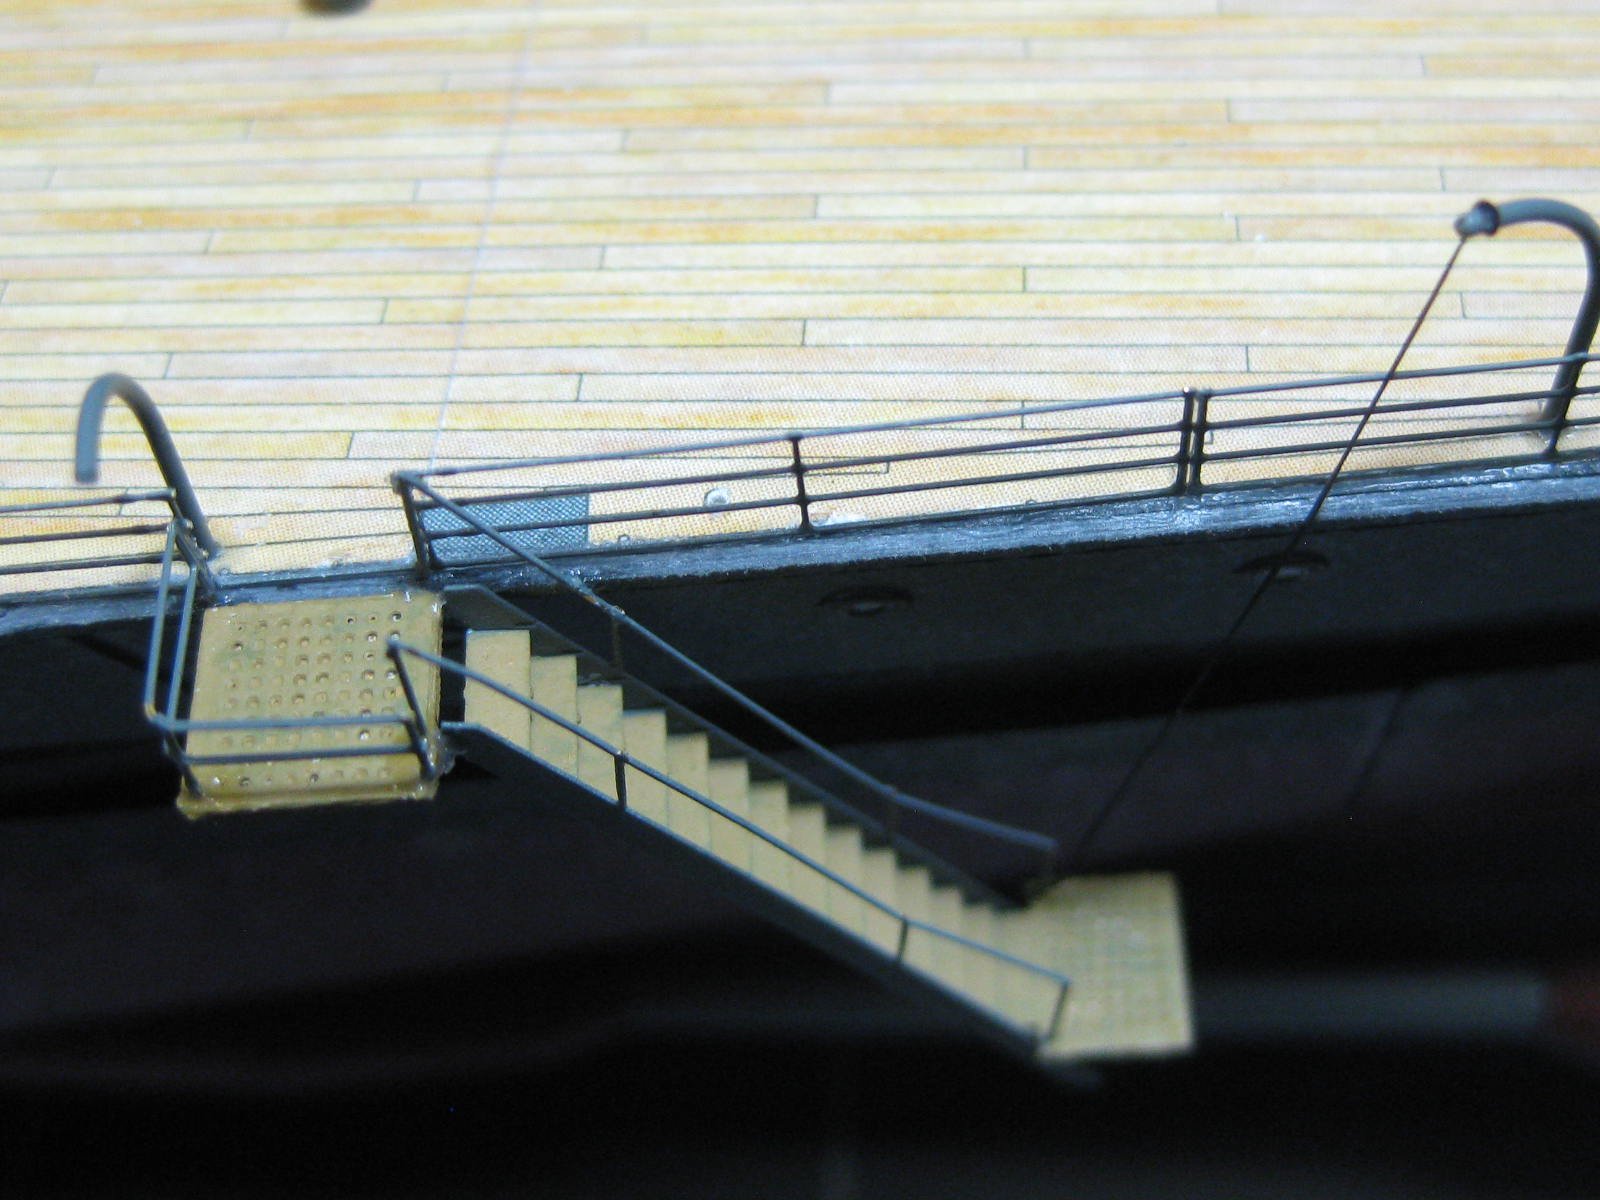
Thank you Grant . The Screws (propellors) are of similar construction to those in my Amatsukaze kit, also by Halinski - lots of petals, which means lots of careful cutting. I shaped the central piece using a rounded stick on high-density foam : Four hours later : And finally the completed units. I used a thin wash of acrylic to soften the dark colour of the seams : I've started the main deck railings, and also made and fitted the port side entry ladders. The railings were designed for a plastic (Tamiya) kit and don't fit perfectly in regard to positions of the ladders, bollards etc, so some fudging is needed : Danny

.thumb.JPG.a8200db054b72c9f1cde258327c4f060.JPG)
.thumb.JPG.8bdb91b5e6c3c5bbbfcfbeb6fa13e0ad.JPG)
.thumb.JPG.4eb89288014a7c9d9b50e4aaf925052b.JPG)
- 244 replies
-
- 15
-
-
It's an elastic thread from Ez-Line. I tie it with a simple overhand knot at each end, put enough tension on the line for the particular application - tighter for those lines that have another attached to them so they don't get pulled out of shape - and finish off with a tiny drop of CA glue. Danny
-
The Rigging only took a day to do, and it's turned out the best of any Card model I've done to date : Danny
.thumb.JPG.220285baa1de2ca98727fd12b4fe941b.JPG)
.thumb.JPG.1089bcd0a0c57af1fba4c25e58fd90af.JPG)
.thumb.JPG.8ed4f1dc03948e9f2329280274e82d5c.JPG)
.thumb.JPG.cd8a8da4cc83dd5bdaacb7cc3634a837.JPG)
.thumb.JPG.6e6506b98857c36c9001a4f8d00bae83.JPG)
- 244 replies
-
- 24
-
-
Thanks John, OC and Popeye . The return hawse for the anchor chain is one of the trickiest parts to cut and roll on the whole model, mostly due to it's small size : The Anchors took me a full day to make, and I'm pretty happy with the way they turned out. Here are the parts for just one of them : The shanks and flukes under construction : The finished anchors : The rest of the small details on the starboard side foredeck. I've since added the port side as well, which completes all the parts for the decks and superstructure with only the deck railings to go : Danny
.thumb.JPG.513be5ad752d5c335e1e7aa825b99d39.JPG)
.thumb.JPG.4881b65d6f8db0abe580e6f6d6dcf7f9.JPG)
.thumb.JPG.6288f3434453a96102ec258f39e1cd9f.JPG)
.thumb.JPG.bf1090ca7f5c9c81b1bf37ba6ea6af6d.JPG)
.thumb.JPG.4d77518e0f79edae5b1ec9f5ea4838ca.JPG)
.thumb.JPG.564d1358d21ef81697effdb0880b6bcc.JPG)
.thumb.JPG.5da53b4244c9a711fcb08f1d3e4c2022.JPG)
.thumb.JPG.5da2ddc3a3f7c7c3fc35aacf7174b6b8.JPG)
.thumb.JPG.ae322b10e79d86065d9528ed2ca5f92b.JPG)
.thumb.JPG.59be094e76415c21bf13c5382ceb1824.JPG)
.thumb.JPG.028be6cb924257b757e2f295fe462b8f.JPG)
- 244 replies
-
- 16
-
-
Nice kit . You could fix the mast fairly easily - I had the same problem with my Longboat in a Bottle (different reason) and managed a repair. Use a piece of wire with a "hook" bent into the end to pull back on the top of the mast, and a "push" stick to support the mast just below the break. It takes a bit of patience, but it IS possible . Danny
-
A couple of pics of the finished upper decks. Railings hadn't been fitted when I took the pics, but they are on now : Danny
.thumb.JPG.32f65ed09bb33b227d4e8cae018ef5ac.JPG)
.thumb.JPG.5f3c48f95f2a11f2fbd3ab28ad5ecab3.JPG)
.thumb.JPG.0637ec169b2df9415c410a54052a9941.JPG)
- 244 replies
-
- 20
-
-
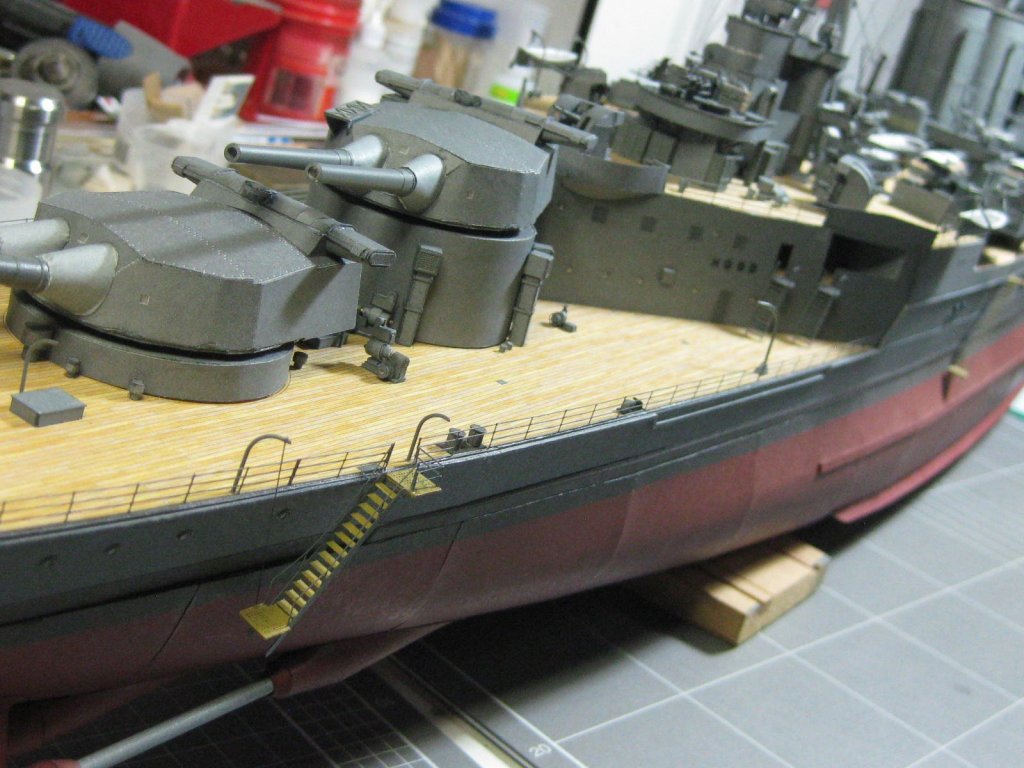
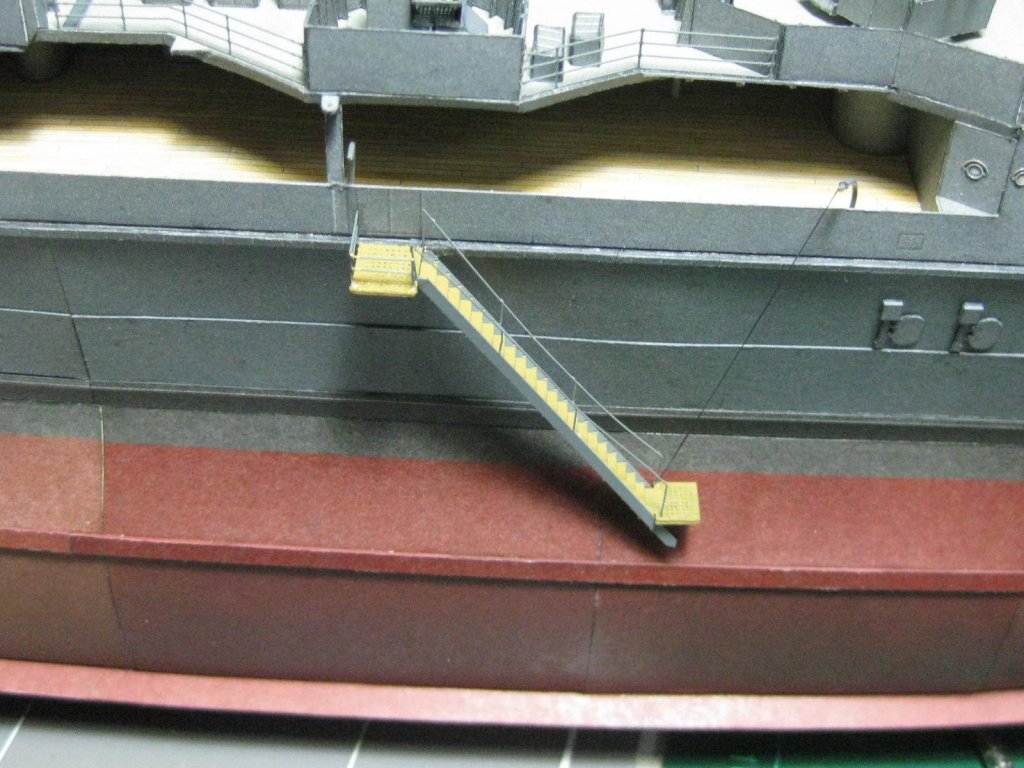
Thank you guys . There are a LOT of small details on the main deck. Whenever I come across a "new" part that has more than just the one piece I'm making them all at once and storing the remainder for future fitting (on the other side of the hull probably). Everything except the rigging is now fitted above the main deck. Here is a selection of details : Danny
.thumb.JPG.2c4d446b50211a6eab2993bedf6a24c6.JPG)
.thumb.JPG.fe8417d6409eb7c93c319778222d4deb.JPG)
.thumb.JPG.29c6927e676172b0bccf25bdf671f5f2.JPG)
.thumb.JPG.01eec5e4772bd085afcda5369eaefe26.JPG)
.thumb.JPG.19a08016d6f1a6ddd829639236c17ee8.JPG)
.thumb.JPG.633bda75680913dabcace73e182ed343.JPG)
.thumb.JPG.26a0b6da4ba102836e9026e51569a42b.JPG)
.thumb.JPG.437d5898ba386f682fe304c90a422de0.JPG)
.thumb.JPG.e7104794024a848cf61bc277db48862c.JPG)
.thumb.JPG.728542f6545a6f20e019021a1f6edcaf.JPG)
- 244 replies
-
- 15
-
-
As I mentioned somewhere in the Log Dave, I know NOTHING about Stagecoaches. So the answer is I DON'T KNOW . I merely followed all the kit's instructions - first time in a long time . Thanks all for the well wishes and comments. The grandson loves it, and it's still intact after 18 months . Danny
-
It sure did . It looks like I'll be sticking with paper for a while yet. Plus the fact that I don't need as much workshop space for working in card, which is a bit of a consideration in my current circumstances. A bit further to Chris's comments above. Ships aren't the only things you can model in card. You think of it and there's some kind of card kit available - planes, tanks, rail, buildings, cars, motorbikes, furniture, the list is nearly endless. Danny
-
No, not really. The tiller is actually square for most of it's section. It's only 1mm thick, so rounding it is not an option. It looks a LOT better in "real life" . Besides, the boats are already fitted to the deck, and removing the rudders would be a major task. Danny
-
......... continued. All the boats, with the exception of the one already fitted to the deck : The boats fitted to the deck : I'm going to re-fit this launch. For some reason I missed the marks when gluing it down : Danny
.thumb.JPG.061f3e6622c276e33855dc59fae26de4.JPG)
.thumb.JPG.b90be9bb4446be0311551f2101a3dd69.JPG)
.thumb.JPG.c111dd2ea28036f9e003a74d291392fa.JPG)
.thumb.JPG.ee3a6af9fa9e00c2284966fa2001747e.JPG)
.thumb.JPG.2f665d6c7100a918b1da16bd1246962f.JPG)
- 244 replies
-
- 24
-
-
Thank you Carl and John. The last two ship's boats are of different construction again. The hulls are made from thin (0.12mm) paper, with the inner and outer skins glued together before shaping and gluing the two halves along the keel : The interiors and keels were then fitted. These two boats hang from davits. I made them from 0.6mm and 0.3mm brass wire and then painted them : For ease and accuracy of fitting the davits to the boats I made a jig : Two straps are used to secure the boats : The boats and davits finished : Continued in next post ..........
.thumb.JPG.6d808672e50d4a8b0342386d0e5c1bc6.JPG)
.thumb.JPG.dccd526051c435df5d245ed525e1940f.JPG)
.thumb.JPG.c521643aec228c904c1800eddbe1500d.JPG)
.thumb.JPG.1f832e3eae6a47038404e8671d5cb53d.JPG)
.thumb.JPG.e1003ff2436af777f184e9633d1d98c5.JPG)
.thumb.JPG.61093c824d64e2945794c819ed4c8635.JPG)
.thumb.JPG.ef4754ee4813e6f9f4446bace5e1043f.JPG)
- 244 replies
-
- 15
-
-
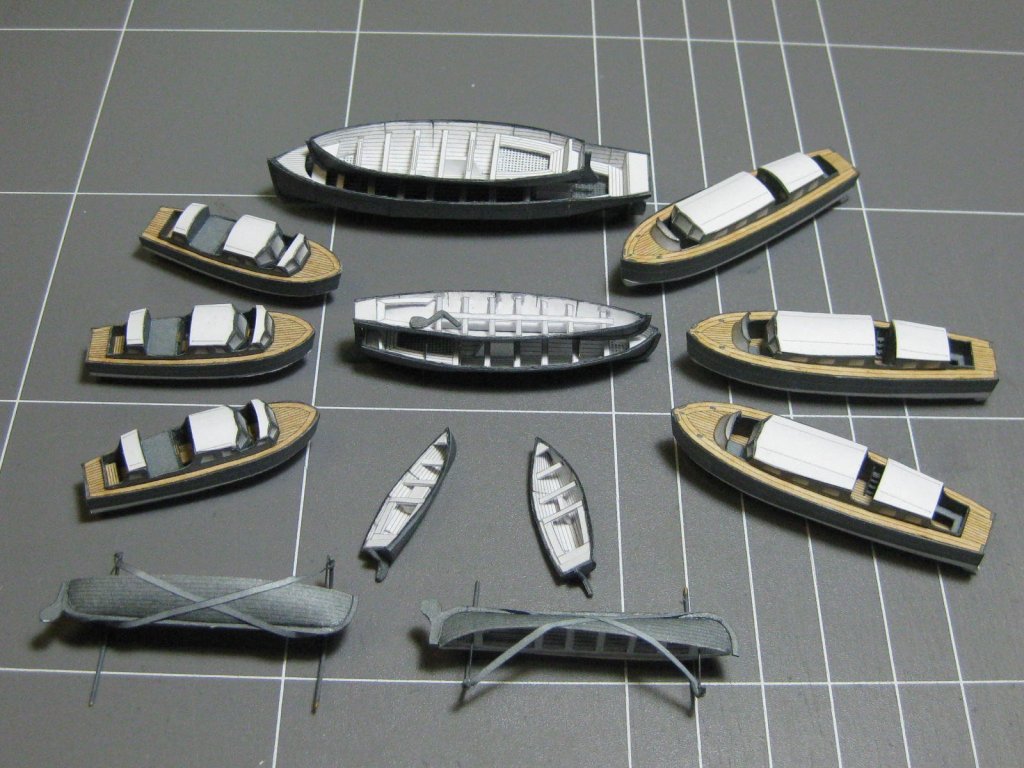
I was wrong about the amount of small boats - there aren't just 10, there are 15. There are six Motor Launches of two types. Here are the first three in construction phases, as they are totally different to the open boats. Work starts with the hulls : The interior and deck are in three pieces. First the floor is glued to the sides : Then the deck is glued to the interior and hull : There are two benches inside the cabin : All the other pieces are fitted, including two roofs : The other three launches are a bit different, and also a bit easier to make. Here are the build pics : The props, skegs, prop shafts and rudders : I still have two more open boats left to make, which will happen tomorrow. Danny
.thumb.JPG.4714f3a3520c843b2900c5b188ff20bb.JPG)
.thumb.JPG.cd94627172275b0cf3707669c5b11a36.JPG)
.thumb.JPG.d4a8c0c7677647b250644d73e27169ff.JPG)
.thumb.JPG.09ad486d3ab8f312e101303dfe57aa72.JPG)
.thumb.JPG.cf5d1f0ce78208a7af9d35d135e1a8cc.JPG)
.thumb.JPG.eecde90216f4246052b8d268799b729a.JPG)
.thumb.JPG.dd3fca33f4cc0d0d96f5f8c236311441.JPG)
.thumb.JPG.5c96f7cca6af2a2f6f2e5da9cbe77fad.JPG)
.thumb.JPG.110efd4ee15c9dd6d21a17d3665e711b.JPG)
.thumb.JPG.48c9a9a084899e663cb01d951e972663.JPG)
.thumb.JPG.cc2334323a97678b6200d70dc18a36df.JPG)
.thumb.JPG.0b0f4c22cfef27ad260210c454393ec6.JPG)
- 244 replies
-
- 20
-
-
There are 10 Ship's Boats on Hood, all of varying types. Below is the construction process for the first ones. This is typical of the way they are all built, so I'll only show it once unless there are any major differences in some of the others. 1st step is to cut out all the required pieces. Next I shape the hull skins using a rounded stick and a piece of high-density foam : Then the bow edges are glued together : Next the transom : These boats have a reverse curve foward of the rudder, so that section gets glued and clamped with self-holding tweezers : The rest of the keel can now be glued : The thinner interior lining is glued in place after first shaping in similar fashion to the outer skin : Next comes the keel. Once this is glued in place the hull can be finally reshaped using the rounded stick from inside. : Fitting out the interior is the last step, and doesn't require a detailed description : A Gunwhale finishes off the edges nicely : Here is one of the next two boats, with the gunwhales still to be fitted. These are a little larger than the first, but of a similar style. They are motorized : And the first of these four fitted to the deck : Danny
.thumb.JPG.10aeebf0f06c300dcc85a234885105bf.JPG)
.thumb.JPG.640a94314bb35f9fb62052ed4a80abf4.JPG)
.thumb.JPG.a1503c701d2b2246e7548b07afcb683f.JPG)
.thumb.JPG.56e6106df06bcdf4ae05fd7e41c30876.JPG)
.thumb.JPG.5f160bbb013cdac4c29cbff35c20a097.JPG)
.thumb.JPG.8014fbc5d7169d3b8cbd6bd5931d76b0.JPG)
.thumb.JPG.df89b7f28bd734a820b189f9d4b53c90.JPG)
.thumb.JPG.5b36f62713bfd8ce711e9b9eb0e94902.JPG)
.thumb.JPG.21e500728c55c4a14408f44ea82ab22c.JPG)
.thumb.JPG.a54d84ea2bd9c4dc6e1fbe75bfb46582.JPG)
.thumb.JPG.033a3c49d7ae816ce33103b87b81957c.JPG)
.thumb.JPG.77b15221d41d9fdf01e8d9c441de58d9.JPG)
.thumb.JPG.eec1696217ee2fc3226c248e4f3b293c.JPG)
- 244 replies
-
- 22
-


.JPG.0d8200f804269d723c3b204c2c736929.JPG)
.JPG.ef4c072015030c3e2c93de884b9f9115.JPG)
.JPG.2e39c7cf5e4021bb08472d2085ded148.JPG)
.JPG.2e76868f4ad67a22769e7a776b0c326f.JPG)
.JPG.f51028c24f9d3436794749f1294a32be.JPG)
.JPG.5b636b2c89ffe6f500439a09d0a719c7.JPG)
.JPG.cab7cdfc5e8bb8ce932b1ad8bc63ad5f.JPG)
.JPG.4374723722271f7513668535123f68bb.JPG)
.JPG.ed06821d1e9765ddcd08adf8176f6eda.JPG)
.JPG.7e0ca526945ad7f3387252f14a4b5f8d.JPG)
.JPG.5f0ff89d8feb8c01732d548d4d6c9400.JPG)
.JPG.c326c2e0228f47bb28fb49604adc86fd.JPG)
.JPG.eabcc647d38454f47863fb7ea2c12cc5.JPG)

.JPG.6c6aa14d4433cf5d6ade5175913fc10c.JPG)
.JPG.4119fc5fe1980426e563b789e6c4df57.JPG)
.JPG.613b8c6bcb269006f8b98f34134a82f2.JPG)
.JPG.3d246671131fa3318a696ac6b5982a7b.JPG)
.JPG.0febe3c53cffd4c250d9e298d43c8910.JPG)
.JPG.833f1a33155c2d6f80d5ac6a04456deb.JPG)
.JPG.12ce7ff8aa34f549eb3427d59959ae1d.JPG)
.JPG.c8c9d07427e633c1ba7eae92924f3573.JPG)
.JPG.1d3009e8bfa721c59c19acca7366c105.JPG)
.JPG.655f83489baa0122bfa852e7f4d6ea5e.JPG)
.JPG.54d0ee8247f9d9523a306fd1406928e8.JPG)
.JPG.277edaeaa513b222492b5acf8885f5c4.JPG)
.JPG.68d67d5cc0c701e53e164c8f1761c011.JPG)
.JPG.2ca87d067d7dc2d6d9c0771b8fe76338.JPG)
.JPG.f4ffdede52f69b5c73c2ba51871091f6.JPG)
.JPG.75cb40b3ccb0015f67e7d47eb6fb6ef9.JPG)
.JPG.d1c919a39bffc534c4d9013cc854d3df.JPG)
.JPG.84a974978538ea24784ac6c1f3d7bd98.JPG)
.JPG.3ab5c47082370693a57cf10a685c9018.JPG)
.JPG.2b9e7b58649b368e8c6735b56c524cc3.JPG)
.JPG.b494a6f7e838fbbb79c44d77e2fbce48.JPG)
.JPG.398d3e34ac8d7dad9c66ac6ce98f155c.JPG)
.JPG.7b6b8358846a2f73a86cb56c0327d94c.JPG)
.JPG.aae2c1e7ce74b6c92fd8a282a2e72d5c.JPG)
.JPG.b35a8b65fee389179a689d71f968f348.JPG)
.JPG.c3d7ec1eaa4d07a2286fda8cb200becd.JPG)
.JPG.176975a4a23dba3e615ef0b7f8648c91.JPG)
.JPG.c522757a8b3850c6461534e049be3dad.JPG)
.JPG.1794a5ece1b16d04e48c52bb346042e2.JPG)
.JPG.020591931010e07d95ff33a255790af4.JPG)
.JPG.3f01a839239aef23c133db235bb5465f.JPG)
.JPG.4675e0edf6b9c8e9b8b84efe70e05e01.JPG)
.JPG.3f25bfd432d76a57f79678501a7823f1.JPG)
.JPG.6552e1fd5a6c9ed162679bcad107961e.JPG)
.JPG.5b2e8e2681739439cab624bfc01b260e.JPG)
.JPG.89cfd82a234d440086d6dd5393a5952f.JPG)
.JPG.7fda1645dbf0737f6228c1e853c66427.JPG)

.JPG.7913556792dedc82c1736ef048676255.JPG)
.JPG.1bec2d4de6b0a15e6f9b428704ea3345.JPG)
.JPG.aa36bbac807f386aee549786e3943a49.JPG)
.JPG.bfac17bd642ccc4607d9b7742d41f0c3.JPG)
.JPG.56e2dd2ace6dc8d918e4c7cdd92f0b1f.JPG)
.JPG.501b6155b96afb39ef8a46a626f47d72.JPG)
.JPG.5ad2e8d7c0e391e288c7233182285a6a.JPG)
.JPG.38431d06284244cc11f7fbd7e5f74966.JPG)
.JPG.0290fa774a212fac49cb5b9f245499cc.JPG)
.JPG.d127f9b8466a2aa016c2843dc7cafaa2.JPG)
.JPG.205af252be0edbb02d4d134a17d5cf0a.JPG)
.JPG.7b210141d021f01d38b945523c80a0b0.JPG)
.JPG.40e2d29c223fbe8c69348e08e6de2576.JPG)
.JPG.a7bd14d6e7eb1083bcab81472035b07f.JPG)
.JPG.9aa458f1599dc397c413a48641db90b9.JPG)
.JPG.5bf0586375b05907716feb7794b71369.JPG)
.JPG.1dc437663807dbf3648894d23226e38d.JPG)
.JPG.5a0f513640fcb91c248e49018bb8cb8c.JPG)
.JPG.7da065d07e6a8494634925a52cada282.JPG)
.JPG.d1f4d37ae648646165354672ea555d9f.JPG)
.JPG.b589ee259b38f20fb5d02f094004b88f.JPG)
.JPG.2491052dab230eb094a672ac018d125e.JPG)
.JPG.3c90199bfe363ebea66faa51ad6ba830.JPG)
.JPG.427b35db3536c42471b336a228e0486e.JPG)
.JPG.f13e346bc638389538e90f0d9ffedbdb.JPG)
.JPG.94fc6dc31cb59effb13cea388ee561cd.JPG)
.JPG.e3371b903092ff3a7bfbee5bfc059531.JPG)
.JPG.f0e83981fc06e677c76919a33ed768c7.JPG)
.JPG.2a2bc5b73f07809170a5165b28535121.JPG)
.JPG.dd9c1cb0dfcbcad27aea4748fc6413e3.JPG)
.JPG.a829992149cbf22d893d554d3a3957b5.JPG)
.JPG.9a2e2bb592e60f4861e4e7ad464974a9.JPG)