Jared
-
Posts
108 -
Joined
-
Last visited
Content Type
Profiles
Forums
Gallery
Events
Everything posted by Jared
-
This is an interestIng link of the lifespan of plastics: https://thediecastmodel.com/how-long-do-plastic-models-last/
-
Congratulations George. You have done a magnificent job on this model and the workmanship bears this out! Your work certainly inspires me to keep working on mine. What's your next ship?
- 600 replies
-
- 1
-

-
- Flying Fish
- Model Shipways
- (and 2 more)
-
I'm with Rick on this. Your log has been exceptionally helpful George and I am most thankful to you. Sorry I can't help on your davits question.
- 600 replies
-
- 1
-
-
- Flying Fish
- Model Shipways
- (and 2 more)
-
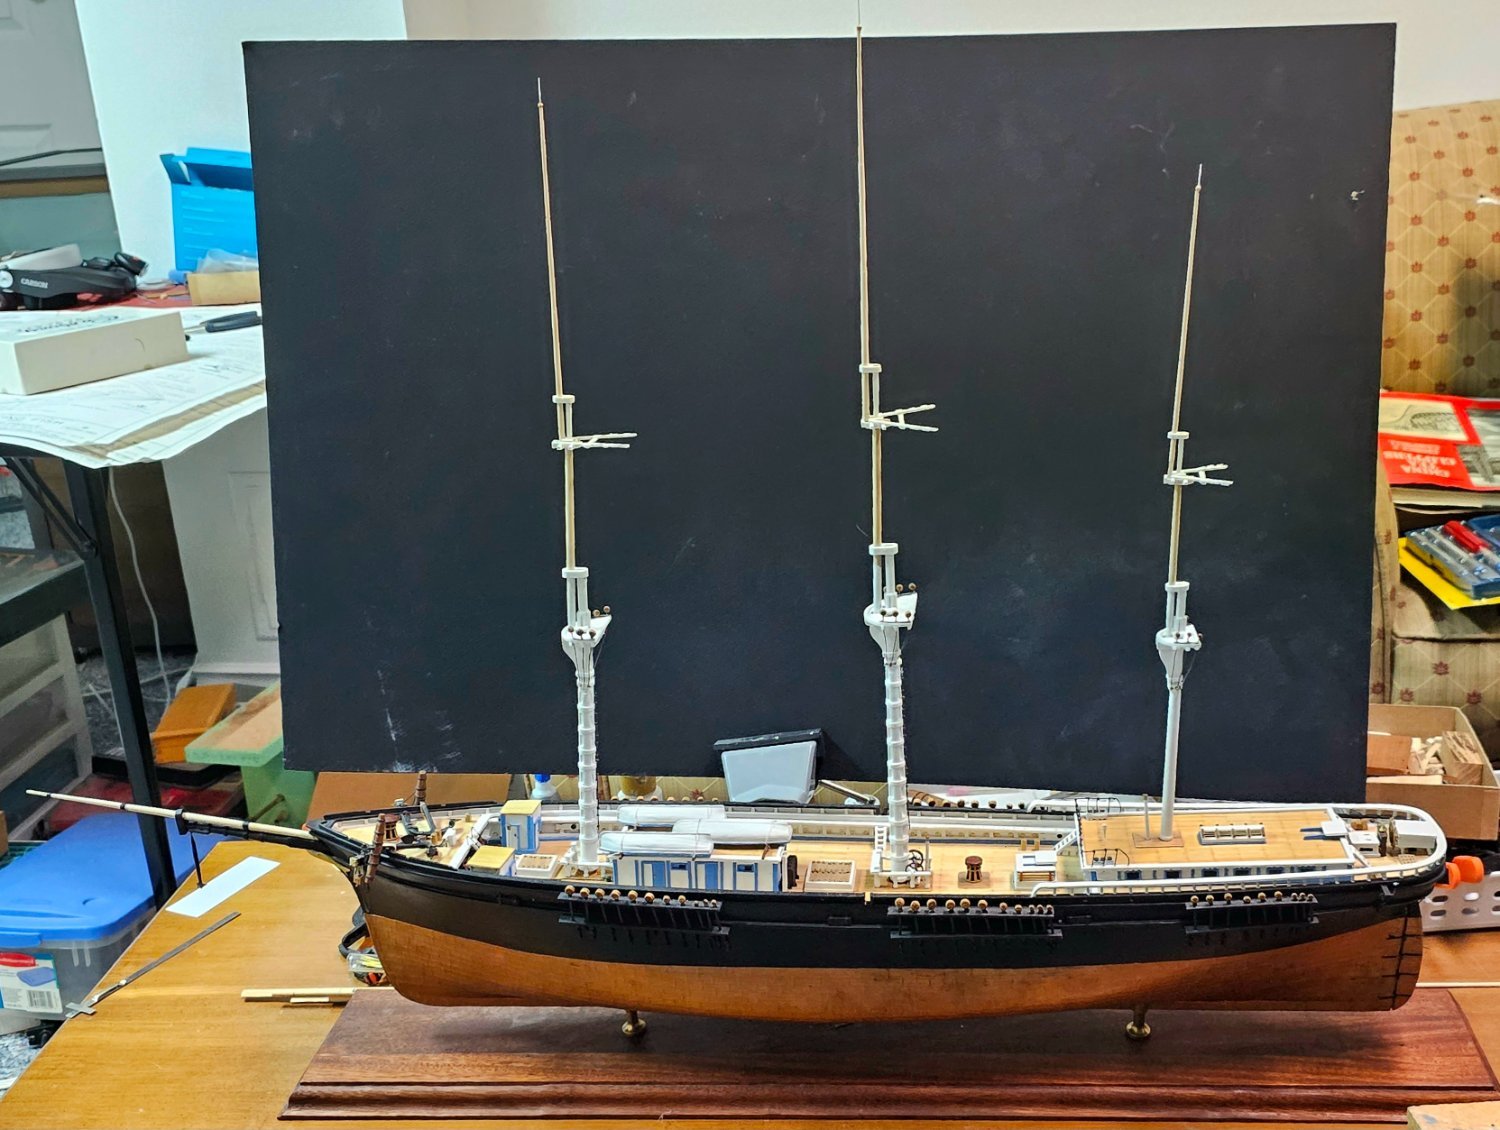
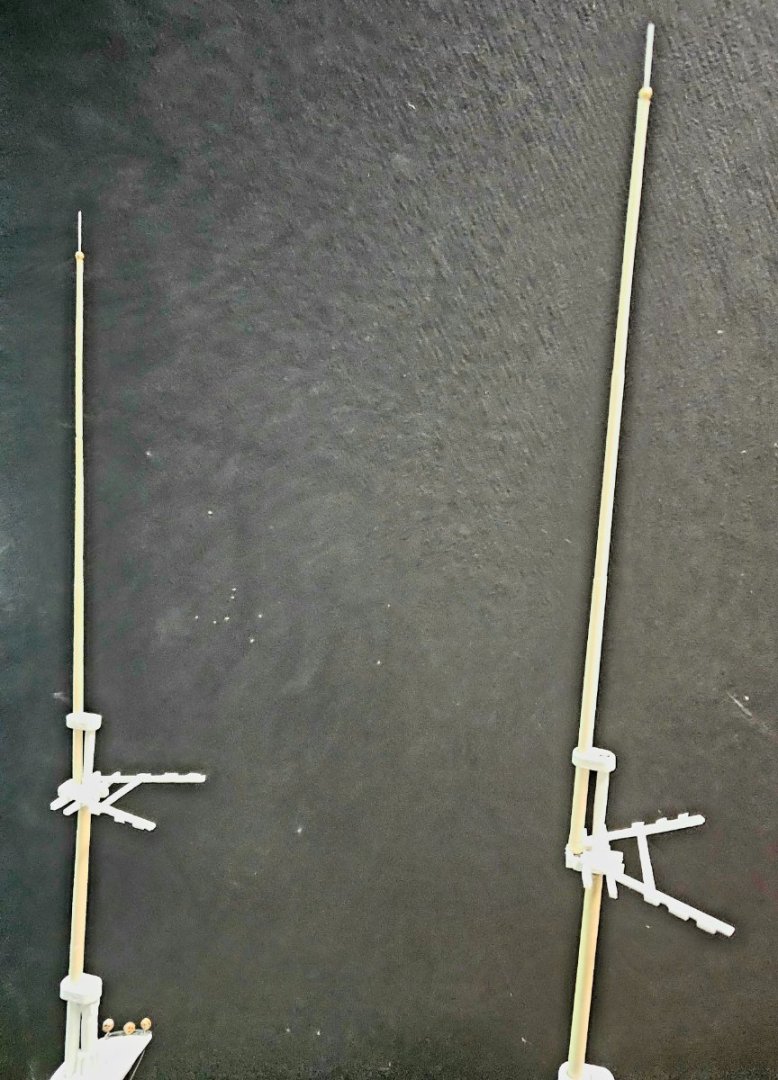
Today I complete the topgallant masts. The second photo show a side view of the model, with the various masts loosely attached. I still have more to do on them, including installing fids, eyebolts, and blocks.

- 101 replies
-
- 6
-
-
- Flying Fish
- Model Shipways
- (and 1 more)
-
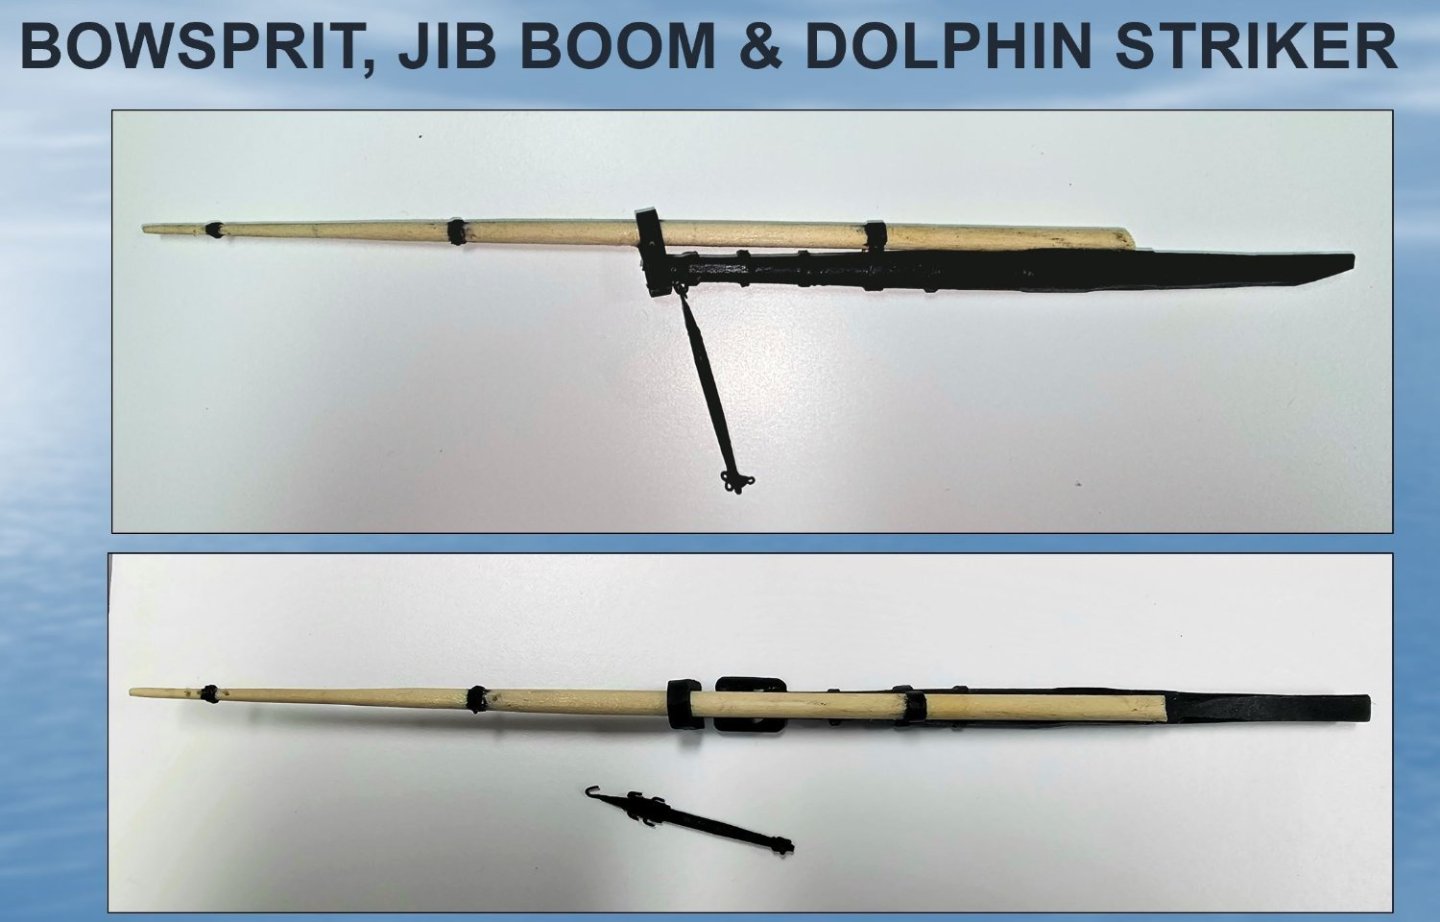
Over the weekend I made significant progress on the Bowsprit, Jib Boom and Dolphin Striker. The work on the Bowsprit and Jib Boom was fairly easy. The paint scheme is as per James Buttersworth's Flying Fish painting. The various holes for the ring bolts and other rigging components are difficult to see but have been completed.
- 101 replies
-
- 2
-
-
- Flying Fish
- Model Shipways
- (and 1 more)
-
My kit was purchased around 2008.
-
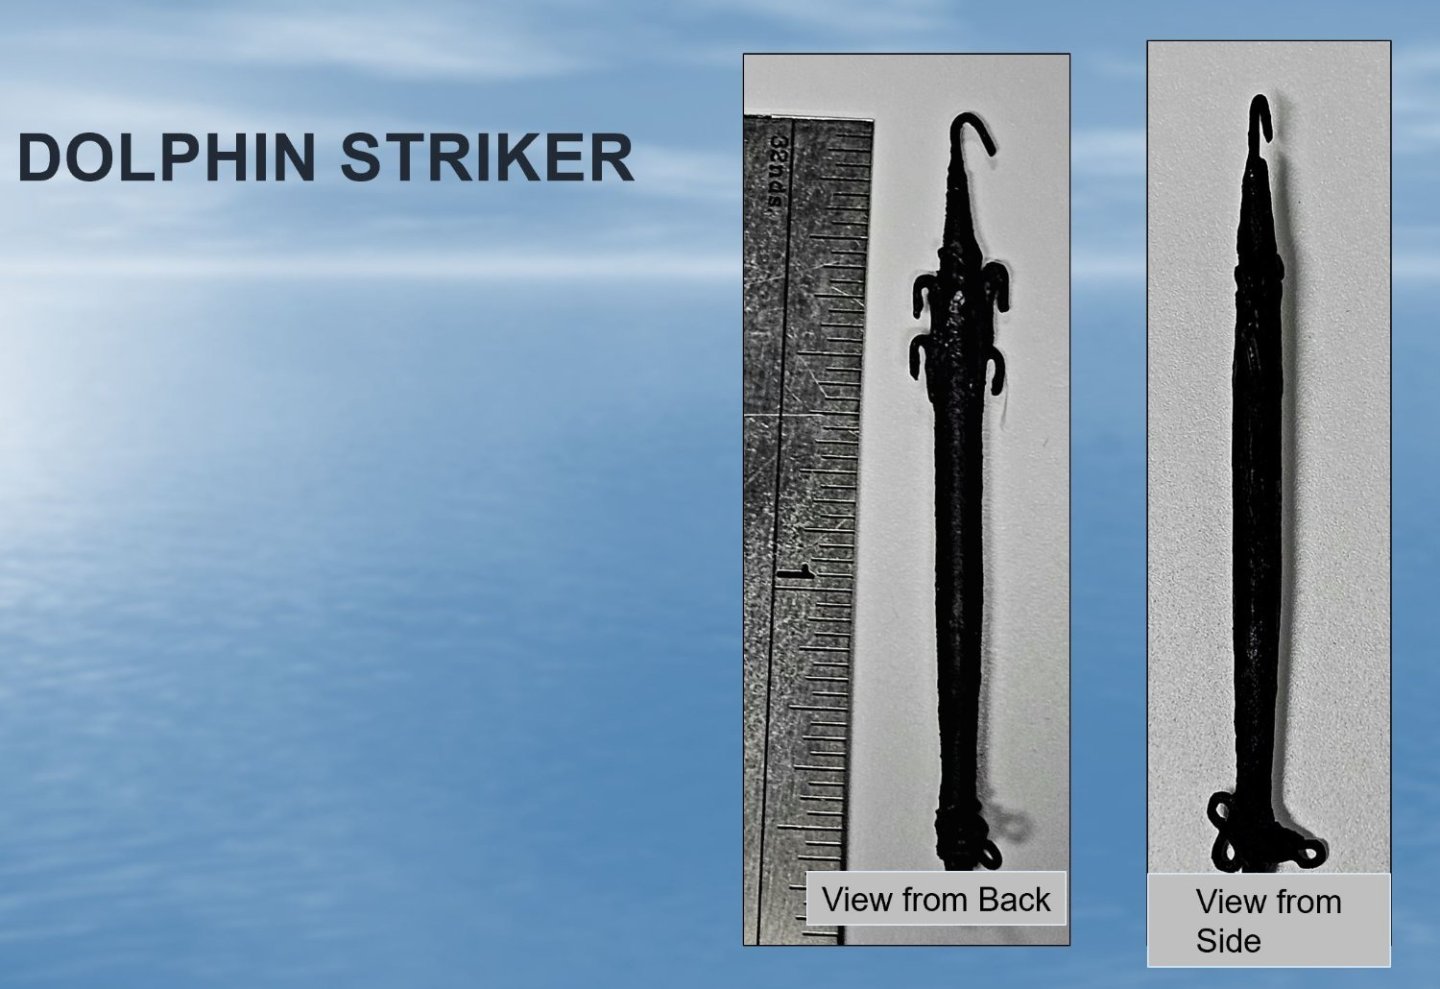
Spent all day today building the dolphin striker. This tiny part turned out to be one of the most challenging pieces to date. All of the small metal fittings on the dolphin striker were made by bending thin blackened copper wire. For the lower metal band I used adhesive copper tape. The lower fitting was made from a single piece of wire. On another note, I mentioned that I discovered the other day that I was missing one size of wooden blocks. I contacted Model Expo and soon after I received a reply that the missing blocks were on the way. What fantastic customer service!!
- 101 replies
-
- 1
-
-
- Flying Fish
- Model Shipways
- (and 1 more)
-
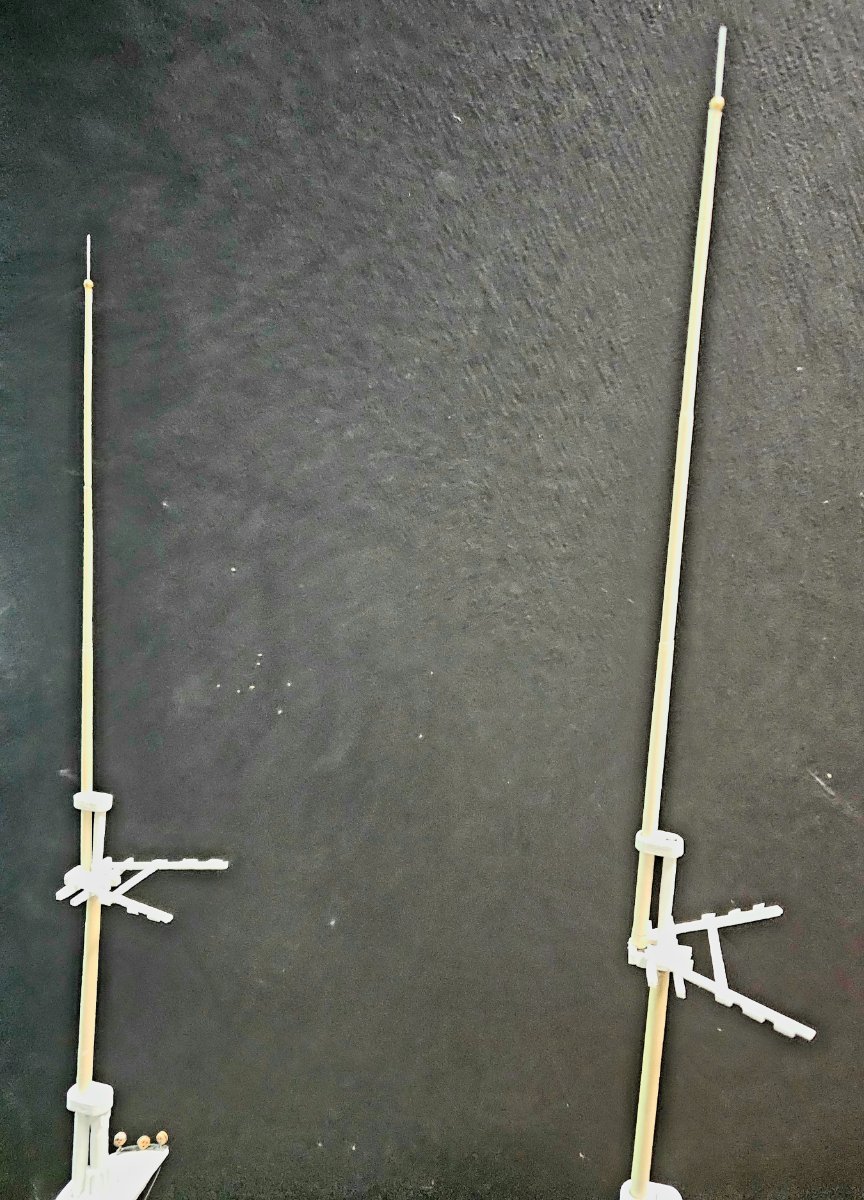
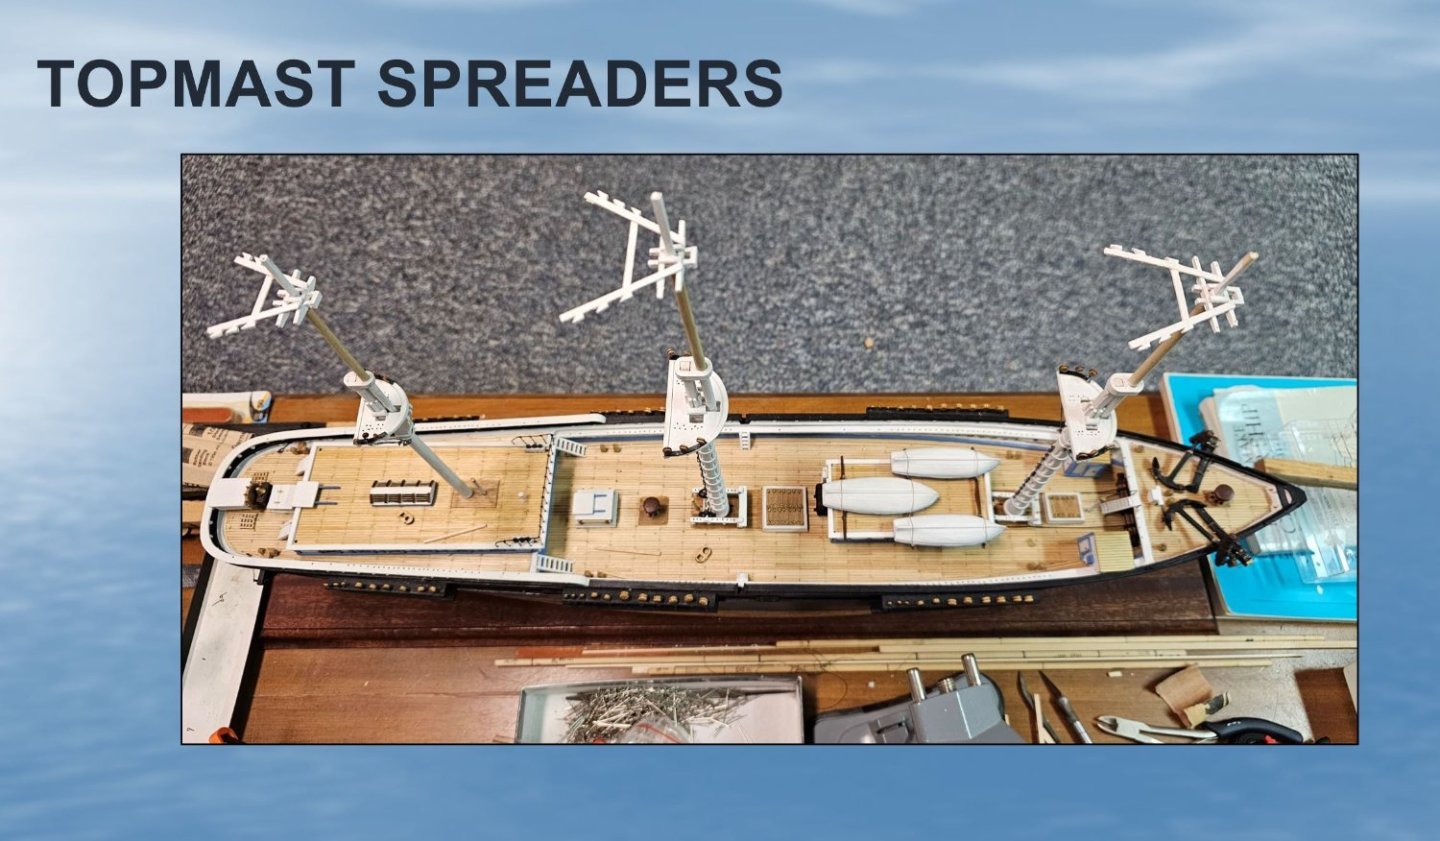
Quick update. The spreaders on the 3 topmasts. I was hoping to start adding the blocks to the masts, but discovered on size of blocks was missing from my kit. While I await the missing parts from Model Expo, I will work on the bowsprit and jib-boom. I implemented your suggestion George to strengthen the spreaders with copper strip on the main topmast and mizzen topmast spreaders. I added copper strip where I could on the already completed spreader on the fore topmast as doing otherwise would have required a complete rebuild of the structure. Adding the cleats to the 2 new spreaders went much better than what I encountered on the fore topmast. Put it down to learning from experience and using finer tweezers.
- 101 replies
-
- 2
-
-
- Flying Fish
- Model Shipways
- (and 1 more)
-
Thanks George for this great suggestion. I was very concerned about them breaking or bending when attaching the rigging.
-
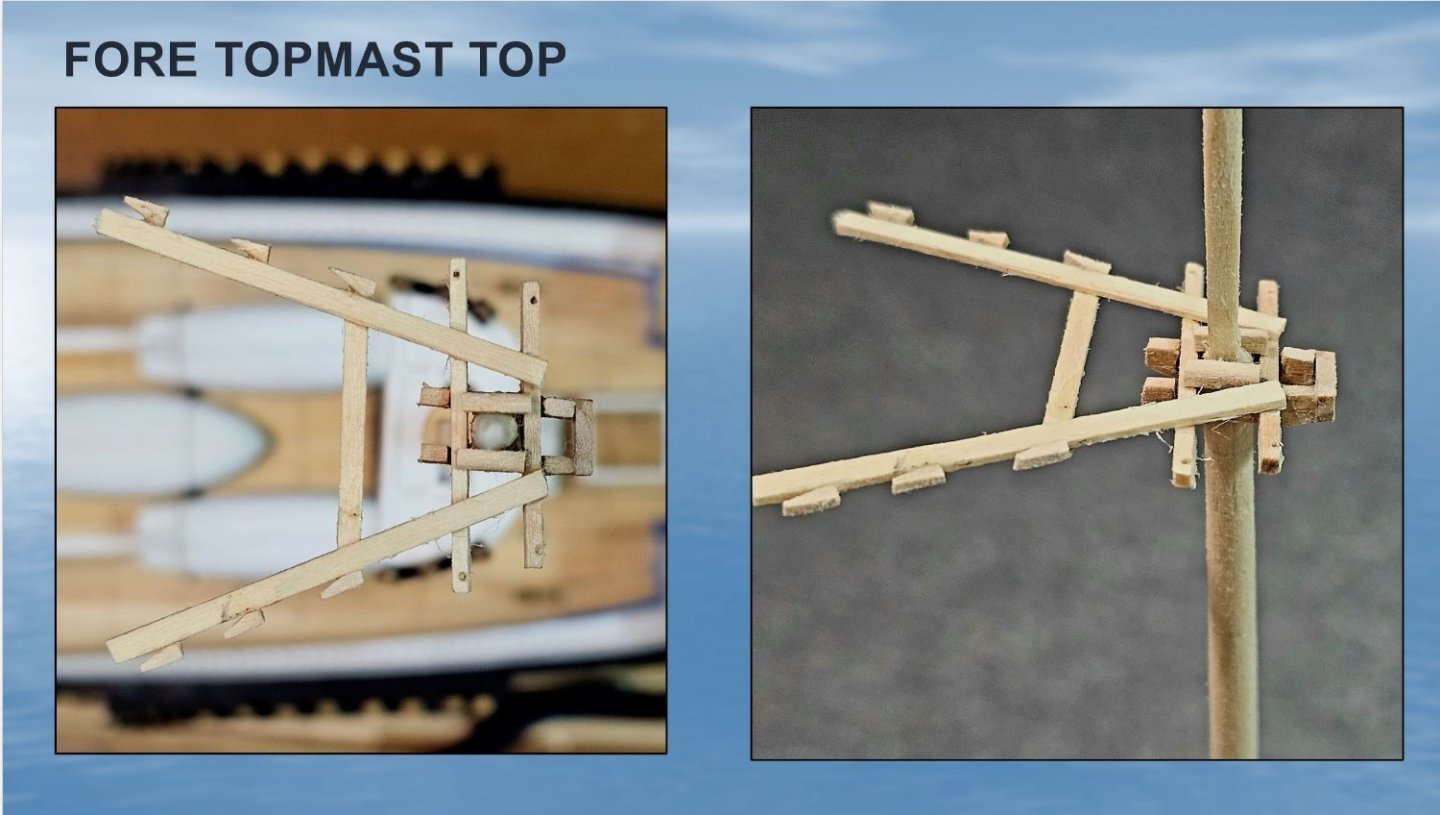
Since the last update I have begun working on the the topmasts & bowsprit. These have been loosely mounted on the ship. In the past few days I have built the top on the fore topmast (see photo). I will be painting the top white. The trickiest thing about building top was the fabricating and mounting the cleats on the spreader. I had to try different types of wood incl. multilayer strips before I finally found something I could cut without the tiny wood pieces falling apart.
- 101 replies
-
- 1
-
-
- Flying Fish
- Model Shipways
- (and 1 more)
-
Like your phage George. What did you study in grad school? I am a bacteriologist.
-
I wish you a soeedy recovery George. Covid is on a surge now, even for those fully vaccinated many times. 3 family members living in 3 different cities have had it in the last month.
-
Thanks George and Rick for your quick, helpful responses. It will certainly be much easier adjusting the rigging made with the thread/cord rather than with stiffer wire.
-
Forgive my ignorance about the standing rigging on the Flying Fish. From the drawings and instruction book, it looks like the standing rigging is to be made from dark thread, meant to simulate tarred hemp. UNDERHILL states in his book on clipper ship masting & rigging that "By the beginning of our period ( i.e.clipper period) wire had to a large extent superseded hemp for all forms of standing rigging". Should I be making the standIng rigging from blackened brass wire? Thanks.
-
My ship has also been on hyatius for various reasons. Best to take your time and work on it when you are in the right frame of mind. I look forward to seeing your progress!
-
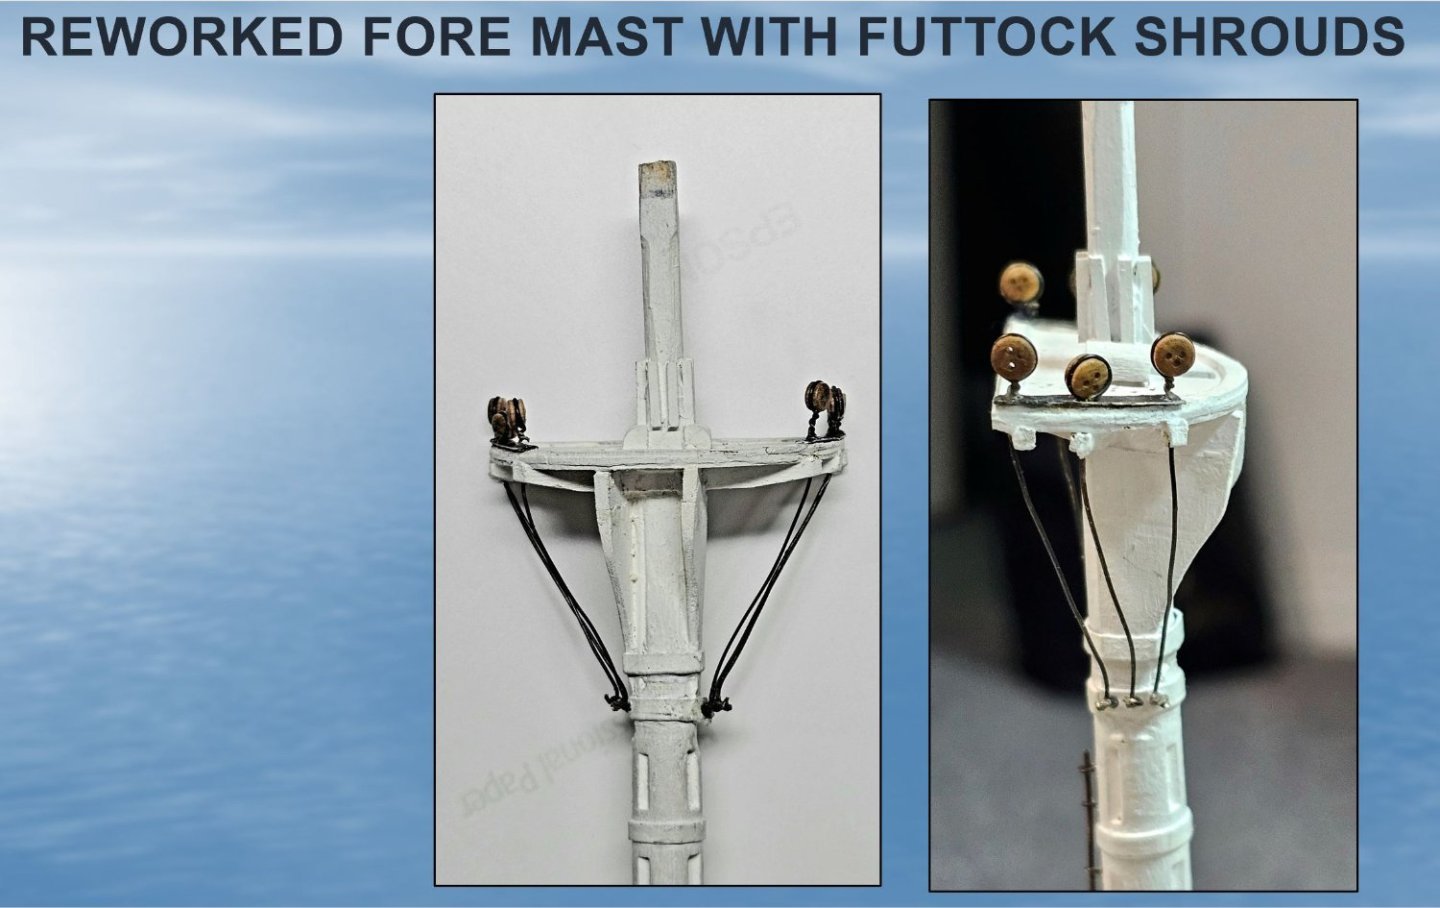
Have now completed the futtock shrouds on the lower main mast and mizzen mast. The work on these went much easier and faster than those on the foremast. Put it down to experience 😀. Much easier to do once you have worked it all out. Nowhere as difficult as what I implied earlier.
- 101 replies
-
- 2
-
-
- Flying Fish
- Model Shipways
- (and 1 more)
-
Today's activities were reworking the front of the tops thanks per the information ClipperFan provided above based on the Glory of the Seas. This was a simple fix. (See first Photo below). I then tackled the futtocks shrouds on the foremast, which might have been simple if I were an orthodontist, which I am not. The brass wire I started working with turned out to be too thick and stiff to work with. After completing 2 of the shrouds I switched to a thinner brass wire and the work proceed much better. All of the brass was blackened before assembly.
- 101 replies
-
- 2
-
-
- Flying Fish
- Model Shipways
- (and 1 more)
-
Back to the cutting board to fix the front side of the top. As to the lubberholes, I am going to leave them as is, as it will require a complete rebuild of the under top supports. The cross tree design under the Glory's tops are very different from what the FF plans show. Thanks for posting the Glory images.
-
Thanks for sharing your wealth of knowledge ClipperFan. The photos are very helpful.
-
Interesting photos for sure. I do worry about how small the lubber holes are on the FF model. The cap bases in the kit are all supplied laser cut so that set the sizes of the lubber holes. I won't be surprised if I have to enlarge them later to accommodate all the rigging, especially on the mizzen mast.
-
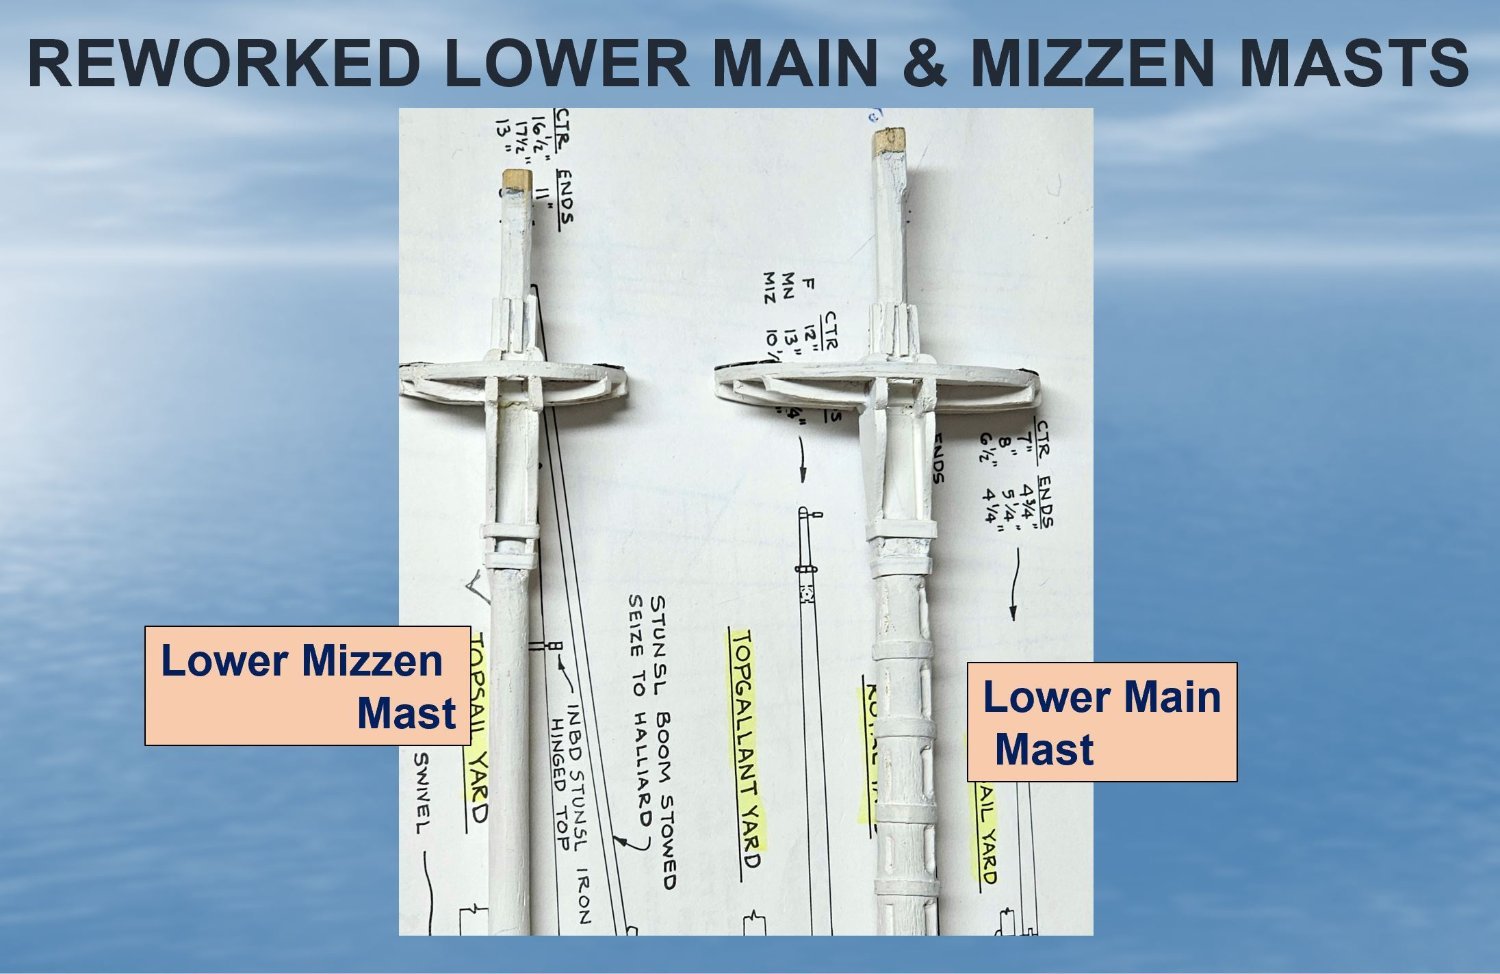
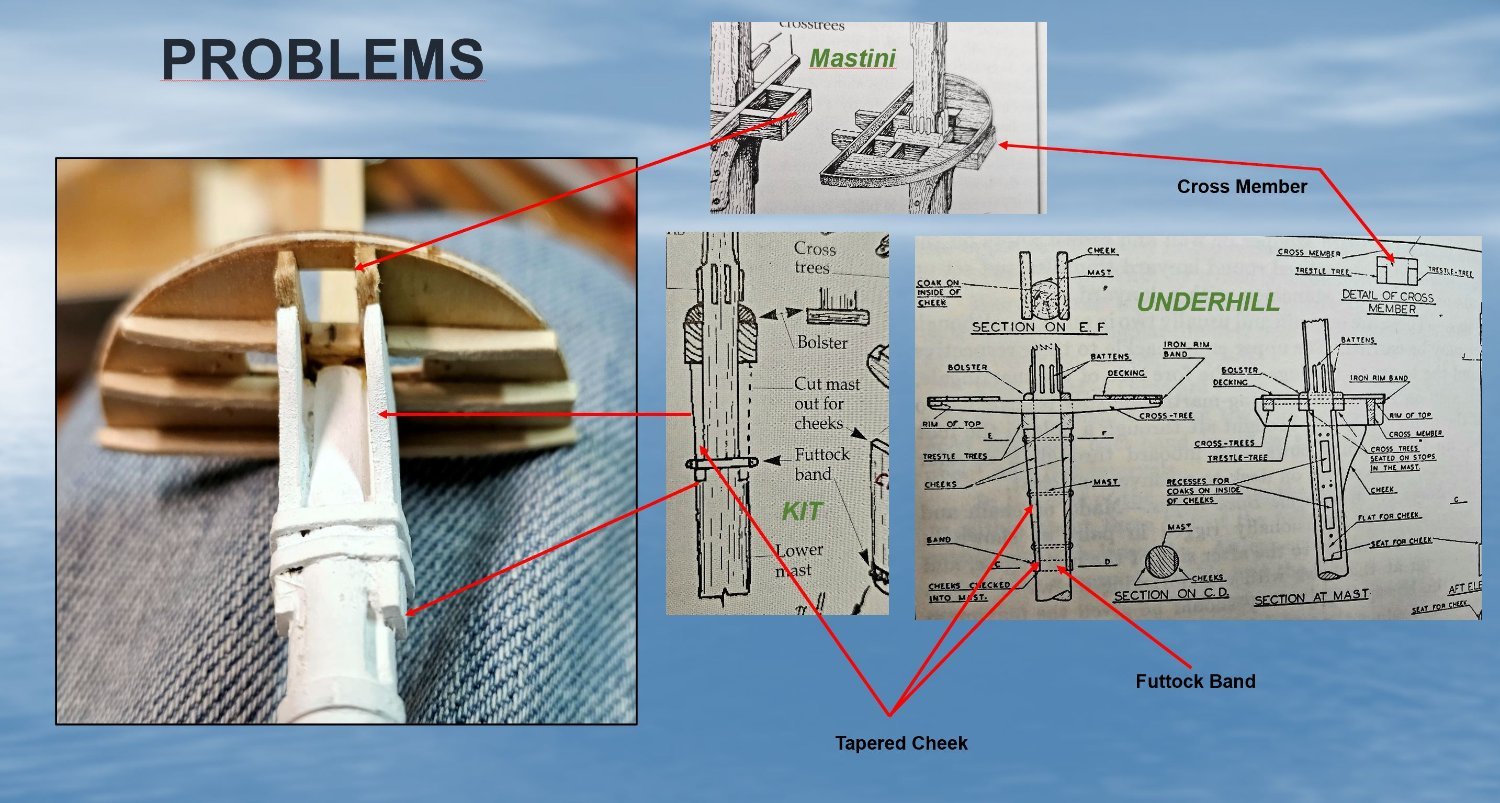
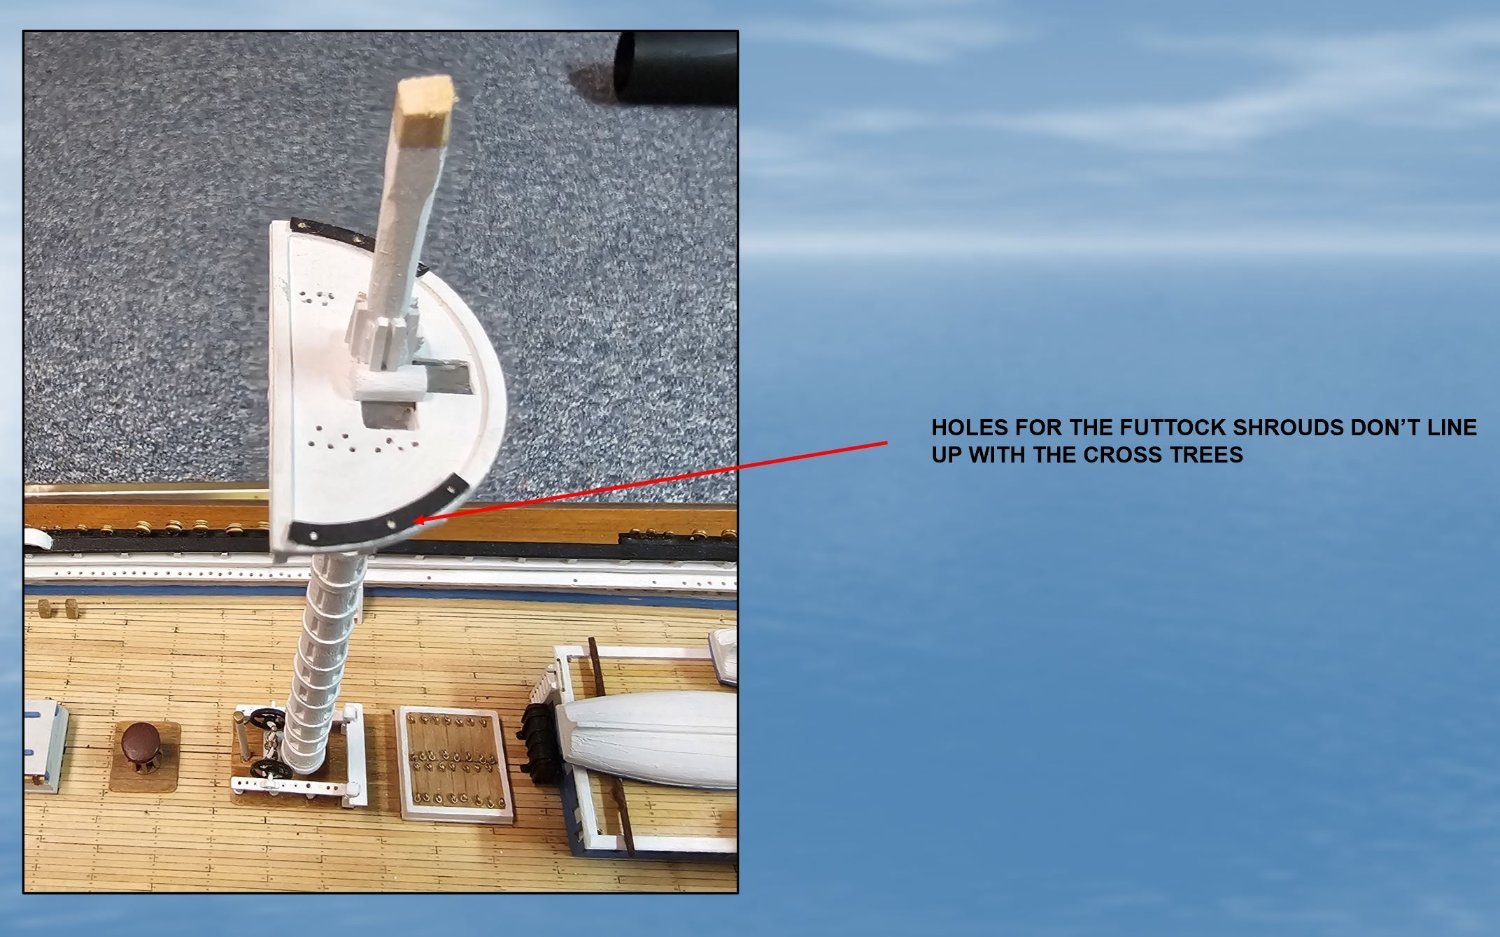
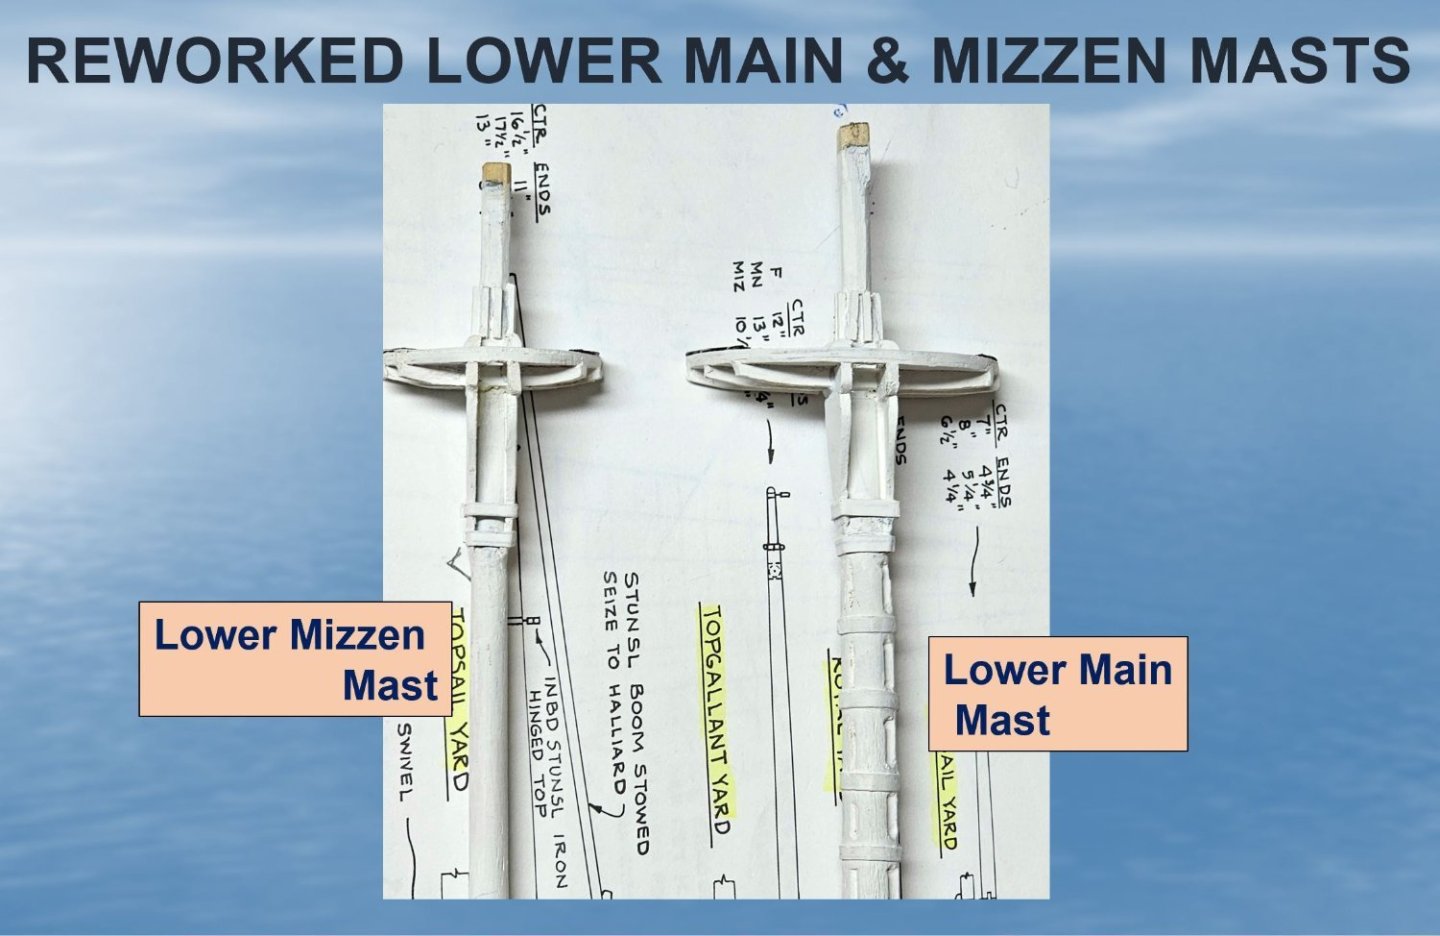
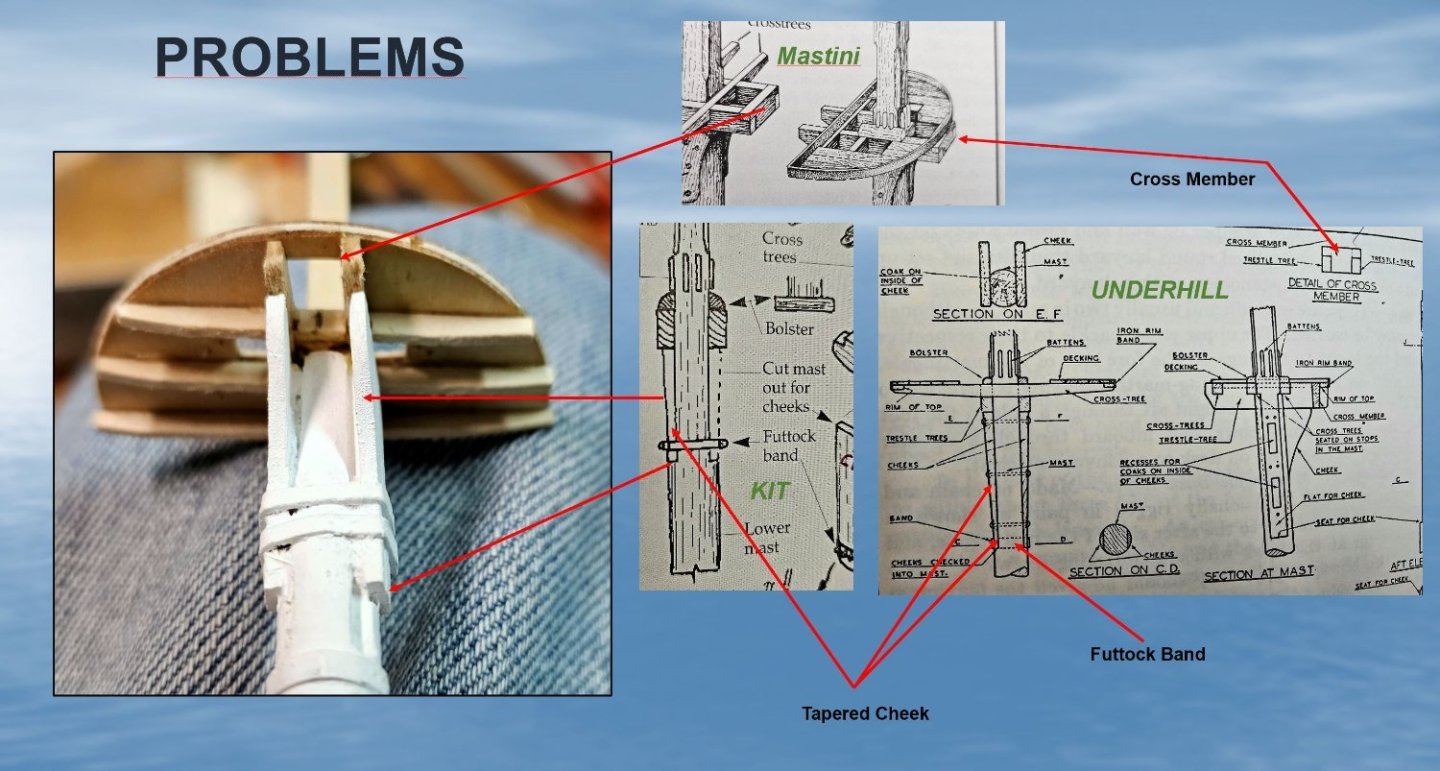
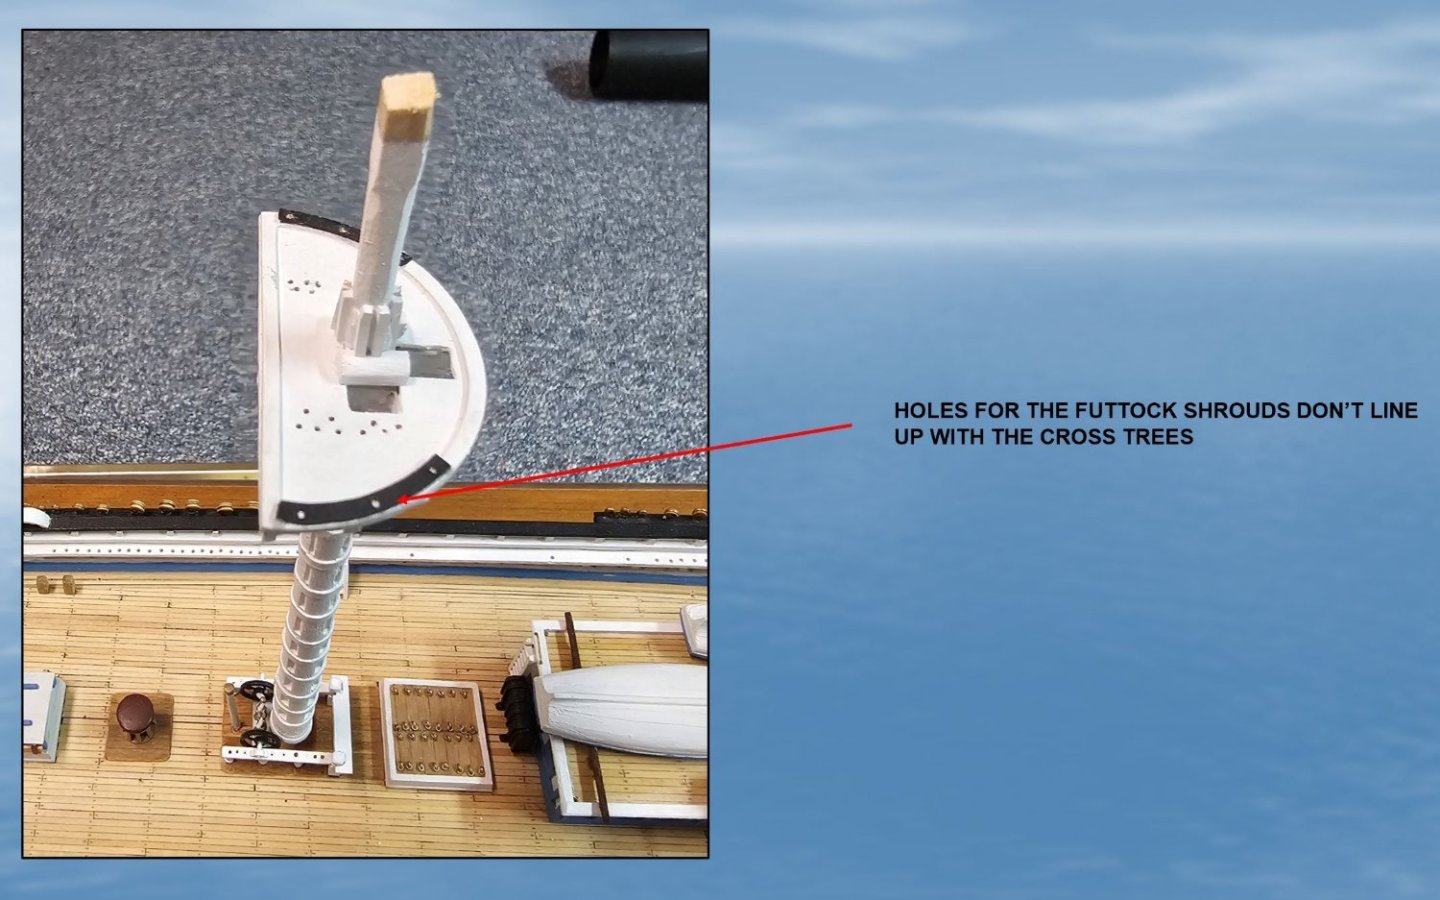
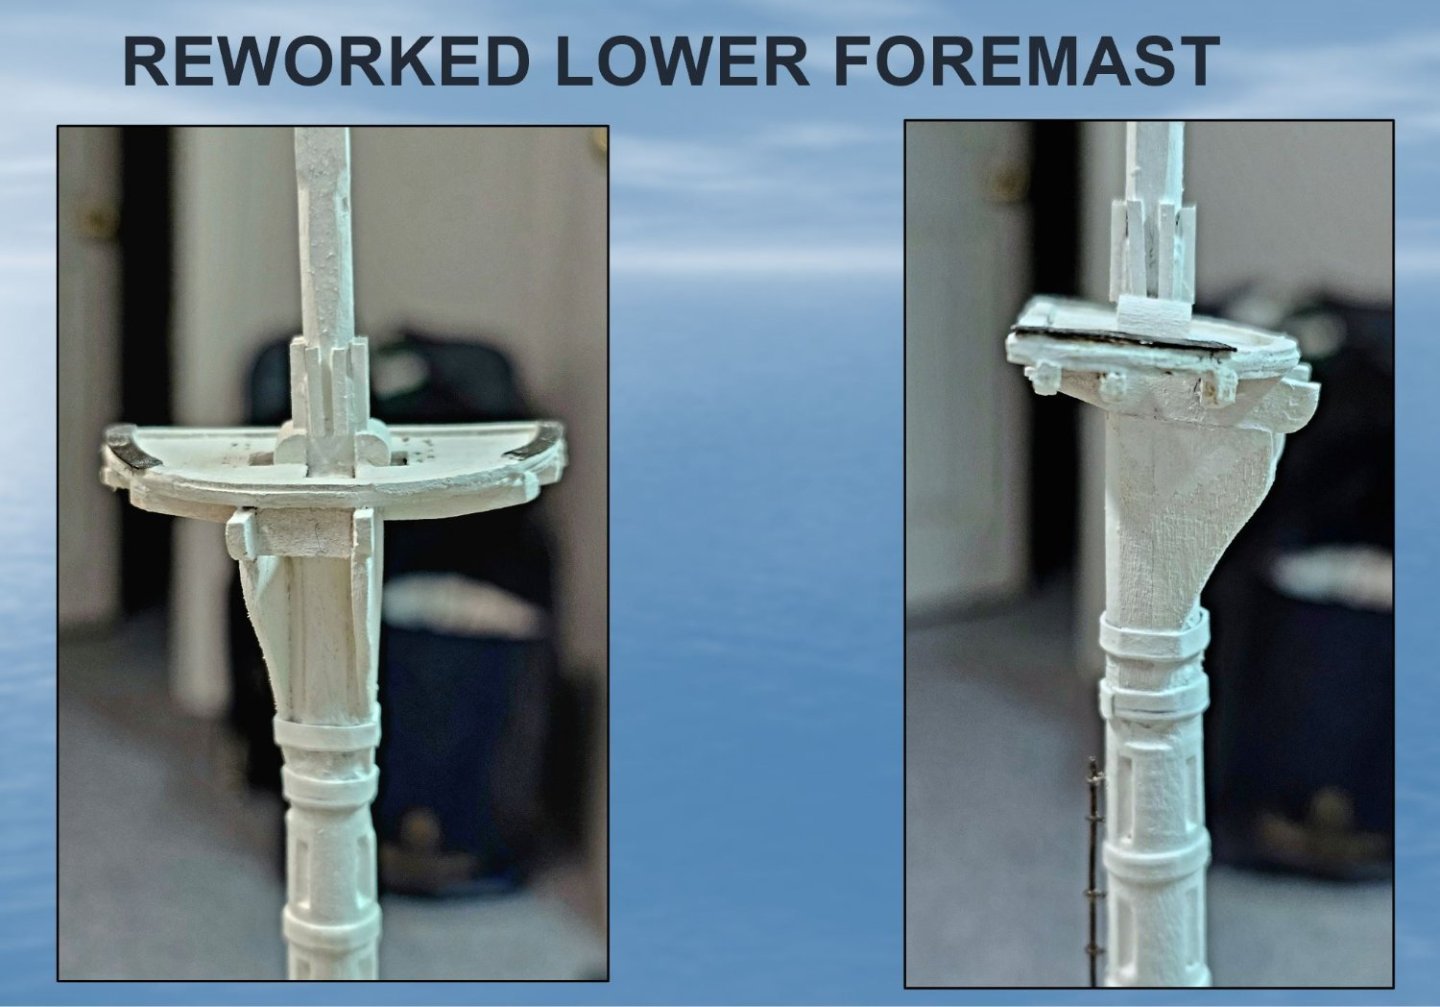
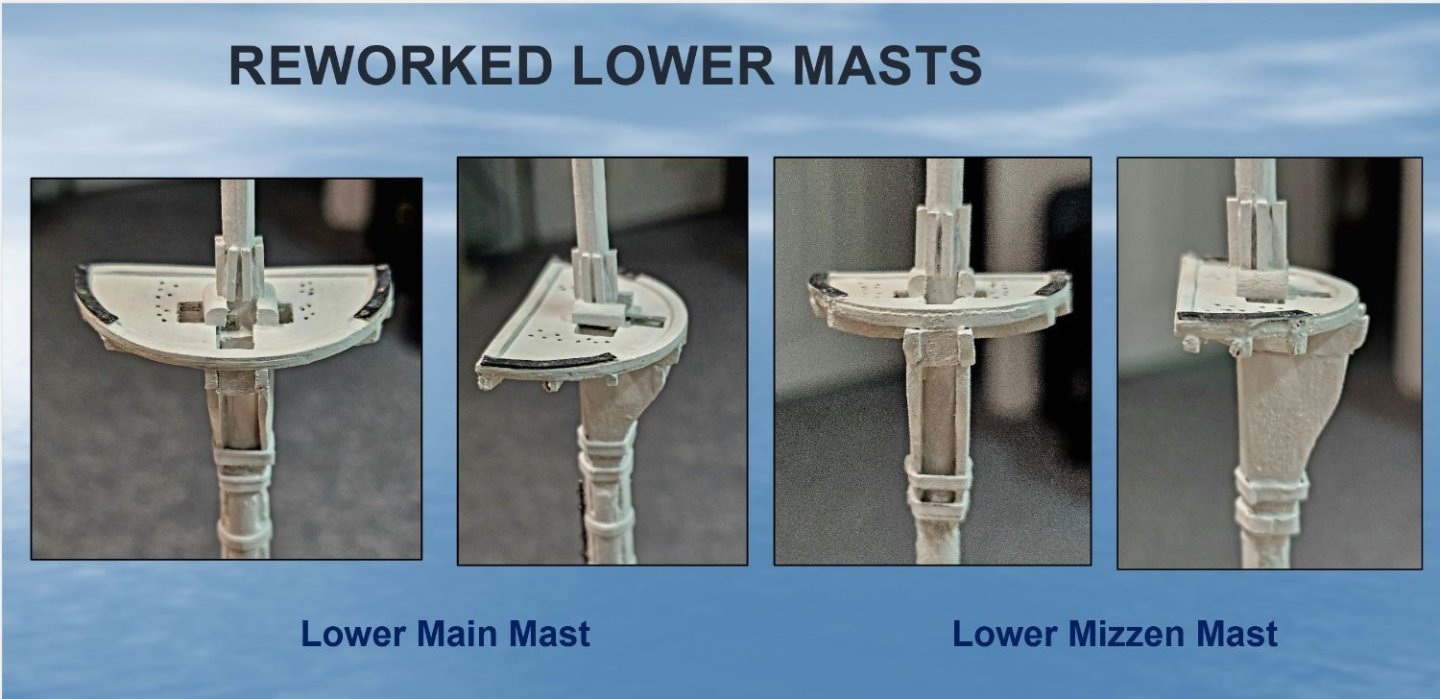
To err is human! In reading through the chapter on masts and spars of wooden vessels (Chap. III in Underhill referenced earlier), I discovered several errors in the construction of the tops on my lower masts. These are highlighted in the first two photos below. These mostly resulted from my lack of close enough attention and understanding of the fine details of the model plans, many of which are less than obvious. I failed to notice that the thickness of cheeks should taper off towards the heel and that the cheeks fit flush with the mast in stops cut into the the port and starboard sides and "dressed down to make a flat seating and stop for the cheeks" (Underhill pg. 65). Underhill goes on to state that the joint between the cheek and stop is covered by the futtock band, not above it the way shown in the kit plans. In my efforts to scratch build the iron plates on the top platforms, I didn't pay enough attention to where I drilled to holes in the plate - which should have line up with the cross trees so the futtock shrouds are correctly placed. They did not. And finally, something I cannot find in the Flying Fish plans is any reference to cross member spacers which sit between the the fore ends of the trestle trees to confine the fore side of the topmast heel (as illustrated by the drawings from books by Underhill and Mastini, in photo 1 below). I point these out for the benefit of any builder of the kit who is following my log, so that they don't fall into the same holes. Photos 3 and 4 show the reworked lower masts on my model as they now stand (to be further sanded and painted).
-
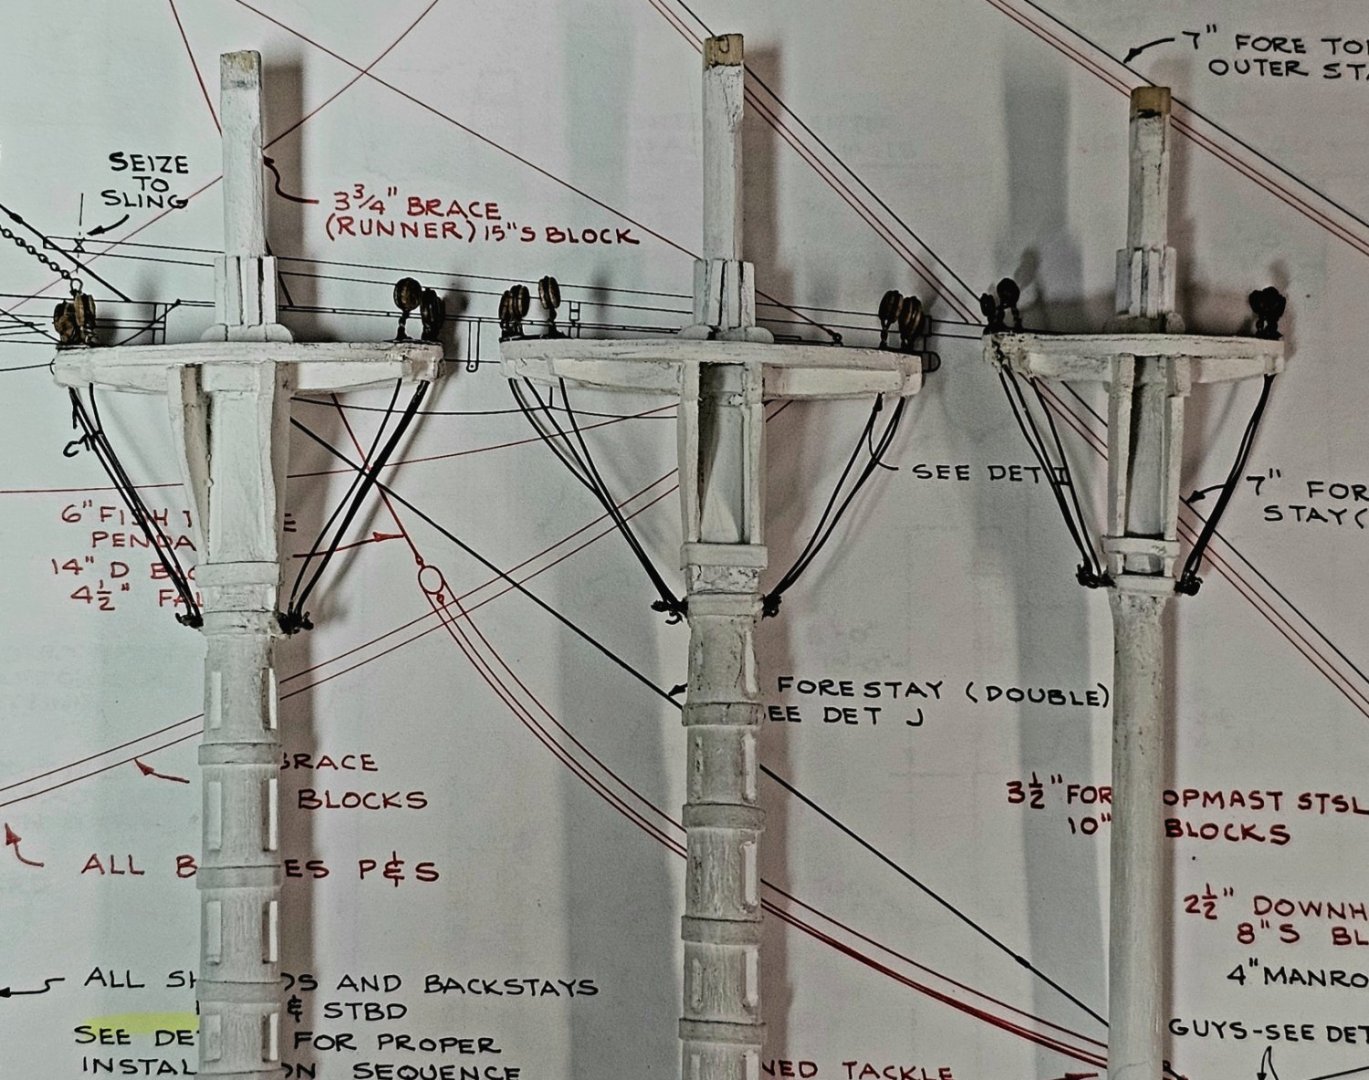
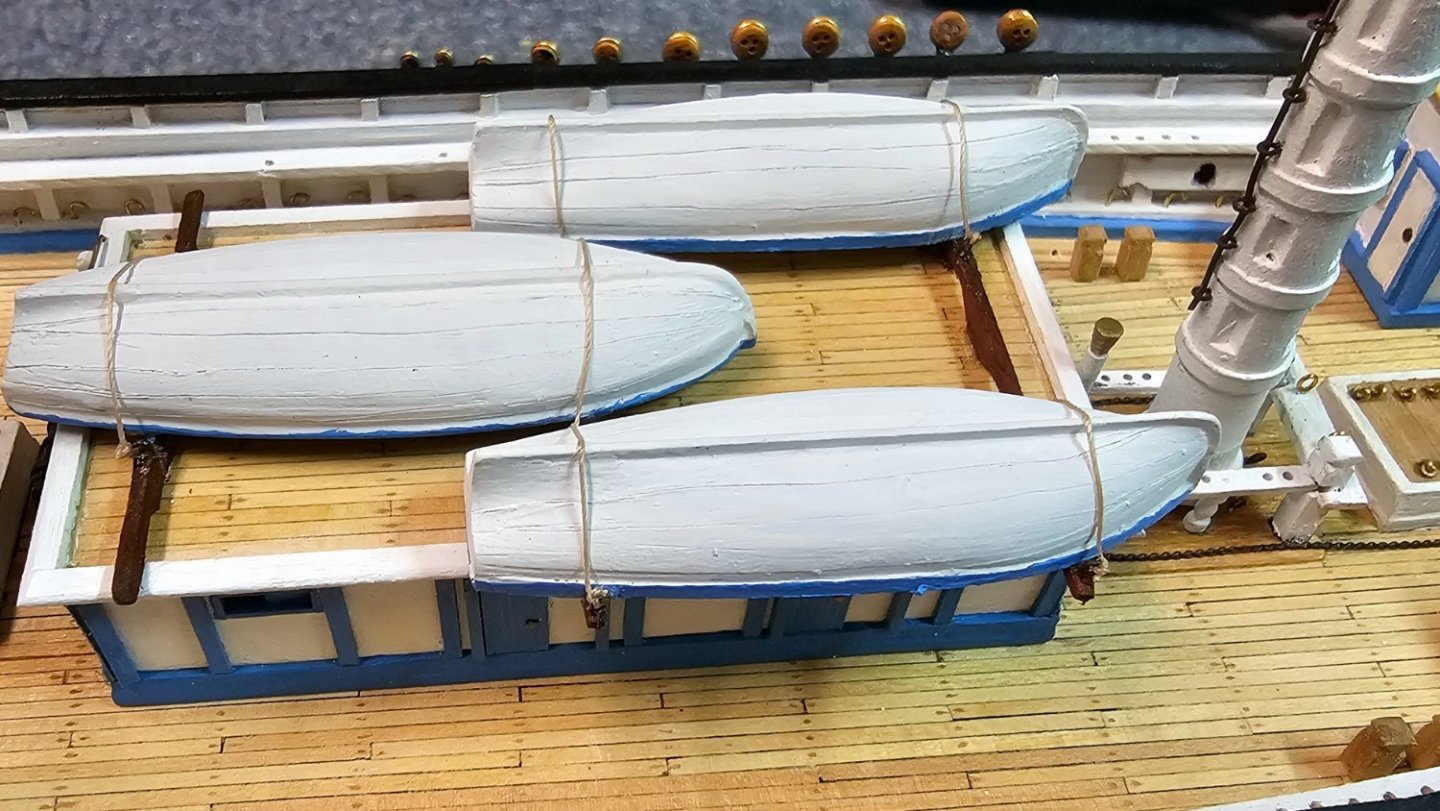
A quick update. Finally got around to securing the the 3 ship' boats on the cabin top. This was my introduction to the coming rigging on the Flying Fish and to the difficulties in securing ropes in such small spaces (see Photo below). As I now contemplate the final construction of the lower masts with the futtocks shrouds and attaching various blocks and eye bolts, and look ahead at the complex rigging diagrams on the plans, I have come to appreciate George's advice that the construction of the masts has to be planned well ahead to ensure that all the holes are predrilled and fittings for the rigging attached before the masts are fully assembled and secured to the deck. In truth, the rigging diagrams at first sight seem rather overwhelming to me. My previous model build was a whaler (Charles Morgan), whose rigging plans are far less complex than that of a clipper ship. I have therefore decided to pause for a bit and refresh my understanding of ship's rigging, before proceeding any further. This week I started reading my way through Harold Underhill's classic book "Masting & Rigging the Clipper Ship & Ocean Carrier", which is a masterful resource. My plan at this stage is to complete my Flying Fish with the standing rigging and some of the key running rigging, but not to put sails on her.
- 101 replies
-
- 1
-
-
- Flying Fish
- Model Shipways
- (and 1 more)
-
Thanks Rick
-
Thanks Mike. Yours look like they would anchor very well with lots of surface area for the glue to grip. For mine I used long nose pliers that I ground down to make the tip end thinner. All of the wire bending was by hand. It's tricky at first to get consistency but with practice it is achieved. I think your method would be much better with thinner wire. Thanks.