HOLIDAY DONATION DRIVE - SUPPORT MSW - DO YOUR PART TO KEEP THIS GREAT FORUM GOING! (Only 13 donations so far - C'mon guys!)
×


ted99
-
Posts
235 -
Joined
-
Last visited
Content Type
Profiles
Forums
Gallery
Events
Everything posted by ted99
-
Continuing with fiddly bits. Main turrets and secondary battery turrets completed. I must say that the CA does not adhere well to the cast resin L'Arsenal turret, or the other Chinese ones very well. I used epoxy on the big parts which worked very well. Had to resort to drilling holes in the tops for the stanchion posts to get them to stay in place. I'll spray grey at some point later, when all the superstructure, more or less, is ready for paint. The blast bags are masked at present, after doing tan paint on them.

-
Practice is improving my CA skills. I started with just using the tip of the CA glue container, then a stick. Next was a looper. Now, I'm using the looper for the larger pieces and the Micro-Mark forked tip for the really small stuff.

-
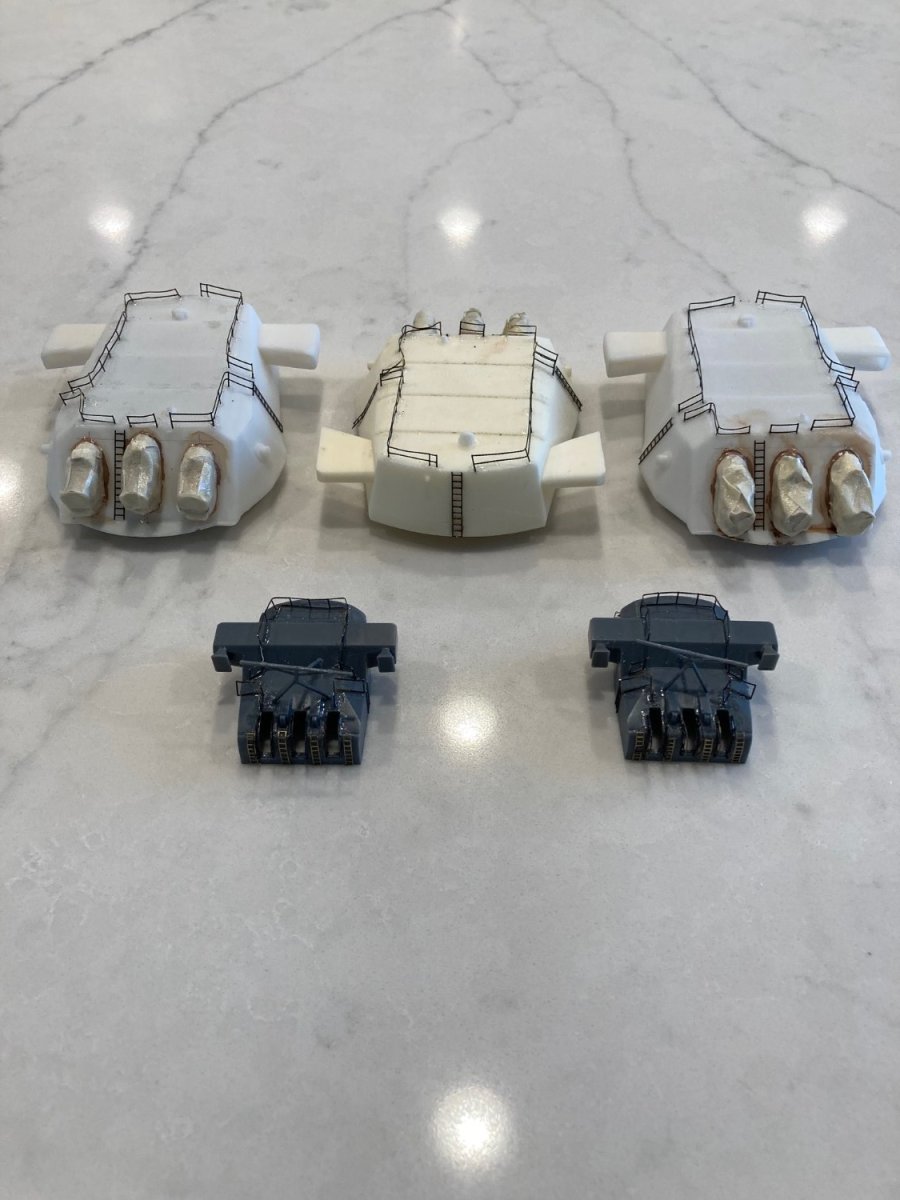
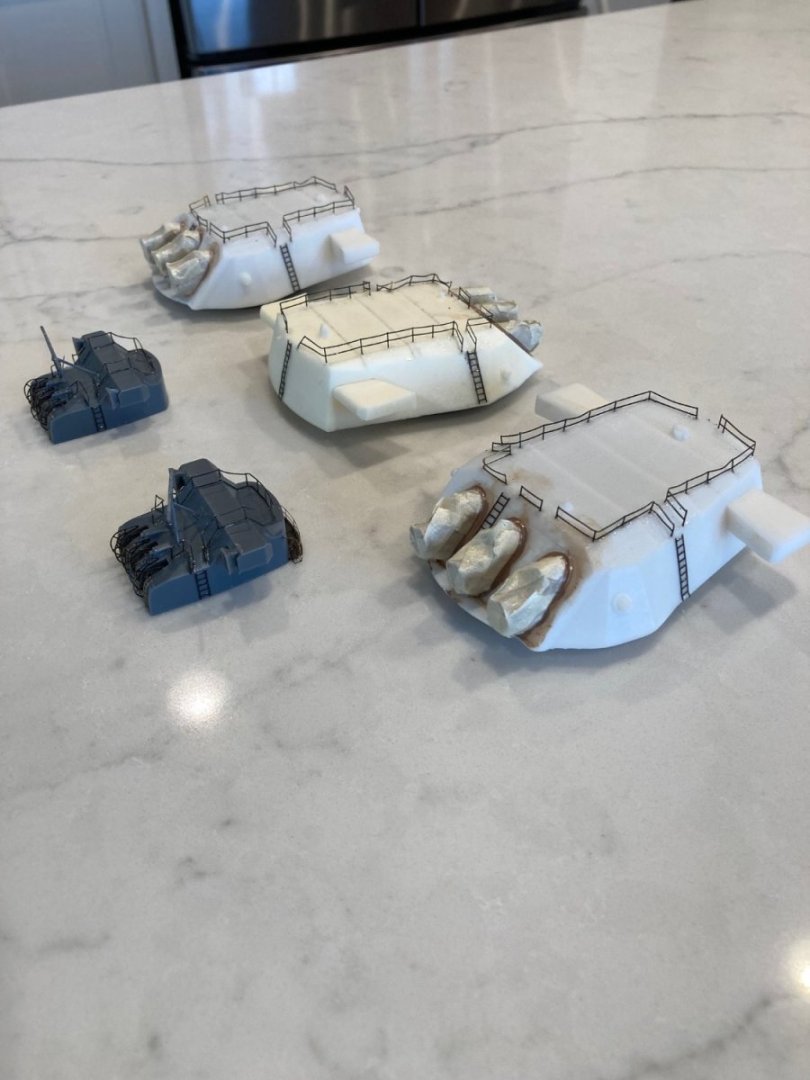
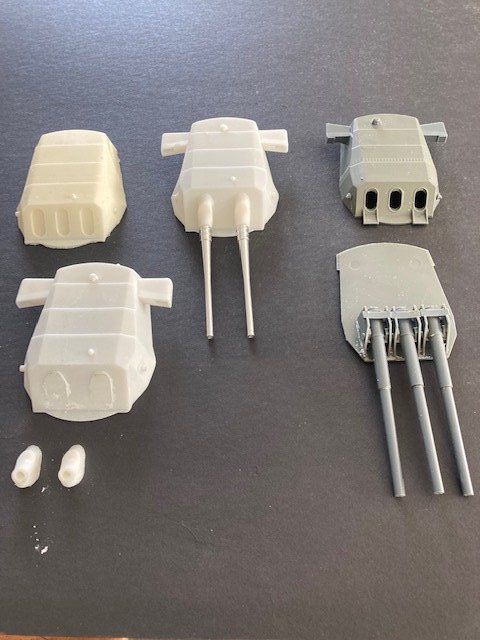
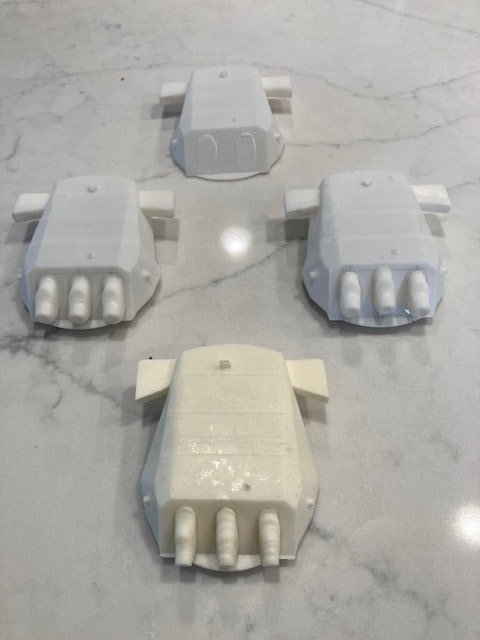
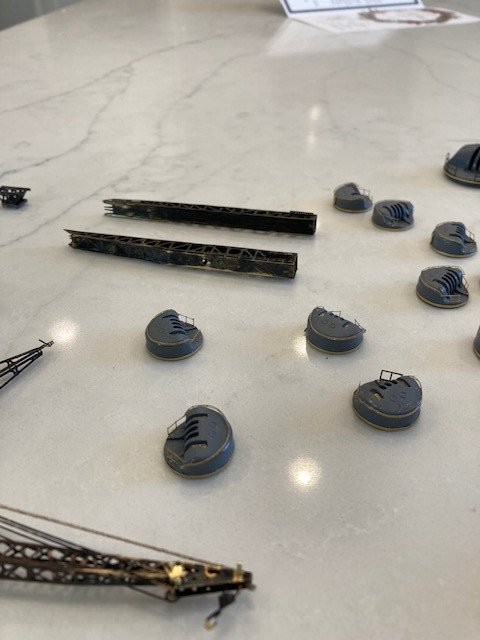
I've mentioned several time about how the Nichimo kit is for stand-off RC use. Very apparent in the main 18" turrets. They could be made to work if one did a lot of filler to simulate the blast bags, but I opted for something else. L'Arsenal does a cast resin kit that is very good, including the PE brass, but it's relatively expensive (almost $120 for the three) and given that I'm not willing to put a lot more $ into this compromised kit, I went a different path. One of the Chinese vendors offered a bargain price on 3 of the turrets because the maker did two barrels per turret, rather than the correct three (including aluminum barrels). My previous gold Medal PE set includes PE turret brass. So, I got a set, plus one of the L'Arsenal turrets and did some modifications. I cut the blast bags off the front of the discount turrets and epoxied three on each of two of the turrets, so that I now have two correct turrets. I'll put the L'Arsenal turret at the single stern position and the two fabricated ones together at the front, as the blast bag casting details are a little different between the two types. Pictures attached. In the first picture, the right hand turrets are the kit ones and the L'Arsenal is upper left. The top center is the stock incorrect turret and the lower right is after taking a razor saw to the blast bags. The right photo has the discount turrets with the cut off blast bags epoxied to the fronts (discarded donor turret top middle). The L'Arsenal turret with the resin blast bags epoxied to the turret is bottom middle.
-
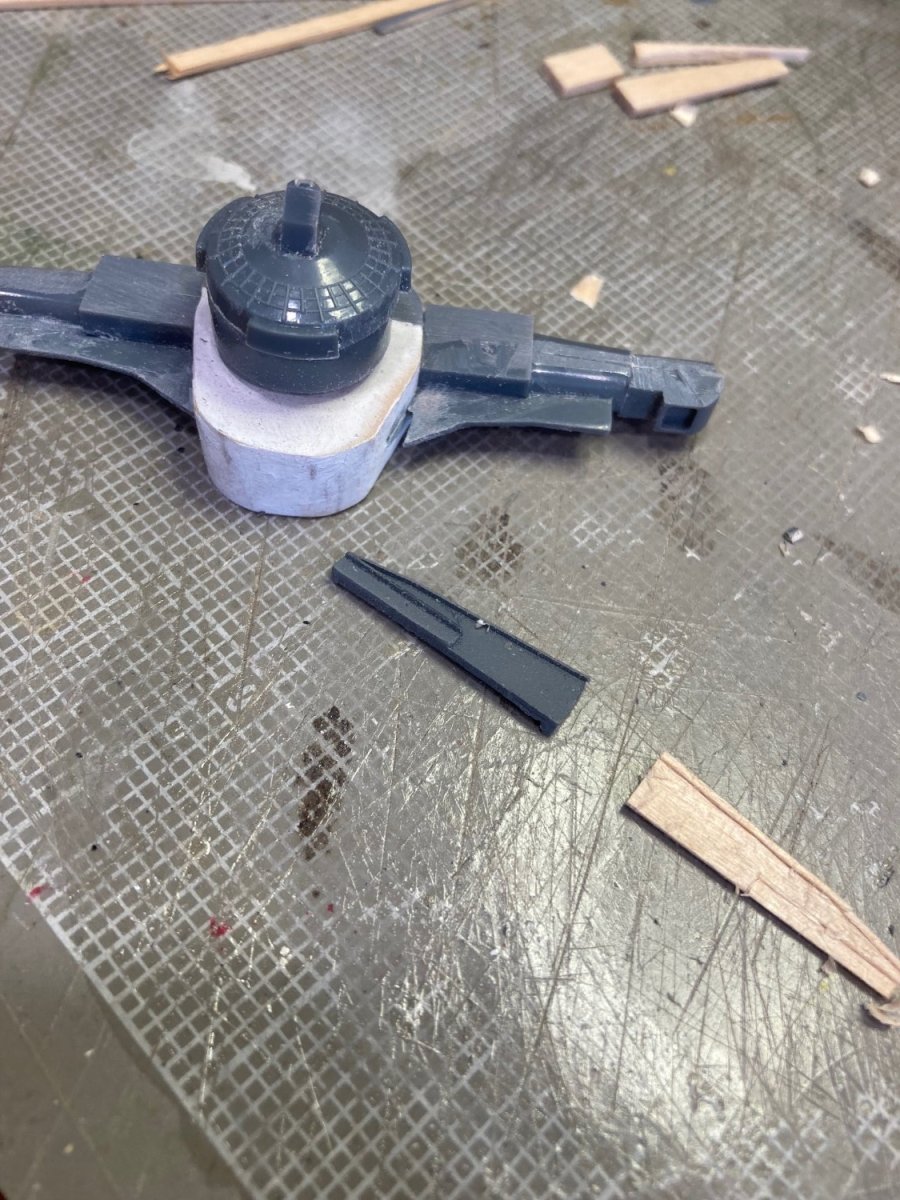
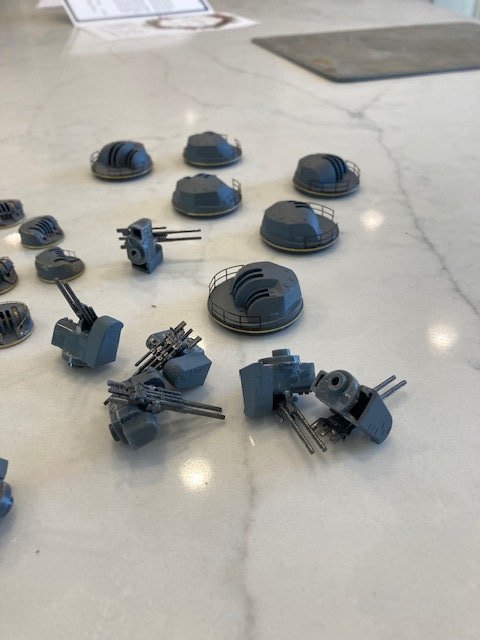
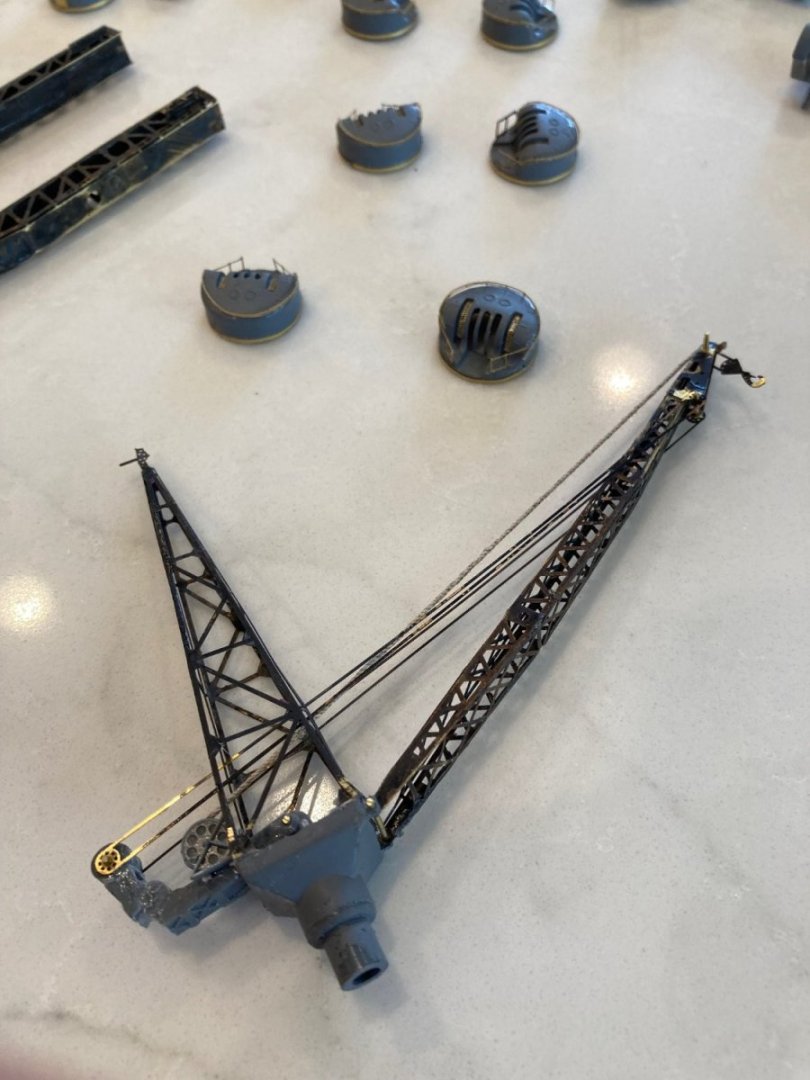
Continuing to hone my technique on the small bits. The crane and the catapaults are from the gold medal models PE, while the detail around the gun turrets is from the Fujimi PE. There is some, but not a lot of duplication between the two. I'll end up with a lot of the Fujimi PE unused because there is no place for it on the Nichimo plastic, or it's just too small for my skill level. The crane is a problem because there is nothing in either the Nichimo plastic or the Fujimi and Gold Medal PE for the mechanical bits for raising the boom or lifting a load. Also, "A" isn't any help because there are only minimal photos and no drawings on the mechanism. What there is looks like nothing I have ever seen on a crane. So, I just used some scrap plastic to dummy up what passes for the operating mechanism. The larger brass pieces show the "Brass Blackening" results, which is no where close to gray. I'll be air brushing all this stuff with gray, but the black on the insides of the trusses actually will assist by allowing me to just get the outsides coated gray and avoid build-up on the outsides trying to get gray on the insides of the trusses to cover up the brass color. "Taint a hobby if you hurry" is what I remind myself when I get frustrated with tiny pieces of brass and uncooperative PE. Lots of this little stuff to keep doing.
- 95 replies
-
- 12
-

-

-
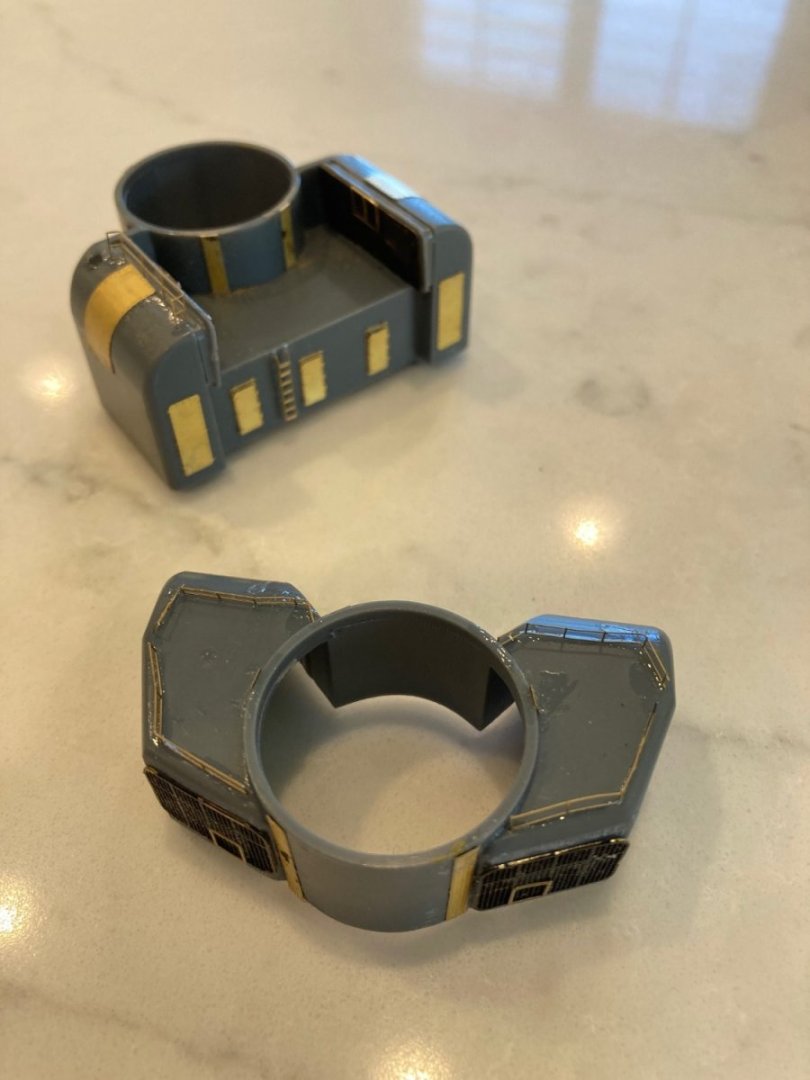
The Fujimi PE Brass is MUCH better than the Gold Medal Models, but extremely difficult to assemble because of it's fine gauge. The Gold Medal models is equivalent to that of the Amati Bismarck. I'm enclosing a picture of the bottoms of the two secondary armament mounts with all of the Fujimi brass attached. Note that the ladder actually has stand-offs to raise it above the bulkhead. Gold Medal and Amati just made these one-dimentional and glued directly to the bulkhead. But, VERY difficult for me and my skill level to attach--skills should be a lot better when I'm finished--which is the idea for proceeding with this "compromised" Nichimo kit. Skills should be a lot better when I take up the Trumpeter Missouri and Enterprise (CV-6) later. It's a challenge doing the Nichimo PE as all the pictures (no instructions) show the Fujimi plastic as the base, which is sometimes quite different from the Nichimo plastic. A hint for others that may take up the Nichimo: Each Fujimi detail picture sheet has an alpha-numeric number next to the picture of a PE piece in place on the Fujimi plastic. The first "letter" of this ID indicates which "sheet" of PE has that part and the "number" following the letter is etched lightly next to the part on the sheet. Unfortunately, the brass PE sheets are NOT marked (at least where I have found them) with the appropriate letter for that sheet. So, when you find a part, use a felt tip pen to mark that sheet with the correct letter. It's a LOT easier to find a part if you are looking on the correct sheet. I'm just going to use detail parts as best as possible, considering the difference between the Nichimo plastic and the Fujimi plastic. Correct NOT, but this is just practice, anyway. Using an arm-mounted magnifier, I can see the PE parts, but I haven't figured out how to pick up many of the smallest parts yet. The wax on a toothpick is a little too crude for some of these parts. Plus, I haven't figured out how to hold a very thin piece of brass vertically on a bulkhead and get CA to set, yet too much "wiggling".
-
I've started on some of the PE detail work and provided a picture of the funnel as an example. Some comments on the PE detail sheets: 1) The Fujimi PE detail sheets are for the "replacement" plastic parts produced by Fujimi for the Yamato. e-Bay is replete with ads for the Fujimi replacement bridge/funnel and mid-ships outer parts and these are different from the plastic provided in the Nichimo kit. While a lot of the parts are similar, like the hatches and doors; many are different. For instance, the director turrets have completely different PE tops than what is embossed in the Nichimo plastic part (look at the embossing on the piece adjacent to the funnel which has two embossed details, but the Fujimi PE has three hatches in the same place). The Fujimi PE brass is very thin and extremely well detailed. This makes it only for the "Expert" modeler with a lot of experience and specialized tools. It's really good stuff but I have to admit it's beyond my skill level. Fujimi includes a LOT of tiny little brass bits for the funnel that I find myself completely unable to attach. I did assemble the funnel innards and top and this is shown in the picture. But, the PE is such a fine gauge that my results will not stand close scrutiny. Lesson from this is that one should purchase the Fujimi plastic superstructure parts if one is going to try the Fujimi PE. It's looking like very little of the Nichimo kit is used other than the hull if one is going for a display-quality model. Parenthetical note: Just another reason to go with the new MRC/Trumpeter model kit and forget the Nichimo, if you have not already committed to the Nichimo. More on this later when I get to the Main and secondary guns. 2) The Gold Medal PE brass (Gold Medal has gone out of business, but another company in California advertising on e-Bay has taken to offering the Yamato PE sheets) is designed for the Nichimo kit and is also a heavier gauge of brass sheet. It is not nearly as comprehensive as the Fujimi PE, but at least it's within my skill level. The Gold Medal PE does the cranes, towers, aircraft catapaults, details around the directors and railings. This is probably enough to be a satisfactory upgrade to the Nichimo kit, considering how relatively crude the Nichimo kit is. I'll repeat my previous observation: This Nichimo kit is for a motorized stand-off model to go in the water. It is not a display-grade kit. I'm going to defer using the Fujimi PE for the time being and go to the Gold Medal PE for now.

-
As I mentioned earlier, I bought a partially assembled kit. So far, nothing important has been missing. Had to fab some wooden subs for some parts, but not critical

-
The plastic parts provided in the Nichimo kit, but the Fujimi PE (Bridge and Superstructure). The PE does not exactly match the Nichimo plastic, but I'll use it as best as possible. Not going to spend any more money on parts for the Nichimo, given the MRC model. This Yamato is my first venture into a Plastic kit and I'm treating it a learning experience which will pay off when I take up my Trumpeter Missouri and Enterprise (CV-6), with their attendant additional detail sets. I'm reconciled to doing as best as I can on this Yamato and going on to the others. When they are finished, if I'm not satisfied with the Nichimo, I'll consider doing the MRC Yamato as a replacement. I anticipate you will have completed your build log of the MRC kit by then and it will be very instructive.
-
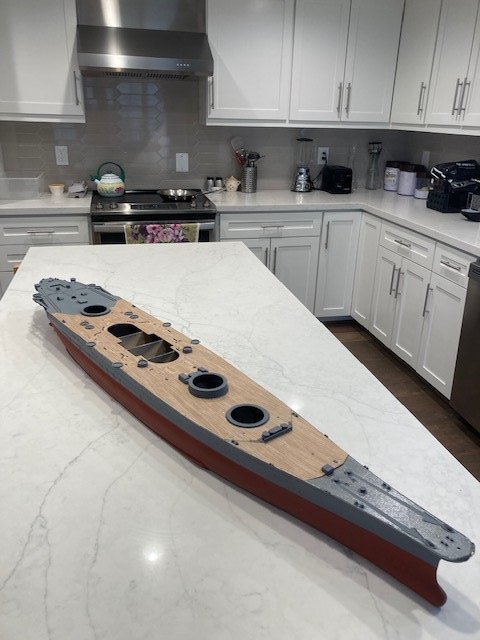
Deck glued on. Used Gorilla Wood glue as recommended by the maker. I thinned it a little bit with water to slightly thicker than heavy cream and it seemed to work out OK. Spread it with a glue brush--this might be the first time I have ever actually used a glue brush for glue. Some feedback on the "Scaledecks" wood decking: 1) Trimming was necessary, and in one place (the front of the middle section) major surgery was needed. I wonder if there were different moldings from Nichimo during the production run of this model? The problem was not due to misalignment between different plastic deck pieces. It was all in one deck casting which led me to think that there may have been variances over time. 2) The deck planking detail ink is not waterproof (or at least waterbourne glue-proof). In the process of getting glue up to the edges of the deck pieces it's easy to put too much there and it will squeeze out at the edges when one pushes down on the planking to get it tight to the plastic deck. What eventually worked best for me was to leave the extruded glue bits alone for a few minutes so that it begins to harden off and then use a sharp tool to pick it off before it completely sets. I'll try some other manufacturer of wood decking on a future build to see if other ink is more durable in the face of wood glue. Any one else have some insight on this? Curiously, the "Hogback" has become much more evident with the application of the wood deck. I've been doing superstructure sub assemblies while waiting for paint/glue, etc. to dry and I'm close to the point where I will need to make a decision on going ahead with the Nichimo build and start applying the PE parts. This will be a real learning process for me as it's nothing like the step-by-step manual of the Amati Bismarck.
-
I think the key was making sure the "crack" would not reopen with the epoxy/fiberglass. I can see it in one spot because I know where to look.
-
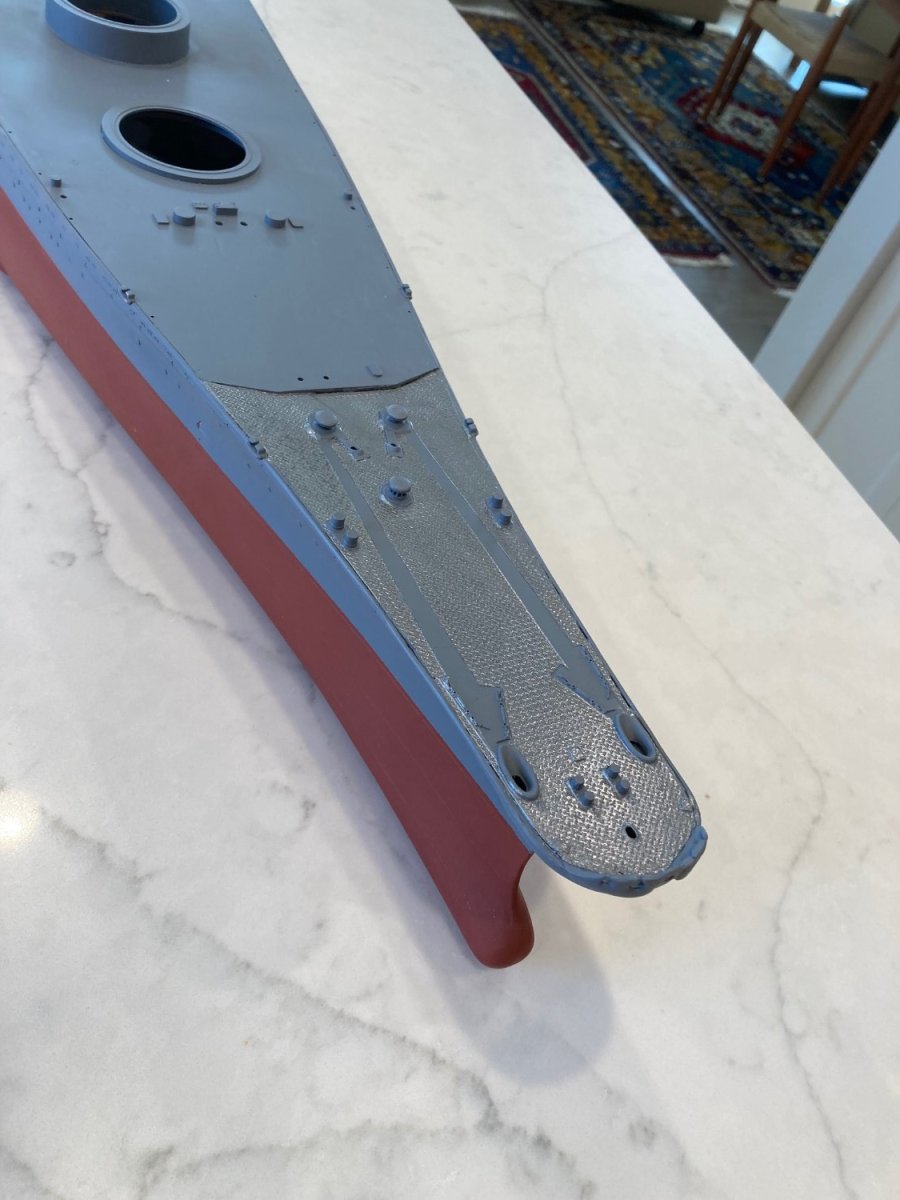
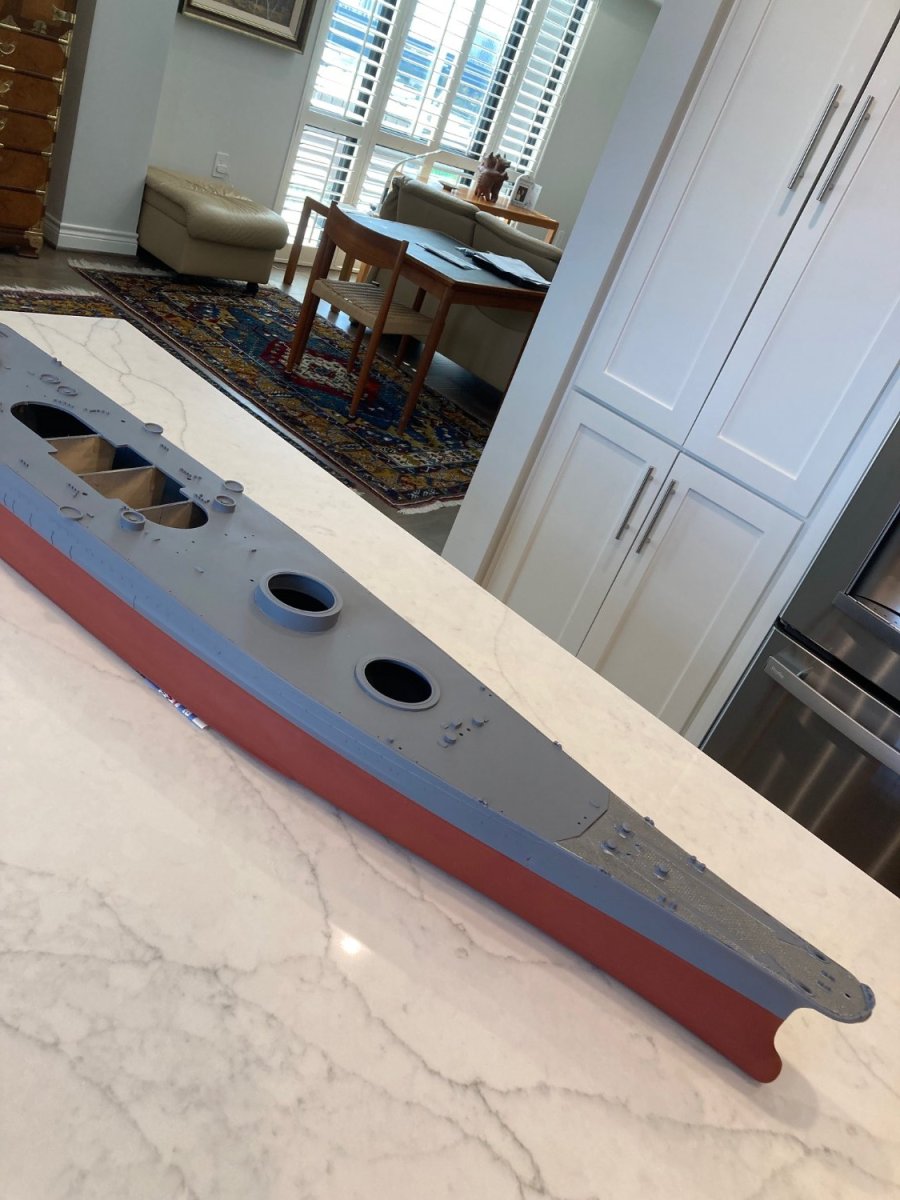
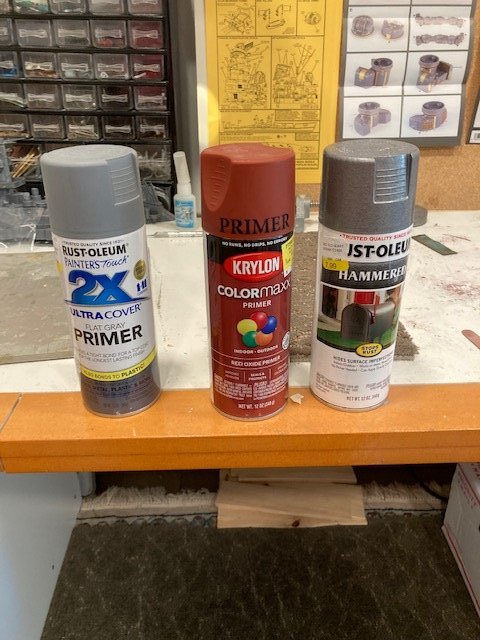
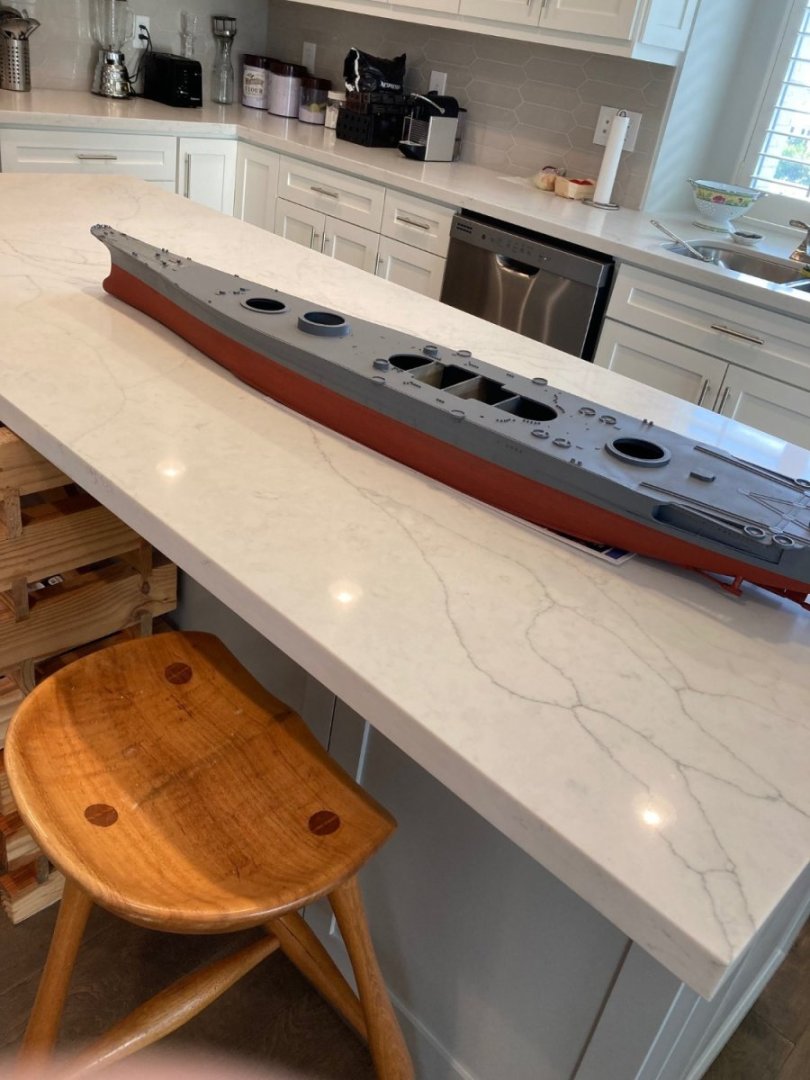
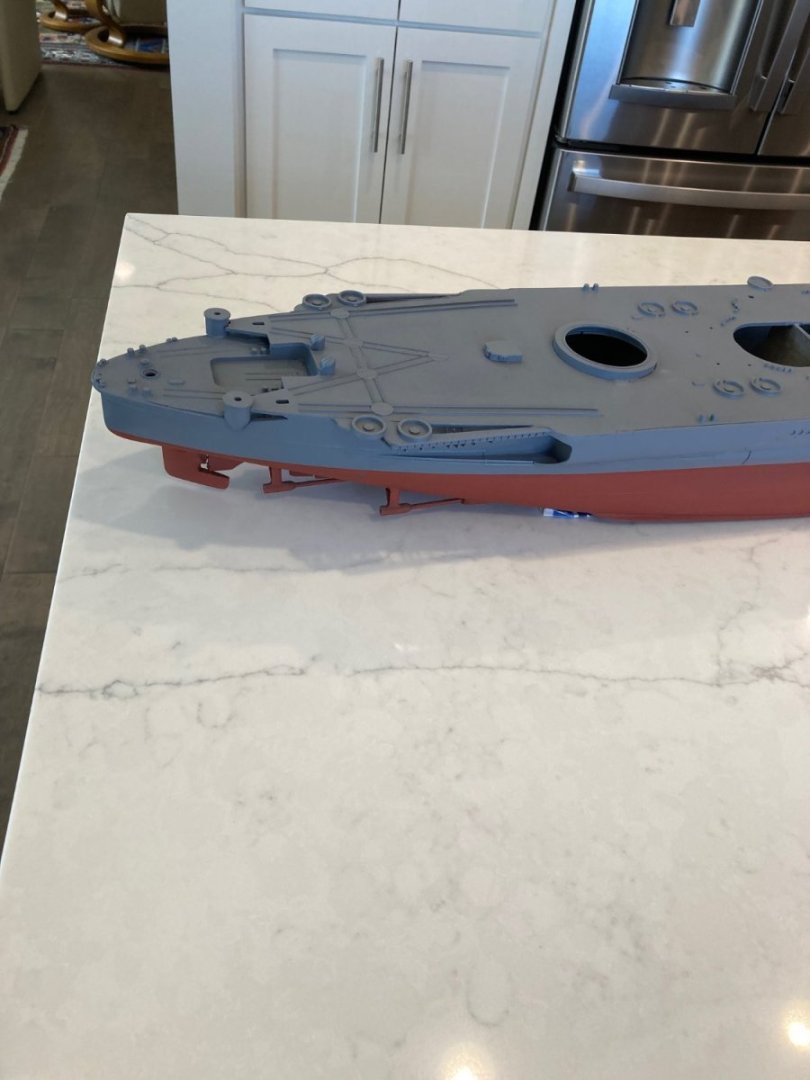
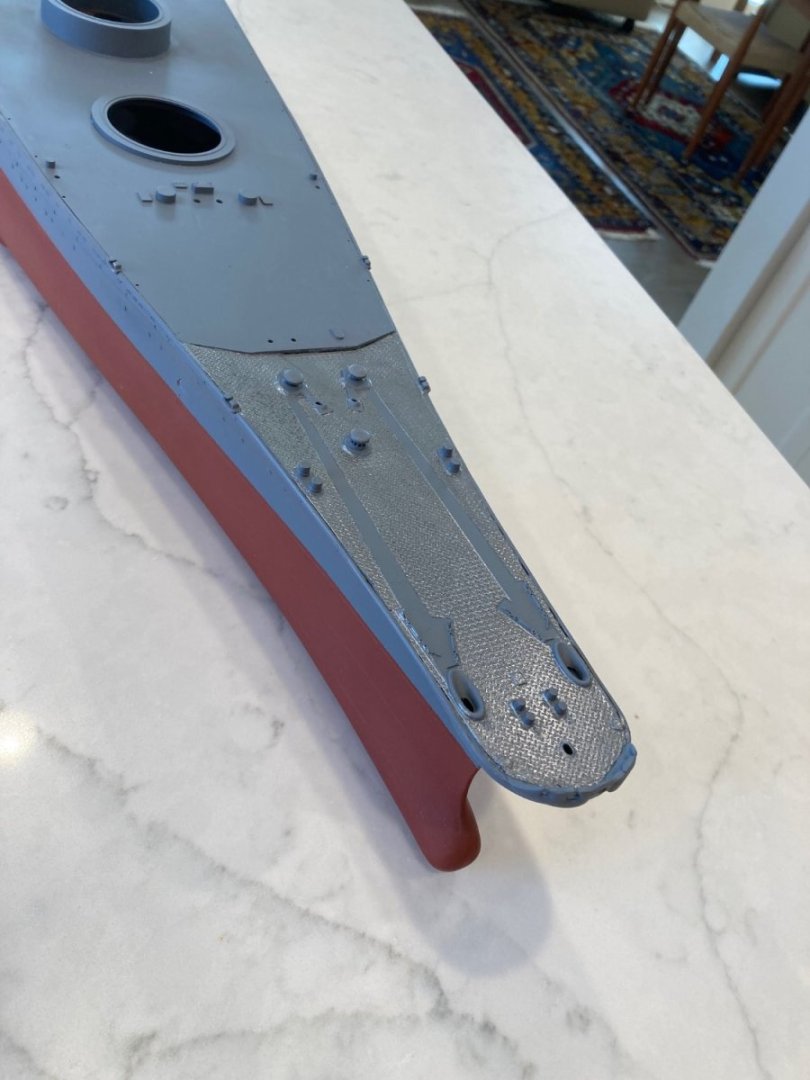
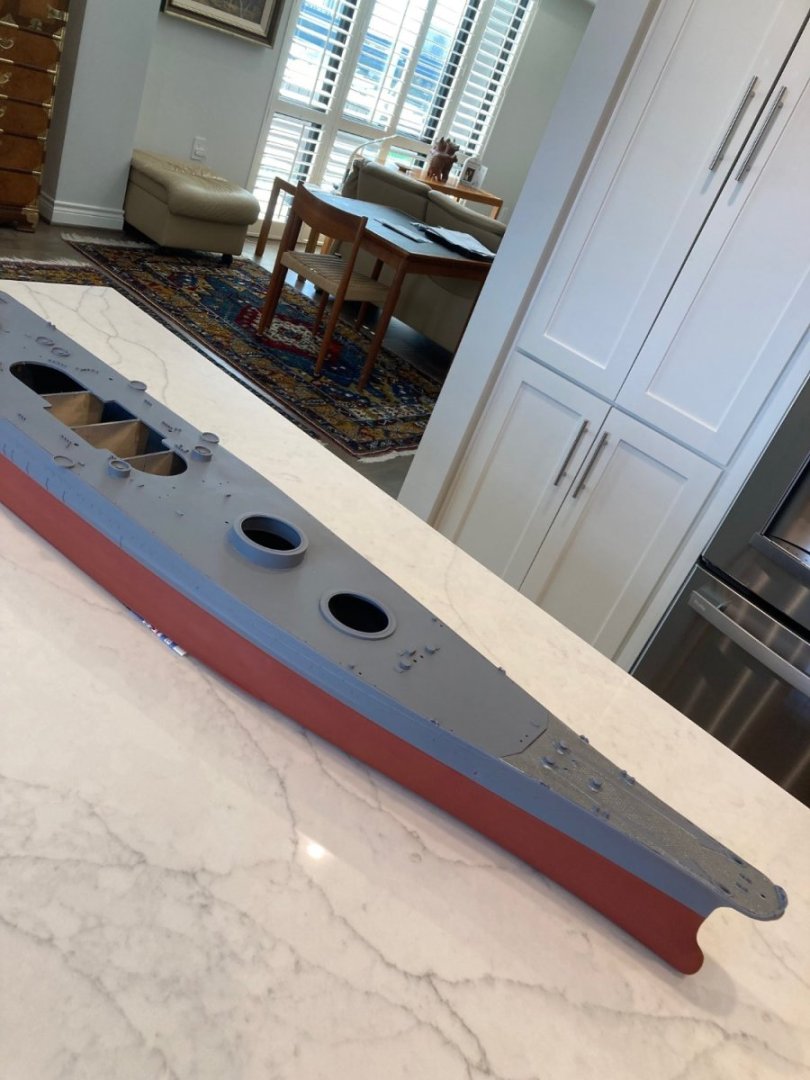
Hull is now painted. Picture of the three rattle cans of color. Already mentioned the Oxide Red bottom. I wanted a darker grey for the topsides and superstructure and settled on 2X primer Grey. It has a slight bluish tint. I wanted a grey that was different from the Bismarck and the USA grey--which I think will be somewhat lighter. The foredeck on Yamato is covered with galvinized plates and not painted. I decided to try the "Hammered" finish shown because it might have a texture kinda like galvinized metal, and because it's lighter than the grey color, according to the "A" pictures. It's gloss, but that won't be a problem as I will be spraying everything with a Matte Clear coat as the last step. I'll probably do the Matte clear on the bottom right away as a top coat to protect the soft primer I used as the bottom paint. Next step is to put down the wood deck and give it a matte clear spray as suggested by the manufacturer, before gluing on the deck furniture.
-
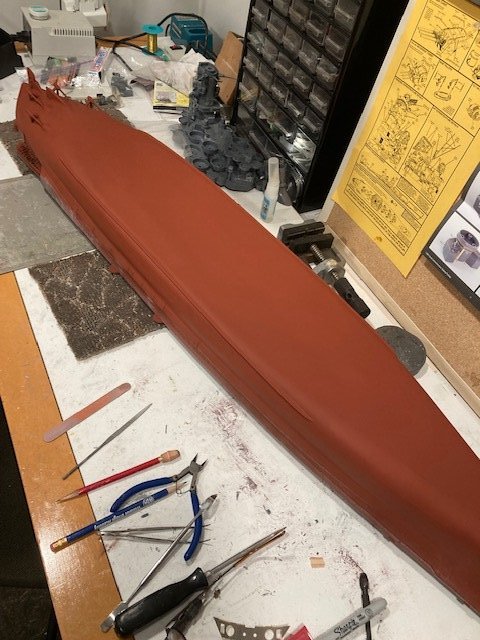
Repairs complete. I found a rattle can paint that looks to almost be an exact match to the bottom paint color in "A" : Kyron Red Oxide Primer. Gives exactly the right sheen, too. Once the bottom paint has hardened off, a little; I'll mask and paint the topsides and deck.
-
Yes, and even more so if I had the Yamato on a stand, like the Bismarck, and they were both at the same height.
-
1/200 Trumpeter IJN YAMATO - issued by MRC/Gallery Models
ted99 replied to yvesvidal's topic in REVIEWS: Model kits
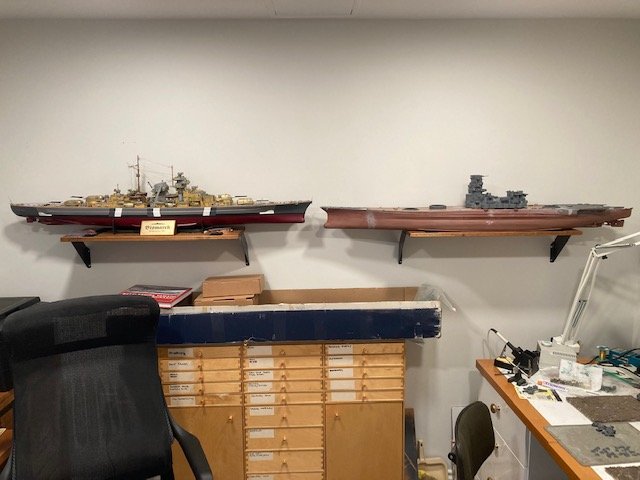
Photo of the wall with Yamato temporarily on the shelf. My other wall for future expansion. Missouri and Enterprise CV-6 will go on shelves above. The sub squeezed into a point above the bows

- 104 replies
-
- 3
-
-

-
- MRC/Gallery
- Yamato
- (and 1 more)
-
Photo of my wall where I am going to display the set of four WWII classics. The completed Amati Bismarck is on the left. The space for the Yamato, with it temporarily placed there. I'll add two more shelves above for Missouri and Enterprise CV-6. I've decided to add a fifth model: a 1:200 Fleet Submarine--the craft that got them all. It'll be tiny compared to the others and truly David and the Goliath's. Second picture is my other wall for any possible expansion.
-
1/200 Trumpeter IJN YAMATO - issued by MRC/Gallery Models
ted99 replied to yvesvidal's topic in REVIEWS: Model kits
I've already got two of the shelves on the wall, with Bismarck on one and "parts" waiting assembly on the other. When I finish the third model, the other two shelves will go up, above the first two. Oh yes, I far prefer 1:200 scale, but it just looked to me like a more modern kit of the Yamato was available in 1:350 and something I would have paid more attention to if I had thought of multiple battleships/carriers when I started out. I only mentioned it because it may trigger a thought for some future builder. In any event, the MRC Yamato really brought my "four" into being equally modern and detailed 1:200 kits, so 1:350 would have been moot for me. I'm even gonna add a fifth model--a 1:200 WWII Fleet Submarine-- in the center of the four shelves. The ultimate downfall to all of the other four warships. It will look tiny compared to the other four and David to the Goliath's.- 104 replies
-
- 1
-
-
- MRC/Gallery
- Yamato
- (and 1 more)
-
Many thanks for that, Yves. The review looks like it took almost as much time as it would take to build the model (lol). The pictures of the hull castings look like the aircraft/boat deck hangers are very similar to the Tamiya 1:350 model. The plans are fantastic, compared to Nichimo. Your kit is night and day when compared to the Nichimo. I'll keep on with my Nichimo, even if it's just for practice; because I can't ever see myself being satisfied with the relative "crudity" of the plastic castings, no matter how much PE detail is added. I really wish I had been able to get the pre-order deal for the MRC offering. I'll be watching the price trends and hoping the Chinese e-Bay discounters get in on this kit.
-
1/200 Trumpeter IJN YAMATO - issued by MRC/Gallery Models
ted99 replied to yvesvidal's topic in REVIEWS: Model kits
I love building complicated kits and if all the aftermarket detail bits are added, the Nichimo is nothing if it is not complicated. I also like puzzling out data gaps and ambiguities in the "plans"(not). Obviously, I'm not at the scratch-building level of modeling. I expected the shortcomings of this kit when I started it. I did not expect that a much better kit at a cheaper overall price would appear in 1:200 scale, so that is my source of buyer's remorse. After almost 50 years with no new Yamato offerings in 1:200, I was not expecting a new one. Yes, I'm having fun; but if I can provide an OPINION that may be helpful to other's decision-making, I'm happy to do it. YMMV. I started my Battleship build with the Amati Bismarck, because it looked like a fun thing to do and it was BIG allowing a lot of detail. Then, my thinking evolved to doing the "set" I describe in my Yamato build log. If I had it all to do over, I think I would have gone for 1:350 scale for the set. Seems like there is a better choice of kits in that scale and there would certainly be more room on the wall for four 1:350 ships than 1:200. The 1:350 build log of the Tamiya Yamato by RGL certainly shows that there is plenty of detail in 1:350 scale.- 104 replies
-
- 3
-
-
-
- MRC/Gallery
- Yamato
- (and 1 more)
-
Yves--I've made several postings on your review of the MRC Yamato, which you may not being checking. My last was a question on how the Boat and aircraft hanger areas are modeled in the MRC kit. The Nichimo is woefully deficient in this area.
-
1/200 Trumpeter IJN YAMATO - issued by MRC/Gallery Models
ted99 replied to yvesvidal's topic in REVIEWS: Model kits
Yves-- I know I said I wasn't going to post here, anymore, but I just started reviewing the completed build log by RGL for the 1:350 Tamiya Yamato. I was struck by all the interior detail for the boat hangers and the aircraft hangers. The Nichimo kit doesn't even do the full depth of the aircraft elevator deck. How is this area done on the MRC kit?- 104 replies
-
- 2
-
-
- MRC/Gallery
- Yamato
- (and 1 more)
-
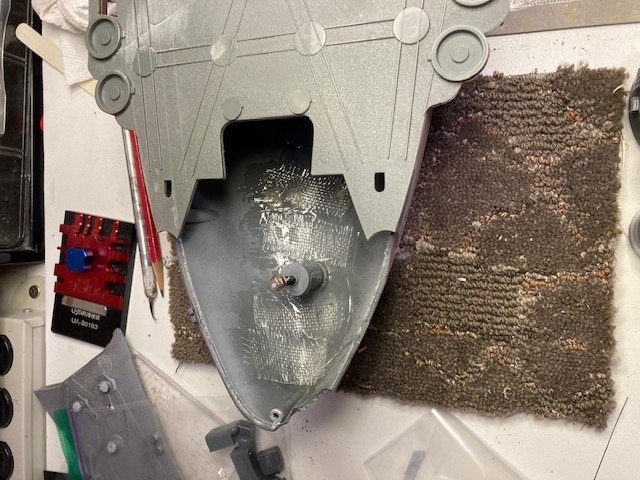
I've glued the bow section back on and glued the split in the stern section with plastic cement. I have no confidence that these glue joints will suffice, so I spanned the breaks on the inside of the hull with 30 min epoxy, reinforced with fiberglass cloth. I'll see if any cracks open up as I fill and sand the exterior of these breaks.

-
1/200 Trumpeter IJN YAMATO - issued by MRC/Gallery Models
ted99 replied to yvesvidal's topic in REVIEWS: Model kits
Sorry, in the above I used the label Nichimo when saying that you will need to purchase PE detail parts. I should have said "Fujimi".- 104 replies
-
- 2
-
-
- MRC/Gallery
- Yamato
- (and 1 more)
-
1/200 Trumpeter IJN YAMATO - issued by MRC/Gallery Models
ted99 replied to yvesvidal's topic in REVIEWS: Model kits
Looking at the information posted by Yves and comparing it to my experience, so far, with the Nichimo kit; I offer my observations to anyone deciding between the two. If I don't specify which model, I am referring to the Nichimo: 1. The hull and deck castings are Styrene plastic and all the detail plastic parts are ABS plastic. One needs a special cement for ABS (Plastruct). 2. The hull plating details are vastly inferior to the MRC kit. 3. The hull desperately needs the interior reinforcing that the MRC kit provides. After assembling the hull and decks, I had to add (belatedly) interior reinforcement in the mid-ships area to bring the deck up to "level" to allow the superstructure to sit on the deck properly. 4. The plastic decks are child-like and you will need to purchase an aftermarket wood deck. Parts of the wooden decks from scaledecks.com do not line up with cast-in protrusions in the Nichimo decks requiring alterations to one or the other. This wood deck is an extra cost of almost $100, depending on your source. 5. The instructions are "scanty", at best. For instance, line drawings of fully assembled deck modules are provided, but not step-by step drawings. You have to pick out each part, locate it on the plastic sprue and puzzle out the best fit. It's doable, but subject to error. A lot of space is devoted to motorization of the guns and other bits. 6. The ABS plastic detail parts, like radar antennas, cranes, dollies, etc are crude at best. If you are a serious modeler, you will need to throw all this away and purchase the PE detail parts from Nichimo, Toms River and Gold Medal Models at an extra cost of at least $300. 7. The main gun turrets are designed for motorization and compromises have been made to accommodate the "ability" to rotate and elevate the gun barrels. As a consequence, you can purchase after market metal gun barrels for the MRC kit, but you are stuck with Nichimo's toy-like offering. 8. Original versions of the Nichimo kit were manufactured almost 50 years ago and I'm sure that many kits now found on resale sites date from that era. My hull seems to be brittle and modern kits rarely use ABS plastic. Also, has the grade of styrene plastic used in models improved in 50 years? I'm only at the hull closure stage, now; but I have used time waiting for cement to set to pre-assemble parts of the superstructure. Check out my build log for more information as I do not expect to make further contributions to this thread. I'll offer the following generalization. The Nichimo kit is well-served as a "stand-off" motorized model for deployment on water. It is NOT a display-quality static model. With the addition of $300 to $400 of detail parts, it can be one; but the added hull detail (and probably more modern plastics) of the MRC kit makes it a better choice if a display model is your desire.- 104 replies
-
- 3
-
-
-
- MRC/Gallery
- Yamato
- (and 1 more)
-
Thanks for the encouragement, George. Looking at the pictures posted by Yves, I'm really impressed by the hull plating detail. I scratched some into my Nichimo hull, but it's nothing like the MRC. The manual seems like a big difference, too. Where Nichimo provides a single picture of a piece of superstructure with all the bits and pieces attached, the MRC seems to be more of a step-by step like the Amati Bismarck. So far the Nichimo has been manageable. The key will come with the Fujimi and Gold Medal Models PE. They give you pictures of the attached PE and that may be enough. I don't know what MRC does, but if one is at the level of doing PE details, one should assume that one picture is enough. Also the "A" book has been very helpful when something is unclear. BUT, there are variances between Nichimo and the Yamato in "A". I would guess that the MRC kit relied heavily on the "A" material. There seems to be no better reference available (other than photographs). The reinforcement in the MRC hull is badly needed. I've already posted a picture of what I found necessary to add in my Nichimo to get the mid-deck to be level. I also suspect that there is no ABS plastic or Styrene plastic parts variance. The Nichimo castings are less than top quality. Clearly, if I had been aware of the MRC path in the beginning, I would have gone that way. Given where I am, I'll continue and make a stop or go decision when the time comes to start applying the PE detail. It's pretty clear that a partially assembled Nichimo Yamato has no resale value, but the unused PE brass could be resold. Perhaps Yves could offer an opinion on whether the MRC PE for the midships area is as extensive as the Fujimi stuff. Judging from his picture of his PE and comparing it to the PE sheets from Fujimi that I have, the Fujimi is a "little" more extensive. It looks to me like the Gold Medal Models PE brass for the after deck (flight deck) area (not covered by Fujimi) is the same as in the MRC kit.
-
Well, this is "live and learn" day. I read your review, Yves, and it hits everything I dislike about the Nichimo kit. I wrapped up my "research" for a Yamato kit back at the beginning of the year. When I saw the ads later, I thought the MRC kit was just a reissue of the Nichimo kit at a higher price than the old kits available on eBay. Wrong, Wrong, Wrong. I would have given pause if anything I read pointed out that it was Trumpeter. I may abandon this Nichimo kit. I'll keep on a little while and see if the coming recession results in any price reductions. Perhaps MRC will lose their exclusivity and the Chinese discounters will be able to pick it up. Call continuing the build "practice" to see where I need to watch out for in the Trumpeter kit.