MORE HANDBOOKS ARE ON THEIR WAY! We will let you know when they get here.
×


ted99
-
Posts
235 -
Joined
-
Last visited
Content Type
Profiles
Forums
Gallery
Events
Everything posted by ted99
-
1/200 Trumpeter IJN YAMATO - issued by MRC/Gallery Models
ted99 replied to yvesvidal's topic in REVIEWS: Model kits
As I was about half-way through my 1:200 Amati Bismarck, I hatched the idea to build the three most modern and major battleships of WW II in 1:200 scale: Bismarck, Yamato, and Missouri. Searching, I found that I would have to do this in Plastic for the latter two and the old Nichimo kit was the only one I could find for Yamato. So, I bought a used one on eBay and all the Scale Decks, Nichimo and Gold Medal PE detail kits for my next build after Bismarck was completed. I also bought the Trumpeter Missouri, plus the Pontos detail set so I would have it in case things went in short supply. About the time I completed Bismarck, I decided that I should also add the type of ship that rendered the Battleship obsolete for it's intended purpose--the carrier-- and bought the Trumpeter CV-6 Enterprise and it's detail kits. I might round out the nemesis of all--the Fleet Submarine--but keeping things in 1:200 scale makes for a rather small model. So now, I'm partially into the Nichimo Yamato (build log underway) and Yves points out this thread. His description of the MRC kit hits EVERYTHING that I was finding bad about the Nichimo kit. I'm considering abandoning the Nichimo kit to go with this (which I have now learned is done by Trumpeter) MRC kit. Unfortunately, I had "completed" my research into kits back at the beginning of the year and completely missed out on this new offering.- 104 replies
-
- 2
-

-
- MRC/Gallery
- Yamato
- (and 1 more)
-
Yes, I had seen the MRC postings, but did not see any reference to Trumpeter. Also the price was very high, at that time.
-
Found it on Amazon. I sure never saw it 6 months, ago. Also one seller in the UK on eBay. The usual Chinese discounted sellers of Trumpeter kits haven't made any postings, yet. I bought both of my Trumpeter Missouri and CV-6 Enterprise from that source and the slow shipping was not a problem as both are "next" after Bismarck and Yamato. It's an "enhanced" kit with several sheets of PE, which look a lot like the old "Gold Metal" offerings. I wonder how the plastic bits stack up with the Nichimo kit. One would think it's improved. Much improved? One would never call the Nichimo plastic details "fine".
-
Trumpeter has a 1:200 Yamato? I'll have to look it up. Sure am sorry I missed that one and got an old Nichimo! My opinion on dies was based on seeing airplane kits and 1:72 ship kits being reissued in different boxes. Learned something new, here.
-
Thought I'd pass on some experience with adhesives. First, this kit is now about 50 years old--I wonder if the styrene is getting more brittle with age? Second, the hull, decks and major superstructure are styrene and all the other details are ABS plastic. Are kits with contemporary plastics better than 50 years ago. Dies can live forever and plastic kits can be reissued at any time by any company with the rights to the die with contemporary plastic mixes. I suspect that the "new" kits of the Yamato with a different brand name that have appeared on e-Bay are using the old Nichimo dies. The Plastruct is the only one that actually "melts" ABS and it does a good job of "welding" ABS to styrene. But, it's a very aggressive solvent, so one must be very sparing on small parts. The "Same Stuff" from Micro Mark is supposed to be the same as the old Tenax 7R--I don't think so. Doesn't work at all on ABS and it's not an aggressive solvent so it's better on very small styrene to styrene parts. I've been using the Ambroid plastic cement in a tube for hull to deck joints and it really doesn't do a good job of "welding". The thickness is good for gap-filling, but it doesn't melt the plastic substrate like the Plastruct. I used it for the hull to deck joins and as you can see, both the fore and Aft-most decks "popped off" on impact with the concrete porch deck and I'm able to just scrape the old cement off. Even though it is thin, I think the Plastruct would have been a better choice. I even wonder if the hull would have broken off if there had been a good weld between the hull and decks. I also wonder if the Testor's "Red" is a better thickened solvent? I already had the Ambroid. Anybody have an opinion? The maker of the wooden deck recommends Testor's Red for gluing superstructure details to the wooden deck. Best of all is the Epoxy. I'll be using it (with reinforcement) inside the hull at the breaks. But Epoxy is a pain to use because of the mixing. I only use it where I'm looking for maximum strength--especially if it's embeded with fiberglass cloth.

-
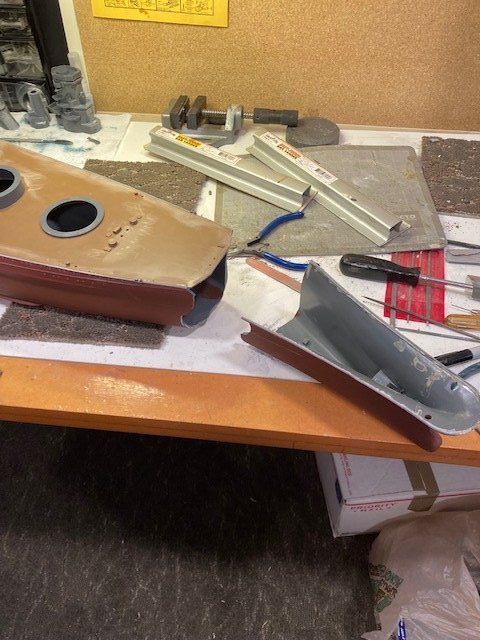
A temporary setback. Those of you that followed my Bismarck build may recall that I have to do my spray painting from a rattle can on my 8th floor balcony. I had just repainted the hull bottom with Rust-oleum "Rusty Metal Primer". I like it better than the "brick red" for comparison to the color in the "A" color plates). The hull was upside down resting on a board suspended at a corner of my balcony railing to dry. Just as I was going out to bring it in, a big gust of wind (the mid-West cold spell front just arriving) blew the hull off the board and onto the concrete balcony. Thankfully it went that way and not down 8 floors. The hull was resting on the gun turrets, rather than flat on deck giving room for the wind to get beneath the hull and lift it. The bow broke off, the stern was cracked and both the fore and aft-most sections of deck were knocked off. Thankfully, I was there just as it happened and I was able to quickly retrieve all the bits and pieces before they blew off. There will be a slight pause in progress while I reconstruct.
-
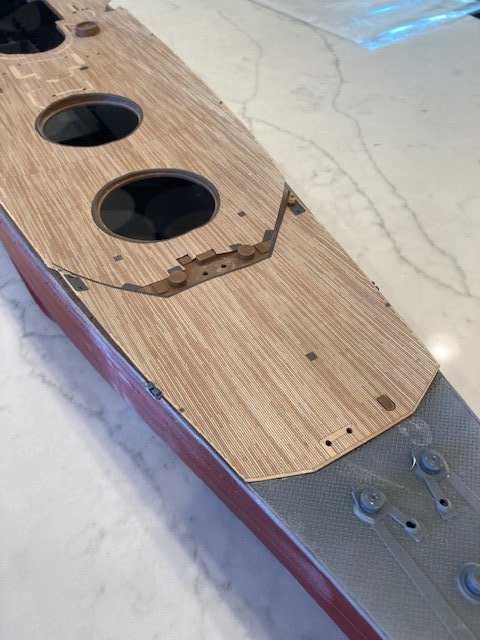
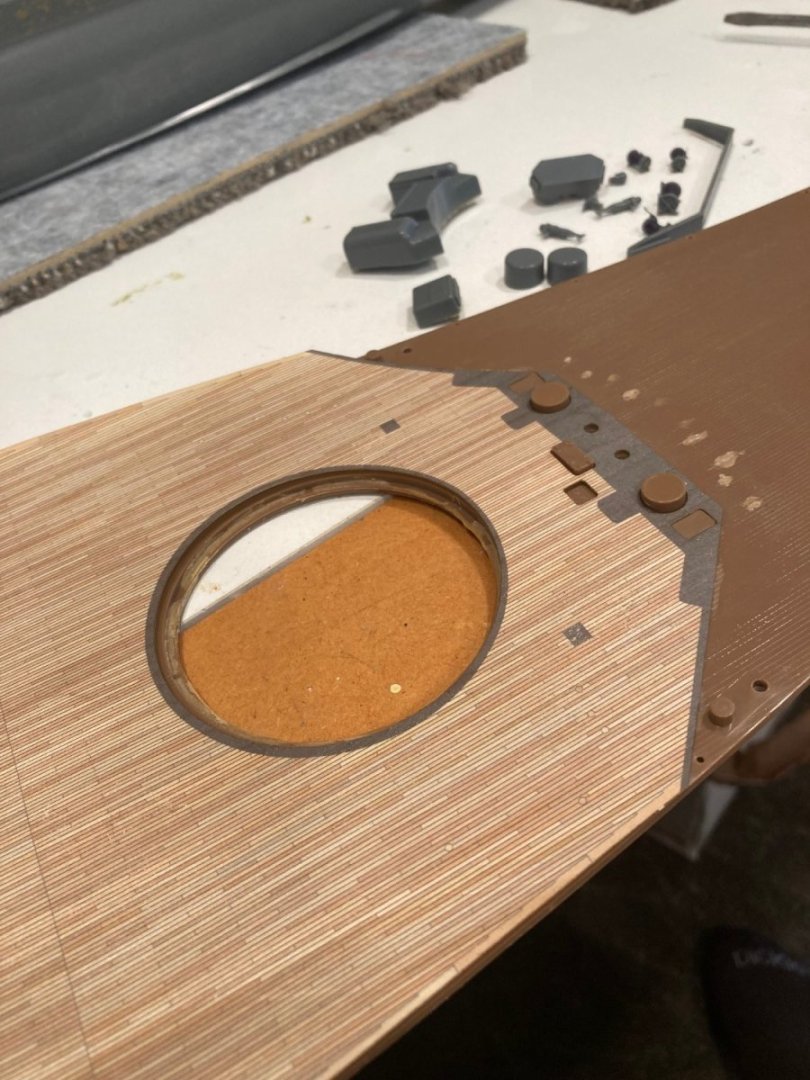
Continuing to prepare the hull for paint. Did a dry fit of all three deck wood pieces. Found minor places where the pre-cut holes needed a little adjustment to get the edges of the wood to line up with the sides in the correct position. One major area of non-fit was at the front of the center deck piece where there are a number of pieces of deck furniture and the breakwater. Big discrepancy in this area. Not a deck piece alignment problem since this is all one piece of pre-cast deck. Solution was to use an exacto knife and cut off the part of the front of the wooded deck that was done in grey shading, not wood simulation. This area will now be grey-painted deck. It already has grey painted deck furniture (the pre-cutouts for these pieces were way out of place) and I think it will be fine. The alternative would have been to cut off the deck protrusions and remake them after the deck was laid. I took the easier path. Photo will show where I had to insert wood bulkheads between the hull and the deck to get the deck level across the area where the superstructure sits. As it was, the deck was concave and the superstructure had gaps around the edges. Epoxied these wood supports in place. The superstructure sits on top of the wooden deck, once it's in place, I plan to epoxy the superstructure in place. The instructions for the wood deck suggest using Gorilla Glue PVA for attachment and I think this will result in a good fitment--better and more durable than contact cement.


-
Thanks to all above. This old fella did not know that one can simply pose a question on Google. Live and learn. It looks like the miracle-gro and water would be a good way to get a reasonably-priced (esp if you already have some miracle-gro) quantity large enough to simply immerse a sheet of PE brass. I did the brass-black with a dipped Q-tip and it was tedious. It would be easier to "catch" the process at just the right color change with a quick rinse if dipping was possible. The color I'm looking for is the brownish color copper goes to when naturally exposed, but before it goes all the way to green--like old copper pipe. The linoleum walkways on the flight deck are shown in "A" as being this color, with brass strips between the sections of linoleum. If I can catch the copper strips at just the right stage of tarnishing, I can use an exacto blade to scratch the tarnished strip with the separations and then "fix" with matte clear spray. I've cut a strip of the copper tape and placed it in my workshop area (but out of the sun so that the adhesive is not affected) to be exposed to see if it will naturally tarnish. I can wait to install this on the flight deck until much later in the building process. I'll slide it between my fingers every now and then, too (lol). PE brass certainly starts to tarnish quickly once it's taken out of the plastic envelopes.
-
Tried a vinegar soak and it made no change. I suspect that only mechanical action (sanding) will remove the black. I'll wait until I've assembled some of these things to decide if I'll keep the black. For instance, a truss tower could be lightly airbrushed (a capability I do not have as of now) on the outside over the black and not worry about getting a big buildup trying to get the gray on the inside of the truss's. Just ordered some gun bluing for a test to see if it can result in the desired "dark grey". I really do like the idea of a non-paint coating.
-
^^^ Thanks for the above. I did a vigorous rubbing and it just made it "more black". Didn't think gun bluing would work on brass. I'll give it a try. In the meanwhile, I'll do a test with a vinegar soak.
-
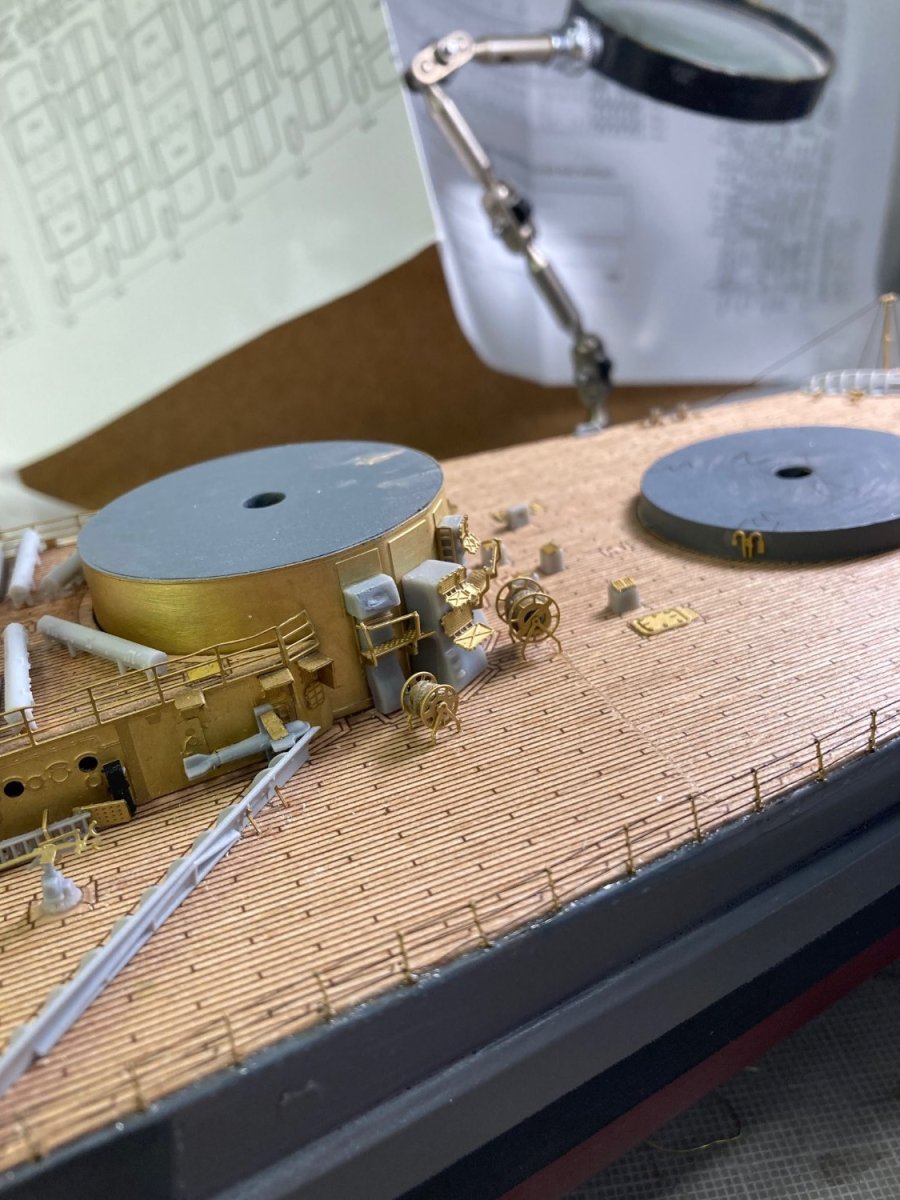
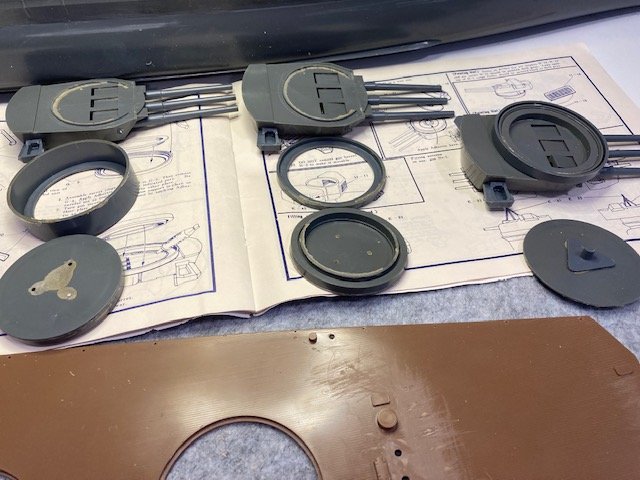
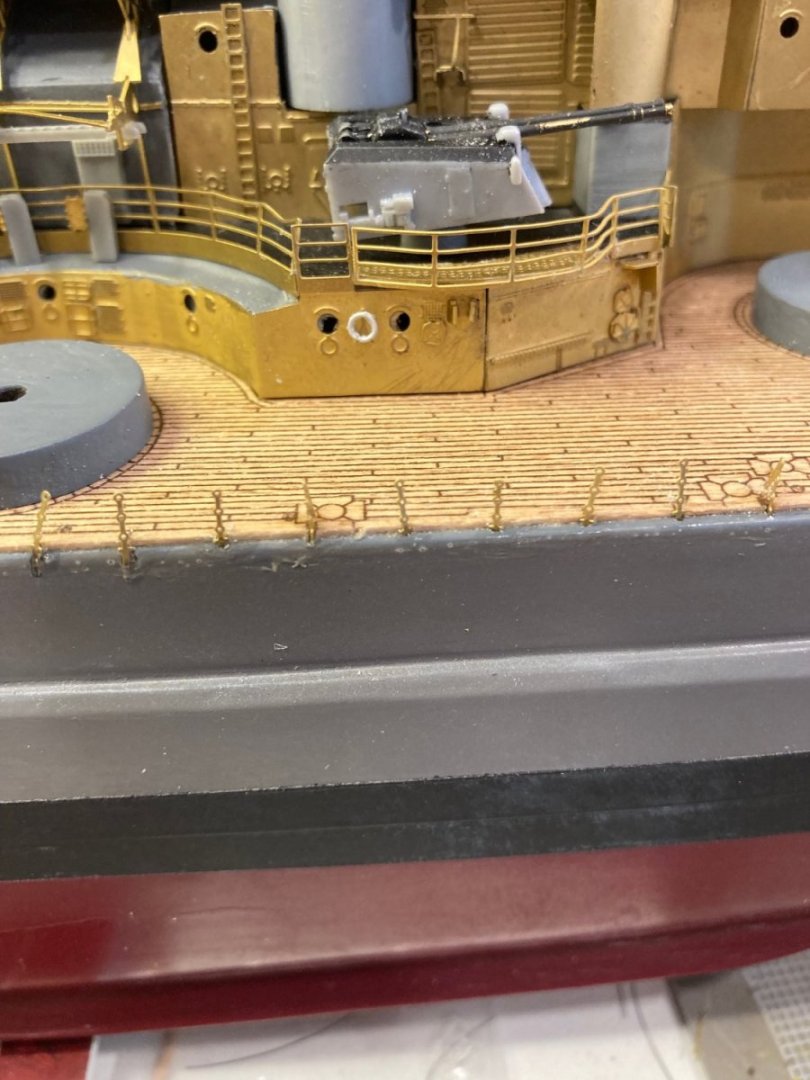
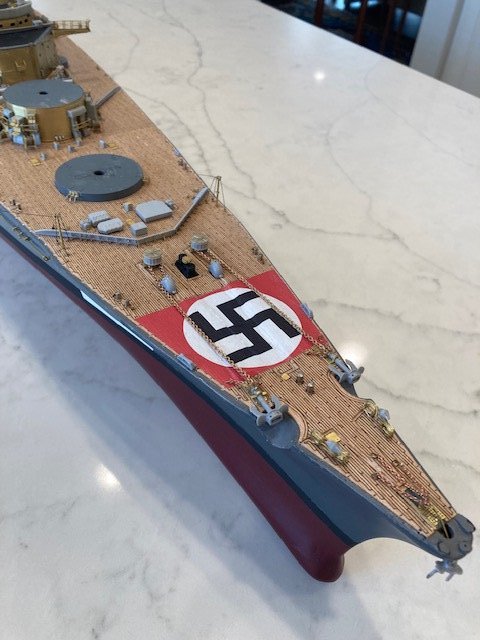
Painted the bottom of the hull with Glidden spray can "brick red". I'd like for a little more "orange" in the color to look like the color plates in "Anatomy", but one works with what one has. Reason for painting now is that attaching the rudder needs to be done while I have access to the inside of the hull, and once the decks go on, no access. I wanted to paint the hull bottom and rudder with the rudder off, so paint it now, I must. The deck pieces fit OK, except for the next to last one aft. The hull sides need to be squeezed in to mate up with the deck and I couldn't have done that without a clamp. I used CA adhesive for this job as I did not think that a plastic cement would be strong enough. It took a hard squeeze to get the edges in the correct place. There seemed to be some sort of incompatibility between the Nichimo styrene plastic used for the hull and decks because anywhere I put it seemed to weaken the plastic. My first try was to hold everything together with the screws provided for deck to hull join when access is needed for the (unused by me) electric motors. They held perfectly when dry assembled but when I applied thin CA to the hull/deck join, the plastic deck edges at the screws gave way and the hull sides sprung out. The clamp had to be used. After the CA set up, all seems to be well, but just in case I applied a fillet of epoxy at the hull/deck join at the rear of this section of deck. I will have to paint the hull aft deck before I put in place the next to last deck section because this deck section protrudes over the aft-most deck piece. I'll probably do all the topsides at the same time. This deck piece is fairly interesting. The Nichimo casting has corrugations in the two triangular places at the edge of the deck that represent ventilation holes. According to "Anatomy", this is actually a mesh. I'm going to cut out these corrugations and replace them with very fine mesh copper screen. This deck has two walkways that "A" (how I'm going to abbreviate "Anatomy") says are linoleum and are the color of old cork in the book. I got some 1/4" wide copper foil and placed it in the indicated spot. I'm hoping that this copper will tarnish a little to something closer to the correct color--just give it some time, hopefully. As I look at the detail parts, the railings are going to be attached with CA adhesive at the edges of the wooden decks and it won't be possible to paint them after attachment. So, my initial thought was to spray paint them while they are still attached to the sheet. Then, I thought, why not "chemically" blue them with "Brass Black". I've done so and the color has come out black rather than blue. I've attached a picture. Has anyone ever done/heard of this? The chemical coating seems to be part of the brass now and added no thickness.


-
George--I want to amend my previous statement regarding the kit being "horizontal" after the upswept bow. I put a straightedge on the edge of the top of the plastic hull and there IS some upsweep from where the bow upsweep begins to aft. So "Hogback" is an accurate description. It doesn't appear to be as much as the photo you show, but I still believe there is some perspective distortion in that photo because of the camera lens being parallel with the upswept deck. The Anatomy book side view of both Yamato and Musashi also shows upsweep from aft of where the bow upsweep begins--to just about the same degree as the model hull.
-
George--Yes, name is correct. I adopted ted99 a long time ago for multi-media posts and have just kept it. I think there is some alteration in perspective in the photo you show. The kit has a definite "upsweep" to the bow, starting at about 1/3 of the distance from the bow. The sheer is horizontal from that point aft. In fact, the plastic deck portion for the part of the kit aft of the galvinized foredeck has a "cast-in" curve to match the upswept sheer line of the hull. It looks to me like your photo was taken with the camera parallel to the upswept deck and makes the ship look like it's the midship area that is upswept--opposite of the case in the model. I have a tag on e-Bay postings for 1:200 Yamato, watching for detail bits, and it looks like some people are offering the Nichimo kit at more reasonable prices, now.
-
Effort to date is taking out things I don't want, like the motorizing, and poor assembly. Seems like this model was started by someone with little or no plastic modeling experience. Nichimo used Styrene plastic for the hull, superstructure, and decks plus ABS for all the small details. Means two types of plastic glue needed for optimum results. Nichimo supplied small tubes of each type of cement, but this all dates from the mid-80's and quality is unknown, so I've discarded all of the little tin tubes. As I started taking apart the pieces already built I discovered that the former builder only used the correct glue for the fore deck and 2 inserts. All the rest used some type of glue unknown to me, which popped loose very easily. It seems to be a type of urethane that bubbled as it cured. I remember when "Gorilla Glue" first came out it was a urethane cured by humidity in the air and really did grip like a gorilla on wood. It slightly foamed as it cured. There were even some fillets around the prop shaft fairings that looked like Ambroid model airplane glue. Not a lot there to be undone, relatively speaking. There are two inserts at the stern hanger deck area that were glued in with the correct cement, but poorly fitted, so I'm doing filler there. I dry fit the wooden deck to the front bow area to see how the details would be attached. It requires the details to be glued on top of the wooden deck, so I removed all the little do dads that had been glued on to the styrene deck (with some type of lousy cement) by the previous builder. Just sanded down the areas where glue was and this will be no problem because the wood deck will cover all the plastic surface. Same with the previously assembled gun turrets. Took them all apart to do a better job of assembling and adding cloth blast bags, plus a decent paint job. Threw away the Rube Goldberg levers, et al. that Nichimo provided to motorize the turret rotation. It's going to be a static model.


- 95 replies
-
- 10
-
-
These are the "start" photos of this build. It'll take me a little time to figure out what the sequence of build should be, so we are all along for the ride.
.jpg.6f14c18d4c0c2cf28beeb7a43dcdb36b.jpg)


- 95 replies
-
- 13
-
-
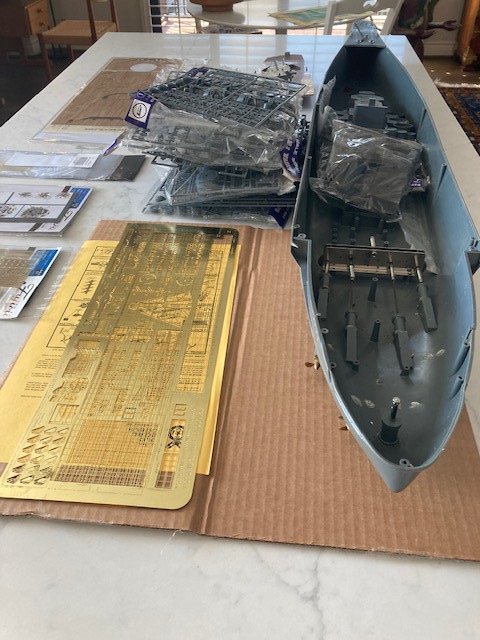
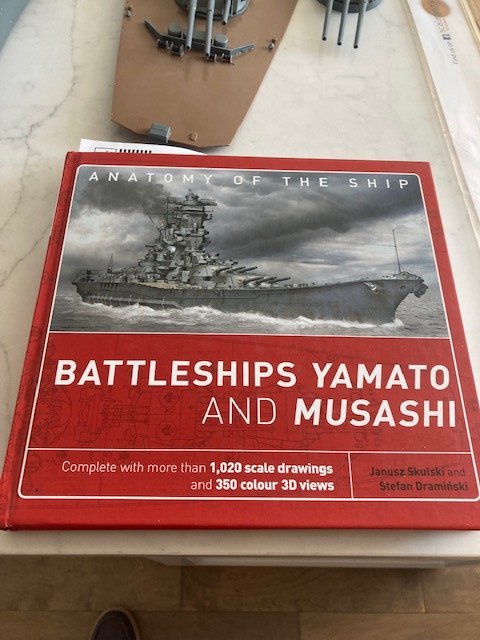
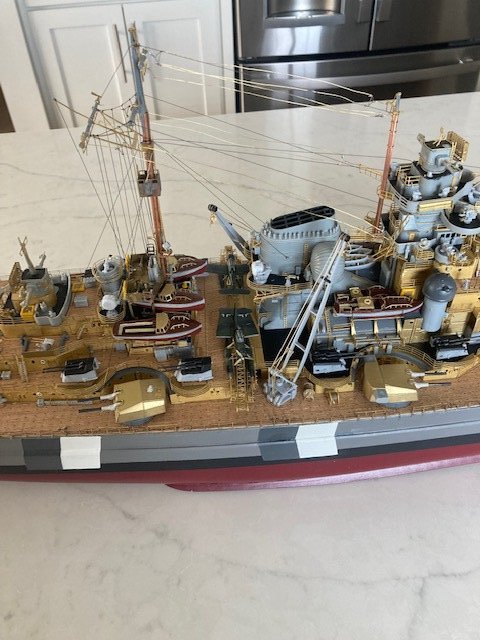
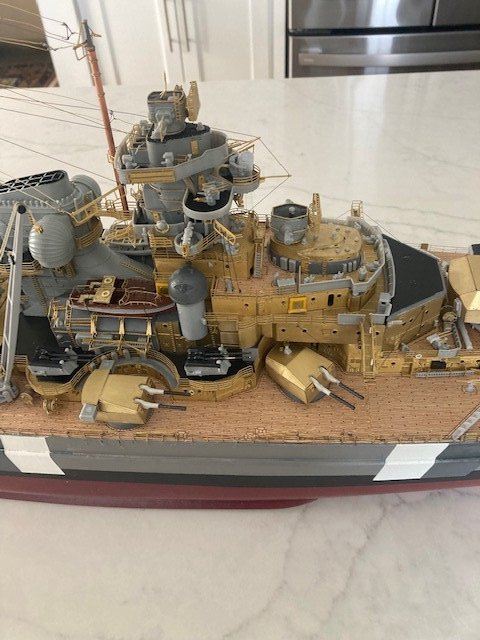
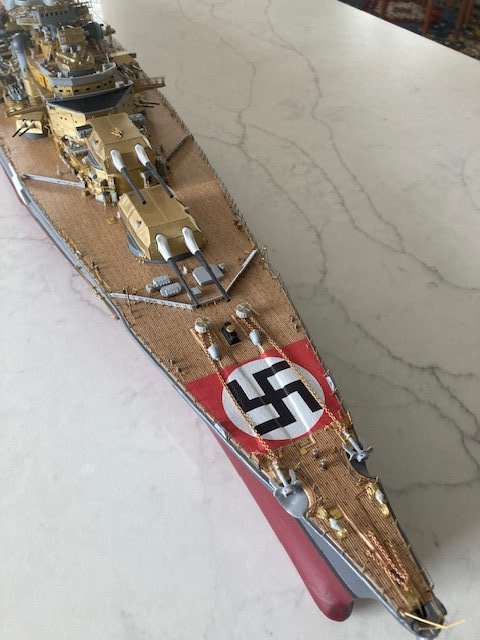
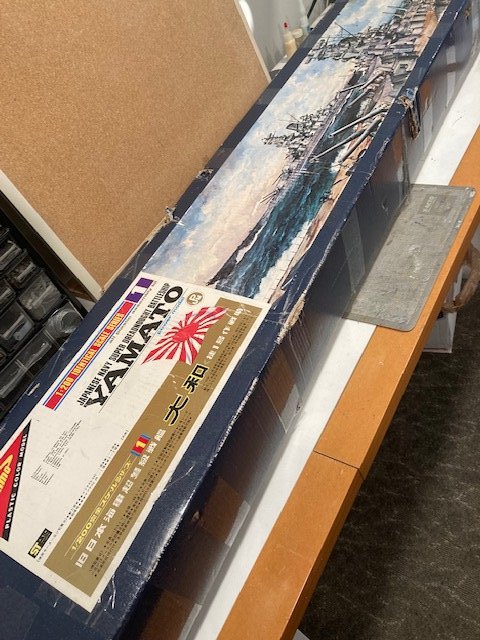
I've just completed the 1:200 Amati kit of the Bismarck and really enjoyed it. I was about half way through and started to think about my next build. I decided it would be neat to do the major Battleships of WW II in 1:200 identical scale. I decided on Bismarck, the Yamato and the Missouri. Not too interested in Hood as it was obsolete at the start and the Italian or French battleships were both obsolete and non-factors in the war. The Amati Bismarck is a wooden hull with copious brass-clad super structure and LOTs of PE and plastic detail. My chosen ships in 1:200 are pretty much limited to all-plastic, with Nichimo being the most commonly available for Yamato and Trumpeter for Missouri. Just about the time I was completing Bismarck I decided to add a fourth--USS Enterprise CV-6--as representative of the ship that obsoleted the Battleships. Once again it's all-plastic from Trumpeter. The good thing is that after-market PE and deck details are readily available for all 3. Initially, I was disappointed that there were no readily-available wooden hull models, but after reflection; I decided that I had spent a lot of time filling, sanding and priming the hull of Bismarck to make it look like plastic. So, I decided that it wasn't too much of a compromise to go with plastic hull and superstructure--plus my shoulder was going to really appreciate not having to do all that sanding. I first saw the Nichimo 1:200 kit of the Yamato back in the mid-1980's and bought one "for the shelf". After about 10 years, I decided that I had too many kits and sold it. So, I had to find another one here in the 2022 era. An e-Bay search showed that there were a lot of "new" kits available in the $600-$800 range, plus shipping, but I did a wait and watch and found one that had been started back in the 90's. It seemed to be complete and it's partial construction was limited to setting up the RC motor features and the mechanism to rotate the main 18" guns. It was less than half the going rate for "new" kits, so I took a risk and bought it. As the build log goes on I'll find out just what I will need to do as I discover the kits condition. The detail parts I have bought are: Scale Decks wooden deck set, Fujimi PE Detail sets 201 and 202, Gold Medal Models PE crane and catapaults set + railings, Tom's model Works Deck Reels and most importantly the Anatomy of the Ship book of the Yamato and Musashi. The Nichimo "instructions" are next to useless and I don't think I could contemplate doing this model without this book. This will be a big difference from the Amati Bismarck and it's VERY comprehensive step-by-step instructions and illustrations. I do think that the experience of having built the Amati Bismarck has given me a leg up in building the Yamato. Time will tell as I proceed--and I'll illustrate what I've learned as I do it for any future builders of this kit. So far as I could find, there are no build logs of this kit. My next post will show pictures of things as I start.
-
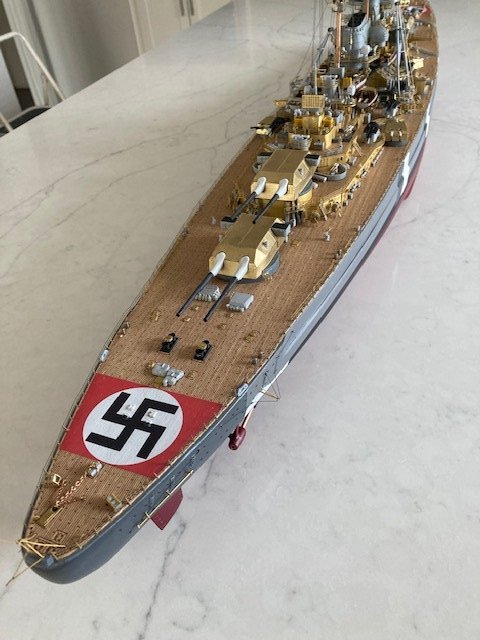
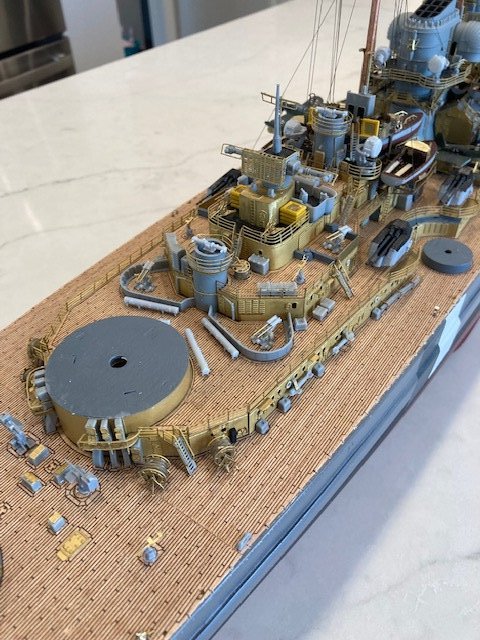
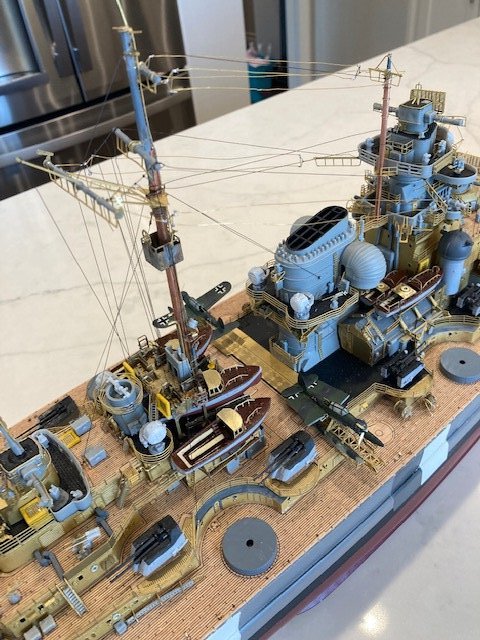
I'm finished. Railings completed and all the little do dads done. The railing for the other side was easier than the first, having had the experience. Pictures of the completed ship attached. I'm happy with my decision to keep the brass natural. It's a showcase of my modeling skills (such as they are)--not something attempting to be a museum scale model. I've decided my future projects. At first I was going to do the major Battleships: Bismarck, Yamato and Missouri. But, thinking about it, I've added Enterprise CV-6--the ship type that obsoleted the battleship. All in 1:200 scale. Have to go to all-plastic for this, though. The wooden hull for Bismarck wasn't all that difficult and I really don't need to do that again (nor would my shoulder want to do all that sanding, again). I now have all 3 future kits (Nichimo and Trumpeter) in hand, and the super detail PE sets that go with them. Next up is the Nichimo Yamato. I have not found any build logs for this ship on this site, so it's going to be all virgin territory for me. So, for any other future builders, I will do a build log. I'm thinking that I will actually paint the future models since all the superstructure is plastic, not wood and brass like Amati's Bismarck. I'll see if I can figure out how to log this build as "completed" later.


-
Thanks, Rod. No, it was a Viking cruise on one of their new ocean-going ships. 970 Pax capacity, which I think is ideal--large enough to weather heavier seas, but not so large that one is in port with 5000 of your closest friends. But, every stop had at least one other ship and up to three others. These cruise ships have a lot of superstructure, compared to draft, but they do have stabilizing vanes. Leaving the first Iceland port (capitol whose name I cannot spell, at the moment) and turning North up the West coast we encountered seas heavy enough that the Captain felt it prudent to slow down and we missed the first port call. Sea state subsided after that first day and the ride was very comfortable. My worst time at sea was in a Nuclear Cruiser escorting Enterprise when we ran into a Typhoon on the way to Japan in 1967. Enterprise was taking water over the bow 112 feet up and my Cruiser looked like a submarine from the Bridge. Decks were totally awash. I've been in the North Atlantic before, but at a "classified" submerged depth. Neither Wife nor I have been visited with Covid, YET. We took all of the precautions you describe, except pre-test. Will resume construction after I'm sure my body is in the correct time zone.
-
One final note. I don't think it's possible to do this job without a magnifying class on some sort of stand.
-
Starboard side railing complete. I take back anything I said about fiddley bits before. These stanchions and railings are the fiddlest bits there ever were. Eye crossingly tedious. But the result is worth it. Look much better than the PE railings on the superstructure. I've never done anything like this before, so I'll detail my approach in case there is a better way before I start on the port side. 1. Drilled the railing holes way back when it came up in the instructions just as the wooden deck was glued to the hull. Instructions called for .71mm drill, which I used. I think a slightly smaller size is better and one should do test holes in scrap to pick the optimum size, as Rod did. 2. The instructions say to use a pin to clean out the stanchion holes after painting. I didn't paint, but still thought I would use a pin vise to open them up a bit. A #80 drill is slightly larger than the etched hole and worked without twisting the very thin brass. Tedious--oh yes. 3. I drilled my holes hard by the printed wood deck edge, as directed by the instructions (and as would be on Bismarck judging from photos). This caused a problem with the little "tabs" on either side of the stanchion used to get a uniform depth of the bottom of the stanchion in the hole. If you set the stanchion at 90 deg to the deck edge so that the holes are pointed in the correct direction, one of the tabs hangs up on the top of the decking. I dealt with this by inserting the stanchion in the hole with the tabs flat to the edge of the decking. This ends up looking like the prototype with flanges on either side of the stanchion hard against the wooden deck edge. I then twisted the stanchion 90 degrees to get the holes parallel with the deck edge. BUT, before doing that, I drilled out the holes once again using a pin vise. This was because frequently, capillary action on the CA glue would block the lowest hole. This time I used a #79 drill to go up one more size. It was easy to do this with all of the holes facing out and flat with deck edge. No problems with the larger drill and I really appreciated the extra size when threading the railing material. 4. The supplied black "thread" is perfect for the job. Stiff enough to thread easily, but not so stiff that there are problems with pulling it through. Experimented with EZ line for this, but it's too flexible. Also tried #30 brass wire but too stiff. attached picture showing where the stanchions are flat and then where I had done the 90 deg bend. Second picture is after completion. I'm about to leave on a Cruise to Iceland, then Shetland IS. and Faroes on the way to Bergen. LOL, I'll be retracing the first half of Bismarck's last voyage. No work until I get back in about 3 weeks. Ted

-
Thanks, Rod. Yes, LED lights here too. Bismarck did skirt the arctic ice pack as she came down the Greenland coast, but was never in the ice, but that fake Carrera marble top does look like it. I'm really pleased with the natural brass look. I left all plastic parts their natural color, except where there were black highlights, and painted all of the wood parts either gray or black. Bismarck will be with the natural brass, The next ones will be fully painted and Bismarck will be my "demo" model.
-
Well, I corrected the mast, more or less, by using a cut-off disc in a moto tool just below the crows nest and rotating 180 deg. A short piece of the 3mm brass tube was just right as a splint inside the 4mm mast. Everything is now done, except for the railings and the fore and aft flag stanchions. Pictures attached. I experimented with some green EZ line for one section of the antennas. I liked how the stretchiness made the lines tight, but not so powerful a pull as to risk pulling something out they were attached to. I was reluctant to use the EZ line throughout because the instructions state it's subject to degradation from UV light. Time will tell. I had some of the fine "green" line (which is advertised to be "corroded copper"). If I had been buying it, I would have used the black. I'd prefer a thickness between the "fine" and "thick", but I suspect that the fine is actually "to scale". Also, I tried using 30 ga brass wire for the four sets of horizontal antennas and soldered the ends to the brass spreaders. I like the look of them.


-
I really like the work you did on the boat cradles. I did mine before I worked out using thin CA and a looper, so they are crude in comparison.