
HOLIDAY DONATION DRIVE - SUPPORT MSW - DO YOUR PART TO KEEP THIS GREAT FORUM GOING! (Only 24 donations so far out of 49,000 members - C'mon guys!)
×


DocRob
-
Posts
1,263 -
Joined
-
Last visited
Content Type
Profiles
Forums
Gallery
Events
Everything posted by DocRob
-
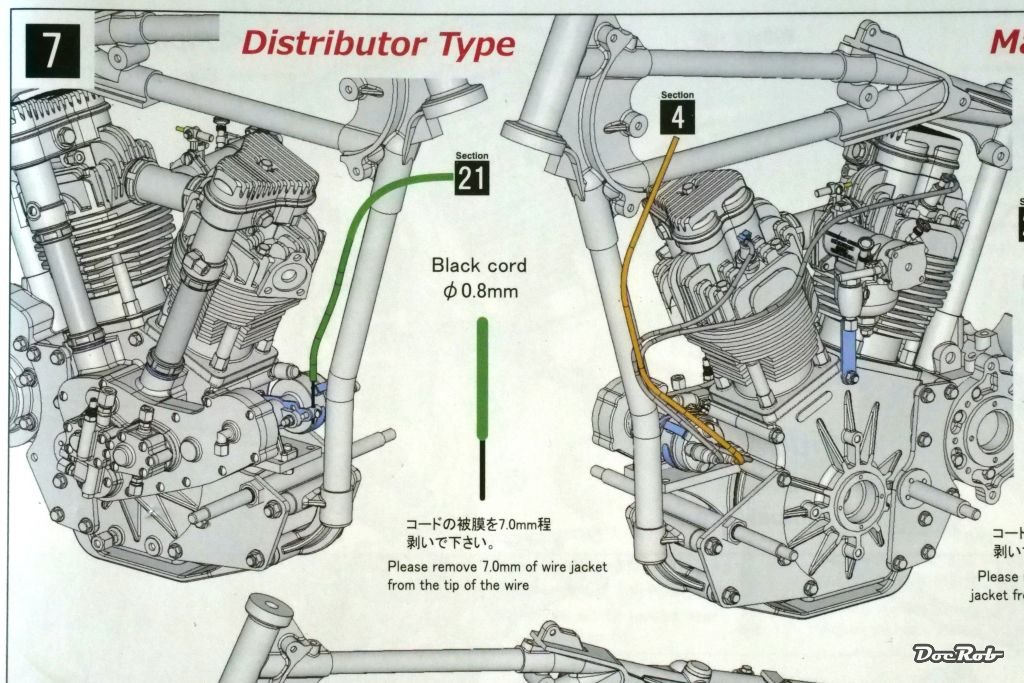
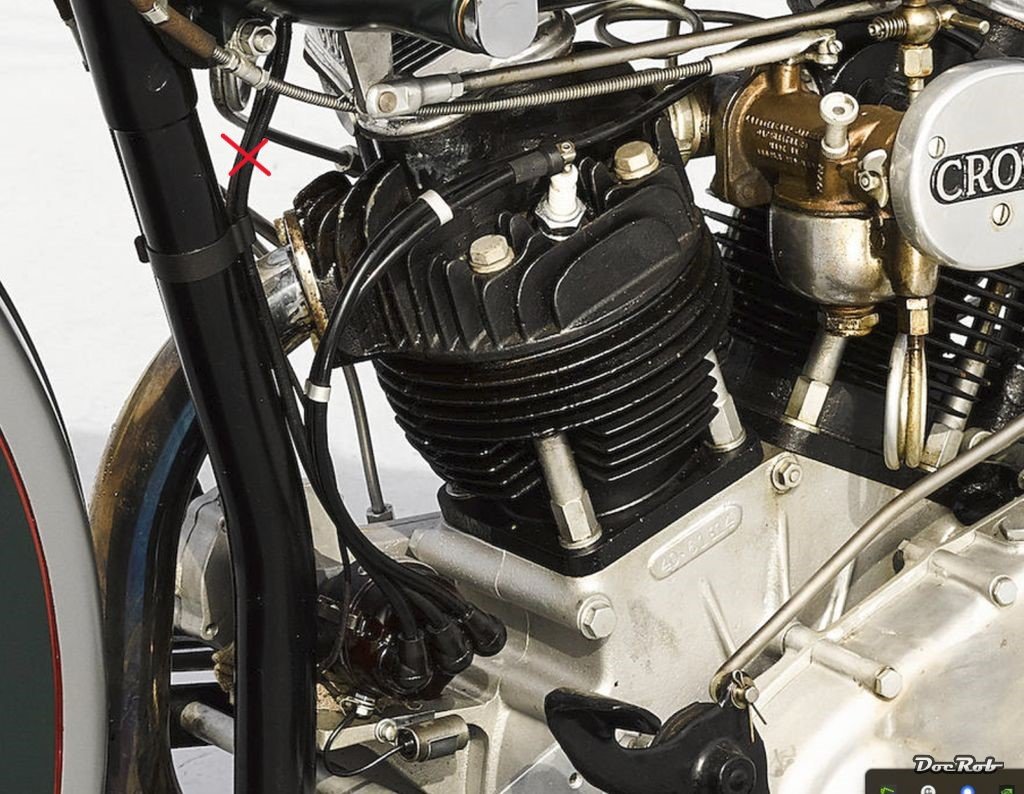
 Thank you Craig, I think, the wire you refer to is shown in the manual in green It ends at the handlebar. The yellow one with the section 7 reference on the lower pic is the one in question, it´s the same like the yellow one in the upper drawing, labeled section 4. Cheers Rob
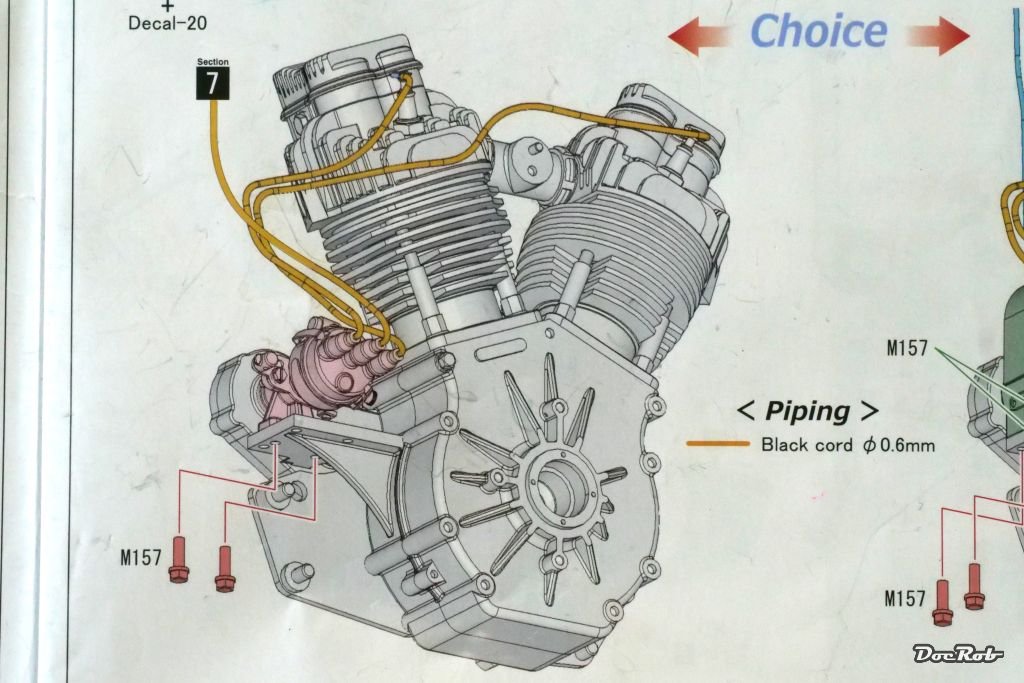
-
I have one question for the classic bike experts. Which function has the marked wire, which leads from the distributor to the area of the tank. The other two are the ignition wires, but the third cable, I have no idea of the function. The MFH manual doesn´t show either. The cable just ends under/in the tank area. Cheers Rob
-
After airbrushing the frame with Tamiya LP-1 gloss black, I continued with the engine. I added the carburetor and some fuel lines, which are hard to reach later. The engine is more or less finished now and will be mounted into the frame next. Cheers Rob
-
I built up the frame from it´s various parts, which again included lots of drilling and leafing through the manual, to see, which diameter is needed for a hole and what´s going in. Luckily the precision of the casting is fantastic and there are only minimal irritations in the parts. Here is a mock up with the engine mounted into the frame. Meanwhile said frame is primed and the missing carburetor parts got airbrushed. Cheers Rob
-
Triumph 3HW by Tim Moore - Italeri - 1/9
DocRob replied to Tim Moore's topic in Non-ship/categorised builds
The bike looks absolutely fantastic, Tim. I really like, how you nailed the materials appearance of everything. The paint has the right shine as have the different metals and dullness is where it belongs. Hard to achieve, but great to look at, congratulations. Cheers Rob- 77 replies
-
- 10
-

-
Keeping my head in the game.....
DocRob replied to Egilman's topic in 3D-Printing and Laser-Cutting.
Impressive work Egilman, I hope your CAD development will be put to reality, when ready. Like you, I learned pen and paper construction in my early days as an engineer, but I never converted to CAD other than producing early day 3D-animations. Your re-engineering is fascinating to follow, I only recently learned, that Model Factory Hiro designs their kits only from pictures very often as well. Cheers Rob -
Absolutely Gary, these veneer Tamiya kits are a bit of a mixed bag, quality wise, like I encountered with my recent Renault RE20 Turbo build. With a bit of extra work, they will look very good in the end. I also changed a lot of the Tamiya tubing with finer tubes from MFH and braided lines, which looked more realistic. For my future Brabham BT44 build, I added some MFH funnels and other details to the highly visible engine. These decals must be pretty old, I would test them before applying them to the model. Cheers Rob
-
The last building sequence was a bit fiddly, with wiring the spark plugs with tiny etched parts and micro rivets, followed by the distributor, which consists of about 20 parts, a lot need to be pre drilled for various installments. There are two variants and I chose the more complicated. The magneto has a fewer parts count, but looks odd and the pictures I have of the real bike always have the distributor installed. I prepared the wires, but add them later, when the engine meets the frame. And that´s how tiny the distributor is, you find it on the left side of the engine, lower middle. Cheers Rob
- 102 replies
-
- 11
-
-

-
I added more details to the engine and also prepared the distributor. Drilling the tiny oil tube connectors proved tricky. They need to be drilled to accept the oil tubing made from solder wire. Most of the screws shown on the casings are separate parts and also need to be pre drilled and then inserted. The manual suggests to add the oil tubes next, but I will do it later, because handling the still not finished engine would be a nightmare with the soft wiring on. Luckily the places for the tubing should be reachable later. I also added some dots of black panel wash here and there to enhance contrasts. Cheers Rob
- 102 replies
-
- 11
-
-
-
Exactly Craig, most of the polishing tumblers include a bag of non specified steel pins. Mine, the only one which could be shipped to my place after a lot of effort included none and had to purchase them separately. Cheers Rob
-
I use only the 0,3 mm steel pins, water and a drop of detergent. There are polishing fluids around, but I haven´t tested these. The non magnetic white metal parts are relatively unmoved in the magnetic tumbler, which helps avoiding scratches due to impact of the parts. Only the steel pins swirl around and do their polishing job. I tried a simple rotating tumbler as well, filled with water and tiny steel balls. The surfaces were shinier with that treatment, but you loose sharpness of details and the steel balls don´t reach in all the tiny crevices. Cheers Rob
-
Thank you Craig, the tumbler indeed helped a lot, specially for a kit like the Crocker, where many parts will be left without painting or even be polished later for a realistic chrome effect. You can toy a bit with the diameter of the steel pins, I bought some with 0,6mm and 0,3 mm diameter and used 200 gram of the latter. The tumbling process needs to be supervised. I tumbled about an hour, but you have to find a balance, between nice surfaces as a result and not losing sharpness in tiny details like boltheads on the other side. I recommend wearing rubber gloves, while handling the parts after tumbling, you will be astonished, how black the water will be, and I guess, it´s not too healthy either. I also got the magnetic tumbler suggestion through videos and build logs too. Cheers Rob
-
The engine is on it´s way and it is a bit fiddly, but due to great engineering and tight tolerances manageable. Adding all the V-shaped cylinder parts proved tricky, when the rocker came into play and the connecting tube (carburetor) needed to be added at the same time. Unfortunately, I mis-orientated this part and had to pry it loose later, which was no fun at all and caused some spots for later touch ups. Cheers Rob
- 102 replies
-
- 13
-
-
-
Well, first building steps are prepared. Note to myself, test fit often and understand the manual, specially where parts need to be drilled. I don´t know about the MFH car kits, but with the Crocker engine parts there are dozens of holes to be drilled and some are hard to reach in later stages. The foot pedal and drill stand for my Proxxon mini drill help a lot to make the job faster. The good thing with drilling white metal, there is nearly no burr to be removed. The engine block, with one cylinder mostly mounted, showing the parts of the other: Mock assembly for test fitting of one cylinder. The ribs and heads are actually removed and primed and will be sprayed semi matte black later. Cheers Rob
- 102 replies
-
- 13
-
-
Well, I´m not much into the chopper thing, Ken. Personally, I prefer European bikes for European roads, they just perform better. My last one was a KTM 950 SM, the last one with carburetors. This thing drove like a sharp blade, but with the handling of a bicycle. Perfect for ultra fast city commuting, alpine roads, just everything below 200 km/h, because there was no windshield. Even week trips were no problem with the furious KTM. I loved that beast, but left it in Berlin, when I went to my island and promised my wife not to drive motorcycles anymore. Well, now it´s mountainbiking . Cheers Rob
-
Your Dino came out fantastic, Gary. Somehow, I missed your log, but read it now. These veneer Fujimi kits seam to be a very good base. I´m in the middle of their 1/20 McLaren MP4/6 and found the kit lacking in many aspects, very disappointing, but not unfixable. Cheers Rob
-
Today, I spent some exhausting hours to sort the parts, mainly the white metal cast ones, as they are the most numerous. I made it a two step affair, first using the parts layout prints from the MFH homepage, to check if everything is there. These photos of the parts are especially helpful, as they are scaled and this helps to identify the parts. In the second step, I sorted the parts into a plastic box with different sized trays, ordered after the steps in the manual. The tiny parts, like screws and bolts, I left out, as they are easier identified separately. Tomorrow, I will add resin and rubber parts along with screws, nuts and bolts. Cheers Rob
- 102 replies
-
- 11
-
-
Good to have you along, Yves. I´m sure, sooner or later, I will have a lot of questions about how to work with this kind of kits, so be prepared . Cheers Rob
-
Same with me for a long time, Gary. I often looked for the MFH kits, watched build logs with fascination and then there was the Crocker, hitting all my buttons. The F1 cars in large scale are really tempting. I had the luck two weeks ago, to lay my hand on one of the 200 limited Williams FW16 ´Senna ´Edition, which hopefully will arrive next week. They started to sell at 7:00 pm JST on the seventh of May and a quarter of an hour later, there was a message, all have been sold, so I´m overly happy to have scored one. Cheers Rob
-
Good to have you along, Egilman. I am absolutely no expert when it comes to classic American bikes, except, that I rode some, I borrowed from friends. The price tag is daunting, indeed, but you receive a lot of quality for it. I will see, how this build turns out, to figure out, how many of the MFH kits will find their way into my stash. So far it´s three and one in the mail. Like you said, MFH can´t be praised enough for their portfolio of rare subjects produced as kits. You sure got the feeling, there is a lot of passion involved. Cheers Rob
-
F-14D Super Tomcat by CDW - AMK - 1:48 Scale
DocRob replied to CDW's topic in Non-ship/categorised builds
Great progress with the big cat, Craig. The engineering of the AMK jet kits is fantastic and the fit of their MIG-31 kit was perfect, even on the most complicated parts, like the intakes. The only issue, I had with the kit, were the bang seats, which were horribly out of scale. I hope this is not the case with yours. The pic shows the kit seat on the right, to the left is a seat from a Brassin refined SU-27 kit and in the middle is the seat with pilot, I used, I guess it was made by Aerobonus. Cheers Rob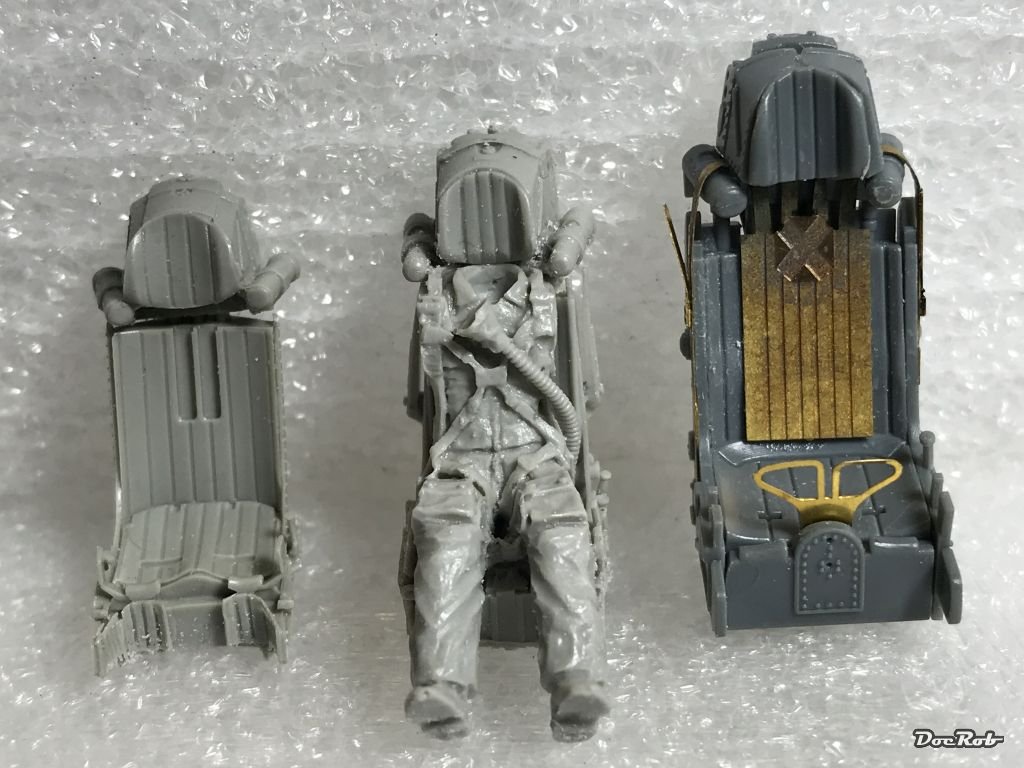
- 45 replies
-
- 11
-
-
-
Ladies and Gentlemen, lets start our engines and begin a new adventure. Some month ago, I received my first MFH kit, after I saw some pictures of the finished model and fell in love with the bike immediately. There she was, all the great ingredients of an American bike classic minus the to my eye ugly mid section, the classic Harley Davidson models have. I will not tell a lot about the history of the bike, as I´m not an expert here, but it´s a pretty exclusive one. Hand built, the numbers of production bikes range between 60 and 300. The few surviving beauties are among the highest priced motorcycles of today. The Crocker was fast, so fast, that the company complied, to give back the full price of the bike, should the driver be overtaken by a Harley or Indian on a strait road. The kit was bought from MFH in Japan directly for a decent price and the fastest and trouble free shipping, I ever had and reached after six days on my doorstep. Since then, I bought some more MFH kits, as simply browsing through the boxes, the absolute top quality of the kits has an addictive spell over me. The kits are multi-media, most parts are from cast white metal, some photo etch, rubber parts, different hoses and wires, some chrome plated metal parts, nice decals, ... I preparation for the build, I read a lot about MFH kits, to get a hold onto the many new adventures, I was expecting with the build and as one result, I invested into a magnetic tumbler polisher for cleaning the white metal parts. It took my month to finally obtain one to my remote place in the world, but finally, it arrived. After some successful testing, all white metal parts were dumped into the tumbler´s bowl, then, I added water with a drop of detergent and 200 gram of 0,3 mm steel polishing needles. The strong magnet in the base swirls the needles around the non magnetic parts and `hammers´ the surfaces very gingerly. After about an hour of tumbling the water was dark black and the parts looked like this. It was not so easy to remove the tinier parts from the needles and I keep all the bowls with needles and the blackened water until, I made sure, I picked all the parts out. For now, I rinsed the parts with water again and layed them out onto kitchen paper to dry. The finish of the tumbled parts is fantastic, but of course, further cleanup will be needed down the road. Some parts will get polished, as the white metal looks perfectly, like steel or even chrome when polished carefully. Next step will be checking against a copy of the manual, if all parts are there. MFH manuals include only a rudimentary parts list, but on their homepage, they have pictures of the kits parts, which will be helpful for the task. I will add a few detail pictures from some of the parts, to show the fantastic casting quality. The tumble polishing of the parts effect surface detail only minimal, details remained sharp. Stay tuned for more. Cheers Rob
- 102 replies
-
- 14
-
-
-
Thank you Dan, I copy so much of build logs, books and wherever I can get hold of inspirations. It´s relatively rare that you develop new techniques by yourself, isn´t it. I´m a week off for now, enjoying a week in the Spanish seafood Mekka of Galicia, hopefully without too much rain ,but lots of good wine and delicious food and possibly some maritime inspirations. Cheers Rob
-
Thank you wefalk, you may be right about the watch and the moustache. Possibly airfields for strategic bombing were a bitt off the frontline and therefore not so much at risk, concerning gas attacks. Like you, I doubt, that a mechanic owns a wristwatch in 1917 or 1918. I store my finished models in a cramped shelf in my cave. With most of my built models, I loose interest after I finished them and store them away. Sometimes, I give models away as a present to friends. The only exception might be the Duchess of Kingston, which might end up presented somewhere in our living rooms, when at last finished. Cheers Rob
-
Muchas gracias Señhores, finishing this kit brought a nice feeling of satisfaction, albeit in the end the little glitches add up and yes, finally figure painting. I like to choose figures for many of my builds, which tell a story, but when it comes to painting these, I sometimes shy back. It´s a steep learning curve and still a lot to master, but wat is modeling without a challenge? Cheers Rob
