
HOLIDAY DONATION DRIVE - SUPPORT MSW - DO YOUR PART TO KEEP THIS GREAT FORUM GOING! (Only 13 donations so far - C'mon guys!)
×


DocRob
-
Posts
1,257 -
Joined
-
Last visited
Content Type
Profiles
Forums
Gallery
Events
Everything posted by DocRob
-
 It was printed, like Egilman explained. In case of my AEG, it might have been overpainted with a slightly yellow transparent varnish on the original plane. That´s what I tried to simulate. The varnish make it look a bit like on a sepia photo and I have to say, I like the effect, which unifies the lozenge with the painted areas, Balkenkreuze and markings. There are some examples of printed Lozenge on the Aviatic webpage, who sell many different variations of lozenge camo decals, which are of very good quality. used them on other builds and they looked fantastic, having a woven background and looking cloth like. You have to scroll down, too see the pics of the real thing. 1/32 "Lozenge" Decals (aviattic.co.uk) That´s a very polite way to remind me of my photographic shortcomings, Egilman There was once a build of a Gotha bomber over on LSM, where the builder used masks for the camo and in one of my Wingnut wings related books was another one building a day bomber AEG, using masks. The day bomber schemes consists of larger lozenges, but I have never seen anybody, replicating the smaller lozenged fighter or naval hex schemes. Cheers Rob
 -
Not a lot of difference between these two pics, at least at first sight. What I tried to achieve, is to make the huge wings a little bit more interesting. First, I used a sharpened AK weathering pencil blue green and rubbed the tip over all the seams on the wing spars, quite tedious to do, but did a bit of highlighting. Then, I mixed Tamiya smoke with some drops of Tamiya clear yellow and sprayed it in slightly irregular patterns over the plane in the direction of the airflow. This tinted everything a bit and blended in the decals even better. Next was a matte coat, but the Tamiya LP matte clear was not matte enough for my liking. Therefore, I used Pledge with about 25 percent of Tamiya flat base mixed in. I would have liked it a bit more matte, but didn´t dare to add more flat base, as there is a risk at about thirty percent, that the mix sprays with a frosty surface. On the lower wing, I had some decal lifting on the trailing edge. I ´glued´ these in place with decal adhesive, but this will be a weak spot until finishing the build. Cheers Rob
- 190 replies
-
- 16
-

-

-
Today, my long awaited parcel from Japan arrived, which included my Infini 0,135 mm aero flexible rigging thread. I never used the stuff and was eager to see, if it is suitable for the classic ´ thread through tube - then through the eyelet - and back a second time through the tube ´rigging and it worked. So this will be my method of rigging the nacelles, which are very delicate with their struts. The outer wings will be made with the same process, but with mor rigid fishing line instead for extra stability. Cheers Rob
- 190 replies
-
- 13
-
-
Today, I test fitted the engine nacelles with their struts to the fuselage/wings, not for vanity, instead for good reason, as it proved impossible to add the cabane struts to their fuselage holes, which they share with the nacelle´s struts. I will have to shave a bit off the lugs, despite, there is no color onto the lugs and holes in the fuselage. While testing, I broke one strut, because these are very fragile, close to the connection points. As this is the area, where some rigging lines lead, later, there is no way drilling through the strut and to weaken it further. I have to find another way and may rigg the nacelles with elastic thread. Speaking of cabane struts. If you ever build a WNW AEG, watch out closely, when to add them. They skipped my attention in the manual completely, until I inspected the rigging diagram and asked myself, where do these struts come from. I found them relatively hidden in the manual then. I then drilled out all the holes in the wings, where attachment points for the rigging will be with a 0,4 mm drill bit and then added Gaspatch metal cast eyelets, glued in with CA, orientated that the struts won´t interfere with rigging too much. Before airbrushing and decaling the wings, made photos to show, where the holes for the eyelets lay, which proved to be helpful now, when I probed them with a needle. With my kit, one side of the cabane struts where completely bent on the sprue. I tried to righten them, but that proved extremely difficult, as I didn´t want to break them. I used a hairdryer and bent them little by little. You can see one of the struts still bent on the picture. Cheers Rob
- 190 replies
-
- 13
-
-
Just stumbled into your build log and initially my jaw dropped. That Falcon display is absolutely fantastic and has so much dynamic with it´s setting. All the best to you and your wife. Cheers Rob
-
I finished decaling the wings and matte coated them. I´m happy to have finished the decal phase now, never in my builds, decals have covered nearly the whole kit like here. I also started to weather the fuselage and will prepare the wings now, with fitting in the eyelets for rigging. The manual mentioned, that many AEG´s received a yellow / green tinted varnish over the lozenge cloth and I will see, If I replicate that too. She is a big girl for sure. Cheers Rob
- 190 replies
-
- 14
-
-
-
P-51D Mustang by CDW - FINISHED - Dragon - 1:32 Scale
DocRob replied to CDW's topic in Non-ship/categorised builds
Fantastic Craig, you built an absolute beauty out of this error prone old kit, congratulations. Cheers Rob -
P-51D Mustang by CDW - FINISHED - Dragon - 1:32 Scale
DocRob replied to CDW's topic in Non-ship/categorised builds
I really can´t remember, if primed or not. I have to go through my ancient build logs to find out and will add that later. Cheers Rob -
Proxxon mini lathe verdict
DocRob replied to Srenner's topic in Modeling tools and Workshop Equipment
They are made from plastic, but that would be sufficient, if they were made precisely. They had burrs, leaving marks in the wood on mine and weren´t drilled out like they should be. You initially needed a lot of force inserting a 6 mm wood rod into the 6 mm collet. I bought my Proxxon lathe for 120 Euros here in Europe, don´t know about the prices abroad. Like @barkeater mentioned, the pass through ability of the Proxxon is an important feature for shaping masts and yards. Cheers Rob -
P-51D Mustang by CDW - FINISHED - Dragon - 1:32 Scale
DocRob replied to CDW's topic in Non-ship/categorised builds
Your Mustang looks fantastic, Craig, I love the shiny finish with the panel accentuation. Good that the original decals worked, I had very mixed results with HGW wet transfers on different builds. If everything works out, they loook perfectly, but that´s only the case with perfect surface preparation, concentration and sheer luck. I liked the little worn effect on the stencils from a MIG-31 I once build, but would be carefully with a relatively new looking plane. How did you get the AK Extreme Metal black base to really cure. I used it twice as a base for chrome and polished aluminum, like you, straight from the jar and it never dried, staying tacky even after weeks. I threw my bottles away and use Tamiya LP gloss black instead. Works perfectly, is durable and dries fast. Cheers Rob -
Proxxon mini lathe verdict
DocRob replied to Srenner's topic in Modeling tools and Workshop Equipment
I added the three jaw chuck for larger parts for mine as well as the drill chuck with sliding sleeve for the tailstock, to enhance the possibilities of the lathe. I haven´t seen an add on tool holder, the included one is not very long, but works well enough for my cases. PROXXON - DB 250 Cheers Rob -
Proxxon mini lathe verdict
DocRob replied to Srenner's topic in Modeling tools and Workshop Equipment
I bought mine for the exact same reason, tapering and shaping masts and yards, which worked perfectly. The only drawback are the plastic collets, which are of a very bad quality, with lots of burr and hardly fitting the diameter, they were made for. As I couldn´t find metal substitutes, I modified mine by drilling them out finely and sanded them carefully to fit. Cheers Rob -
Yup, my normally used soaking tub was too small and I had to steal something from the kitchen . There are five large sheets of decals with this kit, luckily to a very high standard quality and fit wise. Cheers Rob
-
Indeed the different available decal solutions help a lot with the application. In case of the wings, I used only warm water with a drop of detergent for applying. When relatively dry, there are still some folds and creases visible. The combination of decal softener solution and use of a hairdryer is used then to get rid of these and to conform the decal round the corners. In this case, I had to do this several times, because the decal solution I used (Tamiya decal adhesive softener type and Micro Sol) are relatively mild. If your decals don`t dissolve with stronger stuff, the process would be faster. The WNW (Cartograph) decals from this kit react with stronger fluids, so I always recommend to test the on a spare decal from the sheet. Like Craig described ,the use of decals on foil for representing flags should work. The only (lie) reason, I drink wine are the tinfoil caps, which are perfectly as flag or for representing other ´cloth´ material . . If you want to bend the flag after the application, I would also use a hairdryer to soften the decal material. Cheers Rob
-
After half a square meter of lozenge decals, I have most of the wings finished. The process of decaling is very time consuming, but the decals behave very well, given these are the largest, I ever worked with. Fit is still outstanding. A good sequence helps, starting with the undersides from inside to outside. Then softener and hairdryer in iterative circles, until the decal settled around the corners and then on with the upper side. Good work for days, where you don´t have the time for continuous hours at the bench, but work an hour here another there, over the complete days. The most difficult parts were the smaller ailerons, where it is hard to lay the decals around the corners with relatively mild softeners. Now it´s decision time, I haven´t decaled the upper side of the upper wing, because of my pre thought rigging method. I will use proper eyelets and small brass tube sections for the lower wing side of the rigging, but initially had the idea, to drill the rigging holes in the upper wing through, using flexible rigging thread, inserted through these holes and use only a piece of brass tube as a fake turnbuckle. Then I could glue the taught rigging threads in place cut the rest off and decal over on top to hide the holes. The proper way would be rigging lower and upper side with eyelets and brass tubes and fishing line as rigging thread, which even strengthen the wing assembly. Cheers Rob
- 190 replies
-
- 14
-
-
-
Keeping my head in the game.....
DocRob replied to Egilman's topic in 3D-Printing and Laser-Cutting.
This is a remarkable project, despite the recent drawback Egilman. I hope your MKII will become alive soon. All the best wishes for your health issues, keeping the mind occupied helps a lot, I think. Cheers Rob -
Progress is a bit slow at the moment, but I managed to prepare the wings for decaling and painted struts and other wing connected parts. It´s a Wingnut kit and I spoke about tolerances before and that´s why used liquid mask and numbered tape strips for identification of the struts, to seal the connection points and wooden or plastic rods for the strut´s holes in the wing, glued in with heavily water thinned white glue. I then applied some white pastel onto the seams of the wings, with a flat piece. This was the fastest and easiest way to pre shade the spars. I didn´t want to put much effort into this step, because I guess, it may remained unseen with the opacity of the lozenge decals on top. Then the wings were coated with Mr Color GX-100 gloss varnish. I always have mixed results with that stuff. If everything works fine, it produces an absolutely fantastic gloss layer mixed with leveling thinner, but when not.... I learned the hard way, not to pre mix GX-100 in a plastic jar, as it produces very ugly ´frosted´ spray, maybe because color and/or thinner reacts with the plastic jar. In this case, I mixed everything in a glass jar, but still, I had the frosting effect three times while spraying. After cleaning the airbrush, I used the same mix without issues, very strange. Cheers Rob
- 190 replies
-
- 13
-
-
P-51D Mustang by CDW - FINISHED - Dragon - 1:32 Scale
DocRob replied to CDW's topic in Non-ship/categorised builds
I have these mask sets for my Tamiya P-51, makes life easier, hopefully. P-51D MUSTANG - SURFACE PANELS MASK - 1/32, Miryoku MIR/32008 (scalemates.com) P-51D MUSTANG - PAINT MASKS FOR WHEEL BAY - 1/32, Miryoku MIR/32009 (scalemates.com) Cheers Rob -
P-51D Mustang by CDW - FINISHED - Dragon - 1:32 Scale
DocRob replied to CDW's topic in Non-ship/categorised builds
Good kit, bad kit, doesn´t matter, it looks like a Mustang and it´s going to be a nice one Craig. I like Pledge as a varnish like you, but prefer using it in the airbrush. What I don´t like about Pledge, it´s not the most durable finish and can be easily damaged with decal solutions. I once had frosty irritations around decals, using the relatively mild Micro Sol onto pledged decals. It´s good to see, the Pledge took away only a tiny bit of the shine, an effect, I always fear, when it comes to sealing NMF. Cheers Rob -
Thank you Ken, this part of the build, is right down my alley, playing mad scientist, with the whole bench cluttered with colors, pigments, metal waxes, tools to wear and tear, a bunch of different brushes and a picture in my had, how everything should look. I especially like the hairspray method for weathering, which was used for the cowlings and engine cages here. I prefer working into the layers for weathering instead of onto, like paint chipping with a brush. When you work ´into´ the layers and later add more weathering with oils and washes, you achieve a much deeper result. Cheers Rob
-
This may not mean a lot to most of you, but I got the decaled fuselage sealed in. I feared bad reactions with `hot´ varnishes, but because of my planned weathering schedule, I wanted a durable sealing coat, a contradiction. First, I wiped down the whole airframe with a cotton towel and purified water, to get rid of decal solution residues. I took out god old Tamiya X-22 clear and mixed it with Tamiya acrylic thinner and sprayed it on some test parts, so far so good. When I sprayed on my decaled test elevator, the finish looked like marbled and scratched, bummer. With shaking hands, I mixed the ´hot´ Tamiya lacquer LP-32 flat clear with equally ´hot´ levelling thinner at a ratio of about 55% thinner, less than normal and cautiously sprayed the tail underside and immediately blew the varnish dry with the airbrush, to minimize reaction time. Hooray, it worked, no smelt decals and a nice and even near flat coat. Even the resprayed elevator was rescued, with over spraying and looks good now. Cheers Rob
- 190 replies
-
- 10
-
-
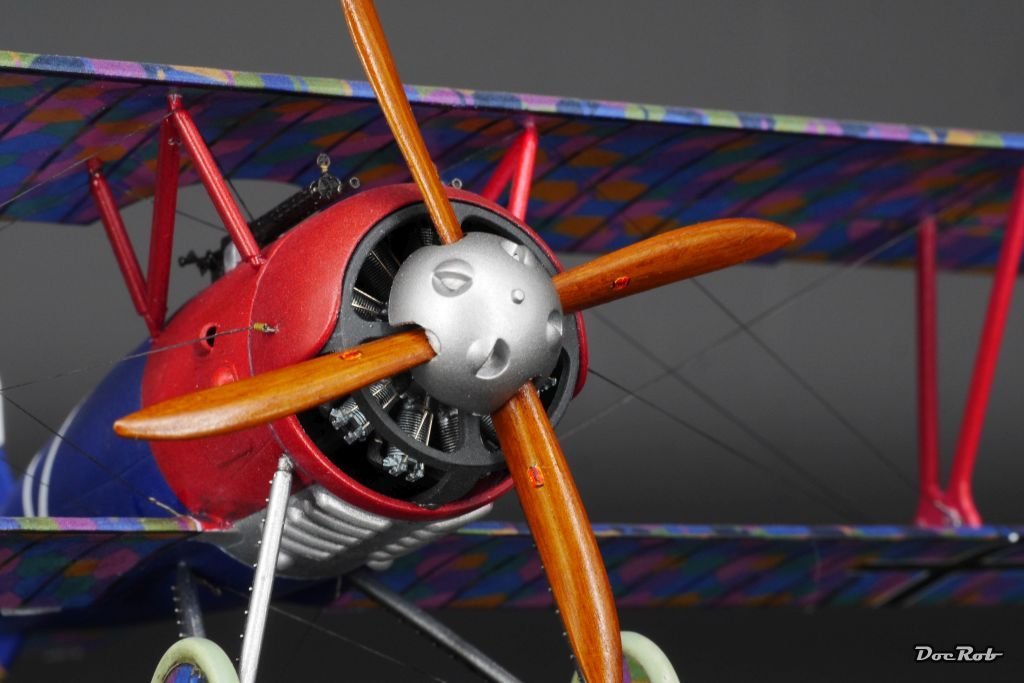
Phew, I got some work done over the last days. The engine nacelles were not the easiest part of the build. Many fragile parts were to paint weather and mount, and I´m really lucky, it is a WNW kit with great engineering and fit. Look alone for the filigrane tubing around the exposed engine, unbelievable. I applied Tamiya XF-17 onto the outside of the cowlings and struts onto the hairspray. When dried, I dampened the parts, activating the hairspray and abused the surfaces with toothpicks, fiber pencil and other scratching tools with an emphasize on the sheet borders and fasteners. Again, all the painted parts were glued together using CA, which I prefer to runny plastic cement with near ready parts. Unfortunately, I broke an engine strut, where it connects to the lug, which will be inserted into the wing later, damn, a very important connection. Out with the 0,5 mm drill bit, drilled both ends and inserted a brass rod along CA. Left nacelle Right nacelle Later, I will apply some brown Flory clay wash, but this has to wait, until I have the fuselage weathered, to achieve a similar finish. I mocked some picture, carefully mounting the nacelles to the beast. @Egilman, there is no need to worry about the Rexx exhausts, I removed them as carefully as I could from their packing, but felt the weight and was immediately relived. They are sturdy and don´t feel fragile at all. Cheers Rob
- 190 replies
-
- 16
-
-
-
After I figured out, which parts were needed for the nacelles and radiators, I started to paint them. The left engine will be displayed un-cowled, the right one with cowlings. All parts were sprayed with AK matte aluminum, which is not that matte, but covers great and has a nice metallic sheen. It will be only the base layer for weathering and was followed by two coats of horrible smelly hairspray for later chipping. Then the parts were sprayed with Tamiya XF-22 (RLM 22) for the engine bearers and XF-17 sea blue for the outside of the cowlings and radiators. The sea blue was highlighted then, with some drops of sand color added, highlighting the upper sides and the panel borders. The effect is hard to see on the pic, but it´s there. Later, the cowling outsides will be dampened to activate the hairspray and scratched with a variety of tools for chipping. Airbrushing slightly lighted sea blue onto the dark surfaces proved difficult, but I remembered that with my H&S Infinity Giraldez edition airbrush came three different nozzle guide horns (the mounted one is the longest), which were very helpful, placing the slightly lighter dots and will come handy with free hand squiggle camo, as you keep the same distance to the kit and it makes aiming easier. Cheers Rob
- 190 replies
-
- 12
-
-
Just stumbled into your log Greg. With a bit of time, I will read the entire thread about how your masterpiece was made. I´m sure, there´s a lot to learn in it. Your Dreadnought looks fantastic overall and I couldn´t imagine, how difficult the antenna rigging was. Cheers Rob
-
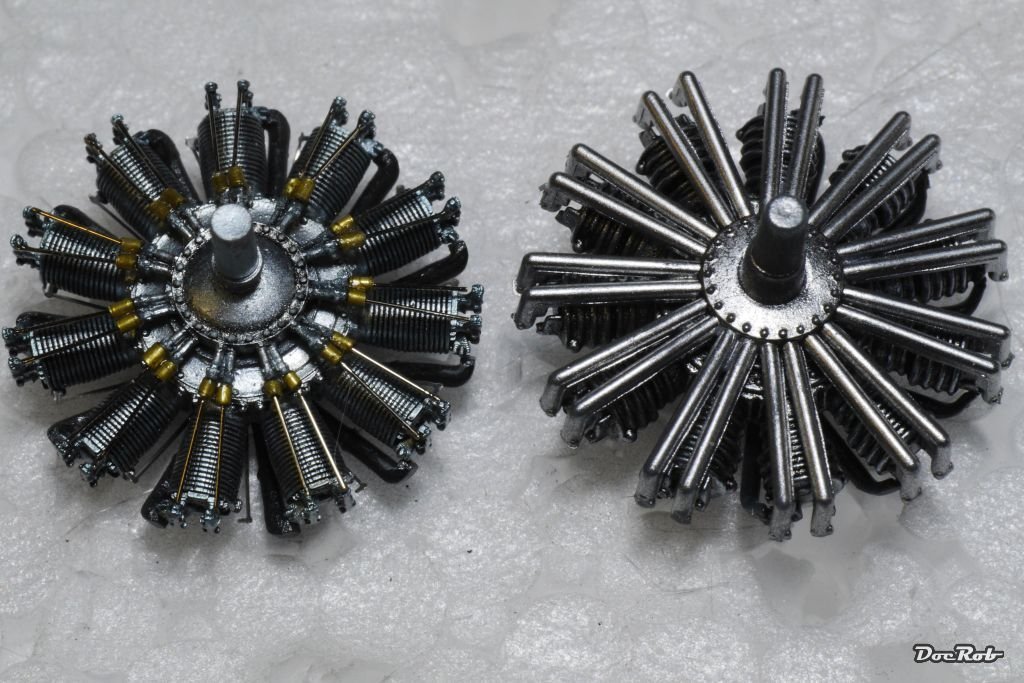
That sounds like a great idea, wefalck. I guess, there were some interesting speedboats built with airplane engines and there are some great engine kits around in 1/32, 1/48 and 1/72. Lukgraph for example has some in their portfolio as has Copper State. I once built the ´predecessor´ of the SH4 (I know, it´s not the same amount of cylinders, ...) the SH3 twice for my 1/48 Siemens Schuckert D.III twin build. Left, the Eduard Brassin engine and right the kit part. There are the evil twins. Cheers Rob
- 190 replies
-
- 11
-
-
