
HOLIDAY DONATION DRIVE - SUPPORT MSW - DO YOUR PART TO KEEP THIS GREAT FORUM GOING! (Only 13 donations so far - C'mon guys!)
×


DocRob
-
Posts
1,257 -
Joined
-
Last visited
Content Type
Profiles
Forums
Gallery
Events
Everything posted by DocRob
-
 Thank you Craig and Egilman, it confirms, what I started to understand with the clear coat. I began with an approximately 60/40 mix, where the cotton candy effect started and then thinned a bit more and the effect vanished. 60/40 is my go to mixing ratio for lacquers and similar and works perfectly with my usual colors and relatively low pressure setting. More thinner would lead to not enough color coverage and possible color running. Clear seems to be a different breed and I was confused about past results, where I thought, contamination was the problem. Luckily, I try colors on a dummy sprue first, as not all the cotton candy residues vanished with overcoating. Tiny white residues where left, not acceptable for me. Cheers Rob
 -
Gloss coating to me is always adventurous and this time was not different. I used Mr. Color GX-100 clear gloss, which really looks perfect, when everything fits, but can be a nightmare to work with. I had cases in the past, where I had an effect like cotton candy, when spraying the GX-100 and thought, it was, because the clear was contaminated during the process. This time, I picked a new jar of GX-100, opened a new bottle of Mr. Color leveling thinner, poured both liquids directly into the metal cup of my airbrush and stirred with a cleaned metal rod. The airbrush was thoroughly cleaned beforehand. Cotton Candy again on my test sprue. As the whole process was clean and uncontaminated, I added more thinner, step by step and finally, it worked. The mix was not too thick at the beginning, but seemed to be the reason for that strange effect. I would really like to master that stuff on a reliable basis and take the thrill out of this step. Cheers Rob
-
Thank you Gary, polishing the tank was always the second option, if the two color scheme failed and I doubted a positive outcome from the beginning. I start to like the finish and today, I sealed everything under a layer of gloss coat. When do you have the chance in modeling to let metal look like real metal, no Alclad no Extreme Metals, just the real thing. Cheers Rob
-
That´s how the Crocker looks with the applied flame contour decals. I added the rear fender loosely to get an idea how everything looks, before I start to clearcoat everything. there is also another option included, which includes decals the front part of the tank to be pre painted gloss black. Looks attractive too, but somehow, I like the polished finish. Cheers Rob
-
I thought about that too, Craig, but cutting the masks error free, without a cutting plotter would surely exceed my abilities. I always had the fall back plan to do a polished version of the tank with decaled flame contour ornament. The last option, would be a part black, part polished fuel tank. Cheers Rob
-
I gave the fuel tank another try and oversprayed the white, after sanding away the visible seam, using a different white color. The result was better but not good enough, so I stripped the tank, something I never did before. I always try to have the perfect plan, the appropriate tools, but this time, no luck. There are several decals for the fuel tank included in the kit, so my next try will be a polished finish with next to apply pinstripes in flame shape, similar to the black and white design. I filed and steel wooled the surface, before I polished with Autosol and my Proxxon cotton bit and finally by hand with cotton cloth and again Autosol. Somehow the sheen is hard to capture, it looks near mirror like in reality and the grey ´smear´ on the lower pic is some kind of reflex , no bad spot. Cheers Rob
-
Hmmh, well, mixed success for today. The decals for this MFH kit are extremely well made. They fit perfectly, are robust and have a good color density. I dreaded the golden pinstripes on the mudguards a bit, but they came out great, applied only with water and a drop of detergent, no decal solutions needed. The parts are still not gloss coated. I´m not happy with the fuel tank. As per manual, I airbrushed it gloss white, masked off the front part, and sprayed the rest gloss black. The finish was almost perfect, but there was a tiny parting line between the colors. After applying the decals, the parting line showed even more, but there is also a different hue to the white sprayed part of the tank. I may strip the tank and use other decals as decor. The flame decals generally lay down beautifully and all the wrinkles on the curved contour could be pushed out while curing, but the result is not satisfactory. I watched the MFH promotion pictures of the kit, and the parting line is visible as well, bummer. Cheers Rob
-
Lots of prep work done lately. I filed, sanded and near polished fuel tank and mudguards, primed them with Mr. Color grey primer 1200 and sprayed the tank with Tamiya LP-2 gloss white, which came out nice and shiny. Of course, I drilled all the necessary holes beforehand. The rims also needed a lot of preparation. As you can see on the pic, there are prominent cast seams between the spokes, which I cleaned with a sharp blade and then used a rotating tool to refine the surfaces. I decided against polishing and also primed the rims, after I drilled the holes for the spokes. Body color will be black now, where initially thought about dark blue, but I don´t like the look of blue rims. All other parts, which will be painted black, were drilled, prepared and primed. Luckily some help arrived today, more drill bits and two DSPIAE hand drills, the left one with a collet, the right one with a chuck. You can´t have enough of these, as you permanent need to drill holes in different diameters. Cheers Rob
- 102 replies
-
- 11
-

-
PBY-3 Catalina by PvG Aussie - FINISHED - Wolfpack - 1/72
DocRob replied to PvG Aussie's topic in Non-ship/categorised builds
You are right Peter, your release is the only -3 of the pack, it seems, but I guess the sprues are modular, to made fit to all -X with some new parts added. Mine is a shelve queen for the moment, as I have other projects in the pipeline. I added Quickboost resin engines and propellers for mine and also some Reskit Browning MG´s. I´m not sure, if I like the all gloss sea blue proposed for my -5A, so I may have to look for some decals as well. 1/72 is not my favorite scale, so it may take a while until I start, but I like the big Cat and this makes the build mandatory. Cheers Rob -
PBY-3 Catalina by PvG Aussie - FINISHED - Wolfpack - 1/72
DocRob replied to PvG Aussie's topic in Non-ship/categorised builds
The original kit was issued by Academy in 1993, but got new parts and decals for different versions. To my knowledge, Wolfpack adds new decals and masks with their releas. I have the Revell boxing rooting from the same base kit. Cheers Rob -
What a nice kit and display. Like Egilman says, the rotating prop let it look real. Cheers Rob
-
The battery/alternator area was a little bit nightmarish to assemble, with lots of connecting parts, PE brackets and the wiring, which needed to be pre fabricated, because of the tiny PE connection fittings. Somehow, I got it done with a bit of wiggling. Adding the pedals on both sides was much simpler affair, luckily and they are now awaiting the footrests. Until now, there is one thing to remember with that kind of build. Study the manual, examine, where all the parts connect and how, measure the connecting diameters and drill out the corresponding holes and try not to forget any, as they may be impossible too reach later. Sure, test fitting is mandatory as well. Cheers Rob
- 102 replies
-
- 11
-
-
Luckily my world doesn´t only move by turning a key or push a button, as I walk, run, work in the garden and bike a lot without burning fuel or electricity. No blocks where I live . You´re right, technology, specially combustion engines changed the world, but computers and smartphones also did. Do you have the same technological insight on these evenly important modern world movers? Me neither and I don´t want to sound disrespectful. What I mean, technology changes and in it´s whole is very complex to understand. I´m a bit more than half wit with computers, but with combustion engines, it´s only very basic knowledge, I possess, even when I studied engineering in the late 80´s. When I got my apprenticeship as an engineer, I built a steam machine from raw material as a learning project and there are not many mysteries with these anymore. We also developed a CNC-milling machine as a project, late 80´s, like I said and that left a thorough insight, which was reinforced later on. With car and bike engines, it´s different, I´m more of a user. I understand nearly all the mechanical processes, but fail where electricity comes into the game. Modeling is clearly a chance to understand technology, due to replicating them and discuss the subjects, like here on MSW. I learned a lot about the "how does it work" through modeling, but it takes time with complex knowledge. The Crocker is a good example, where there is a lot of technology involved, with only little more, like design. In a way, it´s technologic essence, nearly nothing is hidden and therefore prone for learning. I can only thank you again for showing me, how this wonderful bike works. Cheers Rob
-
Wow thank you Egilman, I can feel your head shaking about my non existent knowledge about the ignition system of classic bikes. I will need some time to digest the thorough information you supplied here. I have to understand the English terminology first an then the described process itself. Cheers Rob
-
I added the ignition wiring, spark plugs and the mysterious third wire, which leads to the hidden condenser coil, the shift rods and gearbox. The alternator and battery are finished, but only mounted temporary, to determine the length of the wiring. The only "AM" used is the tiny bracket, which holds together the ignition wiring. I fabricated it from tin of a wine bottle cap. So far no real worries except a wrong aligned part (my fault), which needed to be pried loose. Luckily I was test fitting the following assemblies and noticed it. Electrical wiring is a bit tedious, as there are tiny PE parts to bend, to accept the un-isolated wire, which easily slips out before gluing. You learn to like Tamiya manuals, where they show you the length of the wires, but apart from that, the MFH manual is pretty clear and easy to understand. Cheers Rob
- 102 replies
-
- 10
-
-

-
I achieved some important progress today, marrying the engine and the frame. Luckily casting precision and design is very good and I had only a little wiggling to do, while join the numerous connection points of the engine bearing plates to the engine. The frame itself needed some bending, to accept the engine, which I did before painting. The cast material is durable but easy to bend an very good to work with, luckily. Cheers Rob
- 102 replies
-
- 14
-
-
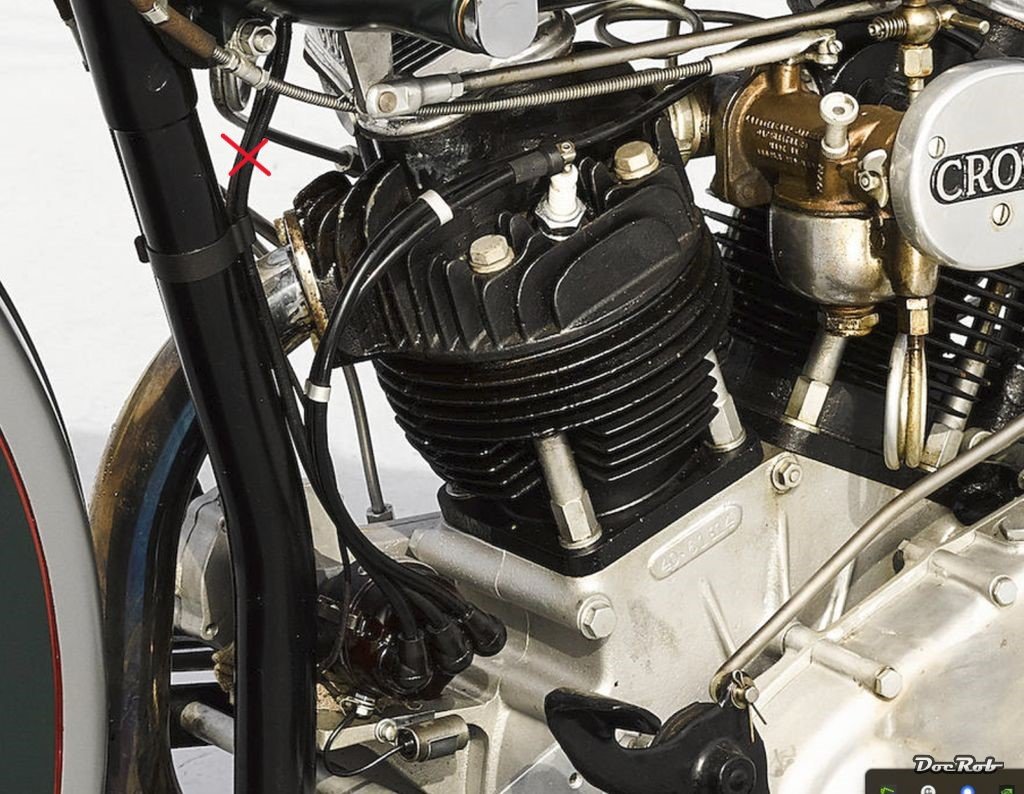
Oops, I missed the start of a new page and the even more detailed information, Egilman, thanks for that. I studied a lot of pictures from various Crockers and all seem to be different in details, specially the ignition system. I cannot tell, which of them are original or have been modified later. The condenser coil seemed to have been all over the place, in front of the engine, under the tank and like on your pic behind the engine, which I haven´t seen before on my pictures. When I look for the MFH pictures of the ´Small tank´ model, there are lots of differences to the later ´Big tank´ version. Like on your pic, the coil is mounted behind the seat post. The later big tank allowed to hide the coil under said tank. Cheers Rob
-
Muchas gracias amigos, you solved the mystery to a classic bike noob like me. The Crockers were hand built and all a bit different in the end. Some examples show said coil mounted onto the frame visibly in front of the engine, with others it´s hidden under the tank. I think Egilman is referring to the 61 cubic inches or about 1000 ccm leading to about 65 hp.
-
That´s a possibility Craig and yes the Crocker has a battery. Cheers Rob
-
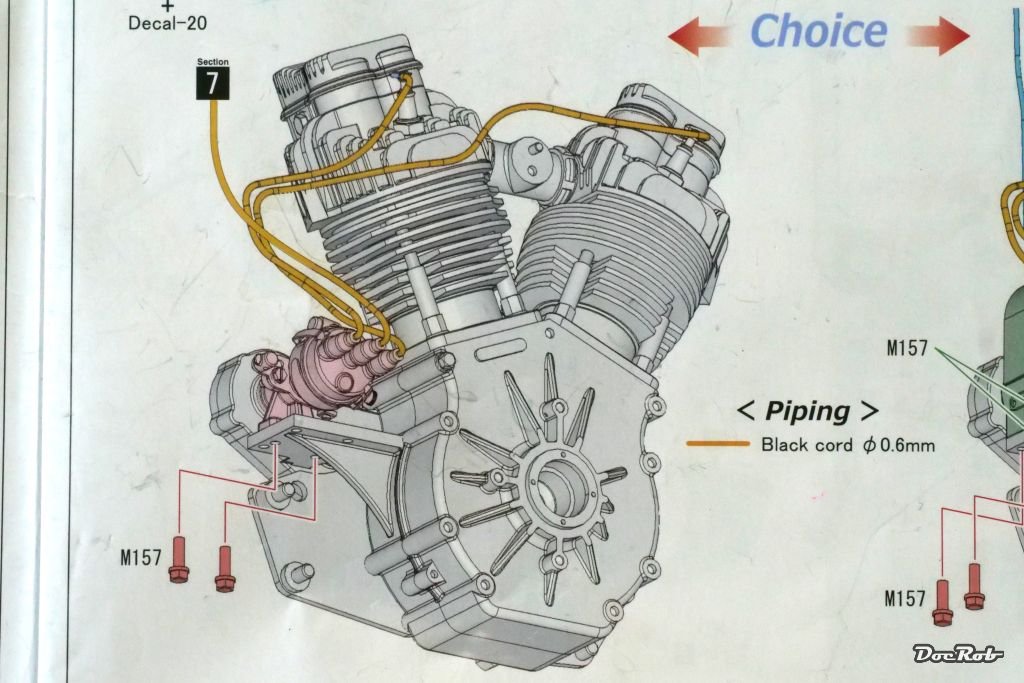
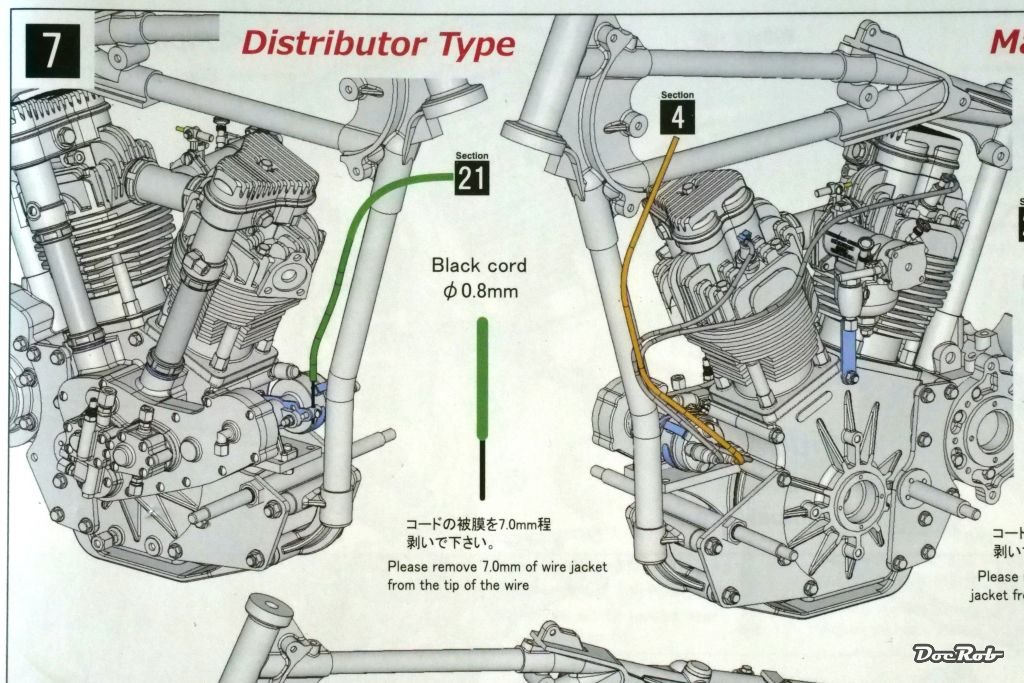
Thank you Craig, I think, the wire you refer to is shown in the manual in green It ends at the handlebar. The yellow one with the section 7 reference on the lower pic is the one in question, it´s the same like the yellow one in the upper drawing, labeled section 4. Cheers Rob
-
I have one question for the classic bike experts. Which function has the marked wire, which leads from the distributor to the area of the tank. The other two are the ignition wires, but the third cable, I have no idea of the function. The MFH manual doesn´t show either. The cable just ends under/in the tank area. Cheers Rob
-
After airbrushing the frame with Tamiya LP-1 gloss black, I continued with the engine. I added the carburetor and some fuel lines, which are hard to reach later. The engine is more or less finished now and will be mounted into the frame next. Cheers Rob
-
I built up the frame from it´s various parts, which again included lots of drilling and leafing through the manual, to see, which diameter is needed for a hole and what´s going in. Luckily the precision of the casting is fantastic and there are only minimal irritations in the parts. Here is a mock up with the engine mounted into the frame. Meanwhile said frame is primed and the missing carburetor parts got airbrushed. Cheers Rob
-
Triumph 3HW by Tim Moore - Italeri - 1/9
DocRob replied to Tim Moore's topic in Non-ship/categorised builds
The bike looks absolutely fantastic, Tim. I really like, how you nailed the materials appearance of everything. The paint has the right shine as have the different metals and dullness is where it belongs. Hard to achieve, but great to look at, congratulations. Cheers Rob- 77 replies
-
- 10
-
-
Keeping my head in the game.....
DocRob replied to Egilman's topic in 3D-Printing and Laser-Cutting.
Impressive work Egilman, I hope your CAD development will be put to reality, when ready. Like you, I learned pen and paper construction in my early days as an engineer, but I never converted to CAD other than producing early day 3D-animations. Your re-engineering is fascinating to follow, I only recently learned, that Model Factory Hiro designs their kits only from pictures very often as well. Cheers Rob
